

Page 1
Hitachi Colour TV
C29-F800S
C29-F800SN
C29-F800SNT
Page 2
Thank you for purchasing this colour TV.
Please read this instruction manual carefully before using the TV, especially the Safety Precautions in
page 3-4. Keep it carefully for future reference.
CONTENTS
SAFETY PRECAUTIONS 3
SETUP 5
Insert The Batteries
FUNCTIONAL PARTS 6
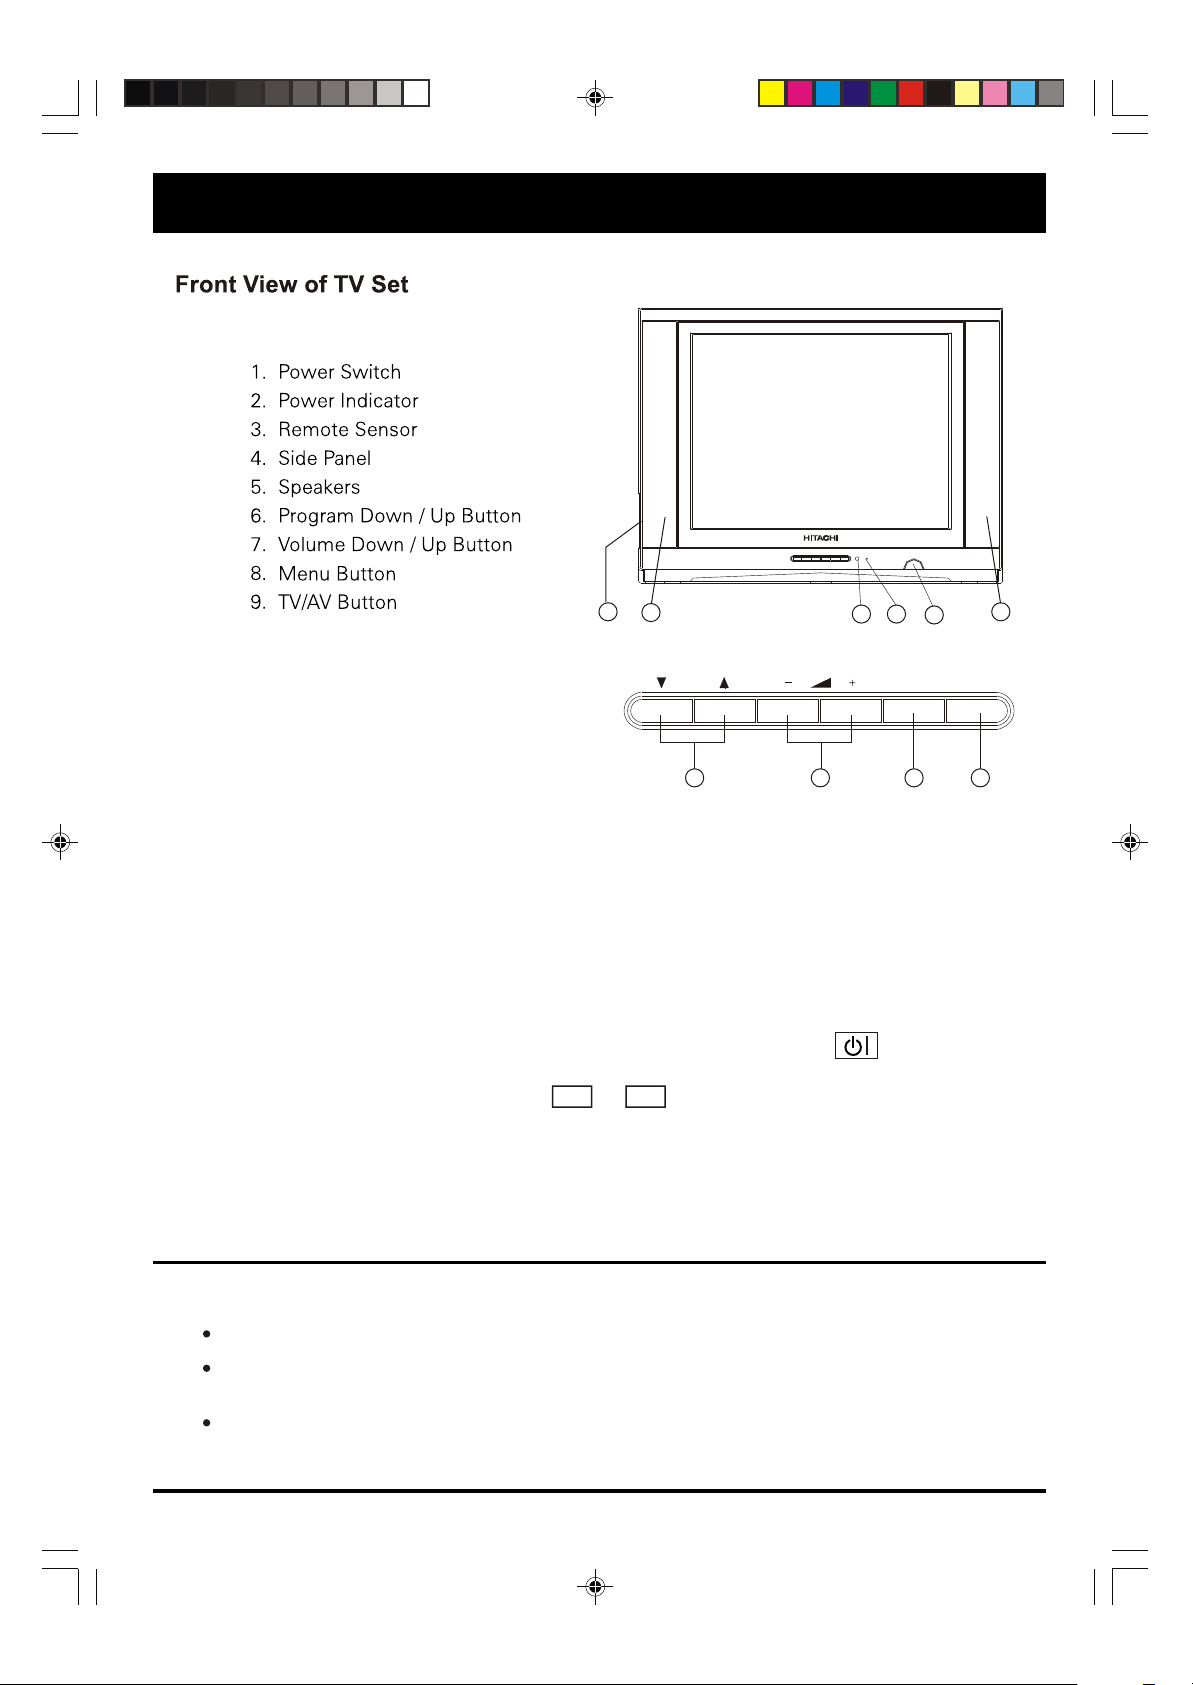
Front View of TV Set
Rear View of TV Set
Side Panel of TV Set
Remote Control Unit
TELETEXT OPERATIONS 11
5
6
7
7
8
MENU SCREENS 13
Picture Menu
Sound Menu
Time Menu
Setup Menu
Tune Menu
Exchange Menu
TROUBLESHOOTING 17
SPECIFICATIONS 19
is a trademark of SRS Labs , Inc.
TruBass technology is incorporated under license form SRS Labs , Inc.
13
14
14
15
15
16
2
Page 3
SAFETY PRECAUTIONS
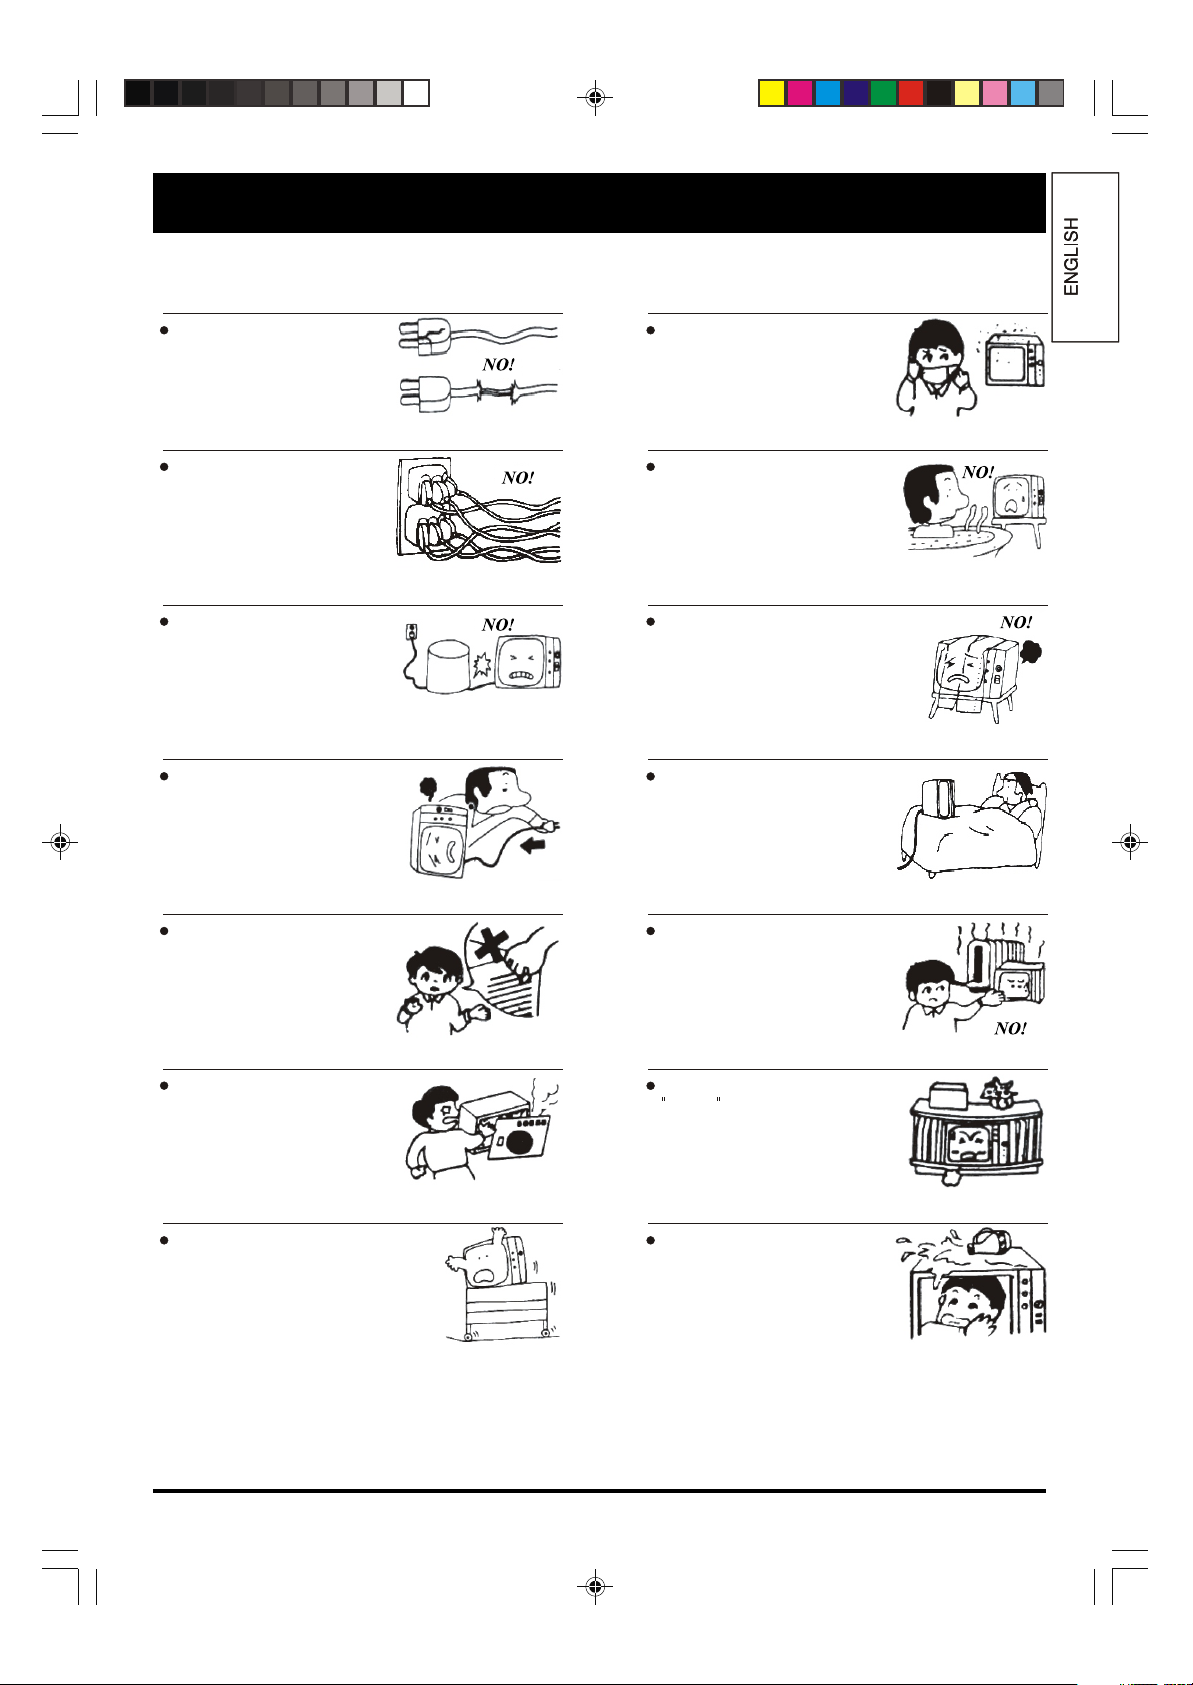
MAINTENANCE
•When the power cord or plug
is damaged or frayed, unplug
this TV from the wall outlet
and refer servicing to
service personnel.
•Do not overload wall outlets
and extension cords as this
can result in fire or electric
shock.
• Do not allow anything to rest
on or roll over the power cord
and do not place the TV where
the power cord is
traffic or abuse.
in a shock or
• If the TV set has been
or the cabinet has
damaged, unplug this
from the wall outlet
servicing to
personnel.
qualified service
qualified
subject
This may result
fire hazard.
dropped
been
TV set
and refer
•Avoid dusty places, since
accumulated dust inside the
chassis may cause failure of
the set when high humidity
persists.
•Do not use this TV set near
water, for example, near a
bathtub, washbowl, kitchen
sink, or laundry tub, in a wet
basement, etc.
•Never cover the slots or
openings of the set with cloth
or other material.
to
•Never block the bottom
ventilation slots of the set by
placing it on a bed, sofa, rug,
etc.
•Never push objects of any
kind into this TV set through
cabinet slots as they may
touch dangerous voltage
points or short out parts that
could result in a fire or
shock.
•Do not attempt to service this
TV yourself as opening or
removing covers may expose
you to dangerous voltage.
Refer all servicing to qualified
service personnel.
•Do not place this TV set on
unstable cart, stand or
The TV set may fall,
serious injury to
serious damage
appliance.
electric
an
table.
causing
human and
to the
•Never place the set near or
over a radiator or heat
register.
•Never place the set in a
“built-in ” enclosure, unless
built-in
proper ventilation is provided.
•The TV set shall not be
exposed to dripping or
splashing and that no objects
filled with liquids, such as
vases, shall be placed on the
TV set.
3
Page 4
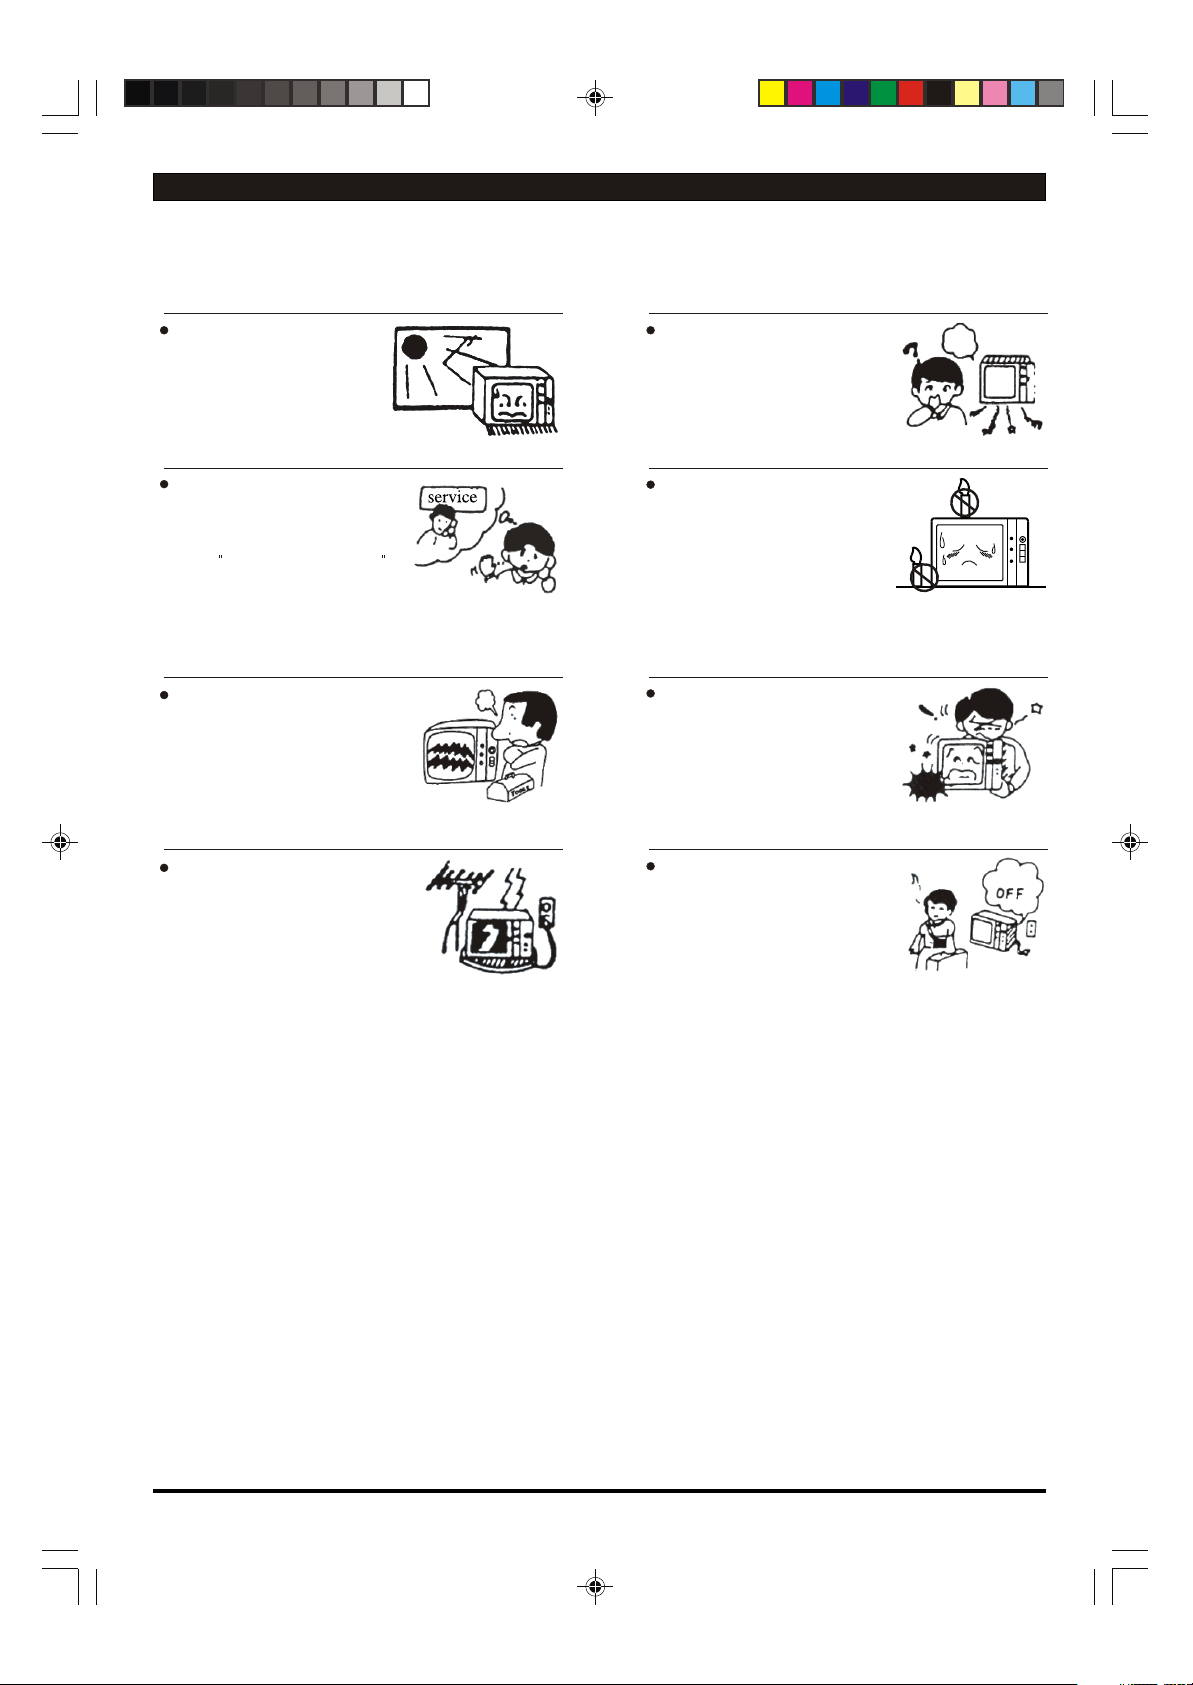
MAINTENANCE
• Choose a place where light
(artificial or sunlight) does
shine directly on the
If the set does not work
properly:
If you are unable to restore
normal operation by following
the TROUBLESHOOTING
•
section in your operating
manual, do not attempt any
further adjustment. Unplug
the set and consult service
personnel.
• Adjust only those controls
that are covered in the
operating manual as
adjustment of other
may result in
ask your
restore
operation.
•Lightning:
In order not to damage the
parts in the set, unplug and
remove the antenna
connection during lightning.
damage,
service personnel
the set to normal
not
screen.
improper
controls
please
•If a strange sound or smell
gives off from this set, please
turn off the television and
unplug from the wall outlet,
then refer to service
personnel.
•To prevent fire, never place
any type of candle or naked
flames on the top or near the
TV set.
•Avoid any kind of impact to
your television. Be special
careful not to damage the
screen face.
to
•When going out:
If your television set is set to
remain unused for a period of
time, turn off the television
and unplug it from the wall
outlet.
4
Page 5
SETUP
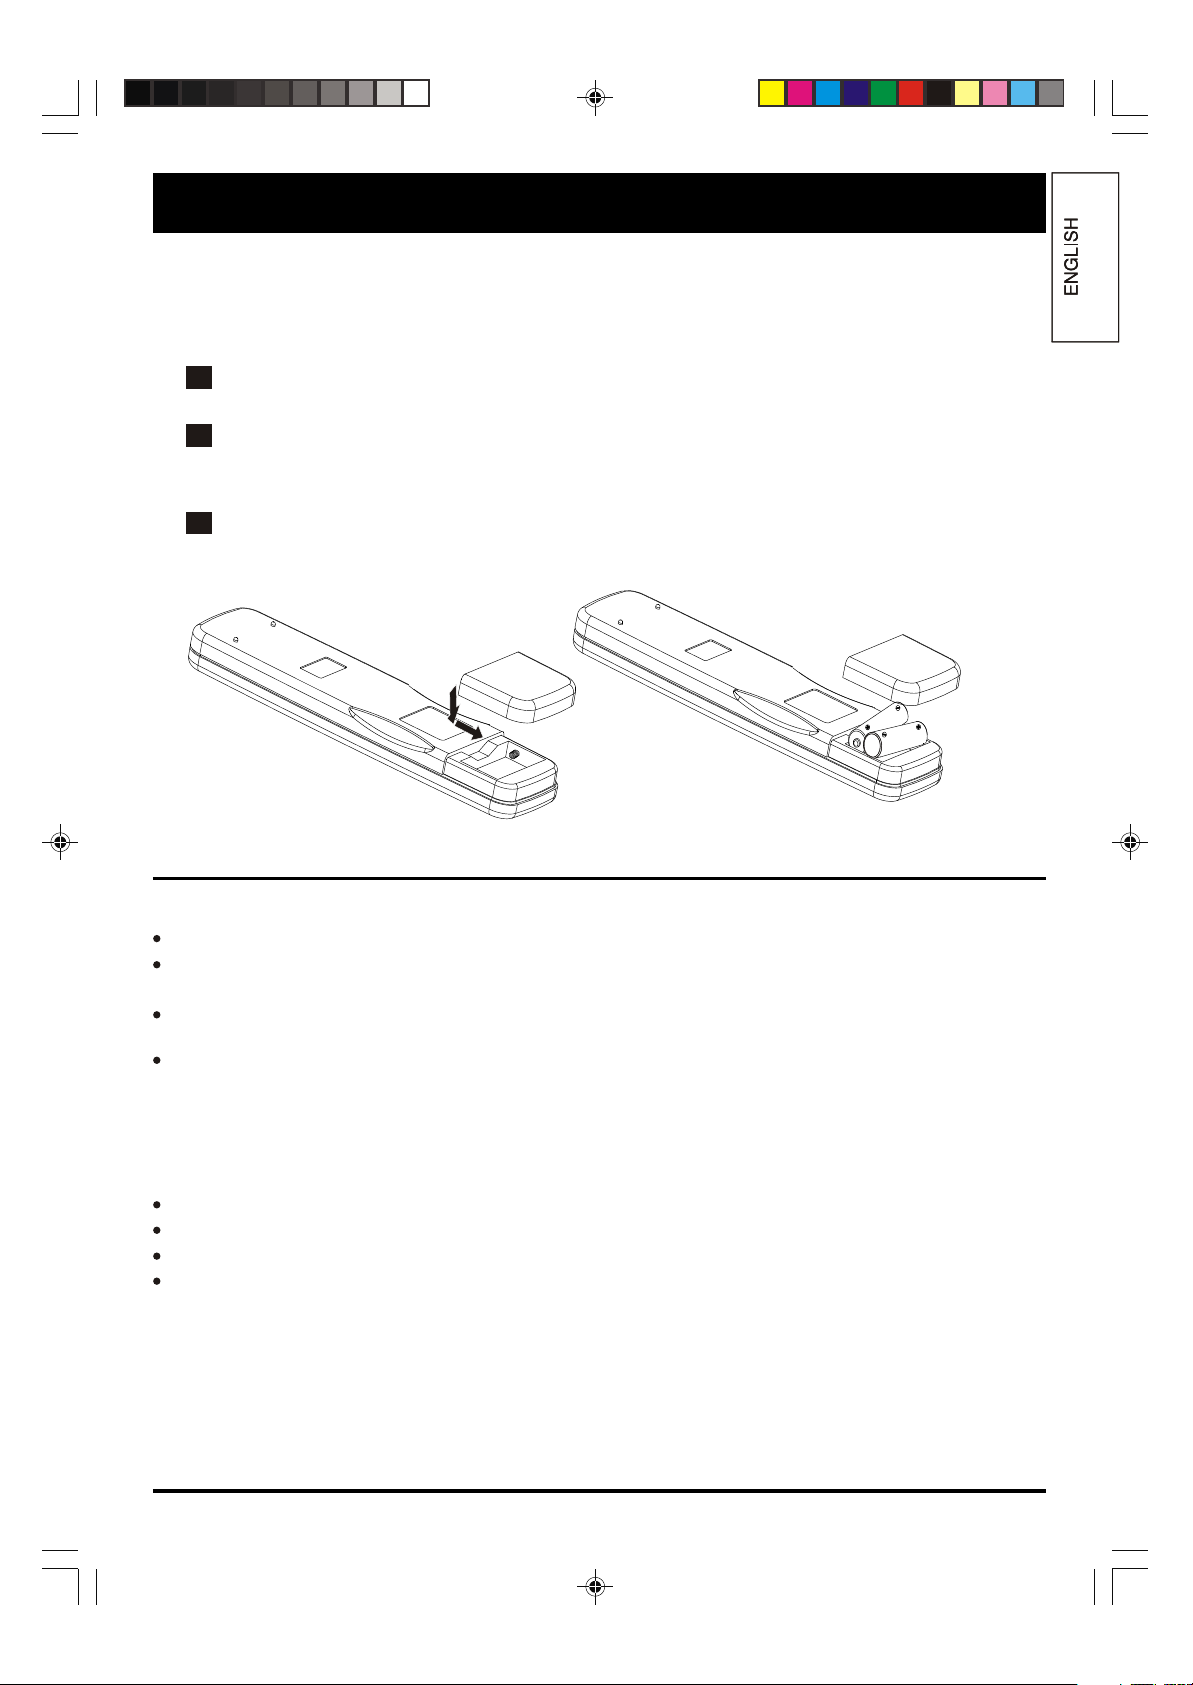
Insert The Batteries
Remove the battery cover by pressing it and sliding it down.
1
2
Insert the two 1.5V (AAA size) batteries making sure the polarity (+ or -) of the
batteries matches the polarity marks inside the unit.
3
Replace the battery cover by sliding it in until you hear a click sound.
Precautions when using batteries
Do not use old and new batteries together.
Do not use different types of batteries (for example, Manganese and Alkaline batteries)
together.
Note that there are chargeable and non-chargeable batteries. Do not attempt to charge
non-chargeable batteries.
Remove the batteries from the remote control unit if you do not intend to use the unit for a long
time.
Precautions when using the remote control unit
Do not drop the remote control unit.
Do not subject the remote control unit to physical shocks.
Keep the remote control unit dry. Wetting it may cause the unit to malfunction.
Replace the batteries with new ones when operation of the unit deteriorates.
5
Page 6
FUNCTIONAL PARTS
44
55
PROG.
66 77 88 99
33 22
11
MENU
55
TV/AV
To turn the TV power ON
Press the power switch on the TV set to switch on the TV.
When the TV set is ON ,the power indicator lights up dimly in red.
Standby Mode
At standby mode, the power indicator lights up brightly in red.
You can switch on the TV set or switch it to standby mode using the button on the
remote control unit. The picture usually takes a few second before appearing.
You can also press any number (0-9), or buttons to switch it on from standby
P+ P -
mode.
To turn the TV power OFF
Press the power switch on the TV set to switch off the TV.
When the TV set is off, the power indicator will not light up.
NOTE
If the TV set does not receive any signal for 5 minutes, it will enter standby mode.
If you are not going to use this TV set for a long time, switch off the set using
the power switch on the TV set and disconnect the power plug from the wall outlet.
Please note that the remote control unit can switch the TV set to ON or to
STANDBY mode only when the main power is ON.
6
Page 7

Rear View of TV Set
1. YCbCr IN Terminals (YUV)
2.
Antenna Input Socket (75 Ohm)
3. S-Video In Terminals
4. AV IN 1 Terminals
5. AV OUT Terminals
6. AC Power Cord
1
6
Y Cb
LEFT RIGHT
Side Panel of TV Set
1. AV IN 2 Terminals
2. Headphone Jack
YCbCr IN
AUDIO
2
Cr
75 ANT
AV IN 2
VIDEO
LEFT
1
RIGHT
3 4 5
AV IN 1
VIDEO
AUDIO
S-VIDEO
LEFT
RIGHT
AV OUT
VIDEO
AUDIO
LEFT
RIGHT
2
NOTE
For Australia only - Install an external aerial conforming to AS 1417.1 for safety purpose.
S.VIDEO and AV IN 1 (VIDEO) inputs cannot be used at the same time.
Precautions when connecting to other equipment
When using external equipment with this TV set, please read the instruction manual of the
external equipment.
Switch off all power supplies to the equipment and TV set before connection.
Always ensure that the input and output terminals are correctly connected.
7
Page 8

Remote Control Unit
112 3
SLEEP
1 2 3
RECALL
4
SOUND
MODE
PIC.
TV/AV
MODE
LANG.
SOUND
PIC.
U.N.L
REVEAL
TV/TEXT
CLOCK
MIX TYPE
P
6
5
MENU
INDEX
P
4
SOUND
CH I/II
SYS.
6
5
87
9
--/-----/---
0
SETUP
TUNE
SUBPAGE
HOLD
GAME
LST-CH
SUBTITLE CANCEL
POWER ON / STANDBY button
Press this button to switch on the TV when
at standby mode or vice versa.
Press any number 0-9, or
P+ P -
buttons will also switch on the TV from
standby mode.
2
SLEEP button
Press this button to set the sleep timer.
When the preset length of time has passed,
the TV set enters standby mode.
3
SOUND SYSTEM button
Press this button to select the correct
sound system.
4
STEREO/BILINGUAL SOUND button
*1
When stereo program is received, press
this button to select STEREO or MONO.
In AV MODE ,press this button or select
5
6
STEREO, CH-L or CH-R.
When bilingual program is received, press
this button to select DUAL-1, DUAL-2 or
MONO.
The screen will display NICAM or A2 when
such broadcast is received.
CLE-9XX
Mode Description
STEREO
MONO
DUAL-1
DUAL-2
Stereo mode.
Mono mode.
Multi-sound channel for language 1.
Multi-sound channel for language 2.
CH-L Left sound track.
CH-R Right sound track.
5
CHANNEL UP / DOWN
P+ P -
buttons
Press these buttons to select channels in
ascending or descending order.
6
VOLUME UP / DOWN buttons
+
Press these buttons to adjust the volume level
up or down.
..
8
*2
Page 9

Remote Control Unit
SOUND
CH I/II
SYS.
SLEEP
7
8
9
10
RECALL
SOUND
MODE
PIC.
MODE
SOUND
REVEAL
TV/TEXT
MIX TYPE
1 2 3
5
4
87
TV/AV
0
LANG.
SETUP
PIC.
U.N.L
HOLD
GAME
CLOCK
SUBTITLE CANCEL
P
MENU
INDEX
P
CLE-9XX
6
9
--/-----/---
TUNE
SUBPAGE
LST-CH
12
11
7
MUTE button
Press once to mute the sound. Press again
to restore the sound volume.
8
RECALL button
Press this button to display the settings on
the screen. (e.g. Channel number, system)
9
SOUND MODE button
Press this button to select the desired sound
mode.
USER SPEECH
MUSIC THEATER
Sound Mode Description
USER
SPEECH
THEATER
MUSIC
10
PICTURE MODE button
User preset sound mode.
Low treble and low bass level.
High treble and high bass level.
Middle treble and middle bass level.
Press this button to select the desired
picture mode.
USER SOFT
RICH STANDARD
Picture Mode Description
USER
SOFT
STANDARD
RICH
User preset picture mode.
Low contrast and low brightness level.
Middle contrast and middle brightness level.
High contrast and high brightness level.
11
DIGIT button
This TV allows you to select channels from
0 to 199.
Press this button to select one-digit, twodigit or three-digit channels input options.
To select a one-digit channel (e.g. Channel
8), press this button to change
--/---
channel selection to "-" on screen display
and press the "8" button only.
To select a two-digit channel (e.g. Channel
28), press this button to change
--/---
channel selection to "--" on screen display
and press "2" and "8" buttons.
To select a three-digit channel (e.g. Channel
128), press this button to change
--/---
channel selection to "1--" on screen display
and press "2" and "8" buttons.
12
CHANNEL SELECTION buttons
Press the number buttons to select a channel.
..
9
Page 10

Remote Control Unit
13
MENU button
*2
Press this button to enter the menu screens
for various optional adjustable settings.
14
TV/AV button
*2
Press this button to switch between TV
broadcasts and AV input programs.
TV AV1 AV2
14
16
15
19
RECALL
SOUND
MODE
PIC.
MODE
SOUND
REVEAL
TV/TEXT
MIX TYPE
SOUND
SYS.
SLEEP
1 2 3
5
4
87
TV/AV
0
LANG.
SETUP
PIC.
U.N.L
HOLD
GAME
CLOCK
SUBTITLE CANCEL
P
MENU
INDEX
P
CLE-9XX
CH I/II
6
9
--/-----/---
TUNE
SUBPAGE
LST-CH
17
18
21
20
13
YCbCr S-VIDEO
15
SOUND MENU button
*2
Press this button to enter into the [SOUND]
menu directly.
16
PICTURE MENU button
*2
Press this button to enter into the [PICTURE]
menu directly.
17
SETUP MENU button
*2
Press this button to enter into the [SETUP]
menu directly.
18
TUNE MENU button
*2
Press this button to enter into the [TUNE]
menu directly.
19
CLOCK button
*2
Press this button to display the preset clock
time.
20
GAME button
*2
Press this button to enter the game provided
with this TV set. Press this button again or
button to exit.
Buttons Actions In Game
P -
P+
+
MENU
To speed up.
To transform.
To shift left.
To shift right.
To restart the game.
RECALL
21
LAST CHANNEL button
*2
Press this button to return to previously
viewed channel.
NOTE
*1
Only applicable to models with NICAM and Sound Multiplex function only.
*2
See "Teletext Operations" section for details of these buttons functions in Teletext mode.
Only applicable to models with Teletext function only.
..
10
Page 11

TELETEXT OPERATIONS
For models with Teletext function only.
This page shows the function of the buttons on the remote control unit when in Teletext mode.
1
TV/TEXT button
Press this button to enter Teletext mode.
Press this button the second time to
SOUND
CH I/II
SYS.
SLEEP
1 2 3
RECALL
4
SOUND
MODE
PIC.
TV/AV
MODE
6
LANG.
6
5
87
9
--/-----/---
0
8
SETUP
SOUND
7
1
REVEAL
TV/TEXT
MIX TYPE
PIC.
U.N.L
CLOCK
P
P
MENU
INDEX
TUNE
SUBPAGE
HOLD
GAME
LST-CH
SUBTITLE CANCEL
3
4
2
5
2
superimpose the teletext page over the TV
programme.
Press this button again to exit .
TELETEXT PAGE UP / DOWN buttons
2
P+
P -
Press these buttons to increase or decrease
the Teletext page number.
3
PAGE NUMBER SELECTION buttons
Press the number buttons to select a
Teletext page number.
4
COLOUR buttons
Press these buttons to access directly to
the corresponding pages displayed at the
lower part of the Teletext screen.
5
INDEX button
Press this button to go to the index page.
CLE-9XX
6
LANGUAGE button
Press this button to select the Teletext
language (if applicable e.g. English or Russian).
7
REVEAL button
Press this button to reveal the hidden
information for some Teletext pages (e.g.
answers to puzzles or riddles). Press again
to hide the information.
8
U.N.L button
Press this button to change the Teletext
screen display mode through the following:
- Upper half screen enlarged
- Lower half screen enlarged
- Normal screen state
11
Page 12

11
9
HOLD button
Press this button to hold the Teletext page
on display to prevent the page from changing.
Press again to release the hold state.
SOUND
CH I/II
SYS.
SLEEP
10
SUB PAGE button
Some Teletext pages may contain several
RECALL
SOUND
MODE
PIC.
MODE
1 2 3
5
4
87
TV/AV
0
LANG.
6
9
--/-----/---
sub-pages which are automatically paged
in a certain cycle by the TV station. Press
this button once, "0001" will be displayed
on screen. Enter number buttons (0-9) to
look for other sub-pages if available.
If there is no sub-pages, "****" will be
displayed. Press this button again to
cancel.
SETUP
SOUND
9
REVEAL
TV/TEXT
MIX TYPE
PIC.
U.N.L
CLOCK
P
P
MENU
INDEX
TUNE
SUBPAGE
HOLD
GAME
LST-CH
SUBTITLE CANCEL
10
13
12
11
TYPE button
Press this button to switch the Teletext type
such as west/east type directly if applicable.
12
SUB TITLE button
Some TV channels transmit program with
optional sub-titles.Press this button to view
sub-titles if applicable.
CLE-9XX
13
CANCEL button
Press this button to return to the TV mode
temporarily while searching for a required
text page. When the required text page
has been received, the page number will
be displayed at the top left of the screen.
Press this button again to display the
Teletext
screen.
12
Page 13

MENU SCREENS
SLEEP
1 2 3
5
6
4
9
87
0
--/-----/---
PIC.
SETUP
SOUND
TUNE
TV/TEXT
CLOCK
GAME
LST-CH
INDEX
SUBPAGE
U.N.L
HOLD
REVEAL
MIX TYPE
SUBTITLE CANCEL
LANG.
MENU
SOUND
SYS.
CH I/II
RECALL
SOUND
MODE
PIC.
MODE
AV/TV
P
P
This TV set allows you to adjust any settings by selecting from the menu screens.
[PICTURE] menu
PICTURE
CONTRAST
BRIGHTNESS
COLOUR
SHARPNESS
HUE
BLACK STRETCH
COMB FILTER
75
48
48
75
0
OFF
ON
Press the button to enter the menu
MENU
screens for the following optional adjustable
settings.
PICTURE SOUND TIME
EXCHANGE TUNE SETUP
*1
This menu allows you to adjust the picture settings
according to your preference.
1
Press the button 1 time or press the
MENU
PIC.
button directly.
2
Select the desired item using the and buttons.
Use the and buttons to adjust the settings.
3
Press the button 6 times or press button
4
+
MENU
P+
P -
PIC.
to exit to TV mode.
Selected Items
BRIGHTNESS
Functions
Adjust brightness level.
CONTRAST Adjust contrast level.
COLOUR
SHARPNESS
*2
HUE
BLACK STRETCH
COMB FILTER
Adjust colour intensity.
Adjust sharpness level.
Adjust the hue towards red(+)or green(-) picture tones.
Select ON to extend the black levels to enhance contrast.
*3
Select ON to reduce the discolorations in fine picture detail.
NOTE
*1
[EXCHANGE] menu will not be available in AV mode.
*2
HUE can only be selected and adjusted when receiving NTSC broadcasts.
*3
COMB FILTER cannot be set to ON when receiving no colour signal or is at S-VIDEO input
program or YUV input program.
13
Page 14

[SOUND] menu
SOUND
VOLUME
BASS
TREBLE
BALANCE
TRUBASS
SURROUND
6
50
50
0
ON
ON
This menu allows you to adjust the sound settings according to your
preference.
1
Press the button 2 times or press button directly.
2
Select the desired item using the and buttons.
Use the and buttons to adjust the settings.
3
MENU
+
SOUND
P+
P -
Selected Items
VOLUME
BASS
TREBLE
BALANCE
TRUBASS
*1
SURROUND
--:--
--:- 1
--:- 20
--:- 1
*2
[TIME] menu
TIME
CLOCK
ON TIME
ON PROG
OFF TIME
SLEEP TIMER
REMIND TIME
REMIND PROG
Selected Items
CLOCK
ON TIME
ON PROG
OFF TIME
SLEEP TIMER
REMIND TIME
REMIND PROG
Press the button 5 times or press button to exit
4
MENU
SOUND
to TV mode.
Functions
Adjust volume level.
Adjust bass level.
Adjust treble level.
Adjust speaker sound towards left(-) or right (+)speaker.
Select ON to enjoy SRS TRUBASS sound.
Select ON to enjoy surround sound effect.
This menu allows you to set the various timer functions.
1
Press the button 3 times.
2
Select the desired item (e.g. Hour , minute ,channel number)
using the and buttons.
Use the and buttons to adjust the settings.
3
4
Press the button 4 times to exit to TV mode.
MENU
+
MENU
P -P+
Functions
Set the current clock time.
Set the clock time to switch on TV.
Set the channel number for ON TIME activation.
Set the clock time to switch off TV.
Set the length of time to switch off TV.
Set the clock time to change to REMIND PROG channel.
Set the channel number for REMIND TIME activation.
NOTE
*1
is a trademark of SRS Labs , Inc.
TruBass technology is incorporated under license form SRS Labs , Inc.
*2
All the timer functions will only be effective if the power of the TV set is switched off using
the remote control unit. If the power is switched off by the power button on the TV set or
a power failure occurs, the timer will be reset.
14
Page 15

[SETUP] menu
SETUP
LANG.
BACKGROUND
NOISE REDUCE
CHILD LOCK
ENGLISH
OFF
OFF
OFF
This menu allows you to adjust the various setup functions.
1
Press the button 4 times or press button
MENU
SETUP
directly.
2
Select the desired item using the and buttons.
Use the and buttons to adjust the settings.
3
+
P+
P -
Selected Items
LANG.
BACKGROUND
NOISE REDUCE
AUTO
M
VHF-L
OFF
2
*1
*2
CHILD LOCK
[TUNE] menu
TUNE
COLOUR SYS
SOUND SYS
BAND
SKIP
PROGRAM
SEARCH
FINE TUNE
AUTO SEARCH
Selected Items
COLOUR SYS
SOUND SYS
BAND
*4
SKIP
PROGRAM
SEARCH
FINE TUNE
*5
AUTO SEARCH
Press the button 3 times or press button to exit
4
MENU
SETUP
to TV mode.
Functions
Select the on-screen display language.
Select ON to change screen to blue at no signal condition.
Select ON to reduce noise in weak signal picture.
Select ON to disable access to TV via buttons on TV.
This menu allows you to set a channel to a desired TV
station.
1
Press the button 5 times or press button
MENU
TUNE
directly.
2
Select the desired item using the and buttons.
Use the and buttons to adjust/activate the functions.
3
Press the button 2 times or press button to exit
4
+
MENU
P+
TUNE
to TV mode.
Functions
*3
Select the appropriate colour system.
Select the appropriate sound system (i.e. I,M,DK or BG).
Select band system for tuning (i.e. VHF-L,VHF-H or UHF).
Select ON to skip the channel in PROGRAM.
Set the channel number by number buttons or button.
Activate to manually search for desired broadcast stations.
Fine tune the unsatisfactory signal reception.
Activate to auto search & preset receivable broadcast stations.
P -
--/---
NOTE
*1
If CHILD LOCK is set to ON, you can access the TV by remote control unit only.
You may keep the remote control unit out of reach to prevent children from any unauthorized
access to the TV.
*2
In AV mode, only COLOUR SYS will be displayed in [TUNE] menu.
*3
If COLOUR SYS is set to AUTO, the colour system will be detected and selected automatically.
If the signal reception is poor, an incorrect colour system may be detected and selected. You
can rectify this problem by setting the colour system (PAL, NTSC, NTSC4.43 or SECAM) manually.
*4
When SKIP is set to ON, the channel number will be changed from green to grey.
*5
When using FINE TUNE to adjust the signal reception, the channel number will be changed
from green to yellow; if SKIP is set to ON at the same time, the channel number will be
changed from yellow to white.
15
Page 16

[EXCHANGE]
*1
menu
EXCHANGE
PROGRAM
PROGRAM
EXCHANGE
1
1
This menu allows you to arrange channel numbers by
exchanging between 2 preset channel numbers.
1
Press the button 6 times.
Select the first PROGRAM item using the and buttons.
2
Use the and buttons to select the channel number you
+
MENU
want to exchange from.
3
Select the second PROGRAM item using the and buttons.
Use the and buttons to select the channel number you
+
want to exchange to.
Select EXCHANGE and press the or buttons to
4
activate the exchange command.
5
Press the button to exit to TV mode.
MENU
NOTE
*1
[EXCHANGE] menu is not available in AV mode.
P+
+
P+
P -
P -
16
Page 17

TROUBLESHOOTING
IMPORTANT NOTES
The following problems do not always indicate a hardware failure. Therefore, please use the troubleshooting
guide below before calling for repair service.
If, after following the guide none of the remedies work, unplug the TV set and call for service.
• GHOST:
Please change the
height or
antenna.
building
cause
highly
improve the reception.
position of the
Reflections from
or mountains might
this
directional antenna may
direction,
phenomenon. A
•SOUND IS HEARD (BUZZER) BUT NO
PICTURE:
Please check whether
brightness and
control
adjusted,
is
properly.
are
and
connected
the antenna
contrast
properly
into
the
plug
•NO PICTURE AND NO SOUND:
Please check that the
receiver is plugged in
that the indicator on
panel of TV
lights is red.
TV
and
the front
•NO COLOUR PICTURE OBTAINABLE
DURING A COLOUR PROGRAM:
Please check that if the
signal is too weak.
check the colour
adjusted
tune the
method
multi-system models,
that the system selected
correct, including
audio systems.
properly.
frequency with the
of the fine tuning.
input
Please
control is
Please fine
check
colour
and
For
is
•NOISE OR INTERFERENCE:
IGNITION NOISE
White spots and horizontal streaks may appear on
the screen. Usually this is caused by interference
from automobile, neon lamps or other electrical
appliance. So, the antenna should be installed away
from such interference sources.
SNOW
Small dots may appear on
entire screen.
coaxial
installment
RADIO FREQUENCY INTERFERENCE
The interference produces
moving ripples or diagonal
streaks. This is not caused
by the receiver but is
by interference
signals or
cable
and
radio.
Check
or
the direction.
from
the
the
antenna
caused
other
• VCR:
When the VCR test signal
(TSG) is received, the
side of the test
distorted as
figure. This
and
the playback picture
not
influenced by it.
shown in the
is not a
lower
pattern is
malfunction
is
17
Page 18

Please make these simple checks as
indicated ( ) on the chart for the
respective symptoms and their possible
remedies.
s
e
i
ed
em
R
e
l
b
i
s
s
Symptoms
No picture, no sound
Poor sound, picture OK
Poor picture, sound OK
Weak picture
Blurred picture
Double image
Lines in picture
Distorted picture
Weak reception on some channels
Horizontal bars
Picture rolls vertically
Poor colour
No colour
Misoperation of Remote control
Remote control unit no operation
On Screen Display Control outside the screen
o
P
e
bl
ou
tr
n
o
i
et
s
stat
f
y
l
o
k
ab
b
ac
o
b
pr
es
r
i
on
K,
w
O
f
ons
en
i
ti
,
l
c
e
ok
ne
br
nn
n
r
a
o
o
h
c
f
c
l
l
t
a
a
i
i
n
er
er
re
a
a
e
ent
i
k
k
ff
r
i
c
o
d
e
ec
-
y
h
h
r
T
C
C
Re
e
c
n
a
i
l
p
p
n a
a
as
h
c
u
s
,
ype)
e
t
l
c
r
n
o
tro
o
re
n
d
e
o
f
n
i
c
er
f
t
i
s
n
s
(
ng
i
i
l
al
n
ne
a
t
u
t
h
oc
aeri
l
g
i
r
ne
y
i
f
b
st
st
ju
ju
obabl
d
d
r
P
A
A
r
ou
ol
c
ng
i
t
as
c
ol
tr
oad
rol
r
on
ol
b
c
tr
ont
s
n
i
i
c
o
t
m
c
s
on
e
r
i
t
a
tr
at
n
st
sys
olou
f
f
i
i
co
c
t
k
k
st
s
c
u
u
e
ec
j
j
h
h
d
d
A
C
A
C
t
uni
l
o
r
t
e
ont
s
c
y
tl
on"
e
c
t
e
o
is "
r
m
h
or
c
c
re
t
i
s
in
w
s
f
es
i
r
of
/
e
tt
on
f
i
ba
k
k
ec
ec
h
C
Ch
18
Page 19

SPECIFICATIONS
Model Name C29-F800S C29-F800SN C29-F800SNT
Screen Size
Power Supply /
Power Consumption
NICAM/A2
Teletext
Reception System
RF :
VIDEO :
Frequency Range
Preset Channels
Aerial Input
Audio Output
TV Dimension (W x D x H)
TV Weight
Please refer to the values as indicated on the
rating label pasted at the back of the TV set.
No Yes Yes
No No Yes
74 cm (29 inch) diagonal
*1
Full Multi System
PAL - B/G,D/K , I
SECAM - B/G,D/K , K1
NTSC-M
PAL / NTSC / SECAM
NTSC 50
NTSC 4.43
PAL 6 0
SECAM 60
44.25 - 863.25 MHz
0 - 199
75 Ohm coaxial
8 W + 8 W
785 x 495 x 591 mm
44.5 kg
Specifications may be subject to change without notice for improvement.
NOTE
*1
Teletext function will only operate in countries where Teletext transmission service is available.
If such transmission is unavailable (e.g. in Hong Kong), Teletext function will not operate.
19
Page 20

20
 Loading...