

Page 1

MINI HIFI AUDIO SYSTEM
WITH DAB TUNER RECEIVER SYSTEM
AXM75DAB
Instruction Manual
Before operating please read all these
instructions thoroughly.
Page 2

SOME DOS AND DON'TS ON THE SAFE USE OF EQUIPMENT
This equipment has been designed and manufactured to meet international safety standards but,
like any electrical equipment, care must be taken if you are to obtain the best results and safety is
to be assured.
**************
DO
read the operating instructions before you attempt to use the equipment.
DO
ensure that all electrical connections (including the mains plug, extension leads and interconnections between the pieces of equipment) are properly made and in accordance with the
manufacturer's instructions. Switch off and withdraw the mains plug before making or changing
connections.
DO
consult your dealer if you are ever in doubt about the installation, operation or safety of your
equipment.
DO
be careful with glass panels or doors on equipment.
DO
route the mains lead so that it is not likely to be walked on, crushed, chafed, or subjected to
excessive wear and tear or heat.
**************
DON'T
DON'T
tablecloths, curtains, etc. Overheating will cause damage and shorten the life of the equipment.
DON'T
liquids, such as vases, to be placed on the equipment.
DON'T
to equipment. High temperatures can melt plastic and lead to fires.
DON'T NEVER
complete safety always fit the manufacturer's approved stand or legs with the fixings
provided according to the instructions.
DON'T
the requirements of traffic safety. It is illegal to watch television whilst driving.
DON'T
hearing.
DON'T
that it is designed for unattended operation or has a stand-by mode. Switch off using the
switch on the equipment and make sure that your family know how to do this. Special
arrangements may need to be made for infirm or handicapped people.
DON'T
normally, or if it is damaged in any way - switch off, withdraw the mains plug and consult
your dealer.
remove any fixed cover as this may expose dangerous voltages.
obstruct the ventilation openings of the equipment with items such as newspapers,
allow electrical equipment to be exposed to dripping or splashing, or objects filled with
place hot objects or naked flame sources such as lighted candles or nightlights on, or close
use makeshift stands and fix legs with wood screws - to ensure
use equipment such as personal stereos or radios so that you are distracted from
listen to headphones at high volume, as such use can permanently damage your
leave equipment switched on when it is unattended unless it is specifically stated
continue to operate the equipment if you are in any doubt about it working
ABOVE ALL
- NEVER let anyone especially children push anything into holes, slots or any other
opening in the case - this could result in a fatal electrical shock;
- NEVER guess or take chances with electrical equipment of any kind
- it is better to be safe than sorry!
************
2
Page 3
SAFETY PRECAUTIONS
WARNINGS
ATTENTION
To reduce the risk of
electric shock, do not
remove the cover.
There are no user
serviceable parts
inside the unit. Refer
all servicing to qualified
personnel.
The lightening flash with arrowhead
symbol within the triangle is a warning
sign alerting the user of "dangerous
voltage" inside the unit.
The exclamation point within the
triangle is a warning sign alerting the
user of important instructions
accompanying the products.
WARNING
To reduce the risk of fire or electric
shock, do not expose this appliance to
rain or moisture.
- Minimum distances around the apparatus for sufficient ventilations;
- The ventilation should not be impeded by covering the ventilation
openings with items such as newspaper, table-cloths, curtains etc.
- No naked flame sources such as lighted candles should be placed
on the apparatus;
- Attention should be drawn to the environmental aspects of battery
disposal;
- The use of apparatus in tropical and/or moderate climates.
3
Page 4

IMPORTANT
The mains lead on this equipment may be supplied with a moulded plug incorporating a fuse, the
value of which is indicated on the pin face of the plug. Should the fuse need to be replaced, an
ASTA or BS approved BS1362 fuse must be used of the same rating. If the fuse cover
is detachable never use the plug with cover omitted. If a replacement fuse cover is required,
ensure it is of the same colour as that visible on the pin face of the plug. Fuse covers are
available from your dealer.
DO NOT cut off the mains plug from this equipment. If the plug fitted is not suitable for the power
points in your home or the cable is too short to reach a power point, then obtain an appropriate
safety approved extension lead or consult your dealer.
Should it be necessary to change the mains plug, this must be carried out by a competent person,
preferably a qualified electrician.
If there is no alternative to cutting off the mains plug, ensure that you dispose of it immediately,
having first removed the fuse, to avoid a possible shock hazard by inadvertent connection to the
mains supply.
IMPORTANT
The wires in this mains lead are coloured in accordance with the following code:
Blue
Brown
As these colours may not correspond to the coloured markings identifying the terminals in your
plug, proceed as follows:
The wire coloured BLUE must be connected to the terminal marked with the letter or coloured
BLUE or BLACK. The wire coloured BROWN must be connected to the terminal marked with
the letter or coloured BROWN or RED.
On no account connect either of these wires to the terminal marked E or by the earth symbol
or coloured green and yellow.
Alternatively, this equipment may be supplied with a rewireable plug already fitted, which may
be removed if not suitable and an alternative fitted in accordance with the preceding
instructions.
: NEUTRAL
: LIVE
N
L
4
Page 5

FRONT PANEL VIEW
1
10
11
19
20
21
22
23
24
2
3
4
5
6
7
8
9
12
13
14
15
16
17
18
25
26
27
28
29
5
Page 6
30
31
32
33
34
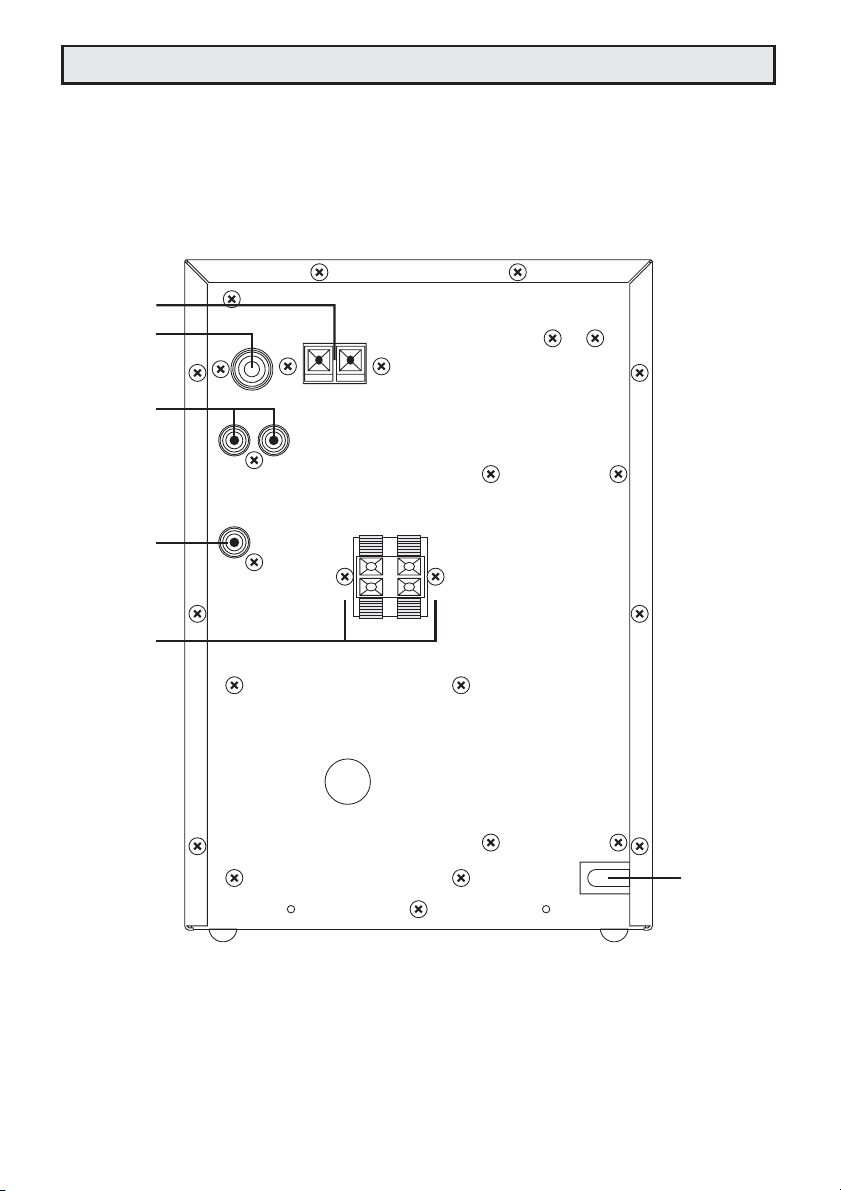
REAR VIEW
35
6
Page 7

REMOTE HEANDSET VIEW
36
37
38
39
40
41
42
43
44
45
46
47
48
49
50
51
52
53
54
55
56
57
58
59
60
7
Page 8

Frontal view
BRIEF INSTRUCTION
1 MULTI-FUNCTION DISPLAY
indication unit for amplifier, tuner,
and CD player.
2 DAB/FM AM
key to select operating mode
Tuner mode/for radio recordings DAB
and FM, MW(AM) band selection.
3 0-9/+10
preset station memory pushbutton
to save station/track selection.
4 VOLUME
to adjust volume.
5 MENU/STORE
to turn on DAB menu and tuner
memory pushbutton.
6 MP3 INFO/RDS INFO
to display ID Tag of MP3 (Title,
Artist & Album name) if available.
to select displaying various R.D.S.
information.
7 RDS PTY/SCROLL
to select displaying various R.D.S.
information.
8 MULTI FUNCTION
function to change the values or
adjustments of the function
selected. In case no other function
has been chosen, this control knob
serves to adjust the volume.
9 DAB AUTO SEARCH
search DAB stations automatically.
10 AUX
key to select operating mode
playback for a unitconnected
to the jacks 32 "AUX".
11 FM/AM TUNING
manual/auto FM/AM stations
search.
12 IR SENSOR
remote control receiver.
13 EQ/TONE
button to select preset EQ (ROCK/
POPS/JAZZ/DANCE/FLAT/
CUSTOM/TREBLE and BASS).
14 HEADPHONE 1
socket for connecting a headphone.
15 CLOCK
display clock, adjust clock and timer.
16 HEADPHONE 2
for connecting a second headphone.
17 SELECT/ALARM ON OFF
select function at DAB mode and
select alarm on/off at normal mode.
18 STANDBY
to switch the system from standby
to operating state and off.
19 CD/MP3 CD-ROM transport drawer
20 INTRO
to play the beginning 10s of every
track on the disc when playing CD.
21 CD
key to select operating mode
playback of integrated CD player.
22 PAL/NTSC
to match the colour system of your
television.
23 PROGRAM
CD/MP3 CD-ROM memory pushbutton.
24 REPEAT
repeat function/repeat of selected
passage.
25 SKIP
reverse/forward track selector.
reverse/forward search.
/
8
Page 9
BRIEF INSTRUCTION
26 OPEN CLOSE
to open and close the CD/MP3
CD-ROM transport drawer.
27 STOP
to stop CD/MP3 CD-ROM playback.
28 PLAY
to start CD/MP3 CD-ROM playback.
29 PAUSE
to stop and restart CD/MP3 CD-ROM
playback.
Rear view
30 AM ANTENNA
antenna socket for AM loop
antenna.
31 DAB/FM ANTENNA
antenna socket for 75 Ohm
coaxial plug.
32 AUX
chinch jacks for external tape or
similar.
33 VIDEO OUT
socket to connecting cable to the
video input socket on the TV.
34 SPEAKER
terminals for loudspeakers
(impedance: 8 Ohm).
35 POWER SUPPLY CABLE
for connection to power source.
Remote control
36
CLOCK
display clock, adjust clock and timer.
37 EQ SETUP
button to select preset EQ setting
(ROCK/POPS/JAZZ/DANCE/FLAT/
CUSTOM).
38 SLEEP
activate and deactivate sleep timer
function.
39
/
in CD operating mode, reverse or
forward search.
40 CD
key to select CD operating mode.
41 SELECT
to select the desired DAB ststion.
DISPLAY
42
press to turn MP3 INFO on/off.
press to display the disc content
and current operating mode.
43 MENU
to turn on DAB menu at DAB mode.
44 DAB/FM AM
to turn on DAB or FM/AM.
45 PLAY
to start CD/MP3 CD-ROM playback.
46 AUX
key to select operating mode
playback for a unit connected
to the jacks 32 "AUX".
47 INTRO
to play the beginning 10 seconds
of every track on the disc when
playing CD/MP3 CD-ROM.
9
Page 10

BRIEF INSTRUCTION
48 POWER
switch the system from standby to
operating state and off.
49
/
reverse/forward track selector.
reverse/forward search.
50 MUTE
sound pause to switch off the
sound reproduction. By pressing
the button again, the sound is
switched on again.
51 MANUAL TUNE
to start manual tuning at DAB.
52 VOL. +/-
to adjust volume.
53 OPEN CLOSE
to open and close the CD/MP3
CD-ROM transport drawer.
54 PAUSE
to stop and restart CD/MP3 CD-ROM
playback.
55 STOP
to stop CD playback.
56 REPEAT
repeat function/repeat of selected
passage.
57 0-9/+10
preset station memory pushbutton to
save station/track selection.
58 RDS INFO/MP3 INFO
in TUNER operation mode, to select
displaying various R.D.S. information.
when playing MP3 CD-ROM to display
ID Tag of MP3 (Title,Artist & Album name)
if available.
59 MEMORY
CD/TUNER memory
pushbutton.
60 BALANCE
Centric adjustment of the channels
on the right and on the left.
/
SETTING UP AND CONNECTING THE STEREO SYSTEM
Before switching on the stereo system...
... please read carefully the instructions
on the following pages.
The functional arrangement of the
controls makes the stereo system
easier to operate.
To make use of all the options available,
you should nevertheless study these
instructions carefully.
Important!
Unauthorized opening of the equipment
will invalidate any warranty claims.
Note:
To help your dealer identify your
stereo system if after sales service
is required, please quote the serial
number inscribed on the name
plate on the rear of the stereo
system.
Installation
You must take the room layout into
consideration (arrangement of power
and antenna sockets).
Switch off the unit before connecting.
Make sure all the connecting are
correct. Plug-in connections which are
too loose can cause operational
malfunctions.
10
Page 11

SETTING UP AND CONNECTING THE STEREO SYSTEM
Place your set on a stable, horizontal,
vibration-free surface where there is
no risk of the set falling over or being
subjected to vibrations. - This could
otherwise damage the sensitive
electronics inside. -
Any heat generated by the set must be
free to escape. - Any heat build-up
may cause the electronic components
to malfunction or fail. -
Therefore, if you place your set in a
cabinet or on a shelf, make sure that there
is enough room for heat to dissipate and
air to circulate around the set. If in doubt,
ask your dealer.
The ventilation slits at the rear of the set
must always be free. Do not cover them
by curtains, mats or newspapers. In
addition, avoid placing your set next to
radiators or in sunlight where additional
heat could affect the set.
Protect your set from humidity. Do not
place your set under a window,
otherwise, in the worst case, rain could
fall onto the set. Do not place any
containers filled with water on the set,
e.g. flower vases, potted plants, etc. If
the container should fall over and water
enters the set, damage is unavoidable.
However, if water does enter the set,
immediately pull out the power plug and
inform your dealer. He will then check the
set before you use it again.
- Liquid entering the set could cause
dangerous short-circuits which, in the
worst case, could cause a fire. -
If you bring your set from a cold place to
a warm place, leave the set switched off
for a few hours. Condensation could form
inside the set.
Do not allow any objects to drop into the
set through the ventilation slits. They
could come into contact with parts
conducting electricity.
- This could lead to short-circuits.
Cleaning
Before cleaning the set, switch of the
STANDBY switch on the set and
disconnect the set from the mains.
Clean the housing of the set and the
remote control unit using a moist cloth.
Do not use any solvents, white spirits,
thinners, etc. Otherwise, they could damage
the surface for the set.
Power connection
Insert the power plug in the wall socket.
When you disconnect the mains plug
from a socket, do not pull the cable,
always pull the plug.
AM ANTENNA CONNECTION
Plug the supplied loop antenna to AM
antenna socket 30 to receive AM radio
broadcast.
DAB/FM ANTENNA CONNECTION
Plug the supplied auxiliary antenna to
DAB/FM antenna socket 31 for DAB/FM
reception. In some areas where an outside
4-element aerial antenna is essential to
obtain good reception quality, connect the
stereo system to the outside antenna by
plugging the antenna cable (coaxial, 75
ohms) into the DAB/FM antenna socket 31
at the rear of the stereo system.
11
Page 12

SETTING UP AND CONNECTING THE STEREO SYSTEM
Connecting the loudspeakers
Press down the locking levers 34 to
insert the loudspeaker cable. Attach the
black wire of the loudspeaker cable to
the corresponding black (negative)
terminal of the machine. Connect the
second wire accordingly. Connect the
loudspeaker on the right side of listener
to the terminals marked "R" and connect
the loudspeaker on the left of the listener
to the terminals marked "L".
lmportant
To achieve a stereo effect, the
loudspeakers should be arranged to form
an equal-sided triangle with the seating
position of the listener. The main direction
of sound projection should not be
blocked by furniture, curtains, or similar
objects.
AUX
The AUX connection to the auxiliary
appliances is made via the plugs 32
located at the back.
- Connect the "AUX" input plugs of the
amplifier with the output plugs of the
auxiliary unit.
Make sure that you plug in the leads
correctly to the right and left channels.
Headphone1&2
Sockets to fit a 6.3mm dia. jack plug for
a headphone. (Use commercially available
adapters for other types of plug).
AMPLIFIER AND TUNER
Multi-function buttons
The multi-function buttons are positioned
around the tuning knob. Their functions
are shortly described in the following
sections.
These functions can be stored separately,
thus, they remain the basic adjustment
when switching on the device with
"STANDBY" 18.
- Select function
- Adjust values
Press button...
"VOLUME" 4, you can also get into the
volume function directly when your device
is in another function, appears
in multi-function display 1.
The volume can be changed with turning
knob "MULTI FUNCTION" 8 (scale range
from min-63 max).
"FM/AM TUNING" 11 for the normal station
finding and for the automatic search run.
(For explanations see "Station tuning").
"MENU/STORE" 5 to store the stations on
each programme place. (For explanations
see "Programme memory").
"EQ/TONE" 13 for preset equalizer selection
to suit your listening pleasure, with turning
knob "MULTI-FUNCTION" 8, ROCK/POP/
JAZZ/CLASSIC/FLAT/CUSTOM appears
in multi-function display 1 subsequently
each time the knob is turned.
VOLUME
12
Page 13

AMPLIFIER AND TUNER
"Bass" can be adjusted at CUSTOM by
pressing EQ/TONE 13, 2 times. It adjusts
the individual playback sound, in this case
the low frequencies, appears
in multi-function display 1.
With turning knob "MULTI FUNCTION" 8
the bass can be changed.
"TREBLE" can be adjusted at CUSTOM by
pressing EQ/TONE 13, 1 time. It adjusts
the individual playback sound, in this case
the high frequencies, appears
in multi-function display 1.
By turning knob "MULTI FUNCTION" 8,
the "treble" can be changed.
"EQ/TONE" 13 to select preset equalizer
(ROCK/POP/JAZZ/CLASSIC/FLAT/
CUSTOM) to adjust the playback sound
to suit your individual pleasure.
BASS
TREBLE
Manual tuning:
Press button "FM/AM TUNING" 11. Now you
have to adjust the desired station with button
"MULTI FUNCTION" 8 within the following
10 seconds. The corresponding frequency
can be seen in multi-function display 1.
By slowly turning button "MULTI FUNCTION"
8 each notch changes the receiving frequency
by 0.05MHz upwards or downwards in FM
band and 9KHz/10KHz upwards or
downwards in AM(MW) band.
Auto tuning:
Press button "FM/AM TUNING" 11.
By quickly turning button "MULTI FUNCTION"
8 over 1/2 a turn within the following 10
seconds, the auto tuning function is started
and the direction of the search run determined.
When a receivable station has been found,
the auto tuning function will automatically be
stopped, and the station will be tuned in
optimally at the same time. The
corresponding station frequency will be
shown in multi-function display 1.
FM/AM Station tuning
You have two possibilities of executing
the station tuning function:
- manual station tuning
- auto tuning.
Switch your radio to operation mode
DAB/FM/AM with button 2. Press
Tuner 2 again to select DAB,FM,
AM(MW) frequency band.
By again turning button "MULTI FUNCTION" 8,
the auto tuning function can be started again.
The tuner will be muted during auto tuning.
13
Page 14

AMPLIFIER AND TUNER
RDS (RADIO DATA SYSTEM) for
FM only
RDS (Radio Data System) allows for the
name, specific type of program and text
of the radio station being played to be
displayed and for the time of the clock
to be adjusted automatically if this
information has been transmitted. "RDS"
is displayed on Multi-function display 1
when the received station has the
information transmitted.
To display various R.D.S. information on
multi-function display 1 after tuning to a
FM station, press the R.D.S. select button
6, the name of the station is displayed on
the multi-function display 1. SLIGHTLY
rotate the multi-function jog 8 clockwise,
other RDS information is displayed on the
multi-function display 1 consecutively as
follows:-
- specific type of program broadcasted
e.g. VARIETY, POP, MUSIC etc.
- time of the clock transmitted by the
radio ststion.
- text transmitted by the radio station.
band. You can directly call up the saved
stations using the preset station memory
pushbuttons on the tuner or on the remote
control.
The saved stations remain saved even if
the tuner is switched off or if there is a
power failure.
In order to store your stations to the
desired programme places proceed as
follows:
1. Make sure that your radio is in operation
mode TUNER, if necessary, switch over
with button "DAB/FM/AM" 2.
2. Adjust the desired station as described
under "Station Tuning". Here you have
the possibility of selecting manual
tuning or auto tuning.
3. Press button "MENU/STORE" 5. The
programme place number is flashing
in multi-function display 1.
4. Now select the desired programme
place number within the following 5
seconds by using numeral buttons 3.
5. Then press button "MENU/STORE" 5
to save the programme.
Select the tuner preset station
memories
On the tuner:
Select the preset station memories 1-32
using the pushbutton 3. To select a two
digit preset station memory, press the
relevant numeric pushbuttons in succession.
The display 1 serves for check purposes.
Using the remote control
Select programme place 1-32 by pressing
numeral buttons 57.
Programme memory
The program memory allows you to save
32 stations in FM and 16 stations in AM(MW)
Attention:
In case the input does not take place within
these 5 seconds, the programme place
number remains the same. The storage
function can only be activated again by
pressing button "MENU/STORE" 5
afterwards.
Changing a programme number
If you wish to store a different station under
any programme number, you can do so
following the procedure described above.
The old station will be cleared.
14
Page 15

AMPLIFIER AND TUNER
DAB Tuning
When you switch to DAB mode by pressing "DAB/FM/AM" 2
or on your handset 44, "now tuning" will be shown on
multi function display 1.
If stations are found
The stations will be stored in alphanumeric order. The first
station on the list will be selected and you will hear it
through the speaker. To listen to other stations, see
"Selecting a station".
If no stations are found
"No stations available" will be shown on the display.
Manual tune
the manual tuning option to improve reception.
Autotune local
of the local autotune option.
Autotune full
of the full autotune option.
Retuning your unit
Your can re-tune your unit at any time using the autosearch
process. You may wish to do this if a new mulitiplex is
launched or you move your unit to another room. You do
not need to perform an autotune to pick up new stations
within a mulitplex you are listening to as your unit monitors
and refreshes the list of available stations automatically.
The following two options are available:
Autotune local
allocation. This should only take a few seconds.
Autotune full
in Band III. This may take a minute or more.
1. Ensure your unit is switched on and the aerial is
connected and fully extended.
2. Push and release the "DAB AUTO SEARCH" button
9 once for local scan or hold down for around two
seconds for a full scan.
Note
"DAB AUTO SEARCH" button 9 again during the
tuning process.
- See Manual tune for details of using
- See Retuning your unit below for details
- See Retuning your unit below for details
- scans all frequencies in the UK channel
- scans the full range of digital frequencies
You can cancel autosearch by pushing the
15
Page 16

AMPLIFIER AND TUNER
The display will indicate tuning is underway. When
finished the unit will return to the station you were
listening to and you will hear it through the speakers.
All the stations found are now stored in the unit and you
can select another station as described in Selecting a
station.
If no stations are found, you see the message "No
stations available" Check your aerial is fully extended
and try one of the available tuning options.
Selecting a station
Once you have tuned your unit, you can select the digital
radio station you want to listen by pressing "SCROLL" 7,
turn "MULTI FUNCTION" knob 8 and "SELECT" 17 to confirm.
If you have assigned stations to presets you can also select
them directly by pressing the relevant numbered button 3 or
57, see Storing and recalling presets.
1. The top line of the display shows the name of the currently
selected station.Press "SCROLL" 7 and rotate "MULTI
FUNCTION" knob 8 to see the names of other stored
stations on the buttom line of the display. Stop when you
find the station to which you want to listen.
2. Press "SELECT" knob 17 or 41 to listen to the station
you have selected. The display may show "Now
tuning..." briefly as it finds the new station.
If a station has one or more secondary services available the
display will show ">>" next to the station name on the station
list and they will appear after the primary service as you press
"SCROLL" knob 17, turn "MULTI FUNCTION" knob 8 and
"SCROLL" knob 17 to confirm.
A secondary service will display "<<" before the station name
on the station list indicating that it belongs to the primary
service before it in the list.
If the station has "?" before its name the service is currently
inactive or invalid. If you select a station which has this
symbol, the unit tries to tune to that station. If still unavailable
"Station not available". Check your aerial is fully extended.
16
Page 17

AMPLIFIER AND TUNER
Changing the display mode
The unit has six display modes which enable you to view parts
of the broadcast data on the bottom line of the display.
Press the "DISPLAY" button 42 and repeat to cycle through
the six different display modes.
Scrolling text The default mode, displays scrolling text
messages which accompany the audio,
where available.
Program Type A label describing the type of content being
broadcast by the service.
Multiplex name Displays the name of the mulitiplex in which
the current service is found, see "Guide to
Digital Radio" on pagg 21 for more
information on multiplexes.
Date and time Displays the date and time obtained from the
current mulitiplex.
Channel Displays the mode of the channel identifier
and frequency for the station to which you
are tuned, see "Guide to Digital Radio"
on page 21 for more information.
Mode Displays the mode of the current service,
Stereo or Mono and the data rate at which the
aduio signal is being transmitted. This rate is
set by the broadcaster to suit the type and
quality of material being transmitted.
Signal error Displays the signal error rate for the signal to
which you are tuned. As a guide values from
0 to 15 indicate good reception, 16 to 30
borderline reception and 31 or more, poor
reception. You can attempt to reduce this
signal error rate by adjusting your aerial
position using Manual tune option described
on page 18.
17
Page 18

AMPLIFIER AND TUNER
Storing and recalling presets
The numeric buttons (1-9) enable you to store radio stations
for one-touch access.
To store a station
You can store a station to a preset while listening to it or when
you see the station name on the bottom line of the display
while scrolling through the station list.
Press and hold down a numbered button for around two
seconds to store the station under that number. The display
show e.g. "Preset 1 saved" when the station has been
successfully saved. Once you save a station to a preset, the
station name has the preset number next to it on the station list.
To recall a previously stored station
Press the numeric button 3 under which you stored the station.
If the selected preset is empty, the display shows "No Station
Available". Please select another preset and make sure the
preset has station stored.
Manual tune
This option provides a signal level display which you can use
to find the best position for your radio and aerial.
When you select this option, the bottom line of the display
shows the channel identifier and frequency. Press "MENU"
button 5 or 43, rotate "MULTI FUNCTION" knob 8 to "Manual
tune" and press "SELECT" knob 17 or 41. Then turn the
"MULTI FUNCTION" knob 8 to choose your favorite frequency.
Press "SELECT" button 17 or 41 again to confirm.
1. The list includes all channels, UK stations are in the
Note
range 11B to 12D. You see a signal level display. The empty
block indiactes the minimum required level for reception and
the solid blocks indicate the current level.
2. Move your aerial or radio whilst watching the display and
to try to raise the current level to the empty block or beyond.
The display will change to show the multiplex name on the
bottom line of the display once a good signal is received
and the multiplex will be added to the service list.
3. Press "MENU" button 5 or 43 to exit manual tuning or
turn the "MULTI FUNCTION" knob 8 to select another
channel.
18
Page 19

AMPLIFIER AND TUNER
Advanced setup options
The unit has a number of advanced features which enable you
to change the order and number of stations on the station list,
perform manual tuning, apply Dynamic Range Control (DRC)
and view the software version.
Press the "MENU" 5 or 43 to enter the advanced setup menu,
turn the "MULTI FUNCTION" knob 8 to scroll through the
following menu options then press "SELECT" button 17 or 41
to select that option.
Station Order
This option enables you to choose the order in which stations
appear as you scroll through the station list.
When you select this option you see the currently selected
order on the top row of the display and a scroll list on the
bottom. Turn the "MULTI FUNCTION" knob 8 to scroll through
the following options and press "SELECT" button 17 or 41
to select one:
Alphanumeric Displays all stations in alphanumeric order.
This is the default setting.
Active station Display active stations at the top of the
service list in alphanumeric order and
inactive ones at the bottom in alphanumeric
order. See "Selecting a station" on page 16
for information on active stations.
ENS station Stations are displayed in ensemble order.
Stations at the lower frequencies are
displayed first.
Fav station Display the six most listened to stations at
the top of the station list in alphanumeric
order and the rest below in alphanumeric
order. Your favourite stations will be
displayed with the station name when you
scroll through the station list.
Prune stations Removes inactive stations from the station
list. See "Selecting a station" on page 16
for information on active ststions.
presets Available only when Fav station order (above)
Fav
has been selected. Transfers your six favourite
stations to the preset buttons. See page 18
for information on using presets.
19
Page 20

AMPLIFIER AND TUNER
DRC Value
DRC (Dynamic Range Control) enables you to alter the dynamic
range of the received audio (dependent on broadcast material)
by making the quieter sounds in a broadcast more audible. This
may be useful in noisy environments or particularly quiet parts
of programmes. The DRC level of a broadcast is set by a
broadcaster and transmitted with the service. Changing this
DRC value enables you to apply a scaling factor to this level.
When you select this option you see the current DRC value
on the top line of the display and a scroll list on the bottom.
Press "MENU" button 5 or 43, rotate "MULTI FUNCTION"
knob 8 to "DRC Value" and press "SELECT" button 17 or 41.
Select the following DRC value by tuning the "MULTI
FUNCTION" knob 8 and "SELECT" button 17 or 41 to confirm.
DRC 0 DRC scaling is switched off.
DRC ½ DRC scaling is set to ½ that sent with the
transmitted service.
DRC 1 Applies the DRC scaling as sent with the
transmitted service. This is the default setting.
Sw version
This option enables you to view the version number of the
software installed in your unit. You may be asked to quote
this if you contact Technical Support for advice. This option
can only be viewed, no adjustment is available.
Resetting your unit
A reset option is provided to enable you to reset your unit.
This removes all presets, stored stations and favourite
station settings and resets all options to defaults. Performing
an autotune process will solve most problems but you may
want to use this option if you move house or want to restore
default values to options you have changed.
To select the reset option:
1. Press and hold the "MENU" button 5 for more than five
seconds. The display will show "Clear Memory".
2. The unit will enter "Auto Tuning" mode and search for
new DAB stations again.
20
Page 21

AMPLIFIER AND TUNER
Guide to digital radio
Your unit enables you to receive and listen to DAB radio programmes. Digital Audio Broadcast
(DAB) uses digital signals rather than traditional analogue signals enabling near CD-quality
audio with virtually interference-free reception. DAB also enables broadcasters to transmit
additional data along with the audio including other audio channels, text and in the future,
perhaps computer data and images.
Digital radio is broadcast as groups of data called ensembles or multiplexes. Each multiplex
can contain a number of stations (services) and each station contains a primary service and
can contain secondary services as illustrated in the following diagram.
Each multiplex is transmitted in a set frequency range and received by your unit for decoding.
Your unit enables you to receive multiplexes broadcast in frequency band lll (174-240 MHz)
and store the services in each multiplex for you to access. The number of multiplexes you
receive will vary depending on your location. Band lll is divided into 41 channels identified as
5A to 13F. Each channel can contain one multiplex. Channels allocated to the UK are in the
range 11B to 12D.
Multiplexes and stations have labels (names) which are used to identify them. Instead of needing
to know a particular frequency to listen to your favourite broadcast you can simply select the
station name. Secondary services and additional data such as text containing programme or
multiplex information are also easily accessed using your unit.
BBC National DAB
(Primary) BBC Radio 4
(Secondary) Parliament
DAB SIGNAL
1
1
2
14+
23
21
MULTIPLEX
Primary SERVICES
3+
SECONDARY SERVICES
Page 22

COMPACT DISC PLAYER FOR CD
CD mode
Note:
The functions of keys "CD TRACK" 3, "INTRO"
20, "REPEAT" 24, "SKIP" 25, "OPEN/CLOSE"
26, "STOP" 27, "PLAY" 28 and "PAUSE" 29 can
be activated using the remote control.
Loading and removing discs
When you switch over to the operating mode
"CD", the message below appears in the
display unit 1:
Press the "OPEN/CLOSE" button 26 to open
the transport drawer to insert or remove the
DISC.
Then insert the DISC with the labelled side
facing upwards. You can also play CD
singles without an adapter.
The perfect functioning of the CD player
is only assured with compact discs
whose playtime does not exceed 74
minutes.
Close the CD transport drawer by
pressing the "OPEN CLOSE" button 26.
The CD will start to play.
Playing the entire DISC
Once the CD player has read and
displayed the contents of the DISC, the
DISC is ready for playing. Briefly press
the "PLAY" button 28 to start play. During
playback, the number of the track played
and the play time are displayed.
When the "STOP" button 27 is pressed,
the total tracks and playing time are
displayed.
22
Page 23

COMPACT DISC PLAYER FOR CD
When all tracks on the DISC have been
played, playback stops and the indication
appears in the displayed 1:
Note:
- When selecting a track directly via the
numeric buttons, the playback of the
corresponding title starts immediately.
- If you insert a DISC the wrong way up,
i.e. with the label side facing downwards,
this will appear in the display unit:
In some cases, the CD player may skip
some tracks on a disc during disc play. This
problem may be caused by defects (such as
scratches) in the disc being played, which
are too large for the error compensation
circuits to handle. If you encounter this
problem, check the CD player's operation
as follows, before having the unit serviced.
Play a new disc. If the CD player operates
normally, the skipping problem is probably
due to a defective disc.
Playback time
You can select the display mode by pressing
the "DISPLAY" pushbutton 42 on remote
control several times:
- the length of time the track has played.
- the remaining play time of the track.
- the total remaining play time of the CD or of
the programming.
Pause
Press the "PAUSE" button 29 or 54 on remote
control, in order to stop for a moment during
play. Press button 29 or 54 on remote control
again to restart play.
Track selection/search
Press the "SKIP" pushbuttons 25 briefly to
select the tracks you want during playback
in ascending or descending order.
Press the pushbutton as many times until
the track you want appears in display 1.
"SKIP" right = ascending
"SKIP" left = descending
Display unit 1 serves for check purposes.
You can also compose the track number of
the desired track immediately by pressing
number 0-9/+10 button 3.
Example Press 5 to select track No.5
Press +10 and then 5 to select
No.15
Press +10 and then 10 to
select track No.20
Press +10 three times and
then 2 to select track No.32
If you press" " 39 pushbuttons ,you
can start automatic search during playback.
You can rapidly look for a certain passage.
Playback is not switched off.
" " = forward
" " = reverse
Press the "PLAY" button 22 and 45 on the
remote control, the system starts normal
playback.
23
Page 24

COMPACT DISC PLAYER FOR CD
Repeat functions
Repeat:
Press the "REPEAT" pushbutton 24 or 56
once, the unit will show the current status.
Press the "REPEAT" pushbutton 24 on main
unit or 56 on remote control once, the track
now playing is repeated continuously. The
following message appears in the display 1:
Press the "REPEAT" pushbutton 24 on main
unit or 56 on remote control again to play the
entire disc or the programmed tracks
continuously. The following message appears
in the display 1:
Press the "REPEAT" pushbutton 24 on main
unit or 56 on remote control one more time to
clear repeat function.
Programme memory
The built-in programme memory allows you to
store up to 99 tracks and to play them back in
whatever order you wish. If you should
accidentally enter more than 99 tracks, the
memory will stop storing tracks after it has
reached 99.
It is normal that 99 min 59 will be displayed for
program total time over 100 minutes.
Example:
You wish to listen to tracks 14, 2, 9, 12 and 22
in that order on a disc as described above.
When the scanner has read the disc, "20" and
the total playing time will appear in the display
unit.
Press the "MEMORY" pushbutton 59 on the
remote control to switch over to programming
mode. Enter the track number by pressing
the numeric keys 14.
Enter the track number 2 by pressing the
numeric keys.
You can then store all the remaining tracks
in the same way.
After all the tracks have been stored, press
button "PLAY" 28 on the main unit or 45 on
the remote control to begin playing the
programmed tracks. After all programmed
tracks have been played the following
message appears in the display:
It is possible to store a track more than once
in the same programme if desired.
By pressing button "PLAY" 28 or 45, you can
play the entire programme again. To play the
entire programme continuously, press button
"REPEAT" 24 or 56 three times,
"REPEAT ALL" appears in the display 1.
24
Page 25

COMPACT DISC PLAYER FOR CD
Note:
The entire programme will be cleared as soon
as you open the disc compartment.
Stop
You can stop play by pressing the "STOP"
button 27 or 55 once.
Note on using compact discs
Always hold discs by the edges and make
sure they remain clean. Do not touch the
shiny rainbow surface. Do not stick any
paper or adhesive tape on the side of disc
with the label. Keep discs away from direct
sunlight and heat sources, such as
radiators. Do not leave discs in a car which
is parked in direct sunlight, since the
temperature inside the car can become
extremely high. Clean discs with a cloth
before playing them.
Do not use any solvents such as benzine,
thinners, commercially available cleaners
or anti-static spray intended for analog
discs to clean your compact discs. After
playing, store a disc in its case again.
Moisture
If the unit is exposed to extreme temperature
fluctuations, moisture will form inside it.
Condensation will form on the lens and on
other parts inside the unit. If the CD player is
operated under these conditions, the laser
beam will not be able to read the signals. In
this case you should remove the DISC, close
the disc compartment, set the unit to Standby
and leave it alone for around 1 hour. The
moisture will then have evaporated and you
will be able to use your CD player again.
Hints concerning the CD player
When the CD player is not in use, the drawer
should always remain closed to protect the
mechanism from dust. Despite this, the lens
could possibly become soiled by dust or could
get steamed up by a hardly visible film, so that
the CD system can no longer scan the disc in
the drawer. In this case, qualified personnel
has to clean the lens.
25
Page 26

PLAYING MP3 CD-ROM
Insert the MP3 CD-ROM disc.The first screen
appears on your TV set. The left column is
one level higher than right column. The
currently selected item appears depressed.
Use " " or " " key 39 to navigate the menu.
Use "PLAY" button 28 or 45 to enter the
selected folder, for escape from folder press
"STOP" button 27 or 55. You can navigate
the MP3 tracks by using " " or " " key 39.
ROOT
FILE NAME
FILE NAME
FILE NAME
FILE NAME
FILE NAME
FILE NAME
PAGE 01/02
FILE NAME
FILE NAME
FILE NAME
FILE NAME
FILE NAME
FILE NAME
Press "PLAY" button 28 or 45 to play the
desired MP3 track.
While playing, you can press and hold " "
or " " key 39 to search the track at 2X speed.
Normal play will be resumed when releasing
key 39. You can skip to next or previous track
by pressing " " or " " key 25 or 49.
Press "STOP" key 27 or 55 to stop playing.
JPG Photo Album
Use this player to display a collection of digital photos that have been saved in JPG/JPEG format
onto a CD. These discs can originate from many sources including a computer or a photo
developing service.
Viewing JPEG Slideshow
Insert a CD-ROM with JPEG files, the unit will start to play slideshow automatically.
The file menu will be displayed when "STOP" is pressed.
Use the number keys to select a picture to view.
During display, use or buttons to skip between photos.
(Notes: If JPEG file is large, the file is displayed through serveral passes.)
26
Page 27

TIME AND ALARM SETTING
- Turn on the unit by pressing "STANDBY"
key 18.
- Press "CLOCK" key 15 on the main unit or
36 on the remote control once will display
the time.
- Press "SELECT/ALARM ON OFF"" key 17
or 41 will activate set clock mode, and the
hour digit will blink, turn the
"MULTI FUNCTION" knob 8 to set the hour.
Press "SELECT/ALARM ON OFF" key 17
or 41 again, the minute digit will blink, turn the
"MULTI FUNCTION" knob 8 again to set the
minute. Press "SELECT/ALARM ON OFF"
17 or 41 again to confirm.
- If RDS is available, the unit will adjust the
clock automatically when at tuner
mode and RDS signal is detected.
- Press "CLOCK" key 15 or 36 twice will
activate the timer mode.
- Press "SELECT/ALARM ON OFF" 17 or 41,
the hour digit of alarm on will blink, turn the
"MULTI FUNCTION" knob 8 to set the hour.
- Press "SELECT/ALARM ON OFF" 17 or 41
again, the minute digit will blink, turn the
"MULTI FUNCTION" knob 8 again to set the
minute. Press "SELECT/ALARM ON OFF"
17 or 41 to confirm. Then repeat the same
keystroke for setting the alarm off time.
If you want to deactivate the alarm, press
"SELECT/ALARM ON OFF" 17 or 41 when
the clock is not displayed.
Sleep:
Press "SLEEP" button 38 on the remote
control to activate sleep function. You select
the desired sleep time by pressing "SLEEP"
button 38 continuously, sleep timer varies
from 15 min, 30 min, 45 min, 90 min, 120 min
or off.
27
Page 28

SPECIFICATIONS
Power Source : AC230V ~ 50Hz
Frequency Range : FM 87.5 - 108 MHz
MW 522 - 1629 KHz
Dimensions of unit : (W) 166 x (H) 240 x (D) 257 mm
Weight of unit : 4.5 kg
Weight and dimensions are approximate because we continually strive to improve our products,
specifications may change without prior notice.
28
Page 29

Page 30

Page 31

Your Guarantee of Excellence
Thank you for purchasing this Hitachi product
In the unlikely event that this product should develop a fault, we undertake to replace or repair
any part of the product which fails due to a manufacturing defect within 12 months of the date of
purchase provided that:
I) The product has been installed and used only in accordance with the instructions supplied
with the product.
ii) The product has not been repaired, maintained, or modified by any person other than an
Hitachi authorised engineer.
iii) The product serial number has not been removed or altered.
This guarantee does not apply to product acquired second hand or for commercial or communal
use.
This guarantee does not cover the replacement of exhausted batteries, the adjustment of user
controls, or head cleaning and general consumer maintenance tasks.
Any parts replaced under this guarantee shall become the property of Hitachi Europe Ltd. Any
claims made under guarantee must be directed to the dealer from whom the equipment was
originally purchased.
Please note that evidence of the date of purchase will be required before any service under this
guarantee is carried out.
THIS GUARANTEE DOES NOT AFFECT YOUR STATUTORY RIGHTS.
IN ALL CASES OF DIFFICULTY PLEASE CONSULT YOUR HITACHI DEALER
Page 32

Hitachi Home & Life Solutions, Inc.
Hitachi Atago Building,
No.15-12, Nishi Shimbashi, 2-chome,
Minato-ku, Tokyo, 105-8410 Japan
Tel: 03 3502 2111
HITACHI EUROPE LTD.
Digital Media Group
Whitebrook Park
Lower Cookham Road
Maidenhead
Berkshire SL6 8YA
UNITED KINGDOM
Tel: 01628 643000
Fax: 01628 643400
consumer-service@hitachi-eu.com
Email:
HITACHI EUROPE GmbH
Munich Office
Dornacher Strasse 3
D-85622 Feldkirchen bei München
GERMANY
Tel: 089-991 80-0
Fax: 089 - 991 80 -224
Hotline: 0180 - 551 25 51 (12ct/min.)
HSE-DUS.Service@Hitachi-eu.com
Email:
HITACHI EUROPE SRL
Via T. Gulli n.39
20147 MILAN
ITALY
Tel: 02 487861
Fax: 02 48786381
Servizio Clienti
Tel. 02 38073415
customerservice.italy@hitachi-eu.com
Email:
HITACHI EUROPE S.A.S
Lyon Office
B.P. 45, 69671 Bron Cedex
FRANCE
Tel: 04 72 14 29 70
Fax: 04 72 14 29 99
france.consommateur@hitachi-eu.com
Email:
HITACHI EUROPE S.A.
364, Kifissias Ave. & 1, Delfon Str.
152 33 Chalandri
Athens
GREECE
Tel: 1-6837200
Fax: 1-6835694
service.hellas@hitachi-eu.com
Email:
HITACHI EUROPE S.A.
Gran Via Carles III, 86 Planta 5
Edificios Trade - Torre Este
08028 Barcelona
SPAIN
Tel: 93 409 2550
Fax: 93 491 3513
rplan@hitachi-eu.com
Email:
HITACHI EUROPE AB
Box 77
S-164 94 KISTA
SWEDEN
Tel: 08 562 711 00
Fax: 08 562 711 11
csgswe@hitachi-eu.com
Email:
HITACHI EUROPE LTD.
Norwegian Branch Office
Strandveien 18
1366 Dysaker
NORWAY
Tel: 02205 9060
Fax: 02205 9061
csgnor@hitachi-eu.com
Email
HITACHI EUROPE LTD.
Benelux Branche Office
Bergensesteenweg 421
1600 Sint-Pieters-Leeuw
BELGIUM
TEL : 0032/2 363 99 01
FAX: 0032/2 363 99 00
Email : info@hitachi.be
www.hitachi-consumer-eu.com
 Loading...