

Page 1

INSTRUCTION MANUAL
NOTICE D'UTILISATION
GEBRUIKSAANWIJZING
MANUALE DI ISTRUZIONI
MANUAL DE INSTRUCCIONES
NÁVOD K OBSLUZE
NÁVOD NA OBSLUHU
KULLANMA KILAVUZU
AXM649BT
Bluetooth Micro system
Micro Chaîne Bluetooth
Bluetooth Microsysteem
Sistema Micro Hi-Fi Bluetooth
Microcadena Bluetooth
Bluetooth mikrosystém
Bluetooth mikrosystém
Bluetooth Müzik Seti
Before operating please read these instructions thoroughly.
Lisez attentivement cette notice d’utilisation en totalité avant d’utiliser le produit.
Voor gebruik, lees deze gebruiksaanwijzing grondig door.
Prima di utilizzare il prodotto, leggere attentamente le istruzioni.
Lea detenidamente estas instrucciones antes de utilizar el aparato.
Nežli začnete přístroj používat, přečtěte si prosím pozorně tento návod.
Pred spustením si pozorne prečítajte návod.
Lütfen çalıştırmadan önce bu talimatların tamamını okuyun.
Page 2

Some Dos And Don't On The Safe Use Of Equipment
This equipment has been designed and manufactured to meet international safety standards but,
like any electrical equipment, care must be taken if you are to obtain the best results and safety is
to be assured.
***********************************
DO read the operating instructions before you attempt to use the equipment.
DO ensure that all electrical connections (including the mains plug, extension leads and intercon-
nections between the pieces of equipment) are properly made and in accordance with the manufacturer’s instructions. Switch off and withdraw the mains plug before making or changing connections.
DO consult your dealer if you are ever in doubt about the installation, operation or safety of your
equipment.
DO be careful with glass panels or doors on equipment.
DO route the mains lead so that it is not likely to be walked on, crushed, chafed, or subjected to
excessive wear and tear or heat.
***********************************
DON’T remove any xed cover as this may expose dangerous voltages.
DON’T obstruct the ventilation openings of the equipment with items such as newspaper, tablecloths, curtains, etc. Overheating will cause damage and shorten the life of the equipment.
DON’T allow electrical equipment to be exposed to dripping or splashing, or objects lled with liquids, such as vases, to be placed on the equipment.
DON’T place hot object or naked ame sources such as lighted candles or nightlights on, or close
to equipment. High temperatures can melt plastic and lead to res.
DON’T use makeshift stands and NEVER x legs with wood screws-to ensure complete safety
always t the manufacturer’s approved stand or legs with the xings provided according to the
instructions.
DON’T use equipment such as personal stereos or radios so that you are distracted from the requirements of trafc safety. It is illegal to watch television whilst driving.
DON’T listen to headphones at high volume, as such use can permanently damage your hearing.
DON’T leave equipment switched on when it is unattended unless it is specically stated that it
is designed for unattended operation or has a stand-by mode. Switch off using the switch on the
equipment and make sure that your family know how to do this. Special arrangements may need to
be made for inrm or handicapped people.
DON’T continue to operate the equipment if you are in any doubt about it working normally, or if it is
damaged in any way-switch off, withdraw the mains plug and consult your dealer.
ABOVE ALL,
- NEVER let anyone especially children push anything into holes, slots or any other opening in the
case - this could result in a fatal electrical shock;
- NEVER guess or take chances with electrical equipment of any kind
- it is better to be safe than sorry!
***********************************
GB-1
01_AXM649BT_GB_P41013409-A101_20 Mar 13.indd 1 2013-3-20 9:43:58
Page 3
To achieve the utmost in enjoyment and performance, please read this manual carefully before
attempting to operate the unit in order to became familiar with its features, and assure you years of
faithful, trouble free performance and listening pleasure.
Important Notes
* Keep instructions: the safety and operating instructions should be retained for future reference.
* Avoid installing the unit in locations described below:
Places exposed to direct sunlight or close to heat radiating appliances such as electric heaters.
On top of other stereo equipment that radiate too much heat. Places lacking ventilation or dusty
places. Places subject to constant vibration. Humid or moist places.
* Make sure not to obstruct the ventilation openings.
* Before turning on the power for the rst time, make sure the power cord is properly installed.
* Mains plug is used as the disconnect device and it shall remain readily operable completely.
* The product shall not be exposed to dirpping or splashing and that no objects lled with liquids,
such as vases, shall be placed on the product.
* To completely disconnect the power input, the mains plug of apparatus shall be disconnected
from the main. Unplug the unit from the wall outlet before storms to prevent damage due to
lightning and any power uctuation.
* When the standby LED and display are not illuminated; this inducates that the power switch is set
to off or the set is disconnected from the mains.
* Minimum distances 10cm around the apparatus for sufcient ventilations.
* Attention should be drawn to the environmental aspects of battery disposal.
* The mains plug should not be obstructed or should be easily accessed during intended use.
* The ventilation should not be impeded by covering the ventilation openings with items such as
newspaper, table-clothes, curtains etc.
* No naked ame sources usch as lighted candles should be placed on the apparatus.
* Battery shall not be exposed to excessive heat such as sunshine, re or the l ke.
For safety reasons, do not remove any covers or attempt to gain access to the inside of the
product. Refer any servicing to qualied personnel.
Do not attempt to remove any screws, or open the casing of the unit; there are no user serviceable
parts inside, refer all servicing to qualied service personel.
CAUTION
RISK OF ELECTRIC SHOCK
DO NOT OPEN
CAUTION: TO REDUCE THE RISK OF ELECTRIC SHOCK DO NOT REMOVE COVER (OR
BACK), NO USER SERVICEABLE PARTS INSIDE, REFER SERVICING TO
QUALIFIED SERVICE PERSONNEL.
DANGEROUS VOLTAGE
There is high voltage, that may be of sufcient magnitude to constitute a risk
of electric shock to persons is present within this product enclosure.
ATTENTION
The owner manual contains important operating and maintenance instructions, for your safety, it is necessary to refer to the manual.
WARNING: TO PREVENT FIRE OR SHOCK HAZARD, DO NOT EXPOSE THIS APPLIANCE TO
DRIPPING OR SPLASHING.
GB-2
01_AXM649BT_GB_P41013409-A101_20 Mar 13.indd 2 2013-3-20 9:43:58
Page 4
Note:
- This unit will become warm when used for a long period of time. This is normal and does not
indicate a problem with the unit.
- If unusual conditions occur in the display or buttons, switch the unit off then turn on the unit
again.
- The rating label is located on the base of the unit.
- The marking information is located at the bottom of apparatus.
Laser Product
This product is equipped with low power laser equipment. For your own safety do not remove any
covers or take the product apart. Repair work must be carried out by qualied personnel.
Caution
This product is equipped with low
CLASS 1
LASER PRODUCT
Correct Handling of Batteries
• Improper or incorrect use of batteries may cause corrosion or battery leakage, which could
cause re, personal injury or damage to property.
• Use only the types of the batteries which are indicated in this manual.
• Do not dispose of the used batteries as domestic waste. Dispose of them in accordance with the
local regulations.
• Small button cell batteries such as used in the remote handset for this unit are easily swallowed
by young children and this can be dangerous. Keep loose button cells away from young children
and make sure that the battery holder tray is secure in the remote control. Seek medical advice
if you believe a cell has been swallowed.
• Batteries (battery pack or batteries installed) shall not be exposed to excessive heat such as
sunshine, re or the like.
power laser equipment inside, for
your safety, don’t open the laser radiation protective equipment. Don’t
look at the laser radiation district
when the equipment is operating.
Danger of explosion if battery is incorrectly replaced.
Replace only wi h the same or equivalent type.
CAUTION
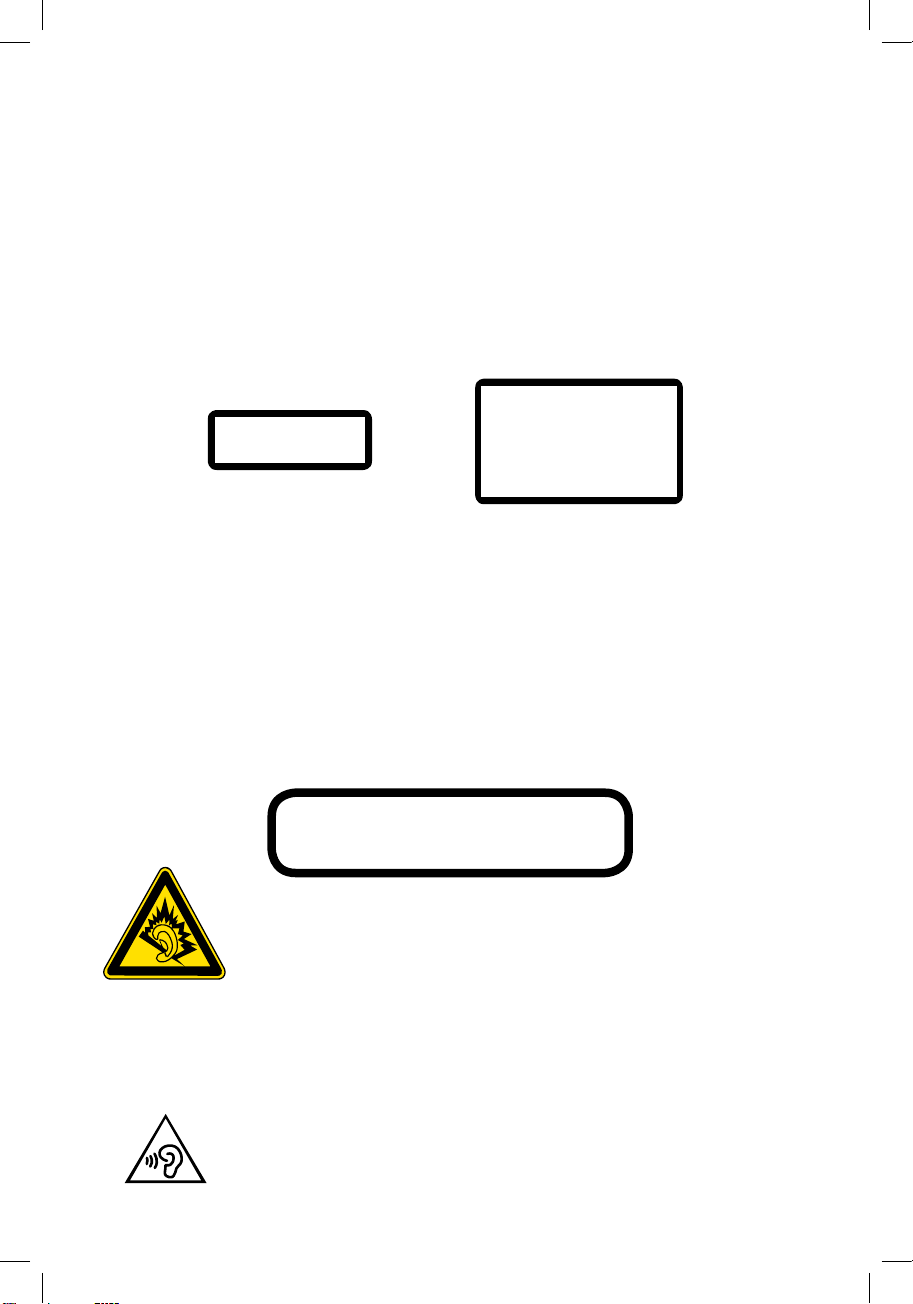
At full power, prolonged listening to the player can damage the ears of the user.
WARNING: To protect your hearing
It is important that any headphones or earphones used in conjunction with this product are
compliant with French Decree of 8 November 2005 implementing Article L.5232-1 This ensures that
the sound level does not exceed 100 dB SPL. The prolonged listening at high volume for more than
ve hours a week can damage your hearing.
To prevent possible hearing damage, do not listen at high volume levels for long
periods.
GB-3
01_AXM649BT_GB_P41013409-A101_20 Mar 13.indd 3 2013-3-20 9:43:58
Page 5
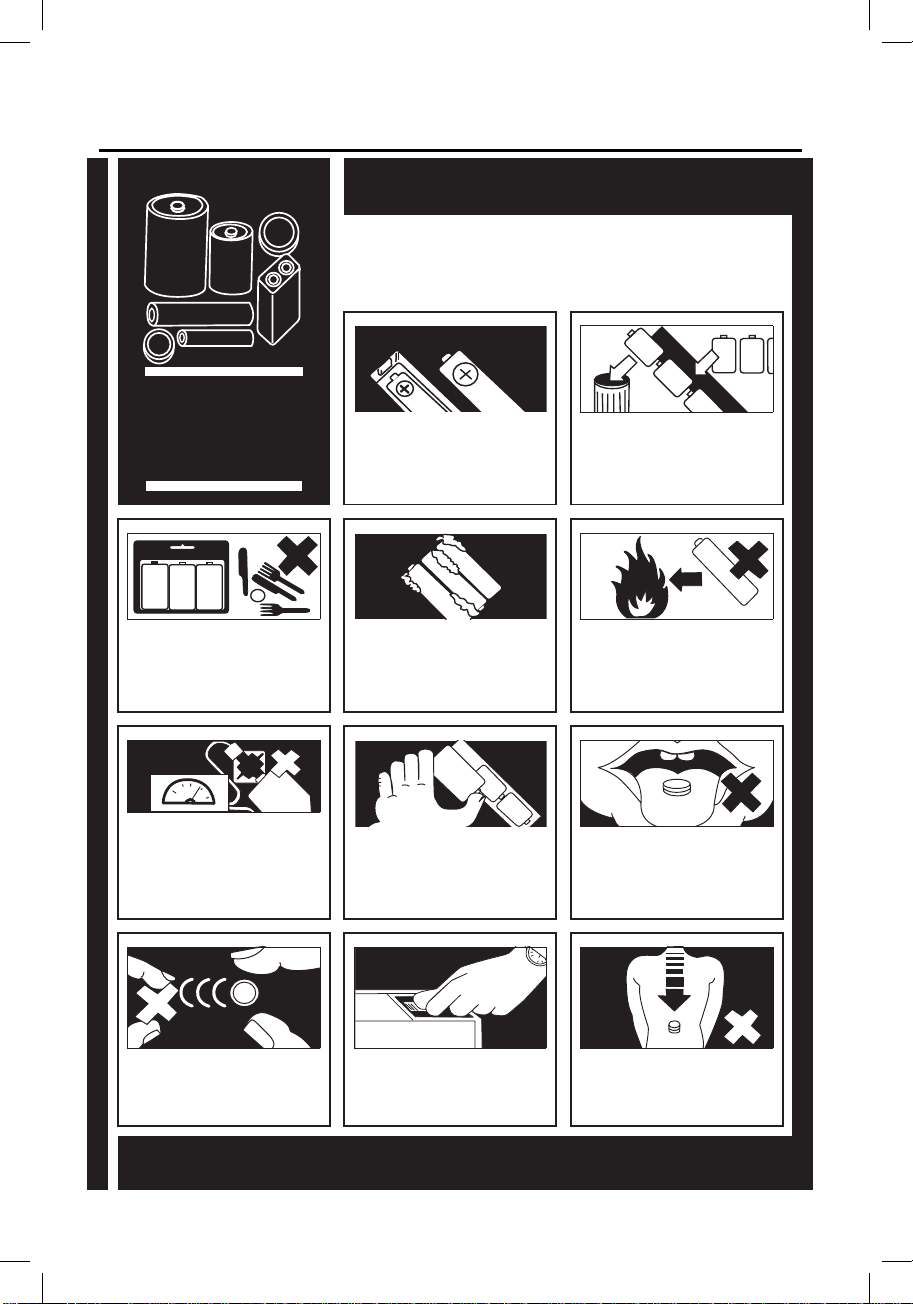
Battery Safety Guidelines
Used correctly, domestic batteries are a safe and dependable source of
portable power. Problems can occur if they are misused or abused —
resulting in leakage or, in extreme cases, fire or explosion.
Here are some simple guidelines to safe battery use designed to eliminate
any such problems.
BATTERY
SAFETY
GUIDELINES
Store unused batteries in their packaging
and away from metal objects which may
cause a short-circuit resulting in leakage or,
in extreme cases, fire or even an explosion.
Never attempt to recharge ordinary
batteries, either in a charger or by applying
heat to them. They may leak, cause fire or
even explode. There are special
rechargeable batteries which are clearly
marked as such.
Take care to fit your batteries correctly,
observing the plus and minus marks on the
battery and appliance. Incorrect fitting can
cause leakage or, in extreme cases, fire or
even an explosion.
Remove dead batteries from equipment and
all batteries from equipment you know you
are not going to use for a long time.
Otherwise the batteries may leak and cause
Supervise children if they are replacing
batteries themselves in order to ensure
damage.
these guidelines are followed.
Replace the whole set of batteries at one
time, taking care not to mix old and new
batteries or batteries of different types, since
this can result in leakage or, in extreme
cases, fire or even an explosion.
Never dispose of batteries in fire as this can
cause them to explode. Please recycle
dead batteries; do not put with the
normal household waste.
Remember that small button cell batteries
such as used in some hearing aids, toys,
games and other appliances, are easily
swallowed by young children and this can be
dangerous.
Keep loose button cells away from young
children.
Make sure battery compartments are
secure.
Seek medical advice if you believe a cell has
been swallowed.
GB-4
01_AXM649BT_GB_P41013409-A101_20 Mar 13.indd 4 2013-3-20 9:43:58
Page 6

Table of Contents
Some Dos And Don't On The Safe Use Of Equipment .................................................... 1
Important Notes ................................................................................................................ 2
Laser Product ............................................................................................................................................. 3
Correct Handling of Batteries ..................................................................................................................... 3
Battery Safety Guidelines ................................................................................................. 4
Pack Contents .................................................................................................................. 7
Product Overview .............................................................................................................8
The CD Player ...........................................................................................................................................8
The Amplier Player ................................................................................................................................... 8
Remote Control Overview ................................................................................................9
Installation of Battery ...............................................................................................................................10
Handling the Remote Control ................................................................................................................... 10
Remote Control Operation Range ............................................................................................................11
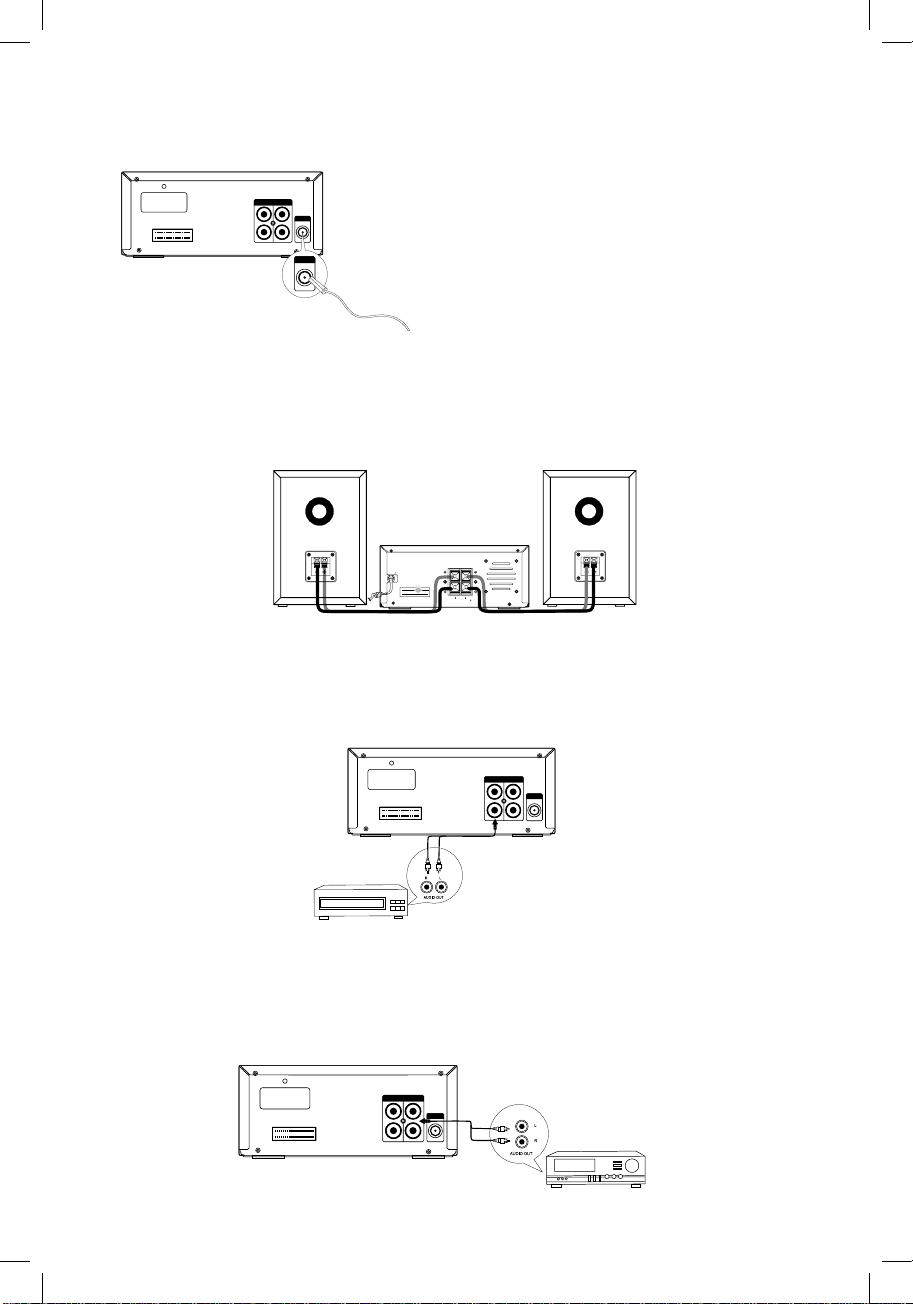
Connections....................................................................................................................12
Connecting the FM Antenna .................................................................................................................... 13
Connecting the Speakers ......................................................................................................................... 13
Connecting Auxiliary Equipment .............................................................................................................. 13
Connecting Control Cable ........................................................................................................................ 14
Connecting the AC Power Cable ............................................................................................................. 14
ECO-Power/Standby Features ....................................................................................... 14
Switching ON/OFF ................................................................................................................................... 14
Switching he system to ECO Power/Standby mode .............................................................................. 14
Setting the Clock ...........................................................................................................15
Setting the Clock Manually ..................................................................................................................15
Setting the Clock Automatically ...........................................................................................................15
Display he Clock ................................................................................................................................ 15
Sound Quality ................................................................................................................. 15
Adjusting the Volume ............................................................................................................................... 15
Adjusting the Super Bass ......................................................................................................................... 15
Adjusting the Bass ................................................................................................................................... 15
Adjusting the Treble ................................................................................................................................. 15
Controlling the Loudness ......................................................................................................................... 15
Presetting Equalizer ................................................................................................................................ 15
Changing the Front Panel Darkness ........................................................................................................ 15
Listening to Radio Broadcasts ........................................................................................ 16
Tuning in to a Station ............................................................................................................................... 16
Presetting Stations ................................................................................................................................... 16
To change the FM Reception Mode ......................................................................................................... 16
FM Display Modes ................................................................................................................................... 17
CD Operation..................................................................................................................18
CD Playing ............................................................................................................................................... 18
Direct Select track .................................................................................................................................... 18
To Skip Search and Play .......................................................................................................................... 18
To Search ................................................................................................................................................. 18
Text Display During Playback .................................................................................................................18
Programme Play ...................................................................................................................................... 18
Random Play (CD and MP3 discs) .......................................................................................................... 18
Playing the Beginning (Intro) of each Track ............................................................................................. 18
Playing Repeatedly (CD) .........................................................................................................................19
GB-5
01_AXM649BT_GB_P41013409-A101_20 Mar 13.indd 5 2013-3-20 9:43:58
Page 7

MP3/WMA Disc Playing .................................................................................................. 19
Playing Repeatedly (MP3 disc) ................................................................................................................ 20
Use the USB .................................................................................................................. 20
For devices with USB Cables: .................................................................................................................20
For memory Cards ................................................................................................................................... 20
USB Storage Device Data Protection ...................................................................................................... 20
Set the alarm timer .........................................................................................................22
Activate / deactivate alarm timer ....................................................................................22
Set sleep timer................................................................................................................22
Disc Handling .................................................................................................................23
Troubleshooting .............................................................................................................. 24
Specications .................................................................................................................25
GB-6
01_AXM649BT_GB_P41013409-A101_20 Mar 13.indd 6 2013-3-20 9:43:58
Page 8
Pack Contents
Make sure all of the following contents are included.
The Unit
Speakers x 2
Speaker Cable x 2 FM Antenna
INSTRUCTON MANUAL
NOTCE D UT LISAT ON
GEBRUIKSAANWJZING
MANUALE DI ISTRUZIONI
MANUAL DE NSTRUCCIONES
NÁVOD K OBSLUZE
NÁVOD NA OBSLUHU
KULLANMA KI AVUZU
AXM649BT
Buetoo h M cro system
Mcro Cha ne Blue oo h
Buetoo h M crosys eem
Sstema Mic o Hi Fi Buetoo h
Beo e opea ng pease ead t ese nst cto s tho o ghy
sez a eni ement et e no ce dut ia in n oai é av nt dui se e podu t
Voo geb uk ees d ze gebuks anwj i g go d g oo
ma di tlz ae l po oto eg ee a en amene le st zi ni
ea d tei amen e s as i stu cones a tes de tlza el paato
Ne l za nee p sto použ at p čt te s p sm po o ně teto ná od
d pusenm si p zo ne p čta e ávod
üten alş ımad n nce bu a imaa n t m mnı kuy n
Stand
Instruction Manual
Mcrocadena B uetooth
Buetoo h mikrosys ém
Buetoo h mikrosys ém
Buetoo h Mü ik Se i
Remote Control
(battery included)
Control Cable
GB-7
01_AXM649BT_GB_P41013409-A101_20 Mar 13.indd 7 2013-3-20 9:44:01
Page 9
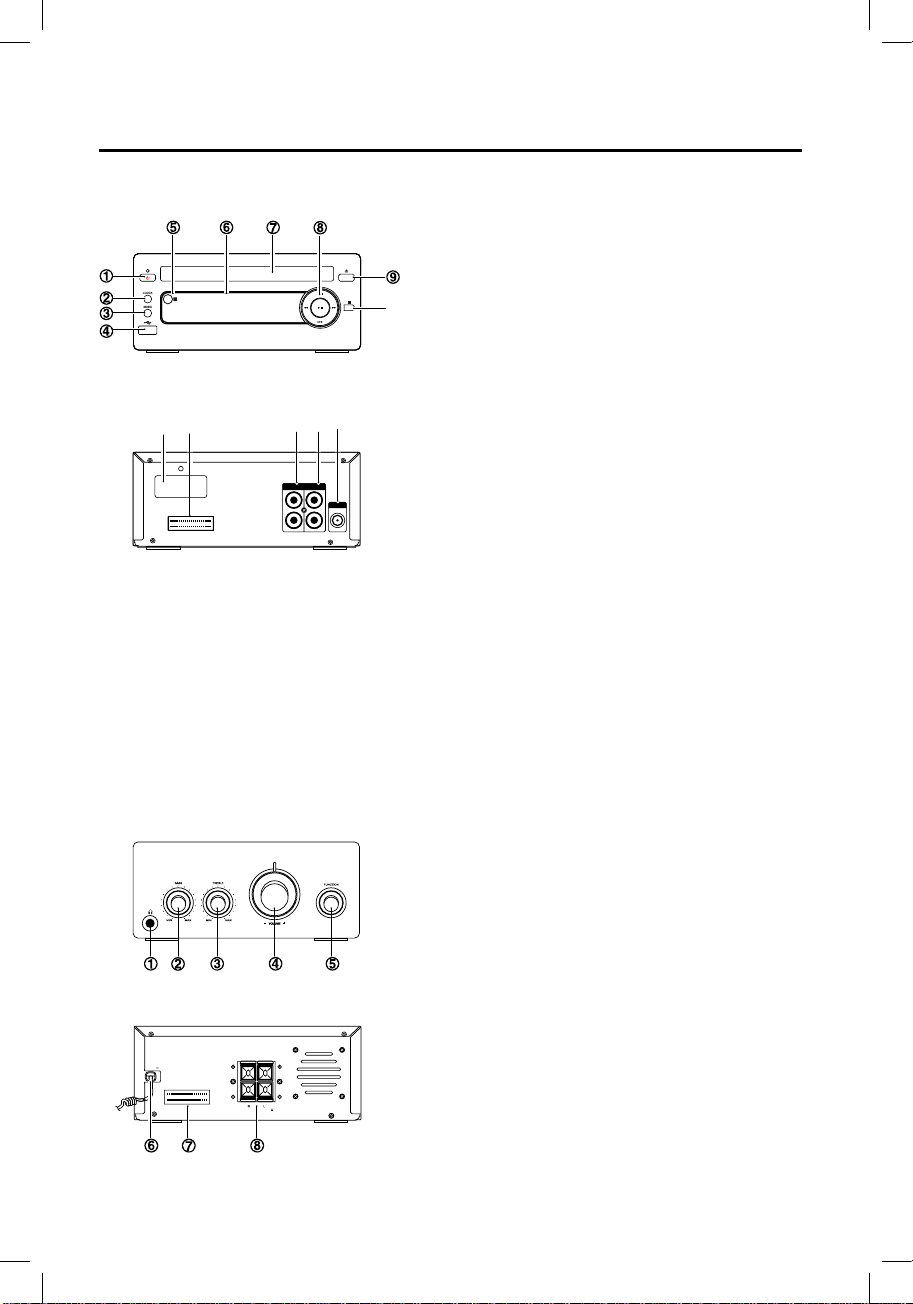
Product Overview
FM
ANTENNA
CABLE
AUX IN 1
LRL
R
AUX IN 2
CABLE
AC
SPEAKER O UTPUT( )
The CD Player
1. Standby Button
2. Clock Button
3. Mode Button
4. USB Jack
5. Remote Sensor
6. Vacuum Fluorescent Display (VFD)
Display Lens
7. Disc Tray
8. Fast Forward Button (C)
Tuning Forward Button
Reverse Button (D)
Tuning Backward Button
Next Button ( G )
Preset Up Switch
Previous Button (H)
Preset Down Switch
Play/Pause Button (BF)
9. Open/Close Button(K)
10. Stop Button(L)
11. Bluetooth Antenna
12. Power Control Cable Socket
13. AUX1 Input Terminals (L&R) (AUX IN1)
14. AUX2 Input Terminals (L&R) (AUX IN2)
15. FM Antenna
The Amplifier Player
1. Headphone Terminal
2. Bass Control Knob
3. Treble Control Knob
4. Volume Control Knob
5. Function Select Knob
6. AC Power Cable
7. Power Control Cable Socket
8. Speaker Output Terminals (L&R)
01_AXM649BT_GB_P41013409-A101_20 Mar 13.indd 8 2013-3-20 9:44:02
GB-8
Page 10
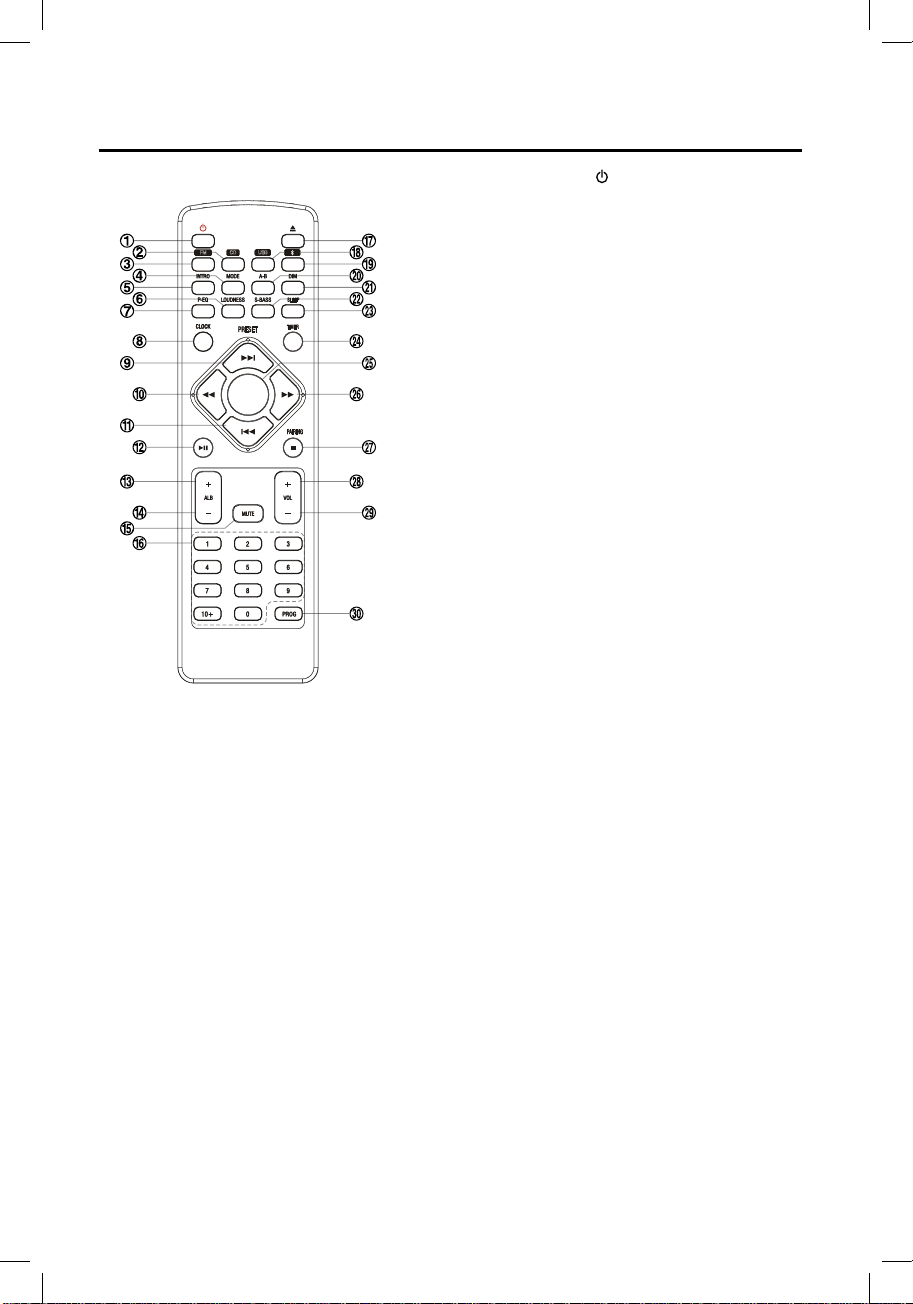
Remote Control Overview
AUX
DISPLAY
1. Standby Button
2. Disc Function Button
3. FM Button
4. Mode Button (
5. Intro Button (
6. Loudness Button (
7. Preset Equalizer Button (
8. Clock Button (
9. Next Button
Preset Up Switch
10. Fast Backward Button
Tuning Backward Button
11. Previous Button
Preset Down Switch
12. Play/Pause Button
13. Album Up Button (
14. Album Down Button (
15. Mute Button (
16. Number Button (
17. Open/Close Button
18. USB Function Button
19. AUX Function Button (
Bluetooth Button
20. Repeat A-B Button (
21. Dimmer Button (
22. Super Bass Button (
23. Sleep Button (
24. Timer Button (
25. Display Button (
RDS Display
26. Fast Forward Button
Tuning Forward
27. Stop Button
Pairing Cleared Button (
28. Volume Up Button (
29. Volume Down Button (
30. Program Button (
MODE
INTRO
CLOCK
G
MUTE
SLEEP
TIMER
L
)
)
LOUDNESS
)
D
H
BF
ALB + )
ALB - )
)
0~9, 10+
K
AUX 1 / AUX 2
A-B
DIM )
S-BASS
)
)
DISPLAY
C
VOL+
VOL-
PROG
)
P-EQ )
)
)
)
)
PAIRING
)
)
)
)
)
GB-9
01_AXM649BT_GB_P41013409-A101_20 Mar 13.indd 9 2013-3-20 9:44:02
Page 11

Installation of Battery
1. Remove the insulating mylar strip from the
battery. It is located at the bottom back
side of the remote control.
2. Loosen the screw on the battery compartment
cover with a screwdriver. Pull out the battery
compartment with your ngernails.
3. Replace a new battery (size 2025) correctly
and fully insert the battery compartment back
to the original position. Tighten the screw with
a screwdriver.
Handling the Remote Control
Remove the batteries if the remote control is not going to be used for an extended period of
•
time.
To avoid possible failure, read the following instructions and handle the remote control
•
properly.
Do not drop or cause impact to the remote control.
•
Do not spill water or any liquid on the remote control.
•
Do not place the remote control on a wet object.
•
Do not place the remote control under the direct sunlight or near sources of excessive heat.
•
Do not use caustic cleaners ( porcelain, stainless steel, toilet, or oven cleaner etc. ) on the
•
remote, as it may suffer damage.
Note:
Remove the battery from remote control handset when it is not to be used for a long period.
Otherwise it can be damaged due to leakage of battery.
GB-10
01_AXM649BT_GB_P41013409-A101_20 Mar 13.indd 10 2013-3-20 9:44:03
Page 12
30° 30°
Max. 5 m
A X
DS LAY
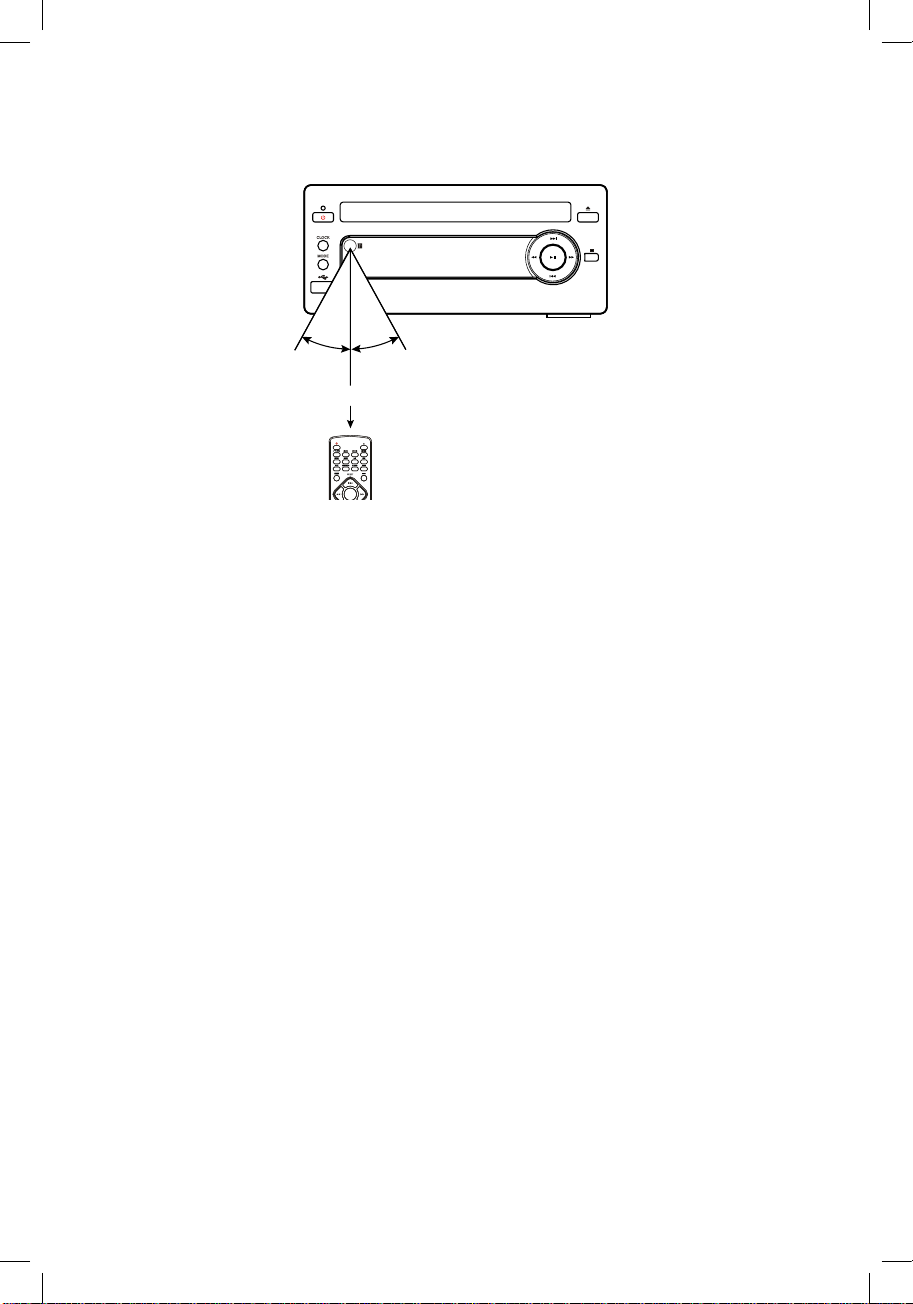
Remote Control Operation Range
Point the remote control to the unit no more than 5 meters from the remote control sensor and
within 30° horizontally and 30° vertically of the front of the unit. The operating distance may vary
according to the brightness of the room.
Note:
Make sure that there is no obstacle between the infrared remote sensor of the unit and remote
•
control. If you install the unit on rack, etc.., the remote controllable range may decrease
depending on the thickness or colour of glass door of rack.
Do not expose the infrared remote sensor to direct sunlight or other strong light, such as inverter
•
uorescent light.
GB-11
01_AXM649BT_GB_P41013409-A101_20 Mar 13.indd 11 2013-3-20 9:44:03
Page 13
M
N NN
N
N
N N
N
N
Connections
Caution: Make all connections before plugging the unit into the AC Power outlet.
Please read these additional installation notes before use.
If the following steps are not followed correctly the unit may become damaged.
Please note the correct steps for setting up the unit are as follows:
1. The speaker wires, control cable between CD player and amplier are to be connected rst.
2. After the above cables are correctly connected, the AC power cord can then be connected to
power outlet.
Caution:
i) Reversing the steps by connecting the AC power cord rst will cause malfunction of the
unit.
ii) During operation, if the control cable requires to be reconnected, the AC power supply
must be disconnected rst. Otherwise, damage to the unit may be caused.
Speaker
Main Unit
AC Power Cord
Speaker
AC Power Cord
Speaker
AC Power Cord
Main Unit
Speaker
AC Power Cord
GB-12
01_AXM649BT_GB_P41013409-A101_20 Mar 13.indd 12 2013-3-20 9:44:04
Page 14
Connecting the FM Antenna
A
NTENNA
CABLE
AUX N 1
L
R R
AUX N 2
A
C
SP AKE R UTP T )
FM
ANTENNA
CABLE
AUX N 1
LRL
R
AUX N 2
AUX IN 2
AUX IN 1
ANTENNA
LRL
FM
CABLE
R
ANTENNA
FM
tenna socket on the rear of the unit.
Caution:
To avoid noise, keep Antenna away from the unit,
the connecting cable and the AC power cable.
Connecting the Speakers
Connect the supplied FM Antenna to the FM An-
Connect the speaker cords between the terminals as shown below.
Connect the cable with a black head to the (-) terminals and cable with a red head to the (+) terminals.
The Amplier
Right Speaker Box
Rear View
Left Speaker Box
Rear View
Connecting Auxiliary Equipment
Connect the AUX IN 1 terminals on the rear of the unit to the line output terminals on the auxiliary
equipment with an audio cable (no supplied) illustrated below.
The CD Player
Auxiliary equipment
Connect the AUX IN 2 sockets on this unit to the audio output sockets on the auxiliary equipment
as illustrated below.
The CD Player
Auxiliary equipment
01_AXM649BT_GB_P41013409-A101_20 Mar 13.indd 13 2013-3-20 9:44:05
GB-13
Page 15
FM
ANTENNA
ABLE
AUX N 1
LRL
R
AUX IN 2
CABL
AC
SPEAKER O UTPU (6 )
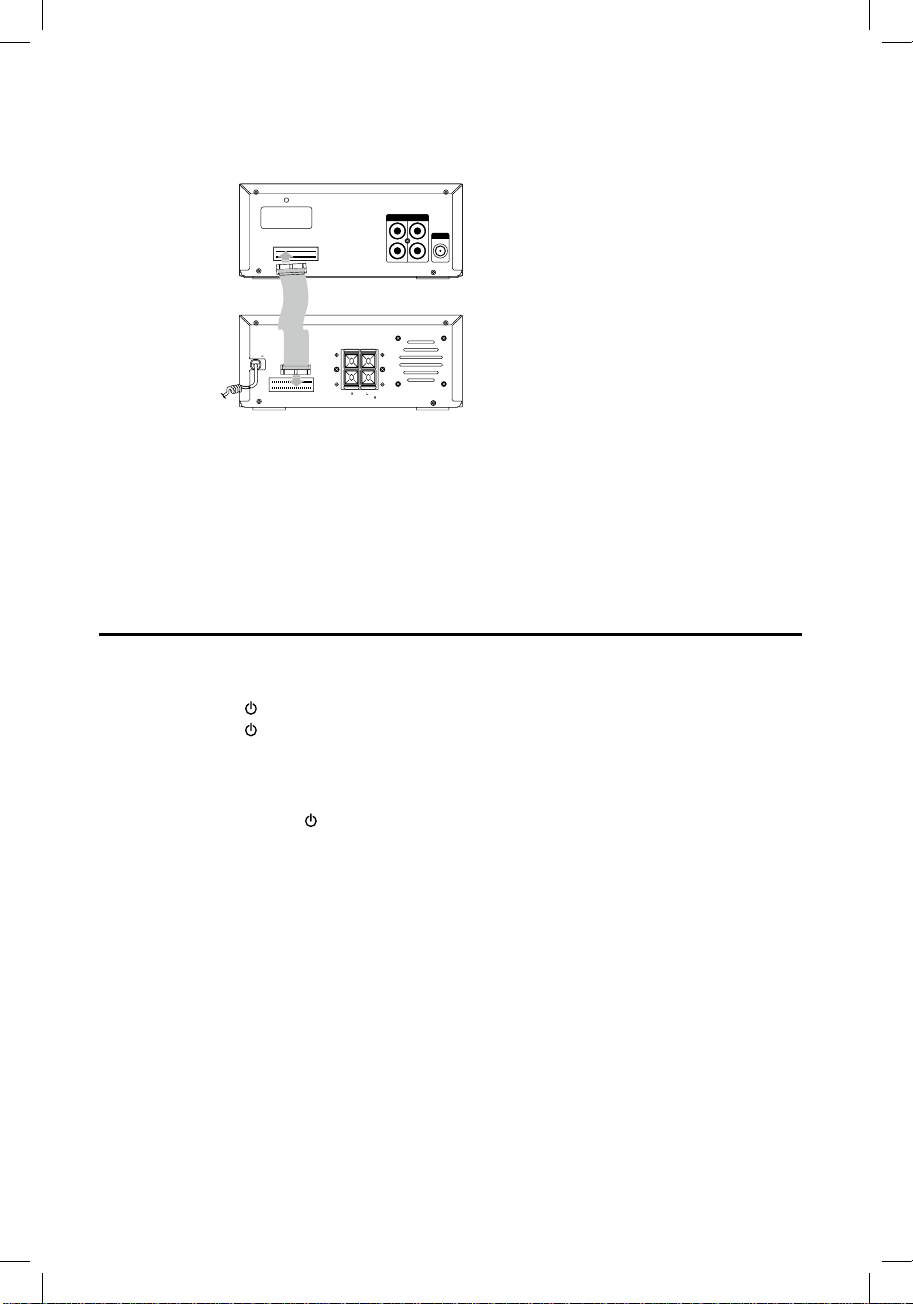
Connecting Control Cable
Connect the control cable between the CD player and the amplier.
The CD player
The Amplier
Connecting the AC Power Cable
Insert the AC Power cable into a wall outlet, then your unit is ready to use.
Caution: * Be sure to unplug the power plug from the outlet when going out or when the unit is not
in use for an extended period of time.
* The mains plug is used as the disconnect device and it shall remain readily operable.
ECO-Power/Standby Features
Switching ON/OFF
When you insert the AC Power cable into a wall outlet, the unit will be in standby mode.
• Press the
• Press the
scroll across the display.
Switching the system to ECO Power/Standby mode
Press and hold the standby button for 2 seconds or more to switch to ECO Power Standby or
normal standby.
* ECO Power standby mode
The clock will not be displayed. Press the
* Normal standby mode
The clock display on the LCD.
Standby
Standby
button to switch the unit on. The word “HELLO” will show in the display.
button to switch the unit back to standby mode. The words “BYE BYE” will
CLOCK
button to display the clock on the LCD.
GB-14
01_AXM649BT_GB_P41013409-A101_20 Mar 13.indd 14 2013-3-20 9:44:05
Page 16
Setting the Clock
Setting the Clock Manually
1. Set the unit in eco power standby mode.
2. Press and hold the Clock button (
begins to blink.
3. Set the hour with the Volume Up/Down button (
4. Press the Clock button (
5. Set the minute with the Volume Up/Down button (
6. Press the Clock button (
Note:
• When the clock setting time for each step is longer, the clock setting mode will be cancelled.
• If a power failure occurs or the unit is disconnected from the mains, the clock setting will be lost.
Setting the Clock Automatically
Tune into a RDS station and wait for few minutes. To conrm, press the Clock button (
Display the Clock
In standby mode, press the Clock button (
CLOCK
CLOCK
Sound Quality
Adjusting the Volume
To increase or decrease the volume, rotate the Volume Control knob (
press the Volume Up/Down buttons (
Adjusting the Super Bass
You can reinforce the bass sound to maintain rich, full bass at low volume.
Press the Super Bass button (
on the front panel. Press the Super Bass button (
Adjusting the Bass
Rotate the BASS knob clockwise or counter clockwise on the Amplier to adjust the intensity of the
bass output sound.
Adjusting the Treble
Rotate the TREBLE knob clockwise or counter clockwise on the Amplier to adjust the intensity of
the treble output sound.
Controlling the Loudness
This unit has a loudness function, which can automatically increase the bass sound effect at low
volume. It can also increase the bass sound effect at high volume, but it will be relatively less when
it is at high volume. Press the Loudness button (
loudness function, the icon “
Presetting Equalizer
You can adjust the sound reproduced simply by choosing from 5 preset equalizers. Press the Preset Equalizer button (
P-EQ
) repeatedly to scroll through the following options:
FLAT POP JAZZ ROCK CLASSIC
CLOCK
), the VFD will display CLOCK SET and CLOCK 24
VOL+/-
) or Previous/Next buttons (H/G).
), the minute indicator will blink.
VOL+/-
) or Previous/Next buttons (H/G).
), the built-in clock starts operating.
CLOCK
).
- VOLUME +
VOL +/-
) on the remote control.
S-BASS
) on the remote control to get the effect, the word “DBB” will lit
S-BASS
) again to cancel the effect.
LOUDNESS
” will display on the front panel, press again will disappear.
) on the remote control to obtain the
) on the unit or
CLOCK
).
Changing the Front Panel Darkness
This unit has three brightness levels for you to adjust the clock display. Press the Dimmer Control
D M
button (
01_AXM649BT_GB_P41013409-A101_20 Mar 13.indd 15 2013-3-20 9:44:05
) on the front panel or the remote control repeatedly to choose the desired brightness.
GB-15
Page 17

Listening to Radio Broadcasts
You can listen to FM stations. Stations can be tuned in manually, automatically or from preset memory storage.
Caution:
Before listening to the radio, please check that the FM Antenna is correctly connected and adjusted
for length and direction.
Tuning in to a Station
1.
Rotate the Function button (
the remote control. The word “TUNER” will be displayed on the front panel.
2. Select a station using one of the following methods.
Auto Tuning
Press and hold the Tuning Backward/Forward button (D/C) on the remote control or on the
unit for one second or more, the frequency changes down or up automatically until a station is
found.
Manual Tuning
Repeatedly press the Tuning Backward/Forward button (D/C) on the remote control or on
the unit to change the frequency until you nd the station you want.
Preset Tuning (Available only after the stations are preset)
Repeatedly press the Preset Up/Down Switch button (H/G) on the remote control or on the
unit to select the desired preset number. Its band and frequency are displayed on the front
panel.
FUNCTION
) on the unit or press the Tuner Function button (FM) on
Presetting Stations
You can manually preset up to 20 FM stations.
To tune in to the desired station:
1. Press the Program button (
2. Press the Preset Up/Down switch button (H/G) on the remote control to select the preset
number.
Note: If you select more than 20, the preset number will be changed to “1” automatically.
3. Press the Program button (
broadcast frequency display.
4. Repeat above steps 1 to 3 for each station you want to store in memory with a preset number.
Note: If the unit is unplugged or if a power failure occurs, the preset stations will not be erased after being stored.
PROG
) on the remote control, the preset number will be displayed.
PROG
) again to store the station. The display will return to the
To change the FM Reception Mode
Press the Mode button (
tion mode.
MODE
) to select the Stereo or Mono channel to receive the best FM recep-
GB-16
01_AXM649BT_GB_P41013409-A101_20 Mar 13.indd 16 2013-3-20 9:44:05
Page 18
FM Display Modes
Every time you press the
Station Name, Frequency, Programme Type, Radio Text, Date / Clock.
The information is displayed on the lower segment of the display.
Station Name
When an RDS station is received, the name of that station
will be displayed.
Programme Type
Programme type identication signal. (Example: News,
Rock, Classical music.)
Time
The RDS CLOCK system may not properly operate in
areas where RDS CLOCK service is not available. Once
RDS CLOCK service is available, the RDS CLOCK
system will commence operation.
DISPLAY
button, the display will cycle through the following display modes:
Programme Type
Station Name
Time
Radio Text
This displays a station description.
Frequency
This shows the frequency of the current station, e.g.
89.80 MHz.
Radio Text
Frequency
GB-17
01_AXM649BT_GB_P41013409-A101_20 Mar 13.indd 17 2013-3-20 9:44:05
Page 19

CD Operation
CD Playing
1. Rotate the Function button (
the remote control. The word “DISC” will be displayed on the front panel.
2. Press the Open/Close button (K) to open the disc door and place the disc on the disc tray (with
the printed side up).
3. Press the Open/Close button (K) to close the disc door, the unit will read the disc and play it
automatically.
Note: If in stop mode, please press the Play/Pause button (BF) to start playing the disc.
4. Press the Play/Pause button (BF) to pause the playing, press again to continue play.
5. Press the Stop button (L) to stop the disc playing.
Direct Select track
Load a disc, upon nishing reading the disc, you can select tracks by using number buttons (0-9,10+)
on the remote control and play.
If the song number is less than 10, press the number buttons 0-9.
If the song number is over 10, press the Number button (10+) and press the one of the number
buttons 0-9. Each press of 10+ increases the tens by 1 e.g. 10, 20, 30, so for track ‘22’ press ‘10+’
twice then ‘2’.
To Skip Search and Play
Press the Previous button (
Press the Next button (G) once or more to skip forward one or more tracks on the disc.
To Search
Press and hold the Reverse button (D) or Fast Forward button (C) to search for the position
that you intend to start playing.
Text Display During Playback
Press the Display button (
Programme Play
You can programme up to 20 tracks to play in any desired order. The player must be in STOP mode
only with a CD inserted.
1. Insert a disc and press the Stop button (L) when it starts playing.
2. Press the Programme button
3. Press the Number buttons (
control to select the desired track number.
4. Press the Programme button
5. Repeat steps 3-4 to select and store all desired tracks.
6. Press the Play/Pause button (BF) to start programme play.
7. Press the Stop button (L) once to stop the programme play. Press the Stop button (L) twice to
clear programme.
Note: Random play will not shufe the programmed music list.
Random Play (CD and MP3 discs)
The CD can be played randomly.
Press the Random button (
begin the random play.
Playing the Beginning (Intro) of each Track
Press the Intro button (
tively. The playing time of each track is 10 seconds. When you hear the desired track, press the
Intro button (
INTRO
).
FUNCTION
H
DISPLAY
(PROG)
0-9, +10
(PROG)
RANDOM)
INTRO
) on the remote control to play the beginning of each track consecu-
) on the unit or press the Disc Function button ( CD ) on
) once or more to skip previous one or more tracks on the disc.
) to show the current track number and remaining playback time.
, “
) or the Previous/Next buttons (H/G) on the remote
to conrm the track number to be stored.
once and then press the Previous/Next buttons (H/G) to
GB-18
” appears.
01_AXM649BT_GB_P41013409-A101_20 Mar 13.indd 18 2013-3-20 9:44:22
Page 20

Playing Repeatedly (CD)
ONE and ALL Repeat Play can be set by pressing the Mode button (
First press : To repeat the same track, the words “
Second press : To repeat playing all tracks on a disc, the words “
will blink.
Third press : To play tracks randomly, the words “
Fourth press : To cancel the repeat playing, the word “
TRK
” and “
TRK
” will stay lit and “
SHUF
” will disappear.
MODE
).
REP
” will blink.
TRK
” will stay lit and “
SHUF
REP ALL
” will blink.
”
Repeat A-B can be set by pressing the repeat A-B button (
A-B
).
First press : Select the start point, the words “A-” will stay lit.
Second press : Select the end point, the words “A-B” will stay lit.
Third press : To cancel repeat play, the words “A-B” will disappear.
Note: A-B repeat function can only be used within the same track.
MP3/WMA Disc Playing
Note: MP3/WMA music playback from CD maybe be affected due to the type and format of disc or
condition of the recording. If you are having trouble playing a certain disc, it is recommended to use
USB input instead for best MP3/WMA playback.
When selecting tracks the player will automatically display the album and track number. For example: track number 21 may be from album 3, track 7.
1. Rotate the Function button (
the remote control. The word “DISC” will be displayed on the front panel.
2. Press the Open/Close button (K) to open the disc door and place the MP3/WMA disc on the
disc tray.
3. Press the Display button (
will be displayed or “NO ID3” if there is no ID3 information. Press this button again, and the
album, track and playing time will be displayed.
4. When playing MP3/WMA discs, the current album and track will be displayed.
5. Press the Previous/Next buttons (H/G) to select the previous/next track. When pressing the
Reverse/Fast Forward buttons (D, C) for a few seconds, it will search backward or search
forward.
6. Press the A bum Up button (
the next/previous album, and play the rst track of this a bum.
If the playing has ended, press the A bum Up button (
remote control to select the next/previous a bum.
Then choose the track with the Next button (G) or Previous button (H).
7. Press the Play/Pause button (BF) to start playing the disc.
8. Press the Stop button (L) to stop playback.
Note: Play will continue to the nal track when the selected tracks have been played.
The rst 2 digits of the display is the album number, the next 3 digits is the track number and
the remaining digits display the minutes and seconds.
FUNCTION
DISPLAY
ALB+
) on the unit or press the Disc Function button (CD) on
) on the remote control, ID3 information (song title and artist)
) or Album Down button (
ALB-
) on the remote control to select
ALB+
) or Album Down button (
ALB-
) on the
GB-19
01_AXM649BT_GB_P41013409-A101_20 Mar 13.indd 19 2013-3-20 9:44:23
Page 21
Playing Repeatedly (MP3 disc)
ONE, ALB and ALL repeat play can be set by pressing the Mode button (
First press : To repeat the same track, the words “
Second press : To repeat playing album, the words “
TRK
TRK
Third press : To repeat playing all tracks on a disc, the words “
will blink.
Fourth press : To play tracks randomly, the words “
Fifth press : To cancel the repeat playing, the word “
TRK
SHUF
REP
” and “
” will stay lit and “
TRK
” will stay lit and “
” will disappear.
MODE
).
” will blink.
REP ALB
” will blink.
” will stay lit and “
SHUF
REP ALL
” will blink.
”
Repeat A-B can be set by pressing the repeat A-B button (
A-B
).
First press : Select the start point, the words “A-” will stay lit.
Second press : Select the end point, the words “A-B” will stay lit.
Third press : To cancel repeat play, the words “A-B” will disappear.
Note: A-B repeat function can only be used within the same track.
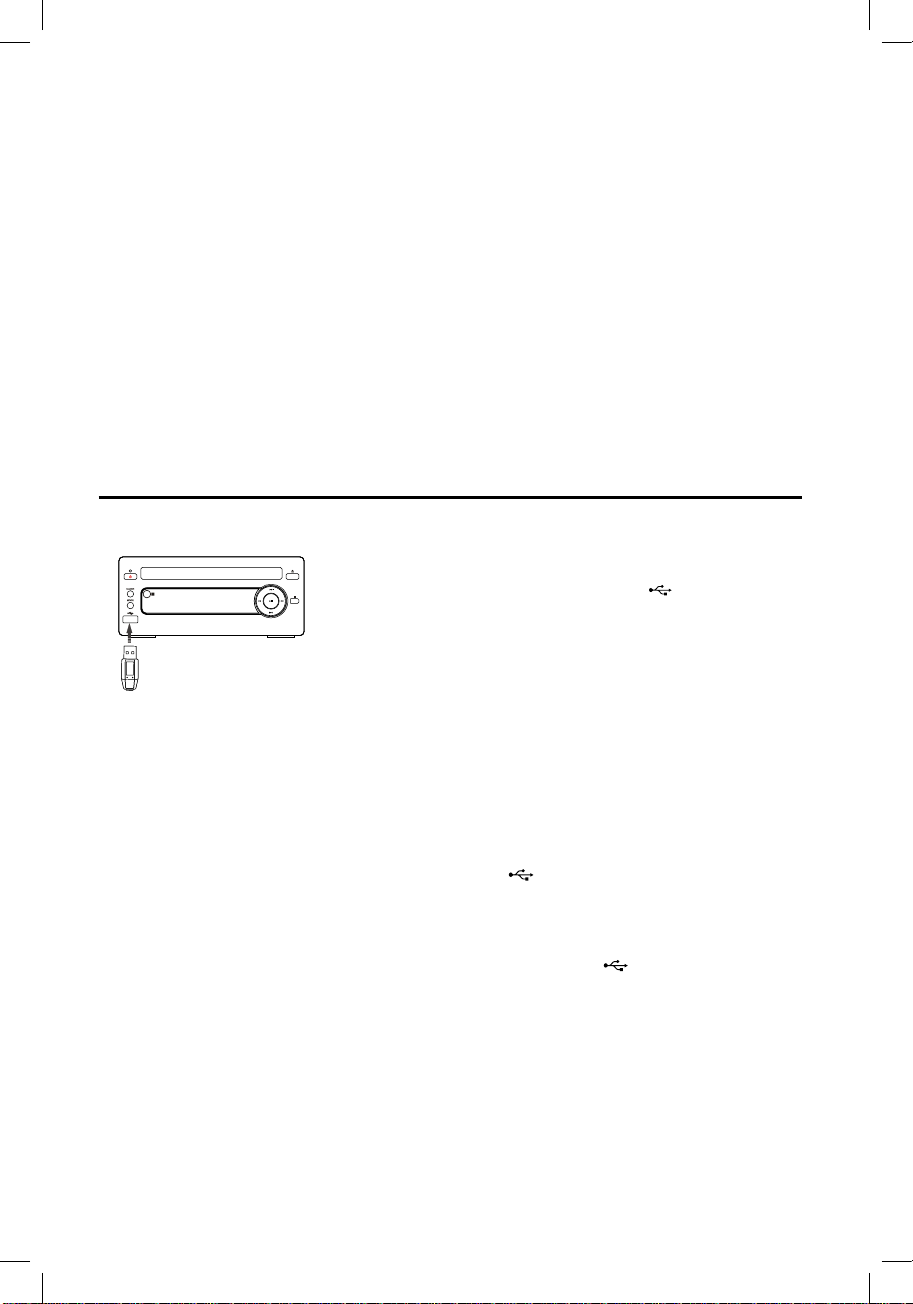
Use the USB
By connecting an USB mass storage device (including USB ash
memory, USB ash players or memory cards) to this unit, you can
enjoy the device's stored music through the unit.
1. Insert the USB device's USB plug into the
front of unit.
USB
2. Press the USB button (
) on remote control or rotate the
function select button on the Amplier to select the USB
function. The word “USB” will be displayed on the front panel.
3. The device's stored music will be played automatically.
4. When you store more than one folder in the USB ash, use the
a bum up button (
ALB+
) or album down button (
remote control to select the next/previous folder. Then choose
the track with the next button (G) or previous button (H) to
play the folder.
5.
The player support the USB music le format of MP3, WMA only.
For devices with USB Cables:
1. Insert one plug of the USB cable (not supplied) to the socket on the unit.
2. Insert the other plug of the USB cable to the USB output terminal of the USB device.
For memory Cards:
1. Insert the memory card into a card reader (not supplied).
2. Use a USB cable (not supplied) to connect the card reader into the
USB Storage Device Data Protection
Always insert the USB device in the correct direction. Failure to do so may result in damage
to the USB device and this unit.
Do not remove the USB device while it is being accessed.
Electrical interference and electrostatic discharges may cause the USB device to malfunction
and suffer damage, resulting in data loss.
It is strongly recommended that any important data is backed up on a PC to protect against corruption, data loss or device malfunction. Please note that our company shall not accept any liability for
damage or loss of stored data.
Note: USB connection is not compatible with all hard drive models.
GB-20
socket on the
ALB-
) on the
socket on the unit.
01_AXM649BT_GB_P41013409-A101_20 Mar 13.indd 20 2013-3-20 9:44:23
Page 22

Play from Bluetooth device
With this unit, you can listen to audio les from a player if bluetooth connection is available.
Pairing bluetooth-enabled devices
To connect your Bluetooth device to the unit, you need to pair the device to the unit. Pairing needs
only to be done once.
Note:
* The operational range between this unit and a Bluetooth device is approximately 10 meters.
* Before you connect a Bluetooth device to this unit, familiarize yourself with the Bluetooth
capablities of the device.
* Compatibility with all Bluetooth devices is not guaranteed.
* Any obstracle between this unit and a Bluetooth device can reduce the operational range.
* Keep this unit away from any other
1. Press the Bluetooth button on the remote control or rotate the function on the front panel.
2. Turn on the Bluetooth function on your device.
3. Search for other Bluetooth device with your device.
4. Select “
5. Enter default password “
6. Press and hold Pairing Cleared button (
AXM649BT
” in the pairing list.
0000
electronic device that may cause interference.
” if necessary.
PAIRING
) more than 2 seconds to clear pairing mode.
Note:
* The device will also be disconnected when the device is moved beyond the operation range.
* If you want to reconnect the device to the unit, place it within the operational range.
* The device will be connected the Bluetooth device pairing already, and also enter pairing mode,
other Bluetooth device can be searching for connecting or pairing.
* When the unit disconnected from the Bluetooth device, it will enter pairing mode automatically,
other Bluetooth devices can be searching for connection or pairing.
Listen to music from Bluetooth device
If the connected Bluetooth device supports Advanced Audio Distribution Prole (A2DP), you can
listen to the music stored on the device through the unit.
1. Pair the device with the unit.
2. Start playing music via device.
Play from an external device
You can listen to an audio device through this unit.
1. Make sure that the external audio device is connected to this unit.
2. Press
3. Start to play the device (see the device user manual).
AUX
button to select the audio input through the AUX IN 1/2 (L and R) sockets.
GB-21
01_AXM649BT_GB_P41013409-A101_20 Mar 13.indd 21 2013-3-20 9:44:23
Page 23

Set the alarm timer
This unit can be used as an alarm clock. You can select DISC, USB or TUNER as alarm source.
Note:
■ Ensure that you have set the clock correctly.
1. In standby mode, press and hold the
display.
/ VOL +/–
2. Press H /
3. Press
4. Press H /
then press
G
TIMER
button to conrm. The hour digits are displayed and begin to blink.
/ VOL +/–
G
TIMER
button again.
button on the remote control or on the front panel to select source.
button on the remote control or on the front panel to set hour, and
The minute digits are displayed and begin to blink.
5. Press
H
then press
6. Press
VOL +/-
/ VOL +/–
G
/
TIMER
button to conrm.
button on the remote control or on the front panel to set minute, and
to adjust volume, and then press
A clock icon appears on the display.
Activate / deactivate alarm timer
TIMER
button until [TIMER SET] (set timer) scrolls on the
TIMER
button to conrm.
1. In the standby mode, press
TIMER
button repeatedly.
* If timer is activated, the icon is displayed.
* If timer is deactivated, the icon disappears on the display.
Note:
■ The alarm timer is not available when the source is set as "AUX".
■
If the USB source is selected but no device connected, the unit switches to TUNER automatically.
Set sleep timer
This unit can switch to standby mode automatically after a set period.
1. When the unit is turned on, press
OFF
When the sleep timer is activated, SLEEP icon “ ” displayed.
* To deactivate the sleep timer, press
SLEEP
button repeatedly to select a preset period (in minutes).
120 90
SLEEP
...
45 30 15
button repeatedly until [OFF] (sleep off) appears.
GB-22
01_AXM649BT_GB_P41013409-A101_20 Mar 13.indd 22 2013-3-20 9:44:23
Page 24
Disc Handling
Handling Precautions
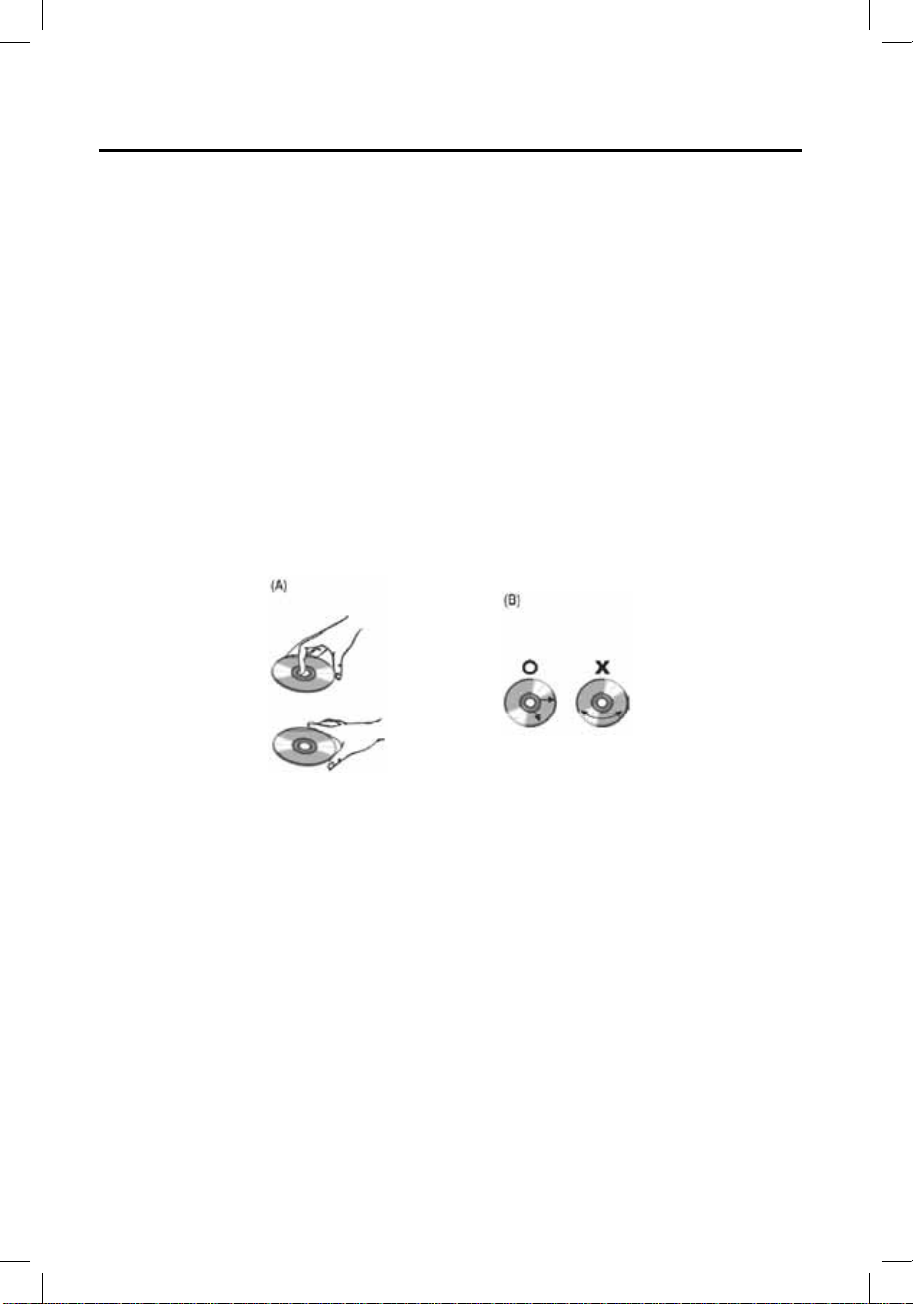
• Hold the disc by the edges so the surface will not be soiled with ngerprints. (A)
Fingerprints, dirt and scratches can cause skipping and distortion.
• Do not write on the label side with a ball-point pen or other writing implements.
• Do not use record cleaning sprays, benzine, thinner, static electricity prevention liquids or any
other solvent.
• Be careful not to drop or bend the disc.
• Do not install more than 1 disc on the disc tray.
• Do not try to close the disc tray when the disc is not installed properly.
• Be sure to store the disc in its exclusive case when not in use.
If the surface is soiled (B)
• Wipe gently with a soft, damp (water only) cloth.
• When wiping discs, always move the cloth from the center hole toward the outer edge.
(If you wipe the discs using a circular motion, circular scratches are likely to occur, which will
cause noise.)
• If the disc is brought from a cold to a warm environment, moisture may form on the disc. Wipe
the moisture off with a soft, dry, lint-free cloth before using the disc.
Improper disc storage
You can damage discs if you store them in the following places:
• Areas exposed to direct sunlight.
• Humid or dusty areas.
• Areas directly exposed to a heat outlet or heating appliance.
The disc formats can play in this unit:
Audio CD, CD-R, MP3 and WMA disc.
GB-23
01_AXM649BT_GB_P41013409-A101_20 Mar 13.indd 23 2013-3-20 9:44:23
Page 25
Troubleshooting
If you are having a problem with your unit, check this list for a poss ble solution before calling for
service.
If you cannot solve the problem from the hints given here, or the unit has been physically damaged,
call a qualied person, such as your dealer, for service.
Symptom Possible Cause Action
No sound is heard Connections are incorrect, or loose Check all connections and make
Poor radio recep ion The Antenna is disconnected
The disc skips The disc is dirty or scratched Clean or replace the disc
The disc does not play The disc is upside down
Unable to operate
the remote control
Operations are disabled The built-in microprocessor has malfunc-
The Bluetoo h device
cannot play
The Bluetoo h cannot
connect with the system
The Antenna is not properly extended and
positioned
The disc is dirty
The path between the remote control and
the sensor on the player is blocked
The batteries have lost their charge
tioned due to external electrical interference
The audio quality is poor after connection.
The Bluetooth reception is poor
The device does not support the profiles
required for the system.
The Bluetooth function of the device is not
enabled.
The system is not in he pairing mode.
Th e sys tem is alread y con nec te d wit h
another Bluetooth-enabled device.
corrections
Reconnect the Antenna securely
Extend Antenna to the best reception
position
Put the disc in with the label side up
Remove disc from player, wipe with
a clean cloth and re-insert.
Remote the obstruction
Replace the batteries
Unplug the unit then plug it back in
Move the device closer to the system
or remove any obstacle between the
device and the system
Refer to the user manual of the device
for how to enable the function
Disconnect that device or all other
connected devices and then try again.
GB-24
01_AXM649BT_GB_P41013409-A101_20 Mar 13.indd 24 2013-3-20 9:44:23
Page 26

Specications
Unit Specification
Power Requirements : 220-240V ~ 50/60Hz
FM Tuning Range : 87.5~108 MHz
Power Consumption : 50W (ECO Standby 0.5W)
Output Power : 45W x 2
THD : ≤ 1%
Dimensions : (CD) 160(W) x 78(H) x 250(D) mm
(Amplier) 160(W) x 78(H) x 250(D) mm
Speaker Specification
Impedance : 6
Input Power : 50W
Dimensions : 130(W) x 182(H) x 203(D) mm
Bluetooth Specification
Communication system : Bluetooth Standard version 2.1 and EDR specication
Output : Bluetooth Standard Power Class 2
Maximum communication Range : approx.10m
Frequency band : 2.4 GHz Band (2.4000 GHz - 2.4835 GHz)
Compatible Bluetooth proles : Advanced Audio Distr bution Prole (A2DP)
Supported Multi devices pairing
Supported codecs (Receive) : SBC(Sub Band Codec)
(Transmit) : SBC(Sub Band Codec)
:
Ω
up to 8 devices
Remote Control
Distance : 6m
Angle : ±30°
The disc formats can play in this unit:
Audio CD, CD-R, MP3 and WMA disc.
Note: Product information is subject to change without prior notice.
GB-25
01_AXM649BT_GB_P41013409-A101_20 Mar 13.indd 25 2013-3-20 9:44:24
Page 27

The mark
2002/96/EC (WEEE). The mark indicates the requirement NOT to dispose the equipment including
any spent or discarded batteries as unsorted municipal waste, but use the return and collection
systems available.
If the batteries or accumulators included with this equipment, display the chemical symbol Hg, Cd,
or Pb, then it means that the battery has a heavy metal content of more than 0.0005% Mercury,
or more than 0.002% Cadmium or more than, 0.004% Lead.
Notes for battery disposal
Your unit contains batteries covered by the European Directive 2006/66/EC, which cannot be
disposed of with normal household waste. Please inform yourself about the local rules on separate
collection of batteries. The correct disposal of batteries helps prevent potentially negative consequences on the environment and human health.
is in compliance with the Waste Electrical and Electronic Equipment Directive
In the unlikely event of a problem developing, please contact the store where you purchased your
equipment.
We continually strive to improve our products; specications may change with out prior notice.
For advice on where to purchase accessories, please contact the store where you purchased your
equipment.
Kesa Electricals © UK: EC1N 6TE
GB-26
01_AXM649BT_GB_P41013409-A101_20 Mar 13.indd 26 2013-3-20 9:44:24
Page 28

Darty Group
España France
Darty Hispana S.A. Darty France
Polígono Industrial C.L.A. 129, avenue Gallieni - 93140
Calle Rio Guadalhorce N 4 BONDY,
28906 Getafe (Madrid) France
Ayuda en línea Darty Spain: Hotline Darty France
902 30 30 14
Quels que soient votre panne et le
lieu d'achat de votre produit en
France, avant de vous déplacer en
magasin Darty, appelez le 0 978 970 970
(prix d'un appel local) 7j/7 de 7h a 22h
Belgium Holland
1600 Sint-Pieters-Leeuw
Postbus 75513 ・ 1118 ZN Schiphol
Bellsingel 61 ・ 1119 NT Schiphol Rijk
Belgium. Holland
De dienst na verkoop is Hiervoor kunt u contact opnemen met
bereikbaar van maandag
t/m zaterdag via hulplijn
+32 2 334 00 00
het BCC Service Center : 0900 0555 (10 cent
p/m).
Geopend van maandag t/m vrijdag van
8.00 tot 20.00 uur en zaterdag van 09.00 tot
17.00.
Česká republika Italia
Datart International a.s. Darty Italia
Pernerova 35 Kesa Sourcing Limited – Filiale Italiana
186 00, Praha 8 – Karlin Presso Centro Commerciale
Czech Republic Brianza/Carrefour
Superstrada Milano-Meda, 44
Pomoc číslo Datart Czech Republic:
20037 Paderno Dugnano (MI).
810 328 278.
Per richieste di assistenza o di
informazioni sull’utilizzo di questo
prodotto, indipendentemente dal negozio
Darty in cui lo hai acquistato, puoi
chiamare il numero 199.777.779, dal lunedì
al sabato dalle 08:00 alle 20:00, la
domenica dalle 09:00 alle 17:00
Türkiye Slovenská
Darty Turkey Limited DATART INTERNATIONAL, a.s.
Cumhuriyet Cd. Seyhan ap Zadunajská cesta 10
No:36 K:1 Elmadag 851 01 Bratislava
34367, Istanbul – Turkey Slovenska republika.
Çevrimiçi Yardm Darty Turkey:
0090-212-4448880
08_AXM649BT_TR_41013409_16 Jan 13 indd 27 2013-1-17 9:37:25
Zákaznícka linka Datart Slovenská republika
0850 328 278 9.00 hod.–21.00 hod.
Page 29

Choses à faire et à éviter pour une utilisation sécurisée de l’appareil
Cet appareil a été conçu et fabriqué conformément aux standards de sécurité internationaux, mais
comme pour tous les appareils électriques, vous devez en prendre soin an de garantir une utilisation optimale et non dangereuse.
***********************************
LISEZ la notice d’utilisation avant d’utiliser l’appareil.
VÉRIFIEZ que tous les branchements électriques (y compris la che, le cordon d’alimentation
et les câbles de connexion des différents éléments de l’appareil) sont correctement effectués et
conformes aux instructions du fabricant. Éteignez l’appareil et débranchez sa che de la prise électrique avant d’effectuer ou de modier des branchements.
CONTACTEZ le distributeur si vous avez des doutes concernant l’installation, l’utilisation ou la
sécurité de votre appareil.
PRENEZ SOIN des trappes et panneaux en verre de l’appareil.
POSITIONNEZ le cordon d’alimentation en sorte qu’on ne risque pas de marcher dessus, qu’il ne
risque pas d’être écrasé ou élimé, ni soumis à une chaleur ou à une usure excessive.
***********************************
NE RETIREZ AUCUN capot xe, car cela peut provoquer l’exposition à des tensions dangereuses.
NE BOUCHEZ AUCUN orice de ventilation de l’appareil avec des objets tels que du papier journal,
une nappe, des rideaux, car cela peut provoquer la surchauffe de l’appareil et réduire sa durée de vie.
N’EXPOSEZ PAS les appareils électriques à des gouttes ou des éclaboussures. NE PLACEZ AUCUN récipient contenant un liquide, par exemple un vase, sur l’appareil.
NE PLACEZ PAS d’objet chaud, ni de source de amme vive, par exemple une bougie allumée ou
une veilleuse, sur ou près de l’appareil. Les températures élevées peuvent faire fondre les plastiques et provoquer des incendies.
N’UTILISEZ PAS de support improvisé et NE FIXEZ JAMAIS de pieds avec vis en bois - An de
garantir une sécurité totale, utilisez des supports ou pieds approuvés par le fabricant et utilisez les
xations fournies en respectant les instructions.
N’UTILISEZ PAS d’appareils, tels que des radios ou lecteurs portables, pouvant détourner votre attention lorsque vous utilisez un moyen de transport. Regarder la télévision en conduisant est illégal.
N’ÉCOUTEZ PAS une source audio avec des écouteurs ou un casque à un volume élevé, car cela
peut léser irrémédiablement vos capacités auditives.
NE LAISSEZ PAS l’appareil sous tension sans surveillance, sauf s’il est clairement spécié qu’il est
conçu l’être ou s’il comporte un mode veille. Éteignez l’appareil en actionnant son interrupteur et assurez-vous que tous les membres de votre famille savent comment l’éteindre. Il peut être nécessaire
de prendre des dispositions spéciales pour les personnes souffrant d’un handicap ou d’une inrmité.
NE CONTINUEZ PAS à utiliser l’appareil si vous avez des doutes concernant son bon fonctionnement ou s’il a été endommagé de quelque manière que ce soit - Éteignez-le, débranchez sa
che de la prise électrique et consultez le distributeur.
CONSIGNES IMPÉRATIVES,
- NE LAISSEZ PERSONNE, notamment les enfants, insérer un objet dans les orices de ventilation
et autres ouvertures du boîtier de l’appareil, car cela peut provoquer un choc électrique mortel.
- NE TENTEZ JAMAIS de deviner ou d’essayer quelque chose lorsque vous utilisez un appareil
électrique, et ce, quel qu’il soit.
- Mieux vaut prévenir que guérir !
***********************************
02_AXM649BT_FR_P41013409-A101_4 Mar 13.indd 1 2013-3-14 10:28:08
FR-1
Page 30
An de proter au mieux de votre appareil, lisez attentivement cette notice d’utilisation avant de
l'utiliser pour la première fois pour vous familiariser avec ses fonctions. Vous pourrez ainsi proter
de votre appareil audio sans souci pendant des années.
Remarques importantes
* Conservez la notice d’utilisation : conservez les consignes de sécurité et instructions d'utilisation
pour consultation ultérieure.
* Ne placez pas l'appareil dans l’un des endroits suivants :
À la lumière du soleil ou près d'appareils produisant de la chaleur, par exemple un radiateur
électrique. Sur un autre appareil stéréo dégageant beaucoup de chaleur. Dans un endroit
poussiéreux ou insufsamment aéré. Dans un endroit constamment soumis à des v brations.
Dans un endroit mouillé ou humide.
* N'obstruez jamais les orices de ventilation de l’appareil.
* Vériez que le cordon d'alimentation est correctement installé avant d'allumer l'appareil pour la
première fois.
* La che de l’appareil sert de dispositif de coupure de l’alimentation et doit donc rester entièrement
accessible en permanence.
* Cet appareil ne doit jamais être exposé à des gouttes ou éclaboussures et aucun objet rempli de
liquide, par exemple un vase, ne doit être placé dessus.
* Pour débrancher complètement l’appareil de l’alimentation électrique, débranchez sa che de la
prise électrique. Par temps orageux, débranchez l'appareil de la prise murale an d'éviter qu’il ne
soit endommagé par la foudre ou des variations de tension.
* Si le voyant de veille à LED et l'écran ne sont pas allumés, cela indique que l’interrupteur marche/
arrêt est sur la position hors tension ou que l’appareil n’est pas branché sur le secteur.
* Veillez à ce qu’il n’y ait aucun objet à moins de 10 cm de l’appareil an de permettre une aération
sufsante.
* Soyez attentif à l’impact environnemental de la mise au rebut des batteries/piles.
* L’accès à la che de l’appareil ne doit jamais être gêné et elle doit rester toujours facilement
accessible pendant l’utilisation prévue.
* Ne recouvrez jamais les orices de ventilation de l’appareil avec un objet, par exemple un journal,
une nappe, un rideau, etc., pour éviter de réduire l'aération de l'appareil.
* Aucune source de amme vive, par exemple une bougie allumée, ne doit être placée sur l’appareil.
* Les piles ne doivent pas être exposées à une chaleur excessive, par exemple à la lumière du
soleil, une amme, etc.
Par sécurité, ne retirez aucun capot et n’essayez pas d'accéder à l'intérieur de l’appareil. Toutes les
réparations doivent être conées à un personnel qualié.
N'essayez pas d'enlever des vis ou de démonter le boîtier. Aucune pièce interne de l’appareil n’est
réparable par l’utilisateur. Toutes les réparations doivent être conées à un réparateur qualié.
ATTENTION
RISQUE DE CHOC ÉLECTRIQUE
NE PAS OUVRIR
ATTENTION : AFIN DE RÉDUIRE LES RISQUES DE CHOC ÉLECTRIQUE, N'ESSAYEZ PAS
DE DÉMONTER LE BOÎTIER (OU LE CAPOT ARRIÈRE) DE L'APPAREIL.
L'APPAREIL NE CONTIENT AUCUNE PIÈCE RÉPARABLE PAR L’UTILISATEUR.
TOUTES LES RÉPARATIONS DOIVENT ÊTRE CONFIÉES À UN RÉPARATEUR
QUALIFIÉ.
FR-2
02_AXM649BT_FR_P41013409-A101_4 Mar 13.indd 2 2013-3-14 10:28:08
Page 31

TENSION DANGEREUSE
Il y a à l’intérieur du boîtier de cet appareil une tension sufsamment élevée
pour présenter un risque de choc électrique pour les personnes.
ATTENTION
La notice d’utilisation contient d’importantes consignes d’utilisation et
d’entretien, pour votre sécurité, respectez-les.
AVERTISSEMENT : POUR VOUS PRÉMUNIR CONTRE LES RISQUES D'INCENDIE OU DE
CHOC ÉLECTRIQUE, VEILLEZ À CE QUE CET APPAREIL NE SOIT
JAMAIS EXPOSÉ À DES ÉCLABOUSSURES OU À DES GOUTTES.
Remarque :
- Cet appareil chauffe après une durée d'utilisation prolongée. C’est normal et ce n’est en aucun
cas le signe d’un dysfonctionnement.
- Si l’écran ne fonctionne plus normalement, éteignez l’appareil et rallumez-le.
- La plaque signalétique se trouve sur la base de l’appareil.
- Des marquages informatifs se trouvent sous le boîtier de l’appareil.
Appareil laser
Cet appareil est équipé d’un laser à basse puissance. Pour votre sécurité, ne retirez aucune partie
du boîtier de l’appareil et ne le démontez pas. Toutes les réparations doivent être effectuées par du
personnel qualié.
Attention
Cet appareil est équipé d’un laser
CLASSE 1
PRODUIT LASER
à basse puissance. Pour votre
sécurité, n’ouvrez pas les pièces
de protection du faisceau laser. Ne
regardez pas la zone du faisceau
laser lorsque l’appareil est en
fonctionnement.
Manipulation correcte des piles
• L'utilisation incorrecte ou impropre des piles peut provoquer de la corrosion ou les faire fuir, ce
qui peut provoquer un incendie, des blessures corporelles ou des dommages matériels.
• Utilisez exclusivement le type de pile spécié dans cette notice d’utilisation.
• Ne jetez pas les piles avec les ordures ménagères non triées. Mettez-les au rebut en respectant
les réglementations locales.
• Les piles boutons de petite taille comme celles utilisées dans la télécommande de cet appareil
peuvent être facilement avalées par un enfant en bas âge, ce qui est dangereux. Veillez à ce
que les piles bouton sorties de leur emballage ou de la télécommande soient toujours hors de
portée des enfants en bas âge et vériez toujours que le porte-pile est correctement inséré dans
la télécommande. Demandez conseil à un médecin si vous pensez qu'une pile a été avalée.
• Les piles (ou blocs-piles) ne doivent pas être exposées à une chaleur excessive (lumière du
soleil, feu, etc.).
Danger d'explosion si les piles sont incorrectement
remplacées. Ne remplacer que par le même type ou
un type équivalent.
ATTENTION
FR-3
02_AXM649BT_FR_P41013409-A101_4 Mar 13.indd 3 2013-3-14 10:28:08
Page 32

A pleine puissance, l’écoute prolongée du baladeur peut endommager l’oreille
de l’utilisateur.
AVERTISSEMENT: pour protéger votre ouïe
Il est important que n'importe quel casque ou écouteurs utilisés en conjonction avec ce produit
soient conformes à la norme Français Arrêté du 8 novembre 2005 portant application de l'article L.
5232-1 Ceci garantit que le niveau sonore ne dépasse pas 100 dB SPL.
L'écoute prolongée à volume élevé pendant plus de cinq heures par semaine peut endommager
votre audition.
Afin d’éviter des dommages auditifs éventuels, ne pas écouter à un niveau
sonore élevé pendant une longue durée.
FR-4
02_AXM649BT_FR_P41013409-A101_4 Mar 13.indd 4 2013-3-14 10:28:08
Page 33

Consignes de sécurité concernant les piles
Utilisées correctement, les piles à usage domestique constituent une
alimentation électrique portable fiable et sûre. Des problèmes peuvent
survenir si elles sont utilisées de manière impropre ou non soigneuse,
elles peuvent se mettre à fuir et parfois, dans des cas extrêmes,
provoquer un incendie ou une explosion.
Voici quelques consignes simples d’utilisation sécurisée des piles visant
à vous prémunir contre de tels risques.
CONSIGNES
DE SÉCURITÉ
CONCERNANT
LES PILES
Positionne correctement vos piles en
respectant les signes plus et moins
présents sur les piles et l'appareil.
Si elles sont incorrectement installées, cela
peut les faire fuir et provoquer,
dans des cas extrêmes,
un incendie ou même une explosion.
Remplacez simultanément toutes les piles.
N’utilisez pas simultanément des piles
neuves et usagées ou de types différents,
car cela peut provoquer des fuites et,
dans des cas extrêmes,
un incendie, voir même une explosion.
Rangez les piles inutilisées dans leur
emballage, à l’écart de tout objet métallique
pouvant provoquer un court-circuit,
ce qui risquerait de provoquer des fuites et,
dans des cas extrêmes, un incendie,
voir même une explosion.
N'essayez jamais de recharger des piles
ordinaires, que ce soit avec un chargeur
ou en les chauffant. Elles risquent de se
mettre à fuir, de provoquer un incendie ou
même d’exploser. Il existe des batteries
rechargeables portant des inscriptions
l’indiquant clairement.
Veillez à ce que les piles boutons sorties de
leur emballage restent hors de portée
des jeunes enfants.
Retirez toujours les piles usagées de
l appareil et retirez toutes les piles de
l’appareil avant toute période d’inutilisation
prolongée. Sinon elles peuvent fuir et
provoquer des dégâts matériels.
Surveillez les enfants s'ils remplacent les
piles eux-mêmes afin de garantir que
ces consignes sont respectées.
Veillez à ce que les logements des
piles soient solidement fermés.
Ne jetez jamais les piles dans un feu,
car elles risquent d’exploser.
Recyclez les piles usagées.
Ne les jetez pas avec les
ordures ménagères classiques.
Gardez à l’esprit que les petites piles
boutons (telles que celles utilisées dans
certaines prothèses auditives, dans
certains jeux et dans d’autres appareils)
peuvent être facilement avalées par un
jeune enfant, ce qui peut être dangereux.
Demandez conseil à un médecin si vous
pensez qu'une pile a été avalée.
FR-5
02_AXM649BT_FR_P41013409-A101_4 Mar 13.indd 5 2013-3-14 10:28:09
Page 34

Table des matières
Choses à faire et à éviter pour une utilisation sécurisée de l’appareil ............................. 1
Remarques importantes ................................................................................................... 2
Appareil laser ............................................................................................................................................. 3
Manipulation correcte des piles .................................................................................................................3
Consignes de sécurité concernant les piles ..................................................................... 5
Contenu de l'emballage ....................................................................................................8
Description de l’appareil ................................................................................................... 9
Lecteur CD ................................................................................................................................................. 9
Amplicateur .............................................................................................................................................. 9
Description de la télécommande .................................................................................... 10
Installation de la pile .................................................................................................................................11
Manipulation de la télécommande ............................................................................................................11
Portée d'utilisation de la télécommande ..................................................................................................12
Branchements ................................................................................................................13
Brancher l’antenne FM ............................................................................................................................. 14
Brancher les enceintes ............................................................................................................................14
Brancher une source audio auxiliaire ....................................................................................................... 14
Brancher le câble de commande ............................................................................................................. 15
Brancher le cordon d'alimentation ........................................................................................................... 15
Modes Veille/Économie d’énergie .................................................................................. 15
Allumer/éteindre l’appareil .......................................................................................................................15
Mettre l’appareil en veille/mode économie d’énergie ............................................................................... 15
Régler l'horloge ..............................................................................................................16
Réglage manuel de l'horloge ............................................................................................................... 16
Réglage automatique de l'horloge ....................................................................................................... 16
Afcher l'horloge .................................................................................................................................. 16
Régler le son ..................................................................................................................16
Régler le volume ...................................................................................................................................... 16
Régler le renforcement des basses ......................................................................................................... 16
Régler les graves ..................................................................................................................................... 16
Régler les aigus ....................................................................................................................................... 16
Compensa ion sonore .............................................................................................................................. 16
Égaliseur .................................................................................................................................................. 16
Modier la luminosité de l’afchage du panneau avant ........................................................................... 16
Écouter la radio ..............................................................................................................17
Régler la fréquence d’une station de radio .............................................................................................. 17
Prérégler des stations .............................................................................................................................. 17
Changer le mode de réception FM ..........................................................................................................17
Modes d'afchage FM .............................................................................................................................. 18
CD ..................................................................................................................................19
Lecture des CD ........................................................................................................................................ 19
Sélectionner directement une piste .......................................................................................................... 19
Changer de piste ...................................................................................................................................... 19
Rechercher un passage ........................................................................................................................... 19
Afcher les informations de lecture ......................................................................................................... 19
Programme de lecture .............................................................................................................................19
Lecture aléatoire (CD et disques MP3) .................................................................................................... 19
Lire le début (intro) de chaque piste ........................................................................................................20
Répéter la lecture (CD) ............................................................................................................................ 20
FR-6
02_AXM649BT_FR_P41013409-A101_4 Mar 13.indd 6 2013-3-14 10:28:09
Page 35

Disques MP3/WMA ........................................................................................................20
Répéter la lecture (Disque MP3) .............................................................................................................. 21
USB ................................................................................................................................21
Supports de stockage avec câble USB : .................................................................................................. 21
Cartes mémoire ......................................................................................................................................21
Protection des données des supports de stockage USB ......................................................................... 21
Régler l’alarme ...............................................................................................................23
Activer/désactiver l’alarme.............................................................................................. 23
Régler le délai d'extinction automatique .........................................................................23
Manipulation des disques ............................................................................................... 24
Dépannage ..................................................................................................................... 25
Spécications .................................................................................................................26
FR-7
02_AXM649BT_FR_P41013409-A101_4 Mar 13.indd 7 2013-3-14 10:28:09
Page 36

Contenu de l'emballage
Vériez que l’emballage contient toutes les pièces suivantes :
Unité principale
Enceintes x 2
Câbles d’enceinte x 2 Antenne FM
INSTRUCTON MANUAL
NOTCE D UT LISAT ON
GEBRUIKSAANWJZING
MANUALE DI ISTRUZIONI
MANUAL DE NSTRUCCIONES
NÁVOD K OBSLUZE
NÁVOD NA OBSLUHU
KULLANMA KI AVUZU
AXM649BT
Buetoo h M cro system
Mcro Cha ne Blue oo h
Buetoo h M crosys eem
Sstema Mic o Hi Fi Buetoo h
B fre op ra ng pease ead t ese nsr cto s th ro ghy
Lsez a eni ement ete no ce dut i ai n n oa ié av nt du iser e podut
Voo geb uk ees d ze gebuks anwj i g ro dg oor
Prma di tl za e l ro oto eg ere aen amene le sr zi ni
Lea d tei amen e s as i sru cones a tes de tlz r el paato
Ne l za nee sro pouí at p tte s pr s m poo n teto ná od
Pr d pus e ím si pzo ne pr ta e ávod
Lüfen al rmad n nce bu aima arn t m mnı kuy n
Socle
Notice d’utilisation
Mcrocadena B uetooth
Buetoo h mikrosys ém
Buetoo h mikrosys ém
Buetoo h Mü ik Se i
Télécommande
(pile fournie)
Câble de commande
FR-8
02_AXM649BT_FR_P41013409-A101_4 Mar 13.indd 8 2013-3-14 10:28:12
Page 37

Description de l’appareil
FM
ANTENNA
CABLE
AUX IN 1
LRL
R
AUX IN 2
CABLE
AC
SPEAKER O UTPUT( )
Lecteur CD
1. Touche Veille
2. Touche Horloge
3. Touche Mode
4. Port USB
5. Capteur infrarouge
6. Afcheur uorescent (VFD)
7. Plateau de lecture
8. Avance rapide (C)
Monter la fréquence radio
Retour rapide (D)
Baisser la fréquence radio
Suivant ( G )
Station préréglée suivante
Précédent (H)
Station préréglée précédente
Lecture/Pause (BF)
9. Bouton Ouvrir/Fermer (K)
10. Touche Stop (L)
11. Antenne Bluetooth
12. Connecteur du câble de commande
13. Entrées AUX1 (G et D) (AUX IN 1)
14. Entrées AUX2 (G et D) (AUX IN 2)
15. Antenne FM
Amplificateur
1. Prise écouteurs
2. Bouton de réglage des graves
3. Bouton de réglage des aigus
4. Bouton de réglage du volume
5. Bouton Fonction
6. Cordon d’alimentation
7. Connecteur du câble de commande
8. Sorties audio pour enceintes (G et D)
02_AXM649BT_FR_P41013409-A101_4 Mar 13.indd 9 2013-3-14 10:28:12
FR-9
Page 38

Description de la télécommande
AUX
DISPLAY
1. Veille
2. Disque ( CD )
3. Radio ( FM )
4. Mode (
5. Intro (
6. Compensation sonore (
7. Égaliseur (
8. Horloge (
9. Suivant
Station préréglée suivante
10. Retour rapide
Baisser la fréquence radio
11. Précédent
Station préréglée précédente
12. Lecture/Pause
13. Album Suivant (
14. Album Précédent (
15. Sourdine (
16. Touches numériques (
17. Bouton Ouvrir/Fermer
18. USB
19. AUX (
Bluetooth
20. Répétition A-B (
21. Luminosité (
22. Super basses (
23. Dormir (
24. Minuterie (
25. Afchage (
Afchage RDS
26. Avance rapide
Monter la fréquence
27. Stop
Couplage (
28. Monter le volume (
29. Baisser le volume (
30. Programme (
MODE
)
INTRO
)
P-EQ )
CLOCK
G
D
H
MUTE
AUX 1 / AUX 2
DIM )
SLEEP
TIMER
DISPLAY
L
PAIRING
PROG
)
BF
ALB + )
ALB - )
)
)
A-B
)
S-BASS
)
)
)
C
)
VOL+
VOL-
)
LOUDNESS
0~9, 10+
K
)
)
)
)
)
FR-10
02_AXM649BT_FR_P41013409-A101_4 Mar 13.indd 10 2013-3-14 10:28:13
Page 39

Installation de la pile
1. Retirez la languette isolante en Mylar du
logement de la pile. Elle se trouve au bas du
dos de la télécommande.
2. Avec un tournevis, dévissez la vis du
logement de la pile. Sortez le porte-pile
à l’aide d’un ongle.
3. nsérez correctement une pile neuve
(de type 2025), puis réinsérez entièrement
le porte-pile dans la télécommande.
Revissez la vis avec un tournevis.
Manipulation de la télécommande
Retirez les piles de la télécommande avant toute période d’inutilisation prolongée.
•
An d'éviter un dysfonctionnement, lisez les consignes suivantes et utilisez la télécommande
•
correctement.
Veillez à ce que la télécommande ne tombe pas et ne subisse pas de choc.
•
Veillez à ne jamais renverser d'eau ni aucun autre liquide sur la télécommande.
•
Ne posez pas la télécommande sur un objet mouillé.
•
N'exposez pas la télécommande à la lumière directe du soleil et ne la placez pas à proximité
•
d’une source de chaleur excessive.
N'utilisez pas de produit caustique (par exemple un produit de nettoyage pour porcelaine, inox,
•
toilettes, four, etc.) pour nettoyer la télécommande, car cela peut la détériorer.
Remarque :
Retirez les piles de la télécommande avant toute période d’inutilisation prolongée.
Sinon la télécommande peut être endommagée si les piles se mettent à fuir.
FR-11
02_AXM649BT_FR_P41013409-A101_4 Mar 13.indd 11 2013-3-14 10:28:14
Page 40

30° 30°
Max. 5 m
A X
DS LAY
Portée d'utilisation de la télécommande
Dirigez la télécommande vers l’appareil, à moins de 5 m du panneau avant de l’appareil, et selon
un angle horizontal de 30° et un angle vertical de 30°. La portée de la télécommande peut varier en
fonction de la luminosité de la pièce.
Remarque :
Vérifiez qu’il n’y a aucun d’obstacle entre le capteur infrarouge de l’appareil et la télécommande.
•
Si l’appareil est installé dans un meuble, la portée de la télécommande peut être réduite en
fonction de l’épaisseur ou de la couleur de la porte en verre du meuble.
N’exposez pas le capteur infrarouge à la lumière directe du soleil ni à une source lumineuse
•
puissante, par exemple un tube fluorescent.
FR-12
02_AXM649BT_FR_P41013409-A101_4 Mar 13.indd 12 2013-3-14 10:28:14
Page 41

M
N NN
N
N
M
N N
N
N
Branchements
Attention : Effectuez tous les branchements avant de brancher l’unité principale dans une
prise électrique.
Lisez ces instructions d'installation complémentaires avant d'utiliser l’appareil.
Si vous ne respectez pas les consignes suivantes, cela peut détériorer l’appareil.
L’ordre d'installation correct de l’appareil est le suivant :
1. Les câbles des enceintes et le câble de commande lecteur CD/amplicateur doivent être
branchés en premier.
2. Une fois ces câbles correctement branchés, vous pouvez brancher le cordon d'alimentation
dans une prise secteur.
Attention :
i) N'inversez pas les étapes en branchant d’abord le cordon d’alimentation dans une prise
secteur, car cela peut provoquer le dysfonctionnement de l’appareil.
ii) S’il est nécessaire de rebrancher le câble de commande quand l'appareil est en
fonctionnement, débranchez d'abord son cordon d'alimentation. Sinon, l’appareil risque
d’être endommagé.
Enceinte
Unité principale
Cordon d’alimentation
Enceinte
Cordon d’alimentation
Enceinte
Cordon d’alimentation
Unité principale
Enceinte
Cordon d’alimentation
FR-13
02_AXM649BT_FR_P41013409-A101_4 Mar 13.indd 13 2013-3-14 10:28:14
Page 42

Brancher l’antenne FM
AN
TENNA
CABLE
AUX N 1
L
R R
AUX N 2
ABE
C
SP A ER UT T )
FM
ANTENNA
CABLE
AUX N 1
LRL
R
AUX N 2
AUX IN 2
AUX IN 1
ANTENNA
LRL
FM
CABLE
R
ANTENNA
FM
d’antenne FM au dos de l’appareil.
Attention :
An d’éviter les parasites, veillez à ce que l’antenne
soit éloignée de l’appareil, des câbles de connexion et du cordon d’alimentation.
Brancher les enceintes
Br anche z l’antenne F M fou rnie dans la prise
Branchez les câbles des enceintes dans les connecteurs comme montré ci-dessous.
Branchez les câbles pourvus de ches noires dans les connecteurs (-) et les câbles pourvus de
ches rouges dans les connecteurs (+).
Amplicateur
Enceinte droite
Vue arrière
Enceinte gauche
Vue arrière
Brancher une source audio auxiliaire
Avec un câble audio (non fourni), branchez les entrées AUX1 au dos de l’appareil aux sorties audio
d’une source audio auxiliaire, comme montré ci-dessous.
Lecteur CD
Source audio auxiliaire
Raccordez les connecteurs AUX IN 2 de cet appareil aux sorties audio de la source audio auxiliaire, comme montré ci-dessous.
Lecteur CD
Source audio auxiliaire
02_AXM649BT_FR_P41013409-A101_4 Mar 13.indd 14 2013-3-14 10:28:15
FR-14
Page 43

FM
ANTENNA
ABLE
AUX N 1
LRL
R
AUX IN 2
CABL
AC
SPEAKER O UTPU (6 )
Brancher le câble de commande
Branchez le câble de commande sur le lecteur CD et l’amplicateur.
Lecteur CD
Amplicateur
Brancher le cordon d'alimentation
Branchez la che du cordon d’alimentation dans une prise murale, votre appareil est prêt à l’emploi.
Attention: * Pensez à toujours débrancher la che du cordon d’alimentation de la prise électrique
avant de quitter la pièce et avant toute période d’inutilisation prolongée.
* La che du cordon d’alimentation de l’appareil sert de dispositif de coupure de
l’alimentation et doit donc être accessible en permanence.
Modes Veille/Économie d’énergie
Allumer/éteindre l’appareil
Lorsque vous branchez le cordon d’alimentation dans une prise électrique, l’appareil entre dans le
mode veille.
• Appuyez sur la touche
• Appuyez sur la touche
délent à l’écran.
Mettre l’appareil en veille/mode économie d’énergie
Appuyez sur la touche Standby pendant au moins 2 secondes pour basculer dans le mode veille
économie d’énergie ou veille normale.
* Mode veille économie d’énergie
L’heure n’est pas afchée. Appuyez sur la touche Horloge
* Mode veille normale
L’heure est afchée.
02_AXM649BT_FR_P41013409-A101_4 Mar 13.indd 15 2013-3-14 10:28:15
Standby
pour allumer l’appareil. Le mot « HELLO » s’afche.
Standby
pour remettre l’appareil en veille. Les mots « BYE BYE »
CLOCK
pour afcher l’heure à l’écran.
FR-15
Page 44

Régler l'horloge
Réglage manuel de l'horloge
1. Mettez l’appareil dans le mode veille économie d’énergie.
2. Maintenez la touche Horloge (
clignoter.
3. Réglez les chiffres des heures avec les touches du volume (
Suivant (
4. Appuyez sur la touche Horloge (
5. Réglez les chiffres des minutes avec les touches du volume (
Suivant (
6. Appuyez sur la touche Horloge (
Remarque :
• Si vous attendez trop longtemps pendant les étapes de réglage de l’horloge, l’appareil quitte
automatiquement le mode de réglage de l’horloge.
• S’il y a une coupure de courant ou si l’appareil est débranché du secteur, le réglage de l’horloge est perdu.
Réglage automatique de l'horloge
Afficher l'horloge
H/G
H/G
Réglez la fréquence d’une station de radio RDS, puis attendez quelques minutes. Pour conrmer, appuyez sur la touche Horloge (
Dans le mode veille, appuyez sur la touche Horloge (
).
).
Régler le son
Régler le volume
Pour monter ou baisser le volume, tournez le bouton de réglage du volume (
ou appuyez sur les touches du volume (
Régler le renforcement des basses
Vous pouvez renforcer les basses pour qu’elles soient pleines et riches même à volume réduit.
Appuyez sur la touche Super Basses (
DBB » s’afche sur le panneau avant. Appuyez à nouveau sur la touche Super Basses (
pour désactiver cette fonction.
Régler les graves
Tournez le bouton de réglage des graves (
montre ou dans le sens contraire pour monter ou réduire les graves.
Régler les aigus
Tournez le bouton de réglage des aigus (
montre ou dans le sens contraire pour monter ou réduire les graves.
Compensation sonore
Cet appareil intègre une fonction permettant d’augmenter automatiquement les graves lorsque le
volume est bas. Cette fonction permet également d’augmenter les basses lorsque le volume est
élevé, mais l’effet est moindre que lorsque le volume est bas. Appuyez sur la touche de la compensation sonore (
sur le panneau avant. Appuyez à nouveau sur cette touche pour désactiver cette fonction, l’icône
“ ” n’est plus afchée.
Égaliseur
Vous pouvez sélectionner l’un des cinq préréglages de l’égaliseur. Avec la touche Égaliseur (
, choisissez l’un des 5 préréglages dans l’ordre suivant :
Modifier la luminosité de l’affichage du panneau avant
La luminosité d’afchage de l’heure peut être réglée sur trois niveaux différents. Réglez la luminosité
en appuyant plusieurs fois sur la touche Luminosité (
LOUDNESS
FLAT POP JAZZ ROCK CLASSIQUE
CLOCK
) appuyée, « CLOCK SET » s’afche et CLOCK 24 se met à
VOL+/-
) ou les touches Précédent/
CLOCK
), les chiffres des minutes se mettent à clignoter.
CLOCK
), l’horloge interne s’enclenche.
CLOCK
).
VOL +/-
) de la télécommande.
S-BASS
) de la télécommande pour activer cette fonction, «
BASS
) de l’amplicateur dans le sens des aiguilles d’une
TREBLE
) de l’amplicateur dans le sens des aiguilles d’une
) de la télécommande pour activer cette fonction, l’icône “ ” s’afche
DIM
VOL+/-
) ou les touches Précédent/
CLOCK
).
- VOLUME +
) du panneau avant ou de la télécommande.
) de l’appareil
S-BASS
P-EQ
)
)
FR-16
02_AXM649BT_FR_P41013409-A101_4 Mar 13.indd 16 2013-3-14 10:28:16
Page 45

Écouter la radio
Vous pouvez écouter les stations de radio FM. Les fréquences des stations de radio peuvent être
réglées manuellement ou automatiquement, ou être préréglées.
Attention :
Avant d’écouter la radio, vériez que l’antenne FM est correctement branchée, déployée et orientée.
Régler la fréquence d’une station de radio
1.
Tournez le bouton Fonction (
télécommande. « TUNER » s’afche sur le panneau avant.
2. Pour écouter une station de radio, procédez de l’une des manières suivantes :
Syntonisation Auto
Maintenez la touche Baisser/Monter la Fréquence (D/C) de la télécommande ou de
l’appareil appuyée pendant 1 seconde au minimum, la fréquence baisse ou monte
automatiquement jusqu’à ce qu’une station soit trouvée.
Syntonisation Manuelle
Appuyez plusieurs fois sur les touches Baisser/Monter la Fréquence (D/C) de la télécommande
ou de l’appareil pour modier la fréquence jusqu’à trouver la station de radio désirée.
Stations préréglées (disponible uniquement si au moins une station de radio a
été préréglée)
Appuyez plusieurs fois sur les touches Station Préréglée Précédente/Suivante (H/G) de
la télécommande ou de l’appareil pour sélectionner l’une des stations de radio préréglées. Sa
fréquence et sa bande de fréquences s’afchent sur le panneau avant.
FUNCTION
) de l’appareil ou appuyez sur la touche Radio (FM) de la
Prérégler des stations
Vous pouvez prérégler jusqu’à 20 stations FM.
Pour prérégler une station de radio, procédez comme suit :
1. Appuyez sur la touche Programme (
2. Appuyez sur les touches Station Préréglée Précédente/Suivante (H/G) de la télécommande
pour sélectionner un numéro de mémoire.
Remarque : Si vous dépassez « 20 », le numéro repasse automatiquement à « 1 ».
3. Appuyez à nouveau sur la touche Programme (
L’écran afche à nouveau la fréquence diffusée.
4. Répétez les étapes 1 à 3 ci-dessus pour chaque station de radio que vous voulez prérégler en
leur affectant un numéro de mémoire différent.
Remarque : Si l’appareil est débranché ou si le courant est coupé, les stations préréglées sont
conservées en mémoire.
PROG
) de la télécommande, un numéro de mémoire s’afche.
PROG
) pour prérégler cette station de radio.
Changer le mode de réception FM
Appuyez sur la touche Mode (
réception de la FM.
MODE
) pour sélectionner le mode Stéréo ou Mono an d’optimiser la
FR-17
02_AXM649BT_FR_P41013409-A101_4 Mar 13.indd 17 2013-3-14 10:28:16
Page 46

Modes d'affichage FM
Chaque fois que vous appuyez sur la touche Afchage
dans les modes d’affichage suivants : Nom de la Station, Fréquence, Type de Programme,
Radiotexte, Heure.
Les informations s’afchent dans la partie inférieure de l'écran.
Nom de la Station
Lors de la réception d’une station RDS, le nom de la
station s’afche.
Type de Programme
Signal d’identication du type de programme
(Par exemple : Actualités, Rock, Musique classique.)
Heure
La fonction RDS CLOCK peut ne pas fonctionner
correctement dans les zones où le service RDS CLOCK
n’est pas disponible. Quand un service RDS CLOCK
est disponible, la fonction RDS CLOCK s’active.
DISPLAY
, l’écran bascule successivement
Nom de la Station
Type de Programme
Heure
Radiotexte
Afcher la description de la radio.
Fréquence
Afcher la fréquence de la station diffusée, par exemple
89.80 MHz.
Radiotexte
Fréquence
FR-18
02_AXM649BT_FR_P41013409-A101_4 Mar 13.indd 18 2013-3-14 10:28:16
Page 47

CD
Lecture des CD
1. Tournez le bouton Fonction (
la télécommande. « DISC » s’afche sur le panneau avant.
2. Appuyez sur la touche Ouvrir/Fermer (K) pour ouvrir le plateau de lecture, puis insérez un
disque dans le plateau de lecture (face imprimée vers le haut).
3. Appuyez à nouveau sur la touche Ouvrir/Fermer (K) pour refermer le plateau de lecture, l’appareil
initialise le disque et lance la lecture automatiquement.
Remarque : Quand le lecteur est à l’arrêt, appuyez sur la touche Lecture/Pause (BF) pour
démarrer la lecture du disque.
4. Appuyez sur la touche Lecture/Pause (BF) pour mettre la lecture en pause. Appuyez à
nouveau sur cette touche pour reprendre la lecture.
5. Appuyez sur la touche Stop (L) pour arrêter la lecture.
Sélectionner directement une piste
Chargez un disque. Quand le lecteur a ni d’initialiser le disque, sélectionnez une piste avec les
touches numériques (0-9,10+) de la télécommande pour l’écouter.
Si le numéro de la piste est inférieur à 10, appuyez sur les touches numériques 0-9.
Si le numéro de la piste est supérieur à 10, appuyez sur la touche numérique (10+), puis
saisissez le chiffre des unités avec les touches numériques 0-9. À chaque pression sur la
touche 10+, le chiffre des dizaines augmente de 1, soit 10, 20, 30. Donc pour saisir « 22 »,
appuyez deux fois sur « 10 », puis une fois sur « 2 ».
Changer de piste
Appuyez une ou plusieurs fois sur la touche Précédent (
Appuyez une ou plusieurs fois sur la touche Suivant (G) pour sauter à l’une des pistes suivantes.
Rechercher un passage
Maintenez la touche Retour rapide (D) ou Avance rapide (C) appuyée pour rechercher le début
d’un passage que vous voulez écouter.
Afficher les informations de lecture
Appuyez sur la touche Afchage (
et la durée de lecture restante.
Programme de lecture
Vous pouvez programmer jusqu’à 20 pistes dans l’ordre que vous voulez. L’appareil doit
impérativement être à l’arrêt et un CD doit être inséré.
1. Insérez un disque, puis appuyez sur la touche Stop (L) lorsque la lecture démarre.
2. Appuyez sur la touche Programme
3. Appuyez sur les touches numériques (
la télécommande pour saisir le numéro d’une piste.
4. Appuyez sur la touche Programme
5. Répétez les étapes 3 et 4 pour saisir et programmer d’autres pistes.
6. Appuyez sur la touche Lecture/Pause (BF) pour démarrer la lecture du programme.
7. Appuyez une fois sur la touche Stop (L) pour arrêter la lecture du programme. Appuyez une
deuxième fois sur la touche Stop (L) pour effacer le programme.
Remarque : La fonction de lecture aléatoire n’est pas disponible lors de la lecture d’un programme.
Lecture aléatoire (CD et disques MP3)
Un CD peut être lu dans un ordre aléatoire.
Appuyez une fois sur la touche Aléatoire (
ant (H/G) pour démarrer la lecture aléatoire.
FUNCTION
DISPLAY
(PROG), «
(PROG)
) de l’appareil ou appuyez sur la touche Disque ( CD ) de
H
) pour sauter à l’une des pistes précédentes.
) pour afcher le numéro de la piste en cours de lecture
0-9, +10
) ou les touches Précédent/Suivant (H/G) de
pour conrmer le numéro de piste à ajouter au programme.
RANDOM)
FR-19
» s’afche.
, puis appuyez sur les touches Précédent/Suiv-
02_AXM649BT_FR_P41013409-A101_4 Mar 13.indd 19 2013-3-14 10:28:17
Page 48

Lire le début (intro) de chaque piste
Appuyez sur la touche
piste. Les 10 premières secondes de chaque piste sont lues. Lorsque vous entendez la piste désirée, appuyez sur la touche
Répéter la lecture (CD)
Appuyez plusieurs fois sur la touche
Première pression : Répéter la lecture d’un chier, «
Deuxième pression : Répéter la lecture de toutes les pistes du disque, «
et «
Troisième pression : Répéter la lecture des pistes dans un ordre aléatoire, «
continu et «
Quatrième pression : Désactiver la fonction de répétition, «
INTRO
de la télécommande pour lire successivement le début de chaque
INTRO
pour l’écouter.
MODE
REP ALL
pour sélectionner l’un des modes de répétition : UN ou TOUT.
» clignote.
SHUF
» clignote.
TRK
REP
» et «
SHUF
» clignotent.
» n’est plus afché.
TRK
» est afché en continu
TRK
» est afché en
La touche Répétition
A-B
vous permet d’utiliser la répétition A-B.
Première pression : Dénir le début du passage, «A-» s’afche.
Deuxième pression : Dénir la n du passage, «A-B» s’afche.
Troisième pression : Désactiver la répétition, «A-B» n’est plus afché.
Remarque : La fonction de répétition A-B ne permet de répéter la lecture que d’un passage interne
à un chier.
Disques MP3/WMA
Remarque : La lecture de chiers MP3/WMA enregistrés sur un disque peut être affectée par le
type et le format du disque ou la qualité d’enregistrement. Si vous n’arrivez pas à lire correctement
un disque, nous vous conseillons d’utiliser une source USB pour lire les chiers MP3/WMA.
Pendant la sélection de chiers, le lecteur afche automatiquement le numéro de l’album et de
chier. Par exemple : Le chier 21 peut être le chier 7 de l’a bum 3.
1. Tournez le bouton Fonction (
la télécommande. « DISC » s’afche sur le panneau avant.
2. Appuyez sur la touche Ouvrir/Fermer (K) pour ouvrir le plateau de lecture, puis insérez un
disque MP3/WMA dans le plateau de lecture.
3. A
ppuyez sur la touche Afchage (
titre du morceau) s’afchent si elles sont disponibles, dans le cas contraire « NO ID3 » s’afche. Si
vous appuyez une deuxième fois sur cette touche, l’écran afche l’album, la piste et la durée de lecture.
4. Pendant la lecture de disques MP3/WMA, l’écran afche l’a bum et la piste.
5. Sélectionner les pistes précédentes/suivantes avec les touches Précédent/Suivant (H/G).
Pour effectuer un retour rapide ou une avance rapide, maintenez la touche Retour rapide ou
Avance rapide (D, C) appuyée quelques secondes.
6. Appuyez sur la touche Album Suivant (
télécommande pour sélectionner l’album suivant ou précédent et lire la première piste de
l'album sélectionné.
Une fois la lecture terminée, appuyez sur la touche Album Suivant (
Album Précédent (
ALB-
Puis sélectionnez une piste avec les touches Suivant (G) et Précédent (H).
7. Appuyez sur la touche Lecture/Pause (BF) pour démarrer la lecture du disque.
8. Appuyez sur la touche Stop (L) pour arrêter la lecture.
Remarque : Une fois les pistes sélectionnées entièrement lues, la lecture continue avec les pistes
suivantes. Les 2 premiers chiffres afchés indiquent le numéro de l’album, les 3 suivants indiquent
le numéro de la piste, et les chiffres restants indiquent la durée écoulée en minutes et secondes.
FUNCTION
) de l’appareil ou appuyez sur la touche Disque (CD) de
DISPLAY
) de la télécommande, les métadonnées ID3 (artiste et
ALB+
) ou sur la touche A bum Précédent (
ALB+
) ou sur la touche
ALB-
) de la
) de la télécommande pour sélectionner l’album suivant ou précédent.
FR-20
02_AXM649BT_FR_P41013409-A101_4 Mar 13.indd 20 2013-3-14 10:28:17
Page 49

Répéter la lecture (Disque MP3)
Appuyez plusieurs fois sur la touche
Première pression : Répéter la lecture d’un chier, «
Deuxième pression : Répéter la lecture des chiers dans un ordre aléatoire, «
continu et «
Troisième pression : Répéter la lecture de tous les chiers du disque, «
et «
Quatrième pression: Répéter la lecture des chiers dans un ordre aléatoire, «
continu et «
Cinquième pression: Désactiver la fonction de répétition, «
La touche Répétition
A-B
Première pression : Dénir le point de départ, «A-» est afché en continu.
Deuxième pression : Dénir la n du passage, «A-B» est afché en continu.
Troisième pression : Désactiver la répétition, «A-B» n’est plus afché.
Remarque : La fonction de répétition A-B ne permet de répéter la lecture que d’un passage interne
à un chier.
MODE
REP ALL
pour sélectionner l’un des modes de répétition : UN, ALB ou TOUT.
REP ALB
» clignote.
» clignote.
SHUF
» clignote.
TRK
» et «
SHUF
vous permet d’utiliser la répétition A-B.
REP
» clignotent.
TRK
TRK
» est afché en continu
TRK
» n’est plus afché.
» est afché en
» est afché en
USB
Branchez un support de stockage de masse USB (par exemple
une clé USB, un lecteur à mémoire ash ou une carte mémoire)
sur cet appareil pour écouter les chiers qu’il contient.
1. Insérez la che USB d’un support de stockage de masse USB
dans le port
2. Appuyez sur la touche
bouton de sélection de la fonction de l’amplicateur pour
sélectionner la fonction USB. « USB » s’afche sur le panneau
avant.
3. Les chiers enregistrés sur le support de stockage USB sont lus
automatiquement.
4. Si le support USB comporte plus d’un dossier, sélectionnez le
dossier suivant/précédent avec les touches Album Suivant
ALB+
(
) et Album Précédent (
sélectionnez un chier avec les touches Suivant (
Précédent (
Supports de stockage avec câble USB :
1. Insérez l’une des ches du câble USB (non fourni) dans le port au dos de l’appareil.
2. Insérez l’autre che du câble USB dans le port de sortie USB du support de stockage.
Cartes mémoire :
1. Insérez la carte mémoire dans un lecteur de carte (non fourni).
2. Branchez le lecteur de carte mémoire dans le port
(non fourni).
Protection des données des supports de stockage USB
Insérez le support de stockage USB dans le bon sens. Ne pas respecter cette exigence peut
provoquer la détérioration du support de stockage USB et cet appareil.
Ne débranchez pas le support de stockage USB quand il est train d’être utilisé par l’appareil.
Les interférences électriques et les décharges électrostatiques peuvent provoquer le
ysfonctionnement et endommager les supports de stockage USB, et provoquer la perte de données.
d
Il est fortement recommandé d’effectuer des copies de sauvegarde des données importantes sur
un ordinateur pour vous protéger contre les risques de perte ou de corruption des données et de
dysfonctionnement des supports de stockage USB. Notre société ne saurait en aucun cas être
tenue responsable en cas de dommage ou de perte de données.
Remarque : La connexion USB n’est pas compat ble avec tous les supports de stockage USB.
au dos de l’appareil.
USB
H
).
au dos de l’appareil avec un câble USB
FR-21
de la télécommande ou tournez le
ALB-
) de la télécommande. Puis
G
) et
02_AXM649BT_FR_P41013409-A101_4 Mar 13.indd 21 2013-3-14 10:28:18
Page 50

Bluetooth
Cet appareil vous permet d’écouter les chiers audio enregistrés sur les lecteurs Bluetooth.
Coupler des périphériques Bluetooth
Pour pouvoir connecter un périphérique Bluetooth à l’appareil, vous devez les coupler. Le couplage
n'a à être effectué qu’une seule fois.
Remarque :
* La portée opérationnelle entre cet appareil et un périphérique Bluetooth est d’environ 10 mètres.
* Avant de connecter un périphérique Bluetooth à cet appareil, familiarisez-vous avec les
fonctions Bluetooth de ce périphérique.
* La compat bilité avec tous les périphériques Bluetooth n’est pas garantie.
* Tout obstacle présent entre cet appareil et un périphérique Bluetooth peut réduire la portée
opérationnelle.
* Maintenez cet appareil éloigné des autres appareils électroniques pour éviter qu'il n'y ait des
interférences.
1. Appuyez sur la touche Bluetooth
la fonction du panneau avant.
2. Allumez le Bluetooth de votre périphérique Bluetooth.
3. Recherchez les autres périphériques Bluetooth avec votre périphérique.
4. Sélectionnez «
5. Si nécessaire, saisissez le mot de passe par défaut «
6.
Appuyez sur la touche Couplage (
Remarque :
* Le périphérique se déconnecte s'il est déplacé hors de portée opérationnelle.
* Pour reconnecter le périphérique à l’appareil, remettez-le à portée opérationnelle de l’appareil.
* Quand l’appareil est déjà connecté à un périphérique Bluetooth déjà couplé, il peut entrer dans
le mode de couplage et les autres périphériques Bluetooth peuvent le rechercher pour s’y
coupler et s’y connecter.
* Quand l’appareil est déconnecté de tout périphérique Bluetooth, il entre automatiquement dans
le mode de couplage et les périphériques peuvent le rechercher pour s’y coupler et s’y connecter.
Écouter les chiers audio enregistrés sur un périphérique Bluetooth
Si un périphérique Bluetooth est compatible avec le Prol de Distribution Audio Avancée (A2DP),
vous pouvez écouter les chiers audio enregistrés dans ce périphérique grâce à cet appareil.
1. Couplez le périphérique avec l’appareil.
2. Démarrez la lecture audio sur le périphérique.
AXM649BT
» dans la liste de couplage.
de la télécommande ou tournez le bouton de sélection de
0000
».
PAIRING
) plus de 2 secondes pour quitter le mode de couplage.
Écouter des fichiers audio enregistrés sur un périphérique externe
Vous pouvez écouter des sources audio externes avec cet appareil.
1. Vériez que la source audio externe est branchée sur cet appareil.
2. Appuyez sur la touche
3. Démarrez la lecture sur la source audio externe (reportez-vous à sa notice d’utilisation).
02_AXM649BT_FR_P41013409-A101_4 Mar 13.indd 22 2013-3-14 10:28:18
AUX
pour sélectionner l’entrée audio via les entrées AUX IN 1/2 (G et D).
FR-22
Page 51

Régler l’alarme
Cet appareil intègre une fonction alarme. Vous pouvez sélectionner DISQUE, USB ou TUNER
comme source audio de l’alarme.
Remarque :
■ Vériez que vous avez correctement réglé l’horloge.
1. Dans le mode veille, maintenez la touche Minuterie
SET] (Régler l’alarme) déle à l’écran.
2. Sélectionnez une source avec les touches H /
panneau avant.
3. Appuyez sur la touche Minuterie
TIMER
pour conrmer. Les chiffres des heures s'afchent et se
mettent à clignoter.
4. Réglez les chiffres des heures avec les touches H /
panneau avant, puis appuyez à nouveau sur la touche Minuterie
Les chiffres des minutes s’afchent et se mettent à clignoter.
5. Réglez les chiffres des minutes avec les touches H /
du panneau avant, puis appuyez sur la touche Minuterie
6. Réglez le volume avec les touches
VOL +/-
, puis appuyez sur la touche Minuterie
conrmer.
L’icône Horloge s’afche.
TIMER
/ VOL +/–
G
appuyée jusqu’à ce que [TIMER
de la télécommande ou du
/ VOL +/–
G
G
TIMER
/ VOL +/–
de la télécommande ou du
TIMER
.
de la télécommande ou
pour conrmer.
TIMER
pour
Activer/désactiver l’alarme
1. Dans le mode veille, appuyez plusieurs fois sur la touche Minuterie
* Quand l’alarme est activée, l’icône s’afche.
* Quand l’alarme est désactivée, l’icône n’est pas afchée.
Remarque :
■ L’alarme n’est pas dispon ble si la source est réglée sur « AUX ».
■
Si la source USB est sélectionnée, mais qu’aucun périphérique USB n’est branché, l’appareil
bascule automatiquement dans le mode TUNER.
TIMER
.
Régler le délai d'extinction automatique
Cet appareil peut se mettre automatiquement en veille après un délai prédéni.
1. Quand l’appareil est allumé, appuyez plusieurs fois sur la touche Dormir
sélectionner un délai d’extinction automatique (en minutes).
OFF
120 90
...
45 30 15
Quand cette fonction est activée, l’icône SOMMEIL “ ” s’afche.
* Pour désactiver cette fonction, appuyez plusieurs fois sur la touche Dormir
que [OFF] soit afché.
FR-23
SLEEP
SLEEP
pour
jusqu’à ce
02_AXM649BT_FR_P41013409-A101_4 Mar 13.indd 23 2013-3-14 10:28:18
Page 52

Manipulation des disques
Précautions d’utilisation
• Saisissez les disques par leur bord de manière à ne pas souiller leur surface avec vos
empreintes digitales. (A)
Les empreintes digitales, les saletés et les rayures peuvent faire sauter la lecture et provoquer
la distorsion du son.
• N’écrivez pas sur la face imprimée des disques avec un stylo à bille ou un autre outil d’écriture.
• N’utilisez pas de spray de nettoyage pour disque, de benzène, de diluant, de produits
antistatique, ni aucun autre type de solvant.
• Veillez à ne pas faire tomber et à ne pas tordre les disques.
• N’insérez jamais plus de 1 disque à la fois dans le plateau de lecture.
• N’essayez pas de refermer le plateau de lecture si le disque est mal installé.
• Rangez toujours les disques dans leur boîtier individuel après usage.
Si la surface d’un disque est sale (B)
•
Essuyez-la délicatement avec un chiffon doux et légèrement humidié (avec de l’eau uniquement).
• Lors du nettoyage des disques, essuyez-les toujours depuis leur trou central vers leur bord
extérieur.(Si vous les essuyez avec des mouvements circulaires, vous risquez de provoquer des
rayures circulaires qui généreront des distorsions sonores).
• Si vous faites passer un disque d'un environnement froid à un environnement chaud, de la
condensation peut se former à sa surface. Essuyez-la avec un chiffon sec et ne peluchant pas
avant d’utiliser le disque.
Rangement incorrect des disques
Les disques risquent d’être abîmés si vous les rangez dans les endroits suivants :
• Endroits exposés à la lumière directe du soleil.
• Endroits humides ou poussiéreux.
• Endroits directement exposés à une source de chaleur ou un appareil de chauffage.
Disques compatibles avec cet appareil :
CD audio, CD-R, disques WMA et MP3.
FR-24
02_AXM649BT_FR_P41013409-A101_4 Mar 13.indd 24 2013-3-14 10:28:18
Page 53

Dépannage
Si vous rencontrez un problème avec votre appareil, procédez aux vérications suivantes avant de
contacter un réparateur.
Si vous n’arrivez pas à régler le problème avec ces indications ou si l’appareil a subi une détérioration physique, contactez un personnel qualié, par exemple le distributeur, pour faire réparer l’appareil.
Problème Cause possible Action
Il n’y a pas de son. Les branchements sont incorrects ou
La réception radio est
mauvaise.
La lecture du disque saute. Le disque est rayé ou sale. Nettoyez le disque ou changez-le.
Le disque n’est pas lu. Le disque est à l’envers.
La télécommande ne fonctionne pas.
Certaines fonctions sont
indisponibles.
Certaines fonctions sont
indisponibles.
Impossible de connecter le
périphérique Bluetooth à
l’appareil.
desserrés.
L’antenne est débranchée.
L’antenne n’est pas correctement déployée
et positionnée.
Le disque est sale.
Il y a des obstacles entre la télécommande
et le capteur infrarouge de l’appareil.
Les piles sont usées.
Le microprocesseur intégré connaît un
dysfonctionnement dû à des interférences
électriques externes.
La qualité audio est mauvaise une fois la
connexion établie.
La réception Bluetooth est mauvaise.
Le périphérique n’est pas compatible avec
les prols requis par l'appareil.
Le Bluetooth de votre périphérique n’est pas
activé.
L’appareil n'est pas dans le mode de couplage.
L’appareil est déjà connecté à un
périphérique Bluetooth.
Inspectez tous les branchements et
effectuez les corrections nécessaires.
Branchez correctement l’antenne.
Déployez l’antenne et orientez-la correctement pour optimiser la réception.
Insérez le disque avec sa face
imprimée vers le haut.
Sortez le disque du lecteur, essuyezle avec un chiffon propre, puis
réinsérez-le.
Enlevez les objets bloquant le signal.
Changez les piles.
Débranchez l’appareil et rebranchez-
le.
Rapprochez le périphérique de l’appareil
ou retirez les obstacles présents entre
l’appareil et le périphérique.
Consultez la notice d'utilisation du
périphérique pour savoir comment
activer cette fonc ion.
Déconnectez le périphérique et tous
les autres périphériques connectés,
puis réessayez.
FR-25
02_AXM649BT_FR_P41013409-A101_4 Mar 13.indd 25 2013-3-14 10:28:18
Page 54

Spécications
Spécification de l’unité principale
Alimentation : 220-240V ~ 50/60Hz
Plage de réception FM : 87.5~108 MHz
Puissance absorbée : 50 W (veille ECO 0,5 W)
Puissance de sortie : 45W x 2
Taux de distorsion harmonique : ≤ 1%
Dimensions : (CD) 160 (L) x 78 (H) x 250 (P) mm
(Amplicateur) 160 (L) x 78 (H) x 250 (P) mm
Spécifications des enceintes
Impédance : 6
Puissance absorbée : 50W
Dimensions : 130 (L) x 182 (H) x 203 (P) mm
Spécifications du Bluetooth
Système de communication : Version 2.1 et spécications EDR
Sortie : Classe de puissance 2
Portée de communication maximale : Env. 10 m
Bandes de fréquences : 2.4 GHz (2.400 GHz - 2.483 GHz)
Prols Bluetooth : Prol de Distribution Audio Avancée (A2DP)
Couplage de plusieurs appareils
Codecs compatibles (Récepteur) : SBC (Sub Band Codec)
(Émetteur) : SBC (Sub Band Codec)
:
Ω
jusqu’à 8
Télécommande
Distance : 6m
Angle : ±30°
Disques compatibles avec cet appareil :
CD audio, CD-R, disques WMA et MP3.
Remarque : Les informations produit peuvent être modiées sans préavis.
FR-26
02_AXM649BT_FR_P41013409-A101_4 Mar 13.indd 26 2013-3-14 10:28:18
Page 55

Le symbole
d’Équipements Électriques et Électroniques. Ce symbole signie que l’appareil et les piles/batteries
usagés ou à mettre au rebut NE DOIVENT PAS être jetés avec les ordures ménagères non triées,
mais déposés dans un centre de collecte spécique existant.
Si les piles ou batteries fournies avec cet appareil comportent les symboles chimiques Hg, Cd ou
Pb, cela signie qu’elles contiennent des quantités de métaux lourds supérieures à 0,0005% de
mercure, 0,002% de cadmium ou 0,004% de plomb.
Remarques concernant la mise au rebut des piles
La directive européenne 2006/66/CE prescrit que les piles contenues dans votre appareil ne doivent pas être jetées avec les ordures ménagères classiques. Prenez connaissance des réglementations locales relatives à la collecte séparée des piles. La mise au rebut appropriée des piles aide
à prévenir des conséquences potentiellement néfastes pour l’environnement et la santé humaine.
est conforme à la réglementation 2002/96/CE (DEEE) concernant les Déchets
Dans l’éventualité improbable où un problème surviendrait, contactez le magasin où vous avez
acheté votre appareil.
Nous travaillons sans relâche pour constamment améliorer nos produits, c’est pourquoi leurs
spécications peuvent être modiées sans préavis.
Pour obtenir des renseignements concernant les lieux de vente d’accessoires, contactez le
magasin où vous avez acheté l’appareil.
Kesa Electricals © UK: EC1N 6TE
FR-27
02_AXM649BT_FR_P41013409-A101_4 Mar 13.indd 27 2013-3-14 10:28:18
Page 56

Darty Group
España France
Darty Hispana S.A. Darty France
Polígono Industrial C.L.A. 129, avenue Gallieni - 93140
Calle Rio Guadalhorce N 4 BONDY,
28906 Getafe (Madrid) France
Ayuda en línea Darty Spain: Hotline Darty France
902 30 30 14
Quels que soient votre panne et le
lieu d'achat de votre produit en
France, avant de vous déplacer en
magasin Darty, appelez le 0 978 970 970
(prix d'un appel local) 7j/7 de 7h a 22h
Belgium Holland
1600 Sint-Pieters-Leeuw
Postbus 75513 ・ 1118 ZN Schiphol
Bellsingel 61 ・ 1119 NT Schiphol Rijk
Belgium. Holland
De dienst na verkoop is Hiervoor kunt u contact opnemen met
bereikbaar van maandag
t/m zaterdag via hulplijn
+32 2 334 00 00
het BCC Service Center : 0900 0555 (10 cent
p/m).
Geopend van maandag t/m vrijdag van
8.00 tot 20.00 uur en zaterdag van 09.00 tot
17.00.
Česká republika Italia
Datart International a.s. Darty Italia
Pernerova 35 Kesa Sourcing Limited – Filiale Italiana
186 00, Praha 8 – Karlin Presso Centro Commerciale
Czech Republic Brianza/Carrefour
Superstrada Milano-Meda, 44
Pomoc číslo Datart Czech Republic:
20037 Paderno Dugnano (MI).
810 328 278.
Per richieste di assistenza o di
informazioni sull’utilizzo di questo
prodotto, indipendentemente dal negozio
Darty in cui lo hai acquistato, puoi
chiamare il numero 199.777.779, dal lunedì
al sabato dalle 08:00 alle 20:00, la
domenica dalle 09:00 alle 17:00
Türkiye Slovenská
Darty Turkey Limited DATART INTERNATIONAL, a.s.
Cumhuriyet Cd. Seyhan ap Zadunajská cesta 10
No:36 K:1 Elmadag 851 01 Bratislava
34367, Istanbul – Turkey Slovenska republika.
Çevrimiçi Yardm Darty Turkey:
0090-212-4448880
08_AXM649BT_TR_41013409_16 Jan 13 indd 27 2013-1-17 9:37:25
Zákaznícka linka Datart Slovenská republika
0850 328 278 9.00 hod.–21.00 hod.
Page 57

Hoe het apparaat op een veilige manier gebruiken
Dit apparaat is ontworpen en vervaardigd conform de internationale veiligheidsnormen maar, zoals
bij elk ander elektrisch apparaat, moet u voorzichtig zijn om het beste resultaat te krijgen en ervoor
te zorgen dat de veiligheid altijd wordt gewaarborgd.
***********************************
LEES de gebruiksaanwijzing alvorens het apparaat te gebruiken.
ZORG dat alle elektrische aansluitingen (waaronder de stekker, verlengsnoeren en verbindingss-
tukken tussen de onderdelen van het apparaat) juist en in overeenstemming met de aanwijzingen
van de fabrikant z jn gemaakt. Schakel het apparaat uit en haal de stekker uit het stopcontact
alvorens aansluitingen te maken of te wijzigen.
RAADPLEEG uw handelaar als u twijfelt over de installatie, werking of veiligheid van uw apparaat.
LET OP met glazen panelen of deuren op apparatuur.
LEG het snoer op een dergel jke manier zodat niemand er over kan lopen, deze niet wordt verplet-
terd of schuurt, of niet onderhevig is aan bovenmatige slijtage of hitte.
***********************************
Verwijder GEEN vastgemaakt deksel, deze kan gevaarlijke spanningen onthullen.
Dek GEEN ventilatieopeningen van het apparaat met voorwerpen, zoals kranten, tafe kleden, gordijnen, enz. af. Dit zal oververhitting veroorzaken en de levensduur van het apparaat verkorten.
Stel het elektrisch apparaat NIET bloot aan druppels of spatten of plaats geen voorwerpen met
vloeistof, zoals een vaas, op het apparaat.
Plaats GEEN hete voorwerpen of voorwerpen met een naakte vlam, zoals een aangestoken kaars
of nachtlamp, op of in de buurt van het apparaat. Hoge temperaturen kunnen het plastic doen
smelten en brand veroorzaken.
Gebru k GEEN t jdelijke standaards en maak NOOIT poten met houten schroeven vast – om een
volledige veiligheid te waarborgen, gebruik alleen standaards die door de fabrikant zijn aanbevolen
of de meegeleverde poten met bevestigingsmateriaal conform de gebruiksaanwijzing.
Gebru k GEEN apparatuur zoals persoonlijke stereo’s of radio’s die ertoe kunnen leiden dat u op
een onveilige manier rijdt. Het is verboden om t jdens het r jden televisie te kijken.
Luister NIET naar een koptelefoon op een hoog volume, dit kan tot permanent gehoorverlies leiden.
Laat GEEN ingeschakelde apparatuur zonder toezicht achter tenzij het uitdrukkelijk is aangegeven
dat deze voor werking zonder toezicht is ontworpen of een stand-bymodus heeft. Schakel het apparaat uit met behulp van de schakelaar en zorg dat uw gezin weet hoe het apparaat uitgeschakeld
moet worden. Speciale voorzieningen kunnen nodig zijn voor het gebruik door zwakke of invalide
personen.
Gebru k het apparaat NIET langer als u tw jfelt over de juiste werking of als het apparaat beschadigd is. In dit geval schakel het apparaat onmiddell jk uit, haal de stekker uit het stopcontact en neem
contact op met uw handelaar.
VOOR ALLES,
- Zorg dat er NOOIT iemand, voornamelijk kinderen, voorwerpen in de gaten, sleuven of andere
openingen in de behuizing steken - dit kan tot dodelijke, elektrische schokken leiden.
- Gis of neem NOOIT risico’s met elektrische apparatuur, het is beter om veilig te zijn dan later spijt
te hebben!
***********************************
NL-1
03_AXM649BT_NL_P41013409-A101_4 Mar 13 indd 1 2013-3-14 10:28:43
Page 58

Om het mees te p lezi er en de best e prest atie s uit uw appa raat te k rijg en, lees de ze
gebruiksaanw jzing grondig door alvorens het apparaat te gebruiken zodat u vertrouwd bent met
zijn bediening en gedurende jaren probleemloos naar het apparaat kunt luisteren.
Belangrijke mededelingen
* Bewaar de gebruiksaanwijzing: bewaar de gebruiksaanwijzingen en veiligheidsvoorschriften voor
toekomstige raadpleging.
* Plaats het apparaat niet in onderstaande locaties:
Plaatsen blootgesteld aan direct zonlicht of in de buurt van verwarmingstoestellen, zoals
elektrische kachels. Op een ander stereo-apparaat dat veel warmte afgeeft. Stofge of slecht
geventileerde ruimten. Plaatsen die aan continue trilling onderhevig zijn. Vochtige plaatsen.
* Belemmer de ventilatie-openingen niet.
* Alvorens het apparaat voor de eerste keer in te schakelen, zorg dat het snoer juist is geïnstalleerd.
* De netstekker wordt gebruikt om het apparaat van de stroom los te koppelen en deze moet
steeds eenvoudig bereikbaar zijn.
* Stel het apparaat niet bloot aan gedruppel of gespetter en plaats geen voorwerpen gevuld met
vloeistoffen, zoals vazen, op het apparaat.
* Om het apparaat volledig van de stroom los te koppelen, haal de stekker van het apparaat uit het
stopcontact. Bij stormweer, haal de stekker uit het stopcontact om schade veroorzaakt door
bl ksem of stroomschommelingen te vermijden.
* Als de stand-by LED en het display niet branden, betekent dit dat de stroomschakelaar is
uitgeschakeld of dat de stekker uit het stopcontact is gehaald.
* Handhaaf een minimale afstand van 10cm rondom het apparaat zodat deze voldoende wordt
geventileerd.
* Houd rekening met het milieu bij het weggooien van batterijen.
* De stekker van het toestel mag niet worden belemmerd en moet eenvoudig bereikbaar zijn
t jdens het gebru k.
* De ventilatie mag niet worden belemmerd door de openingen te bedekken met kranten,
tafelkleden, gord jnen enz.
* Plaats geen voorwerpen met open vlam, zoals kaarsen, op het apparaat.
* Stel de batterijen niet bloot aan overmatige hitte, zoals van de zon, vuur enz.
Uit veiligheidsoverwegingen, haal geen deksels af en probeer niet om het product te openen.
Raadpleeg hiervoor een bevoegde technicus.
Probeer niet om de schroeven los te maken of de behuizing van het apparaat te openen. Dit
product bevat geen onderdelen die door de gebruiker kunnen worden gerepareerd, raadpleeg altijd
een gekwaliceerde technicus.
OPGELET
RISICO OP ELEKTRISCHE SCHOKKEN
NIET OPENEN
OPGELET: OM HET RISICO OP ELEKTRISCHE SCHOKKEN TE BEPERKEN, OPEN HET
DEKSEL (OF ACHTERZIJDE) NIET, BEVAT GEEN ONDERDELEN DIE DOOR
DE GEBRUIKER GEREPAREERD KUNNEN WORDEN, LAAT ONDERHOUD DOOR
GEKWALIFICEERDE TECHNICUS UITVOEREN
NL-2
03_AXM649BT_NL_P41013409-A101_4 Mar 13 indd 2 2013-3-14 10:28:43
Page 59

GEVAARLIJKE SPANNING
Er is gevaarlijke spanning binnenin dit product aanwezig, deze kan voldoende
hoog zijn om een risico op elektrische schokken bij personen te veroorzaken.
OPGELET
De gebruiksaanw jzing bevat belangrijke gebruiks- en onderhoudsinstructies
voor uw veiligheid. Het is nodig om deze gebruiksaanw jzing te raadplegen.
WAARSCHUWING: OM BRAND OF RISICO OP SCHOKKEN TE VERMIJDEN; STEL DIT
APPARAAT NIET BLOOT AAN DRUPPELS OF SPATTEN.
Opmerking:
- Dit apparaat wordt warm wanneer het gedurende een lange periode wordt gebruikt. Dit is
normaal en geeft geen storing van het apparaat aan.
- Als het display of de bediening niet naar behoren werkt, schakel het apparaat uit en vervolgens
opnieuw in.
- Het typeplaatje bevindt zich onderaan dit apparaat.
- De labelinformatie bevindt zich onderaan het apparaat.
Laserproduct
Dit product is uitgerust met een laser van laag vermogen. Voor uw eigen veiligheid, verwijder geen
enkel deksel of haal het product niet uit elkaar. Reparaties mogen alleen door gekwaliceerd personeel worden uitgevoerd
Waarschuwing
Dit product is uitgerust met een
KLASSE 1
LASERPRODUCT
ingebouwde laser van laag vermogen. Voor uw veiligheid, open de
beveiligingen tegen laserstraling
niet. Kijk niet in de laser wanneer
het apparaat in werking is.
Juiste hantering van de batterijen
• Een verkeerd of onjuist gebruik van de batterijen kan corrosie of lekkage veroorzaken. Dit kan
brand, persoonlijk letsel of schade aan eigendommen veroorzaken.
• Gebruik alleen het type batter jen zoals aangegeven in deze handleiding.
• Gooi lege batter jen niet met het huishoudelijk afval weg. Gooi deze volgens de lokale
voorschriften weg.
• Kleine knoopcelbatter jen die b jvoorbeeld in de afstandsbediening worden gebruikt kunnen
eenvoudig door jonge kinderen worden ingeslikt, en dit is gevaarl jk. Houd losse
knoopcelbatterijen uit de buurt van jonge kinderen en zorg dat de batterijhouder stevig in de
afstandsbediening steekt. Raadpleeg een arts als u denkt dat een knoopbatterij werd ingeslikt.
• Stel batterijen (accupack of geïnstalleerde batterijen) nooit bloot aan overmatige warmte zoals
zonlicht,vuur, enz.
Er is ontplofngsgevaar als de batterij op een verkeerde
manier wordt geplaatst. Vervang de batterij altijd door
een batterij van hetzelfde of een gelijkwaardig type.
OPGELET
NL-3
03_AXM649BT_NL_P41013409-A101_4 Mar 13 indd 3 2013-3-14 10:28:44
Page 60

Een langdurige blootstelling aan een hoog volume met gebruik van een kop- of
oortelefoon kan het gehoor van de gebru ker beschadigen.
WAARSCHUWING: om uw gehoor te beschermen
Het is belangrijk om met dit product een kop- of oortelefoon te gebru ken conform het besluit van
de Franse regering van 8 november 2005 houdende toepassing van artikel L.5232-1. Dit besluit
waarborgt dat het geluidsniveau 100 dB SPL niet overschrijdt.
Een langdurige blootstelling aan een hoog volume gedurende langer dan vijf uur per week kan uw
gehoor beschadigen.
Om gehoorbeschadiging te vermijden, luister niet gedurende een lange periode
aan een hoog volumeniveau.
NL-4
03_AXM649BT_NL_P41013409-A101_4 Mar 13 indd 4 2013-3-14 10:28:44
Page 61

Batterijveiligheidsrichtlijnen
Het gebruik van juiste batterijen voor huishoudelijke doeleinden zijn een
veilige en betrouwbare, draagbare voedingsbron. Problemen kunnen
zich voordoen als deze verkeerd worden gebruikt – wat leidt tot lekkage,
of in extreme gevallen, tot brand of ontploffing.
Hier volgen enkele eenvoudige richtlijnen voor een veilig batterijgebruik
zodat dergelijke problemen zich niet voordoen.
BATTERIJ-
VEILIGHEIDS
RICHTLIJNEN
Bewaar ongebruikte batterijen in hun
verpakking en uit de buurt
van metalen voorwerpen, die kunnen een
kortsluiting veroorzaken wat kan
leiden tot lekkage, of in extreme gevallen,
tot brand of ontploffing.
Probeer niet om gewone batterijen op te
laden; noch in een lader, noch door warmte
toe te brengen. Deze kunnen lekken,
en brand of zelfs ontploffing veroorzaken.
Er bestaan speciale, oplaadbare batterijen
voor dit doeleinde.
Installeer uw batterijen correct, houd
rekening met het plus en min-teken vermeld
op de batterij en het apparaat.
Een verkeerde installatie kan lekkage,
of in extreme gevallen, brand of
zelfs ontploffing veroorzaken.
Haal gebruikte batterijen uit het apparaat.
Haal alle batterijen uit het apparaat als u
deze gedurende een lange periode niet
zult gebruiken. Zo niet kunnen de batterijen
lekken en schade veroorzaken.
Houd toezicht over kinderen als zij de
batterijen in het apparaat plaatsen om
ervoor te zorgen dat deze richtlijnen
worden gevolgd.
Vervang altijd alle batterijen tegelijkertijd.
Meng geen oude met nieuwe batterijen
of batterijen van een verschillend type.
Dit kan leiden tot lekkage,
of in extreme gevallen,
tot brand of zelfs ontploffing.
Gooi batterijen nooit in vuur, deze kunnen
ontploffen. Recycle gebruikte batterijen.
Gooi deze niet met het gewone
huishoudelijk afval weg.
Let op, kleine knoopbatterijen zoals
gebruikt in gehoorapparaten, speelgoed,
spellen en andere apparatuur kunnen
eenvoudig door kleine kinderen worden
ingeslikt en dit is gevaarlijk.
Houd losse knoopbatterijen uit de nabijheid
van jonge kinderen.
Zorg dat het batterijcompartiment
vergrendeld is.
Raadpleeg een arts als u denkt dat een
knoopbatterij werd ingeslikt.
NL-5
03_AXM649BT_NL_P41013409-A101_4 Mar 13 indd 5 2013-3-14 10:28:44
Page 62

Inhoudsopgave
Hoe het apparaat op een veilige manier gebruiken .......................................................... 1
Belangrijke mededelingen ................................................................................................ 2
Laserproduct .............................................................................................................................................. 3
Juiste hantering van de batterijen .............................................................................................................. 3
Batterijveiligheidsrichtlijnen ..............................................................................................4
Inhoud van de verpakking ................................................................................................7
Beschrijving van het product ............................................................................................8
De CD-speler ............................................................................................................................................. 8
De versterker .............................................................................................................................................8
Beschrijving van de afstandsbediening ............................................................................ 9
De batterijen installeren ........................................................................................................................... 10
De afstandsbediening hanteren ............................................................................................................... 10
Werkingsbereik van de afstandsbediening ...............................................................................................11
Aansluitingen .................................................................................................................. 12
De FM-antenne aansluiten ....................................................................................................................... 13
De luidsprekers aansluiten ....................................................................................................................... 13
Randapparatuur aansluiten ...................................................................................................................... 13
Besturingskabel aansluiten ...................................................................................................................... 14
Het AC-snoer aansluiten .......................................................................................................................... 14
ECO-stroom/stand-byfuncties ........................................................................................14
In-/uitschakelen ........................................................................................................................................ 14
Het systeem op de ECO-stroom/stand-bymodus instellen ..................................................................... 14
De klok instellen ............................................................................................................15
De klok handmatig instellen ................................................................................................................. 15
De klok automatisch instellen ..............................................................................................................15
De klok weergeven ..............................................................................................................................15
Geluidskwaliteit............................................................................................................... 15
Het volume regelen .................................................................................................................................. 15
De superbas regelen ................................................................................................................................ 15
Het basgeluid regelen .............................................................................................................................. 15
De hoge tonen regelen ............................................................................................................................15
De geluidssterkte regelen ........................................................................................................................ 15
De equalizer vooraf instellen .................................................................................................................... 15
De helderheid van het frontpaneel wijzigen ............................................................................................. 15
Naar radio-uitzendingen luisteren................................................................................... 16
Op een radiosta ion afstemmen ............................................................................................................... 16
Voorkeurstations instellen ........................................................................................................................ 16
De FM-ontvangstmodus wijzigen ............................................................................................................. 16
FM-displaymodi ........................................................................................................................................ 17
CD-werking ..................................................................................................................... 18
CD’s afspelen ........................................................................................................................................... 18
Een bepaalde track rechtstreeks kiezen .................................................................................................. 18
Zoeken en afspelen .................................................................................................................................18
Zoeken ..................................................................................................................................................... 18
Tekstweergave tijdens het afspelen ........................................................................................................ 18
Programma afspelen ................................................................................................................................ 18
Willekeurig afspelen (CD en MP3-discs) .................................................................................................18
Het begin (intro) van elke track afspelen .................................................................................................19
Herhaald afspelen (CD) ........................................................................................................................... 19
NL-6
03_AXM649BT_NL_P41013409-A101_4 Mar 13 indd 6 2013-3-14 10:28:44
Page 63

MP3/WMA-disc afspelen ...............................................................................................19
Herhaald afspelen (MP3-disc) .................................................................................................................20
De USB gebruiken ......................................................................................................... 20
Voor apparatuur met een USB-kabel: ...................................................................................................... 20
Voor geheugenkaarten: ............................................................................................................................ 20
Gegevensbescherming bij USB-opslagapparatuur ................................................................................. 20
De alarmtimer instellen ................................................................................................... 22
De alarmtimer in-/uitschakelen ....................................................................................... 22
De slaaptimer instellen ...................................................................................................22
Discs hanteren................................................................................................................23
Probleemoplossing ......................................................................................................... 24
Specicaties ...................................................................................................................25
NL-7
03_AXM649BT_NL_P41013409-A101_4 Mar 13 indd 7 2013-3-14 10:28:44
Page 64

Inhoud van de verpakking
Controleer of de volgende onderdelen in de verpakking aanwezig zijn.
Het apparaat
Luidsprekers x 2
Luidsprekerkabel x 2 FM-antenne
INSTRUCTON MANUAL
NOTCE D UT LISAT ON
GEBRUIKSAANWJZING
MANUALE DI ISTRUZIONI
MANUAL DE NSTRUCCIONES
NÁVOD K OBSLUZE
NÁVOD NA OBSLUHU
KULLANMA KI AVUZU
AXM649BT
Buetoo h M cro system
Mcro Cha ne Blue oo h
Buetoo h M crosys eem
Sstema Mic o Hi Fi Buetoo h
B fre op ra ng pease ead t ese nsr cto s th ro ghy
Lsez a eni ement ete no ce dut i ai n n oa ié av nt du iser e podut
Voo geb uk ees d ze gebuks anwj i g ro dg oor
Prma di tl za e l ro oto eg ere aen amene le sr zi ni
Lea d tei amen e s as i sru cones a tes de tlz r el paato
Ne l za nee sro pouí at p tte s pr s m poo n teto ná od
Pr d pus e ím si pzo ne pr ta e ávod
Lüfen al rmad n nce bu aima arn t m mnı kuy n
Voetstuk
Gebruiksaanwijzing
Mcrocadena B uetooth
Buetoo h mikrosys ém
Buetoo h mikrosys ém
Buetoo h Mü ik Se i
Afstandsbediening
(batterij meegeleverd)
Besturingskabel
NL-8
03_AXM649BT_NL_P41013409-A101_4 Mar 13 indd 8 2013-3-14 10:28:47
Page 65

Beschrijving van het product
FM
ANTENNA
CABLE
AUX IN 1
LRL
R
AUX IN 2
CABLE
AC
SPEAKER O UTPUT( )
De CD-speler
1. Stand-by knop
2. Klok knop
3. Modus knop
4. USB-aansluiting
5. Afstandssensor
6. Vacuüm-uorescentiedisplay (VFD)
Display Lens
7. Disclade
8. Snel doorspoelen knop (C)
Vooruit afstemmen knop
Terugspoelen knop (D)
Achteruit afstemmen knop
Volgende knop ( G )
Preset omhoog schakelaar
Vorige knop (H)
Preset omlaag schakelaar
Afspelen/Pauze knop (BF)
9. Open/Dicht knop(K)
10. Stop knop(L)
11. Bluetooth antenne
12. Aansluiting voor besturingskabel
13.
AUX1-ingangsaansluitpunten (L&R) (AUX IN1)
14.
AUX2-ingangsaansluitpunten (L&R) (AUX IN2)
15. FM-antenne
De versterker
1. Koptelefoonaansluiting
2. Basregelaar
3. Hoge tonen-regelaar
4. Volumeregelaar
5. Functiekiezer
6. AC-snoer
7. Stroomkabelaanlsluiting
8.
Luidspreker-uitgangsaansluitklemmen (L&R)
03_AXM649BT_NL_P41013409-A101_4 Mar 13 indd 9 2013-3-14 10:28:48
NL-9
Page 66

Beschrijving van de afstandsbediening
1. Stand-by knop
2. Discfunctieknop
3. FM knop
4. Modus knop (
AUX
DISPLAY
5. Intro knop (
6. Geluidssterkte knop (
7. Preset Equalizer knop (
8. Klok knop (
9. Volgende knop
Preset omhoog schakelaar
10. Terugspoelen knop
Achteruit afstemmen knop
11. Vorige knop
Preset omlaag schakelaar
12. Afspelen/Pauze knop
13. Album omhoog knop (
14. Album omlaag knop (
15. Demping knop (
16. Cijfer knop (
17. Open/Dicht knop
18. USB-functieknop
19. AUX functieknop (
Bluetooth knop
20. A-B herhalen knop (
21. Dimmer knop (
22. Superbas knop (
23. Slaap knop (
24. Timer knop (
25. Displayknop (
RDS-display
26. Snel doorspoelen knop
Vooruit afstemmen
27. Stop knop
Koppeling wissen knop (
28. Volume omhoog knop (
29. Volume omlaag knop (
30. Programma knop (
MODE
INTRO
CLOCK
G
H
0~9, 10+
DIM )
SLEEP
TIMER
DISPLAY
L
)
)
LOUDNESS
P-EQ )
)
D
BF
ALB + )
ALB - )
MUTE
)
)
K
AUX 1 / AUX 2
A-B
S-BASS
)
)
)
C
PAIRING
VOL+
VOL-
PROG
)
)
)
)
)
)
)
)
NL-10
03_AXM649BT_NL_P41013409-A101_4 Mar 13 indd 10 2013-3-14 10:28:48
Page 67

De batterijen installeren
1. Verwijder het isolatiestrookje van de batterij.
Deze bevindt zich onderaan de afstandsbediening.
2. Maak de schroef op het batterijdeksel met
een schroevendraaier los. Haal de
batterijhouder met uw vingernagels uit.
3. Breng een nieuwe (2025) batterij juist in
en plaats de batterijhouder opnieuw in de
originele positie. Draai de schroef met
behulp van een schroevendraaier vast.
De afstandsbediening hanteren
Haal de batterijen uit de afstandsbediening als u deze gedurende een lange periode niet zult
•
gebru ken.
Om mogelijke defecten te vermijden, lees de volgende instructies en gebru k de
•
afstandsbediening op een juiste manier.
Zorg dat er niets op de afstandsbediening valt.
•
Mors geen water of een andere vloeistof op de afstandsbediening.
•
Plaats de afstandsbediening niet op een nat voorwerp.
•
Stel de afstandsbediening niet bloot aan direct zonlicht of bronnen met overmatige hitte.
•
Gebruik geen agressieve schoonmaakmiddelen (bijv. voor porselein, roestvrij staal, toilet of
•
ovens) op de afstandsbediening, dit kan schade veroorzaken.
Opmerking:
Verwijder de batterij als u de afstandsbediening gedurende een lange periode niet zult gebruiken.
Zo niet kan de afstandsbediening door het lekken van de batterij schade oplopen.
NL-11
03_AXM649BT_NL_P41013409-A101_4 Mar 13 indd 11 2013-3-14 10:28:49
Page 68

30° 30°
Max. 5 m
A X
DS LAY
Werkingsbereik van de afstandsbediening
Richt de afstandsbediening niet verder dan 5 meter naar de sensor van de afstandsbediening en
binnen een hoek van 30° horizontaal en 30° verticaal naar de voorzijde van het apparaat. De werkingsafstand kan verschillen naar gelang de helderheid van de kamer.
Opmerking:
Zorg dat er zich geen obstakel tussen de infrarood afstandssensor van het apparaat en de
•
afstandsbediening bevindt. Als u het apparaat in een kast, enz. installeert, is het mogelijk dat het
werkingsbereik afneemt door de dikte of kleur van de glazen deur van de kast.
Stel de infrarood afstandssensor niet bloot aan direct zonlicht of ander fel licht, zoals TL-verlichting.
•
NL-12
03_AXM649BT_NL_P41013409-A101_4 Mar 13 indd 12 2013-3-14 10:28:49
Page 69

M
N NN
N
N
N N
N
N
Aansluitingen
Waarschuwing: Maak alle aansluitingen voordat u de stekker in een AC-stopcontact steekt.
Lees deze extra installatie-instructies voor gebruik.
Het niet juist opvolgen van deze stappen kan schade aan het apparaat veroorzaken.
Stel het apparaat correct op door volgende stappen uit te voeren:
1. Sluit eerst de luidsprekerkabels en besturingskabel tussen de CD-speler en versterker aan.
2. Eenmaal bovenstaande kabels juist zijn aangesloten, steek de stekker van het AC-snoer in een
stopcontact.
Waarschuwing:
i) Als u bovenstaande stappen omdraait en eerst de stekker in het stopcontact steekt, zal
dit tot defect van het apparaat leiden.
ii) Tijdens de werking, als de besturingskabel opnieuw dient aangesloten te worden, haal
eerst de stekker uit het stopcontact. Zo niet kan dit schade aan het apparaat veroorzaken.
Luidspreker Luidspreker
Hoofdeenheid
AC-snoer
AC-snoer
AC-snoer
Luidspreker Luidspreker
Hoofdeenheid
AC-snoer
NL-13
03_AXM649BT_NL_P41013409-A101_4 Mar 13 indd 13 2013-3-14 10:28:50
Page 70

De FM-antenne aansluiten
AN
TENNA
CABLE
AUX N 1
L
R R
AUX N 2
A
C
SP AKE R UTP T )
FM
ANTENNA
CABLE
AUX N 1
LRL
R
AUX N 2
AUX IN 2
AUX IN 1
ANTENNA
LRL
FM
CABLE
R
ANTENNA
FM
antenne aansluiting achteraan het apparaat aan.
Waarschuwing:
Om geruis te voorkomen, houd de antenne uit de
buurt van het apparaat, de aansluitkabel en het
AC-snoer.
De luidsprekers aansluiten
Sluit de meegeleverde FM-antenne op de FM-
Sluit de luidsprekerkabels op de aansluitklemmen aan, zoals hieronder weergegeven.
Sluit de kabel met een zwart uiteinde aan op de (-) aansluitklem en de kabel met een rood uiteinde
op de (+) aansluitklem.
Versterker
Rechter luidspreker
Achteraanzicht
Linker luidspreker
Achteraanzicht
Randapparatuur aansluiten
Sluit de AUX IN 1 aansluitpunten achteraan het apparaat op de lijn uitgangsaansluitpunten van het
randapparaat aan met behulp van een audiokabel (niet meegeleverd), zoals hieronder afgebeeld.
De CD-speler
Randapparaat
Sluit de AUX IN 2 aansluitingen op dit apparaat aan op de audio uitgangsaansluitingen op het randapparaat, zoals hieronder weergegeven.
De CD-speler
Randapparaat
03_AXM649BT_NL_P41013409-A101_4 Mar 13 indd 14 2013-3-14 10:28:51
NL-14
Page 71

FM
ANTENNA
ABLE
AUX N 1
LRL
R
AUX IN 2
CABL
AC
SPEAKER O UTPU (6 )
Besturingskabel aansluiten
Sluit de vermogenskabel tussen de CD-speler en de versterker aan.
De CD-speler
De versterker
Het AC-snoer aansluiten
Steek de stekker van het AC-snoer in een stopcontact en uw apparaat is klaar voor gebru k.
Waarschuwing: * Haal de stekker uit het stopcontact als u de woning verlaat of wanneer het
apparaat gedurende een lange periode niet gebruikt zal worden.
* De netstekker wordt gebruikt om het apparaat van de stroom los te koppelen en
deze moet steeds eenvoudig bereikbaar zijn.
ECO-stroom/stand-byfuncties
In-/uitschakelen
Het apparaat bevindt zich in de stand-bymodus als u de stekker in een stopcontact steekt
Standby
knop om het apparaat in te schakelen. Het woord “HELLO” verschijnt op
Standby
knop om het apparaat op de stand-bymodus in te stellen. De woorden “BYE
CLOCK
knop om de klok op de LCD weer te geven.
NL-15
• Druk op de
het display.
• Druk op de
BYE” verschijnen op het display.
Het systeem op de ECO-stroom/stand-bymodus instellen
Druk en houd de stand-by knop gedurende minstens 2 seconden ingedrukt om naar ECO
Stroom stand-by of Normaal stand-by te schakelen.
* ECO-stroom stand-bymodus
De klok wordt niet weergeven. Druk op de
* Normale stand-by modus
De klok wordt op de LCD weergegeven.
03_AXM649BT_NL_P41013409-A101_4 Mar 13 indd 15 2013-3-14 10:28:51
Page 72

De klok instellen
De klok handmatig instellen
1. Stel het apparaat op de ECO-stroom stand-bymodus in.
2. Druk en houd de klok knop (
begint te knipperen.
3. Stel het uur met de Volume omhoog/omlaag knop (
4. Druk op de klok knop (
5. Stel de minuten met de Volume omhoog/omlaag knop (
6. Druk op de klok knop (
Opmerking:
• Als de klokinsteltijd voor elke stap langer wordt, zal de klokinstelmodus geannuleerd worden.
• De klokinstelling gaat verloren als een stroomuitval zich voordoet of het snoer losgekoppeld is.
De klok automatisch instellen
Stem af op een RDS station en wacht enkele minuten. Om te bevestigen, druk op de klok knop (
De klok weergeven
In de stand-bymodus, druk op de klok knop (
Geluidskwaliteit
Het volume regelen
Om het volume te verhogen of te verlagen, draai de volumeregelaar (
of druk op de volume omhoog/omlaag knoppen (
De superbas regelen
U kunt het basgeluid verhogen om een r jke, volle bas op een laag volume te krijgen.
Druk op de superbas knop (
versch jnt op het frontpaneel. Druk nogmaals op de superbas knop (
Het basgeluid regelen
Draai de BASS knop op de versterker met de klok mee of tegen de klok in om de intensiteit van het
basuitgangsgeluid aan te passen.
De hoge tonen regelen
Draai de TREBLE knop op de versterker met de klok mee of tegen de klok in om de intensiteit van
het hoge tonen-uitgangsgeluid aan te passen.
De geluidssterkte regelen
Dit apparaat is voorzien van een geluidssterktefunctie, deze verhoogt automatisch het basgeluideffect bij
een laag volume. Deze kan tevens het basgeluideffect bij een hoog volume verhogen, maar deze is relatief
lager. Druk op de Geluidssterkte knop (
openen, het pictogram “
De equalizer vooraf instellen
U kunt het geluid aanpassen door een van de 5 preset equalizers te kiezen. Druk herhaaldelijk op
de Preset Equalizer knop (
CLOCK
) ingedrukt, de VFD geeft CLOCK SET weer en CLOCK 24
VOL+/-
) of Vorige/Volgende knop (H/G) in.
CLOCK
) en de minutenweergave knippert.
VOL+/-
) of Vorige/Volgende knop (H/G) in.
CLOCK
) en de ingebouwde klok wordt in werking gesteld.
CLOCK
CLOCK
).
- VOLUME +
VOL +/-
) op de afstandsbediening.
S-BASS
) op de afstandsbediening om het baseffect te kr jgen, het woord “DBB”
S-BASS
) om het effect te annuleren.
LOUDNESS
” verschijnt op het frontpaneel, druk nogmaals om het pictogram te verwijderen.
P-EQ
) om de volgende opties te doorlopen:
FLAT POP JAZZ ROCK CLASSIC
) op de afstandsbediening om de geluidssterktefunctie te
) op het apparaat
).
De helderheid van het frontpaneel wijzigen
Dit apparaat is voorzien van drie helderheidsniveaus om het klokdisplay te regelen. Druk herhaaldelijk op de
dimmer regelknop (DIM) op het frontpaneel of de afstandsbediening om de gewenste helderheid te kiezen.
NL-16
03_AXM649BT_NL_P41013409-A101_4 Mar 13 indd 16 2013-3-14 10:28:51
Page 73

Naar radio-uitzendingen luisteren
U kunt naar FM-stations luisteren. Het station kan handmatig of automatisch worden afgestemd of
uit voorkeurstations worden gekozen.
Waarschuwing:
Alvorens naar de radio te luisteren, controleer of de FM-antenne juist is aangesloten en op de juiste
lengte en richting is ingesteld.
Op een radiostation afstemmen
1.
Draai de functiekiezer (
afstandsbediening. Het woord “TUNER” wordt op het frontpaneel weergegeven.
2. Selecteer een radiostation met behulp van een van de volgende methodes.
Automatisch afstemmen
Druk en houd de achteruit/vooruit afstemmen knop (D/C) op de afstandsbediening gedurende
minstens één seconde ingedrukt en de frequentie gaat automatisch omlaag of omhoog totdat een
radiostation wordt gevonden.
Handmatig afstemmen
Druk herhaaldelijk op de achteruit/vooruit afstemmen knop (D/C) op de afstandsbediening
om de frequentie te w jzigen totdat u de gewenste radiostation hebt gevonden.
Op voorkeurstations afstemmen (Alleen mogelijk als er voorkeurstations zijn ingesteld)
Druk herhaaldelijk op de preset omhoog/omlaag knop (H/G) op de afstandsbediening of
op het apparaat om het gewenste voorkeurstation te selecteren. De band en frequentie van het
voorkeurstation worden op het frontpaneel weergegeven.
FUNCTION
) op het apparaat of druk op de tuner functieknop (FM) op de
Voorkeurstations instellen
U kunt tot 20 FM-radiostations handmatig instellen.
Om op het gewenst station af te stemmen:
1. Druk op de programma knop (
voorkeurstation wordt weergegeven.
2. Druk op de Preset Omhoog/Omlaag knop (H/G) op de afstandsbediening om het nummer
van het voorkeurstation te selecteren.
Opmerking: Als u een cijfer hoger dan 20 selecteert, wordt deze automatisch in “1” gewijzigd.
3. Druk nogmaals op de programma knop (
terug naar het uitzendfrequentie-display.
4. Herhaal bovenstaande stappen 1 tot 3 voor elk radiostation dat u in het geheugen als een
voorkeurstation wilt opslaan.
Opmerking: De voorkeurstations blijven behouden wanneer het apparaat wordt losgekoppeld of
een stroomuitval zich voordoet.
PROG
) op de afstandsbediening en het nummer van het
PROG
) om het station op te slaan. Het apparaat keert
De FM-ontvangstmodus wijzigen
Druk op de modus knop (
ontvangst wordt verkregen.
MODE
) om het stereo- of monokanaal te selecteren zodat de beste FM-
NL-17
03_AXM649BT_NL_P41013409-A101_4 Mar 13 indd 17 2013-3-14 10:28:51
Page 74

FM-displaymodi
Telkens u op de
radiostation, frequentie, programmatype, radiotekst, datum / klok.
De informatie wordt in het onderste deel van het display weergegeven.
Naam van radiostation
Als een RDS-station wordt ontvangen, worden de naam
van het radiostation weergegeven
Programmatype
Identicatiesignaal van het programmatype.
(Bijvoorbeeld: Nieuws, Rock, Klassieke muziek.)
Tijd
Het is mogelijk dat het RDS-KLOK systeem niet correct
werkt in gebieden waar de RDS-CLOCK service niet
besch kbaar is. Eenmaal de RDS-KLOK service
besch kbaar is, start het RDS-KLOK systeem.
DISPLAY
knop drukt, zal het display de volgende displaymodi doorlopen: Naam van
Programmatype
Naam van
radiostation
Tijd
Radiotekst
Dit geeft een omschrijving van het radiostation weer.
Frequentie
Dit geeft de frequentie van het huidig station weer, bijv.
89.80 MHz.
Radiotekst
Frequentie
NL-18
03_AXM649BT_NL_P41013409-A101_4 Mar 13 indd 18 2013-3-14 10:28:51
Page 75

CD-werking
CD’s afspelen
1. Draai de functiekiezer (
afstandsbediening. Het woord “DISC” wordt op het frontpaneel weergegeven.
2. Druk op de Open/dicht knop (K) om de CD-deur te openen en de disc op de disclade (met de
bedrukte zijde omhoog) te plaatsen
3. Druk op de Open/dicht knop (K) om de CD-deur te sluiten, het apparaat zal de disc lezen en
deze automatisch afspelen.
Opmerking: In de stopmodus, druk op de Afspelen/pauze knop (BF) om het afspelen van de
disc te starten.
4. Druk op de Afspelen/pauze knop (BF) om het afspelen te pauzeren, druk nogmaals om het
afspelen te hervatten.
5. Druk op de Stop knop (L) om het afspelen van de disc te stoppen.
Een bepaalde track rechtstreeks kiezen
Plaats een disc. Eenmaal de disc is gelezen, kunt u tracks met behulp van de cijferknoppen (0-9,10+)
op de afstandsbediening selecteren en afspelen.
Als het tracknummer lager dan 10 is, druk op de cijferknoppen 0-9.
Als het tracknummer hoger dan 10 is, druk op de cijferknop (10+) en druk op een van de
c jferknoppen 0-9. Elke druk op 10+ verhoogt het tiental met 1, bijv. 10, 20, 30, dus voor track ‘22’
druk tweemaal op ‘10+’ en vervolgens op ‘2’.
Zoeken en afspelen
Druk één of meerdere keren op de vorige knop (
disc terug te keren.
Druk één of meerdere keren op de volgende knop (G) om naar één of meerdere tracks op de
disc verder te gaan.
Zoeken
Druk en houd de Terugspoelen knop (D) of Snel doorspoelen knop (C) ingedrukt om naar de
gewenste startpositie voor afspelen te gaan.
Tekstweergave tijdens het afspelen
Druk op de display knop (
speelt jd te tonen.
Programma afspelen
U kunt tot 20 nummers programmeren om deze in uw gewenste volgorde af te spelen. De speler
dient zich in de stopmodus te bevinden met een CD ingebracht.
1. Breng een disc in en druk op de Stop knop (L) wanneer deze start met afspelen.
2. Druk op de Programma knop
3. Druk op de cijferknoppen (
afstandsbediening om het gewenste tracknummer te selecteren.
4. Druk op de Programma knop
5. Herhaal stappen 3 en 4 om alle andere gewenste nummers te selecteren en op te slaan.
6. Druk op de Afspelen/pauze knop (BF) om het geprogrammeerd afspelen te starten.
7. Druk eenmaal op de Stop knop (L) om het afspelen van het programma te stoppen. Druk
tweemaal op de Stop knop (L) om het programma te wissen.
Opmerking: Het willekeurig afspelen zal de geprogrammeerde muzieklijst niet shuffelen.
Willekeurig afspelen (CD en MP3-discs)
De CD kan willekeurig worden afgespeeld..
Druk eenmaal op de Willekeurige knop (
pen (H/G) om het willekeurig afspelen te starten.
FUNCTION
DISPLAY
(PROG)
0-9, +10
(PROG)
) op het apparaat of druk op de Disc functieknop ( CD ) op de
H
) om naar één of meerdere tracks op de
) om het nummer van de huidige track en de resterende af-
, “
) of de Vorige/Volgende knoppen (H/G) op de
om het tracknummer dat u wilt opslaan te bevestigen.
RANDOM)
” verschijnt.
en druk vervolgens op de Vorige/volgende knop-
NL-19
03_AXM649BT_NL_P41013409-A101_4 Mar 13 indd 19 2013-3-14 10:28:53
Page 76

Het begin (intro) van elke track afspelen
).
INTRO
) op de afstandsbediening om opeenvolgend het begin van elke track
MODE
) om EEN of ALLES herhalen in te stellen.
REP ALL
TRK
” knippert.
TRK
REP
” en “
” knipperen.
” bl jft branden en “
SHUF
” verdwijnt.
TRK
SHUF
” bl jft
” knippert.
Druk op de Intro knop (
af te spelen. De afspeelt jd van elke track is 10 seconden. Als u de gewenste track hoort, druk op
de Intro knop (
INTRO
Herhaald afspelen (CD)
Druk op de modus knop (
Eerste druk : Om dezelfde track te herhalen, de woorden “
Tweede druk : Om alle tracks op een disc herhaaldelijk af te spelen, het woord “
branden en “
Derde druk: : Om tracks willekeurig af te spelen, het woord “
Vierde druk : Om het herhaald afspelen te annuleren, het woord “
Druk op de Herhalen A-B knop (
A-B
) om herhalen A-B in te stellen.
Eerste druk : Selecteer het startpunt, het woord “A-” blijft branden.
Tweede druk : Selecteer het eindpunt, het woord “A-B” blijft branden.
Derde druk : Om het herhaald afspelen te annuleren, het woord “A-B” verdwijnt.
Opmerking: De A-B herhaalfunctie kan alleen binnen dezelfde track gebruikt worden.
MP3/WMA-disc afspelen
Opmerking: Het afspelen van MP3/WMA vanaf een CD kan worden beïnvloed door het type en
formaat van de disc of de opnamekwaliteit. Als u problemen ondervindt bij het afspelen van een
bepaalde disc, is het aanbevolen om de USB-ingang te gebruiken voor de beste afspeelkwaliteit
van MP3/WMA.
Tijdens het selecteren van de track, geeft de speler automatisch het nummer van het a bum en de
track weer. B jvoorbeeld: tracknummer 21 kan van album 3, track 7 zijn.
1. Draai de functiekiezer (
afstandsbediening. Het woord “DISC” wordt op het frontpaneel weergegeven.
2. Druk op de Open/dicht knop (K) om de CD-deur te openen en de MP3/WMA disc op de
disclade te plaatsen
3. Druk op de Display knop (
artiest) wordt weergegeven of “NO ID3” wordt weergegeven als er geen ID3-informatie
aanwezig is. Druk nogmaals op deze knop om het album, track en afspeeltijd weer te geven.
4. Tijdens het afspelen van MP3 / WMA-discs wordt het huidig album en track weergegeven.
5. Druk op de Vorige / Volgende knoppen (H/G) om de vorige/volgende track te selecteren.
Druk gedurende enkele seconden op de Terugspoelen / snel doorspoelen knoppen (D, C)
om terug of snel door te spoelen.
6. Druk op de Album omhoog knop (
om het volgende/vorige a bum te selecteren en de eerste track van dit a bum af te spelen.
Als het afspelen is beëindigd, druk op de Album omhoog knop (
ALB-
(
) op de afstandsbediening om het volgende/vorige album te selecteren.
Kies vervolgens de track met de Volgende knop (G) of Vorige knop(H).
7. Druk op de Afspelen/pauze knop (BF) om de disc af te spelen.
8. Om het afspelen te stoppen, druk op de Stop knop (L).
Opmerking: Het afspelen gaat verder tot aan de laatste track wanneer de geselecteerde tracks
afgespeeld zijn.De eerste 2 cijfers van het display zijn het nummer van het album, de volgende 3
het nummer van de track en de resterende cijfers geven de minuten en seconden weer.
FUNCTION
DISPLAY
) op het apparaat of druk op de Disc functieknop (CD) op de
) op de afstandsbediening, ID3-informatie (titel van liedje en
ALB+
) of Album omlaag knop (
ALB-
) op de afstandsbediening
ALB+
) of Album omlaag knop
NL-20
03_AXM649BT_NL_P41013409-A101_4 Mar 13 indd 20 2013-3-14 10:28:53
Page 77

Herhaald afspelen (MP3-disc)
Druk op de modus knop (
Eerste druk : Om dezelfde track te herhalen, de woorden “
Tweede druk : Om het album willekeurig af te spelen, het woord “
ALB
Derde druk : Om alle tracks op een disc herhaaldelijk af te spelen, het woord “
branden en “
Vierde druk
: Om tracks willekeurig af te spelen, het woord “
V jfde druk : Om het herhaald afspelen te annuleren, het woord “
MODE
” knippert.
) om EEN, ALB of ALLES herhalen in te stellen.
REP ALL
TRK
” knippert.
TRK
REP
” en “
TRK
” blijft branden en “
” bl jft branden en “
SHUF
” verdwijnt.
” knipperen.
TRK
SHUF
REP
” bl jft
” knippert.
Druk op de Herhalen A-B knop (
A-B
) om herhalen A-B in te stellen.
Eerste druk : Selecteer het startpunt, het woord “A-” blijft branden.
Tweede druk : Selecteer het eindpunt, het woord “A-B” blijft branden.
Derde druk : Om het herhaald afspelen te annuleren, het woord “A-B” verdwijnt.
Opmerking: De A-B herhaalfunctie kan alleen binnen dezelfde track gebruikt worden.
De USB gebruiken
Sluit een USB-massa-opslagapparaat (waaronder een USB-ashgeugenstick, USB-ashspeler of geheugenkaart) op dit apparaat aan
om te genieten van de muziek die op het USB-toestel is opgeslagen.
1. Breng de USB-stekker van het USB-toestel in de
aansluiting vooraan het apparaat in.
2. Druk op de USB functieknop (
of draai de functiekeuzeknop op de versterker om de
USB-functie te selecteren. Het woord “USB” wordt op het
frontpaneel weergegeven.
3. De muziek, die op het USB-toestel opgeslagen is, wordt
automatisch afgespeeld.
4. Als er meerdere mappen op de USB-ash opgeslagen zijn,
gebru k de A bum omhoog knop (
ALB-
(
) op de afstandsbediening om naar de volgende/vorige
map te gaan. Kies vervolgens de track met de Volgende knop
(G) of Vorige knop (H) om de map af te spelen.
Voor apparatuur met een USB-kabel:
1.
Breng een uiteinde van de USB-kabel (niet meegeleverd) in de aansluiting op het apparaat.
2. Steek het andere uiteinde van de USB-kabel in de USB-uitgangsaansluiting van het USB-toestel.
Voor geheugenkaarten:
1. Breng de geheugenkaart in een kaartlezer (niet meegeleverd).
2. Gebruik een USB-kabel (niet meegeleverd) om de kaartlezer op de aansluiting op het
apparaat aan te sluiten.
Gegevensbescherming bij USB-opslagapparatuur
Breng het USB-apparaat altijd in de juiste richting in. Zo niet kan dit schade aan het
USB-apparaat en dit apparaat veroorzaken.
Verwijder het USB-apparaat niet wanneer deze wordt geraadpleegd.
Elektrische storing en elektrostatische ontlading kan een verkeerde werking of schade aan het
USB-apparaat veroorzaken en tot verlies van gegevens leiden.
Het is daarom aanbevolen om een back-up van belangrijke gegevens op een PC te maken om tegen corruptie, verlies van gegevens of verkeerde werking van het apparaat beschermd te zijn. We
zijn niet aansprakelijk voor schade of verlies van de opgeslagen gegevens.
Opmerking: De USB-verbinding is niet compat bel met alle harde sch jfmodellen.
NL-21
USB
) op de afstandsbediening
ALB+
) of A bum omlaag knop
03_AXM649BT_NL_P41013409-A101_4 Mar 13 indd 21 2013-3-14 10:28:53
Page 78

Vanaf Bluetooth apparaat afspelen
Met dit apparaat is het mogelijk om naar audiobestanden vanaf een speler te luisteren in het geval
een Bluetooth-verbinding voorhanden is.
Bluetooth-geactiveerde apparatuur koppelen
Om uw Bluetooth-apparaat met het apparaat te verbinden, dient u deze aan elkaar te koppelen.
Het koppelen dient slechts eenmaal te gebeuren.
Opmerking:
* Het werkingsbere k tussen dit apparaat en een Bluetooth-apparaat is circa 10 meter.
* Alvorens een Bluetooth-apparaat met dit apparaat te verbinden, maak uzelf vertrouwd met de
Bluetooth-eigenschappen van het apparaat.
* De compatibiliteit met alle Bluetooth-apparaten is niet gewaarborgd.
* E k obstakel tussen dit apparaat en een Bluetooth apparaat kan het werkingsbere k verkleinen.
* Houd dit apparaat uit de buurt van een ander elektronisch apparaat om storing te voorkomen.
1. Druk op de
2. Schakel de Bluetooth-functie op uw apparaat in.
3. Zoek naar het ander Bluetooth-apparaat met uw apparaat.
4. Selecteer “
5. Voer, indien nodig, het standaard wachtwoord “
6. Druk en houd de Koppeling wissen knop (
om de koppelingsmodus te wissen.
Opmerking:
* Het apparaat wordt tevens losgekoppeld als het apparaat buiten het werkingsbereik wordt
verplaatst.
* Als u de koppeling opnieuw wilt maken, plaats het apparaat binnen het werkingsbereik.
* Het apparaat wordt met het reeds gekoppelde Bluetooth-apparaat verbonden en de
koppelingsmodus wordt tevens geopend. U kunt ook naar andere Bluetooth-apparatuur zoeken
waarmee u een koppeling of verbinding wilt maken.
* Als het apparaat van het Bluetooth-apparaat is losgekoppeld, wordt de koppelingsmodus
automatisch geopend en kunt u naar andere Bluetooth-apparatuur zoeken waarmee u een
koppeling of verbinding wilt maken.
Naar muziek vanaf een Bluetooth-apparaat luisteren
Als het verbonden Bluetooth-apparaat Advanced Audio Distribution Prole (A2DP) ondersteunt,
kunt u via het apparaat naar muziek vanaf het Bluetooth-apparaat luisteren.
1. Maak een koppeling tussen het apparaat en het Bluetooth-apparaat
2. Speel muziek via het apparaat af.
Bluetooth knop op de afstandsbediening of draai de functieknop op het frontpaneel.
AXM649BT
” in de lijst met koppelingen.
PAIRING
0000
” in.
) gedurende meer dan 2 seconden ingedrukt
Vanaf een extern apparaat afspelen
U kunt via dit apparaat naar een audio-apparaat luisteren.
1. Zorg dat het externe audio-apparaat met dit apparaat is verbonden.
2. Druk op de
3. Start om het afspelen vanaf het apparaat te starten (zie gebru ksaanw jzing van het apparaat).
03_AXM649BT_NL_P41013409-A101_4 Mar 13 indd 22 2013-3-14 10:28:53
AUX
knop om de audio-invoer via de AUX IN 1/2 (L en R) aansluitingen te selecteren.
NL-22
Page 79

De alarmtimer instellen
Dit apparaat kan als een alarmklok worden gebruikt. U kunt DISC, USB of TUNER als alarmbron
selecteren.
Opmerking:
■ Zorg dat u de klok juist hebt ingesteld.
1. In de stand-bymodus, druk en houd de Timer knop
totdat [TIMER SET] op het display wordt weergegeven.
/ VOL +/–
2. Druk op de H /
G
knop op de afstandsbediening of het frontpaneel om een bron
te selecteren.
3. Druk op de
4. Druk op de H /
TIMER
knop om te bevestigen. De uurweergave knippert op het display.
/ VOL +/–
G
knop op de afstandsbediening of het frontpaneel om het uur in
te stellen en druk vervolgens nogmaals op de
De minutenweergave knippert op het display.
/ VOL +/–
5. Druk op de H /
G
knop op de afstandsbediening of het frontpaneel om de
minuten in te stellen en druk vervolgens op de
ruk op
VOL +/-
om het volume te regelen en druk vervolgens op de
6. D
Een klokpictogram verschijnt op het display.
De alarmtimer in-/uitschakelen
TIMER
op de afstandsbediening ingedrukt
TIMER
knop.
TIMER
knop om te bevestigen.
TIMER
knop om te bevestigen.
1. In de stand-bymodus, druk herhaaldel jk op de
TIMER
knop.
* Het pictogram wordt weergegeven als de timer ingeschakeld is.
* Het pictogram verdwijnt van het display als de timer uitgeschakeld wordt.
Opmerking:
■ De alarmtimer is niet beschikbaar wanneer de bron op “AUX” is ingesteld.
■
Als de USB-bron is geselecteerd maar geen apparaat is verbonden, wordt het apparaat
automatisch op TUNER ingesteld.
De slaaptimer instellen
Dit apparaat kan na een bepaalde vooraf ingestelde tijd automatisch naar de stand-bymodus
schakelen.
1. Wanneer het apparaat ingeschakeld is, druk herhaaldelijk op de
bepaalde t jd (in minuten) te selecteren:
OFF
120 90
...
45 30 15
Het “ ” pictogram wordt weergegeven als de slaaptimer geactiveerd is.
* Om de slaaptimer uit te schakelen, druk herhaaldelijk op de
verschijnt.
SLEEP
knop om een vooraf
SLEEP
knop totdat [OFF] (slaap uit)
NL-23
03_AXM649BT_NL_P41013409-A101_4 Mar 13 indd 23 2013-3-14 10:28:53
Page 80

Discs hanteren
Voorzorgsmaatregelen bij gebruik
• Houd de disc bij de rand vast zodat het oppervlak niet door vingerafdrukken bevuild wordt. (A)
Vingerafdrukken, vuil en krassen kunnen het overslaan en vervorming veroorzaken.
• Schrijf niets op de labelzijde met een balpen of ander schrijfgerief.
• Maak de disc niet schoon met platenreinigers, benzine, verdunners, vloeistoffen om statische
elektriciteit te voorkomen of andere oplosmiddelen.
• Laat de disc niet vallen en buig deze niet.
• Plaats slechts 1 disc tegelijkert jd in de disclade.
• Probeer niet om de disclade te sluiten als de disc niet juist geplaatst is.
• Berg de disc altijd in z jn doosje op wanneer niet in gebru k.
Als het oppervlak vuil is (B)
• Veeg voorzichtig met een zacht, vochtige (alleen water) doek.
•
Tijdens het afvegen van de disc, beweeg het doek alt jd vanaf het middelste gat naar de buitenrand.
(Als u de disc in cirkelvormige bewegingen afveegt, kunnen cirkelvormige krassen ontstaan die
geruis kunnen veroorzaken.)
• Condensatie op de disc kan zich vormen als de disc vanaf een koude naar een warme ruimte
wordt gebracht. Veeg de condensatie af met een zachte, droge en pluisvrije doek alvorens de
disc te gebru ken.
Verkeerde opslag van discs
U kunt de disc beschadigen als u deze in de volgende plaatsen opbergt:
• Omgeving blootgesteld aan direct zonlicht.
• Vochtige of stofge ruimten.
• Directe blootstelling aan een warmte-uitlaat of verwarmingstoestel.
Het apparaat kan de volgende discformaten afspelen:
Audio CD, CD-R, MP3 en WMA disc.
NL-24
03_AXM649BT_NL_P41013409-A101_4 Mar 13 indd 24 2013-3-14 10:28:53
Page 81

Probleemoplossing
As uw apparaat niet naar behoren werkt, raadpleeg deze lijst voor een mogel jke oplossing alvorens met een reparateur contact op te nemen.
Neem contact op met een gekwaliceerde persoon, zoals uw handelaar, als onderstaande tips het
probleem niet oplossen of het apparaat fysiek beschadigd is.
Probleem Mogelijke oorzaak Handeling
Geen geluid Aansluitingen zijn verkeerd of los Controleer alle aansluitingen en maak
Slechte radio-ontvangst De antenne is losgekoppeld
De disc slaat over De schijf is vuil of beschadigd Reinig of vervang disc
De disc wordt niet
afgespeeld
De afstandsbediening werkt
niet
Er kunnen geen handelingen worden uitgevoerd
Het Bluetooth-apparaat
wordt niet afgespeeld
Het Bluetooth-apparaat kan
geen verbinding met het
systeem maken
De antenne is niet juist uitgetrokken en
gepositioneerd
De disc is ondersteboven ingebracht
De disc is vuil
Het pad tussen de afstandsbediening en de
sensor van de speler is belemmerd
De batterijen zijn leeg
De ingebouwde microprocessor werkt verkeerd door externe elektrische storingen
De audiokwaliteit is zwak na aansluiting.
De Bluetooth-ontvangst is zwak.
Het apparaat ondersteunt geen proelen die
voor het systeem vereist zijn.
De Bluetooth-functie van het apparaat is
niet geactiveerd.
Het systeem bevindt zich niet in de
koppelingsmodus.
Het sys teem i s re eds m et een an der
Bluetooth-geactiveerd apparaat verbonden.
de nodige aanpassingen
Sluit de antenne juist aan
Trek de antenne naar de beste ontvangstpositie uit
Plaats de schijf met het label naar
boven gericht.
Haal de disc uit de speler, veeg met
een schone doek en breng opnieuw in.
Verwijder de belemmering
Vervang de batterijen
Koppel het apparaat los en vervol-
gens opnieuw aan.
Breng het appara at dich ter bij het
systeem of verwij de r el k ob stakel
tussen het apparaat en het systeem.
Zie de gebruikershandleiding van het
apparaat hoe de functie te activeren.
Koppel het apparaat of alle andere
verbonden apparaten los en probeer
opnieuw.
NL-25
03_AXM649BT_NL_P41013409-A101_4 Mar 13 indd 25 2013-3-14 10:28:54
Page 82

Specicaties
Specificaties van apparaat
Stroomeisen : 220-240V ~ 50/60Hz
FM-afstembere k : 87.5~108 MHz
Stroomverbruik : 50W (ECO Stand-by 0,5W)
Uitgaand vermogen : 45W x 2
THD : ≤ 1%
Afmetingen : (CD) 160(B) x 78(H) x 250(D) mm
(Versterker) 160(B) x 78(H) x 250(D) mm
Specificaties van luidspreker
Impedantie : 6
Ingaand vermogen : 50W
Afmetingen : 130(H) x 182(B) x 203(D) mm
Bluetooth specificaties
Communicatiesysteem : Bluetooth Standaard versie 2.1 en EDR-specicatie
Uitvoer : Bluetooth Standaard Vermogenklasse 2
Maximum communicatiebere k : circa 10m
Frequentieband : 2.4 GHz band (2.4000 GHz - 2.4835 GHz) compatibel
Bluetooth proelen : Advanced Audio Distr bution Prole (A2DP) ondersteund
Koppeling van meerdere apparaten : tot 8 apparaten
Ondersteunde codecx (Ontvangen) : SBC(Sub Band Codec)
(Zenden) : SBC(Sub Band Codec)
Ω
Afstandsbediening
Bereik : 6m
Hoek : ±30°
Het apparaat kan de volgende discformaten afspelen:
Audio CD, CD-R, MP3 en WMA disc.
Opmerking: De productinformatie is vatbaar voor wijzigingen zonder voorafgaande kennisgeving.
NL-26
03_AXM649BT_NL_P41013409-A101_4 Mar 13 indd 26 2013-3-14 10:28:54
Page 83

Het teken
2002/96/EC (AEEA). Het teken geeft aan dat het apparaat, inclusief de lege batterijen, NIET met
het huishoudelijk afval mag worden weggegooid, maar moet worden ingeleverd b j de ofciële inzamelpunten.
Als de batterijen of accumulatoren die zich in het toestel bevinden het chemisch symbool Hg, Cd
of Pb dragen, betekent dit dat er zich meer dan 0,0005% kwik, meer dan 0,02% cadmium of meer
dan 0,004% lood in de batter jen bevindt.
Opmerkingen inzake het verwijderen van batterijen
Uw apparaat bevat batterijen, die onder de Europese Richtlijn 2006/66/EC vallen, die niet met het
gewone huishoudelijk afval mogen worden weggegooid. Vraag uw gemeente naar advies over hoe
batterijen op een juiste manier weg te gooien. De juiste verwijdering van batter jen vermijdt een mogelijke negatieve impact op het milieu en de mensel jke gezondheid.
voldoet aan de richtlijn inzake Afgedankte elektrische en elektronische apparatuur
In het onwaarschijnlijke geval dat er zich een probleem voordoet, neem contact op met de winkel
waar u het apparaat hebt gekocht.
We streven er continu naar om onze producten te verbeteren; de specicaties kunnen wijzigen
zonder voorafgaande kennisgeving.
Voor advies waar accessoires te kopen, neem contact op met de winkel waar u het apparaat hebt
gekocht.
Kesa Electricals © UK: EC1N 6TE
NL-27
03_AXM649BT_NL_P41013409-A101_4 Mar 13 indd 27 2013-3-14 10:28:54
Page 84

Darty Group
España France
Darty Hispana S.A. Darty France
Polígono Industrial C.L.A. 129, avenue Gallieni - 93140
Calle Rio Guadalhorce N 4 BONDY,
28906 Getafe (Madrid) France
Ayuda en línea Darty Spain: Hotline Darty France
902 30 30 14
Quels que soient votre panne et le
lieu d'achat de votre produit en
France, avant de vous déplacer en
magasin Darty, appelez le 0 978 970 970
(prix d'un appel local) 7j/7 de 7h a 22h
Belgium Holland
1600 Sint-Pieters-Leeuw
Postbus 75513 ・ 1118 ZN Schiphol
Bellsingel 61 ・ 1119 NT Schiphol Rijk
Belgium. Holland
De dienst na verkoop is Hiervoor kunt u contact opnemen met
bereikbaar van maandag
t/m zaterdag via hulplijn
+32 2 334 00 00
het BCC Service Center : 0900 0555 (10 cent
p/m).
Geopend van maandag t/m vrijdag van
8.00 tot 20.00 uur en zaterdag van 09.00 tot
17.00.
Česká republika Italia
Datart International a.s. Darty Italia
Pernerova 35 Kesa Sourcing Limited – Filiale Italiana
186 00, Praha 8 – Karlin Presso Centro Commerciale
Czech Republic Brianza/Carrefour
Superstrada Milano-Meda, 44
Pomoc číslo Datart Czech Republic:
20037 Paderno Dugnano (MI).
810 328 278.
Per richieste di assistenza o di
informazioni sull’utilizzo di questo
prodotto, indipendentemente dal negozio
Darty in cui lo hai acquistato, puoi
chiamare il numero 199.777.779, dal lunedì
al sabato dalle 08:00 alle 20:00, la
domenica dalle 09:00 alle 17:00
Türkiye Slovenská
Darty Turkey Limited DATART INTERNATIONAL, a.s.
Cumhuriyet Cd. Seyhan ap Zadunajská cesta 10
No:36 K:1 Elmadag 851 01 Bratislava
34367, Istanbul – Turkey Slovenska republika.
Çevrimiçi Yardm Darty Turkey:
0090-212-4448880
08_AXM649BT_TR_41013409_16 Jan 13 indd 27 2013-1-17 9:37:25
Zákaznícka linka Datart Slovenská republika
0850 328 278 9.00 hod.–21.00 hod.
Page 85

Istruzioni per l'uso sicuro del prodotto
Il dispositivo è stato progettato e costruito in conformità agli standard internazionali di sicurezza.
Tuttavia, come per ogni dispositivo elettronico, è necessario adottare alcuni accorgimenti per assicurare i migliori risultati e preservare la sicurezza.
***********************************
Leggere le istruzioni prima di utilizzare il prodotto.
Assicurarsi che tutti i collegamenti elettrici (inclusi presa di corrente, prolunghe e cavi che collegano
i vari elementi del sistema) siano corretti e conformi alle istruzioni del costruttore. Spegnere il dispositivo e scollegarlo dalla presa di corrente prima di stabilire o modicare i collegamenti. In caso di
dubbi sull’installazione, l’uso o la sicurezza dell’apparecchio, consultare il proprio rivenditore.
Fare attenzione ai pannelli in vetro e agli sportelli del dispositivo.
Disporre il cavo di alimentazione in modo che non possa essere calpestato, schiacciato o piegato e
che non sia soggetto a usura o calore eccessivo.
***********************************
Poiché il prodotto contiene tensioni pericolose, non rimuovere i pannelli ssi.
Non ostruire le aperture di ventilazione dell’apparecchio con oggetti quali giornali, tovaglioli, tende,
ecc. Il surriscaldamento potrebbe danneggiare l’apparecchio o ridurre la sua vita utile.
Non appoggiare oggetti contenenti liquidi, ad esempio vasi, sopra gli apparecchi elettrici e non
esporli a gocce o spruzzi.
Non appoggiare oggetti caldi o amme libere come candele o luci notturne accanto o sopra
l’apparecchio. Le alte temperature possono fondere la plastica e provocare incendi.
Non utilizzare supporti di fortuna e non ssare MAI le gambe con viti per legno. Per garantire la
massima sicurezza, utilizzare sempre i supporti approvati dal costruttore e montare le gambe con i
ssaggi forniti insieme al prodotto seguendo le istruzioni.
Non utilizzare apparecchi stereo o radio se ciò potrebbe costituire una distrazione dai rischi connessi al trafco. Guardare la televisione mentre si guida è proibito da legge.
Non utilizzare le cufe ad alto volume per evitare danni permanenti all’udito.
Non lasciare acceso l’apparecchio quando è incustodito, a meno che non sia esplicitamente indicato nelle istruzioni che il prodotto può essere lasciato in funzione senza sorveglianza o in modalità
di standby. Spegnere l’apparecchio utilizzando l’interruttore apposito e assicurarsi che i propri famigliari sappiano come spegnere il prodotto. Potrebbe essere necessario apportare speciali modiche
per consentire l’utilizzo del dispositivo a persone inferme o diversamente abili.
Non continuare a utilizzare l’apparecchio se si sospetta un malfunzionamento oppure se il prodotto
presenta danni di qualsiasi tipo. In tal caso spegnere l’apparecchio, scollegarlo dalla presa di corrente e consultare il proprio rivenditore.
SOPRATTUTTO,
- Vericare che NESSUNO, soprattutto i bambini, introduca oggetti nei fori, nelle fessure o in
qualsiasi apertura del prodotto, poiché ciò potrebbe causare scosse elettriche anche mortali.
- NON tentare in alcun caso di maneggiare un qualsiasi dispositivo elettrico senza le dovute
competenze.
- Prevenire è meglio che curare!
***********************************
IT-1
04_AXM649BT_IT_P41013409-A101_4 Mar 13.indd 1 2013-3-14 10:29:20
Page 86

Per utilizzare il prodotto a lungo e in maniera ottimale, si raccomanda di leggere attentamente
questo manuale per familiarizzarsi con le funzioni dell'apparecchio.
Note importanti
* Relative alla sicurezza e all'uso del prodotto per futuro riferimento.
* Non installare l'apparecchio nei seguenti luoghi:
Luoghi esposti alla luce solare diretta o vicino ad apparecchi che irradiano calore, ad esempio
caloriferi elettrici. Sopra altri apparecchi stereo che irradiano molto calore. Luoghi polverosi o
scarsamente ventilati. Luoghi soggetti a costanti vibrazioni. Luoghi soggetti a umidità o condensa.
* Assicurarsi di non ostruire le aperture di ventilazione.
* Prima di accendere l'apparecchio per la prima volta, assicurarsi che il cavo di alimentazione sia
installato correttamente.
* La presa di corrente è l'unico dispositivo per scollegare l'apparecchio dalla rete elettrica e deve
essere facilmente accessibile.
* Non appoggiare oggetti contenenti liquidi, ad esempio vasi, sopra gli apparecchi elettrici e non
esporli a gocce o spruzzi.
* Per scollegare completamente l'apparecchio dalla rete elettrica è necessario scollegare il cavo
di alimentazione dalla presa di corrente. Scollegare l'apparecchio dalla presa di corrente durante
i temporali, per evitare il rischio di danni causati dai fulmini e dalle uttuazioni di corrente.
* Se la spia di standby e il display non sono illuminati l'apparecchio è spento oppure è scollegato
dalla presa di corrente.
* Lasciare intorno all'apparecchio uno spazio l bro di almeno 10 cm per garantire una sufciente
ventilazione.
* Smaltire le batterie usate conformemente alle normative vigenti in materia di protezione
dell'ambiente.
* La presa di corrente deve essere sempre facilmente accessibile.
* Non ostruire le aperture di ventilazione con oggetti quali giornali, tovaglie, tende, ecc.
* Non appoggiare amme libere sull'apparecchio, ad esempio candele accese.
* Non esporre le batterie a calore eccessivo, ad esempio luce solare diretta, amme vive o simili.
Per motivi di sicurezza, non rimuovere i pannelli né tentare di accedere alle parti interne
dell'apparecchio. Afdare qualsiasi riparazione a personale qualicato.
Non tentare di rimuovere le viti o di aprire l'apparecchio. Il prodotto non contiene parti riparabili
dall'utente. Afdare qualsiasi riparazione a personale qualicato.
ATTENZIONE
RISCHIO DI SCOSSA ELETTRI-
CA: NON APRIRE
ATTENZIONE: PER RIDURRE IL RISCHIO DI SCOSSE ELETTRICHE, NON RIMUOVERE
ALCUN COPERCHIO (O PANNELLO POSTERIORE). IL PRODOTTO NON
CONTIENE PARTI RIPARABILI DALL'UTENTE. PER LE RIPARAZIONI,
RIVOLGERSI SEMPRE A PERSONALE QUALIFICATO.
TENSIONE PERICOLOSA
Presenza di alta tensione di potenza tale da costituire un rischio di folgorazione in caso di apertura dell’apparecchio.
ATTENZIONE
Il manuale dell’utente contiene istruzioni importanti relative all’uso e alla manutenzione. Per un uso sicuro, fare sempre riferimento al presente manuale.
AVVERTENZA: PER EVITARE IL RISCHIO DI INCENDI O SCOSSE ELETTRICHE, NON
ESPORRE L'APPARECCHIO A GOCCIOLAMENTI O SPRUZZI.
IT-2
04_AXM649BT_IT_P41013409-A101_4 Mar 13.indd 2 2013-3-14 10:29:20
Page 87

per proteggere l'udito
Nota:
- Se utilizzato a lungo, l'apparecchio diventa caldo. Si tratta di un fenomeno normale.
- Se il display o i pulsanti funzionano in modo anomalo, spegnere e riaccendere l’apparecchio.
- L’etichetta informativa è posizionata sulla base dell’unità.
- The marking information is located at the bottom of apparatus.
Prodotto laser
Il prodotto è dotato di sistema laser a bassa potenza. Per la propria sicurezza, non rimuovere alcun
coperchio né smontare il prodotto. La riparazione deve essere effettuata da personale qualicato.
Attenzione
Questo prodotto è dotato al proprio
CLASSE 1
PRODOTTO LASER
Manutenzione delle batterie
• L'uso improprio o scorretto delle batterie potrebbe causare corrosioni o provocare fuoriuscite
dalle batterie, con conseguente rischio di incendi, lesioni personali o danni materiali.
• Usare esclusivamente i tipi di batterie indicati in questo manuale.
• Non gettare le batterie esauste insieme ai riuti domestici. Smaltire le batterie conformemente
alle normative locali.
• Le piccole batterie a bottone utilizzate per il telecomando dell’unità possono essere facilmente
ingerite dai bambini, con conseguente pericolo. Tenere le batterie disimballate fuori dalla portata
dei bambini e vericare che il vano batterie del telecomando sia ben ssato. In caso di
ingestione, contattare un medico.
• Non esporre le batterie (installate o confezionate) a calore eccessivo, ad esempio luce solare
diretta, amme l bere o simili.
interno di sistema laser a bassa
potenza. Per la propria sicurezza,
non aprire i pannelli di protezione
dalle radiazioni laser. Evitare di
direzionare lo sguardo verso il
vano con radiazioni laser quando
l’apparecchio è in funzione.
Se installate erroneamente, le batterie possono
esplodere. Sostituire le batterie esauste con batterie
di tipo identico o equivalente.
ATTENZIONE
L'ascolto prolungato del wa kman a volume massimo può causare danni all'udito.
AVVERTENZA:
è importante che qualsiasi cufa o auricolare utilizzati con questo prodotto siano conformi al
decreto francese dell'8 novembre 2005 sull'applicazione dell'articolo L. 5232-1, che stabilisce che
il livello sonoro non debba superare i 100 dB SPL. L'ascolto prolungato a volume elevato per oltre
cinque ore la settimana può provocare danni all'udito.
Per evitare danni all'udito, non ascoltare a volume elevato per lunghi periodi di
tempo.
IT-3
04_AXM649BT_IT_P41013409-A101_4 Mar 13.indd 3 2013-3-14 10:29:20
Page 88

Uso sicuro delle batterie
Se utilizzate correttamente, le batterie domestiche sono una fonte di
energia sicura e affidabile. Tuttavia, un uso errato o improprio può
causare perdite e, in casi estremi, incendi o esplosioni.
Di seguito sono descritte semplici istruzioni per un uso sicuro
delle batterie e per evitare pericoli.
USO SICURO
DELLE
BATTERIE
Conservare le batterie non ancora utilizzate
nella loro confezione, lontano da oggetti
metallici che potrebbero provocare
cortocircuiti causando perdite e,
in casi estremi, incendi o esplosioni.
Non tentare in alcun caso di ricaricare
le batterie normali, né con caricabatterie
né riscaldandole.
Potrebbero verificarsi perdite,
incendi o esplosioni.
Esistono speciali batterie ricaricabili,
chiaramente contrassegnate come tali.
Inserire le batterie nel verso corretto,
rispettando i segni più e meno indicati
sulla batteria e sull'apparecchio.
L’inserimento scorretto delle batterie può
causare perdite e, in casi estremi,
incendi o esplosioni.
Rimuovere le batterie esauste
dall’apparecchio. In caso di inutilizzo
prolungato dell’apparecchio,
rimuovere le batterie. In caso contrario,
le batterie potrebbero subire perdite
e danneggiare l’apparecchio.
I bambini possono sostituire le batterie
esclusivamente sotto la supervisione
di un adulto che garantisca il rispetto
di queste istruzioni.
Sostituire sempre l’intero set di batterie,
assicurandosi di non combinare batterie
vecchie con batterie nuove o di tipo
differente. In caso contrario si potrebbero
verificare perdite e in casi estremi,
incendi o esplosioni.
Non gettare le batterie nel fuoco per evitare
il rischio di esplosioni.
Please recycleRiciclare le batterie esauste;
non gettarle insieme ai normali rifiuti
domestici.
Prestare attenzione alle batterie a bottone,
utilizzate ad esempio in alcuni
apparecchi acustici,
giocattoli, giochi e altri dispositivi:
possono essere facilmente ingerite
dai bambini ed essere molto pericolose.
Tenere le batterie a bottone disimballate
fuori dalla portata dei bambini.
Assicurarsi che i vani batteria siano
ben chiusi.
In caso di ingestione, contattare un medico.
been swallowed.
IT-4
04_AXM649BT_IT_P41013409-A101_4 Mar 13.indd 4 2013-3-14 10:29:21
Page 89

Indice
Istruzioni per l'uso sicuro del prodotto .............................................................................. 1
Note importanti .................................................................................................................2
Prodotto laser ............................................................................................................................................. 3
Manutenzione delle batterie ....................................................................................................................... 3
Uso sicuro delle batterie ................................................................................................... 4
Contenuto della confezione .............................................................................................. 7
Panoramica del prodotto ..................................................................................................8
Lettore CD .................................................................................................................................................. 8
Amplicatore .............................................................................................................................................. 8
Panoramica del telecomando ........................................................................................... 9
Inserimento delle batterie ......................................................................................................................... 10
Manutenzione del telecomando ............................................................................................................... 10
Portata del telecomando ...........................................................................................................................11
Collegamenti...................................................................................................................12
Collegamento dell’antenna FM ................................................................................................................ 13
Collegamento degli altoparlanti ................................................................................................................ 13
Collegamento di dispositivi ausiliari ......................................................................................................... 13
Collegamento del cavo di controllo .......................................................................................................... 14
Collegamento del cavo di alimentazione .................................................................................................14
FunzionE ECO-Power/Standby ...................................................................................... 14
Accensione e spegnimento ...................................................................................................................... 14
Attivazione modalità ECO Power/Standby ............................................................................................... 14
Orologio .......................................................................................................................... 15
Impostazione manuale dell'orologio ..................................................................................................... 15
Orologio ...............................................................................................................................................15
Orologio ..............................................................................................................................................15
Qualità del suono............................................................................................................15
Regolazione del volume ........................................................................................................................... 15
Funzione Super Bass ............................................................................................................................... 15
Regolazione degli alti ............................................................................................................................... 15
Funzione Loudness .................................................................................................................................. 15
Equalizzatori predeniti ............................................................................................................................ 15
Retroilluminazione del display .................................................................................................................15
Unzionamento della radio ............................................................................................... 16
Ricerca di una stazione ............................................................................................................................ 16
Preimpostare una stazione ...................................................................................................................... 16
Modica della modalità di ricezione FM ................................................................................................... 16
Modalità di visualizzazione FM ................................................................................................................ 17
Lettura di CD ..................................................................................................................18
Riproduzione di CD .................................................................................................................................. 18
Selezione diretta delle tracce ................................................................................................................... 18
Saltare le tracce ....................................................................................................................................... 18
Ricerca ..................................................................................................................................................... 18
Visualizzazione del testo durante la riproduzione .................................................................................... 18
Riproduzione programmata .....................................................................................................................18
Riproduzione casuale (dischi CD e MP3) ................................................................................................ 18
Riproduzione dell’inizio di ogni traccia ..................................................................................................... 19
Riproduzione ripetuta (dischi CD) ............................................................................................................ 19
IT-5
04_AXM649BT_IT_P41013409-A101_4 Mar 13.indd 5 2013-3-14 10:29:21
Page 90

Lettura di dischi MP3/WMA ............................................................................................ 19
Riproduzione ripetuta (dischi MP3) .......................................................................................................... 20
Lettura di dispositivi USB ............................................................................................... 20
Per dispositivi dotati di cavo USB: ........................................................................................................... 20
Per le schede di memoria: ....................................................................................................................... 20
Protezione dati USB ................................................................................................................................. 20
Impostare la sveglia........................................................................................................ 22
Attivare/disattivare la sveglia .......................................................................................... 22
Impostare lo spegnimento automatico............................................................................ 22
Manipolazione dei dischi ................................................................................................23
Risoluzione dei problemi ................................................................................................24
Speciche tecniche.........................................................................................................25
IT-6
04_AXM649BT_IT_P41013409-A101_4 Mar 13.indd 6 2013-3-14 10:29:21
Page 91

Contenuto della confezione
Vericare che la confezione contenga quanto segue.
Unità principale
Altoparlanti x 2
Cavo altoparlanti x 2 ANTENNA FM
INSTRUCTON MANUAL
NOTCE D UT LISAT ON
GEBRUIKSAANWJZING
MANUALE DI ISTRUZIONI
MANUAL DE NSTRUCCIONES
NÁVOD K OBSLUZE
NÁVOD NA OBSLUHU
KULLANMA KI AVUZU
AXM649BT
Buetoo h M cro system
Mcro Cha ne Blue oo h
Buetoo h M crosys eem
Sstema Mic o Hi Fi Buetoo h
B fre op ra ng pease ead t ese nsr cto s th ro ghy
Lsez a eni ement ete no ce dut i ai n n oa ié av nt du iser e podut
Voo geb uk ees d ze gebuks anwj i g ro dg oor
Prma di tl za e l ro oto eg ere aen amene le sr zi ni
Lea d tei amen e s as i sru cones a tes de tlz r el paato
Ne l za nee sro pouí at p tte s pr s m poo n teto ná od
Pr d pus e ím si pzo ne pr ta e ávod
Lüfen al rmad n nce bu aima arn t m mnı kuy n
Base
Manuale di istruzioni
Mcrocadena B uetooth
Buetoo h mikrosys ém
Buetoo h mikrosys ém
Buetoo h Mü ik Se i
Telecomando
(batteria inclusa)
Cavo di controllo
IT-7
04_AXM649BT_IT_P41013409-A101_4 Mar 13.indd 7 2013-3-14 10:29:24
Page 92

Panoramica del prodotto
FM
ANTENNA
CABLE
AUX IN 1
LRL
R
AUX IN 2
CABLE
AC
SPEAKER O UTPUT( )
Lettore CD
1. Pulsante Standby
2. Pulsante Orologio (CLOCK)
3. Pulsante Modalità (MODE)
4. Ingresso USB
5. Sensore telecomando
6. Display uorescente a vuoto (VFD)
7. Vassoio disco
8. Pulsante Avanti veloce (C)
Sintonizzazione avanti Pulsante
Indietro veloce (D)
Sintonizzazione indietro Pulsante
Successivo ( G )
Preimpostato su
Precedente (H)
Preimpostato giù
Pulsante Riproduci/Pausa (BF)
9. Pulsante Apri/Chiudi (K)
10. Pulsante Stop (L)
11. Antenna Bluetooth
12.
Ingresso cavo di controllo dell’alimentazione
13. Terminali ingresso AUX1 (L/R)
14. Terminali ingresso AUX2 (L/R)
15. Antenna FM
Amplificatore
1. Ingresso cufe
2. Manopola Controllo bassi
3. Manopola Controllo alti
4. Manopola Controllo volume
5. Manopola Selezione funzione
6. Cavo di alimentazione
7.
Ingresso cavo di controllo dell’alimentazione
8. Terminali di uscita degli altoparlanti (L/R)
04_AXM649BT_IT_P41013409-A101_4 Mar 13.indd 8 2013-3-14 10:29:25
IT-8
Page 93

Panoramica del telecomando
AUX
DISPLAY
1. Pulsante Standby
2. Funzione disco
3. Funzione radio
INTRO
MUTE
TIMER
L
MODE
)
LOUDNESS
CLOCK
G
D
H
ALB + )
ALB - )
)
0~9, 10+
K
A-B
DIM )
S-BASS
)
DISPLAY
C
)
)
)
BF
)
AUX 1 / AUX 2
)
)
)
VOL+
VOL-
PROG
4. Modalità (
5. Intro (
6. Loudness (
7. Equalizzatori predeniti (
8. Orologio (
9. Successivo
Preimpostato su
10. Avanti veloce
Sintonizzazione indietro
11. Precedente
Preimpostato giù
12. Riproduci/Pausa
13. Album su (
14. Album Giù (
15. Mute (
16. Numeri (
17. Apri/Chiudi
18. Funzione USB
19. Funzione AUX (
Bluetooth
20. Ripeti A-B (
21. Dimmer (
22. Super Bass (
23. Spegnimento automatico (
24. Timer (
25. Display (
RDS
26. Avanti veloce
Sintonizzazione avanti
27. Stop
Appaiamento cancellato (
28. Aumento volume (
29. Diminuzione volume (
30. Programmazione (
P-EQ )
)
SLEEP
PAIRING
)
)
)
)
)
IT-9
04_AXM649BT_IT_P41013409-A101_4 Mar 13.indd 9 2013-3-14 10:29:25
Page 94

Inserimento delle batterie
1. Rimuovere la pellicola protettiva dal vano
batteria, situato sul retro del telecomando.
2. Allentare con un cacciavite la vite sul
coperchio del vano batteria. Estrarre la
batteria con l’ausilio delle unghie.
3. Sostituire con una nuova batteria (di tipo 2025)
e inserire il vano batteria nella posizione
originaria. Serrare la vite con un cacciavite.
Manutenzione del telecomando
Rimuovere le batterie dal telecomando in caso di inutilizzo prolungato.
•
Per evitare possibili guasti, leggere le seguenti istruzioni e maneggiare il telecomando con cura.
•
Evitare che il telecomando subisca urti o cadute.
•
Non versare acqua o liquidi sul telecomando.
•
Non posizionare il telecomando su un oggetto bagnato.
•
Non esporre il telecomando alla luce solare diretta o a fonti di calore eccessivo.
•
Non usare detergenti caustici (prodotti per la pulizia di porcellana, acciaio inossidabile, sanitari,
•
forni, ecc.) sul telecomando poiché potrebbero danneggiarlo.
Nota:
Rimuovere la batteria in caso di inutilizzo prolungato del telecomando, per evitare che subisca
dovuti a eventuali fuoriuscite.
IT-10
04_AXM649BT_IT_P41013409-A101_4 Mar 13.indd 10 2013-3-14 10:29:26
Page 95

30° 30°
Max. 5 m
A X
DS LAY
Portata del telecomando
Puntare il telecomando verso l’unità a non più di 5 metri di distanza dall’apposito sensore, entro
un’angolazione orizzontale di 30° e una verticale di 30° rispetto al lato frontale dell’unità stessa. La
portata potrebbe variare in base alla luminosità della stanza.
Nota:
Assicurarsi che non siano presenti ostacoli fra il sensore a infrarossi dell’unità e il telecomando.
•
Se si installa l’unità su un rack o simili, la portata del telecomando potrebbe ridursi in base allo
spessore o al colore dello sportello di vetro del rack.
Non esporre il sensore a infrarossi alla luce solare diretta o ad altre fonti di illuminazione
•
intensa, ad esempio alle luci fluorescenti di un invertitore.
IT-11
04_AXM649BT_IT_P41013409-A101_4 Mar 13.indd 11 2013-3-14 10:29:26
Page 96

M
N NN
N
N
N N
N
N
Collegamenti
Attenzione! Effettuare tutti i collegamenti prima di collegare l’apparecchio alla presa di corrente.
Leggere queste note integrative sull’installazione prima dell’uso.
L'unità potrebbe subire danni in caso di mancato rispetto delle istruzioni seguenti.
Di seguito sono riportare le fasi per una congurazione corretta dell’unità:
1. Innanzitutto, collegare l'unità principale e l'amplicatore tramite il cavo di controllo.
2. A procedura ultimata, collegare il cavo di alimentazione alla presa di corrente.
Attenzione!
i) Invertire i passaggi sopraccitati, collegando prima il cavo di alimentazione, causerà il
malfunzionamento dell’unità.
ii) Se durante il funzionamento è necessario ricollegare il cavo di controllo, scollegare
preliminarmente il cavo di alimentazione. In caso contrario, l’unità potrebbe subire danni.
Altoparlante
Cavo di alimentazione
Unità
principale
Altoparlante
Cavo di alimentazione
Altoparlante
Cavo di alimentazione
principale
Unità
Altoparlante
Cavo di alimentazione
IT-12
04_AXM649BT_IT_P41013409-A101_4 Mar 13.indd 12 2013-3-14 10:29:27
Page 97

Collegamento dell’antenna FM
AN
TENNA
CABLE
AUX N 1
L
R R
AUX N 2
ABE
C
SP AKE R UTP T 6 )
FM
ANTENNA
CABLE
AUX N 1
LRL
R
AUX N 2
AUX IN 2
AUX IN 1
ANTENNA
LRL
FM
CABLE
R
ANTENNA
FM
FM sul retro dell’unità.
Attenzione!
Per evitare distu rbi, tene re l’ante nna lonta no
dall’unità, dal cavo di collegamento e dal cavo di
alimentazione.
Collegamento degli altoparlanti
Collegare l’antenna FM fornita alla presa Antenna
Collegare i cavi degli altoparlanti ai terminali, come mostrato in gura.
Collegare il cavo con il connettore nero ai terminali (-) e il cavo con il connettore rosso ai terminali (+).
Amplicatore
Altoparlante destro
Vista posteriore
Altoparlante sinistro
Vista posteriore
Collegamento di dispositivi ausiliari
Collegare i terminali di ingresso AUX 1 sul retro dell’unità e i terminali di uscita del dispositivo ausiliario con un cavo audio (non fornito), come mostrato in gura.
Lettore CD
Dispositivo ausiliario
Collegare i terminali di ingresso AUX 2 sul retro dell’unità e i terminali di uscita audio del dispositivo
ausiliario, come mostrato in gura.
Lettore CD
Dispositivo ausiliario
04_AXM649BT_IT_P41013409-A101_4 Mar 13.indd 13 2013-3-14 10:29:27
IT-13
Page 98

FM
ANTENNA
ABLE
AUX N 1
LRL
R
AUX IN 2
CABL
AC
SPEAKER O UTPU (6 )
Collegamento del cavo di controllo
Collegare il cavo di controllo sia al lettore CD che all’amplicatore.
Lettore CD
Amplicatore
Collegamento del cavo di alimentazione
Inserire il cavo di alimentazione in una presa di corrente. L’unità è quindi pronta per l’uso.
Attenzione! * Assicurarsi di scollegare l’apparecchio dalla presa di corrente se si prevede di non
utilizzarlo per un periodo prolungato.
* La presa di corrente è l’unico dispositivo per scollegare l’unità dalla rete elettrica e
deve essere facilmente accessibile.
FunzionE ECO-Power/Standby
Accensione e spegnimento
Dopo aver inserito il cavo di alimentazione in una presa di corrente, l’unità entrerà in modalità Standby.
• Premere il pulsante
• Premere il pulsante
scritta “BYE BYE”.
Attivazione modalità ECO Power/Standby
Tenere premuto il pulsante standby per 2 o più secondi per passare dalla modalità Standby normale alla modalità Standby ECO Power e viceversa.
* Modalità Standby ECO Power
L’orologio non è visualizzato. Premere il pulsante Orologio
display.
* Modalità Standby normale
L’orologio è visualizzato sul display.
04_AXM649BT_IT_P41013409-A101_4 Mar 13.indd 14 2013-3-14 10:29:28
Standby
per accendere l’unità. Sul display apparirà la scritta “HELLO”.
Standby
per riportare l’unità in modalità Standby. Sul display scorrerà la
CLOCK
per visualizzare l’orologio sul
IT-14
Page 99

Orologio
Impostazione manuale dell'orologio
1. Impostare la modalità Standby Eco Power.
2. Tenere premuto il pulsante Orologio (
inizierà a lampeggiare.
3. Impostare l’ora con i pulsanti Aumento volume/Diminuzione volume (
Precedente/Successivo (
4. Premere il pulsante Orologio (
5. Impostare i minuti con i pulsanti Aumento volume/Diminuzione volume (
Precedente/Successivo (
6. Premere il pulsante Orologio (
Nota:
• Se la pausa tra un passo e l’altro è troppo lunga, la modalità di impostazone dell’orologio verrà
annullata.
• In caso di interruzione di corrente o di scollegamento dell’unità dalla rete elettrica, l’impostazione
dell’orologio verrà persa.
Orologio
Sintonizzarsi su una stazione RDS e attendere qualche minuto. Per confermare, premere il pul-
sante Orologio (
Orologio
In modalità Standby, premere il pulsante Orologio (
CLOCK
H/G
H/G
).
CLOCK
); sul display apparirà “CLOCK SET”, e “CLOCK 24”
).
CLOCK
); l’indicatore dei minuti lampeggerà.
).
CLOCK
); l’orologio interno entrerà in funzione.
CLOCK
VOL+/-
) o con i pulsanti
VOL+/-
) o con i pulsanti
).
Qualità del suono
Regolazione del volume
Per aumentare o ridurre il volume, ruotare la manopola Controllo volume (
premere i pulsanti Aumento volume/Diminuzione volume (
VOL +/-
) sul telecomando.
Funzione Super Bass
È possibile intensicare i bassi per garantirne la riproduzione chiara e nitida anche a basso volume.
Premere il pulsante Super Bass (
display si accenderà la spia “DBB”.Premere nuovamente il pulsante Super Bass (
attivare la funzione.
S-BASS
) sul telecomando per attivare la funzione Super Bass. Sul
Regolazione dei bassi
Ruotare la manopola Controllo bassi (BASS) sull’amplicatore per regolare l’intensità dei bassi in uscita.
Regolazione degli alti
Ruotare la manopola Controllo alti (TREBLE) sull’amplicatore per regolare l’intensità degli alti in uscita.
Funzione Loudness
L’unità è dotata di una funzione di sonorità che aumenta automaticamente l’effetto audio dei bassi a
volume inferiore. La funzione consente inoltre di aumentare l’effetto audio dei bassi ad alto volume, anche se in questo caso sarà meno efcace. Premere il pulsante Loudness (
funzione. Sul pannello anteriore comparirà “
” Premere nuovamente per annullare la visualizzazione.
Equalizzatori predefiniti
È possibile regolare l’audio riprodotto semplicemente scegliendo uno dei 5 equalizzatori predeniti. Premere ripetutamente il pulsante Equalizzatori predeniti (P-EQ) per scorrere ciclicamente le opzioni seguenti:
FLAT POP JAZZ ROCK CLASSIC
Retroilluminazione del display
L'unità dispone di tre livelli di retroilluminazione del display. Premere ripetutamente il pulsante Dimmer
(DIM) sul pannello frontale o sul telecomando per selezionare il livello di luminosità desiderato.
- VOLUME +
LOUDNESS
) sull’unità o
S-BASS
) per dis-
) per attivare tale
IT-15
04_AXM649BT_IT_P41013409-A101_4 Mar 13.indd 15 2013-3-14 10:29:28
Page 100

Unzionamento della radio
È poss bile sintonizzarsi sulle stazioni radio FM manualmente o automaticamente, o sintonizzarsi
direttamente sulle stazioni preimpostate.
Attenzione!
Prima di iniziare ad ascoltare la radio, vericare che l’antenna FM sia collegata correttamente e
regolata in termini di lunghezza e orientamento.
Ricerca di una stazione
1. Ruotare la manopola Selezione funzione
radio (FM) sul telecomando. Sul display apparirà la scritta “TUNER”.
2. Selezionare una stazione utilizzando uno dei metodi seguenti.
Sintonizzazione automatica
Tenere premuto il pulsante Sintonizzazione indietro/avanti (D/C) sul telecomando o sull’unità
per almeno un secondo: la frequenza diminuirà o aumenterà no al rilevamento di una stazione.
Sintonizzazione manuale
Premere ripetutamente il pulsante Sintonizzazione indietro/avanti (D/C) sul telecomando o
sull’unità per modicare la frequenza no al rilevamento della stazione desiderata.
Stazioni preimpostate (se presenti)
Premere ripetutamente il pulsante Preimpostato su/giù (H/G) sul telecomando o sull’unità
per selezionare il numero corrispondente alla stazione preimpostata. Sul display appariranno
banda e frequenza.
FUNCTION
(
) sull’unità o premere il pulsante Funzione
Preimpostare una stazione
È possibile preimpostare no a 20 stazioni FM.
Per memorizzare la stazione desiderata:
1. Premere il pulsante Programmazione (
memorizzazione.
2. Premere il pulsante Preimpostato su/giù (H/G) sul telecomando per selezionare il numero di
memorizzazione.
Nota: se si seleziona un numero superiore a 20, si passa automaticamente al numero “1”.
3. Premere nuovamente il pulsante Programmazione (
display riapparirà la frequenza.
4. Ripetere i passaggi 1-4 per ciascuna stazione che si desidera memorizzare.
Nota: in caso di scollegamento dalla presa di corrente o di interruzione di corrente, le stazioni preimpostate non verranno cancellate.
PROG
) sul telecomando; sul display apparirà il numero di
PROG
) per memorizzare la stazione. Sul
Modifica della modalità di ricezione FM
Premere il pulsante Modalità (
gliore modalità di ricezione FM.
MODE
) per selezionare il canale Stereo o Mono per ricevere la mi-
IT-16
04_AXM649BT_IT_P41013409-A101_4 Mar 13.indd 16 2013-3-14 10:29:28
 Loading...