

Page 1
MICRO COMPONENT
SYSTEM
AX-M20E(BS)
Instruction Manual
AUTO REVERSE
MICRO COMPONENT SYSTEM AX-M20
CD Sync.
TIMER/
CLOCK
SNOOZE
1
2
4
5
7
8
0
10 +
REPEAT
ST/MONORANDOM
CD/TUNER
REW.
F.FWD
CT
PTY PANEL RDS
X-BASS
PRESET EQ
REMOTE CONTROLLER
RB-AXM20
HITACHI
PRESET
EQ.
REC
SLEEP
POWER
3
DIMMER
AUX
6
BAND/
9
TUNER
CD
PROGRAM/
AUTO PRESET
TAPE
+
-
VOLUME
STANDBY/ON
HITACHI
R D S
TAPE
. .
REV MODE
REC
X-BASS
COMPACT
disc
HITACHI
MICRO COMPONENT SYSTEM
AX-M20
VERTICAL LOADING MECHANISM
TUNER PRESET CD OPEN/CLOSE
TUNER
DOWN UP
BAND
CD
AUX
OPEN
PLAYSTOPPLAYPAUSE
VOLUME
REMOTE
SENSOR
PHONES
NOTICE
The STANDBY/ON button on the front panel switches the unit from ON to STANDBY
but does not isolate the unit from the mains supply. If it is to be left unattended for a
long period, it is recommended that the unit is switched to standby and the mains plug
is removed from the socket.
Before operating please read all these instructions thoroughly.
1
Page 2

SOME DO’S AND DON’TS ON THE
SAFE USE OF YOUR EQUIPMENT
This equipment has been designed and manufactured to meet international
safety standards but, like any electrical equipment, care must be taken if you
are to obtain the best results and safety is to be assured.
★ ★ ★ ★ ★ ★ ★ ★ ★ ★ ★
DO
read the operating instructions before you attempt to use the equipment.
DO
ensure that all electrical connections (including the mains plug, extension
leads and interconnections between pieces of equipment) are properly made and
in accordance with the manufacturer’s instructions. Switch off and withdraw the
mains plug when making or changing connections.
DO
consult your dealer if you are ever in doubt about the installation, operation or
safety of your equipment.
DO
be careful with glass panels or doors on the equipment.
★ ★ ★ ★ ★ ★ ★ ★ ★ ★ ★
DON’T
continue to operate the equipment if you are in any doubt about it working
normally, or if it is damaged in any way-switch off, withdraw the mains plug and
consult your dealer.
DON’T
remove any fixed cover as this may expose dangerous voltages.
DON’T
leave equipment switched on when it is unattended unless it is specifically
stated that it is designed for unattended operation or has a standby mode. Switch
off using the switch on the equipment and make sure that your family knows how
to do this. Special arrangements may need to be made for infirm or handicapped
people.
DON’T
use equipment such as personal stereos or radios so that you are distracted from the requirements of traffic safety. It is illegal to watch television whilst
driving a vehicle.
DON’T
listen to headphones at high volume, as such use can permanently damage your hearing.
DON’T
obstruct the ventilation of the equipment, for example with curtains or soft
furnishings. Overheating will cause damage and shorten the life of the equipment.
DON’T
use makeshift stands and NEVER fix legs with wood screws - to ensure
complete safety always fit the manufacturer’s approved stand or legs with the
fixings provided according to the instructions.
DON’T
allow electrical equipment to be exposed to rain or moisture.
(For UK)
ABOVE ALL
-
NEVER
slots or any other opening in the case - this could result in a fatal
electrical shock;
-
NEVER
kind. It is better to be safe than sorry!
let anyone especially children push anything into holes,
guess or take chances with electrical equipment of any
★ ★ ★ ★ ★ ★ ★ ★ ★ ★ ★
2
Page 3

DECLARATION OF CONFORMITY
We declare under our sole responsibility that this product, to which this
declaration relates, is in conformity with the following standards:
EN60065, EN55013, EN55020, EN60555-2 and EN60555-3.
Following the provisions of 73/23/EEC, 89/336/EEC and 93/68/EEC
Directives.
IMPORTANT
The mains lead on this equipment may be supplied with a moulded plug
incorporating a fuse, the value of which is indicated on the pin face of the
plug. Should the fuse need to be replaced, an ASTA or BSI approved BS1362
fuse must be used of the same rating. If the fuse cover is detachable never
use the plug with the cover omitted. If a replacement fuse cover is required,
ensure it is of the same colour as that visible on the pin face of the plug. Fuse
covers are available from your dealer.
DO NOT cut off the mains plug from this equipment. If the plug fitted is not
suitable for the power points in your home or the cable is too short to reach a
power point, then obtain an appropriate safety approved extension lead or
consult your dealer.
Should it be necessary to change the mains plug, this must be carried out by
a competent person, preferably a qualified electrician.
If there is no alternative to cutting off the mains plug, ensure that you dispose
of it immediately, having first removed the fuse, to avoid a possible shock
hazard by inadvertent connection to the mains supply.
IMPORTANT
The wires in this mains lead are coloured in accordance with the following
code:
Blue : NEUTRAL
Brown : LIVE
As these colours may not correspond to the coloured markings identifying
the terminals in your plug, proceed as follows:
The wire coloured BLUE must be connected to the terminal marked with the
letter N or coloured BLUE or BLACK. The wire coloured BROWN must be
connected to the terminal marked with the letter L or coloured BROWN or
RED.
On no account connect either of these wires to the terminal marked E or by
e
the earth symbol
Alternatively, this equipment may be supplied with a rewireable plug already
fitted, which may be removed if not suitable and an alternative fitted in accordance with the preceding instructions.
or coloured green or green and yellow.
3
Page 4
PRECAUTIONS
• If no sound is emitted from the speakers when the volume is raised, lower the volume, switch
the STANDBY/ON button to STANDBY, and check to see if the speaker cords are properly
connected.
• This unit contains a muting circuit and it takes about 2 – 4 seconds until this unit reaches stable
operation after switching the STANDBY/ON.
• Never open the covers or touch the inside or insert a metal objects. Any of these could cause an
electric shock or a fault.
• When thunder starts, unplug the power cord and disconnect the antenna.
• The apparatus shall not be exposed to dripping or splashing.
• To clean cabinet and panels when dirty, clean off dirt on the surfaces with a dry cloth. Never use
thinner, benzene or alcohol, for these will damage the surface finish.
•
Protect the unit against excessive heat (e.g. direct sunlight), dust and moisture.
• Discs which can be played on the CD player have the following mark on them:
• Be carefull not to damage the power supply cord. Be sure to hold the plug when pulling it out; do
not pull the cord.
• Do not install the set in a confined location; otherwise, heat dissipation will be poor and
malfunctions may occur.
• Do not place foreign objects in the disc compartment. It may cause damage to the mechanism.
• Do not move the sound system suddenly from a very cold room into a warm room. When a
chilled CD player is moved suddenly to a warm location, condensation may form on the pickup
lens, preventing proper operation. In this case, wait 1 – 2 hours before resuming play.
• During playback, if the CD player is subjected to a sudden shock or jolt, some noise may be
produced. This is not a malfunction.
• The CD player has wide dynamic range. As a result, if you turn your amplifier’s volume up too
high during soft (low volume) parts of a program, your speakers may be damaged when the
dynamic range of a sudden loud passage is produced.
• Do not store discs in high-temperature, high-humidity locations. The discs may develop warps
and become unable to play. Also, discs with moisture on them may be unplayable. Wipe any
moisture off with a soft, dry cloth, and be sure discs are fully dry before using.
• Do not leave a disc inside the CD player when it is not used for a long period.
• Please do not use compact discs with cellophane or with labels attached or those CD with
peeled off stains, such as rental CD. If such discs were used on a CD player, they may get
trapped inside the unit and cause malfunction.
• CD with special shapes (heart-shaped CDs, octagonal CDs etc.) cannot be played on this set.
Attempting to do so may damage the set. Do not use such CDs.
SAFEGUARDS
Electrical energy can perform many useful functions. This unit been engineered and
manufactured to assure your personal safety. Improper use can result in potential
electrical shock or fire hazards. In order not to defeat the safeguards, observe the
following instructions for its installations, use and servicing.
INSTALLATION
Avoid the use of this unit in high temperature areas (such as near heating equipment)
or in direct sunlight. Do not block the unit from radiating heat.
4
Page 5

SPECIAL FEATURES
➣
Sound Enhancement
- Enhance low frequency response with Dynamic Bass.
- Choose from a variety of preset sound settings to match your music, POP,
ROCK, CLASSIC etc.
➣
Tuner
- PLL synthesizer tuner with 20 preset stations for FM and MW respectively.
➣
CD Player
- Motorized CD door opening for vertical disc loading.
- CD Synchronized recording for one touch recording from CD to Tape.
➣
Tape Deck
- Auto reverse function for uninterrupted playback.
- Bi-directional playback and recording capability.
➣
Programmable Clock and Timer
- Timer playback for tuner, CD and AUX.
- Automatic sleep function.
➣
Speaker System
- 2-way bass reflex speaker system.
➣
Comprehensive Remote Control
CONTENTS
System Connections .............................. 6
Connecting Antennas ............................. 7
Connecting Speakers ............................. 8
Connecting Sub Woofer ......................... 8
Connecting Auxiliary Equipment ............ 9
Connecting Optical Digital Equipment.. 10
Mains Power Supply ............................ 10
Key to Illustrations ........................... 11-13
Using Remote Control .......................... 14
Function and Features .................... 15-18
Troubleshooting ................................... 19
Specifications ....................................... 20
Listen to the Radio ............................... 21
Presetting Radio Stations..................... 22
Auto Presetting Radio Stations ............ 23
Recalling Preset Stations ..................... 23
Sound Modes ....................................... 23
Receiving RDS Broadcasts .................. 24
PTY Search .......................................... 25
Playing CDs ................................. 26 & 27
Programming CD Tracks...................... 28
Direct Access CD Play ......................... 29
Random CD Play
(Remote Control Only) ....................... 29
Repeat CD Play ................................... 30
Playing Tapes ...............................31 & 32
Play Features ....................................... 32
Recording from the Radio .................... 33
Tape Erasing ........................................ 34
CD Synchronized Recording ................ 34
Setting the Clock .................................. 35
Setting the Sleep Timer........................ 35
Setting the Start/Stop Timer ................. 36
Timer Playback .................................... 37
Using Headphones............................... 38
Recording Protection............................ 38
Maintenance (Cassette Deck) .............. 39
Maintenance (CD Player) ..................... 39
5
Page 6

LOCATION OF CAUTION LABEL
SIDE VIEW
CLASS 1 LASER PRODUCT
KLASSE 1 LASER PRODUKT
LUOKAN 1 LASER LAITE
KLASS 1 LASER APPARAT
CLASS 1 LASER PRODUCT
KLASSE 1 LASER PRODUKT
LUOKAN 1 LASER LAITE
KLASS 1 LASER APPARAT
SYSTEM CONNECTIONS
REAR VIEW
D
E
A
Å – Connecting Antennas
LLR
R
ı – Connecting Speakers
Ç – Connecting Subwoofer
Î – Connecting Auxiliary
B
C
Equipment
‰ – Connecting Optical
Digital Equipment
C
F
Ï – Mains Power Supply
6
Page 7
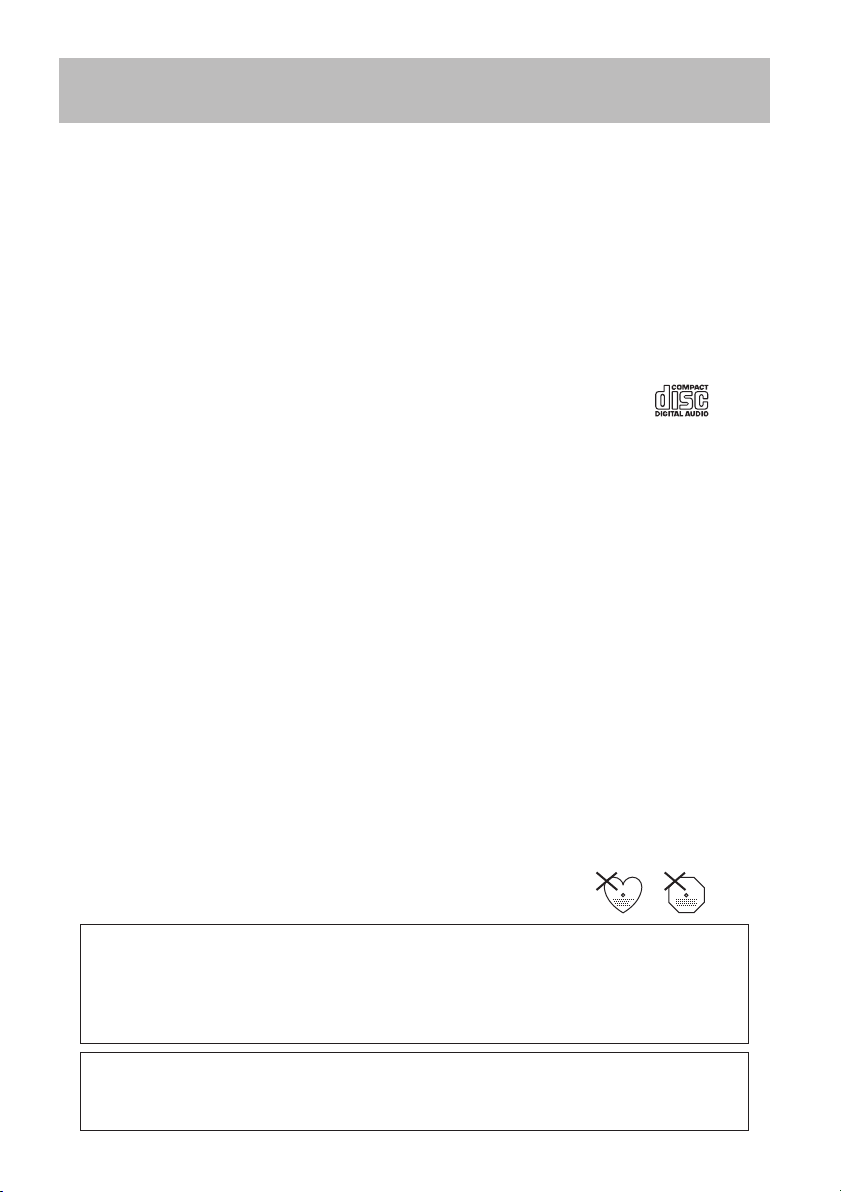
Å CONNECTING ANTENNAS
AM antenna connection and adjustment
AM loop antenna
(provided)
LR
LR
FM antenna connection and adjustment
FM outdoor antenna
(optional)
LR
LR
Coaxial cable
(1) (3)
20mm
(2) (4)
FM
EXT
AM
LOOP
AM
EXT
Insert in the direction
of the arrow
FM feeder
antenna
(provided)
10mm
COAXIAL
75Ω
AM
LOOP
ANTENNA
FM
EXT
AM
EXT
7
Page 8

ı CONNECTING SPEAKERS
Speaker cord connection
LR
➤
LR
Connect the Black cord to the (-)
terminal.
12
Connect the Black
cord to the (-)
terminal and the
Red cord to the (+)
terminal.
Right speaker
(rear side)
➤
Connect the cord from the speaker on
the left to the (LEFT) terminals and the
cord from the speaker on the right to the
(RIGHT) terminals.
Left speaker
(rear side)
Ç CONNECTING SUB WOOFER
SUB WOOFER
LR
LR
➤
OPTIONAL
8
Page 9
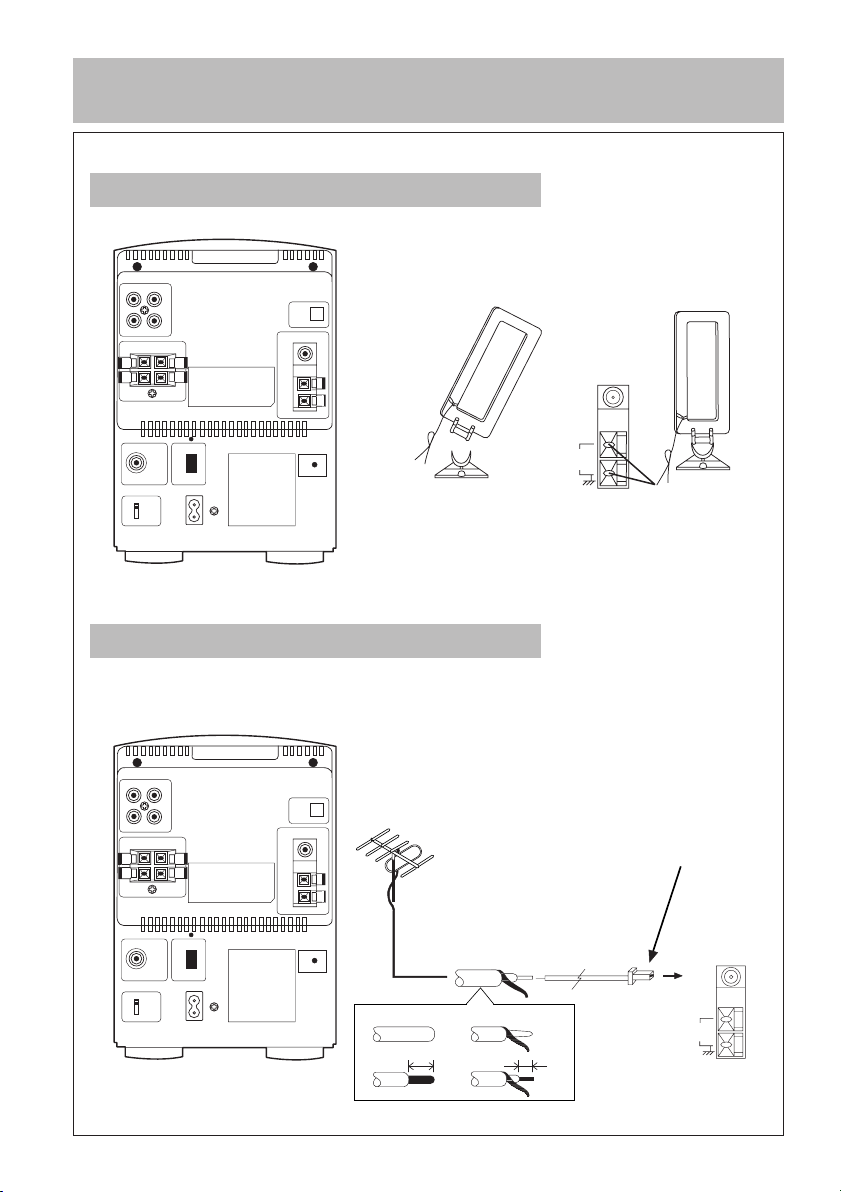
Î CONNECTING AUXILIARY
EQUIPMENT
Connection of external audio units for playback sound
from this unit
Cassette deck, MD
player or turntable
LR
LR
LINE IN
(AUX)
LINE OUT
Signal cord
(optional)
(with built-in equalizer)
(optional)
LINE OUT
Connection with cassette deck, etc. for recording
from this unit
LR
LR
LINE IN
(AUX)
LINE OUT
Signal cord
(optional)
9
Cassette deck,
etc. (optional)
LINE IN
Page 10

‰
CONNECTING OPTICAL
DIGITAL EQUIPMENT
Connection to an optical device
LR
LR
Ï
MAINS POWER SUPPLY
Mains Supply
Connect the optical digital
cord to this unit after removing
the terminal cover from the
optical terminal.
OPTICAL
DIGITAL
OUT
Optical digital cord
(optional)
LR
OPTICAL DIGITAL IN
MD recorder, etc.
(optional)
10
To AC outlet
230 V 50 Hz
Page 11

KEY TO ILLUSTRATIONS
FRONT VIEW
REMOTE
SENSOR
UP
PHONES
CD
EJECT
o
o
o
o
o
o
o
o
o
o
o
o
o
o
o
o
o
o
o
o
o
o
o
o
o
o
o
o
VOLUME
0
=
~
!
*
(
)
_
+
¡
™
£
¢
STANDBY/ON
STANDBY
TUNER PRESET CD OPEN/CLOSE
DOWN
TAPE
TOP VIEW
PRESET
CD Sync.
EQ
REC
X-BBS
REC PAUSE PLAY STOP PLAY
REAR VIEW
AUX
TUN ING
BAND
DIRECTION MODE
1
2
3
4
5
6
7
8
9
@
#
$
%
^
&
•
∞
LR
§
¶
11
Page 12
KEY TO ILLUSTRATIONS
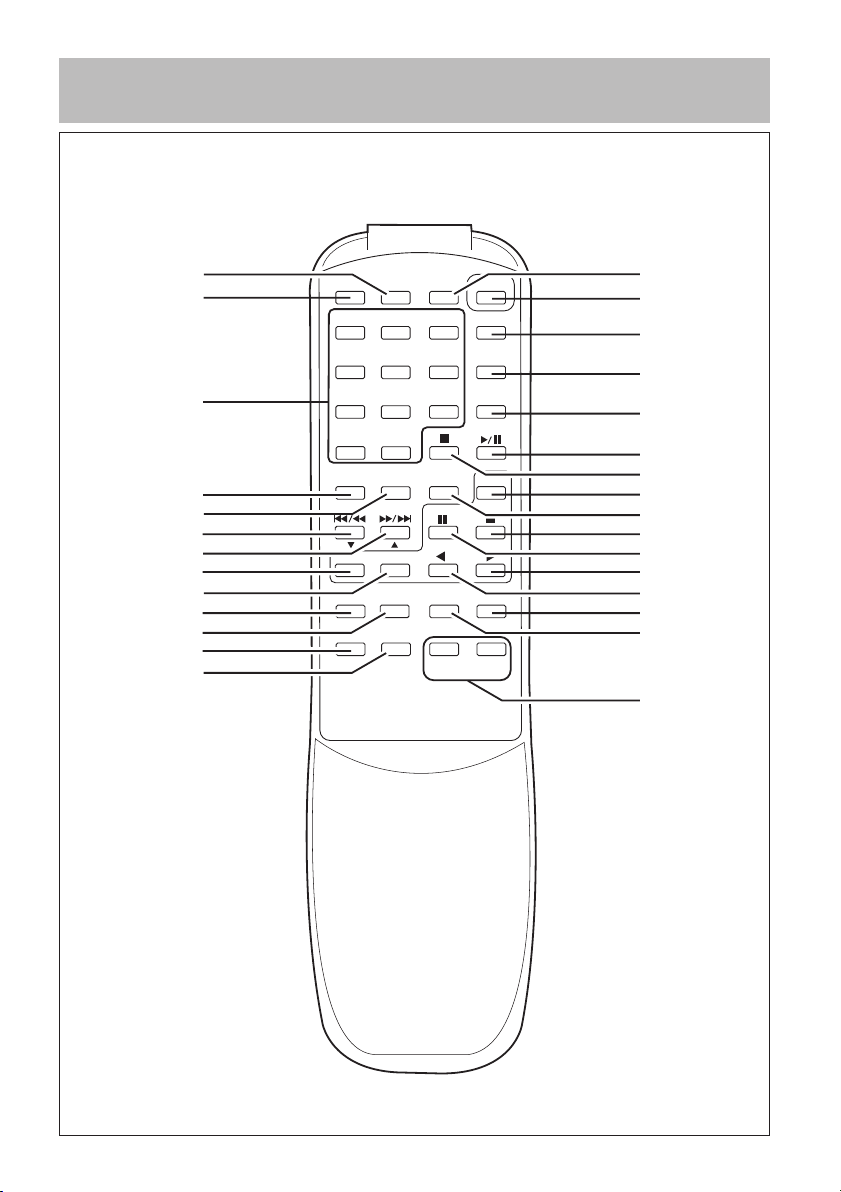
REMOTE CONTROL
±
[
]
\
{
}
|
“
‘
«
”
’
»
TIMER/
SNOOZE
2
5
8
10 +
F.FWD
PTY PANEL
PRESET EQ
SLEEP
PROGRAM/
AUTO PRESET
CLOCK
1
4
7
0
REPEAT
ST/MONO RANDOM
CD / TUNING
REW.
CT
X-BASS
HITACHI
REMOTE CONTROLLER
RB-AXM20
3
6
9
-
VOLUME
POWER
DIMMER
AUX
BAND/
TUNER
CD
TAPE
RDS
+
ª
º
–
≠
Ÿ
⁄
¤
‹
›
fi
fl
‡
°
·
‚
—
12
Page 13

KEY TO ILLUSTRATIONS
GENERAL SECTION
2 LCD Display
4 Remote Sensor
7 PHONES Jack
0 STANDBY/ON Button
! AUX Button
% VOLUME Control Knob
+ X-BASS Button
¡ PRESET EQ. Button
∞ DIGITAL OUT (OPTICAL)
§ RESET Button
¶ AC Mains
• BEAT CUT Switch
TUNER SECTION
5 BAND Selection Button
6 TUNING Up
- TUNER PRESET Button
= TUNING Down
CASSETTE DECK
~ TAPE Button
@ Cassette Door
# Continuous Play Button
$ Cassette Door EJECT Button 0
^ Forward Play Button 3
& STOP Button 7
* Both Side Play Button [
( FAST FORWARD / REWIND Button ¡
) REWIND / FAST FORWARD Button 1
_ CD Sync. Record Button
™ RECORD Button ¶
£ PAUSE Button 8
¢ Reverse Play Button 2
CD PLAYER SECTION
1 CD Door
3 CD OPEN / CLOSE Button
6 FORWARD SEARCH / SKIP
Button ¡/¢
8 PLAY / PAUSE Button 6
9 STOP Button 7
= BACK SEARCH / SKIP Button 4/1
REMOTE CONTROL
ª SLEEP Button
º POWER Button
– DIMMER Button
≠ AUX Button
Ÿ BAND / TUNER Button
⁄ CD PLAY / PAUSE Button 3/8
¤ CD STOP Button 7
‹ TAPE Button
› PROGRAM / AUTO PRESET Button
fi TAPE STOP Button
fl TAPE PAUSE Button
‡ TAPE FORWARD PLAY Button
° TAPE REVERSE PLAY Button
· RDS Button
‚ PANEL Button
— VOLUME Buttons (– / +)
± TIMER / SNOOZE Button
[ CLOCK Button
] Number 0-9, 10+ Buttons
\ REPEAT / STEREO / MONO Button
{ RANDOM Button
} CD BACK SEARCH / SKIP
Button 4/1 / TUNING DOWN ∞
| CD FORWARD SEARCH / SKIP
Button ¡/¢ / TUNING UP 5
“ TAPE REWIND Button
‘ TAPE FAST FORWARD Button
« CT Button
” PTY Button
’ X-BASS Button
» PRESET EQ. Button
13
Page 14

+
-
+
-
USING REMOTE CONTROL
;;;;;;;;;;;;;;;;;;;;;;;;;;;;;;;;;
;;;;;;;;;;;;;;;;;;;;;;;;;;;;;;;;;
;;;;;;;;;;;;;;;;;;;;;;;;;;;;;;;;;
;;;;;;;;;;;;;;;;;;;;;;;;;;;;;;;;;
;;;;;;;;;;;;;;;;;;;;;;;;;;;;;;;;;
;;;;;;;;;;;;;;;;;;;;;;;;;;;;;;;;;
;;;;;;;;;;;;;;;;;;;;;;;;;;;;;;;;;
;;;;;;;;;;;;;;;;;;;;;;;;;;;;;;;;;
;;;;;;;;;;;;;;;;;;;;;;;;;;;;;;;;;
;;;;;;;;;;;;;;;;;;;;;;;;;;;;;;;;;
;;;;;;;;;;;;;;;;;;;;;;;;;;;;;;;;;
;;;;;;;;;;;;;;;;;;;;;;;;;;;;;;;;;
;;;;;;;;;;;;;;;;;;;;;;;;;;;;;;;;;
;;;;;;;;;;;;;;;;;;;;;;;;;;;;;;;;;
;;;;;;;;;;;;;;;;;;;;;;;;;;;;;;;;;
;;;;;;;;;;;;;;;;;;;;;;;;;;;;;;;;;
;;;;;;;;;;;;;;;;;;;;;;;;;;;;;;;;;
;;;;;;;;;;;;;;;;;;;;;;;;;;;;;;;;;
;;;;;;;;;;;;;;;;;;;;;;;;;;;;;;;;;
;;;;;;;;;;;;;;;;;;;;;;;;;;;;;;;;;
;;;;;;;;;;;;;;;;;;;;;;;;;;;;;;;;;
;;;;;;;;;;;;;;;;;;;;;;;;;;;;;;;;;
;;;;;;;;;;;;;;;;;;;;;;;;;;;;;;;;;
;;;;;;;;;;;;;;;;;;;;;;;;;;;;;;;;;
;;;;;;;;;;;;;;;;;;;;;;;;;;;;;;;;;
;;;;;;;;;;;;;;;;;;;;;;;;;;;;;;;;;
;;;;;;;;;;;;;;;;;;;;;;;;;;;;;;;;;
;;;;;;;;;;;;;;;;;;;;;;;;;;;;;;;;;
;;;;;;;;;;;;;;;;;;;;;;;;;;;;;;;;;
;;;;;;;;;;;;;;;;;;;;;;;;;;;;;;;;;
;;;;;;;;;;;;;;;;;;;;;;;;;;;;;;;;;
;;;;;;;;;;;;;;;;;;;;;;;;;;;;;;;;;
;;;;;;;;;;;;;;;;;;;;;;;;;;;;;;;;;
;;;;;;;;;;;;;;;;;;;;;;;;;;;;;;;;;
;;;;;;;;;;;;;;;;;;;;;;;;;;;;;;;;;
;;;;;;;;;;;;;;;;;;;;;;;;;;;;;;;;;
;;;;;;;;;;;;;;;;;;;;;;;;;;;;;;;;;
;;;;;;;;;;;;;;;;;;;;;;;;;;;;;;;;;
;;;;;;;;;;;;;;;;;;;;;;;;;;;;;;;;;
;;;;;;;;;;;;;;;;;;;;;;;;;;;;;;;;;
;;;;;;;;;;;;;;;;;;;;;;;;;;;;;;;;;
;;;;;;;;;;;;;;;;;;;;;;;;;;;;;;;;;
;;;;;;;;;;;;;;;;;;;;;;;;;;;;;;;;;
;;;;;;;;;;;;;;;;;;;;;;;;;;;;;;;;;
;;;;;;;;;;;;;;;;;;;;;;;;;;;;;;;;;
;;;;;;;;;;;;;;;;;;;;;;;;;;;;;;;;;
;;;;;;;;;;;;;;;;;;;;;;;;;;;;;;;;;
;;;;;;;;;;;;;;;;;;;;;;;;;;;;;;;;;
;;;;;;;;;;;;;;;;;;;;;;;;;;;;;;;;;
;;;;;;;;;;;;;;;;;;;;;;;;;;;;;;;;;
;;;;;;;;;;;;;;;;;;;;;;;;;;;;;;;;;
;;;;;;;;;;;;;;;;;;;;;;;;;;;;;;;;;
;;;;;;;;;;;;;;;;;;;;;;;;;;;;;;;;;
;;;;;;;;;;;;;;;;;;;;;;;;;;;;;;;;;
;;;;;;;;;;;;;;;;;;;;;;;;;;;;;;;;;
;;;;;;;;;;;;;;;;;;;;;;;;;;;;;;;;;
;;;;;;;;;;;;;;;;;;;;;;;;;;;;;;;;;
;;;;;;;;;;;;;;;;;;;;;;;;;;;;;;;;;
;;;;;;;;;;;;;;;;;;;;;;;;;;;;;;;;;
;;;;;;;;;;;;;;;;;;;;;;;;;;;;;;;;;
;;;;;;;;;;;;;;;;;;;;;;;;;;;;;;;;;
;;;;;;;;;;;;;;;;;;;;;;;;;;;;;;;;;
;;;;;;;;;;;;;;;;;;;;;;;;;;;;;;;;;
;;;;;;;;;;;;;;;;;;;;;;;;;;;;;;;;;
yyyyyyyyyyyyyyyyyyyyyyyyyyyyyyyyy
yyyyyyyyyyyyyyyyyyyyyyyyyyyyyyyyy
yyyyyyyyyyyyyyyyyyyyyyyyyyyyyyyyy
yyyyyyyyyyyyyyyyyyyyyyyyyyyyyyyyy
yyyyyyyyyyyyyyyyyyyyyyyyyyyyyyyyy
yyyyyyyyyyyyyyyyyyyyyyyyyyyyyyyyy
yyyyyyyyyyyyyyyyyyyyyyyyyyyyyyyyy
yyyyyyyyyyyyyyyyyyyyyyyyyyyyyyyyy
yyyyyyyyyyyyyyyyyyyyyyyyyyyyyyyyy
yyyyyyyyyyyyyyyyyyyyyyyyyyyyyyyyy
yyyyyyyyyyyyyyyyyyyyyyyyyyyyyyyyy
yyyyyyyyyyyyyyyyyyyyyyyyyyyyyyyyy
yyyyyyyyyyyyyyyyyyyyyyyyyyyyyyyyy
yyyyyyyyyyyyyyyyyyyyyyyyyyyyyyyyy
yyyyyyyyyyyyyyyyyyyyyyyyyyyyyyyyy
yyyyyyyyyyyyyyyyyyyyyyyyyyyyyyyyy
yyyyyyyyyyyyyyyyyyyyyyyyyyyyyyyyy
yyyyyyyyyyyyyyyyyyyyyyyyyyyyyyyyy
yyyyyyyyyyyyyyyyyyyyyyyyyyyyyyyyy
yyyyyyyyyyyyyyyyyyyyyyyyyyyyyyyyy
yyyyyyyyyyyyyyyyyyyyyyyyyyyyyyyyy
yyyyyyyyyyyyyyyyyyyyyyyyyyyyyyyyy
yyyyyyyyyyyyyyyyyyyyyyyyyyyyyyyyy
yyyyyyyyyyyyyyyyyyyyyyyyyyyyyyyyy
yyyyyyyyyyyyyyyyyyyyyyyyyyyyyyyyy
yyyyyyyyyyyyyyyyyyyyyyyyyyyyyyyyy
yyyyyyyyyyyyyyyyyyyyyyyyyyyyyyyyy
yyyyyyyyyyyyyyyyyyyyyyyyyyyyyyyyy
yyyyyyyyyyyyyyyyyyyyyyyyyyyyyyyyy
yyyyyyyyyyyyyyyyyyyyyyyyyyyyyyyyy
yyyyyyyyyyyyyyyyyyyyyyyyyyyyyyyyy
yyyyyyyyyyyyyyyyyyyyyyyyyyyyyyyyy
yyyyyyyyyyyyyyyyyyyyyyyyyyyyyyyyy
yyyyyyyyyyyyyyyyyyyyyyyyyyyyyyyyy
yyyyyyyyyyyyyyyyyyyyyyyyyyyyyyyyy
yyyyyyyyyyyyyyyyyyyyyyyyyyyyyyyyy
yyyyyyyyyyyyyyyyyyyyyyyyyyyyyyyyy
yyyyyyyyyyyyyyyyyyyyyyyyyyyyyyyyy
yyyyyyyyyyyyyyyyyyyyyyyyyyyyyyyyy
yyyyyyyyyyyyyyyyyyyyyyyyyyyyyyyyy
yyyyyyyyyyyyyyyyyyyyyyyyyyyyyyyyy
yyyyyyyyyyyyyyyyyyyyyyyyyyyyyyyyy
yyyyyyyyyyyyyyyyyyyyyyyyyyyyyyyyy
yyyyyyyyyyyyyyyyyyyyyyyyyyyyyyyyy
yyyyyyyyyyyyyyyyyyyyyyyyyyyyyyyyy
yyyyyyyyyyyyyyyyyyyyyyyyyyyyyyyyy
yyyyyyyyyyyyyyyyyyyyyyyyyyyyyyyyy
yyyyyyyyyyyyyyyyyyyyyyyyyyyyyyyyy
yyyyyyyyyyyyyyyyyyyyyyyyyyyyyyyyy
yyyyyyyyyyyyyyyyyyyyyyyyyyyyyyyyy
yyyyyyyyyyyyyyyyyyyyyyyyyyyyyyyyy
yyyyyyyyyyyyyyyyyyyyyyyyyyyyyyyyy
yyyyyyyyyyyyyyyyyyyyyyyyyyyyyyyyy
yyyyyyyyyyyyyyyyyyyyyyyyyyyyyyyyy
yyyyyyyyyyyyyyyyyyyyyyyyyyyyyyyyy
yyyyyyyyyyyyyyyyyyyyyyyyyyyyyyyyy
yyyyyyyyyyyyyyyyyyyyyyyyyyyyyyyyy
yyyyyyyyyyyyyyyyyyyyyyyyyyyyyyyyy
yyyyyyyyyyyyyyyyyyyyyyyyyyyyyyyyy
yyyyyyyyyyyyyyyyyyyyyyyyyyyyyyyyy
yyyyyyyyyyyyyyyyyyyyyyyyyyyyyyyyy
yyyyyyyyyyyyyyyyyyyyyyyyyyyyyyyyy
yyyyyyyyyyyyyyyyyyyyyyyyyyyyyyyyy
yyyyyyyyyyyyyyyyyyyyyyyyyyyyyyyyy
BATTERY INSERTION
3V [2 X “AA” cell OR IEC R6 OR JIS R6P (JIS SUM-3)]
1. Point the remote control at the remote sensor (1) when operating.
2. The remote control may not be effective in the strong day light.
3. Never get the remote control wet.
4. Replace the batteries when the performance of the remote control becomes
NOTES: • Do not use new and old batteries or different kinds of batteries
1
HITACHI
ON/STANDBY
TUNER PRESET CD OPEN/CLOSE
AUX
TAPE
SENSOR
TUNING
UPDOWN
PHONES
BAND
CD
6 m
30°
R
E
W
O
P
P
E
E
R
L
E
S
M
/
R
M
I
E
E
D
M
Z
I
O
T
O
N
3
S
X
K
U
C
A
O
L
C
2
/
D
6
N
R
A
E
B
N
1
U
T
5
9
D
C
4
8
E
P
7
A
T
/
M
T
A
E
R
S
G
E
O
10 +
R
R
P
P
O
T
U
A
0
M
O
D
N
A
T
A
R
E
O
P
N
E
O
R
M
/
T
R
S
E
N
U
T
/
D
C
S
D
R
D
W
F
.
F
L
E
N
A
.
P
W
E
R
Y
T
P
+
T
Q
C
E
T
-
E
S
VOLUME
E
R
P
S
S
A
B
X
I
H
RB-AXM20
C
A
REMOTE CONTROLLER
IT
H
CLOCK
1
4
7
0
REPEAT
ST/MONO
CD/TUNER
REW.
CT
X-BASS
REMOTE CONTROLLER
30°
TIMER/
SNOOZE
SLEEP
POWER
2
3
DIMMER
AUX
5
6
BAND/
8
9
TUNER
CD
10 +
PROGRAM/
AUTO PRESET
TAPE
RANDOM
F.FWD
PTY PANEL
RDS
PRESET EQ
+
-
VOLUME
RB-AXM20
HITACHI
unstable.
together.
• During radio listening (MW), if you operate the remote control
extremely close to the sound system, some noise may be produced.
14
HITACHI
L
C
R
E
W
O
P
P
E
E
R
L
E
S
M
/
R
M
I
E
E
D
M
Z
I
O
T
O
N
3
S
X
K
U
C
A
O
2
/
D
6
N
R
A
E
B
N
1
U
T
5
9
D
C
4
8
E
P
7
A
T
/
M
T
A
E
R
S
G
E
O
10 +
R
R
P
P
O
T
U
A
0
M
O
D
N
A
T
A
R
E
O
P
N
E
O
R
M
/
T
R
S
E
N
U
T
/
D
C
S
D
R
D
W
F
.
F
L
E
N
A
.
P
W
E
R
Y
T
P
+
T
Q
C
E
T
-
E
S
VOLUME
E
R
P
S
S
A
B
X
I
H
RB-AXM20
C
A
REMOTE CONTROLLER
IT
H
Page 15

FUNCTION AND FEATURES
GENERAL SECTION
SWITCHING THE SYSTEM ON AND PUTTING IT INTO STANDBY MODE
• Switching ON : The STANDBY indicator goes off. The display window backlight lights up.
• Switching to STANDBY : The STANDBY indicator lights up. The display window backlight goes off
and only the clock is indicated.
CLOCK AND TIMER
The player’s programmable TIMER can be used to automatically start or stop playing any sound
source or start recording from the radio at a predetermined time. (To set the TIMERS refer to pages
35-36)
Additionally, there is a SLEEP TIMER for automatically putting your set into low power mode if it is
left idle for a preset time period. (Refer to page 35)
ONE TOUCH OPERATION (COMPU PLAY)
• Even when the power is set to STANDBY, pressing one of the buttons shown below will automatically turn on the sound system. A sound source is chosen, and play begins.
Function mode
CD
TUNING
BAND
TAPE
AUX
• When the OPEN/CLOSE button is pressed, the CD door open/close however the sound source
does not switch.
Note: When switching off the power, be sure to press the STANDBY/ON button.
CD
TUNER
TAPE
AUX
When this button is pressed with a CD loaded, CD playback
begins.
When this button is pressed, the tuner is engaged.
When this button is pressed, the tape is engaged.
A sound source connected to the LINE IN
(AUX) terminal can be engaged.
Operations
VOLUME, X-BASS AND OTHER CONTROLS
• VOLUME buttons (using the remote control unit)
+ : Use to increase the volume
– : Use to decrease the volume
EXTRA BASS EFFECT
Pressing the X-BASS [25] Button alternates between Extra Bass ON and OFF.
When X-Bass is ON, the X-BASS indicator will be visible on the LCD display.
ON : X-BASS indicator lights up. X-BASS sound is activated.
OFF : X-BASS indicator goes off. X-BASS sound is not activated.
• DIMMER Button (using the remote control unit)
When the power is switched on, pressing this button dims the display window’s backlight. When
the button is pressed again, the display window returns to its normal brightness.
• PRESET EQ Button
POPS : More presence in the vocals and midrange
ROCK : Powerful sound emphasizing treble and bass
CLASSIC : Enriched sound with heavy bass and fine treble
JAZZ : Accented lower frequencies for jazz-type music
FLAT : Natural sound
15
Page 16

RESET
If operations or the display malfunctions:
Many functions of this unit are controlled by microprocessors which are vulnerable to
electromagnetic interference. To restore your systems functions in such an event, make
sure the unit in standby mode and then press the reset switch. You will also have to preset
your radio stations again because pressing the reset switch clears the preset stations.
Rear view
LR
LR
Press RESET switch inside
the unit with a cocktail stick.
Do not use a metal stick.
TUNER SECTION
TUNER AERIALS
• For FM, connect the provided FM feeder antenna (see page 7).
• For MW, adjust the position of AM loop antenna (see page 7).
A. STEREO/MONO button (using the remote control unit)
- Auto mode:
When listening to an FM stereo broadcast, set the unit to this mode by pressing the ST/
MONO button. The STEREO indicator lights up when the FM stereo broadcast is received.
- Mono mode:
When the FM stereo reception is weak or noisy, set the unit to MONO MODE by pressing
the ST/MONO button.
- Seek tuning:
Press and hold the UP or DOWN button for one second or more. The unit enters the seek
tuning mode to automatically tune in the nearest station, so the broadcast can be heard.
- Manual tuning:
Each time the UP or DOWN button is pressed, the unit steps through the current frequency
band.
Note:
• When seek tuning to the required station is not possible because the broadcast signal is
too weak, press the UP or DOWN button momentarily to perform manual tuning.
• When the unit is set to STANDBY, or another mode (CD or AUX) is selected, the last
tuned frequency is stored in memory. When the power is switched on again and BAND
button is pressed, the same station will be turned to.
B. Auto preset tuning (using the remote control unit)
This will automatically store any broadcasting stations with strong signals into the memory
(Max. 10 for FM and 10 for MW)
• Press the AUTO PRESET button for more than 2 seconds. The frequencies of stations’
broadcasting signals can be stored in memory automatically in the order of increasing
frequency.
16
Page 17

C. Presetting stations (using the remote control unit)
A total of 20 FM or MW stations can be memorized.
Notes:
• The previous stored station is erased when a new station is stored, because the
new station’s frequency replaces the previous frequency in memory.
• When listening to a MW broadcast, noise may be heard if the remote control unit is
used.
• All preset stations will be erased when the power cord is disconnected or a power
failure occurs. In such cases, store the stations again.
D. If you hear beat noise while recording from an MW station, flip the beat cut switch to
reduce the noise.
E. Frequency step of MW band
To tune to your local MW station, you can select either 9 kHz or 10 kHz as the frequency
step. By default, the factory setting for the unit’s step is 9 kHz.
To switch to the required frequency step:
1) Make sure the unit is in TUNER MODE and the band set to MW.
2) To select 9 kHz frequency step - press and hold the BAND button while pressing
the ¡/¢ button.
3) To select 10 kHz frequency step - press and hold the BAND button while pressing
the 4/1 button.
The frequency step that you have set will be in effect until either step 2 or 3 is performed
again.
F. RDS Button (using the remote control unit)
Use this button to automatically tune to stations using the radio data system. There
are program type identification (PTY), clock time (CT) and radio text (RT) functions.
DISPLAY
• RDS (Radio Data System) When the RDS button is pressed, the system searches for
a station and automatically tunes it in. The “RDS” indicator lights up and the station’s
name is displayed on the display.
• PTY (Program Type) This indicator lights up when the type of RDS program is specified.
• RT (Radio Text) This lights when in RT mode and the RT message is displayed.
REMOTE CONTROL
0
10 +
REPEAT
PROGRAM/
AUTO PRESET
ST/MONO RANDOM
CD/TUNING
REW.
F.FWD
CT
PTY PANEL RDS
X-BASS
PRESET EQ
REMOTE CONTROLLER
RB-AXM20
HITACHI
-
VOLUME
CD
TAPE
+
CT button
Use this to correct the time of the clock on the AX-M20. Press
this button when the time service of an RDS station is
received correctly. “CT ON” is displayed for 2 seconds and
the AX-M20’s clock is corrected. Press the CT button twice,
and “CT OFF” is displayed.
❈ The clock can be adjusted manually in “CT OFF” mode.
RDS button
Automatically tunes to stations using the radio data system.
17
Page 18

PTY button
After selecting “PTY” with the RDS button, Press the PTY
Button to select one of the 16 program types.
PANEL button
When receiving an RDS broadcast, press the PANEL Button
to switch between the frequency, PTY, RT or CT display.
Note that this button will not function if the reception is poor.
Each time the button is pressed, the display mode changes
as follows:
PTY CT RT
Frequency
CD PLAYER SECTION
The ¡/¢ [6] and 4
• At any time, press ¡/¢ [6] to skip to the next track. Press repeatedly to skip multiple
tracks.
/
• Pressing 4
it again to skip to the previous track. (
tracks immediately)
Pressing and Holding
•
the forward or backward search functions.
CASSETTE TAPE SUBSYSTEM
• You may switch recording or playback to either side of a cassette without removing it. If
the cassette is inserted SIDE A up, FORWARD PLAY 3 [19] will play SIDE A and
REVERSE PLAY 2 [29] will play SIDE B.
• Use the FAST FORWARD / REWIND ¡ [22] or REWIND / FAST FORWARD 1
[23] buttons to rapidly advance or rewind the tape.
• Press the PAUSE 8 [28] button to temporarily halt the tape during playback or recording.
Press it again to exit PAUSE mode.
• The STOP 7 [20] button shuts off the cassette tape operation.
• To insert or remove a cassette, use the EJECT
• Do not press EJECT
STOP 7 [20] button and then press the EJECT
• It is advisable to press the STOP 7 [20] button first, before change function to CD,
tuner or AUX.
1 [12]
/
1 [12] buttons have several functions:
during play
returns to the beginning of the current track. Press
In STOP mode
either ¡/¢ [6] or 4/1 [12] buttons
0 [17] button while the tape is playing. If this happen, press the
Program Service Name
, 4/1 [12] skips to previous
0 [17] button.
0 [17] button.
during play
initiates
Use only NORMAL tapes in the cassette deck of this sound system. The characteristics
of the cassette deck mechanisms do not match other types of tape.
18
Page 19

TROUBLESHOOTING
Power
Problems
General
Operations
Tape Deck
CD Player
Symptom
No AC Power
The set functions incorrectly even
though you press the proper
operation buttons
Cassette cannot be inserted
No recording
Sound deterioration or irregular
tape speed
Disc does not play
Player does not operate correctly;
sound is interrupted; noise occurs
and tracks cannot be selected.
Player does not operate normally
when control buttons are
pressed.
Possible Explanation
• The power cord is loose
• Unplug the power cord then
reattach it and try the operation
again.
• Make sure the cassette is
seated properly in the holder
• The erasure prevention tabs
have been broken off. Cover
them with tape.
• Clean tape head, capstan and
pressure roller with a cotton
swab
• The disc is loaded oppositely
• The disc is scratched or warped
• The disc is dirty. Clean it with a
soft cloth
• Press the STOP button then
play the disc again
19
Page 20

SPECIFICATIONS
TUNER SECTION
Frequency Range FM : 87.5 – 108 MHz (50 kHz step)
MW: 522 – 1611 kHz (9 kHz step)
: 520 – 1710 kHz (10 kHz step)
Antennas FM: FM feeder antenna
MW: AM loop antenna
CD PLAYER SECTION
Sampling Frequency : 44.1 kHz
: 1 bit D/A convertor
This unit can be connected to another recorder with the optical digital output terminals on
the back panel for digital recordings
TAPE SECTION
Type : 4 Tracks, 2 Channels, Stereo auto reverse cassette recorder
Mechanism Type : Logic control deck mechanism
Tape Speed : 4.75 cm/s
Recording System : AC bias with ALC
Erase System : AC
Frequency Response : 100 ~ 8,000 Hz
TIMER SECTION
System : Digital Quartz clock
Display Format : 24-hour cycle
GENERAL SPECIFICATION
Power Requirements : AC 230 V, 50 Hz
Power Consumption : 33 W in AC operation
Speakers : Main: 10cm (4 in.) dia., Tweeter: 2.5cm (1 in.)
Power Output : 12.5 W + 12.5 W
Outputs : Headphones jack (stereo 3.5mm) Impedance: 16 - 68 ohms
: Optical Digital Output
Dimensions : Main Unit: 165 (W) X 232 (H) X 280 (D) mm
: Speaker Unit: 140 (W) X 230 (H) X 172 (D) mm
Weight : Main Unit: Approx. 3.9 kg
: Speaker Unit: Approx. 1.6 kg/piece
Accessories Supplied : AC power cord (1)
: Remote Control Unit (1)
: FM antenna (1)
: Loop antenna (1)
: Speaker Cord (2)
Specifications are subject to change for performance improvement without notice.
20
Page 21

LISTEN TO THE RADIO
TIMER/
CLOCK
SLEEP
POWER
12
TUNING
BAND
35
o
o
o
o
o
o
o
o
o
o
o
o
o
o
o
o
o
o
o
o
o
o
– +
VOLUME
4
X-BASS
X-BASS
SNOOZE
1
2
3
DIMMER
4
AUX
5
6
BAND/
TUNER
BAND/
7
8
9
TUNER
CD
0
10 +
REPEAT
PROGRAM/
AUTO PRESET
TAPE
RANDOM
ST/MONO
CD/TUNING
REW.
F.FWD
CT
PTY PANEL RDS
X-BASS
PRESET EQ
+
-
VOLUME
REMOTE CONTROLLER
RB-AXM20
HITACHI
MHz
FLAT
\
\
KHz
FLAT
TIMER/
CLOCK
SLEEP
POWER
SNOOZE
1
2
3
DIMMER
4
AUX
5
6
BAND/
7
8
9
o
o
o
o
o
o
TIMER/
CLOCK
SNOOZE
1
2
4
5
7
8
0
10 +
REPEAT
RANDOM
ST/MONO
CD/TUNER
REW.
F.FWD
CT
PTY PANEL
X-BASS
PRESET EQ
0
10 +
REPEAT
PROGRAM/
AUTO PRESET
RANDOM
ST/MONO
CD/TUNING
REW.
F.FWD
CT
PTY PANEL
X-BASS
PRESET EQ
REMOTE CONTROLLER
RB-AXM20
HITACHI
-
VOLUME
SLEEP
POWER
3
DIMMER
AUX
6
BAND/
9
TUNER
CD
PROGRAM/
AUTO PRESET
TAPE
RDS
+
-
VOLUME
TUNER
CD
TAPE
RDS
+
-
VOLUME
+
DOWN
STANDBY/ON
UP
TIMER/
CLOCK
SLEEP
POWER
SNOOZE
1
2
3
DIMMER
4
AUX
5
6
BAND/
7
8
9
TUNER
CD
0
10 +
REPEAT
PROGRAM/
AUTO PRESET
TAPE
RANDOM
ST/MONO
CD/TUNING
REW.
F.FWD
CT
X-BASS
PRESET EQ
TIMER/
CLOCK
SNOOZE
1
2
4
5
7
8
0
10 +
REPEAT
RANDOM
ST/MONO
CD/TUNING
REW.
F.FW D
CT
PTY PANEL RDS
X-BASS
PRESET EQ
REMOTE CONTROLLER
RB-AXM20
HITACHI
PTY PANEL RDS
SLEEP
3
6
9
PROGRAM/
AUTO PRESET
-
VOLUME
-
VOLUME
POWER
DIMMER
AUX
BAND/
TUNER
TAPE
CD/TUNING
+
CD
POWER
+
21
Page 22

PRESETTING RADIO STATIONS
MHz
MEMORY
FLAT
MHz
MEMORY
FLAT
TIMER/
1
2
DOWN
DOWN
TUNING
BAND
MEMORY
TUNING
BAND
UP
MHz
FLAT
UP
456
CLOCK
1
4
7
REPEAT
ST/MONO
REW.
CT
X-BASS
SNOOZE
0
10 +
RANDOM
CD/TUNING
F.FWD
PTY PANEL RDS
PRESET EQ
3
6
9
-
VOLUME
3
TIMER/
CLOCK
SLEEP
POWER
SNOOZE
1
2
3
DIMMER
4
5
6
7
8
9
0
POWER
DIMMER
AUX
BAND/
TUNER
CD
TAPE
+
10 +
REPEAT
AUTO PRESET
RANDOM
ST/MONO
CD/TUNING
REW.
F.FWD
CT
PTY PANEL RDS
X-BASS
PRESET EQ
REMOTE CONTROLLER
RB-AXM20
HITACHI
PROGRAM/
-
VOLUME
AUX
BAND/
TUNER
CD
TAPE
+
0-9, 10+
PROGRAM /
AUTO PRESET
SLEEP
POWER
2
3
DIMMER
AUX
5
6
BAND/
TUNER
BAND/
8
9
TUNER
CD
PROGRAM/
AUTO PRESET
TAPE
+
-
VOLUME
TIMER/
CLOCK
SLEEP
SNOOZE
1
2
4
5
7
8
0
10 +
REPEAT
PROGRAM/
AUTO PRESET
RANDOM
ST/MONO
CD/TUNING
REW.
F.FWD
CT
PTY PANEL RDS
X-BASS
PRESET EQ
Repeat step 2-4 to
program other channel
MEMORY
TIMER/
CLOCK
SLEEP
SNOOZE
1
2
4
5
7
8
0
10 +
REPEAT
RANDOM
ST/MONO
CD/TUNING
REW.
F.FWD
CT
PTY PANEL RDS
X-BASS
PRESET EQ
REMOTE CONTROLLER
RB-AXM20
HITACHI
PROGRAM/
AUTO PRESET
3
6
9
-
VOLUME
2
3
1
POWER
DIMMER
BAND/
TUNER
TAPE
MHz
FLAT
AUX
CD
+
MEMORY
TIMER/
CLOCK
SNOOZE
1
2
4
5
7
8
0
10 +
REPEAT
AUTO PRESET
RANDOM
ST/MONO
CD/TUNING
REW.
F.FWD
CT
PTY PANEL RDS
X-BASS
PRESET EQ
REMOTE CONTROLLER
RB-AXM20
HITACHI
SLEEP
PROGRAM/
3
6
9
-
VOLUME
POWER
DIMMER
BAND/
TUNER
22
AUX
CD
TAPE
+
MHz
FLAT
PROGRAM /
AUTO PRESET
TIMER/
CLOCK
SNOOZE
1
2
4
5
7
8
0
10 +
REPEAT
RANDOM
ST/MONO
CD/TUNING
REW.
F.FW D
CT
PTY PANEL RDS
X-BASS
PRESET EQ
REMOTE CONTROLLER
RB-AXM20
HITACHI
SLEEP
3
6
9
PROGRAM/
AUTO PRESET
-
VOLUME
DIMMER
POWER
AUX
BAND/
TUNER
CD
TAPE
+
PROGRAM /
AUTO PRESET
Page 23

AUTO PRESETTING RADIO STATIONS
MHz
FLAT
X-BASS
Press and hold for more
than 2 seconds
TIMER/
CLOCK
SNOOZE
1
2
4
5
7
8
0
10 +
REPEAT
RANDOM
ST/MONO
CD/TUNING
REW.
F.FWD
CT
PTY PANEL RDS
X-BASS
PRESET EQ
REMOTE CONTROLLER
RB-AXM20
HITACHI
SLEEP
PROGRAM/
AUTO PRESET
3
6
9
-
VOLUME
POWER
DIMMER
AUX
BAND/
TUNER
CD
TAPE
+
PROGRAM /
AUTO PRESET
RECALLING PRESET STATIONS
TUNER PRESET
X-BASS
MEMORY
POPS
X-BASS
MEMORY
POPS
0-9, 10+
MHz
MHz
TIMER/
CLOCK
SNOOZE
1
2
4
5
7
8
0
10 +
REPEAT
AUTO PRESET
ST/MONO
RANDOM
CD/TUNING
REW.
F.FWD
CT
PTY PANEL RDS
X-BASS
PRESET EQ
REMOTE CONTROLLER
RB-AXM20
HITACHI
SLEEP
PROGRAM/
3
6
9
-
VOLUME
DIMMER
POWER
TUNER
AUX
BAND/
CD
TAPE
+
SOUND MODES
12
PRESET
EQ
POPS
ROCK
CLASSIC
JAZZ
FLAT
X-BASS
23
Page 24

RECEIVING RDS BROADCASTS
R-D-S
POPS
PTY
MHz
CT
POPS
R-D-S
MHz
RT
POPS
R-D-S
1
2
3
7
8
9
4
5
6
0
10 +
X-BASS
TAPE
-
+
VOLUME
PRESET EQ
CD/TUNING
TIMER/
SNOOZE
CT
PTY PANEL RDS
CLOCK
BAND/
TUNER
CD
REPEAT
ST/MONO
RANDOM
PROGRAM/
AUTO PRESET
AUX
DIMMER
POWER
F.FWD
SLEEP
REW.
RDS
1
2
3
7
8
9
4
5
6
0
10 +
X-BASS
TAPE
-
+
VOLUME
PRESET EQ
CD/TUNING
TIMER/
SNOOZE
CT
PTY PANEL RDS
CLOCK
BAND/
TUNER
CD
REPEAT
ST/MONO
RANDOM
PROGRAM/
AUTO PRESET
AUX
DIMMER
POWER
REW.
F.FWD
SLEEP
1
TUNING
BAND/
TUNER
BAND
X-BASS
MHz
POPS
During seek tuning
3a
(Frequency UP tuning)
DOWN
TUNING
BAND
UP
ST/MONO
CLOCK
REPEAT
REW.
X-BASS
1
4
7
0
CD/TUNING
CT
TIMER/
SLEEP
SNOOZE
2
5
8
10 +
PROGRAM/
AUTO PRESET
RANDOM
F.FWD
PTY PANEL RDS
PRESET EQ
3
6
9
-
VOLUME
To stop seek function halfway, press
UP button.
2
RDS
POPS
During seek tuning
3b
POWER
DIMMER
AUX
BAND/
TUNER
CD
TAPE
+
(Frequency DOWN tuning)
TUNING
DOWN
BAND
To stop seek function halfway, press
DOWN button.
X-BASS
UP
4
5
To receive the next station, repeat step 3.
R-D-S
TIMER/
CLOCK
SLEEP
POWER
SNOOZE
1
2
3
DIMMER
4
7
REPEAT
ST/MONO
REW.
CT
X-BASS
5
8
0
10 +
RANDOM
CD/TUNING
F.FWD
PTY PANEL RDS
PRESET EQ
PROGRAM/
AUTO PRESET
6
9
-
VOLUME
AUX
PANEL
BAND/
TUNER
CD
TAPE
+
POPS
R-D-S
POPS
24
MHz
=
±
≠
≠
+
Page 25

PTY SEARCH
R.D.S
PTY
TIMER/
CLOCK
SLEEP
POWER
REPEAT
ST/MONO
1
4
7
REW.
CT
X-BASS
0
CD/TUNING
SNOOZE
10 +
RANDOM
F.FWD
PRESET EQ
2
3
5
6
8
9
PROGRAM/
AUTO PRESET
PTY PANEL RDS
-
VOLUME
DIMMER
AUX
BAND/
TUNER
CD
TAPE
+
1
RDS
RDS
POPS
X-BASS
2
3
DOWN
CLOCK
REPEAT
ST/MONO
REW.
X-BASS
1
4
7
0
CD/TUNING
CT
TIMER/
SLEEP
SNOOZE
2
3
5
6
8
9
10 +
PROGRAM/
AUTO PRESET
RANDOM
F.FWD
PTY PANEL RDS
PRESET EQ
-
TUNING
BAND
VOLUME
POWER
DIMMER
PTY
R.D.S
PTY
R.D.S
PTY
R.D.S
AUX
BAND/
TUNER
TAPE
PTY
CD
+
UP
R.D.S
R-D-S
R.D.S
R.D.S
R.D.S
CLOCK
REPEAT
ST/MONO
PTY
PTY
PTY
PTY
PTY
1
4
7
0
CD/TUNING
REW.
CT
X-BASS
TIMER/
SLEEP
SNOOZE
2
3
5
6
8
9
10 +
PROGRAM/
AUTO PRESET
RANDOM
F.FWD
PTY PANEL RDS
PRESET EQ
-
VOLUME
POWER
DIMMER
AUX
BAND/
TUNER
CD
TAPE
+
PTY
R.D.S
PTY
R.D.S
PTY
R.D.S
PTY
R.D.S
PTY
R.D.S
PTY
R.D.S
PTY
R.D.S
To receive the next
4
station, repeat steps
2-3.
Only the UP button can be used.
25
Page 26

PLAYING CDs
12
STANDBY/ON
POWER
SLEEP
POWER
3
DIMMER
AUX
6
BAND/
9
TUNER
CD
PROGRAM/
TAPE
Printed
side
facing
out
-
VOLUME
RDS
+
Open Close
ST/MONO
TIMER/
CLOCK
SNOOZE
1
2
4
5
7
8
0
10 +
REPEAT
AUTO PRESET
RANDOM
CD/TUNING
REW.
F.FWD
CT
PTY PANEL
X-BASS
PRESET EQ
5
1
2345 67891011
CD
TIMER/
CLOCK
SNOOZE
1
2
4
5
7
8
0
10 +
REPEAT
RANDOM
ST/MONO
CD/TUNING
REW.
F.FWD
CT
PTY PANEL
X-BASS
PRESET EQ
X-BASS
12 131415
FLAT
SLEEP
POWER
3
DIMMER
AUX
6
BAND/
9
TUNER
CD
PROGRAM/
AUTO PRESET
TAPE
RDS
+
-
VOLUME
43
o
o
o
o
o
o
OVER
CD
X-BASS
o
o
o
o
o
o
o
– +
VOLUME
TIMER/
CLOCK
SLEEP
POWER
SNOOZE
1
2
3
DIMMER
4
AUX
5
6
BAND/
7
8
9
TUNER
CD
0
10 +
REPEAT
PROGRAM/
AUTO PRESET
TAPE
RANDOM
ST/MONO
CD/TUNING
REW.
F.FWD
CT
PTY PANEL
PRESET EQ
-
RDS
VOLUME
X-BASS
o
o
o
o
o
o
o
o
o
o
+
-
VOLUME
+
TIMER/
CLOCK
SNOOZE
1
2
4
5
7
8
0
10 +
REPEAT
AUTO PRESET
RANDOM
ST/MONO
CD/TUNING
REW.
F.FWD
CT
PTY PANEL
X-BASS
PRESET EQ
REMOTE CONTROLLER
RB-AXM20
HITACHI
SLEEP
POWER
3
DIMMER
AUX
6
BAND/
9
TUNER
CD
PROGRAM/
TAPE
RDS
+
-
VOLUME
26
Page 27

PLAYING CDs - continued
POWER
1
2
3
7
8
9
4
5
6
0
10 +
X-BASS
TAPE
-
+
VOLUME
PRESET EQ
CD/TUNING
TIMER/
SNOOZE
CT
PTY PANEL
RDS
CLOCK
BAND/
TUNER
CD
REPEAT
ST/MONO
RANDOM
PROGRAM/
AUTO PRESET
AUX
DIMMER
POWER
REW.
F.FWD
SLEEP
TIMER/
6
DOWN
TUNING
BAND
UP
CLOCK
REPEAT
ST/MONO
X-BASS
1
4
7
0
CD/TUNING
REW.
CT
SLEEP
SNOOZE
2
5
8
10 +
PROGRAM/
AUTO PRESET
RANDOM
F.FW D
PTY PANEL RDS
PRESET EQ
3
6
9
-
VOLUME
POWER
DIMMER
BAND/
TUNER
AUX
CD
TAPE
+
CD/TUNING
To pause
78
12 131415
FLAT
OVER
CD
ST/MONO
TIMER/
CLOCK
SLEEP
POWER
SNOOZE
1
2
3
DIMMER
4
AUX
5
6
BAND/
7
8
9
TUNER
CD
CD
0
10 +
REPEAT
PROGRAM/
AUTO PRESET
TAPE
RANDOM
CD/TUNING
REW.
F.FWD
CT
PTY PANEL
RDS
X-BASS
PRESET EQ
+
-
VOLUME
Resume play
CD
ST/MONO
14
12 13
15
FLAT
OVER
TIMER/
CLOCK
SLEEP
POWER
SNOOZE
1
2
3
DIMMER
4
AUX
5
6
BAND/
7
8
9
TUNER
CD
CD
0
10 +
REPEAT
PROGRAM/
AUTO PRESET
TAPE
RANDOM
CD/TUNING
REW.
F.FWD
CT
PTY PANEL
PRESET EQ
-
VOLUME
RDS
+
X-BASS
910
CD
TIMER/
CLOCK
SLEEP
POWER
SNOOZE
1
2
3
DIMMER
4
AUX
5
6
BAND/
7
8
9
TUNER
CD
0
10 +
REPEAT
PROGRAM/
AUTO PRESET
TAPE
RANDOM
ST/MONO
CD/TUNING
REW.
F.FWD
CT
PTY PANEL RDS
X-BASS
PRESET EQ
-
VOLUME
+
STANDBY/ON
27
Page 28

PROGRAMMING CD TRACKS
You may store at most 20 tracks in the memory in the desired sequence. You may store any track
more than once. When playing, you will only hear the stored titles in the selected sequence.
Make sure it is in stop mode
1 2
TIMER/
CLOCK
SLEEP
POWER
CD
1
2345 67891011
1
4
7
0
REPEAT
ST/MONO
CD/TUNING
REW.
CT
X-BASS
SNOOZE
2
5
8
10 +
PROGRAM/
AUTO PRESET
RANDOM
F.FWD
PTY PANEL RDS
PRESET EQ
12 131415
FLAT
3
DIMMER
AUX
6
BAND/
9
TUNER
CD
TAPE
+
-
VOLUME
OVER
MEMORY
1
2345 67891011
12 131415
FLAT
OVER
34
0-9, 10+
5
CD
MEMORY
1
2345 67891011
TIMER/
CLOCK
SNOOZE
1
2
4
5
7
8
0
10 +
REPEAT
ST/MONO
RANDOM
CD/TUNING
REW.
F.FWD
CT
PTY PANEL
X-BASS
PRESET EQ
PROGRAM/
AUTO PRESET
MEMORY
12 131415
FLAT
OVER
SLEEP
POWER
3
DIMMER
AUX
6
BAND/
9
TUNER
CD
TAPE
RDS
+
-
VOLUME
Clear program
6
TIMER/
CLOCK
SLEEP
POWER
SNOOZE
1
2
3
DIMMER
4
AUX
5
6
BAND/
7
8
9
TUNER
CD
CD
0
10 +
REPEAT
PROGRAM/
AUTO PRESET
TAPE
RANDOM
ST/MONO
CD/TUNING
REW.
F.FWD
CT
PTY PANEL
RDS
X-BASS
PRESET EQ
+
-
VOLUME
Open
8
FLAT
OVER
STOP
BUTTON
x2
28
Page 29

DIRECT ACCESS CD PLAY
1
2
3
7
8
9
4
5
6
0
10 +
X-BASS
TAPE
-
+
VOLUME
PRESET EQ
CD/TUNING
TIMER/
SNOOZE
CT
PTY PANEL RDS
CLOCK
BAND/
TUNER
CD
REPEAT
ST/MONO
RANDOM
PROGRAM/
AUTO PRESET
AUX
DIMMER
POWER
REW.
SLEEP
F.FWD
TIMER/
CLOCK
SLEEP
POWER
SNOOZE
1
2
3
0-9, 10+
REPEAT
ST/MONO
REW.
X-BASS
4
7
CT
5
6
8
9
0
10 +
PROGRAM/
AUTO PRESET
RANDOM
CD/TUNING
F.FWD
PTY PANEL RDS
PRESET EQ
-
VOLUME
REMOTE CONTROLLER
RB-AXM20
HITACHI
DIMMER
AUX
BAND/
TUNER
CD
TAPE
+
RANDOM CD PLAY
(REMOTE CONTROL ONLY)
12
RANDOM
TIMER/
CLOCK
SLEEP
POWER
SNOOZE
1
2
3
DIMMER
4
AUX
5
6
BAND/
7
8
9
TUNER
CD
0
10 +
REPEAT
PROGRAM/
AUTO PRESET
ST/MONO
TAPE
RANDOM
CD/TUNING
REW.
F.FWD
CT
PTY PANEL
PRESET EQ
-
VOLUME
RDS
+
X-BASS
RANDOM
1
234567891011
\
TIMER/
CLOCK
SNOOZE
1
2
4
5
7
8
0
10 +
REPEAT
RANDOM
ST/MONO
CD/TUNING
REW.
F.FWD
CT
PTY PANEL
X-BASS
PRESET EQ
12 131415
OVER
FLAT
SLEEP
PROGRAM/
AUTO PRESET
3
6
9
-
VOLUME
POWER
DIMMER
AUX
BAND/
TUNER
CD
TAPE
RDS
29
CD
+
UP
RANDOM
1
234567891011
12 131415
OVER
FLAT
Page 30

REPEAT CD PLAY
FLAT
1
234567891011
12 131415
OVER
ALL
• You can repeat playback for 1 track or all tracks on a disc.
TIMER/
CLOCK
SLEEP
POWER
SNOOZE
1
2
3
DIMMER
4
AUX
5
6
BAND/
7
8
9
REPEAT
ST/MONO
0
10 +
REPEAT
ST/MONO
RANDOM
CD/TUNING
REW.
F.FWD
CT
PTY PANEL RDS
X-BASS
PRESET EQ
REMOTE CONTROLLER
RB-AXM20
HITACHI
AUTO PRESET
TUNER
CD
PROGRAM/
TAPE
1
+
-
VOLUME
234567891011
➔
12 131415
FLAT
OVER
➔➔
1
234567891011
ALL
12 131415
FLAT
OVER
1
REPEAT
ST/MONO
2
Repeat 1 track
TIMER/
CLOCK
SLEEP
POWER
SNOOZE
1
2
3
DIMMER
4
AUX
5
6
BAND/
7
8
9
TUNER
CD
0
10 +
REPEAT
ST/MONO
RANDOM
CD/TUNING
REW.
F.FWD
CT
PTY PANEL RDS
X-BASS
PRESET EQ
REMOTE CONTROLLER
RB-AXM20
HITACHI
AUTO PRESET
1
TAPE
+
VOLUME
234567891011
PROGRAM/
-
«
12 131415
FLAT
Repeat all tracks
1
TIMER/
CLOCK
SLEEP
POWER
SNOOZE
1
2
3
DIMMER
4
AUX
5
6
BAND/
7
8
9
REPEAT
x2
OVER
ST/MONO
0
10 +
REPEAT
ST/MONO
RANDOM
CD/TUNING
REW.
F.FWD
CT
PTY PANEL RDS
X-BASS
PRESET EQ
REMOTE CONTROLLER
RB-AXM20
HITACHI
PROGRAM/
AUTO PRESET
TUNER
CD
TAPE
+
-
VOLUME
1
234567891011
ALL
12 131415
FLAT
OVER
«
2
30
Page 31

PLAYING TAPES
REC PAUSE PLAY STOP PLAY
CD
1
2
3
7
8
9
4
5
6
0
10 +
X-BASS
TAPE
-
+
VOLUME
PRESET EQ
CD/TUNING
TIMER/
SNOOZE
CT
PTY PANEL
RDS
CLOCK
BAND/
TUNER
CD
REPEAT
ST/MONO
RANDOM
PROGRAM/
AUTO PRESET
AUX
DIMMER
POWER
REW.
F.FWD
SLEEP
12
2
STANDBY/ON
3
TAPE
REPEAT
ST/MONO
CLOCK
REW.
X-BASS
1
4
7
0
CD/TUNING
CT
FLAT
TIMER/
SLEEP
SNOOZE
2
5
8
10 +
PROGRAM/
AUTO PRESET
RANDOM
F.FWD
PTY PANEL RDS
PRESET EQ
POWER
3
DIMMER
AUX
6
BAND/
9
TUNER
CD
TAPE
TAPE
+
-
VOLUME
4
3
1
5
o
o
o
o
o
o
o
o
o
o
o
o
– +
o
o
o
o
o
VOLUME
o
o
o
o
o
o
-
VOLUME
TIMER/
CLOCK
SLEEP
POWER
SNOOZE
1
2
3
DIMMER
4
AUX
5
6
BAND/
7
8
9
TUNER
CD
0
10 +
REPEAT
PROGRAM/
AUTO PRESET
TAPE
RANDOM
ST/MONO
CD/TUNING
REW.
F.FWD
CT
PTY PANEL
RDS
X-BASS
PRESET EQ
+
-
VOLUME
REMOTE CONTROLLER
RB-AXM20
HITACHI
+
6
X-BASS
X-BASS
ST/MONO
CLOCK
REPEAT
X-BASS
1
4
7
0
CD/TUNING
REW.
CT
TIMER/
SNOOZE
2
5
8
10 +
RANDOM
F.FWD
PTY PANEL
PRESET EQ
SLEEP
PROGRAM/
AUTO PRESET
3
6
9
-
VOLUME
POWER
DIMMER
AUX
BAND/
TUNER
CD
TAPE
RDS
+
31
Page 32

PLAYING TAPES (Cont’d)
78
REC PAUSE PLAY STOP PLAY
PLAY FEATURES
PRESET
CD Sync.
EQ
REC
X-BASS
REC PAUSE PLAY STOP PLAY
Reverse
PLAY
DIRECTION MODE
Forward
PLAY
STANDBY/ON
o
o
o
o
o
o
o
o
o
o
o
o
o
o
o
o
o
o
o
o
– +
VOLUME
EJECT
o
o
o
o
o
o
o
o
Play One Side
Play Both Side
Continuous Play
32
Page 33

RECORDING FROM THE RADIO
12
2
STANDBY/ON
3
TUNING
BAND
FM MW
Ø
Ø
TIMER/
CLOCK
SNOOZE
1
2
4
5
7
8
0
10 +
REPEAT
RANDOM
ST/MONO
CD/TUNING
REW.
F.FWD
CT
PTY PANEL RDS
X-BASS
PRESET EQ
REMOTE CONTROLLER
RB-AXM20
HITACHI
PROGRAM/
AUTO PRESET
SLEEP
POWER
3
DIMMER
AUX
6
BAND/
TUNER
BAND/
9
TUNER
CD
TAPE
+
-
VOLUME
4
3
1
REC PAUSE PLAY STOP PLAY
1
5
REC PAUSE PLAY STOP PLAY
Record on Side A / B
7
REC PAUSE PLAY STOP PLAY
33
6
REC PAUSE PLAY STOP PLAY
8
STANDBY/ON
Page 34

TAPE ERASING
STANDBY/ON
12
TAPE
3
1
REC PAUSE PLAY STOP PLAY
2
2
3
1 2
4
1
REC PAUSE PLAY STOP PLAY
1
CD SYNCHRONIZED RECORDING
Make sure it is at the CD mode
2
2
3
Printed side
facing out
1
Open Close
CD Sync.
34
35
• Do not press CD Sync. REC during Tuner or AUX function.
REC
REC PAUSE PLAY STOP PLAY
34
CD
Page 35

SETTING THE CLOCK
BAND
TUNING
UP
DOWN
1
2
3
7
8
9
4
5
6
0
10 +
X-BASS
TAPE
-
+
VOLUME
PRESET EQ
CD/TUNING
TIMER/
SNOOZE
CT
PTY PANEL RDS
CLOCK
BAND/
TUNER
CD
REPEAT
ST/MONO RANDOM
PROGRAM/
AUTO PRESET
AUX
DIMMER
POWER
REW.
F.FWD
SLEEP
SLEEP
CLOCK
POPS
Press and hold for more than 1 second
1
TIMER/
CLOCK
SLEEP
POWER
SNOOZE
1
2
3
DIMMER
4
AUX
5
REPEAT
ST/MONO
X-BASS
7
0
CD/TUNING
REW.
CT
8
10 +
RANDOM
F.FWD
PTY PANEL
PRESET EQ
DOWN
PROGRAM/
AUTO PRESET
6
9
-
VOLUME
BAND/
TUNER
CD
TAPE
RDS
+
POPS
TUNING
UP
CLOCK
Setting minute
3
BAND
CLOCK
POPS
CLOCK
2
4
CLOCK
Setting hour
TIMER/
CLOCK
SLEEP
POWER
SNOOZE
1
2
3
DIMMER
4
AUX
5
6
BAND/
7
8
9
TUNER
CD/TUNING
10 +
F.FWD
PTY PANEL
PRESET EQ
PROGRAM/
AUTO PRESET
-
VOLUME
CD
TAPE
RDS
+
0
REPEAT
ST/MONO RANDOM
REW.
CT
X-BASS
POPS
SETTING THE SLEEP TIMER
CLOCK
13
STANDBY/ON
2
SLEEP
POPS
TIMER/
CLOCK
SNOOZE
1
4
7
0
10 +
REPEAT
ST/MONO RANDOM
CD/TUNING
REW.
F.FWD
CT
X-BASS
PRESET EQ
SLEEP
2
3
5
6
8
9
PROGRAM/
AUTO PRESET
PTY PANEL RDS
-
VOLUME
DIMMER
POWER
AUX
BAND/
TUNER
CD
TAPE
+
SLEEP
10 20 60 120
35
Page 36

SETTING THE START/STOP TIMER
CLOCK
POPS
BAND
TUNING
UP
DOWN
1
3
7
9
4
6
0
10 +
TAPE
CD/TUNING
TIMER/
SNOOZE
CLOCK
BAND/
TUNER
CD
REPEAT
ST/MONO
RANDOM
PROGRAM/
AUTO PRESET
AUX
DIMMER
POWER
REW.
F.FWD
SLEEP
TIMER/
SNOOZE
2
8
5
12
Setting minute
3
DOWN
ST/MONO
TIMER/
CLOCK
SLEEP
SNOOZE
POWER
1
2
3
DIMMER
4
5
7
8
0
10 +
REPEAT
PROGRAM/
AUTO PRESET
RANDOM
CD/TUNING
REW.
F.FWD
TUNING
TIMER/
AUX
6
SNOOZE
BAND/
TUNER
9
CD
TAPE
ON
UP
Setting hour
Repeat Steps 2-3 to set the
4
STOP timer.
ON
BAND
ON
OFF
5
TIMER/
CLOCK
SLEEP
SNOOZE
2
3
5
6
8
9
0
10 +
PROGRAM/
AUTO PRESET
RANDOM
CD/TUNING
F.FWD
PTY PANEL
PRESET EQ
-
VOLUME
REMOTE CONTROLLER
RB-AXM20
HITACHI
POWER
DIMMER
TIMER/
AUX
SNOOZE
BAND/
TUNER
CD
TAPE
RDS
+
36
1
4
7
REPEAT
ST/MONO
REW.
CT
X-BASS
Page 37

TIMER PLAYBACK
1
2
3
ON
TIMER/
CLOCK
SLEEP
POWER
SNOOZE
1
2
3
DIMMER
4
AUX
5
6
BAND/
7
8
9
STANDBY/ON
0
10 +
REPEAT
RANDOM
ST/MONO
CD/TUNING
REW.
F.FWD
CT
PTY PANEL RDS
X-BASS
PRESET EQ
REMOTE CONTROLLER
RB-AXM20
HITACHI
PROGRAM/
AUTO PRESET
-
VOLUME
TUNER
CD
POWER
TAPE
+
Sound source Timer Mode Operations
Sound source CD Load a CD
Sound source TUNER Tune in a station
Sound source AUX Press AUX
TIMER/
CLOCK
SLEEP
POWER
SNOOZE
1
2
3
DIMMER
4
AUX
5
6
BAND/
7
8
9
STANDBY/ON
0
10 +
REPEAT
RANDOM
ST/MONO
CD/TUNING
REW.
F.FWD
CT
PTY PANEL RDS
X-BASS
PRESET EQ
REMOTE CONTROLLER
RB-AXM20
HITACHI
PROGRAM/
AUTO PRESET
-
VOLUME
TUNER
CD
POWER
TAPE
+
• To set the START/STOP TIMER see page 36
• To get extra 5 minutes of sleep ... (will snooze for another 5 minutes)
TIMER/
CLOCK
SLEEP
SNOOZE
1
2
4
5
7
8
0
10 +
REPEAT
ST/MONO
RANDOM
CD/TUNING
REW.
F.FWD
CT
PTY PANEL
X-BASS
PRESET EQ
REMOTE CONTROLLER
RB-AXM20
HITACHI
PROGRAM/
AUTO PRESET
3
6
9
-
VOLUME
POWER
DIMMER
TIMER/
AUX
SNOOZE
BAND/
TUNER
CD
TAPE
During timer playback, user can get extra 5 minutes of
RDS
+
sleep (5 minutes in standby mode) by pressing TIMER/
SNOOZE button.
Note: In order for the snooze function to operate, the timer
on/off interval setting has to be more than 5 minutes.
37
CLOCK
SNOOZE
Page 38

USING HEADPHONES
You can connect stereo headphones having a 3.5mm plug to the socket. Inserting the
plug will disconnect the speaker.
REMOTE
STANDBY/ON
STANDBY
TUNER PRESET CD OPEN/CLOSE
TUNER
DOWN
BAND
AUX
TAPE
SENSOR
UP
PHONES
CD
RECORDING PROTECTION
SIDE “A”
SAFETY TAB FOR SIDE “B”
SAFETY TAB FOR SIDE “A”SIDE “B”
REC PAUSE PLAY STOP PLAY
REC PAUSE PLAY STOP PLAY
38
Page 39

MAINTENANCE (CASSETTE DECK)
OPEN
EJECT
ERASE HEAD
CAPSTANPRESSURE ROLLER
RECORD/PLAYBACK HEAD
CLEANING STICK
MAINTENANCE (CD PLAYER)
BLOWER
PICKUP LENS
CLEANING STICK
PICKUP LENS
39
Page 40

Hitachi, Ltd. Tokyo, Japan
International Sales Division
THE HITACHI ATAGO BUILDING,
No. 15 –12 Nishi Shinbashi, 2 – Chome,
Minato – Ku, Tokyo 105-8430, Japan.
HITACHI HOME ELECTRONICS HITACHI HOME ELECTRONICS
(EUROPE) LTD. (HELLAS) S. A.
Dukes Meadow 1 Delfon Street
Millboard Road GR-15233
Bourne End Athens
Buckinghamshire GREECE
SL8 5XF Tel: 01-6837200
UNITED KINGDOM Fax: 01-6835694
Tel: 01628 643000 Email:
Fax: 01628 643400
Email:
consumer-service@hitachi-eu.com
HITACHI SALES EUROPA GmbH HITACHI SALES IBERICA, S. A
Am Seestern 18 Gran Via Carlos III, 101 - 1
40547 Dusseldorf 08028 Barcelona
GERMANY SPAIN
Tel: 02 11 - 5 29 15 - 0 Tel: 93 409 2550
Fax: 02 11 - 5 29 15 - 190 Fax: 93 491 3513
Email:
HSE-DUS.Service@Hitachi-eu.com Email: rplan@hitachi-eu.com
HITACHI SALES ITALIANA SPA HITACHI HOME ELECTRONICS
Via T. Gulli n.39 (NORDIC) AB
20147 MILAN Box 77
ITALY S-164 94 KISTA
Tel: 02 487861 SWEDEN
Fax: 02 48786381 Tel: 08 562 711 00
Servizio Clienti Fax: 08 562 711 11
Tel. 02 38073415 Email:
Email:
customerservice.italy@hitachi-eu.com
Tel: 03 35022111
service.hellas@hitachi-eu.com
csgswe@hitachi-eu.com
HITACHI FRANCE S.A. HITACHI HOME ELECTRONICS
BP 45, 69671 Bron Cedex NORWAY
FRANCE Brugata 14
Tel: 04 -72.14.29.70 N-0186
Fax: 04 -72.14.29.99 OSLO
Email:
conso-hitachi@compuserve.com NORWAY
ITEM N.V./S.A. (INTERNATIONAL TRADE FOR
ELECTRONIC MATERIAL & MEDIA N.V./S.A)
UCO Tower – Bellevue, 17
B – 9050 GENT
BELGIUM (for BENELUX)
Tel: 09 230 48 01
Fax: 09 230 96 80
Email:
hitachi.item@skynet.be
IBEUROPE 4/00
www.hitachi-consumer-eu.com
Tel: 02205 9060
Fax: 02205 9061
Email
csgnor@hitachi-eu.com
40
 Loading...