

Page 1

DG150
Bedienungsanleitung 1–10
Operating instructions 11–20
Mode d’emploi 21–30
*371747*
371747
D
GB
F
Page 2
1
Page 3
3
2
21
22
24
26
27
29
28
25
23
Page 4

11
It is essential that the operating
instructions are read before the
tool is operated for the first time.
Always keep these operating
instructions together with the tool.
Ensure that the operating instructions are with the tool when it is
given to other persons.
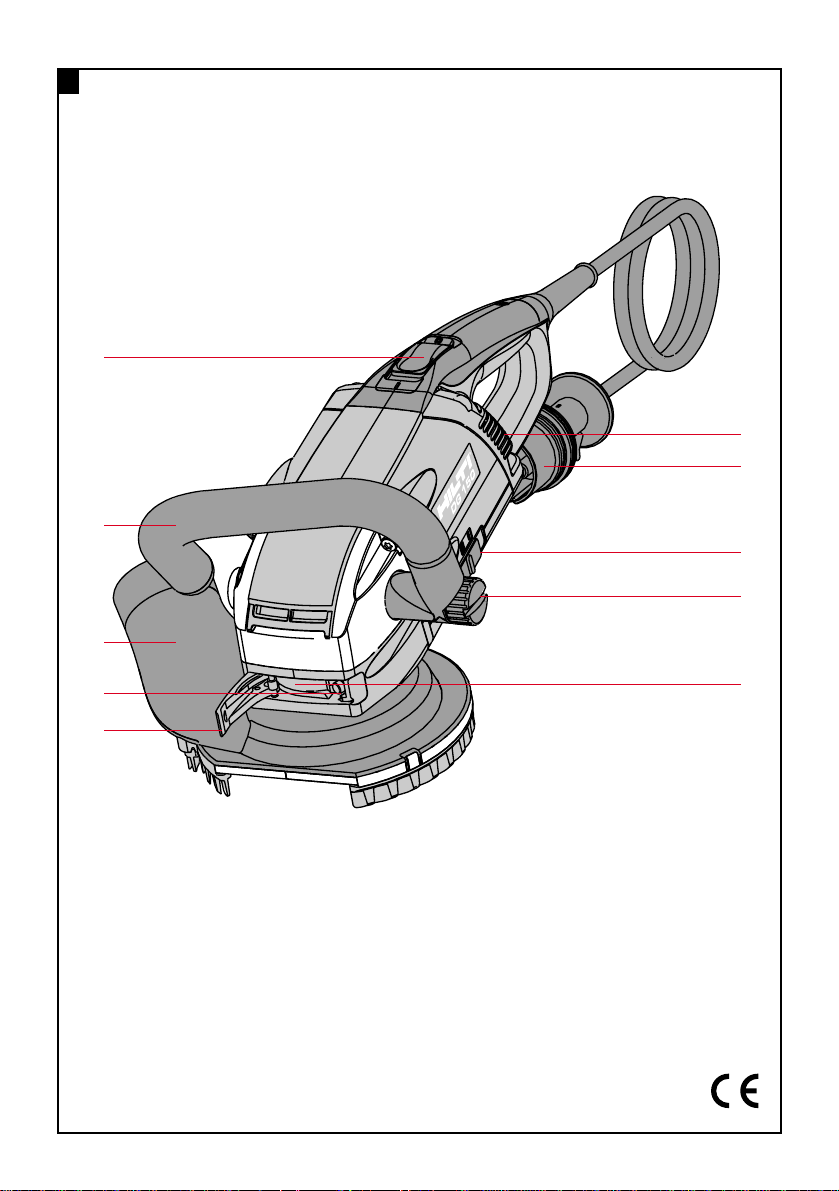
DG150 grinder with DPC20
Operating controls and
component parts of the DG150
On / off switch
Side handle
Guard assemby
Adjusting screw
Clamping lever
Indicator lamp (LED)
Supply cord plug
Speed control switch (settings 1 and 2)
Side handle fastening screw
Clamping band
Wrench
Clamping nut
Diamond cup wheel
Lamellar seal, small
Clamping flange
Lamellar seal, large
Retaining ring
Spindle
Circlip
Guard lower section
21
Guard upper section with hose connector
22
Spindle lockbutton
Operating controls and component parts of the
DPC20
23
Indicator lamp (LED)
24
Supply cord
25
Guide rib
26
Carrying handle
27
Supply cord holder
28
Electric socket with cover
29
Locking lug
1. General information
These numbers refer to the tool’ s operating controls
or indicators.
These numbers refer to the corresponding illustrations. The illustrations can be found on the fold-out cover pages. Keep these pages open while studying the operating instructions.
In these operating instructions, the DG150 with the
DPC20 is referred to as «the tool».
Location of identification data on the tool
The type designation and serial number can be found
on the type plate on the tool. Make a note of this data in
your operating instructions and always refer to it when
making an enquiry to your Hilti representative or service department.
Type:
Serial no.:
Type:
Serial no.:
Contents Page
1. General information 11
2. Description 12
3. Tools and accessories 13
4. Technical data 13
5. Safety precautions 14
6. Before use 16
7. Operation 17
8. Care and maintenance 18
9. Troubleshooting 18
10. Disposal 19
11. Warranty 20
12. Declaration of confirmity See cover
Page 5
12
1.1 Indication of danger
WARNING
Used to draw attention to a potentially dangerous situation which could lead to serious personal injury or fatal accident.
CAUTION
Used to draw attention to a potentially dangerous situation which could lead to minor personal injury or damage
to the equipment or other property.
NOTICE
Used to draw attention to an instruction or other useful information. It is not used to indicate dangerous situations
or situations that could lead to damage to the equipment or other property .
1.2 Pictograms
2. Description
The DG 150 is an electrically-powered diamond grinding tool for use by tradesmen in the construction industry for
grinding mineral materials. The DG 150 can be operated only in conjunction with the DPC 20 which, together, thus
form a system.
Items supplied
1 DG 150 grinder
1 DPC 20 power conditioner
1 Clamping flange
1 Clamping nut
1 Wrench
1 Protective goggles
1 Operating instructions
Obligation signs
Warning signs
General
warning
Warning:
electricity
Warning:
avoid hand
injuries
Warning:
hot surface
Wear eye
protection
Safety helmet
must be worn
Wear ear
protection
Wear protective
gloves
Read the
operating
instructions
before use.
Wear breathing
protection
Wear protective
clothing
Page 6

13
4. T echnical data
DG150 DPC20
Nominal voltage 100 V 110 V 120 V 220 V 230 V 240 V
Nominal current 15 A 16 A 15 A 9.6 A 9.2 A 8.8 A
Power input 1500 W 1760 W 1800 W 2100 W 2100 W 2100 W
Power output 1070 W 1260 W 1285 W 1500 W 1500 W 1500 W
Mains frequency 50/60 Hz 50/60 Hz 60 Hz 50/60 Hz 50 Hz 50 Hz
No-load speed at setting no. 1 4700 r .p.m.
No-load speed at setting no. 2 6600 r.p.m.
Weight 4.1 kg 3.8 kg 3.8 kg 3.8 kg 3.4 kg 3.4 kg 3.4 kg
Dimensions (l×w×h) 46×25×23 cm 27×22×15 cm
Electrical protection class Protection class II Z (double insulated)
Interference immunity as per EN 55014-2
Radio and television interference suppression as per EN 55014-1
Noise and vibration information (in accordance with EN 50144)
Typical A-weighted sound power level (LWA) 88 dB(A)
Typical A-weighted emission sound
pressure level (LpA) 101 dB(A)
Typical weighted vibration at the grip 4.0 m/s
2
Other significant characteristics of the appliance
Time to stop after switching off ≤ 2 sec.
Thermal overload protection
Restart safety interlock
Right of technical changes reserved
3. Diamond cup wheels and accessories
Hilti item
Diamond cup wheels Use/material
DG-CW 150/6″ A1 Grinding highly abrasive materials such as screed and similar mineral
materials
DG-CW 150/6″ B1 Grinding to remove coatings with a maximum layer thickness of 3 mm from
concrete and similar mineral materials
DG-CW 150/6″ C1 Grinding concrete and similar mineral materials of medium hardness and
medium abrasiveness
DG-CW 150/6″ C10 Grinding concrete
DG-CW 150/6″ C2 Grinding concrete and similar very hard and highly abrasive mineral materials
DG-CW 150/6″ D1 Fine finishing of concrete and similar mineral material surfaces
Lamellar seals One large lamellar seal and one small lamellar seal
Retaining ring Retaining ring for attaching the large lamellar seal to the dust hood
DG 150 toolbox Carrying case
VCD 50L Dry-type vacuum cleaner
Clamping flange for DG150 Special quick-stop compatible clamping flange to be used exclusively
for fitting Hilti DG-CW 150/6″ diamond cup wheels
Clamping nut for DG150 Special M13 clamping nut for fitting Hilti DG-CW 150/6″
diamond cup wheels
Page 7

14
5. Safety precautions
5.1 Basic safety information
In addition to the safety precautions listed in the individual sections of these operating instructions, the following points must be strictly observed at all times.
5.2 Correct use
The DG150 may be operated only in conjunction with
the DPC 20. T ogether with the Hilti VCD50L and the corresponding DG-CW 150/6" diamond cup wheels, the
DG150 forms a very advantageous electrically-powered,
hand-held grinding system that releases a minimum of
dust. In order to ensure optimum dust extraction, an
industrial vacuum cleaner in good working condition
must be used at all times. To ensure safe operation, the
DG150 may be used only together with original Hilti cup
wheels. The DG150 is designed exclusively for dry grinding on the surface of concrete or similar mineral materials and for removing thin coatings, with a maximum
thickness of 3 mm, from these materials.
The locally applicable health regulations and corresponding
safety precautions must be observed and implemented
at all times while grinding coated or uncoated mineral
materials with the DG150.
Do not, under any circumstances, use the tool in any
way other than as described in the operating instructions.
5.3 Incorrect use (misuse)
● The tool is not suitable for grinding metals, wood or
other materials not listed at paragraph 5.2.
●The tool is not suitable for use with diamond cutting
discs, abrasive cutting or grinding discs, wire brushes
or other insert tools not approved for use (see section 3).
● The tool is not suitable for wet grinding.
● Do not clamp the tool in a vice.
● Grinding materials containing asbestos is not per-
missible.
● Materials containing substances hazardous to health
may be ground only after consultation with the local
authority responsible for safety at work and in accordance with the locally applicable regulations concerning
safety at work.
●Diamond cup wheels, clamping flanges and clamping
nuts not listed in section 3 "Diamond cup wheels and
accessories" may not be used.
5.4 State of the art
●The tool is designed and manufactured according to
the state of the art.
●The tool and its ancillary equipment may present hazards when used incorrectly by untrained personnel or
not as directed.
5.5 Proper arrangement and organisation of the workplace
●Work from a safe stance and remain in balance at all
times.
●When working outdoors, the use of rubber gloves and
non-slip shoes is recommended.
●Avoid unfavourable body positions.
●Ensure that the workplace is well lit.
●Objects which could cause injury should be removed
from the working area.
●Keep other persons, children in particular , outside the
area affected (tool and supply cord) while you are working.
●Grinding off projecting objects such as nails and screws
etc. is not permissible. Such objects must be removed
carefully before beginning grinding.
●Do not wear loose clothing, loose long hair and jewellery which could become caught up in moving parts.
●Always lead the supply cord, extension cord and extraction hose away to the rear when working.
●Take care to avoid tripping over the supply cord, extension cord or extraction hose.
●Do not expose the tool to rain or snow and do not use
it in damp or wet areas or where there is a risk of fire or
explosion.
●Avoid a high dust concentration by ensuring that the
workplace is well ventilated.
●The side handle must be fitted to the tool at all times
when in use.
●Keep the grips dry , clean and free from oil and grease.
●The tool must be held by both hands when in use.
●Use clamps or a vice to secure loose workpieces.
●T ake care of the cup wheels. Y ou will work more effi-
ciently and more safely if the cup wheels are kept clean
and sharp (segments unpolished). Observe the maintenance regulations and instructions on changing cup
wheels.
●T ake care to avoid concealed electric cables, gas and
water pipes. Check the working area, e.g. using a metal
detector.
● Sparks may fly when grinding. Take care to ensure
that flying sparks do not present a hazard to other persons. Due to the risk of fire, grinding must not be carried out in the vicinity of inflammable materials (within
the area of flying sparks).
●For increased personal safety, the use of a ground fault
interrupter / residual current device (30 mA) is recommended under certain circumstances, e.g. in very damp
conditions or where large quantities of conductive dust
are produced.
Page 8

15
5.6 Information on emissions
5.6.1 Dust
CAUTION
Grinding may produce hazardous dust.
● Before starting work, find out to which dangerous
material class the grinding dust produced belongs. Use
the tool in conjunction with an industrial vacuum cleaner with an officially approved safety classification and
which complies with the local dust protection regulations.
● When grinding, the industrial vacuum cleaner used
must be equipped with a filter suitable for the application.
● Conductive dust may collect inside the tool when
grinding conductive materials. This may have a negative effect on the insulation of the tool and cause electric shocks. As a result, tools used for this application
must be checked by a technical specialist or Hilti
service department at least every six months to ensure
integrity of the insulation and to check for possible accumulation of conductive dust or other conductive substances.
5.7 General hazards presented by the tool
● Operate the tool only as directed and only when it is
in faultless condition.
● Unplug the supply cord when the tool is not in use
(e.g. during pauses between work), before cleaning or
maintenance and when changing cup wheels.
●Never leave the tool unsupervised.
●When not in use, the tool must be stored in a dry place,
locked up or out of reach of children.
●Operate the tool only together with its respective safety equipment.
●Do not overload the tool. The tool operates more efficiently and more safely within its given performance
range.
●Do not use the tool for purposes for which it was not
intended (e.g. attaching drill bits or similar, fitting saw
blades for cutting wood, etc.).
●Avoid unintentional starting. Do not keep your finger
on the on / off switch while carrying the tool when connected to the mains supply.
●Check the condition of the cup wheel before it is used.
●Use only the original accessories or items of additional
equipment listed in the operating instructions. The use
of other cup wheels or accessories may present a risk of
injury.
●Follow the instructions given by Hilti when fitting and
using cup wheels.
●T est new cup wheels by allowing them to run at maximum speed for at least 30 seconds before use.
● Damaged cup wheels of cup wheels that run out of
round (vibration) must not be used.
●Do not subject cup wheels to impacts and keep them
free from grease.
● -CAUTION- The tool continues to run for approx. 2
seconds after switching off.
● Do not attempt to brake the rotating cup wheel by
applying lateral pressure.
5.7.1 Mechanical hazards
●Do not leave wrenches etc. attached to the tool. Before
switching on, check that wrenches and adjusting tools
have been removed.
●Check whether parts have suffered damage and that
all moving parts function faultlessly without sticking. All
parts must be fitted correctly and fulfil all of the conditions necessary to ensure faultless operation of the tool.
●Use only original Hilti cup wheels.
●The mounting hole in the cup wheel must fit the cen-
tring collar of the clamping flange without play . Do not
use reducers or adaptors. Before switching on, check
that the cup wheel is fitted correctly and free to rotate.
●Always switch off the tool and unplug the supply cord
before fitting or removing the cup wheel.
● Observe the direction of rotation arrow when fitting
the cup wheel.
5.7.2 Electrical hazards
●Protect yourself from electric shocks. Avoid body contact with earthed objects, e.g. pipes and radiators.
● Check the condition of the tool including the supply
cord and extension cord as well as the plug connections.
Do not operate the tool if damage is found, if the tool is
not complete or if its controls cannot be operated faultlessly.
●Never carry the tool by the supply cord.
●Grip the plug and not the cable when pulling it out of
the socket.
● Do not expose the supply cord to heat, oil or sharp
edges.
●Do not touch the supply cord in the event of it becoming damaged while working. Disconnect the supply cord
plug from the socket.
●Disconnect the supply cord plug from the socket when
the tool is not in use, before maintenance, before changing cup wheels and before adjusting the position of the
guard or side handle.
● When working outdoors, use only extension cords
that are approved and correspondingly marked for this
application.
● Check the tool for any damage. All parts of the tool
must be checked carefully to ensure correct, faultless
functionality before further use.
●Damaged switches must be replaced at a Hilti service
centre. Do not use the tool if it cannot be switched off
and on properly.
Page 9

16
● If necessary, have the tool repaired by an electrical
specialist (Hilti service department).
●T o avoid risk of accident, use only original Hilti spare
parts.
● Insert the supply cord plug in the socket only when
the tool is switched off.
● - WARNING - Do not disconnect the plug of the DG150
from the power unit DPC20 under load.
5.7.3 Thermal hazards
●The diamond cup wheel, parts of the guard or the tool
(gearing section) may become hot during operation. To
avoid burns, do not touch these parts with the bare hands.
Wear safety gloves.
5.8 Requirements to be met by users, installation and
maintenance personnel
5.8.1 Requirements to be met by users
●The tool is intended for professional use.
●The tool may be operated, serviced and repaired only
by authorised, trained personnel. This personnel must
be informed of any special hazards that may be encountered.
●Always concentrate on the job you are doing. Proceed
carefully and do not use the tool if your full attention is
not on the job.
5.8.2 Personal protective equipment
●Always wear eye protection, a safety helmet, ear protection, safety gloves, breathing protection and protective clothing when grinding.
●Wear knee protectors when working on floors.
●Wear sturdy shoes or boots.
5.8.3 Protective equipment
●Connect the tool to the industrial vacuum cleaner .
●Unless stated otherwise in the operating instructions,
damaged protective equipment and parts must be correctly repaired or replaced at an accredited service workshop.
●For safety reasons, the tool may be operated only when
the guard and when safety gloves are worn.
● The guard may be adjusted only when the tool has
been switched off and the supply cord unplugged.
6. Before use
It is essential that the safety precautions printed in these
operating instructions are read and observed.
- WARNING -
■The guard is used in a partly open
position for working close to edges.
■The rotating cup wheel presents a
risk of serious injury.
■Work carefully when the guard is
open and close it again when you
have finished working at the edge.
6.1 Guard
–WARNING– The tool may be used only with the guard
fitted.
A damaged or incomplete guard must be replaced immediately.
6.1.1 Adjusting the guard
The extraction hose connector can be brought into the
most favourable position for working by rotating the entire
guard.
Rotating the guard
1. Switch the tool off.
2. Disconnect the supply cord plug from the socket.
3. Open the clamping lever.
4. Rotate the guard.
-NOTE- When the extraction hose connector comes
into contact with the opened lever, the guard can be
rotated further by moving it downwards.
5. Close the clamping lever.
6.1.2 Adjusting the guard to the work surface
1. Switch the tool off.
2. Disconnect the supply cord plug from the socket.
3. Lay the tool down on the cup wheel.
4. Open the clamping lever.
5. Rotate the guard and adjust it to the optimum height.
-NOTE- For optimum dust extraction while grinding,
the lamellar seal should be almost in contact with the
work surface (gap 0 ... 1 mm).
6. Close the clamping lever.
6.1.3 Adjusting the guard for working close to edges
The opening in the lower section of the guard can be
rotated until part of the cup wheel is exposed. This is of
advantage, for example, when grinding close to a wall.
- CAUTION -
■The cup wheel or parts of the guard
may become hot during use.
■These parts may burn your hands.
■ Wear safety gloves when chang-
ing the cup wheel or adjusting the
guard.
Page 10

17
-NOTE- More dust may escape from the guard when
working at edges.
Adjusting the guard
1. Switch the tool off.
2. Disconnect the supply cord plug from the socket.
3. Open the clamping lever.
4. Rotate the upper and lower sections of the guard in
opposing directions until they are in a suitable position.
5. Close the clamping lever
-NOTE-The guard engages perceptibly in the closed,
normal position.
-NOTE- If the guard is not held securely when the lever
is closed, tighten the clamping band by turning the adjusting screw in a clockwise direction.
If the guard cannot be moved when the lever is open,
release the clamping band by turning the adjusting screw
in a counter-clockwise direction.
6.2 Side handle
6.2.1 Using and adjusting the side handle
For safety reasons, the side handle must always be used.
It can be adjusted in two axes until in the most favourable
working position:
– Two angled positions for right or left-handed use
– Pivoted forwards / back in increments
1. Switch the tool off.
2. Disconnect the supply cord plug from the socket.
3. Release the side handle by turning the clamping screw
in a counter-clockwise direction.
4. Bring the side handle into the desired position.
5. Tighten the clamping screw by turning it in a clockwise direction.
6.3 Diamond cup wheel
●The tool must always be switched off and the supply
cord plug disconnected before manipulating the cup
wheel in any way.
● Press in the spindle lockbutton (only when rotation
has stopped).
● When changing the cup wheel, clean all cup wheel
mounting parts.
●Use only original Hilti diamond cup wheels, clamping
flanges and clamping nuts.
6.3.1 Fitting the diamond cup wheel
1. Place the clamping flange on the spindle, with the
O-shaped recess underneath, ensuring that it engages
securely.
A
2. Place the cup wheel on the centering collar of the clamping flange.
B
3. Screw on the clamping nut in a clockwise direction
and tighten it by hand or with the wrench against the
resistance of the motor / gearing.
6.3.2 Removing the diamond cup wheel
1. Press in the spindle lockbutton and hold it in this position.
2. Release the clamping nut by turning it with the wrench
in a counter-clockwise direction.
3. Release the spindle lockbutton.
4. Remove the diamond cup wheel.
6.3.3 Changing the speed setting
The tool provides two different speed settings.
Recommendation
Setting I: 4700 r
.p.m.
Use this setting for grinding soft mineral materials such
as paint coatings on cement rendering. At this speed setting, dust extraction performance is improved and the
tool can be guided more easily for removing coatings
from soft materials.
Setting
II:6600r.p.m.
Use this setting for grinding hard mineral materials such
as concrete, screed or rock in order to obtain full grinding performance.
7. Operation
It is essential that the safety precautions printed in these
operating instructions are read and observed.
-CAUTION-
■ Grinding may produce hazardous
dust.
■ The dust produced by grinding
may be damaging to the lungs
and eyes.
■ Use a dust extraction system,
wear a safety helmet, breathing
protection and eye protection.
-CAUTION-
■The tool and the grinding operation emit noise.
■Excessive noise may damage the
hearing.
■Wear ear protection.
7.1 Switching the tool on
1. Connect the hose between the tool and the industrial
vacuum cleaner.
2. Connect the electric cable between the DG 150 and the
DPC 20.
3. Connect the DPC 20 to the mains supply.
4. Lift the tool away from the work surface.
Page 11

18
5. Push the on / off switch forward to the ON (I) position.
The switch engages in the ON (I) position.
After a power cut, the tool can be restarted by moving
the on / off switch to the OFF (0) position and then to the
ON (I) position.
7.2 Testing new diamond cup wheels
Allow the tool to run for at least 30 seconds under no
load. The diamond cup wheel should not be used if it
vibrates. Do not subject diamond cup wheels to impacts
and keep them free from grease.
7.3 Grinding
● Never operate the tool without its protective equip-
ment.
●Use only Hilti DG-WC 150/6″ diamond cup wheels.
●Apply moderate pressure, appropriate to the materi-
al being ground. Move the tool from side to side and do
not press the diamond cup wheel into the material.
● The diamond cup wheel may overheat and suffer dam-
age when grinding particularly hard mineral materials,
e.g. concrete containing a high proportion of hard aggregates. Should this occur, the grinding operation must be
interrupted and the diamond cup wheel allowed to cool
for a short time with the tool running under no load.
●Slower progress may indicate that the diamond cup
wheel has lost cutting power (segments have become
polished). The segments can be resharpened by grinding an abrasive material (Hilti sharpening plate or abrasive sand-lime block).
7.4 Switching the tool off
1. Press the on / off switch. When released, the switch
returns to the OFF position.
2. Disconnect the supply cord from the socket.
3. If an industrial vacuum cleaner is used, disconnect the
hose between the tool and the vacuum cleaner.
8. Care and maintenance
Disconnect the supply cord plug from the socket before
manipulating the DG 150 or DPC 20 (making adjustments, cleaning, etc.). The ventilation slots in the motor
housing must be unobstructed and kept clean at all times.
If possible, use compressed air to blow dust out of the
motor at regular intervals (approx. every four weeks).
Do not use metal objects for cleaning. Under extreme
conditions, conductive dust may collect inside the tool
when grinding mineral materials. This may have a negative effect on the tool’s protective insulation.
8.1 Replacing the guard’s lamellar seal
Replace the guard's lamellar seal at least each time the
cup wheel is changed.
-NOTE- Disassembly / assembly of the seal parts can be
facilitated by rotating the parts of the guard in relation to
each other.
Disassembly
1. Always switch the tool off and unplug the supply cord
before making adjustments to the tool or changing
parts, etc.
2. Use a screwdriver to press the three lugs of the retaining ring over the edge of the guard.
3. Remove the large lamellar seal from the retaining ring.
4. Release the small lamellar seal by pressing with a
screwdriver in the two slots on the outside of the guard.
Assembly
1. Clean the locating grooves to remove large dust particles.
2. Press the small lamellar seal into the guide in the guard
until it engages.
3. Place the large lamellar seal in the groove in the retaining ring.
4. Press the retaining ring with the lamellar seal over the
edge of the guard until it engages.
8.2 Repairs
The tool requires no maintenance.
The tool has been manufactured and tested with great
care. Nevertheless, in the event of a fault developing, the
tool should be returned to a Hilti service centre for repair .
The tool may be repaired by trained electrical specialists
only.
9. T roubleshooting
9.1 DG 150 indicator lamp (LED)
Overheating of the tool is indicated by the lamp blinking
red. The lamp continues to blink for the duration of the
fault, irrespective of the switch position.
In the event of the lamp blinking red, switch the tool off
and allow it to cool until the red lamp no longer blinks.
9.2 DPC 20 indicator lamp (LED)
Indicator status:
a) Green lamp lights continuously
This indicates that the DPC 20 is ready for operation.
The DPC 20 is connected to the mains supply and indicates no malfunctions. This is the normal status.
b) Green blinking
This may occur with 100 V to 120 V versions when
under load. This indicates that the mains voltage is
too low. The DG 150 reacts by achieving significantly
lower performance.
c) Red blinking
The lamp blinks red when the DPC 20 reacts to irregularities such as too high or too low current, voltage
or temperature, etc. The indicator changes to green
when the problem has been rectified. The power output fuses should be checked if the indicator continues to blink red.
Page 12

19
No indication
The DPC 20 is receiving no power from the mains supply. This could be caused by the mains supply itself, the
supply cord or extension cable or a fault in the DPC 20.
It is not immediately possible to determine whether the
indicator itself is defective. For this reason, the DPC 20
should be checked together with the DG 150 at regular
intervals, at least every six months, by a trained specialist or at a Hilti service centre.
10.Disposal
Most of the materials from which Hilti power tools are manufactured can be recycled. The materials must be correctly separated before they can be recycled. In many countries, Hilti has already made arrangements for taking back
your old electric tools for recycling. Please ask your Hilti customer service department or Hilti sales representative
for further information.
Should you wish to return the electric tool yourself to a disposal facility for recycling, proceed as follows: Dismantle the tool as far as possible without the need for special tools. Use absorbent paper to wipe oily parts clean and
collect any oil that runs out. This paper should also be disposed of correctly. On no account should oil be allowed
to enter the waste water system or find its way into the ground.
Part / assembly Main material Recycling
Toolbox Plastic Plastics recycling
Motor housing Plastic Plastics recycling
Motor (rotor , stator) Steel, copper, plastic Scrap metal
Fan Plastic Plastics recycling
Bearing plate Magnesium alloy Scrap metal
Electronics Plastic, electronic parts Plastics recycling / electronics scrap
Gear housing Magnesium alloy Scrap metal
Flange Magnesium alloy Scrap metal
Internal gearing parts Steel Scrap metal
Side handle Plastic Plastics recycling
Guard Plastic Plastics recycling
Cup wheel mount Steel Scrap metal
Grip Plastic Plastics recycling
Electric conductors Plastic, copper Plastics recycling / scrap metal
Power conditioner housing Plastic Plastics recycling
Heat sink Aluminium Scrap metal
Page 13

20
11. Warranty
Hilti warrants that the product supplied is free of defects
in material and workmanship. This warranty is valid as
long as the tool is operated and handled correctly, cleaned
and serviced properly and in accordance with the Hilti
operating instructions, all warranty claims are made within 12 months from the date of sale (invoice date), and
the technical system is maintained. This means that only
original Hilti consumables, components and spare parts
may be used with the product.
This warranty provides the free-of-charge repair or replacement of defective parts only. Parts requiring repair or
replacement as a result of normal wear and tear are not
covered by this warranty.
Additional claims are excluded, unless stringent national rules prohibit such exclusion. In particular , Hilti is
not obligated for direct, indirect, incidental or consequential damages, losses or expenses in connection
with, or by reason of, the use of, or inability to use the
tool for any purpose. Implied warranties of merchantability
or fitness for a particular purpose are specifically excluded.
For repair or replacement, send the tool and/or related
parts immediately upon discovery of the defect to the
address of the local Hilti marketing organisation provided.
This constitutes Hilti’s entire obligation with regard to
warranty and supersedes all prior or contemporaneous
comments and oral or written agreements concerning
warranties.
Page 14

12. Konformitätserklärung
Bezeichnung: Diamantschleifgerät
Typenbezeichnung: DG150
Konstruktionsjahr: 2001
Wir erklären in alleiniger Verantwortung, dass dieses
Produkt mit den folgenden Richtlinien und Normen
übereinstimmt: 98/37 EG, 89/336/EWG, 73/23 EWG,
EN 292, EN 55014-1, EN 55014-2, EN 61000-3-2, EN
61000-3-3
Hilti Corporation
Dr. Andreas Meyer Dr. Martin Gödickemeier
Head of Diamond Systems Head of Diamond System Development
Business Unit Business Unit
July 2001 July 2001
12. EC declaration of conformity
Designation: Diamond grinder
Type designation: DG150
Year of design: 2001
We declare, on our sole responsibility , that this product
complies with the following standards or standardisation documents: 98/37 EC, 89/336/EEC, 73/23 EEC,
EN 292, EN 55014-1, EN 55014-2, EN 61000-3-2, EN
61000-3-3
12. Déclaration de conformité
Désignation: Meuleuse au diamant
Modèle: DG 150
Année de conception: 2001
Nous déclarons sous notre seule et unique responsabilité que ce produit est conforme aux directives et normes suivantes: 98/37 EC, 89/336/EEC, 73/23 EEC, EN
292, EN 55014-1, EN 55014-2, EN 61000-3-2, EN
61000-3-3.
Page 15

Hilti Corporation
FL-9494 Schaan
Tel.:+423/ 2342111
Fax: +423/234 2965
www.hilti.com
Hilti = registered trademark of Hilti Corp., Schaan W 2608 0901 00-Pos. 1 1 Printed in Liechtenstein © 2001
Right of technical and programme changes reserved S. E. & O.
371747 A
 Loading...