


Operator’s Manual
All SCS Models

LIMITED WARRANTY FOR HENNY PENNY APPLIANCES
Subject to the following conditions, Henny Penny Corporation makes the following limited warranties to
the original purchaser only for Henny Penny appliances and replacement parts:
NEW EQUIPMENT:
defective in material or workmanship within two (2) years from date of original installation, will be
repaired or replaced without charge F.O.B. factory, Eaton, Ohio, or F.O.B. authorized distributor. To
validate this warranty, the registration card for the appliance must be mailed to Henny Penny w ithin ten
(10) days after installation.
REPLACEMENT PARTS:
to be defective in material or workmanship within ninety (90) days from date of original installation
will be repaired or replaced without charge F.O.B. factory, Eaton, Ohio, or F.O.B. authorized
distributor.
The warranty for new equipment and replacement parts covers only the repair or replacement of the
defective part and does not include any labor charges for the removal and installation of any parts, travel or
other expenses incidental to the repair or replacement of a part.
EXTENDED FRYPOT WARRANTY:
or workmanship issues for a period of up to seven (7) years from date of manufacture. This warranty shall not
cover any frypot that fails due to any misuse or abuse, such as heating of the frypot without shortening.
0 TO 3 YEARS:
issues will be replaced at no charge for parts, labor, or freight. Henny Penny will either install
a new frypot at no cost or provide a new or reconditioned replacement fryer at no cost.
3 TO 7 YEARS:
issues will be replaced at no charge for the frypot only. Any freight charges and labor costs to
install the new frypot as well as the cost of any other parts replaced, such as insulation,
thermal sensors, high limits, fittings, and hardware, will be the responsibility of the owner.
Any claim must be presented to either Henny Penny or the distributor from whom the appliance was
purchased. No allowance will be granted for repairs made by anyone else without Henny Penny’s written
consent. If damage occurs during shipping, notify the sender at once so that a claim may be filed.
THE ABOVE LIMITED WARRANTY SETS FORTH THE SOLE REMEDY AGAINST HENNY
PENNY FOR ANY BREACH OF WARRANTY OR OTHER TERM. BUYER AGREES T HAT NO OTHER
REMEDY (INCLUDING CLAIMS FOR ANY INCIDENTAL OR CONSEQUENTIAL DAMAGES) SHALL
BE AVAILABLE.
The above limited warranty does not apply (a) to damage resulting from accident, alteration, misuse, or
abuse; (b) if the equipment’s serial number is removed or defaced; or (c) for lamps and fuses. THE ABOVE
LIMITED WARRANTY IS EXPRESSLY IN LIEU OF ALL OTHER WARRANTIES, EXPRESS OR
IMPLIED, INCLUDING MERCHANTABILITY AND FITNESS, AND ALL OTHER WARRANTIES ARE
EXCLUDED. HENNY PENNY NEITHER ASSUMES NOR AUT HORIZES ANY PERSON TO ASSUME
FOR IT ANY OTHER OBLIGATION OR LIABILITY.
Any part of a new appliance, except lamps and fuses, which proves to be
Any appliance replacement part, except lamps and fuses, which proves
Henny Penny will replace any frypot that fails due to manufacturing
During this time, any frypot that fails due to manufacturing or workmanship
During this time, any frypot that fails due to manufacturing or workmanship

Warning:
Incorrect installation, adjustment, servicing, maintenance, cleaning, or
unauthorized modifications to the appliance can result in damage, injury
or death. Read the Operating Manual carefully before starting to use the
appliance.
For your safety:
Do not store or use any flammable gases or liquids near this appliance.
What to do in the event of danger or if you smell gas:
- Shut off the gas supply immediately
- Do not touch any electric control elements
- Make sure the area is well ventilated
- Avoid open flames or sparking
- Use an external telephone to notify the appropriate gas supplier
(if the gas supplier is unobtainable call the relevant fire station).
“RESET” (gas appliances only)
If the burner function is faulty, "RESET GAS" will appear on the display.
After 15 sec. you will hear an audible signal. Press the "RESET GAS" display to re-start the automatic ignition process. If the "RESET GAS" display does not light up again after approximately 15 seconds, the flame is
burning and the appliance is operational.
Please notify Customer Support if “RESET GAS” is still displayed after
repeated pressing!
RESET GAS
- 2 -
Manual
SmartCooking System
TM

Dear Customer
Congratulations on your new SmartCooking System
entered a new era in cooking. Thanks to a readily understandable visual control concept you and your
SmartCooking System
TM
will achieve excellent results quickly, with very little time or expense in training. Just
TM
. By purchasing a SmartCooking System
press a button to select the desired food item and how you want it cooked – that’s it! There is no longer
any need for traditional inputs such as temperature, time and humidity or complicated programming and
constant monitoring. Of course the SmartCooking System
TM
also provides the versatile capabilities of a perfect Combi-steamer. Thanks to the easy-to-understand control concept you can use Programming Mode to
create your own tailor-made cooking programs in practically no time. You’ll enjoy the peace of mind of a12
month warranty from the date of invoice. The warranty excludes glass damage, light bulbs and sealing
material as well as damage caused by improper installation, use, maintenance, repair or deliming. We recommend that you study the manual thoroughly so that you can make the best possible use of the wide
variety of applications and benefits offered by your SmartCooking System
TM
.
TM
you have
And now enjoy your new SmartCooking System
Your Authorized Henny Penny Distributor
Call Customer Service 1-937-456-8400 for any questions or problems in operating your unit.
Henny Penny reserves the right to make technical changes in the interest of progress!
As of August 16, 2005, the Waste Electrical and Electronic Equipment directive went into
effect for the European Union. Our products have been evaluated to the WEEE directive.
We have also reviewed our products to determine if they comply with the Restriction of
Hazardous Substances directive (RoHS) and have redesigned our products as needed in
order to comply. To continue compliance with these directives, this unit must not be
disposed as unsorted municipal waste. For proper disposal, please contact your nearest
Henny Penny distributor.
TM
.
- 3-

General Instructions / For Your Safety 6
Features 11
General User Instructions 12
SelfCooking ControlTMMode 14
Controls 15
Operation 16
Combi-steamer mode 24
Controls 25
Moist heat 26
Dry heat 27
Dry heat and moist heat 28
ClimaPlus Control
®
29
Time settings, continuous operation, preheating 30
Working with the temperature probe 31
Steam Injection, Fan speed control 32
Cool down 33
Programming Mode
Controls 34
Programming SmartCooking ControlTMProcesses 35
Programming in Manual Mode 36
Program start, check, change 37
Program delete, copy 38
Level Control 39
Program lock 41
Functions
CleanJet
®
42
CleanJet®stop 45
CleanJet®request 46
HACCP logging 47
Delta T cooking 48
Half energy, Demand-related energy supply 49
Automatic start time 50
CalcDiagnosis System®CDS 51
- 4 -
Contents

Service
ChefLine®/Service Info 52
Drain steam generator 53
Model and software identification 54
Settings
Real time, time format 55
Date, temperature unit, language 56
Buzzer, Display contrast, CleanJet®request 58
Manual clean 59
CleanJet®Times and Tablet Usage 61
Fault warnings 62
Help function 64
- 5 -
Contents

Please take the time to read the following safety
and operating instructions carefully.
Keep this manual in a convenient location so that it
is available to anyone using the equipment.
This equipment must only be used to cook food in
commercial foodservice establishments. Any other
use is not intended and is therefore considered
dangerous.
Before using the unit for cooking make sure there
are no cleaner or rinse aid tablet residues in the
cooking cabinet.
Remove any cleaner and rinse aid tablet residues
and rinse thoroughly with hand shower.
Operate using hands only. Damage caused by the
use of pointed, sharp or other objects will invalidate the warranty.
The equipment must only be used by trained personnel.
It is vital that all users be given regular safety
instruction.
We recommend that the operator gives your staff
regular training to avoid the risk of accident or
damage to the unit.
Daily checks before switching on
• Lock air baffle top and bottom.
• Lock hinged racks properly in position in the
cooking cabinet.
General
• The temperature of door glass, outer casing and
add-ons may exceed 140°F (60°C)
• Avoid having heat sources (e.g. grill plates, deep
fryers etc.) near the appliance.
• If the unit is idle for prolonged periods, shut the
water supply stop valve and turn off the
appliance power supply (gas and electricity).
When setting up table-top units with the appliance
manufacturer’s original standard stand or base
cabinet the maximum top rack working height
is 63 in. (160 cm).
WARNING – If containers are filled
with liquid or contents which liquefy during
cooking, do not use rack levels higher
than those where the user can see into
the container. Warning sticker is
enclosed with equipment.
Warning!
• Caution! Hot steam (risk of scalding)!
• Caution! Containers and grids are hot!
• Make sure the mobile oven rack is
correctly locked in position!
- 6 -
General Instructions – For Your Safety

Energy saver display
To reduce unnecessary power consumption, brightness of control panel displays is reduced during
normal operation. Display readouts will dim slightly
after the first 10 minutes and once more after an
additional 10 minutes. When a display is touched
or the cooking cabinet door is opened, the display
returns to full brightness.
If the unit is switched on for longer than 20 minutes and neither a cooking mode nor CleanJet
®
is
selected, the energy saver circuit activates automatically and only the current time of day and the date
are shown on the display.
Gas appliances only
• If a gas unit is installed under a ventilation
hood, the hood must be on when the appliance
is in use.
• If a gas unit is connected to a chimney, the flue
duct must be cleaned in compliance with
specific regional regulations. Contact your
installer for this information.
• Do not put allow objects to touch the gas unit’s
exhaust stacks.
• Gas units must be operated in a stationary
condition.
Loading/removal
Open appliance door slowly.
When door is opened heating and fan shut down
automatically.
The fan wheel brake is activated. The fan keeps run-
ning for a brief period only. Do not touch the fan
wheel.
Do not insert pans or grids until the hinged rack
has been properly secured and the mobile oven
rack has been pushed up to the stop and locked in
place.
Only use commercial-grade heatproof accessories.
Units with hinged rack (061/062/101/102)
To remove rack
Slightly raise rack unit and lift out of front catch.
Swing rack to middle of cooking cabinet.
Lift up and out of slots. To replace, set into slots
and reverse the procedure.
- 7 -
General Instructions / For Your Safety

Mobile oven rack
Working with mobile oven racks, mobile
plate racks and transport carts for
base-top units (option)
• Remove hinged rack.
• Set guide rails on cabinet floor.
• Push mobile oven rack or plate rack into cabinet
up to the stop and lock into place.
• Transport carts must be properly attached to the
unit using the holder.
• Unlock mobile oven rack or plate rack and roll
out.
• When transporting the mobile oven rack or plate
rack on the transport cart, make sure the
transport safety catch is engaged.
• Cover and secure containers with liquids to avoid
spills and the risk of scalding.
Working with mobile plate racks
When not in use make sure temperature probe is
placed in its ceramic tube holder.
Warning!
Before the mobile plate rack is removed the
temperature probe must be removed and
placed in the holding position on the run-in
rail.
Warning!
• Pans must be locked with pan locks on the
mobile oven rack!
• Mobile oven racks, mobile plate racks,
transport carts and units on casters can
tip over when being moved over an
inclined plane or threshold.
- 8 -
General Instructions / For Your Safety
Unit size Pan capacity
GN
061 6 6x1/1
062 12 6 6x2/1
101 10 10x1/1
102 20
10
10x2/1
201 20 20x1/1
202
40
20 20x2/1
Full-size steam
table pans
Full size
sheet pans

Low water
Low water warning may appear on the display
when you switch the unit on. It means that the
steam generator is not yet filled with water. When
filling is complete the warning display goes out
automatically.
If the display does not go out, check that the water
supply valve is open and the strainer at the water
supply (solenoid valve) is unblocked.
Ambient temperatures
If ambient temperatures drop below 35°F (5°C)
make sure the cooking cabinet has been warmed to
a temperature greater than 35°F (5°C) before
using it.
Temperature probe
• The temperature probe and temperature probe
positioning aid may be hot—use oven mitts.
• Cool temperature probe with hand shower
before use.
• Do not let temperature probe hang out of
cooking cabinet.
• Remove temperature probe before unloading
food.
Cool down
Use the "Cool Down" function to cool the cooking
cabinet .
Warning!
• During "Cool Down" the fan wheel runs
when the door is open!
• Do not switch on "Cool Down" function
unless air baffle is correctly locked.
• Do not touch the fan wheel.
• Do not attempt to cool cabinet with cold
water.
Hand shower
Pull hand shower out to use.
Press hand shower control button to select 2 jet
strengths.
Hand shower retracts automatically.
Make sure hand shower hose is fully rewound after
use.
Do not pull hand shower out beyond the end mark.
Warning!
• Hand shower and hand shower water may
be hot!
- 9 -
General Instructions / For Your Safety

Cleaning
• Hinged rack or mobile oven/plate rack must be
placed in the cooking cabinet as instructed
before starting CleanJet
TM
cleaning.
• Leave the door slightly open if the unit is going
to be idle for a prolonged period (e.g.
overnight).
• Do not clean unit with high pressure cleaner.
• Do not treat unit with acids or expose to acid
fumes —this will damage the protective layer
of stainless steel, and units may discolor.
• Follow the instructions on the cleaner pack.
• For detailed cleaning instructions, see
"CleanJet
TM
" or "Manual Cleaning” chapters.
• Only use cleaning agents available through your
authorized distributor.
Warning!
• Wear the correct protective clothing,
gloves, goggles and mask.
Deliming
• Note that the steam generator must be delimed
as required. Contact your Henny Penny
distributor.
Maintenance
• Inspection, maintenance and repair work should
only be done by trained technicians.
• The unit must be switched off during cleaning
(except CleanJet
TM
cleaning or manual/
programmed cleaning), inspections,
maintenance or repair work.
• Movement of units on casters must be
restricted so that connected power, water and
drain lines are not damaged. Before moving unit,
make sure that power, water and drainage lines
are correctly disconnected. If the unit is being
relocated or returned to its original position,
make sure that movement restriction devices,
power, water and drainage lines are properly
connected.
Servicing
• Your appliance should be serviced by an author-
ized service technician at least once a year to
ensure that it remains in perfect working order.
Warning!
• Switch the appliance off at the mains
before opening service doors or working
on live components.
- 10 -
General Instructions / For Your Safety

a Unit serial number
(visible only when door open)
b Exhaust diverter
(gas appliances only, optional)
c Interior lighting
d Cabinet door with double glass panel
e Door handle
Table-top units: one-handed operation with
slam function
Floor units: (One-handed operation)
f Unlocking device to open double glass
door panel
(inside)
g Integal and self-draining door drip pan
(inside)
h Drip collector connected directly to
appliance drain
i Adjustable feet
j Unit data plate
(with all important data such as power input,
gas type, voltage, phase number and frequency,
as well as model and serial number, see also
Functions/Settings/ Type)
k Control panel
l Protective cover for electrical
installation area
m Central dial
n Hand shower
(with automatic rewind)
o Run-in guide
(floor models)
p Air filter
(installation area ventilation)
- 11 -
Features
Applies to base-top models 061, 062, 101, 102.
a
i
n
k
l
j
c
c
f
f
d
e
o
Applies to floor models with roll-in carts 201 and 202.
p
b
m
b
a
i
k
l
j
c
d
e
g
h
f
n
f
p
m

SelfCooking Control
TM
Mode
When unit is switched on or SCC
button is touched, unit enters
SmartCooking Control
TM
Mode. See chapter on
SmartCooking Control
TM
Mode
for description.
Combi-Steamer Mode
When Moist Heat or Dry Heat
(or both simultaneously for
Combination) buttons are
touched, the unit enters
Combi-Steamer Mode. See
chapter on Combi-Steamer
Mode for description.
Programming Mode
When the "Prog” button is
touched unit enters
Programming Mode. See
chapter on Programming Mode
for description.
- 12 -
General User Instructions
200ºC
0:15
60%
new
copy change
delete
LevelControl
Clean

Your SmartCooking SystemTMhas a touch screen.
You can operate functions and/or enter data simply
by touching it lightly with one finger.
Selecting a function
Examples:
Press button
Short bleep and flashing red light confirms button
has been pressed.
Active button is surrounded by flashing red frame.
The central dial can be used to enter data while the
button is flashing.
Confirmation of data input
takes place automatically after 4 seconds.
or
press on central dial (dial push function)
or
press any button.
Central dial
You can enter your desired values by rotating the
central dial.
Push Function
Entries can be confirmed by pressing the central
dial.
Unit too hot
If the cooking cabinet is hotter than the set temperature, the selected mode button will flash.
(See "Cool Down" chapter for cooking cabinet
cooling).
Help Function
This will give you handy tips on everyday
use
(see also Help Function chapter).
- 13 -
General User Instructions
The 7 SmartCooking ControlTMprocesses (large
roasts, grill/sauté, poultry, fish, bakery products,
side dishes, Finishing
®
) automatically detect
product-specific requirements, the size of the food
to be cooked and the load size. Cooking time,
temperature and the ideal cooking cabinet climate
are continuously adjusted to achieve the desired
result. The remaining cooking time is displayed.
- 14 -
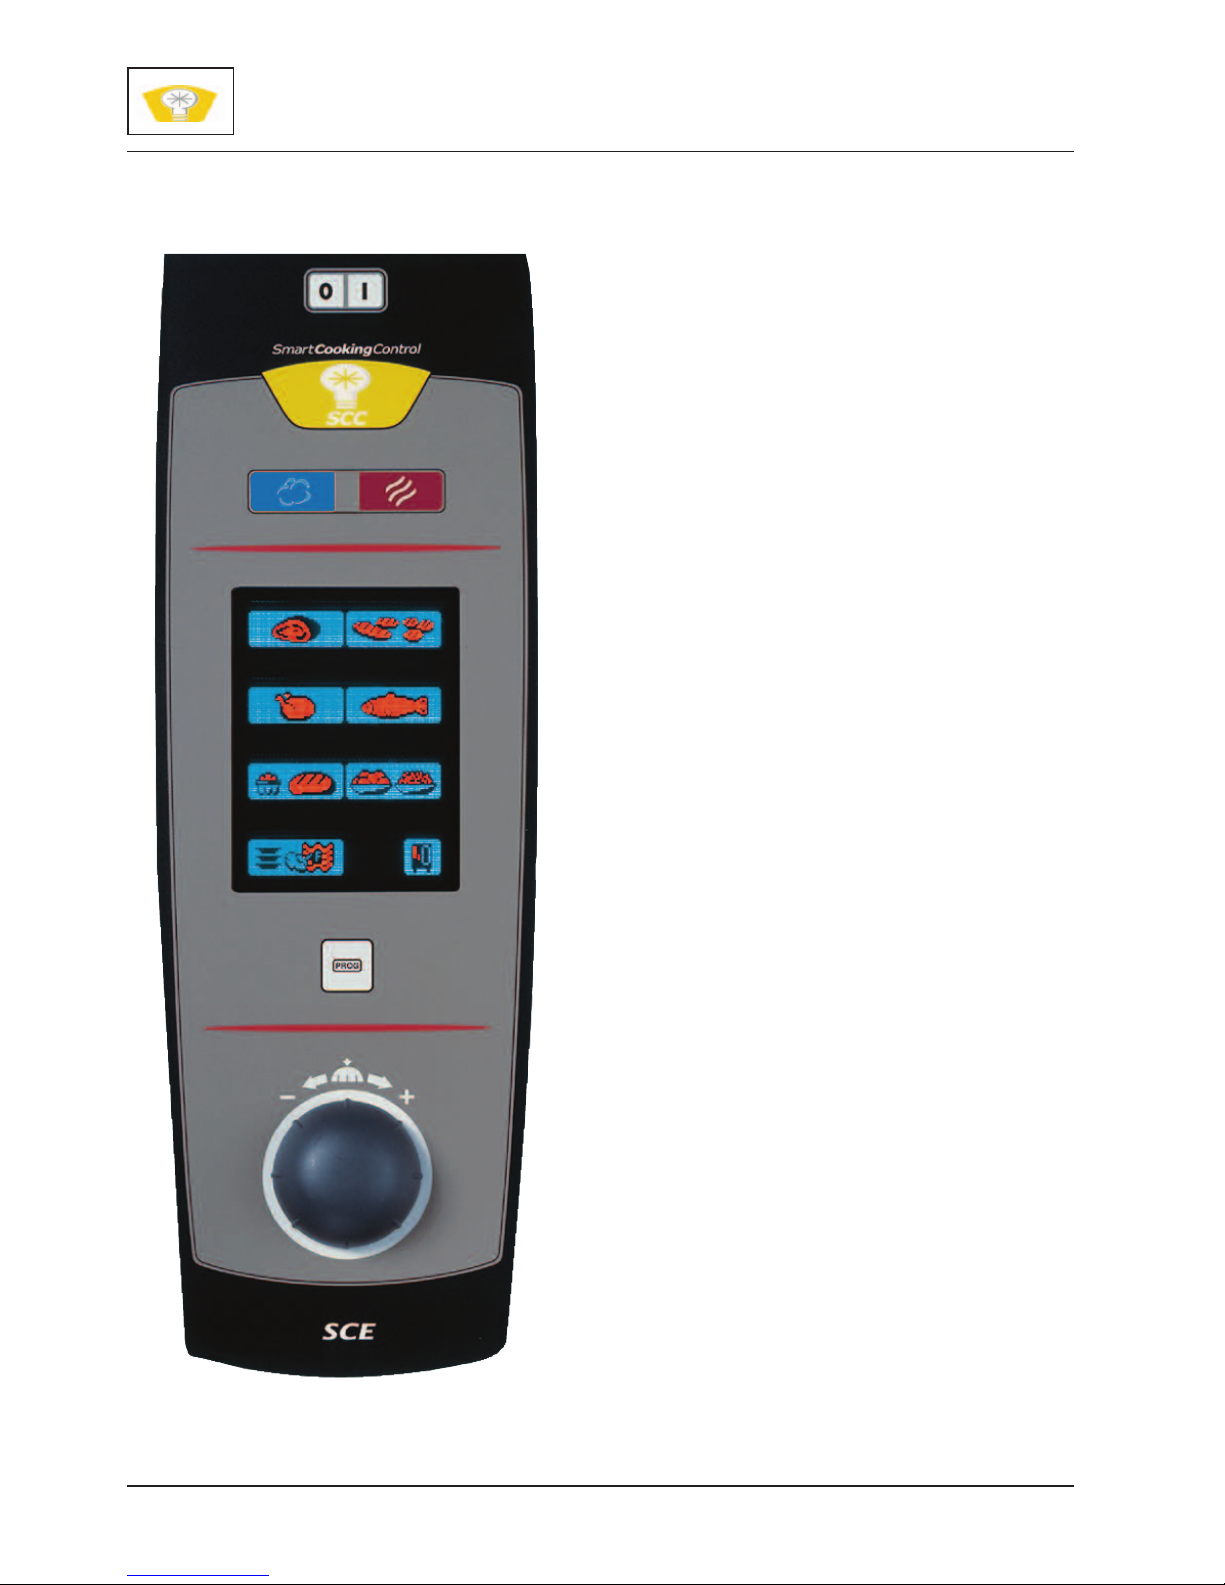
SmartCooking ControlTMMode
?????

On/Off switch
SmartCooking Control
TM
7 Processes:
Large roasts
Grill/sauté
Poultry
Fish
Bakery products
Side dishes
Finishing
®
Function button
Programming Mode button
Centr
al dial
with Push Function
- 15 -
SmartCooking ControlTMMode – Controls
Following are five examples that explain the operation of SmartCooking Control
TM
mode. Or, simply
follow the User Guide on the display.
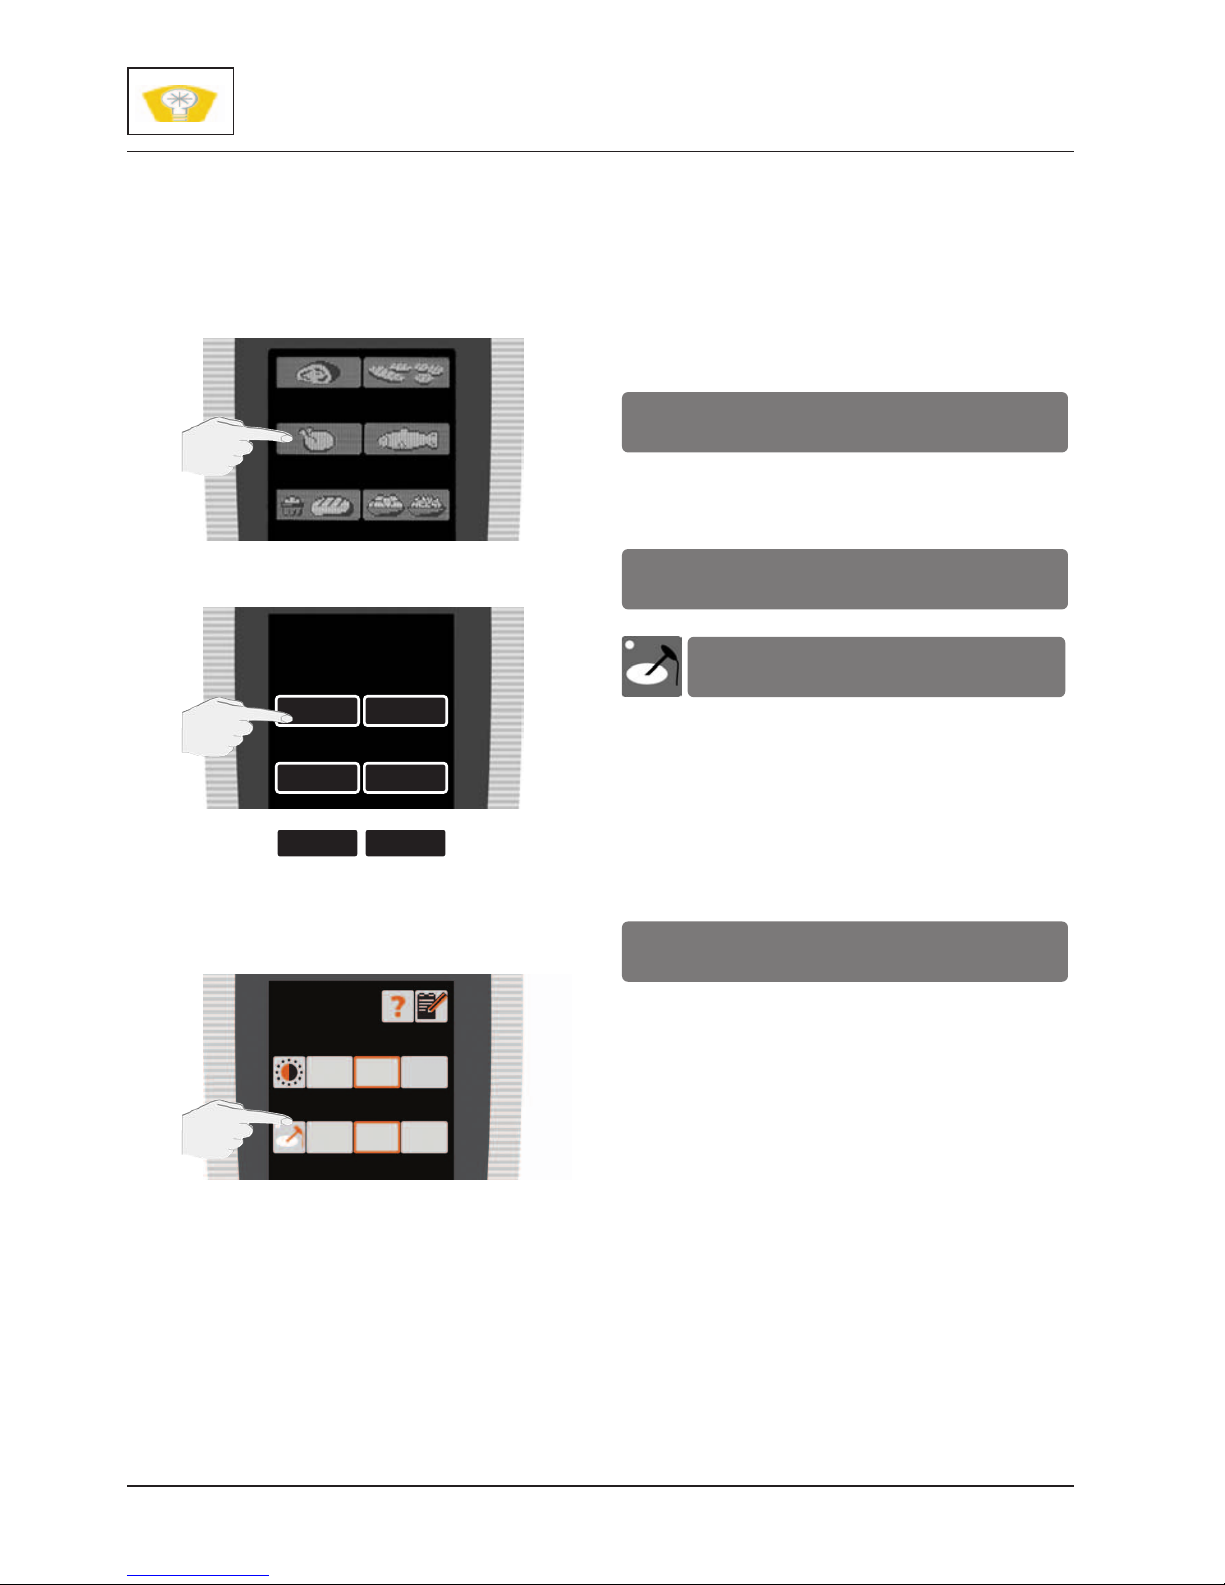
Example 1: Veal roast
Touch the icon illustrated by a large roast.
On the next screen will appear six preparation
options. Select one—Universal Roast, for example—and that’s it! The unit will begin working to
give you a preset factory-tested result.
Or you have the option of making individual
changes to the level of browning and cooking.
You can also make changes to any of the preset
suggestions for the level of browning and cooking.
Simply select a different setting than the one highlighted. If you wish to change a setting you must
do so within 60 seconds.
When required, the unit preheats—the display
shows:
When the preheat temperature is reached the display shows:
Please note that the temperature probe must be
inserted when required.
If the temperature probe is incorrectly inserted (see
chapter on Working with Temperature Probe) the
display will show:
You must then attempt to re-insert the probe properly. If the probe is not inserted, or remains improperly inserted, the mode is discontinued.
Probe Position
Insert core temperature probe
Load
preheat
- 16 -
SmartCooking ControlTMMode – Operation
universal
roasting
universal
roasting
light dark
rare
well done
roast with
crackling
soft
roasting
soft
cooking
overnight
roasting
overnight
cooking
1
2
3

Note
The actual elapsed cooking time is displayed once
the cooking time is completed and the door has
been opened. In some SmartCooking Control
TM
mode operations, no preheating is necessary.
Discontinuing an operation in SelfCooking
Control
TM
Mode
An operation in SmartCooking ControlTMMode may
be discontinued while the display shows the
"back" symbol. If the "back" symbol is unavailable, the only way to halt the process is to switch
off the unit.
- 17 -
SmartCooking ControlTMMode – Operation

Example 2: Muffins
Select “Bakery Products” by touching the icon illustrated by a loaf of bread.
Select the "Sweet Baking " option—that’s it!
The unit will begin working to give you a preset
factory-tested result.
You can also make changes to any of the preset
suggestions for the level of browning and cooking.
Simply select a different setting than the one highlighted. If you wish to change a setting you must
do so within 60 seconds.
The unit preheats automatically—the display
shows:
When the preheat temperature is reached the display shows:
The probe positioning aid must be used with liquid
or batter products.
Please note that the temperature probe
must be inserted when requested!
If the temperature probe is incorrectly inserted (see
chapter on Working with Temperature Probe) the
display will show:
You must then attempt to re-insert the probe properly. If the probe is not inserted, or remains improperly inserted,
the mode is discontinued.
Probe position
Insert core temperature probe
Load
preheat
- 18 -
SmartCooking ControlTMMode – Operation
sweet
baking
savoury
baking
sweet
baking
light
dark
2
1
3

Note
The actual elapsed cooking time is displayed once
the cooking time is completed and the door has
been opened.
Discontinuing an operation in SmartCooking
Control
TM
Mode
An operation in SmartCooking ControlTMMode may
be discontinued while the display shows the
"back" symbol. If the "back" symbol is unavailable, the only way to halt the process is to switch
off the unit.
- 19 -
SmartCooking ControlTMMode – Operation

Example 3: "Finishing®– à la carte”
Select "Finishing®" mode by touching the icon
illustrated by a column of plates
Select "à la carte" option– that’s it!
The unit will begin working to give you a preset
factory-tested result.
You can also make changes to any of the preset
suggestions for the level of humidity or finishing
time. Simply select a different setting than the one
highlighted.
The unit preheats automatically—the display
shows:
If desired you can change the default settings and
store your new ones.
When the preheat temperature is reached the display shows:
Level Control
Level Control automatically appears when door is
open for loading.
4
Select level (rack) you have loaded (e.g. level 3)
5
Repeat for as many levels as you load.
The time runs when the cooking cabinet door is
closed. As soon as the door is opened the time is
stopped.
Load
preheat
- 20 -
SmartCooking ControlTMMode – Operation
2
3
1
plated
banquet
plates
à la carte
container
CT-probe
container
service
chicken
plates
à la carte
dry humid
short
long

With Level Control you can enter an individual time
for each of your racks and have it displayed. That
way you can always see exactly when each rack is
ready. A buzzer sounds and the indicated level
flashes as soon as the preset time for the relevant
rack is up. Once the cabinet door has been opened
and shut that level is free again and can be
reloaded.
Select the loaded level for which you want to
change the cooking time (e.g. level 3)
Turn Central Dial to input desired time and press
dial to confirm.
1
2
- 21 -
SmartCooking ControlTMMode – Operation
”LevelControl”

Example 4: "Finishing®– Banquet”
Select "Finishing®" mode
Select "Banquet" option – that’s it!
The unit will begin working to give you a preset
factory-tested result.
You can also make changes to any of the preset
suggestions for the level of humidity or finishing
time. Simply select a different setting than the one
highlighted.
The unit preheats automatically—the display
shows:
If desired you can change the default settings and
store your new ones.
When the preheat temperature is reached the display shows:
Please note that the temperature probe must be
inserted in the ceramic tube on the mobile plate
rack when requested!
Insert core temperature probe
Load
preheat
- 22 -
SmartCooking ControlTMMode – Operation
2
3
1
plated
banquet
plates
à la carte
container
CT-probe
container
service
chicken
plated
banquet
dry humid
short long

Example 5: Rice
Select Side Dishes by touching the icon illustrated
with two bowls of food
Select "Steam rice" option – that’s it!
The unit will begin working to give you a preset
factory-tested result.
You can also change the cooking time by simply
selecting a different setting than the one highlighted. If you wish to change a setting you must do so
within 60 seconds.
Please note that the temperature probe must be
inserted into the container of rice when requested.
If the temperature probe is incorrectly inserted (see
chapter on Working with Temperature Probe) the
display will show:
You must then attempt to re-insert the probe properly. If the probe is not inserted, or remains improperly inserted, the mode is discontinued.
Note
The actual elapsed cooking time is displayed once
the cooking time is completed and the door has
been opened.
Probe position
Insert core temperature probe
- 23 -
SmartCooking ControlTMMode – Operation
1
Convenience
Gratin/
Quiches
dumplings/
potatoes
steamed
rice
steamed
side dishes
2

All Combi-Steamer functions are available in
Combi-Steamer Mode.
Combi-Steamer mode is available by touching the
Moist Heat or Dry Heat (or both simultaneously for
Combination) buttons.
- 24 -
Combi-Steamer Mode

Request current cooking data
Hold down temperature button
The following values are displayed:
• current cooking cabinet humidity level
• current cooking cabinet temperature
• elasped cooking time
• current probe temperature
- 25 -
Combi-Steamer Mode – Controls
On/Off switch
3 operating modes:
"Moist Heat" button
"Dry Heat" button
Combination of
Dry and Moist Heat
ClimaPlus
®
window
Cooking cabinet temperature
Time
Probe temperature
Steam Injection
Fan speed control
Cool down
Store
Function button
Pr
ogramming Mode button
Central dial
with Push In function

The fresh steam generator generates hygienic fresh
steam.
Cooking cabinet temperature setting range:
86-265°F (30-130°C.)
Cooking methods:
Steaming, stewing, blanching, simmering, soaking,
vacuum cooking, thawing, preserving
Example setting range: 86-265°F (30-130°C)
1
2
3
4
5
or use temperature probe
4
Desired Actual
5
(See chapter “Working with Temperature Probe”).
Optional functions, except CleanJet
®
, Deliming and
Cool Down, are available.
168°F 67°F
0:33
212°F
- 26 -
Combi-Steamer Mode – Moist Heat

Powerful heating elements produce dry heat.
Cooking cabinet temperature setting range:
86-575°F (30-300°C)
Specific cooking cabinet humidity levels can be set
(see chapter on “ClimaPlus Control
®
).
Cooking methods:
Baking, roasting, grilling, deep-frying, gratinating,
glazing
1
2
3
4
5
6
7
or use temperature probe
6
Desired Actual
7
(See chapter on “Working with Temperature
Probe”).
Optional functions, except CleanJet
®
, Deliming and
Cool Down, are available.
Note
If cooking cabinet temperature reaches 575°F
(300°C) it will be automatically reduced to 518°F
(270 °C) after 90 minutes.
168°F 67°F
0:33
320°F
- 27 -
Combi-Steamer Mode – Dry Heat

In combination Mode, "Moist Heat" and "Dry
Heat" cooking modes are combined. This combination creates a hot humid cabinet climate for especially intensive cooking.
Specific cooking cabinet humidity levels can be set
(see chapter on “ClimaPlus Control
®
).
Cooking cabinet temperature setting range:
86-575°F (30-300°C)
Cooking methods:
Roasting, baking, Finishing
®
1
Press both buttons simultaneously.
2
3
4
5
6
7
or use temperature probe
6
Desired Actual
7
(See chapter on “Working with Temperature
Probe”).
Optional functions, except CleanJet®, Deliming and
Cool Down, are available.
Note
If cooking cabinet temperature reaches 575°F
(300°C) it will be automatically reduced to 518°F
(270 °C) after 90 minutes.
168°F 67°F
0:33
320°F
- 28 -
Combi-Steamer Mode – Combination
of Moist Heat and Dry Heat

ClimaPlus Control®measures and maintains the
humidity in the cooking cabinet to within one percent. You can set the precise product-specific climate for each food in the ClimaPlus window.
Moist Heat
The factory setting for ClimaPlus Control®is
100% humidity for cooking temperatures up to
265°F (130°C.)
Dry Heat
Desired maximum humidity levels can be set in Dry
Heat mode with
ClimaPlus Control®.
Red bars
and associated percentages show the
maximum permissible moisture level in the cooking
cabinet.
When more red is visible on the display,
the humidity level is lower and the cooking climate
in the cabinet is drier.
Combination Mode - Dry Heat +
Moist Heat
Precise humidity levels can be set and maintained in Combination Mode with ClimaPlus
Control
®
.
When more blue is
visible in the window, the
humidity level in the cooking cabinet is higher.
When more red is visible in the window, the
humidity level is lower and the cooking climate is
drier.
While cooking is taking place you can see what
ClimaPlus Control
®
is doing:
Up arrow is lit—moisture building in cooking cabinet.
Down arrow is lit—moisture being vented from
cooking cabinet.
1
2
The exact humidity level is shown as a percentage.
- 29 -
Combi-Steamer Mode – ClimaPlus Control
®

Timer
1
2
Continuous operation
1
Press and hold clock button until "Continuous"
appears on the display.
or
1
2
Rotate central dial to the left until "Continuous"
appears.
Manual Preheat
1
2
3
Press clock button once and rotate central dial
to the left. First "Continuous" appears, then
"Preheat".
Real-time setting
(see chapter on System Settings).
Start-time setting
(see chapter on System Settings).
Change to min/sec or h/min
(see chapter on System Settings).
preheat
CONT.
CONT.
CONT.
0:33
- 30 -
Combi-Steamer Mode
Time settings, Continuous operation, Preheat

The cooking process is regulated by a 6-point core
temperature measurement in the food.
Wash temperature probe prior to use and rinse cool
with hand shower.
Insert temperature probe into the thickest part of
product so that the tip of the probe is in the center
of the food to be cooked.
1
2
3
4
Desired Actual
5
Timer is disabled when temperature probe is in use.
A buzzer sounds when the preselected core temperature is reached. The unit switches off automatically.
Using the temperature probe with
frozen food
Carefully drill a hole in the thickest part of the
product with the hand-drill provided. To do this,
place frozen product on a stable surface. Protect
your arms and hands!
Working with the temperature
probe positioning aid
Use the temperature probe positioning aid for liquids, batters or very thin products or those with soft
pre-cooked consistency that do not easily support
the temperature probe.
Warning!
• The temperature probe and positioning aid
may be hot – wear oven mitts.
• Do not let temperature probe hang out of
cooking cabinet.
• Remove temperature probe from the food
before removing a load.
168°F 67°F
320°F
- 31 -
Combi-Steamer Mode
Working with the Temperature Probe

Steam Injection
A powerful jet vaporizes bursts of water evenly
through the cooking cabinet.
Humidification creates ideal rising conditions and
gives bakery products an attractive, glossy finish.
Available with Dry Heat or Combination
Moist and Dry Heat.
1
Steam Injection duration:
Each burst is limited to 2 seconds. Press the button
again to humidify for an additional 2-second burst.
Temperature range
86-500°F (30-260°C)
Fan speed control
5 fan speeds are available.The unit normally operates at the Standard setting.
Available in any cooking mode or medium.
1
2
Turbo air speed
Standard air speed
1/2 air speed
1/4 air speed
Fan cycles at 1/4 air speed
Note
Fan speed is automatically reduced after a certain
time so that your products do not dry out when
cooked for very long periods at temperatures below
212°F (100°C.)
- 32 -
Combi-Steamer Mode – Steam Injection,
Fan speed control

The "Cool Down" function allows you to bring high
cooking cabinet temperature down quickly and
gently so you can continue to cook at lower cabinet
temperatures.
1
deselect mode
2 close door
3
4
open door
Display shows current cooking cabinet
temperature.
5
All fan speeds are available for Cool Down.
Maximum Cool Down time is 5 minutes.
Note
Close cabinet door before selecting Cool Down
function. Cool Down function is not programmable.
Warning!
• During Cool Down the fan wheel does NOT
switch off when the door is opened.
• Do not switch on "Cool Down" function
unless air baffle is correctly locked.
• Do not touch the fan wheel.
• Do not attempt to cool unit with cold
water.
270°F
COOL DOWN
open door
- 33 -
Combi-Steamer Mode – Cool Down

It takes no time at all to create your own cooking
programs in Programming Mode using the easy-tounderstand control concept.
- 34 -
Programming Mode – Controls
Select program
Program name
New program
Level control
Change program
Copy program
Delete program
Function button
new
clean
change
copy
delete
new
copy change
LevelControl
delete
clean
LevelControl

Programming SmartCooking Mode
You can copy or adapt the 7 operating modes
(large roasts, grill/sauté, poultry, fish, bakery products, side dishes, Finishing
®
) to meet your individual
requirements and store them under a new name.
Examples:
You rename "Universal Roast" and store it under
the new name of "Veal Roast" with the individual
settings, e.g. "light browning" and "well done".
Note:
Any SCC process can be named and saved while
the process is operating.
1
2
3
Enter desired program names—dial letter with
central dial and press central dial to select.
4
If no name is entered a number is
allocated automatically.
5
6
7
8
9
Program stored.
Note
You can also perform steps 5-9 first, and then steps
2-4.
store
ABCDEF G HIJKLM
new
- 35 -
Programming Mode –
Programming SmartCooking Control
TM
Processes
universal
roasting
light dark

Programming in Manual-Mode
1
2
3
Enter desired program name. Dial letter with
central dial and press central dial to select.
4
If no name is entered a number is
allocated automatically.
5
6
7
8
or Preheat
or Temperature Probe
8
9
Optional functions, except CleanJet®, Deliming and
Cool Down can be included in the cooking program.
10
11
You can store your program, add extra program
steps, or end programming.
12
To add additional program steps, simply follow the
process from 5 through 9.
Note
Alternatively you can begin the programming
process at steps 5-9 and follow with steps 2-4 to
name and store the program
169°F 66°F
0:33
320°F
store
ABCDEF G HIJKLM
new
- 36 -
Programming Mode
Programming in Manual Mode

Start program
Example: "Test" Program
1
2
3
4
During program execution the program name
and program number appear on the display.
Note
You can adjust the settings (ClimaPlus Control
®
temperature, time, etc.) as required while a program is running.
Test program steps
1
2
3
4
5
Program step 1
6
Program step 2
Change program
1
2
3
4
Name can be changed as required.
5
6
Parameters can be changed, e.g. cooking cabinet temperature.
7
Your changes are stored.
320 °F
store
change
Test
TEST
2
TEST
1
Test
Test
TEST
1
Test
Test
- 37 -
Programming Mode
Start, check, change program

Delete program
Example: "Test" program
1
2
3
4
5
Copy program
Example: "Test" program
1
2
3
4
5
Name can be changed as required. If no name
is entered a number is allocated automatically.
6
store
ABCDEF G HIJKLM
copy
Test
delete
delete
Test
- 38 -
Programming Mode – Delete, copy program

Programming Level Control allows you to enter an
individual time for each rack and have it displayed.
You can always see exactly when each rack is
ready. The buzzer sounds and the display for the
indicated level flashes when the programmed time
for that rack has elapsed. When the cabinet door
has been opened and shut the level is reset and the
rack can be reloaded.
Note
Please note that the products must always be
cooked with the same cooking parameters
(climate, cooking cabinet temperature, air speed,
etc.).
Example: "Test" program
1
2
3
Enter desired program name. Dial each letter
with central dial and press central dial to select.
4
5
6
7
8
9
10
Program stored.
0:33
320 °F
store
Test
ABCDEF G HIJKLM
LevelControl
- 39 -
Programming Mode – Level Control

Optional functions, except CleanJet®, Deliming and
Cool Down can be included in the cooking program.
Note
In Level Control only one cooking step can be
entered (plus "Preheat", if necessary). The Level
Control function cannot be used for SmartCooking
modes.
Start Level Control Program
Example: "Test" program
1
2
3
4
Level Control is automatically activated when
Finishing
®
à la carte or Finishing®container service
is selected.
5
Select desired level.
6
Repeat this procedure for any rack.
Cooking time begins when the cabinet door is
closed. When cabinet door is opened, cooking time
is stopped.
To change a cooking time, simply select the loaded
level for which you want to change the cooking
time and dial in new time.
1
2
Test
Test
- 40 -
Programming Mode – Level Control

Setting Program Lock:
No new programs can be created when "Program
Lock" is set. Existing programs may be used but
not edited, copied or deleted.
1
2
3
4
Enter password
Use central dial to dial desired letter or number
and press central dial to select.
Default password "12345”
Program lock active
Program lock inactive
Change password
1
2
Enter password:
Use central dial to dial desired letter or number
and press central dial to select.
3
4
Enter password:
Use central dial to dial desired letter or number
and press central dial to select.
5
6
Repeat step 4.
ABCDEF G HIJKLM
repeat new password
ABCDEF G HIJKLM
enter new password
ABCDEF G HIJKLM
enter old password
_xxxx
change password
ABCDEF G HIJKLM
enter password
_xxxx
Prog
settings
- 41 -
Programming Mode – Program Lock

It is essential that the unit is cleaned at the
end of every work day in order to maintain
safe food handling practices and to keep the
unit in good operating condition.
Use the CleanJet®‚ automatic cleaning program to
clean the cooking cabinet. Please note that the unit
must be cleaned every day, even if it is only operated on Moist Heat.
6 levels of cleaning are available that can be
matched to the conditions of the cabinet.
Note:
The cleaning steps are described on the following
pages.
Caution!
• Always wear gloves when handling
Cleaner and Rinse Aid tablets—danger of
corrosive burns!
• Never open the cooking cabinet door
while the cleaning process is under way—
chemical cleaner and hot vapor may
escape—danger of scalding!
• Use only Cleaner and Rinse Aid tablets
supplied by your authorized distributor.
Using other chemical cleaners may
damage the unit and invalidate the
warranty.
1 De-select cooking program or control mode.
Note:
For safety reasons CleanJet®can only be selected
when no cooking process is engaged.
Follow the user prompt:
2
3
Note:
If the cabinet temperature exceeds 167°F at the
start of a CleanJet
®
program, the following mes-
sage is displayed:
4
Or use Cool Down function. Cool Down function
automatically switches off when unit has cooled.
You may continue cleaning:
5
Select the cleaning step appropriate to the conditions in the cabinet. Follow the user prompts.
Rinse aid (blue) Cleaner (red)
3x 2x
remove grids/containers
open door
strongmedium
light
interim
cleaning
rinse
rinse
without tabs
open door
unit too hot
CleanJet
®
- 42 -
Functions – CleanJet
®

6 Place the indicated number of each tablet into
the recess in the air baffle at the left of the
Cabinet according to the instructions below.
Note:
The number of Cleaner and Rinse Aid tablets will
vary with the different cleaning level selected.
7
Rinse Aid tablet (blue): Remove outer
protective foil only.
Do not damage the
transparent protective film!
8
Place Rinse Aid tablet (blue) with transparent
protective film into the recess in the air baffle
on the left side of the cabinet.
9
Cleaner tablet (white): remove protective foil.
10
Place Cleaner tablet (white) on top of Rinse
Aid tablet (blue).
Caution!
• Do not place Cleaner and Rinse Aid tablets
in the cooking cabinet!
• Hinging racks or mobile plate rack must
be inserted in the cooking cabinet as
instructed prior to CleanJet‚ cleaning.
- 43 -
Functions – CleanJet
®

11 Close cabinet door.
12
The cleaning time is displayed.
When the cleaning program has finished, a buzzer
will sound for 20 seconds.
The unit is ready for cooking again.
Caution!
• After the end of CleanJet
®
cleaning check
the cooking cabinet for cleaner and rinse
aid residues. Remove any cleaner and
rinse aid tablet residues and rinse
thoroughly with hand shower.
Note:
Leave the unit door slightly open if it is going to be
idle for a prolonged period (e.g. overnight).
∆
∇
0:00
do not open door
0:43
CleanJet medium
Start
- 44 -
Functions – CleanJet
®
Cleaning step Description/application Cleaner/Rinse Aid
Rinse without tablets Rinse cabinet with warm water. No
Rinse For non-greasy limescale deposits Rinse Aid
e.g. after baking, working in Moist Heat.
Interim cleaning For all soiling– without drying. Cleaner
Short cleaning time with increased user of Cleaner.
Light For light soiling, e.g. after mixed loads, Cleaner/Rinse Aid
applications to 200 °C.
Medium For roasting and grilling deposits, e.g. after cooking Cleaner/Rinse Aid
chick
en,
steaks, grilled fish.
Strong For heavy roasting and grilling deposits, Cleaner/Rinse Aid
e.g. multiple loads of chicken, steaks, etc.
Examples of cleaning step selections:

Interrupting the CleanJet
®
Program:
In the event of power failure or if the unit is
switched off, the display shows:
If Interrupt CleanJet
®
is not confirmed by pressing
the display or the central dial within 20 seconds,
the program continues uninterrupted until completion.
If Interrupt CleanJet®is selected/confirmed:
1
2
You are prompted to remove any remaining
Cleaner and Rinse Aid tablets from the unit.
Caution!
• Always wear gloves when handling
Cleaner and Rinse Aid tablets—danger of
corrosive burns!
3 Close door.
Close the cabinet door. This display will remain
for 10 seconds.
Always rinse any residue from cleaning tablets.
When door is open for rinsing, the display shows:
Once rinsing has finished the display shows:
Caution!
Thoroughly flush away Cleaner and Rinse
Aid residues with hand shower.
Your unit is ready for cooking again.
cleaning incomplete
Interrupt Cleanjet
close door
remove tabs
Interrupt Cleanjet
Interrupt Cleanjet
- 45 -
Functions – CleanJet®Stop

CleanJet®Request
This function allows a fixed time to be set for
CleanJet® cleaning.
1
2
3
4
5
Set the desired time for the cleaning request using
the central dial.
When the hours of operation are reached the
CleanJet
®
Request display will come on automatically. If an active cooking process is running at the
time, CleanJet
®
Request will appear immediately
upon completion. If the unit is switched off at the
time, CleanJet
®
Request will appear when the unit
is switched back on.
CleanJet
®
is activated (see CleanJet®).
or
CleanJet®Request is suppressed and appears on
completion of the next cooking process, or when
the unit is switched on.
Later
CleanJet
CleanJet request
8:00
settings
- 46 -
Functions – CleanJet®Request

HACCP process data is logged continuously and
stored for up to one week. Data can be downloaded at anytime via the unit interface.
You will need a PC or notebook computer and
CombiLink
®
software. Detailed instructions for set-
ting up the interface are found in the CombiLink
®
users guide.
To output stored process data:
1
2
Continuous process data output is interrupted.
3
4
Start time (date/time of day)
5
6
Finish time (date/time of day)
7
The following data is logged:
Data output every 60 sec (in ASCCII format)
• Batch no.
• Time of day
• Cooking program no. or name
• Cooking cabinet temperature
• Core temperature
• Door open /door closed
• Change of cooking mode
• CleanJet
®
‚ cleaning
• 1/2 energy
• Demand-related energy supply
Download
09:1507.25.03
09:1507.18.03
HACCP
- 47 -
Functions – HACCP logging

This method of cooking gradually raises the temperature in the cabinet by maintaining a constant
differential (Delta) to the current core temperature
of the product. In this way, the meat is cooked
slowly until done.
The numerical difference between the core temperature and the cooking cabinet temperature is the
Delta temperature.
Delta Temperature range: 68-140°F (20-60°C)
Note: Remember this number is neither the core
temperature nor the cooking temperature. It is the
DIFFERENCE between actual temperatures indicated in degrees.
1
2
3
4
5
6
72
∆ 25
∆T
- 48 -
Functions – Delta-T cooking
∆T

1/2 Energy
The 1/2 Energy function reduces power consumption of the heating elements in electric units by
50%.
Available for any cooking medium—not
available in SmartCooking Control
TM
mode.
1
2
3
Function E1/2 active, E/2 red light comes on
Note:
Cooking times are longer when cooking with half
energy. Food quality may be reduced.
When selected, the 1/2 Energy function affects all
applications in manual and custom program operation.
If E/2 is activated and an SCC process is selected,
you will be prompted to de-select E/2 before continuing.
Demand-related energy supply
Available on electric units only. Available in
Combi-Steamer mode only.
Reduced energy requirements reduce the energy
supply to the unit. When normal power supply is
interrupted by this energy-saving feature, the display will show:
E
320 °F E/2
E/2
- 49 -
Functions - 1/2 Energy,
Demand-Related Energy Supply
E/2

Automatic Start Time lets you set a time for the unit
to start up and run a cooking program automatically.
Enter automatic start time:
1
or
1
or
1
Select an item in SmartCooking ControlTMmode, or
choose a cooking program, or enter desired cooking parameters manually.
2
3
Most recently set start time is automatically displayed.
4
5
Set the desired start time using the central
dial and press the central dial to confirm.
06:00 start time
17:00 start time
17:00 start time
start time
- 50 -
Automatic start time

6
7
Set the desired date using the central dial and
press the central dial to confirm.
The start time is activated.
After 10 seconds the display begins alternating
between real time and the start time. All other cabinet lighting is switched off.
Note:
Or you can put steps 2-7 before step 1.
De-activating start time
Select function
Caution!
• Do not keep food in an un-cooled or unheated condition for a prolonged period!
The CalcDiagnosis System®rinses and drains the
steam generator based on the amount of use.
The CalcDiagnosis System
®
also monitors the
limescale build-up in the steam generator and displays the level graphically as a red bar.
1
Limescale level displayed:
Note:
When 8 red bars are indicated, the display shows:
for 10 seconds.
Steam generator should be delimed within the next
3-4 weeks.
When 9 red bars are indicated, display shows:
for 2 minutes.
The steam generator MUST be delimed within 2
weeks at the most!
CalcCheck
CalcCheck
CDS
start time
start time
02:00 (real Time)
06:00 start time
05.20.04
05.19.04
- 51 -
Functions – CalcDiagnosis System®CDS

A special telephone number for help with operating
the SmartCooking System
TM
‚ has been programmed
into the unit. To display this number:
1
2
3
The display shows:
The following service notices can be displayed in
the Service-Info area.
1
2
3
The display shows:
e.g.
Note:
If there is no service notice, the relevant Customer
Service telephone number is shown under ServiceInfo.
Service notices are displayed automatically at 10
second intervals.
See also Fault Indications chapter.
Tel. 1-937-456-8400
call Customer Serv.
No Function
Service 26
Service✆Info
Tel. 1-937-456-8400
Chef✆Line
- 52 -
ChefLine®/Service – Service-Info

You should drain the steam generator before moving, shipping, storing the unit, or to prevent freezing in water lines.
1 Un-select cooking process.
2 Open cabinet door.
3
4
5
The steam generator is drained automatically.
- 53 -
Service – Draining the steam generator

The model number and software identification can
be displayed using the "Model" Function.
1
2
3
4
Model: .............................
SW: ....................
No. ...........
Mod.
- 54 -
Service – Model and software identification

Basic system settings can be displayed and
changed.
1
2
Real time setting
1
2
3
4
Time format setting
Press the display to change between the 24 hour
and 12 hour time formats. The selected item
appears brighter in the display.
Note: Date format is linked to time format and
changes automatically. In am/pm time format, date
appears as 05/19/03 (month/day/year). In 24h time
format, date appears as 19.05.03 (day/month/year)
Time format for
cooking processes
Press the display to change between h:m and m:s.
Set time format glows red.
Possible time settings:
h:m setting: hours : minutes
m:s
setting: minutes : seconds
Note:
m:s setting only possible up to 99 minutes and 59
seconds.
The time format for each individual program step
can be changed during programming.
Example:
Program step 1 (h:m),
Program step 2 (m:s),
Program step 3 (h:m)
h:m
m:s
am/pm
24H
9:50
9:50
Progenglish
°C / °F05.19.03
h:m
m:s
am/pm
24H
9:50
settings
- 55 -
Settings – real time, time format

Date setting
1
2
3
4
5
6
Date format is linked to time format.
Selection:
In am/pm time format, date appears as 05/19/03
(month/day/year)
In 24h time format, date appears as 19.05.03
(day/month/year)
Temperature unit setting
Choose either Fahrenheit or Celsius temperature
scales.
1
Press the display to change between °C and °F.
The selected item appears brighter in the display.
°F / °C
05.19.04
05.19.04
05.19.04
- 56 -
Settings – Date, temperature unit, language

Language setting
1
2
Use the central dial to select the language you
want.
Note:
For USA, select "English (USA). There may be sepa-
rate English language selections for other nations
or regions.
User Language setting
1
2
Select "User" with the central dial.
3
4
The term to be translated is suggested to you in
English.
5
Enter desired term with the central dial and
confirm by pressing the central dial.
6
Select the next term and continue as described
above.
Program lock
(see Programming)
Prog
load
ABCDEF G HIJKLM
Water
User
english
- 57 -
Settings – Date, temperature unit, language

Buzzer setting
1
2
Use central dial to select the desired signal tone
and press to confirm.
Display Contrast setting
1
2
Use central dial to change the contrast on the display. The factory default is set automatically for
maximum indicator life.
CleanJet®Request time setting
Hours of operation for the automatic cleaning
request is set using the CleanJet
®
Request function.
1
2
3
For description see CleanJet®chapter.
24:00
- 58 -
Settings – Buzzer, Display Contrast,
CleanJet
®
Request

Instead of cleaning with CleanJet®, the unit may be
cleaned manually.
Caution!
• It is vital to wear the correct protective
clothing, gloves, face mask and safety
goggles.
• Only use the hand spray pistol made by
the appliance manufacturer.
• Never leave unused containers under
pressure.
• Follow the safety instructions on the spray
bottle and cleaner canister.
• Please make sure that the air baffle and
grid shelf are properly inserted and locked
before starting to clean.
Note:
Make sure the cabinet temperature is 140*F or less
before you start manual cleaning. If it is over 140°F
you will see the following message:
Cool cabinet to below 60 °C.
To begin Manual cleaning.
1
Switch unit off
.
2 Using Henny Penny Oven & Grill Cleaner, spray
the cabinet, the inside of the door, the door
gasket, the area behind the swivel air baffle
and both sides of the air baffle with the cleaner.
3 Insert air baffle and grid shelf and lock properly.
4
Switch unit on.
5
6
cooking cabinet
too hot
- 59 -
Manual cleaning

7
8
Cleaning program begins.
Follow the display prompt.
The cleaning time is shown on the display.
9 When "Rinse" appears, open cabinet door and,
using the built-in hand shower, thoroughly rinse
the cooking cabinet, grid rack, mobile oven
rack, and the area behind the air baffle.
10 Insert air baffle and grid shelf and lock prop-
erly.
11 Wipe cabinet door and door gasket with a
damp cloth, close cabinet door.
Note:
•
Leave the cabinet door slightly open if the unit
will be idle for a prolonged period (e.g.
overnight).
• To prevent corrosion of high-quality chrome
nickel steel, the unit must be cleaned regularly,
even if it is operated only at "Moist Heat ".
• If there is heavy soiling let the residues soften for
10 minutes in "Moist Heat" mode before
cleaning.
• Do not treat unit with acids or expose to acid
fumes. This will damage the protective layer of
stainless steel and may cause discoloring in the
finish.
• Do not use high pressure cleaners.
• Rinse the spray pistol nozzle and nozzle
extension with clear water after every use.
• Rinse the cleaning bottle with warm water after
use.
• A couple of drops of salad oil will clear any
stiffness in the pump plunger.
rinse
∆
∇
0:40
clean
- 60 -
Manual cleaning

- 61 -
CleanJet®Times and Tablet Usage
Model
Rinse
without
tablets
Rinse
Interim
Cleaning
Light Medium Strong
61 11 min 51 min 38 min 1 hr 47 min 2 hr 22 min 3 hr 35 min
62 12 min 53 min 41 min 1 hr 51 min 2 hr 27 min 3 hr 41 min
101 12 min 52 min 40 min 1 hr 49 min 2 hr 25 min 3 hr 38 min
102 11 min 50 min 38 min 1 hr 46 min 2 hr 20 min 3 hr 33 min
201 10 min 48 min 35 min 1 hr 42 min 2 hr 14 min 3 hr 28 min
202 11 min 49 min 37 min 1 hr 45 min 2 hr 18 min 3 hr 31 min
CleanJet®Program Times
Model
Rinse
without
tablets
C R
Rinse
C R
Interim
Cleaning
C R
Light
C R
Medium
C R
Strong
C R
61 -- -- -- 1 2 -- 2 1 4 1 6 1
62 -- -- -- 2 3 -- 3 1 6 1 8 1
101 -- -- -- 1 2 -- 2 1 4 1 6 1
102 -- -- -- 2 4 -- 4 2 6 2 8 2
201 -- -- -- 2 4 -- 4 2 6 2 8 2
202 -- -- -- 2 4 -- 4 2 6 2 8 2
CleanJet®Cleaner/Rinse Aid Tablet Consumption

Fault When and how What to do
indication
Service 10 For 2 minutes after switching on Can be suppressed with "arrow button”. Unit
can be used for cooking.
Please notify Customer Service!
Service 11 For 2 minutes after switching on Can be suppressed with "arrow button”. Unit
can be used for cooking.
Please notify Customer Service!
Service 12 For 2 minutes after switching on Can be suppressed with "arrow button”. Unit
can be used for cooking.
Please notify Customer Service!
Service 14 For 2 minutes when switching on Can be suppressed with "arrow button”. Unit
can only be used in Dry Heat mode.
Please notify Customer Service!
Service 20 Indicated for 2 minutes when changing SCC item selection and programs not
cooking mode, switching on, or when available. Limited use of Combi-Steamer mode
selecting SCC items is available. Please notify Customer Service!
Service 21
F
or 2 minutes when switching on
SCC item selection and progr
ams is not
available. Limited use of Combi-Steamer mode
is available. Please notify Customer Service!
Service 23 Continuous indication Please notify Customer Service!
- 62 -
Fault warnings
Any faults developed by your unit will be shown on
the display:
Faults displayed that do not prevent continued
operation can be bypassed by pressing the back
arrow button.
Tel. .............................
Call for Service
Cleaning Function
Service 26

Service 24 Continuous indication Please notify Customer Service!
Service 25 Indicated for 2 minutes during CleanJet
®
not functioning!
CleanJet
®
cleaning • Turn water supply on full
• Check supply filter
• Remove containers from cooking cabinet
• If you cannot identify the fault please notify
Customer Service.
• If Service 25 appears while CleanJet
®
cleaning is operating, remove tablets from
cooking cabinet and rinse cabinet
thoroughly with hand shower (including
behind the air baffle).
• Unit can be used to cook for short periods.
Please notify Customer Service!
Service 26 Continuous indication If fault indication appears when CleanJet
®
cleaning is operating, initiate "CleanJet
®
Abort". If the fault indication remains after
"CleanJet
®
Abort", remove tablets from the
cooking cabinet and rinse cabinet thoroughly
with hand shower (including behind the air
baffle).Please notify Customer Service!
Service 27 For 2 minutes after switching on CleanJet
®
system fault! Unit can be used for
cooking. Please notify Customer Service!
Service 28 For 2 minutes after switching on Please notify Customer Service!
Service 29 Continuous indication Please check air filter under the control panel
and clean or replace if necessary. Check
whether an external heat source is affecting the
unit. If fault indication remains, please notify
Customer Service!
Service 30 For 2 minutes when switching on Moisture regulation not functioning! Unit can
be used for cooking to a limited extent. Please
notify Customer Service!
Service 31 For 2 minutes after switching on Core temperature probe defective! Unit can be
used for cooking without temperature probe.
Please notify Customer Service!
Service 32 Continuous indication. Shut off gas supply!
Gas units only Please notify Customer Service!
Service 33
Continuous indication after 3 Resets
Shut off gas supply!
Gas units only
Please notify Customer Service!
Service 34 Continuous indication. Shut off gas supply!
Please notify Customer Service!
- 63 -
Fault warnings

Simple Help texts are on file in the unit to assist in
a great number of common operations.The Help
Function is available wherever the display shows
"?".
1
2
To browse through the Help Function:
1
2
- 64 -
Help Function


North American Distributors
Equipment, Supplies, Parts and Service
For U.S.
& Canadian sales or
ser
vice please contact your nearest
Henny Penny Distributor
1 & 2.General Services
101 Mystic Ave.
Medford, MA 02155
(800) 233-1033
3. Globe-Monte Metro, Inc.
47-02 Metropolitan Avenue
Ridgewood,
NY 11385
(718) 786-5760
4. Guertin Dist. Inc.
5 Technology Drive
East Syracuse, NY 13057-9713
(315) 437-4928
(800) 468-6336
5. Kreiser Distributing Co.
13800 Route 30
N. Huntington, PA 15642
(724) 863-3360
6. AFS Equipment Company
9130-X Red Branch Road
Columbia, MD 21045
(410) 964-3770
(800) 969-3770
7. HP Sales & Service Co.
425 Otter Street
Bristol, PA 19007
(215) 785-3250
8. Astro Food Equipment
7901 Old Rockside Rd.
Independence, OH 44131
(216) 619-8821
(800) 367-4237
9. Carlisle Food Systems, Inc.
11020 Lakeridge Pkwy.
Ashland, VA 23005
(804) 550-2169
10. Price-Davis, Inc.
3882 East Highway 27
Iron Station, NC 28080
(509) 928-8815
(704) 732-2236
(800) 456-1014
11. Big A Distributors, Inc.
1744 Forest Parkway
Lake City, GA 30260
(404) 366-6510
(800) 222-0298
12. W.H. Reynolds
Distributors, Inc.
5843 Barry Road
Tampa, FL 33634
(813) 873-2402
Miami-(954) 845-0841
Jacksonville-(904) 781-9054
FL Watts (800) 282-2733
13. Ber-Vel Distributing Co. Inc.
7376 Highway 75
Pison, AL 35126
(205) 681-1855
14.
Barnett Group
2089
York Ave.
Memphis, TN 38104
(901) 278-0440
Nashville,
TN
(615) 242-6451
Scotsman Supply
516 5th Ave., South
Nashville, TN 37203
(615) 242-6451
15.
St. Clair Supply Company
231 East Main Street
Eaton, OH 45320
(937) 456-5500
(800) 762-2968
16. Dine Equipment Co.
3110 Preston Hwy.
P.O. Box 34038
Louisville, KY 40232
(502) 637-3232
FAX (502) 637-5177
17. United Marketing Assoc.
11877 Belden Court
Livonia, MI 48150
(734) 261-5380
18. Taylor Ent. of Wisconsin, Inc.
N8108 Maple St.
Ixonia, WI 53036
(262) 567-7286
FAX (262) 567-7201
19. Food Service Solutions, Inc.
1682 Barclay Blvd.
Buffalo Grove, IL 60089
(847) 459-8040
(847) 459-7942
20. Hess Meat Machines, Inc.
5640 Gravois
St. Louis, MO 63116
(314) 351-1751
(800) 572-4728
FAX (314) 351-2148
21. Delta Supply Co., Inc.
3315 W. Roosevelt Rd.
Little Rock, AR 72204
(501) 664-4326
22. Dixie Supply
490 Julianne St.
Bldg. C-1
Jackson, MS 39201
(601) 354-3025
23. Beaullieu Refrigeration Inc.
200 North Luke St.
Lafayette, LA 70506
(337) 235-9755
24. S.L.E. Corporation
1110 Avenue “H” East
Suite 100
Arlington, TX 76011
(817) 640-7999
25. Brooks Industries
4420 S.W. 29th St.
Oklahoma City, OK 73119
(405) 685-7200
26.
Specialty Food Equipment
4717 Roe Parkwa
y
Roeland Park, KS 66205
(913) 312-1880
(800) 444-8108
27. PHT Systems
1801 Old Highway 8
Suite 120
New Brighton, MN 55112
(651) 639-0368
28.
Mid-Nebraska Restaurant
Supply Co.
1415 S. Webb Road
Grand Island, NE 68802
(308) 384-5780
29. Robert G. Wood & Co.
2080 W. Cornell Ave.
Englewood, CO 80110
(303) 761-0500
(800) 358-3061
30. Taylor Restaurant Equip, LLC
8307 Central Ave. - NE
Albuquerque, NM 87108
(505) 255-9898
FAX (505) 255-3279
31. Taylor Freezer Sales of
Arizona, Inc.
2825 E. Chambers
Phoenix, Arizona 85040
(602) 276-1733
(800) 224-8400
Fax: 602-268-8948
32. National Equipment Corp.
242 West-3680 South
Salt Lake City, UT 84115
(800) 266-5824
(800) 955-9202
33. The Nicewonger Co.
19219 West Valley Hwy
Suite M103
Kent, WA 98032
(800) 426-5972
FAX (425) 656-0907
34. Tri-State Market Supply
10010 E. Montgomery
Spokane, WA 99206
(509) 928-8815
(877) 828-4268
36. Western Pacific
Distributors, Inc.
1739 Sabre St.
Haywood, CA 94545
(510) 732-0100
37. Don Walters Company
2121 S. Susan Street
Suite A
Santa
Ana, CA 92704
(714) 979-5863
38.
T
royer Foods,
Inc.
17141 State Route 4
Goshen, IN 46526
(219) 533-0302
39.
Tri-City HP, Inc.
527
West Fourth St.
Davenport, IA 52801
(563) 322-5382
40.
Certified Commercial Service
& Equipment (CCSE)
6031-A Industrial Heights Drive
Knoxville, TN 37909
(865)-546-8778
41.
ISI Commercial Refrigeration
& 42.
640
West 6th St.
Houston, TX 77007
(713) 861-4455
(800) 777-0314
FAX: 713-861-3759
43. WPD-Las Vegas
3555 W. Reno Ave., Suite H
Las Vegas, NV 89118
(702) 252-8664
FAX (702) 252-8836
44. HP Sales of New Jersey
113 Gaither Drive, Unit 206
Mt. Laurel, NJ 08054
(856) 642-2000
(866) 642-3344 - toll free
FAX (856) 642-2199
CANADA
44. DSL Inc., Canada
14520 128th Ave.
Edmonton, Alberta
Canada T5L 3H6
(403) 452-7580
(Western Canada-Alberta,
British Columbia, Manitoba,
Saskatchewan, Yukon, &
N.W.Territories)
45. TFI Food Equipment Solutions
52 Armthorpe Rd.
Brampton, Ontario
Canada L6T 5M4
(905) 790-2211
(Eastern Canada-Ontario,
Montreal, and Maritime
Provinces)
46. Bazinet Taylor Ltee.
4750 Rue Bourg
Ville St. Laurent
Quebec, Canada H4T 1J2
(514) 735-3627
(Quebec only)
For further assistance contact:
Henny Penny Corporation
P.O. Box 60
1219 US Route 35 West
Ea
ton,
OH 45320
Phone: 937-456-8400
Toll-free: 800-417-8417
Fax:
937-456-8402
Toll-free: 800-417-8402
www.hennypenny.com


International Distributors
Equipment, Supplies, Parts and Service
U.S.
Headquarters
Henn
y Penny Corporation
1219 U.S. Route 35 West
Ea
ton, OH 45320 USA
Telephone: 937-456-8417
Fax:
937-456-1860
Representative Office
1. Henny Penny Corporation
Representative Office
Parc d’Entreprises de
I’Esplanade
2bis Rue Paul Henri Speak
Saint Thibault des Vignes
77462 La
gny sur Mame Cedex,
France
T
elephone: 33 (1) 60075600
Fax: 33 (1) 60071489
U.S. Export Centers
2. Feco Interna
tional Company
20 North San Mateo Drive,
Suite 9
San Mateo, CA 94401 USA
Telephone: 415-348-3499
Fax: 415-348-3575
Caribbean Islands & Central
America (excluding Puerto Rico)
3. Total Equipment Suppliers
9550 NW 41st St.
Miami, FL 33178
Telephone: 305-718-9550
Fax: 305-718-9505
Algeria
4. SOMAB
Y1 Rue Mahmoud Boudjatit
(Oasis) Ager,Algeria
Tel: 213-21-23-3051/3052
Fax: 213-21-23-3161
Argentina
5. Oditec S.A.
Augstin Alvarez 2128
1602 Florida
Buenos Aires, Argentina
Telephone: (541) 796-0820
Fax: (541) 796-2009
Australia
6. J.L. Lennard Pty. Ltd.
937-941 Victoria Rd.
West Ryde NSW 2114
Sydney, Australia
Telephone: 61-2-9807-7200
Fax: 61-2-9807-7300
Bahrain
7. Mohammed Jalal Catering
Old Palace Road
P.O. Box 1335
Manama, State of Bahrain
Telephone: 973-274-800
Fax: 973-274-900
Bangladesh
8. Puffin International Ltd.
3691B Elephant Rd.
Swarankika Plaza
4th Floor-Dhaka 1205
Dhaka, Bangladesh
Telephone: 8802-863117
Fax: 880-2-867563
Belgium
9. Engelen-Heere N.V.
Industrialpark
T
erbekehof
Fotografielaan 14
B-2610 Antwerpen (Wilrijk)
T
elephone: 323-825-5577
Fax:
323-825-3702
Bulgaria
11.
E.C.E. - CAIX S.A.R.L.
23A Rue Oborichte
Sofia 1604,
Bulgaria
Telephone: 19-359-2-946-1479
Fax:
19-359-2-946-3340
Chile
12. IMAHE
San Francisco N° 1210
1214 Santiago, Chile
T
el: 56-2-555-8878
Fax: 56-2-555-7076
Chile
12. IMAHE
San Francisco N
° 1210
1214 Santiago, Chile
T
el: 56-2-555-8878
Fax: 56-2-555-7076
China
13. Bonny Foodservice Products
8C Yeung Yiu Chung (No. 8)
Industrial Bldg., No. 20
Wang Hoi Rd.
Kowloon Bay, Kowloon Hong Kong
Telephone: 852-796-5616
Fax: 852-799-8490
J & C Foodservice Products
Flat B, 15/F Fangzhou build
# 2115 Si Chuan Bei Lu
Shanghai
200081
China
PH: +86 21-56727240
Fax: +86 21-56975710
Colombia
14. Industrial Taylor Ltda.
Transversal 93, Numero 64-24
Apartado Aereo 95075
Bogota D.E., Colombia
Telephone: 57 (1) 4340016
Fax: 571-223-2642
Crotia
15. New Rok
Opatija M. Tita 15
51410 Opatija, Crotia
Telephohe: 385-51-701-251
Fax: 385-51-701-251
16.
Cyprus
M. Modestou & Sons Ltd.
156 D-E-Z, Kantaras Ste.
2051 Strovolos
Nicosia, Cyprus
Telephone: 357-22-329729
Fax: 357-22-329738
Czech Republic
17. CITUS PRAHA spol s r.o.
Argentinska 20
Prague 7 Holeovice 170 00
CZECH REPUBLIC
Telephone: 420 2340 -948 - 22
Fax: 420 2340 -948 - 33
Denmark
18. Inter-Gastro A.S.
Midtager 18
2605 Brondby
Denmark DK2605
T
elephone:
45-43292000
Fax: 45-43292001
Ecuador
19.
Equindeca Cia. Ltda.
Hotel El Conquistador
Gran Colombia 6-65
Cuenca, Ecuador
T
elephone:
593-7-288-8444
Fax: 593-7-288-1442
Eg
ypt
20.
Con Trade Centre
3A Ramsis Street
Maaroof Building #83 & #62
Cairo, Egypt
T
elephone: 20 (2) 770642/762551
Fax: 20 (2) 756258
Estonia
21. Sisustaja As
Tihniku 5
11625
Tallinn, Estonia
Telephone: 372-6502300
Fax: 372-6502301
Finland
22.
Monilaite-Dayton Oy
P.O. Box 27
Salpakuja 6
01201 Vantaa, Finland
Telephone:
358-9-877-01011
Fax: 358-9-877-01099
France
23. Diffusion International de
Materiel (DIM)
Parc d’activite Clemenceau
Chemin du Chateau d’Eau
B.P. 4009
59704 Marcq-En-Baroeuil
Cedex, France
Telephone: (33) 20890000
Fax: (33) 20727355
Germany
24. SESJAK GmbH & Co. KG
Wullener Feld 9a
D-58454 Witten
Germany
Telephone: 49-2302-697077
Fax: 49-2302-698451
Technik, Design & Service für die
Gastronomie CATSERVE
Siemensring 37
Willich 47877
Germany
Telephone: (49) 2154 92375
Fax: (49) 2154 923775
Ghana
25. DRT Ghana
E6619 Ablade Road
Kanda Estate
P.O. Box C2074
Accra-Cantonments, Ghana
Telephone: 233-2123-3949
Fax: 233-2123-1380
Greece
26. Domestica S.A.
65 Stournara Str.
Athens 10432, Greece
Telephone: 30-15-24-30-14/15
Fax: 30-15-22-91-58
Guam
27. Pacific Technical Service, Inc.
New Commercial Building
#979 Rt. 16, Suite B-3
Barrigada, Guam 96913
Telephone: 6710632-5000
Fax: 671-632-3333
Holland
28.
Englelen-Heere B.V
.
Straatveg 85, Postbus 35020
3005 DA Rotterdam,
Holland
Telephone: 311-042-23077
Hong Kong
29.
Bonny Foodservice Products
8C Yeung Yiu Chung (No. 8)
Industrial Building #20
Wang Hoi Road
Kowloon Ba
y, Kowloon,
Hong Kong
T
elephone: 852-796-5616
Fax: 852-799-8490
Hungary
30.
Hotex Service
H-2094 Nagykovacsi
Kossith Lajos u. 1.
Hungar
y
T
elephone: 36-263-56653/89543
Fax:
36-26389463
Iceland
31. A. Karlsson H. F.
Brautarholti 28
105 Reykjavik, PO Box 167
Iceland
Telephone: 354-560-0900
Fax: 354-560-0901
India
32. Aishwarya Consolidates Pvt.Ltd.
Arumugam Circle
8/38 Kanakapura Road
Basavanagudi
Bangalore 560 004, India
Telephone: 91-80-2657-7577/7578
Fax: 91-80-661-7576
Int’l. Refrigeration Corp
7 Netaji Subhash Marg
Darya Ganj
New Delhi 110002, India
Telephone: 91-11-2681-2528
91-11-2681-10669
Fax: 91-11-2601-1827
Indonesia
33. P.T. Gema
JL. Raya Bloulevard Raya
Block IOA 2 No. 27
Kelapa Gading Permai
Jakarta 14240, Indonesia
Telephone: 62-21-4532077
62-21-4508910
Fax: 62-21-4532586/4530777
Ireland
34. Martin Food Equipment Ltd.
Gaskin Business Park
Coes Road
Dundalk, Louth County
Ireland
Telephone: 353-42-30366
Fax: 353-42-30370
Italy
35. Allegra SRL
Via Roma 4bis
Lanzo, Torinese
Italy
Telephone: 39-011-540264
Fax: 39-011-533779
Japan
36. Toei Kogyo Co. Ltd.
4F, Nissay Nishi-Gotanda
Building 24-5
Nishi-Gatanda 7-Chome
Shina
ga
wa-ku,
T
okyo 141-0031
Japan
Telephone: 813-3779-1081
Fax:
813-3779-1638
Jordan
37. Awar Trading Est
PO Box 962227
Amman 11196,
Jordan
Telephone: 962-6-55-19-610
Fax: 962-6-58-26-544

Korea
38.
Ohjin Corporation
3rd Floor, Ohjin building, 164-18
Poi-dong,
Kangnam-ku,
Seoul 135-26,
Korea
Telephone: 82 2-2057-6721
Fax:
82 2-2057-6734
Kuwait
39.
Mabrook Hotel Supplies Co.
PO Box 43832 Ha
walli
32053 Kuwait
T
elephone: 965-481-8242
965-483-01648
Fax: 965-483-4314
Lebanon
40. Pro Kitchen
Cahlfoun Building
Kaslik - Main Road
PO Box 1066 Jounieh
Lebanon
Telephone: 961-9-635-077
Fax:
961-9-635-059
Lithuania
41.
Master Group Baltic Master
Dariaus Ir Girena 175
2038 Vilnius, Lithuania
T
elephone: 370-52-306-520/530
Fax: 370-52-306-542
Malaysia
42. SCC Corp. Sdn. Bhd.
19-21 Jalan Hujan
Taman Overseas Union
58200 Kuala Lumpur,
Malaysia
Telephone: 60-3-77828384
Fax: 60-3-77818561
Malta
43. C & H Bartoli Ltd.
232 The Strand
Gzira Gzros, Malta
Telephone: 356-342-584
Fax: 356-342-569
Mauritius Island
44. (Mauritius, Reunion Island,
Seychelles)
Hassam Moussa Rawat
10 Bourbon Street
P.O. Box 492
Port Louis, Mauritius Island
Telephone: 160 (230) 2080024
Fax: 160-230-2080147
Mexico
45. North
Cavimex Del Note, SA de C.V.
AV Colon 1340 PTE Centro
Monterrey, Nuevo Leon
Telephone: 52-8372-3888
FAX: 52-8372-8951
Pacific
Micro Herros De Occidente,
S.A. de C.V.
Av. Juan Palamar y Arias
#83 Col. Jardines Vallarta
Zapopan, Jalisco, Mexico
C.P.45020
Telephone: 52-33-3629-5044
Fax: 52-33-3673-2943
Central Mexico Metro
Mexico City
Space Food Technologies
S.A de C.V.
Pestalozzi # 851
Col del
Valle 03020
Mexico City, Mexico
Telephone: (5255) 5682-0718
Mobile:
(5255)1941-1569
FAX: (5255) 5682-0718
Morocco
46. Electra
Boulevard AHL Loghlam
BP 25698
Sidi Bernoussi -
Ain-Sebaa
Casablanca Morocco
T
elephone: 212-22-753-531
Fax: 212-22-753-554
Netherlands
47.
Engelen-Heere B.V.
Linschotenstraat 100
3044A
w Rotterdam
The Netherlands
Telephone: 010-422-30-77
Fax:
010-422-34-35
New Zealand
48.
Taylor Equipment Limited
4 Ponuz Place
Mt. Wellington
Auckland,
New Zealand
T
elephone: 64 (9) 5733377
Fax: 64 (9) 5730841
Norway
49. Grillfagmannen A.S.
Ostensjoveien 44
N-0667 Oslo 6, Norway
T
elephone: 47 (2) 651410
Fax: 47 (2) 720017
Oman
50. Mohsin Haider Darwish LLC
P.O. Box 880
Ruwi,
Code 112
SULTANATE OF OMAN
Telephone: 968-703411
Fax:
(968) 789927
Pakistan
51. The Equipment Company
Ground Floor, Dadabhoy Centre
Sharea Faisai, Karachi 75530
Pakistan
Telephone: 922-1-778-1778/2778
Fax: 922-1-587-0456/778-2777
Peru
52. Importadora Tecnica
Comercial C.R. Ltda.
Jr. Marcos de Aramburu #595
Lima 17, Peru
Telephone: 51-1-275-2689
Fax: 51-1-275-2689
Philippines
53. HKR Equipment Corp.
9705 Kamagong St.
San Antonio Village
Makati City, Philippines
Telephone: 632-897-1569
Fax: 632-897-4913
Poland
54. Tanake S. A.
Ul. Pulawska 426
02-884 Warsaw
Poland
Telephone: 48-22-3369000
Fax: 48-22-3369009
Portugal
55. Abranfrio
Avenida 25 de Abril, 675
2200-299 Abrantes
Portugal
Telephone: 351-241379850
FAX: 351-241379859
Puerto Rico
56. Progressive Sales and Service
PO Box 10876
Caparra Heights Station
San Juan, Puerto Rico
00922-0876
Telephone: 787-782-7474
Fax: 787-793-6479
Qatar
57. Tristar Group/Sterling Catering
C.R.
No.
6778
P.O. Box 4746
Doha,
Qa
tar
Telephone: 974-4664433
Fax: 974-4657999
Romania
58.
Delta Technologies Romani S.A.
Sector 6, 20 Constructorilor Blvd.
Bloc 20
A, sc. B 7th Floor
Apt.
64
Bucharest, D599 Romania
T
elephone: 401-220-4261
Fax:
401-220-3990
Saudi Arabia
59.
Commercial Center
Development & Economy
P
.O. Box 1210
Jeddah 21431,
Saudi Arabia
Telephone: 966 (2) 629-1858
Fax: 966 (2) 629-1860
Senegal
60. Breading Systems Co.
C/ Ripoche,14
35007 Las Palmas
Spain
Telephone: 34-9-28-22-43-86
Fax:
34-9-28-27-56-90
Singapore
61.
ArtiZen Pte Ltd.
No: 59 Ubi Ave 1, #03-02
Bizlink Centre
Singa
pore 408938
Telephone: 65-6749 6880
Fax: 65-6749 1516
South Africa
62. Foodserv “CC”
PO Box 55269
Northlands 2116,
Republic of South Africa
Telephone: 27 (11) 616-5183,
Fax: 27 (11) 616-8287
Spain
63. Adisa
Tuset, 8-10
08006 Barcelona, Spain
Telephone: 34-93-415-0018
Fax: 34-93-218-1782
Sri Lanka
64. Sperrys Commercial Equipment
1014 Parliament Road
Etul Kotte
Kotte/Colombo, Sri Lanka
Telephone:9411-286-25 77
9411-287-3050
Fax: 9411-287-30-56
Suriname
65. Tessco N.V.
Oude Charlesburgweg #47
Paramaribo Suriname
Telephone: 597-473366/477388
Fax: 597-473388
Sweden
66. Eurospice AB
Box 5050
Hejargatan 6
632 29 Eskilstuna, Sweden
Telephone: 46 (16) 165600
Fax: 46 (16) 131390
Latvia
67. Kompanija Vitrum Ltd
G. Astras Street 3a
LV-1084 Riga
PH: +371 7802384
FAX: +371 7802387
Syria
68. Lahham Trading & Contracting
Hamra Str. Omyad Building
P
.O.
Box 2960
Damascus Syria
T
elephone:
963-11-331-2251
Fax: 963-11-331-2252
Taiwan
69. Feco Corporation
420,
11 F Keelung Rd.
Sec. 1 Postal Code 110
T
aipei, Taiwan
Republic of China
T
elephone:886-2-2758-2288
Fax: 886 (2) 2758-2297
Thailand
70.
Fieco Company Ltd.
43/524-526 Amarinnivej 1
Anusaovari Laksi
Phaholoyothin Road
Bangkok 10220
Thailand
T
elephone: 66-2-521-3824/3878
Fax: 66-2-552-0833
T
unisia
71. Semci
16,
Rue Aziz Taj
1101
Tunis RP, Tunisia
Telephone: 216 -133-1501
Fax: 216-133-0698
Turkey
72. Klimatek
Inönü Caddesi, Akar Palas 22/6
A
yaspasa
Istanbul 80090
Turkey
T
elephone: 90-212-245-1812
Fax: 90-212-293-3903
United Arab Emirates
73. Habtoor International
P.O. Box 55332
Dubai,
United Arab Emirates
Telephone: 971-4-272-1212
Fax: 971-4-272-2255
United Kingdom
74. Servequip Products Ltd.
214 Purley Way
GB-Croyden CRO 4XG, England
Telephone: 44-208-6868855
Fax: 44-208-6817509
Uruguay
75. Tecnoland S.A.
Dr. José Scorsería 2740
CP 11300 Montevideo, Uruguay
Telephone: 598-2-7105900
Fax: 598-2-7105900
Venezuela
76. Prefer, C.A.
Avenida Presidente Medina
Edificio Prefer, Local No. 44
Entre Calles Chile y Progreso
urb. Los Acacias
Caracas 1040, Venezuela
Telephone:58-212-633-6933/2801
Fax: 58-212-632-6711
Vietnam
77. Cao Sinh Pte
Block 1, Lorong 8
Toa Payoh Industrial
Estate #01-1383
Singapore 319053
Telephone: 65-2516241
Fax: 84-2538814
Yemen
78. PentaRefrig. & Engineering Co Ltd
Street 14th of October
Sanaa-Hadda
Republic of Yemen
Telephone: 967 1 424321
967 1 424322
Fax: 00967 1 424323
Russia
79. FoodEq, Ltd.
10/2 Kozevincheskaya St.
Building Kurortproject
Moscow
113114 Russia
Telephone: 7(095) 959-6962,
7(095) 959-6904
FAX: 7(095) 235-1745
Revised 6/04

Henny Penny Corporation
P.O. Box 60
Eaton, OH 45320
+1 937 456.8400
+1 937 456.8402 Fax
Toll free in USA
800 417.8417
800 417.8434 Fax
www
.hennypenny.com
Form No
.: FM05-034C ©2004 Henny Penny Corporation,Eaton, OH 45320, Revised 04-06 Printed in USA
 Loading...