


NAUTIZ X7
Manual

NAUTIZ X7 Manual
Trademarks
Microsoft, Windows, the Windows logo, Windows Media, Outlook and ActiveSync are registered trademarks or trademarks of Microsoft Corporation in the United States and/or other countries. Microsoft products are licensed to OEMs by Microsoft Licensing, Inc., a wholly owned subsidiary of Microsoft Corporation.
The Bluetooth word mark and logos are owned by the Bluetooth SIG, Inc.
All other brand and product names are trademarks or registered trademarks of their respective companies.
Disclaimer
Specifications and manuals are subject to change without notice. Handheld assumes no liability for damage incurred directly or indirectly from errors, omissions, or discrepancies between the device and the manuals.
Notes
Depending upon the specific model purchased, the color and look of your device and accessories may not exactly match the graphics shown in this document.
The screenshots and other presentations shown in this document are for reference only. They may differ from the actual screens and presentations generated by the actual product.
2

NAUTIZ X7 Manual
ENERGY STAR® is a government program that offers businesses and consumers energy-efficient solutions, making it easy to save money while protecting the environment for future generations.
Please reference ENERGY STAR® related information from www.energystar.gov.
As an ENERGY STAR® Partner, MiTAC Technology Corporation has determined that this product meets the ENERGY STAR® guidelines for energy efficiency.
An ENERGY STAR® qualified computer uses 70 % less electricity than computers without enabled power management features.
Earning the ENERGY STAR®
•When every home office is powered by equipment that has earned the ENERGY STAR®, the change will keep over 289 billion pounds of greenhouse gases out of the air.
•If left inactive, ENERGY STAR® qualified computers enter a low-power mode and may use 15 watts or less. New chip technologies make power management features more reliable, dependable, and user-friendly than even just a few years ago.
•Spending a large portion of time in low-power mode not only saves energy, but helps equipment run cooler and last longer.
•Businesses that use ENERGY STAR® enabled office equipment may realize additional savings on air conditioning and maintenance.
•Over its lifetime, ENERGY STAR® qualified equipment in a single home office (e.g., computer, monitor, printer, and fax) can save enough electricity to light an entire home for more than 4 years.
•Power management (“sleep settings”) on computers and monitors can result in much savings annually.
Remember, saving energy prevents pollution
Because most computer equipment is left on 24 hours a day, power management features are important for saving energy and are an easy way to reduce air pollution. By using less energy, these products help lower consumers’ utility bills, and prevent greenhouse gas emissions.
3

NAUTIZ X7 Manual - Content |
|
Content |
|
CHAPTER 1 |
|
GETTING STARTED......................................................................................... |
........................... 7 |
Identifying Hardware Components ............................................................................................. |
8 |
Front Components............................................................................................................. |
8 - 11 |
Back Components................................................................................................................ |
12 |
Top Components .................................................................................................................. |
13 |
Bottom Components ............................................................................................................ |
13 |
Getting Your Device Ready for Use........................................................................................... |
14 |
Installing the SIM Card and Battery................................................................................. |
14 - 15 |
Connecting to AC Power and Charging the Battery............................................................... |
16 |
Performing the Initial Startup ............................................................................................... |
17 |
Synchronizing with Your Computer........................................................................................... |
17 |
Installing ActiveSync or WMDC............................................................................................. |
17 |
Using Options .......................................................................................................................... |
18 |
Using an SD Card................................................................................................................. |
18 |
Using the Hand Strap........................................................................................................... |
18 |
CHAPTER 2 |
|
BASIC SKILLS .......................................................................................................................... |
19 |
Power Saving and Turning Off.................................................................................................. |
20 |
Backlight Off........................................................................................................................ |
20 |
Entering the Suspend Mode ................................................................................................. |
20 |
Turning Off........................................................................................................................... |
20 |
Navigating on the Screen......................................................................................................... |
20 |
Using the Stylus................................................................................................................... |
20 |
Using the Keypad................................................................................................................. |
20 |
Today Screen........................................................................................................................... |
21 |
Landscape View................................................................................................................... |
21 |
Navigation Bar and Toolbar ...................................................................................................... |
21 |
Running Programs ................................................................................................................... |
22 |
Shortcut Menus ....................................................................................................................... |
22 |
Notifications ............................................................................................................................ |
22 |
Entering Information ................................................................................................................ |
22 |
Entering Text Using the Input Panel...................................................................................... |
23 |
Writing on the Screen .......................................................................................................... |
24 |
Drawing on the Screen ........................................................................................................ |
24 |
Recording a Message .......................................................................................................... |
25 |
Using My Text ...................................................................................................................... |
26 |
Securing Your Device ............................................................................................................... |
26 |
Locking the Keypad ............................................................................................................. |
26 |
Locking Your Device............................................................................................................. |
26 |
CHAPTER 3 |
|
USING THE PHONE (SELECT MODELS ONLY) ............................................................................ |
27 |
About Your Phone .................................................................................................................... |
28 |
Switching On or Off the Phone............................................................................................. |
28 |
Starting Microsoft Phone...................................................................................................... |
29 |
Phone Status Icons .............................................................................................................. |
29 |
Making a Call .......................................................................................................................... |
30 |
Dialing a Call ....................................................................................................................... |
30 |
Making a Call from the Onscreen List .................................................................................. |
30 |
Making a Call from Contacts................................................................................................ |
31 |
Making a Call from the Call History List ............................................................................... |
31 |
Making a Call from Speed Dial............................................................................................. |
32 |
Responding to a Call................................................................................................................ |
32 |
Answering a Call.................................................................................................................. |
32 |
Rejecting a Call.................................................................................................................... |
32 |
Ending a Call........................................................................................................................ |
32 |
4

Content |
|
Operations during a Call .......................................................................................................... |
33 |
Adjusting the Phone Volume................................................................................................. |
33 |
Using the Mute Function ...................................................................................................... |
33 |
Using the Speakerphone ...................................................................................................... |
33 |
Managing More Than One Call ............................................................................................. |
34 |
Taking a Note during a Call.................................................................................................. |
35 |
Using Call History .................................................................................................................... |
35 |
Viewing Call History ............................................................................................................. |
35 |
Adding an Entry to Contacts Using Call History .................................................................... |
35 |
Using Speed Dial ..................................................................................................................... |
36 |
Creating a Speed Dial Entry ................................................................................................. |
36 |
Editing or Deleting a Speed Dial Entry.................................................................................. |
36 |
Customizing Your Phone .......................................................................................................... |
37 |
Changing Phone Settings ..................................................................................................... |
37 |
Changing Security Settings .................................................................................................. |
37 |
Changing Services Settings ................................................................................................. |
37 |
Changing Network Settings.................................................................................................. |
37 |
Additional Phone Operations.................................................................................................... |
38 |
Using Text Messages ........................................................................................................... |
38 |
Setting up an Internet Connection........................................................................................ |
38 |
Checking Your Voice Mail ..................................................................................................... |
38 |
Making an Emergency Call................................................................................................... |
38 |
Dialing an International Call ................................................................................................. |
38 |
CHAPTER 4 |
|
MANAGING YOUR DEVICE......................................................................................................... |
39 |
Managing Power...................................................................................................................... |
40 |
Low Battery Signals and Actions.......................................................................................... |
40 |
Power-Saving Tips ............................................................................................................... |
40 |
Customizing Your Device.......................................................................................................... |
41 |
Settings – Personal.............................................................................................................. |
41 |
Settings – System........................................................................................................... |
41-42 |
Settings – Connections ........................................................................................................ |
43 |
Searching and Organizing Information ..................................................................................... |
44 |
CHAPTER 5 |
|
MICROSOFT POCKET OUTLOOK ............................................................................................... |
45 |
Calendar: Scheduling Appointments and Meetings................................................................... |
46 |
Creating an Appointment ..................................................................................................... |
47 |
Using the Calendar Summary Screen................................................................................... |
47 |
Contacts: Tracking Friends and Colleagues .............................................................................. |
47 |
Creating a Contact ............................................................................................................... |
48 |
Using the Contacts Summary Screen................................................................................... |
48 |
Tasks: Keeping a To Do List ..................................................................................................... |
49 |
Creating a Task.................................................................................................................... |
49 |
Using the Tasks Summary Screen........................................................................................ |
49 |
Notes: Capturing Thoughts and Ideas....................................................................................... |
50 |
Creating a Note.................................................................................................................... |
50 |
Messaging: Sending and Receiving Messages......................................................................... |
50 |
About Accounts.................................................................................................................... |
50 |
Reading E-mail Messages.................................................................................................... |
51 |
Composing and Sending an E-mail ................................................................................. |
51-52 |
Reading Text Messages (Select Models Only)....................................................................... |
52 |
Composing and Sending a Text Message (Select Models Only) ............................................ |
52 |
CHAPTER 6 |
|
MORE PROGRAMS ................................................................................................................... |
53 |
ActiveSync............................................................................................................................... |
54 |
Synchronizing Data.............................................................................................................. |
54 |
NAUTIZ X7 Manual
5

NAUTIZ X7 Manual - Content |
|
Content |
|
Synchronizing Directly with Exchange Server....................................................................... |
55 |
Office Mobile ........................................................................................................................... |
56 |
Creating a Document/Workbook/Note .................................................................................. |
56 |
Opening a Document/Workbook/Note/Presentation .............................................................. |
57 |
Internet Explorer ...................................................................................................................... |
57 |
Windows Live and Messenger ................................................................................................. |
58 |
Setting up Windows Live...................................................................................................... |
58 |
Signing in to Messenger ...................................................................................................... |
58 |
Windows Media ....................................................................................................................... |
59 |
Pictures & Videos..................................................................................................................... |
60 |
Viewing Pictures and Videos ................................................................................................ |
60 |
Camera.................................................................................................................................... |
60 |
Taking Pictures ............................................................................................................... |
60-61 |
Recording Video Clips .......................................................................................................... |
62 |
Internet Sharing (Select Models Only) ...................................................................................... |
63 |
Remote Desktop Mobile........................................................................................................... |
63 |
Other Programs ....................................................................................................................... |
64 |
E-Compass .......................................................................................................................... |
64 |
TacLink ........................................................................................................................... |
65-66 |
CHAPTER 7 |
|
GETTING CONNECTED.............................................................................................................. |
67 |
Types of Connections............................................................................................................... |
68 |
Using Cellular Connection (Select Models Only) ....................................................................... |
68 |
Setting up a Cellular (GPRS) Connection............................................................................... |
68 |
Setting up a Dial-up Connection .......................................................................................... |
69 |
Using Wireless Network ........................................................................................................... |
69 |
Switching On or Off the Wi-Fi Radio ..................................................................................... |
69 |
Connecting to a Wireless Network........................................................................................ |
70 |
Using the Bluetooth Function ................................................................................................... |
71 |
Switching On or Off the Bluetooth Radio .............................................................................. |
71 |
Sending Files via the Bluetooth Function.............................................................................. |
72 |
Creating a Bluetooth Partnership.......................................................................................... |
72 |
CHAPTER 8 |
|
TROUBLESHOOTING AND MAINTENANCE ................................................................................. |
73 |
Resetting Your Device .............................................................................................................. |
74 |
Restoring Factory Default State ............................................................................................... |
74 |
Troubleshooting ....................................................................................................................... |
75 |
Caring for Your Device ............................................................................................................. |
76 |
CHAPTER 9 |
|
REGULATORY INFORMATION .................................................................................................... |
77 |
Regulations Statements........................................................................................................... |
78 |
European Notice .................................................................................................................. |
78 |
FCC Caution.................................................................................................................... |
79-81 |
Safety Precautions................................................................................................................... |
82 |
About Charging .................................................................................................................... |
82 |
About the Charger................................................................................................................ |
82 |
About the Battery................................................................................................................. |
82 |
About the Radio Frequency Exposure ................................................................................... |
82 |
6

NAUTIZ X7 Manual
Chapter 1
Getting Started
This chapter introduces you to the external components of your device and guides
you through the process of setting up your device for use.
7

NAUTIZ X7 Manual - Chapter 1
Identifying Hardware Components
Front Components
1 2 3
4
5
|
|
|
|
|
6 |
|
|
|
|
|
|
7 |
|
|
|
|
|
|
||
|
|
|
|
|
|
|
|
|
|
8 |
|
||
Ref |
|
Component |
|
Description |
||
1 |
|
Mobile Phone |
|
Flashes in blue to indicate that the phone function is switched on (select models only). |
||
|
|
|||||
|
Indicator |
|
||||
|
|
|
|
|
||
|
|
|
|
|
|
|
|
|
|
|
Flashes in blue to indicate that the Bluetooth radio is on. |
||
|
|
RF (Radio |
|
Flashes in amber to indicate that the Wi-Fi (wireless network) radio is on. |
||
2 |
|
Frequency) |
|
Flashes in purple to indicate that the GPS receiver is on. |
||
|
|
Indicator |
|
If more than one module is switched on, the indicator changes color in a cyclic way. |
||
|
|
|
|
|||
|
|
|
|
|
|
|
|
|
Charge/ |
|
Glows in amber to indicate that battery charging is in progress. |
||
3 |
|
|
Glows in green to indicate that the battery is fully charged. |
|||
|
Notification |
|
||||
|
|
|
|
|||
|
|
Indicator |
|
Glows in red to indicate that the battery power is critically low (less than 10%). |
||
|
|
|
|
Flashes in red to inform you of scheduled appointments, alarms and reminders. |
||
|
|
|
|
|
|
|
8

NAUTIZ X7 Manual - Chapter 1
Identifying Hardware Components
Front Components
Ref Component Description
4 |
Earpiece |
Serves as the phone earpiece during a call (select models only). |
|
|
|
||
|
|
|
|
5 |
Touch Screen |
Displays the output of your device and responds to your tapping. |
|
|
|
|
|
6 |
Keypad |
Includes keys for numbers and specific functions. It lights up when a key is pressed. (See the |
|
next section for details.) |
|||
|
|
||
|
|
|
|
7 |
Power Button |
Turns on or off your device. |
|
|
|
|
|
8 |
Microphone |
Records voices. |
|
Serves as the mouthpiece during a call (select models only). |
|||
|
|
||
|
|
|
9
NAUTIZ X7 Manual - Chapter 1
Identifying Hardware Components
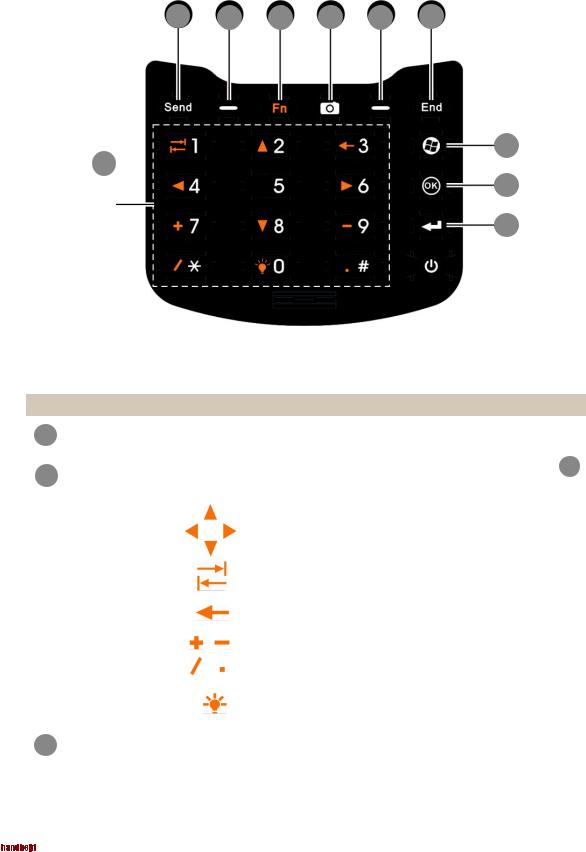
Keypad
2 |
3 |
4 |
5 |
3 |
6 |
1
7
8
9
Ref |
Component |
Description |
1 |
Numeric Keys |
Enter numbers (majorly for models with the phone function). |
|
|
|
2 |
Alternative |
Provide functions as indicated by the orange icons when Fn lock is on. (See also item 4 |
Function Keys |
later in this table.) |
|
|
|
|
|
|
Moves up, down, left and right within the screen or menu. |
|
|
|
|
|
Goes to the next input field. |
|
|
|
|
|
Backspaces over one character when in a text input field. |
|
|
|
|
|
Enters the symbols when in an input field. |
|
|
|
|
|
Increases the brightness level of the screen. It cycles to the lowest level |
|
|
after reaching the highest level. |
|
|
|
3 |
Send Key |
Dials or answers a call (select models only). |
|
|
|
10
NAUTIZ X7 Manual - Chapter 1
Identifying Hardware Components
Keypad
Ref Component Description
3 |
Left/Right Soft |
Performs the command shown on the bottom left or right corner of the screen. |
||
Key |
||||
|
|
|
||
|
|
|
||
4 |
Function Key |
Switches on or off the “alternative functions” of the numeric keys. Fn lock is off by default. |
||
When it is switched on, the icon |
shows in the navigation bar. |
|||
|
|
|
|
|
5 |
Camera Key |
Starts the Camera program. |
|
|
Serves as the shutter release button if the Camera program is currently in use. |
||||
|
|
|||
|
|
|
||
6 |
End Key |
Ends or rejects a call (select models only). |
||
Returns to the Today screen from another program. |
||||
|
|
|||
|
|
|
|
|
7 |
Start Key |
Opens the Start menu. |
|
|
|
|
|
||
|
|
|
|
|
8 |
OK Key |
Closes the current displayed menu or program. |
||
|
|
|||
|
|
|
|
|
9 |
Action Key |
Confirms your selection by pressing, similar to the Enter key on a keyboard. |
||
|
|
|||
|
|
|
|
|
11

NAUTIZ X7 Manual - Chapter 1
Identifying Hardware Components
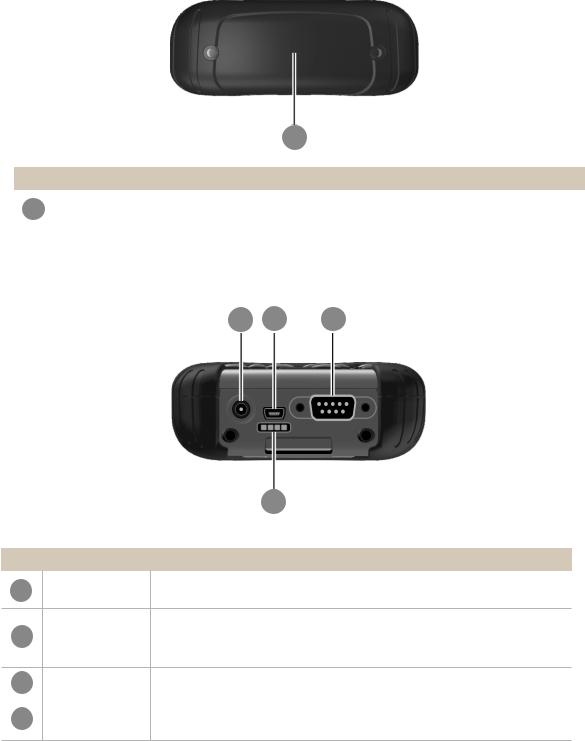
Back Components
2 3
4
5
1
6
4
Ref |
Component |
Description |
|
1 |
Stylus |
Serves as the input device by tapping on the touch screen to make selections and enter |
|
information. |
|||
|
|
|
|
2 |
Camera Lens |
Takes still pictures or records video clips. |
|
|
|
|
|
3 |
Flash |
Provides extra light when taking pictures. |
|
|
|
|
|
4 |
Hand Strap |
The hand strap attaches here. |
|
Holders |
|||
|
|
||
5 |
Speaker |
Plays music, sounds and voices. |
|
|
|
|
|
6 |
Battery Cover |
Inside is the battery. |
|
|
|
|
12
NAUTIZ X7 Manual - Chapter 1
Identifying Hardware Components
Top Components
1
Ref Component Description
1 |
SD Card Slot |
Inside is the SD card slot. |
|
Cover |
|||
|
|
||
|
|
|
Bottom Components
1 2 3
4
Ref |
Component |
Description |
1 |
Power Connector |
Connects to the AC adapter. |
USB OTG
2 (Host & Client) Connects to the USB cable.
Connector
3 |
Serial Connector Provides D-sub 9 pins RS232 function. |
||
|
|
|
|
4 |
Docking |
Connects to the office dock (an option). |
|
Connector |
|||
|
|
||


 13
13

NAUTIZ X7 Manual - Chapter 1
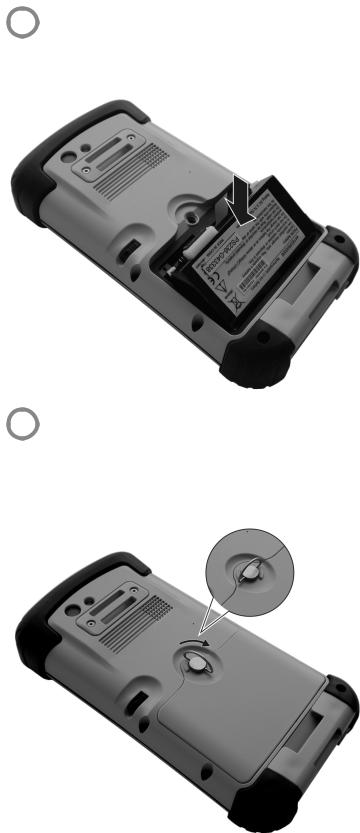
Getting Your Device Ready for Use
Installing the SIM Card and Battery
1
Lift the latch handle of the battery cover and turn it counterclockwise to the unlock (vertical) position. Then, detach the cover from the device.
Unlock position
2
If you model has the phone function, you need to install the SIM card provided by your mobile operator. With the SIM card’s chip side facing up and the beveled corner pointing to the slot, insert the card all the way into the slot.
NOTE: To remove the SIM card, slightly push in the card to release it and then pull the card out of the slot.
14
NAUTIZ X7 Manual - Chapter 1
Getting Your Device Ready for Use
Installing the SIM Card and Battery
3
To install the battery, attach the bottom side of the battery to the compartment at an angle and then lower the upper side to engage the connector.
4
Attach the bottom side of the battery cover to the device at an angle and then, with the handle still in the unlock (vertical) position, fit the latch handle into place. Secure the latch by turning it clockwise to the lock (horizontal) position.
Lock position


 15
15

NAUTIZ X7 Manual - Chapter 1
Getting Your Device Ready for Use
Connecting to AC Power and Charging the Battery
Be sure to fully charge the battery before using your device for the first time.
1.Plug the DC cord of the AC adapter into the power connector of the device ( 1 ).
2.Plug the female end of the AC power cord into the AC adapter and the male end into an electrical outlet ( 2 ).
2
1
3. The charge indicator glows in amber when charging is in progress. Do not disconnect your device from AC power until the battery is fully charged, as indicated by the amber indicator turning into green. This will take a couple of hours.
CAUTION: For optimal performance of the lithium battery, take note of the following:
• Use the included AC adapter only.
•There is no need to fully discharge the battery before charging. You can charge the battery before it is discharged.
•Do not charge the battery where the temperature is high (e.g. in direct sunlight).
•As a protection against damage, your device stops charging when the battery’s temperature is extremely high or low. In high temperature conditions, the charging stops when the battery’s temperature gets above 70 °C (158 °F) and continues when the temperature lowers to 60 °C (140 F). In low temperature conditions, the charging stops when the temperature gets below -5 °C (23 °F) and continues when the temperature rises to 0 °C (32 °F).
•If you will not use the product for a long period of time, be sure to fully charge the battery at least once every two weeks. Over discharge of the battery can affect the charging performance.
16

NAUTIZ X7 Manual - Chapter 1
Getting Your Device Ready for Use
Performing the Initial Startup
When turning on your device for the very first time, you will be guided through a setup process.
1.Make sure that your device is either connected to AC power or the battery has power.
2.Press the power button to turn on your device.
The backlight of the keypad will light up and, after a few seconds, the setup screen appears.
3.Follow the on-screen instructions to complete the setup wizard.
4.For models with the phone function only:
If a SIM card has been inserted and the mobile phone network operator (or you) has set the PIN, you will be prompted to enter the PIN. Enter the PIN and tap Enter.
If a SIM card has not been inserted yet, a message of an invalid or missing SIM card will appear on the screen. You can tap Cancel to continue the startup procedure.
5.After the setup is completed, the Today screen appears. You can now use your device.
Synchronizing with Your Computer
ActiveSync and Windows Mobile Device Center (WMDC) provide an easy way to synchronize data on a Windowsbased computer with your device. ActiveSync works on computers that have the Windows XP operating systems. WMDC works only on computers that have Windows Vista.
ActiveSync and WMDC act as gateways between your device and your computer for transferring Outlook e-mail, appointments, contacts, and tasks, and media such as pictures, music, and videos. You can also use the Explore feature in either program to move files or programs from your computer to your device.
Installing ActiveSync or WMDC
If you’re using Windows XP or earlier versions of Windows, install ActiveSync with the supplied Getting Started Disc. If you’re using Windows Vista, download and install Windows Mobile Device Center 6.1. (Visit the Microsoft website to download the program and to obtain operating instructions.)
NOTE:
•Before installation, make sure that you have Microsoft Outlook installed on your computer.
•Connect your device to the computer AFTER Windows Mobile Device Center or ActiveSync is installed.
•ActiveSync connection problems may occur in some specific cases. They are likely caused by interoperability with desktop firewall applications or applications that manage network traffic. For troubleshooting information, visit the Microsoft web site.
After the software installation, connect your device to your computer with
the USB cable and you are ready to synchronize.
17
NAUTIZ X7 Manual - Chapter 1
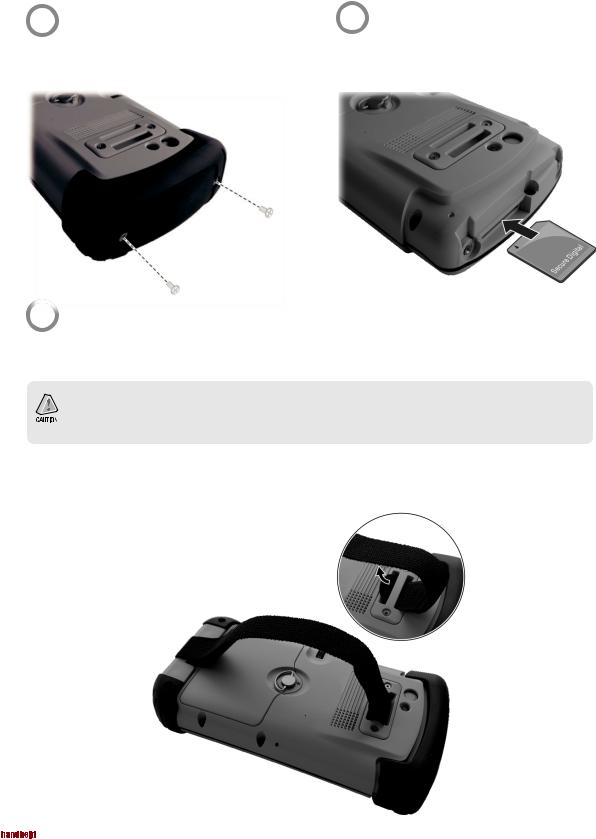
Using Options
Using an SD Card
Your device has a SD (Secure Digital) card slot where you can insert an SD/SDHC memory card or SDIO card. To insert an SD card:
1
Remove the rubber protection cap by unfastening two screws.
2
Insert the card into the slot, with the connector pointing to the slot and its label facing the back of the device.
Replace the cap and secure with the two screws. The cap is required for the waterproof capability of your device.
NOTE: A taller cap is available as an option for protecting an SDIO card which is larger.
Using the Hand Strap
You can attach the hand strap to your device.
18
NAUTIZ X7 Manual
Chapter 2
Basic Skills
This chapter familiarizes you with the basic operations of your device.


 19
19

NAUTIZ X7 Manual - Chapter 2
Power Saving and Turning Off
Backlight Off
The backlight of the screen dims out after a period of inactivity (default 30 seconds while on battery power and 1 minute while on external power).
To restore the backlight, tap the screen or press a button.
Entering the Suspend Mode
Your device automatically suspends after a period of inactivity (default 3 minutes while on battery power and 5 minutes while on external power).
To manually suspend the device, briefly press the power button.
NOTE: (For models with the phone function only) The Mobile Phone Indicator keeps on flashing when your device is suspended. Any incoming call will resume your device.
To resume operation, press the power button. You will be back to where you left off.
Turning Off
If you are not using your device, press and hold the power button for at least 3 seconds until the device plays a notification sound and turns off.
Navigating on the Screen
Using the Stylus
Use the stylus to navigate and select objects on the screen.
Pull the stylus out of the slot and extend it for ease of use. Store it in the slot when not in use.
Tap
Touch the screen once with the stylus to open items and select options.
Drag
Hold the stylus on the screen and drag across the screen to select text and images. Drag in a list to select multiple items.
Tap and hold
Tap and hold the stylus on an item to see a list of actions available for that item.
On the shortcut menu that appears, tap the action you want to perform.
Using the Keypad
You can also use the keypad to navigate on the screen. (See “Keypad” in Chapter 1 for information.)
20 


Today Screen
When you switch on your device for the first time each day, you will see the Today screen. The Today screen can be easily accessed from any screen by tapping  and then Today.
The Today screen shows your upcoming appointments, active tasks, information about e-mail messages, and more. You can tap a section on the Today screen to open the program that is associated with that section.
Landscape View
You can use your device in a landscape manner. To change the screen view, tap  Settings System Screen General Landscape or
Portrait.
Navigation Bar and Toolbar
The navigation bar is located at the top of the screen. It displays the active programs and allows you to switch programs and close screens.
The navigation bar and Start menu:
The navigation bar also contains the volume indicator, battery indicator, and connectivity indicators. You can tap an indicator for related controls.
Use the toolbar at the bottom of the screen to perform tasks in programs. The toolbar includes a left soft key, a right soft key, and the Input panel button in between. The right soft key is usually Menu while the left soft key varies with programs.
An example of the toolbar:
|
|
|
|
Left Soft Key |
Right Soft Key |
||
|
|
|
|
Input panel button
NAUTIZ X7 Manual - Chapter 2
 Tap to select a program.
 Tap to quickly select a program you have recently used.
Tap to see additional programs.
Tap to customize your device.


 21
21

NAUTIZ X7 Manual - Chapter 2
Running Programs
You can switch from one program to another without closing any program.
•To run a program, tap  on the left-top corner of the screen and select from the Start menu.
• |
To access additional programs, tap |
Programs and tap the program icon. |
Shortcut Menus
With shortcut menus, you can quickly choose an action for an item. The actions in the shortcut menus vary from program to program. To access a shortcut menu, tap and hold the stylus on the name of the item that you want to perform the action on. When the menu appears, lift the stylus and tap the action you want to perform. Or tap anywhere outside the menu to close the menu without performing an action.
Notifications
Your device reminds you in a variety of ways when you have something to do. For example, if you have set up an appointment in Calendar, a task with a due date in Tasks or an alarm in Clock, you will be notified in any of the following ways:
•A message appears on the screen.
•A sound, which you can specify, is played.
•The notification indicator flashes in red.
To choose reminder types and sounds for your device, tap  Settings Personal Sounds & Notifications.
Entering Information
You have several options for entering new information:
•Use the Input panel to enter typed text, either by using the on-screen keyboard or other input methods.
•Write directly on the screen.
•Draw pictures on the screen.
•Speak into the microphone to record a message.
22 


NAUTIZ X7 Manual - Chapter 2
Entering Text Using the Input Panel
Use the Input panel to enter information in any program on your device. You can either type using the on-screen keyboard or write using a recognizer. In any case, the characters appear as typed text on the screen.
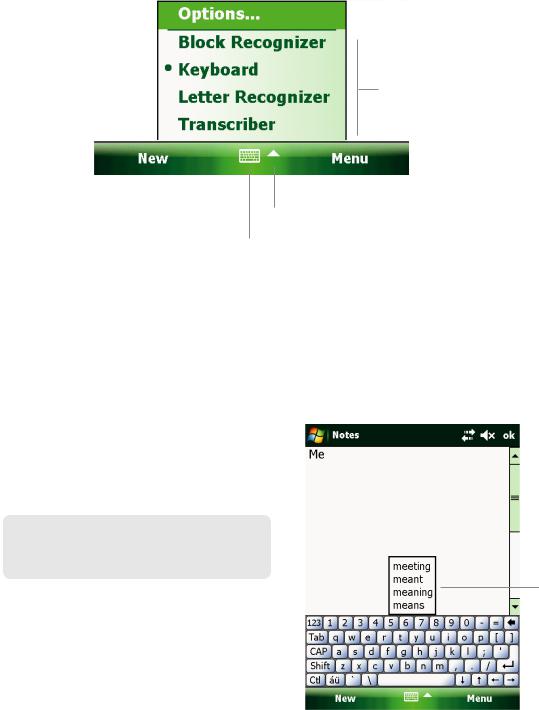
To show or hide the Input panel, tap the Input panel button. Tap the arrow next to the Input panel button to see your choices.
Select an input method.
Tap to see your choices.
Input panel button.
When you use the Input panel, your device anticipates the word you are typing or writing and displays it above the Input panel. When you tap the displayed word, it is inserted into your text at the insertion point. The more you use your device, the more words it learns to anticipate.
Recognizer
NOTE: The availability of recognizers depends on the region and the language version you purchased.
With a recognizer, you can write letters using the stylus just as you would use a pen on paper. When you write a letter, it is
converted to typed text that appears on the screen. For specific instructions on using a recognizer, open a recognizer and then tap the question mark next to the writing area.
Tap here if this is the right word.


 23
23

NAUTIZ X7 Manual - Chapter 2
Writing on the Screen
In any program that accepts writing, such as the Notes program, you can use your stylus to write directly on the screen. Write the way you do on paper. You can edit and format what you have written and convert the information to text later.
To write on the screen, tap Menu Draw to switch to drawing mode. A check ( ) appears before the command.
NOTE: Not all programs support the drawing mode.
Drawing on the Screen
You can draw on the screen in the same way that you write on the screen.
1. Tap Menu Draw to enable drawing mode. A check ( ) appears before the command.
2.To create a drawing, cross three ruled lines on your first stroke. A drawing box appears.
3.Subsequent strokes in or touching the drawing box become part of the drawing. Drawings that do not cross three ruled lines will be treated as writing.
The drawing box indicates the
boundaries of the drawing.
24 


NAUTIZ X7 Manual - Chapter 2
Recording a Message
You can quickly capture thoughts, reminders and phone numbers by recording a message. In the Notes program, you can either create a stand-alone recording or include a recording in a written note. If you want to include the recording in a note, open the note first. In the Messaging program, you can add a recording to an email message.
To create a recording:
1. Tap  Programs Notes to switch to the program.
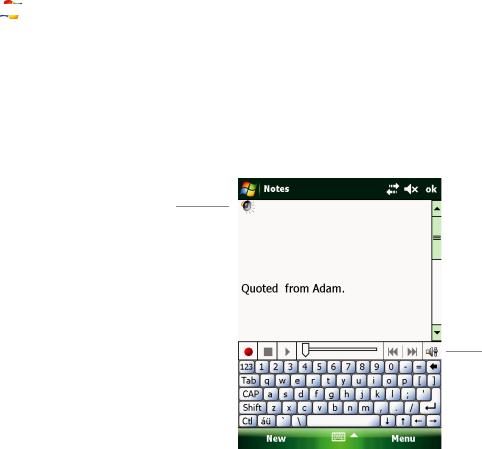
1.Tap Menu View Recording Toolbar to show the Recording toolbar.
2.Hold the device’s microphone near your mouth or other source of sound.
3.Tap the  Record button on the Recording toolbar to start recording.
4.To stop recording, tap the  Stop button on the Recording toolbar. The new recording appears in the note list or as an embedded icon.
To play a recording, tap it in the list or tap its icon in the note.
Indicates an embedded recording.
Recording toolbar
Recording Formats
Your device supports several formats for voice notes. The formats vary in both the quality of the recording and the size of the sound file. When selecting a recording format, you should consider the quality you need as well as how much storage memory the recording will use on your device.
Not all recording formats are compatible with other software or computers. If you will share your recordings with others or transfer a recording to your desktop computer, be sure to choose a recording format that is supported by the software used to play recordings on the other computer.
To select a recording format:
1.Tap  Settings Personal Input.
2.On the Options tab in the Input control panel, select a voice recording format from the drop-down list.


 25
25
 Loading...