


M3 Mobile
Manual

M3 Mobile Manual - Content |
|
Content |
|
CHAPTER 1 |
|
M3 Introduction...................................................................................................................... |
4 |
Product Composition ............................................................................................................. |
5 |
Name and function of each part ............................................................................................ |
6 |
Input Buttons.......................................................................................................................... |
7 |
Soft/Hard Reset ..................................................................................................................... |
8 |
How to use stylus pen ............................................................................................................ |
9 |
LED/Battery attaching/detaching .......................................................................................... |
10 |
Charging .............................................................................................................................. |
11 |
How to connect to PC........................................................................................................... |
12 |
CHAPTER 2 |
|
BASIC USAGE .......................................................................................................................... |
14 |
Calibration....................................................................................................................... |
15-17 |
Main Screen ........................................................................................................................ |
18 |
Input Sreen ..................................................................................................................... |
19-23 |
CHAPTER 3 |
|
ACTIVE SYNC INTRODUCTION .......................................................................................... |
25-26 |
Installing ActiveSync ............................................................................................................ |
27 |
Top Side connectors ............................................................................................................ |
28 |
CHAPTER 4 |
|
HOW TO USE INTERNET .......................................................................................................... |
30 |
Via GPRS/EDGE .............................................................................................................. |
31-32 |
Via Wireless LAN ........................................................................................................... |
33-35 |
Browsing the Web Site .................................................................................................. |
36-40 |
CHAPTER 5 |
|
HOW TO USE THE PHONE ....................................................................................................... |
42 |
Init Screen ........................................................................................................................... |
43 |
Phone Control ...................................................................................................................... |
44 |
Phone call and receive ........................................................................................................ |
45 |
Phonebook ........................................................................................................................... |
46 |
SMS send and receivee .................................................................................................. |
47-48 |
Phone functions .................................................................................................................. |
49 |
Phone setting ...................................................................................................................... |
50 |
CHAPTER 6 |
|
USAGE OF DEVICE .................................................................................................................. |
52 |
To use the Camera ......................................................................................................... |
53-56 |
Bluetooth Communication ............................................................................................... |
57-61 |
IrDA Communication ........................................................................................................... |
62 |
To use the GPS ............................................................................................................... |
63-64 |
To use the Scanner .............................................................................................................. |
65 |
2

Chapter 1
Introducing the M3 Mobile
3

M3 Mobile Manual - Chapter 1
1.Introduction
•Product Composition
•Name and function of each part
•Input buttons
•Soft/Hard Reset
•How to use Stylus pen
•LED Battery Attaching/Detaching
•Charging
•How to connect to PC
4

M3 Mobile Manual - Chapter 1
Product Composition
At the first time of opening the product box, please check if itcontains all the basic components, listed as following.
M3 Mobile main terminal |
Cradle + USB cable |
|
+ 2 units of standard battery |
||
|
CD + ActiveSync 4.x
Ear Mic Phone |
Portable Adapter |
+ 2 units of Stylus pen |
|
Attention:
The product components may differ depending on the supplied products.
How to use the manual
•This manual provides detailed information to make using the device easier and faster.
•The content related to phone or communication in this manual is only applicable when the device is equipped with GSM/GPRS/EDGE module for Voice and Data communication.
•The features described in this manual can not be used when it is not equipped in the device (e.g. GSM, WLAN, Bluetooth, IrDA, Scanner, Camera, GPS).
•The content of this manual is subject to change without prior notice due to product improvement or modification of its functions, etc..
5

M3 Mobile Manual - Chapter 1
Name and function of each part
Charge Ramp (Left) |
Camera button |
|
GSM/GPRS/EDGE |
||
StatusRamp (Center) |
Pistol Grip Connector |
|
Scanner Ramp (Right) |
||
Scanner button |
||
|
Stylus Pen |
|
|
Antenna |
Volume button
Key Pad |
Infrared Communication- |
Reset Switch |
Charge & USB/serial |
Port (IrDA) |
|
|
|
|
portUpper (portable) |
LCD Touch Screen |
|
Lower (Cradle) use |
|
|
Barcode Scanner
Window
Mini SD Extrension Slot
Ear Mic Plug
Flash |
|
Camera |
SIM Card Slot |
Battery Lock
Battery
6

M3 Mobile Manual - Chapter 1
Input button
Start button |
Phone/Call button |
End button |
Alphanumeric
Left, right function button Power button
button
Input button
Function button |
Return button |
Direction button |
Backspace button |
|
Volume button |
Camera button |
|
Scanner button |
Component |
Description |
|
|
Power Button |
Press to toggle the device on/off |
|
|
|
Long press to menu (Backlight, Display, etc) Function |
|
|
Phone/Call function |
Press to accept the call or to execute the phone |
|
|
End function |
Press to hang-up/reject call. |
|
|
Input keys |
Press to input alphabet characters or numbers |
|
|
Left, right function button |
Press to lunch an assigned application or function |
|
|
Alphanumeric |
Press to switch between alphabet and number input |
|
|
Backspace button |
Press to move back |
|
|
Function button |
Press to Function Key with (*,0, #) |
|
|
Directionbutton |
Press to move left, right and up, down |
|
|
Return button |
Press to confirm the action |
|
|
Scanner button |
Press to launch the barcode data scan application |
|
|
Camera button |
Press the top key to increase volume, press the bottom key |
|
to decrease volume |
|
|
VideosVolume |
Press the top key to increase volume, press the bottom key |
|
to decrease volume. |
|
|
Attention:
Some key functions might not be supported, depending on the option.
7
M3 Mobile Manual - Chapter 1
Soft/Hard Reset
Soft Reset
-A soft reset allows your device to get a fresh start, similar to rebooting a computer.
-This restarts your device and adjusts memory allocation.
-All records and entries are retained after a soft reset.
-Unsaved data in open programs may in some cases be lost.
Hard Reset
-A hard reset removes power to your device.
-This erases all records and entries, deletes all additional programs you have installed, and restores the device’s default factory settings.
-Never perform a hard reset unless a soft reset does not correct your problem.
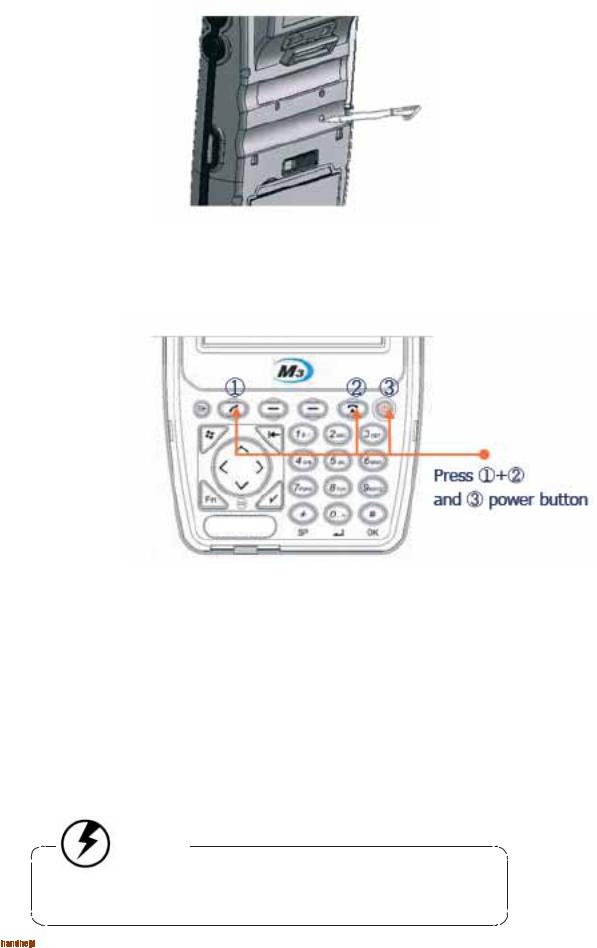
To perform a hard reset
*Press the power button for more than 12 seconds to turn off the power (can be confirmed by LCD off)
*While pressing call and end button, please press the power button shortly.
*When the [CLEAN BOOT WARNING] window will pop up with message
“All data will be lost! Do you want to continue?”
1. YES 0. NO, please press 1 to perform the Hard Reset.
Attention:
Please mind that you need to set up the standard timezonedate, and time. After power off.
8
M3 Mobile Manual - Chapter 1
How to use Stylus Pen
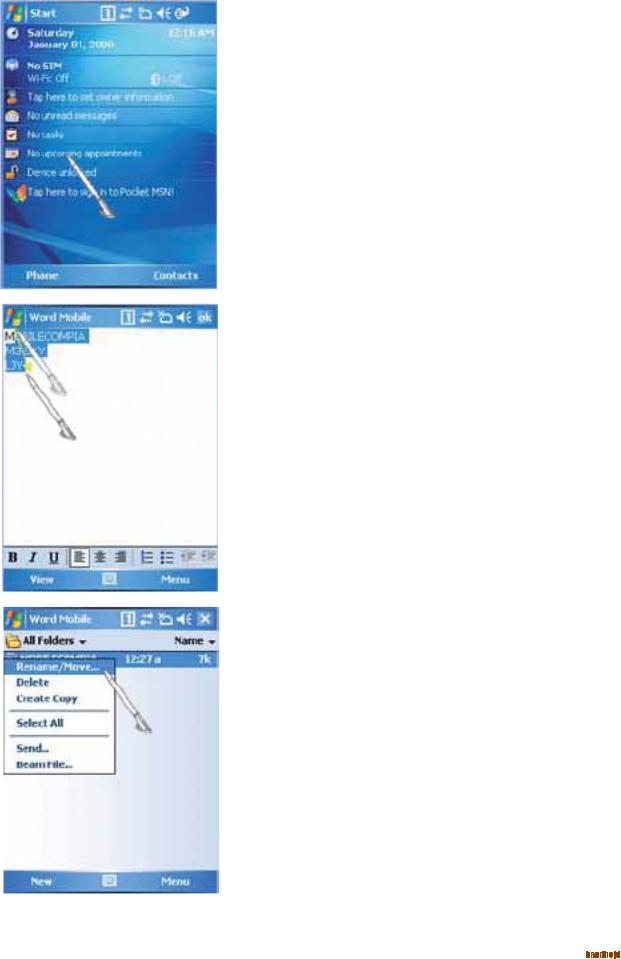
Tap
•Tap the touch screen one time using a Stylus pen to select and execute items and files.
Drag
•It is used when you select the text. Please drag the desired part with stylus pen attached on the screen.
Long Press
•Leave Stylus pen touching the screen for long and you can select the menu on the pop-up screen. You can also select functions available in the designated item using the pop-up menu.The function of the pop-up menu canbe different according to the program.
9
M3 Mobile Manual - Chapter 1
LED / Battery attaching/detaching
LED Alarm
– Informs Charging, Scanner Status.
Type |
LED Status |
Details |
|
|
|
LED for charging |
Red |
Charging |
|
Green |
Charging complete |
|
|
|
GSM |
Blue Blinking |
GSM/GPRS Standby |
/GRPS |
|
(within range of phone/internet) |
Status LED |
|
GSM/GPRS in use |
|
Blue On |
(phone/SMS/internet in use) |
|
|
GSM/GPRS is off or out of range |
|
Blue OFF |
|
|
|
|
Scanner LED |
Green |
When the barcode data is successfully read |
|
|
|
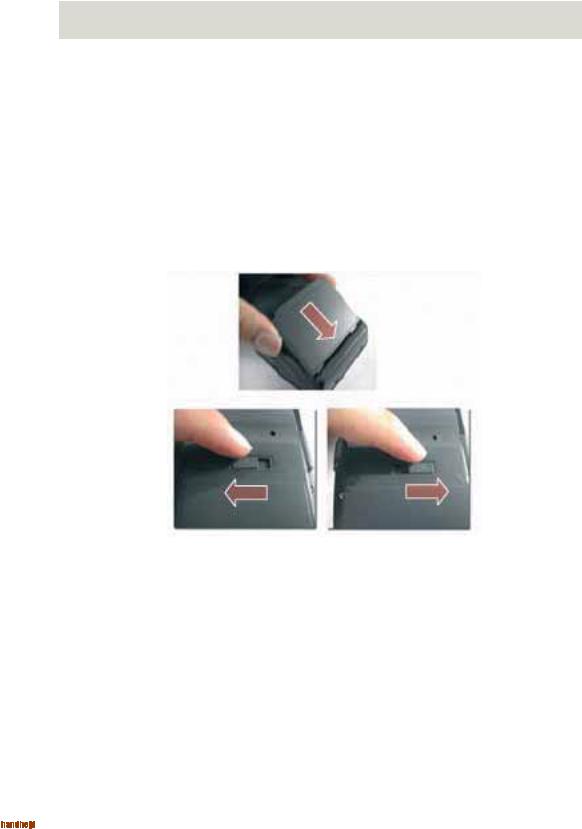
Battery attaching/detaching
–Attaching Battery
As picture shown, put the battery pack to back of PDA, and lock the battery pack with locking device.
–Detaching Battery
Press locking device to the right, then using upper notch, detach the battery from main body.
10
M3 Mobile Manual - Chapter 1
Charging
*Connect plug-in from charger to charge jack of main body, or charge jack of cradle, and then place main body onto cradle.
*Charging LED
Type |
LED Status |
Details |
|
|
|
ChargingDirect charg- |
Red |
Charging |
ing to main body |
Green |
Charging complete |
|
|
|
Cradle Charging |
Red |
Charging |
(Extra battery charging) |
Green |
Charging complete |
|
|
|
*When charging, the status of the battery attached to main body can be confirmed by the LED left of upper corner of main body. Also the status of Sub-battery can be confirmed by the LED right of low corner of Cradle.
Seperate Battery
* Charging in cradle. Main Body Charging LED
Seperate Battery
Charging LED
* Charging using portable adapter.
Attention:
*Do not use any other charger except one (5.2 V / 3A) provided.
*Make sure to handle it gentle; damage with excessive force may cause no warranty.
*Incongruent change of battery can cause the explosion.
*When attached battery is completely discharged, plug charger to main body, then reset the device to check if screen is back on. To use, do at least
10 minute charging.


 11
11
M3 Mobile Manual - Chapter 1
How to connect to PC
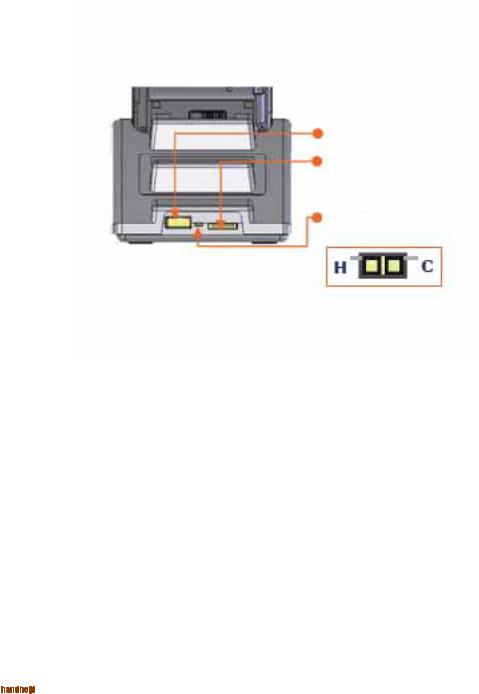
•A cradle of the M3 Mobile supports charging and USB connection.
•Connecting step of cradle of the M3 Mobile is as following. –Connect charger to USB cradle. (24pin connector) –Connect charger to power source. (to wall)
–Connect USB cable of USB cradle to USB port of desktop PC.
–Place the M3 Mobile onto docking cradle then execute Synchronization with –Desktop PC.
•The location of USB port can be at the back, front or side of PC and the shape of USB port is identical on Desktop PC and Notebook.
•USB host function is available by putting USB cable into USB port of Cradle.
USB Host/Client
AC Power
USB Host/Client changeover switch
Connecting to Cradle
12
Chapter 2
Basic Usage


 13
13

M3 Mobile Manual - Chapter 2 - Basic Usage
2.Basic Usage
•Calibration
•Main screen
•Input screen
14

M3 Mobile Manual - Chapter 2 - Basic Usage
Calibration
Calibrate the touch screens shown below, at first time use or when cold (hard) booted.
Tap the screen one time with a Stylus pen
Tap the (+) mark with the Stylus pen as it moves around.
You can see the screen how to use the Stylus. If you don’t need it, click the Skip.
1.Press and hold the Stylus pen on the screen then select the Cut on the pop-up menu.
2.Press and hold the Stylus pen like the arrow on screen, Tap the Paste on the pop-upmenu.
3.When all processes are complete, click the Next.


 15
15

M3 Mobile Manual - Chapter 2 - Basic Usage
Calibration
Calibration continue...
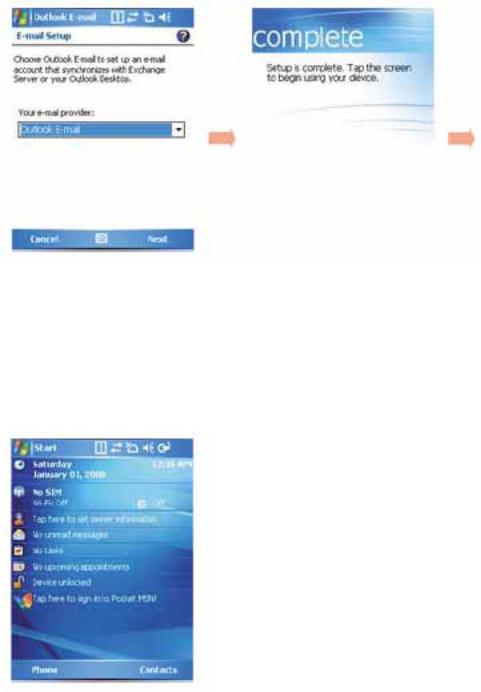
Set up the standard time zone date, and time.
To set up a password, tap ‘Next’ otherwise tap ’Skip’..
To set up a password set up a password type and password.
To set up an e-mail account, tap ’Next’ otherwise tap ‘Skip’.
16
M3 Mobile Manual - Chapter 2 - Basic Usage
Calibration
Calibration continue...
Choose outlook e-mail to set up an e-mail account and then tap the ‘Next’. (POP3/IMAP/Outlook /E-mail).
If you choose outlook E-mail or POP3/ IMAP and then tap the ‘Next’, you should set up it step by step.
You can see the screen above after the Calibration.
When all processes are complete, tap the screen to start system.


 17
17

M3 Mobile Manual - Chapter 2 - Basic Usage
Main Screen
Start menu
Info bar
Day/Time info
Wireless info
User info
Messages info
Task info
Today info
Lock info
Pocket MSN info
Left / Right function info
Button |
Function |
|
|
Start menu |
Select the program you want to use. |
|
|
Info bar |
View the power, modem, sound, input |
|
mode and connecting view. |
|
|
Day/Time info |
View the current date and time. |
|
|
Wireless info |
View the Wireless power and state. |
|
|
User info |
View the personal information. |
Messages info |
View the Messages received. |
|
|
Task info |
View the task information. |
|
|
Today info |
View the Today’s information. |
|
|
Lock info |
View the screen / Lock information. |
|
|
Pocket MSN info |
View the Pocket MSN information. |
|
|
Left/Right Function info |
View the Left / Right information. |
18
M3 Mobile Manual - Chapter 2 - Basic Usage
Input screen
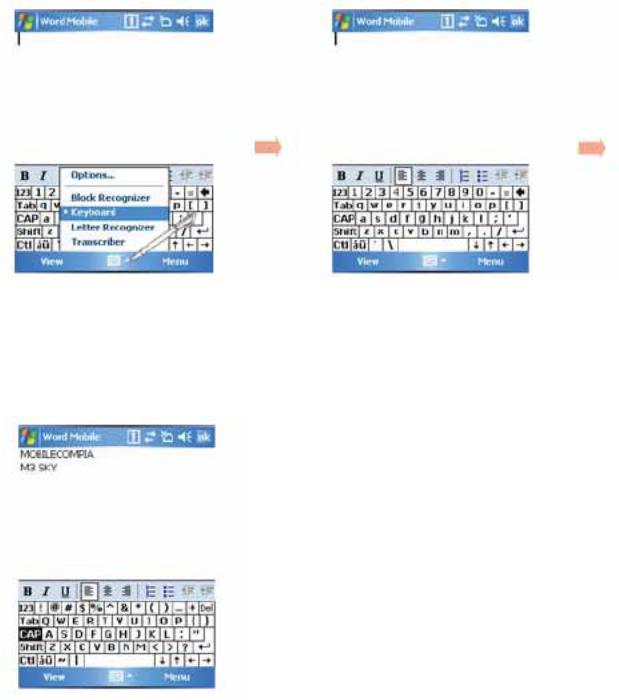
To use input
-Process this program “ Start > Programs > Word Mobile”.
To use the Keyboard Input
Tap the arrow next to the keyboard icon and then select the keyboard on the menu screen as a picture above.
This is the Keyboard Input Screen.
You can input the letter, number and characters when you click the each icon on the keyboard Input screen.


 19
19
M3 Mobile Manual - Chapter 2 - Basic Usage
Input screen
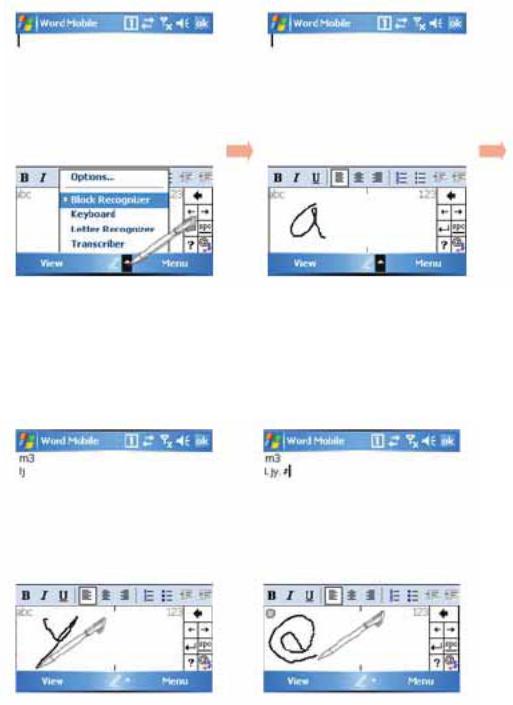
Usage of Block Recognizer input.
Tap the arrow next to the keyboard icon |
It is the screen of block |
and then select the Block Recognizer on |
|
the menu screen as a picture above. |
|
In this input screen you can input letters in ‘abc’ and numbers in ‘123 ‘ each
in the input box seen on the screen.
In the input screen of block recognizer you can input special letters and characters by tapping the input box once.
20 


 Loading...