

Page 1

User‟s Manual
Nautiz X3
Page 2

NAUTIZ X3
User Manual
Product Notices
©2010 by Handheld Group AB. All rights reserved.
No part of this manual can be reproduced or transmitted in any form or by any means,
electronic, mechanical or otherwise, without prior written consent from Handheld. The
contents of this manual are subject to change without prior notice.
Software will be provided literally “as is." All software including firmware, applications,
etc. have been appropriately licensed. Handheld assigns the user with a non-transferable,
non-exclusive license for the software supplied. Users may not transfer the license to any
third party, in the form of sublicensing or by other means, except in those instances
outlined below. Full or partial modification, merging and integration of the software is
prohibited unless explicitly allowed under copyright law. Hereby, the user shall agree to
not violate laws regarding decompilation, disassembly, decoding and reverse engineering
of all or part of the licensed software without the prior consent of Handheld.
Handheld has the right to modify the product or the software in order to improve the
stability, features and design of the product.
Handheld does not accept any liability whatsoever for any incidental or consequential loss
or damage arising from the use of applications, products, circuits or other software
mentioned in this manual.
Handheld and its logo and Nautiz and its logo are trademarks. Microsoft, Windows CE,
Windows Mobile, Bluetooth, Wi-Fi, GSM, etc. are the property of their respective owners.
Nautiz ™
http://www.Nautiz.com/x3
Page 3

CONTENTS
Technical Support
Safety Information
About the Product
Unpacking Product
Status Indicators
Components and Buttons
Working with Your Unit
Inserting/Removing SIM Card
Battery Information
Performing Initial Startup
Attaching Hand Strap
Installing Screen Protector
Using Expansion Port
Entering Data/Using Stylus Pen
Password Protecting
Resetting
Memory
Settings/Applications
Connections
USB Port
Connecting to a PC
Bluetooth
Wi-Fi (802.11)
Wireless WAN
Camera
Barcode Scanner
GPS
Phone Features
Calling
Text Messaging
Troubleshooting
Caring for your Unit/Safe Use
Environmental Specification
Hardware Specification
Regulatory Information
Page 4

TECHNICAL SUPPORT
The contents of this manual are based upon the current version of Windows Mobile 6.5
running on NAUTIZ X3.
The illustrations contained in this manual may differ from the actual screen images for
your device.
Please contact your reseller for product support.
If you discover any problems with the product, please contact Handheld‟s Technical
Support Team on +46 510 54 71 70.
Alternatively, you can view the FAQ by visiting our website at
http://www.handheldgroup.com for more information.
When making an inquiry, please have the following information at hand:
1. Serial number of the product
2. Model number
3. Supplier information, user contacts
Handheld does not accept liability for any damages resulting from improper return
packaging when the user sends the product to Handheld.
Page 5

SAFETY INSTRUCTIONS
Power
In the event of abnormal sounds, smells, or smoke, please contact Customer Support after unplugging the product
from the power outlet and removing the battery.
Do not touch the power plug with wet hand.
Do not charge the battery during a lightening storm, and unplug the cradle from the power outlet.
When the surface of the product is wet, turn off the product and remove the battery from the product, then wipe
off water with a cloth or a dry towel before use.
Use the cradle when you charge the battery, if possible.
Communication
Do not use PDA or make call without a Bluetooth device while driving a car
Do not touch the product or its power plug with wet hand or you may get shocked.
Turn off the product in aircraft or in hospital. The electromagnetic waves of the product may interfere with
electric aviation devices or medical equipment.
Turn off the product in the areas exposed to the risk of explosion.
It is safest to power off the product while gassing up a car.
Be wary of using a headset (earphones). The use of headphones at high volume for prolonged periods of time
may impair hearing ability.
If the product has features like laser or flash, do not level them at the eyes of people or animals. Laser and flash
can impair eyesight.
The following information is for the safety of users and to prevent the product from being damaged.
Please read the followings carefully and use the product accordingly.
Page 6
Product
When you use the battery for the first time, fully charge before using the device
Before resetting the device, backup programs and data in advance.
Before proceeding with software reset, backup programs and data to a safer place. As the saved data will be safe,
data or files currently being used may be deleted.
Do not place any heavy object on the product.
If the touch screen gets dirty with foreign materials, clean it before use.
When using the touch screen, do not use sharp objects (pens, steel wires, and screwdrivers), and only use the
stylus and dedicated accessories coming with the products
Only use the provided batteries, power adapter, and cradle.
Handheld is not responsible for damages to the unit resulting from other software installed by a user after
purchasing the product.
Do not allow the surface of a battery to come in contact with metal objects.
Although the product is fully ruggedized, take care to not purposely damage the unit through extreme shock, or
immersion in water. Refer to product specifications.
Installation and Storage
Do not store the product inside a car to avoid possible theft.
Keep PDA and its stylus out of the reach of children to avoid injury.
If PDA is not going to be used for prolonged periods of time, insert it into the cradle for continuous power supply.
Warranty
Please do not arbitrarily attempt to disassemble, repair, and modify the main unit of the product. In such cases,
warranty of the product will be invalidated.
Page 7

ABOUT THE PRODUCT
UNPACKING PRODUCT
The images in this user manual may not reflect the color and shape of the actual product.
Please check to make sure there are no missing components. Contact our Customer Care
Center if you wish to purchase any additional or optional products
Main Unit Hand strap Stylus and Stylus Lanyard
Li-ion Ion Battery Travel Charger
Data Sync Cable Earphones
Page 8
STATUS INDICATORS
Following are some of the status indicators seen on your unit.
The backup battery levels are low.
More than one instant message
received.
More than one e-mail or text
message received.
More than one voice message
received.
The speakerphone is on.
There are more notifications than
those shown. Tap this icon to display the
rest of the notifications.
Notification of upcoming
appointments.
Dialling without a SIM Card.
Call in progress.
Calls are being forwarded.
Call placed on hold
Antenna/Signal icons: Connected to
a wireless network and signal strength is
okay.
Antenna/Signal icons: Not connected
to a wireless network
Antenna/Signal icons: No service or
signal search is not available
Connecting to HSDPA.
Connected.
Not connected.
Synchronisation in progress.
Wi-Fi is available.
Wi-Fi connected.
HSDPA is available.
3G is available.
GPRS is available.
EGPRS is available.
Missed calls.
HSDPA is in use.
Connecting to 3G.
3G is in use.
Connecting to GPRS.
GPRS is in use.
Roaming in progress.
No SIM card installed.
All sound is on
All sound is off
Vibration mode is on
Page 9

Main battery is charging.
Main battery is half full
Main battery is fully charged
Main battery is charged sufficiently
for use.
Main battery is low
Main battery is very low
Page 10
COMPONENTS AND BUTTONS
Ref
Component
Description
1
Speaker
Omits sound when using cellular function
2 Upper
Indication LED´s
Flashes slow blue to indicate cellular network coverage
Flashes quick blue while searching for cellular networks
2 Lower
Power LED
Turned off means battery is not charging
Red indicated battery is charging
Green indicates charging is complete
3
Scan Key
Hold down to enable scanner
4
Power Button
Hold down to turn device on/off
6
Reset Button
Use stylus to trigger reset
7
Microphone
Audio for cellular function or record
8
20Pin Universal
Connector
Charging, USB Data, Handsfree.
9
Volume Keys
Use to turn volume up and down
10
Misc. Keys
(←)Backspace (1aA/FN)key (keypad function
change)
Front View and Keypad Buttons
Top View
Page 11
Component
Description
Laser Scanner
Used to read 1D barcodes
Imager Scanner
Used to capture data in 2D barcodes
Ref
Component
Description
12
Stylus Pen
Use to tap touch screen to make selections
13
Camera and Flash
Takes still pictures and records video clips, flash (above)
provides light for pictures
14
Hand Strap Holder
The hand strap attaches here
15
Battery Latch
Keeps battery cover in place, flip to unlock to release battery
a
Micro SD Card Slot
Micro SD is used to store data
b
U-SIM Card Slot
SIM Card enables cellular function
Page 12
WORKING WITH YOUR UNIT
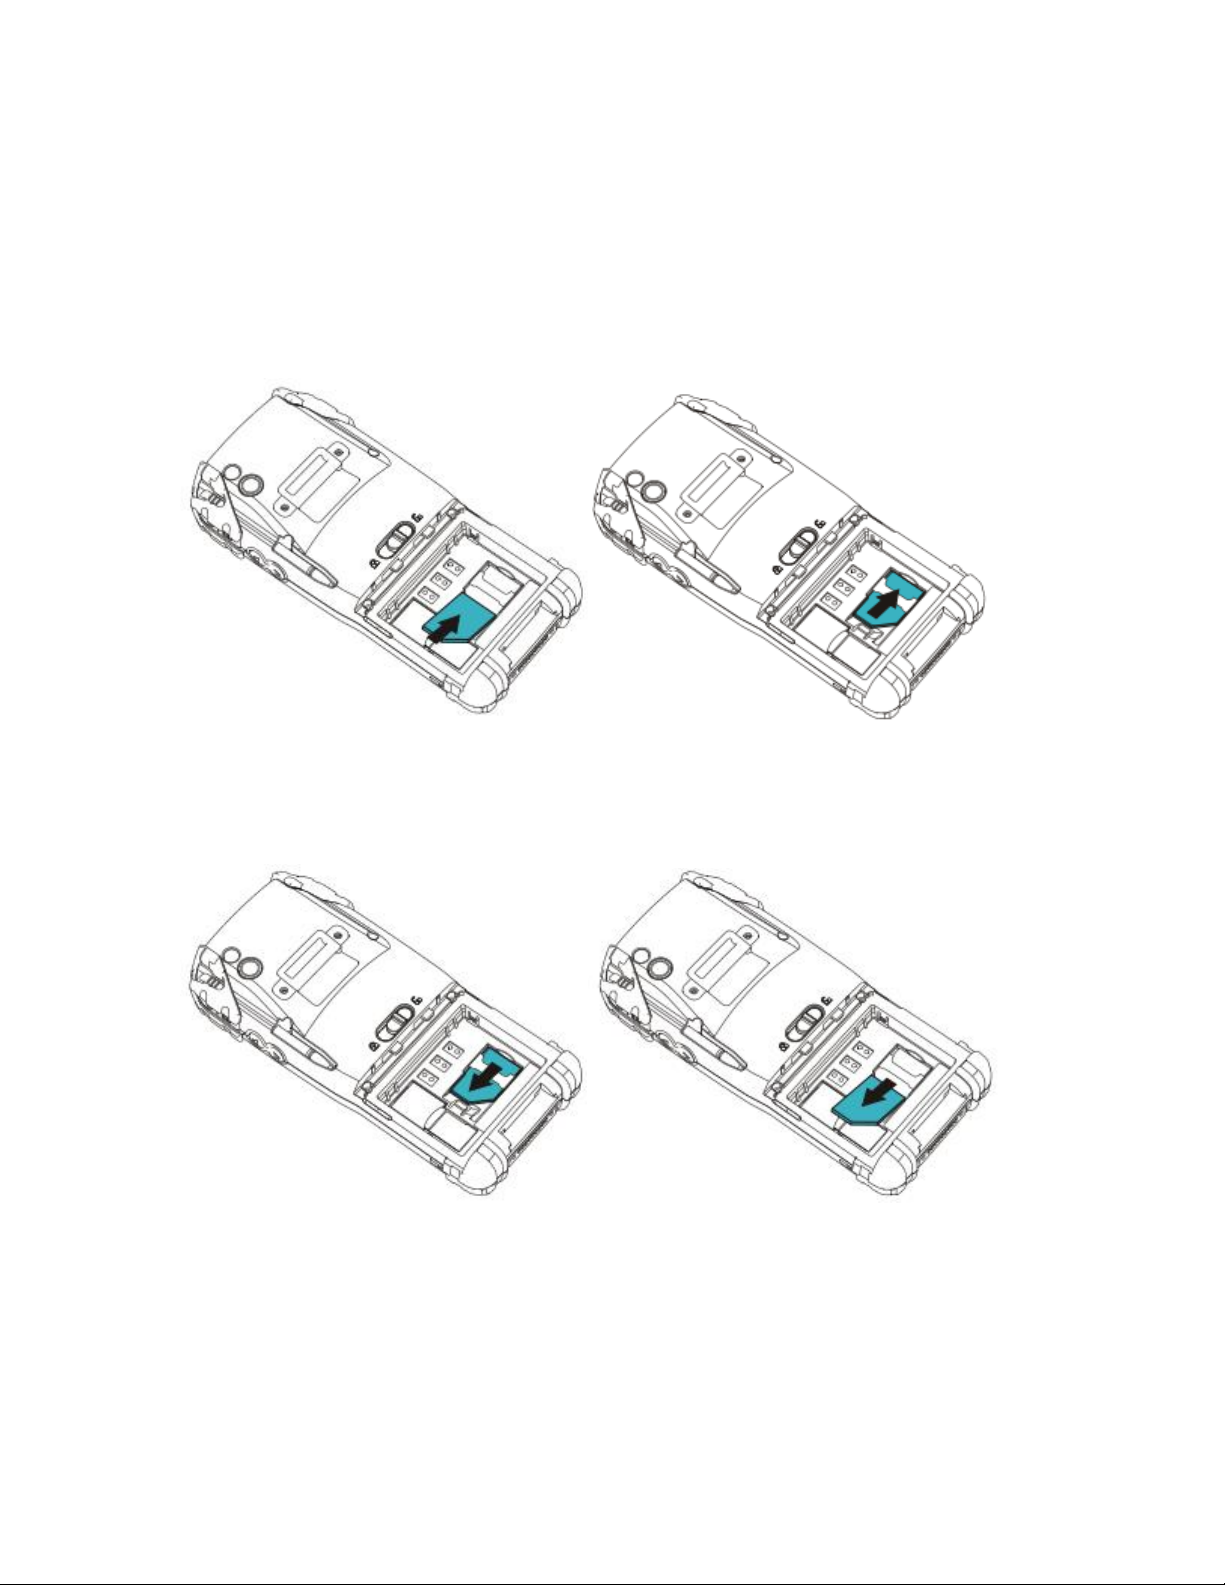
INSERTING/REMOVING SIM CARD
If you wish to enable cellular functions insert your SIM card while battery is not attached
as seen in the diagram below.
Insert:
1. 2.
You can remove the SIM card anytime you do not wish to use cellular function as seen
below.
Remove:
1. 2.
After installing a SIM card for the first time or after replacing it,
1. Turn on the device.
2. Press tap on Wireless Manager on Today Screen.
3. Make sure the phone is turned on.
4. Make a call for checking cellular connection.
Page 13
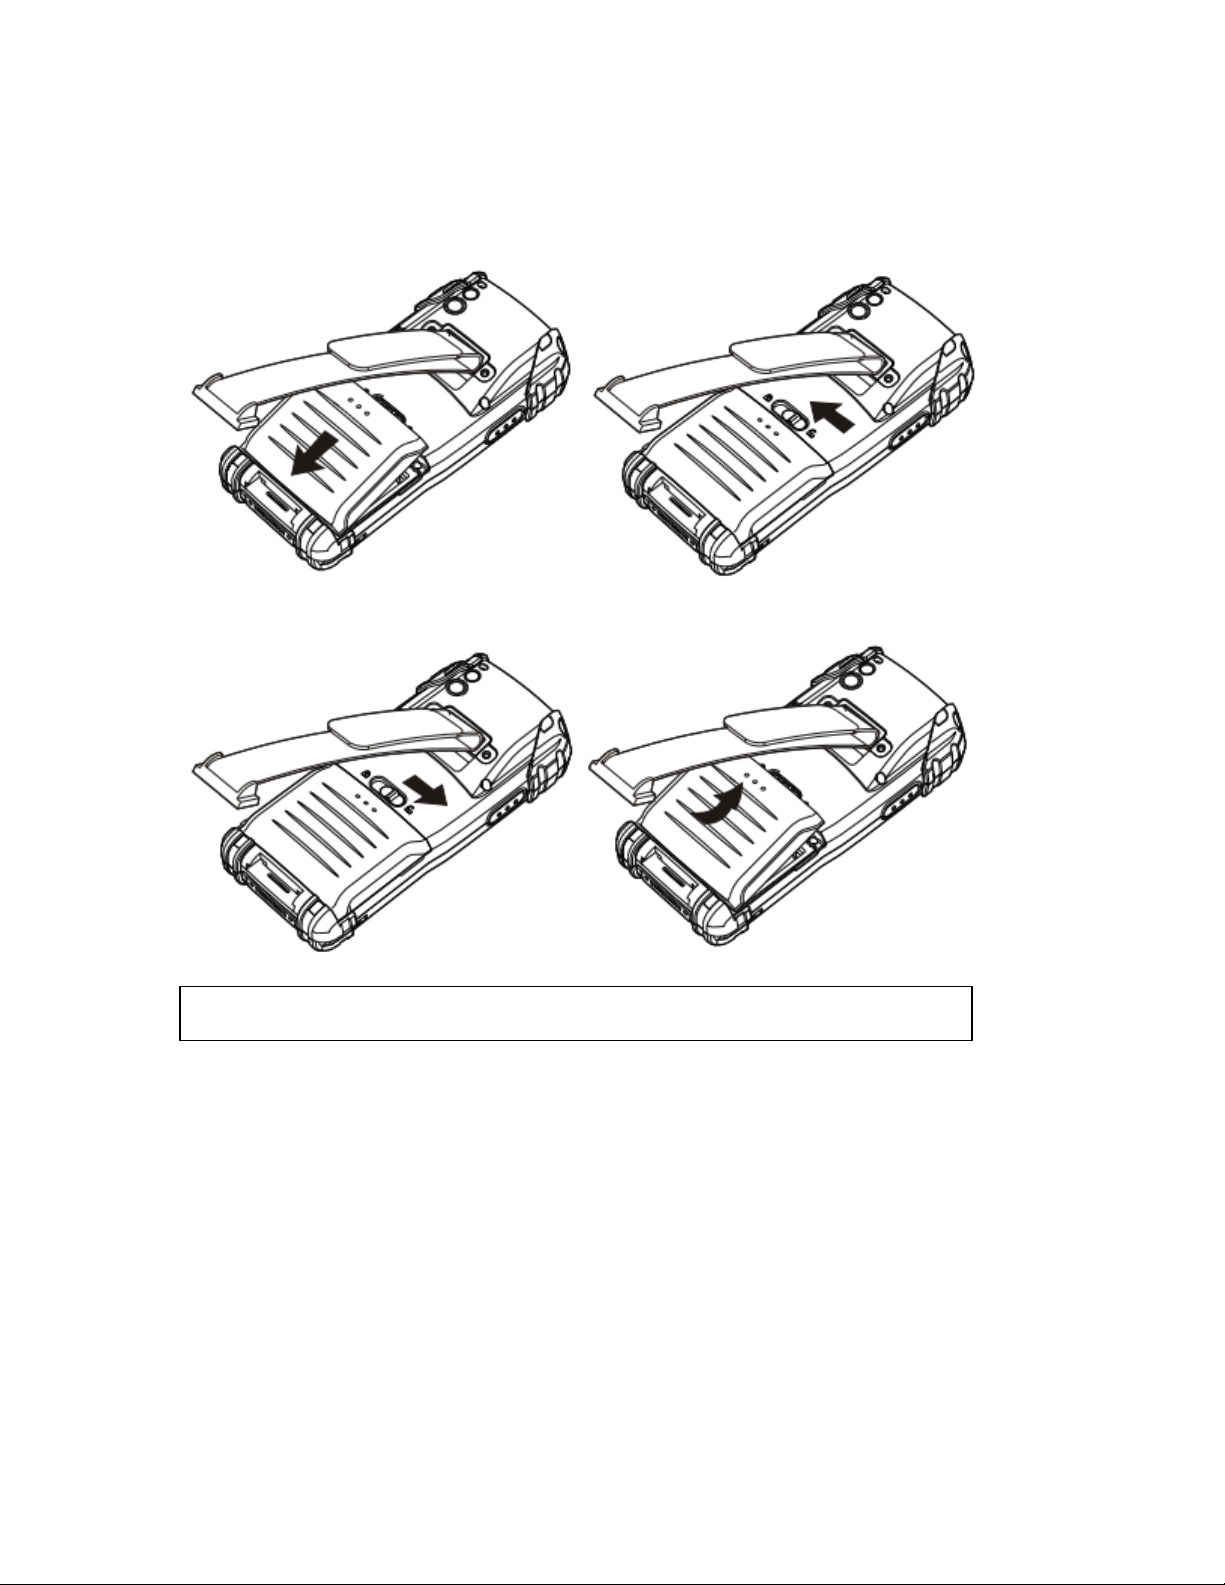
BATTERY INFORMATION
Charge battery fully before using device for the first time.
Your unit comes with one li-ion Polymer Battery. Insert the battery as seen below:
Insert:
1. 2.
Remove:
1. 2.
Before using the battery for the first time, please fully charge the battery until yellow
LED light is on, which indicates charging status. See power LED description on page 9
for all LED indicators relating to battery. Use only handheld approved chargers and
cables. In order to charge the backup battery inside the product, we recommend that
you charge the battery more than 12 hours before using the product for the first time.
Charging may take longer if the device is turned on.
Charging temperature ranges from 0°C to 40°C (32°F to 104°F)
Checking remaining battery power
To check the charging status of the NAUTIZ X3: Tap Start > Settings > Systems >
Power and open the Power Screen.
Page 14

You can select automatic power-off after a certain period of time by tapping the
Advanced tab, this will prolong battery life.
Optimizing battery life
Please follow the battery saving instructions below:
1. Leave the NAUTIZ X3 connected to the charger when it is not in use OR remove the
battery.
2. Set the device to power down when it has not been used for a certain period of time.
3. Set the backlight to power down when it has not been used for a certain period of
time.
4. Turn off all wireless tasks when the device is not in use.
5. The device will charge faster if turned off.
High usage of camera, barcode scanner, GPS, expansion ports or using device in
extreme temperatures will also shorten battery life.
Power Settings:
Set the device to power down when it has not been used for a certain period of time.
1. Start > Settings > Power Icon > Advanced tab.
2. On Battery Power: Turn off the screen if the device has not been used for
a. (When battery power is used: turn the device off when it has not been
used for the following time periods.)
b. Select the X option and choose a time period between 1 and 5 minutes
from the dropdown menu.
3. Tap OK.
Backlight Settings:
Page 15
Set the backlight to power down when it has not been used for a certain period of time.
1. Start > Settings > System > Backlight Icon > Battery Power tab.
2. On Battery Power: Disable the backlighting if the device has not been used for
a. (When battery power is used: turn the backlighting off when it has not
been used for the following time periods.)
b. Select the X option and choose a time period between 1 and 5 minutes
from the dropdown menu.
3. Tap OK.
Turn off all wireless radios when the they are not being used
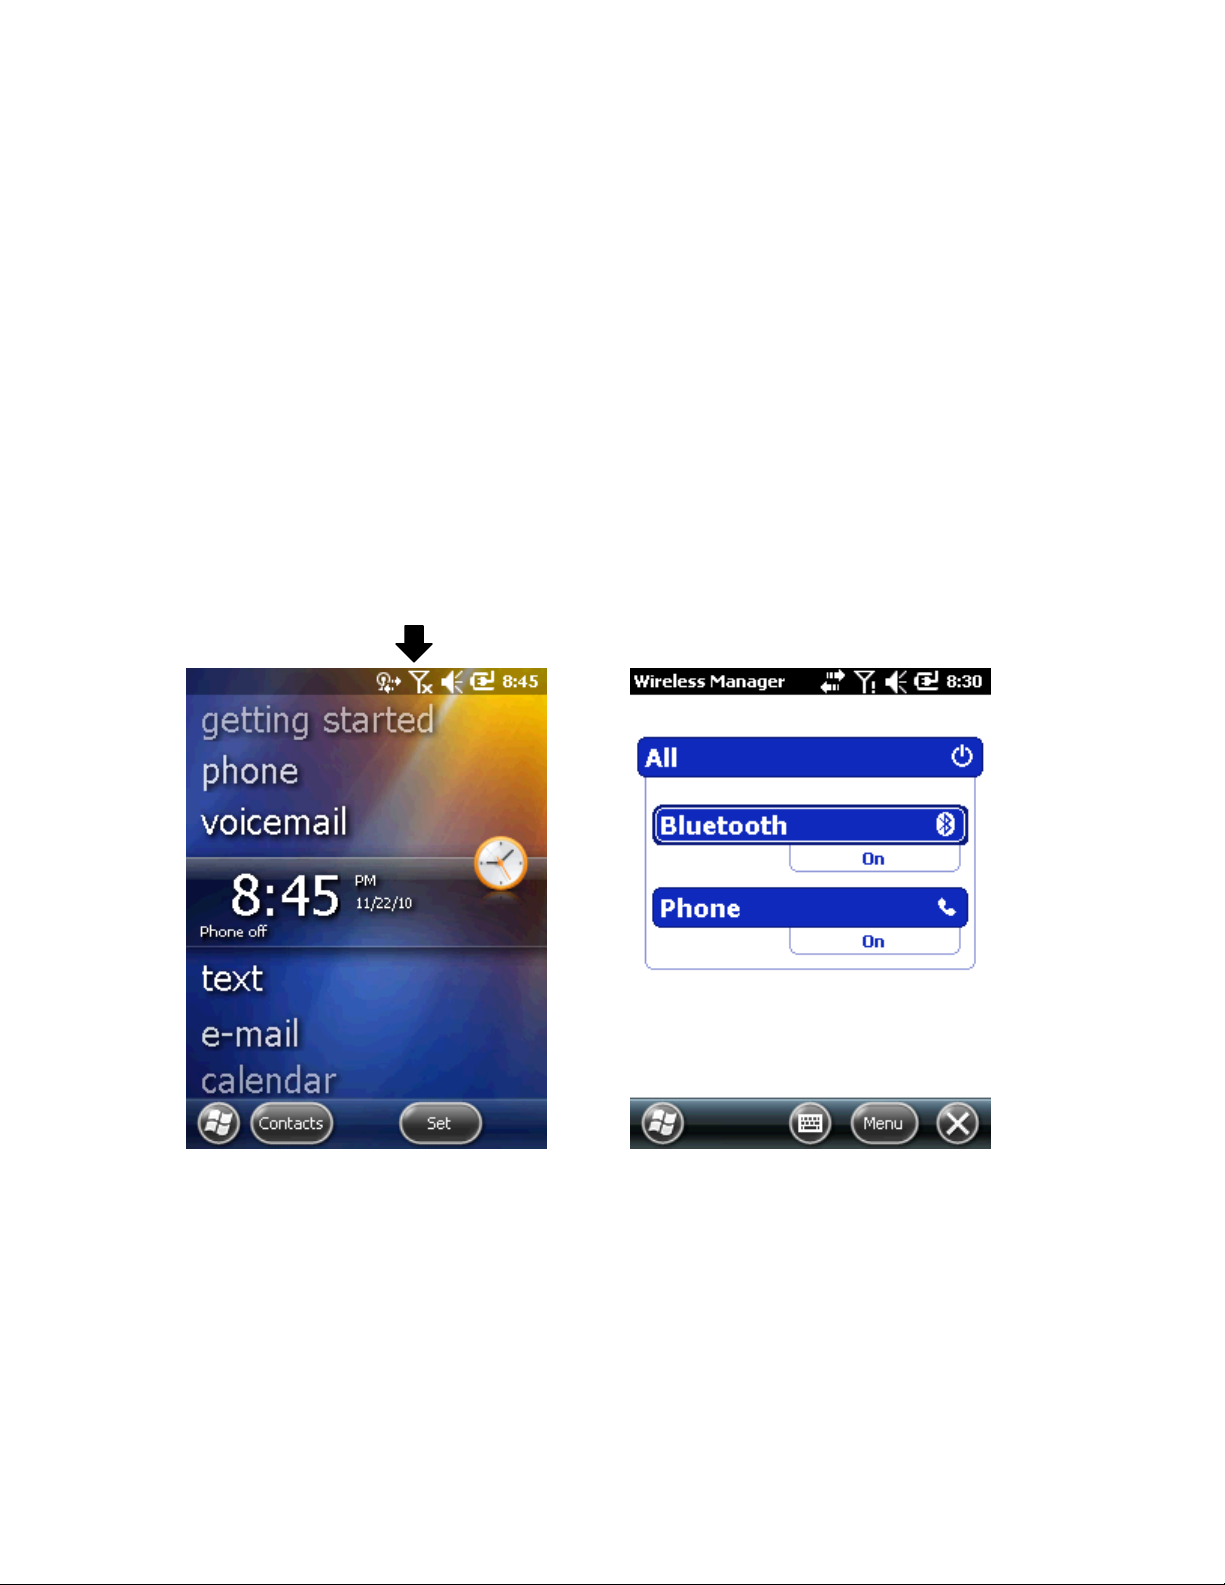
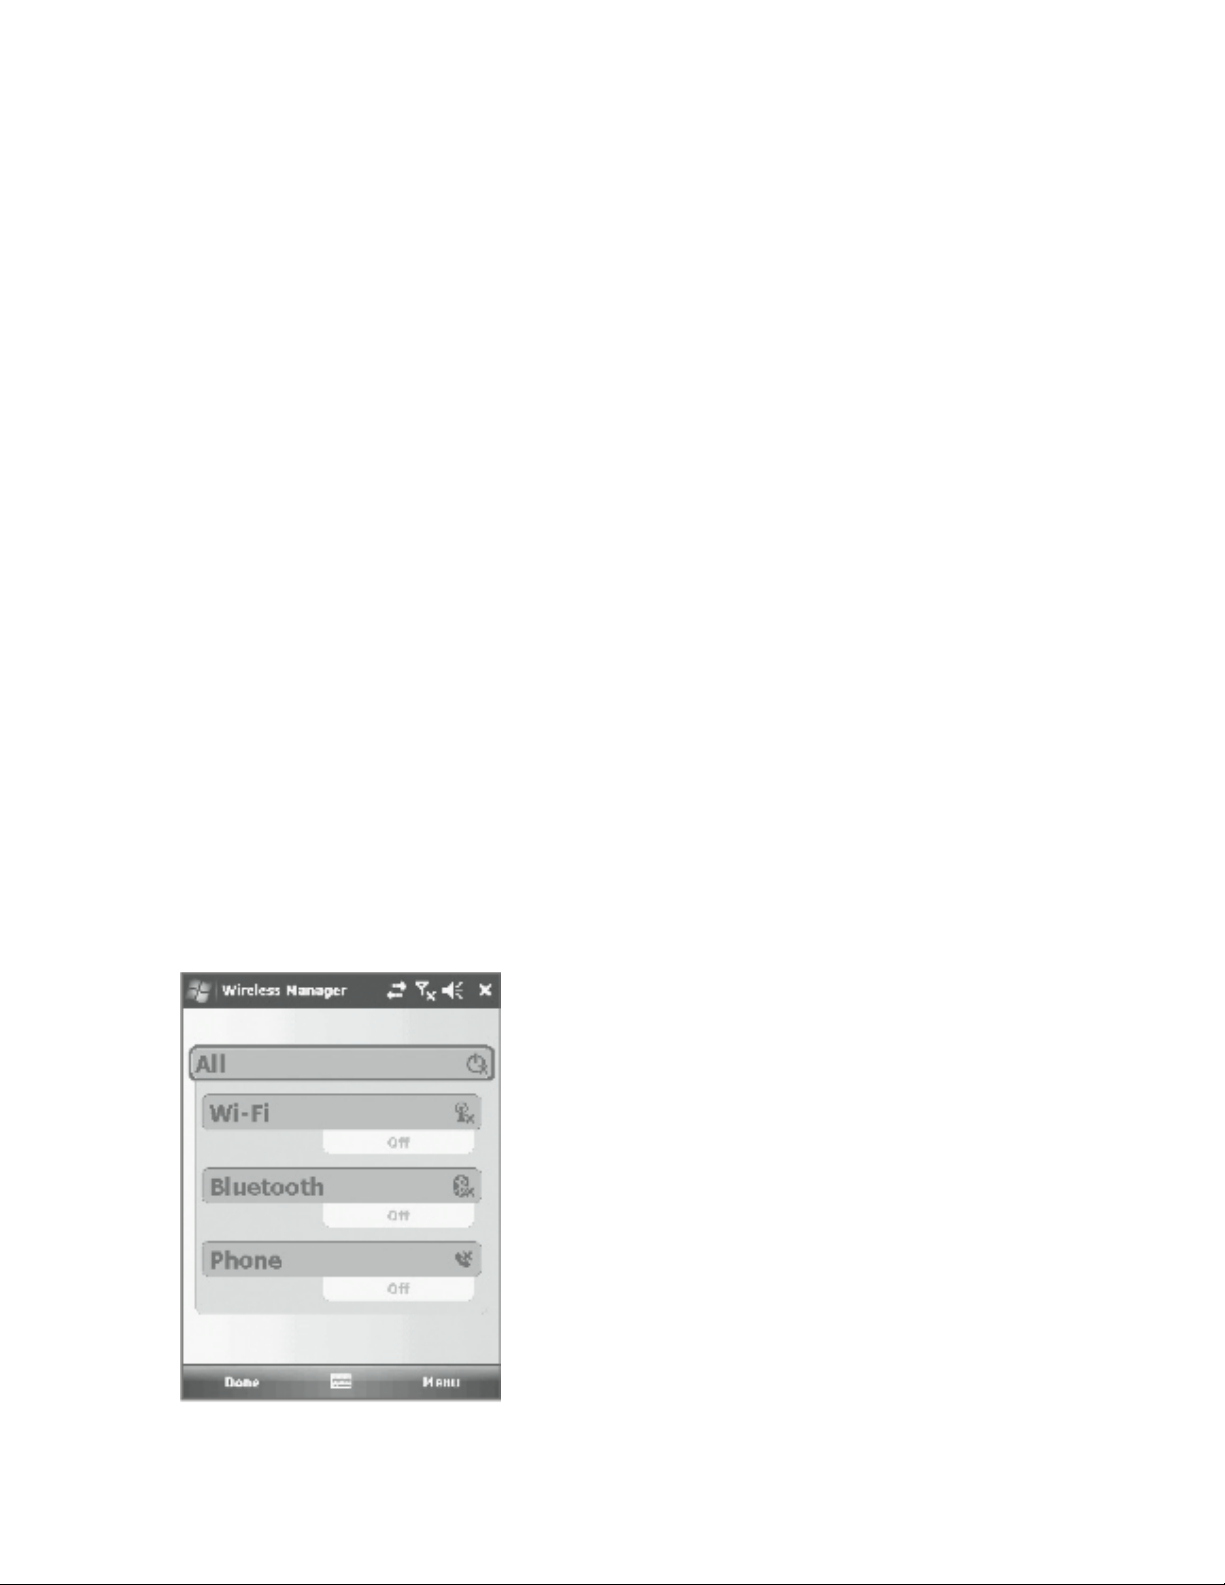
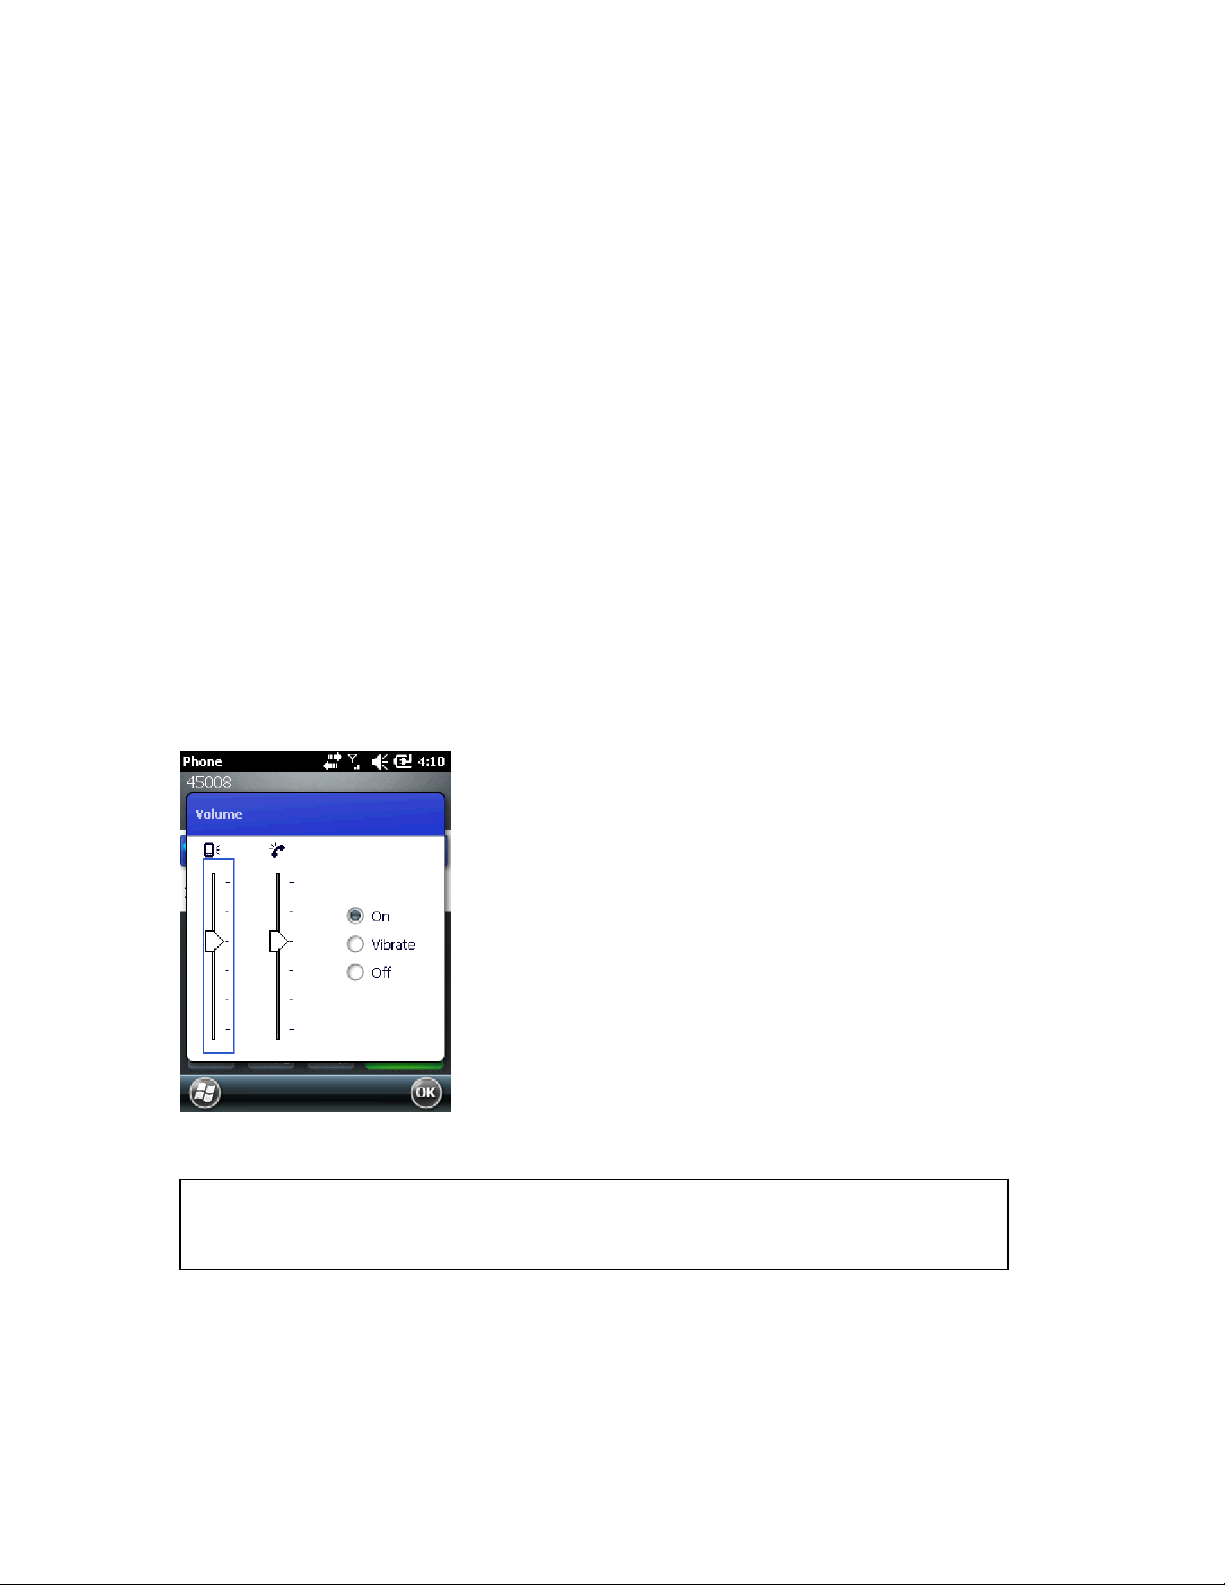
Microsoft Windows Mobile 6.5 includes the Wireless Manager that allows you to control
all the wireless functions of the device in one place (this includes activating, deactivating
and checking the status of the wireless connections).
To open the Wireless Manager, tap Wireless Manager or the Connectivity Icon on the
home screen then select Communication Icon, then Wireless Manager
Press the specified button to activate or deactivate the wireless network.
Press the ALL button to activate or deactivate all the wireless connections.
Press Menu to configure connectivity settings.
PERFORMING INITIAL STARTUP
When turning on your device for the very first time, you will be guided through a setup
process.
1. Make sure that your device is either connected to AC power or the battery has power.
Page 16

2. Press the power button to turn on your device. The backlight of the keypad will light
Take care when inserting and removing the MicroSD card as
damage from static electricity could occur.
up and, after a few seconds, the setup screen appears.
3. Follow the on-screen instructions to complete the setup wizard.
4. For models with the phone function only: If a SIM card has been inserted and the
mobile phone network operator (or you) has set the PIN, you will be prompted to enter
the PIN. Enter the PIN and tap Enter.
If a SIM card has not been inserted yet, a message of an invalid or missing SIM card will
appear on the screen. You can tap Cancel to continue the startup procedure.
5.After the setup is completed, the Today Screen appears. You can now use your device.
ATTACHING HAND STRAP
Adjust the Hand Strap for convenient and comfortable use of the device
1. Connect the Hand Strap to the end of the device, underneath the battery cover.
2. Adjust the length of the Hand Strap by passing the Velcro through the hole.
3. Press both side of strap together to affix.
INSTALLING SCREEN PROTECTOR
Use of a screen protector is high encouraged. Screen damage caused by misuse of screen
protector may not be covered under warranty
The protective screen cover is installed at the factory to minimise damage that may
occur during shipment. Remove the protective screen cover before use. After removing
the screen cover, attach protective film to the screen.
USING SD SLOT
The MicroSD card slot is used for additional data storage and can be used to transfer
information. The slot is located underneath the battery.
It is recommended to follow the appropriate ESD preventative measures relating to
static electricity.
Page 17
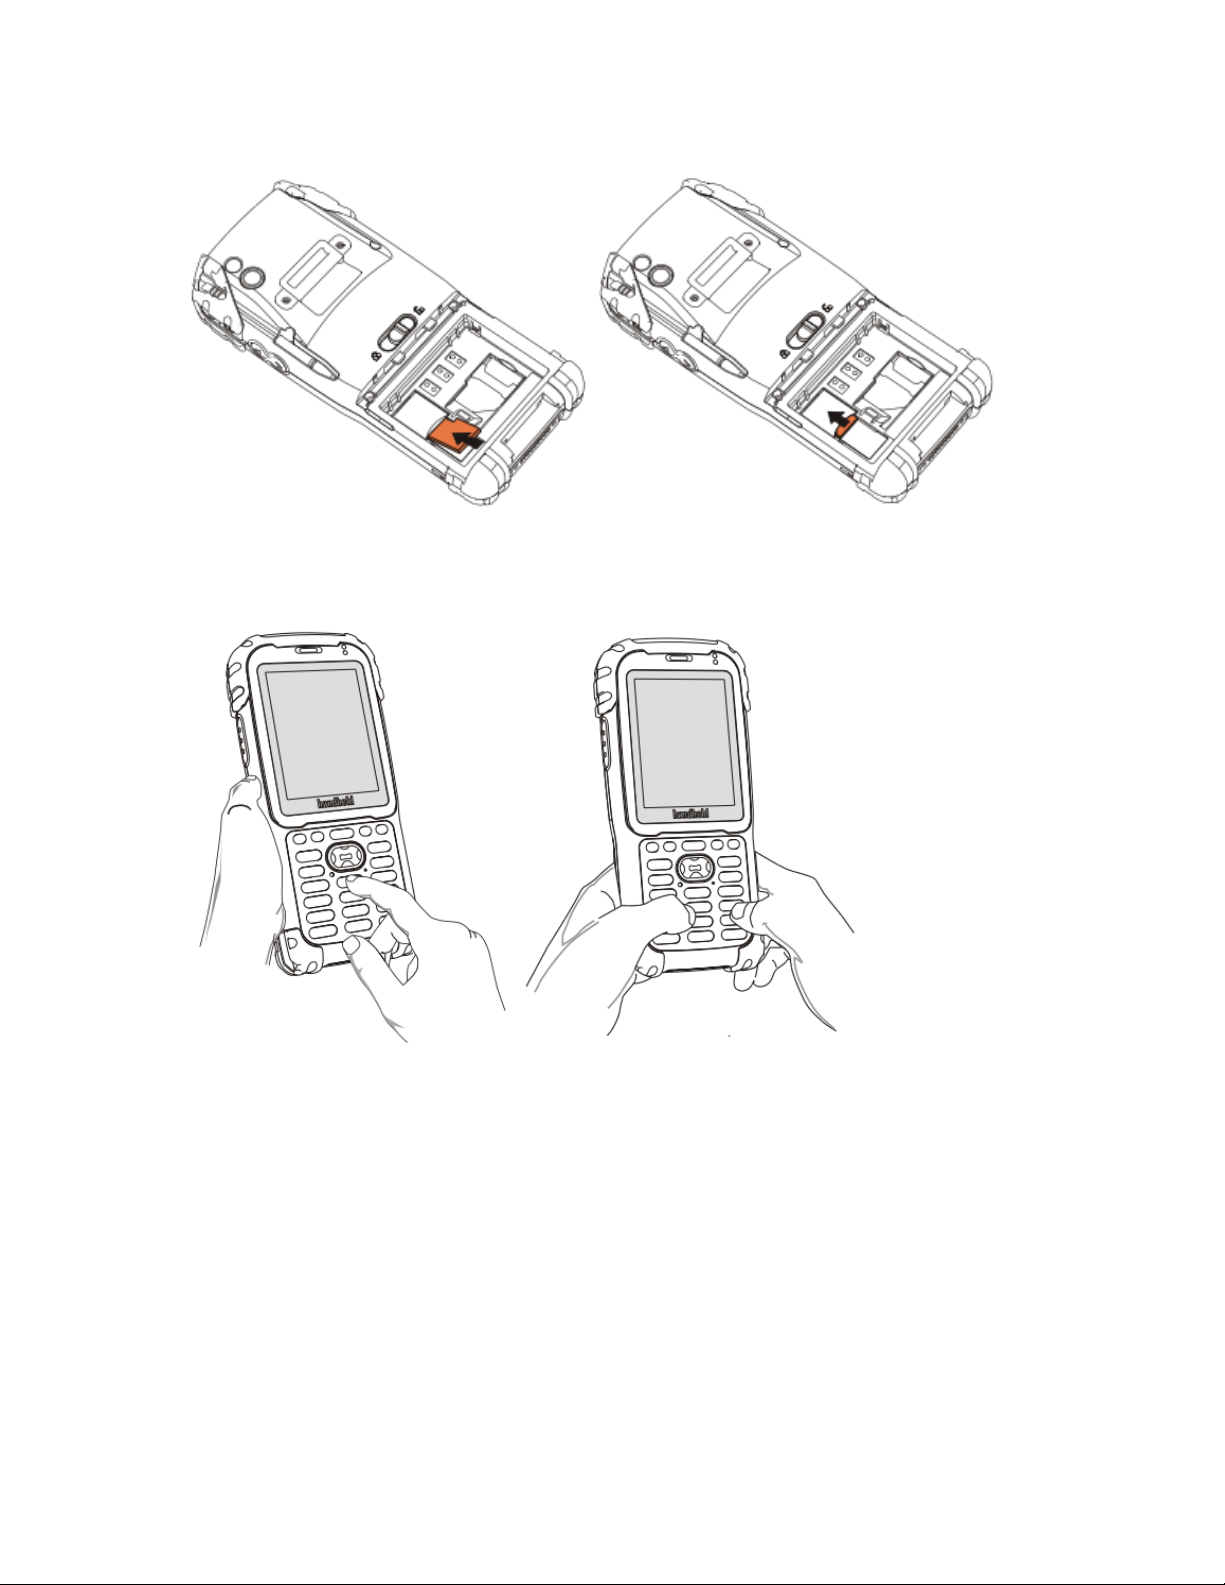
1. 2.
ENTERING DATA/USING STYLUS PEN
When entering data using the keypad, you can use just one hand or both hands
Using Stylus Pen
Use can use the stylus to navigate and select objects on the screen. Pull the stylus out of
the slot and extend it for ease of use. Store it in the slot when not in use.
Tap
Touch the screen once with the stylus to open items and select options.
Drag
Hold the stylus on the screen and drag across the screen to select text and images. Drag in
a list to select multiple items.
Tap and hold
Tap and hold the stylus on an item to see a list of actions available for that item. On the
shortcut menu that appears, tap the action you want to perform.
Page 18
Do not use other tools except for the stylus provided by Handheld in order
to avoid damage on the screen.
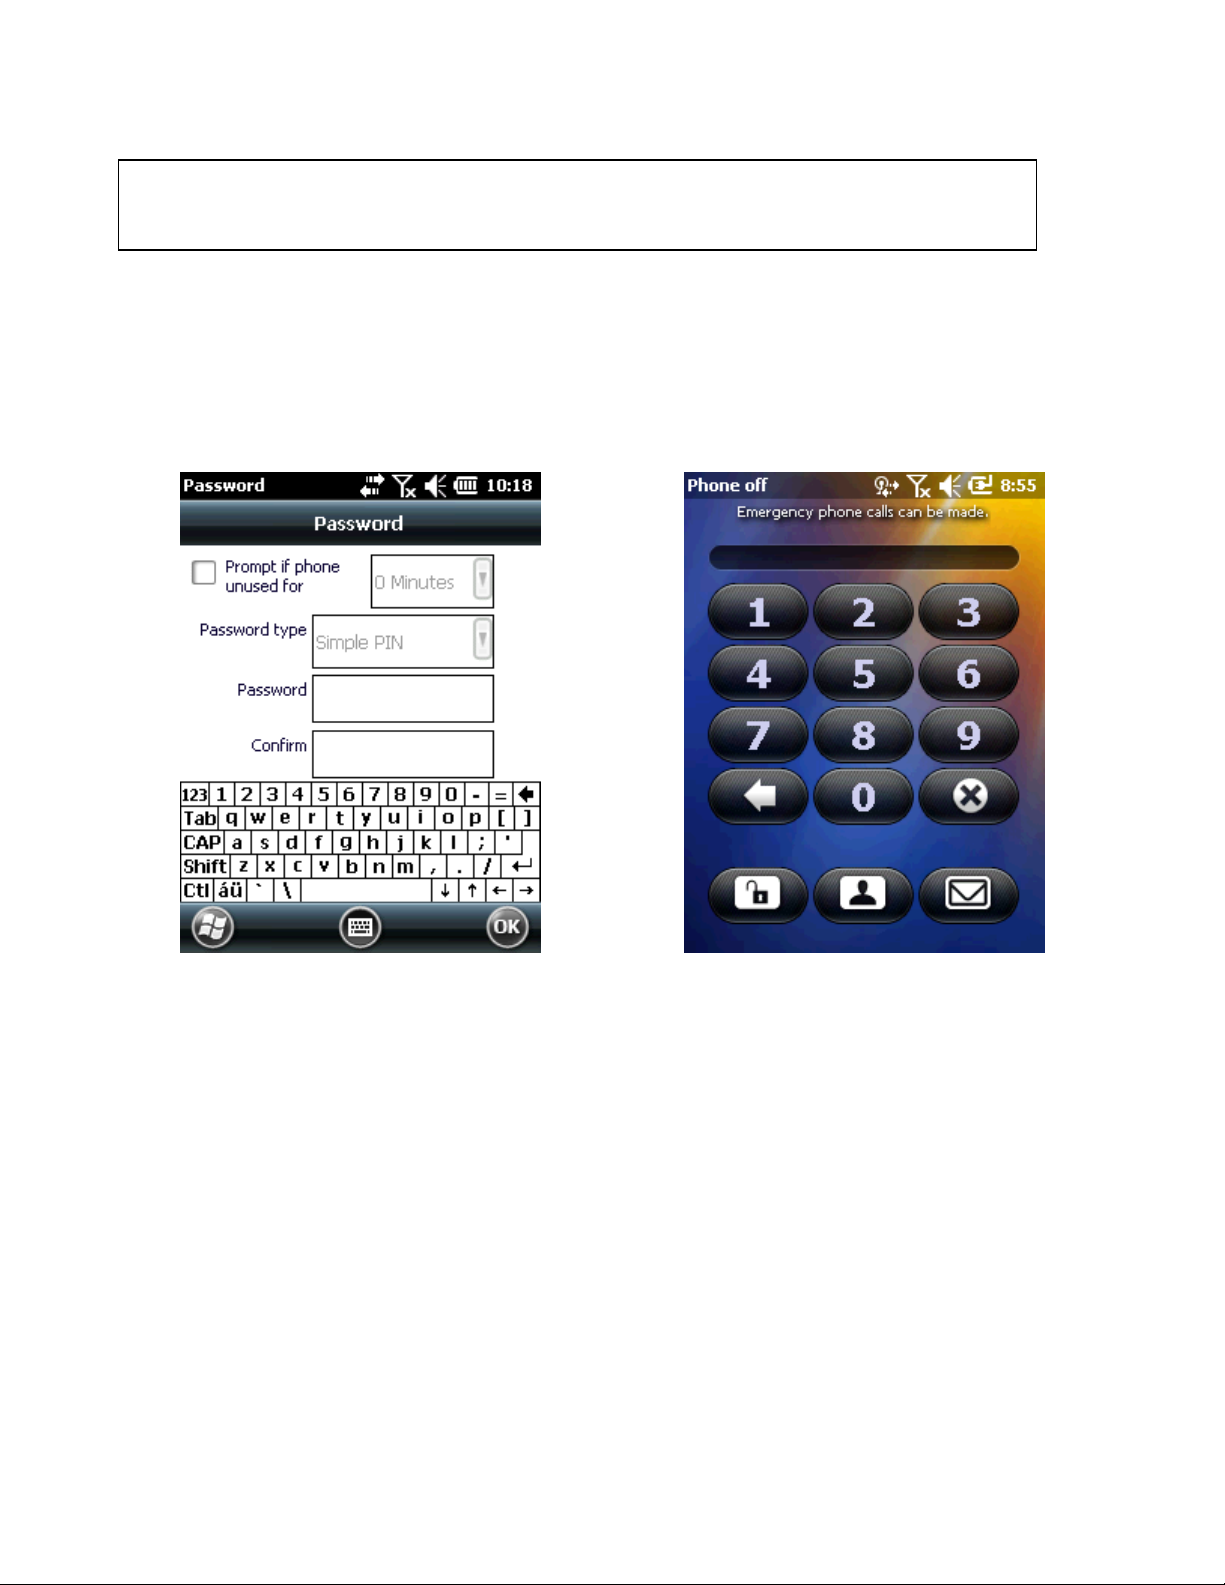
PASSWORD PROTECTING/LOCKING
Password Protecting
Password protecting your device will prevent unauthorized use.
To password protect go to Start > Setting > Lock > Password tab.
Password window and password tab Enter the password to unlock device
1. Activate password protection by checking confirm column, if the device is not going
to be used for a specified period of time.
2. Select time value that forces protective function to be activated, if the device is not
used for a specific period of time from the drop-down menu.
3. Password type: Select simple PIN or a complicated PIN of letters and numbers.
a. Simple passwords can be created by entering 4 digit numbers.
b. How to create a complicated password
i. Password: Enter 7 digit numbers to create a complicated password. A
complicated password must be composed of more than 7 characters, including
at least 3 elements out of uppercase letters, lowercase letters, numbers, and a
punctuation mark.
4. Confirm: Reenter the password.
5. Tap Confirm.
6. If you want to enter a hint to easily recall the password in the future, tap Hint column
a. Enter a hint for recalling the password into the text box.
Page 19
7. Tap Confirm.
Emergency phone calls can be made even when device is locked
When a user tries to access NAUTIZ X3 after a certain period of unused time, a password
screen will be prompted. This window is also prompted when NAUTIZ X3 is connected
with a host computer via the cradle or via the communication cable.
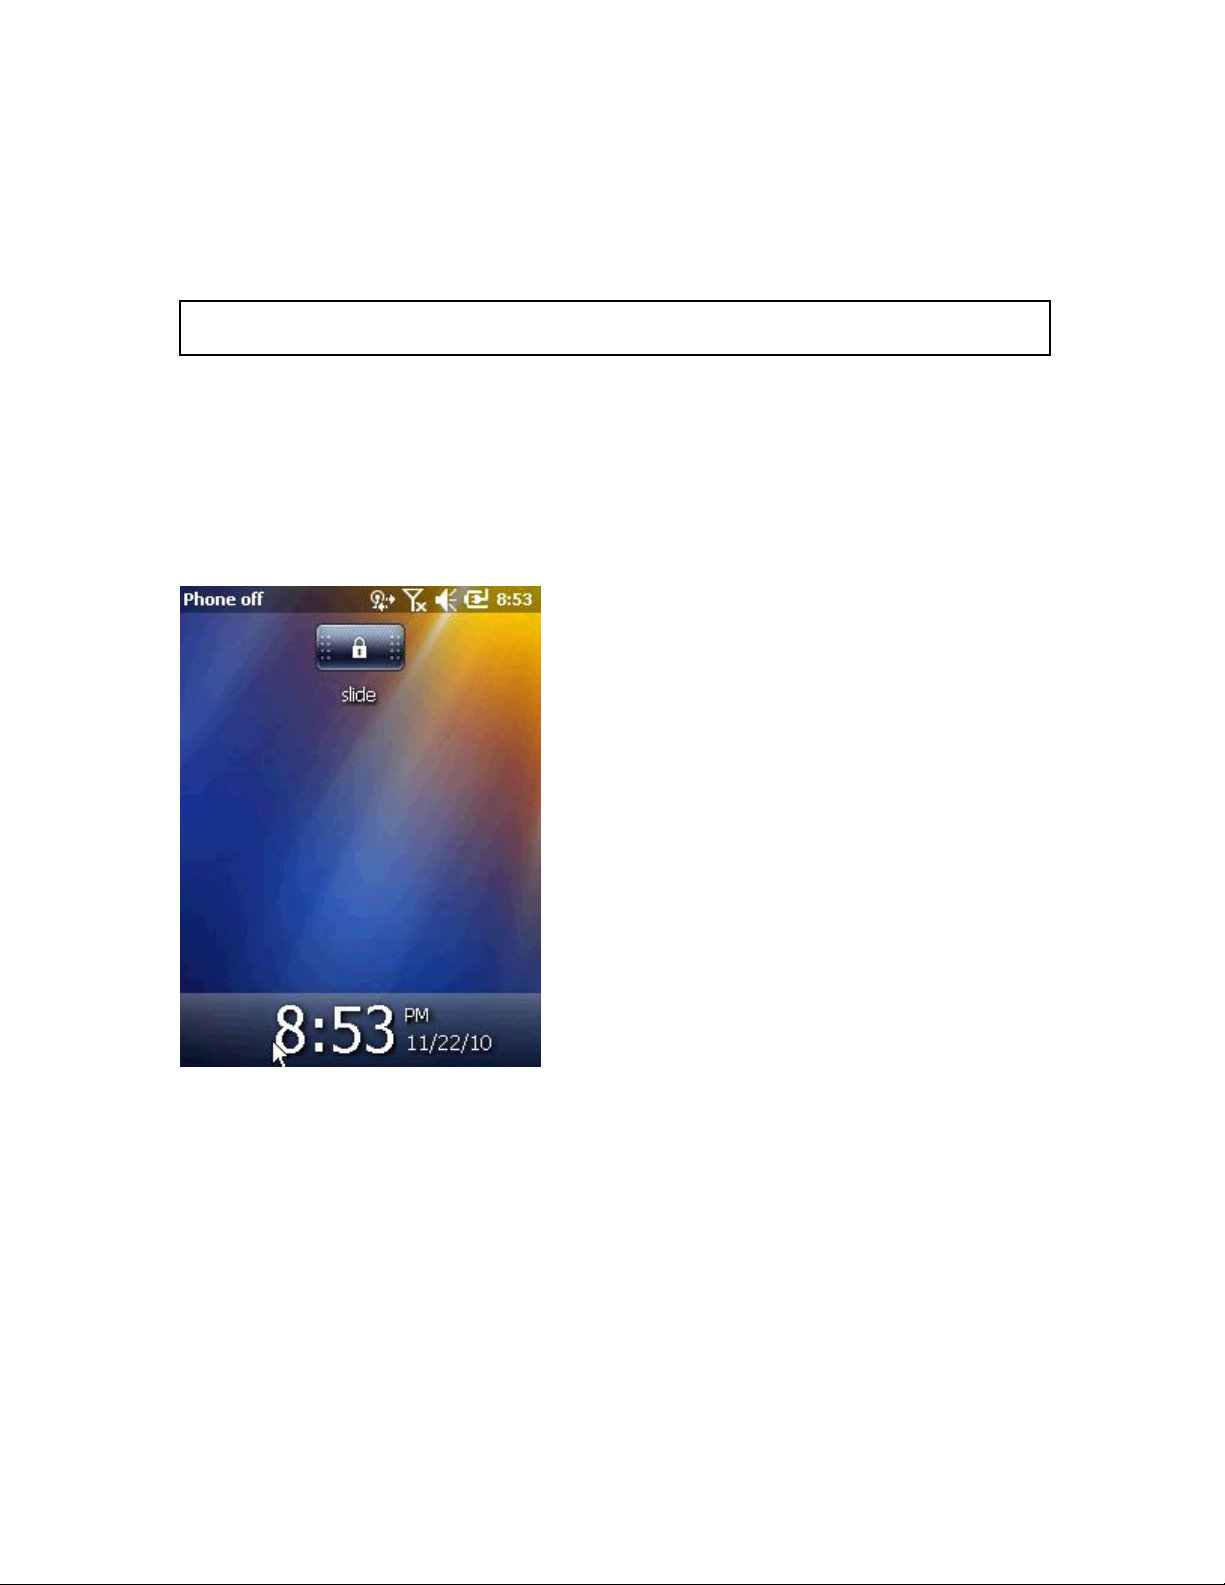
Locking
You can lock the device to prevent unintended pressing of buttons or activation of screen.
When locked, NAUTIZ X3 will not respond to input from the screen or keyboard.
To lock NAUTIZ X3, tap Lock icon that looks like a lock beneath the Start.
To unlock NAUTIZ X3, slide the lock button to the left or to the right.
RESETTING
There are two kinds of resets: Soft rest and hard reset. A soft reset will restart NAUTIZ
X3 after closing all running programs. A hard reset, also, restarts NAUTIZ X3 along with
resetting the clock. The data stored in flash memory or storage card will remain intact.
If NAUTIZ X3 is not working properly, perform a soft reset first. If the problem persists,
perform a hard reset.
How to perform a soft reset:
Press the reset button at the front with a stylus.
Page 20

Documents not saved prior to resetting may be lost
How to perform a hard reset:
Quickly press the reset button at front of the device with a stylus while pressing power
button at the same time.
Please note that a hard reset deletes all programs, documents and settings in the memory
(RAM). The manufacturer takes no responsibility for loss of data or programs. Therefore,
you should back up critical data and programs before making a hard reset of the terminal.
How to perform Suspend mode and Wakeup mode
Press power button at top of front side for 2 second.
Turning backlight on and off
Press power button at the front of the device for a short while.
MEMORY
Copy the data in the Nautiz X3 and keep it in a separate place. Data stored in the Nautiz
X3 may be deleted during repair or upgrade. So make sure to take a back up of important
data. (Ringtones, sounds, text or voice messages and font sets are part of the standard
software.)
Removing the memory card or shutting off the power while using a memory card may
result in loss of data, or malfunction of the card and the terminal.
Once a program or file is deleted it cannot be recovered. Windows Mobile 6.5 does not
support a recycle bin application.
How to Back Up Data
There are many ways data can be transferred or backed up.
Critical data can be backed up by:
1. Using the data sync cable to connect and transfer info from device to PC.
2. Downloading and storing information on the MicroSD card or transferring it to a
PC.
3. Using Bluetooth to connect to another device (wirelessly).
SETTINGS/APPLICATIONS
Home Screen
The Home Screen showing the list of applications and information status indicating bar is
scrollable. The application and its additional information are highlighted in Information
status bar.
Page 21
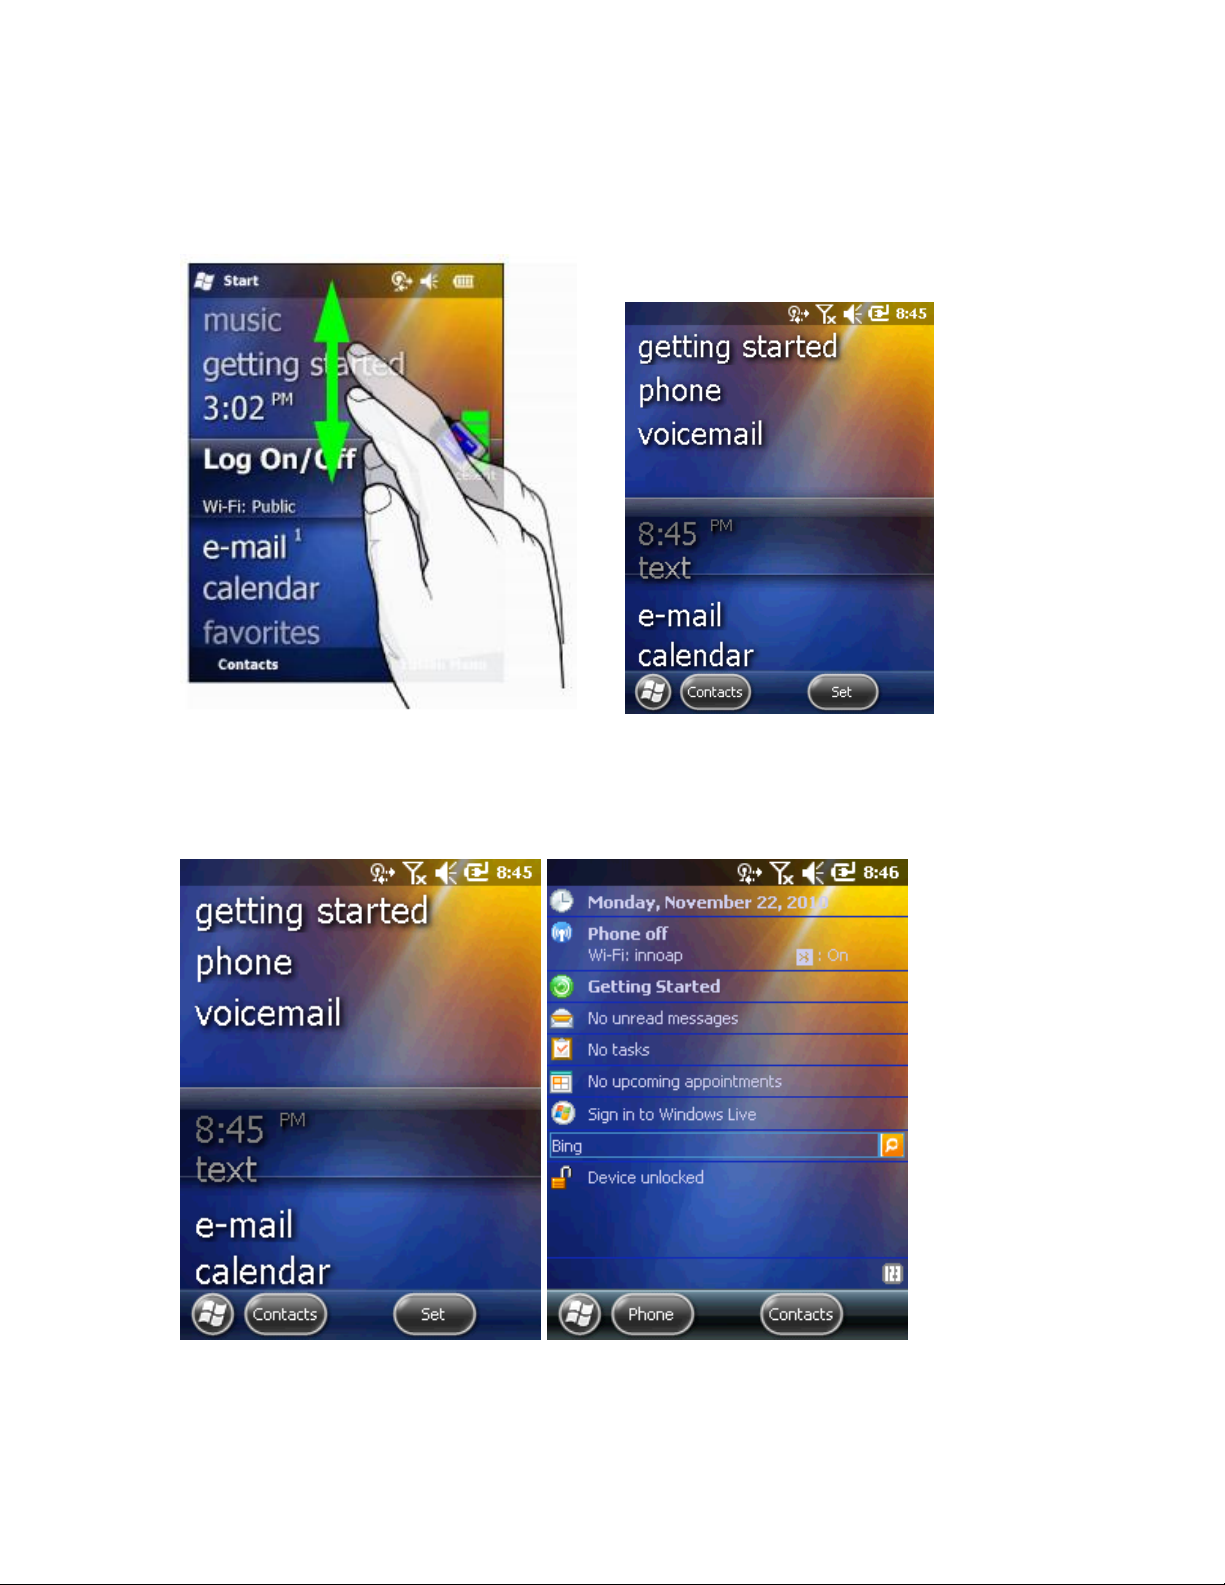
The home screen moves up and down if you scroll the screen up and down while pressing
and holding on the screen with your finger. And the information on the selected
application will be displayed on the status bar as the names below information status
indicating bar moves.
In addition, you can move your finger up and down by skipping the names of applications
while pressing and holding on the information status-indicating bar. When you stop
holding on your finger on the screen, the information status display bar and the name of
the application will be displayed at the center of the screen.
Page 22
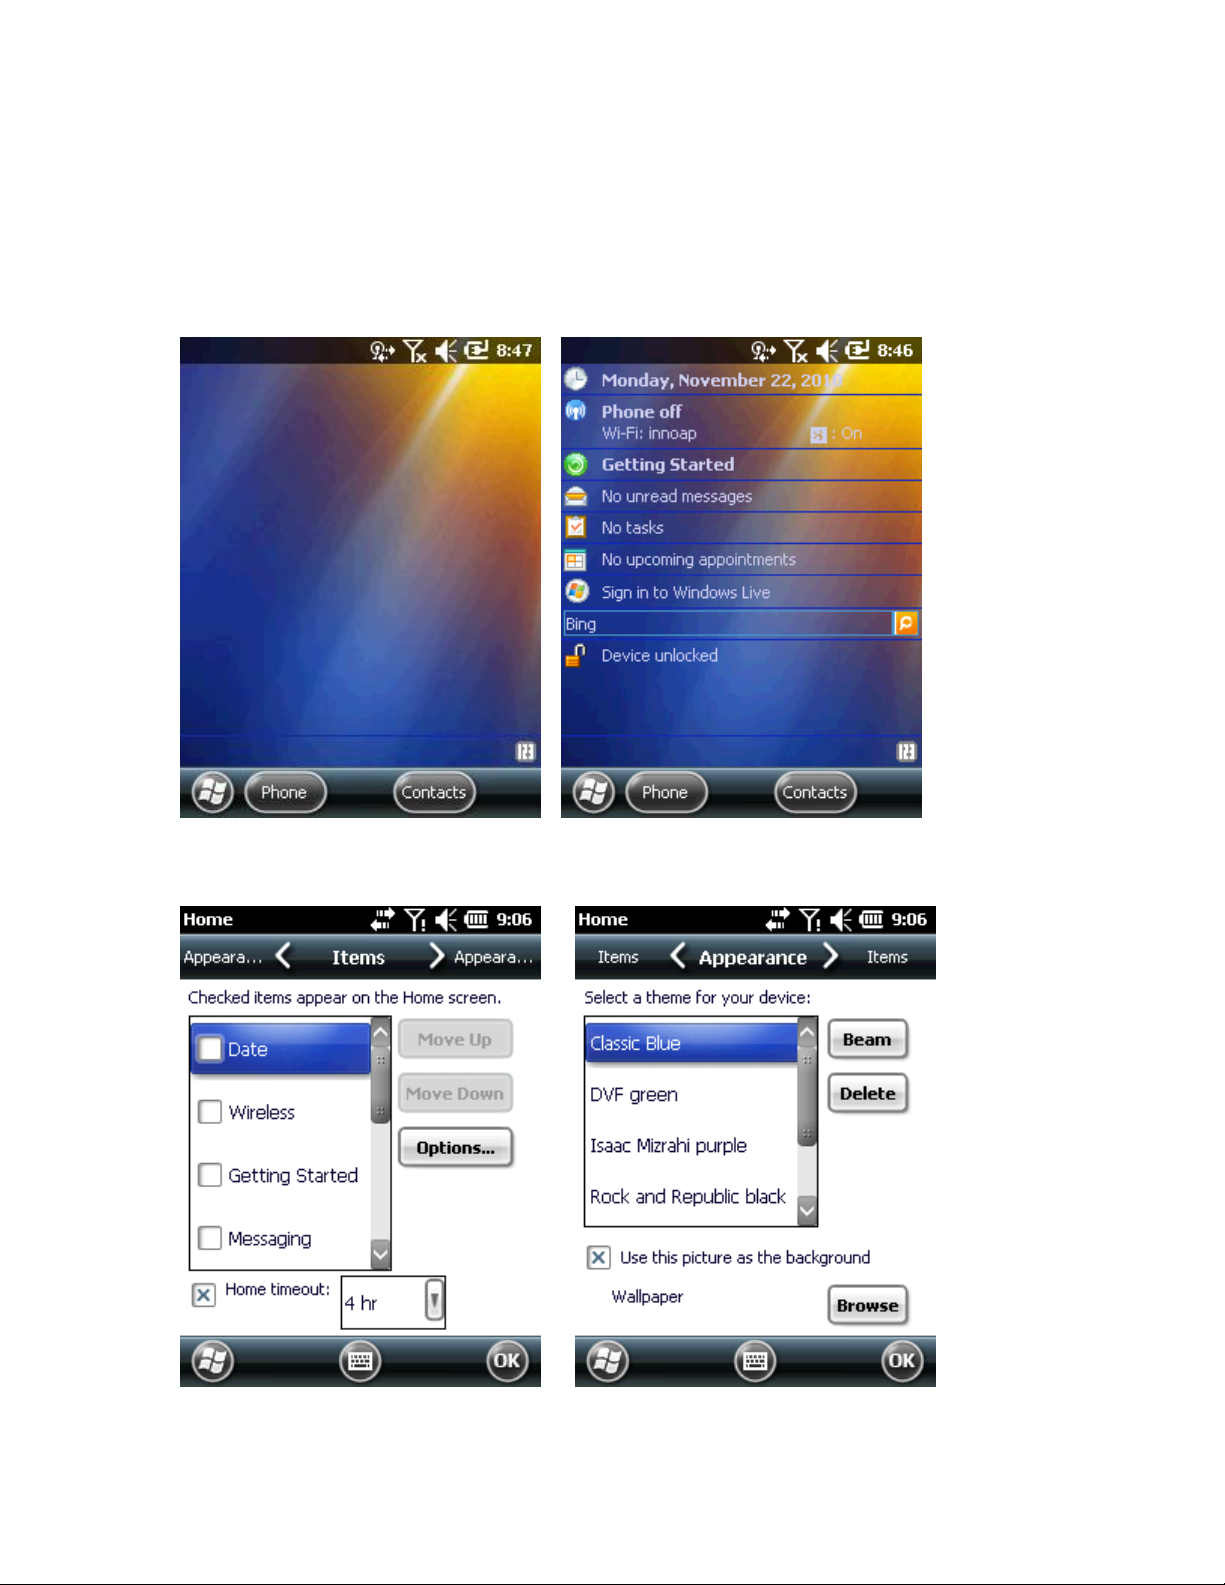
To customize Home Screen, tap Start > Setting > Home icon. You can customize the
background of the screen using the Appearance tab and change the screen properties
using the Property tab.
Classic Home Screen
You can change the Home Screen into the classic layouts used for Windows Mobile 6.5.
To change the screen to the classic layouts, go to Start > Setting > Home tab.
Page 23
Uncheck the checkbox that was pre-checked by Windows and select other options. Then
press OK.
Note: Task bar is only available in the classic layout.
Soft key indicator bar
The soft key indicator bar is displayed at the bottom of the screen, and there are two postkey buttons. This button shows a user a task and menu depending on situations and can
be dynamically changed. For example, the soft key of viewing the list of Contacts is New
menu. If a user starts to create a new contact on that screen, that soft key will be changed
to Complete and Menu.
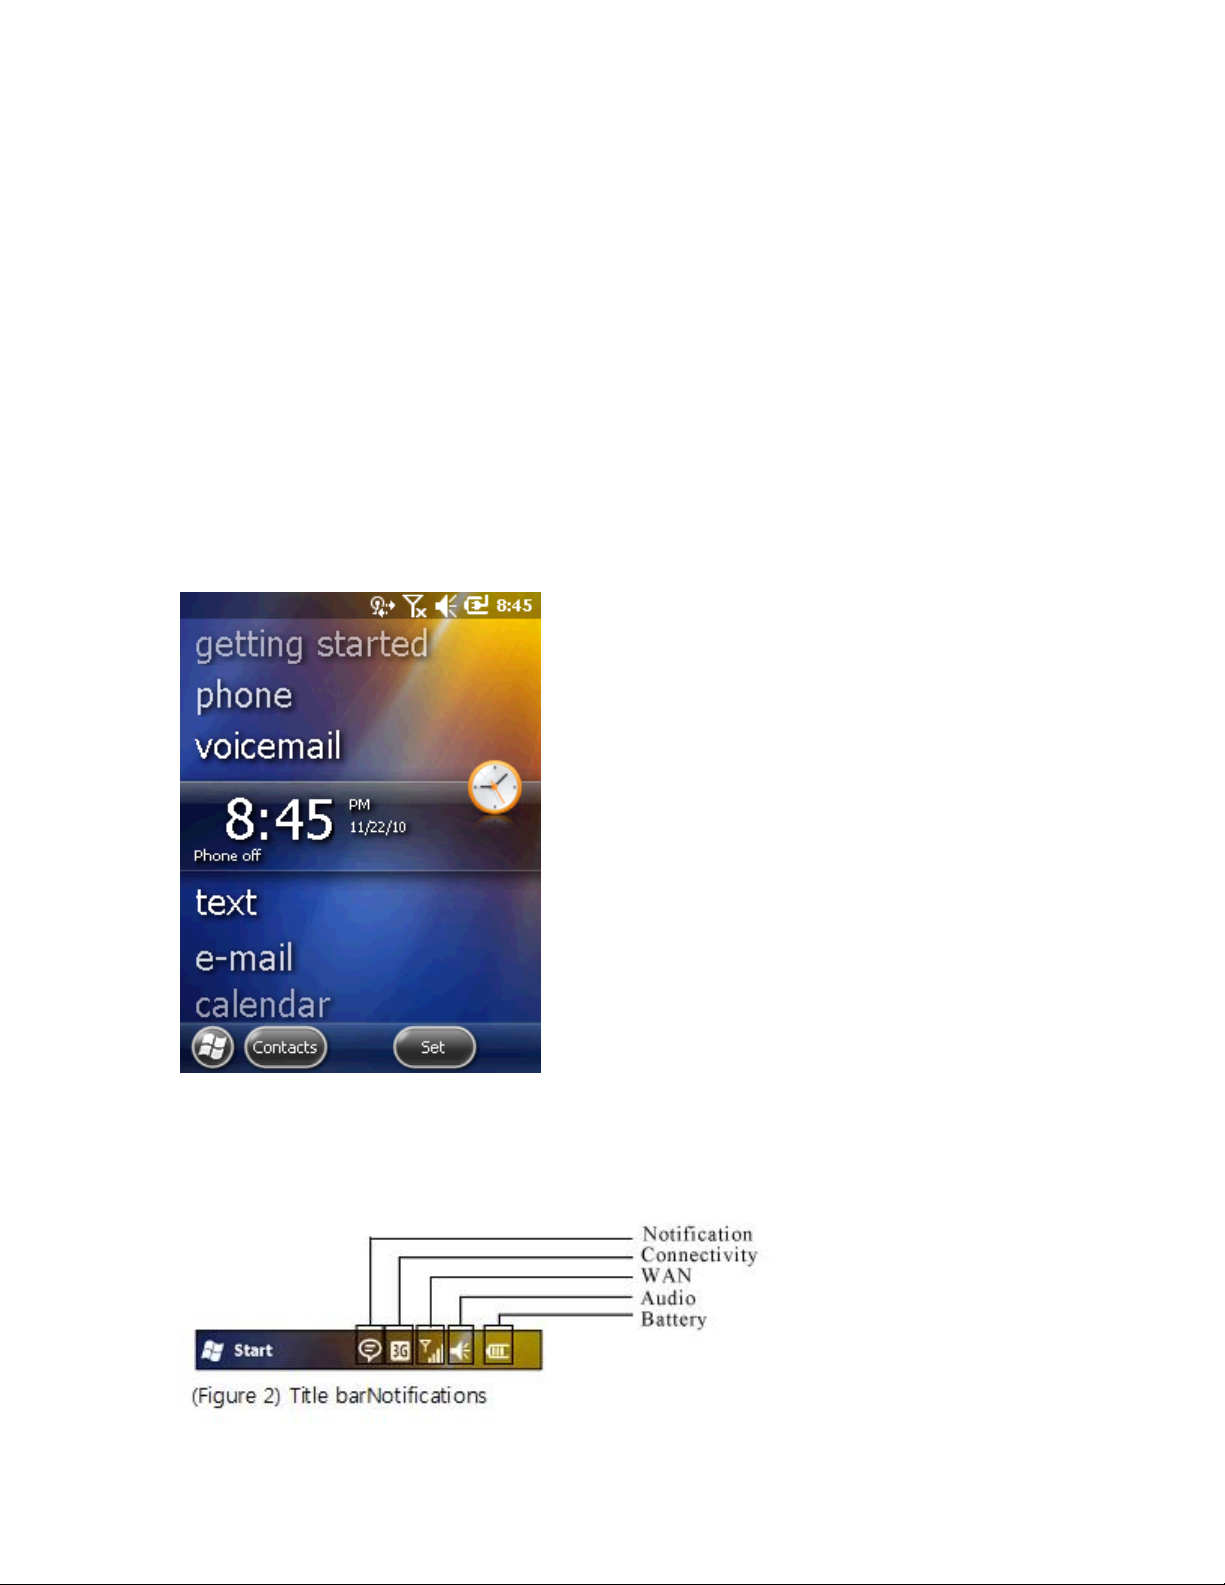
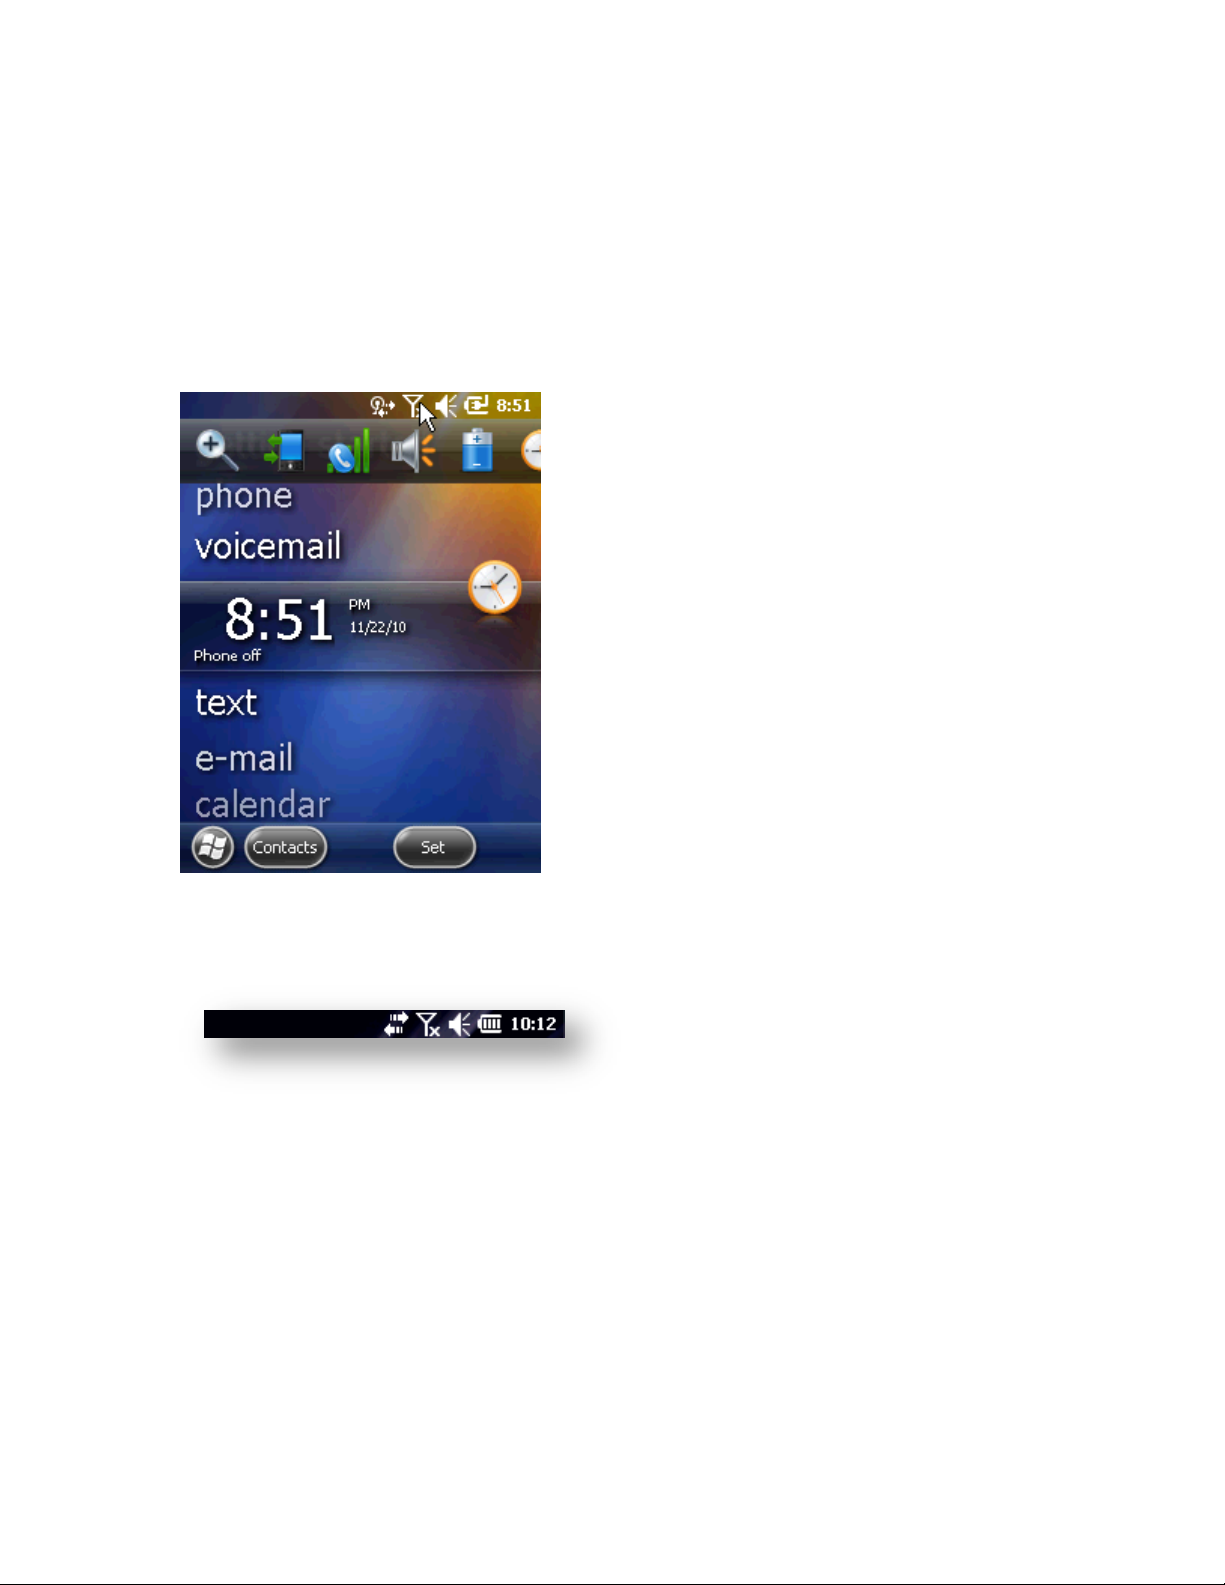
Start Screen
The Home Screen consists of a status bar at the top, the Home Screen in the middle and
soft keys at the bottom:
Soft key status bar on the Home Screen of the application status bar
(Figure 1) Windows Mobile Start Screen
Title bar
Status-indicating icons are listed in the title bar
Page 24
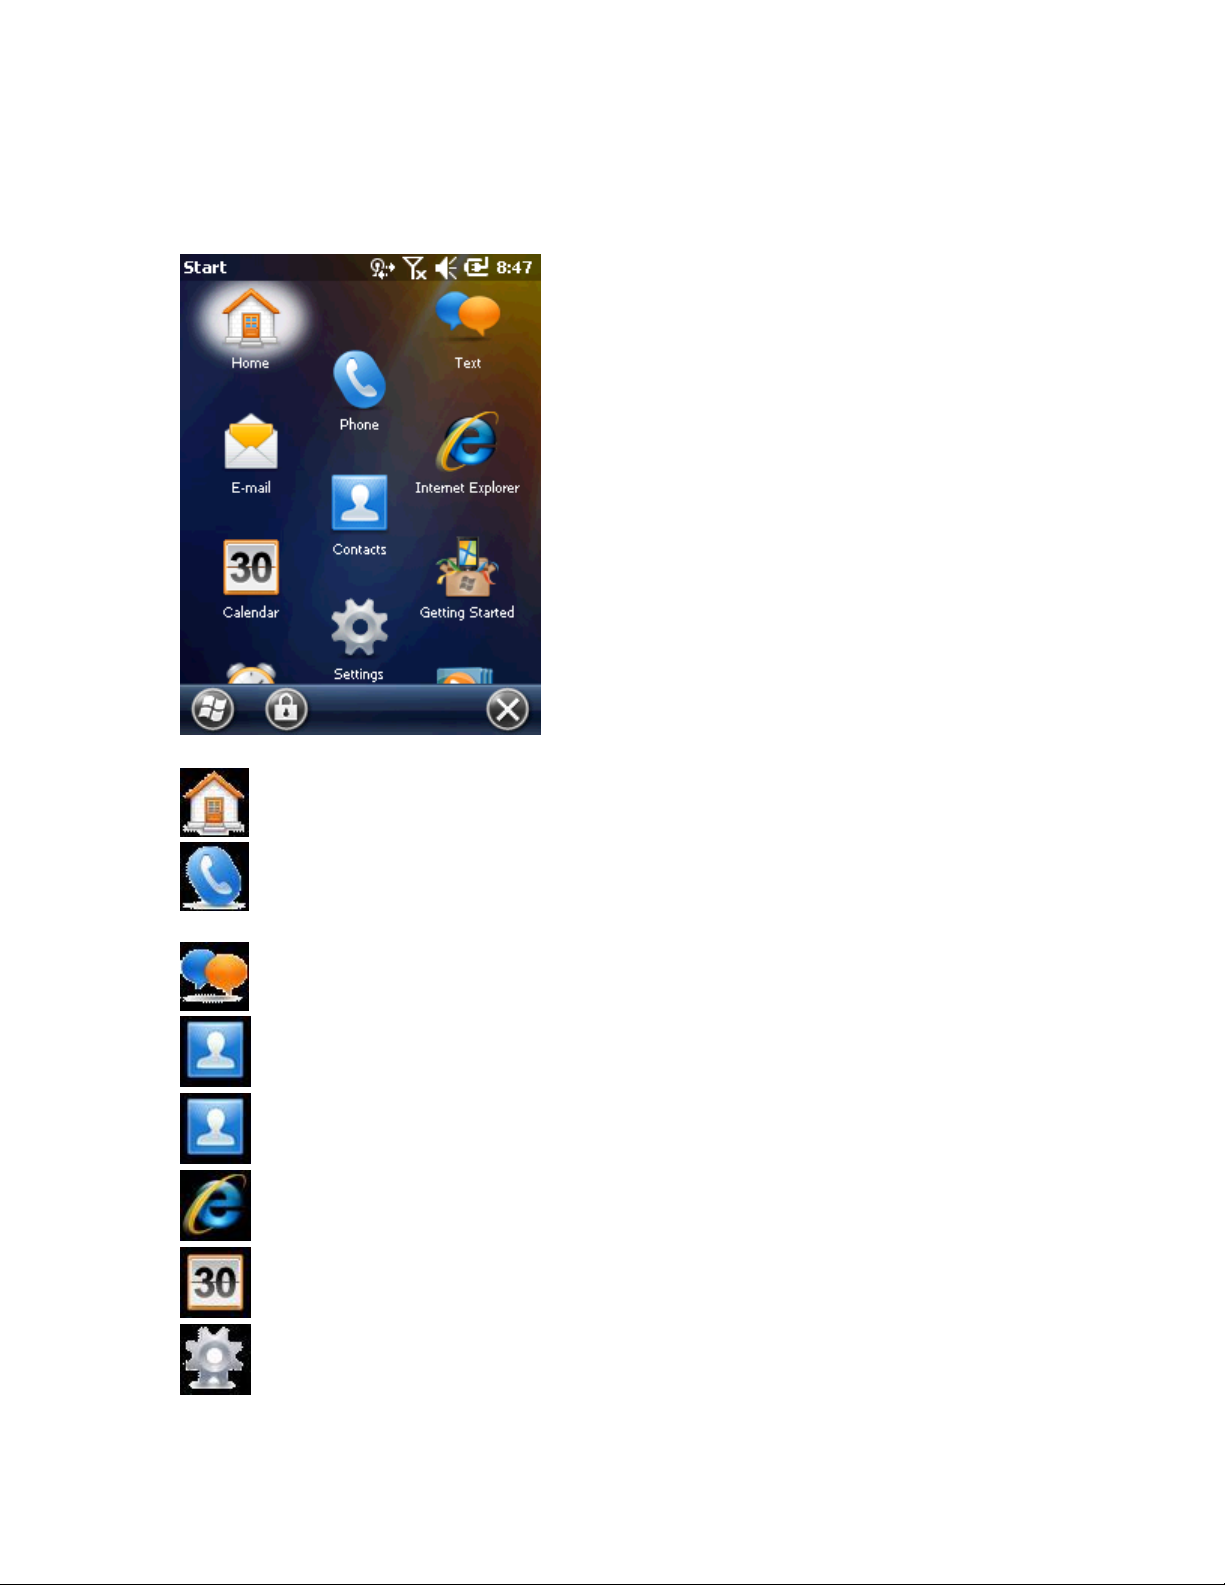
The user applications and folders are displayed on the Start Screen.
Applications and folders displayed on the Start Screen
Home: Closing Start menu and displaying the Home Screen.
Phone: Making calls, Answering calls, changing calls, and configuring call
conference.
Text: Sending and receiving SMS text messages.
E-mail: Sending and receiving emails.
Contacts: Sharing contacts with friends and peers.
Internet Explorer: Browsing web sites.
Calendar: Managing appointments and request meetings.
Settings: Opening the configuration folder. See Configuration Folder in page 10.
Page 25
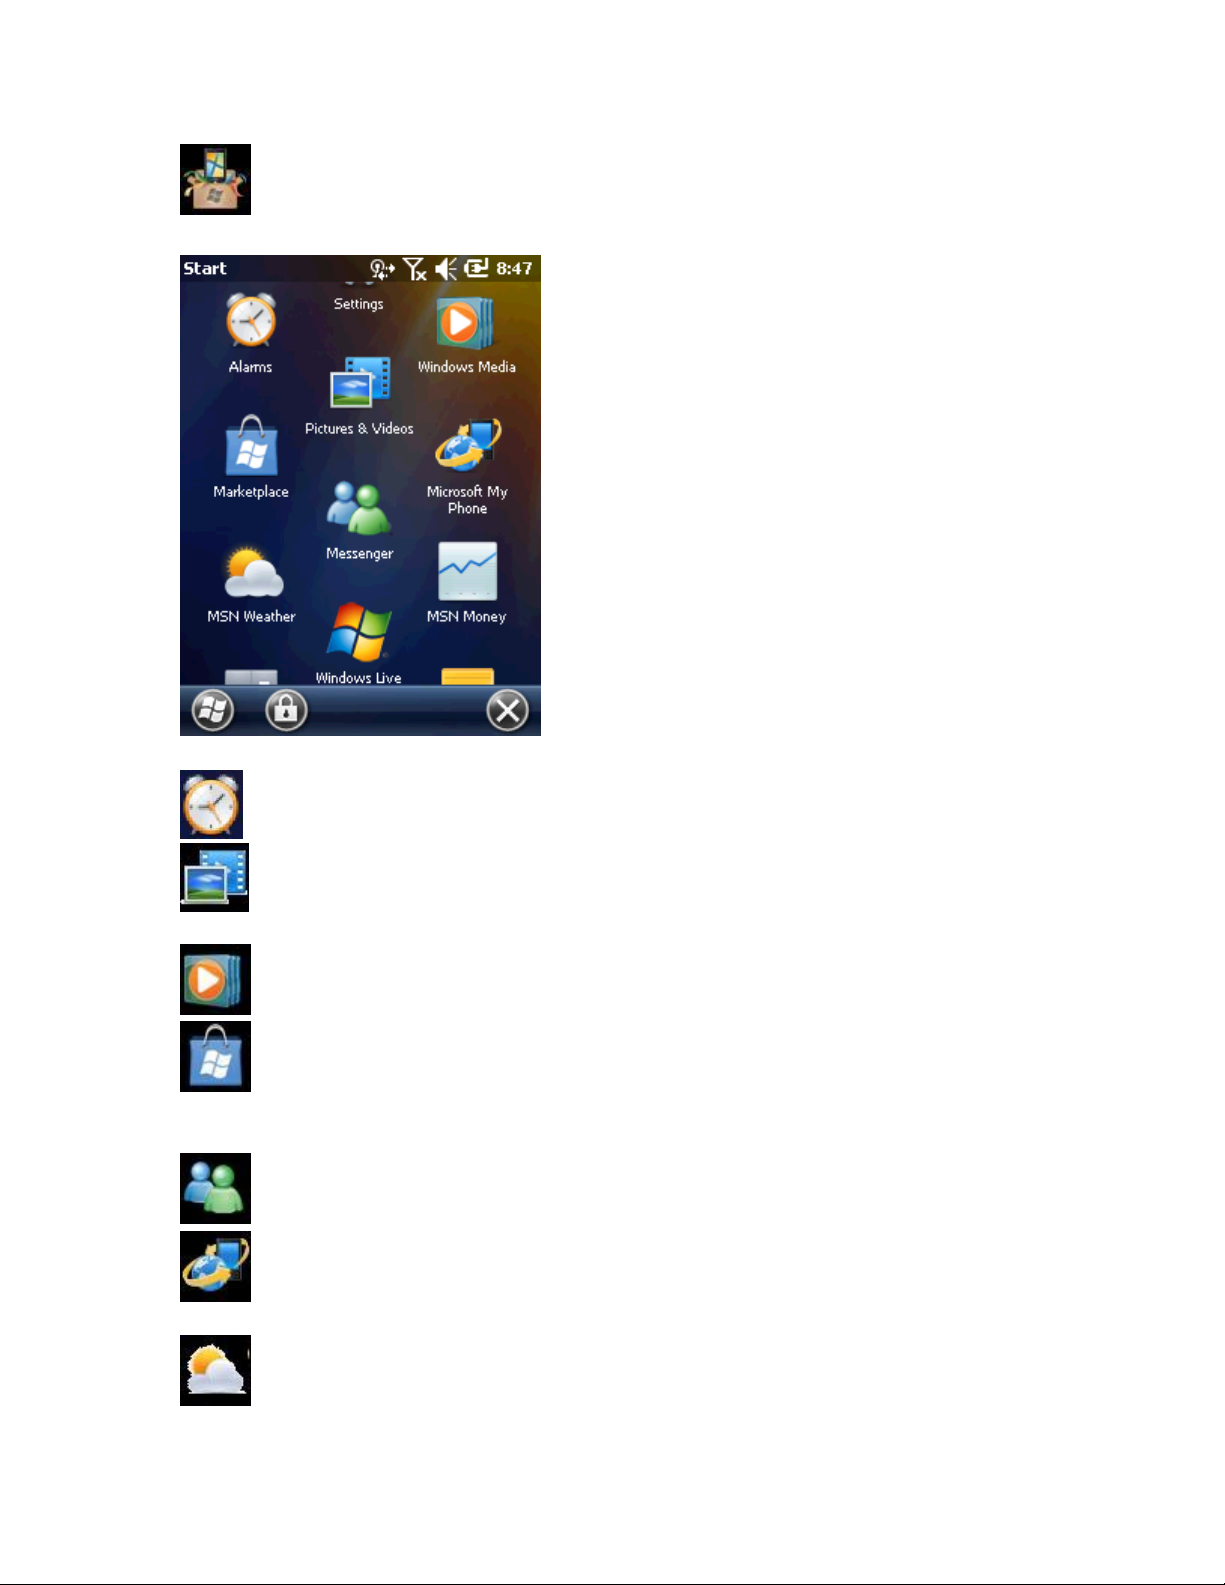
Getting Started: Launching Start applications.
Alarms: Setting local time of each country and alarms.
Picture & videos: Viewing and managing pictures, animation, gif, and video
files.
Windows Media: Playing audio and video files.
Marketplace: Purchasing or downloading applications from the Marketplace.
You can reconnect to it after upgrading via the Internet using ActiveSync, if it is your
first time use.
Messenger: A mobile version of Windows Live Messenger.
Microsoft My Phone: Synchronizing contacts, appointments, tasks, text
messages, music, pictures, videos and documents with a Microphone My Phone account.
MSN Weather: Checking nearby weather forecast.
Page 26

Windows Live: If you want to search for information on the web, use the
Windows Live™.
MSN Money: Manage finances of a user.
Calculator: Performing basic arithmetic calculations including addition,
subtraction, multiplication, and division.
Game: Launching games.
Notes: Creating handwriting memos or pictures or voice recoding files.
Tasks: Managing tasks.
File Explorer: Configuring and managing files in the device.
Active Sync: Synchronizing information between NAUTIZ X3 and a host
computer or Exchange Server.
Page 27

Internet Sharing: Connecting a laptop computer to the Internet using the data
connection capability of NAUTIZ X3.
Task Manager: Viewing memory usage and CPU allocation status. You can end
running processes using this. For further information, please refer to user‟s manual of
Microsoft application for Windows Mobile 6.5 .
Search Phone: Searching for contacts, data, or other information in NAUTIZ X3.
For further information, please refer to user‟s manual of Microsoft applications for
Windows Mobile 6.5.
Help: Displaying online help on the current screen or program.
Remote Desktop Mobile.
Pre-installed configuration applications are listed in screen shot below.
Choose Start > Settings to open Settings folder.
Page 28

Bluetooth: Opening Bluetooth applications, setting NAUTIZ X3 to visible mode,
and searching for other Bluetooth devices within range.
Clock & Alarms: Setting the clock of device to the data and time of local residence
or if you are on travel, you can set them to the corresponding area. You can set alarm for
specific date and time.
Home: Customizing the appearance of the Home Screen and displayed information
on the screen.
Locks: Setting a password for NAUTIZ X3.
Power: Checking remaining battery power and saving power by setting up the expiry
time of display.
Sounds & Notifications: Selecting sounds for various events and alarms and set how
to alarm for each event.
Connections: Connection applications are contained (see the below).
Personal: Personal applications are contained (see the below).
System: System applications are contained (see the below).
Microsoft My Phone: Synchronizing contacts, appointments, tasks, text messages,
music, pictures, videos and documents with a Microsoft My Phone account.
Page 29

Beam: A feature related to IrDA (however, it is not supported on NAUTIZ X3).
Connections: In order for the device to connect to the Internet or private local
networks by configuring more than of connection types – Dial-up, GPRS, Bluetooth,
Modem, etc.
Domain Enroll: For the management and security of a registered device, enroll the
device in Active Directory. For further information, refer to user‟s manual of Microsoft
applications for Windows Mobile 6.
USB – PC: Activating or inactivating and enhanced network connection.
Wi-Fi: Configuring a wireless network connection and user-defined settings.
Wireless Manager: Activating or inactivating a wireless connection of NAUTIZ X3
and configuring user-defined Wi-Fi or Bluetooth settings.
Page 30

Buttons: Allocating a program to a button. It configures the options of how to input.
Owner Information: Entering NAUTIZ X3 owner‟s information.
Phone: Configuring phone settings.
System folder
(only 2D Imager barcode Set)
About: Viewing the basic system information such as the version of Windows
Mobile R, the type of processor used for NAUTIZ X3, etc.
Page 31

Backlight: Setting the expiry time of display backlight and adjusting brightness.
Barcode: Setting Barcode message modes, gun modes, decoding sounds, etc.
(admin Password: 23646)
Certificates: Verifying the certificate information installed in NAUTIZ X3.
Customer Feedback: Submitting a user‟s comment on Windows Mobile 6 software.
Device Profile: Verifying the build information of NAUTIZ X3 and the other module
information.
Encryption: Encrypting files in a storage card. The encrypted files can be only read
on this device.
Error Reporting: Activating and inactivating the error reporting feature of the
device. Once this function is activated, any occurrence of error will be recorded in a text
file including the status of the program and the computer, and if a user wants, it will be
reported to Technical Support Team at Microsoft.
External GPS: Configuring an appropriate GPS communication port, if necessary. If
there is any program accessing GPS data in the device, or in case of connecting GPS
receiver to the device, you have to perform this task in advance.
(Pocket Controller Program NOT included)
Keypad: Configuring keypad shortcuts and key maps.
GPS Power: Control „GPS‟ Power management.
Page 32
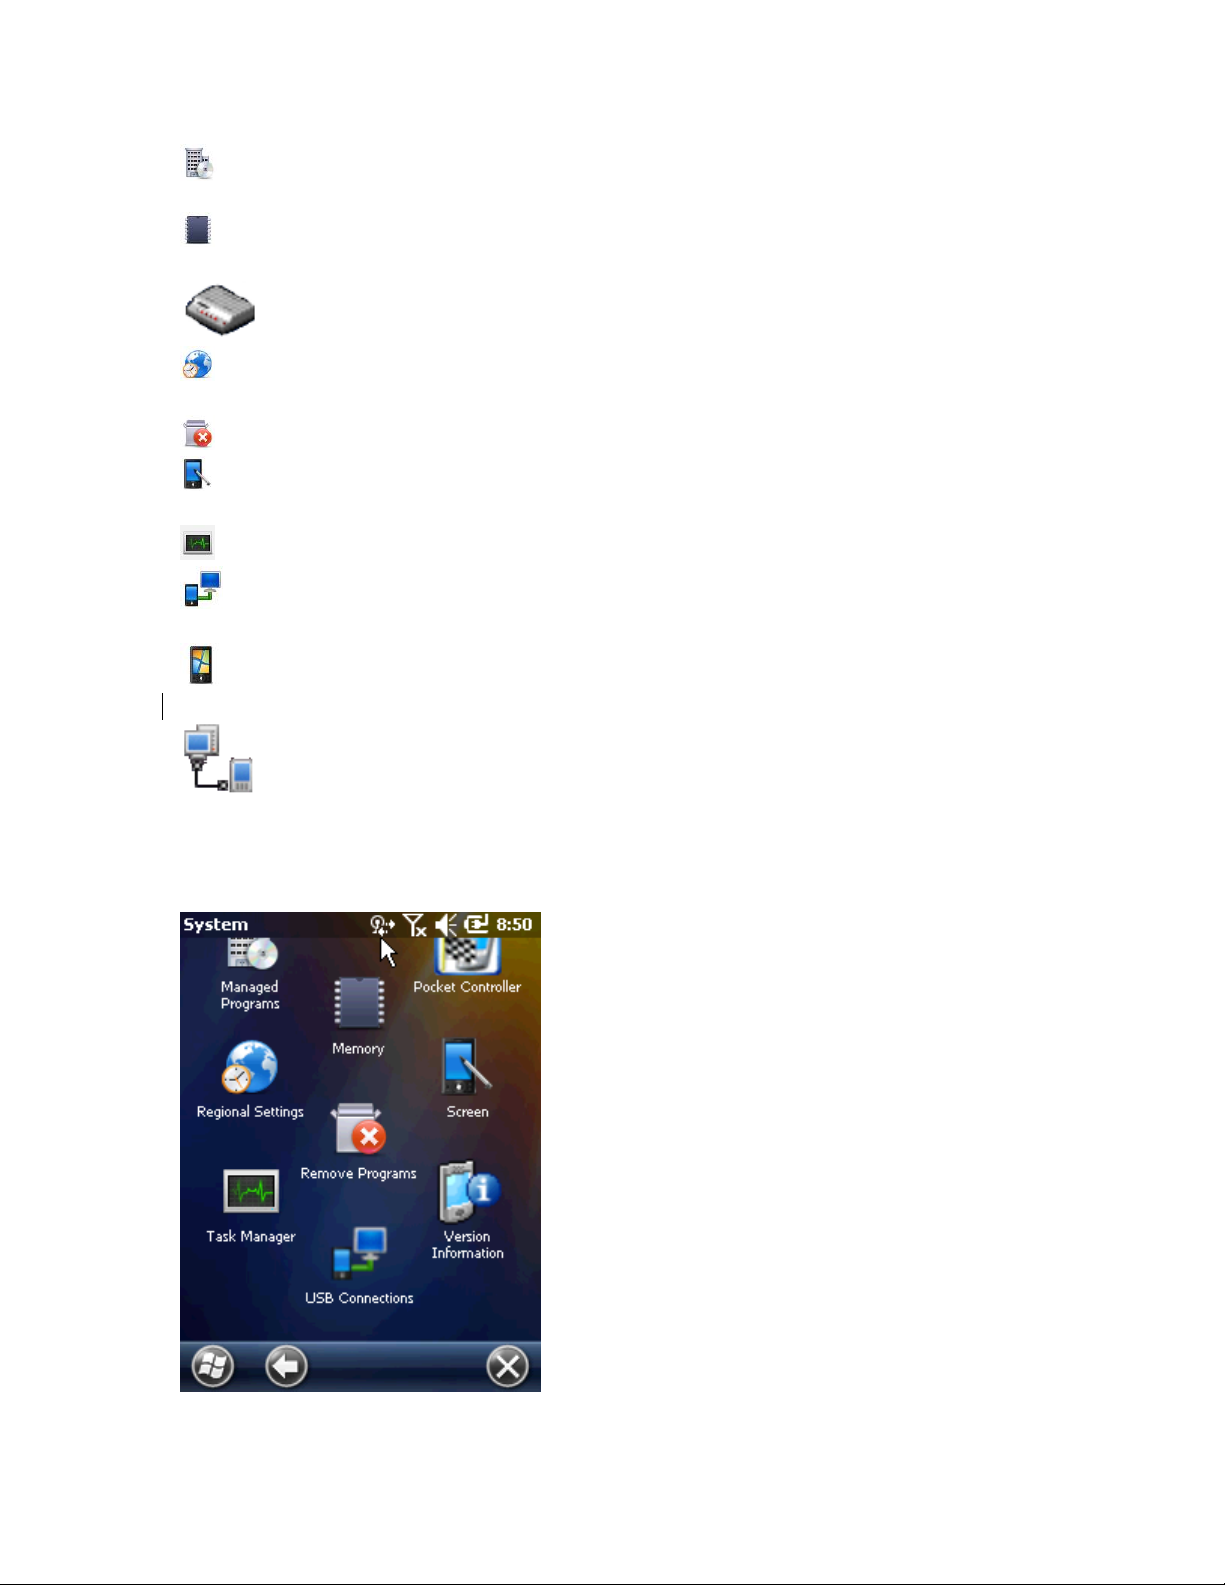
Managed Programs: Displaying installed applications in NAUTIZ X3 using Mobile
Device Manager.
Memory: Checking memory allocation status and memory card information; aborting
currently running programs.
Modem Band Setting: Configuring Modem band settings.
Regional Settings: Configuring NAUTIZ X3 locale settings according to each region
including how to display numbers, currencies, date/time, or time format.
Remove Programs: Removing programs installed in NAUTIZ X3.
Screen: Changing display direction; aligning screen if it isn‟t responding correctly to
stylus, changing text size.
Task Manager: Stopping running programs.
USB Connections: Configuring how to operate when establishing a USB
connection.
System Information: Displaying the software and hardware information on
NAUTIZ X3.
USB Host-Client: Selecting USB host Mode or Client Mode.
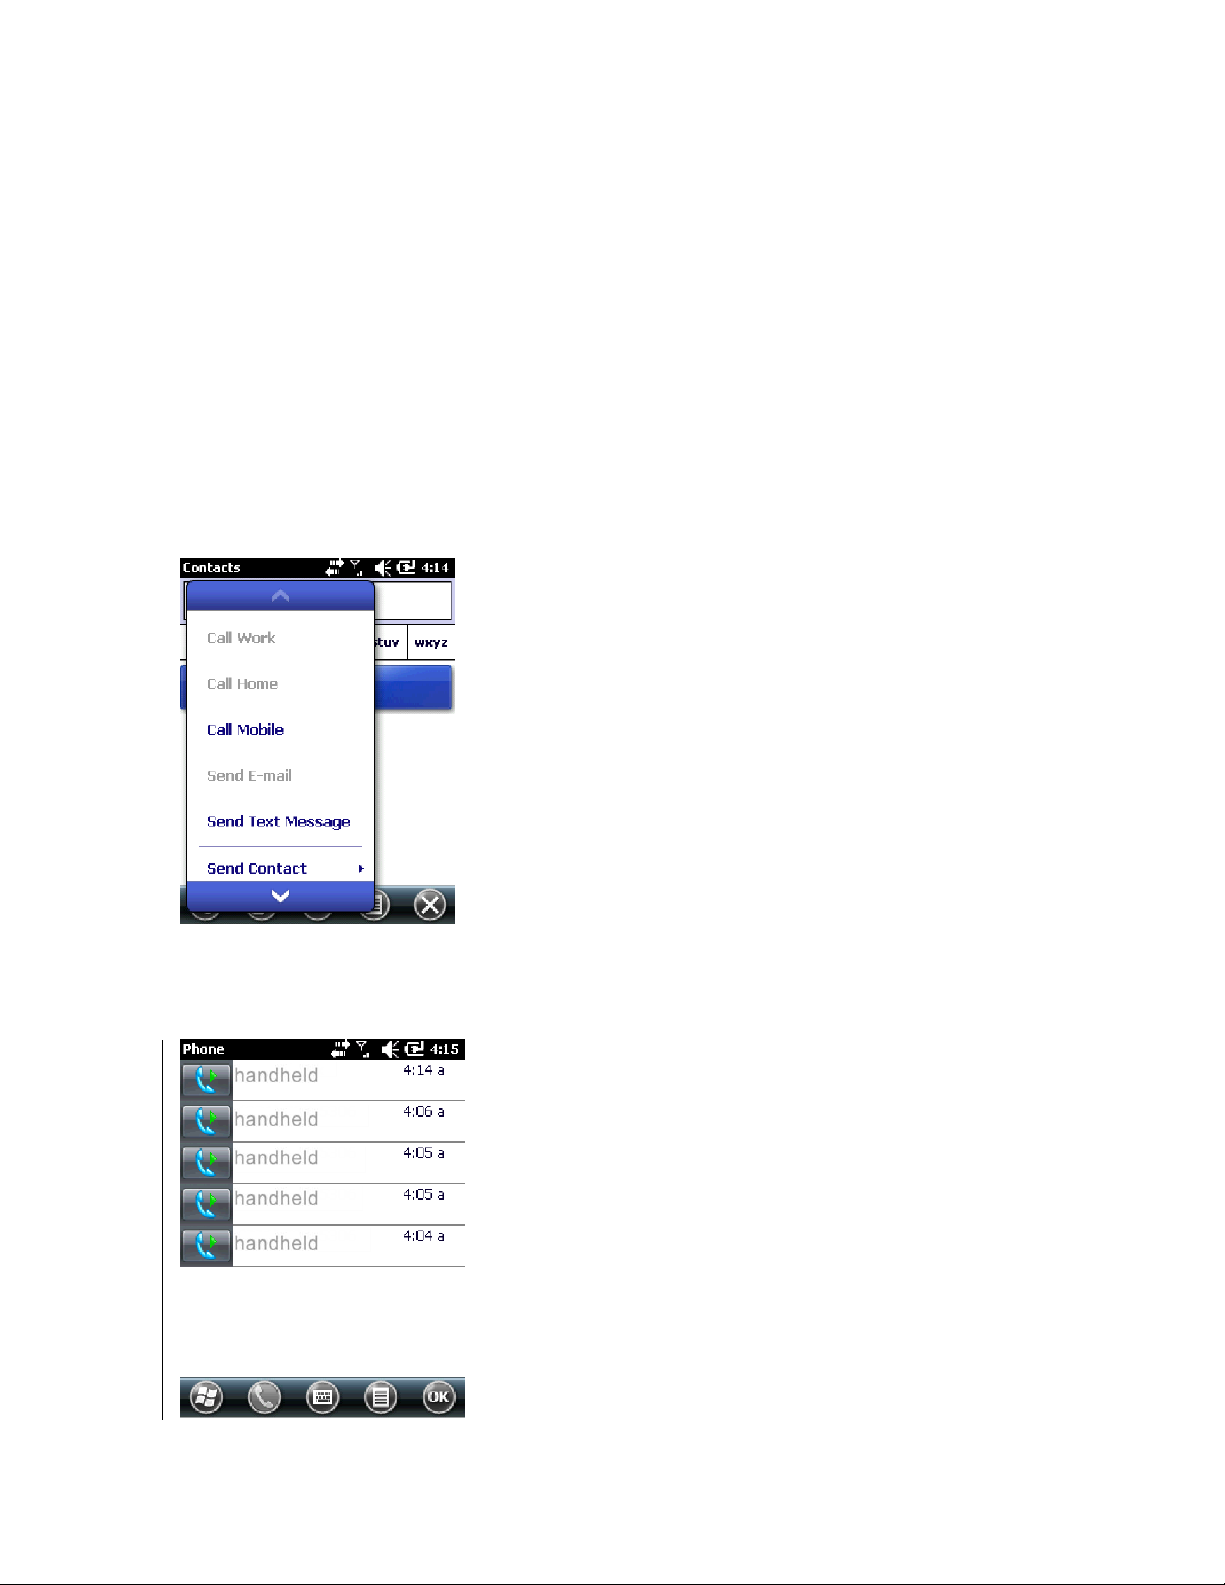
Adjusting Volume
Adjust the volume using the speaker icon on the Navigation Bar.
1. Tap the speaker icon to open the volume dialogue box.
Volume dialogue box
Page 33
2. Adjust volume moving the slide bar by dragging it.
3. Turn volume on or off by selecting turn-off or turn-on radio button.
You can adjust system volume via Sounds and Alarms window or use the up-and-down
button located on the side of NAUTIZ X3.
Display of battery level
Battery icon on the Navigation Bar indicates battery power level. If the main battery is
lower than the pre-specified level, the corresponding icon displays the level; when battery
dialogue box appears, it displays the main battery level.
Battery level dialogue box
On the Home Screen, the battery icon is always displayed on the Navigation Bar,
indicating battery level. The message will be displayed until it is dismissed.
Battery icon on the title bar
Or you can check battery level by opening the power window.
CONNECTIONS
USB PORT
The USB port can be used to transfer information through a wired connection. Data sync
cable is provided. Instructions on how to change USB-Host to USB-Client on 20pin
connector of NAUTIZ X3 follow.
Change USB Host mode and USB Client mode
Page 34
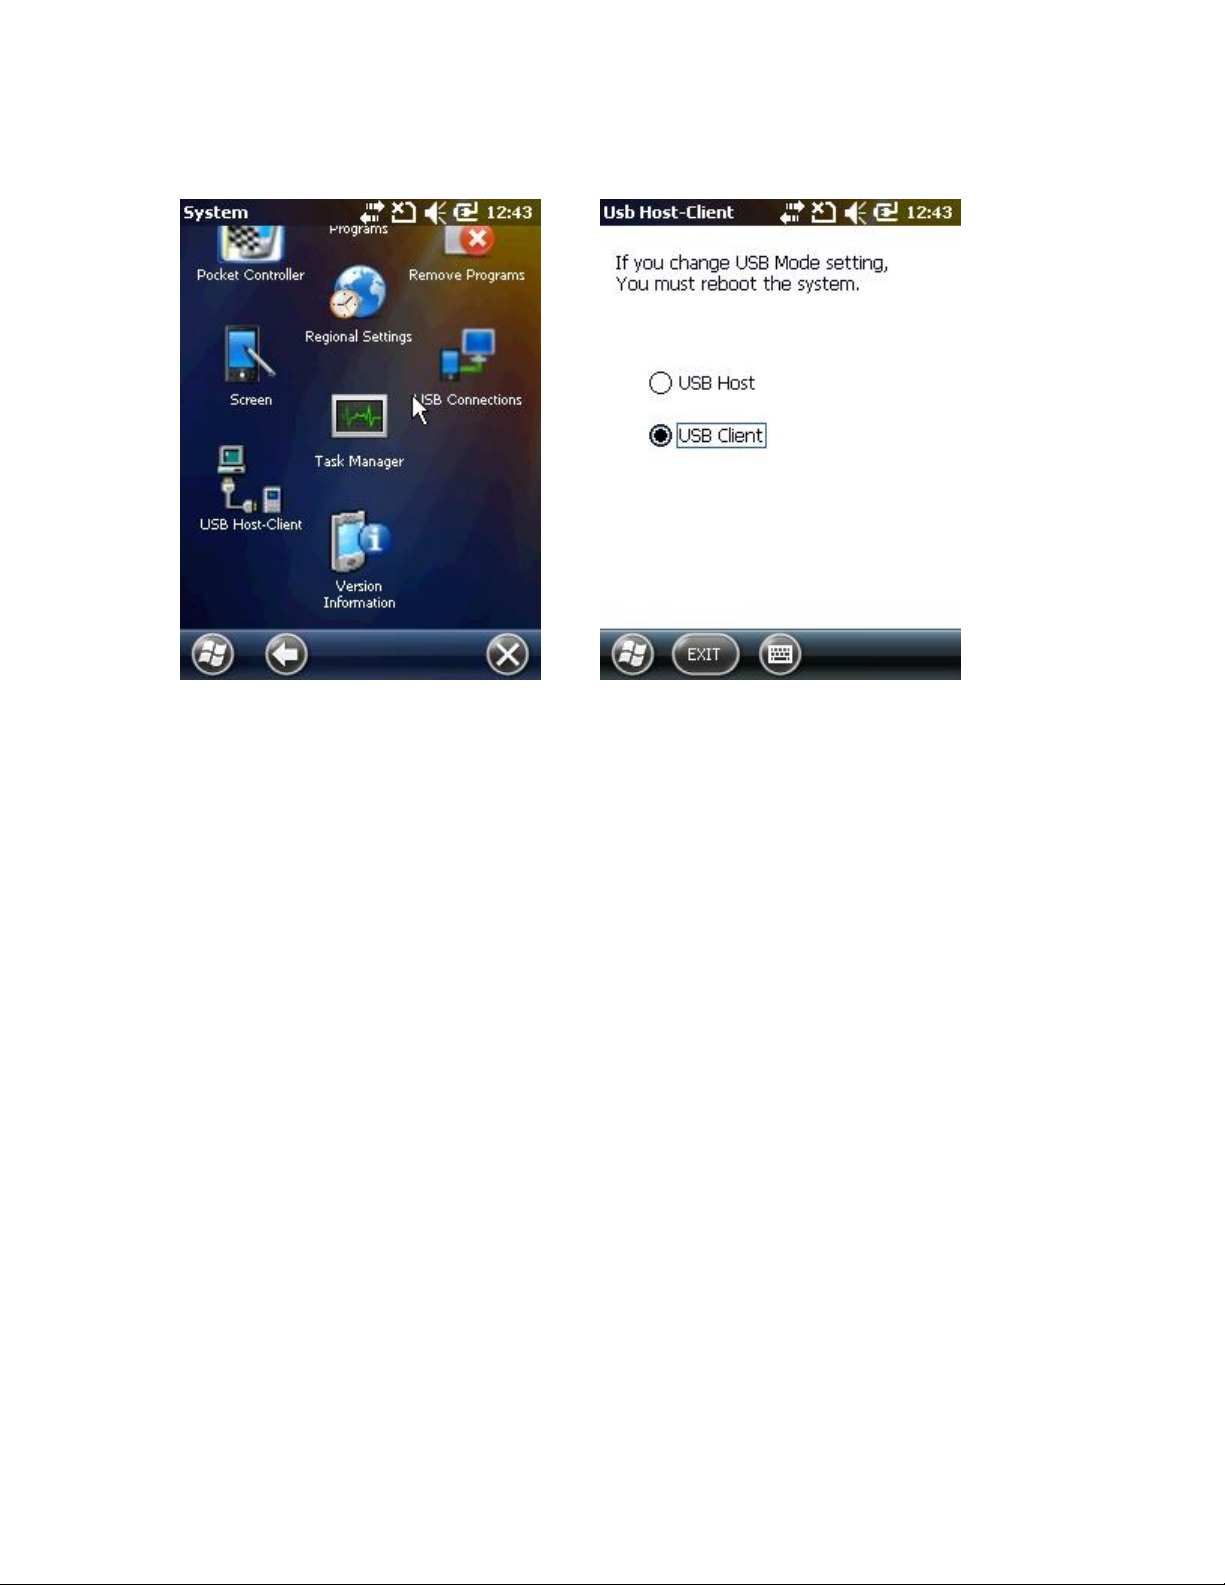
1. Start -> Settings -> System -> USB Host-Client Icon Click
2. Select USB Mode
CONNECTION TO A PC
What this allows (copy files, sync information etc.)
How to install connectivity software on a PC
o WMDC or ActiveSync
BLUETOOTH
Bluetooth wireless technology is designed, in particular, for short range communication
(10m/30ft) and low power consumption.
The NAUTIZ X3 is equipped with Bluetooth technology that can exchange information
(files, appointments, tasks, etc.) with other Bluetooth-enabled devices such as phones,
printers, access points or mobile computers. To use the NAUTIZ X3 as a modem,
establish a dial-up modem connection between the device and a computer.
Do not use Bluetooth pairing or search whilst a 802.11b connection is in progress.
The Bluetooth wireless connection on the NAUTIZ X3 works at Class 2 device power
level. The maximum output power is 2.5mW and the estimated distance is 10m
(32.8ft). The distance depends on power levels and may differ depending on the
environment (open spaces vs. closed office space, etc.). It is therefore, difficult to
define the distance.
Security
Page 35

Current Bluetooth specifications define the security level by the connection level and
Microsoft Bluetooth Stack
OBEX Object Push Services
Hands-Free Audio Gateway Services
Serial Port Services
Personal Area Networking Services
PBAP Services
Dial-Up Networking Services
HID Client Services
A2DP/AVRCP Services
there are no security definitions based on applications. Therefore, application
developers may define security mechanisms for meeting specific requirements. The
application level security is implemented per user, whereas the connection level
security is implemented per device connection. The Bluetooth specification defines the
security algorithms and procedures necessary to certify devices and, if necessary,
encrypt the data between the connected devices. The certification of devices is a
fundamental feature of Bluetooth; however, the connection encryption is selective.
Synchronisation between Bluetooth devices is performed by generating initialisation
keys used as connection keys required for certifying devices. Basically, a Bluetooth
stack responds without a key when a key is requested (the response to the keyrequesting event is the user‟s role). The certification of Bluetooth devices is based on
attempt-response transactions. In Bluetooth technology, other PIN numbers or
passwords used for generating 128 bit keys for security and encryption can be re-used.
Encrypted keys are extracted from the link keys used for certifying synchronised
devices. Also, the limitations in distance and the high-speed frequency hopping of
Bluetooth wireless technology make eavesdropping difficult.
Recommendations are as follows:
. Synchronisation should be performed under secure conditions.
. Do not save the PIN on the device. Store it elsewhere.
. Implement application level security.
Microsoft stack supports smart synchronisation. For details, refer to MICROSOFT
MSDN.
Bluetooth Composition
- In principle, the NAUTIZ X3 is configured to use the Microsoft Bluetooth stack.
The services available via Microsoft Bluetooth stack is listed in Table 6-1.
Table 6-1. Bluetooth services
Ports supported by the Microsoft Bluetooth Stack
COM5
For more information about ports, contact Handheld‟s Technical Support Team.
Power states of Bluetooth
Page 36
Pause
If there is an active Bluetooth pairing, the Bluetooth wireless connection enters lowpower consumption mode to maintain the active pairing. If there is no active pairing,
the Bluetooth wireless connection will be disconnected.
A pairing between the NAUTIZ X3 and another Bluetooth device will time out if there
is no data exchange between the two devices. The NAUTIZ X3 will be temporarily
suspended when the power button is pressed (except for instances where a call is
made), this will unsuspend the device shortly after receiving data from the Bluetooth
device. E.g. if redialling from the headset, the suspension will be lifted.
Restart
If Bluetooth was enabled prior to the temporary suspension, it will be powered on when
the NAUTIZ X3 restarts.
Turning the Bluetooth Wireless mode on/off
Turn the Bluetooth wireless connection off to save battery or when you enter an area
with restricted wireless connectivity (e.g. an aircraft). When the wireless connection is
turned off, other Bluetooth devices will be unable to detect or connect to the NAUTIZ
X3. Turn the Bluetooth wireless connection on in order to exchange information with
other Bluetooth devices within range. The Bluetooth wireless connection allows for
short range communication only.
Note: Turn the wireless connection off when not in use to extend the battery life.
Bluetooth Activation/Deactivation
1. Tap Start > Settings > Connections > Bluetooth or tap Wireless Manager >
Bluetooth
See Figure 6-1. Bluetooth mode tab
2. Tap anywhere in the Bluetooth bar to turn it on and off.
Page 37
Search for other Bluetooth devices
If smart synchronisation is pre-configured or a pre-defined PIN is
requested, the password prompt will not be displayed.
The NAUTIZ X3 can receive information from a detected device without connecting to
the device. When a connection has been established with another device, the NAUTIZ
X3 will automatically exchange data if the Bluetooth wireless connection has been
activated.
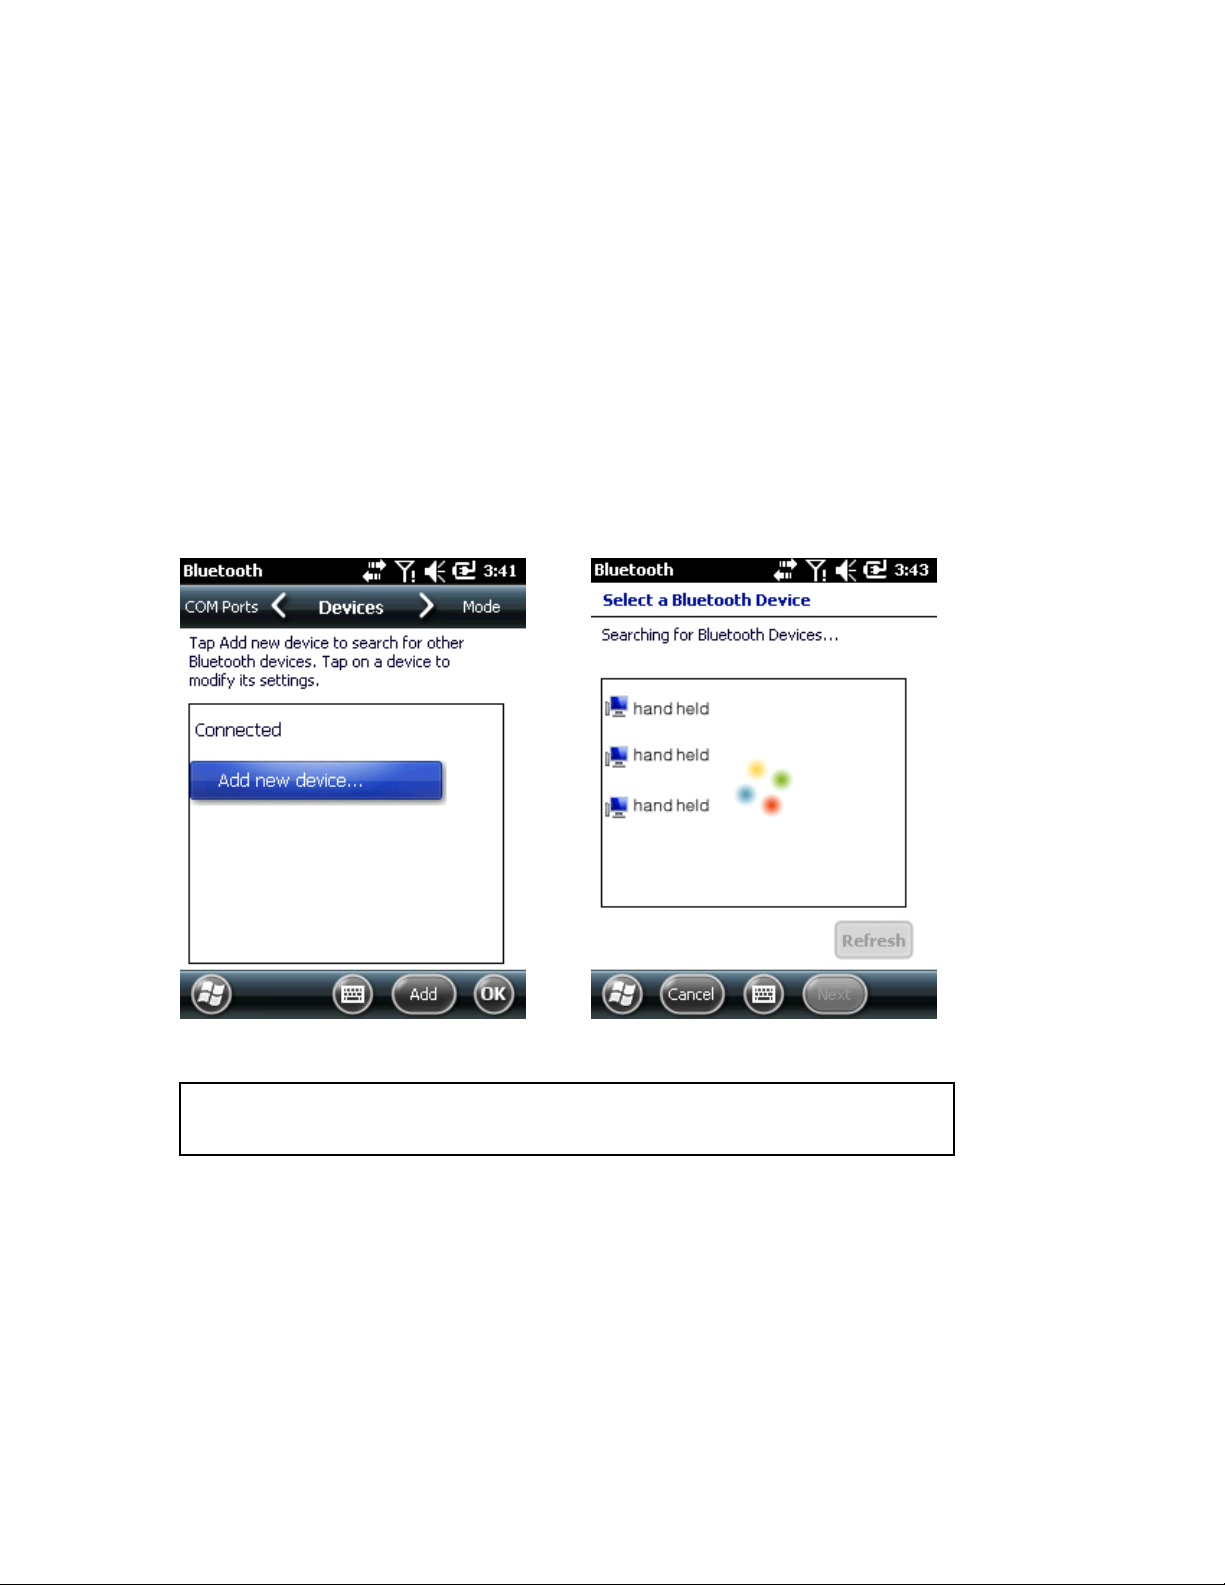
How to locate Bluetooth devices within range
1. Activate Bluetooth on both devices.
2. Set the Bluetooth devices to detection and connection-enabled mode.
3. Ensure that the devices are within 10m (30ft) of each other.
4. Choose Start > Settings > Bluetooth > Add New Device
5. Tap Add New Device. The NAUTIZ X3 will search for new Bluetooth devices
within range.
6. Choose a device from the list.
Searching for a Bluetooth device Select a Bluetooth device
7. Tap Next A password prompt will be displayed.
8. Enter a password for the other device. The device will then be added to the Bluetooth
Device List.
Page 38
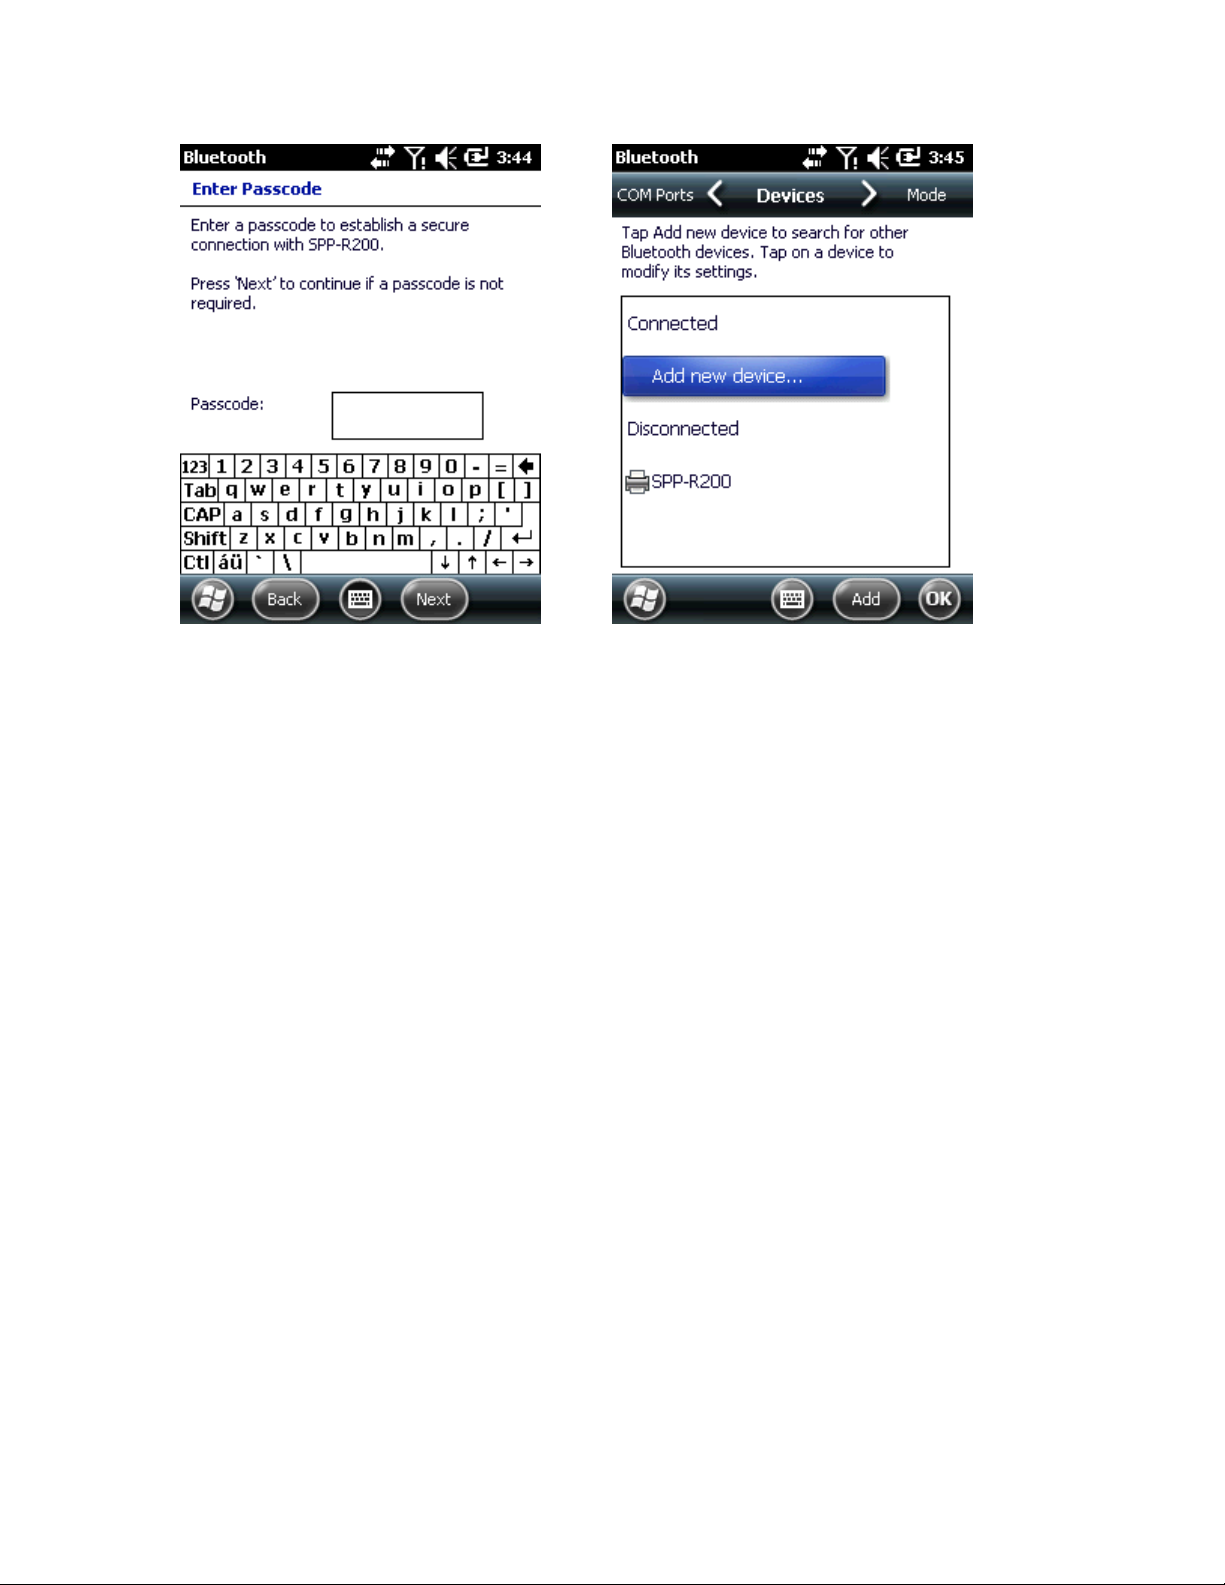
A password prompt will be displayed. If there is a specific password for the device,
enter the password at the prompt and tap Next. If there is no password for the device,
enter an arbitrary password and tap Next. Bluetooth will attempt to establish a pairing
with the device.
9. If there is a pre-defined password, the same message will appear in the other device
requesting the password. Enter the password to configure the synchronised connection
(if the password of the device is entered, there is no other tasks to perform on other
device).
10. When connected, a list of appropriate and supported services will appear.
11. Choose the service you want and tap OK. If you don‟t select the service, it will not
be synchronised even if the device is synchronised. If you don‟t select a service, the
password prompt will be displayed.
12. The device will appear in the list in the main panel. When both devices accept the
password, a reliable (synchronised) pairing is established.
Available Services
Some devices may not require a PIN, this depends upon the device certification.
Hands-free Services
Connect a Bluetooth headset
Pairing differs between Bluetooth headsets, and the device will only remember the
most recently connected headset. If a problem occurs while making a connection to a
headset, switch the headset to detection mode. For more details, refer to the user
manual for the headset. Only WAN audio will be transmitted to a headset. System
audio will be transmitted using the NAUTIZ X3 speaker. You can answer and make
calls using a hands-free profile.
1. Activate Bluetooth on both devices and turn on detection mode.
Page 39

2. Ensure that the devices are within 10m (30ft) of each other.
3. Tap Start > Settings > Bluetooth.
4. Tap New Device. The NAUTIZ X3 will search for Bluetooth devices within range.
5. Enter the name of the headset and tap Next. A password prompt will be displayed.
6. Enter the password for the headset.
7. Tap Next The NAUTIZ X3 will connect to the headset. For detailed instructions
about the communications with Bluetooth devices, please refer to the user manual for
the headset.
Note: While an active pairing is being established, the NAUTIZ X3 will not go into
pause mode even when the power button is pressed. A notification message will appear
instead. The power button can be used again when the WAN connection has been
disconnected (if using a hands-free profile).
Serial Port Services
Wireless Bluetooth uses a serial port connection as well as the wired serial cable
connection. It is used for configuring applications that will be used for connections
with the relevant serial ports.
How to connect to serial ports
1. Activate Bluetooth on both devices and turn on detection mode.
2. Ensure that the devices are within 10m (30ft) of each other.
3. Go to Start > Settings > Bluetooth > Device.
4. Tap Add New Device. The NAUTIZ X3 will search for Bluetooth devices within
range.
5. Choose a device from the list.
6. Tap Next A password prompt will be displayed.
Note: If smart synchronisation is pre-configured or a pre-defined PIN is requested, the
password prompt will not be displayed.
7. Enter password and tap Next. The device will then be added to the Bluetooth Device
List.
8. Select a serial device from the list of devices. The Connection settings screen will be
displayed.
9. Select the serial port confirmation column.
10. Tap Save.
11. Tap the COM ports tab.
Page 40
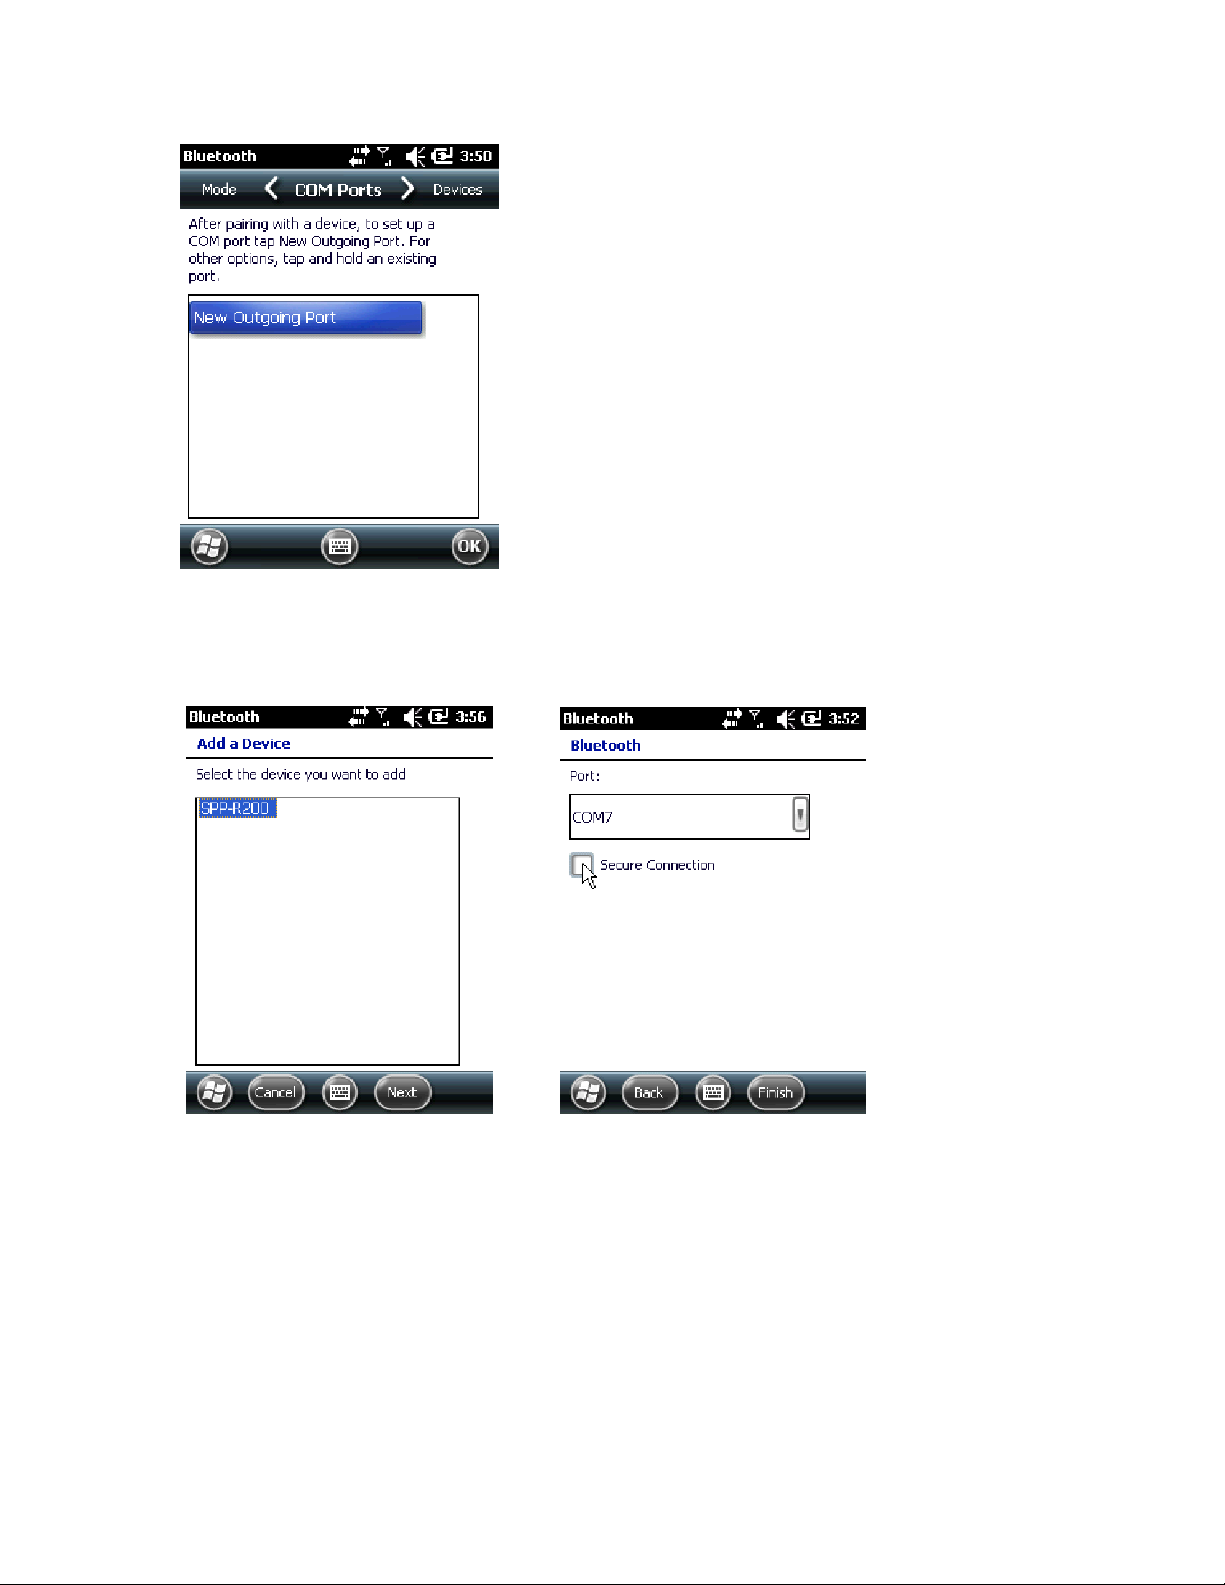
12. Tap New Outgoing Port. The Add a Device screen will be displayed.
13. Select the serial device and tap Next.
14. Select a COM port from the drop-down menu.
15. Tap Finish
Note: This process alone will not create a partnership. To make a partnership again, the
application must run Microsoft Bluetooth Stack by opening the selected COM port.
ActiveSync using serial port services
As with a wired serial connection, ActiveSync also uses a Bluetooth serial port
connection. Therefore, an application required for connecting to the correct serial port
must be configured.
Page 41

Configure the Bluetooth features of the device prior to establishing a Bluetooth
ActiveSync connection.
How to configure Bluetooth ActiveSync
Note: In order to improve security, the network bridge (particularly the Remote NDIS
adapter Connection Bridge) of a computer must be deactivated before connecting the
device to a computer with a networked connection. For further information relating to
the network bridge, refer to the Windows Online Help of the computer.
The following instructions correspond to computers running Windows XP with SP2 or
higher.
1. Activate Bluetooth on both devices and turn on detection mode. Ensure that the
devices are within 10m (30ft) of each other.
2. Double click Start > Settings > Configuration Panel > Bluetooth device.
3. Select the "Search for a Bluetooth Device" box and the "Allow a New Bluetooth
Device to Connect to This Computer" box under Options.
4. Select Receive (start connections from the device) after clicking Add on the COM
Port tab and click OK.
Click OK after checking the added COM port.
5. Click Start > ActiveSync.
6. Click File > Connection Settings.
7. Allow one of the following connections: Press Start > ActiveSync after selecting a
COM port whose number was checked in the previous step from the drop-down menu.
8. Choose a connection via Menu > Bluetooth.
Synchronisation will automatically start and the ActiveSync icon will appear at the
bottom right hand side of the Home Screen.
If certification is required, a password window will appear, enter a password (PIN
code) and press Enter and repeat this procedure on the other device. Passwords are
recommended for enhanced security and passwords should be between 1 and 16
characters and can be any combination of alphanumeric characters. If you are not going
to use a password, just click Next.
9. To disconnect the ActiveSync connection, click the ActiveSync icon on the Home
Screen and click Disconnect.
A2DP/AVRCP Services
A2DP/ AVRCP are used for connecting to high-quality stereo headsets.
1. Activate Bluetooth on both devices and set the Bluetooth devices to detection and
connection mode.
2. Ensure that the devices are within 10m (30ft) of each other.
3. Tap Add a Device after selecting Start > Settings > Connections > Bluetooth. The
NAUTIZ X3 will search for Bluetooth devices within range.
4. Select the stereo headset from the list and tap Next. A password prompt will be
displayed. For more details, refer to the user manual for the headset.
Note: If smart synchronisation is pre-configured or a pre-defined PIN is requested, the
password prompt will not be displayed.
5. Tapping Connection will pair NAUTIZ X3 with the stereo headset.
Page 42

The stereo headset associated with the hands-free service will be connected to the
hands-free service after connecting to the A3DP service.
1. Tap Add a Device after selecting Start > Settings > Connections > Bluetooth. The
NAUTIZ X3 will search for Bluetooth devices within range.
2. Select the stereo headset from the list. Tapping Next will take you to a password
window. For more details, refer to the user manual for the headset.
Note: If smart synchronisation is pre-configured or a pre-defined PIN is requested, the
password prompt will not be displayed.
3. Tap Connection. The NAUTIZ X3 will connect to the stereo headset.
WI-FI(802.11)
If your unit‟s cellular function is enabled, you can connect to wireless networks to access
the Internet. The Wi-Fi function must be enabled in order for the device to search for
wireless networks in the area.
To enable Wi-Fi:
1. Tap Start > Settings > Connections > Wireless Manager.
2. Tap anywhere on the Wi-Fi bar to turn it on and off.
Once Wi-Fi is enabled you can search for local wireless networks. To search for
networks:
1. Tap Start > Settings > Connections > Wi-Fi.
2. Available networks will be displayed on screen. Tap the network you wish to connect
to. A password may be required.
To connect to a hidden network tap “Add New” at the top of the screen.
‘
Page 43
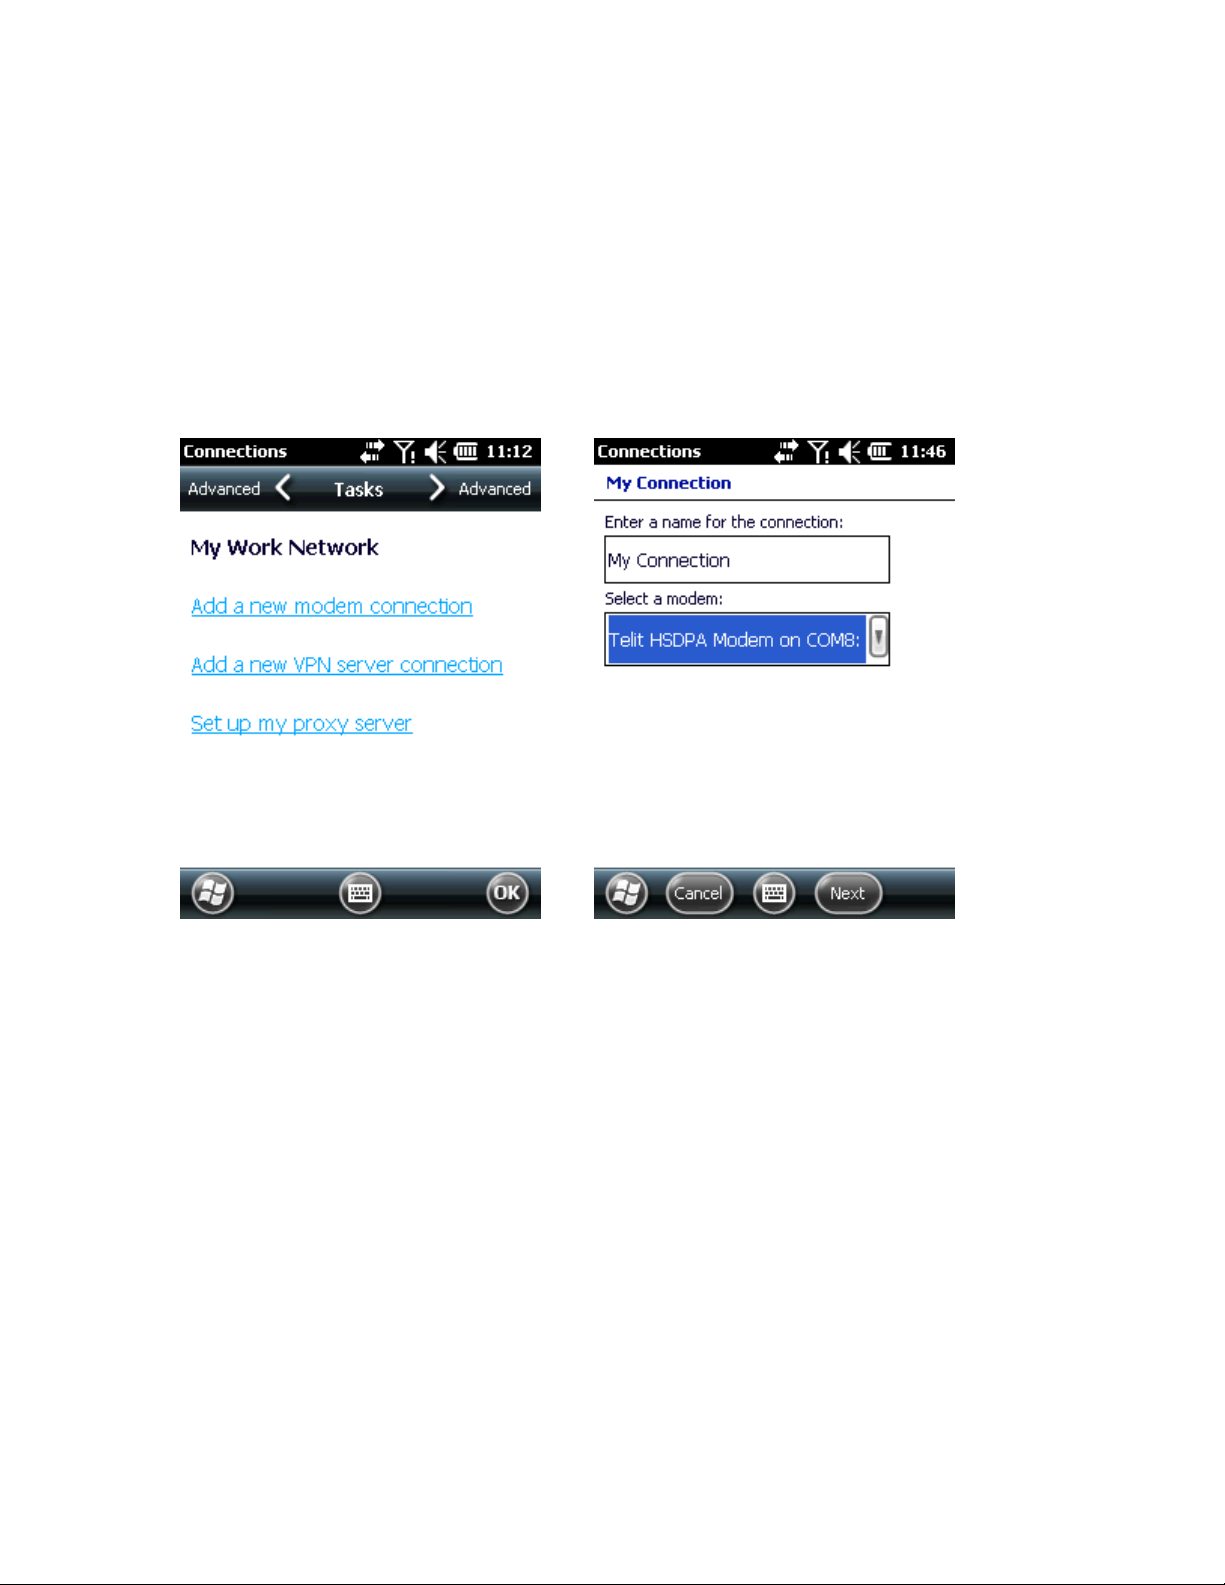
WIRELESS WAN
Settings may vary depending on country. Please contact your service provider or retailer
for further information.
1. Tap Start -> Settings -> Connections -> Connections -> “Tasks”.
2. Tap “Add a new modem connection”.
3. Enter the Connection name and select modem.
4. Tap Next.
5. Enter the Data Dial Number.
6. Tap Next.
7. Enter your user name and password and if necessary domain (user-defined setting).
Page 44

Manual settings may interfere with regular communication.
The default setting is Automatic.
8. If you need to define settings, tap the “Advanced” button
9. Tap Finish
Manual Network Settings for WAN
1. Wireless manager -> tap the Menu button -> Phone Settings -> Network or Phone
Program -> Menu button -> Option -> Network.
2. Select Network.
3. Tap “Manual” from the dropdown menu.
4. Select Network ISP.
5. Tap the OK button.
Page 45

CAMERA
Taking pictures
1. Tap Start > Pictures and Videos icon.
2. Choose camera from the navigation bar.
3. Check the image in the view finder and, if necessary, adjust settings.
4. Press the Enter key to take a picture.
Video Recording
1. Tap Start > Pictures and Videos icon.
2. Choose camera from the navigation bar.
3. Choose Menu > Videos to set the shooting mode to Video.
a. The available recording time will be displayed on the screen.
b. The default video recording time is limited to 30 seconds.
4. Start recording by tapping the Enter key.
5. Stop recording by tapping the Enter key again.
Page 46

Pictures & Videos Taking pictures Video recording
In order to perform data capture, an application such as
Notes must be running.
View pictures and video clips
1. Tap Start > Pictures and Videos icon.
2. Choose the picture or video clip you want to view.
Set Picture as Background
You can set a photo as the background image for the home screen.
1. Tap Start > Pictures and Videos > Menu.
2. Select “Set as Home Background”.
3. Select transparency level and tap ok.
BARCODE SCANNER
The NAUTIZ X3 provides two kinds of data capture modes:
1. Laser decoding (1D Scanner).
2. Image decoding (2D Scanner).
Laser scanning
The barcode scanning features of the NAUTIZ X3 are as follows:
1. Recognise various linear barcodes such as Code39, Codel128 and 1-dimensional
barcodes, etc.
2. Customise the settings to fit your working environment.
When scanning, please consider the following:
Generally, scanning is a simple task composed of levelling, scanning and decoding.
Therefore, the process quickly becomes familiar. However, in order to optimise the
scanning performance the following should be noted:
Distance
All scanning devices have an optimal recognition range (minimum or maximum
distance from the barcode). The range may differ depending on barcode size or the
scanning device.
When scanning is performed within the optimal range it is quick and reliable. However,
if scanning is performed too close or too far, the success rate may decrease. When
scanning, move the NAUTIZ X3 forward and backwards until you find the optimal
range of operation. The larger the barcode, the greater the distance required between
the barcode and the NAUTIZ X3. If the distance between the barcodes is shorter, the
closer the distance required between the barcode and the NAUTIZ X3.
Angle
Page 47

Scanning should not be performed at an angle as this may decrease the recognition
ability.
Scanning barcodes
1. Check that the scanning application is running on the NAUTIZ X3.
2. The laser beam exits the end of the NAUTIZ X3 while the scan button is
pressed. The red scan beam should cover the entire barcode. The laser beam
indicates that scanning is in progress. An alarm will sound and the laser turns off to
indicate that the barcode has successfully been decoded.
<Correct> <Incorrect>
3. Release the scan button.
Image decoding
The image scanning features of the NAUTIZ X3 are as follows:
1. Recognise linear barcodes such as Code39 and Code128, including 2-D barcodes
such as PDF417 and QR codes.
2. Image capturing for various applications.
3. Intuitive aimer.
The image scanner captures barcodes using digital camera technology and saves the
captured images before extracting data using an optimised decoding algorithm.
Operation modes
The integrated image scanner of the NAUTIZ X3 supports four operation modes: Each
mode can be adjusted via the barcode settings menu.
Decode Only: Decode a barcode. The scanner remains in decoding mode whilst the
scan button is pressed or until decoding has completed.
Image Decoding: Simultaneously processes barcode decoding and barcode-image
capture.
Image Only: Captures the barcode image.
Page 48

Multi-scan Mode: Decode multiple barcodes quickly and conveniently. New barcodes
When using the NAUTIZ X3 in a vehicle, ensure that the device is safely
affixed and that it does not block vision to prevent accidents. For the
safety of you and others, do not use the device while driving.
can be decoded whilst the scan button is pressed.
Image scanning
1. Check that an associated program, such as Notes, is running on the NAUTIZ X3.
2. Press the scan button to turn on the aiming pattern to help level the scanner with the
target. Move the aiming pattern to the centre of the barcode area. The red laser
beam indicates that scanning is in progress, an alarm will sound to indicate that the
barcode was successfully decoded.
3. Release the scan button.
GPS
The NAUTIZ X3 utilises GPS (Global Positioning System) technology using the ublox chipset. GPS satellites orbiting the earth transmit digital wireless signals to the
GPS technology in the device. The wireless signals contain precise time data, and can
be used for identifying the location of a user.
Page 49

Setting up GPS on the NAUTIZ X3
The basic features of the NAUTIZ X3 are as follows:
1. Choose Start > Settings > System > External GPS.
2. Set the GPS program port to COM4 via the program tab.
3. Set the GPS program port to COM9 via the program tab.
4. Set the baud rate to 115 200 via the Hardware tab.
Several programs can access GPS data simultaneously. Each program must access GPS
data using Microsoft GPS API or COM4.
Operation
The default setting is subject to change.
It may take from a few seconds up to several minutes for satellite signals to be
received. Ideal conditions are outdoors with no obstacles blocking the skyline. It may
take longer to calculate the initial position and receive signals under other conditions.
When using the device indoors, access to GPS signals may be restricted or
unobtainable.
When using a GPS navigation program, make sure that the NAUTIZ X3 is not in
temporary pause mode. If the NAUTIZ X3 is in temporary pause mode, the GPS
module will not receive any power. To continue using the GPS, the GPS receiver has to
search for effective GPS signals again. This could delay the retrieval of location
information.
GPS maps on a MicroSD card
Some software vendors provide GPS map data on MicroSD cards. If using MicroSD
for navigation software:
1. Remove the battery from the NAUTIZ X3.
2. Open the SD Card slot, located at the right hand side inside the battery compartment.
3. Insert the SD card into the slot.
4. Close the SD slot by pushing it down.
Answer calls while using GPS
If you are receiving a call while using GPS navigation software
1. Tap the Answer button to receive the call.
2. Tap the End call button to resume GPS audio when finishing the call.
When receiving incoming calls whilst using the GPS, the GPS audio will be muted
until the call has ended.
Losing GPS signals while driving a vehicle
If the vehicle's window contains heating threads, this could affect the GPS performance
of the device. To improve GPS signals, mount the NAUTIZ X3 in a clear line to the
sky, without any obstacles. To access satellite information, the NAUTIZ X3 and GPS
satellites should be in a clear line with the sky.
Page 50
The NAUTIZ X3 can be used for making calls, saving contacts, managing call records,
sending text messages, storing received messages, etc.
In addition, users can browse the web via a dial-up network to send data in real time
with a variety of office applications.
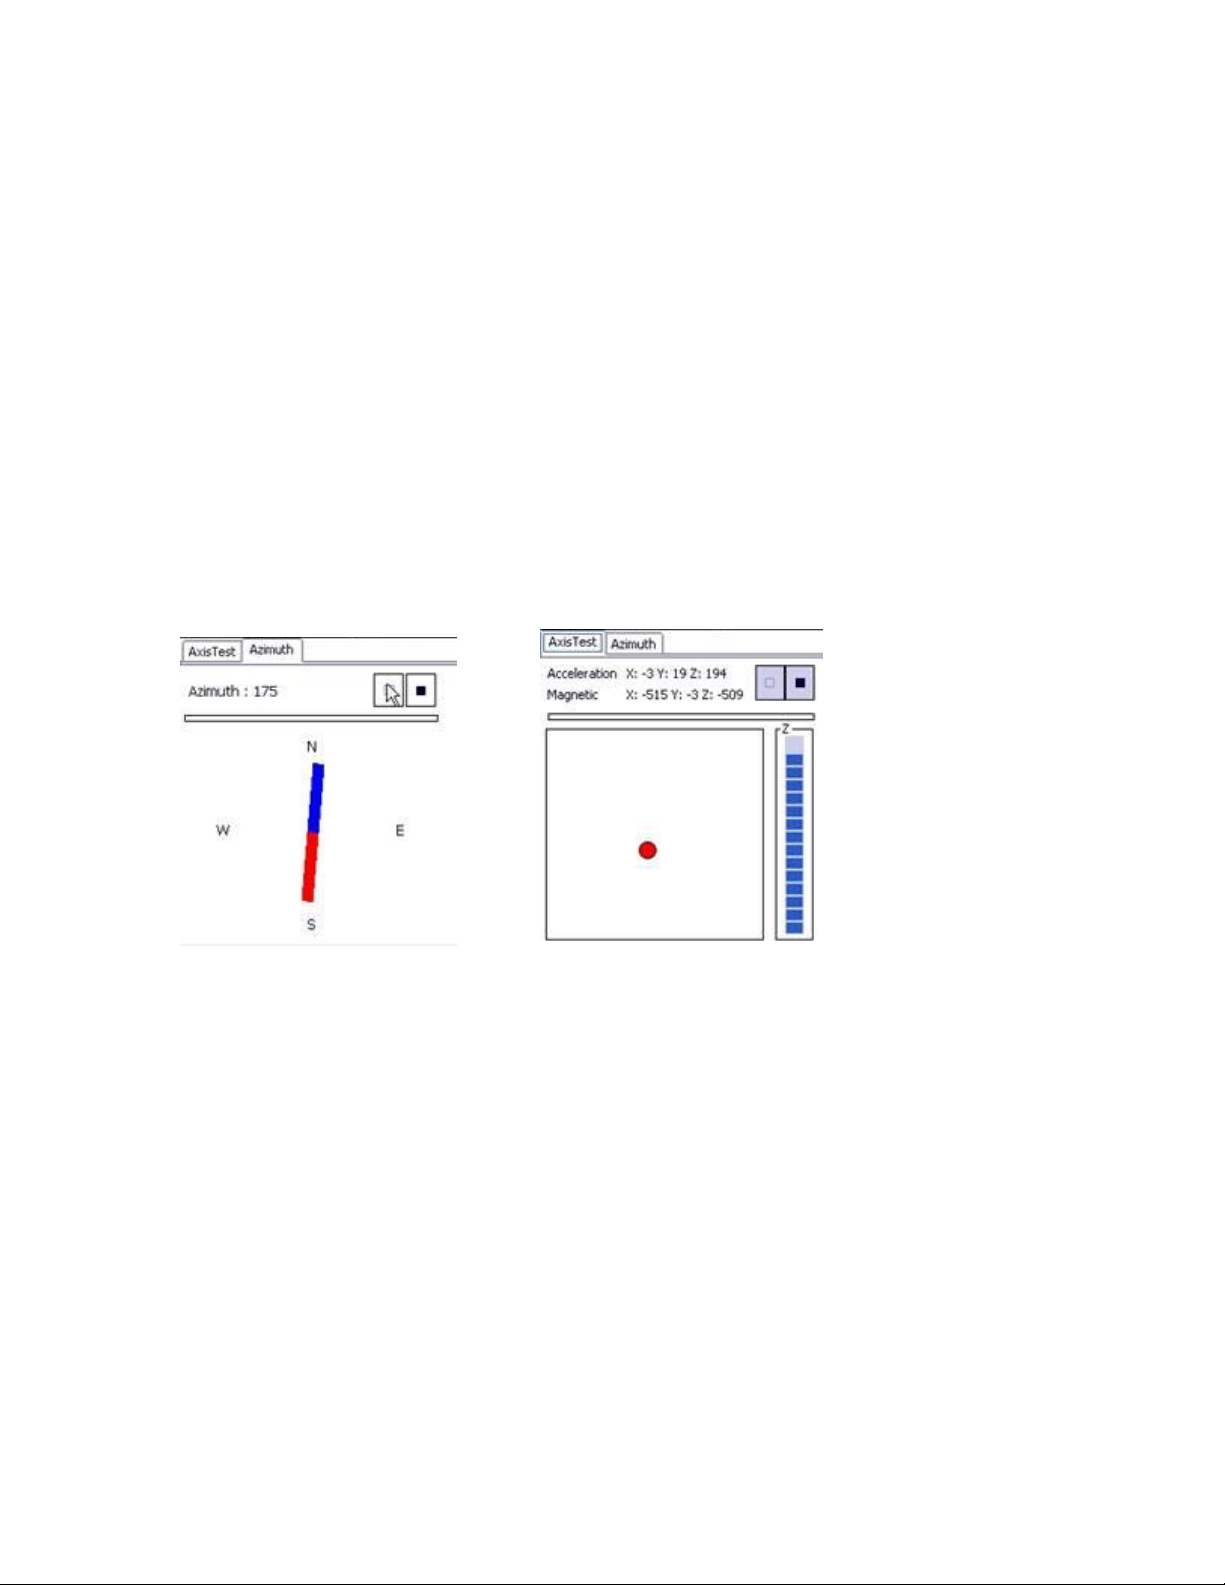
Sensors
Additional sensors in the NAUTIZ X3 are listed below:
E-compass
Using the integrated sensors, the magnetic direction can be recognised.
6 axis Sensors
Motion can be detected by measuring any changes in the vector of an object or objects in
the field of view.
PHONE FEATURES
The phone application can be used irrespectively of any other programs running on the
device.
In order to use the phone, press the "S” button, choose "Start > Phone" or simply tap
the green button on the Home Screen.
Page 51
Turning the phone on/off
The phone can be activated or deactivated via the Wireless Manager.
Choose Start > Settings > Connection to launch the Wireless Manager.
Enable or disable a connection type by selecting its name.
To configure connection settings, tap Menu > and find connection type for which you
wish to alter the settings.
CALLING
There are three audio modes to choose from when making a telephone call.
Handset mode: Uses the speaker at the front of the NAUTIZ X3. Handset mode is the
default mode.
Speaker mode: Enables the speaker mode.
Headset mode: The NAUTIZ X3 can be used with earphones or a Bluetooth headset.
The default mode is handset mode. The user can listen to audio files using earphones or
a Bluetooth headset.
Page 52
Making an emergency call is possible even if the SIM card is not
installed. Please refer to page 7 for further information.
Using wired headsets
Headsets can be used for audio applications. Connect a headset (earphones) to the
earphone plug located on the side of the NAUTIZ X3. Adjust the volume before
connecting the headset. When a headset is connected, the speaker is disabled.
Bluetooth headsets
A Bluetooth headset can be used for audio communication. Please refer to chapter 6
“Using Bluetooth” for further information about connecting a Bluetooth headset to the
NAUTIZ X3. Adjust the volume before connecting the headset. When a Bluetooth
headset is connected, the speaker is disabled.
When making a phone call, the use of Bluetooth hand-free profile is recommended
instead of using Headset profile. For more details, please refer to chapter 6 – Using
Bluetooth.
Adjusting the audio volume
Adjust the ring volume via the volume control settings or via the volume button located
at the top of the device. These buttons also adjust the audio volume when making a
phone call. To adjust the volume, tap the title bar and then tap the speaker icon that
appears. Adjust the volume by moving the slide up and down.
Making a phone call
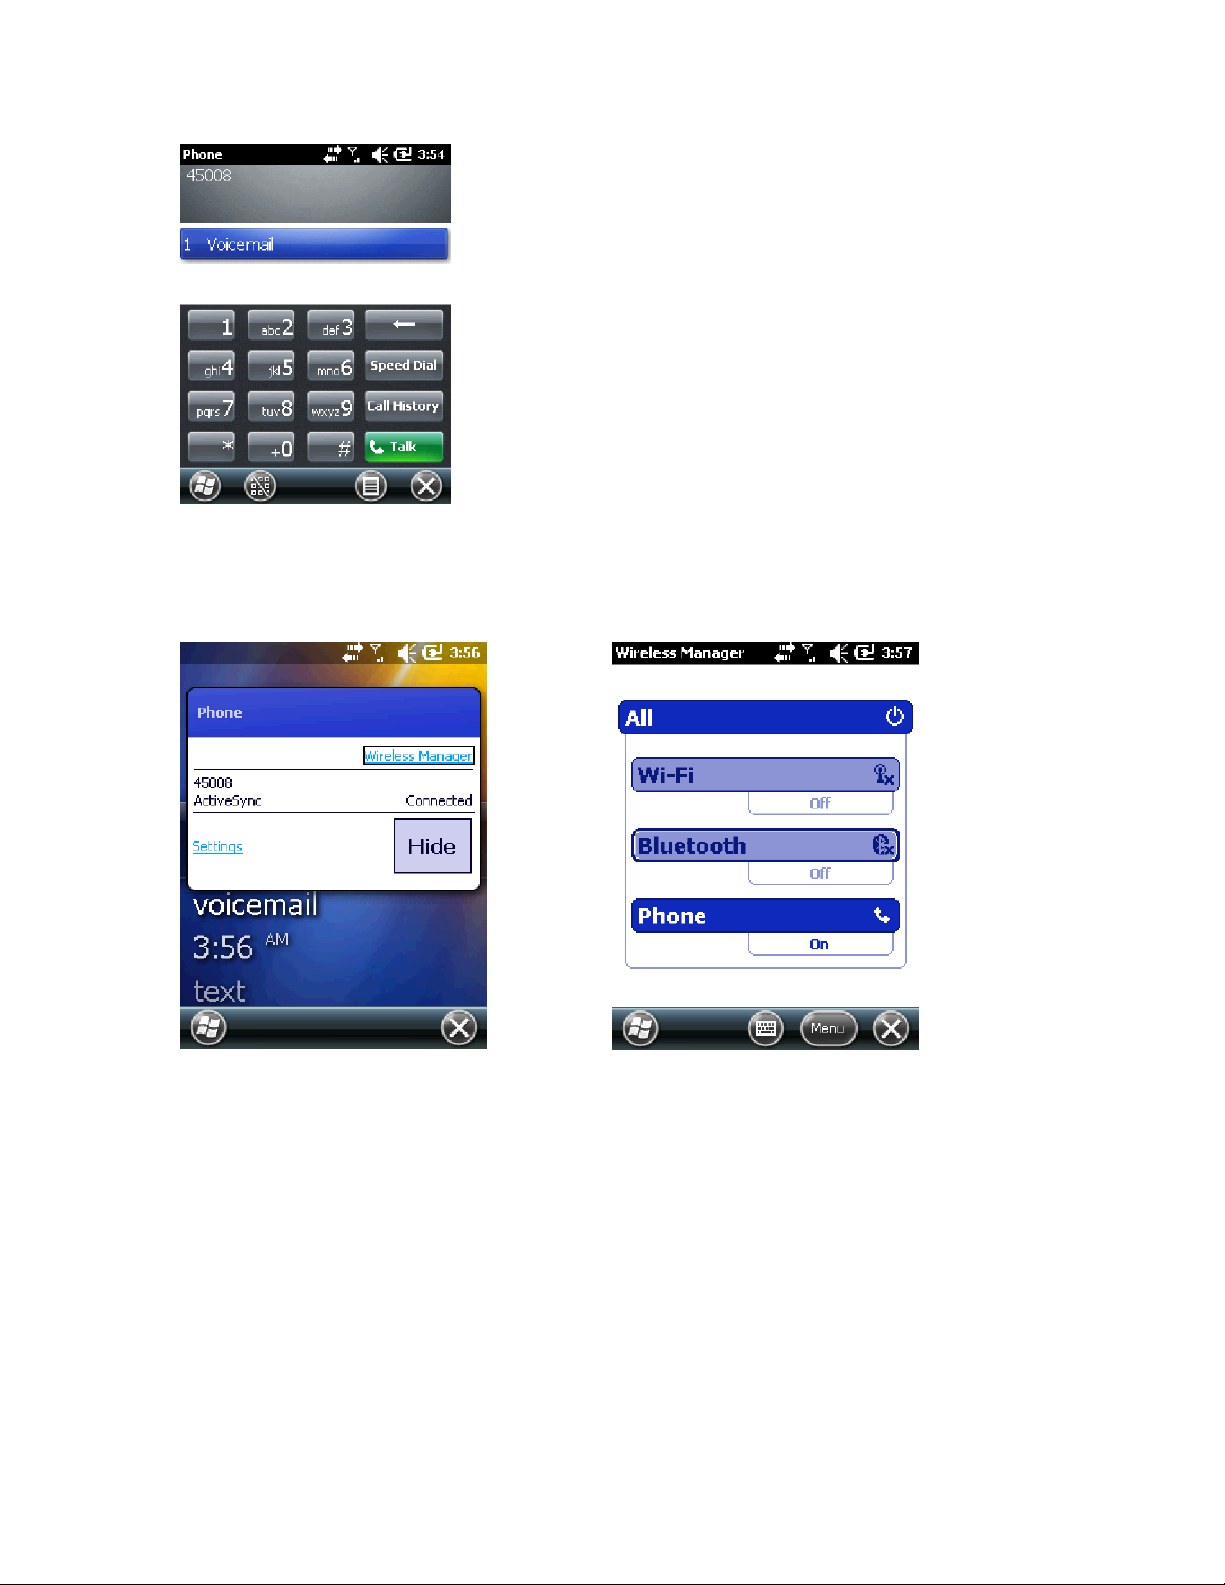
Calls can be started from the phone, contact list, call list and the text message box on
the NAUTIZ X3.
Using the Phone Dialler
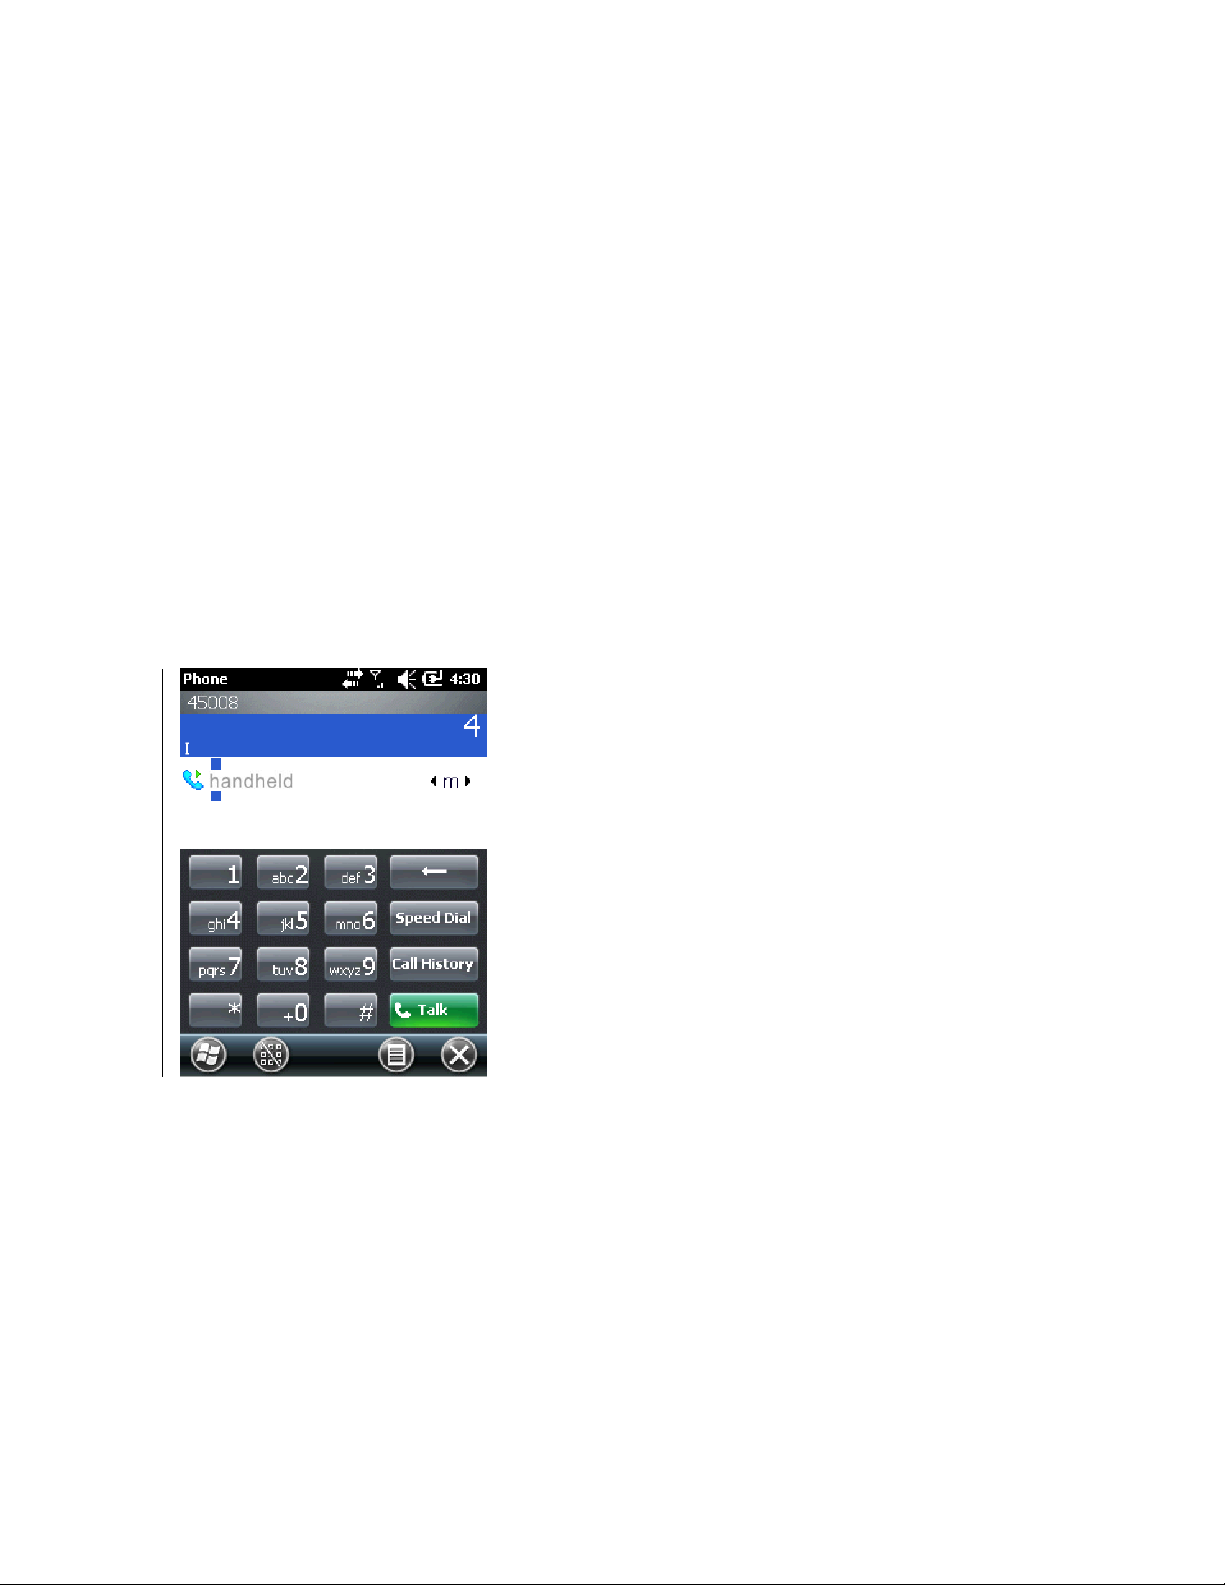
Make a telephone call using the phone program
Page 53
1. Tap Start > Phone, tap the green talk button or press the send "S" key on the keypad.
2. Tap a numerical button or press the send "S” key.
3. Tap the green talk button or the send “S” key on the keypad to dial.
4. To cancel an outbound call or to terminate a call, tap the red End key or press end
“E” key on the NAUTIZ X3 keypad.
5. If you enter the wrong number, erase by tapping the “” Delete key or the “” on
the keypad one by one.
Dialling Contacts
Calls can be made to existing Contacts
Make a call via the Contacts screen.
1. Tap Start > Contacts.
2. Select the contact you wish to dial and hold for a short while.
3. Choose between Call Work, Call Home and Call Mobile.
Make calls using the Call History
Tap Start > Phone or Tap the “S” Talk key on the NAUTIZ X3 keypad.
Tap the desired item from the Call History.
Page 54
Start a voice call by tapping the phone icon next to the number.
To make or terminate a call, tap End or tap the red end call on the NAUTIZ X3
keypad.
Making emergency calls
You can make an emergency call even if no SIM card is installed. For more details
about installing a SIM card, please refer to SIM Card Installation on page 3.
a. Emergency calls may be unavailable, depending on the network coverage.
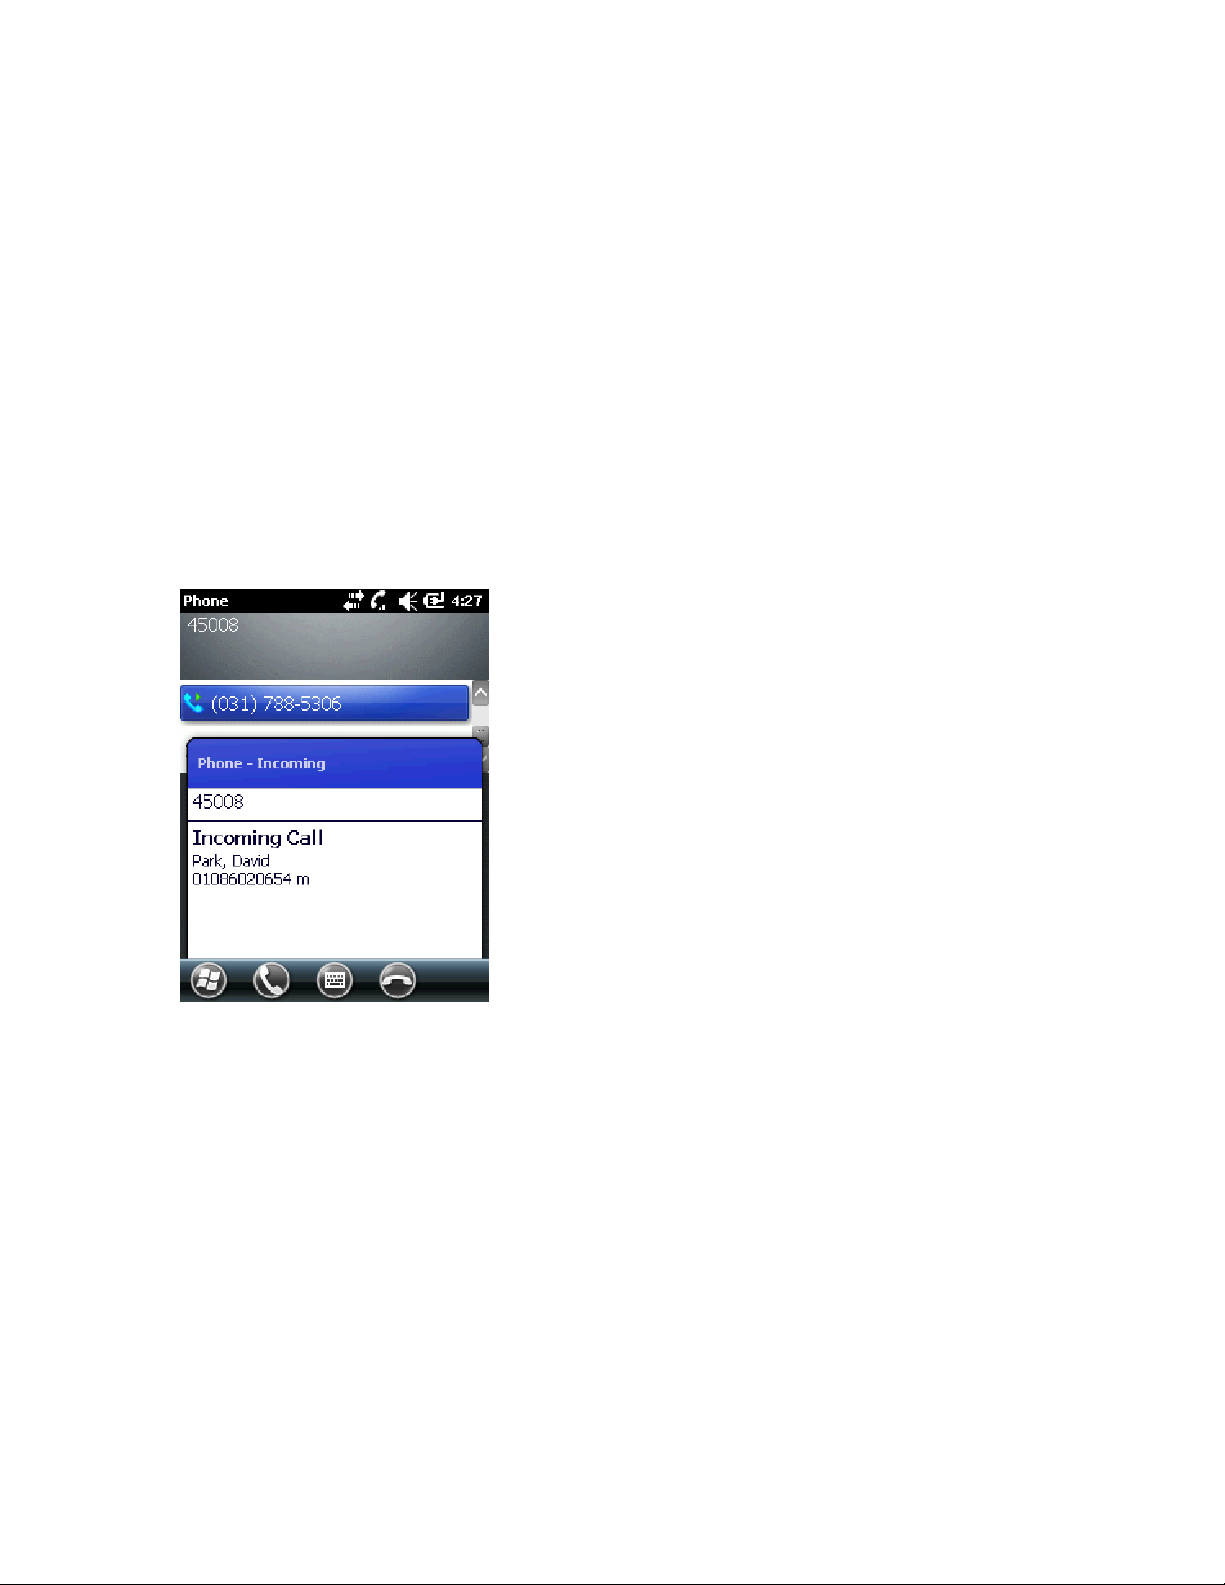
Answering Calls
A pop-up window will be displayed when there is an incoming call. If a ringer alert is
set, the phone will ring.
To answer the call, tap Phone > Receive or tap the Send “S” Talk key on the NAUTIZ
X3 keypad.
Press Ignore to ignore the call. The caller will be informed that you are unable to
answer the call.
To end a call, tap End Call or tap the END “E” button on the NAUTIZ X3 keypad.
Handling incoming calls
1. To answer an incoming call while already on a call, tap the Stand-by key to switch
to stand-by mode.
2. You can use other programs on the NAUTIZ X3 whilst on a call. If you wish to
change to the Phone screen, tap Talk or Start > Phone. To end the call, tap End Call.
3. You can add the number you are on a call with or a number from the Call History to
your Contacts list by tapping Menu > Contact > Save.
4. To answer an incoming call whilst already on a call, tap Answer or Send after
disconnecting the current call by tapping End on the keypad followed by Answer or the
Send key.
Page 55
5. To answer a stand-by call during a call, answer the call after tapping Answer or
Send to switch the existing call to stand-by mode.
Smart Dialling
When inputting numbers or letters the device will search for matches in Contacts and
the Call History and show you a filtered list. The filtered list is created from Contacts
and Call History. You can then choose a contact from the filtered list.
Tap on a phone number to make a call. If there is a match in the Contacts list, the
Contact will be displayed.
To search for telephone numbers
1. You can search for telephone numbers by entering one or two numbers.
2. You can search for saved contacts and phone numbers on the SIM by entering three
or more numbers.
How to locate contacts
1. Enter the first letter of the name
2. You can narrow the search by adding more letters.
Make a call or send a text message using Smart Dialling.
1. Start by entering numbers or letters.
2. Search for contacts or numbers from the Smart Dialling panel.
3. When you‟ve located the contact you wish to call, tap Talk to make a call or tap
Menu > Text Messages to send a text message.
4. You can choose between the telephone numbers associated with the contact by
tapping the name of the contact after selecting them.
Mute the microphone during a call
Muting the microphone during a call will allow you to continue hearing the other
person, but they will be unable to hear you.
1. Tap Start > Phone or Tap the “S” Talk key on the NAUTIZ X3 keypad.
Page 56
2. Make a call.
3. Tap Mute on the screen to mute the microphone. The mute icon will be displayed on
the screen.
Creating a memo
To create a memo during a call, tap the Menu button and select Create Memo.
How to check memos created during a call
1. Tap Start > Phone, the green talk key or the Send "S" key on the NAUTIZ X3
keypad.
2. Tap Call History.
3. Select a call record with an associated memo and hold, alternatively click the memo
icon.
Page 57
4. Tap View Memo.
5. Tap OK to end.
5. Note: You can launch the Memo program by choosing Start > Memo.
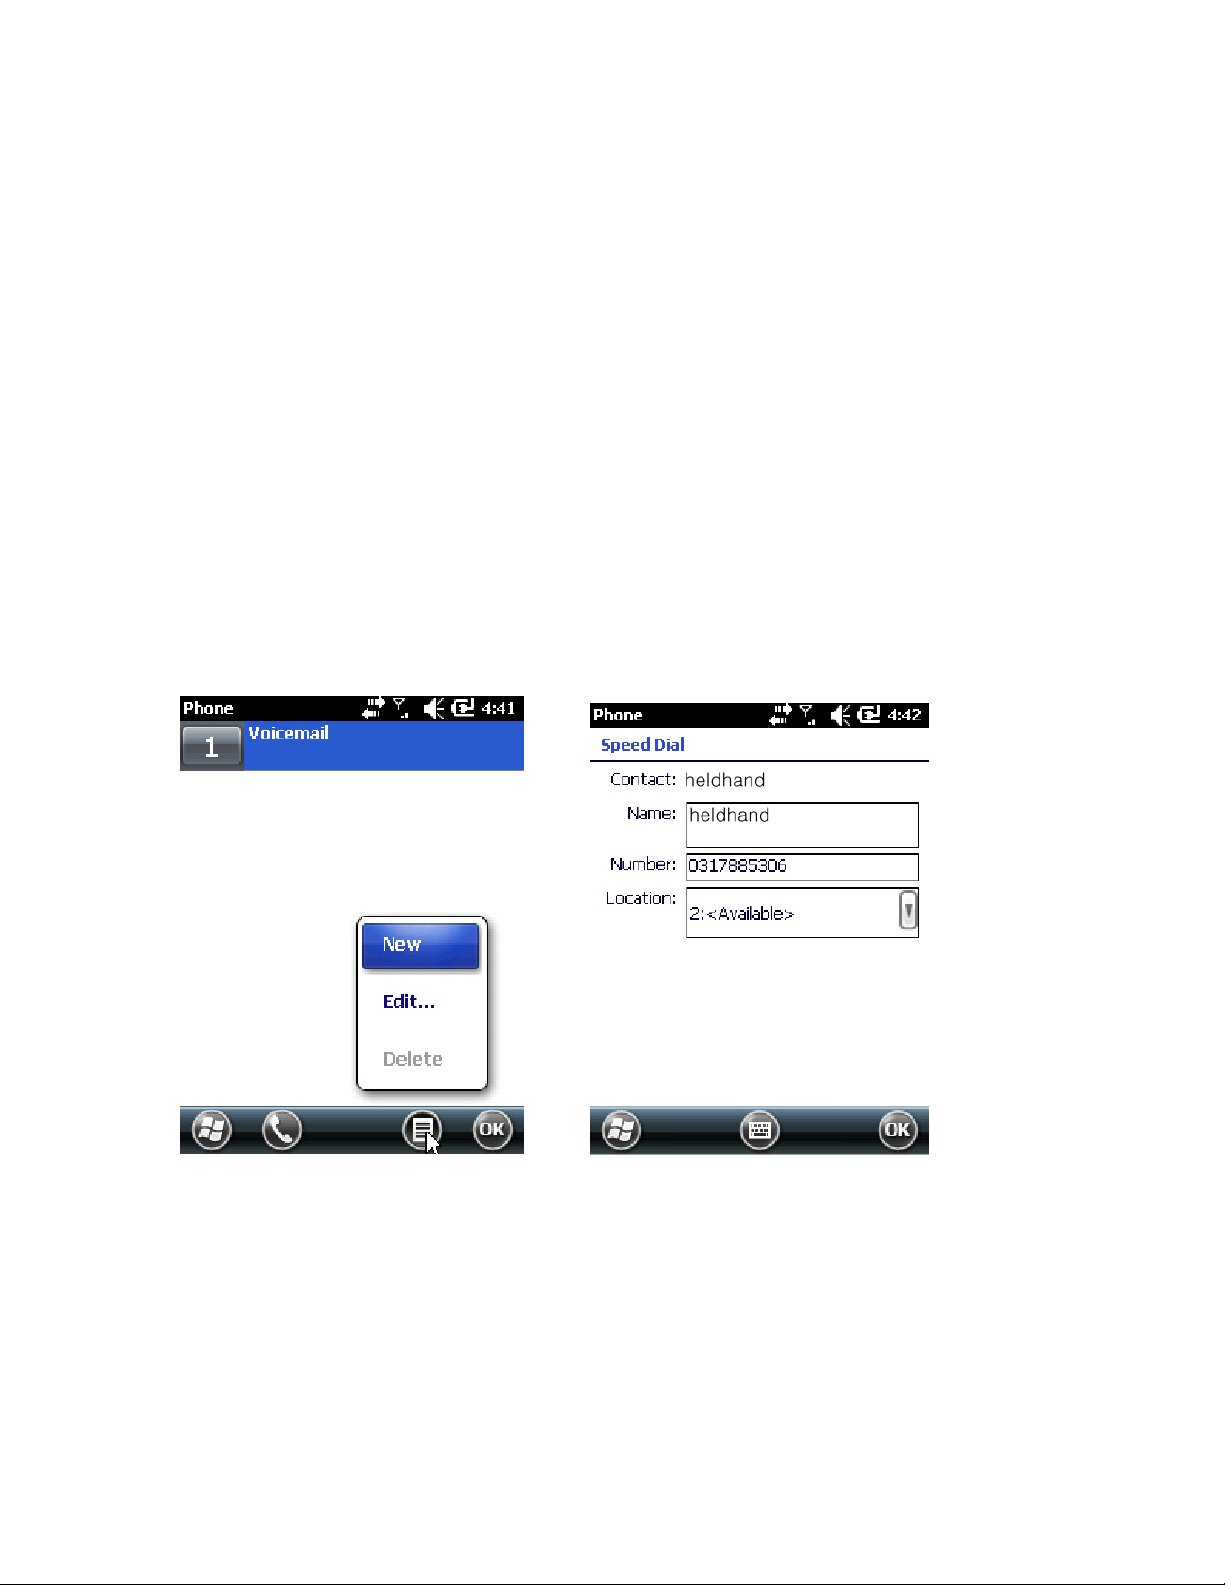
Speed Dial
You can make a call using a single tap by creating a speed dial entry. After assigning a
number to Contacts, the number can be added to Speed Dial.
Add a Number to Speed Dial
Add a number to Speed Dial using the Phone keypad
1. Locate any contacts and numbers you wish to add to Speed Dial from the Call
History.
2. Tap Start > Phone, the green talk key or the Send "S" key on the NAUTIZ X3
keypad.
3. Tap Speed Dial > Menu > New.
4. Select the item you wish to add to Speed Dial from the Contacts list.
5. Select a Speed Dial number from the location column. The first Speed Dial number
is reserved for voice mail.
6. Tap OK to add the contact to the Speed Dial list.
Editing or Deleting a Speed Dial Number
1. Tap Start > Phone, the green talk key or the Send "S" key on the NAUTIZ X3
keypad.
2. Tap the Speed Dial button.
3. Press Edit or select the item to be deleted.
4. Tap Edit or Delete.
Page 58

Using the Call History
You can use the Call History to check recent calls or make a call to a recent number.
The Call History will display the duration of all received, sent and missed calls. The
icons displayed on the Call History screen are listed under Table 4-1.
Incoming call
Missed call
Outgoing call
Managing the Call History
You can reset talk time and delete call history.
Modifying the Call History View
1. Tap Start > Phone, the green talk key or the Send "S" key on the NAUTIZ X3
keypad.
2. Tap Call History.
3. Tap Menu > Filter to display the menu.
4. You can view missed, outgoing and incoming calls.
Page 59

Reset the Recent Call Counter
1. Tap Start > Phone, the green talk key or the Send "S" key on the NAUTIZ X3
keypad.
2. Tap Call History.
3. Tap Menu.
4. Choose Call Timers.
5. Tap Reset.
Delete all Call History
1. Tap Start > Phone, the green talk key or the Send "S" key on the NAUTIZ X3
keypad.
2. Tap Call History.
3. Tap the Menu icon.
Page 60

4. Choose Delete All Calls.
If more than two
calls are in progress
simultaneously, only
the first call will be
recorded.
5. Tap Yes.
View Call Details
1. Tap Start > Phone, the green talk key or the Send "S" key on the NAUTIZ X3
keypad.
2. Tap Call History.
3. Select an item to view call details.
Using the Call History
You can send voicemails, save contacts, delete history and voice calls via the Call
History menu.
Page 61

1. Tap Start > Phone, the green talk key or the Send "S" key on the NAUTIZ X3
keypad.
2. Tap Call History.
3. Press and hold the desired item.
4. Choose an item from the menu.
Switching Between Calls
How to switch between two calls:
1. Tap Start > Phone, the green talk key or the Send "S" key on the NAUTIZ X3
keypad.
2. When the first call is connected, the Stand-by button will be displayed on the
keypad.
3. Tap the Stand-by button to put the first call into stand-by mode.
4. Proceed with the second call.
5. After connecting the second call, a switch button will be displayed.
6. To end the calls, tap End on the phone keypad or the red End Talk key on the
NAUTIZ X3 keypad.
Conference Calls
Not all mobile phone networks support conference calls. Contact your wireless service
provider to find out whether conference calls are supported.
TEXT MESSAGING
View Text Messages
You can check your text messages while on a call. A Text Message Notification
window will appear when you receive a new text message.
Page 62

If the phone is disabled,
you will have to enable
it in order to make a
new call or send a text
message.
You can make a call, save, read or delete messages from the text message screen. If
you subscribe to Caller ID services, you can identify the caller by comparing the
number to the information saved in Contacts.
You can read saved text messages when the phone functionality is turned off.
1. Tap Start > Text.
2. The Text Message window will appear.
3. Tap on a text message from the list.
Send Text Messages
Create a new text message
1. Tap Start > Text > Menu icon > New
Page 63

2. You can check the size of the message you are writing using the character counter.
3. For delivery reports choose tap Menu > Message Options > Message Transmission
Check Request.
4. You can enter the recipients number manually or by selecting a contact by tapping
Menu > Add Recipient.
5. Write your message.
6. Tap the Send button to send your message.
If the phone functionality is disabled, a message prompting you to enable the phone
will be displayed. You can turn the phone on to send a message or save a message in
the drafts folder by tapping OK. Any messages saved in the drafts folder will be sent
when you next turn the phone on.
If you are outside of network range, the message will be saved in the drafts folder.
Messages saved in the drafts folder are not automatically sent, you will need to select
the message and re-send when coverage resumes.
FAQ
Q: What is the password for setting the scanner?
A: The password for scanner settings is 23646
Q: Which com port should be used for the GPS?
A: Please use com port 4
Q: Does the Nautiz X3 support USB Host or Client?
A: Nautiz X3 supports USB host and client on a software level. By changing the
settings in the application, the user can choose either one of them.
Page 64

Q: What COM port should I use to connect to my GPS?
A: COM9 at 115 200 baud is the hardware port. COM4 is the software port.
USE COM 4
CARING FOR YOUR UNIT/SAFE USE
This chapter provides troubleshooting guidelines, including cleaning instructions and
storage advice for the NAUTIZ X3.
Maintenance
Please follow the below instructions for trouble-free use of the device.
Take care to protect the screen from scratches. Only use a plastic pen designed for
touch screens or the stylus provided. Never use pens, pencils or other sharp objects
on the screen.
It is recommended that the screen is protected using protective film (one sheet of
protective film is supplied with the product).
Advantages of using protective film
o Protects the screen from scratches and grooves.
o More realistic feel when writing and touching
o Protects the screen from damage caused by abrasion and foreign bodies.
o Extends the lifespan of the touch screen.
The NAUTIZ X3 screen is made from glass. Do not drop the NAUTIZ X3 or apply
excessive force to the screen.
Protect the NAUTIZ X3 from severe temperature changes. When the temperature is
high, do not leave the device on the dashboard of the vehicle and keep well away
from any heat sources.
Do not use or store the NAUTIZ X3 in dirty, humid or wet conditions.
Use a soft cloth (e.g. cloth designed for lens cleaning) for cleaning your NAUTIZ
X3. If the screen surface gets dirty, clean using soapy water and a damp cloth.
To maximise battery life and performance, replace the battery periodically. The
battery life depends on use.
Battery Safety Instructions
No debris, combustibles or chemicals should be allowed near the battery whilst
charging. Extra caution is required when charging the battery in non-commercial
conditions.
The battery should only be used in accordance with the instructions for use, storage
and recharge as set out by this manual.
Improper use of the battery may result in fire or explosion. The charging
temperature of the battery range from 0C to 40C (32F ~ 104F).
Do not use incompatible batteries or chargers. The use of incompatible batteries or
chargers may result in risks such as fire, explosion, leaks, etc. If you have any
question about batteries or the charger, contact Handheld.
Do not attempt to disassemble, open, bend, modify, puncture, or smash the product
or the battery.
If you drop the device on a solid surface hard, the battery may overheat.
Page 65

Extra care must be taken to avoid short circuiting, contact a metal conductor to the
battery terminals.
Special attention must be paid to avoid modification, restoration, inserting foreign
bodies into the battery, exposing the battery to water or other liquids, fire,
explosion, and other risks.
Do not allow children to handle the battery unsupervised. .
Used batteries must be disposed of in accordance with local regulations.
Do not burn the battery.
If the battery has been swallowed, immediately contact a doctor.
If the battery leaks, be careful not to allow the fluid to come into contact with skin
or eyes. If battery fluid comes into contact with skin or eyes, rinse using plenty of
water and seek immediate medical advice.
If you suspect damage to the device or the battery, contact Handheld.
Cleaning
Cleaning the exterior
Use only detergents or cleaners dedicated for computers.
Screen
Use only detergents or cleaners dedicated for computers. Take care not to allow any
excess liquid to enter the gaps around the screen. To avoid scratches, wipe using a nonabrasive dry cloth.
Scanner Window
Clean regularly using a lens cleaner.
Connectors
1. Remove the battery
2. Soak the end of a swab with isopropyl alcohol and rub across the connector
pins.
3. Be careful as to not leave any residue on the connectors.
4. This process should be repeated approximately three times.
If isopropyl alcohol is not available, use computer cleaning detergent or a pencil eraser
(rubber) taking care not to leave any foreign bodies at the pins.
Cradle
1. Remove the power cable from the cradle.
2. Soak the end of a swab with isopropyl alcohol and rub across the connector
pins.
3. Be careful as to not leave any residue on the connectors.
4. Rub the connectors carefully ensuring that both sides of the connectors are fully
cleaned; repeat three times.
5. Remove any foreign bodies inside the cradle using compressed air or similar.
6. Clean the exterior using computer cleaning detergents.
Page 66

Contamination levels may vary depending on the users' operational environment, it is
recommended that the device be cleaned regularly.
 Loading...