

Page 1

NAUTIZ X2
MANUAL
Page 2

CONTENT
1. Introduction ..................................................................................................................................................................... 4
1.1 Appearance of Nautiz X2 ........................................................................................................................................... 4
1.2 Installing the Battery .................................................................................................................................................. 5
1.3 Removing the Battery ................................................................................................................................................ 5
1.4 Inserting a SIM Card .................................................................................................................................................. 6
1.5 Inserting a TF Card .................................................................................................................................................... 6
1.6 Charging .................................................................................................................................................................... 7
2. Using the Nautiz X2 ......................................................................................................................................................... 8
2.1 Powering On/Off the Nautiz X2.................................................................................................................................. 8
2.2 Locking and Unlocking the Nautiz X2 ........................................................................................................................ 8
2.3 Keys ........................................................................................................................................................................... 8
2.4 Home Screen ............................................................................................................................................................. 9
2.5 Status Icons and Indicators ..................................................................................................................................... 10
2.6 Basic Settings .......................................................................................................................................................... 11
2.6.1 Date and Time Settings ..................................................................................................................................... 11
2.6.2 Display Settings ................................................................................................................................................ 12
2.6.3 Ringtone Settings.............................................................................................................................................. 13
2.6.4 Security Settings ............................................................................................................................................... 14
2.6.5 Language and Input Method Setting ................................................................................................................ 14
2.6.6 Shortcuts .......................................................................................................................................................... 15
2.6.7 Widgets ............................................................................................................................................................. 15
3. Call Function ................................................................................................................................................................. 16
3.1 Making a Call ................................ ................................................................ ................................ ........................... 16
3.2 Contacts .................................................................................................................................................................. 17
3.3 SMS and MMS ........................................................................................................................................................ 18
3.4 Email ........................................................................................................................................................................ 18
4. Network Connection and Connection ........................................................................................................................... 20
4.1 Wi-Fi Network Connection ...................................................................................................................................... 20
4.2 Bluetooth ................................................................................................................................................................. 20
4.3 GPS ......................................................................................................................................................................... 22
4.4 Connecting the Nautiz X2 to a PC ........................................................................................................................... 22
4.5 Synchronization ....................................................................................................................................................... 23
5. Enabling the Scan Function .......................................................................................................................................... 24
6. Enabling the NFC Function ........................................................................................................................................... 25
7. Managing the Nautiz X2 ................................................................................................................................................ 26
7.1 Installing Applications .............................................................................................................................................. 26
7.2 Uninstalling Applications ......................................................................................................................................... 26
7.3 Managing Applications ............................................................................................................................................ 27
8. Precautions and Troubleshooting ................................................................................................................................. 28
8.1 Precautions .............................................................................................................................................................. 28
Ver 1.0 2
Page 3

8.2 Troubleshooting ....................................................................................................................................................... 29
Appendix ........................................................................................................................................................................... 31
Ver 1.0 3
Page 4
1. INTRODUCTION
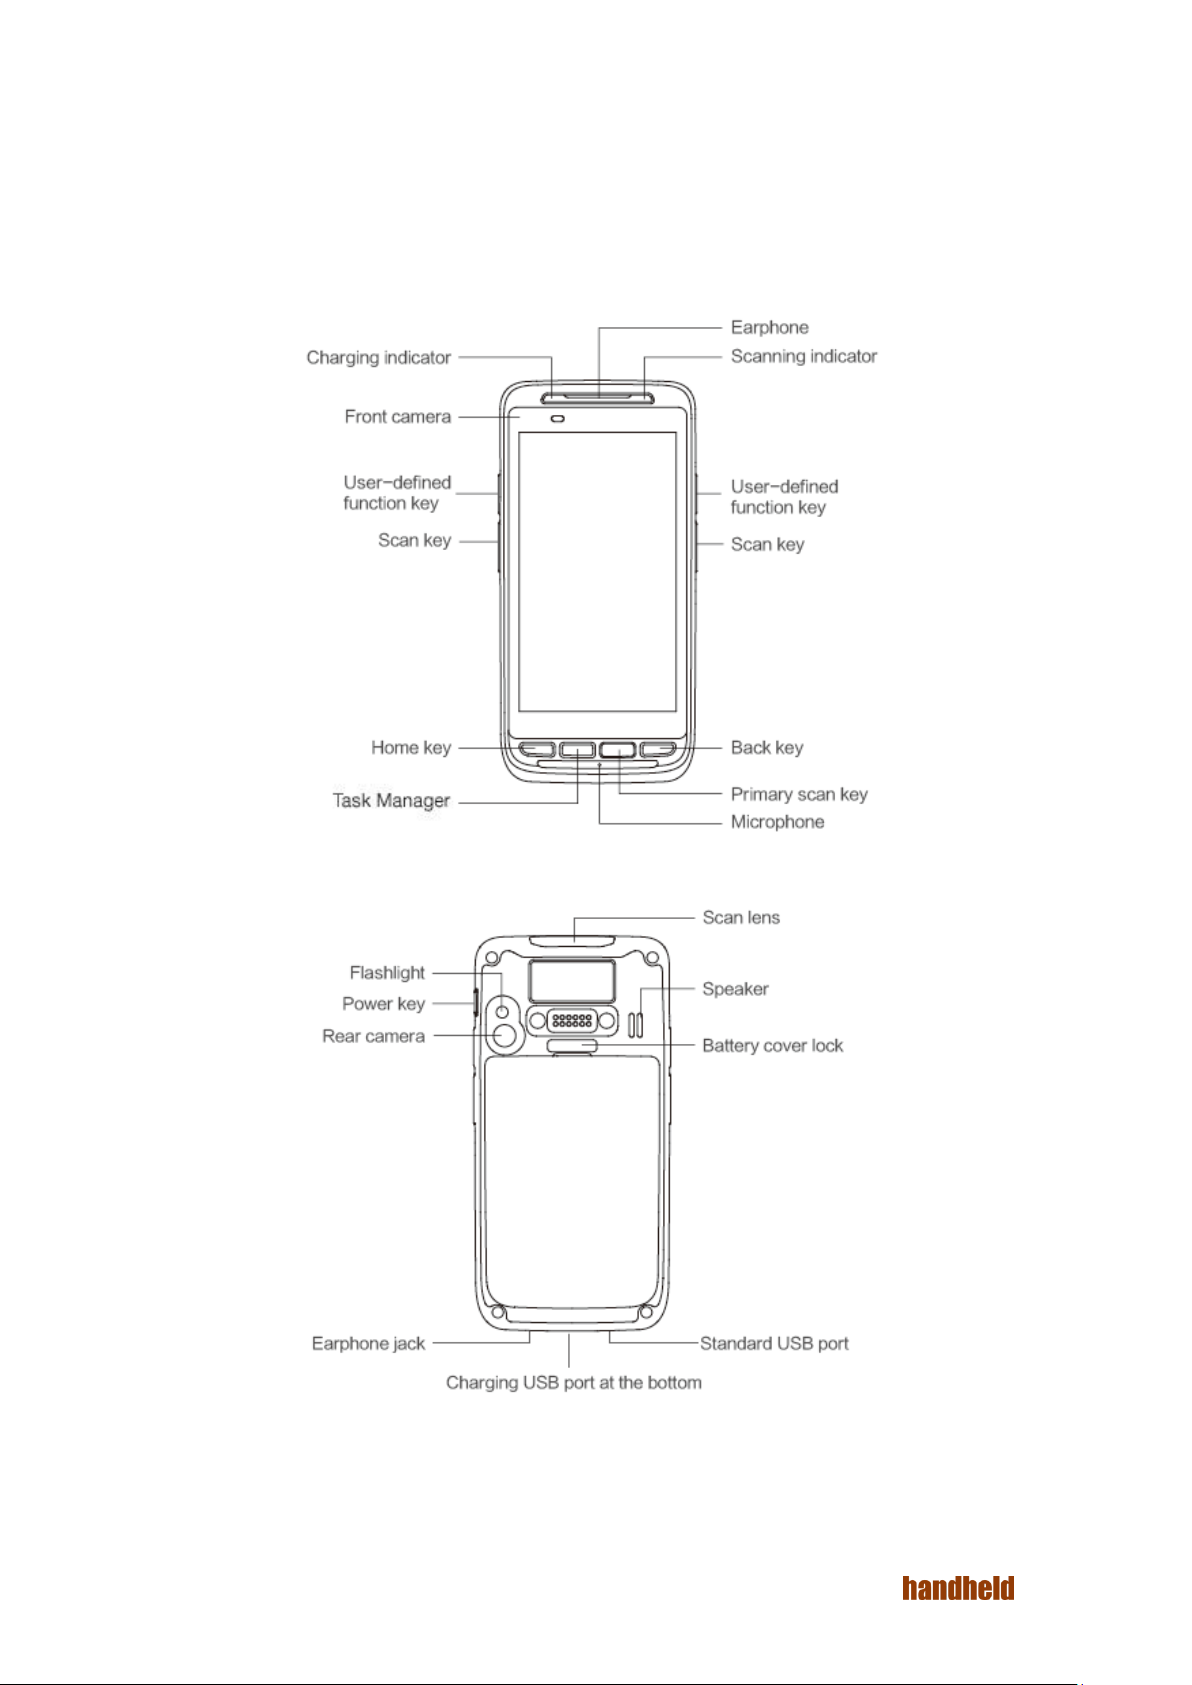
1.1 Appearance of Nautiz X2
FIGURE 1-1 FRONT VIEW OF NAUTIZ X2
FIGURE 1-2 REAR VIEW OF NAUTIZ X2
Ver 1.0 4
Page 5
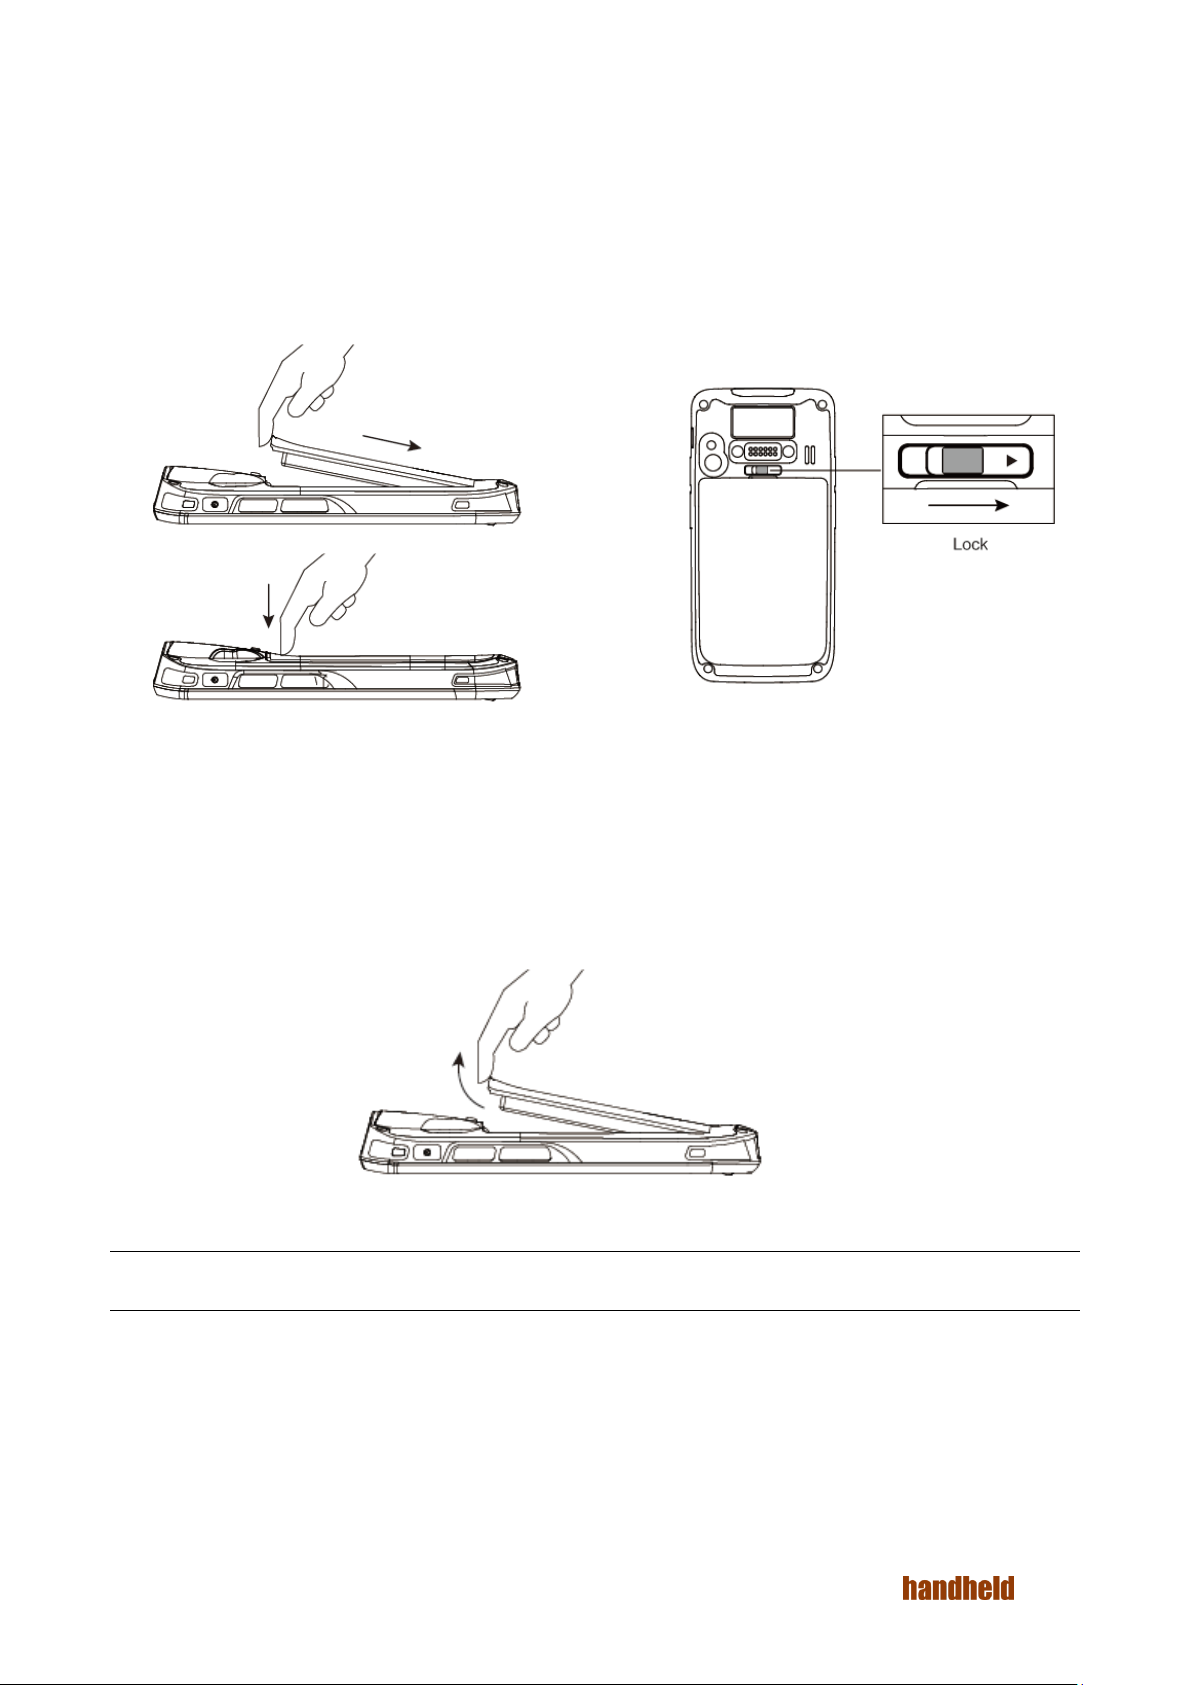
1.2 Installing the Battery
1. Push the battery to the bottom of the battery compartment and press it downwards.
2. Push the battery cover lock to the right to lock the battery cover.
1.3 Removing the Battery
1. Push the battery cover lock to the left.
2. Pull up the battery cover from the groove at the upper end of the battery cover.
NOTE: The Nautiz X2 adapts integrated design for the battery and battery cover.
Ver 1.0 5
Page 6
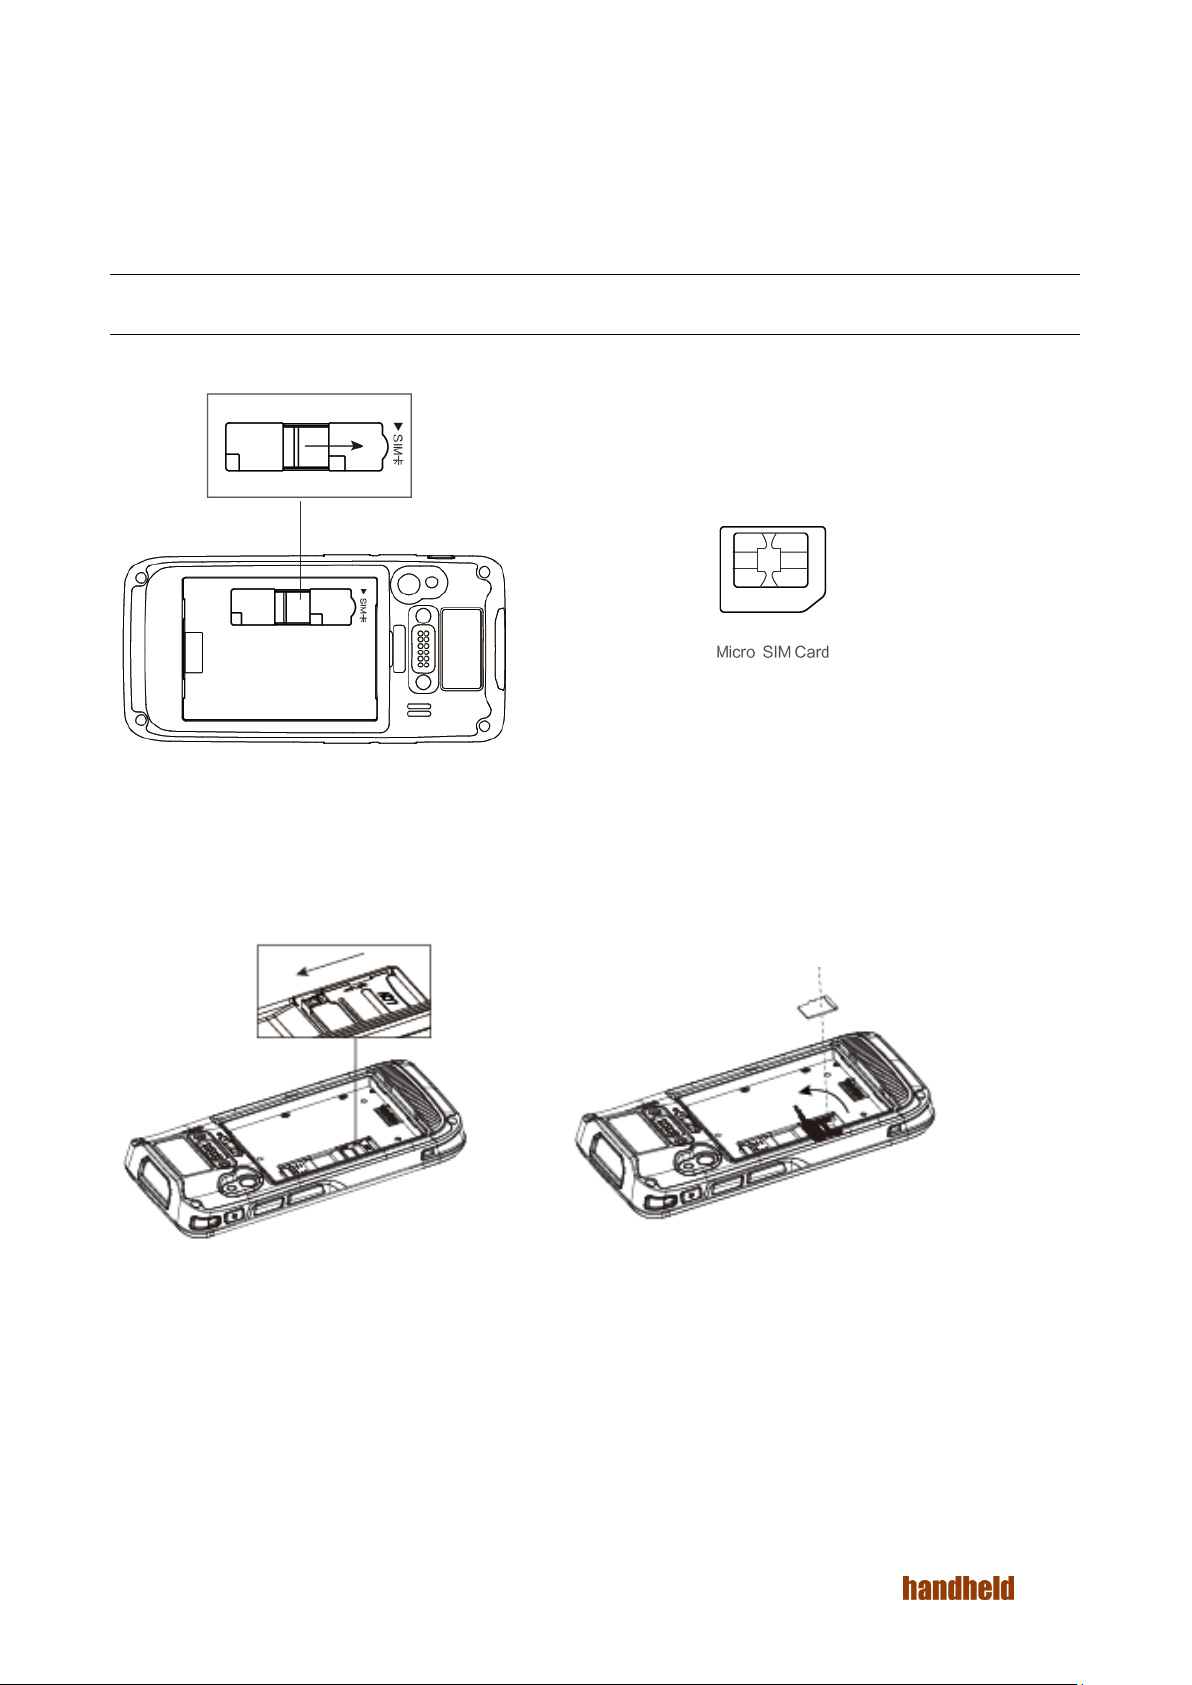
1.4 Inserting a SIM Card
Insert a SIM card by following the direction in the figure below.
NOTE: Micro SIM cards are applicable to the Nautiz X2. After replacing a SIM card, restart the Nautiz X2.
1.5 Inserting a TF Card
1. Push the card cover by following the OPEN direction marked on the card cover.
2. Open the card cover upwards and insert a TF card, as shown in the figure below.
3. Close the card cover, as shown in the figure below.
4. Pull back the card cover by following the LOCK direction marked on the card cover.
Ver 1.0 6
Page 7
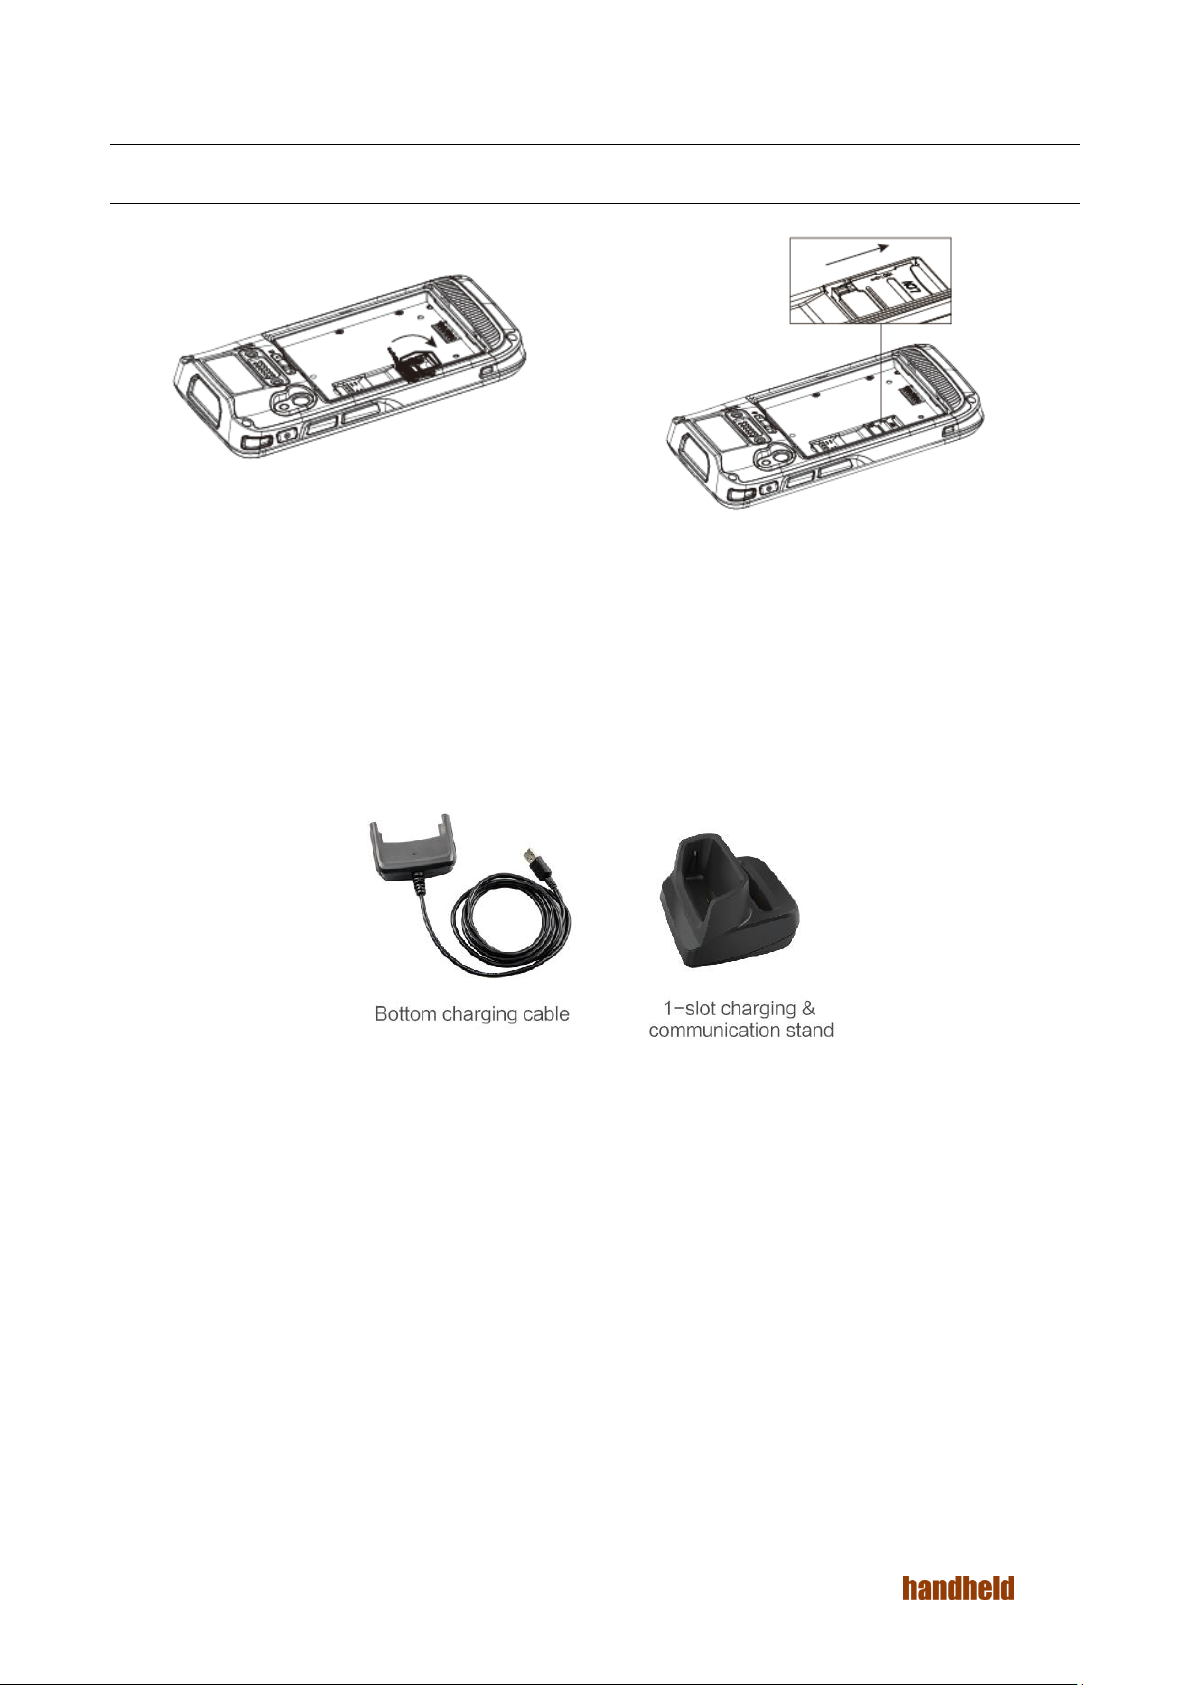
NOTE: TF cards, namely Micro SD cards, are applicable to the Nautiz X2. After replacing a TF card, restart the Nautiz X2.
1.6 Charging
You can charge a battery in the following ways:
1. Bottom charging cable;
2. 1-slot charging & communication stand (to be purchased separately).
Description of charging indicator:
When the battery is in the charging status, the charging indicator is in red.
When the battery is fully charged, the charging indicator is in green.
When the battery volume is low:
1. A message indicating that the battery volume is less than 20% is displayed on the screen.
2. The Nautiz X2 gives out a low battery prompt tone.
3. The charging indicator blinks in red.
The following operations can help obtain a longer standby duration of the Nautiz X2.
Shorten the time to sleep by selecting Settings > Display > Sleep.
Set the screen brightness to a small value by selecting Settings > Display > Brightness.
Disable functions that are not frequently used, for example, GPS, Bluetooth, Wi-Fi and 3G communication.
Ver 1.0 7
Page 8
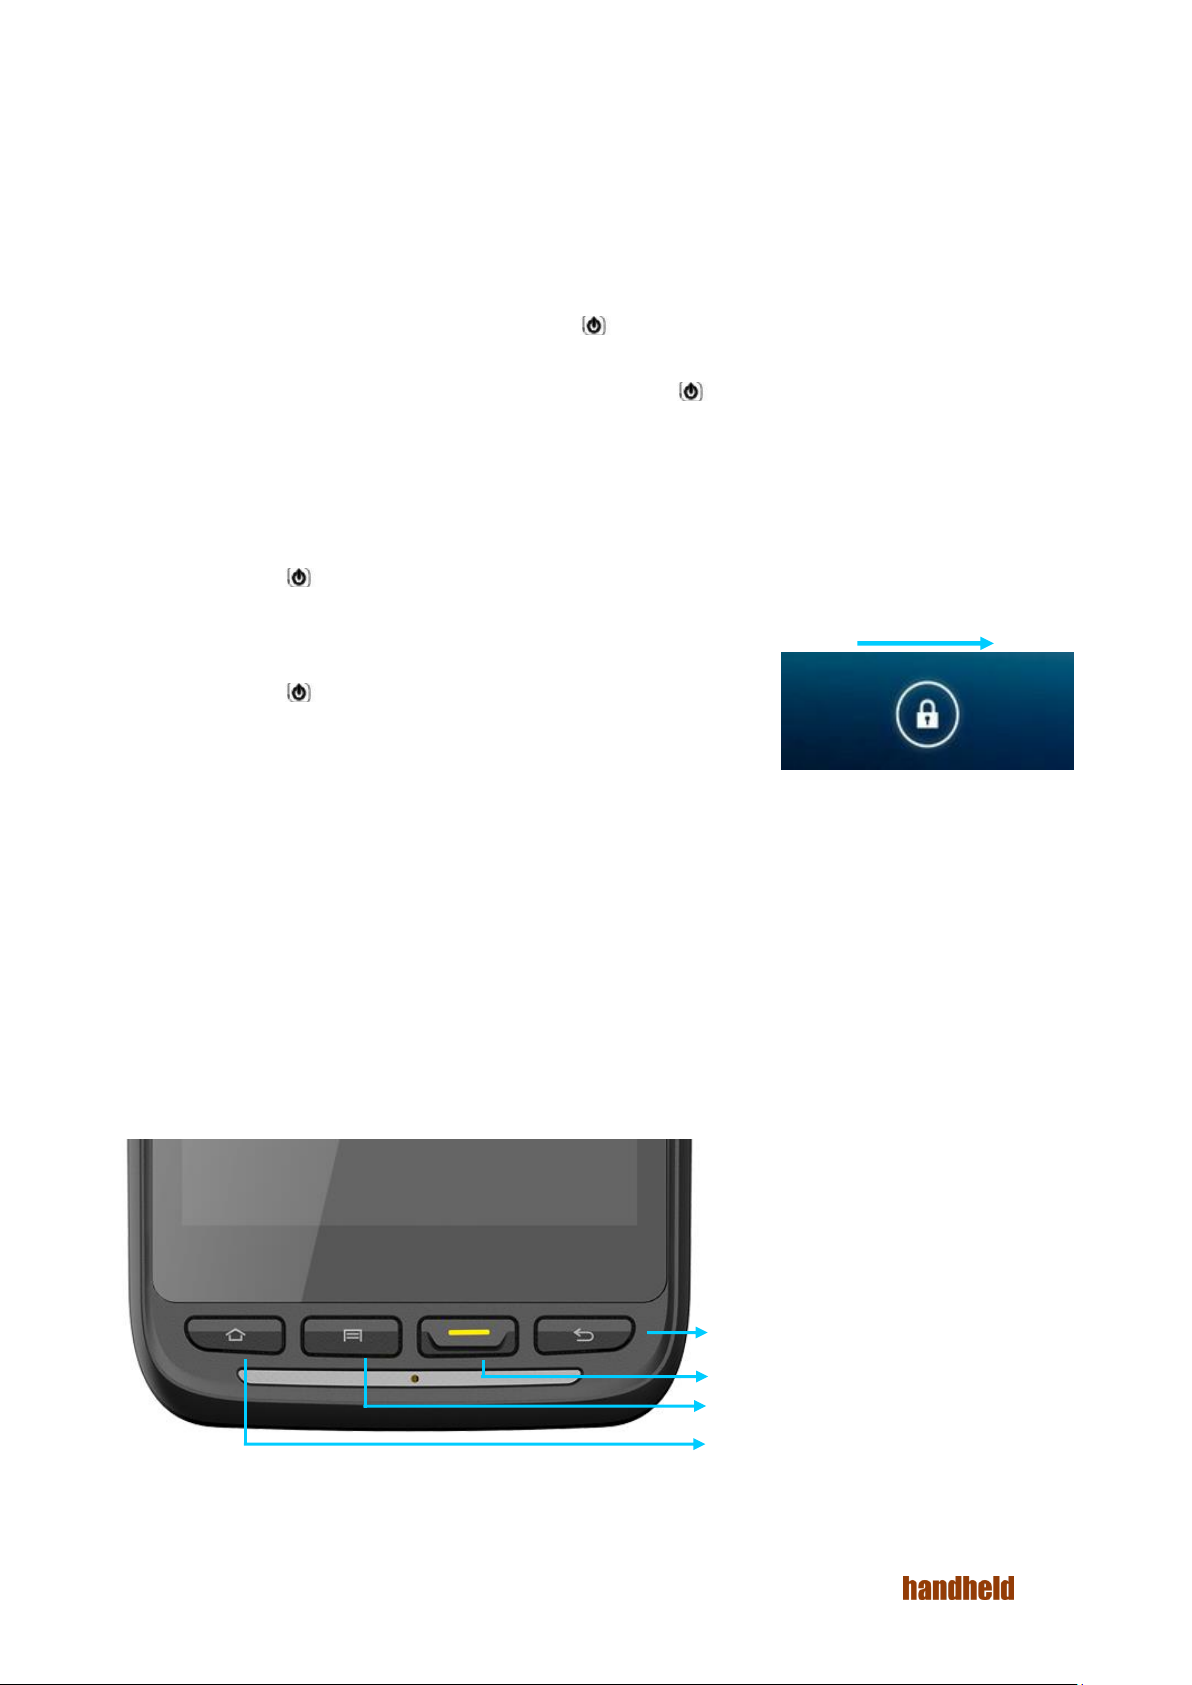
2. USING THE NAUTIZ X2
Return key
Scan key
Task manager
Home key
2.1 Powering On/Off the Nautiz X2
After installing a SIM card and a battery and charging the Nautiz X2 completely, you can use the Nautiz X2.
1. To power on the Nautiz X2, press the On/Off key on the right for some time. The Nautiz X2 vibrates,
displays the startup screen and enters the Android OS after the guide progress is complete. It takes some time
for the Nautiz X2 to initialize. Please wait patiently.
2. To power off the Nautiz X2, press the On/Off key on the right for some time. A dialog box that provides
shutdown options is displayed. Click Power Off.
2.2 Locking and Unlocking the Nautiz X2
Locking the Nautiz X2
Press the On/Off key momentarily to lock the Nautiz X2. If you do not perform any operation for the Nautiz X2
within the default locking time, the Nautiz X2 is automatically locked.
Unlocking the Nautiz X2
Press the On/Off key momentarily and slide the unlock key to the right on
the screen.
2.3 Keys
The Nautiz X2 provides a physical keypad that consists of four keys, as shown in the figure below.
On the physical keypad of the Nautiz X2, keys are respectively home key, multitask key, scan key, and back key from
left to right.
Home key: used to go back to the home screen.
Task manager: used to switch between / close running apps.
Scan key: used to scan.
Return key: used to return to the previous operation screen.
Ver 1.0 8
Page 9
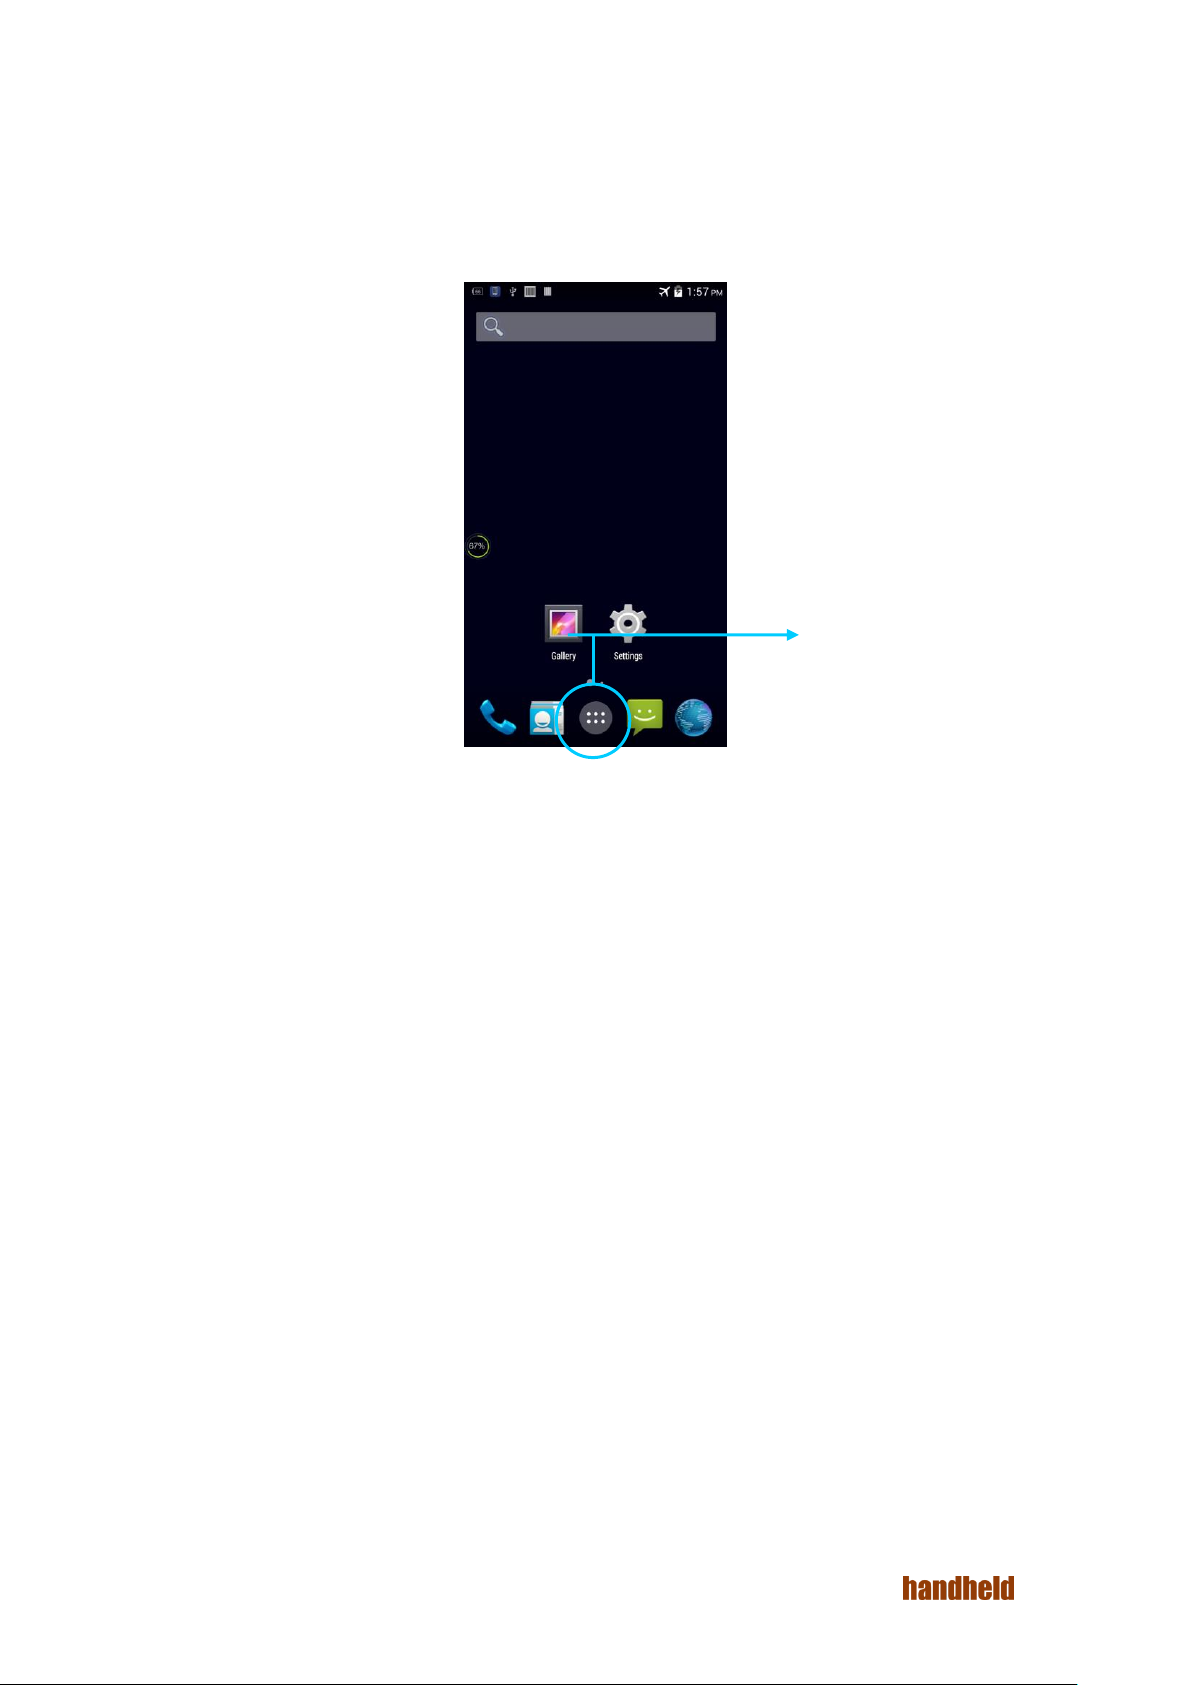
2.4 Home Screen
Application tray
By default, the Nautiz X2 has one home screen. You can add home screens by placing applications to the home screen
and slide to the left or right to switch to another home screen. On the home screen, click the icon of any application to
open the application.
You can freely add or delete the icon of an application in the blank of the home screen.
If you click the application tray, all applications can be viewed.
Ver 1.0 9
Page 10
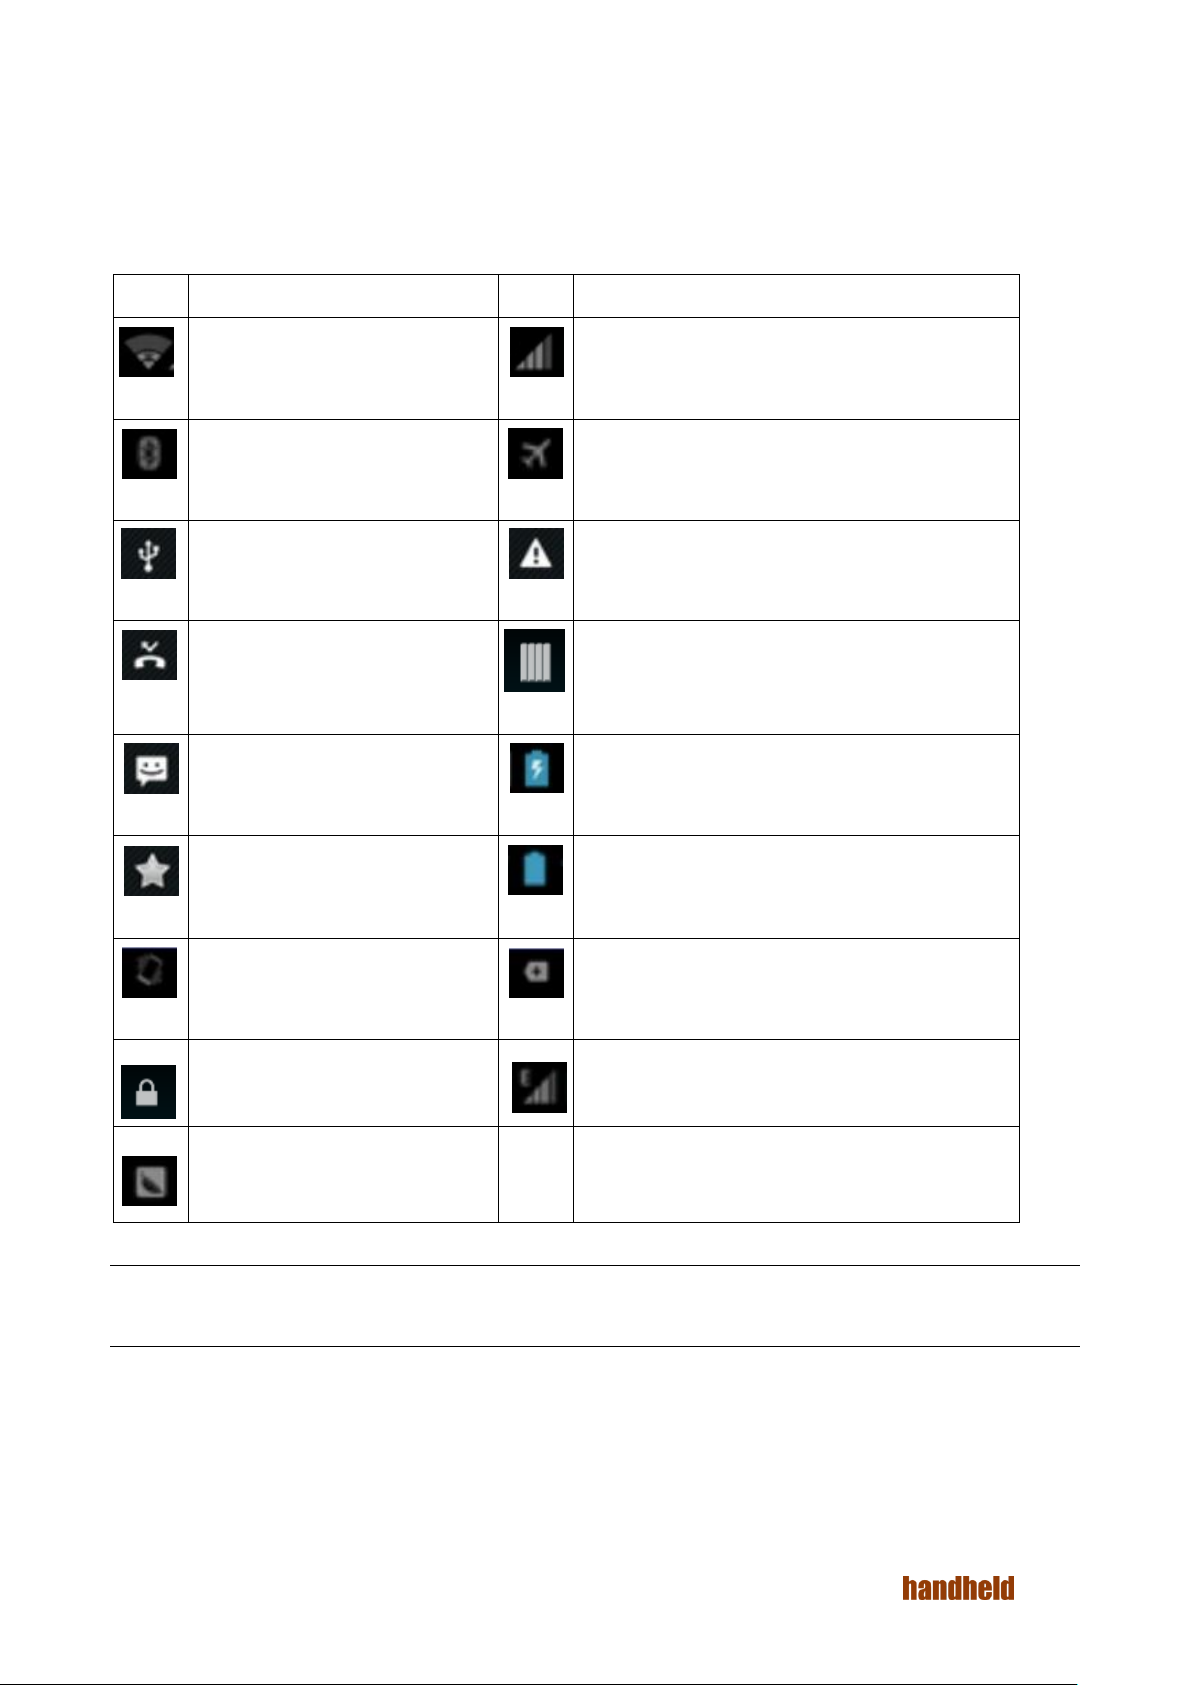
2.5 Status Icons and Indicators
Icon
Description
Icon
Description
WLAN
Signal strength
Bluetooth
Flight mode
USB connection
Network access restricted
Missed calls
USB debugging
New messages
Charging
Modem logs
Battery full
Silent mode
Multiple notification icons, which are beyond the
scope of display
Application permission
EDGE
Connection between USB and PC
pea pod
Status icons and indicators are in the status bar at the upper part of the screen and show device status and
notifications.
NOTE: As software is upgraded continuously, status indicators may be different from those displayed on the Nautiz X2. The actual
status indicators prevail.
Ver 1.0 10
Page 11

2.6 Basic Settings
2.6.1 Date and Time Settings
To change the date and time in the Nautiz X2, do as follows:
1. Find the following icon.
2. Select Settings > Date & time > Set date or Set time.
Ver 1.0 11
Page 12

2.6.2 Display Settings
1. Find the following icon.
2. Select Settings > Display > Lock screen notification/Wallpaper/Brightness/Auto-rotate
screen/Sleep/Interactive screensaver/Font size/Cast screen.
Ver 1.0 12
Page 13

2.6.3 Ringtone Settings
1. Find the following icon.
2. Select Settings > Audio profiles > General/Silent/Meeting/Outdoor. Click different modes and set the
ringtone in the modes.
Ver 1.0 13
Page 14

2.6.4 Security Settings
1. Find the following icon.
2. Select Settings > Backup & reset > Factory data reset.
The Nautiz X2 starts to restore factory settings.
If you perform the preceding operation, the following data will be cleared:
Account
Data and settings of the system and applications
Downloaded applications
The following data will not be cleared:
Current system software and bound applications
Files in the SD card, for example, music and photos
2.6.5 Language and Input Method Setting
1. Find the following icon.
2. Select Settings > Language & input, click Language, select a language, click Default, and select an input method.
Ver 1.0 14
Page 15

2.6.6 Shortcuts
You can add shortcut icons on the home screen of the Nautiz X2.
On the home screen, click the icon of application tray, press and hold an icon and drag it to the home screen.
2.6.7 Widgets
You can add widgets such as clock, music player and calendar on the home screen of the Nautiz X2.
On the home screen, press and hold a blank space. The entry for setting wallpaper and widgets is displayed. Click a
widget and drag it to a blank space.
Click the icon of a widget to open the widget.
Ver 1.0 15
Page 16

3. CALL FUNCTION
Keypad for dialing
Call records
Contacts
Voice call
3.1 Making a Call
1. Find the following icon.
2. Enter a phone number.
3. To make a call.
4. To terminate the call.
Ver 1.0 16
Page 17

3.2 Contacts
1. Find the following icon.
2. Click Contacts to open the list of contacts.
3. To add a contact, click ->
4. To import or export contacts, press the menu key and click Import/Export.
5. To edit or delete a contact, select the contact, press the menu key and click Edit/Delete
Ver 1.0 17
Page 18

3.3 SMS and MMS
1. Find the following icon.
2. Click enter a receiver and text to be sent.
3. Click to send the message.
4. On the message editing page, press the menu key, click Add subject to convert the message into a
multimedia message. After editing the message, click
NOTE: Click to add attachments such as photo, video and audio.
to send the message.
Ver 1.0 18
Page 19

3.4 Email
You can send or receive emails.
1. Find the following icon.
2. Enter an email address and password and click Next.
3. Set Inbox checking frequency and click Next.
4. Create a name for the account and click Next. The email receiving page is displayed.
To synchronize or delete an account, do as follows:
1. On the home screen, click Settings.
2. Under the ACCOUNTS option, click POP3 to open added accounts and click the name of an account to be
synchronized or deleted. On the Sync page, click in the upper right corner and select Sync now or
Remove account.
Ver 1.0 19
Page 20

Click to enable Wi-Fi and
search for networks
4. NETWORK CONNECTION AND CONNECTION
Click to connect the network
4.1 Wi-Fi Network Connection
Find the following icon
1.
Select Settings >
2.
Click
3.
4.
5.
Enable/disable WLAN
. The Nautiz X2 lists networks in the range of search.
Scan
Click a network and enter the password in the dialog box that is displayed.
Click
Connect
. The Wi-Fi connection is completed.
.
WIRELESS & NETWORKS
. The Nautiz X2 starts to search for networks. If WLAN is enabled, click
4.3
>
WLAN
.
4.2 Bluetooth
After you enable the Bluetooth function on the Nautiz X2, you can establish wireless connections with other Bluetooth
devices such as computers and mobile phones. In the scope without solid obstacles, the effect of Bluetooth
connections is good.
1. Find the following icon.
2. Select Setting > WIRELESS & NETWORKS > Bluetooth.
3. Click the icon for enabling/disabling Bluetooth to enable Bluetooth and search for other Bluetooth devices.
4. In the list of searched devices, click a device to pair the device.
Ver 1.0 20
Page 21

5. In the dialog box that is displayed, confirm the PIN and click Pair to connect the device.
Click to make other devices
able to detect the device
Click to enable Bluetooth and
search for Bluetooth devices
6. Click on the right of a paired device. The
operation as required
.
Rename, Unpair
and
Internet access
options are displayed. Perform
Ver 1.0 21
Page 22

CAUTION
Ensure that the device to be connected to the Nautiz X2 has enabled the Bluetooth function and Bluetooth visibility.
During the connection process, set and pair the PIN. The Nautiz X2 does not support connection without a password.
4.3 GPS
The Nautiz X2 is equipped with a high-performance navigation chip and can quickly and accurately obtain position
information. Handheld provides a GPS positioning demonstration program GPS Test.
4.4 Connecting the Nautiz X2 to a PC
Connect the Nautiz X2 to a PC by using a USB data cable so that you can transmit and process files such as photo,
video and music files between the memory card of the Nautiz X2 and the PC.
1. Connect the device to a USB port of the PC by using a USB data cable.
2. The status bar of the Nautiz X2 displays the USB connection icon. Slide downwards the status bar. The USB
connection status can be viewed and the USB connection mode can be selected.
Ver 1.0 22
Page 23

4.5 Synchronization
1. Find the following icon.
2. Select Settings > Accounts & sync.
3. Click Add account to set a new account.
4. Select Company or Email, enter the email address and password, click Next and wait until the connection is
5. Click Accounts. On the synchronization setting page, perform setting as required.
Ver 1.0 23
Page 24

5. ENABLING THE SCAN FUNCTION
1. Click the iScan icon on the menu page.
2. Click the blue slider on the right of Enable Barcode Scanning to enable the scanning function (if you click the
slider again, the scanning function is disabled).
3. Press the front or side scan keys to scan a barcode. When the scanning indicator becomes green from red and
a beep is heard, the barcode is scanned successfully.
NOTE: iScan is used to scan barcodes. By default, iScan is installed and scanning is enabled upon delivery of the device.
Ver 1.0 24
Page 25

6. ENABLING THE NFC FUNCTION
1. Click the Settings icon on the menu page.
2. Wireless & Networks -> More -> NFC
3. Click the slider on the right to enable NFC (if you click the slider again, NFC is disabled).
4. Put an NFC card close to the back of the Nautiz X2. After a beep is heard, the card is read successfully.
Ver 1.0 25
Page 26

7. MANAGING THE NAUTIZ X2
7.1 Installing Applications
The Nautiz X2 uses Google Android OS, where the suffix of Android software is apk. To install programs on the
Nautiz X2, use the following methods:
1. Download software at the online software store (Google Play) provided by Google.
2. Download software installation packages, store them on the SD cad and install the software through file
manager.
3. Connect the Nautiz X2 to a PC by using a USB data cable and install software for the Nautiz X2 on the PC.
7.2 Uninstalling Applications
If too many programs are installed or some programs are unnecessary, uninstall programs to improve the running
speed of the Nautiz X2. To uninstall a program, do as follows:
1. Select Settings > App. In the application list that is displayed, select an application and click it. On the page
for uninstalling the application, click Uninstall and then click OK. Wait several seconds until the application is
uninstalled.
2. Click the application tray. On the application screen, find the icon of an application, press and drag the icon to
the dustbin to uninstall the application.
Ver 1.0 26
Page 27

7.3 Managing Applications
Select Settings > App. On the application management screen, you can view application status in the options such as
Downloaded, SD Card and Running, click an application, access the application information screen, and perform
operations such as forcibly stopping, uninstalling and stopping an application.
Ver 1.0 27
Page 28

8. PRECAUTIONS AND TROUBLESHOOTING
8.1 Precautions
Put the Nautiz X2 and its components and accessories in the places where children cannot reach.
Keep the Nautiz X2 dry. Rain, moisture and liquid contain acidic materials and will corrode the circuit board.
Do not store or use the Nautiz X2 in dusty or dirty places.
Do not store the Nautiz X2 in a place that is too hot. High temperature will shorten the service life of electronic
components.
Do not store the Nautiz X2 in a place that is too cold. When the temperature inside the Nautiz X2 rises,
moisture is generated inside the Nautiz X2, which may damage the circuit board.
Do not try to disassemble the Nautiz X2. Otherwise, the Nautiz X2 may be damaged.
Do not touch the screen surface of the Nautiz X2 by using a pen, a pencil or other sharp articles in case the
screen may be scratched.
Do not throw, beat or violently collide the Nautiz X2. Otherwise, the components of the Nautiz X2 may be
damaged and the Nautiz X2 may be faulty.
Do not use strong chemical products or strong detergent to clean the Nautiz X2. If the Nautiz X2 become dirty,
clean the surface of the Nautiz X2 by using a soft cloth soaked with dilute glass detergent.
Please use the protective film to reduce wear as much as possible. The screen protective film can improve the
availability and durability of the screen.
Pay attention to the following during use of the battery:
The area where the Nautiz X2 is charged must keep away from scraps, inflammables or chemical substances.
When you charge the battery of a mobile device, the temperature on the battery and charger must be in the
range 0C to 40C.
Do not use incompatible batteries or chargers, which may cause fire, explosion, leakage or other hazards.
Do not disassemble, press, twist, pierce or cut the battery.
Do not make the battery short-circuited or contact the connecting terminal of the battery by using metal or
other conductive objects.
Do not insert other materials into the battery, contact the battery with water or other liquid, or expose the
battery in an open fire, explosive source or other sources of danger.
Do not put or store the battery in the environment where the temperature is too high.
Do not put the battery in a microwave oven or a drying machine.
Do not put the battery into a fire.
If the battery leaks, do not let the liquid stain your skin or eyes. Otherwise, wash your skin or eyes with lots of
water and go to see the doctor immediately.
Cleaning Nautiz X2
Clean the shell by using a cloth soaked with alcohol, including keys and space between keys.
You can clean the display screen by using a cloth soaked with alcohol. Do not let the liquid gather around the
screen. Otherwise, dry the screen by using a soft non-woven cloth in case strip marks are left on the screen.
Clean the scan lens regularly by using lens paper or other articles suitable for cleaning optical materials.
Ver 1.0 28
Page 29

8.2 Troubleshooting
Fault
Cause
Solution
After the power key is
pressed, the Nautiz X2 is
not powered on.
The battery volume is too low
or the battery is not charged.
Charge the battery or replace the battery.
The battery is incorrectly
installed.
Correctly install the battery.
The system breaks down.
Restore factory settings.
The rechargeable battery
can no longer be charged.
The battery fails.
Replace the battery.
The temperature of the battery
is too high or low.
Put the battery in normal temperature.
During data
communication, data is not
transmitted or transmitted
data is incomplete.
The cable configuration is
incorrect.
Consult the system administrator.
The communication software is
incorrectly installed or
configured.
Install or reinstall the synchronization software to
update the driver.
The relevant function is not
activated after a user clicks
a button or icon.
The system does not respond.
Restart the system.
No sound can be heard.
The volume is too low or is
disabled.
Adjust the volume.
The Nautiz X2 is closed.
The Nautiz X2 is in the inactive
state.
After being inactive for a period of time, the
Nautiz X2 is locked.
The battery is used up.
Replace the battery.
The Nautiz X2 responds at
a low speed.
Too many files are stored in the
Nautiz X2.
Remove unused memos and records. If
necessary, save the records on the host or
increase the storage capacity by using an SD
card.
Too many applications are
installed on the Nautiz X2.
Remove applications installed on the Nautiz X2.
The Nautiz X2 cannot
decode a barcode while
reading it.
The scan application is not
loaded.
Load the scan application in the Nautiz X2.
Reading a barcode fails.
Check that the barcode is indefective.
The battery volume is low.
If the scanner stops sending out a light beam
after you press the trigger switch, check the
battery volume.
TABLE 8-1 NAUTIZ X2 TROUBLESHOOTING
Ver 1.0 29
Page 30

TABLE 8-2 BLUETOOTH TROUBLESHOOTING
Fault
Cause
Solution
The Nautiz X2 cannot
detect any Bluetooth
device nearby.
The Nautiz X2 system is too far
away from other Bluetooth
devices.
Move the Nautiz X2 close to other Bluetooth
devices, making the distance between them
within 10 meters.
The Bluetooth devices nearby
are not enabled.
Enable the Bluetooth devices you are searching
for.
Bluetooth devices are in a
mode that cannot be detected.
Set Bluetooth devices in a mode that can be
detected.
When a user attempts to
connect a Bluetooth phone
to the Nautiz X2, the
Bluetooth phone identifies
the Nautiz X2 as the
previously paired Nautiz
X2.
The Bluetooth phone
memorizes the name and
address of the Nautiz X2
paired previously over
Bluetooth.
Remove the paired device and the name from the
Bluetooth phone.
A Bluetooth device can be
detected but cannot be
connected.
The Nautiz X2 does not
support connecting a
Bluetooth device without a
password.
Set a password for the Bluetooth device.
Fault
Cause
Solution
Charging fails.
The cable is in poor contact.
Replace the cable.
Connecting to the Nautiz
X2 fails.
The cable is in poor contact.
Replace the cable.
Fault
Cause
Solution
Connecting to an AP fails.
The password for the WLAN device is incorrect.
TABLE 7-3 CABLE TROUBLESHOOTING
TABLE 7-4 WI-FI TROUBLESHOOTING
Ver 1.0 30
Page 31

APPENDIX
Component
Description
Nautiz X2
Standard battery
Power adapter
Used to charge the battery.
Bottom charging cable
USB data cable
Used to communicate with the Nautiz X2 or charge the Nautiz X2.
Instructions
Item
Nautiz X2
System configuration
CPU
High-performance quad-core 1.3 GHz processor
Operating
System
4G: Android 5.1
Memory
8 GB ROM+1 GB RAM
Expansion
Slot
Mini SD card, up to 32 GB
Display
4.7- inch, 1280 x 720 High resolution
Touch Panel
Industrial-grade capacitive touch panel (supporting operation with gloves)
Camera
(Optional)
8 MXP camera in the back side, autofocus lens, LED flash
Exit Window
Corning® Gorilla® glass
Keypad
4 front keys, 4 side keys , Power key
Battery
3.7 V 3600 mAh rechargeable lithium polymer battery
Audio
Built-in microphone /Mini USB/Headphone connector
Notification
Vibrator alerts/LED/Audio notification
Vibration
Motor
Built-in programmable vibration motor
Structure parameters
TABLE 1 ACCESSORIES OF THE NAUTIZ X2
TABLE 2 TECHNICAL SPECIFICATIONS OF THE NAUTIZ X2
Ver 1.0 31
Page 32

Item
Nautiz X2
Dimensions
(L x W x D)
150 mm x 73.5 mm x 16 mm (24 mm thick at the head)
Weight
230g (including battery)
Communication and transmission
Wireless
WAN
(Network
frequency)
Wireless
WAN
(Data
service)
4G: GPRS/ EVDO /WCDMA/ TD-LTE/LTE FDD/CDMA 1X
Wireless LAN
4G: Wi-Fi 802.11a/b/g/n Dual-band Wi-Fi: 2.4G+5G)
Bluetooth
Bluetooth 4.0
GPS
Supporting GPS
Operating environment
Development
tool
Android SDK+JDK+Eclipse
Supported
language
Java
Operating
Temp.
-10℃ ~ 50℃ (14℉ to 122℉)
Storage
Temp.
-20℃ ~ 60℃ (-4℉ to 140℉)
Humidity
0 to 95% (non-condensing)
Drop
specification
Multiple drops to cement ground from a distance of 1.2m
Sealing
standard
IP65
ESD
15 kV air discharge, 8 kV direct discharge
1D laser scanning engine
Optical
resolution
4 mil
Ver 1.0 32
Page 33

Item
Nautiz X2
Scan depth
of field
3.81 cm to 60.98 cm
Scanning
angle
473 (standard)
Scanning
speed
10212 times per second (two-way)
1D/2D image scanning engine
Optical
resolution
3 mil
Scanning
angle
Omni-directional
Scanning
speed
300 times per second
NFC
Frequency
13.56 MHz
Reading
distance
Within 10 mm
Communicati
on protocol
ISO14443A
Input/output port
USB Port
1 (Mini USB port)
Charger Port
1 (Charging interface at the bottom)
Headset Port
1
Ver 1.0 33
Page 34

Power Adapter:
Manufacturer: SHENZHEN FUJIA APPLIANCE CO.,LTD.
Model: FJ-SW1260502000UE
Input: AC 100-240V; 50/60Hz;0.4Amax
Output: DC5.0V;2000mA
Battery:
Model: 1ICP9/65/85
Capacity:3300 mAh 12.2Wh
Nominal Voltage:DC 3.7V
Maximum Charge Voltage:DC 2.4V
CE marking:
CAUTION
RISK OF EXPLOSION IF BATTERY IS REPLACED BY AN INCORRECT TYPE. DISPOSE OF USED BATTERIES
ACCORDING TO THE INSTRUCTIONS.
To prevent possible hearing damage, do not listen at high volume levels for long periods.
Fully understand user manual before use.
Ensure your player at low volume levels or power off before you leaving.
Statements
C
authority to operate the equipment.
This equipment has been tested and found to comply with the limits for a Class B digital device, pursuant to Part 15 of
the FCC Rules. These limits are designed to provide reasonable protection against harmful interference in a residential
installation. This equipment generates, uses and can radiate radio frequency energy and, if not installed and used in
accordance with the instructions, may cause harmful interference to radio communications. However, there is no
guarantee that interference will not occur in a particular installation.
If this equipment does cause harmful interference to radio or television reception, which can be determined by turning
the equipment off and on, the user is encouraged to try to correct the interference by one or more of the following
measures:
Reorient or relocate the receiving antenna.
Increase the separation between the equipment and receiver.
Connect the equipment into an outlet on a circuit different from that to which the receiver is connected.
Consult the dealer or an experienced radio/TV technician for help.
This equipment complies with FCC radiation exposure limits set forth for an uncontrolled environment. End user must
follow the specific operating instructions for satisfying RF exposure compliance. This transmitter must not be colocated or operating in conjunction with any other antenna or transmitter.
The portable device is designed to meet the requirements for exposure to radio waves established by the Federal
Communications Commission (USA). These requirements set a SAR limit of 1.6 W/kg averaged over one gram of tissue.
The highest SAR value reported under this standard during product certification for use when properly worn on the
body
Ver 1.0 34
Page 35

 Loading...