

Page 1
SZT Linux 數位監控系統
使用說明手冊
Installation Guide
1
Page 2

PC Requirement
4/8 channel 12/16 channel
CPU Dual Core E1200 or above E2180 / E2200 or above
-- Gigabyte -- or -- Asus-- Intel 945, 965, P31, G31 chipset
Motherboard
ASUS need to install ne※ twork driver manually
RAM
512 MB 1GB
GIGABYTE / ASUS (NVIDIA
chipset) 7200GS, 7300GS
GIGABYTE / ASUS (NVIDIA
chipset ) 6600, 7300GT, 7600
VGA
64 bit above
※Not support ATI chipset VGA.
128MB/128bit above
※Not support ATI chipset VGA.
DVD-RW Support Asus , Lite-On , Philip , BenQ or Pioneer
USB Disk
※ Using original display card with DVI switch for second monitor
※ Information subject to change without notification*
Support USB Backup
2
Page 3
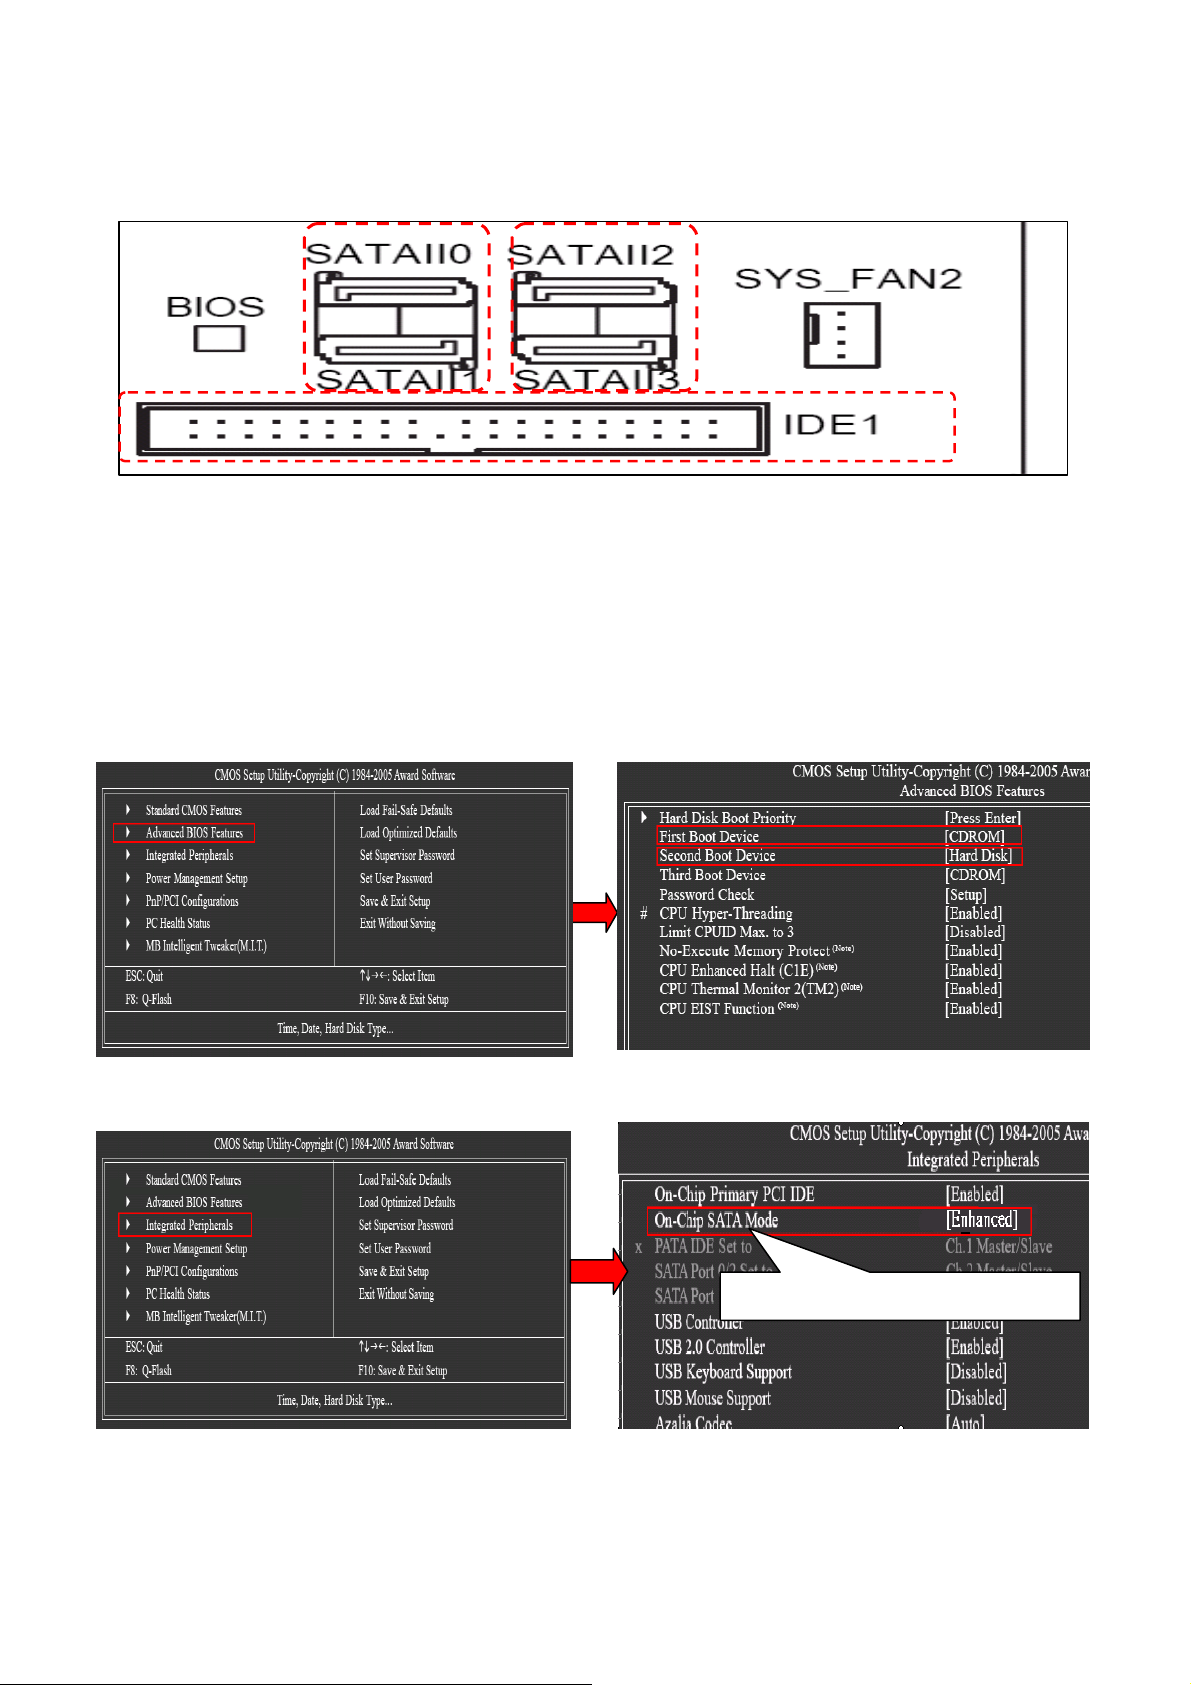
Chapter 1: HDD Installation Important Note
Insert hard disk with the interface slot in order from symbol SATAll0 → SATAll1
→ SATAll2 → SATAll3 on the motherboard.
Chapter 2: Press “Delete” right after the rebooting to enter the BIOS setting
(1) Enter “Advanced BIOS Features” and select “CDROM” to be first boot device,
“Hard Disk” to be second boot device.
(2) Enter” Integrated Peripherals” and Set “On-Chip SATA Mode” as “Enhanced”.
Step 1:
Step2:
On-Chip SATA Mode: Enhanced
※ Select “Save & Exit Setup” after setting accomplish.
※ Insert the Linux DVR CD into the DVR-ROM
3
Page 4

SkyView Linux-DVR installation steps
Step1:
At beginning, select “Installation” and key in “autoyast=file:///eng.xml”
below at “Boot Options” and press” Enter” for automatic installing Linux O.S and
configurations setup. (1st hard disk will automatically partition; 2nd hard disk above
need to partition manually; Please refer to CD user manual for more information)
Select: “Installation”
Key in “autoyast=file:///eng.xml”
Select “Boot from Hard Disk”
After key in “autoyast=file:///eng.xml”, on the installation processing about 30 minutes,
there will be some installing screens appear. However, just not care them until the below
page show up, which means the O.S. installation is done.
Click “close” to shut the page.
4
Click “close”
Page 5

Rebooting the computer
Click → Select “Leave ” → Select “Restart Computer” → Click “Confirm”
Step2:
SkyView software and drivers installation
(Do not take Linux DVR CD out in order to run installation continually)
1. Click “Boot from Hard Disk”
Select “Boot from Hard Disk”
2. Select “Failsafe --openSUSE 10.3 DVR” within 8 seconds
Select “Failsafe --openSUSE 10.3 DVR”
5
Page 6

Key in the following command for installing SkyView applications and driver
a. Linux login
: Key in “root” and press “Enter”
b. Password : Key in “1qaz2wsx” (1, 2 are numerals) and press “Enter”, if enter correct
password will appear ” have a lot of fun ” ; ( Write in small letter and password will be invisible )
c. Linux : ~# mkdir□ /media/linuxdvr ( □ stands for “spacebar”)
d. Linux : ~
will appear: mount: block device /dev/sr0 is write-protected, mounting read-only
# mount□ /dev/cdrom□/media/linuxdvr , Entering correct command
e. Linux : ~# cd□/media/linuxdvr/suse
f. Linux : ~# sh□ dvr.sh (This command means starting install SkyView AP )
Key in: “root”
再試一次
Incorrect password
Key in root password: “1qaz2wsx”
Correct password
mkdir□/media/linuxdvr
mount□/dev/cdrom□/media/linuxdvr
cd□/media/linuxdvr/suse
sh□dvr.sh
6
Page 7

The installing of audio driver will appear five screens; click “OK” or “YES” only
Wait one minute after click “YES” on last screen, and then choose signal format type
During the installation, do not press any key until below page appear
or
NTSC format : key in “1”; PAL format : key in “2”; then press “Enter”
Complete key in 1 or 2 format, computer will automatically reboot and then take CD out.
DVR Main screen will automatically appear and log out the DVR program first for
setting network and date time. More information please refer to CD User Manual
Key in: password “DVR” to log out of SkyView program.
Key in: “DVR”
Useful Tips: Disable “Show tips on startup
Removing
and close the page
7
 Loading...