

Page 1

ALGIZ 10X
Quick Start Guide
handheld
Page 2

What’s in the Box
1
Ref. Item Description
1 Battery Pack One 2 Cell Li-Ion Battery Pack
ALGIZ 10X
32
Quick Start Guide
4
handheld
2 12V Adapter
12V Adapter w/ standard power cord. Standard type, 1.8M
3 Screen protector lm
4 Quick start guide Algiz 10X Quick start guide
Starting ALGIZ 10X
Note: you will be asked to enter your Microsoft Windows license number that is located under the main battery.
Press and hold power button for 4 seconds to power on the unit. Follow the on-screen instructions to get started
with Windows. The screen calibration may not be accurate the rst time you start the computer. Follow the procedure
to calibrate the touchscreen.
Insert Battery Pack
Caution
Please fully charge the battery in advance of operating Algiz
10X for the first time. New battery packs should be fully
charged before Algiz 10X is disconnected from the external
power source. It takes approximately 3 hours to fully charge
the battery from empty.
Screen Calibration
1. Open Control Panel > Hardware and Sound > Tablet PC Settings
2. Click Calibrate and follow instructions
Repeat step 1 and 2 until you are satised with the calibration
Page 3

Function Keys
Ref. Components Description
1 Power Button* Hold down for 4 seconds to turn the computer on
1. Power Button
2. Menu
3. Up/Down/Left/
Right/OK Button
4. F1-F3
2 Menu
3 Up/Down/Left/ Right/OK Button Control of up, down, left, right and Enter functions
4 F1 – F3 3 programmable buttons. Press F1 to congure
* If computer does not respond you can power off by holding down the Power Button until the LEDs switches off.
Hold down for about 10 seconds.
Menu button to control: brightness, volume, battery, power
to modules, and system information
LED Indicators
Ref. Symbol Indicator Status Description
Power mode
Storage Status
Radio Status
Battery Status
GPS Status Green: Indicates GPS power on
Green: System is on
No light: System is off or LED indicators are off in HotTab
Flashing green light: SSD is reading/writing data
Green: Indicates that any transmitting radio is turned on
(WiFi, BT, WWAN)
Green: Full battery, Red: Low battery, Orange: Charging,
Flashing red: Running on Hot-swap battery
Page 4
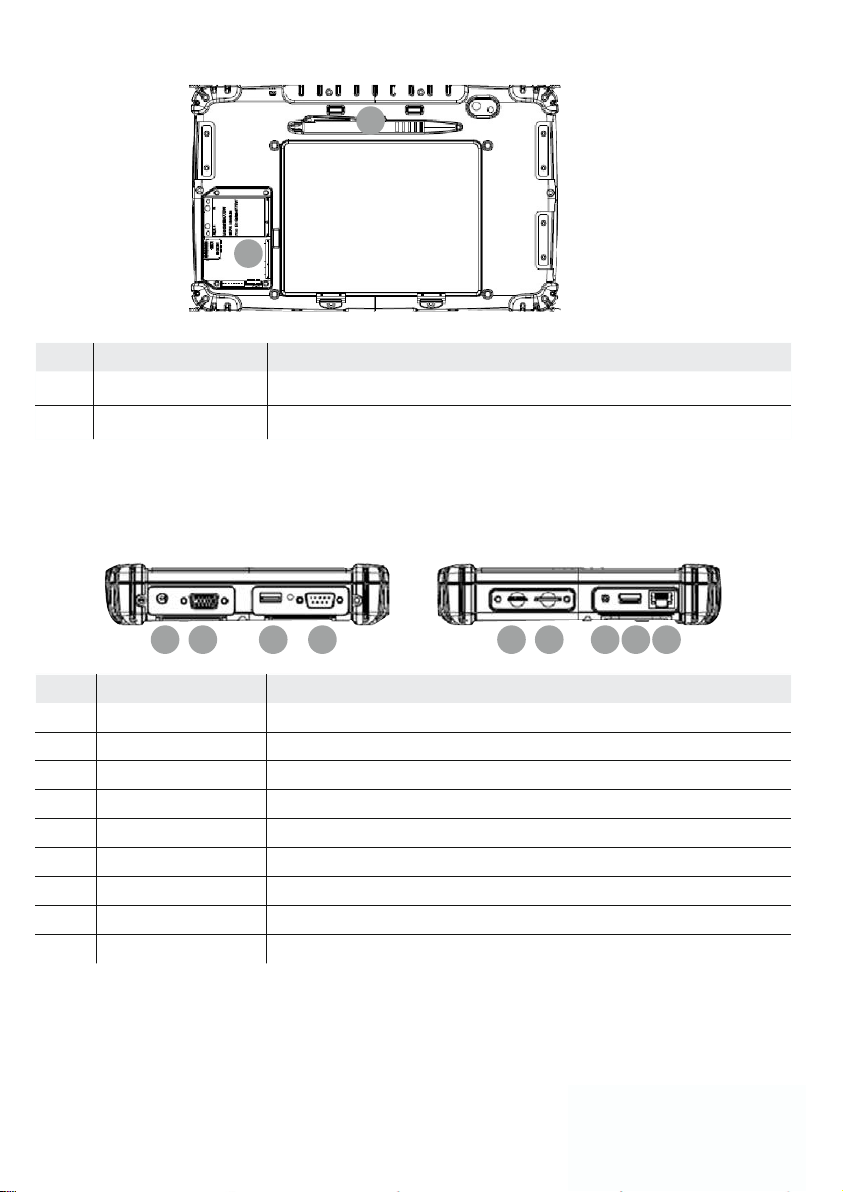
Rear Side
2
Ref. Item Description
1 Stylus Pen -
2 Service Window Expansion slots
Left and Right Side
3 6 92 5 81 4 7
1
Ref. Item Description
1 DC Power Jack -
2 VGA For connecting external display devices such as monitors and projectors
3 USB 2.0 Port -
4 RS232 Accepts external connections using the interface of RS232 (D-sub 9 pins)
5 Micro SD Card Slot Accepts Micro SDXC (up to 2TB)
6 SIM Card Slot -
7 Combo Audio Jack Audio in and out
8 USB 2.0 Port -
9 Ethernet (RJ45) 10/100/1000-based network
Please go to www.handheldgroup.com/manuals to download the full manual.
handheld
www.handheldgroup.com
 Loading...