

Page 1

DC Power Supply
GPD-X303S Series
USER MANUAL
GW INSTEK PART NO. 82PD-433S0M01
ISO-9001 CERTIFIED MANUFACTURER
Page 2

This manual contains proprietary information, which is protected by
copyrights. All rights are reserved. No part of this manual may be
photocopied, reproduced or translated to another language without
prior written consent of Good Will company.
The information in this manual was correct at the time of printing.
However, Good Will continues to improve products and reserves the
rights to change specification, equipment, and maintenance
procedures at any time without notice.
Good Will Instrument Co., Ltd.
No. 7-1, Jhongsing Rd., Tucheng Dist., New Taipei City 236, Taiwan (R.O.C).
Page 3

TABLE OF CONTENTS
Table of Contents
SAFETY INSTRUCTIONS ................................................... 5
OVERVIEW ...................................................................... 10
Introduction......................................... 10
Series Lineup / Main Features .............13
Principle of Operation.......................... 14
Front Panel Overview........................... 16
Rear Panel Overview ............................21
CV/CC Crossover Characteristics ......... 22
SETUP............................................................................. 23
Power Up ............................................. 23
Load Cable Connection ........................ 24
Output On/Off..................................... 25
Beep On/Off ........................................25
Switch between channels ..................... 26
Front Panel Lock .................................. 26
OPERATION.................................................................... 27
CH1/CH2 Independent Mode .............. 27
CH3 Independent Mode....................... 29
CH4 Independent Mode....................... 31
CH1/CH2 Tracking Series Mode........... 33
CH1/CH2 Tracking Parallel Mode ........ 39
SAVE/RECALL SETUP ...................................................... 41
Save Setup ........................................... 41
Recall Setup......................................... 42
REMOTE CONTROL ........................................................ 43
Remote Control Setup..........................43
3
Page 4

GPD-X303S Series User Manual
Remote Connection Step......................44
Command Syntax .................................46
Error Messages .................................... 46
Command List...................................... 47
Command Details ................................ 48
FAQ ................................................................................ 53
APPENDIX ...................................................................... 54
Fuse Replacement................................54
Specifications ......................................55
Declaration of Conformity....................57
INDEX............................................................................. 58
4
Page 5
SAFETY INSTRUCTIONS
SAFETY INSTRUCTIONS
This chapter contains important safety instructions
that you must follow when operating the GPDX303S series and when keeping it in storage. Read
the following before any operation to insure your
safety and to keep the best condition for the GPDX303 series.
Safety Symbols
These safety symbols may appear in this manual or on the GPDX303S series.
WARNING
CAUTION
Warning: Identifies conditions or practices that
could result in injury or loss of life.
Caution: Identifies conditions or practices that
could result in damage to the GPD-X303S series or
to other properties.
DANGER High Voltage
Attention Refer to the Manual
Protective Conductor Terminal
Earth (ground) Terminal
5
Page 6
GPD-X303S Series User Manual
Do not dispose electronic equipment as unsorted
municipal waste. Please use a separate collection
facility or contact the supplier from which this
instrument was purchased.
Safety Guidelines
General
Guidelines
CAUTION
• Do not place any heavy object on the GPD-
• Avoid severe impacts or rough handling that
• Do not discharge static electricity to the GPD-
• Do not block or obstruct the cooling fan vent
• Do not perform measurement at circuits directly
• Do not disassemble the GPD-X303S series unless
(Measurement categories) EN 61010-1:2001 specifies the
measurement categories and their requirements as follows. The
GPD-X303S series falls under category I.
• Measurement category IV is for measurement performed at the
• Measurement category III is for measurement performed in the
• Measurement category II is for measurement performed on the
• Measurement category I is for measurements performed on
X303S series.
leads to damaging the GPD-X303S series.
X303S series.
opening.
connected to Mains (see note below).
you are qualified as service personnel.
source of low-voltage installation.
building installation.
circuits directly connected to the low voltage installation.
circuits not directly connected to Mains.
Power Supply
WARNING
6
• AC Input voltage: 100V/120V/220V/230V
±10%, 50/60Hz
• Connect the protective grounding conductor of
the AC power cord to an earth ground, to avoid
electrical shock.
Page 7

SAFETY INSTRUCTIONS
Fuse
WARNING
Cleaning the
GPD-X303S
series
Operation
Environment
• Fuse type: 100V/120V: T6.3A/250V,
220V/230V: T3.15A/250V
• Make sure the correct type of fuse is installed
before power up.
• To ensure fire protection, replace the fuse only
with the specified type and rating.
• Disconnect the power cord before fuse
replacement.
• Make sure the cause of fuse blowout is fixed
before fuse replacement.
• Disconnect the power cord before cleaning.
• Use a soft cloth dampened in a solution of mild
detergent and water. Do not spray any liquid.
• Do not use chemicals or cleaners containing
harsh products such as benzene, toluene, xylene,
and acetone.
• Location: Indoor, no direct sunlight, dust free,
almost non-conductive pollution (note below)
• Relative Humidity: < 80%
• Altitude: < 2000m
• Temperature: 0°C to 40°C
7
Page 8
GPD-X303S Series User Manual
Storage
environment
Disposal
(Pollution Degree) EN 61010-1:2001 specifies the pollution degrees
and their requirements as follows. The GPD-X303S series falls under
degree 2.
Pollution refers to “addition of foreign matter, solid, liquid, or
gaseous (ionized gases), that may produce a reduction of dielectric
strength or surface resistivity”.
• Pollution degree 1: No pollution or only dry, non-conductive
pollution occurs. The pollution has no influence.
• Pollution degree 2: Normally only non-conductive pollution
occurs. Occasionally, however, a temporary conductivity caused
by condensation must be expected.
• Pollution degree 3: Conductive pollution occurs, or dry, non-
conductive pollution occurs which becomes conductive due to
condensation which is expected. In such conditions, equipment
is normally protected against exposure to direct sunlight,
precipitation, and full wind pressure, but neither temperature
nor humidity is controlled.
• Location: Indoor
• Relative Humidity: < 70%
• Temperature: −10°C to 70°C
Do not dispose this instrument as unsorted
municipal waste. Please use a separate collection
facility or contact the supplier from which this
instrument was purchased. Please make sure
discarded electrical waste is properly recycled to
reduce environmental impact.
8
Page 9
SAFETY INSTRUCTIONS
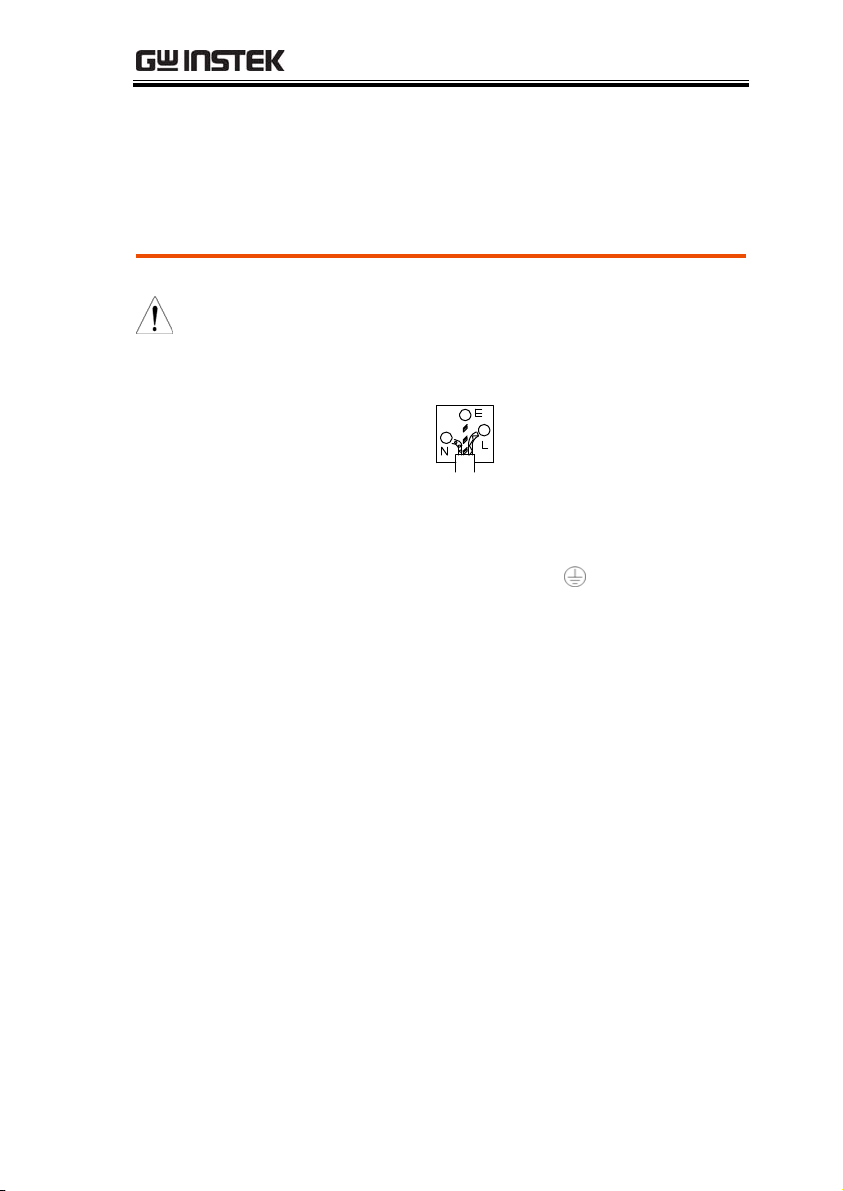
Power cord for the United Kingdom
When using the GPD-2303S/GPD-3303S/GPD-4303S series in the
United Kingdom, make sure the power cord meets the following
safety instructions.
NOTE: This lead/appliance must only be wired by competent persons
WARNING: THIS APPLIANCE MUST BE EARTHED
IMPORTANT: The wires in this lead are coloured in accordance with the
following code:
Green/ Yellow: Earth
Blue: Neutral
Brown: Live (Phase)
As the colours of the wires in main leads may not correspond with the colours
marking identified in your plug/appliance, proceed as follows:
The wire which is coloured Green & Yellow must be connected to the Earth
terminal marked with the letter E or by the earth symbol
Green & Yellow.
The wire which is coloured Blue must be connected to the terminal which is
marked with the letter N or coloured Blue or Black.
The wire which is coloured Brown must be connected to the terminal marked
with the letter L or P or coloured Brown or Red.
If in doubt, consult the instructions provided with the equipment or contact the
supplier.
This cable/appliance should be protected by a suitably rated and approved HBC
mains fuse: refer to the rating information on the equipment and/or user
instructions for details. As a guide, cable of 0.75mm
or 5A fuse. Larger conductors would normally require 13A types, depending on
the connection method used.
Any moulded mains connector that requires removal /replacement must be
destroyed by removal of any fuse & fuse carrier and disposed of immediately, as
a plug with bared wires is hazardous if a engaged in live socket. Any re-wiring
must be carried out in accordance with the information detailed on this label.
or coloured Green or
2
should be protected by a 3A
9
Page 10

GPD-X303S Series User Manual
OVERVIEW
This chapter describes the GPD-2303S/GPD3303S/GPD-4303S series in a nutshell, including
its main features and front / rear panel
introduction. After going through the overview,
follow the Setup chapter (page23) to properly
power up and set operation environment.
Introduction
Overview
The GPD-X303S regulated DC power supply series
are light weight, adjustable, multifunctional work
stations. The GPD-2303S has a 2 independent
adjustable voltage outputs. The GPD-3303S three
independent outputs: two with adjustable voltage
levels and one with fixed level selectable from
2.5V, 3.3V and 5V. The GPD-4303S has four
independent voltage outputs that are all fully
adjustable. The GPD-X303S series can be used for
logic circuits where various output voltage or
current are needed, and for tracking mode
definition systems where plus and minus voltages
with insignificant error are required.
10
Page 11

OVERVIEW
Independent /
Tra c k i n g S e ri es /
Tracking Parallel
Constant Voltage/
Constant Current
The three output modes of GPD-X303S series,
independent, tracking series, and tracking parallel,
can be selected through pressing the TRACKING
key on the front panel. In the independent mode,
the output voltage and current of each channel are
controlled separately. The isolation degree, from
output terminal to chassis or from output terminal
to output terminal, is 500V. In the tracking modes,
both the CH1 and CH2 outputs are automatically
connected in series or parallel; no need to connect
output leads. In the series mode, the output
voltage is doubled; in the parallel mode, the
output current is doubled.
Each output channel is completely transistorized
and well-regulated, and works in constant voltage
(CV) or constant current (CC) mode. Even at the
maximum output current, a fully rated,
continuously adjustable output voltage is
provided. For a big load, the power supply can be
used as a CV source; while for a small load, a CC
source. When in the CV mode (independent or
tracking mode), output current (overload or short
circuit) can be controlled via the front panel. When
in the CC mode (independent mode only), the
maximum (ceiling) output voltage can be
controlled via the front panel. The power supply
will automatically cross over from CV to CC
operation when the output current reaches the
target value. The power supply will automatically
cross over from CC to CV when the output voltage
reaches the target value. For more details about
CV/CC mode operation, see page22.
Automatic
tracking mode
The front panel display (CH1, CH2) shows the
output voltage or current. When operating in the
tracking mode, the power supply will
automatically connect to the auto- tracking mode.
11
Page 12

GPD-X303S Series User Manual
Dynamic load
When used in audio production lines, the power
supply can provide a continuous or dynamic load
using a jumper connector (JP101/JP401). When the
jumper connectors are connected to the “ON”
position (shorted), a stable DC current power will
be provided for audio power amplifiers.
12
Page 13

OVERVIEW
Series Lineup / Main Features
Main Features
Performance
Operation
Protection
• Low noise: Temperature controlled cooling fan
• Compact size, light weight
• Constant Voltage / Constant Current operation
• Tracking Series / Tracking parallel operation
• Output On/Off control
• Multi-output:
GPD-2303S: 30V/3A x2;
GPD-3303S: 30V/3A x2, 2.5V/3.3V/5V/3A x 1
GPD-4303S: 30V/3A x2, 5V/1A x1, 5V/3A
(10V/1A) x1
• Digital panel control
• 4 sets of panel setup save/recall
• Coarse and fine Voltage/Current control
• Software calibration
• Buzzer output
• Key lock function
• Overload protection
• Reverse polarity protection
• Overvoltage protection
Interface
• USB for remote control
13
Page 14
GPD-X303S Series User Manual
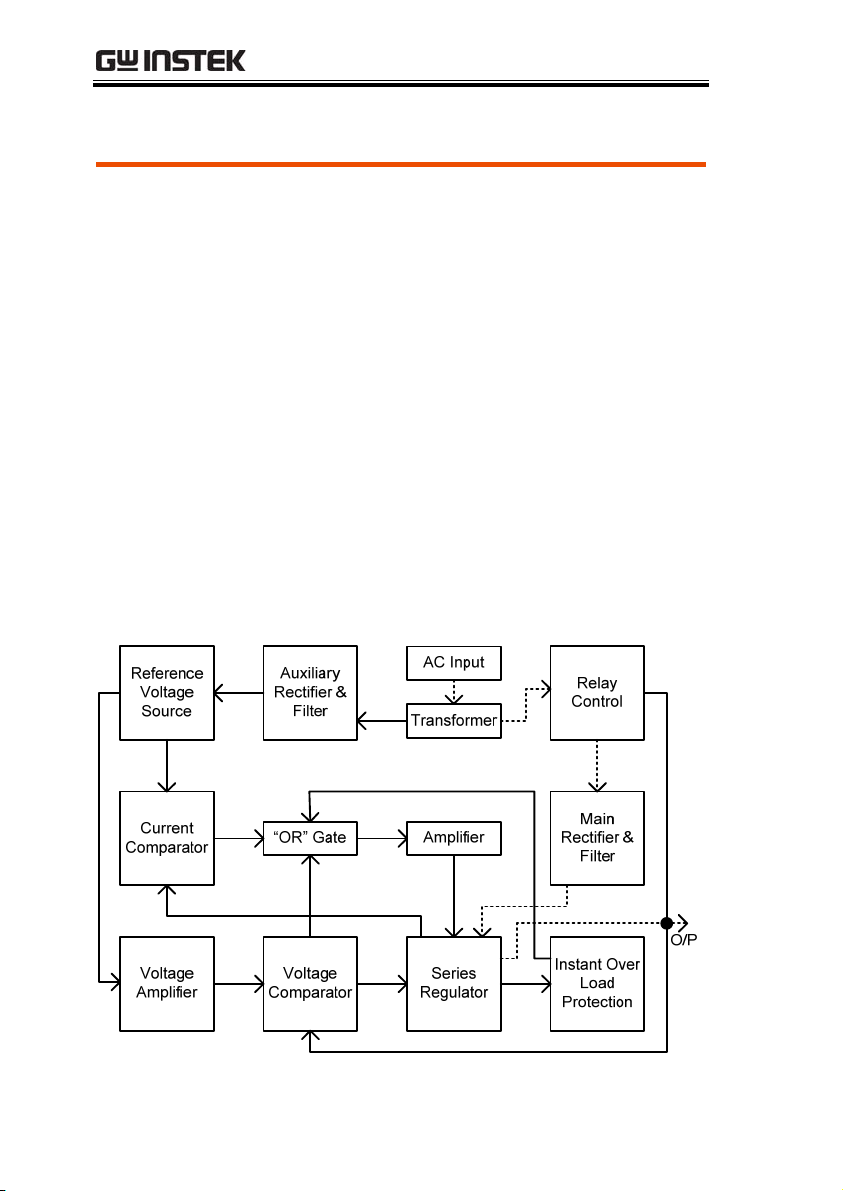
Principle of Operation
Overview
Block diagram
The power supply consists of the following.
• AC input circuit
• Transformer
• Bias power supply including rectifier, filter,
pre-regulator and reference voltage source
• Main regulator circuit including the main
rectifier and filter, series regulator, current
comparator, voltage comparator, reference
voltage amplifier, remote device and relay
control circuit
The block diagram below shows the circuit
arrangement. The single phase input power is
connected to the transformer through the input
circuit. Details of each part are described in the
next page.
14
Page 15

OVERVIEW
Auxiliary Rectifier
Main Rectifier
Current Limiter
Overload
The auxiliary rectifiers D1011~ D1014 provide bias
voltage filtered by the capacitors C102 and C103,
for the pre-regulators U101 and U102. They
provide a regulated voltage for other modules.
The main rectifier is a full wave bridge rectifier. It
provides the power after the rectifier is filtered by
the capacitor C101, and then regulated via a serieswound regulator, which is finally delivered to the
output terminal.
U104 acts as a current limiter. When the current is
over predetermined rating, U104 is activated and
decreases the current. U208 provides a reference
voltage. U206 is an inverter amplifier. U103 is a
comparator amplifier which compares the
reference voltage to the feedback voltage, and then
delivers it to Q102, which then calibrates the
output voltage.
When the unit is overloaded, Q107 activates to
control the current magnitude of Q102, to limit the
output current. The relay control circuit controls
the power dissipation in the series-wound
regulated circuit.
15
Page 16
GPD-X303S Series User Manual
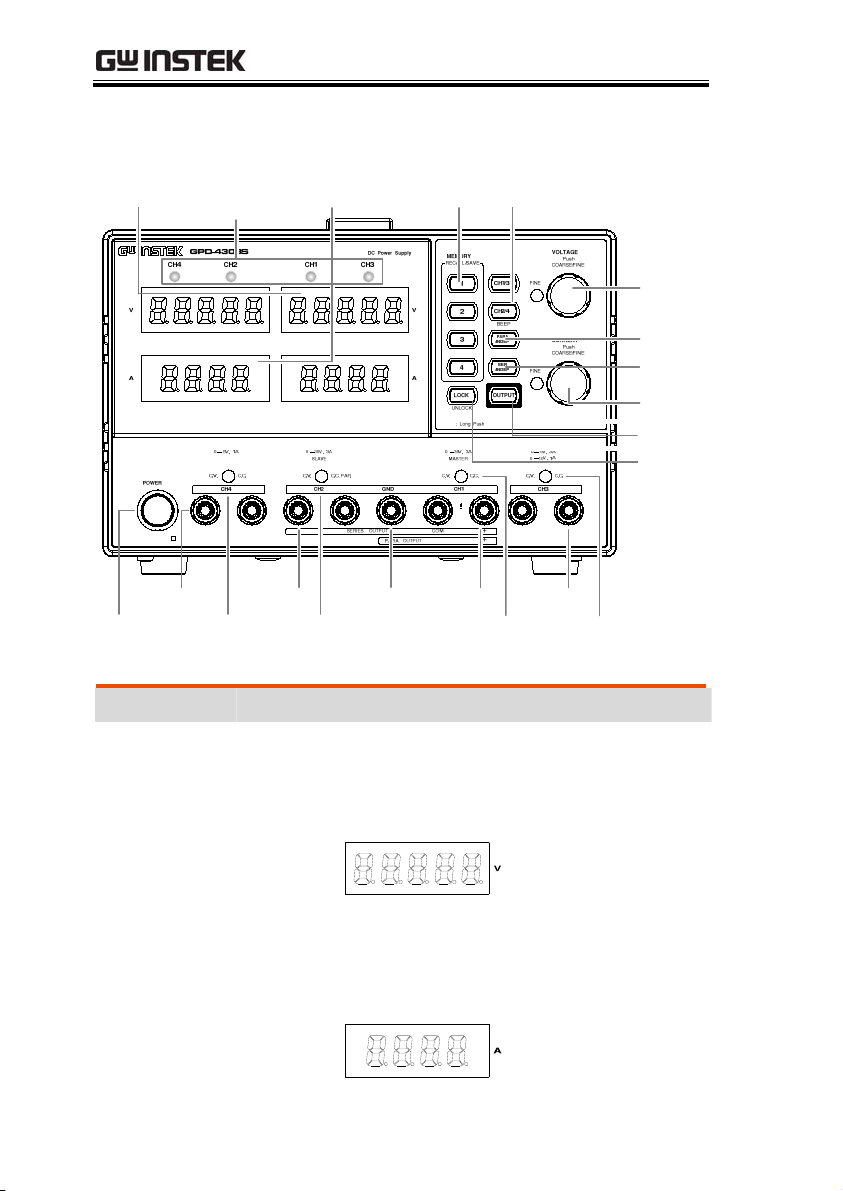
Front Panel Overview
VoltMeter Ammeter Memory Keys
CH4 Output
Power
Switch
Channel
Indicator
CH4 CV/CC
Indicator
GND Terminal
CH2 CV/CC/PAR
Indicator
CH1 OutputCH2 Output
Display
Vol tmeter
Displays output voltage of each channel.
GPD-4303S: CH1/CH3 and CH2/CH4
GPD-2303S/3303S: CH1 and CH2
CH1/CH3, CH2/
CH4(Beep) Keys
CH1 CV/CC
Indicator
Voltage
Knobs
Parallel
Keys
Series Keys
Current
Knobs
Output Key
Lock Key
CH3 Output
CH3 CV/CC
Indicator
5 digits:
Ammeter
Displays output current of each channel.
GPD-4303S: CH1/CH3 and CH2/CH4
GPD-2303S/3303S: CH1 and CH2
4 digits:
16
Page 17
OVERVIEW
Control Panel
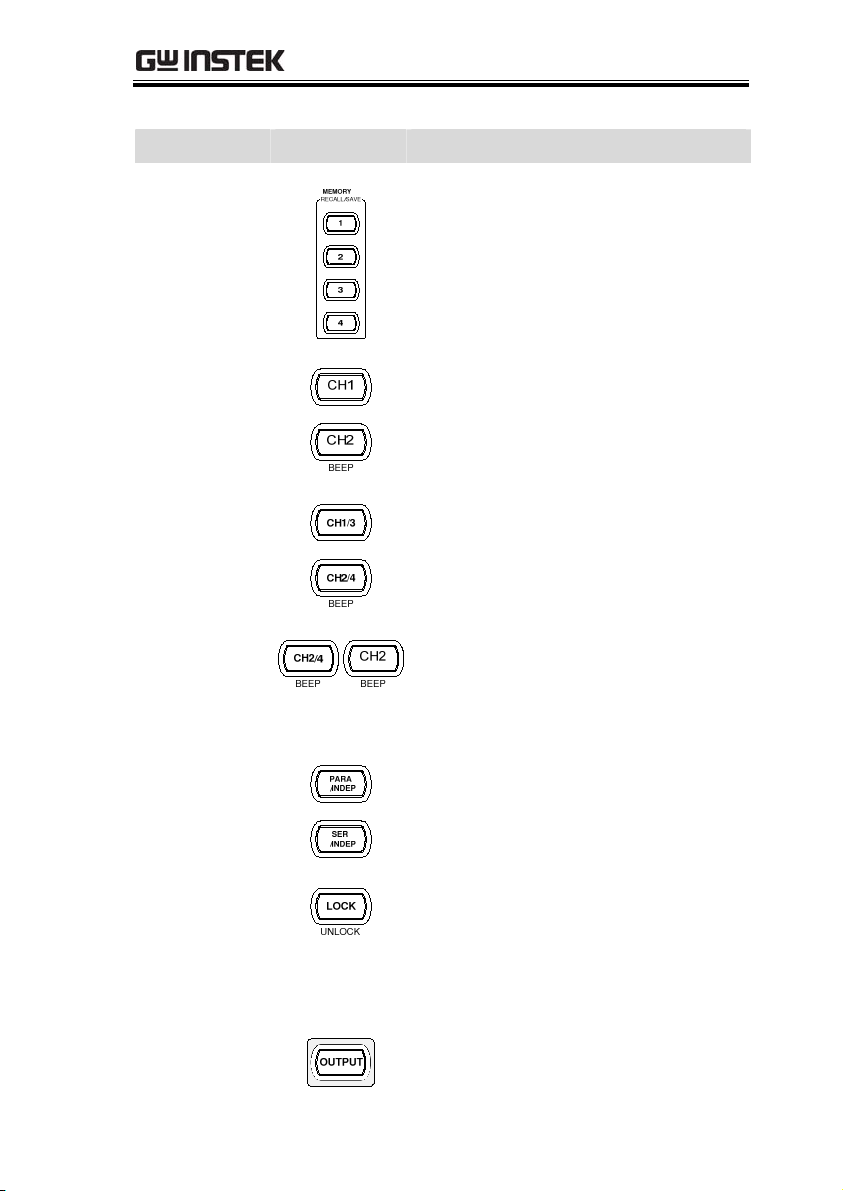
Memory Keys
CH1/CH2
CH1/3 and
CH2/4
Beep Keys
Parallel/Series
Keys
Saves or recalls panel settings. Four
settings, 1 ~ 4, are available. For
save/recall details, see page41.
GPD-2303S/2303S: Selects the output
channel (CH1/CH2) for level
adjustment. For level setting details,
see page27.
GPD-4303S: Selects the output
channel (CH1/3 and CH2/4) for
level adjustment. For level setting
details, see page27.
Pressing and holding the CH2
(2303S/3303S) or the CH2/4 key
(4303S) enables the beeper sound. For
details, see page25.
Activates Tracking Parallel operation
or Tracking Series operation, For
details, see page33.
Lock Key
Locks or unlocks the front panel keys
(excluding the OUTPUT key).
Pressing the LOCK key will also exit
remote mode if the machine is in
remote mode. For details, see page26.
Output Key
Turns the output on or off.
17
Page 18
GPD-X303S Series User Manual
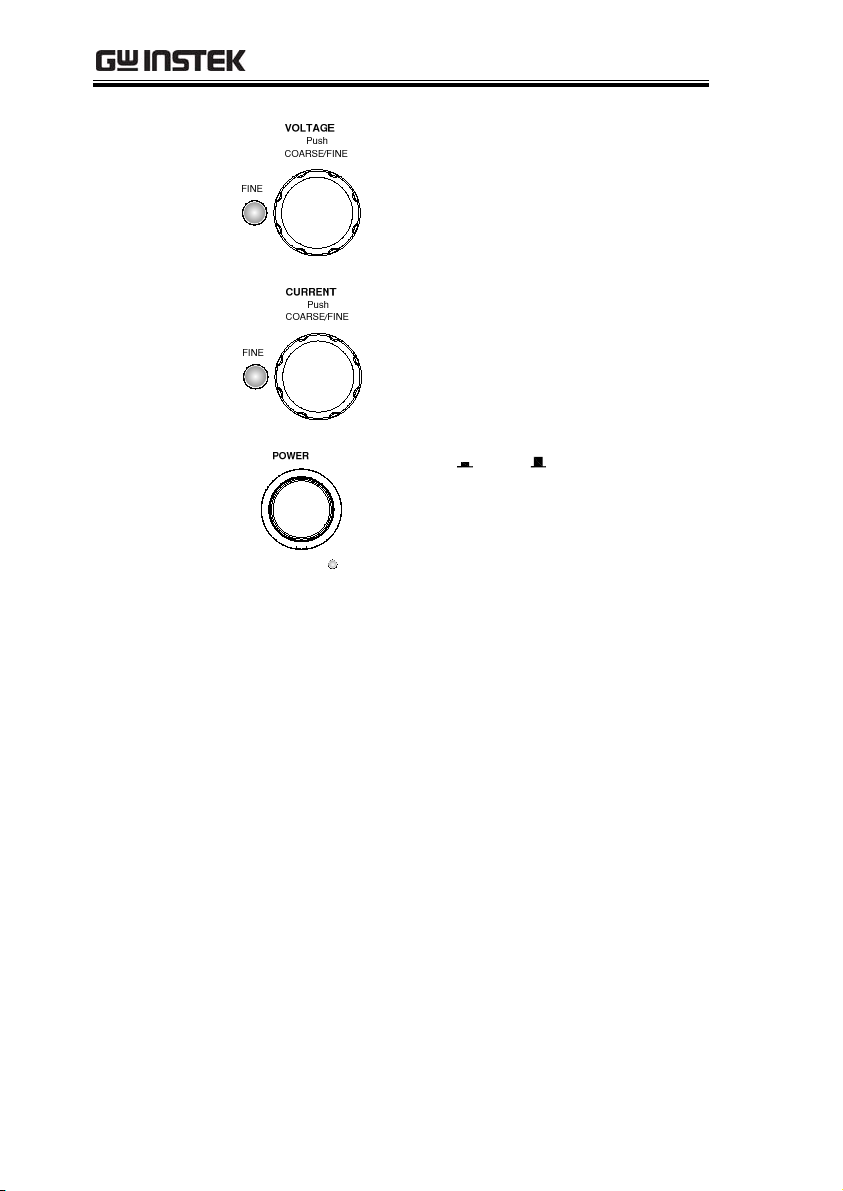
Voltage Knobs
Current Knobs
Power Switch
Adjusts the output voltage level for
the selected channel. Pressing the
knob switches coarse and fine level
setting.
Adjusts the output current level for
the selected channel. Pressing the
knob switches coarse and fine level
setting.
Turns On
or Off the main power.
For power up sequence, see page23.
18
Page 19

OVERVIEW
Te rm i na l s
Default Terminals
GND
Te rm i na l
CH1 CV/CC
Indicator
CH1 Output
CH2
CV/CC/PAR
Indicator
European Terminals
Accepts a grounding wire.
Indicates CH1 Constant
Voltage or Constant Current
state.
Outputs CH1 voltage and
current.
Indicates CH2 Constant
Voltage, Constant Current,
or Tracking Parallel
operation mode.
CH2 Output
CH3 CV/CC
Indicator
CH3 Output
Outputs CH2 voltage and
current.
Indicates CH3 Constant
Voltage or Constant Current
state for the GPD-4303S.
Outputs CH3 voltage and
current.
19
Page 20

GPD-X303S Series User Manual
CH3
Overload
Indicator
CH3 Voltage
Selector
CH4 CV/CC
Indicator
CH4 Output
Channel
Indicator
Indicates when CH3 (3303S)
output current is overloaded.
Selects CH3 output voltage
for the GPD-3303S: 2.5V,
3.3V, or 5V.
Indicates CH4 constant
voltage or constant current
for the GPD-4303S.
Outputs CH4 voltage and
current.
Indicates which channel the
2 LED voltmeters/ammeters
represent.
20
Page 21

OVERVIEW
Rear Panel Overview
USB Connector
Power Cord /
Fuse Socket
AC Selector
Accepts a USB slave connector for
command-based remote control
(page43).
The power cord socket accepts the
AC mains: 115V/230V, 50/60Hz.
For power up details, see page23.
The fuse holder contains the AC
main fuse. For fuse replacement
details, see page54.
Selects AC voltage: 100V/ 120V/
220V/ 230V.
21
Page 22

GPD-X303S Series User Manual
CV/CC Crossover Characteristics
Background
CV mode
CC mode
The GPD-4303S, GPD-3303S and GPD-3303S
automatically switch between constant voltage
mode (CV) and constant current mode (CC),
according to load condition.
When the current level is smaller than the output
setting, the GPD-X303S series operates in Constant
Voltage mode. The indicator on the front panel
turns green (C.V.) The Voltage level is kept at the
setting and the Current level fluctuates according
to the load condition until it reaches the output
current setting.
When the current level reaches the output setting,
the GPD-X303S series starts operating in Constant
Current mode. The indicator on the front panel
turns red (C.C.) The Current level is kept at the
setting but the Voltage level becomes lower than
the setting, in order to suppress the output power
level from overload. When the current level
becomes lower than the setting, the GPD-X303S
series goes back to the Constant Voltage mode.
Diagram
22
Vmax
Vout
Constant
Voltage
Constant
Current
Imax
Iout
Page 23

SETUP
SETUP
This chapter describes how to properly power up
and configure the GPD-X303S series before
operation.
Power Up
Select AC voltage
Connect AC
power cord
Power On
Before powering up the power
supply, select the AC input
voltage from the rear panel.
Connect the AC power cord to
the rear panel socket.
Press the Power switch to turn
on the power. The display shows
the initialization screen with the
model name (3303S shown),
followed by the last recalled
settings.
Power Off
Press the Power switch again to turn off the power.
23
Page 24

GPD-X303S Series User Manual
Load Cable Connection
GTL-104A
GTL-105A
GTL-203A, 204A
1. Turn the terminal
counterclockwise and loosen
the screw.
2. Insert the cable terminal.
3. Turn the terminal clockwise
and tighten the screw.
Insert the plug into the socket.
Insert the plug into the terminal.
Wire type
When using load cables other than the attached,
make sure they have enough current capacity for
minimizing cable loss and load line impedance.
Voltage drop across a wire should not excess 0.5V.
The following list is the wire current rating at
450A/cm
2
.
Wire size (AWG) Maximum current (A)
20 2.5
18 4
16 6
14 10
12 16
24
Page 25

SETUP
Output On/Off
Panel operation
Automatic output
off
Pressing the Output key turns
on all channel outputs.
The key LED also turns on. Pressing the Output
key again turns the output and the key LED off.
Any of the following actions during output on
automatically turns it off.
• Change the operation mode between
independent / tracking series / tracking parallel
• Recalling other setups from the memory
• Storing the setup into the memory
Beep On/Off
Panel operation
By default, the beep sound is
enabled. To turn off the beep,
press the CH2 or CH2/CH4 key
for 2 seconds.
A beep will be heard and the beep setting will be
turned off. To enable the beep, press the CH2 or
CH2/CH4 key again for 2 seconds.
List of beep
The following operations beep when the beep
setting is on.
• Power on
• INDEP – SER – PARA
mode switching
• Setup save/recall
• Voltage/current knob
fine/coarse switching
• Output on/off
• Panel lock/unlock
• CH1/CH2 output
level knob switching
• Voltage/current level
reaching minimum
(zero) level
25
Page 26

GPD-X303S Series User Manual
Switch between channels
Panel operation
Switching between channels
only applies to GPD-4303S.
Press the CH1/3 key to
toggle between CH1 and
CH3. The active channel will
be shown on the channel
indicator.
Press the CH2/4 key to
toggle between CH2 and
CH4. The active channel will
be shown on the channel
indicator.
Front Panel Lock
Panel operation
Press the LOCK key to lock
the front panel key
operation. The key LED
turns on. To unlock, press the LOCK key for 2
seconds. The key LED also turns off.
Note
26
The OUTPUT key is not
affected by the lock
operation.
Page 27

OPERATION
OPERATION
CH1/CH2 Independent Mode
Background /
Connection
Output rating
Panel operation
CH1 and CH2 outputs work independent of each
other.
0 ~ 30V/0~3A for each channel
1. Make sure the PARA/
INDEP and SER/INDEP
keys are turned off (the key
LEDs are off).
2. Connect the load to the front panel terminals,
CH1 +/−, CH2 +/−.
27
Page 28

GPD-X303S Series User Manual
Note: this diagram shows non-European terminals.
3. Set the CH1 output voltage
(For CH1)
and current. Press the CH1
key (LED turns on) and then
use the Voltage and Current
knob.
By default, the Voltage and
Current knob work in the
coarse mode. To activate the
fine mode, press the knob to
(Fine control)
turn the FINE LED on.
• Coarse: 0.1V or 0.1A for each step
• Fine: 1mV or 1mA for each step
4. Repeat the above settings for the CH2.
5. To turn on the output, press
the output key. The key
LED turns on and the CH1
/ CH2 indicator shows the
output mode, CV or CC.
(CH1)
(CH2)
28
Page 29

OPERATION
CH3 Independent Mode
Background /
Connection
Output rating
No Tracking
Series/Parallel
For the GDP-3303S the CH3 rating is fixed at
2.5V/3.3V/5V, 3A. CH3 for the 4303S is variable:
0~5V,0~3A / 5.001~10V,0~1A .
3303S:2.5V/3.3V/5V,3A (fixed)
4303S:0~5V,0~3A / 5.001~10V,0~1A
CH3 does not have tracking series/parallel mode.
Also, CH3 output is not affected by CH1 and CH2
modes.
Panel operation
1. Connect the load to the
front panel CH3 +/−
terminal. (the diagram
shows non-European
terminals)
29
Page 30

GPD-X303S Series User Manual
CV → CC
2. 3303S: Select the output
voltage, 2.5V/3.3V/5V
using the CH3 voltage
selector key.
4303S: Press the CH1/3 key
to switch to CH3 (The CH3
indicator will light). Use
the voltage and current
knobs to set the voltage
and current.
3. To turn on the output,
press the output key. The
key LED turns on.
3303S: When the output
Current level exceeds 3.2A, the
overload indicator turns red
and CH3 operation mode
switches from Constant
Voltage to Constant Current.
4303S: When the output value
exceeds the set value, the
C.V./C.C. indicator turns red.
This indicates that CH3 has
switched from the constant
voltage to constant current.
30
Note
Note: “overload” on CH3 in this case does not mean
an abnormal operation.
Page 31

OPERATION
CH4 Independent Mode
Background /
Connection
Output rating
No Tracking
Series/Parallel
The GPD-4303S has a rating of 5V/1A max.
5V/1A max
CH4 does not have tracking series/parallel mode.
The CH4 output is not affected by CH1 and CH2
modes.
Panel operation
1. Connect the load to the
4
front panel CH4 +/−
terminal. (the diagram
shows non-European
terminals)
2. Press the CH2/4 key to
switch to CH4 (The CH4
indicator will light). Use
the voltage and current
knobs to set the voltage
and current.
31
Page 32

GPD-X303S Series User Manual
CV → CC
3. To turn on the output,
press the output key. The
key LED turns on.
When the output value
exceeds the set value, the
C.V./C.C. indicator turns red.
This indicates that CH3 has
switched from constant
voltage to constant current.
32
Page 33

OPERATION
CH1/CH2 Tracking Series Mode
Background
Tracking series without common terminal
Connection
Tracking series operation doubles the Voltage
capacity of the GPD-X303S series by internally
connecting CH1 (Master) and CH2 (Slave) in series
and combining the output to a single channel. CH1
(Master) controls the combined Voltage output
level.
The following describes two types of
configurations depending on the common ground
usage.
Output rating
0 ~ 60V/0 ~ 3A
1. Press the SER/INDEP key
to activate the tracking
series mode. The key LED
turns on.
2. Connect the load to the front panel terminals,
CH1+ & CH2− (Single supply).
33
Page 34

GPD-X303S Series User Manual
Note: this diagram shows non-European terminals.
3. Press the CH2 key (LED
turns on) and then use the
Current knob to set the CH2
output current to the
maximum level (3.0A).
By default, the Voltage and
Current knob work in the
coarse mode. To activate the
(Fine control)
fine mode, press the knob to
turn the FINE LED on.
• Coarse: 0.1V or 0.1A for each step
• Fine: 1mV or 1mA for each step
4. Press the CH1 key (LED
turns on) and then use the
Voltage and Current knob
to set the output voltage
and current level.
5. To turn on the output, press
the output key. The key LED
turns on.
6. Refer to the CH1 (Master) meter and indicator
for the output setting level and CV/CC status.
34
Page 35

OPERATION
Voltage level
Double the reading on the CH1
Voltage meter. In the above case,
the actual output is 20.0 x 2 =
40.0V.
Current level
CH1 meter reading shows the
output Current. In the above
case, 2.000A. (CH2 Current
control must be in the Maximum
position=3.0A).
Tracking series with common terminal
Connection
COM
LOAD
Output rating
0~30V/0~3A for CH1 ~ COM
0~–30V/0~3A for CH2 ~ COM
35
Page 36

GPD-X303S Series User Manual
1. Press the SER/INDEP key to
activate the tracking series
mode. The key LED turns
on.
2. Connect the load to the front panel terminals,
CH1+ & CH2−. Use the CH1 (−) terminal as the
common line connection.
Note: this diagram shows non-European
terminals.
3. Press the CH1 key (LED
turns on) and use the
Voltage knob to set the
(master & slave)
master & slave output
voltage (the same level for
both channels).
By default, the Voltage and
Current knob work in the
(Fine control)
coarse mode. To activate the
fine mode, press the knob to
turn the FINE LED on.
• Coarse: 0.1V or 0.1A for each step
• Fine: 1mV or 1mA for each step
4. Use the Current knob to set
the master output current.
36
Page 37

OPERATION
5. To turn on the output (and
LED), press the output key.
6. For the master (CH1) output level and CV/CC
status, refer to the CH1 meter and indicator.
Master (CH1)
voltage level
CH1 meter reading shows the
output voltage. In the above
case, 20.0V.
Master (CH1)
current level
CH1 meter reading shows the
output current. In the above
case, 2.000A.
7. Press the CH2 key (LED
turns on) and use the
Current knob to set the slave
output current.
8. For the slave (CH2) output level and CV/CC
status, refer to the CH1/CH2 meter and CH2
indicator.
37
Page 38

GPD-X303S Series User Manual
Slave (CH2)
voltage level
The CH1 meter reading shows
the output voltage. In the above
case, 20.0V.
Slave (CH2)
current level
The CH2 meter reading shows
the output current. In the above
case, 3.000A.
38
Page 39

OPERATION
CH1/CH2 Tracking Parallel Mode
Background /
Connection
Output rating
Tracking parallel operation doubles the current
capacity of the GPD-X303S series by internally
connecting CH1 and CH2 in parallel and
combining the output to a single channel. CH1
controls the combined output.
LOAD
0 ~ 30V/0 ~ 6A
1. Press the PARA/INDEP key
to activate the tracking
parallel mode. The key LED
turns on.
2. Connect the load to the CH1 +/− terminals.
Note: this diagram shows non-European terminals.
39
Page 40

GPD-X303S Series User Manual
3. To turn on the output, press
the output key. The key
LED turns on.
4. The CH2 C.V./C.C. PAR.
indicator turns red,
indicating tracking parallel
(PARA) mode.
5. Press the CH1 key (LED
turns on) and then use the
Voltage and Current knob
to set the output voltage
and current. The CH2
output control is disabled.
By default, the Voltage and
Current knob work in the
(Fine control)
coarse mode. To activate the
fine mode, press the knob to
turn the FINE LED on.
6. For the output level and CV/CC status, refer to
the CH1 meter and indicator.
Voltage level
The CH1 meter reading shows
the output voltage. In the above
case, 20.0V.
Current level
Double the amount of CH1
current meter reading. In the
above case, 2.0A x 2 = 4.0A.
40
Page 41

SAVE/RECALL SETUP
SAVE/RECALL SETUP
Save Setup
Background
Contents
Panel operation
The front panel settings can be stored into one of
the four internal memories.
The following list shows the setup contents.
• Independent / tracking series / tracking parallel
mode
• CH1/CH2 knob selection
• Fine/coarse editing mode
• Output voltage/current level
The following settings are always saved as “off”.
• Output on/off
• Front panel lock/unlock
• Buzzer on/off
Press one of the 1~4 Memory
keys for 2 seconds, for example
memory 1. The panel settings
are saved in memory 1 and the
key LED turns on. When the
panel settings are modified, the
LED turns off.
Note
When a setting is stored, the output automatically
turns off.
41
Page 42

GPD-X303S Series User Manual
Recall Setup
Background
Contents
Panel operation
The front panel settings can be recalled from one of
the four internal memories.
The following list shows the setup contents.
• Independent / tracking series / tracking parallel
mode
• CH1/CH2 knob selection
• Fine/coarse editing mode
• Output voltage/current level
The following settings are always recalled as “off”.
• Output on/off
• Front panel lock/unlock
• Buzzer on/off
Press one of the 1~4 Memory
keys, for example memory 1.
The panel settings saved in
memory 1 are recalled. The key
LED turns on. When the panel
settings are modified, the LED
turns off.
Note
When a setting is recalled, the output
automatically turns off.
42
Page 43

REMOTE CONTROL
REMOTE CONTROL
Remote Control Setup
Background
Interface
COM setting
Functionality
check
The GPD-X303S is capable of being remotely
controlled via a USB connection.
USB slave port, rear panel
Set up the COM port inside the PC according to
the following list.
• Baud rate: 9600/57600 /115200
• Parity bit: None
• Data bit: 8
• Stop bit: 1
• Data flow control: None
Run this query command via the terminal
application such as MTTTY (Multi-threaded TTY).
*IDN?
This should return the identification information:
Manufacturer, model name, serial number,
firmware version.
GW INSTEK, GPD-x303S, SN: xxxxxxxx, Vx.xx
43
Page 44

GPD-X303S Series User Manual
Remote Connection Step
Entering the
remote control
mode
Leaving the
remote control
mode
1. Connect the USB cable to the slave port.
2. The connection will be automatically
established, and the front panel shows a
“USB…YES” message.
3. The power supply front panel is automatically
locked (the Lock key will become activated).
1. To exit remote mode either, 1) use the LOCAL
command from the terminal connection, or 2)
Press the LOCK key on the front panel to return
to local mode, or 3) disconnect the USB cable
from the rear panel.
2. The display shows “USB…NO” message.
44
3. The LOCK will no longer be lit when remote
mode is off.
Page 45

REMOTE CONTROL
4. The power supply goes back to the local
operation mode.
45
Page 46

GPD-X303S Series User Manual
Command Syntax
Command format
ISET<X>:<NR2>NL
12345
Output channel
Parameter Type Description Example
<Boolean>
<NR1>
<NR2>
Te rm i na t or
Note
1 (CH1) or 2 (CH2)
boolean logic 0 (off), 1 (on)
integers 0, 1, 2, 3
decimal numbers
Each command must end with a terminal character
(new line code, ASCII: 0x0A) and each query must
end with a carriage return, ASCII: 0x0D.
Commands are not case-sensitive.
1: command header
2: output channel
3: separator
4: parameter
5: terminator(line feed)
0.1, 3.14, 8.5
Error Messages
The following error messages might appear when the GPD-X303S
cannot accept the command.
Message contents Descriptions
a Program
mnemonic too
long
b Invalid character
c Missing parameter
d Data out of range
46
The command length must be 15 characters
or less.
Invalid characters, such as symbols, are
entered. Example: VOUT#
The parameter is missing from the command.
Example: VSET: (should have a number)
The entered value exceeds the specification.
Example: VSET:33 (should be ≤ 32V)
Page 47

REMOTE CONTROL
e Command not
allowed
The entered command is not allowed in the
circumstance. Example: trying to set CH2
output while in the tracking mode.
f Undefined header
The entered command does not exist, or the
syntax is wrong.
Command List
• Detailed descriptions of each command start from the next page.
• The “HELP” command shows all the below commands and their
meanings, except for the HELP command itself.
ISET<X>:<NR2>
ISET<X>?
VSET<X>:<NR2>
VSET<X>?
IOUT<X>?
VOUT<X>?
TRACK<NR1>
BEEP<BOOLEAN>
Sets the output current.
Returns the output current setting.
Sets the output voltage.
Returns the output voltage setting.
Returns the actual output current.
Returns the actual output voltage.
Selects the operation mode.
Turn on or off the beep.
OUT<BOOLEAN>
STATUS?
*IDN?
RCL<NR1>
SAV<NR1>
HELP?
ERR?
BAUD<NR1>
LOCAL
Turn on or off the output.
Returns the GPD-X303S status.
Returns the GPD-X303S identification.
Recalls a panel setting.
Saves the panel setting.
Shows the command list.
Returns the instrument error messages.
Sets the baud rate.
Returns the instrument to local mode.
47
Page 48

GPD-X303S Series User Manual
Command Details
ISET<X>:<NR2>
Description
X
<NR2>
Response time
Example ISET1:2.234
Sets the output current for the selected channel.
1= CH1, 2= CH2, (4303S: 3 = CH3, 4= CH4)
Decimal number, range 0~3.200A
Minimum 10ms
Sets the CH1 output current to
2.234A.
ISET<X>?
Description
X
Response time
Example ISET1?
Returns the output current setting.
1= CH1, 2= CH2, (4303S: 3 = CH3, 4= CH4)
Minimum 10ms
Returns the CH1 output current setting.
VSET<X>:<NR2>
Description
X
Sets the output voltage.
1: CH1, 2: CH2, (4303S: 3: CH3, 4: CH4)
<NR2>
Response time
Example VSET1:20.345
48
Decimal number, range 0~32.000V
Minimum 10ms
Sets the CH1 voltage to 20.345V
Page 49

REMOTE CONTROL
VSET<X>?
Description
X
Response time
Example VSET1?
Returns the output voltage setting.
1: CH1, 2: CH2, (4303S: 3: CH3, 4: CH4)
Minimum 10ms
IOUT<X>?
Description
X
Response time
Example IOUT1?
Returns the actual output current.
1: CH1, 2: CH2, (4303S: 3: CH3, 4: CH4)
Minimum 10ms
VOUT<X>?
Description
X
Response time
Returns the actual output voltage.
1: CH1, 2: CH2, (4303S: 3: CH3, 4: CH4)
Minimum 10ms
Returns the CH1 voltage setting
Returns the CH1 output current
Example VOUT1?
TRACK<NR1>
Description
NR1
Response time
Example TRACK0
Selects the operation mode: independent, tracking
series, or tracking parallel.
0: Independent, 1: Series, 2: Parallel
Minimum 10ms
Returns the CH1 output voltage
Selects the independent mode
49
Page 50

GPD-X303S Series User Manual
BEEP<Boolean>
Description
<Boolean>
Response time
Example BEEP1
Turns the beep on or off.
0:off, 1:on
Minimum 10ms
OUT<Boolean>
Description
<Boolean>
Response time
Example OUT1
Turns on or off the output.
0: off, 1: on
Minimum 10ms
STATUS?
Description
Response time
Return parameter
Returns the GPD-X3303S.
Minimum 10ms
8 bits in the following format
Bit Item Description
0 CH1 0=CC mode, 1=CV mode
1 CH2 0=CC mode, 1=CV mode
2, 3 Tracking 01=Independent, 11=Tracking series,
4 Beep 0=Off, 1=On
5 Output 0=Off, 1=On
6, 7 Baud 00=115200bps, 01=57600bps,
Turns on the beep
Turns on the output
10=Tracking parallel
10=9600bps
*IDN?
Description
Response time
50
Returns the instrument identification.
Minimum 10ms
Page 51

REMOTE CONTROL
Return parameter
GW INSTEK,GPD-X3303,SN: xxxxxxxx, Vx.xx
(Manufacturer, model name, serial number,
firmware version)
RCL<NR1>
Description
<NR1>
Response time
Example RCL1
Recalls a panel setting.
1 – 4: Memory 1 to 4
Minimum 10ms
SAV<NR1>
Description
<NR1>
Response time
Example SAV1
Stores the panel setting.
1 – 4: Memory 1 to 4
Minimum 10ms
Recalls the panel setting stored
in memory 1
Stores the panel setting in
memory 1
BAUD<NR1>
Description
Sets the baud rate to 9600bps/57600bps
/115200bps.
<NR1>
Response time
Example BAUD0
0: 115200bps, 1: 57600bps, 2: 9600bps
Minimum 10ms
Sets the baud rate to 115200bps.
LOCAL
Description
Exits remote mode and sets the instrument to local
mode.
51
Page 52

GPD-X303S Series User Manual
Response time
ERR?
Description
Response time
Contents
HELP?
Description
Response time
Return
parameters
Note
Minimum 10ms
Checks the error status of the instrument and
returns the last error message.
Minimum 10ms
See page 46 for the list of error messages.
Shows the command list.
Minimum 50ms
ISET<x>:<NR2> Sets the value of current.
VSET<x>:<NR2> Sets the value of voltage.
ISET<x>? Return the value of current.
VSET<x>? Return the value of voltage.
IOUT<x>? Returns actual output current,
VOUT<x>? Returns actual output voltage.
TRACK<NR1> Sets the output of the power supply working
on independent or tracking mode.
BAUD< NR1 >Set the value of baud rate.
RCL<NR1> Recall the setting data from the memory which
previous saved.
SAV<NR1> Saves the setting data to memory.
BEEP<Boolean> Sets the BEEP state on or off.
OUT<Boolean> Sets the output state on or off.
LOCAL Return to local mode
*IDN? Returns instrument identification.
ERR? Returns instrument error messages.
STATUS? Returns the power supply state.
All response time estimates are based on a baud rate of
115200bps. Expect longer response times with a baud rate of
57600bps or 9600bps.
52
Page 53

FAQ
FAQ
Q1. I pressed the panel lock key but the output still turns on/off.
A1. For safety reasons the output key is not affected by the panel key
lock feature.
Q2. The CH3 overload indicator turned on – is this an error?
A2. No, it simply means that the CH3 output current reached the
maximum 3.0A and the operation mode turned from CV (constant
voltage) to CC (constant current). You can continue using the power
supply, although reducing the output load is recommended.
Q3. The specifications do not match the real accuracies.
A3. Make sure that the power supply is powered on for at least 30
minutes, within +20°C – +30°C.
Q4. The internal memory is not recording the panel setting correctly –
the output should be on.
A4. The output is always stored or recalled as “off” to ensure safety.
For more information, contact your local dealer or GWInstek at
www.gwinstek.com.tw
/ marketing@goodwill.com.tw.
53
Page 54

GPD-X303S Series User Manual
APPENDIX
Fuse Replacement
Steps
1. Take off the power cord and remove the fuse
socket using a minus driver.
2. Replace the fuse in the holder.
Rating
54
• 100V/120V:T6.3A/250V
• 220V/230V:T3.15A/250V
Page 55

APPENDIX
Specifications
The specifications apply when the GPD-X303S series are powered on
for at least 30 minutes under +20°C – +30°C.
Output Ratings CH1/CH2
Independent
CH1/CH2
Series
CH3
Vol tag e
Regulation
Ripple & Noise
Temperature
Current
Regulation
Ripple & Noise
Tr ac k in g
Operation
Parallel
Meter Resolution
Resolution
CH1/CH2
Parallel
CH4 0~5V,0~1A
Line
Load
Recovery Time
Coefficient
Line
Load
Tracking Error
Regulation
Series
Regulation
Voltage and
current
Ammeter 3.2A full scale, 4 digits 0.4" LED
0 ~ 30V / 0 ~ 3A
0 ~ 60V / 0 ~ 3A
0 ~ 30V / 0 ~ 6A
2.5V/3.3V/5.0V, 0 ~ 3A(3303S)
0~5V,0~3A / 5.001~10V,0~1A(4303S)
≤ 0.01% + 3mV
≤ 0.01% + 3mV (rating current ≤ 3A)
≤ 0.02% + 5mV (rating current > 3A)
≤ 1mVrms (5Hz ~ 1MHz)
≤ 100μs (50% load change, minimum
load 0.5A)
≤ 300ppm/°C
≤ 0.2% + 3mA
≤ 0.2% + 3mA
≤ 3mArms
≤ 0.1% + 10mV of Master (0~30V)
(No Load, with load add load
regulation 100mV)≤ )
Line: ≤ 0.01% + 3mV
Load: ≤ 0.01% + 3mV
(rating current ≤ 3A)
Load: ≤ 0.02% + 5mV
(rating current > 3A)
Line: ≤ 0.01% + 5mV
Load: ≤ 100mV
Voltage: 1mV
Current: 1mA
display
55
Page 56

GPD-X303S Series User Manual
Voltmeter 32V full scale, 5 digits 0.4" LED display
Program
Accuracy
Read back
Accuracy
CH3 of 3303S Voltage
Voltage: ± (0.03% of reading + 10mV)
Current: ± (0.3% of reading + 10mA)
Voltage: ± (0.03% of reading + 10mV)
Current: ± (0.3% of reading + 10mA)
2.5V/3.3V/5.0V, ±5%
Current
3A
Line ≤ 3mV
Load ≤ 5mV
Insulation Chassis and
Ripple & Noise ≤ 1mVrms (5Hz ~ 1MHz)
20MΩ or above (DC 500V)
Te rm i na l
Chassis and
30MΩ or above (DC 500V)
AC cord
Operation
Environment
Indoor use, Altitude: ≤ 2000m
Ambient temperature: 0 ~ 40°C
Relative humidity: ≤ 80%
Installation category: II, Pollution degree: 2
Storage
Environment
Ambient temperature: –10 ~ 70°C
Relative humidity: ≤ 70%
Power Source AC 100V/120V/220V/230V±10%, 50/60Hz
Accessories
User manual x1
Test lead GTL-104A x 2, GTL-105A x 1
(Europe) Test lead GTL-203A x 1, GTL-204A x 2
Dimensions 210 (W) x 130 (H) x 265 (D) mm
Weight
Approx. 7kg
Options
USB cable GTL-246 USB 2.0, A-B type
56
Page 57

APPENDIX
Declaration of Conformity
We
GOOD WILL INSTRUMENT CO., LTD.
(1) No.7-1, Zhongxing Rd., Tucheng Dist., xinbei City 236, Taiwan
(2) No. 69, Lu San Road, Suzhou City (Xin Qu), Jiangsu Sheng, China
declare, that the below mentioned product
Type of Product: Power Supply
Model Number: GPD-2303S/ GPD-3303S / GPD-4303S
are herewith confirmed to comply with the requirements set out in the
Council Directive on the Approximation of the Law of Member States
relating to Electromagnetic Compatibility (2004/108/EC) and Low
Voltage Directive (2006/95/EC).
For the evaluation regarding the Electromagnetic Compatibility and
Low Voltage Directive, the following standards were applied:
◎ EMC
EN 61326-1: 2006 Electrical equipment for measurement, control and
laboratory use –– EMC requirements
Conducted Emission
Radiated Emission
EN 55011: 2009 + A1: 2010 Radiated Immunity
Current Harmonics
EN 61000-3-2: 2006+A2:2009
Voltage Fluctuations
EN 61000-3-3: 2008
------------------------- Conducted Susceptibility
------------------------- Power Frequency Magnetic Field
------------------------- Voltage Dip/ Interruption
◎ Safety
Low Voltage Equipment Directive 2006/95/EC
Safety Requirements
IEC/EN 61010-1: 2001(Second Edition)
ClassB
Electrostatic Discharge
EN 61000-4-2: 2008
EN 61000-4-3: 2006+A2:2010
Electrical Fast Transients
EN 61000-4-4: 2004+A1:2010
Surge Immunity
EN 61000-4-5: 2005
EN 61000-4-6:2008
EN 61000-4-8: 2009
EN 61000-4-11: 2004
57
Page 58

GPD-X303S Series User Manual
INDEX
Automatic out off .................25
Banana plug ..........................24
Baud rate
Remote control..................51
Beep setting
Contents.............................25
Manual...............................25
Remote control..................50
Caution symbol ......................5
CC/CV...................................30
CC/CV indicator..................32
Cleaning the instrument........7
COM setting, remote control
............................................43
Command list .......................47
Recalling the list ...............52
Common terminal, tracking
series...................................33
Cooling fan............................21
safety instruction................6
CV/CC
CH1/CH2 indicator.........28
CH3 indicator....................30
CH4 indicator....................32
Operation theory ........11, 22
Disposal instructions .............8
EN61010
Declaration of conformity57
Measurement category ......6
Pollution degree .................8
EN61326-1 .............................57
Environment
Operation............................ 7
Specification ..................... 55
Storage................................. 8
Error messages, remote
control ......................... 46, 52
Front panel
Lock (manual) .................. 26
Overview .......................... 16
Fuse
Rating ................................ 55
Replacement..................... 54
Safety instruction............... 7
GPD series
Block diagram .................. 14
Dynamic load................... 12
List of features.................. 13
Operation theory ............. 14
Technology overview...... 10
Ground symbol...................... 5
Identification information .. 50
Load connection................... 24
Local
Remote control................. 51
Operation mode
Independent ..................... 27
Specifications.................... 55
Tracking parallel.............. 39
Tracking series ................. 33
Output current setting
Manual .............................. 28
Remote control................. 48
Output on/off
58
Page 59

INDEX
FAQ ....................................53
manual ...............................25
Remote ...............................50
Output voltage setting
Manual...............................28
Remote control..................48
Over load indicator ..............30
Power supply
Safety instruction................6
Setup ..................................23
Socket overview................21
Specification ......................55
Protective ground symbol.....5
Rear panel overview ............21
Recall settings
Manual...............................42
Remote ...............................51
Remote control
Command syntax............. 46
Connection test................. 43
Error messages ................. 46
Interface............................. 43
Save settings
Manual .............................. 41
Remote............................... 51
Service operation
About disassembly ............ 6
Contact .............................. 53
Status, instrument................ 50
Switch channels.................... 26
Tracking mode
Operation theory.............. 11
UK power cord....................... 9
USB interface ........................ 43
Warning symbol..................... 5
Wire, load.............................. 24
59
 Loading...