

Page 1

ǵ
DEUTSCH
ENGLISH
FRANÇAIS
ITALIANO
DVD HOME
CINEMA MICRO
SYSTEM
Scenos
UMS 4400 DVD
Page 2

2
CONTENTS________________________________________________________________________
4 Scenos UMS 4400 DVD
4 Special features of your DVD Micro System
4 Packing contents
5 Set-up and safety
6-14 Overview
6-7 The front of the DVD Micro System
8-9 The displays of the DVD Micro System
10 The back of the DVD Micro System
11 Operating controls and connections of the subwoofer
12-14 The remote control
15-18 Connection and preparation
15 Connection diagram for the loudspeakers
15 Setting up the loudspeakers
16 Connecting the loudspeakers
16-17 Connecting a television, a flat screen or a projector
17 Connecting external devices digitally
18 Connecting the antennas
18 Connecting the power cord
18 Inserting batteries in the remote control
19 Additional information for units sold in the UK.
20-24 Settings
20 Setting the time
20 General information
21-22 Setting the video functions
22 Setting the loudspeaker configuration
22-23 Setting the audio functions
24 Tuning and storing radio stations
25-26 General functions
25 Switching on and off
25 Selecting the input source
25 Inserting a disc
25 Removing discs
25 Adjusting the volume
26 Muting
26 Selecting sound settings
26 General information on disc playback
27-28 Disc features
27 Disc formats
27 DVD features
27-28 VCD/S-VCD features
28 MP3 CD features
28 Audio CD features
28 JPEG Picture CD features
Page 3

CONTENTS
__________________________________________________________________________________
ENGLISH
3
29-34 Disc mode
29 Playback functions
29 Selecting titles or chapters
30 Selecting titles or chapters (in DVD mode)
30 Playback with PBC (playback control) (in Video CD mode)
31 Playback with progressive scan (in DVD mode)
31-32 Displaying information
32-33 Additional playback functions
34 Zero setting (GO TO)
34 Selecting and playing scenes
35 Playing back tracks or titles in random order
35 Repeat functions
36 Creating a track memory – playing back titles or tracks in selected order
37-38 Tuner mode
37 Selecting the tuner input source
37 Selecting the waveband
37 Calling up stored radio stations
37-38 RDS station service
39-40 Timer mode
39-40 Switch-on timer
40 Sleep timer
41 Child lock
41 Changing the child lock settings
41 Changing the parental lock access code
42-43 Additional settings
42 Setting the picture mode
42 Displaying the multi-angle symbol
42 Activating and deactivating the status line
43 Language settings
44-46 Information
44-45 Technical data
45 General instructions for laser devices
45 Cleaning discs
46 Rectifying minor problems
Page 4
4
Special features of your DVD Micro System
Your DVD Micro System provides you with perfect digital video playback in
studio quality.
It also provides superb cinema-quality audio playback – in stereo or with digital
multi-channel sound – depending on the type of DVD or CD used.
In addition to DVDs, you can also play S-Video CDs, MP3 CDs or WMA CDs,
audio CDs and JPEG picture CDs. In addition to this the DVD Micro System
reads home-made DVD Rs and DVD RWs with video data or CD-Rs and CDRWs with Audio data.
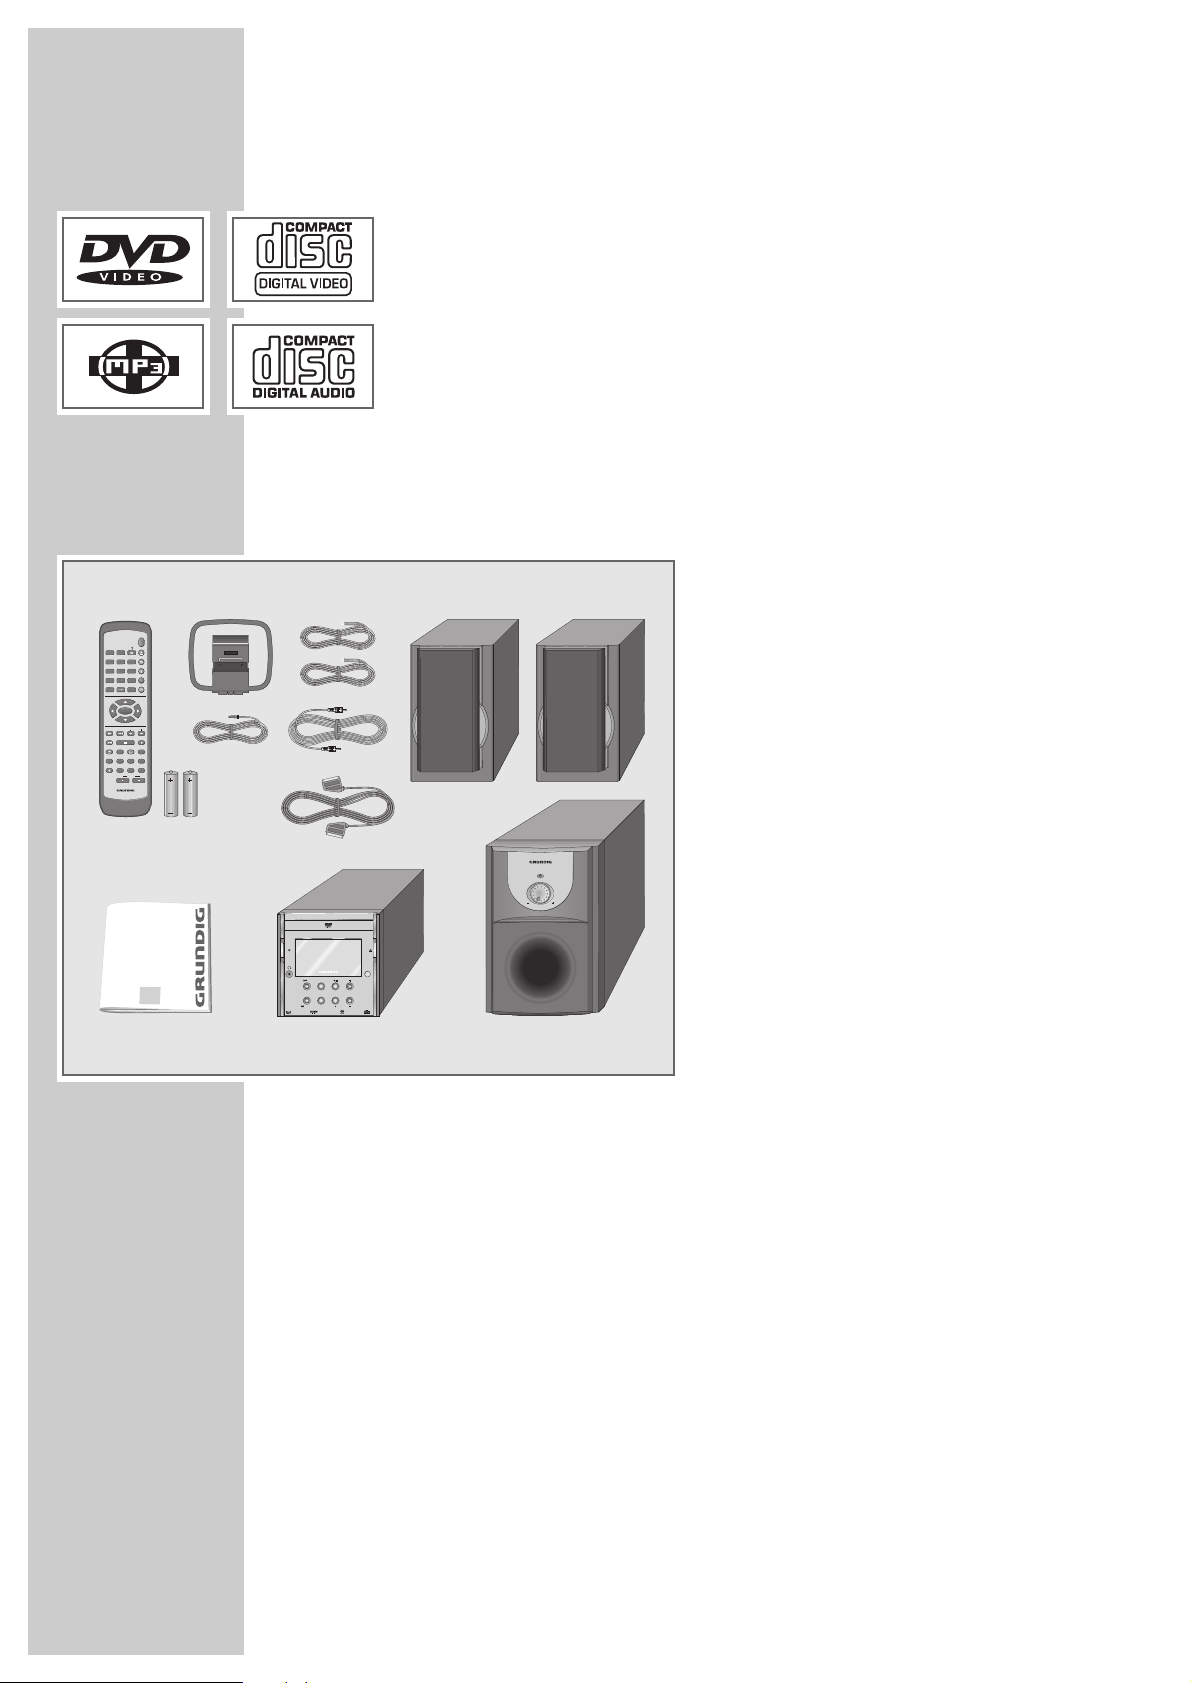
Packing contents
1 DVD Micro System Scenos UMS 4400
2 Remote control
3 Two batteries, 1.5 V, Mignon type, UM
3/R 6/AA
4 Two front loudspeakers
5 Two loudspeaker cables
6 Active subwoofer
7 Subwoofer cable
8 Euro/AV (Scart) cable
9 FM wire antenna
10 AM frame antenna
11 Operating manual
SCENOS UMS 4400 DVD
_________________________________
AM
LOOP ANTENNA
2
3
11
7
8
1
6
10
9
5
4
DOWN UP
BOOKMARK
DISC/
RANDOMTVAM/FM
PBC/
RDS/
P.SCAN
MUTE EQ/BBS
0
GO TO MENU
PRESET TUNING
TITLE
DISPLAY/DIM
ON/OFF
ECO
213
546
879
DEMO/OK
SUBTITLE
REPEAT
CLOCK/SLEEP
A-B
VOLUME
SETUP
SLOWPLAY/PAUSE STOP
PROGRAM
TIMER
DVD MICRO
SYSTEM WITH
DIGITAL TUNER
ON/OFF
ECO
DVD MICRO SYSTEM WITH DIGITAL TUNER
/
UP
AM/FM
SKIP/PRESET TUNER
/
DOWN
STANDBY
VOLUME
cenos
S
DVD VOLUME
TV
Page 5
ENGLISH
5
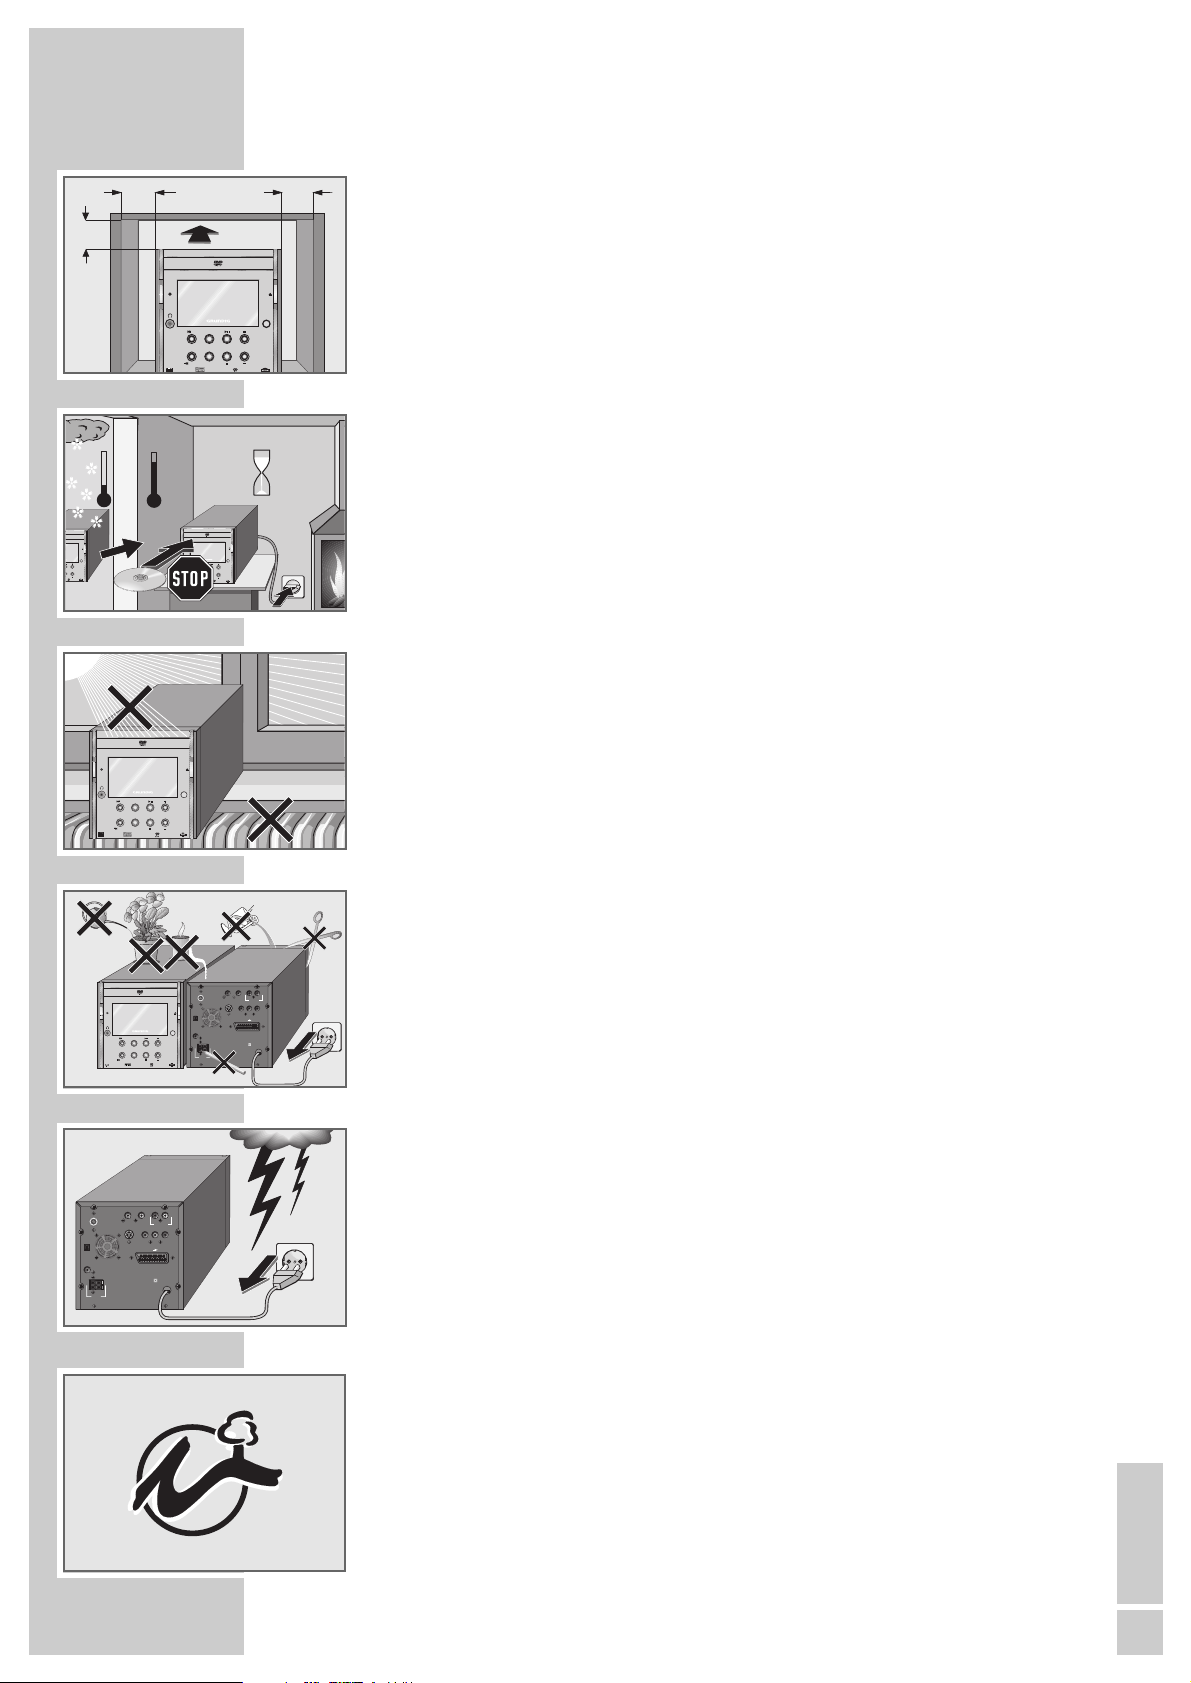
Please note the following information when setting up the home cinema system:
The DVD Micro System and loudspeakers are designed for playing back video
and audio signals at use. Any other use is expressly prohibited.
If you want to set up the DVD Micro System on wall shelves or in cupboards,
please ensure that it is adequately ventilated. There must be at least 10 cm
space at the side, above and at the back of the device. When setting up the
subwoofer, make sure that there is at least 20 cm of space at the side, above
and at the back of the device. Wherever possible the subwoofer should be set
up so that it stands freely.
If the DVD Micro System and loudspeakers are subjected to sudden changes in
temperature, for example if they are brought in from the cold to a warm room,
let them stand for at least two hours. Do not connect them to the mains supply
during this time.
The DVD Micro System and loudspeakers are designed for use in dry rooms.
If you do use them in the open, please ensure that they are protected from moisture, such as rain or water splashes.
Place the DVD Micro System on a hard, level surface. Do not place any objects
such as newspapers on the DVD Micro System or cloth or similar items beneath it.
The laser lens is sensitive to temperature. Therefore, do not place the DVD Micro
System near heating units or in direct sunlight, as this will impair cooling.
Do not insert foreign objects in the disc compartment of the DVD Micro System.
Never open the casing of the DVD Micro System and loudspeakers. No
warranty claims are accepted for damage resulting from improper handling.
Do not place any vessels such as vases containing fluid on the DVD Micro
System and loudspeakers. These may be knocked over and spill fluid on the
electrical components, thus presenting a safety risk. Do not place any objects
such as burning candles on the DVD Micro System or loudspeakers.
Thunderstorms are a danger to all electrical devices. Even if the DVD Micro
System is switched off, it can be damaged by a lightning strike to the mains.
Always disconnect the mains and antenna plugs from the DVD Micro System
and the mains cable from the subwoofer during a storm.
If the DVD Micro System cannot scan DVDs or CDs perfectly, use a commercially
available cleaning-CD to clean the laser optics. Other cleaning methods may
damage the laser optics. Always keep the disc compartment closed to prevent
dust from collecting on the laser optics.
This DVD Micro System successfully combines technology and environmental
friendliness in its overall design. Only environmentally-friendly, high-quality
materials have been used. The batteries included contain no mercury or
cadmium. The range of materials used has been deliberately restricted and all
the larger plastic parts have been labelled. This means that the DVD Micro
System is easily disassembled to make servicing easier and optimise recycling.
SET-UP AND SAFETY ______________________________________________
°C
2h
°C
S
cenos
GITAL TUNER
VD VOLUME
S
cenos
DVD MICRO SYSTEM WITH DIGITAL TUNER
SKIP/PRESET TUNER
AM/FM
TV
DVD VOLUME
SURROUND
ON/OFF
ECO
/
UP
/
DOWN
S
cenos
DVD MICRO SYSTEM WITH DIGITAL TUNER
SKIP/PRESET TUNER
AM/FM
TV
DVD VOLUME
ON/OFF
ECO
/
UP
/
DOWN
230 V~ 50/60 Hz
max. 70W
EURO AV TV
SPEAKERS
AUDIO OUT
L
R
COAXIAL OUT VIDEO OUT
SUBWOOFER
Y Pb/Cb Pr/Cr
FM ANT
AM ANT
IMPEDANCE
8 Ω
LR
S VIDEO
! SERVICE !! SERVICE !! SERVICE !
S
cenos
DVD MICRO SYSTEM WITH DIGITAL TUNER
SKIP/PRESET TUNER
AM/FM
TV
DVD VOLUME
SURROUND
ON/OFF
ECO
/
UP
/
DOWN
10
cm
10
cm
10
cm
1
0
c
m
S
cenos
DVD MICRO SYSTEM WITH DIGITAL TUNER
SKIP/PRESET TUNER
AM/FM
TV
DVD VOLUME
ON/OFF
ECO
/
UP
/
DOWN
230 V~ 50/60 Hz
max. 70W
EURO AV TV
SPEAKERS
AUDIO OUT
L
R
COAXIAL OUT VIDEO OUT
SUBWOOFER
Y Pb/Cb Pr/Cr
FM ANT
AM ANT
IMPEDANCE
8 Ω
LR
S VIDEO
Page 6
6
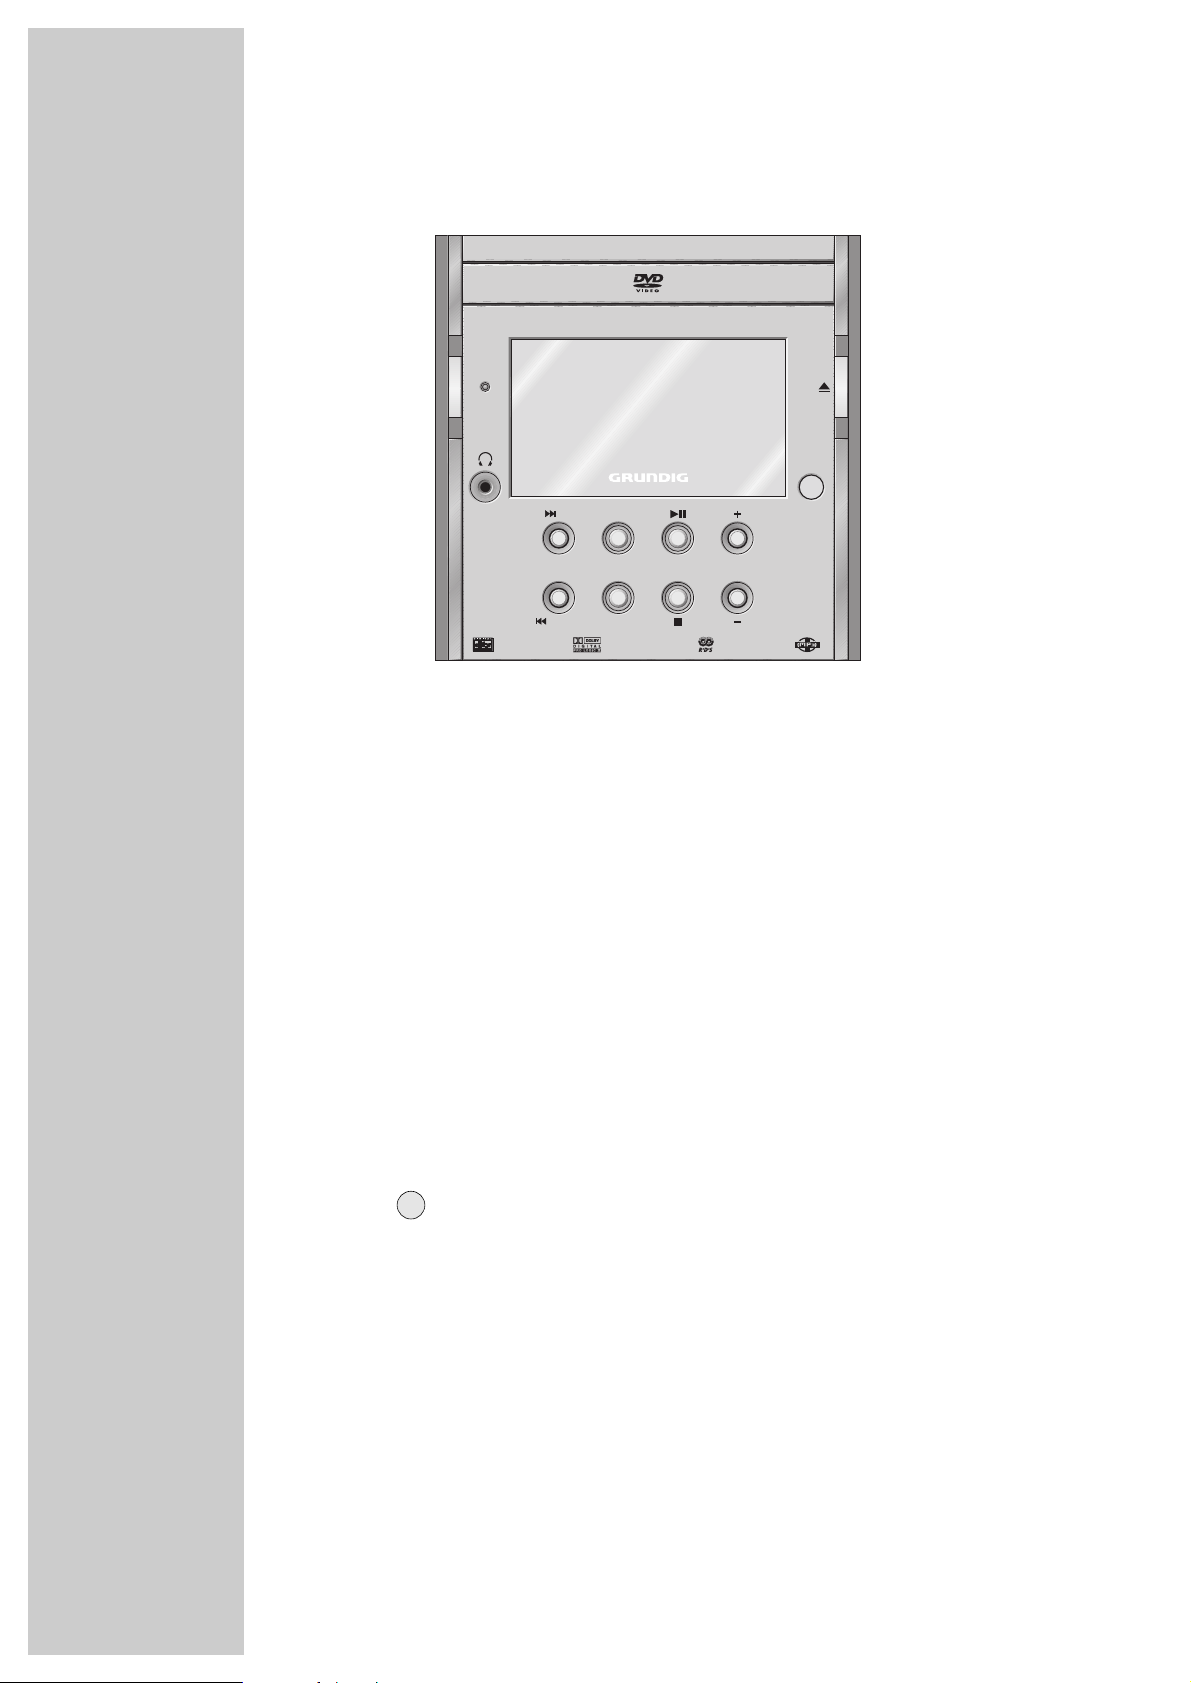
The front of the DVD Micro System
ON/OFF Press briefly: switches the DVD Micro System to standby
ECO and back on again with the last source signal selected.
Hold down: switches the DVD Micro System from standby to
eco mode.
The DVD Micro System is only fully disconnected from the
mains after the plug has been pulled out.
Z
Standby display. Glows red when the DVD Micro System is
switched to standby or to eco mode.
y Headphone jack for connecting a stereo headphone set
with a jack plug (ø 3.5 mm).
The loudspeakers are switched off automatically. The sound
is reproduced in stereo two-channel sound with no surround
sound effects.
ə Opens and closes the disc compartment. Switches the DVD
Micro System from standby when opened with DISC selected
as the input source.
Infrared receiver for the remote control.
9/UP In disc mode – selects the next or previous section or track
SKIP/PRESET during playback.
8/DOWN In tuner mode – switches backwards and forwards through
the preset positions (saved radio stations) step-by-step.
Hold down: starts the station search mode backwards and
forwards.
OVERVIEW________________________________________________________________________
S
cenos
DVD MICRO SYSTEM WITH DIGITAL TUNER
SKIP/PRESET TUNER
AM/FM
TV
DVD VOLUME
SURROUND
ON/OFF
ECO
/
UP
/
DOWN
Page 7
ENGLISH
7
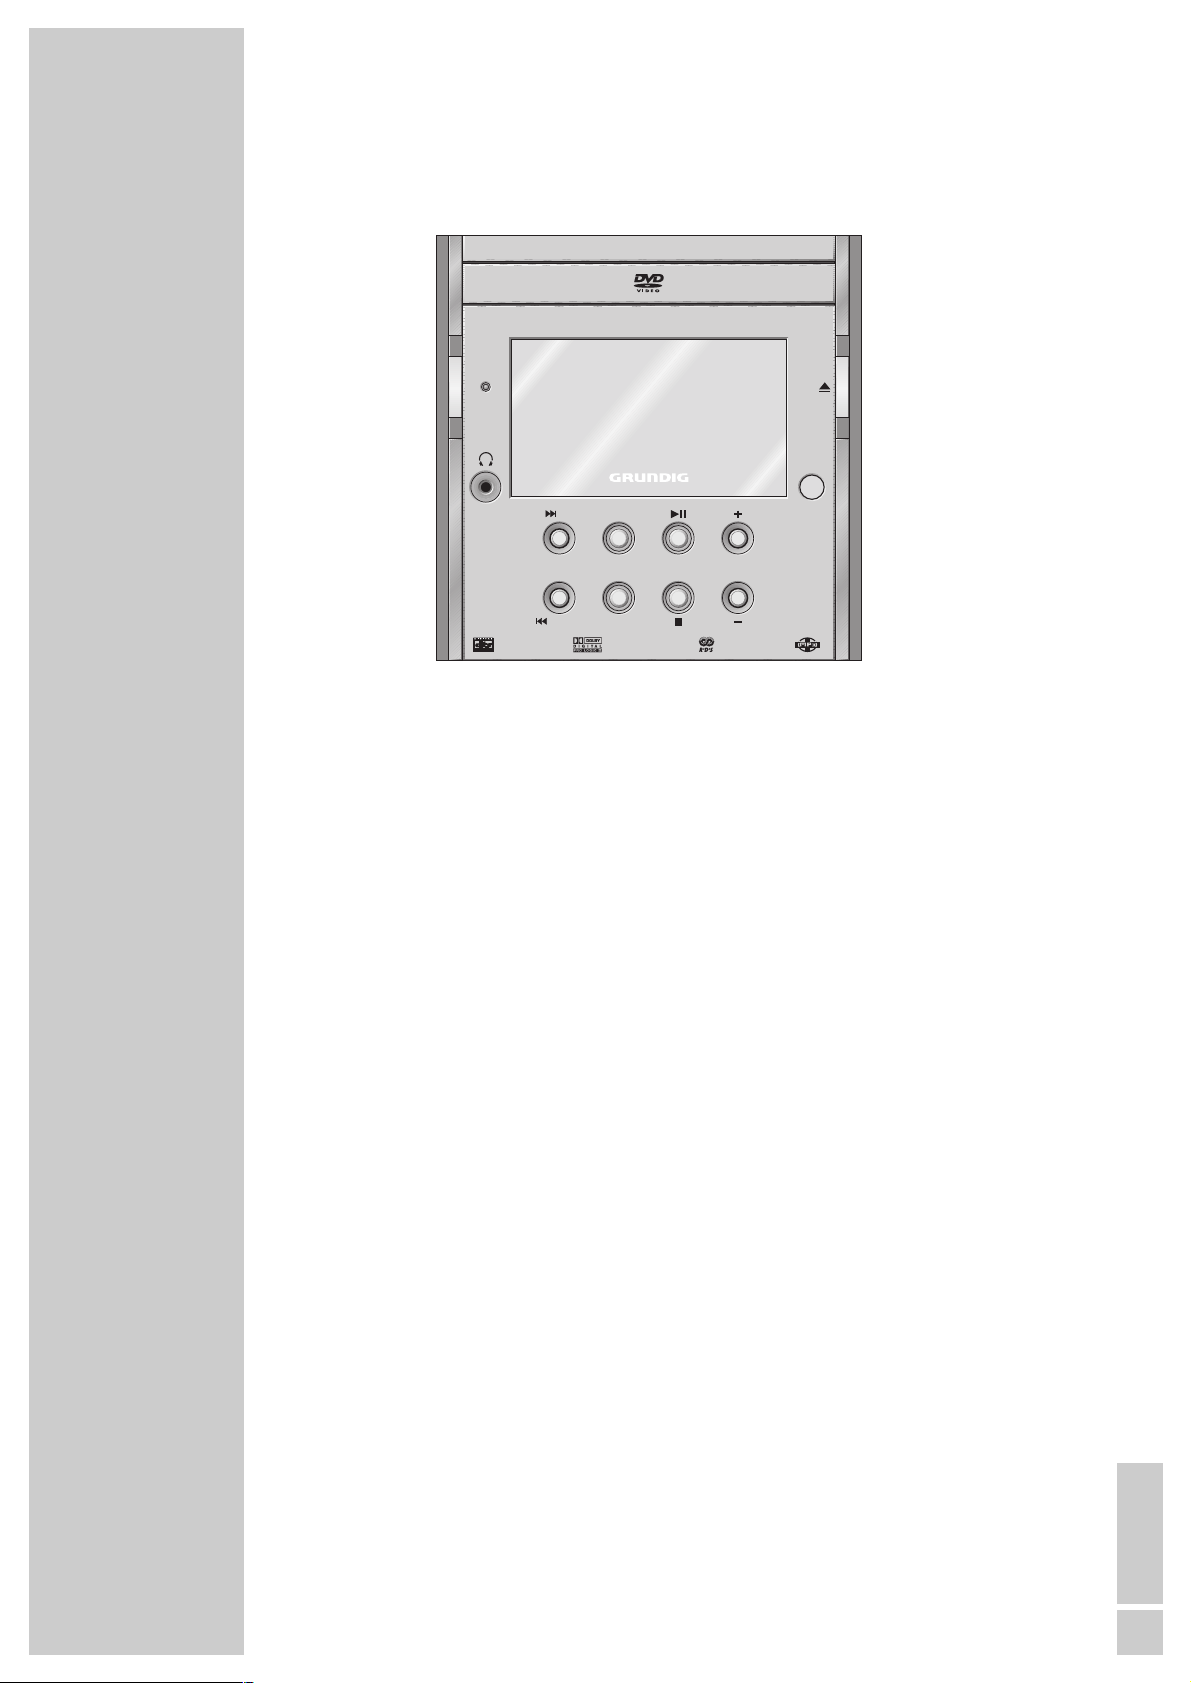
OVERVIEW
__________________________________________________________________________________
FM TUNER Selects the TUNER input source (FM). Switches the DVD
Micro System from standby with TUNER (FM) selected as
the input source.
AM TUNER Selects the TUNER input source (AM).
TV Selects TV as external input source.
DVD
ı
II Selects DVD as the input source.
In disc mode: starts disc playback; pauses playback.
DVD
7
Ends disc playback.
+ VOLUME – Adjusts the volume of the system.
S
cenos
DVD MICRO SYSTEM WITH DIGITAL TUNER
SKIP/PRESET TUNER
AM/FM
TV
DVD VOLUME
SURROUND
ON/OFF
ECO
/
UP
/
DOWN
Page 8

8
OVERVIEW
__________________________________________________________________________________
The displays of the DVD Micro System
0000:00.00 Displays the disc format, various functions and settings as well
as the name or frequency of the radio station.
kHz In combination with the frequency display for AM (medium
wave) reception.
MHz In combination with the frequency display for FM reception.
DVD A DVD is being played back.
VCD A VCD is being played back.
S VCD An S-VCD is being played back.
MP3 An MP3 CD is being played back.
ROCK The ROCK sound setting has been activated.
The BASS BOOST function has been activated.
The “Progressive Scan” video output format has been selected.
ijDIGITAL Dolby Digital indicator.
ALBUM In MP3 mode: a directory is displayed.
TITLE In disc mode: a file or a track is displayed.
TRK In CD-DA mode: a track is displayed.
CHP In DVD mode: a chapter is displayed.
00 Displays the preset station number or the number of analbum
or title.
SLEEP The sleep timer is activated.
P.SCAN
BASS
00000000
.
::
DVD S VCD MP3
CLASSIC ROCK JAZZ POP
ij DIGITAL
SLEEP RANDOM REPEAT ALB TIT ALLALBUM
PTY
ı
II
MUTING
TITLE
TRK
kHz
CHP MHz
PROG TOTAL REMAIN
BASS
TIMER
STEREO
P.SCAN
00
F
Page 9
ENGLISH
9
OVERVIEW
__________________________________________________________________________________
RANDOM Plays back the tracks or chapters in random order.
REPEAT In disc mode: a track or chapter is repeated.
REPEAT ALB In MP3 mode: a directory is played back repeatedly.
REPEAT TIT In DVD mode: a title is repeated.
REPEAT ALL In disc mode: all tracks are repeated.
PROG Flashes when a program is created. Displays the playback
of a program.
The switch-on timer is activated. Flashes when the
switch-on timer is being set.
TOTAL REMAIN In CD-DA mode: the remaining playing time is displayed.
In DVD mode: the remaining playing time of a chapter is
displayed.
F An RDS station is being received.
PTY The PTY (programme type) function is activated.
IR display. Flashes when the DVD Micro System receives
commands from the remote control.
ı
Indicates disc playback.
II Disc playback has been interrupted (pause, freeze frame).
Indicates stereo playback or stereo reception.
MUTING Flashes when the system has been muted.
STEREO
TIMER
00000000
.
::
DVD S VCD MP3
CLASSIC ROCK JAZZ POP
ij DIGITAL
SLEEP RANDOM REPEAT ALB TIT ALLALBUM
PTY
ı
II
MUTING
TITLE
TRK
kHz
CHP MHz
PROG TOTAL REMAIN
BASS
TIMER
STEREO
P.SCAN
00
F
Page 10
10
OVERVIEW
__________________________________________________________________________________
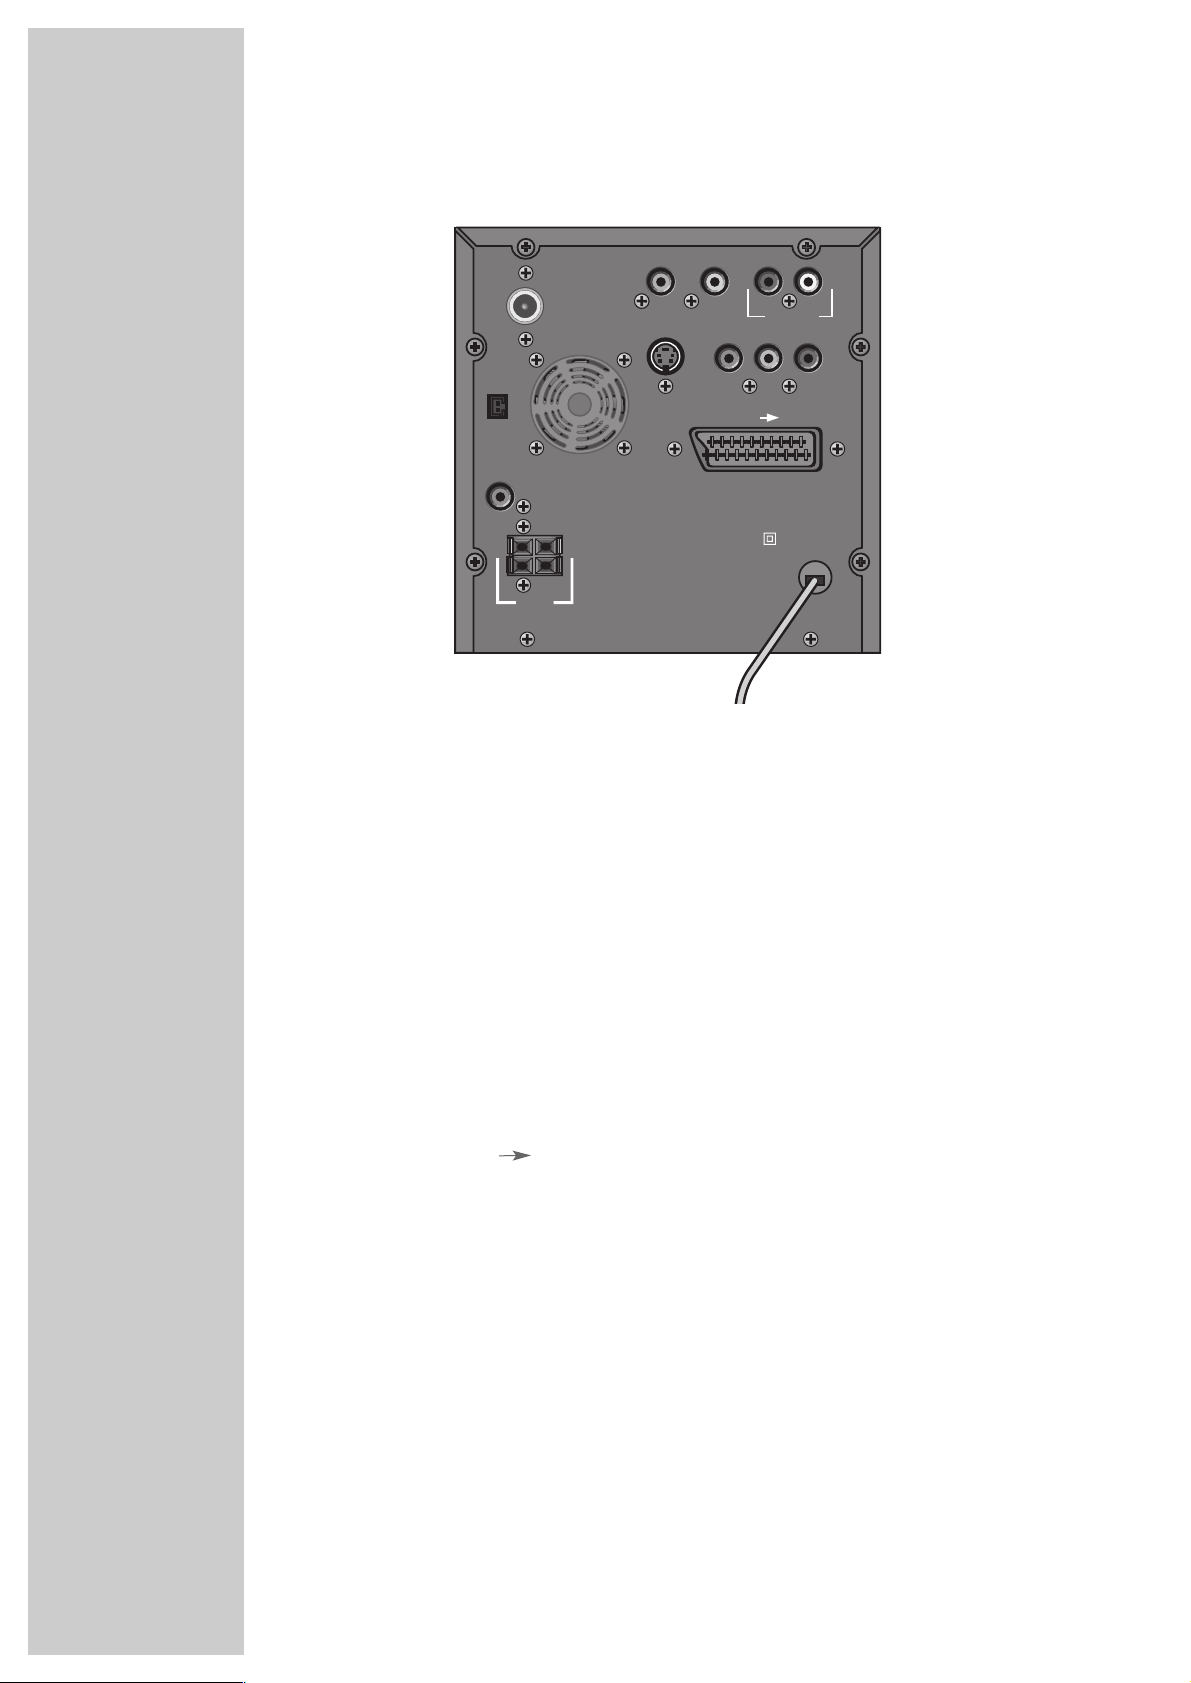
Die Rückseite des DVD Micro Systems
FM ANT Connection socket for the FM antenna.
AM ANT Connection socket for the AM frame antenna supplied.
COAXIAL OUT Coaxial audio signal output for connecting an external
device.
VIDEO OUT Alternative video signal output for connecting the television
using a conventional cinch cable.
R AUDIO OUT L Sound signal output for connecting the television using a
conventional cinch cable.
S-VIDEO OUT Alternative video signal output for connecting the television
using a conventional Y/C cable.
Y Pb/Cb Pr/Cr Progressive scan outputs for connecting the television using
a conventional component cable.
EURO AV TV Euro AV (Scart) socket for connecting the television using
the Euro-AV cable supplied.
SUBWOOFER Signal output for connecting the supplied subwoofer.
SPEAKERS Terminals for connecting the front loudspeakers supplied.
IMPEDANCE 8Ω
230 V~ Power cord.
50/60 Hz The only way to disconnect the device from the mains
supply is to pull out the plug.
230 V~ 50/60 Hz
max. 70W
EURO AV TV
SPEAKERS
AUDIO OUT
L
R
COAXIAL OUT VIDEO OUT
SUBWOOFER
Y Pb/Cb Pr/Cr
FM ANT
AM ANT
IMPEDANCE
8 Ω
LR
S VIDEO
Page 11
ENGLISH
11
OVERVIEW
__________________________________________________________________________________
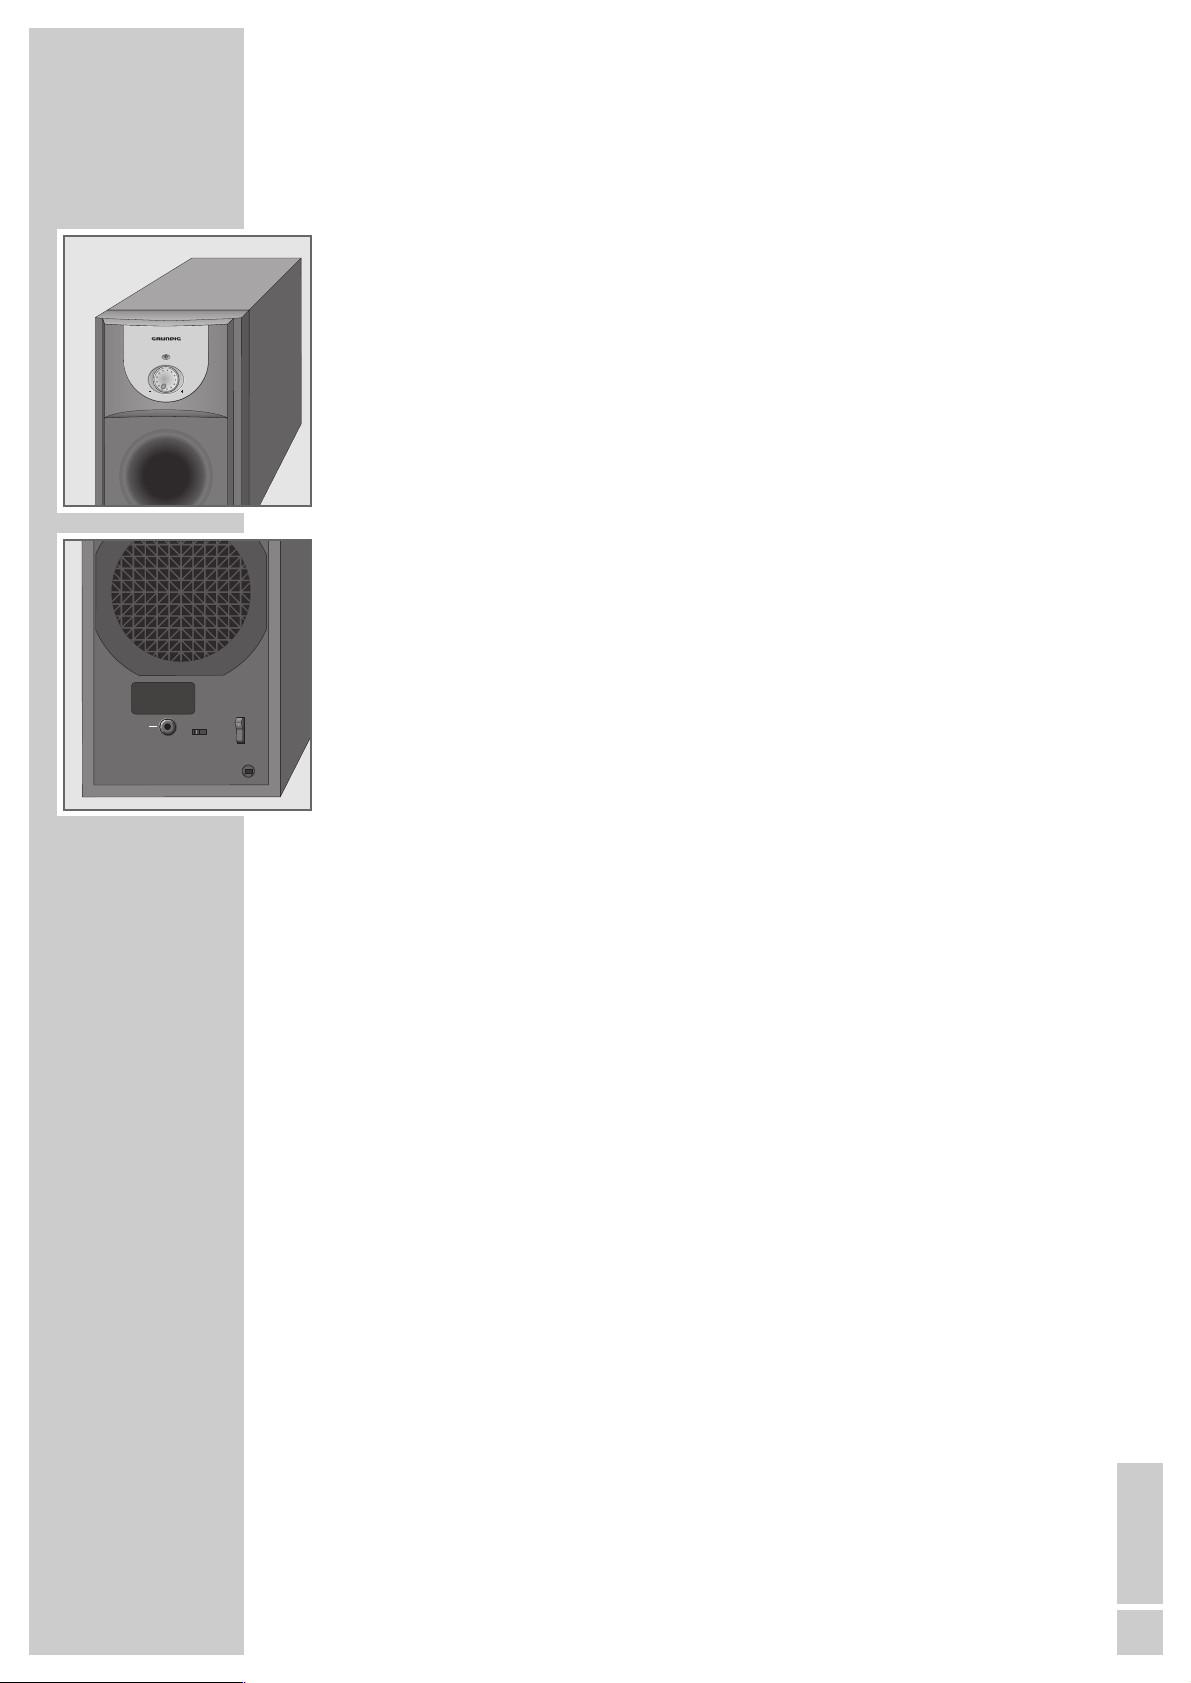
Operating controls and connections of the
subwoofer
STANDBY Operating indicator (on front of device). Lights up green
during operation, and red in stand-by.
– VOLUME + Controller for regulating the bass volume (front side of
the device). Ideally, the recess of the knob should be set
to »+« (maximum) during operation.
If the knob is turned all the way to »–«, the subwoofer
switches to stand-by.
PHASE 0° 180° Phase switch (on back of device).
Note:
The phase is usually determined by the DVD Micro
System. Depending on the position of the subwoofer
and the distance to the listener, switching over the phase
can improve the quality of the bass playback.
SUBWOOFER IN Connection socket for the subwoofer cable (back of the
device).
ON/OFF IO Mains switch. Switches the subwoofer off and on again.
Voltage supply is interrupted when switched off.
230 V~ Power cord (on back of device).
50/60 Hz
SUBWOOFER IN
STANDBY
VOLUME
ON/OFF
I
PHASE0° 180°
0
230 V~ 50/60 Hz
max. 75 W
Page 12

12
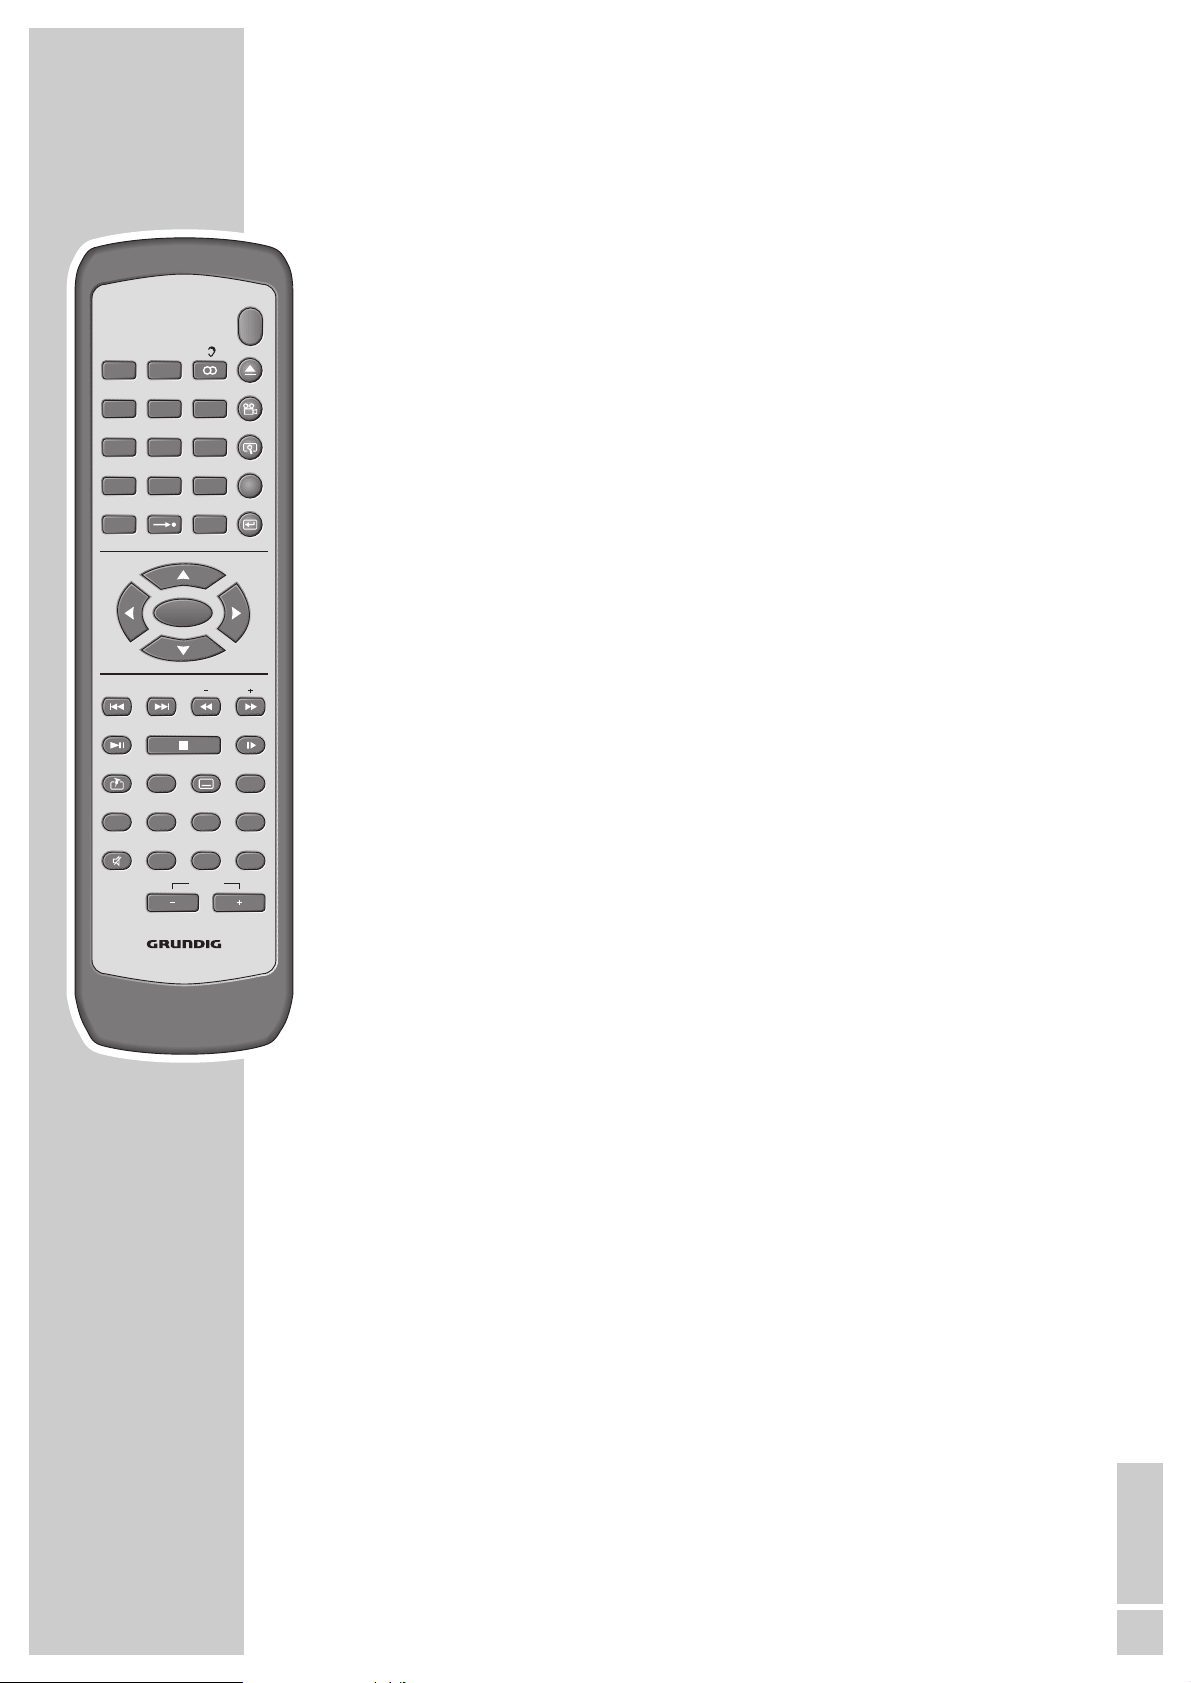
The remote control
ON/OFF ECO Press briefly: switches the DVD Micro System to standby and
back on again with the last source signal selected.
Hold down: switches the DVD Micro System from standby to
eco mode.
DISC/RANDOM Selects DISC as the input source. Switches the DVD Micro
System on from standby with DISC as the input source.
Plays back tracks in random order.
TV In television mode (»TV-IN«) switches the TV sound to the
AM/FM loudspeakers of the DVD Micro System.
Selects TUNER as the input source. Switches the DVD Micro
System on from standby with TUNER selected as the input
source.
Switches between the FM and AM frequency bands.
F
ɳ In DVD mode: switches the DVD settings between different
dubbed languages.
In VCD/S-VCD mode: selects the audio channel.
In tuner mode: switches between stereo and mono playback.
ə Opens and closes the disc compartment.
n Selects the DVD settings appropriately during playback of
various camera angles for certain scenes or passages on the
DVD.
v Zooms in on scenes during playback.
SETUP Calls up the set-up menu of the DVD Micro System on the tele-
vision screen when the system is switched to disc mode and the
disc is stopped.
x In program mode, deletes the current disc program.
Deletes the current bookmark when setting bookmarks.
MENU
Calls up the DVD settings according to the menu of the DVD.
GOTO In DVD mode: for selecting a chapter or title.
In VCD/CD mode: selects the desired starting point for playback (in VCD mode, PBC must be switched off for this).
1 ... 0 Numerical buttons for various inputs.
In disc mode: selects tracks or files directly.
In tuner mode: selects station positions directly.
ŃĽ Move the cursor up and down in the set-up menu (on the TV
screen).
OVERVIEW
__________________________________________________________________________________
DISC/
RANDOMTVAM/FM
213
546
879
0
GO TO MENU
DEMO/OK
DOWN UP
PRESET TUNING
PBC/
TITLE
BOOKMARK
RDS/
DISPLAY/DIM
P.SCAN
MUTE EQ/BBS
ON/OFF
SUBTITLE
REPEAT
A-B
VOLUME
ECO
SETUP
SLOWPLAY/PAUSE STOP
PROGRAM
TIMER
CLOCK/SLEEP
Page 13
ENGLISH
13
OVERVIEW
__________________________________________________________________________________
ľı Move the cursor left and right in the set-up menu (on the TV
screen).
DEMO/OK In standby, switches the demo program on and off.
Activates the selected setting and confirms entries in the set-up
menu.
DOWN PRESET UPIn disc mode: selects the previous or next track, the previous
89 or next chapter or file.
In tuner mode Switching channels up and down.
– TUNING
+
For setting the clock and the timer.
34 In disc mode: starts fast forward and reverse search.
In tuner mode: switches the frequency up or down further.
PLAY/PAUSE
ı
II Starts and pauses playback (freeze frame).
STOP
7
Press once to interrupt playback (Resume), press twice to end
playback (stop).
SLOW
Switches to freeze frame forwards during DVD and VCD/
S-VCD playback, switches through freeze frames step-by-step.
PBC/BOOKMARK
Switches the PBC (Play Back Control) function on and off in
c
VCD/S-VCD mode.
Calls up the menu for setting bookmarks in DVD mode.
TITLE
In CD-DA and VCD/S-VCD mode: calls up the intro function
when the system is stopped.
Calls up the DVD settings according to the track menu of a DVD.
SUBTITLE y For selecting and displaying subtitles of the DVD during
playback according to the DVD prerequisites.
PROGRAM In disc mode: opens the function for storing a track memory
(PROGRAM).
In tuner mode: opens the function for storing radio stations in
preset channel positions.
RDS/P.SCAN
In disc mode: switches the output format of the picture signal
between interlace and progressive scan.
In tuner mode: calls up RDS functions.
DISPLAY/DIM Press briefly: switches the screen display and the display of the
DVD Micro System between various information displays
relating to chapter /track number and playback duration in
disc mode.
Press and hold down: switches the display of the DVD Micro
System between DIM HIGH, DIM LOW and LED OFF.
DISC/
RANDOMTVAM/FM
213
546
879
0
GO TO MENU
ON/OFF
ECO
SETUP
DEMO/OK
DOWN UP
PRESET TUNING
PBC/
TITLE
BOOKMARK
RDS/
DISPLAY/DIM
P.SCAN
MUTE EQ/BBS
SUBTITLE
REPEAT
A-B
VOLUME
SLOWPLAY/PAUSE STOP
PROGRAM
TIMER
CLOCK/SLEEP
Page 14

14
OVERVIEW
__________________________________________________________________________________
REPEAT In DVD mode: for repeating a chapter or title.
In CD mode: for repeating a track, a file (MP3), all tracks or
all files (MP3).
TIMER
Press briefly: switches the switch-on timer on and off.
Press and hold down: activates the switch-on timer setting.
MUTE d Switches the system to and from mute mode.
EQ/BBS Press briefly: selects the sound settings FLAT, CLASSIC, ROCK,
JAZZ or POP.
Hold down: switches the BBS /bass boost) function on and off.
A - B In disc mode: marks a section, which is then constantly repeated.
CLOCK/SLEEP Press briefly: displays the current time in the receiver display.
Hold down: activates the sleep timer setting.
– VOLUME + Adjust the volume of the system.
DISC/
RANDOMTVAM/FM
213
546
879
0
GO TO MENU
DEMO/OK
DOWN UP
PRESET TUNING
PBC/
TITLE
BOOKMARK
RDS/
DISPLAY/DIM
P.SCAN
MUTE EQ/BBS
ON/OFF
SUBTITLE
REPEAT
A-B
ECO
SETUP
SLOWPLAY/PAUSE STOP
PROGRAM
TIMER
CLOCK/SLEEP
VOLUME
Page 15

ENGLISH
15
CONNECTION AND PREPARATION _______
Connection diagram for the loudspeakers
Setting up the loudspeakers
If possible, set up the front loudspeakers in line with the TV set, angled slightly
towards the listener. The listener and the speakers should form an equilateral
triangle. You thus achieve the best stereo effect.
To achieve an optimal bass sound, we recommend that you set up the subwoofer
to the left or right of the front loudspeakers, in such a way that the sound crosses
the room diagonally.
When you are in the centre of the room, you may not be able to pick up
the bass tone of the subwoofer sufficiently. This is caused by what are called
standing waves, which occur between parallel walls. In this case, it is sufficient
to position the subwoofer facing the wall at an angle, or to switch the phase
switch »PHASE 0° 180°« on the subwoofer.
Avoid placing the loudspeakers in a corner, because this over-amplifies the bass
tones.
Objects in front of the loudspeakers significantly impair the treble tones and the
stereo effect.
Subwoofer
Front left
Front right
AM ANT
SUBWOOFER
COAXIAL OUT VIDEO OUT
FM ANT
S VIDEO
LR
IMPEDANCE
8 Ω
SPEAKERS
R
AUDIO OUT
Y Pb/Cb Pr/Cr
EURO AV TV
230 V~ 50/60 Hz
max. 70W
L
SUBWOOFER IN
PHASE0° 180°
ON/OFF
I
0
230 V~ 50/60 Hz
max. 75 W
INPUTINPUT
Page 16

16
CONNECTION AND PREPARATION
_______________________________________
Connecting the loudspeakers
Note:
To connect the loudspeakers, switch off the DVD Micro System and disconnect the mains.
When you connect the loudspeaker cables, do not let frayed ends protrude,
as this can cause short circuits.
Note:
Connect the red loudspeaker cable to the red terminals, and the black cable
to the black terminals.
Connecting the front loudspeakers
1 Connect the cables for the left and right front loudspeakers to the
»SPEAKERS IMPEDANCE 8Ω« terminals on the DVD Micro System and
the appropriate terminals on the loudspeakers (red cable to the red terminal,
black cable to the black terminal).
Connecting the active subwoofer
1 Connect the cables for the subwoofer to the »SUBWOOFER« socket on the
DVD Micro System and the »SUBWOOFER IN« socket on the subwoofer.
Connecting a television, a flat screen or a projector
You have four options, depending on the sockets you have on your television,
flat screen or projector:
– Connection to the Euro-AV (Scart) socket using the Euro-AV cable supplied is
the quickest and easiest method which also produces the best results.
– If your television has no Euro-AV socket, you can still achieve a good picture
quality by connecting it via the S-VIDEO sockets.
– Alternatively, you can connect it using cinch cables to the VIDEO OUT sockets
for standard picture quality.
– Good picture quality is ensured if you connect the television to the Y, Pb/Cb,
Pr/Cr video sockets using a component cable.
Connection using a EURO-AV (Scart) cable
This connection option is recommended by the manufacturer.
1 Plug the EURO-AV cable supplied into the »EURO AV TV« socket
of the DVD Micro System and into the corresponding socket on the television,
flat screen or projector.
SUBWOOFER
O
.
EURO AV TV
230 V~ 50/60 Hz
LR
IMPEDANCE
8 Ω
SPEAKERS
max. 70W
AM ANT
SUBWOOFER
SPEAKERS
AM ANT
SUBWOOFER
FM ANT
AUDIO OUT
S VIDEO
Y Pb/Cb Pr/Cr
EURO AV TV
230 V~ 50/60 Hz
max. 70W
LR
IMPEDANCE
8 Ω
SUBWOOFER IN
ON/
PHASE0° 180°
230 V~
max
L
R
FM ANT
LR
AUDIO OUT
S VIDEO
Y Pb/Cb Pr/Cr
EURO AV TV
230 V~ 50/60 Hz
max. 70W
Page 17

ENGLISH
17
CONNECTION AND PREPARATION
_______________________________________
Connection using a Y/C (S-Video) cable and a cinch cable
1 Plug a standard Y/C cable into the »S-VIDEO OUT« socket on the DVD
receiver and the corresponding socket (S-VIDEO IN) on the television,
flat screen or projector.
2 Plug a standard cinch cable into the »AUDIO OUT L R« sockets on the
DVD receiver and the corresponding sockets (AUDIO IN) on the television,
flat screen or projector.
Connecting using a cinch cable
1 Plug a standard cinch cable into the »VIDEO OUT« socket on the DVD
Micro System and the corresponding socket (VIDEO IN) on the television, flat
screen or projector.
2 Plug a standard cinch cable into the »R AUDIO OUT L« sockets on the
DVD Micro System and the corresponding sockets (AUDIO IN) on the television, flat screen or projector.
Connecting using a component and cinch cables
1 Plug a standard component cable into the »Y«, »Pb/Cb« and »Pr/Cr«
sockets of the DVD Micro System and into the corresponding sockets
(Y, Pb/Cb, Pr/Cr) on the television, the flat screen or the projector.
2 Plug a standard cinch cable into the »R AUDIO OUT L« sockets of the DVD
Micro System and the corresponding sockets (AUDIO IN) of the television,
flat screen or audio projector.
Connecting external devices digitally
You can connect external devices, such as a digital recording device for disc
operation. A coaxial output (»COAXIAL«) is available for this purpose. The
digital output must be activated and set in the set-up menu (see page 21).
1 Connect the input sockets of the external devices with the corresponding
output socket of the DVD Micro System.
Connecting an external 5.1 CH receiver
1 Connect the coaxial input of the external receiver with a standard coaxial
cable to the »COAXIAL« socket of the DVD Micro Systems
2 Connect the video input socket of the external receiver with a standard
cinch cable to the »VIDEO OUT« socket of the DVD Micro System.
AM ANT
SUBWOOFER
AM ANT
TO SUBWOOFER
AM ANT
SUBWOOFER
AM ANT
SUBWOOFER
AM ANT
SUBWOOFER
AM ANT
SUBWOOFER
FM ANT
FM ANT
FM ANT
FM ANT
FM ANT
FM ANT
COAXIAL OUT VIDEO OUT
COAXIAL OUT VIDEO OUT
EURO AV TV
FL SL SUB
COAXIAL OUT VIDEO OUT
COAXIAL OUT VIDEO OUT
COAXIAL OUT VIDEO OUT
COAXIAL OUT VIDEO OUT
S VIDEO
S VIDEO OUT
S VIDEO
S VIDEO
S VIDEO
S VIDEO
R
Y Pb/Cb Pr/Cr
EURO AV TV
R
Y Pb/Cb Pr/Cr
R
AUDIO OUT
Y Pb/Cb Pr/Cr
EURO AV TV
R
AUDIO OUT
Y Pb/Cb Pr/Cr
EURO AV TV
R
AUDIO OUT
Y Pb/Cb Pr/Cr
EURO AV TV
R
AUDIO OUT
Y Pb/Cb Pr/Cr
EURO AV TV
AUDIO OUT
AUDIO OUT
L
L
L
L
L
L
AM ANT
SUBWOOFER
AM ANT
SUBWOOFER
AM ANT
SUBWOOFER
COAXIAL OUT VIDEO OUT
FM ANT
S VIDEO
COAXIAL OUT VIDEO OUT
FM ANT
S VIDEO
COAXIAL OUT VIDEO OUT
FM ANT
S VIDEO
R
AUDIO OUT
Y Pb/Cb Pr/Cr
EURO AV TV
R
AUDIO OUT
Y Pb/Cb Pr/Cr
EURO AV TV
R
AUDIO OUT
Y Pb/Cb Pr/Cr
EURO AV TV
L
L
L
Page 18

18
Connecting the antennas
1 Plug the antenna cable of the rooftop antenna into the FM antenna socket
»FM ANT«.
Note:
If no rooftop antenna is available, use the auxiliary antenna supplied. This
antenna provides reasonably good reception of local FM (VHF) stations.
Do not shorten the auxiliary antenna.
2 For medium wave reception, plug the antenna cable of the supplied MW
frame antenna in to the »AM ANT« socket.
Note:
In order to prevent interference, place the MW frame antenna as far as
possible from the system.
Connecting the power cord
1 Insert the plug of the DVD Micro System (»230 V~ 50/60 Hz«) in the
socket.
Note:
If the DVD Micro System does not react when the buttons are pressed, this
may be caused by electrostatic discharge in the area. In this case pull out the
mains plug and insert it into the socket again after a few seconds.
2 Insert the subwoofer power cord plug (»230 V~ 50/60 Hz«) into the
socket.
Inserting batteries in the remote control
1 Open the battery compartment by pressing the marked latch and lifting
the lid.
2 When inserting the batteries (Mignon type, 2 x 1.5 V, UM 3/R 6/AA)
observe the polarity marked in the battery compartment.
3 Close the battery compartment.
Note:
If the DVD Micro System no longer reacts properly to remote control
commands, the batteries may be flat. Be sure to remove used batteries. The
manufacturer accepts no liability for damage resulting from leaking
batteries.
Environmental note:
Batteries, including those which contain no heavy metal, may not be
disposed of with household waste. Please dispose of used batteries in an
environmentally sound manner. Find out about the legal regulations which
apply in your area.
CONNECTION AND PREPARATION
_______________________________________
O
T
SUBWOOFER IN
O
O
L
230 V~ 50/60 Hz
max. 70W
PHASE0° 180°
TVR
COAXIAL OUT VIDEO OUT
FM ANT
L
R
AUDIO OUT
S VIDEO
Y Pb/Cb Pr/Cr
COAXIAL OUT VIDEO OU
FM ANT
S VIDEO
AM ANT
M
A
A
N
N
E
T
N
A
P
SUBWOOFER
Y
EUR
ON/OFF
230 V~ 50/60 Hz
max. 75 W
I
0
Page 19

ENGLISH
19
CONNECTION AND PREPARATION
_______________________________________
Additional information for units sold in the UK.
Units sold in the UK are suitable for operation from a 240V ac, 50Hz mains supply.
The range of multi-system receivers is built to work in most European countries. However, the mains plug and
socket system for the UK differs from many European countries.
This appliance has been supplied with a fitted, non-removable, approved converter plug for use in the UK. This
converter plug is fitted with a 5A rated fuse.
In case this appliance is supplied with a moulded 2-pin Euro plug only, which is unsuitable for UK operation, this
must be cut off and immediately disposed of. An approved 13A, 3-pin UK plug should then be fitted by a
qualified electrician.
Note:
The severed Euro plug must be destroyed to avoid a possible shock hazard should it be inserted into a socket
elsewhere.
If a non-rewireable 3-pin plug or a rewireable 13A (BS1363) 3-pin plug is used, it must be fitted with a 5A ASTA
or BSI approved BS1362 fuse. If any other type of plug is used it must be protected by a 5A fuse either in the
plug, or at the distribution board. If this type of plug becomes defective, ensure that the fuse is removed before
disposal, to eliminate potential shock hazard.
If it is necessary to change the fuse in the non-rewireable plug, the correct type and rating (5A ASTA or BSI
approved BS1362) must be used and the fuse cover must be refitted. If the fuse cover is lost or damaged, the lead
and plug must not be used until a replacement is obtained. Replacement fuse covers should be obtained from
your dealer.
Important:
The wires in the mains lead are colour coded in accordance with the following code:
BLUE – NEUTRAL
BROWN – LIVE
As the colours of the wires in the mains lead of your appliance may not correspond with the coloured marking
identifying terminals in your plug, proceed as follows:
Connect the BLUE coloured wire to plug terminal marked with the letter “N” or coloured black.
Connect the BROWN coloured wire to the plug terminal marked with the letter “L” or coloured red.
In no circumstance must any of the wires be connected to the terminal marked with the letter “E”, earth symbol
“
z”, coloured green, or green & yellow.
Replacement mains lead sets can be obtained from your local dealer, or by contacting Grundig Consumer
Relations (01788 570088)
Moulded 3-pin lead set, suitable for UK use:
Ref: Leadset UK 8290-991-224
Moulded 2-pin Euro lead set, not suitable for UK use:
Ref: Leadset Euro 8290-991-316
Page 20

20
SETTINGS____________________________________________________________________________
Setting the time
When the DVD Micro System is connected to the mains for the first time, a demo
program runs in the display. This can be interrupted with » DEMO/OK«. Afterwards the clock flashes to indicate that it needs to be set. The following settings
may only be performed in standby mode. During the setting, if no button is
pushed for more than 10 seconds, the DVD Micro system ends the procedure
automatically. You then have to start again.
1 To set the 24 hour format press » PROGRAM« and hold it down.
– Display: »24 HouR«, »24« flashes.
2 To set the 12 hour format, press » TUNING 3« or » TUNING 4«.
– Display: »12 HOUR«, »12« flashes.
3 To set the clock press » PROGRAM« again.
– Display: the hours flash.
4 Set the hours with » TUNING 3« or »TUNING 4« and confirm with
» PROGRAM«.
– Display: the minutes flash.
5 Set the minutes with » TUNING 3« or » TUNING 4« and confirm
with » PROGRAM«.
– Display: the current time.
Notes:
You must reset the time after a power failure or when the mains plug is pulled
out.
Some RDS stations transmit an RDS time signal. If RDS time synchronisation
is activated on the DVD Micro System (»SYNC ON«) (see page 38), the time is
automatically updated when this new information is received.
Time synchronisation can take several minutes, and even with good
reception the accuracy depends on the time signal being transmitted. The
automatic setting is always activated when the DVD Micro System is switched
from standby to tuner mode and receives a suitable RDS station.
General information
You can make the settings required for operating the system in the set-up menu
which appears on the television screen.
To do this, switch on the television and switch it to the channel on which the DVD
Micro System is set. You can only make settings with the remote control in disc
mode when the device is stopped.
Switching on
1 Switch on the DVD Micro System from standby by pressing »DVD
ı
II« on
the device or »DISC/RANDOM« on the remote control.
24 HOUR
12 HOUR
14:39
10:39
10:23
Page 21

ENGLISH
21
SETTINGS
____________________________________________________________________________________
Selecting the menu language
The set-up menu is the control centre of your DVD Micro System. It is called up in
disc mode when the device is stopped by pressing »SETUP«. Eight languages
are available in the set-up menu. The default setting is »ENGLISH«.
1 Press »SETUP« to open the set-up menu.
2 Select the »GENERAL SETUP« menu item with »Ń« or »
Ľ
« and
confirm with »DEMO/OK«.
3 Select the »OSD LANG« line by pressing »Ń« or »
Ľ
«.
4 Use »
ı
« to move to the right column.
5 Select your language using »Ń« or »
Ľ
« and press »DEMO/OK« to
confirm.
Navigating in the set-up menu
Move through the set-up menu with »Ń« or »Ľ« and select the desired item.
The item you select is highlighted and shown in white text.
When you press »DEMO/OK« to confirm your selection, a sub-menu with two
columns appears. Here too, you can navigate with »
Ń« and »
Ľ
« and select the
item you require in the left column. The item you select is highlighted and shown
in white text.
Press »
ı
« to switch to the column on the right and press »Ń« or »Ľ« to make
the setting. Your chosen setting is highlighted in white text. Press »DEMO/OK«
to confirm your selection, and the item is highlighted. You can quit the set-up
menu by pressing »SETUP«.
To make more settings, press »
ľ
« to switch back to the left menu and continue
as described. You can return to the main menu page by selecting the »MAIN
PAGE« line with »Ń« or »Ľ« and confirming with »DEMO/OK«. You can
also exit the menu by selecting the »EXIT SETUP« line with »Ń« or »Ľ« and
confirming with »DEMO/OK«.
Setting the video functions
Setting the picture format
1 Select the »GENERAL SETUP« menu item with »Ń« or »
Ľ
« and
confirm with »DEMO/OK«.
2 Select the »TV DISPLAY« line using »Ń« or »
Ľ
«.
3 Use »
ı
« to move to the right column:
– »NORMAL/PS« for a normal 4:3 television. The large picture is cropped
to the left and right. »NORMAL/PS« is the default setting,
– »NORMAL/LB« for a normal 4:3 television. This creates a widescreen
picture with black bars above and below.
– »WIDE« for a 16:9 large-screen television.
4 Select the required setting by pressing »Ń« or »
Ľ
« and confirm with »OK«.
SETUP MENU - - MAIN PAGE
GENERAL SETUP
SPEAKER SETUP
AUDIO SETUP
PREFERENCES
EXIT SETUP
GENERAL SETUP
- - GENERAL PAGE - -
TV DISPLAY
PIC MODE
ANGLE MARK
OSD LANG
CAPTIONS
MAIN PAGE
SET OSD LANGUAGE TO ENGLISH
ENGLISH
FRANÇAIS
DEUTSCH
ITALIANO
SVENSKA
DANSK
PORTUGUÊS
ESPAÑOL
s
- - GENERAL PAGE - -
TV DISPLAY
PIC MODE
ANGLE MARK
OSD LANG
CAPTIONS
MAIN PAGE
NORMAL TV PAN SCAN
NORMAL/PS
NORMAL/LB
WIDE
s
\
\
- - GENERAL PAGE - -
TV DISPLAY
PIC MODE
ANGLE MARK
OSD LANG
CAPTIONS
MAIN PAGE
NORMAL TV PAN SCAN
NORMAL/PS
NORMAL/LB
WIDE
s
\
Page 22

22
SETTINGS
____________________________________________________________________________________
Setting the colour norm for the television
1 Select the »PREFERENCES« menu item with »Ń« or »
Ľ
« and confirm with
»DEMO/OK«.
2 Select »TV TYPE« with »Ń« or »
Ľ
«.
3 Use »
ı
« to move to the right column:
– »MULTI«: PAL or NTSC video signal output is selected automatically in the
multi-system.
– »NTSC«: PAL video signals are converted to NTSC signals.
– »PA L«: NTSC video signals are converted to PAL signals. »PAL« is the
default setting
4 Select the required setting by pressing »Ń« or »
Ľ
« and confirm with
»DEMO/OK«.
Selecting the video output format
1 Select the »PREFERENCES« menu item with »Ń« or »
Ľ
« and confirm with
»DEMO/OK«.
2 Select »VIDEO OUTPUT« with »Ń« or »
Ľ
«.
3 Use »
ı
« to move to the right column:
– »S-VIDEO«: the television is connected using S-VIDEO.
– »COMPONENT«: the television is connected using Y, Pb/Cb, Pr/Cr. This
setting is a prerequisite for Progressive Scan.
– »RGB«: the television is connected using the Euro-AV socket. »RGB« is the
default value.
4 Select the required setting by pressing »Ń« or »
Ľ
« and confirm with »OK«.
Setting the sound format on the loudspeakers
1 Select »SPEAKER SETUP« with »Ń« or »
Ľ
« and confirm with
»DEMO/OK«.
2 Select »DOWNMIX« using »Ń« or »
Ľ
«, change to the right column with
»ı«, select the desired setting with »Ń« or »Ľ« and confirm with
»DEMO/OK«.
– »LT/RT«: a downmix is performed on the stereo channels which creates a
phantom surround effect.
– »STEREO«: normal 2.1 channel stereo playback.
Setting the audio functions
Activating digital audio signal outputs
You can make the setting for the coaxial output for the connection to an external
device here. If the digital outputs are activated, the analog output signal is
deactivated.
1 Select »AUDIO SETUP« with »Ń« or »
Ľ
« and confirm with
»DEMO/OK«.
- - SPEAKER SETUP PAGE - -
DOWNMIX
MAIN PAGE
LT/RT DOWNMIX
LT/ RT
STEREO
s
\
- - PREFERENCES PAGE - -
TV TYPE
VIDEO OUTPUT
AUDIO
SUBTITLE
DISC MENU
PARENTAL
PASSWORD
MULTISYNC TV
MULTI
NTSC
PAL
s
S
- - PREFERENCES PAGE --
TV TYPE
VIDEO OUTPUT
AUDIO
SUBTITLE
DISC MENU
PARENTAL
PASSWORD
RGB
S-VIDEO
COMPONENT
RGB
s
S
Page 23

ENGLISH
23
SETTINGS
____________________________________________________________________________________
2 Select »AUDIO OUT« with »Ń« or »
Ľ
«.
3 Use »
ı
« to move to the right column.
– »ANALOG«: the coaxial output is deactivated. »ANALOG« is the default
setting.
– »SPDIF/RAW«: the coaxial output provides the original signal format.
– »SPDIF/PCM«: the coaxial output changes into the PCM format for
digital recording devices.
4 Select the required setting by pressing »Ń« or »
Ľ
« and confirm with
»DEMO/OK«.
Multiple channel settings
You can switch the channel playback to Dolby Digital mode if a 1+1 audio code
is available i.e. the Dolby Digital signal only contains a stereo signal.
1 Select »AUDIO SETUP« with »Ń« or »
Ľ
« and confirm with
»DEMO/OK«.
2 Select »DUAL MONO« with »Ń« or »
Ľ
«.
3 Use »
ı
« to move to the right column.
– »STEREO«: 1:1 stereo playback, CH1 for the left channel, CH2 for the
right channel. »STEREO« is the default value.
– »L-MONO«: CH1 mono playback, CH1 on left and right channel.
– »R-MONO«: CH2 mono playback, CH2 on left and right channel.
– »MIX-MONO«: mixed mono playback, CH1 and CH2 on left and right
channel.
4 Select the required setting by pressing »Ń« or »
Ľ
« and confirm with
»DEMO/OK«.
Setting the dynamic range
DTS (AC3) soundtracks have a very large dynamic volume range, hence there is
an extreme relationship between quiet and loud tones. If the full playback
volume is too loud, simply reducing it does not give a satisfactory result, since
dialogue can hardly be heard. You can turn down the louder sounds and
turn up the quieter passages, while retaining the volume of the dialogue. This
function is called the dynamic range.
1 Select »AUDIO SETUP« with »Ń« or »
Ľ
« and confirm with
»DEMO/OK«.
2 Select »DYNAMIC« with »Ń« or »
Ľ
«.
3 Use »
ı
« to move to the right column.
– »OFF«, »2/8« ... »6/8«, »FULL«. »OFF« (default setting) means uncom-
pressed dynamics (for example, during the day), »FULL« means com-
pressed dynamics (for example, late at night).
4 Select the required setting by pressing »Ń« or »
Ľ
« and confirm with
»DEMO/OK«.
- - AUDIO SETUP - -
AUDIO OUT
DUAL MONO
DYNAMIC
PRO LOGIC
PRO LOGIC II MODE
PRO LOGIC II CNTL
MAIN PAGE
ANALOG OUTPUT
ANALOG
SPDIF/RAW
SPDIF/PCM
s
- - AUDIO SETUP --
AUDIO OUT
DUAL MONO
DYNAMIC
PRO LOGIC
PRO LOGIC II MODE
MAIN PAGE
SET STEREO MODE
STEREO
L-MONO
R-MONO
MIX-MONO
s
PRO LOGIC II CNTL
\
\
- - AUDIO SETUP - -
AUDIO OUT
DUAL MONO
DYNAMIC
PRO LOGIC
PRO LOGIC II MODE
MAIN PAGE
DYNAMIC RNG COMPRESSION 6/8
s
PRO LOGIC II CNTL
– – FULL
––
– – 6/8
––
– – 4/8
––
– – 2/8
––
– – OFF
\
Page 24

24
SETTINGS
____________________________________________________________________________________
Setting and storing radio stations
Up to 20 radio stations in the FM range and up to 10 stations in the AM range
can be stored. You can see the displays for this on the DVD Micro system.
1 Press »ON/OFF ECO
Ǽ
« to switch on the DVD Micro System from
standby mode.
– The DVD Micro System switches on with the last input source selected.
2 Use »FM TUNER AM« on the DVD Micro System or »TV AM/FM« on the
remote control to select TUNER as the input source.
– Display: e.g. »FM 87.50 MHz«.
3 Press »FM TUNER AM« on the DVD Micro System or »TV AM/FM« on
the remote control to select the desired frequency band (FM or AM).
4 To start the search, press » TUNING 3« or » TUNING 4« on the
remote control and keep them pressed down until the frequency changes to
search mode.
– The search stops when a station is found.
– Display: »SEARCH«, then »SEARCHING« in ticker text display, then
»FM 100.60 MHz« for example.
Note:
To switch through frequencies step-by-step press » TUNING
3« or
» TUNING 4« on the remote control briefly repeatedly.
– Display: the frequency in steps of 50 kHz.
5 Select the storage function by pressing »PROGRAM« on the remote
control.
– Display: »01« for the preset position flashes.
Note:
If no button is pressed within 5 seconds, the DVD Micro System automatically
quits the storage function.
6 Select the desired station position with the »DOWN PRESET UP« button.
Note:
you can enter the station position directly using the number buttons »1... 0«
on the remote control.
7 Store radio stations by pressing »PROGRAM« on the remote control
within five seconds.
– Display: briefly »STORED« as ticker text, then »1 FM 100
. 60 MHz« for
example.
FM 87.50
MHz
FM 100.60
MHz
o1
FM 100.60
MHz
1
FM 100.60
MHz
FM 98.75
MHz
Page 25

ENGLISH
25
GENERAL FUNCTIONS _________________________________________
Switching on and off
1 Switch on the DVD Micro System from standby or eco mode with »ON/OFF
ECO Ǽ«.
– The system switches on with the most recently selected input source.
2 Switch the DVD Micro System to standby with »ON/OFF ECO
Ǽ
«.
– Display on the DVD Micro-System: briefly »BYE BYE« in ticker text.
3 Switch the DVD Micro System to eco mode with »ON/OFF ECO
Ǽ
« (long
press).
– Display on the DVD Micro-System: briefly »ECO ON ----« in ticker text.
– The displays on the DVD Micro System completely disappear.
Selecting the input source
1 Select the desired input source (DISC, TUNER or TV IN) with »DVD
ı
II« or
»FM TUNER AM« on the DVD Micro System or »DISC/RANDOM« or
»AM/FM TV IN« on the remote control.
– Display on the DVD Micro-System: »DISC« or »TUNER FM« for example.
– If DISC is selected as the input source and no disc has been inserted
beforehand, the DVD Micro System briefly displays »DISC«, then
»WAITING«, then »READING« in ticker text, and then »NO DISC«.
Inserting a disc
1 Press »ə«.
– The disc compartment opens.
– Display on the DVD Micro System: »OPEN«.
Note:
If the DVD Micro System is in standby, it is switched to disc mode with »ə«.
2 Insert the disc in the disc compartment with its label facing upwards.
3 Press »ə«.
– The disc compartment closes again (display: »CLOSE«). The disc is
scanned.
– Display on the DVD Micro System: information concerning the inserted
medium.
Removing discs
1 Open the disc compartment with »ə«.
2 Remove the disc.
Adjusting the volume
1 Adjust the volume of the entire system with »+ VOLUME –« on the DVD
Micro System or with »– VOLUME +« on the remote control.
– Display on the DVD Micro System: »VOL« and the selected value (scale
from »MIN«, »1« to »31«, »MAX«).
TUNER FM
DISC
NO DISC
OPEN
CLOSE
VOL 23
Page 26

26
GENERAL FUNCTIONS
_____________________________________________________________
Muting
With this function the DVD Micro System mutes the connected loudspeakers.
1 Press »d« on the remote control to switch it on mute.
– Display on the DVD Micro System »MUTING« flashes.
2 Briefly press »d« on the remote control again to cancel the muting.
– Display on the DVD Micro System: briefly »MUTING« after which it
disappears.
Selecting sound settings
You can choose between four different sound settings (CLASSIC, ROCK, JAZZ,
POP). The default setting is FLAT.
1 Select the desired sound setting, to do this, press »PRE EQ/BBS« on the
remote control briefly and repeat.
– Display on the DVD Micro System: briefly »FLAT«, »CLASSIC«, »ROCK«,
»JAZZ« or »POP«, and then »CLASSIC«, »ROCK«, »JAZZ« or »POP« are
displayed constantly.
General information on disc playback
If the » « symbol appears on the television screen after entering particular
commands, it means the disc itself has a limited set of functions.
MUTING
CLASSIC
CLASSIC
26
Page 27

ENGLISH
27
DISC FEATURES__________________________________________________________
Disc formats
Your DVD Micro System can play DVD R/DVD RW in DVD video format and
CD-R and CD-RW in CD-DA Format or MP3/WMA format.
Due to difference in quality of the recording media and the quality of the recording itself, it can occasionally happen that a home-made DVD R/DCD RW or
CD-R and CD-RW with audio data cannot be read. This does not indicate a
malfunction of the DVD Micro System.
The causes for this can be faulty software or hardware settings, or even the
CD itself. Should such problems arise, contact the customer services of your
CD burner/software manufacturer or search for information about this, for
example, on the Internet.
If you make a DVD R/DVD RW or CD-R/CD-RW, please observe the legal
regulations and do not infringe the copyright of third parties.
Some recordings (DVD R/DVD RW, CD-R and CD-RW) have to be finalised.
When MP3/WMA-CDs are played back, individual tracks may be skipped or
incorrectly played back. This can be due to the disc configuration, the encoder
software or the hardware used for the recording.
Audio CDs (CD-DA) meet the specification and bear the corresponding logo.
Copy-protected CDs do meet this specification in some circumstances and do
not bear the corresponding logo. These CDs can cause playback errors.
DVD features
You can recognise a DVD by the logo on the label.
Depending on the content of the DVD, the discs contain one or more titles. Each
title may contain one or more chapters. Titles and chapters can be selected
easily and conveniently.
You can control and direct playback of a DVD using the menu of the DVD Micro
System on the television screen.
Many DVDs have audio tracks recorded in up to eight languages. You can select
the language you want. Many DVDs are recorded by the manufacturer with
subtitles in several languages. You can select subtitles from up to 32 different
languages.
Your DVD Micro system has been enabled with regional code 2. DVDs with
additional regional codes cannot be played.
VCD/S-VCD features
You can recognise S-VCD/VCDs (video CDs) by the logo on the label.
Depending on the contents of the VCDs/S-VCDs (films, music videos etc.), the
discs may carry one or more tracks. Like audio CDs, VCDs/S-VCDs have a
track structure.
VCDs/S-VCDs can be created using the PBC (playback control) system for track
navigation.
Page 28

28
DISC FEATURES
__________________________________________________________________________
You can control and direct playback of the VCD/S-VCD using the menu of the
DVD Micro System on the television screen.
S-VCDs can contain different dubbed languages and subtitles.
PBC (playback control)
PBC is a navigation option for VCDs/S-VCDs. PBC switches between the playlist
structure (the menu on the VCD/S-VCD) and manual selection by the user.
PBC is activated after the VCD/S-VCD has been scanned. This function allows
interactive playback of the VCD/S-VCD if you follow the menu on the television
screen.
MP3/WMA CD features
MP3 stand for MPEG-1 Audio Layer 3, WMA for Windows Media Audio. Both
formats enable audio files to be saved on a computer with a sound quality similar to that of a CD. The standard encoding bit rate for MP3 files is 128 kbps.
Generally, the higher the bit rate of a file, the better the sound quality.
Most MP3 files on the Internet are encoded at 128 or 160 kbps.
160 kbps is considered CD quality. MP3/WMA files can be downloaded from
the Internet and then burned onto a CD ROM disc. MP3/WMA CDs contain
only sound recordings.
In MP3/WMA mode, the terms “album” and “file” are very important. “Album”
corresponds to a folder on a PC, and “file” to a file on a PC or a CD-DA track.
Audio CD features
An audio CD (CD-DA) is identified by this logo.
Audio CDs contain only sound recordings. They can be played in the normal
manner on an audio system. The individual tracks are stored in a sequence.
There are no folders.
As well as audio CDs, the DVD Micro System can also read CD-R and CD-RW
with audio data.
JPEG Picture CD features
JPEG stands for Joint Picture Experts Group. This process was designed to
compress picture files.
JPEG files can be burned onto a CD along with other file types. Such CDs are
known as file CDs or mixed mode CDs. For example, the CD could contain MP3
files (audio) and JPEG files (for example to display album covers).
The files on a JPEG CD can be organised in directories. This structure is similar
to that of an MP3 CD.
JPEG CDs only contain data in the compressed JPEG format. This is mostly data
from digital cameras or from picture processing programs. The data (pictures)
can be displayed individually or in sequence in a slide show.
Page 29

ENGLISH
29
DISC MODE______________________________________________________________________
Playback functions
In DVD mode, playback sometimes starts automatically after the disc has been
scanned. Sometimes a menu appears on the screen where you can start disc
playback.
A menu also appears on the screen with VCDs/S-VCDs where you can control
the playback of the disc interactively if you switch on the PBC function (see
page 30).
In MP3/WMA and audio CD modes playback always starts with the first file
or track.
Playing back the disc
1 Start playback in stop mode by pressing »PLAY/PAUSE
ı
II«.
2 To pause playback (freeze-frame in video mode), press »PLAY/PAUSE
ı
II«.
3 Press »PLAY/PAUSE
ı
II« to resume playback.
4 To end playback press »STOP
7
« twice.
Interrupting/resuming playback (resume)
In DVD mode, you can stop playback at any point and then continue where you
left off.
1 To interrupt playback, press »STOP
7
« once.
2 Press »PLAY/PAUSE
ı
II« to resume playback.
3 To stop playback, press »STOP
7
« twice.
Selecting titles or chapters ...
... step-by-step
1 Select the next chapter, next file or next track by pressing »PRESET 9«
briefly and repeatedly during playback.
2 Select the previous chapter, previous file or previous title with »PRESET 8«
(press twice for files and titles).
– Playback starts with the selected chapter, file or title.
... directly with the numerical buttons
1 During playback, select the desired track with »1 … 0« on the remote
control.
– Playback starts with the selected chapter, file or title.
Notes:
Selecting directly using the numerical buttons is only possible, if the disc is
supporting this function.
PAUSE
PLAY
PLAY
STOP
PRESS PLAY TO CONTINUE
PLAY
STOP
TITLE 01/02 CHAPTER 004/035
TITLE 01/02 CHAPTER 003/035
Page 30

30
DISC MODE
_________________________________________________________________________________
Selecting titles or chapters (in DVD mode) ...
... using the DVD menu
If a DVD contains several titles or chapters, you can select these in the DVD
menu, if the DVD itself offers this function.
1 Call up the DVD menu with »MENU«.
– The DVD menu appears on the screen.
2 Select the title or DVD with »Ń« or »
Ľ
« or »ľ« or »ı« and confirm with
»DEMO/OK«.
– Playback of the selected title or chapter begins.
... using the title menu of the DVD
Some DVDs offer a title menu which shows the titles and chapters.
1 Call up the title menu with »TITLE« on the remote control.
– The title menu appears on the screen.
2 Select the title or DVD with »Ń« or »
Ľ
« or »ľ« or »ı« and confirm with
»DEMO/OK«.
– Playback of the selected title or chapter begins.
Playback with PBC (playback control)
(in Video CD mode)
After scanning the disc, the PBC function is activated, provided this function is
supported by the disc (»PBC ON« briefly appears).
1 Press »PLAY/PAUSE
ı
II« to start playback.
– The DVD Micro System automatically switches to PBC playback mode.
2 Select the desired menu option with »Ń« or »
Ľ
« or »ľ« or »ı« and
activate with »DEMO/OK«.
3 Follow the instructions given in the menu to use the interactive functions.
4 To deactivate the PBC function, press »PBC/BOOKMARK« on the remote
control during playback.
– On the television screen »PBC OFF« appears briefly.
– The playback of the video CD ends.
5 Press »PLAY PAUSE
ı
II« to start normal playback.
PBC ON
PBC OFF
Page 31

ENGLISH
31
layback with progressive scan (in DVD mode)
This function results in the transmission of video signals in a high frequency
range. The function is only active if the video output has been set to
»COMPONENT« in the set-up menu. Before you first switch on the device,
please check whether your television, flat screen or projector is suitable for
this use.
1 Press »RDS/P.SCAN« to switch on the function.
– On-screen display: »PROGRESSIVE TV«.
– Display on the DVD Micro System: » «.
2 Press »RDS/P.SCAN« to switch off the function.
– On-screen display: »INTERLACE TV«.
– Display on the DVD Micro System: » « disappears from the display.
Displaying information ...
... in DVD mode:
1 Press »DISPLAY/DIM« repeatedly on the remote control.
– One after the other you will receive information concerning the following:
– Current title number, current track number and the elapsed playing time of
the title
– The remaining playing time of the title
– The elapsed playing time of the chapter
– The remaining playing time of the chapter.
2 To hide the information line repeatedly press »DISPLAY/DIM« on the
remote control.
... In video CD mode
1 Press »DISPLAY/DIM« on the remote control repeatedly.
– You will receive information concerning:
– The elapsed playing time of the current track
– The remaining playing time of the track
– The total playing time of the VCD/S-VCD
– The remaining playing time of the VCD/S-VCD
2 To hide the information line repeatedly press »DISPLAY/DIM« on the
remote control.
... In MP3/WMA mode
In MP3/WMA mode, the corresponding information is automatically displayed
by the MP3/WMA menu.
In MP3 mode, you can display the name of the artist in the display of the DVD
Micro System by pressing »DISPLAY/DIM«.
P.SCAN
P.SCAN
DISC MODE
_________________________________________________________________________________
TITLE 01/02 CHAPTER 006/035
00:18:14
SINGLE ELAPSED
03:38 TRACK 01/01
PROGRESSIVE TV
INTERLACE TV
Page 32

32
DISC MODE
_________________________________________________________________________________
... In audio CD mode
1 Press »DISPLAY/DIM« repeatedly on the remote control.
– You will receive information concerning:
– The elapsed playing time of the current track
– The remaining playing time of the track
– The elapsed playing time of the CD
– The remaining playing time of the CD.
Additional playback functions
Some of the functions are not available depending on the inserted media.
Fast search
1 During playback, press » TUNING 3« or » TUNING 4« on the
remote control.
– The fast search starts either forwards or backwards.
Note:
The backwards and forwards speed can be changed in four stages by
pressing » TUNING 3« or » TUNING 4« repeatedly during the
search. The maximum speed is »16x«.
2 Press »PLAY PAUSE
ı
II« at the position desired.
– Normal playback starts.
Selecting the camera angle for particular scenes or
passages
Many DVDs contain scenes or passages which were filmed by various
cameras – from different angles. You can select these different camera angles.
Should a DVD offer this function, the multi-angle symbol, for example
»n 1/4«, will appear on the television screen if it has been set up in the
set-up menu.
1 To select the camera angle function, press »n« during playback.
– Display: camera angle »n 2/4«, 2 from 4 in this example.
2 To select another camera angle, press »n«.
Slow motion
You can switch forwards through individual pictures is small steps.
1 During playback, press »SLOW« on the remote control.
2 Change pictures forwards by pressing »SLOW« repeatedly.
3 Switch back to playback with »PLAY PAUSE
ı
II«.
SINGLE ELAPSED
01:07 TRACK 01/19
FF 2x
FF 8x
PLAY
n 2/4
STEP FWD
PLAY
Page 33

ENGLISH
33
DISC MODE
_________________________________________________________________________________
Enlarging the picture (zoom)
This function allows you to enlarge various picture sections. The picture enlargements are selected in the following order: ZOOM1.5 – ZOOM2 – ZOOM3 –
ZOOM OFF.
1 During playback, in pause or slow motion, press »v« on the remote
control.
– Display: »ZOOM x1.5«, a picture section is enlarged.
2 The picture section can be moved with »Ń« or »
Ľ
« or »ľ« or »ı« on the
television screen.
3 To end the function switch »v« to »ZOOM OFF«.
Switching the dubbed language or the audio format
This setting switches away from the preset dubbed language, if the DVD offers
alternatives.
1 During playback, press »F ɳ«.
– Display: the current dubbed language
2 Keep pressing »F ɳ« to select the dubbing language.
Note:
Switching the dubbed language can be suppressed by the structure of the
DVD itself. In this case the setting is usually made in the DVD menu.
Selecting and displaying subtitles
If the DVD provides subtitles, they can be displayed on your TV screen.
When subtitles are available in several languages, you can select your preferred
language.
1 During playback, press »SUBTITLE y«.
– Display: for example »SUBTITLE 02/21: ENGLISH« appears briefly,
then the current subtitles appear.
2 Keep pressing »SUBTITLE y« to select the subtitle language.
Notes:
Switching the subtitles can be suppressed by the structure of the DVD itself.
In this case the setting is usually made in the DVD menu.
ZOOM x1.5
ZOOM OFF
AUDIO 2/3: AC - 3 1CH ENGLISH
AUDIO 1/3: AC - 3 1CH SPANISH
SUBTITLE 02/21: ENGLISH
Page 34

34
DISC-MODE
_________________________________________________________________________________
Zero setting (GO TO) ...
... in DVD mode
This function enables you to select titles or chapters on the DVD when it is
stopped or during playback.
1 Call up this function with »GOTO« on the remote control.
– The information menu is displayed. The chapter number display is
highlighted in yellow.
2 Select the title of chapter number with »
ľ
« or »ı«,
3 Using the numerical buttons »1 … 0« on the remote control, enter new title
or chapter numbers and confirm with »DEMO/OK«.
– Playback of the selected title or chapter begins.
4 Press »GOTO« on the remote control again.
– The line for the time display appears.
5 Enter the desired time with »1 … 0« and confirm with »DEMO/OK«.
– Playback starts at the corresponding point.
... In video CD and CD mode
1 Press »GOTO« on the remote control.
– The line for the time display appears.
2 Enter the desired time with »1 … 0« and confirm with »DEMO/OK«.
– Playback starts at the corresponding point.
Selecting and playing scenes
You can make a bookmark for a scene on a DVD. This bookmark can be
selected directly for playback. You can set two bookmarks per DVD.
Setting bookmarks
1 During playback, press »PBC/BOOKMARK«.
2 Select a bookmark using »
S
« or »A«.
3 Press »DEMO/OK« at the point you wish to mark.
Notes:
Select the second bookmark with »
S
« or »A« and mark a new point.
The bookmark (playing time) can be deleted using »x«.
Playing bookmarked scenes
1 During playback, press »PBC/BOOKMARK«.
2 Select the bookmark with »
S
« or »A«.
3 Select »GO TO« with »
s
« and confirm with »DEMO/OK«.
– Playback starts at the point marked.
TITLE 01/02 CHAPTER /035
007
TRACK 01/02 TIME
_ _:_ _:_ _
MARK GO TO TOTAL
00 00/02
01
Page 35

ENGLISH
35
DISC-MODE
_________________________________________________________________________________
Playing back tracks or titles in random order
If the disc is supporting it, you can play back tracks or titles in random order.
1 When the device is stopped, call up the function by pressing
»DISC/RANDOM«.
– Display: shortly »RANDOM ON«.
2 Start random playback with »PLAY/PAUSE
ı
II«.
3 To stop the function press »STOP
7
« und subsequently »DISC/
RANDOM«.
– Display: shortly »RANDOM OFF«.
Wiederhol-Funktionen
Repeating a selected section (A-B Repeat)
You can mark a desired section to be repeated within a chapter, file or title.
1 To mark the start of the desired section during playback, briefly press
»A-B«.
– Display: »A TO B SET A «.
2 To mark the end of a section, briefly press »A-B« again.
– Display: »A TO B SET B«, the scene marked in this manner is constantly
repeated.
3 To cancel this function, press »A-B« again.
– Display: briefly »A TO B CANCELLED«.
Repeating a chapter, file, title or all chapters, files,
or titles on a disc
1 During playback, press »REPEAT« on the remote control.
– Display: briefly, for example »CHAPTER REPEAT ON« a chapter, file or
title is repeated.
2 During playback, press »REPEAT« on the remote control again.
– Display: briefly, for example »TITLE REPEAT ON« all chapters, files or
titles are repeated.
3 Press »REPEAT« on the remote control a third time to quit the function.
– Display: briefly »REPEAT OFF«.
Notes:
This function is not available in Aux mode.
The PBC function must be switched off in video CD mode.
A TO B SET A
A TO B SET B
A TO B CANCELLED
RANDOM OFF
RANDOM ON
CHAPTER REPEAT ON
TITLE REPEAT ON
REPEAT OFF
Page 36

36
DISC-MODE
_________________________________________________________________________________
Creating a track memory – playing back tracks in
selected order
You can store and then play back up to 99 tracks in a particular order from the
inserted disc. A track may be stored more than once. The DVD Micro System
must be in the stop position.
This function is not available for DVDs.
1 Select this function with »PROGRAM« on the remote control.
– Display on the DVD Micro System: » P01 T00« and » PROG«. » 00«
flashes.
2 Select the desired two-digit track number with the numerical buttons
»1 ... 0« (e.g. »06« or » 12«) and confirm with »DEMO/OK«.
– Display: e.g. »P01« (memory position) and » 03« (for the first track).
Note:
To programme further tracks, repeat step 2.
3 To start playback of the memory, press »PLAY/PAUSE
ı
II«.
– Playback begins with the first programmed track.
4 To end playback of the memory press »STOP
7
«.
– This memory is stored.
Deleting a program
The memory is deleted if:
– When the system is stopped »PROGRAM« is held down (on-screen
display »PROGRAM OFF«);
– The disc compartment is opened
– The DVD Micro System is switched to standby with »ON/OFF«.
PROG
P01 T00
PROG
P02 T03
Page 37

ENGLISH
37
TUNER MODE ________________________________________________________________
Selecting the tuner input source
1 Select the input source with »FM TUNER AM« on the DVD Micro System or
with »TV AM/FM« on the remote control.
– The most recently selected radio station is played (Last Station Memory).
– Display on the DVD Micro System: frequency band and frequency, or
station name.
Selecting the waveband
1 Select FM (VHF) or AM (medium wave) with »FM TUNER AM« on the
DVD Micro System or »TV AM/FM« on the remote control.
– Display on the DVD Micro System: »FM« or »AM« and the frequency.
Calling up stored radio stations
1 Select the desired preset channel position with »1 ... 0« or »DOWN
PRESET« or »PRESET UP« on the remote control.
– Display on the DVD Micro System: briefly, e.g. »06 100.
60
MHz«.
RDS station service
RDS (Radio Data System) is an information system which is provided additionally by most FM stations. If the DVD Micro System is currently receiving an RDS
station, the station name, e.g. »ENERGY«, and »F« appear in the display.
Searching for RDS stations
1 Search for the desired RDS station by repeatedly pressing » TUNING 3«
or » TUNING 4« until an RDS station is received and »F« appears in
the display.
– After a short time the station name appears if the reception strength is
sufficient.
Note:
It may take some time before all the RDS information is available.
Calling up RDS information
If an RDS station is being received, various station information can be called up
in the display. The information remains in the display as long as no other information is called up.
1 Press »
DISPLAY/DIM
« repeatedly.
– The channel position, waveband and frequency, station name, radio text in
ticker text, station type, RDS time, PI code and then the channel position
with the waveband and frequency appear in that order.
FM 100.60
MHz
06 100.60
AM 1404
KHz
F
ENERGY
Page 38

38
TUNER MODE
_____________________________________________________________________________
Switching RDS information on and off
The RDS information can be switched on and off.
1 To call up this function, press »RDS/P.SCAN« twice.
– Display: »INFO OFF« or »INFO ON«.
2 Press »PROGRAM« to switch RDS information on or off.
Searching for station types (PTY)
1 Press »RDS/P.SCAN« to call up the PTY function.
– Display: the current station type, e.g. »NEWS«, »PTY« flashes.
– If no station type code is transmitted, »NONE« appears in the display.
2 To select another station type, press »PRESET 8« or » PRESET 9«.
3 To start the PTY search, press » TUNING 3« or » TUNING 4«.
– Display: »SEARCHING PROGRAMM TYPE« in ticker text, and then the station
type to be searched for and »PTY«, both flashing.
– If the station type cannot be found: »TYPE NOT FOUND« appears in the
display.
– If the station type is found, the frequency appears in the display and the
desired station type can be heard.
Switching RDS time synchronisation on and off
Some RDS stations transmit an RDS time signal. If RDS time synchronisation is
activated on the DVD Micro System (»SYNC ON«), the time is automatically
updated using this new information.
1 To call up this function, press »RDS/P.SCAN« three times.
– Display: »SYNC OFF« or »SYNC ON«.
2 Press »PROGRAM« to switch RDS time synchronisation on or off.
INFO OFF
SYNC OFF
PTY
NEWS
PTY
EARCHING PROGRAMM T
Page 39

ENGLISH
39
TIMER-MODE
__________________________________________________________________
Your DVD Micro System has two timer modes:
– The switch-on timer which switches the DVD Micro System on and off at set
times and wakes you in disc or tuner mode.
– The sleep-timer, which switches the DVD Micro System off at a time you set.
Switch-on timer
Setting the switch-on timer
Notes:
The clock on the DVD Micro System must already be set. During the setting, if
no button is pushed for more than 10 seconds, the DVD Micro System ends
the procedure automatically. You then have to start again.
1 With the system is standby, press »TIMER« for longer than 2 seconds and
keep it held down.
– Display: »TIMER« and the input source last selected, e.g. »DISC« or
»TUNER«.
2 Select the desired input source, by pressing »
PROGRAM
« and then
» TUNING 3« or » TUNING 4«, confirm your selection with
»
PROGRAM
«.
– Display: the volume when switching on, e.g. »VOL 12«.
Note:
If the tuner is selected as the switch-on input source, then select the desired
channel position with » TUNING
3« or » TUNING 4« and conform
with »
PROGRAM
«.
If disc mode is selected and no disc has been inserted, the DVD Micro
System will switch on automatically in tuner mode.
3 Select the desired switch-on volume with » TUNING 3« or » TUNING
4« and confirm with »
PROGRAM
«.
– Display: »ON«, the hours display flashes.
4 Set the hours for the switch-on time with » TUNING 3« or » TUNING
4« and confirm with »
PROGRAM
«.
– Display: »ON«, the minutes display flashes.
5 Set the minutes for the switch-on time with » TUNING 3« or » TUNING
4« and confirm with »
PROGRAM
«.
– Display: »OFF«, the hours display flashes.
6 Set the hours for the switch-off time with » TUNING 3« or » TUNING
4« and confirm with »
PROGRAM
«.
– Display: »OFF«, the minutes display flashes.
7 Set the minutes for the switch-off time with » TUNING 3« or »TUNING
4« and confirm with »
PROGRAM
«.
– Display: briefly, »TIMER OK«.
– The timer settings are saved.
DISC
TIMER
VOL 12
TIMER
ON 12:24
TIMER
OFF 13:50
TIMER
TIMER OK
TIMER
Page 40

40
TIMER-MODE
______________________________________________________________________________
Activating and deactivating the switch-on timer
1 Press »TIMER« to activate.
– Display: »TIMER«.
2 Press »TIMER« again to deactivate.
– Display: »TIMER« disappears from the display.
Sleep timer
Setting the sleep timer
The sleep timer switches the system off at the set time.
1 To activate the function, press and hold down »CLOCK/SLEEP« on the
remote control.
– Display: »SLEEP OFF«, »OFF« flashes.
2 To set the desired switch-off time press (»120 MIN«, »110 MIN« to
»1 MIN«) »CLOCK/SLEEP« repeatedly.
– Display: e.g. »80 MIN«, followed by a constant display of the input source
and »SLEEP«.
– The system switches off after the selected time.
3 To see the remaining time until the switch-off time, press and hold down
»CLOCK/SLEEP« on the remote control.
– Display: e.g. »49 MIN«.
Deactivating the sleep timer
1 Keep pressing »CLOCK/SLEEP« on the remote control until »SLEEP OFF«
appears in the display.
– Display: »SLEEP OFF« disappears after a short while.
– The system stays on.
or
1 Switch the DVD Micro System to standby with »
Ǽ
«.
SLEEP OFF
SLEEP OFF
SLEEP
ANTENNE
Page 41

ENGLISH
41
CHILD LOCK ____________________________________________________________________
Some DVDs have may contain parental guidance warnings concerning age
restrictions. The set-up menu enables you to define eight levels of age restrictions
for the child lock. »1« is the default setting.
If the inserted DVD is not suitable for the defined age category according to the
parental lock, then the DVD will not be played.
Changing the child lock settings
1 Select the »PREFERENCES« menu item with »Ń« or »
Ľ
« and
confirm with »DEMO/OK«.
2 Select »PARENTAL« with »Ń« or »
Ľ
«.
3 Use »
ı
« to move to the right column.
The following settings are available »1« to »8«.
– 1: suitable for all ages
– 2: Level 2
– 3 (PG): only with parental guidance
– 4 (PG 13): not suitable for children under 13, from ages 13 to 18 only
under parental guidance
– 5: Level 5
– 6 (PG-R): may contain violence or sex scenes, can only be viewed under
18 under with parental guidance
– 7 (NC-17): only for adults, not for those under 17
– 8 (ADULT): only for adults
4 Select the required setting by pressing »Ń« or »
Ľ
« and confirm with
»DEMO/OK«.
5 To change the setting, enter the master code »1234« with »1 ... 0« and
confirm with »DEMO/OK«.
Changing the parental lock access code
You can replace the master code with your own personal access code. This
personal code is needed to change the parental lock settings if you yourself wish
to play a disc unsuitable for young people.
1 Select the »PREFERENCES« menu item with »Ń« or »
Ľ
« and confirm with
»DEMO/OK«.
2 Select »PASSWORD« by pressing »Ń« or »
Ľ
«.
3 Use »
ı
« to move to the right column and confirm with »DEMO/OK«.
4 Enter the master code »1234« or – if you already have one the old personal
code with »1 ... 0«.
5 Enter the new code with »1 ... 0«.
6 Confirm the new code by entering it again and then press »DEMO/OK«.
Note:
As the master code is independent from your personal code to access the
parental lock, we advise you to keep pages 41 and 46 of this instruction
manual in a place where your children cannot reach it.
- - PREFERENCES PAGE - -
TV TYPE
VIDEO OUT
AUDIO
SUBTITLE
DISC MENU
PARENTAL
PASSWORD
GENERAL
1
2
3
4
5
6
7
8
s
S
- - PREFERENCES PAGE --
TV TYPE
VIDEO OUT
AUDIO
SUBTITLE
DISC-MENU
PARENTAL
PASSWORD
CHANGE PASSWORD
CHANGE
s
S
Page 42

42
ADDITIONAL SETTINGS_______________________________________
Like the basic settings, you can make additional settings in the set-up menu.
Setting the picture mode
This setting controls contrast and sharpness depending on the medium inserted.
1 Select the »GENERAL SETUP« menu item with »Ń« or »
Ľ
« and
confirm with »DEMO/OK«.
2 Select »PIC MODE« using »Ń« or »
Ľ
«.
3 Use »
ı
« to move to the right column.
The following settings are available: »AUTO «, »FILM«, »VIDEO«,
»SMART« or »SSMART«.
4 Select the required setting by pressing »Ń« or »
Ľ
« and confirm with
»DEMO/OK«.
Displaying the multi-angle symbol
This function allows a scene to be played from various camera angles (multiangle technology). The current angle and the total number of angles is displayed
by the multi-angle-symbol.
1 Select the »GENERAL SETUP« menu item with »Ń« or »
Ľ
« and
confirm with »DEMO/OK«.
2 Select »ANGLE MARK« by pressing »Ń« or »
Ľ
«.
3 Use »
ı
« to move to the right column.
The following settings are available: »ON« or »OFF«. »OFF« is the default
value.
4 Select the required setting by pressing »Ń« or »
Ľ
« and confirm with
»DEMO/OK«.
Activating and deactivating the status line
You can switch the status line on and off as required.
1 Select the »GENERAL SETUP« menu item with »Ń« or »
Ľ
« and
confirm with »DEMO/OK«.
2 Select »CAPTIONS« using »Ń« or »
Ľ
«.
3 Use »
ı
« to move to the right column.
The following settings are available: »ON« or »OFF«.
4 Select the required setting by pressing »Ń« or »
Ľ
« and confirm with
»DEMO/OK«.
- - GENERAL PAGE - -
TV DISPLAY
PIC MODE
ANGLE MARK
OSD LANG
CAPTIONS
MAIN PAGE
SET PICTURE MODE
AUTO
FILM
VIDEO
SMART
SSMART
s
- - GENERAL PAGE - -
TV DISPLAY
PIC MODE
ANGLE MARK
OSD LANG
CAPTIONS
MAIN PAGE
ANGLE MARK ON/OFF
ON
OFF
s
- - GENERAL PAGE - -
TV DISPLAY
PIC MODE
ANGLE MARK
OSD LANG
CAPTIONS
MAIN PAGE
CLOSED CAPTION
ON
OFF
s
\
\
\
Page 43

ENGLISH
43
ADDITIONAL SETTINGS
____________________________________________________________
Language settings
The preference settings in the set-up menu are not available during playback.
To make these settings, playback must be ended first. The default setting is
»ENGLISH«.
Setting the preferred dubbing language
1 Select the »PREFERENCES« menu item with »Ń« or »
Ľ
« and confirm with
»DEMO/OK«.
2 Select »AUDIO« by pressing »Ń« or »
Ľ
«.
3 Use »
ı
« to move to the right column.
4 Select your language using »Ń« or »
Ľ
« and press »DEMO/OK« to
confirm.
Setting the preferred subtitle language
1 Select the »PREFERENCES« menu item with »Ń« or »
Ľ
« and confirm with
»DEMO/OK«.
2 Select »SUBTITLE« with »Ń« or »
Ľ
«.
3 Use »
ı
« to move to the right column.
4 Select your language using »Ń« or »
Ľ
« and press »DEMO/OK« to
confirm.
Setting the preferred disc menu language
1 Select the »PREFERENCES« menu item with »Ń« or »
Ľ
« and confirm with
»DEMO/OK«.
2 Select »DISC MENU« with »Ń« or »
Ľ
«.
3 Use »
ı
« to move to the right column.
4 Select your language using »Ń« or »
Ľ
« and press »DEMO/OK« to
confirm.
- - PREFERENCES PAGE - -
TV TYPE
VIDEO OUT
AUDIO
SUBTITLE
DISC MENU
PARENTAL
PASSWORD
PREFERRED AUDIO LANGUAGE
ENGLISH
FRENCH
GERMAN
ITALIAN
SWEDISH
DANISH
PORTUGUESE
SPANISH
s
S
- - PREFERENCES PAGE - -
TV TYPE
VIDEO OUT
AUDIO
SUBTITLE
DISC MENU
PARENTAL
PASSWORD
PREFERRED MENU LANGUAGE
ENGLISH
FRENCH
GERMAN
ITALIAN
SWEDISH
DANISH
PORTUGUESE
SPANISH
s
S
- - PREFERENCES PAGE - -
TV TYPE
VIDEO OUT
AUDIO
SUBTITLE
DISC MENU
PARENTAL
PASSWORD
PREFERRED SUBTITLE LANGUAGE
ENGLISH
FRENCH
GERMAN
ITALIAN
SWEDISH
DANISH
PORTUGUESE
SPANISH
s
S
S
Page 44

44
General information
Mains voltage:
230V ~, 50/60 Hz
Maximum power consumption:
Operating: ≤ 60 W (DVD Micro System)
Operating: ≤ 85 W (Subwoofer)
Standby: ≤ 6 W (DVD Micro System)
Eco mode: ≤ 1 W (DVD Micro System)
Standby: ≤ 5 W (Subwoofer)
Ambient temperature:
+10°C to +35°C
Amplifier
Output:
Nominal:
5 x 30 W (5 x 8 Ω)
Music:
5 x 50 W (5 x 8 Ω)
Input sensitivity/impedance
(audio analogue):
400 mV / 22 kOhm
Frequency range:
10 ... 24,000 Hz
Non-linear distortion factor:
-1 dB, 8 Ω, 1 kHz, ≤ 0.3 %
Disc unit
Playback standard:
PAL, 50 Hz, 625 lines
NTSC, 60 Hz, 525 lines
Picture format:
4:3, 16:9
Playback system:
DVD-video, video-CD 1.1 and 2.0, S-video-CD,
MP3-CD, WMA-CD, audio-CD (CD-DA)
CD-R, CD-RW, DVD-R,
CD ROM (MP3), sampling frequency 44.1 kHz
Radio
Sensitivity:
Mono (S/N=26 dB), 4 µV
Stereo (S/N=46 dB), 30 µV
Non-linear distortion factor:
Mono (1 kHz, 40 kHz dev.), 0.3 %
Stereo (1 kHz, 40 kHz dev.), 0.6 %
Frequency range:
(± 3 dB) 20 ... 14,000 Hz
Noise voltage ratio:
22.5 kHz dev., DIN A, mono, ≥ 60 dB
40 kHz dev., DIN A, stereo, ≥ 63 dB
FM and AM frequency bands:
FM 87.5 ... 108 MHz
AM 522 ... 1620 kHz
INFORMATION_____________________________________________________________
Manufactured with permission from Dolby Laboratories.
“Dolby”, “Pro Logic” and the double-D symbol “
ij ” are trademarks of Dolby Laboratories.
Technical data
This device is noise-suppressed according to the applicable EU directives.
This product fulfils the European directives 89/336/EEC, 73/23/EEC and
93/68/EEC.
This device conforms to the safety regulation DIN EN 60065 (VDE 0860) and
therefore the international safety regulation IEC 60065.
Do not open the DVD Micro System and loudspeakers. No warranty claims are
accepted for damage resulting from improper handling.
Technical and design modifications reserved.
Page 45

ENGLISH
45
Cleaning discs
Wipe the dirty disc with a cloth from the centre outwards in a straight line.
Do not use any solvents such as benzene, thinners, conventional cleaner or antistatic spray for vinyl records.
General instructions for laser devices
Your system is a CLASS 1 LASER PRODUCT. This means that the laser is
designed in such a way as to ensure that the maximum permissible emission
value cannot be exceeded under any circumstances.
Caution:
If operating devices or methods other than those specified here are employed, it
may lead to dangerous exposure to emissions.
This device emits laser radiation. Because of the danger of eye injuries, the unit
may only be opened or serviced by trained personnel.
If settings other than those specified here are employed or OTHER PROCEDURES are carried out, this may lead to dangerous radiation exposure.
INFORMATION
__________________________________________________________________________
Loudspeakers
Music/rated load:
Music:
2 x 18 W (8 Ω) (front), 1 x 75 W (subwoofer)
Nominal:
2 x 12 W (8 Ω), 1 x 40 W (subwoofer)
Frequency range:
Front loudspeakers:
150 ... 20,000 Hz
Subwoofer:
40 ... 150 Hz
System:
2 x 2-way
subwoofer: Bass reflex system
Dimensions and weight
DVD Micro System
W x H x D: 152 x 157 x 260 mm
4.0 kg
Front loudspeakers
W x H x D: 160 x 270 x 200 mm
2.4 kg
Subwoofer
W x H x D: 199 x 311 x 340 mm
6.3 kg
CLASS 1
LASER PRODUCT
Page 46

46
INFORMATION
__________________________________________________________________________
Rectifying minor problems
Not every picture or sound problem is caused by a defect in your DVD Micro System. Defects can also be caused
by leads having been accidentally pulled out, damaged discs and worn out batteries in the remote control. If the
following measures do not do not rectify the problem, consult your authorised dealer.
Due to the difference in quality of the recording media and the quality of the recording itself, it can occasionally
happen that a home-made disc cannot be read. This does not indicate a malfunction of the DVD Micro System.
Fault
The DVD Micro System cannot be switched
on.
The DVD Micro System does not respond
to the remote control.
No picture or sound.
No sound or insufficient bass tone coming
from the subwoofer.
The inserted disc does not play.
Playback stop, music search, slow motion,
playback repeat or programmed playback
do not work.
No or inadequate MP3 playback.
CD-Rs or CD-RWs are not being played
back, or being played back incorrectly.
Distorted audio signal during FM reception.
You have forgotten the personal access
code for the parental lock.
Possible cause/remedy
No electrical supply:
Check the connection to the mains cable.
Obstacles, used batteries:
Remove all obstacles which could disturb the signal of the
remote control.
Test or replace the batteries of the remote control.
Wrong cable connection, the video or audio connection cable is
faulty:
Check the connections on the DVD Micro System and on the
television.
The MUTE function has been activated:
Deactivate this function as described on page 26.
The subwoofer has been connected incorrectly:
Check to make sure the subwoofer has been connected
properly. Switch the phase angle of the subwoofer if necessary.
Make sure the printed side of the disc is facing upwards.
Clean the disc. The DVD Micro System cannot read the inserted
disc format. Check to see if the inserted DVD has the regional
code 2.
The parental lock settings prevent the playback of the disc:
Alter the parental lock settings (see page 41).
The relevant functions are not available with the inserted disc.
The sampling frequency 44.1 kHz has not been observed:
Burn the new MP3 CD observing the sampling frequency.
Faulty software or hardware settings during burning or the CD
itself:
Check the components of your CD burner/software or change
the CD being used.
Poor stereo reception:
Correct the frequency manually, if necessary.
Faulty antenna connection:
Check the antenna connection.
Enter the master code »1234«.
 Loading...