


COLOR TELEVISION
ELEGANCE 15 FLAT TVD 40-2502/5 TEXT
ENGLISH
POLSKI
MAGYAR

CONTENTS ____________________________________________
3Set-up and safety
4Connection and preparation
4 |
Connecting the antenna and the power cable |
4 |
Inserting batteries in the remote control |
5-8 |
Overview |
5-7 |
The remote control |
8 |
The front of the television |
9-11 |
Settings |
9 |
Tuning television channels automatically |
9-10 |
Changing stored channels |
11 |
Picture settings |
12-13 |
Television operation |
14-15 |
Teletext mode |
14 |
FLOF text and normal text mode |
14-15 |
Additional functions |
16-17 |
Convenience functions |
16-17 |
Convenience functions with the »FEATURES« menu |
18-26 |
DVD mode |
18 |
Special DVD features |
18 |
Disc formats |
19-21 |
Preparation |
22-23 |
Using a DVD, video CD or audio CD |
24Additional functions during DVD or video CD playback
25Using an MP3 CD or JPEG CD
25Additional JPEG CD playback functions
26Creating and playing a playlist
27-28 |
DVD settings |
27 |
Selecting the setup menu |
27-28 |
Menu options |
29-32 |
Using external devices |
29 |
Decoder or satellite receiver |
29Headphones
30Video recorder or set top box
31Camcorder
32Connecting a multi-channel amplifier or digital two channel audio system
33-34 |
Special settings |
33-34 |
Setting television channels |
35-38 |
Information |
35-38 |
Technical data, service information for dealers, |
|
General instructions for laser devices, troubleshooting, |
|
Additional Information for units sold in the UK |
2
5 x |
10 |
10 |
cm |
cm |
20 |
20 cm |
cm |
|
Golf |
gam |
Krie |
VICE |
! |
|
|
! SER |
|
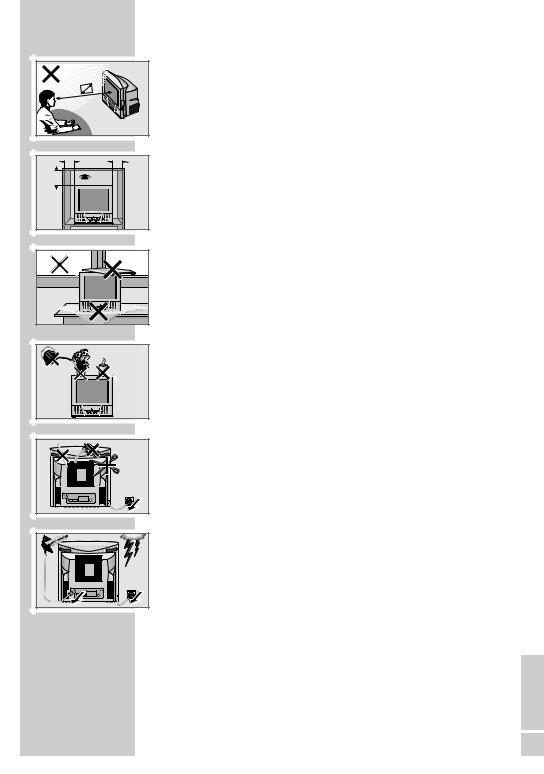
SET-UP AND SAFETY___________________________
Please note the following information when setting up your television set.
This television set is designed to receive and display video and audio signals. Any other use is expressly prohibited.
The ideal viewing distance is 5 times the screen diagonal.
External light falling on the screen impairs picture quality.
Ensure sufficient clearance between the TV and the wall cabinet.
The television set is designed for use in dry rooms. If you do use it in the open, please ensure that it is protected from moisture, such as rain or splashing water. Do not expose the television set to any moisture.
If the television is subject to sudden changes in temperature, for example if it is brought in from the cold to a warm room, connect it to the mains supply and let it stand for at least two hours before you insert a disc.
Do not place any vessels such as vases on the television, as they may spill liquid, thus presenting a safety risk.
Place the television set on a solid, level surface. Do not place any objects such as newspapers on the television set or cloth or similar items beneath it.
Do not place the television set close to heating units or in direct sunlight, as this will impair cooling.
Heat build-up can be dangerous and shortens the operating life of the television set. For reasons of safety, have a specialist remove any dirt deposits in the set from time to time.
Keep the television set away from magnetic fields (loudspeaker boxes, for example).
Do not open the television set under any circumstances. No warranty claims are accepted for damage resulting from improper handling.
Ensure that the mains cable is not damaged.
Thunderstorms are a danger to all electrical devices. Even if the television set is switched off, it can be damaged by a lightning strike to the mains or the antenna cable. Always disconnect the mains and antenna plugs during a storm.
Do not insert foreign objects in the disc compartment.
If the device is unable to scan discs perfectly, use a standard, commercially available cleaning CD to clean the laser optics. Other cleaning methods may damage the laser optics.
Always keep the disc compartment closed to prevent dust from collecting on the laser optics.
Clean the screen with a soft, damp cloth. Only use plain water.
ENGLISH
3

CONNECTION AND PREPARATION__
Connecting the antenna and the mains cable
|
|
VIDEO |
A/L |
A/R |
|
|
AV |
|
COAXIAL |
1 |
TV |
R |
|
|
|
|
|
|
2 |
1Plug the antenna cable of the rooftop antenna into the »Ä« antenna socket on the television.
2Plug the mains cable into the wall socket.
Inserting batteries in the remote control
1 Open the battery compartment by removing the lid.
2 Insert batteries (micro type, e.g. LR 03 or AAA, 2 x 1.5 V). Observe the polarity (marked on the base of the battery compartment).
3 Close the battery compartment.
Note:
If the television no longer reacts properly to remote control commands, the batteries may be flat. Be sure to remove used batteries.
The manufacturer accepts no liability for damage resulting from leaking batteries.
Environmental note
Batteries, including those which contain no heavy metal, may not be disposed of with household waste. Please dispose of used batteries in an environmentally sound manner. Find out about the legal regulations which apply in your area.
4
|
|
|
TV |
|
|
|
DVD |
|
|
|
ZOOM |
|
|
|
PROGRAM |
GO TO |
|
|
DVD MENU |
|
|
|
z |
DVD SETUP |
|
|
TITLE |
TXT |
|
|
AV |
|
|
SUB |
UPDATE |
|
|
|
|
|
|
|
d |
VCR |
|
|
DVD |
SAT |
|
EXT. |
|
|
|
Tele Pilot 165 C
OVERVIEW____________________________________________
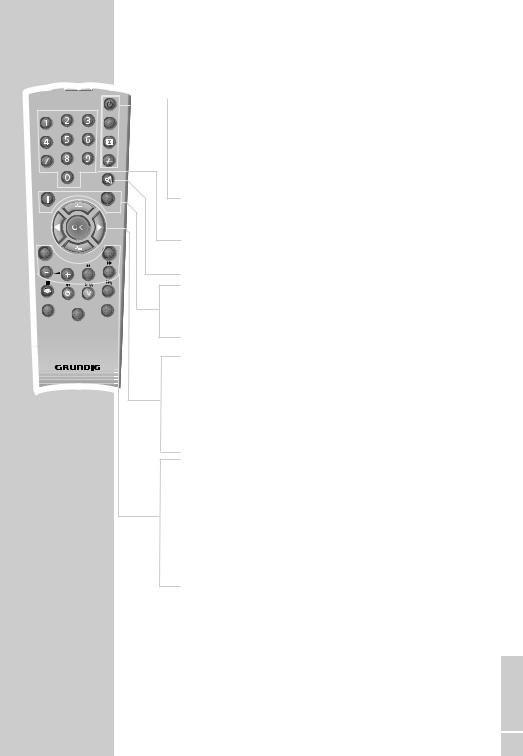
The remote control
TV operation
 Switches off the television set (stand-by).
TV/DVD Switches the remote control from TV mode to
DVD mode and back.
ESwitches between picture formats. Reveal answer in teletext mode.
-/-- Switches between singleand double-digit preset channels.
Switches to double character size in teletext mode.
1…0 Switch the television on from standby mode. Select channels directly.
d Sound on/off (mute).
iOpens and closes the info menu; closes all menus.
ZZap function.
Page hold in teletext mode.
P+, P- |
Switch the television on from standby. |
|
Select channels step-by-step. |
|
Move the cursor up and down. |
OK |
Calls up the station list. |
|
Activates various functions. |
Move cursor to the left/right. |
|
TXT |
Switches between teletext and TV modes. |
|
Hides the menu. |
AV |
Selects the AV channels and the most recently viewed |
|
television channel. |
– + Adjust the volume. |
|
SUB |
Selects sub-pages in teletext mode. |
UPDATE |
Updates the page in teletext mode. |
ENGLISH
5
|
|
|
TV |
|
|
|
DVD |
|
|
|
ZOOM |
|
|
|
PROGRAM |
GO TO |
|
|
DVD MENU |
|
|
|
z |
DVD SETUP |
|
|
TITLE |
TXT |
|
|
AV |
|
|
SUB |
UPDATE |
|
|
|
|
|
|
|
d |
VCR |
|
|
DVD |
SAT |
|
EXT. |
|
|
|
Tele Pilot 165 C
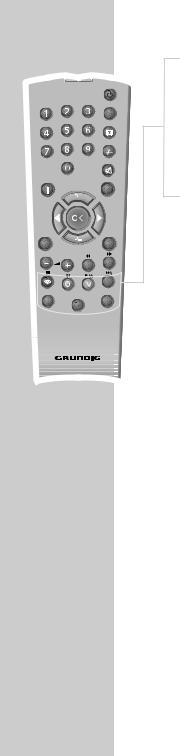
OVERVIEW____________________________________________
zSelects a page in teletext mode.
Shows the time.
Selects a page in teletext mode.
F
VCR, SAT DVD EXT.
Selects a page in teletext mode.
Selects a page in teletext mode.
Switches to operating a GRUNDIG videorecorder, a GRUNDIG satellite receiver or a GRUNDIG DVD player.
Keep the appropriate button (»VCR«, »SAT«, »DVD EXT.«) pressed down. Then press the appropriate button.
Note:
The functions available depend on the model of the device you are using.
Just try it out.
6
|
|
TV |
|
|
DVD |
|
|
ZOOM |
|
|
PROGRAM |
GO TO |
|
DVD MENU |
|
|
z |
DVD SETUP |
|
TITLE |
TXT |
|
AV |
|
SUB |
UPDATE |
|
|
d

VCR |
|
DVD |
|
SAT |
EXT. |
||
|
Tele Pilot 165 C
OVERVIEW____________________________________________
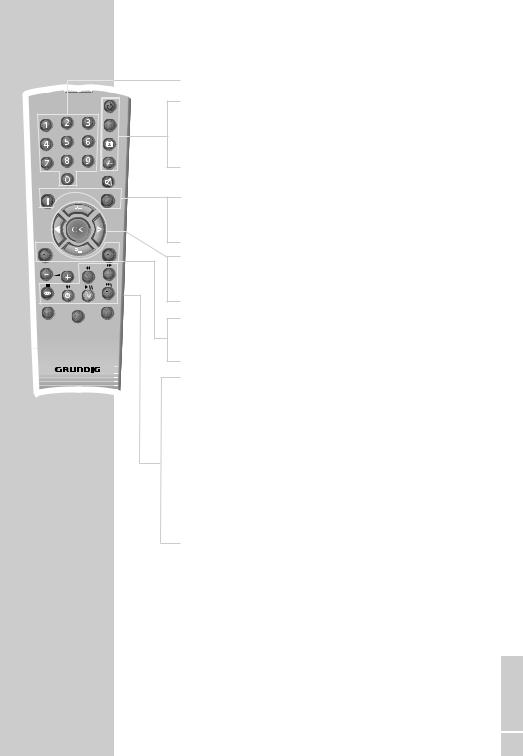
DVD mode
1…0 Numerical keys for various inputs.
TV/DVD Switches the remote control from TV mode to DVD mode and back.
ZOOM Zooms in/out on scenes during playback.
PROGRAM For programming a playback list for the inserted disc.
GO TO Opens the info menu of DVD unit.
DVD During playback, opens the disc menu* on a DVD.
MENU
P+, P- Select various functions in the menus.
OK |
Confirms functions. |
DVD Opens the main menu on the DVD unit.
SETUP
TITLE Calls up the DVD title menu* during playback.
3Switches to reverse frame search at various speeds during playback.
4Switches to forward frame search at various speeds during playback.
7Interrupts all drive functions.
5a |
Selects the previous title or section during playback. |
8! |
Starts playback. |
|
Freeze-frame for DVDs and video CDs. |
|
Pause for audio CDs and MP3 CDs. |
s6 |
Selects the next title or section during playback. |
|
* Depends on the DVD in use |
ENGLISH
7
OVERVIEW____________________________________________
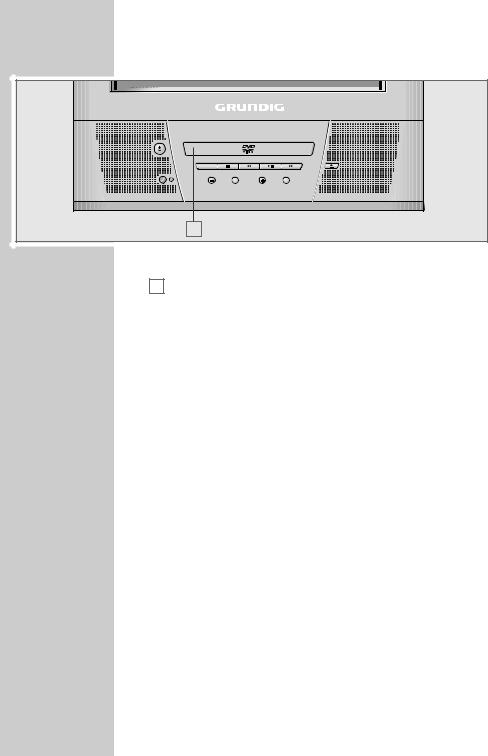
The front of the television set
|
TV/DVD |
|
|
PRG/VOL |
MENU |
|
A |
|
|
Switches the television into and out of standby mode. |
|
A |
Compartment for CD media. |
|
TV/DVD Switches the device from TV mode to DVD mode and back.
7Interrupts all drive functions.
5a |
Selects the previous title or section during playback. |
|
Selects various functions in the menus. |
8/! |
Starts playback. |
|
Freeze-frame for DVDs and video CDs. |
|
Pause for audio CDs and MP3 CDs; |
|
activates menu functions. |
s6 |
Selects the next title or section during playback. |
|
Selects various functions in the menus. |
Opens and closes the disc compartment.
PROG/VOL Preset button for volume or channel selection.
–Channel selection down. Reduce volume.
+Switches the television on from stand-by. Channel selection up.
Increase volume.
MENU |
Opens the TV menu, switches to the previous page in the |
|
TV menu. |
|
Opens the main menu of the DVD unit. |
Headphone jack (3.5 mm ø jack plug).
VIDEO |
Video signal input for camcorder. |
R AUDIO L |
Audio signal input for camcorder. |
8

SETTINGS ______________________________________________
Setting television channels automatically
Language
English |
Svenska |
Romaneste |
|
|
Deutsch |
Dansk |
Hirvatski |
|
|
Français |
Norsk |
âe‰tina |
|
|
|
||||
Italiano |
Suomi |
Slovenãina |
|
|
Español |
Slovensko |
G. Shqipe |
|
|
Portuguesa |
Polski |
apck |
|
|
Ellenika |
Magyar |
Мaкедонски |
|
|
Türkçe |
Pycck |
Srpski |
|
|
Nederlands |
¹1 |
|
|
|
|
|
|
|
|
|
|
|
|
|
OK |
Select |
|
|
|
|
|
|
|
|
|
|
|
|
|
Country Selection
Arabic |
Iran |
Russia |
Belgium |
Ireland |
Schweiz |
Bulgaria |
Italia |
Slovenija |
âeska Rep. |
Magyar |
Slovensko |
Danmark |
Netherl. |
Suomi |
Deutschl. |
Norge |
Sverige |
Ellada |
Österreich |
Türkiye |
España |
Polska |
U. K. |
Franca |
Portugal |
Yugoslavia |
Hrvatska |
Romania |
. . . . . . . . |
|
|
|
|
|
|
|
|
OK |
|
Select |
●i Exit |
|
|
|
The television set is equipped with an automatic channel search system.
You start the search and can then sort the television channels into your order of preference.
100 preset positions are provided, to which you can assign television channels from the antenna or from the cable connection.
You can also delete television channels from the channel list which were found more than once or which have poor reception.
1Switch on the television with » « on the television set, then press »P+« on the remote control.
–The »Language« menu appears when the television is first switched on.
Hint:
If the »Language« menu does not appear on the screen, then set it in accordance with the chapter on resetting all television channels on page 34.
2Select language with »P+«, »P-«, » « or » « and press »OK« to confirm.
–The »Country Selection« menu appears.
3Press »P+«, »P-«, » « or » « to select the country and »OK« to confirm.
Note:
If your country is not displayed, select ». . . . . . . «.
4Press »OK« to start the search.
–The »Setup« menu appears and the search begins. The automatic search may last several minutes depending on the number of television channels received.
–After the search, the television switches to channel 1.
Changing stored channels
|
|
|
|
You can delete channels that have been stored more than once |
|
|
|
|
during the automatic search. You can also store channels in a diffe- |
|
|
|
|
rent preset position, change or enter the name of a channel as well |
|
|
|
|
as skip channels. |
|
|
|
|
Selecting the station list |
|
|
|
|
1 Press »i« to open the »Main Menu«. |
Main Menu |
|
|||
|
|
– The »Main Menu« appears. |
||
Picture |
|
|
|
|
Program Table |
|
|
2 Select »Program Table« with »P+« or »P-« and confirm with |
|
Setup |
|
|
|
|
|
|
|
|
|
Features |
|
|
»OK« |
|
|
|
|
|
|
|
|
|
|
– The »Program Table« menu appears. |
|
|
|
|
|
OK |
Select |
●i Exit |
|
Note: |
|
|
|
||
Further operation is explained in the following sections.
ENGLISH
9

SETTINGS ______________________________________________
Deleting channels
Program Table
|
00 |
|
|
05 |
PRO 7 |
10 |
WDR |
|
|
01 |
ARD |
06 |
BR 3 |
11 |
|
|
|
|
02 |
ZDF |
07 |
VOX |
12 |
|
|
|
|
03 |
RTL |
08 |
KABEL |
13 |
|
|
|
|
04 |
SAT1 |
09 |
S RTL |
14 |
|
|
|
|
|
|
|
|
|
|
|
|
|
|
|
|
|
|
● Skip |
|
|
|
OK |
|
Select |
|
|
● Move |
|
|
|
|
●i |
Exit |
|
|
● Delete |
|
|
|
|
|
|
● Name |
|
|||
|
|
|
|
|
|
|||
|
Program Table |
|
|
|
|
|||
|
|
|
|
|
||||
|
00 |
|
|
05 |
PRO 7 |
10 |
WDR |
|
|
01 |
ARD |
06 |
BR 3 |
11 |
|
|
|
|
02 |
ZDF |
07 |
VOX |
12 |
|
|
|
|
03 |
RTL |
08 |
KABEL |
13 |
|
|
|
|
04 |
SAT1 |
09 |
S RTL |
14 |
|
|
|
|
|
|
|
|
|
|
|
|
|
|
|
|
|
|
● Skip |
|
|
|
OK |
|
Select |
|
|
● Move |
|
|
|
|
●i |
Exit |
|
|
● Delete |
|
|
|
|
|
|
● Name |
|
|||
1In the »Program Table« menu, select the station to be deleted by pressing »P+«, »P-«, » « or » «.
2Press » « (yellow) to delete the channel.
Note:
To delete other stations, repeat steps 1 and 2.
Sorting television channels
1In the »Program Table« menu, select the channel to be moved with »P+«, »P-«, » « of » «.
2Highlight the channel with » « (green).
3Select a new channel position by pressing »P+«, »P-«, » « or » « and then press » « to confirm.
– All of the channels that follow move up one position.
Note:
To sort the other television channels repeat steps 1 to 3.
Entering the channel names (maximum of 5 characters)
Program Table
00 |
|
|
05 |
PRO 7 |
10 |
WDR |
01 |
ARD |
06 |
BR 3 |
11 |
|
|
02 |
ZDF |
07 |
VOX |
12 |
|
|
03 |
RTL |
08 |
KABEL |
13 |
|
|
04 |
SAT1 |
09 |
S RTL |
14 |
|
|
|
|
|
|
|
|
|
|
|
|
|
|
● Skip |
|
OK |
|
Select |
|
|
● Move |
|
|
●i |
Exit |
|
|
● Delete |
|
|
|
|
● Name |
|||
Program Table
00 |
|
|
05 |
PRO 7 |
10 |
WDR |
01 |
ARD |
06 |
BR 3 |
11 |
|
|
02 |
ZDF |
07 |
VOX |
12 |
|
|
03 |
RTL |
08 |
KABEL |
13 |
|
|
04 |
SAT1 |
09 |
S RTL |
14 |
|
|
|
|
|
|
|
|
|
|
|
|
|
|
● Skip |
|
OK |
|
Select |
|
|
● Move |
|
|
●i |
Exit |
|
|
● Delete |
|
|
|
|
● Name |
|||
1In the »Program Table« menu, select the desired channel with »P+«, »P-«, » « or » «.
2Highlight the channel with »F« (blue).
3Select letters or numbers with »P+« or »P-«, move to the next position with » « or » « and repeat.
4Store the channel name with »F« (blue).
Note:
To enter additional channel names, repeat steps 1 to 4.
Skipping television channels
You can mark television channels which should be skipped during selection with »P+« or »P-«. A selection with the number keys is also possible.
1In the »Program Table« menu, select the desired channel with »P+«, »P-«, » « or » «.
2Highlight the channel with »z« (red).
–The television channel is now displayed against a red background.
–You can deselect the selected channel by pressing the red button again.
Concluding the settings
1 Press »i« to finish the settings.
10
Picture
Brightness
Contrast
Colour
Sharpness
SETTINGS ______________________________________________
Picture settings
1Press »i« to open the »Main Menu«.
–The »Main Menu« appears.
2Select »Picture« with »P+« or »P-« and confirm with »OK«.
–The »Picture« menu appears.
3Select »Brightness«, »Contrast«, »Colour« or »Sharpness« with
« or » «.»P+« or »P-« and adjust them with »
4 Press »i« to finish the settings.
|
|
|
|
|
|
|
|
OK |
|
|
●i Exit |
|
|
● Back |
ENGLISH
11

|
|
|
TV |
|
|
|
DVD |
|
|
|
ZOOM |
|
|
|
PROGRAM |
GO TO |
|
|
DVD MENU |
|
|
|
z |
DVD SETUP |
|
|
TITLE |
TXT |
|
|
AV |
|
|
SUB |
UPDATE |
|
|
|
|
|
|
|
d |
VCR |
|
|
DVD |
SAT |
|
EXT. |
|
|
|
Tele Pilot 165 C
TELEVISION OPERATION ___________________
Switching on and off
1Switch on the television by pressing the » « button on the television set.
2Press the » « button to switch the television to standby mode. Press »1...0« or »P+« or »P-« to switch the television back on from standby.
3Press » « on the television set to switch it off completely.
– This saves electricity.
Selecting channels
1Select channel positions directly with »1...0«. Use »–/– – « to select two digit channel positions.
2Press »P+« or »P-« to move up and down channels.
Selecting AV channels
1 Use »AV« to select AV channels directly.
1 Adjust the volume with »– « or » +«.
Muting
1Use »p« to switch the sound off (mute) and to switch it on again.
Displaying time
1You can display the time by pressing the » « button (only for channels with teletext).
Changing the picture format
The television automatically switches to the 16:9 format, if this format is recognised via the Euro-AV socket.
1Select the picture format with »E«. The selected picture format, for example »16:9«, appears on the screen.
– You can choose between the following picture formats:
»Auto« format
The picture format is automatically switched to »16:9« for 16:9 programmes.
The picture format is automatically switched to »4:3« for 4:3 programmes.
»4:3« format
For 4:3 programmes, select picture format »4:3«.
»16:9« format
For 16:9 programmes, select picture format »16:9«.
12
 Loading...