


Operator Manual
Powdered Beverage Dispensers
PIC3, PIC33A, PIC5, PIC6
Model PIC3 

 Model PIC5 with Island Option
Table of Contents
Safety Information ............................... |
2 |
Preventative Maintenance Checklist.10 |
|
Installation............................................ |
3 |
Prepare for Shipment......................... |
11 |
Operation ............................................. |
4 |
Draining the Tank .............................. |
11 |
Cleaning................................................ |
5 |
Troubleshooting Guide ...................... |
12 |
Adjustments.......................................... |
8 |
Spare Parts .......................................... |
13 |
Maintenance......................................... |
9 |
|
|
Thank you for purchasing this quality beverage dispenser. For your safety and the safety of others, read all warnings and the operator manual before installing or using the product. Properly instruct all operators. Keep training records. For future reference, record serial number here: 
Grindmaster-Cecilware
4003 Collins Lane, Louisville, KY 40245 USA Phone: 502.425.4776 Toll Free: 800.695.4500 Fax: 502.425.4664
Web: gmcw.com Email: info@gmcw.com
Grindmaster-Cecilware provides the industry’s BEST warranty. Visit gmcw.com for warranty terms and conditions.
©2016 Grindmaster-Cecilware |
0916 Form # CC-335-06 |
Printed in USA |
Part # 390-00078 |
Safety Information
Important Safety Information
This is the safety alert symbol. It is used to alert you to potential personal injury hazards. Obey all safety messages that follow this symbol to avoid possible injury or death.
For your safety and the safety of others, read all warnings and the operator manual before installing or using the product.
DANGER: This term warns the user of imminent hazard that will result in serious injury or death.
WARNING: This term refers to a potential hazard or unsafe practice, which could result in serious injury or death. CAUTION: This term refers to a potential hazard or unsafe practice, which could result in minor or moderate injury.
NOTICE: This term refers to information that needs special attention or must be fully understood.
 WARNING
The appliance is not intended for outdoor use.
Do not clean with pressurized water or use in an area where pressurized water may be used.
Cleaning and maintenance shall be made only by properly trained persons with supervision.
Risk of electrical shock. Disconnect from power before servicing.
 CAUTION
Lifting hazard. Single person lift could cause injury. Use assistance when moving or lifting.
For safe and proper operation the appliance has to be placed in a stable, vertical position.
The appliance is not to be used by persons with reduced physical, sensory or mental capabilities, or lack of experience and knowledge, unless they have been given supervision or instruction. Be sure to provide supervision or instruction concerning use of the appliance in a safe way and understand the hazards involved.
Children must be supervised to ensure they do not play with the appliance.
The appliance is only to be installed in locations where it can be overseen by trained personnel.
Contents can cause severe burns if handled improperly.
NOTICE
To avoid damaging unit, turn on power and wait for tank to fill with water before turning on heater.
Use only on an electrical circuit that is properly protected and capable providing adequate power.
Do not use extension cord.
Do not pour liquid into tray. Failure to comply will damage the dispenser and void the warranty.
NSF requires installation of 4” legs for PIC 5 and 6.
2 |
Grindmaster® |
Powdered Beverage Dispensers |
|
|
|

Installation
 CAUTION: Lifting hazard. Single person lift could cause injury. Use assistance when moving or lifting.
Unpacking Instructions
Carefully unpack the beverage dispenser and inspect immediately for shipping damage. Your dispenser was shipped in a carton designed to give it maximum protection in normal handling. It was thoroughly inspected before leaving the factory. In case of damage, contact the shipper.
After the machine has been unpacked and placed on a counter, pull out the stainless steel drip tray. It should contain the following:
• 1/4” Flare Water Inlet Fitting.
Water Inlet Connection:
NOTICE: This equipment is to be installed to comply with the applicable Federal, State, or local plumbing codes having jurisdiction. In addition:
1.A quick disconnect water connection or enough extra coiled tubing (at least 2x the depth of the unit) so that the machine can be moved for cleaning underneath.
2.An approved backflow prevention device, such as a double check valve to be installed between the machine and the water supply.
The dispenser is equipped with a ¼" Flare Water Inlet fitting which is located on the left side in the back of the base (when looking at the machine from the front).
Water pipe connecting and fixtures directly connected to a potable water supply shall be sized, installed, and maintained in accordance with Federal, State, and Local codes.
HIGHLY RECOMMENDED:
A WATER SHUT-OFF VALVE and A WATER FILTER, preferably a combination Charcoal/Phosphate Filter, to remove odors and inhibit lime and scale build up in the machine.
Note: In areas with extremely hard water, a water softener must be installed in order to prevent mineral deposits that could result in malfunctioning of the equipment and in order not to void the warranty.
1.Install legs if equipped (PIC5 and PIC6).
2.Install drip tray in front of machine.
3.Connect the 1/4" male flare fitting to the inlet valve on the back of the machine.
4.Flush the water line to purge any debris from the supply line.
5.Connect a 1/4" water line to the 1/4" male flare connection and turn the water supply on.
a.Minimum water pressure to the machine: 20 psi
b.Maximum water pressure to the machine: 100 psi
6.Plug the power cord into a proper electrical outlet.
7.Turn the power switch to the “ON” position and allow the water tank to fill. The machine will make a subtle hissing sound when this occurs. Allow 3-5 minutes for fill time depending on inlet water pressure.
8.After the water tank has filled, allow 15-60 minutes for the water to reach operating temperature. (Green ready light will illuminate when tank is up to preset temperature.)
9.Remove the powder hoppers, rotate the dispense elbow to the “up” position, and fill with desired powder product. IMPORTANT: Check to make sure that the auger inside the hopper is correctly installed prior to filling. Reinstall powder hoppers. Turn dispense elbow down toward the mixing funnel.
10.Peel protective film off photo merchandiser cover.
11.Install flavor decals as needed. (Place one on each hopper, and place the corresponding decal on the dispense section of the front door of the unit)
Note: If water supply is allowed to run dry, watchdog timer circuit may disable fill circuit. If this occurs, ensure adequate water supply for machine, then reset machine by turning power switch “off” for 1 second and then turning the power switch back “ON”. Watchdog timer might engage on initial fill on PIC 5 and PIC 6.
If you need help, call Grindmaster-Cecilware Technical Service Department, (502) 425-4776 or (800) 695-4500 (USA & Canada only) 8 AM - 6 PM EST.
Prior authorization must be obtained from Grindmaster-Cecilware for all warranty claims.
Powdered Beverage Dispensers |
Grindmaster® |
3 |
|
|
|
Operation
Your new dispenser is easy to operate and maintain. Before you place it in service, please have all personnel familiarize themselves with these instructions. Keep this manual in a convenient place for ready reference.
 CAUTION: Cup must rest flat on tray with a 1/4” (6 mm) clearance between cup and spout. Contents can cause severe burns if handled improperly.
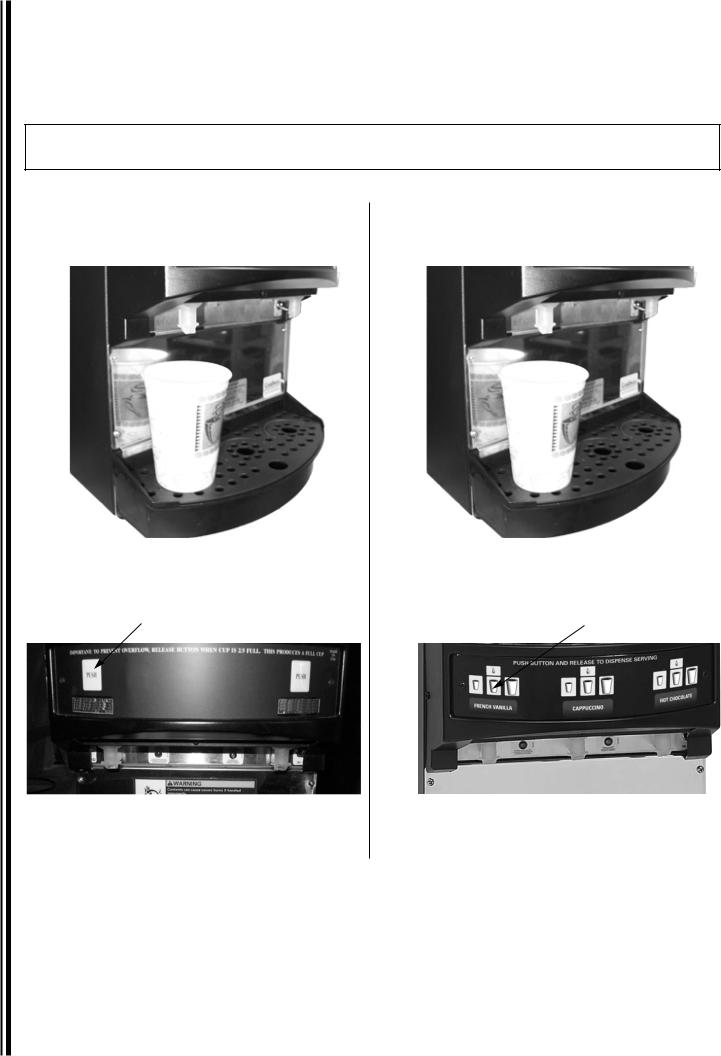
How to Dispense a Cup of Cappuccino:
Models with Manual Dispense Switches |
Models with Portion Control |
• Place a cup under selected drink dispense nozzle. |
• Place a cup under selected drink dispense nozzle. |
|
|
|
|
• Push and hold brew button until cup is 2/3 full, then release button.
Dispense Switch
• Push appropriate switch, then release to dispense one preset serving. (See Portion Control Adjustment to set portion size)
Dispense Switch
NOTE: Portion may be canceled by push and release of the switch during dispensing.
4 |
Grindmaster® |
Powdered Beverage Dispensers |
|
|
|
Cleaning
NOTICE: All sanitizing agents in the food zone must comply with 21 CFR 178.1010.
Sanitize all food dispensing units periodically. All parts to be sanitized must be cleaned first. Cleaning and sanitizing frequency must follow state and local health department regulations.
Daily maintenance:
1.Empty drip pan as needed and wash daily in a dish detergent.
2.Rinse the whipper chambers by placing the rinse switch (located to the right of the dispensing valves when the door is open) in the ON position. Dispense one to two cupfuls until the water is clear. Short bursts of dispensing may also help clean the chambers. When complete, return the rinse switch to the OFF position.
3.Remove the hoppers and refill with product.
Weekly maintenance:
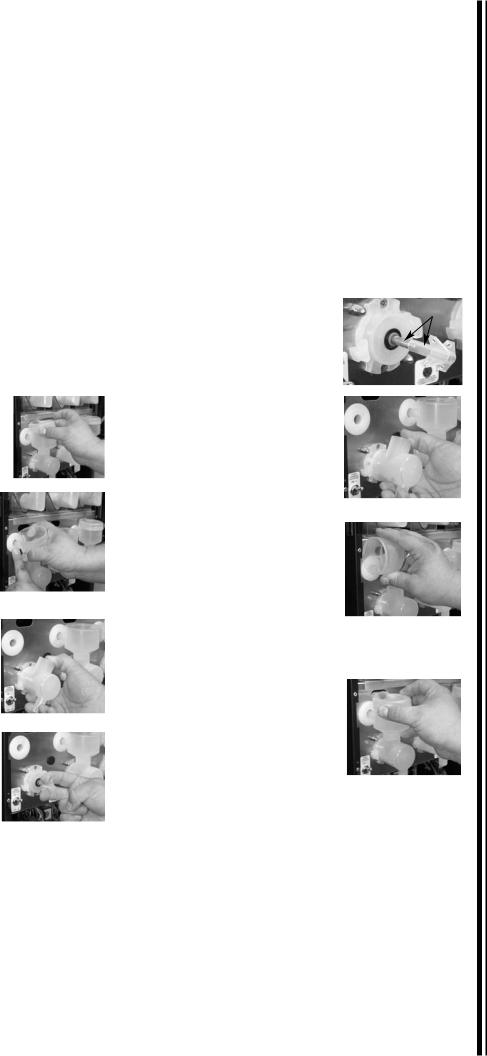
Cleaning the Chambers - Disassembly
1.Open the door and remove the mixing funnel shroud by pulling forward while turning one quarter turn to the right. Lift off and remove.
2.Remove the mixing funnel by lifting the neck of the funnel out of the whipper chamber, then tilt to the left. With one hand on the water inlet fitting on the back panel, pull the funnel out of the white ring.
3.Remove the whipper chamber by rotating it 1/8 turn to the right, then pull to remove.
4.Remove the whipper blade by grasping the whipper blade with two fingers and firmly pulling to remove.
5.Wash, rinse, sanitize, and allow parts to air dry.
Sanitizing
1.Prepare a sanitizing solution in accordance with local health department regulations. You may also refer to the US Food and Drug Administration regulation 21 CFR 178.1010 “Sanitizing Solutions” and US Environmental Protection Agency 40 CFR 18.940 “Tolerance exemptions for active and inert ingredients for use in antimicrobial formulations (Food-contact surface sanitizing solutions)”.
2.Follow the instructions provided with the sanitizing agent.
3.Let all sanitized parts drain and dry naturally. DO NOT WIPE THEM DRY.
Cleaning the Chambers - Reassembly
1. Replace the whipper blade by
lining up the flat inside the |
Flats |
|
|
blade with the flat side of the |
|
motor shaft. Push blade firmly |
|
into place. |
|
2.Replace whipper chamber by positioning the medium-sized opening up and tilting 1/8 turn to the right. Put whipper chamber over whipper blade and turn to the left until it locks into place.
3.Replace the mixing funnel by positioning the large opening up and tilt it slightly to the left. Insert the water inlet pipe into the water inlet fitting on the back panel then rotate the funnel to the right until the
neck of the funnel seats inside the whipper chamber opening.
4.Replace the shroud by placing it on the mixing funnel with the opening to the right. Turn the shroud to the left until the opening in the shroud rests inside the opening in the back panel.
Powdered Beverage Dispensers |
Grindmaster® |
5 |
|
|
|
 Loading...