


Grind’n Brew Coffee Systems®
Operation and Instruction Manual
for
Models: -10H, -11H, -20H, -21H versions
TABLE OF CONTENTS
Warning Labels . . . . . . . . . . . . . . . . . . . . . . . . . . . .3
Technical Data . . . . . . . . . . . . . . . . . . . . . . . . . .4 - 5
Unit Installation . . . . . . . . . . . . . . . . . . . . . . . . . . . .6
Water Hook-up . . . . . . . . . . . . . . . . . . . . . . . . . . . . .6
Electrical Hook-up & Start-up Procedure . . . . . . . . .7
Operating the Touchpad . . . . . . . . . . . . . . . . . . . . .7
Brewing . . . . . . . . . . . . . . . . . . . . . . . . . . . . . . . . . .8
RFID Grind Select Brewing . . . . . . . . . . . . . . . . . . .8
RFID Antenna & Tag Location . . . . . . . . . . . . .8 & 9
Bean Counter . . . . . . . . . . . . . . . . . . . . . . . . . . . . .9
User Settings . . . . . . . . . . . . . . . . . . . . . . . . . . . . .10
Pulse Brew Cycle . . . . . . . . . . . . . . . . . . . . . . . . .10
User Menu . . . . . . . . . . . . . . . . . . . . . . . . . . . . . . .10
Brew Volume Setting . . . . . . . . . . . . . . . . . . . . . . .12
System Restore Feature . . . . . . . . . . . . . . . . . . . .12
User Lockout . . . . . . . . . . . . . . . . . . . . . . . . . . . . .12
Factory/Field Test Menu . . . . . . . . . . . . . . . . . . . .13
Water System Errors . . . . . . . . . . . . . . . . . . . . . . .14
Timer Settings . . . . . . . . . . . . . . . . . . . . . . . . . . . .14
Setting the Grind . . . . . . . . . . . . . . . . . . . . . . . . . .14
Maintenance . . . . . . . . . . . . . . . . . . . . . . . . . . . . .15
Shear Plate Replacement . . . . . . . . . . . . . . . . . . .16
Air Shutter Operation . . . . . . . . . . . . . . . . . . . . . . .16
Troubleshooting Guide . . . . . . . . . . . . . . . . . . . . .17
Exploded Views . . . . . . . . . . . . . . . . . . . . . . .19 - 26
Wiring Harnesses . . . . . . . . . . . . . . . . . . . . . . . . .27
Wiring Diagram . . . . . . . . . . . . . . . . . . . . . . . . . . .28
© GMCW, 1997 PRINTED IN USA
Model Grind’n Brew-10H |
Model Grind’n Brew-11H |
|
|
Model Grind’n Brew-20H |
Model Grind’n Brew-21H |
|
|
GMCW
4003 Collins Lane Louisville, KY 40245 USA (502) 425-4776 (800) 695-4500
FAX (502) 425-4664 www.gmcw.com
Patents Pending
0713 Form # BW-354-02
Part #72074

Warning Labels
Part #71949
Located on the brew basket
Part # 70248
Located on Splash Panel
Grind’n Brew® Coffee Systems |
Page 3 |
Technical Data - Single Bean Models
|
10H |
11H |
|
|
(72078) |
(72079) |
|
|
|
|
|
Voltage |
120 |
120 |
|
|
|
|
|
Frequency |
60Hz |
60Hz |
|
|
|
|
|
Watts |
1710 |
1810 |
|
|
|
|
|
Circuit Breaker |
15 |
15 |
|
|
|
|
|
No. of Hoppers |
1 |
1 |
|
|
|
|
|
Hopper Capacity/Hopper |
5.5 lbs |
5.5 lbs |
|
Brew Capacity |
.5 gal. |
.5 gal. |
|
No. of Warmers |
0 |
1 |
|
Features |
|
|
|
|
|
|
|
Grind n Brew |
X |
X |
|
|
|
|
|
Grind Only |
X |
X |
|
|
|
|
|
Brew Only |
X |
X |
|
|
|
|
|
Half Brew |
X |
X |
|
|
|
|
|
Printed Casing |
|
|
|
|
|
|
|
Stainless Casing |
X |
X |
|
|
|
|
|
Agency Approvals |
|
|
|
|
|
|
|
U.L. Electrical |
X |
X |
|
|
|
|
|
CUL Electrical |
X |
X |
|
|
|
|
|
U.L. Sanitation |
X |
X |
|
|
|
|
|
|
|
|
|
Dimensions (H x W x D) |
31” x 9.25” x 24.25” |
26.25” x 9.25” x 24.25” |
|
(79 cm x 23 cm x 62 cm) |
(67 cm x 23 cm x 62 cm) |
||
|
|||
|
|
|
|
Weight |
65 lbs. |
65 lbs. |
|
|
|
|
|
Shipping Weight |
80 lbs. |
80 lbs. |
|
|
|
|
Page 4 |
Grind’n Brew® Coffee Systems |
Technical Data - Dual Bean Models
|
|
|
20H |
21H |
||
|
|
|
(72050/72076) |
|
(72077) |
|
|
|
|
|
|
|
|
|
Voltage |
120 |
|
120 |
|
|
|
|
|
|
|
|
|
|
Frequency |
60Hz |
60Hz |
|||
|
|
|
|
|
|
|
|
Watts |
1710 |
|
1810 |
|
|
|
|
|
|
|
|
|
|
Circuit Breaker |
15 |
|
15 |
|
|
|
No. of Hoppers |
2 |
|
2 |
|
|
|
Hopper Capacity/Hopper |
6.5 lbs |
6.5 lbs |
|||
|
Brew Capacity |
.5 gal. |
.5 gal. |
|||
|
|
|
|
|
|
|
|
No. of Warmers |
0 |
|
1 |
|
|
|
|
|
|
|
|
|
|
Features |
|
|
|
|
|
|
|
|
|
|
||
Grind n Brew |
|
X |
|
X |
|
|
|
|
|
|
|
|
|
Grind Only |
|
X |
|
X |
|
|
|
|
|
|
|
|
|
Brew Only |
|
X |
|
X |
|
|
|
|
|
|
|
|
|
Half Brew |
|
X |
|
X |
|
|
|
|
|
|
|
|
|
Printed Casing |
|
|
|
|
|
|
|
|
|
|
|
|
|
Stainless Casing |
|
X |
|
X |
|
|
|
|
|
|
|
|
|
|
Agency Approvals |
|
|
|
|
|
|
|
|
||||
U.L. Electrical |
|
X |
|
X |
|
|
|
|
|
|
|
|
|
CUL Electrical |
|
X |
|
X |
|
|
|
|
|
|
|
|
|
U.L. Sanitation |
|
X |
|
X |
|
|
|
|
|
|
|
|
|
|
|
|
|
|
||
Dimensions (H x W x D) |
|
37.5” x 9.5” x 24.25” |
|
32.75” x 9.5” x 24.25” |
|
|
|
(95 cm x 23 cm x 62 cm) |
|
(83 cm x 23 cm x 62 cm) |
|
||
|
|
|
|
|
||
|
|
|
|
|
|
|
Weight |
|
80 lbs. |
|
80 lbs. |
|
|
|
|
|
|
|
|
|
Shipping Weight |
|
95 lbs. |
|
95 lbs. |
|
|
|
|
|
|
|
|
|
Grind’n Brew® Coffee Systems |
Page 5 |
Unit Installation
IMPORTANT:This brewer should be installed by a knowledgeable and experienced commercial equipment installer.
Brewer Contents
Your brewer package should include the following: 1 Grinderbrewer (either single or dual bean)
1 Operation and Instruction Manual (this manual)
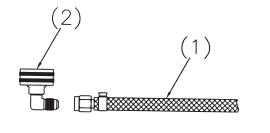
1 Hose to 1/4" flare fitting (part # 61237)
Tools Required for Installation
#2 Phillips screwdriver 9/16" wrench
5/8" wrench
(or crescent wrench) 6" level
NOTE: Other tools may be needed depending on the type of water supply tubing and location.
1.Inspect unit to see if any damage occurred in shipment.
2.Position brewer on counter. Place on sturdy permanent counter top. If you have an airpot brewer, install the 4" plastic legs (included) at the bottom of the brewer. Lean the brewer towards its side to expose screwholes underneath for legs. Adjust the leg height to suit the size of airpots you will use. IMPORTANT: Adjust the feet to level the brewer. With bubble level, check to see that the brewer is level on countertop.
Water Hook-up (All Models) (Refer to Figure A)
IMPORTANT: This equipment must be installed in compliance with applicable Federal, State and/or Local plumbing codes having jurisdiction. Incoming water pressure should be greater than 20 psi and not more than 100 psi.
1.The incoming water supply should have a shut-off valve connected in-line. The end should have a female 1/4" flare fitting. Water supply should be a 1/4" I.D. dedicated line branched off a 1" or larger supply line.
2.Prior to installing the brewer, flush out the water line by running approximately 1 gal. of water into a pail. This will insure no sediment from a new installation can get in the brewer.
3.Make sure your source water is turned off. Connect the water line’s 1/4" female flare fitting (1) to the 1/4" male fitting on the hose connector (2).
4.Make sure Grind’n Brew is unplugged. Connect the water line to the brewer with the hose connector (2).
5.Turn the water valve on, sending water to the brewer. If there are any leaks, tighten connections to stop leakage.
Figure A
PPage 6 |
Grind’n Brew® Coffee Systems |
Electrical Hook-up and Start-up Procedure (All Models)
IMPORTANT: Do not plug the unit in yet.
IMPORTANT: This equipment must be installed in compliance with applicable Federal, State and/or Local electrical codes having jurisdiction. Do not use extension cords. Make sure that the outlet the brewer plugs into is grounded.
IMPORTANT: Make sure that the Main Power Switch in the back of the unit is in the Off position before plugging in the brewer.
1.Plug the brewer into an electrical outlet.
2.Make sure the brew basket is inserted in the brew rails.
3.Reach to the back of the brewer and press the white Main Power Switch to the On position. The front control lights will go on, and water will enter the brewer. The tank will fill in 2-3 minutes from the moment the Main Power Switch is turned on.
4.Once the tank is full, it will take 10-15 minutes to heat the water to the brewing temperature. Once the Ready light is lit, you are ready to brew.
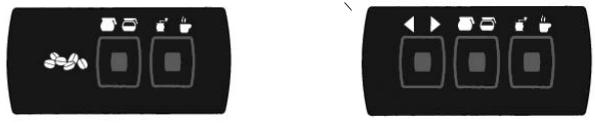
Operating the Touchpad (Refer to Figure B)
1.To select the appropriate bean hopper, press the hopper (left) button until the desired indicator arrow is illuminated.
NOTE: This step only applies to dual bean hoppers. Does not apply to RFID grind select option dual bean hoppers.
2.To select a portion size, press the center of the Portion Size (middle) button until the half pot or full pot symbol (depending on your need) is illuminated.
3.The Mode (right) button allows you to select either the “Brew Only”, “Grind Only” or “Grind and Brew” feature.
a)To grind only, press the center of the Mode (right) button until the grinder symbol is illuminated.
b)To brew only, press the center of the Mode (right) button until the coffee cup symbol is illuminated.
c)To grind and brew, press the Mode (right) button until both symbols are illuminated together.
|
|
|
Grind only |
Bean Selector |
Half or Full Pot |
Brew only |
|
(Dual Bean Models Only) |
|
|
Grind and Brew Option |
|
|
||
|
|
|
|
(Single Bean Model) |
Figure B |
|
(Dual Bean Model) |
IMPORTANT: Brewers are factory set for throw weight and water portion. Please check that installation is correct before making adjustment. No adjustments should be necessary for normal installation.
Grind’n Brew® Coffee Systems |
Page 7 |
Brewing
IMPORTANT: Brewers are factory set for the correct grind and brew times for average situations. You should not need to make adjustments in the field.
1.Make sure that a new paper filter is in the brew basket and the brew basket is in place in the brewer.
2.Place beans in the hopper.
3.Choose to “Grind and Brew”. Press the far right touchpad so “Grind and Brew” lights are lit.
4.Choose the Portion Size. Press the middle touchpad until desired volume is lit.
5.Choose Decaf or Regular coffee (only applicable to dual bean Grind’n Brews without RFID Sensor). Press left touchpad.
Arrow will either point left or right for Decaf or Regular.
6.Place a decanter or airpot under the brew basket, depending on the model.
7.Press Start. You will see the coffee bean level go down slightly. You will hear the coffee grind. Coffee is automatically ground, portioned and placed in brew basket. Then ground coffee is automatically brewed. The Ready light will now blink, indicating that grinding and brewing are in progress. This will take 3-4 minutes for a 1/2 gal. pot.
Portions are factory set. A stop function is added to the start switch. When this switch is depressed, it allows the unit to stop during the selected grind, brew or grind and brew functions.
After brewing a pot, the tank must reheat. Reheat time is 5 1/2 - 8 minutes for 120V brewers. Remember that the brewer will not function (although the grinder will) until the Ready light is on, indicating that the water is hot enough to brew. A flashing green light indicates that the brewer is reheating or that there is a cycle in progress. Do not remove the brew basket while the light is flashing. The brew basket must be removed before a new brew can be initiated. This feature ensures that the operator discards the old coffee grounds and installs a new coffee filter.
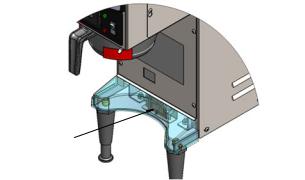
RFID Grind Select Brewing Option
1.Make sure that a new paper filter is in the brew basket and the brew basket is in place in the brewer.
2.Place beans in the hopper.
3.Choose to “Grind and Brew”. Press the far right touchpad so “Grind and Brew” lights are lit.
4.Choose the Portion Size. Press the middle touchpad until desired volume is lit.
5.Place an airpot with the RFID tag under the brew basket aligning the tag with the sensor.
6.If a valid tag is read, a light under one of the hoppers will flash indicating which hopper will be used for grinding and brewing. If satisfied with the choice press Start and the brewing cycle will begin. You will see the coffee
bean level go down slightly. You will hear the coffee grind. Coffee is automatically ground, portioned and placed in brew basket. Then ground coffee is automatically brewed. The Ready light will now blink, indicating that grinding and brewing are in progress. This will take 3-4 minutes for a 1/2 gal. pot. Portions are factory set. A stop function is added to the start switch. When this switch is depressed, it allows the unit to stop during the
selected grind, brew or grind and brew functions.
After brewing a pot, the tank must reheat. Reheat time is 5 1/2 - 8 minutes for 120V brewers. Remember that the brewer will not function (although the grinder will) until the Ready light is on, indicating that the water is hot enough to brew. A flashing green light indicates that the brewer is reheating or that there is a cycle in progress. Do not remove the brew basket while the light is flashing. The brew basket must be removed before a new brew can be initiated. This feature ensures that the operator discards the old coffee grounds and installs a new coffee filter.
5),' $17(11$ /2&$7(' %(+,1' %/$&. 75,0
Page 8 |
Grind’n Brew® Coffee Systems |
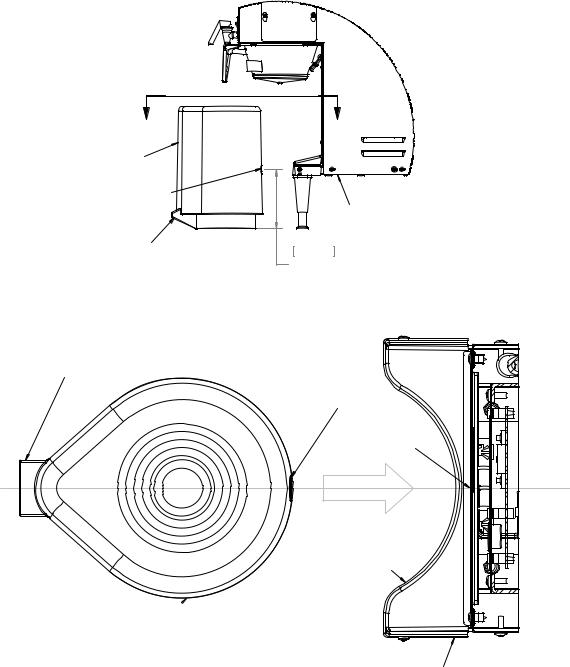
5),' 7$* /2&$7,21
% |
% |
*5$9,7< 327 |
|
5),' 7$* |
|
&(17(5(' 21 |
|
%$&. 2) 327 |
|
|
*1% |
',63(16( |
|
63287 |
PP |
)5217 |
LQ |
2) 327 |
&(17(52) |
|
5),'7$* |
',63(16( 63287
5),'
7$*
5),' $17(11$
%(+,1' 75,0
386+ *5$9,7< 327 ,172 75,0 0$.,1* &217$&772 (1685( 7+$7 7+( $17(11$ 6(16(6 7+( 7$*
75,0
*5$9,7< 327
5),' 7$* 72 %( &(17(5(' 21 %$&. 2) *5$9,7< 327 $1' $/,*1(' :,7+ 5),' $17(11$
*1%
6(&7,21 % %
Bean Counter
The built-in bean counter measures relative usage of its Grind’n Brew® machine by totaling the amount of seconds the augers have fed beans into the grinder. This number directly correlates to the amount of beans used by the machine.
Depending on model, the bean counter is either always shown or hidden to the user.
The Bean Counter Menu is accessed by holding the UP and DOWN keys for 5 seconds. If the counter is normally hidden, it will be shown here. The user can reset the counter through this menu. Pressing the SET button will display “REs” and the user can select “YEs” or “no” with the UP and DOWN keys. Pressing the SET key finalizes the selection. This menu times out after 10 seconds and is disabled by the User Lockout Jumper.
Grind’n Brew® Coffee Systems |
Page 9 |
User Settings
The Grind’n Brew® has several factory-set options that can be modified by the user. These are divided into two categories: Universal Settings or Brew Settings. Universal Settings pertain to the whole unit, and Brew Settings pertain to one of the four available brew cycles – (Regular Full, Regular Half, Decaf Full and Decaf Half). All settings are retained during a power loss. The original factory settings can be restored by using the System Restore Function.
User Settings
Universal Settings |
Brew Settings x 4 |
Temperature Scale |
Auger Time |
|
|
Water Temperature |
Pulse Brew Pulses |
|
|
Low Temp No Brew Enable |
Pulse Brew Pour Time |
|
|
|
Pulse Brew Delay Time |
|
|
|
Brew Time |
|
|
Pre-Infusion and Pulse Brew Cycle
Pulse Brewing is a feature that increases the control and performance of the Grind’n Brew® machine. By pulsing water during the brew cycle, you allow greater contact time and better extraction of the coffee. Ultimately you will achieve a bolder and more consistent cup of coffee by using this feature.
If pulse brewing is selected, the unit will brew the number of pulses identified by the Pulse Brew Pulses setting. Each pulse is identical. It will begin by dumping water for the Pulse Brew Pour Time and then wait for the Pulse Brew Delay Time. This will repeat until all pulses are finished.
Once the pulses are complete, the unit will pour water for the remaining Brew Time. Brew Time is the total amount of time water is poured over the coffee grinds. Pulse Brew Pour Times are included in this total. Pulse Brew Delay Times are not included. The cycle will always stop pouring once the Brew Time is met, regardless of whether this happens in the middle of pulse brewing.
Drip Time is half of the Brew Time. However, the Drip Time will never be greater than 1:30.
Pre-Infusion Controls - The first on cycle and the first off cycle. Independent of pulses.
User Menu
The User Menu is accessed by pressing the SET key on the display board. Navigation is accomplished by pressing the UP, DOWN and SET keys. Feedback to the user is shown by the 3-digit numerical display.
The User Menu exits after a 1 minute timeout or all modes are stepped through. This menu is disabled by the User Lockout Jumper.
Brew Settings - Brew Cycle Selection
There are four independent settings for brew cycles: Regular Full Brew, Regular Half Brew, Decaf Full Brew and Decaf Half Brew. The User Menu adjusts settings for the brew cycle selected by the keypad. For instance, if you want to change settings for Decaf Half brew then set the keypad to the Decaf Hopper and Half Brew Size before entering the User Menu. The keypad settings cannot be changed while the User Menu is displayed.
User Menu Navigation
Advancing through the menu is done by pressing the SET Key. Each parameter is adjusted by pressing the UP and DOWN keys. Pressing and holding the UP and DOWN keys will quickly scroll through settings. The table on the next page shows how to step through this menu.
Page 10 |
Grind’n Brew® Coffee Systems |
 Loading...