


Operator Manual
Grind’n Brew Coffee System®
GNB-10H |
GNB-11H |
GNB-20H |
GNB-21H |
Model: GNB-20H |
Model: GNB-10H |
|
Model: GNB-21H |
|
Model: GNB-11H |
|
|
Table of Contents |
|
|
Safety Information |
..................2 |
Cleaning and Maintenance |
..11 |
Specifications........................... |
3 |
Troubleshooting Guide......... |
13 |
Unpacking ............................... |
3 |
Parts Diagram and List.......... |
16 |
Installation............................... |
4 |
Wiring Harnesses................... |
24 |
Operation ................................ |
5 |
Wiring Diagram..................... |
25 |
User Settings............................ |
6 |
|
|
|
|
|
|
Thank you for purchasing this quality brewing system. For your safety and the safety of others, read all warnings and the operator manual before installing or using the product. Properly instruct all operators. Keep training records. For future reference, record serial number here: 
Grindmaster-Cecilware
4003 Collins Lane, Louisville, KY 40245 USA Phone: 502.425.4776 Toll Free: 800.695.4500 Fax: 502.425.4664
Web: gmcw.com Email: info@gmcw.com
Grindmaster-Cecilware provides the industry’s BEST warranty. Visit gmcw.com for warranty terms and conditions.
©2016 Grindmaster-Cecilware |
0516 Form # BW-354-03 |
Printed in USA |
Part # 390-00062 |
Safety Information
Important Safety Information
This is the safety alert symbol. It is used to alert you to potential personal injury hazards. Obey all safety messages that follow this symbol to avoid possible injury or death.
For your safety and the safety of others, read all warnings and the operator manual before installing or using the product.
DANGER: This term warns the user of imminent hazard that will result in serious injury or death.
WARNING: This term refers to a potential hazard or unsafe practice, which could result in serious injury or death. CAUTION: This term refers to a potential hazard or unsafe practice, which could result in minor or moderate injury.
NOTICE: This term refers to information that needs special attention or must be fully understood.
 WARNING
To reduce risk of electrical shock, do not remove side panels. No user-serviceable parts inside. Repair should be done by authorized service personnel only.
The appliance is not intended for outdoor use.
Do not clean with pressurized water or use in an area where pressurized water may be used.
Cleaning and maintenance shall be made only by properly trained persons with supervision.
Do not remove decanter or airpot while product is brewing.
This appliance is not intended for use by persons with reduced physical, sensory, or mental capabilities, or lack of experience and knowledge, unless they have been given supervision or instruction concerning use of the appliance by a person responsible for their safety.
Children should be supervised to ensure that they do not play with the appliance.
Do not alter or deform the power cord or plug in any way! Altering or deforming the plug may cause electrical shock, damage unit, and will void warranty.
To reduce risk of expolsion or fire, do not use near combustibles.
 CAUTION
Lifting hazard. Single person lift could cause injury. It is recommended that moving or lifting the unit be done by two people to avoid injury.
For safe and proper operation, the appliance must be placed in a stable, vertical position.
To reduce risk of serious burns, or scalding, do not place hand or other body parts under dispenser or container while product is brewing.
Personal injury hazard. Keep fingers, hands, and foreign objects out of hopper.
Always unplug unit from power supply before servicing.
Hot liquid in brew basket could cause burns. Remove with care.
Warmers and surfaces are hot and can cause burns.
NOTICE
Use only on a circuit that is properly protected and capable of the rated load.
Electrically Ground the chassis.
Follow national and local electrical codes.
Do not use extension cord.
GB2 Series |
®® |
Grind’n Brew2 |
GrindmastCecilwarer |

Specifications
|
SINGLE BEAN MODELS |
|
DUAL BEAN MODELS |
|
|||
|
10H |
11H |
20H |
21H |
|||
Dimensions |
31” x 9.25” x 24.25” |
26.25” x 9.25” x 24.25” |
37.5” x 9.5” x 24.25” |
32.75” x 9.5” x 24.25” |
|||
(H x W x D) |
(79 cm x 23 cm x 62 cm) |
(67 cm x 23 cm x 62 cm) |
(95 cm x 23 cm x 62 cm) |
(83 cm x 23 cm x 62 cm) |
|||
Electrical |
120V / 1710W / 15A / 1 PH |
120V / 1810W / 15A / 1 PH |
120V / 1710W / 15A / 1 PH |
120V / 1810W / 15A / 1 PH |
|||
|
|
|
|
|
|||
Circuit NEMA |
5-15R |
5-15R |
5-15R |
5-15R |
|||
No. of Hoppers |
1 |
|
1 |
|
2 |
2 |
|
Hopper Capacity |
5.5 lbs |
5.5 lbs |
6.5 lbs |
6.5 lbs |
|||
Per Hopper |
2.5 kg |
2.5 kg |
3 kg |
3 kg |
|||
Brew Capacity |
0.5 gal |
0.5 gal |
0.5 gal |
0.5 gal |
|||
|
1.9 |
L |
1.9 |
L |
1.9 L |
1.9 |
L |
|
|
|
|
|
|
|
|
No. of Warmers |
0 |
|
1 |
|
0 |
1 |
|
Weight |
65 bs |
65 lbs |
80 lbs |
80 lbs |
|||
|
29 kg |
29 kg |
26 kg |
36 kg |
|||
|
|
|
|
|
|
|
|
|
|
|
|
|
|
|
|
Features |
|
|
|
|
|
|
|
|
|
|
|
|
|
|
|
Grind n Brew |
X |
|
X |
|
X |
X |
|
Grind Only |
X |
|
X |
|
X |
X |
|
Brew Only |
X |
|
X |
|
X |
X |
|
Half Brew |
X |
|
X |
|
X |
X |
|
|
|
|
|
|
|
|
|
Stainless Casing |
X |
|
X |
|
X |
X |
|
Unpacking
Unpacking Instructions
Carefully unpack the machine and inspect immediately for shipping damage. The packaging may contain unattached parts. Your machine was shipped in a carton designed to give it maximum protection in normal handling. It was thoroughly inspected before leaving the factory. In case of damage, contact the shipper, not Grindmaster-Cecilware.
Grind’n Brew |
Grindmaster® |
3 |
|
|
|
Installation
Mechanical Installation
 CAUTION: Lifting hazard. Single person lift could cause injury. It is recommended that moving or lifting the unit be done by two people to avoid injury.
NOTICE: This brewer should be installed by a knowledgeable and experienced commercial equipment installer.
Brewer Contents
Your brewer package should include the following: 1 Grind’n Brew (either single or dual bean)
1 Operation and Instruction Manual (this manual)
1 Hose to 1/4" flare fitting (part # 61237)
Tools Required for Installation #2 Phillips screwdriver
9/16" wrench
5/8" wrench (or adjustable wrench) 6" level
Note: Other tools may be needed depending on the type of water supply tubing and location.
1.Inspect unit to see if any damage occurred in shipment.
2.Position brewer on counter. Place on sturdy permanent counter top. If you have an airpot brewer, install the 4" (10 cm) plastic legs (included) at the bottom of the brewer. Lean the brewer towards its side to expose screw holes underneath for legs. Adjust the leg height to suit the size of airpots you will use.
NOTICE: Adjust the feet to level the brewer. With bubble level, check to see that the brewer is level on countertop.
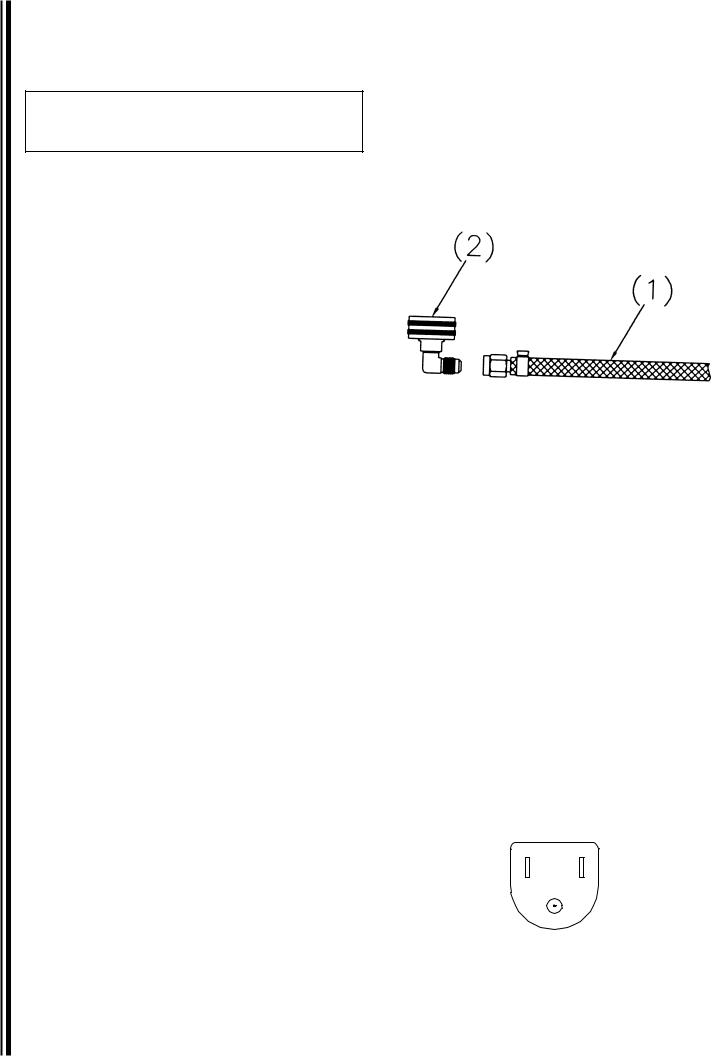
Water Hook-up (Refer to Figure A)
NOTICE: This equipment must be installed in compliance with applicable Federal, State and/or Local plumbing codes having jurisdiction. This product requires an approved back flow prevention water device, such as a double check valve, to be installed between the machine and the water supply. Incoming pressure should be greater than 20 psi and not more than 100 psi.
1.The incoming water supply should have a shut-off valve connected in-line. The end should have a female 1/4" flare fitting. Water supply should be a 1/4" I.D. dedicated line branched off a 1" or larger supply line.
2.Prior to installing the brewer, flush out the water line by running approximately 1 gal. (3.8 L) of water into a pail. This will ensure no sediment from a new installation can get in the brewer.
3.Make sure your source water is turned off. Connect the water line’s 1/4" female flare fitting (1) to the 1/4" male fitting on the hose connector (2).
4.Make sure Grind’n Brew is unplugged. Connect the water line to the brewer with the hose connector
(2).
5.Turn the water valve on, sending water to the brewer. If there are any leaks, tighten connections to stop leakage.
Figure A
Electrical Hook-up and Start-up Procedure (Refer to Figure B)
NOTICE: This equipment must be installed in compliance with applicable Federal, State and/or Local electrical codes having jurisdiction. Do not use extension cords. Make sure that the outlet the brewer plugs into is grounded.
Important: Do not plug the unit in yet. Make sure that the Main Power Switch in the back of the unit is in the Off position before plugging in the brewer.
1. Plug the brewer into an electrical outlet.
2.Make sure the brew basket is inserted in the brew rails.
3.Reach to the back of the brewer and press the white Main Power Switch to the On position. The front control lights will go on, and water will enter the brewer. The tank will fill in 2-3 minutes from the moment the Main Power Switch is turned on.
4.Once the tank is full, it will take 10-15 minutes to heat the water to the brewing temperature. Once the Ready light is lit, you are ready to brew.
NEMA 5-15P
Figure B
4 |
Grindmaster® |
Grind’n Brew |
|
|
|
Operation
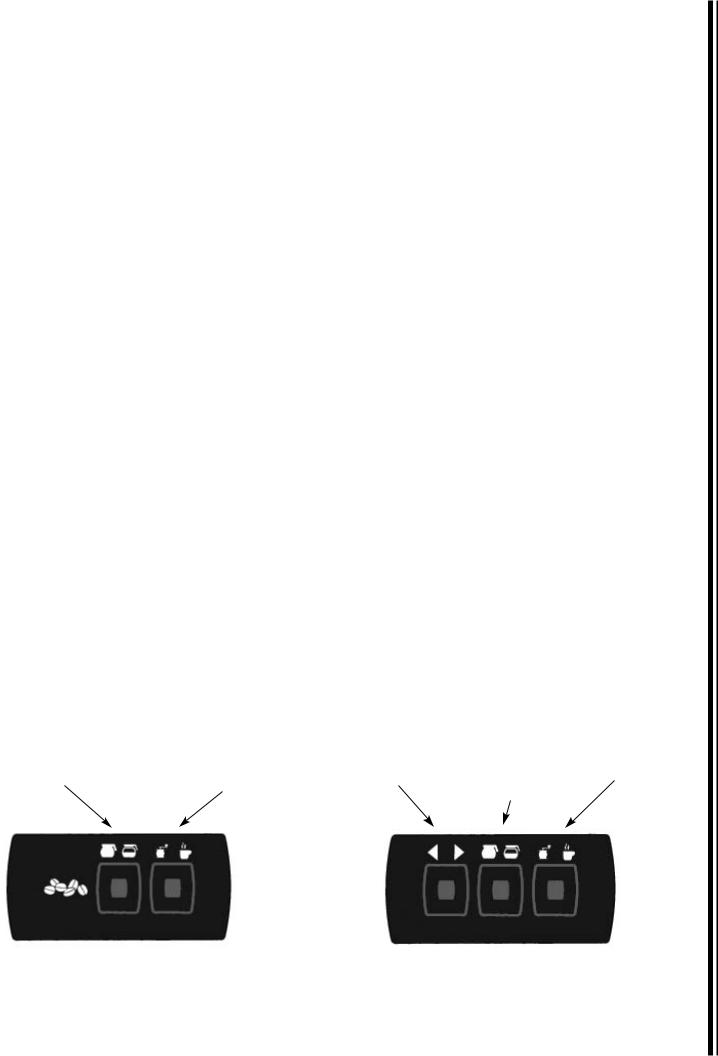
Operating the Touchpad (Refer to Figure C)
1.To select the appropriate bean hopper, press the hopper (left) button until the desired indicator arrow is illuminated.
NOTE: This step only applies to dual bean hoppers.
2.To select a portion size, press the center of the Portion Size (middle) button until the half pot or full pot symbol (depending on your need) is illuminated.
3.The Mode (right) button allows you to select either the “Brew Only”, “Grind Only”, or “Grind and Brew” feature.
a)To grind only, press the center of the Mode (right) button until the grinder symbol is illuminated.
b)To brew only, press the center of the Mode (right) button until the coffee cup symbol is illuminated.
c)To grind and brew, press the Mode (right) button until both symbols are illuminated together.
Important: Brewers are factory set for throw weight and water portion. Please check that installation is correct before making adjustment. No adjustments should be necessary for normal installation.
Brewing
Important: Brewers are factory set for the correct grind and brew times for average situations. You should not need to make adjustments in the field.
1.Make sure that a new paper filter is in the brew basket and the brew basket is in place in the brewer.
2.Place beans in the hopper.
3.Choose to “Grind and Brew”. Press the far right touchpad so “Grind and Brew” lights are lit.
4.Choose the Portion Size. Press the middle touchpad until desired volume is lit.
5.Choose Decaf or Regular coffee (only applicable to dual bean Grind’n Brews). Press left touchpad. Arrow will either point left or right for Decaf or Regular.
6.Place a decanter or airpot under the brew basket, depending on the model.
7.Press Start and the brewing cycle will begin.
8.You will see the coffee bean level go down slightly. You will hear the coffee grind. Coffee is automatically ground, portioned and placed in brew basket. Then ground coffee is automatically brewed. The Ready light will now blink, indicating that grinding and brewing are in progress. This will take 3-4 minutes for a 1/2 gal. (1.9 L) pot. Portions are factory set. A stop function is added to the start switch. When this switch is depressed, it allows the unit to stop during the selected grind, brew, or grind and brew functions.
After brewing a pot, the tank must reheat. Reheat time is 5 1/2 - 8 minutes for 120V brewers. Remember that the brewer function is disabled until the Ready light is on, indicating that the water is hot enough to brew. A flashing green light indicates that the brewer is reheating or that there is a cycle in progress. Do not remove the brew basket while the light is flashing. The brew basket must be removed before a new brew can be initiated. This feature ensures that the operator discards the old coffee grounds and installs a new coffee filter.
|
Grind only |
Bean Selector |
Grind only |
|
|
Brew only |
|||
|
Brew only |
(Dual Bean |
||
Half or Full Pot |
Grind and Brew Option |
|||
Grind and Brew Option |
Models Only) |
|||
Half or Full Pot |
||||
|
|
|
|
(Single Bean Model) |
(Dual Bean Model) |
|
Figure C |
|
|
|
|
Grind’n Brew |
Grindmaster® |
5 |
|
|
|

Operation (continued)
Bean Counter
The built-in bean counter measures relative usage of its Grind’n Brew® machine by totaling the amount of seconds the augers have fed beans into the grinder. This number directly correlates to the amount of beans used by the machine.
Depending on model, the bean counter is either always shown or hidden to the user.
The Bean Counter Menu is accessed by holding the UP and DOWN keys for 5 seconds. If the counter is normally hidden, it will be shown here. The user can reset the counter through this menu. Pressing the SET button will display “REs” and the user can select “YEs” or “no” with the UP and DOWN keys. Pressing the SET key finalizes the selection. This menu times out after 10 seconds and is disabled by the User Lockout Jumper.
User Settings
The Grind’n Brew® has several factory-set options that can be modified by the user. These are divided into two categories: Universal Settings or Brew Settings. Universal Settings pertain to the whole unit, and Brew Settings pertain to one of the four available brew cycles
– (Regular Full, Regular Half, Decaf Full, and Decaf Half). All settings are retained during a power loss. The original factory settings can be restored by using the
System Restore Function.
Universal Settings |
Brew Settings x 4 |
Temperature Scale |
Auger Time |
|
|
Water Temperature |
Pulse Brew Pulses |
|
|
Low Temp No Brew Enable |
Pulse Brew Pour Time |
|
|
|
Pulse Brew Delay Time |
|
|
|
Brew Time |
|
|
Pre-Infusion and Pulse Brew Cycle
Pulse Brewing is a feature that increases the control and performance of the Grind’n Brew® machine. By pulsing water during the brew cycle, you allow greater contact time and better extraction of the coffee. Ultimately you will achieve a bolder and more consistent cup of coffee by using this feature.
If pulse brewing is selected, the unit will brew the number of pulses identified by the Pulse Brew Pulses setting. Each pulse is identical. It will begin by dumping water for the Pulse Brew Pour Time and then wait for the Pulse Brew Delay Time. This will repeat until all pulses are finished.
Once the pulses are complete, the unit will pour water for the remaining Brew Time. Brew Time is the total
amount of time water is poured over the coffee grinds. Pulse Brew Pour Times are included in this total. Pulse Brew Delay Times are not included. The cycle will always stop pouring once the Brew Time is met, regardless of whether this happens in the middle of pulse brewing.
Drip Time is half of the Brew Time. However, the Drip Time will never be greater than 1 minute, 30 seconds.
Pre-Infusion Controls - The first on cycle and the first off cycle. Independent of pulses.
User Menu
The User Menu is accessed by pressing the SET key on the display board. Navigation is accomplished by pressing the UP, DOWN and SET keys. Feedback to the user is shown by the 3-digit numerical display.
The User Menu exits after a 1 minute timeout or all modes are stepped through. This menu is disabled by the User Lockout Jumper.
Brew Settings - Brew Cycle Selection
There are four independent settings for brew cycles: Regular Full Brew, Regular Half Brew, Decaf Full Brew, and Decaf Half Brew. The User Menu adjusts settings for the brew cycle selected by the keypad. For instance, if you want to change settings for Decaf Half brew, then set the keypad to the Decaf Hopper and Half Brew Size before entering the User Menu. The keypad settings cannot be changed while the User Menu is displayed.
User Menu Navigation
Advancing through the menu is done by pressing the SET Key. Each parameter is adjusted by pressing the UP and DOWN keys. Pressing and holding the UP and DOWN keys will quickly scroll through settings. The table on the next page shows how to step through this menu.
6 |
Grindmaster® |
Grind’n Brew |
|
|
|

User Settings (continued)
User Menu Chart
Step |
|
Setting |
Display |
Adjustments |
|
|
|
|
|
|
|
|
|
|
Displays the current |
|
|
1 |
Temperature Scale between °F or °C |
selection. Factory default |
“°F” or “°C” |
||
|
|
|
is “°F” |
|
|
|
|
|
|
|
|
|
|
Water Temperature |
Displays the current |
“170” to “205” °F |
|
2 |
|
selection. Factory default is “195” in °F or “91” |
|||
|
setpoint in °F or °C |
“77” to “96” °C |
|||
|
|
in °C. |
|||
|
|
|
|
||
|
|
|
|
|
|
|
|
Show Auger Time |
|
|
|
3 |
the amount of coffee beans fed into |
“At” |
None |
||
|
|
the grinder |
|
|
|
|
|
|
|
|
|
|
|
Set Auger Time |
Displays the current |
|
|
4 |
the amount of coffee beans fed into |
“0.1” to “45.0” seconds |
|||
selection depending on Brew Cycle |
|||||
|
|
the grinder |
|
||
|
|
|
|
||
|
|
|
|
|
|
|
|
Show Brew Time |
|
|
|
5 |
Total amount of pour time for the brew |
“br” |
None |
||
|
|
cycle |
|
|
|
|
|
|
|
|
|
|
|
Set Brew Time |
Displays the current |
“0.01” to “6.00” in |
|
6 |
Total amount of pour time for the brew |
||||
selection depending on Brew Cycle |
minutes.seconds |
||||
|
|
cycle |
|||
|
|
|
|
||
|
|
|
|
||
7 |
Show Pre-Infusion on |
“Pre-Infusion on” |
None |
||
|
|
|
|
||
8 |
Set Pre-Infusion on time |
Displays the current selection of on time |
“Off” to “2.00” minutes |
||
|
|
|
|
||
9 |
Show Pre-Infusion off |
“Pre-Infusion off” |
|
||
|
|
|
|
||
10 |
Set Pre-Infusion off time |
Displays the current selection of off time |
“5 seconds” to “1 minute” |
||
|
|
|
|
|
|
11 |
|
Show Pulse Brew |
“P-b” |
None |
|
|
|
|
|
||
|
Pulse Brew Pulse Number |
Displays the current |
|
||
12 |
sets the number of pulses in the brew |
“OFF” to “10” |
|||
selection depending on Brew Cycle |
|||||
|
|
cycle |
|
||
|
|
|
|
||
|
|
|
|
||
|
Pulse Brew Pour Time |
Displays the current |
“0.05” to “1.00” in |
||
13 |
sets the amount of pour time in each |
||||
selection depending on Brew Cycle |
minutes.seconds |
||||
|
|
pulse |
|||
|
|
|
|
||
|
|
|
|
||
|
Pulse Brew Delay Time |
Displays the current |
“0.05” to “1.00” in |
||
14 |
sets the amount of delay time |
||||
selection depending on Brew Cycle |
minutes.seconds |
||||
|
|
between each pulse |
|||
|
|
|
|
||
|
|
|
|
||
15 |
Show Low Temp No Brew |
“Ltn” |
None |
||
|
|
|
|
|
|
|
Set Low Temp No Brew |
Displays the current |
|
||
16 |
selection. Factory default |
“OFF” or “ON” |
|||
|
enable or disable |
||||
|
|
is “YEs” |
|
||
|
|
|
|
||
|
|
|
Grind only |
|
|
Bean Selector |
Half or Full Pot |
Brew only |
|
||
(Dual Bean Models Only) |
Grind and Brew Option |
|
|||
The settings selected on the touchpad directly correspond to what is being adjusted on the display.
(Dual Bean Model)
Grind’n Brew |
Grindmaster® |
7 |
|
|
|

User Settings (continued)
Brew Volume Setting Menu
This feature sets the brew time based on water volume of a desired container. Before using this feature, remove the brew basket, remove the spray head and place the desired container in place underneath the brewer.
The Brew Volume Setting Menu is started by selecting a brew cycle and holding in the START switch for 5 seconds. The display will show “Pro” at this time. Again press the START switch, and water will begin dispensing into the container. The display shows a Brew Time count at this time. When satisfied with the water level, again press the START switch. At this point the Brew Time flashes on the display for 20 seconds. Press the START switch again within the 20 seconds to accept the new Brew Time. No changes will be made if the Brew Time is not confirmed in this last step.
There are four independent brew times in the unit. The set Brew Time is the cycle shown on the keypad. The keypad cannot be modified while setting the brew volume. This feature is disabled by the User Lockout Jumper.
System Restore Feature
This function will restore a Grind’n Brew® unit to its original factory settings. To activate system restore, power on the unit while holding in the DOWN button.
Continue holding the DOWN button and the display will scroll “rEStorE” to indicate that a system restore is about to happen. If the DOWN button is released at this point, the restore is cancelled. If the button hold is continued, the display will scroll “donE” to show completion of a system restore.
Upon a successful restore, the original factory settings will override all changes. The bean counter is not affected.
User Lockout
User Lockout is achieved via the position of the LOCK jumper on the board header. Locate the header on the board (shown below) and place the jumper in the desired position. In the Locked position all menus in this document are locked out, and the unit will only allow brewing or grinding functions. There are two versions of the header, 10 pin and 2 pin. Both configurations are shown below.
10 Pin Version |
|
|
|
Locked |
User |
|
|
Lockout |
|
|
Jumper |
1 |
LOCK |
|
|
Unlocked |
|
1 |
LOCK |
|
2 Pin Version |
|
|
|
Locked |
|
|
LOCK |
|
|
Unlocked |
|
|
LOCK |
|
User Lockout Jumper
8 |
Grindmaster® |
Grind’n Brew |
|
|
|

User Settings (continued)
Factory/Field Test Menu
This menu is intended to check product functionality both at the end of the factory line and in the field. This mode is entered by pressing and holding the DOWN key on the display board and Full/Half key on the keypad for 10 seconds. Once the menu is entered, the unit will start with an LED test that lights all LEDs and segments on the display. Navigation is done just like the User Menu. Refer to the table below for operation. Field Test Mode exits after stepping through all modes only – there is not a timeout.
Step |
Function |
Operation |
Description |
|
|
|
|
1 |
LED Test |
All LEDs ON |
Verify that all LEDs turn on. |
|
|
|
|
2 |
Firmware Version |
Display firmware version |
Shows the software version of the control. |
|
|
|
|
3 |
Date Code |
Display date code/serial ID |
Not used with Grind’n Brew® |
|
|
|
|
4 |
Non Resetable Bean |
Scroll non-resetable bean counter |
Shows the total number of seconds the |
|
Counter |
|
grinder has been grinding (non-resetable) |
|
|
|
|
5 |
Configuration Inputs |
Each digit of the display corresponds to a |
Highest Digit (left most): |
|
|
configuration input. The input is either |
“1” - Double Hopper; |
|
|
“0” - disabled or “1” - enabled. |
“0” - Single Hopper |
|
|
|
Middle Digit (center): |
|
|
|
“1” - Always show bean count; |
|
|
|
“0” - Don’t show bean count |
|
|
|
Lowest Digit (right most): |
|
|
|
“1” - Grind’n Brew® Model; |
|
|
|
“0” - Grind Only Model |
|
|
|
|
6 |
Display Water |
Show averaged A/D (Analog/Digital) |
Show the current temperature in °F of the |
|
Temperature |
reading of temperature |
thermistor |
|
|
|
|
7 |
Display Water Level 1 |
Show averaged A/D reading of water level 1 |
If > 500 water level full, |
|
|
|
If < 500 water level not full |
|
|
|
|
8 |
Display Water Level 2 |
Show averaged A/D reading of water level 2 |
Not used with Grind’n Brew® |
|
|
|
|
9 |
Show Input |
Display scrolls “InPut” |
Input Test Mode |
|
|
|
|
10 |
Input Test |
Press each key and the display will show a |
Hopper Button: 12 |
|
|
number related to that key |
Size Button: 10 |
|
|
|
Grind/Brew Button: 8 |
|
|
|
Down Button: 0 |
|
|
|
Up Button: 2 |
|
|
|
Start Switch: 16 |
|
|
|
Basket Out Switch: 17 |
|
|
|
Select Button: advances Factory Test to |
|
|
|
Step 11 |
|
|
|
|
11 |
Show Output |
Display scrolls “outPut” |
Output Test Mode |
|
|
|
|
12 |
Output Test |
Turns on each relay separately. Displays |
Scroll through relay outputs with the UP |
|
|
“O##“ where: |
and DOWN keys. Outputs are as follows: |
|
|
## = 2 digit output number |
|
|
|
|
O01: Fill Valve |
|
|
IMPORTANT: Each output will be turned |
O02: Brew Valve |
|
|
ON when its number is on the display |
O03: N/A |
|
|
REGARDLESS of temperature or fill |
O04: Left Auger Motor |
|
|
level. Be CAREFUL not to overfill the |
O05: Right Auger Motor |
|
|
tank and keep electric items out of the |
O06: not used |
|
|
way of the brew channel. |
O07: Heater |
|
|
|
O08: Grinder Motor |
|
|
|
O09: Basket Out Light |
|
|
|
O10: Ready Light |
|
|
|
|
Grind’n Brew |
Grindmaster® |
9 |
|
|
|
 Loading...