

Page 1

PIX:XP
MEDIA INTERCHANGE TOOL
FOR PROFILE XP MEDIA PLATFORM
User Guide
SOFTWARE VERSION 1.0
071-8174-01
MARCH 2003
20 March 2003 PIX:XP User Guide 1
Page 2

Copyright Copyright © 2003 T homson Broa dcas t and Media Solu tio ns, Inc . Al l righ ts reser ve d. Print ed in
the United Sta tes of America.
This document may not be copied in whole or in part, or otherwise reproduced except as
specifically permitted under U.S. copyright law, without the prior written consent of Thomson
Broadcast and Medi a Solutions, Inc., P.O. Box 59900, Nevada City, California 95959-7 900
Trademarks Grass Valley, Profile, and Profile XP are either registered trademarks or trademarks of
Thomson Broadcast and Media Solutions, Inc. in the United States and/or other countries.
Other trademarks used in this document are either registered trademarks or trademarks of the
manufacturers or vendors of the associated products. Thomson Broadcast and Media
Solutions, Inc. products are covered by U.S. and foreign patents, issued and pending.
Additional information regarding Thomson Broadcast and Media Solutions, Inc. trademarks
and other proprietary rights may be fo und at www.thomsongra ssvalley.com.
Disclaimer Product options and specifications subject to change without notice. The information in this
manual is furnished for informational use only , is subject to change without not i ce, and should
not be construed as a commitment by Thomson Broa dcast and Medi a Solutio ns, Inc. T homson
Broadcast and Media Solutions, Inc. assumes no responsibility or liability for any errors or
inaccuracie s that may appear in this publ i cation.
U.S. Government
Restricted Rights
Legend
Use, duplicat ion, o r disclos ure by t he United States Governme nt is subj ect to res tricti ons as set
forth in subparagraph (c)(1)(ii) of the Ri ghts in Technical Data and Computer Software clau se
at DFARS 252.277-7013 or in subparagraph c(1) and (2) of the Commercial Computer
Software Restricted Rights clause a t FAR 52.227- 19, as applicable. Manufa cturer is Thomson
Broadcast and Media Solutions, Inc., P.O. Box 59900, Nevada City, California 95959-7900
U.S.A.
Revision Status
Rev Date Description
August 22, 2002 Initial rel ease of the PIX:XP User Guide.
071-8174-00.
March 20, 2003 Revised to include new licensing information.
071-8174-01.
2 PIX:XP User Guide 20 March 2003
Page 3

Contents
Chapter 1 Introduction
What is PIX:XP?...................................................................................................................5
System requirements...........................................................................................................5
Licensing..............................................................................................................................7
About this manual.................................................................................................................7
Chapter 2 Using PIX:XP
Simple workflow example.....................................................................................................9
Animated sequence example.............................................................................................15
Chapter 3 Reference
Supported file formats ........................................................................................................19
Supported Profile systems.................................................................................................19
Supported video formats and image sizes.........................................................................20
Supported audio formats....................................................................................................20
20 March 2003 PIX:XP User Guide 3
Page 4

4 PIX:XP User Guide 20 March 2003
Page 5
Chapter
1
Introduction
What is PIX:XP?
PIX:XP, the Profile Image eXchange XP - Image, Audio, and Animation Interchange
Tool for the Profile XP Media Platform, is a software application that allows you to
re-purpose Windows media such as still images, animations, and .wav format audio
to media you can use on your Profile XP Media Platform. It does this by converting
the Windows media into Pr ofile PDRMovi e for mat and trans ferri ng it t o your Pr ofile
system.
System requirements
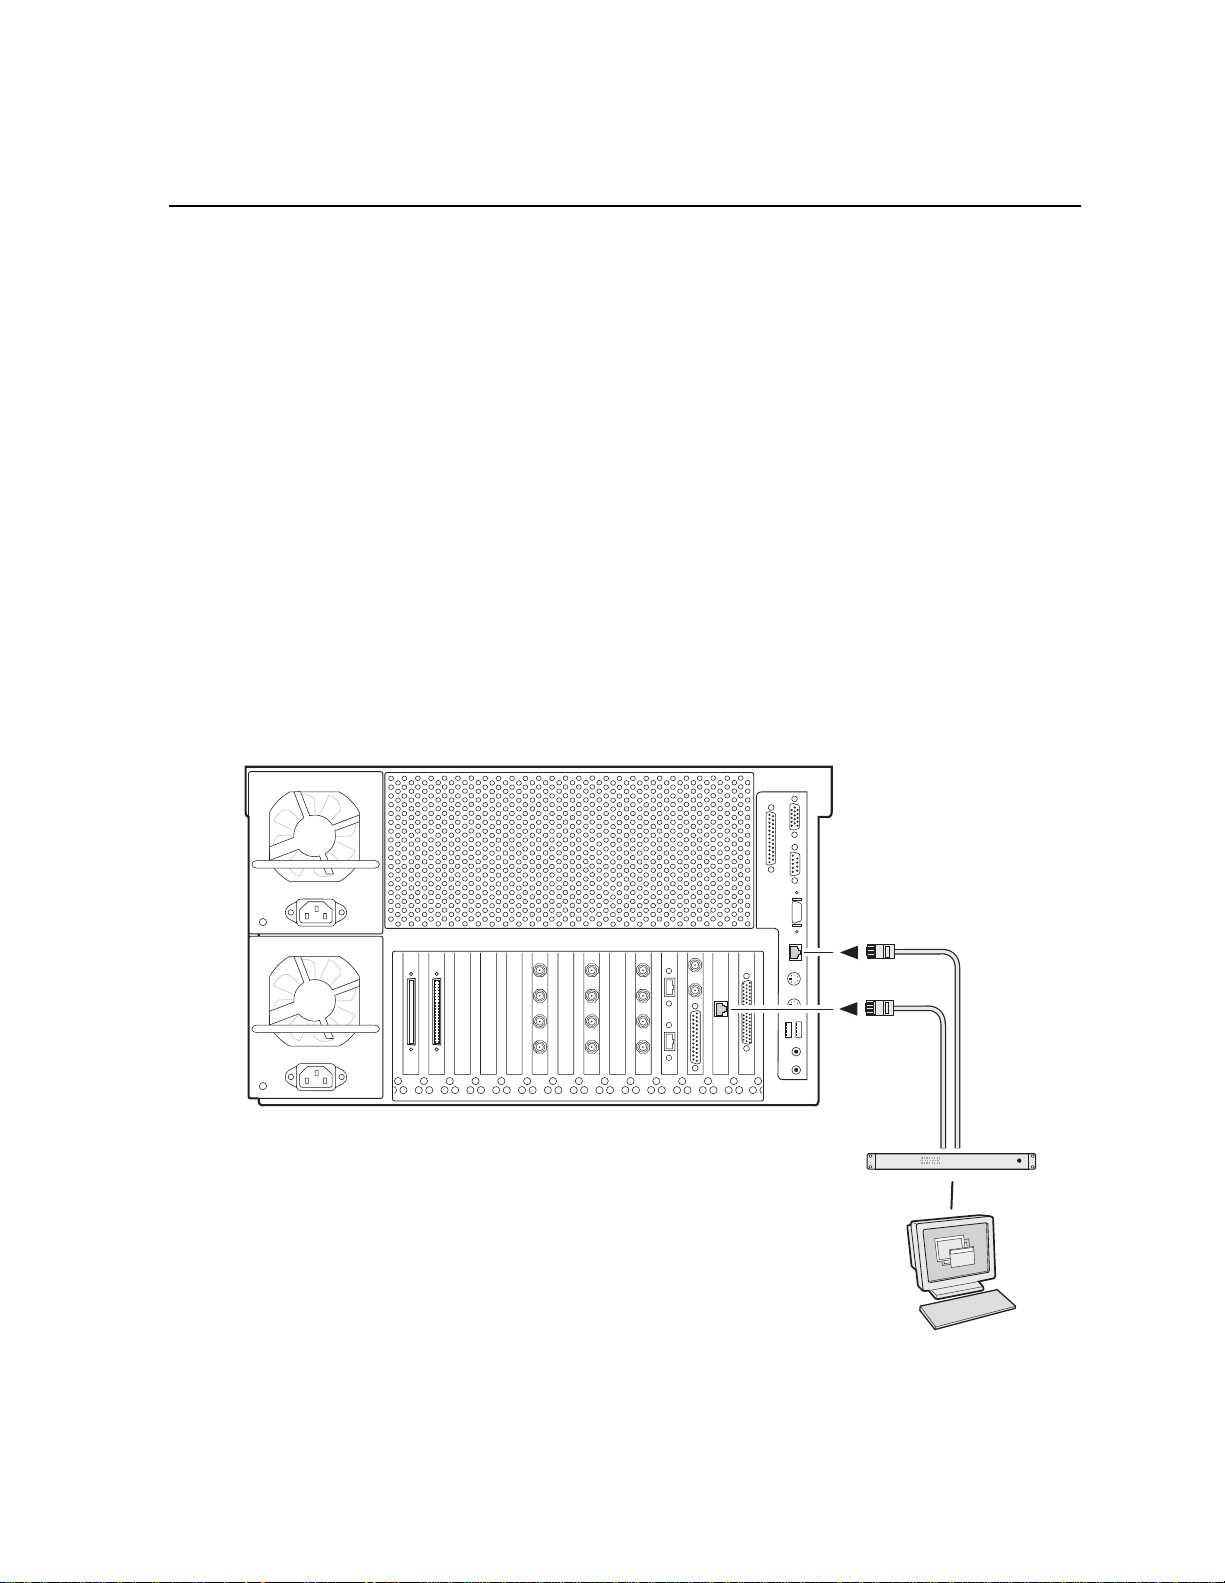
The following illustration shows a simple PIX:XP networked environment. A single
licensed PIX:XP client workstation has Ethernet connections through a switch or hub
to both the Windows NT Ethernet Network card and the Ethernet Video Network card
on the Profile XP system.
Profile XP(s)
8174-3
* Refer to System Guide
for Network Setup
Windows NT
Network*
Video
Network*
Ethernet Hub
or Switch
PIX:XP Client Workstation
20 March 2003 PIX:XP User Guide 5
Page 6

Chapter 1 Introduction
NOTE: The PIX:XP client works tation must have two network r outes to the Profile
system:
• The standard Windows network. This allows you to use the PortServer
interface to a Profile XP system, which enables remote use of Profile
commands.
• The optional Ethernet Video Network on the Profile XP. Depending on the
advice of your local system administrator, you may choose to configure the
Ethernet switch or hub, shown in the previous illustration, so that the two
Profile XP Ethernet connections on different subnets. This may help to
prevent inter-Profile media traffic from congesting the Windows network.
In the following illustration, several PIX:XP client workstations are connected to one
or several Profile XP systems via the two required Ethernet connections. Once the
Profile movies are created on the Profile XP system or systems, they can subsequently
be moved to other Profile (PDR) or Profile XP (PVS) systems over an existing Fibre
Channel Video network. The Profile movies can be played or archived just like any
other standard-definition MPEG2 Profile movie.
Profile XP(s)
8174-2
* Refer to System Guide
for Network Setup
Windows NT
Network*
Video
Network*
Ethernet Hub
or Switch
Fibre Channel
Switch
Fibre Channel Device(s)
6 P IX: XP User Guid e 20 March 2003
PIX:XP Client Workstation
Page 7

The PIX:XP client must be installed on a client workstation which meets the
following requirements:
• Processor: Pentium III or better
• Network: 100 Base T Ethernet on client, Ethernet Video Network
• OS: Windows NT 4.0 with Service Pack 6A
Licensing
PIX:XP is a licensed product. You must obtain a license to use it.
If you don’t have a licence, the application performs all of its functions. All images
that are transferred to a Profile XP system have the Grass Valley logo embedded in
the Profile movie.
The licence is stored and served from the client PC. Each PC on which the PIX:XP
software is installed must be appropriately licensed.
To obtain a licence for a client PC, follow the instructions in the PIX:XP Release
Notes. Typically, you will receive a temporary license immediately via e-mail. A
permanent license will be sent to you via e-mail within five working days.
Licensing
(Option 1L) card on Profile XP system.
Window s 20 00
You can complete the installation of all software components and run with PIX:XP in
demo mode until you receive your licence. When installing the software, be sure to
follow the instructions in the PIX:XP Release N o tes
About this manual
This document provides a tutorial that take s you through increasingly m ore po werful
features of the application by examining work flows of increasing complexity. This is
followed by a reference section which lists supported formats, etc.
For detailed information on the product and its use, please consult the online help
system.
20 March 2003 PIX:XP User Guide 7
Page 8

Chapter 1 Introduction
8 P IX: XP User Guid e 20 March 2003
Page 9

Chapter
2
Using PIX:XP
Simple workflow example
In the simplest case, you’ll convert a single still im age into a Profile movie that lasts
one second.
First, sta rt P IX: XP. I t sea rch for Pr ofi les o n y ou r ne twor k and as ks you to c hoose th e
one on which you wish to create your movie, as shown in the following illustration.
The gear wheels in the icon at the top left of the window spin while the search for
Profile systems is being conducted. When they stop, all the Profiles PIX:XP has been
able to find on your network will be listed in the window. In this example, there is
only one Profile system on the network. Select it and click
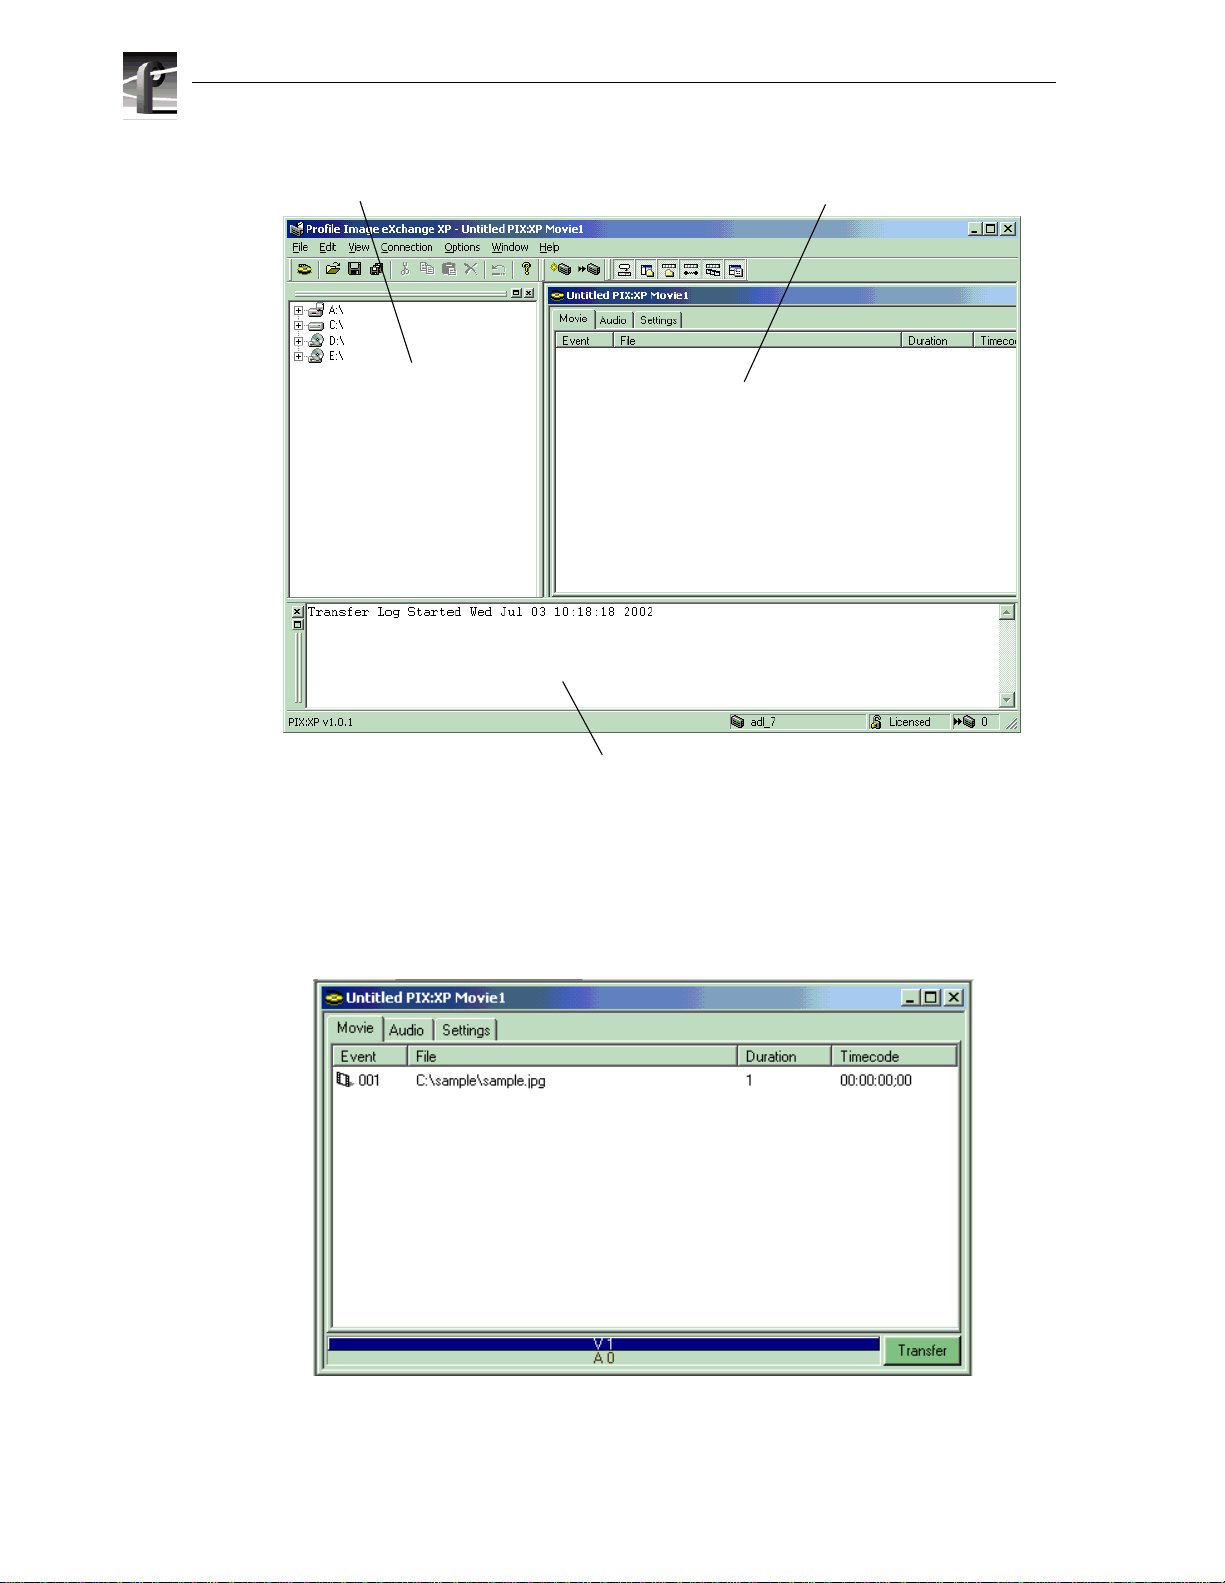
The main PIX:XP interface appears, similar to the following.
20 March 2003 PIX:XP User Guide 9
OK.
Page 10
Chapter 2 Usin g PIX:XP
Explorer pane
Stream Builder pane
Log pane
The Explorer pane allows you to access and select the Windows media you wish to
re-purp ose. T he St ream B uild er pa ne is where yo u orga nize your m ovi e and a djust its
settings. The Log pane displays status progress and error messages.
Use the Explorer to find a still image you’d like to convert into a movie and drag it
into the Stream Builder’s Movie tab as shown here.
10 PIX:XP User Guide 20 March 2003
Page 11
Simple workflow example
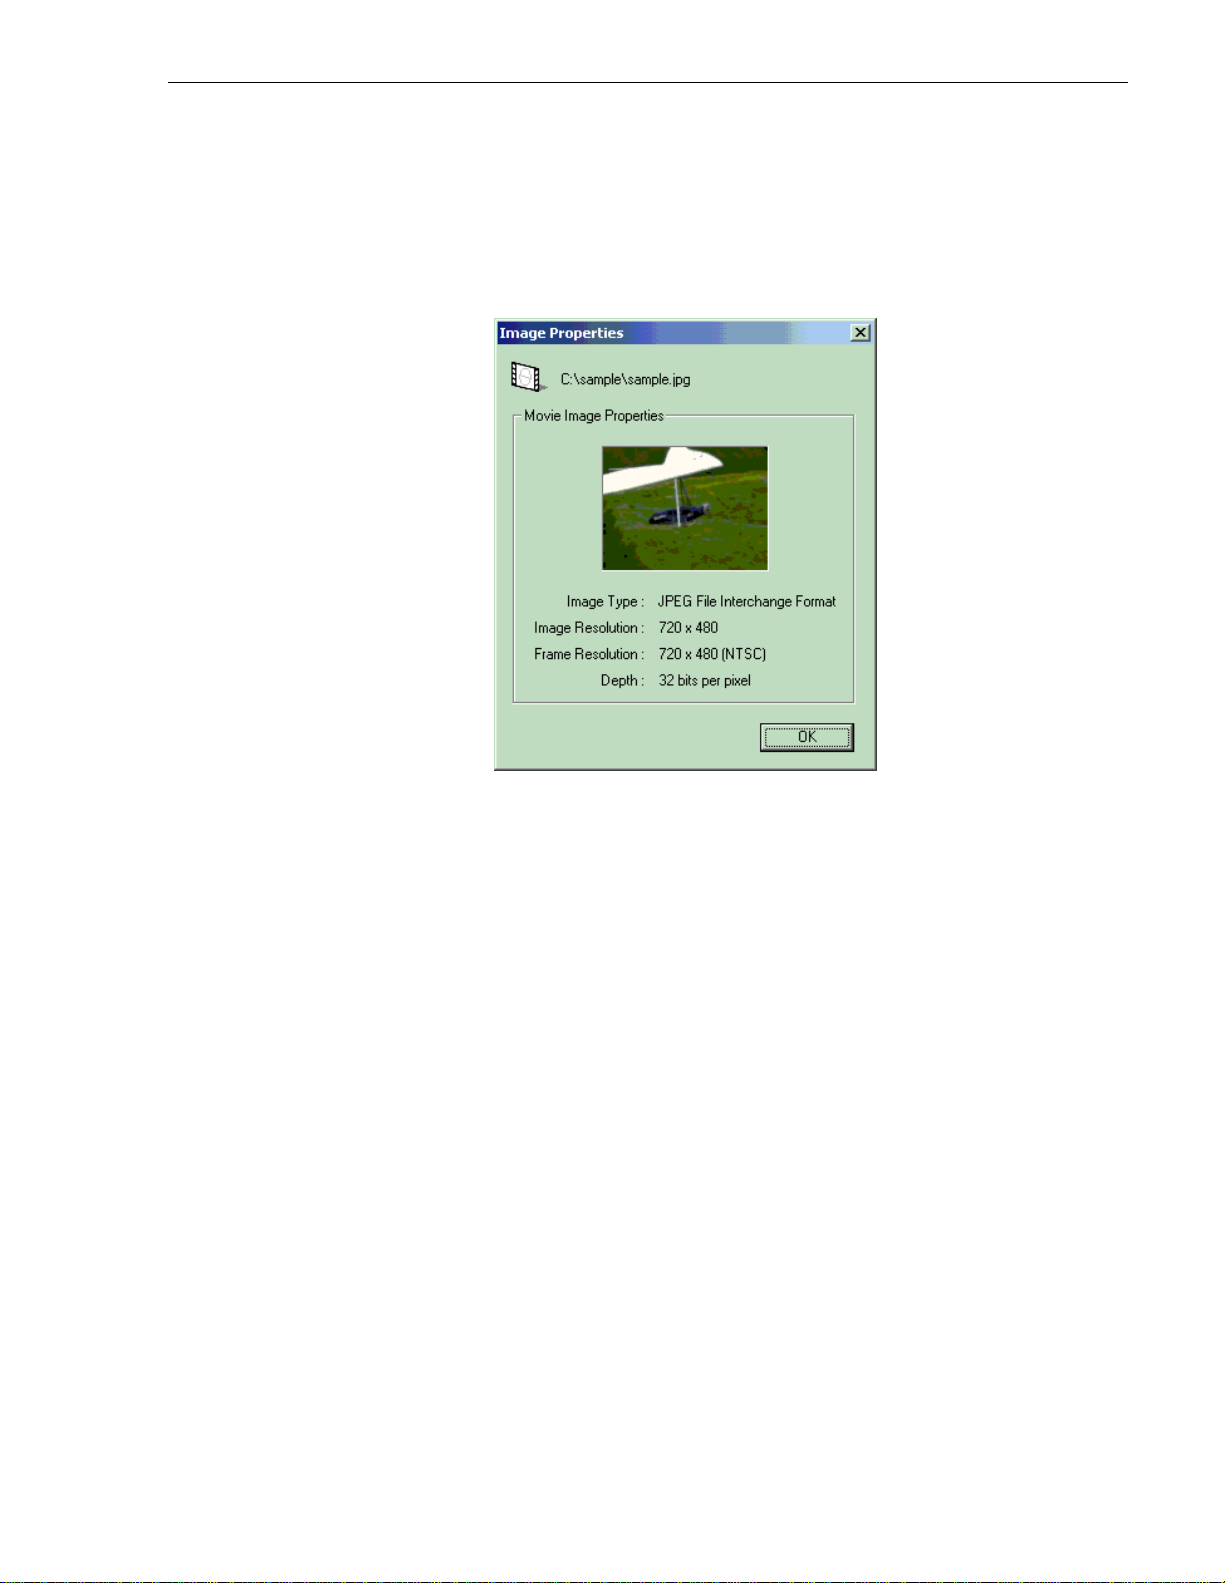
You can view the image’s properties by double clicking its entry in the Stream
Builder, or by choosing Properties from the context (right-click) menu. In the
Properties window, shown here, you can also obtain a full-sized view of the image by
clicking and holding its thumbnail. Release the left mouse button to close the
full-sized view, then click
OK to close the Properties window.
To set the duration of the Profile movie to two seconds and twenty four frames (to
match the audio that we’ll add later), right-click on the still in the Stream Builder pane
and cho o s e
Change Duration. In the resulting dialog box, type in the desired duration
of the Profile movie that will be created from this frame. You can either use
Time-code format, in which case you’d just set it to 00:00:02:24, or a raw frame
count, in which case t he duration depends on the video standard y ou’re using. In the
followin g example, t he video standard is NTSC, so the duration displayed is 84
frames.
If you’d prefer to view the duration of each still image as time-code, choose
| View Durations as Time-code.
Options
20 March 2003 PIX:XP User Guide 11
Page 12

Chapter 2 Usin g PIX:XP
Depending on your source materi al, you may choose to us e commands from the
Options menu to obtain optimal results. For example, your graphics created on a PC
may have a 640 by 480 pi xel resolution that must be conv erted to 720 by 480 for
Profile movie use. In the course of this conversion, the aspect ratio may be slightly
altered. If the resulting small distortion is visible and unacceptable, choose
Maintain Visual Aspect Ratio to preserve the original appearance.
Options |
To add audio tracks to your movie, open the
Audio tab. This will show that, by default,
4 silent tracks will be created in the Profile movie. If you want to change the number
of tracks, change the “Audio Pairs” setting which allows you to set 0, 2, 4…16 audio
tracks. Setting this control to zero will create a movie with no audio on your Profile
system.
Drag & drop .wav files from the Explorer pane into the Stream Builder pane. The
audio must be in the supported format: 48kHz 16bit P CM. If your audio isn’t in this
format, the speaker icon changes to one with a red X through it. The following figure
shows what the Audio tab looks like after:
• The number of audio pairs has been reduced from 2 to 1.
• A legal audio fi le has been dragged and dropped into track 01.
• An illegal audio file has been inserted into track 00.
12 PIX:XP User Guide 20 March 2003
Page 13

Simple workflow example
You can preview each audio track by double-clicking its entry in the audio panel and
clicking t he
the audio is not valid, the Properties dialog box shows the incompatibility.
Preview button t hat appears in its Proper ties dialog box, shown here. If
The final step in preparing your media is accomplished in th e Settings tab, illustrated
here. This tab allows you to select the starting time-code, the video format, Profile
movie name a nd location, legal luminance v alues of your movie, a nd the Movie
Bit-Rate (High = 50Mb/s, I-frame only, Low = 15Mb/s, I-frame only). In this
example, the initial time-code has been changed to 10. Click
Transfer to send your
re-purposed material to Profile system.
20 March 2003 PIX:XP User Guide 13
Page 14

Chapter 2 Usin g PIX:XP
This completes the simple workflow tutorial. During it you learned how to:
• Select the target Profile system.
• Select a still image and turn it into a Profile movie with a specified duration.
• Add audio tracks to your movie and preview them.
• Set the des t ina t ion movie nam e an d video format.
• Initiate the transfer.
You can finish the tutorial by saving your stream settings as a file with the
Save As command.
File |
14 PIX:XP User Guide 20 March 2003
Page 15
Animated sequence example
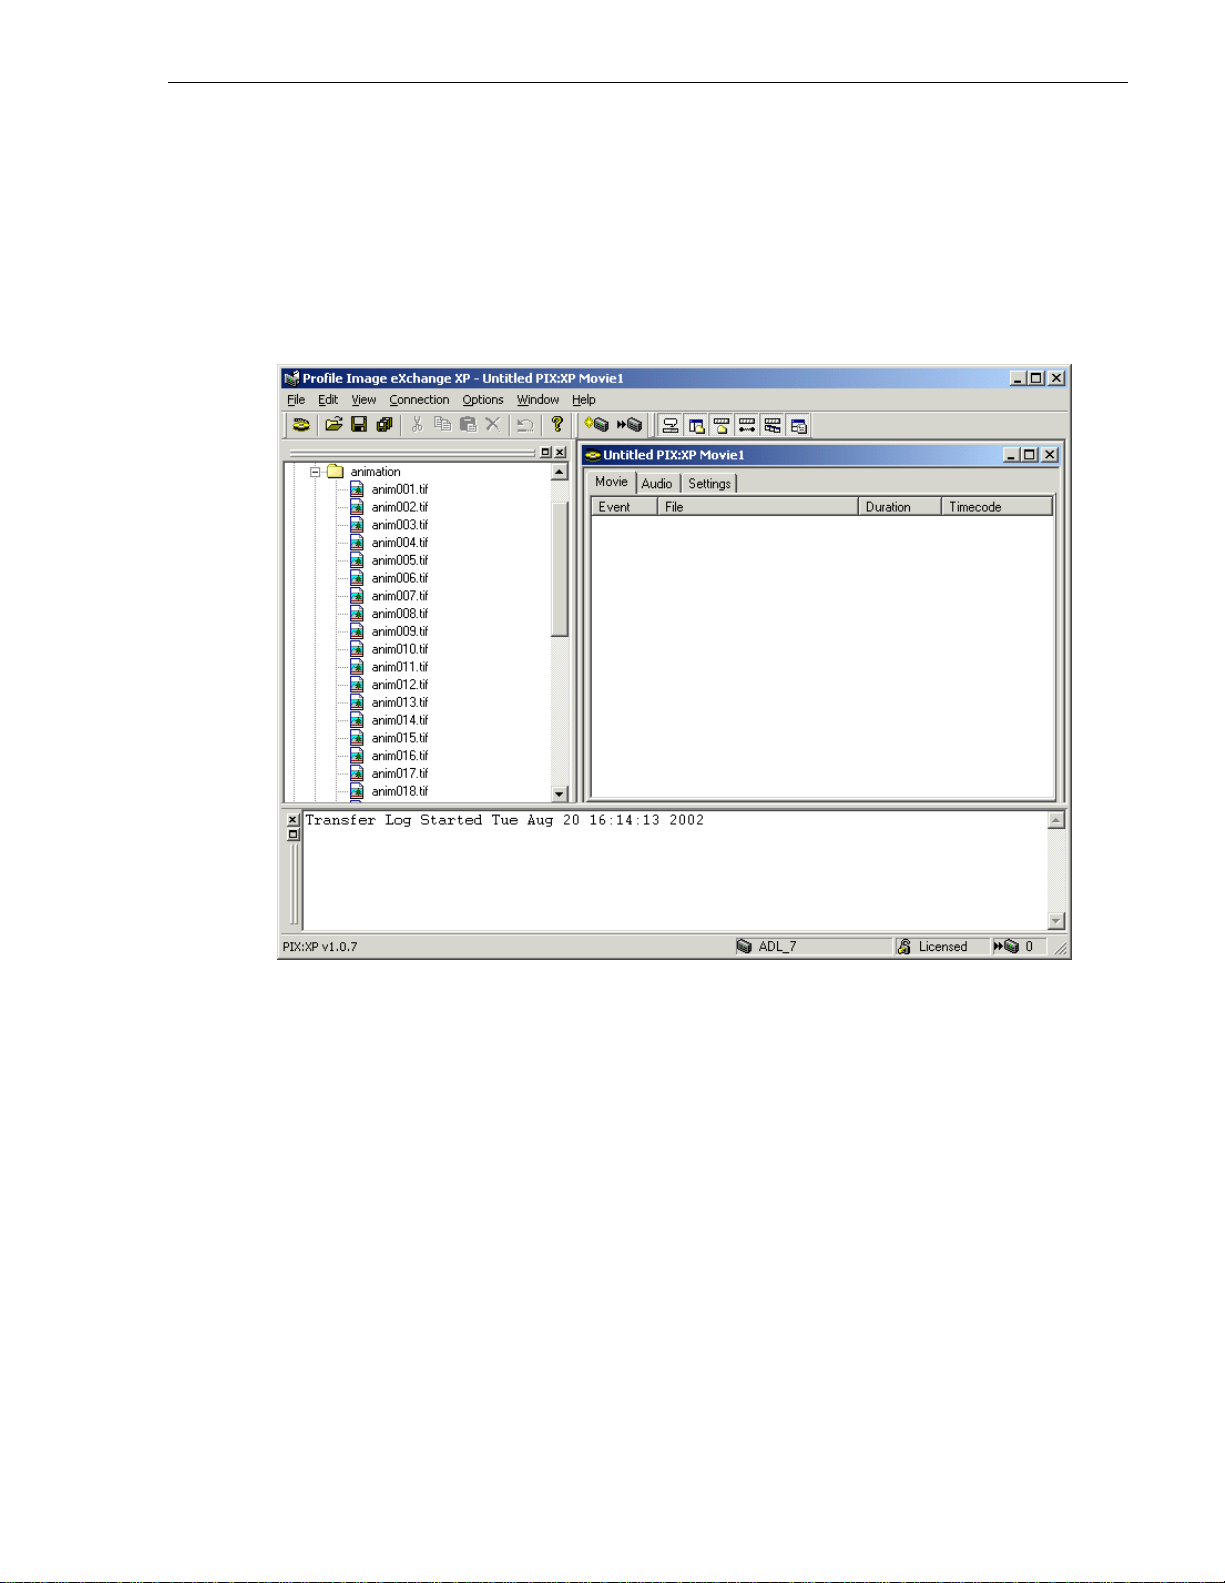
In this sample workflow, you will import a sequence of stills into the application using
a variety of methods and learn how to change their order. The following illustration
shows the starting point for this workflow. The stream has already been saved as
“movie” and the explorer has been navigated to open a folder that contains a
numbered sequence of TIF images.
Animated sequence example
To create a Profile movie composed of the images contained in the 16 files
anim001.tif throug h anim016.tif, all the files must be imported. The most obvious way
of doing this is to select anim001.tif in the Explorer pane and then, with the S
held down, select anim016.tif. This will highlight all the desired files, which can then
be dragged and dropped into the Stream Builder pane. You can use any conventional
Windows function to select files and move them to the Stream Builder pane.
This method is fine for short sequences, but it may be inappropriate fo r hundreds
images. Scrolling through all the files might be tedious and error-prone, especially if
the directory contains a variety of file types. Dragging the parent folder into the
Stream Builder opens a dialog box that allows you to select the files you want to
import, as illustrated here.
20 March 2003 PIX:XP User Guide 15
HIFT key
Page 16

Chapter 2 Usin g PIX:XP
There are several ways you can import files from a folder. In this example, only .tif
files that begin with anim will be imported. The filename specification is “anim*”
where the ‘*’ means “match any characters”. This means that the following filenames
would be sel ected: a nim1.tif, anim01.tif, anim001.tif, etc.
You can be more selective by using standard wildcards to specify the pattern. For
example, test???.tif causes only those filenames that contain three-digit numbers to
be selected. This means that the following filenames would be selected: test001.tif,
test002.tif, etc.; but that these filenames would not be selected: test01.tif, test0001.tif
because they don’t contain three-digit characters. The following figure shows the
result of importing the stills by this method.
16 PIX:XP User Guide 20 March 2003
Page 17

Animated sequence example
The playing order of the stills is from top to bottom of the Stream Builder window as
is indicated by the Time-code column. You can change the order in which the
sequence runs by selecting a still and dragging it up or down. A horizontal line
indicates where the still will be moved to once the mouse button is released.
You can transfer this movie to Profile XP system using the method described in the
first example.
20 March 2003 PIX:XP User Guide 17
Page 18

Chapter 2 Usin g PIX:XP
18 PIX:XP User Guide 20 March 2003
Page 19

Chapter
3
Reference
Supported file formats
PIX:XP provides fairly comprehensive support for most popular f ile formats used in
graphics production. It does not curren tly support images wit h alpha channels. T hat
feature is slated for a release in the near future. The following table lists of supported
file formats:
Name Extensions Restrictions
Tagged Image File Format TIF, TIFF RGB & Mono only, no Alpha
Bitmap BMP
Graphics Interchange Format GIF
Joint Photographic Experts JP G, JP EG
SGI RGB, SGI No Alpha support
TARGA TGA No Alpha support
Supported Profile systems
At the moment, PIX:XP is supported on PVS1000 (the Profile XP Media Platform)
and PVS1100 Profile servers. Support for Media Area Network (MAN) Profile
systems and PVS2000 Profile systems is planned for future releases. Legacy
(PDR100, PDR200, PDR300, and PDR400) Profile systems will not be supported.
At present, only MPEG2 com pressio n is suppor ted. P rofi le movi es c onsist of I- fram e
only, either 15Mb/s or 50Mb/s video. Support for other MPEG 2 bitrates and
DVCPRO is planned for a future release.
20 March 2003 PIX:XP User Guide 19
Page 20

Chapter 3 Reference
Supported video formats and image sizes
Standard Definition PAL and NTSC formats are currently supported, with future
support planned for High Definition.
The Video Format in the Settings pane de faults to the correct settin g according to the
locale of the client PC.
Grass Valley recommends sizing the input still images according to following table
prior to importing them to PIX:XP. This is because PIX:XP automatically re-sizes its
input according to the Video Format selected. If you have chosen
Interpolate Mis-sized images, it will use a smoothing algorithm when re-sizing the
images. Otherwise, it uses no interpolation. This option allows you to trade-off image
quality against speed.
Video Format Image Width Imag e H eight
PAL 720 576
NTSC 720 480
Options |
Supported audio formats
In version 1.0, only 48kHz 16 bit mono PCM in WAV format is supported. Support
for different audio formats will be extended in future releases but will probably
continue to be restricted to WAV.
20 PIX:XP User Guide 20 March 2003
 Loading...