

Page 1

Page 2

Number: 510057.001
The Quality System of:
Thomson Broadcast & Media Solutions
TBMS TBMS
400 Providence Mine Road 17 rue du Petit Albi-BP 8244
Nevada City, CA 95945 95801 Cergy Pontoise
Cergy, France
TBMS
Weiterstadt, Germany TBMS
Brunnenweg 9 10 Presidential Way, 3rd Floor, Suite 300
D-64331 Weiterstadt, Germany Woburn, MA 08101
TBMS TBMS
15655 SW Greystone Ct. 2300 South Decker Lake Blvd.
Beaverton, OR 97006 Salt Lake City, UT 84119
TBMS TBMS - PCB
Nederland B.V. Rennes, France
4800 RP BREDA Rue du Clos Courtel
The Nederlands Cesson-Sevigne, Cedex
France
TBMS/Nextream TBMS/Nextream
Rennes, France Technopole Brest Iroise
Rue du Clos Courtel CS 73808
Cesson-Sevigne, Cedex 29238 Brest Cedex 3
France France
Including its implementation, meets the requirements of the standard:
ISO 9001:2000
Scope: The design, manufacture and support of video hardware and software products
and related systems.
This Certificate is valid until: June 14, 2006
Revision Date: September 9, 2003
Renewal Date: June 14, 2003
Issued for the first time: June 14, 2000
Page 3
Page 4

Copyright
Copyright © 2004 Thomson Broadcast and Media Solutions, Inc. All rights
reserved. Printed in the United States of America.
This document may not be copied in whole or in part, or otherwise reproduced
except as specifically permitted under U.S. copyright law, without the prior written
consent of Thomson Broadcast and Media Solutions, Inc., P.O. Box 59900,
Nevada City, California 95959-7900
Trademarks
Disclaimer
U.S. Government
Restricted Rights
Legend
Revision Status
FeedClip, Grass Valley, NewsEdit, NewsQ, and Profile are either registered
trademarks or trademarks of Thomson Broadcast and Media Solutions, Inc. in the
United States and/or other countries. Other trademarks used in this document are
either registered trademarks or trademarks of the manufacturers or vendors of the
associated products. Thomson Broadcast and Media Solutions, Inc. products are
covered by U.S. and foreign patents, issued and pending. Additional information
regarding Thomson Broadcast and Media Solution, Inc.’s trademarks and other
proprietary rights may be found at www.thomsongrassvalleygroup.com.
Product options and specifications subject to change without notice. The
information in this manual is furnished for informational use only, is subject to
change without notice, and should not be construed as a commitment by Thomson
Broadcast and Media Solutions, Inc. Thomson Broadcast and Media Solutions,
Inc. assumes no responsibility or liability for any errors or inaccuracies that may
appear in this publication.
Use, duplication, or disclosure by the United States Government is subject to
restrictions as set forth in subparagraph (c)(1)(ii) of the Rights in Technical Data
and Computer Software clause at DFARS 252.277-7013 or in subparagraph c(1)
and (2) of the Commercial Computer Software Restricted Rights clause at FAR
52.227-19, as applicable. Manufacturer is Thomson Broadcast and Media
Solutions, Inc., P.O. Box 59900, Nevada City, California 95959-7900 U.S.A.
Rev Date Description
November 30, 2004 Release 071-8369-00 for Software Version 5.1
Page 5

Contents
Introduction . . . . . . . . . . . . . . . . . . . . . . . . . . . . . . . . . . . . . . . . . . . . . . . . . . . 7
Step 1 Designing a Security Schema
Sample Security Schema . . . . . . . . . . . . . . . . . . . . . . . . . . . . . . . . . . . 10
NewsShare System Users and Groups . . . . . . . . . . . . . . . . . . . . . . . . 11
Permissions and Groups . . . . . . . . . . . . . . . . . . . . . . . . . . . . . . . . . . . 11
Step 2 Setting Up a Domain Controller
Overview. . . . . . . . . . . . . . . . . . . . . . . . . . . . . . . . . . . . . . . . . . . . . . . . 15
Installing Windows 2000 Server Software . . . . . . . . . . . . . . . . . . . . . . 16
Adding the Domain Controller to Your Network . . . . . . . . . . . . . . . . . . 16
Adding the New Machine to the Parent Domain. . . . . . . . . . . . . . . . . . 18
Configuring the Domain Controller with Active Directory . . . . . . . . . . . 19
Configuring a New Domain Tree With Integrated DNS . . . . . . . . . . 19
Configuring a Child Domain. . . . . . . . . . . . . . . . . . . . . . . . . . . . . . . 21
Configuring DNS With Forwarder . . . . . . . . . . . . . . . . . . . . . . . . . . 23
Adding FSMs and Profile Servers to the Domain . . . . . . . . . . . . . . . . . 24
Creating Groups . . . . . . . . . . . . . . . . . . . . . . . . . . . . . . . . . . . . . . . . . . 25
Creating Users . . . . . . . . . . . . . . . . . . . . . . . . . . . . . . . . . . . . . . . . . . . 27
Adding Users to the New Groups . . . . . . . . . . . . . . . . . . . . . . . . . . . . . 29
Step 3 Discontinuing Open SAN Service . . . . . . . . . . . . . . . . . . . . . 33
Step 4 Joining Machines to the New Domain
For Each DNP Workstation. . . . . . . . . . . . . . . . . . . . . . . . . . . . . . . . . . 35
For Each FSM and Profile Media Server . . . . . . . . . . . . . . . . . . . . . . . 36
Step 5 Modifying CVFS for Open SAN Security
Adding Windows Security to CVFS . . . . . . . . . . . . . . . . . . . . . . . . . . . 38
Power Cycling the FSMs . . . . . . . . . . . . . . . . . . . . . . . . . . . . . . . . . . . 39
Step 6 Turning the System Back On . . . . . . . . . . . . . . . . . . . . . . . . . 41
Step 7 Setting Security Permissions
Setting Initial Shared Volume Permissions. . . . . . . . . . . . . . . . . . . . . . 44
Setting High Level Shared Volume Permissions . . . . . . . . . . . . . . . . . 45
Setting NewsEdit Root Level Permissions . . . . . . . . . . . . . . . . . . . . . . 47
Setting NewsEdit Bin Permissions . . . . . . . . . . . . . . . . . . . . . . . . . . . . 49
Step 8 Using a Reference Time Source. . . . . . . . . . . . . . . . . . . . . . . 51
Step 9 Testing . . . . . . . . . . . . . . . . . . . . . . . . . . . . . . . . . . . . . . . . . . . 53
Digital News Production
3
Page 6

Contents
4
Digital News Production
Page 7

Grass Valley Product Support
To get technical assistance, check on the status of problems, or report new
problems, contact Grass Valley Product Support via e-mail, the Web, or by
phone or fax.
Web Technical Support
To access support information on the Web, visit the product support Web page
on the Grass Valley Web site. You can download software or find solutions to
problems by searching our Frequently Asked Questions (FAQ) database.
Grass Valley Product Support
World Wide Web:
Technical Support E-mail Address:
http://www.thomsongrassvalley.com/support/
gvgtechsupport@thomson.net.
Phone Support
Use the following information to contact product support by phone during
business hours. Afterhours phone support is available for warranty and contract
customers.
United States (800) 547-8949 (Toll Free) France +33 (1) 34 20 77 77
Latin America (800) 547-8949 (Toll Free) Germany +49 6155 870 606
Eastern Europe +49 6155 870 606 Greece +33 (1) 34 20 77 77
Southern Europe +33 (1) 34 20 77 77 Hong Kong +852 2531 3058
Middle East +33 (1) 34 20 77 77 Italy +39 06 8720351
Australia +61 1300 721 495 Netherlands +31 35 6238421
Belgium +32 2 3349031 Poland +49 6155 870 606
Brazil +55 11 5509 3440 Russia +49 6155 870 606
Canada (800) 547-8949 (Toll Free) Singapore +656379 1390
China +86 106615 9450 Spain + 34 91 512 03 50
Denmark +45 45968800 Sweden +46 87680705
Dubai + 971 4 299 64 40 Switzerland +41 (1) 487 80 02
Finland +35 9 68284600 UK +44 870 903 2022
Digital News Production
5
Page 8

Preface
Authorized Support Representative
Profile Users Group
A local authorized support representative may be available in your country. To
locate the support representative for your country, visit the product support
Web page on the Grass Valley Web site.
You can connect with other Profile XP Media Platform users to ask questions
or share advice, tips, and hints. Send e-mail to profile-users@thomson.net to
join the community and benefit from the experience of others.
6
Digital News Production
Page 9

Introduction
With Open SAN security, you can control the visibility and access for users and
groups within NewsEdit bins by associating the bins and assets with file system
permissions. Open SAN security uses the overlapping modes of inheritance,
exclusivity, and group membership, as implemented by Windows, to establish
file system security. These principals apply:
• Selective access—You create groups of users, such as Editors or Producers,
and set permissions for each group.
• Partial control—You control access to branches of the Bin tree for users and
groups.
• Administrative control—The Administrator has exclusive access to a tool in
the top-level bin that allows the setting of permissions in the top-level bins.
Steps 1-3 can be completed at any time in preparation for Open SAN Security.
Steps 3-9 must be done with the NewsShare system off line, during a
maintenance window.
To use Open SAN security in your newsroom, follow these steps:
Step: Description Refer to...
1 Design a security schema Page 9
2 Create and configure a Domain Controller Page 13
3 Discontinue the Open SAN Service Page 33
4 Join computers to the new domain Page 35
5 Add Windows Security to the CVFS configuration Page 37
6 Turn on the Open SAN Failover Monitor Service and reboot all
client machines and Profile Media Servers
7 Set permissions for the shared volume Page 43
8 Optionally, install and configure NetTime on the FSMs and
Profile Media Servers
9 Test to make sure that security is working Page 53
The rest of this manual discusses each of these steps in detail.
Digital News Production
Page 41
Page 51
7
Page 10

8
Digital News Production
Page 11

1
Step
Designing a Security Schema
The first step in setting up security in your Open SAN system is to determine a
schema for permissions. The schema determines which groups you create, and
which permissions you give each group.
Thomson Grass Valley has created a typical schema for use in illustrating
security principles in this document. You may use this schema if it is
appropriate for your newsroom, or create your own. For the examples in this
manual, we’ll assume that the newsroom has five groups: Editors, Producers,
Archivists, Ingestors, and Viewers.
The Open SAN security principles are agnostic to these groups, though the use
of groups greatly simplifies the establishment of the security schema. We
picked these names as exemplary; you do not need to use them in your
operation. You can have as many or as few groups as you like, named however
you wish. If your domain has a tree hierarchy, you may assign permissions to
global groups as well.
The discussion in this chapter pertains to planning groups, users, and
permissions. The actual creation of domain entities and setting of permissions
are done in Step 8.
Digital News Production
9
Page 12

Step 1 Designing a Security Schema
Sample Security Schema
The following table lists the groups and permissions being used as an example
in this document:
News Group Bin Permissions
Domain Administrator All Full control
Editors Monday-Sunday Read/Write/Delete in top level bins, but
Feeds Read only
HFR Read/Write
Archive Read/Write
Producers Monday-Sunday Read/Write
Feeds Read only
HFR Full control
Archive Read/Write
Archivists Monday-Sunday Read only
Feeds Read/Write
HFR Read only
Archive Full control
Ingestors Monday-Sunday Read only
Feeds Full control
HFR None (permission denied)
cannot delete material from newscast bins.
10
Archive Read/Write
Viewers Monday-Sunday Read only
Feeds Read only
HFR Read only
Archive Read only
Digital News Production
Page 13

NewsShare System Users and Groups
NewsShare System Users and Groups
At a minimum, you need to create two user-group sets for use by certain
components of the NewsShare system:
Group User Members Password
Profile Services profile profile
Vibrint Services VibrintService triton
Permissions and Groups
In addition to the groups you’ll create for your newsroom, you need to create
one group to manage the Profile Media Servers, and set permissions for three
built-in groups—Domain Admins, Everyone, and SYSTEM. Based on our
security schema, the following table illustrates how groups and permissions are
set for the various NewsEdit folders and bins:
Use
Windows
Explorer
Use
NewsEdit
Tools | Set
Root
Permissions
Domain Admins
Everyone
SYSTEM
V:\
V:\media
V:\PDR
V:\Thumbnails (inherit control from V:\)
V:\VibrintAttic (inherit control from V:\)
V:\VibrintAVFiles
**
**
FFF F
FF
FF FF F
F FL RL RL RL R L R F
Archivists
Editors
Ingestors
Digital News Production
Producers
Viewers
Profile Services
11
Page 14

Step 1 Designing a Security Schema
Domain Admins
Everyone
SYSTEM
Archivists
Editors
Ingestors
Producers
Viewers
Profile Services
Use Bin
Security
Properties
Monday-Sunday
Bins
Feeds Bin
HFR Bin
Archive Bin
F
= Full Control
L
= List Folder Contents
= Read
R
= Write
W
= Delete
D
-
= Deny
**
= Inheritance is blocked at this level
F F -W -D W D -W -D W -D L R
F F W -D -W -D W D -W -D L R
F F -W -D W -D -F W D L R
F F W D W -D W -D W -D L R
12
Digital News Production
Page 15

2
Step
Setting Up a Domain Controller
A Domain Controller is a separate machine running Windows 2000 Server
software and configured with Active Directory. If purchased from Thomson
Grass Valley, an XRE is used. If the sole responsibility of the machine is to act
as a domain controller, SMG- or customer-furnished equipment may be used,
provided that it meets the specifications necessary to host Windows 2000
Server.
In general, you need to follow these guidelines for the Domain Controller:
• The Domain Controller cannot be an FSM.
• A separate Domain Controller and related domain node should be allocated
to the technical LAN subnet. This Domain Controller should also have
sufficient access to all related LANs to establish trusts and provide
authentication services.
• An XRE can be used to host another NewsEdit product, SmartBins.
• The domain controller may be remote to the Open SAN, but needs high
availability and direct configurability by your newsroom engineering
department.
• Consistent with the Windows domain model, the domain controller may also
use a backup within the Open SAN subnet.
• You can either create a Domain Controller as a new domain tree or as a child
domain to an existing Domain Controller on your network.
• For normal newsroom operation, if the domain controller is a member of a
forest or tree, the Domain Controller can be subordinate: trusting but not
trusted.
The configuration of Microsoft Windows domains with Active Directory is a
broad and deep topic that is documented extensively by a variety of resources,
including Microsoft’s website. Each news organization has different
infrastructure and policies regarding the configuration of domains. What
NewsShare Open SAN security requires is an Active Directory zone with at
Digital News Production
13
Page 16

Step 2 Setting Up a Domain Controller
least one dedicated Windows 2000 Server domain controller; there are several
ways to achieve this, and the choice appropriate for your organization depends
on your organization’s culture, infrastructure, and IT policies.
In planning, you need to determine the relationship of the new domain to its
tree; whether it will use integrated, delegated, or standalone DNS; and whether
the domain controller’s mode will be mixed, in order to interoperate with preWindows 2000 domain controllers, or native, allowing advanced features,
particularly greater opportunity in configuring user groups. The recommended
configuration to effect the most flexible control of the technical domain is to
run integrated DNS on a native-mode domain controller.
This guide details two of the many ways to set up a domain controller with
Active Directory:
• First node in a domain tree, integrated DNS, (mixed-mode) permissions
compatible with pre-Windows 2000 servers.
• Child node in an existing domain tree, (integrated) DNS in the parent,
(native-mode) permissions compatible with Windows 2000 servers and
higher.
As an adjunct step, depending on the trust relationship between the domain
controllers for NewsShare and those of the larger organization, the use of a
standalone DNS with forwarding may be necessary to achieve a highly isolated
domain. This configuration step is detailed as well.
14
Digital News Production
Page 17

Overview
To create a Domain Controller, follow these steps:
Install Windows 2000 Server software page 16
Add the Domain Controller to the network page 16
Overview
What to do Refer to...
Add the new machine to the parent domain (if creating a child
domain)
Configure Active Directory page 19
Add all FSMs and Profile Media Servers to the new domain page 23
Create new groups page 25
Create users as necessary page 27
Add users to the new groups page 29
page 18
Digital News Production
15
Page 18

Step 2 Setting Up a Domain Controller
Installing Windows 2000 Server Software
Install the Windows 2000 Server software following the network configuration
for your news station.
See the
2000 Server Online Help
Microsoft Windows 2000 Security Configuration Guide
for more information.
or the
Windows
Adding the Domain Controller to Your Network
You need to add the new Domain Controller to your existing network:
1. Right-click on My Network Places and select
The Network and Dial-up Connections window opens.
2. Right-click on the Ethernet Adapter icon and select
3. Select
4. Click
Internet Protocol
Advanced
The Advanced TCP/IP Settings window opens:
.
and click
Properties
Properties
.
.
Properties
.
16
Digital News Production
Page 19

Adding the Domain Controller to Your Network
Add
DNS
.
tab.
5. Click the
6. Click
The TCP/IP DNS Server window opens:
7. Add the IP Address of the DNS server and click
Add
.
If this domain controller is also a DNS server, enter its own IP Address.
and close all windows.
8. Click
OK
Digital News Production
17
Page 20

Step 2 Setting Up a Domain Controller
Adding the New Machine to the Parent Domain
If you are creating a child domain, you need to add the Domain Controller to
the parent domain. If you are creating a new domain tree, you can skip this step.
To add a machine to the Parent Domain:
1. Right-click on My Computer and select
2. Select the Network Identification tab and click
The Identification Changes window appears:
3. Click
Domain
and type
TGV
as the domain name.
Properties
.
Properties
.
18
.
4. Click
5. Enter the username and password for the administrator account on the
6. At the Welcome message, click
7. Reboot the computer.
Digital News Production
OK
The Domain Username And Password window appears.
domain tree root system, and click OK.
.
OK
Page 21

Configuring the Domain Controller with Active Directory
Configuring the Domain Controller with Active
Directory
The next step is to configure your Domain Controller using the Windows
Active Directory wizard. Follow one set of instructions below for the type of
domain you are configuring—either a new domain tree or a child domain.
Configuring a New Domain Tree With Integrated DNS
1. If the Windows 2000 Configure Your Server screen doesn’t appear
automatically after your computer restarts, click
Administrative Tools | Configure Your Server
Start | Programs |
.
2. At the Windows 2000 Configure Your Server screen, click
Active Directory
in the left pane.
3. Click
Start the Active Directory Wizard
.
4. Configure the Domain Controller following these instructions:
On this screen... Do this...
Welcome Click
Domain Controller Type Select
Create Tree or Child Domain Select
Create or Join Forest Select
New Domain Name Enter the name of the new domain, and click
NetBIOS Domain Name Leave set at the default value and click
Database and Log Locations Leave set at default values and click Next.
Shared System Volume Leave set at default value and click Next.
Configure DNS Select
<<message>> If you see a message that the DNS server can’t find the new
Next.
Domain controller for a new domain. Click Next.
Create a new domain tree and click Next.
Create a new forest of domain trees; click Next.
Next.
Next.
Yes, install and configure DNS on this computer
and click Next.
domain name, click
It means the domain name isn’t yet part of the system.
OK and continue with the installation.
Digital News Production
19
Page 22

Step 2 Setting Up a Domain Controller
On this screen... Do this...
Permissions Select Permissions compatible with pre-Windows 2000
servers and click Next.
This selection sets up the domain controller in mixedmode.
Directory Services Restore
Enter triton twice and click
Next.
Mode Administrator Password
Summary Review your choices and click
Next. Your summary
should look like this:
Configure this server as the first domain
controller in a new forest of domain trees.
The new domain is named "xxxx". This is also
the name of the new forest.
The NetBIOS name of the domain is “xxxx”
Database location: C:\WINNT\NTDS
Log file location: C:\WINNT\NTDS
Sysvol folder location: C:\WINNT\SYSVOL
The DNS Service will be installed and configured on
this computer.
Permissions compatible with pre-Windows
2000 servers will be used with this domain; this
will allow anonymous access to domain
information.
Completing the Active
Directory Installation Wizard
Click Finish. The computer prompts you to reboot so the
new settings take effect.
20 Digital News Production
Page 23

Configuring a Child Domain
1. If the Windows 2000 Configure Your Server screen doesn’t appear
automatically after your computer restarts, click
Administrative Tools | Configure Your Server.
Configuring a Child Domain
Start | Programs |
2. At the Windows 2000 Configure Your Server screen, click
Active Directory
in the left pane.
3. Click
Start the Active Directory Wizard.
4. Configure the Domain Controller following these instructions:
On this screen... Do this...
Welcome Click Next.
Domain Controller Type Select
Create Tree or Child Domain Select
Network Credentials Enter the User name and Password of the Domain tree
Domain controller for a new domain.
Click Next.
Create a new child domain in an existing domain
tree and click Next.
root, the name of the Domain, and click
Next.
Digital News Production 21
Page 24

Step 2 Setting Up a Domain Controller
On this screen... Do this...
Child Domain Installation Enter the name of the Parent domain; enter the name of the
Child domain, and click Next.
NetBIOS Domain Name Leave set at default value and click
Next.
Database and Log Locations Leave set at default values and click Next.
Shared System Volume Leave set at default value and click Next.
Permissions Select
Directory Services Restore
Permissions compatible only with Windows 2000
servers and click Next.
Enter triton twice and click
Next.
Mode Administrator Password
Summary Review your choices and click
Completing the Active
Directory Installation Wizard
22 Digital News Production
should look like this:
Next. Your summary
Configure this server as the first domain controller in a new
domain.
The new domain is named “tgv.DOMAIN.gvg”
The NetBIOS name of the domain is “TGV”
This new domain is a child domain of the domain
“DOMAIN.gvg”
Database location: C:\WINNT\NTDS
Log file location: C:\WINNT\NTDS
Sysvol folder location: C:\WINNT\SYSVOL
Click Finish. The computer prompts you to reboot so the
new settings take effect.
Page 25
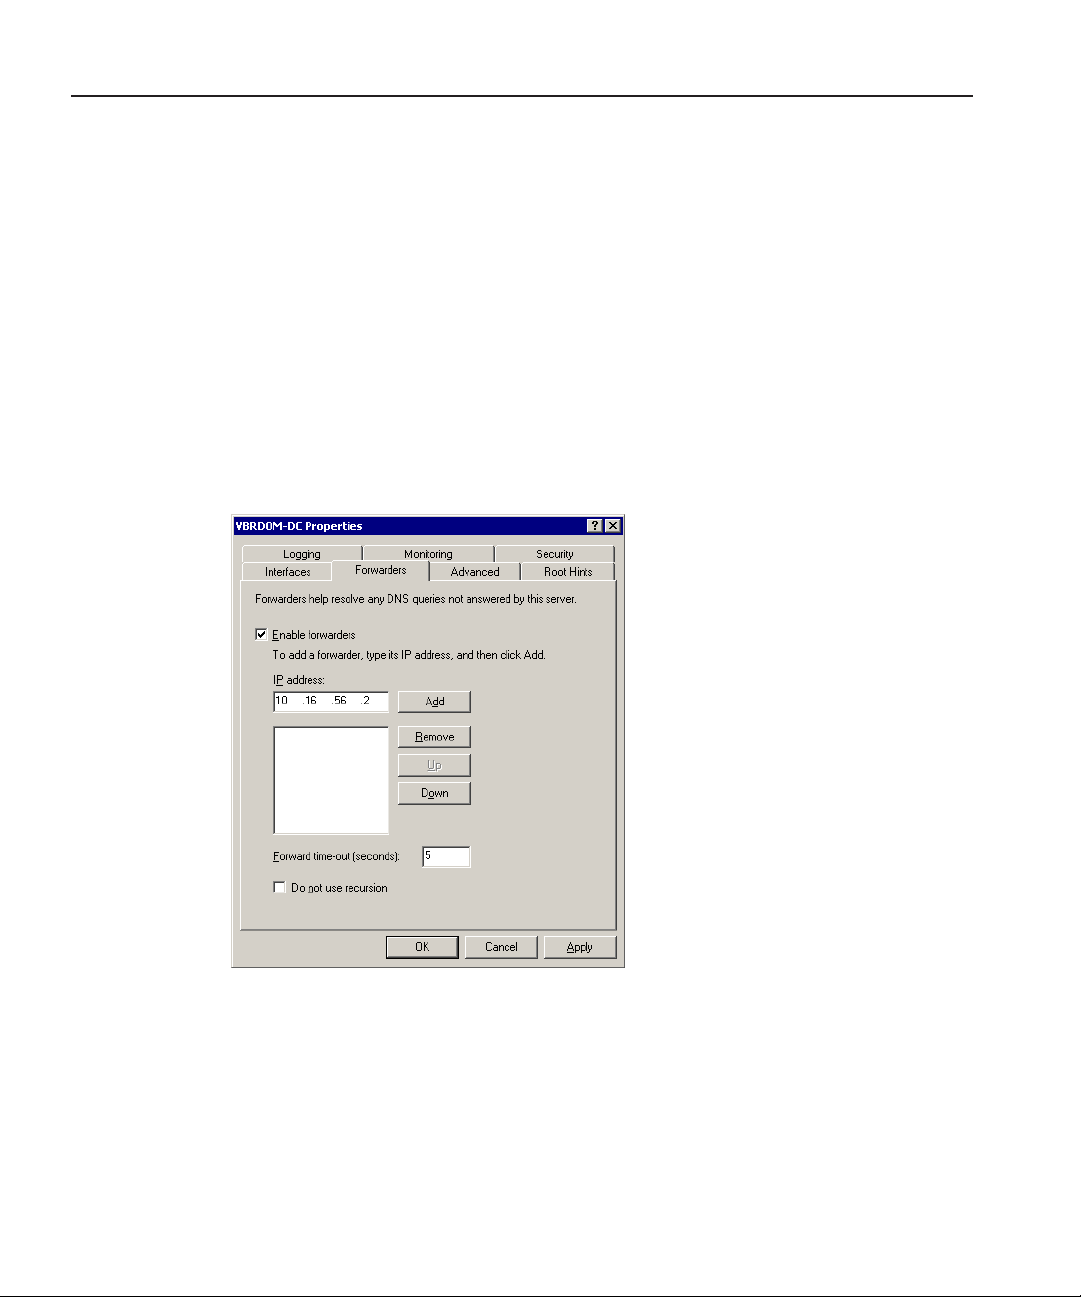
Configuring DNS With Forwarder
If your installation must function in isolation from the enterprise DNS, yet have
access to machines outside the technical LAN, e.g., if you have an experimantal
setup that must access a newsroom computer system, a useful alternative to
joining the enterprise domain is to establish an independently-rooted forest
with isolated DNS.
In this case, you need to configure a DNS forwarder as follows:
Configuring DNS With Forwarder
1. Select
2. Select your Domain Controller, right-click and select
3. On the Forwarders tab, check
Start | Programs | Administrative Tools | DNS.
Properties.
Enable forwarders.
4. Type the IP address for the DNS Server where you want to forward and click
Add.
5. Click
Apply.
6. Close the window.
Digital News Production 23
Page 26

Step 2 Setting Up a Domain Controller
Adding FSMs and Profile Servers to the Domain
Because the FSMs and Profile Media Server components of the Open SAN
system are Windows NT-based machines, before joining the machines to the
domain, you need to add their names to the new domain you are configuring.
To add a machine:
1. Select
2. Right-click on the Computers folder and select
3. Enter the name of the FSM or Profile Media Server.
Start | Programs | Administrative Tools | Active Directory Users
and Computers.
New Computer.
The New Object - Computer window appears:
The pre-Windows 2000 Computer name automatically fills in.
4. Check
5. Click
6. If you see a message saying the computer name contains non-standard
characters, click
The warning is caused by the underscore that is used in naming the clients of
the shared volume.
7. Repeat steps 2-5 for any other FSMs or Profile Media Servers you have.
24 Digital News Production
Allow pre-Windows 2000 computers to use this account.
OK.
Yes to use this name anyway.
Page 27

Creating Groups
You create groups on your Domain Controller according to the security schema
you created in Step 1. Use this table as a guideline for creating your groups:
Group Name Group Scope Group Type Required?
Creating Groups
Vibrint Services The Group Scope is dependent on what
Profile Services Security Yes
Archivists Security Optional
Editors Security
Ingestors Security
Producers Security
Viewers Security
Other groups as necessary for your newsroom
type of Domain Controller you are
configuring.
a
Security Yes
a. If you are working in a mixed-mode domain, your only practical scope choice
is Global, which is what is documented here. In a native-mode domain, other
choices are available. Consult the Windows Active Directory documentation on
group scopes.
1. Select
Start | Programs | Administrative Tools | Active Directory Users
and Computers.
2. In the console tree, double-click the domain node.
3. Right-click the Users folder, select
New and then select Group.
Digital News Production 25
Page 28

Step 2 Setting Up a Domain Controller
The New Object - Group window appears:
4. Type the name of the new group.
5. Click
6. Click
7. Click
Global for the Group Scope.
Security for the Group Type.
OK.
The new group appears in the list.
8. Repeat steps 3-7 to create additional groups.
26 Digital News Production
Page 29

Creating Users
You need to create the users who will become members of the groups you just
created. Users represent each person who logs on to a NewsEdit computer. If
you are creating a new domain tree, you need to create each user using the
directions below. If you are creating a child domain, and will get your users
from the parent domain, you can skip this step.
Regardless of the type of Domain Controller you are configuring, you need to
create these two users:
Full name User logon name Password
profile profile profile
VibrintService VibrintService triton
Creating Users
1. Select
Start | Programs | Administrative Tools | Active Directory Users
and Computers.
2. In the console tree, double-click the domain node.
3. In the details pane, right-click the User folder, select
The New Object - User window opens:
New then select User.
Digital News Production 27
Page 30

Step 2 Setting Up a Domain Controller
4. Enter the user’s first name, initials (if desired), last name, and full name.
User logon name, enter the name that the user will log on with and, from
5. In
the drop-down list, select the correct domain for the user.
6. Click
7. In
Next.
Password and Confirm Password, enter the user’s password.
8. Select the appropriate password options.
9. Click
10. Review the summary of the new user and click
Next.
Finish.
The new user is added to the User folder.
11. Repeat steps 3-10 to create additional users.
28 Digital News Production
Page 31

Adding Users to the New Groups
Adding Users to the New Groups
Once you’ve created groups and users, you can add the users to their respective
groups. If you are configuring a child domain, you may select users from the
parent domain.
You also need to add the profile user to the Profile Services group, and the
VibrintService user to the Vibrint Services group.
This table illustrates how users fit into groups you previously defined:
Group Name Users Required?
Profile Services profile Yes
Vibrint Services VibrintService Yes
Editors Administrator Optional
joe edit 1
joe edit 2
joe edit 3
joe producer
To add a user to a group:
1. Select
Start | Programs | Administrative Tools | Active Directory Users
and Computers.
2. In the console tree, double-click the domain node.
3. Click the folder that contains the group to which you want to add a member.
4. In the details pane, right-click the group and select
Properties.
The group_name Properties window appears.
5. Click the
Members tab and then click Add.
Digital News Production 29
Page 32

Step 2 Setting Up a Domain Controller
The Select Users, Contacts, or Computers window opens:
6. Click
Look in to display a list of domains from which users and computers
can be added to the group, and then click the domain containing the users you
want to add.
7. Click the users to be added, then click
The users appear in the lower box.
8. Click
30 Digital News Production
OK.
Add.
Page 33

Adding Users to the New Groups
The members you added appear in the Members tab:
9. Click
OK to close the window.
10. Repeat steps 3-8 to add users to groups.
Digital News Production 31
Page 34

Step 2 Setting Up a Domain Controller
32 Digital News Production
Page 35

Step
3
Discontinuing Open SAN Service
In order to modify configurations and make other changes, you need to
discontinue all activity on the Open SAN system.
To discontinue Open SAN service:
1. Close all DNP workstation applications, such as NewsEdit, FeedClip, and
NewsQ.
2. Close all Profile Media Server VDR panels.
3. Stop SmartBin Service, if running.
4. Stop the Failover Monitor Service on the backup FSM.
See your Open SAN documentation for instructions.
5. Stop the Failover Monitor Service on the primary FSM.
Digital News Production 33
Page 36

Step 3 Discontinuing Open SAN Service
34 Digital News Production
Page 37

Step
4
Joining Machines to the New Domain
Once you’ve set up the Domain Controller, you need to join each computer in
your newsroom network to the new domain. Computers in the DNP system are
one of two types of Windows machines—DNP workstations run Windows 2000
system software, and the FSMs and Profile Media Servers run Windows NT 4.0.
Follow the instructions below for each type of computer in your Open SAN
system.
For Each DNP Workstation
To join a DNP workstation computer to the new domain:
1. If you’re using the new domain controller as a DNS server, make sure that
the DNS configuration for each machine’s ethernet connection has the new
Domain Controller as its priority DNS Server.
2. Right-click on My Computer and select
3. Select the Network Identification tab and click
4. Click Domain and type
5. Click
6. Enter the domain name and password for the domain tree root and click
7. At the Welcome message, click
8. Reboot the computer.
OK.
TGV as the domain name.
OK.
Properties.
Properties.
Digital News Production 35
OK.
Page 38

Step 4 Joining Machines to the New Domain
For Each FSM and Profile Media Server
To join a FSM or Profile Media Server to the new domain:
1. If the FSM or Profile Media Server is a member of another Domain (instead
of a Workgroup), you need to disjoin that domain.
2. If you’re using the new domain controller as a DNS server, make sure that
the DNS configuration for each machine’s ethernet connection has the new
Domain Controller as its priority DNS Server.
3. Right-click on My Computer and select
4. Select the Network Identification tab and click
5. Click Domain and type
6. Click
7. Enter the domain name and password for the domain tree root and click
8. At the Welcome message, click
9. Reboot the computer.
OK.
TGV as the domain name.
OK.
Properties.
Properties.
OK.
36 Digital News Production
Page 39

Step
5
Modifying CVFS for Open SAN Security
The CentraVision File System (CVFS) runs on the File System Manager(s) as
part of the Open SAN system. In order to use security on NewsEdit
workstations, you need to modify the CVFS configuration to use Windows
Security.
This section discusses how to:
• Add Windows security to CVFS
• Power cycle the FSMs
Digital News Production 37
Page 40

Step 5 Modifying CVFS for Open SAN Security
Adding Windows Security to CVFS
NOTE: You cannot use the CVFS Configuration Tool to add
Windows Security to CVFS. Using the Configuration Tool changes
other settings you don’t want to modify.
To add windows security to CVFS:
1. On the primary FSM, go to
2. Using Notepad, open the file
3. In the line item
If the line item doesn’t exist, add it to the file.
Windows Security, change the value to YES.
C:\MediaAreaNetwork\config.
default.cfg.
4. Save the file and exit Notepad.
5. Repeat these steps on the backup FSM.
38 Digital News Production
Page 41

Power Cycling the FSMs
Once you’ve modified the CVFS configuration, you need to power cycle the
FSMs, as follows:
1. Shut down the backup FSM.
2. Reboot the primary FSM.
3. Power on the backup FSM.
Power Cycling the FSMs
Digital News Production 39
Page 42

Step 5 Modifying CVFS for Open SAN Security
40 Digital News Production
Page 43

Step
6
Turning the System Back On
Before you set permissions on the NewsEdit machines, you need to turn the
system back on:
1. Turn on the Failover Monitor Service on the FSMs.
See your Open SAN documentation for instructions.
2. Reboot all client machines, including Profile Media Servers.
Digital News Production 41
Page 44

Step 6 Turning the System Back On
42 Digital News Production
Page 45

Step
7
Setting Security Permissions
The last step in setting up security for your DNP system is to set permissions for
the NewsEdit folders and bins. You again use the security schema you created
in Step 1 to determine permissions for users and groups.
You can set all permissions from one NewsEdit machine. You need to set
permissions in three different places—in the V:\ directory, in NewsEdit options,
and in the NewsEdit bins.
You need to be logged in as Domain Administrator in order to set security
permissions.
Digital News Production 43
Page 46

Step 7 Setting Security Permissions
Setting Initial Shared Volume Permissions
This task assures a uniform starting point in setting volume permissions,
essentially establishing the secure volume’s permissions to be identical to
either a CVFS volume that does not implement Windows Security, or a default
NTFS volume.
To set shared volume permissions:
1. Open a cmd window, switch to the V: drive, and type the following:
cacls V:\* /T /G Everyone:F
2. Open Windows Explorer, select the V: volume, right-click and select
Properties.
3. Click the
4. If necessary, add the user Everyone and allow Full Control.
5. Click
objects and enable propagation of inheritable permissions.
6. Click
defined permissions... Do you wish to continue?
Security tab.
Advanced... and check the box Reset permissions on all child
OK and click Yes in response to the dialog This will remove explicitly
7. Click OK to exit the Properties window.
44 Digital News Production
Page 47

Setting High Level Shared Volume Permissions
Setting High Level Shared Volume Permissions
Permissions on the V:\ folders are set using Windows Explorer. First you add
the group(s) to the drive and then set security permissions for that group. For
the folders that are inheriting permissions from the folder above it, you don’t
need to set them; they automatically use the permissions they inherit.
Domain Admins
V:\
V:\media
V:\PDR
V:\Thumbnails (inherit Full Control from V:\)
V:\VibrintAttic (inherit Full Control from V:\)
FFF FF
FFFF F*F*
Everyone
F* F*
SYSTEM
F = Full Control
* = Inherits permissions from the folder directly above it
To set permissions on the V:\ folders:
1. Open Windows Explorer and navigate to the V:\ drive.
2. Right-click on the desired folder and select
The default V:\ Properties window opens:
Archivists
Editors
Properties.
Ingestors
Producers
Viewers
Profile Services
Vibrint Services
Digital News Production 45
Page 48

Step 7 Setting Security Permissions
3. Under the Security tab, click Add.
The Select Users, Computers, or Groups window opens.
4. Select the group you want to add to the drive folder and click
The group adds to the bottom pane of the window.
5. Click
OK.
6. Check the box for Full Control in the Allow column.
7. Click
OK.
8. Give Full Control permission to the other groups—Domain Admins,
Everyone, and SYSTEM.
9. Select the V:\PDR drive and do the following:
a. Uncheck
this object.
b. Add these groups: Profile Services, Editors, and Ingestors.
c. Set Full Control permissions for these groups.
46 Digital News Production
Add.
Allow inheritable permissions from parent to propogate to
Page 49

Setting NewsEdit Root Level Permissions
Setting NewsEdit Root Level Permissions
Permissions for V:\VibrintAVFiles are set in NewsEdit options. First you add
the group(s) to the drive and then set security permissions for that group. You
need to login to this machine as Domain Administrator to set root permissions.
Domain Admins
Everyone
SYSTEM
Archivists
Editors
Ingestors
Producers
Viewers
Profile Services
Vibrint Services
V:\VibrintAVFiles
F = Full Control
L = List Folder Contents
R = Read
To set permissions for VibrintAVFiles:
1. Open NewsEdit and select
The Permissions for V:\VibrintAVFiles opens:
F FL RL RL RL R L RFF
Tools | Set Root Permissions.
Digital News Production 47
Page 50

Step 7 Setting Security Permissions
2. Uncheck Allow inheritable permissions from parent to propogate to this
object.
A Security message appears:
3. Select
Copy.
4. Remove the current permissions.
5. Select the Everyone group and click
Remove.
6. Add each of the groups you created for your newsroom (if you are using the
typical security schema, add the groups Archivists, Editors, Ingestors,
Producers, and Viewers).
7. Set permissions for each group according to the chart on page 47.
8. Click
OK.
48 Digital News Production
Page 51

Setting NewsEdit Bin Permissions
Setting NewsEdit Bin Permissions
Permissions for the NewsEdit bins are set in the Properties tab for each Bin.
Follow the instructions below and set the permissions for each bin in your toplevel NewsEdit bin.
Monday-Sunday
Bins
Feeds Bin
HFR Bin
Archive Bin
F = Full Control
L = List Folder Contents
R = Read
W = Write
D = Delete
- = Deny
* = Inherits permissions from the folder directly above it
** = Inheritance is blocked at this level
Domain Admins
F* F* -W -D W D -W -D W -D L R*
F* F* W -D -W -D W D -W -D L R*
F* F* -W -D W -D -F W D L R*
F* F* W D W -D W -D W -D L R*
Everyone
SYSTEM
Archivists
Editors
Ingestors
Producers
Viewers
Profile Services
Digital News Production 49
Page 52

Step 7 Setting Security Permissions
To set permissions for NewsEdit bins:
1. In the NewsEdit bin, right-click on the first bin and select
The Bin Properties window for that bin opens:
Properties.
2. Click the Security tab.
3. Change permissions for each group listed based on the chart on page 49.
4. Click
50 Digital News Production
OK when you are done setting permissions.
Page 53

Step
8
Using the Domain Controller as a
Reference Time Source
Windows 2000 machines automatically synchronize their time with the Domain
Controller, when joined to the domain, but Windows NT machines do not. If
your configuration relies on NetTime to synchronize such machines, you can
use the Domain Controller as the reference server for NetTime clients,
eliminating the need for a separate NetTime server. You do not need to run a
NetTime server on the domain controller.
To redirect NetTime to use the Domain Controller as its time source:
1. Select
2. In the System Tray, right-click on the NetTime icon and select
3. Click
4. Add the name of the Domain Controller and select
5. Click
Start | Programs | NetTime | NetTime.
Settings.
SNTP from the Protocol
drop-down list; leave all other settings as is.
OK.
Properties.
A summary window appears.
Digital News Production 51
Page 54

Step 8 Using the Domain Controller as a Reference Time Source
6. Click Update Now.
7. Repeat for the other FSMs or Profile Media Servers on your Open SAN
network.
While these steps will synchronize the clients with the domain, depending on
your IT practices and policies, you may still need and wish to synchronize your
domain’s time with a world time source. Among other sources, consult the
Microsoft white paper The Windows Time Service for Windows 2000, or the
Microsoft KB Article 216734, How to Configure an Authoritative Time Server
in Windows 2000.
52 Digital News Production
Page 55

Step
Testing
9
After creating and configuring the Domain Controller and setting permissions
for NewsEdit bins, you should test the system to make sure that the security is
working:
• NewsEdit system operation:
Basically, check that permissions exist functionally where they should and
that permissions are denied functionally where they should be denied. A
Viewer user should not be able to write or delete. Significantly, where a user
is denied all permissions (as might be the case for an investigative report that
should be editable by only a small group) make sure that users outside the
group have no access and no availability in the private group. Check that
delete permissions are truly denied. Check that read only users in a particular
bin cannot write.
• Winking:
Winking requires a complicated security relationship between several
processes. Therefore, it’s important to check that users who were expected to
be able to wink can wink. Create a clip in a common-cluster Profile and wink
it to a non-SmartBin using NewsEdit. Likewise, create a NewsEdit clip and
wink it to a Profile non-SmartBin.
• SmartBins:
Since SmartBins on an Open SAN function by winking, they have similar
dependencies to user-initiated winking. Check that a clip recorded on a
Profile SmartBin appears in the associated NewsEdit SmartBin and viceversa.
• Conformance Server:
The Conformance Server has overlapping permissions needs. Publish a story
out of NewsBrowse Advanced Edit to make sure that it works.
Digital News Production 53
Page 56

Step 9 Testing
54 Digital News Production
 Loading...