

Page 1

Panel IP Configuration Utility
Introduction
The feature set of NV96xx control panels has been extended to include a more robust set of connectivity options. The new functionality includes:
• Configuring a panel to use either a static IP address or DHCP.
• Connecting to a control system by defining its IP address.
• Configuring a control panel on a separate subnet through the use of a gateway.
• Connecting to a control system on a separate subnet through the use of a gateway.
The Panel IP Configuration Utility is a small application that addresses these options.
Summary
The Panel IP Configuration Utility does the following:
1 Configure the control panel to use a static IP address.
2 Configure the control panel to use the IP address of a specific control system.
3 Configure the control panel to communicate through a gateway
4 Reset a Panel to DHCP.
You can perform any of these tasks using a connection to the panel’s serial port or using its Ethernet
port. There are reasons for using either the serial port or the Ethernet port:
• With a serial connection, you can configure any individual panel that has no IP address (yet) or
a panel that might not be connected on a network.
• With an Ethernet connection, you can (re)configure any and all panels accessible over Ethernet
by your PC. Those panels, of course, must already have IP addresses. They can already be part
of an NV9000 network.
Panel IP Configuration Utility • User’s Guide 1
Page 2
Installation
Panel IP Configuration Utility
Installation
Follow these steps:
1 Uninstall the previous version of the software.
Go to the Windows control panel. Choose ‘Add or Remove Programs’. Find ‘Control Panel IP
Configuration Utility’ and click ‘Change/Remove’. Click ‘OK’ in the dialog that appears.
2 Insert the software and documentation CD (SB0033) in your CD drive. The CD will “autoplay.”
3 When its main screen appears, click ‘Configuration Software’. When that screen appears, click
‘Install Panel IP Config Utility’.
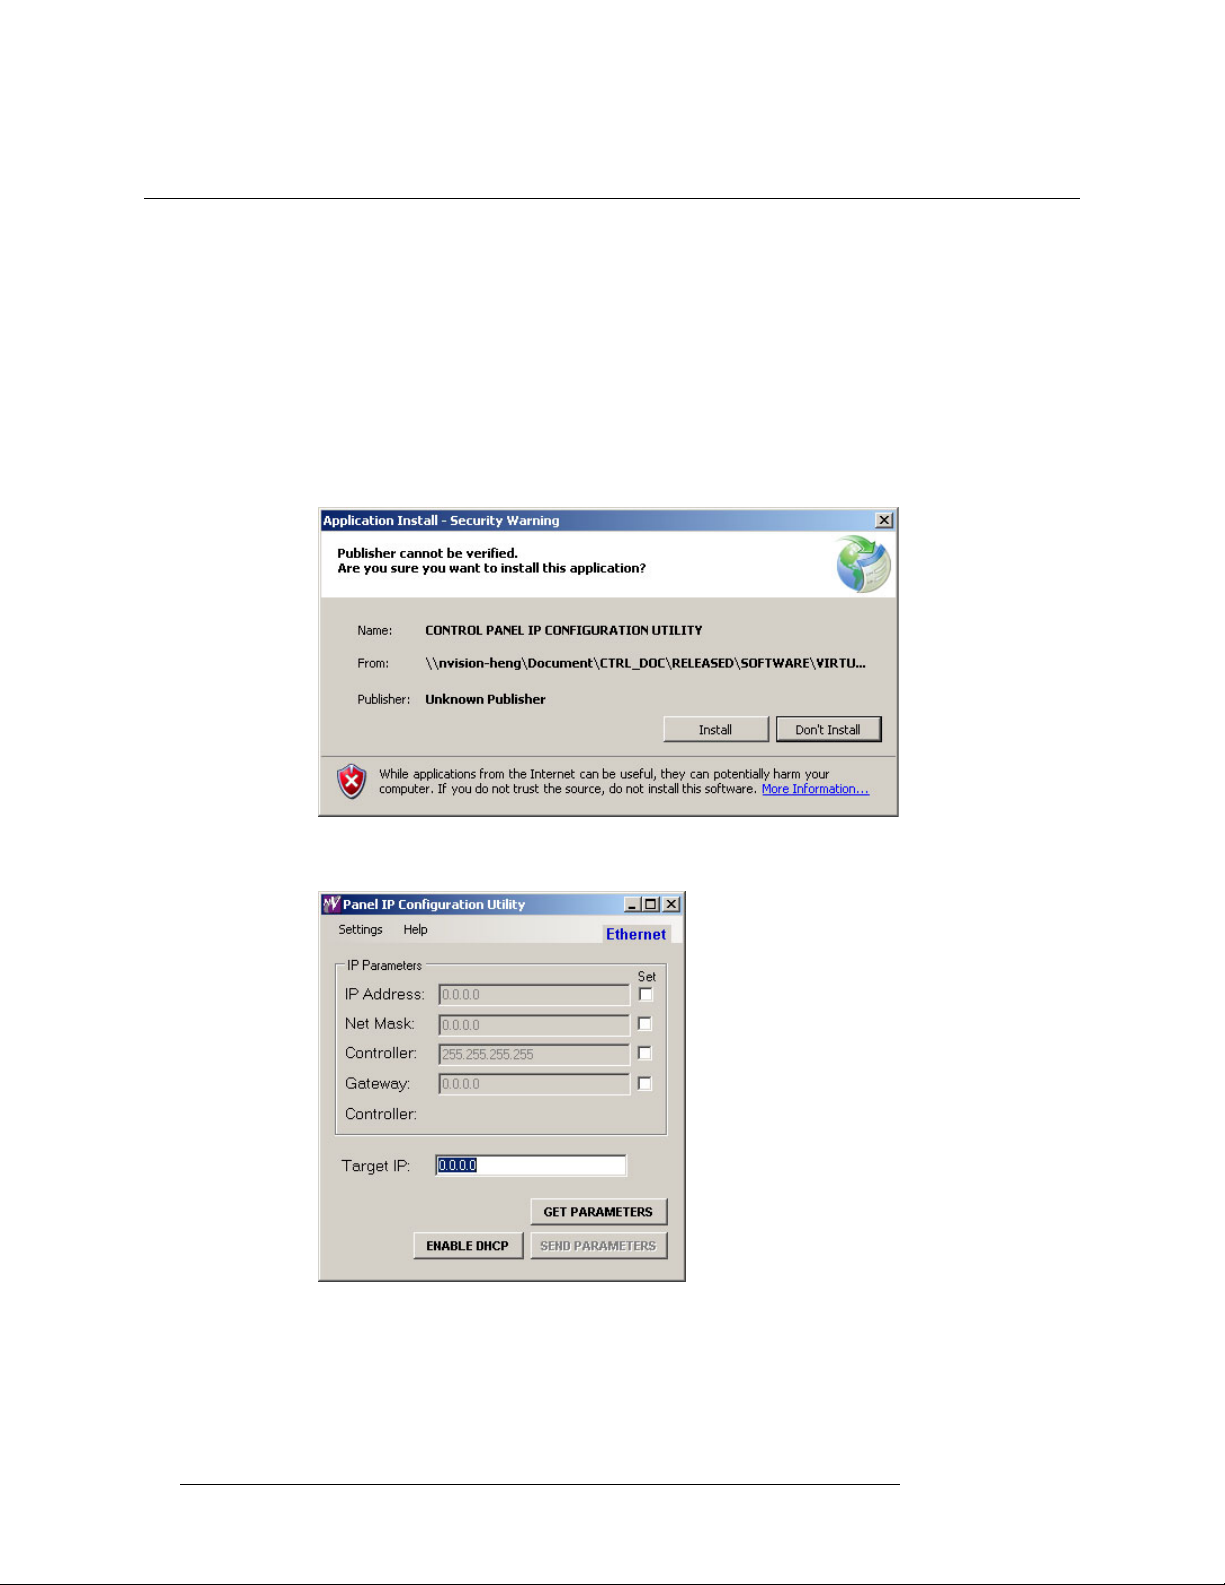
A security warning appears:
Click ‘Install’ to proceed. After a moment, the software will have been installed and display its
initial window:
The software is a very small application and there is little more than this window.
2 Rev 1.2 • 26 Nov 14
Page 3

Menus
Panel IP Configuration Utility
Menus
There are two simple menus.
• Settings Menu
• Help Menu
Settings Menu
This is the settings menu:
Use it to choose serial mode or Ethernet mode.
In serial mode you can configure any individual panel that has no IP address (yet). You will need a
9-pin serial cable for communication between your PC and a control panel. The utility uses a COM
port (RS-232) of your PC.
In Ethernet mode, you can (re)configure any and all panels accessible over Ethernet by your PC.
Those panels of course must already have IP addresses, presumably on an NV9000 network.
In serial mode, you can select the COM port through which the software will communicate with the
control panel. Serial mode requires a direct connection between your PC and the control panel.
In Ethernet mode, the ‘Target IP’ field identifies the panel, on a network, that you want to change.
Help Menu
This is the help menu:
Panel IP Configuration Utility • User’s Guide 3
Page 4

Click ‘About’ to get pertinent details about the product:
Panel
Config
PC
NV9000
Ethernet
COM port
Panel
Config
PC
NV9000
Ethernet
Panel IP Configuration Utility
Operating Details
Operating Details
Configuring the Control Panel to Use an IP Address
This application affects all panels except CR Series “remote panels” which must be pre-config-
ured in CRSC (Compact Router System Configurator).
You may configure a control panel to use a static IP address through its serial port or its Ethernet
port. Configuring the panel through its serial port is useful if the control panel does not have access
to a DHCP server on its subnet. To start this task, connect a 9-pin serial cable between the COM
port of your configuration PC and the control panel. Configuring the panel through the Ethernet
port is useful when the control panel already has an IP address on an NV9000 network, especially if
the panel’s serial port is difficult to access.
Figure 1-2 shows the serial mode connections:
Figure 1-1. Connections for Serial Mode
Figure 1-2 shows the Ethernet mode connections:
Figure 1-2. Connections for Ethernet Mode
4 Rev 1.2 • 26 Nov 14
Page 5

Panel IP Configuration Utility
Operating Details
NV96xx panels usually operate on the same subnet and the NV9000 control system acts as a DHCP
server. When Panel IP Configuration Utility is in Ethernet mode, the IP address to which the control panel is being set must be on the same subnet as the PC that is configuring it. That subnet is the
NV9000’s panel network.
When Panel IP Configuration Utility is in serial mode, the IP address to which the control panel is
being set should be on the same subnet as the NV9000’s panel network. Otherwise, the NV9000
will not recognize the panel.
Configuring the Control Panel to Use a Static IP Address via the Serial Port
1 Turn on the control panel.
If your network does not have a DHCP server, or if the panel is disconnected from your network, the control panel will follow its regular initialization process until it requires an IP
address. At this point, the panel displays “ACQ IP,” an abbreviation for “acquiring IP address.”
It will display this message indefinitely. It must be configured using the serial port.
2 Start the Panel IP Configuration Utility and choose serial mode from the ‘Settings’ menu.
The display at the top right corner of the screen will now display “Serial” in green text. Connect
a serial cable from a serial port of your PC to the serial port of the control panel.
3 Configure the control panel.
Click the ‘Get Parameters’ button: This will read the current values of the panel’s IP configuration:
Both the IP address and the net mask are currently 0.0.0.0, indicating that the control panel is
attempting to resolve its IP address through the use of a DHCP server. You must change both of
these values to configure a static IP address. In this example, we used 192.168.1.58, and
255.255.255.0.
Finally, click the ‘Send Parameters’ button to commit these changes (in the panel). The panel is
now configured to use the designated IP address and net mask.
If the configuration fails, some common causes are:
• Another application is currently using the COM port.
• The serial cable was not connected properly.
Panel IP Configuration Utility • User’s Guide 5
Page 6

Panel IP Configuration Utility
Operating Details
• The Panel IP Configuration Utility might have been in Ethernet mode.
• The IP address assigned is not on the same subnet as the NV9000’s panel network.
• The net mask is incorrect or is using a scope that is too narrow.
• The panel has not finished booting to the point where it is ready to acquire an IP address. It
should display “ACQ IP” or ‘Acquiring IP Address.”
Configuring the control panel to use a Static IP Address via the Ethernet Port
When you configure the IP address of the control panel using the Ethernet port, the panel already
has an IP address (obtained through DHCP or static assignment).
1 Start the Panel IP Configuration Utility and choose Ethernet mode from the ‘Settings’ menu.
The display at the top right corner of the screen will now display “Ethernet” in blue text.
2 Enter the IP address of the control panel in the ‘Target IP’ field and click ‘Get Parameters’.
This will display the current IP configuration settings of the control panel.
6 Rev 1.2 • 26 Nov 14
Page 7

Panel IP Configuration Utility
Operating Details
3 Configure the control panel.
To change the IP configuration, enter new values in the appropriate text boxes. In this example,
we changed the IP address to 192.168.1.59, while the net mask remains 255.255.255.0:
In the general case, click the appropriate check boxes to indicate which values will change, then
make the changes.
Finally, click the ‘Send Parameters’ button to commit these changes. The panel is now configured to use the designated IP address.
If the configuration fails, some common causes are:
• The target IP address is not specified correctly.
• The control panel you wanted to change is using a different IP address.
• Either the PC or the control panel is using an incorrect subnet.
• The appropriate ‘Set’ check box was not selected.
If you want to verify, from the panel, that it was configured correctly, change the target IP field
to reflect the new IP address, once it has been changed, and then click ‘Get Parameters’. The
current values of the panel’s IP configuration will display.
Configuring a New IP Address for the Control System
The default value of the control system’s IP address is 255.255.255.255. This is a broadcast
address. When a control panel attempts to connect to a control system, it sends connection datagrams to all hosts on the subnet (as specified by the broadcast address). If there is a control system
on the subnet, it acknowledges the connection request and begins communicating with the control
panel.
The default method works well under normal circumstances, but sometimes there are multiple control systems on the same subnet or the control system is on an entirely different subnet. In these two
situations, it might be necessary to configure the control panel to connect to specific control system. In this case, if the control system is redundant, it will be necessary to use a virtual IP address
for the redundant pair and enter that virtual IP address in the ‘Controller’ IP address field.
Panel IP Configuration Utility • User’s Guide 7
Page 8

Panel IP Configuration Utility
Serial mode Ethernet mode
Operating Details
Follow these guidelines:
1 Choose the configuration mode.
You can make this change in serial mode or Ethernet mode.
2 Enter the new control system IP address in the ‘Controller’ text box.
Click ‘Get Parameters’. The current values of the panel’s IP configuration will display.
If you are making the change over Ethernet, you must check the ‘Set’ checkbox. You must also
enter the target IP to identify the panel of interest on the controller’s subnet. (In serial mode, the
panel is the one to which you have connected your serial cable.)
When you have finished, click ‘Send Parameters’.
In this example, we set the controller’s IP address to 192.168.1.1.
Notes
• The control system must be on the same subnet as the panel if gateway is set to 0.0.0.0.
• If Ethernet mode is in effect, use the ‘Set’ boxes and the target IP appropriately.
Configuring the Control Panel through a Gateway
If the control system and the control panel are on separate subnets, it is necessary to configure the
control panel to use the gateway which connects the two subnets together. To do this, check the
‘Gateway’ checkbox and set the value of the gateway.
1 Choose the configuration mode.
You can make this change in serial mode or Ethernet mode.
2 Click ‘Get Parameters’. The current values of the panel’s IP configuration will display.
3 Type the new gateway IP address into the ‘Gateway’ text box.
If you are making the change over Ethernet, you must check the ‘Set’ checkbox. You must also
enter the target IP for one of the panels on the controller’s subnet.
When you have finished, click ‘Send Parameters’.
8 Rev 1.2 • 26 Nov 14
Page 9

Panel IP Configuration Utility
Operating Details
Notes
• The gateway must be connected to both subnets and must be forwarding packets correctly.
• If Ethernet mode is in effect, use the ‘Set’ boxes and the target IP appropriately.
• The control panel must be able to resolve the gateway’s MAC address through ARP.
Resetting the Panel to DHCP
If you want to revert a panel to DHCP, connect to the panel serially or select the panel over Ethernet. Then,
1 choose ‘Get Parameters’. The current values of the panel’s IP configuration will display.
2 Click the ‘Enable DHCP’ button.
3 Click ‘Send Parameters’.
(Nothing else is required. You do not have to power-cycle the panel.)
Panel IP Configuration Utility • User’s Guide 9
Page 10

Panel IP Configuration Utility
Operating Details
10 Rev 1.2 • 26 Nov 14
 Loading...