

Page 1
Page 2

Copyright
Copyright © 2004 Thomson Broadcast and Media Solutions, Inc. All rights
reserved. Printed in the United States of America.
This document may not be copied in whole or in part, or otherwise reproduced
except as specifically permitted under U.S. copyright law, without the prior written
consent of Thomson Broadcast and Media Solutions, Inc., P.O. Box 59900,
Nevada City, California 95959-7900.
Trademarks
Disclaimer
U.S. Government
Restricted Rights
Legend
Revision Status
ContentShare, Grass Valley, NewsEdit XT, NewsQ, NewsQ Pro, NewsShare,
Media Manager, and Profile are either registered trademarks or trademarks of
Thomson Broadcast and Media Solutions in the United States and/or other
countries. Other trademarks used in this document are either registered
trademarks or trademarks of the manufacturers or vendors of the associated
products. Thomson Broadcast and Media Solutions products are covered by U.S.
and foreign patents, issued and pending. Additional information regarding
Thomson Broadcast and Media Solutions’ trademarks and other proprietary rights
may be found at www.thomsongrassvalleygroup.com.
Product options and specifications subject to change without notice. The
information in this manual is furnished for informational use only, is subject to
change without notice, and should not be construed as a commitment by Thomson
Broadcast and Media Solutions. Thomson Broadcast and Media Solutions
assumes no responsibility or liability for any errors or inaccuracies that may appear
in this publication.
Use, duplication, or disclosure by the United States Government is subject to
restrictions as set forth in subparagraph (c)(1)(ii) of the Rights in Technical Data
and Computer Software clause at DFARS 252.277-7013 or in subparagraph c(1)
and (2) of the Commercial Computer Software Restricted Rights clause at FAR
52.227-19, as applicable. Manufacturer is Thomson Broadcast and Media
Solutions, Inc., P.O. Box 59900, Nevada City, California 95959-7900 U.S.A.
Rev Date Description
May 25, 2004 Release 071-8325-00 for Software Version 5.0
November 11, 2004 Release 071-8325-01 for Software Version 5.1
Page 3

Installing NewsEdit LT
Use these instructions to install the NewsEdit LT software on the Dell Latitude
D800 Laptop PC.
To install NewsEdit LT, follow these steps:
1. Replace the keyboard with the Thomson Grass Valley color keyboard.
2. Set up Windows for optimal performance with NewsEdit LT.
3. Uninstall any previous versions of NewsEdit or Profile software from the PC.
4. Install the Profile software from the NewsEdit LT CD-ROM.
5. Install the NewsEdit LT software from the NewsEdit LT CD-ROM.
6. Install any options for NewsEdit LT—titling or external controllers.
7. Obtain a License Number from Thomson Grass Valley.
Digital News Production
3
Page 4
Installing NewsEdit SCE
Step 1: Replace the Dell D800 Keyboard
Your NewsEdit LT software kit comes with a color keyboard that makes editing
with NewsEdit LT quick and easy. You should replace the keyboard that ships
with your laptop with the color NewsEdit keyboard.
Please note that these instructions are taken from the Dell Latitude D800
Service Manual; refer to that document on the Dell website at www.dell.com
for more information.
>>> CAUTION: Before performing the following procedure, read the safety
instructions in your System Information Guide.
To avoid electrostatic discharge, ground yourself by using a wrist grounding strap
or by periodically touching an unpainted metal surface (such as the back panel)
on the computer.
To replace your keyboard:
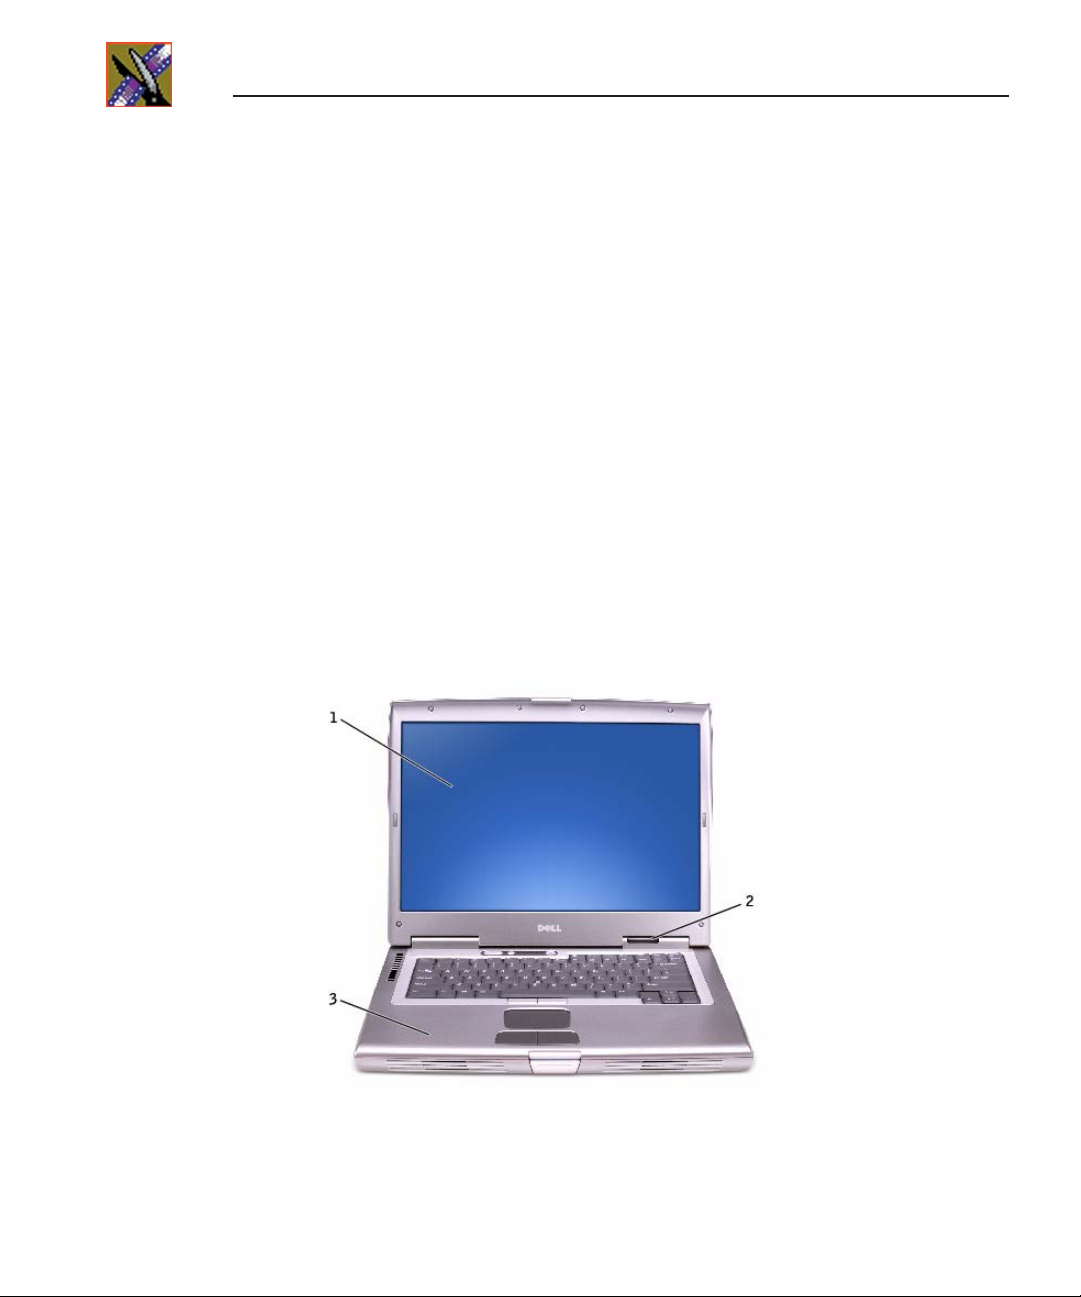
1. Turn the computer right-side up and open it.
Display
Computer
base
Central
control
cover
4
Digital News Production
Page 5
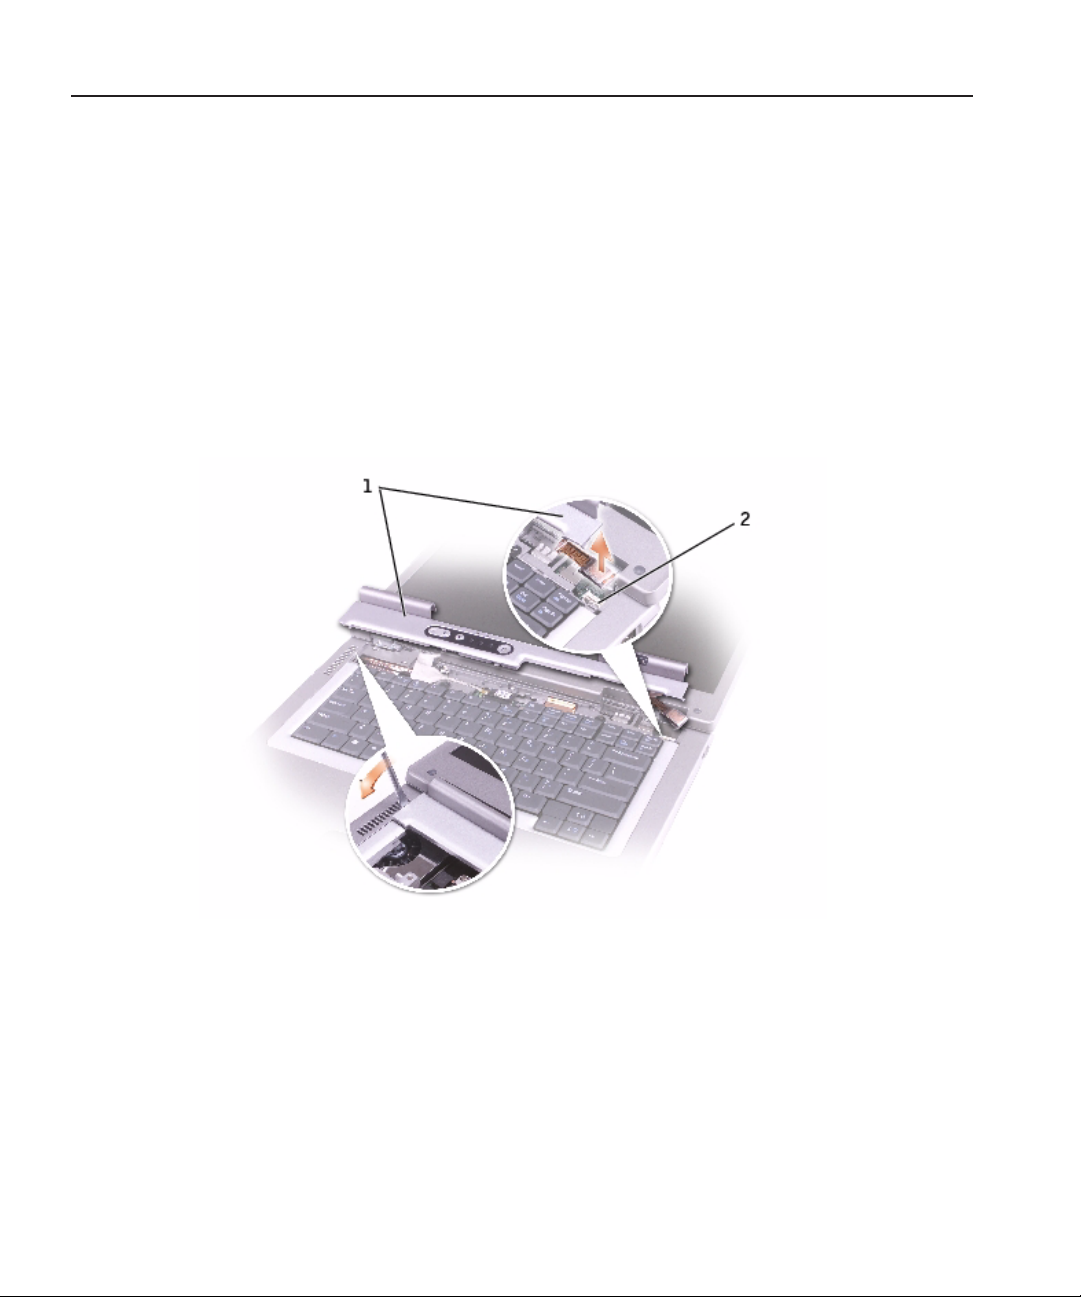
2. Remove the center control cover:
a. Open the display all the way (180 degrees) so that it lies flat against your
work surface.
b. Starting on the left side of the computer, use a plastic scribe or flat-blade
screw driver to pry up the center control cover.
c. Disconnect the center-control-cover flex cable from the system board
connector using the pull-tab.
d. Lift the center control cover away from the computer, and lay it aside.
Center
control
cover
Step 1: Replace the Dell D800 Keyboard
System
board
connector
Digital News Production
5
Page 6

6
Installing NewsEdit SCE
3. Remove the keyboard:
a. Remove the two M2.5 x 6-mm screws across the top of the keyboard.
>>>CAUTION: The keycaps on the keyboard are fragile, easily dislodged,
and time-consuming to replace. Be careful when removing and
handling the keyboard.
b. Rotate the keyboard up and slide it forward.
c. Hold the keyboard up and slightly forward to allow access to the keyboard
connector.
d. Pull up on the keyboard connector tab to disconnect the keyboard
connector from the system board.
M2.5 x 6-mm screws (2)
US keyboard
service kit
Palm rest
4. Reverse these instructions to install the Thomson Grass Valley color
keyboard.
Digital News Production
Page 7

Step 2: Set Up Windows to Use NewsEdit LT
Step 2: Set Up Windows to Use NewsEdit LT
You need to configure several Windows settings in order to use NewsEdit LT.
Updating the Display Adapter Driver
1. Insert the NewsEdit LT CD-ROM into the computer’s CD-ROM drive.
2. Browse to
3. Double-click
D: | Drivers | NVidia for DELL D800
R65893.exe
4. Follow the prompts to load the driver.
5. Reboot your computer when prompted.
Setting Display Properties
1. Right-click on the Desktop and select
The Display Properties window appears.
2. Click the Desktop tab:
a. Click
b. In the Desktop icons section, check
c. Click
3. Click the Appearance tab:
a. Under Windows and buttons:, select
b. Click the
Customize Desktop
and
Internet Explorer
.
Apply
Effects
edges of screen fonts
button, check
.
.
.
, and select
.
Properties
My Computer
Windows Classic Style
Use the following method to smooth
Standard
.
,
My Network Places
.
from the drop-down list.
,
c. Deselect
d. Click
e. Click
OK
Apply
Use large icons
.
.
.
4. Click the Settings tab:
a. The Monitor 1 icon should be selected.
Digital News Production
7
Page 8

8
Installing NewsEdit SCE
b. Set the screen resolution to at least
1024 x 768
recommended).
c. Select
d. Click
Highest (32 bit)
Apply
.
for the Color Quality.
Adjusting System Performance Settings
1. Right-click on My Computer and select
2. Click the Advanced tab.
3. Under Performance, click the
4. In the Visual Effects tab, select
.
Apply
Settings
Adjust for best performance
5. Click the Advanced tab.
6. Under Virtual Memory, click the
7. Select Custom Size and set both the Initial Size and the Maximum Size to
1024
.
.
8. Click
9. Click
Set
OK
three times to close the windows.
button.
Change
Properties
button.
(
1200 x 800
.
is
and click
Setting the Network Access Security Mode
1. From the Start menu, select
2. Double-click
3. Select
Local Security Policy | Local Policies
Administrative Tools
4. Under Security Options, double-click
security model for local accounts
5. Select
Classic-local users authenticate as themselves
down menu.
6. Click
OK
.
7. Close all windows.
Digital News Production
Settings | Control Panel
.
.
Network access: Sharing and
.
.
from the drop-
Page 9

Setting User Account Options
Setting User Account Options
1. From the Start menu, select
2. Double-click
3. Click
4. Uncheck both options:
5. Click
6. Close the window.
Change the way users log on or off
Switching
Apply Options
User Accounts
Use the Welcome Screen
.
.
Settings | Control Panel
.
.
.
and
Use Fast User
Installing Critical Windows Updates
It is highly recommended that you install any critical Windows updates. Open
Internet Explorer, select
Tools | Windows Update
and follow the instructions.
Step 3: Uninstall Previous Versions of Software
If your NewsEdit LT is a new system, you can skip these instructions.
If you are upgrading your NewsEdit LT software, you need to remove any
previous versions of Profile and NewsEdit software before installing the new
software.
To uninstall Profile and NewsEdit software:
1. From the Windows desktop, choose
Add/Remove Programs
2. Find the ProfileXP item, click it to expand, and click
3. Find the NewsEdit item, click it to expand, and click
.
Start | Settings | Control Panel |
Remove
Remove
Digital News Production
.
.
9
Page 10

Installing NewsEdit SCE
Step 4: Install the Profile Software
NewsEdit LT requires Profile software drivers to be installed prior to installing
the NewsEdit LT software.
To install the Profile software on your NewsEdit LT machine:
1. Insert the NewsEdit LT CD-ROM into the machine’s CD-ROM drive.
The installation screen appears.
button next to Profile Software Installer.
2. Click the
3. Install the software following these instructions:
On this screen... Do this...
Install
10
Welcome Click
License Agreement Read and accept, then click
Setup Type Select
Ready to Install Click
Installation Complete Click
Next
.
XP PC
and click
>>>
WARNING: The other setup types are for installing
Profile software on a Profile Video Server or when
using an Open SAN storage system and should never
be used on a NewsEdit LT computer.
.
Install
. The computer prompts you to reboot so the new
Finish
settings take effect.
Next
Next
.
.
Digital News Production
Page 11

Step 5: Install the NewsEdit LT Software
Step 5: Install the NewsEdit LT Software
To install the NewsEdit LT software on your computer:
1. Insert the NewsEdit LT CD-ROM into the machine’s CD-ROM drive.
Install
2. Click the
NOTE: If you have a previous version of NewsEdit software on your
computer that you haven’t removed, the system detects the software
and displays a message. Click
to uninstall the previous version of software.
3. Follow the directions below for using Local or Shared Storage. If your
system is part of an Open SAN system or connected to Network Attached
Storage (NAS), use the instructions for Shared Storage; otherwise, use the
instructions for Local Storage.
button next to the NewsEdit LT Installer.
to close the message and click
OK
Yes
Local Storage System
Follow these instructions if you are installing NewsEdit LT on a system using
local storage:
On this screen... Do this...
Welcome Click
Select Destination Directory Leave set at the default location and click
Select Shared or Local Installation Select
Specify Directory for Video and
Audio Files
Ready to Install Click
Installation Complete Click OK to close the installation program. The computer
Once the computer reboots, a System Self Test runs, testing your software
configuration and software versions.
Next
.
Next
.
Local
and click
Leave set at the default location and click
to begin the installation.
Next
prompts you to reboot so the new settings take effect.
Next
.
Next
Digital News Production
.
11
Page 12

Installing NewsEdit SCE
Shared Storage System
Follow these instructions if you are installing NewsEdit LT on a system using
shared storage.
NOTE: Before you install the NewsEdit LT software on a shared
storage system, you need to connect the computer to the shared
storage and be able to see the Database System Manager (DSM) on
the network. See the documentation that came with your Network
Attached Storage (NAS) system for more information.
On this screen... Do this...
Welcome Click Next.
12
Select Destination Directory Leave set at the default location and click
Select Shared or Local
Installation
Specify the Servers for the
Shared Database
Specify Directory for Shared
Video and Audio Files
Specify Directory for AV
Cache Files
Specify Location for Shared
Thumbnails
Specify Directory for Local
Video and Audio Files
Ready to Install Click
Installation Complete Click
Select
Open SAN or NAS depending on your storage system.
To enable security, check
Enter the names of the primary and secondary (if applicable)
File System Managers (or Database System Managers for the
NAS system) and click
Leave set at the default location and click
Leave set at the default location and click
Leave set at the default location and click
Leave set at the default location and click
Next to begin the installation.
OK to close the installation program. The computer
prompts you to reboot so the new settings take effect.
Domain Security. Click Next.
Next.
Next.
Next.
Next.
Next.
Next.
Once the computer reboots, a System Self Test runs, testing your software
configuration and software versions.
Digital News Production
Page 13

Step 6: Install NewsEdit LT Options
Step 6: Install NewsEdit LT Options
If you have purchased any of the NewsEdit LT options, Titling or External
Controllers, use the instructions below to install the component.
NewsEdit Titling
To install the Titling plug-in:
1. Insert the NewsEdit LT CD-ROM into the machine’s CD-ROM drive.
2. Navigate to
3. Double-click
D: | Chyron.
SetupCGPlugin.exe.
4. Enter vibrint when asked for a password.
The files extract and the CG Plugin Setup screen appears.
5. Follow these instructions to install the plug-in:
On this screen... Do this...
Welcome Click Next.
License Agreement Read and accept by clicking
Choose Destination Location Leave set at the default location and click
Select Program Folder Leave set at
Installation Complete Click
CG Plugin and click Next.
Finish to close the installation program.
Yes.
Next.
Digital News Production 13
Page 14

Installing NewsEdit SCE
External Controllers
With NewsEdit LT, you can use two external controllers:
• Motorized Fader Controller—Lets you control the audio features of
NewsEdit LT, making refining and perfecting the audio mix of your
sequences easier.
• Effects Controller—Lets you control the creation of effects in NewsEdit LT
externally.
To install an external controller:
1. Connect the controller to NewsEdit LT:
a. Plug the controller’s USB connector into one of the available USB ports
on the back of your NewsEdit LT computer.
b. If you are connecting the Motorized Fader Controller, plug the
controller’s power connector into a DC power adapter connection; the
Effects Controller is powered off of the USB cable.
c. When the New Hardware Wizard appears, follow the directions on the
screen.
d. When asked for the controller’s driver, navigate to:
Vibrint 3.0 | Drivers | JLC USB Drivers.
e. Finish the new hardware installation.
2. Assign a COM port for the controller in NewsEdit LT:
a. In NewsEdit LT, choose
b. Select the COM port from the
list.
c. Click
14 Digital News Production
OK.
C: | Program Files |
Tools | Options | Controller.
USB Controller Comm Port drop-down
Page 15

Step 7: Obtain a Software License Number
Step 7: Obtain a Software License Number
Once you’ve installed the Profile and NewsEdit LT software, you need to get a
License Number from Grass Valley.
To obtain a License Number:
1. Open Windows Explorer and browse to
Utilities.
2. Double-click the file License.exe to open it.
The Software License Utility opens:
System
Identification
Number
Your System Identification Number appears in the bottom field of the
window.
C: | Program Files | Vibrint 3.0 |
3. Call Grass Valley Product Support at 1-800-547-8949 and provide the
customer service representative with your System Identification Number, as
well as the software version and the original order number for the system.
4. Enter the License Number provided to you by Grass Valley Product Support
and click
OK.
Your NewsEdit LT software is ready to use. To learn how to use NewsEdit LT,
view the NewsEdit LT User Guide at
C: | Program Files | Vibrint 3.0 | Docs.
Digital News Production 15
Page 16

Installing NewsEdit SCE
16 Digital News Production
 Loading...