

Page 1

NewsBrowse
DESKTOP BROWSING SYSTEM
Installation and Configuration Guide
SOFTWARE VERSION 2.7
071-8307-01
DECEMBER 2004
the most watched worldwide
Page 2

Copyright Copyright © 2004 T homson Broa dcas t and Medi a Solu tio ns, Inc. All righ ts res er ved. Prin ted in
the United Sta tes of America.
This document may not be copied in whole or in part, or otherwise reproduced except as
specifically permitted under U.S. copyright law, without the prior written consent of Thomson
Broadcast and Medi a Solutions, Inc., P.O. Box 59900, Nevada City, California 95959-7900
Trademarks Grass Valley, NewsBrowse, NewsEdit, NewsQ, NewsShare, NewsQ Pro, Media Manager, and
Profile are either registered trademarks or trademarks of Thomson Broadcast and Media
Solutions, Inc. in the United States and/or other countries. Other trademarks used in this
document are either registered trademarks or trademarks of the manufacturers or vendors of
the associated products. Thomson Broadcast and Media Solut i ons, Inc. products are c overed
by U.S. and foreign patents, issued and pending. Additional information regarding Thomson
Broadcast and Media Solutions, Inc. trademarks and other proprietary rights may be found at
www.thomsongrassvalley.com.
Disclaimer Product options and specifications subject to change without notice. The information in this
manual is furnished for informational use only, is subject to chang e w i thout notice, and should
not be construed as a commitment by Thomson Broa dcast and Media Solu tions, Inc . Thomson
Broadcast and Media Solutions, Inc. assumes no responsibility or liability for any errors or
inaccuracie s t hat may appear in this public ation.
U.S. Government
Restricted Rights
Legend
Revision Status
Use, duplicat ion, o r disclos ure by t he Unite d States Governme nt is su bject to restrict ions as s et
forth in subparagraph (c)(1)(ii) of the Rights in Technical Data and Computer Software clause
at DFARS 252.277-7013 or in subparagraph c(1) and (2) of the Commercial Computer
Software Re st ri cted Rights cl ause at FAR 52.227-19, as applicable. Manufacturer is Thomson
Broadcast and Media Solutions, Inc., P.O. Box 59900, Nevada City, California 95959-7900
U.S.A.
Rev Date Description
January 31, 2003 Release to part number 071-8217-00
July 21, 2003 Release for software version 1.5 t o part number 071-8217-01
May 25, 2004 Release for sof tware version 2.0. Part number 071-8307-00.
Decem b er 16 ,
2004
Release for sof tware version 2.7. Add ed i nformation about
Advanced Encod er, FlashN et archiv e, and DIVA rchive. Part number
071-8307-01.
2 NewsBrowse Installation and Configuration Guide December 16, 2004
Page 3

Contents
Preface..................................................................................................................7
Grass Valley Product Support.................................................................................8
Chapter 1 System Overview
Functional description.............................................................................................9
Two tier system diagram.........................................................................................10
NetTime system ......................................................................................................11
Legacy systems.......................................................................................................11
Chapter 2 Installing NewsBrowse
Rack-mount hardware components ........................................................................13
Cable hardware components ..................................................................................13
NewsBrowse server instructions: Dell or Axiom platform...................................14
NewsBrowse server instructions: HAFT platform...............................................15
Network Attached Storage (NAS) instructions - Fastora....................................17
NAS instructions: Serial ATA network platfor m..................................... ........ .....18
Single-channel encoder instructions...................................................................19
RS-422 Cable Pinouts................................................................................... 20
MDI Server instructions......................................................................................21
Advanced Encoder instructions................... ........ ........ ......... ........ ......... ........ .....22
Live monitor encoder instructions.......................................................................23
Router Gateway instructions..............................................................................24
Install NewsBrowse software ..................................................................................25
Chapter 3 Configuring the NewsBrowse System
Configuration overview............................................................................................28
Establish conventions..............................................................................................29
Machine naming convention............................................................................... 29
Channel naming convention...............................................................................29
MDI naming convention......................................................................................30
Services naming convention...............................................................................30
Ports and services convention............................................................................31
Site-specific configuration tables................................. ......... ........ ......................32
Configure network: Two tier....................................................................................34
Distribute host tables..........................................................................................34
Configure network settings on Production network machines............................35
Configure HAFT platform....................................................................................36
Configure network settings on Client network machines....................................36
Test: Verify two tier network settings..................................................................37
Prepare for core configuration stages............................................... ......... ........ .....38
Prepare NetTime................................................................................................38
Prepare NetTime servers...............................................................................38
Prepare NetTime clients................................................................................39
Prepare Profile Media Servers ...........................................................................40
Prepare NAS - Windows Fastora .......................................................................40
Prepare NAS - Serial ATA network platform ......................................................44
Verify NAS access..............................................................................................45
About Windows Domains and the nbadmin account..........................................46
Accessing NewsBrowse services.......................................................................46
Accessing NewsBrowse system configuration pages ........................................47
Stop NewsBrowse services............. ........ ......... ........ ........ ......... ........ ......................49
ASK registration stage.............................................................................................50
Configure Media Frame Core ASK: Register components.................................51
Test: ASK registration stage...............................................................................52
Checklist: ASK registration stage.......................................................................52
December 16, 2004 NewsBrowse Installation and Configuration Guide 3
Page 4

Contents
Managed Device Interface (MDI) stage .................................................................. 53
Prepare MDI server............................................................................................54
Configure ASK Location: MDI server ................................................................. 55
Configure Proxy MDI..........................................................................................56
Configure Profile MDIs.......................................................................................57
Test: MDI stage..................................................................................................58
Checklist: MDI stage .......................................................................................... 60
Encoder stand-alone stage ..................................................................................... 61
Configure ASK Location: Single-channel encoder.............................................62
Configure Ingest Control: Single-channel encoder............................................. 62
Configure Proxy Asset (NAS): Single-channel encoder..................................... 63
Configure media server: Single-channel encoder.............................................. 64
Configure MPEG encoder: Single-channel encoder ..........................................65
Test: Encoder stand-alone stage ....................................................................... 65
Checklist: Encoder stand-alone stage................................................................ 67
Encoder + Server stage..........................................................................................68
Configure ASK Location: NewsBrowse server................................................... 69
Configure Media Frame Core ASK: Single-channel encoder............................. 69
Configure Ingest Scheduler: NewsBrowse server..............................................70
Set up NewsBrowse client for configuration stage tests ....................................71
Test: Encoder + Server stage.............................................................................71
Checklist: Encoder + Server stage.....................................................................72
Router Gateway stand-alone stage......................................................................... 73
Add Router Gateway..........................................................................................73
Configure ASK Location: Router Gateway......................................................... 74
Configure Router Gateway.................................................................................74
Test: Router Gateway stand-alone stage...........................................................74
Checklist: Router Gateway stand alone stage ...................................................75
Router Gateway + Server stage.............................................................................. 76
Add Router Gateway to Ingest Scheduler.......................................................... 77
Test: Router Gateway + Server stage................................................................78
Checklist: Router Gateway + Server stage ........................................................ 78
Advanced encoder stand-alone stage..................................................................... 79
Configure ASK Location: Advanced encoder..................................................... 80
Configure Advanced Encoding Control ..............................................................80
Configure Proxy Asset (NAS): Advanced encoder............................................. 81
Configure MPEG encoder: Advanced encoder..................................................81
Configure Real Media Encoder: Advanced encoder..........................................82
Test: Advanced encoder stand-alone stage - high-res source........................... 83
Test: Advanced encoder stand-alone stage - MPEG proxy source ................... 85
Checklist: Advanced encoder stand-alone stage...............................................86
Advanced encoder + Server stage.......................................................................... 87
Configure Media Frame Core ASK: Advanced encoder..................................... 87
Configure Rules Automation: Advanced encoder ..............................................88
Create Proxy MPEG Rules............................................................................89
Create Proxy Rules ....................................................................................... 90
Test: Advanced encoder + Server stage - high-res source................................91
Test: Advanced encoder + Server stage - MPEG proxy source.........................92
Checklist: Advanced encoder + Server stage .................................................... 92
EDL Export, Save, Conform stage..........................................................................93
Configure Profile MDI: Conform to air settings................................................... 94
Configure NTFS MDI..........................................................................................95
Configure Media Frame Core ASK: NTFS.........................................................95
Configure Conform Services ..............................................................................96
Configure Export Services..................................................................................97
Configure Save EDL settings.............................................................................97
Test: EDL stage..................................................................................................98
4 NewsBrowse Installation and Configuration Guide December 16, 2004
Page 5

Checklist: EDL stage..........................................................................................98
Archive stage...........................................................................................................99
Add archive MDI.................................................................................................100
Verify archive preparations.................................................................................101
Avalon archive preparations ..........................................................................101
FlashNet preparations...................................................................................101
DIVA preparations .........................................................................................102
Network connectivity - all archive types.........................................................103
Configure ASK Location: Archive MDI host........................................................104
Configure Media Frame Core ASK: Archive.......................................................104
Configure Avalon Archive MDI...........................................................................105
Configure FlashNet MDI.....................................................................................107
Configure DIVA MDI...........................................................................................108
Configure Archive Services................................................................................109
Test: Archive stage............................................................................................. 109
Checklist: Archive stage..................................................................................... 110
Deploy remaining machines for full system.............................................................111
Add live monitor encoders.......................................................................................111
Test system interactions with multiple machines ....................................................112
Multiple channel ingest test................................................................................112
Multiple scavenge test........................................................................................112
Purge test...........................................................................................................113
Add NewsBrowse Clients........................................................................................113
Connect server and NAS to customer LAN........................................................113
Set up client PCs................................................................................................114
Configure NewsBrowse Licenses.......................................................................114
Administering NewsBrowse user access ................................................................116
Configure NewsBrowse Groups......................................................................... 116
Configure NewsBrowse Users............................................................................117
Managing NewsBrowse User sessions..............................................................119
Adding custom fields...............................................................................................119
Testing NewsBrowse client operations ...................................................................121
Chapter 4 Recovery Planning
Encoder failure considerations................................................................................123
Server failure considerations...................................................................................123
Database maintenance and administration.............................................................123
Repairing a database that is unusable due to transaction log size ....................124
How to determine the size of the transaction log................................................124
Manually controlling transaction log growth........................................................125
Setting up a database maintenance plan...........................................................125
Database Restoration.........................................................................................128
Chapter 5 Troubleshooting the NewsBrowse system
Troubleshooting tools..............................................................................................129
Troubleshooting tips................................................................................................130
Appendix A Component Interaction Diagrams
Ingest 1....................................................................................................................133
Ingest 2....................................................................................................................134
Scavenge ................................................................................................................135
EDL Export..............................................................................................................136
EDL Save................................................................................................................137
EDL Conform...........................................................................................................138
Archive ....................................................................................................................139
Purge.......................................................................................................................140
December 16, 2004 NewsBrowse Installation and Configuration Guide 5
Page 6

Contents
Appendix B Legacy systems
Three tier system diagram ...................................................................................... 141
Two tier system diagram version 2.0 ...................................................................... 142
Sequential encoder instructions..............................................................................143
Image Support Server (ISS) instructions.................................................................144
Prepare NAS - Linux Fastora..................................................................................145
Index......................................................................................................................147
6 NewsBrowse Installation and Configuration Guide December 16, 2004
Page 7

Preface
This NewsBrowse Installation and Configuration Guide is p art of a full set of support
document at i o n for the NewsBrowse sy s te m, des c ribed as follows:
•
•
•
NewsBrowse Installation and Configuration Guide — Provides explanations and
procedures for installing and configuring the NewsBrowse system at a customer
site. Includes recovery planning and troubleshooting sections. This document is
available in printed form as part of the product bundle when you receive your new
system. It is also available in electronic form (PDF file) on the NewsBrowse
Application CD-ROM.
NewsBrowse Online Help — Provides instruction s for using the NewsBrowse
application. This document is available from the NewsBrowse application Help
menu.
NewsBrowse Release Notes — Contains the latest information about the
NewsBrowse hardware and the software release shipped on your system. The
information in this document includes upgrade instructions, feature changes from
the previous releases, helpful system administrative information, and any known
problems. You receive this document with the latest version of software, on the
NewsBrowse Application CD-ROM.
December 16, 2004 NewsBrowse Installation and Configuration Guide 7
Page 8

Preface
Grass Valley Product Support
To get technical assistance, check on the status of problems, or report new problems,
contact Grass Valley Product Su pport via e-m ail, the Web, or by phone or fax.
Web Technical Support
To acces s suppor t in format ion on the Web, v isit the p roduc t supp ort W eb page on t he
Grass Valley Web site. You can download software or find solutions to problems by
searching our Frequently Asked Questions (FAQ) database.
World Wide Web: http://www.thomsongrassvalley.com/support/
Technical Support E-mail Address: gvgtechsupport@thomson.net.
Phone Support
Use the following information to contact produc t support by phone during business
hours. Afterhours phone support is available for warranty and contract customers.
United States (800) 547-8949 (Toll Free) France +33 (1) 34 20 77 77
Latin America (800) 547-8949 (Toll Free) Germany +49 6155 870 606
Eastern Europe +49 6155 870 606 Greece +33 (1) 34 20 77 77
Southern Europe +33 (1) 34 20 77 77 Hong Kong +852 2531 3058
Middle East +33 (1) 34 20 77 77 Italy +39 06 8720351
Australia +61 1300 721 495 Netherlands +31 35 6238421
Belgium +32 2 3349031 Poland +49 6155 870 606
Brazil +55 11 5509 3440 Russia +49 6155 870 606
Canada (800) 547-8949 (Toll Free) Sin gapore +656379 1390
China +86 106615 9450 Spain + 34 91 512 03 50
Denmark +45 45968800 Sweden +46 87680705
Dubai + 971 4 299 64 40 Switzerland +41 (1) 487 80 02
Finland +35 9 68284600 UK +44 870 903 2022
Authorized Support Representative
A local authorized support representative may be available in your country. To locate
the support representative for your country, visit the product support Web page on the
Grass Valley Web site.
Profile Users Group
You can connect with other Profile XP Media Platform users to ask questions or share
advice, tips, and hints. Send e-mail to profile-users@thomson.net to join the
community and benefit from the experience of others.
8 NewsBrowse Installation and Configuration Guide December 16, 2004
Page 9

Chapter
1
System Overview
NewsBrowse is a media management and editing system. When integrated with a
Profile XP Media Server and a NewsEdit system, NewsBrowse supports the complete
newsroom workflow — from ingest to editing to distribution to archive.
This chapter includes the following topics:
• “Functional description” on page 9
• “Two tier system diagram” on page 10
• “NetTim e system” on page 11
• “Legacy systems” on page 11
Functional description
NewsBrowse processes an incoming feed and simultaneously encodes it into two
formats: a low-resolution (MPEG-1) format stored locally on the Network Attached
Storage (NAS) unit, and a high-resolution format stored on the Profile Media Server.
NewsBrowse creates video thumbnails, storyboards and RealVideo. You can use a
web browser to edit stories using the low-resolution media, which is accessible from
the journalist’s desktop. NewsBrowse also provides a rich metadata search engine
that allows you to search for clips using various criteria.
Once you complete a sequence with the NewsBrowse editor, NewsBrowse can use
that sequenc e to pull the corr espo nding high- resolut ion vid eo fro m the Pr ofile Media
Server and assemble an on-air quality sequence. NewsEdit can also use the sequence
in a similar way. NewsBrowse can also monitor the Profile Media Server to create
low-resolution files that do not exist, and stream live feeds.
From the NewsBrowse application you can archive and restore high-resolution media.
Archived media is still visible from the NewsBrowse application.
For descriptions of the machines used as platforms for the NewsBrowse system, refer
to “Cable hardware components” on page 13.
For descriptions of software components, refer to Appendix A, Component
Interaction Diagrams on page 133.
December 16, 2004 NewsBrowse Installation and Configuration Guide 9
Page 10
Chapter 1 System Overview
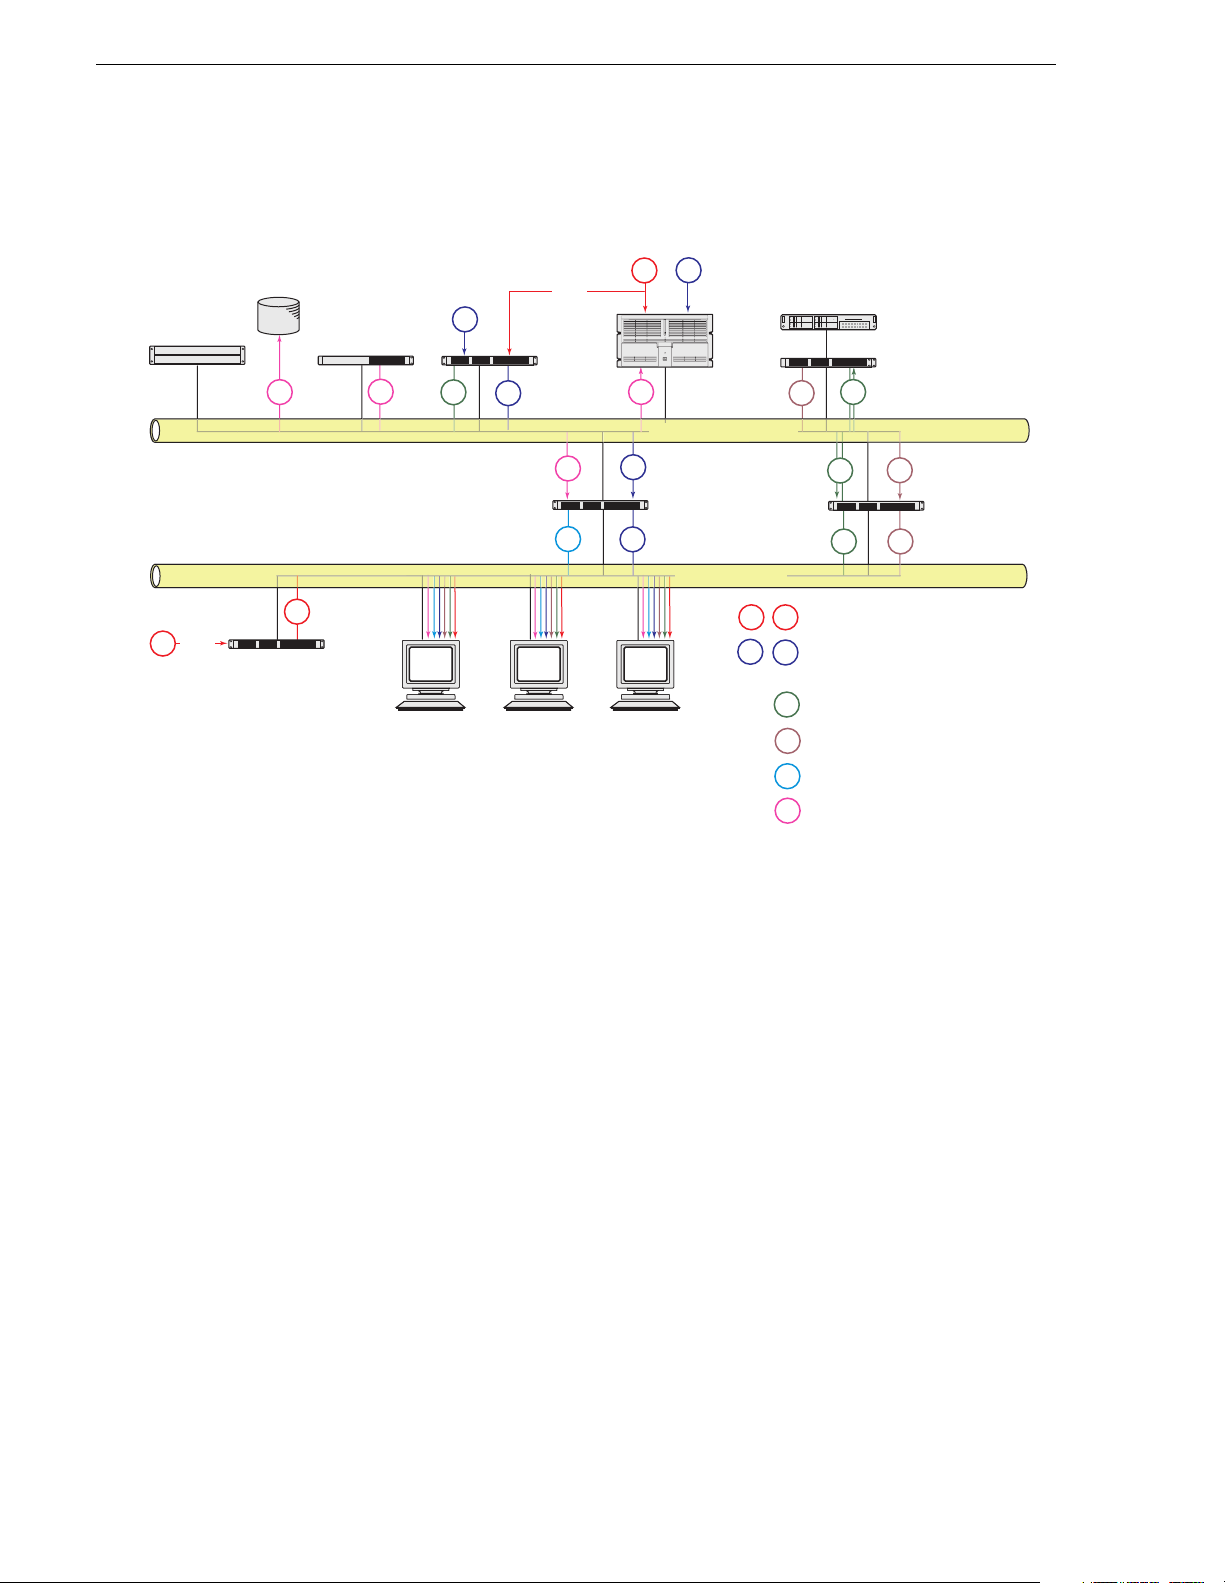
Two tier system diagram
Archive
Router
Gateway
POWERFAULTDATA ALARM
info
MDI Server
info
mpg
TC
info
AV
Video
Server
th/sb
mpg
UIM
Advanced
Encoder
D to A
TC
1-Channel
Encoder
clk
Production Network
info
web
clk
NewsBrowse Server
clk
mpg
mpg
th/sb
Network Attached
Storage
th/sb
Client Network
strm
D to A
AV
Live Monitor
Encoder
AV
TC
High-res Audio/Video & Windows
strm
streaming media
Timecode (house time for live
clk
encoder) & PC clock sync’d to house
time
MPEG1 low-res proxy video (with
mpg
timecode information)
Thumbnail, storyboard and/or Real
th/sb
video
Web application html pages
web
Media Frame Core communications, such
info
as between MDIs, ASK, and Resolver.
NewsBrowse systems for version 2.0 or higher use the two tier network architecture.
This diagram illustrates the recommended architecture for version 2.7.
The system illustrated here includes all hardware platform types. Smaller systems
might not include all types of hardware platforms. Consult the system design for your
specific system to determine the hardware platforms you must install.
10 NewsBrowse Installation and Configuration Guide December 16, 2004
Page 11
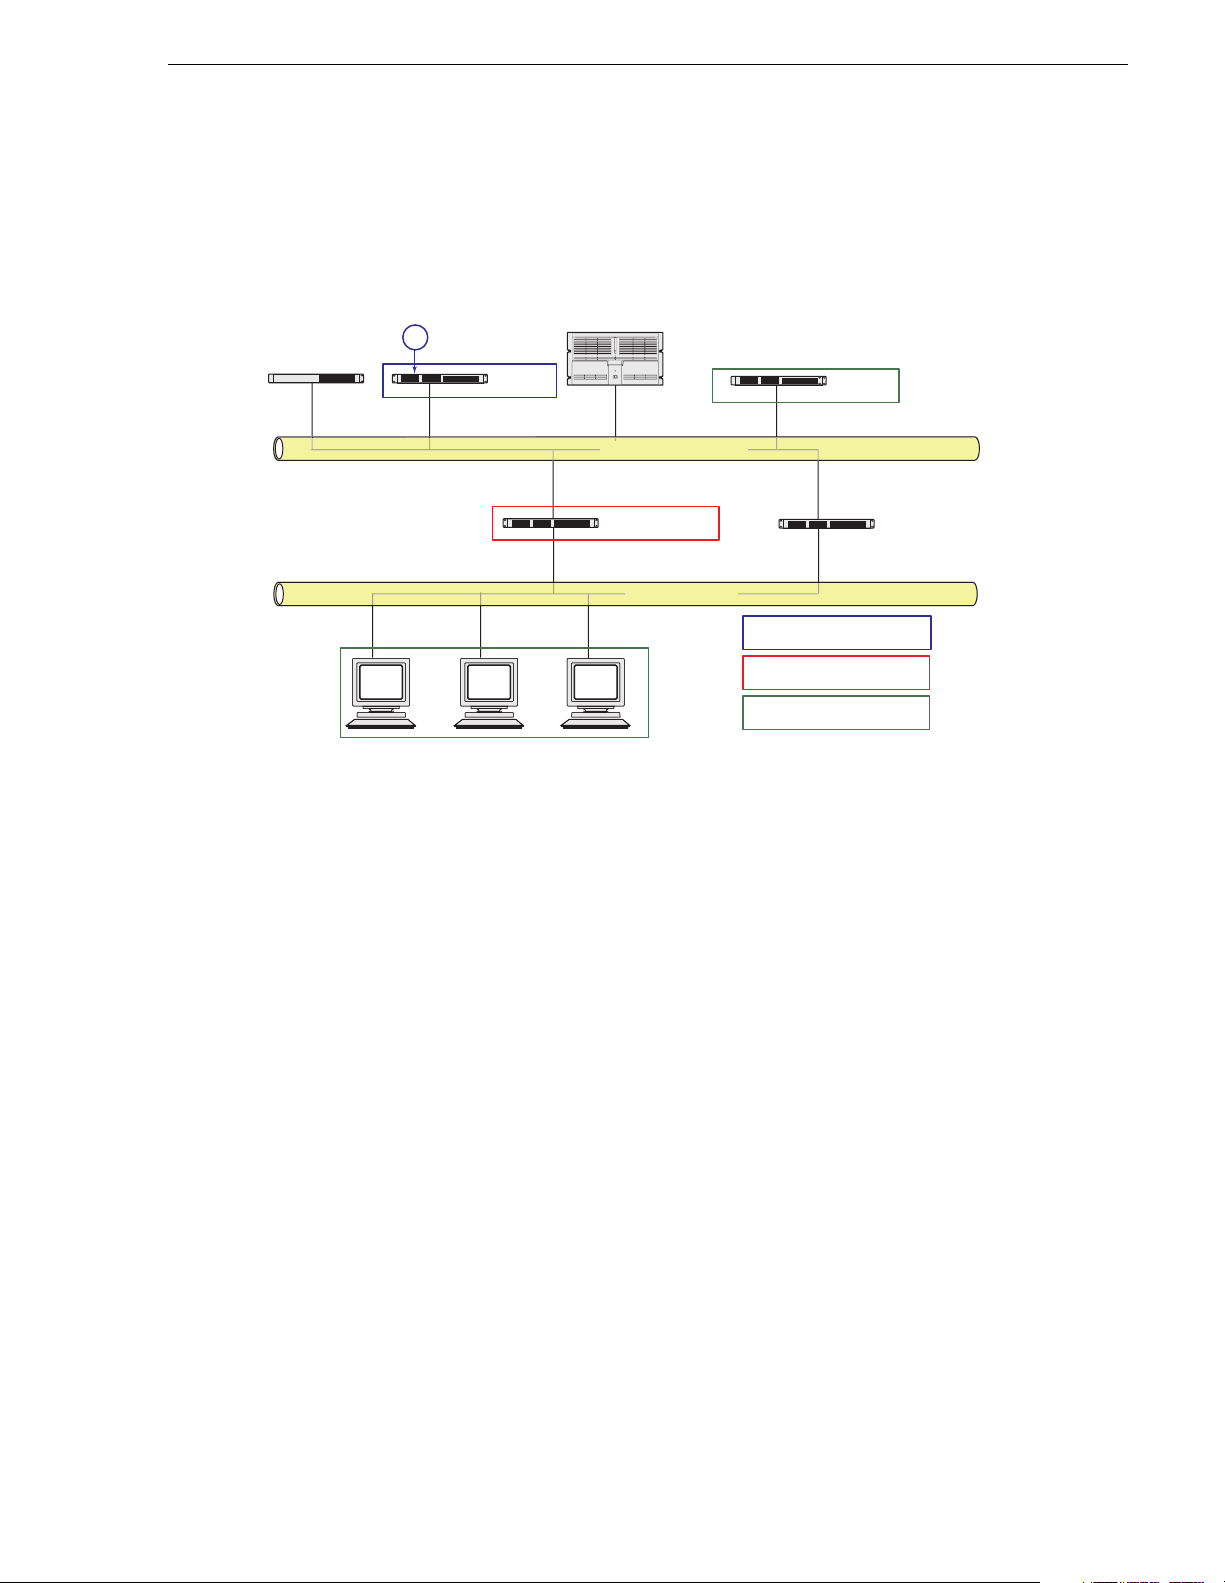
NetTime system
The following diagram illustrates the roles the different NewsBrowse platforms play
in the NetTime system. Refer to “Prepare NetTime” on page 38.
NetTime system
TC
MDI Server
Legacy systems
This manual documents systems that are built new for version 2.7 or higher. While
existing systems can be upgraded to version 2.7 software, their hardware platforms,
network architecture, and other elements might not match the systems documented in
this manual.
1-Channel
Encoder
Video
Server
Production Network
NewsBrowse Server
Client Network
Advanced
Encoder
Network Attached
Storage
Adrienne server
NetTime rebroadcast server
NetTime client
You can find information about systems built before version 2.7 in Appendix B,
Legacy systems on page 141. If you need the entire overview and task flow for
working on a legacy system, you should refer to the version of this manual that
corresponds to the software version around which your system was originally built.
Refer to “Revision Status” on page 2 of this manual for information about previous
manual versions.
December 16, 2004 NewsBrowse Installation and Configuration Guide 11
Page 12

Chapter 1 System Overview
12 NewsBrowse Installation and Configuration Guide December 16, 2004
Page 13

Chapter
2
Installing NewsBrowse
This chapter provides instructions for installing the hardware platforms and software
components that support the NewsBrowse system. When you are done installing the
hardware a nd software, continue with Chapter 3, Configuring the NewsBrowse
System and Chapter 4, Recovery Planning to complete the installation of your
NewsBrowse system.
Rack-mount hardware components
Follow the instructions for your specific rack to install each component of the
NewsBrowse system. One rack-unit spacing is recommended between components
for ventilation.
Cable hardware components
Refer to the system design for your particular NewsBrowse system and the “Two tier
system diagram” on page 10 to identify the hardware components and cabling for
your NewsBrowse system. Then turn to the appropriate instructions in this s ection and
connect cables as required.
Be aware of the following as you cable your system:
• When connecting the network, use 100Tx cabling and switches (or Gigabit uplink
in the case of the NAS). Zoning is not required on the switch if five or less clients
are active. If more than five clients are using the system, it is strongly
recommended that you use an isolated switch or a shared, zoned switch to isolate
the client-side LAN. Network traffic from the NewsBrowse internal LAN is
minimized.
• You may want to postpone cabling to external networks until after configuring
respective IP addresses.
• The single-channel en coder requi res analog video and audio f eeds. Digital t o
Analog conversion of signals may be required.
• Single-channel encoders and live monitor encoders require audio/video
connections. Single-channel encoders require timecode feeds.
• For all NewsBrowse machines, connect the keyboard/mouse cable harness as
follows:
• Plug the Y-cable into the keyboard/mouse port on the back of the machine and
into one end of the keyboard and mouse ports on the cable harness.
• Plug the VGA cable on the harness to the back of the machine.
• Plug the other end of the harness into a PC connection on the KVM Keyboard/
Monitor Drawer unit. (If you are not using the KVM component, plug the cables
into a PC keyboard, mouse, and VGA port.)
December 16, 2004 NewsBrowse Installation and Configuration Guide 13
Page 14
Chapter 2 Installing NewsBrowse
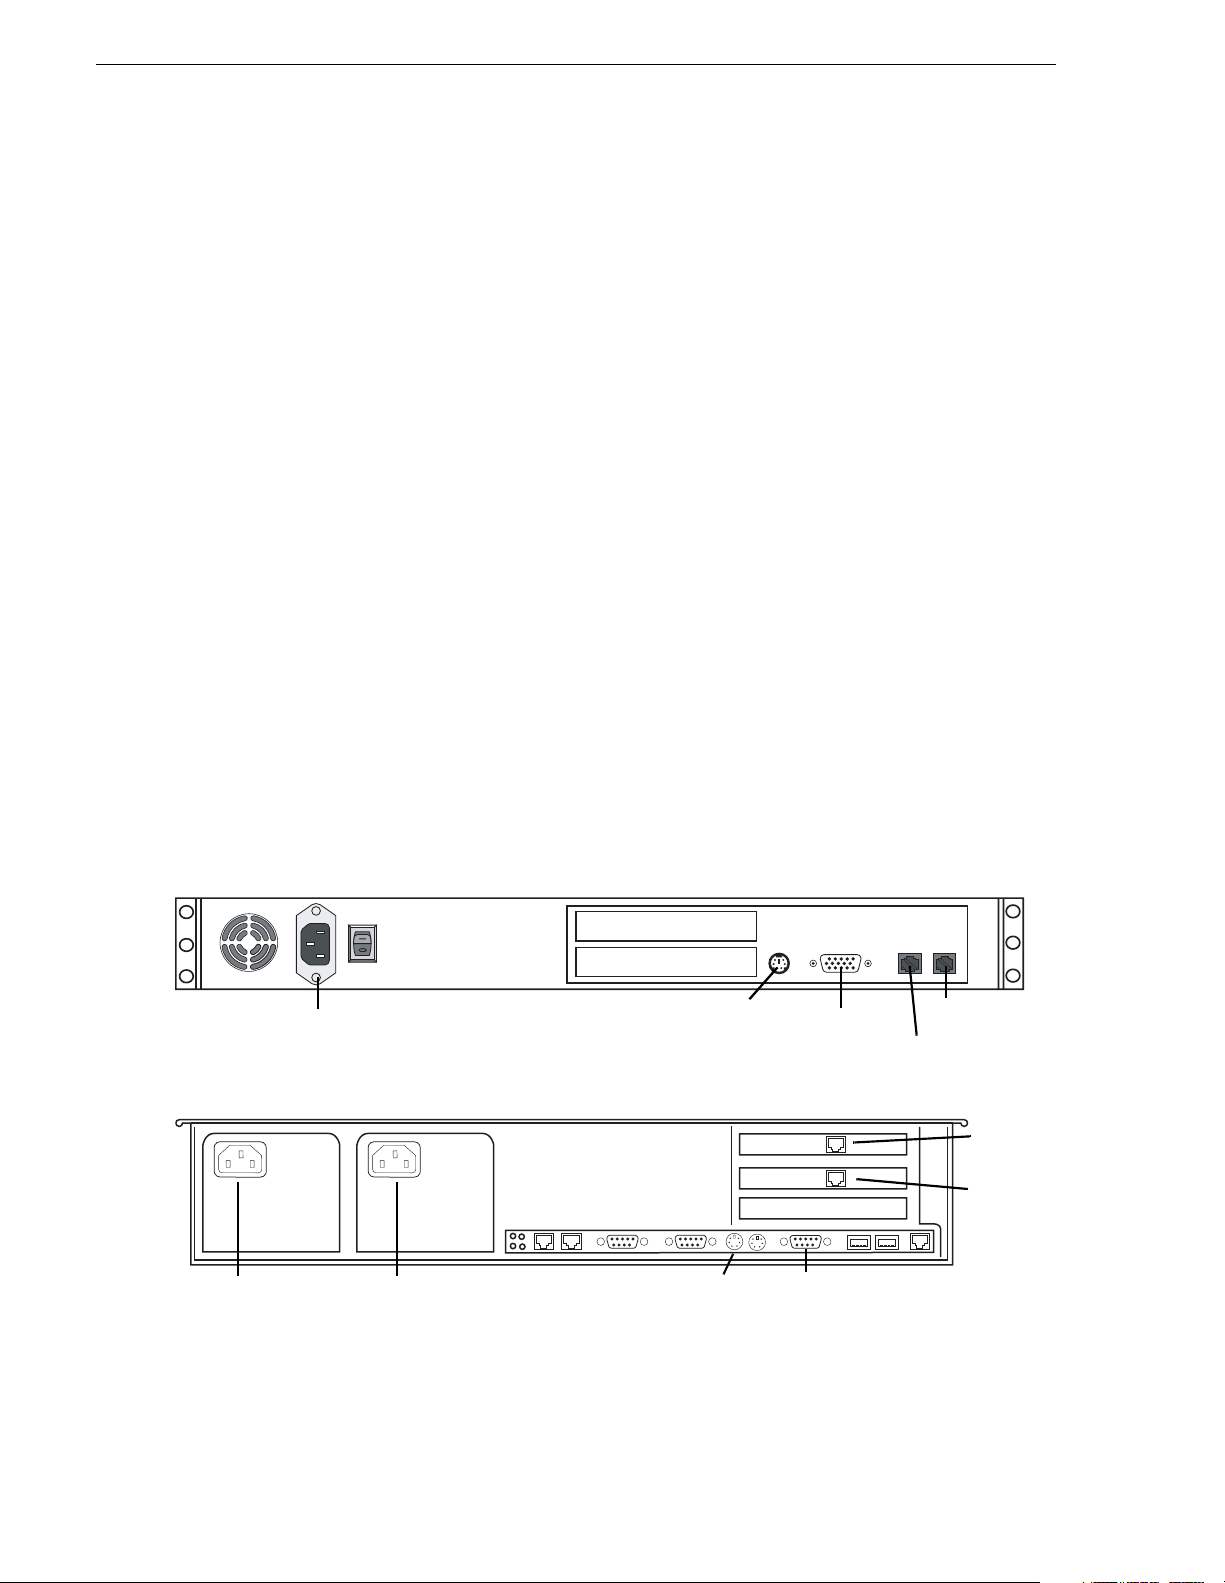
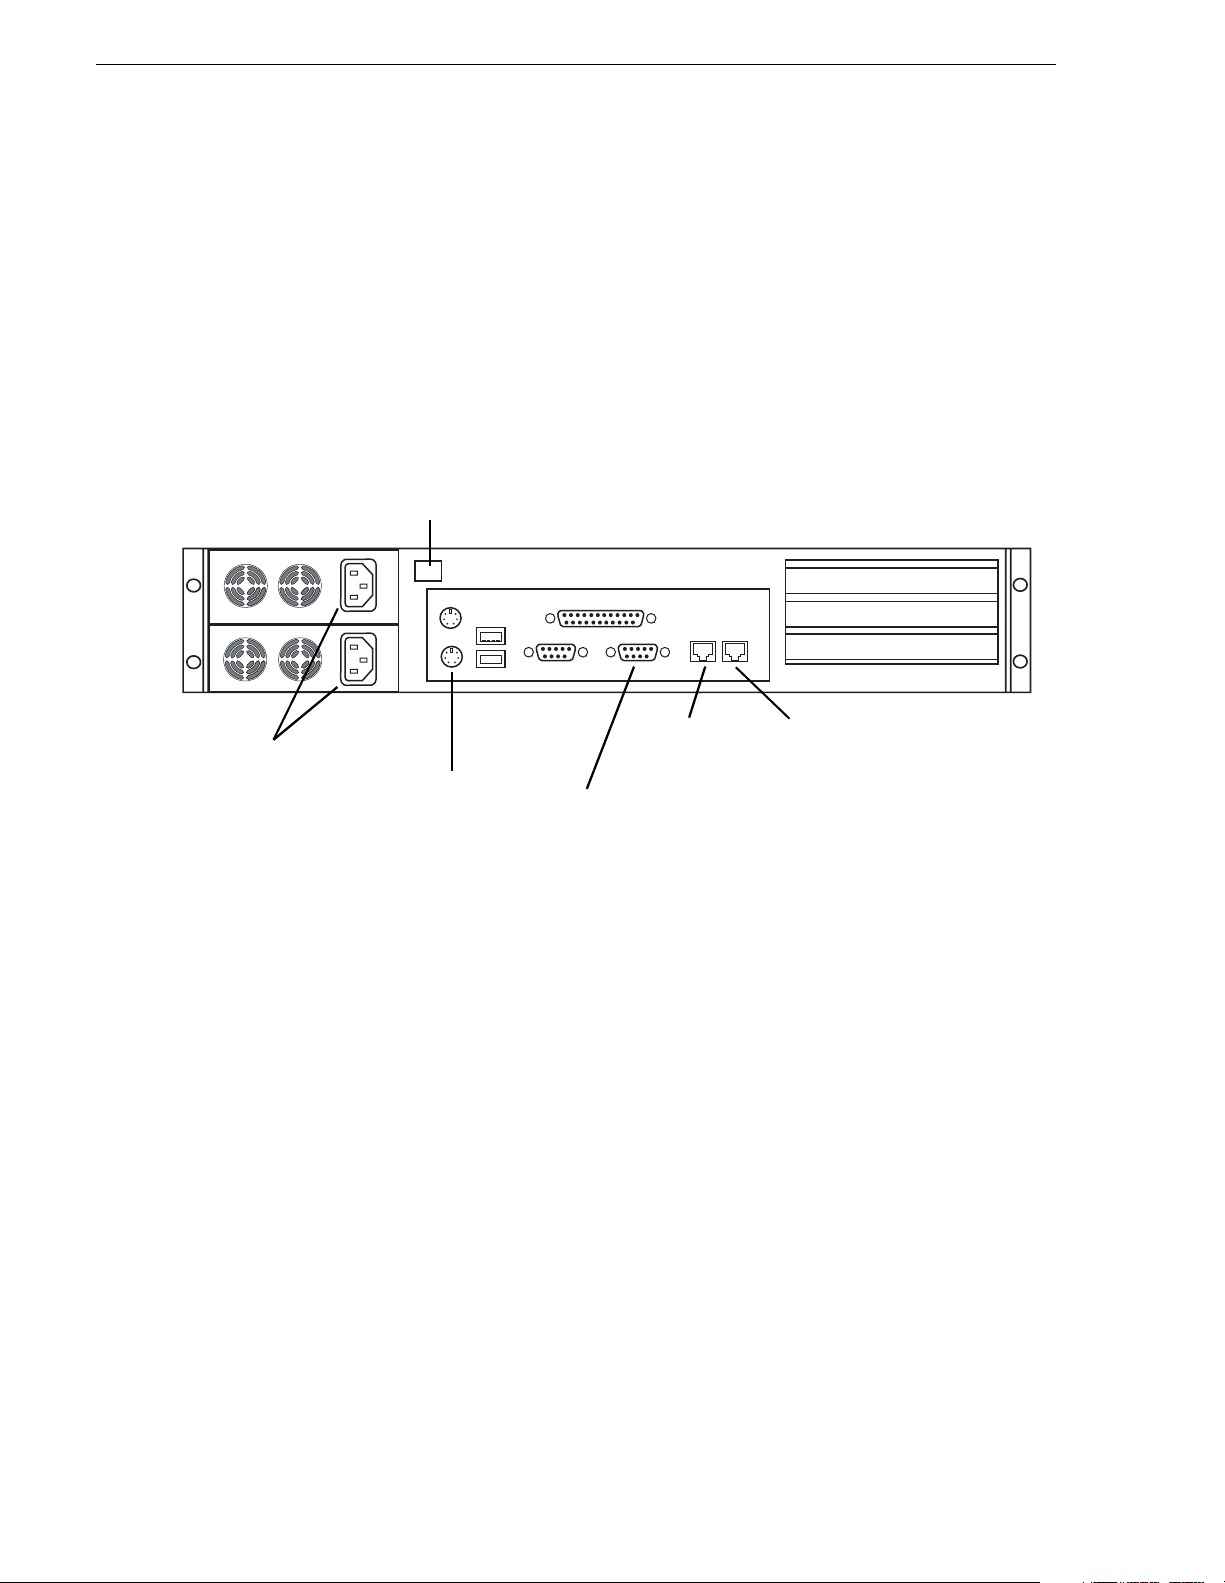
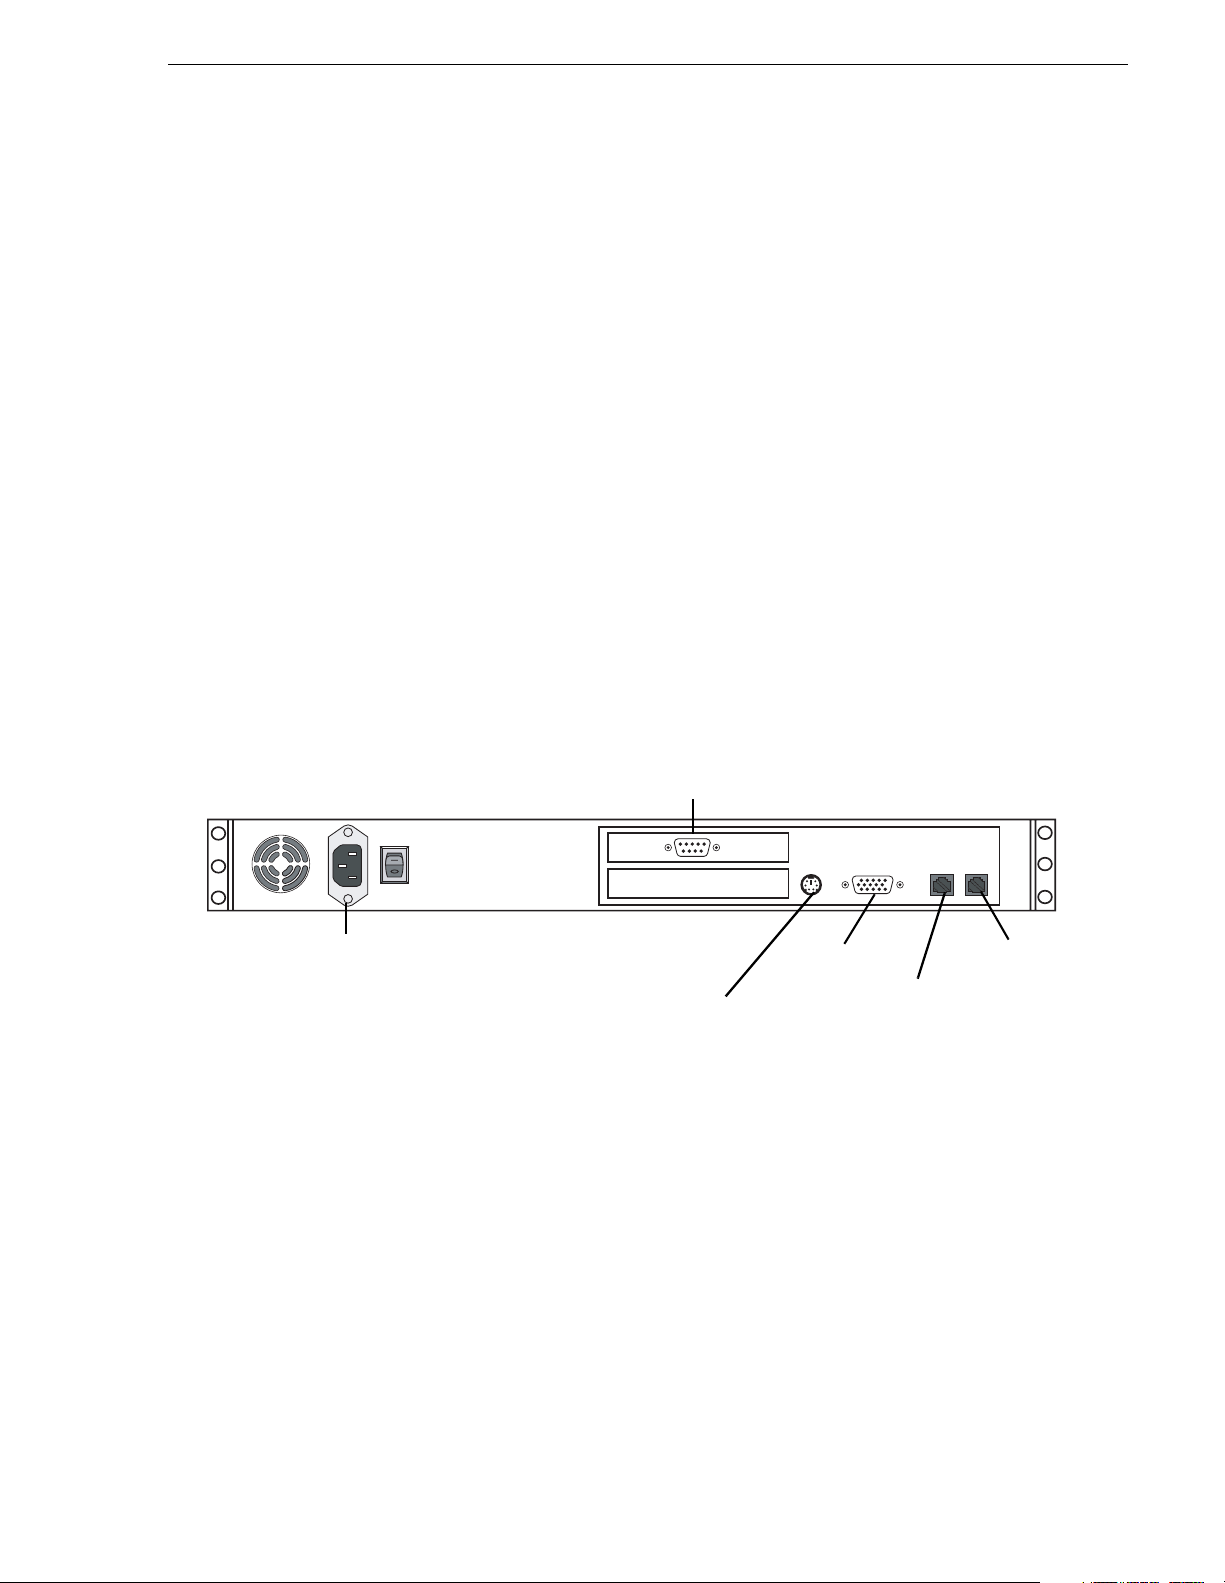
NewsBrowse server in struc t ions: Del l or Axiom pl atform
The central component of the NewsBrowse system is the NewsBrowse server.
Depending on the design of your system, it can host the following software
components:
• The web-application for user interaction
• The Ingest Scheduler which drives the encoders
• The Rules Wizard for backgr ound processing
• The database and Managed Device Interface services for holding and relating
assets in the system.
The server connects to all encoders and the Network Attached storage via the
network. Refer to “Two tier system diagram” on page 10. The client network is
available for access to the web application.
For the NewsBrowse server you have the option of the Axiom platform or the Dell
platform, as explained in this section, or the HAFT platform, as explained in
“NewsBrowse server instructions: HAFT platform” on page 15.
Platform Specifications are as follows:
• P 3, 1Ghz or better (1 or 2 CPU) • Internet Explorer 6 (SP1)
• 512 MB RAM- CD-ROM Drive • Windows Media Player 7.1
• Minimum 20GB Program Drive • Flash Player 6 (6.0.65.0 upd ate)
• Windows 2000 Server (SP3) • Microsoft SQL Server (SP3)
• .NET Framework 1.1 • 100Tx LAN (x2)
Power
Cable as illustrated.
Axiom platform
Power
Dell platform
Power
Keyboard/mouse
port to pigtail
to KVM
Keyboard/mouse
port to pigtail
to KVM
VGA cable
to KVM
VGA cable
to KVM
LAN port 2
LAN po r t 1
LAN port 1
LAN port 2
Connect LAN ports to a network router or switch. Connect port 1 to the Production
Network (or Private Network for three tier) and port 2 to the Client Network.
14 NewsBrowse Installation and Configuration Guide December 16, 2004
Page 15
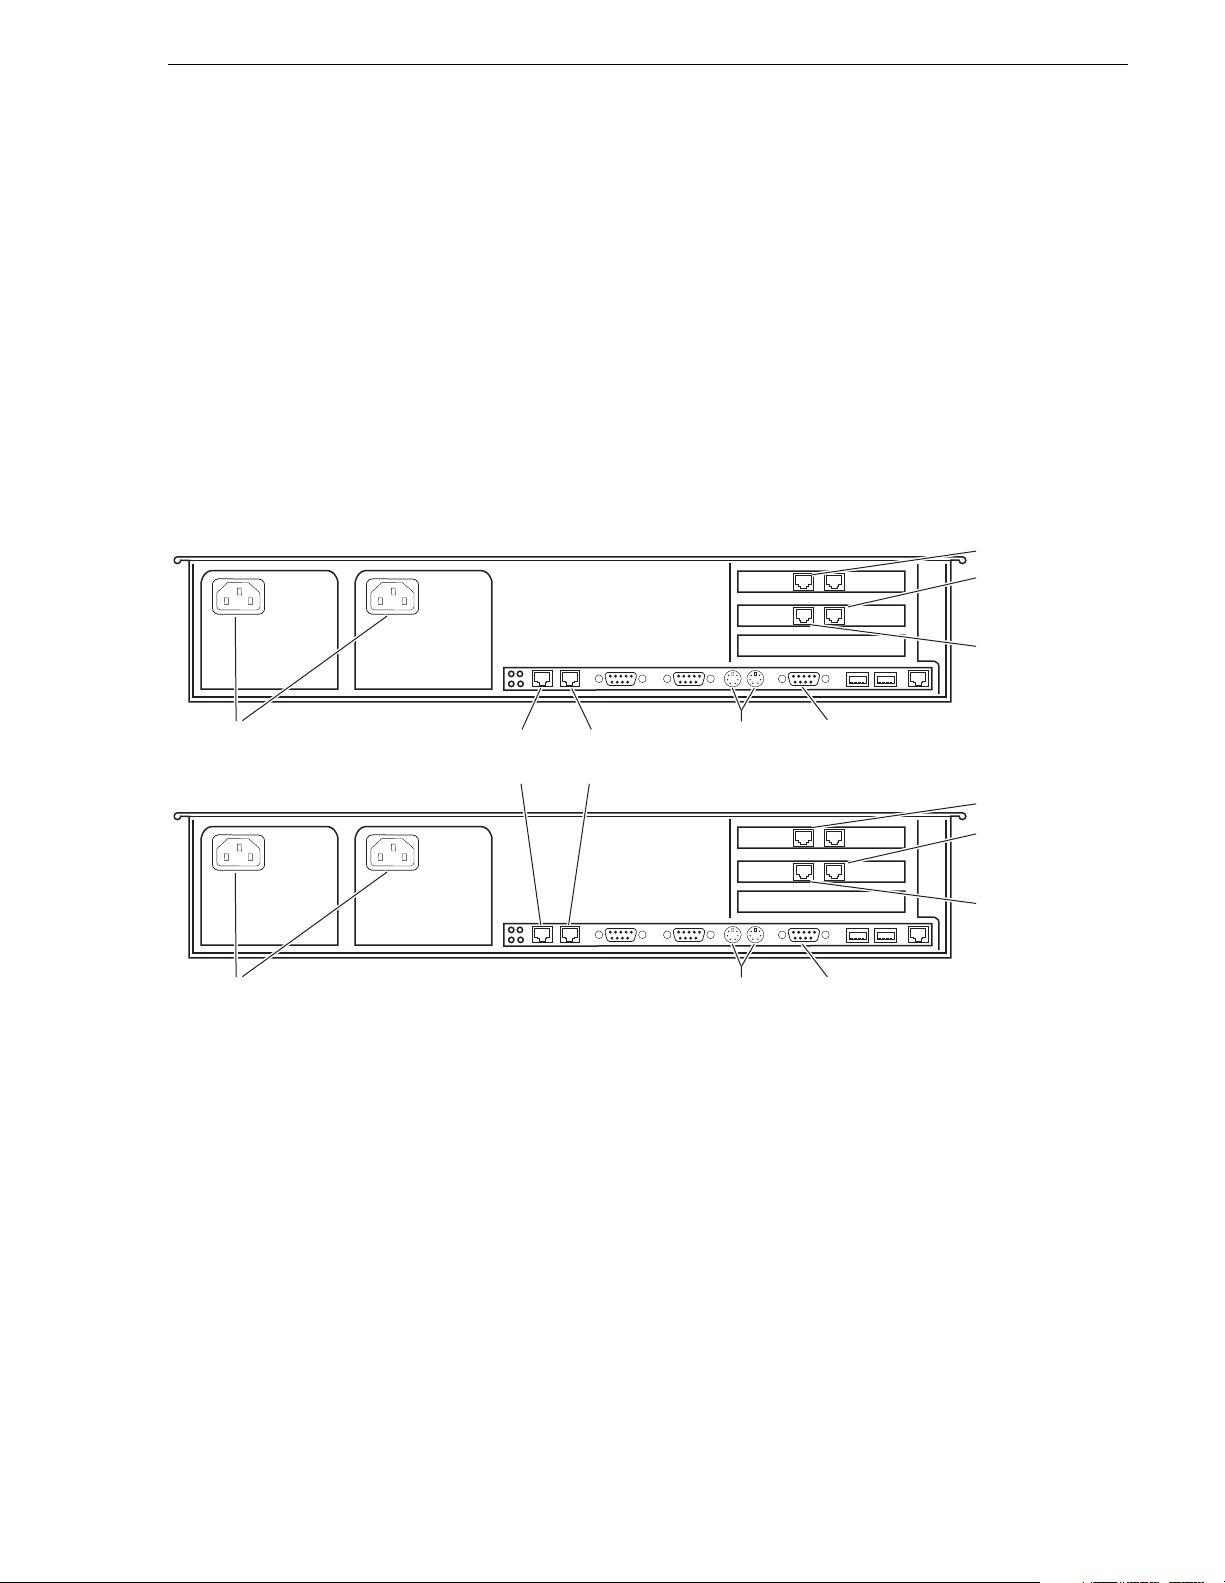
NewsBrowse server instructions: HAFT platform
NewsBrowse server instructions: HAFT platform
For the NewsBrowse server you have the option of the High Availability, Fault
Tolerant (HAFT) platform, also known as the Marathon platform. This platform is
made up of two interconnected Dell 2650 servers.
Platform Specifications are as follows:
• P4, 3GHz, 2 CPU • Internet Explorer 6 (SP1)
• 512 MB RAM- CD-ROM Drive • Windows Media Player 9.0
• Minimum 18GB Program Drive • Flash Player 6 (6.0.65.0 update)
• Windows 2000 Server (SP3) • Microsoft SQL Server (SP3)
• .NET Framework 1.1 • Gb LAN (x4)
PCI-3 A B
AB
PCI-2
LAN port 2
LAN port 1
CoServer
Management
port
Powe r
Powe r
CoServer
Link port 2
CoServer
Link port 1
Keyboard/mouse
ports to pigtail
to KVM
PCI-3 A B
PCI-2
Keyboard/mouse
ports to pigtail
to KVM
VGA cable
to KVM
LAN port 2
LAN port 1
AB
CoServer
Management
port
VGA cable
to KVM
Cable as illustrated and as follows:
• Connect LAN ports to a network router or switch. Connect LAN port 1 to the
Production Network (or Private Network for three tier) and LAN port 2 to the
Client Ne tw or k.
• Connec t the CoServer Managem ent por t to the P roduction Network (or Private
Network for three tier).
• Interconnect CoServer Link ports with cross-over cables.
• Connect power cables to a power supply.
Power supply units are hot-swappable.
December 16, 2004 NewsBrowse Installation and Configuration Guide 15
Page 16

Chapter 2 Installing NewsBrowse
To power up the HAFT platform, use the normal procedures for the Dell server and
log in to the Windows operating system as normal. The virtual server runs in a full
screen window. To get to the Dell server desktop, press
To power down the HAFT platform, right-click the system tray icon and select
Manage Endurance Configuration | Shutdown. This does an orderly shutdown of the
virtual server and the Dell server.
Also re fer to “Configure HAFT platform” on page 36 for network config uration
procedures.
Ctrl + Shift+F12.
16 NewsBrowse Installation and Configuration Guide December 16, 2004
Page 17

Network Attache d Sto rage (NA S) in struct ion s - Fastora
Network Attached Storage (NAS) instructions - Fastora
The NewsBrowse Network Attached Storage (NAS) unit provides storage for
MPEG-1 proxy video, sto ryboards, thumbnails and RealVideo. It may also be
configured to store Edit Decision Lists (EDL) that are saved to the NewsBrowse
system. Encoders are configured to write to specific locations on the NAS via 100Tx
connections over the network. Client access is provided via Gigabit Ethernet uplink
to the Client Network.
Platform Specifications are as follows:
• Microsoft Windows Server 2003
• Redundant Power Supplies
• 1000BaseT LAN
• 100Tx LAN (x2)
• RAID protected drives
For instruct ions on the Li nux version o f t he Fastora NAS, refer to “Prepare NAS -
Linux Fastora” on page 145. If necessar y, y ou ca n m ix Lin ux ver sio ns and Wind ows
versions of t he NAS on a single NewsBrowse system .
LAN port 1 LAN port 2
Gigabit Ethernet
cable to LAN
or clients
Cable as illustrated and as follows:
• Connect a Gigabit Ethernet cable from the port on the NAS to your LAN or directly
• Connect an Ethe rnet cable from
• Connect both power cables from the back of the NAS to a power supply.
Power supply units are hot-swappable. Once power is applied using switches on the
rear panel, use the power switch on the front panel to power down. Failure to use the
front switch will cause the disk array to rebuild on the next power up.
to NewsBrowse clients.
router or swi t ch.
Power
LAN1 and LAN2 ports on the NAS to a network
Power
December 16, 2004 NewsBrowse Installation and Configuration Guide 17
Page 18
Chapter 2 Installing NewsBrowse
NAS instructions: Serial ATA network platform
For the NewsBrowse Network Attached Storage (NAS) unit you have the option of
the Serial ATA network (a.k.a. Ciprico 1700 or DiMedia) platform.
Platform Specifications are as follows:
• Redundant Power Supplies.
• 100BT LAN (x2)
• RAID protected drives
Power alarm
reset button
Power
Keyboard/mouse
port to pigtail
to KVM
LAN Port 0
(Connect to
Client network)
VGA cable
to KVM
LAN Port 1
(Connect to
Production
network)
Make cable connections as illustrated.
Power supply units are hot-swappable. If the power supply fails or when power is
cycled, an alarm will sound. To disable the alarm, press the power alarm reset button
to the In position.
Power up the appliance by pressing the small, round On/Standby switch on the front
left of the machine. Once the electrical cables are connected, the system has electrical
power. Turning the On/Standby switch to standby does not remove power. To remove
power, hold down the On/Standby switch for at least five seconds or disconnect the
electrical cables.
18 NewsBrowse Installation and Configuration Guide December 16, 2004
Page 19
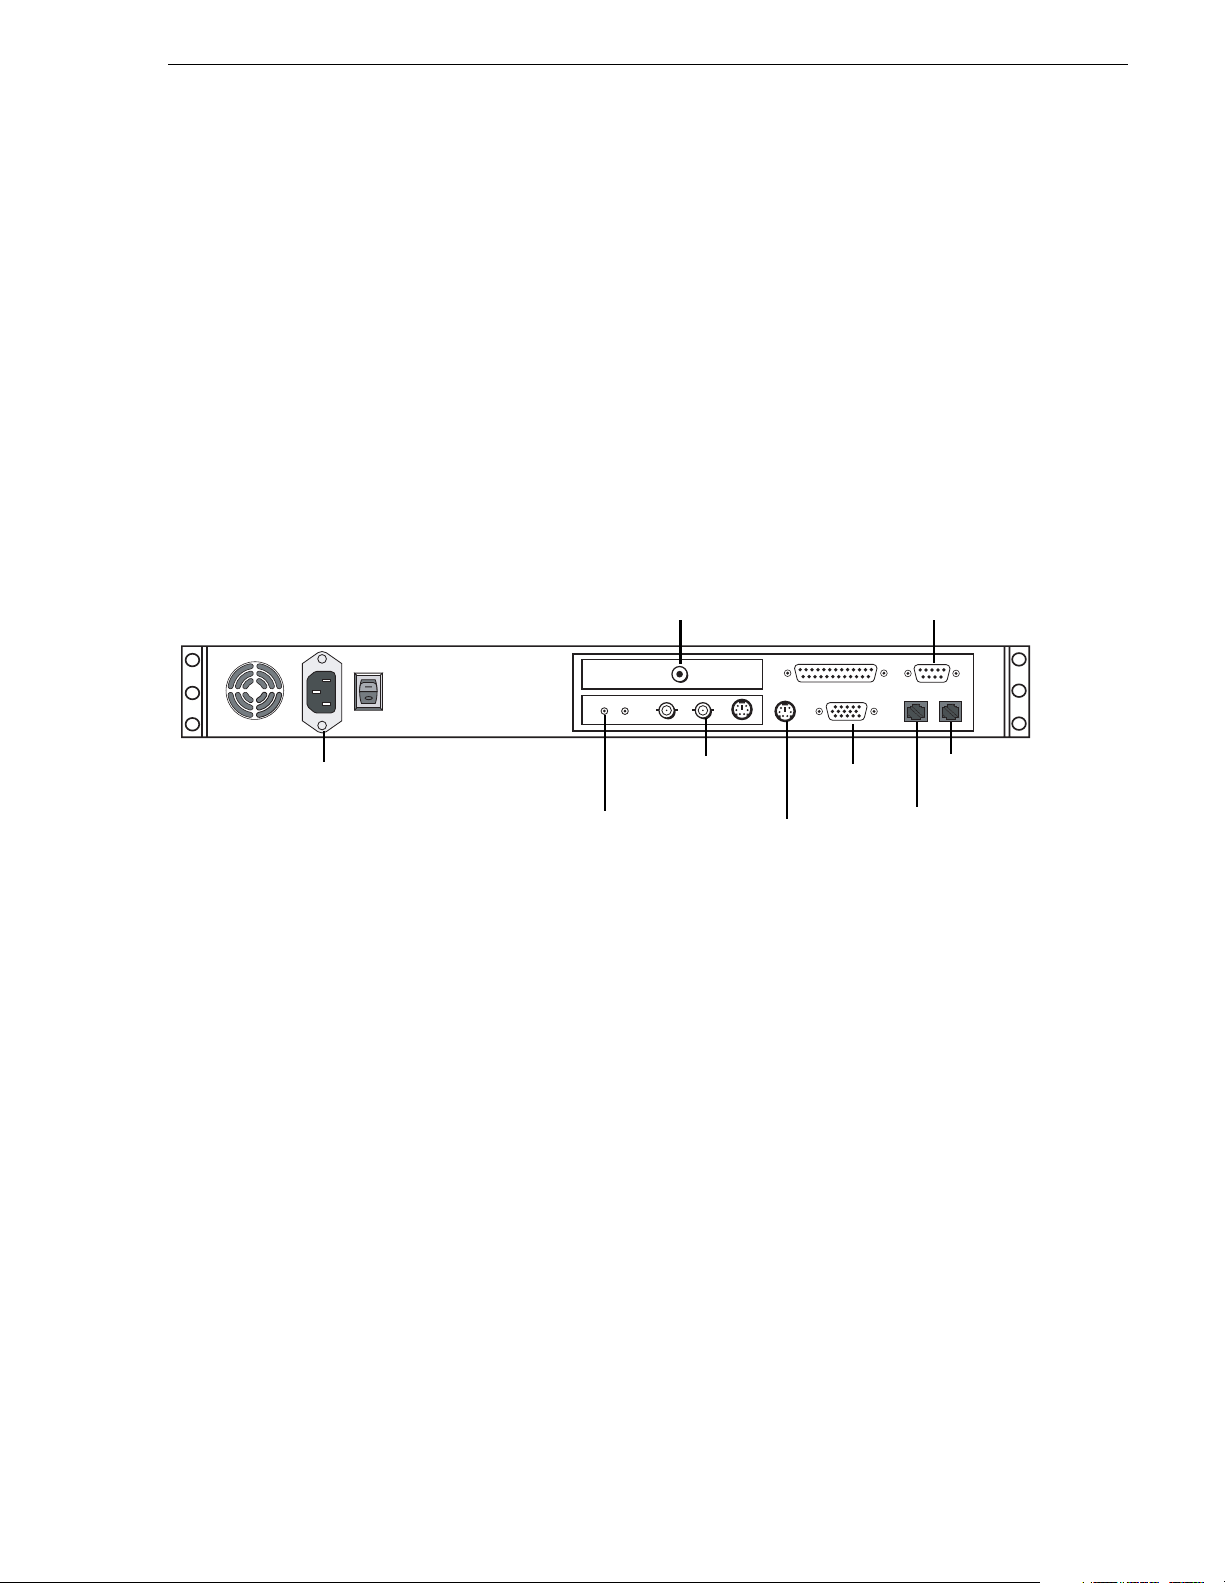
Single-chann el encoder instructions
The singl e-channel encoder c reates MPE G-1 proxy ve rsions of h igh-reso lution vid eo.
The single-channel encoder records MPEG-1 proxy in parallel with ingest into a video
server. A NewsBrowse system may contain multiple single-channel encoders.
If a NewsBrowse system uses Advanced encoders for the creation of MPEG, the
single-channel encoder can be an optional component.
Platform Specifications:
• P 3, 1Ghz or be tter (1 or 2 CPU) • Windows 2000 Server (SP3)
• 512 MB RAM- • .NET Framework 1.1
• CD-ROM Drive • Internet Explorer 6 (SP1)
• Minimum 20GB Program Drive • 100Tx LAN (x2)
RCA Timecode In
Single-channel encoder instructions
RS-422 Out
for VDCP Control
from Profile Channel
(optional)
Power
Audio In
from Router
Video In
from Router
Keyboard/mouse
port to pigtail
to KVM
VGA cable
to KVM
LAN port 2
LAN port 1
Cable as illustrated and as follows:
• Connect a cable from the Video In port on the Encoder to the analog video feed
source.
• Connect a cable from the Audio In port on the Encoder to the analog audio feed
source.
• Connect a Timecode cable from the Timecode In port (RCA port) to the house
timecode feed.
• Connect two Ethernet cables from the
LAN1 and LAN2 port s on the Encoder to a
network router or switch. Make sure the LAN2 port is connected to the network
where the Profile exists. A single-channel encoder can be configured to control up
to two Profiles simultaneously using Ethernet API.
• Optionally connect a RS-422 control cable from the COM2 port on the encoder to
the RS-422 port on the Profile Media Server (only if API is not used). See below
for cable pinouts.
• Optionally connect a RS-422 control cable from the COM2 port on the encoder to
a backup VTR. See below for cable pinouts.
December 16, 2004 NewsBrowse Installation and Configuration Guide 19
Page 20

Chapter 2 Installing NewsBrowse
RS-422 Cable Pinouts
The RS-422 cable that connects the single-channel encoder and the sequential
encoder to a VDCP record channel on the Profile Media Server is a special cable. It
needs to use the pinouts described below.
Encoder DB9-F Profile DB9-M
1 Tx- 8 Rx2 Tx+ 3 Rx+
3 Rx+ 7 Tx+
4 Rx- 2 Tx5 ground 4 ground
20 NewsBrowse Installation and Configuration Guide December 16, 2004
Page 21
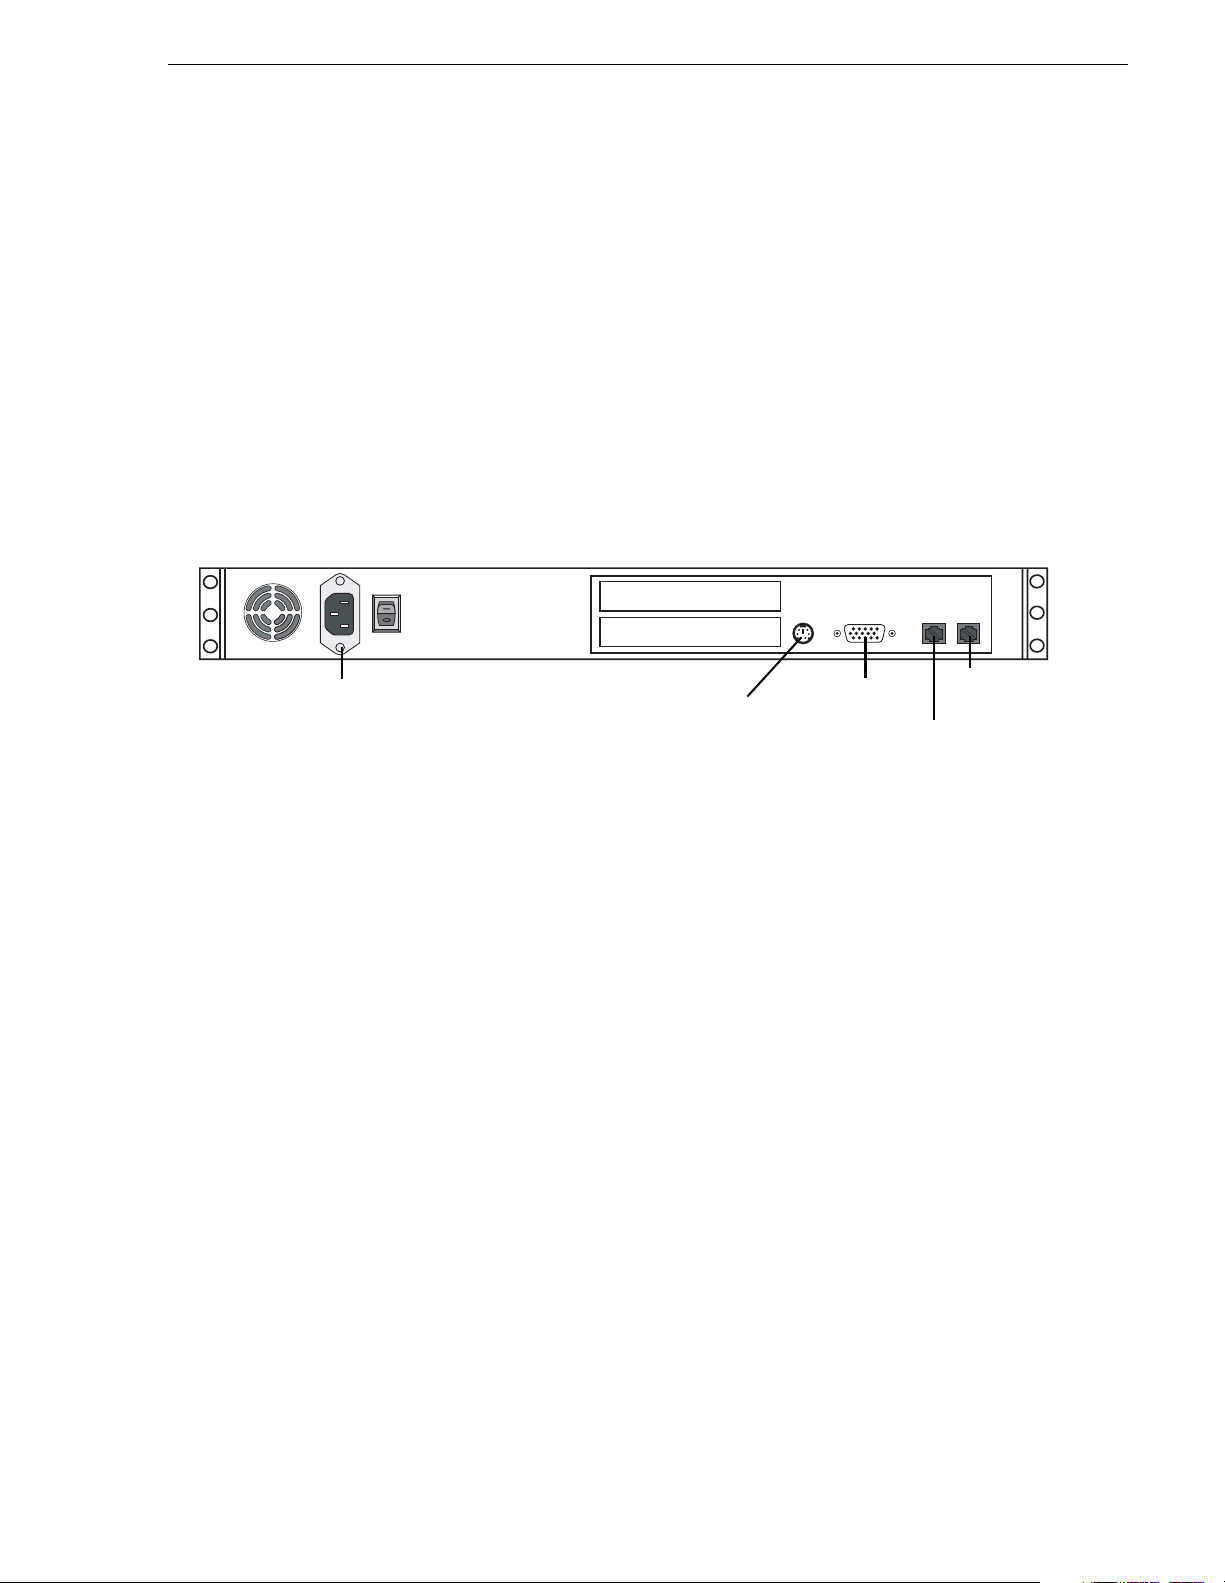
MDI Serv er instruct ions
The MDI server is host for the Managed Device Interface (MDI) services, through
which the NewsBrowse system gets its visibility of the assets on the various machines
in the system.
The MDI server is an optional component. On systems without a MDI server, the MDI
services can run on the NewsBrowse server or other NewsBrowse machine.
Platform Specifications are as follows:
• P 3, 1Ghz or be tter (1 or 2 CP U) • .NET Framework 1.1
• 512 MB RAM- CD-ROM Drive • Internet Explorer 6 (SP1)
• Minimum 20GB Program Drive • 100Tx LAN (x2)
• Windows 2000 Server (SP3)
MDI Server instructions
Power
Keyboard/mouse
port to pigtail
to KVM
VGA cable
to KVM
LAN port 2
LAN port 1
Cable as illustrated and as follows:
• Connect LAN ports to a network router or switch. Connect port 1 to the Production
Network (or Private Network for three tier) and port 2 to the Client Network.
December 16, 2004 NewsBrowse Installation and Configuration Guide 21
Page 22
Chapter 2 Installing NewsBrowse
Advanced Encoder instructions
The Advanced Encoder does the following:
• Creates MPEG-1 proxy versions of high-resolution video assets that already e xist
or are actively being recorded on a video server
• Processes MPEG-1 proxy content and extracts thumbnail images to be used for
proxy identification
• Extracts dynamic scene detection images for storyboard creation
• Renders RealVideo for low bitrate proxy content
The Advanced Encoder processes entirely in the digital domain.
Platform Specifications:
• 2.8 GHz Pentium
•512 MB RAM
• CD-ROM Drive
• Minimum 40GB Program Drive
• Win do w s 20 00 Pro fe s si on a l
• .NET Framework 1.1
• Internet Explorer 6 (SP1)
• Real Producer 8.5
Power
Keyboard/mouse
port to pigtail
to KVM
VGA cable
to KVM
Cable as illustrated and as follows:
• Connect an Ethernet cable from the
router or switch.
Gigabit port 1
Gigabit port 2
not used
Gigabit port 1 Advanced Encoder to a network
22 NewsBrowse Installation and Configuration Guide December 16, 2004
Page 23
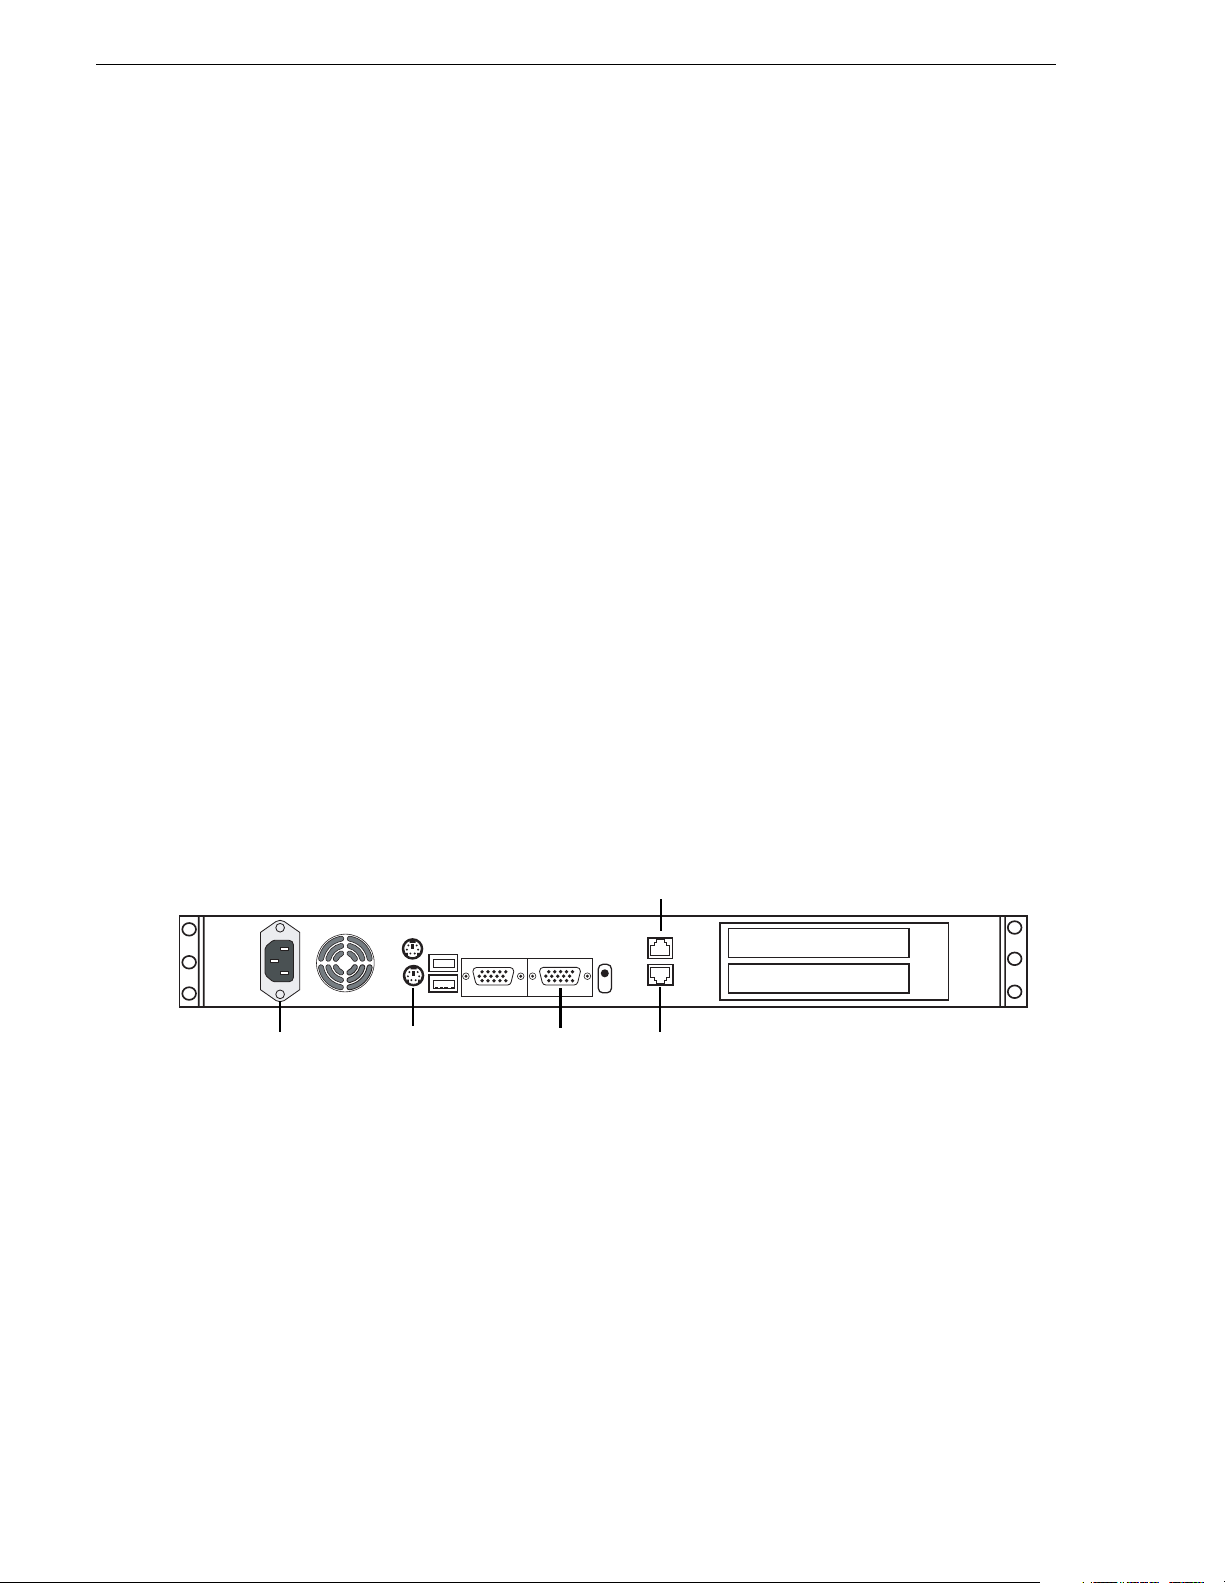
Live monitor encoder instru cti on s
The NewsBrowse live monitor encoder converts an audio/video input into network
streaming media. The NewsBrowse web application is configured to create pages that
point to this streaming media feed. This device accepts audio/video feeds and
connects directly to the Client Network. The steaming video is a real-time conversion
of the feed being received by a single-channel encoder.
A live monitor encoder is an optional component; it may be absent if there is no need
for real-time monitoring, or multiple live monitor encoders may be present to stream
different video feeds.
Platform Specifications:
• Pentium 3 1Ghz or better (1 or 2 CPU)
•256 MB RAM
• CD-ROM Drive
• Minimum 20GB Program Drive
• Windows 2000 Workstation (SP3)
• 100Tx LAN (x2)
Live monitor encoder instructions
• Osprey 22 0 Str ea min g Me d i a Encod e r.
Video/Audio adapter cable
Power
Keyboard/mouse
port to pigtail
to KVM
VGA cable
to KVM
LAN port 1
LAN port 2
not used
Cable as illustrated and as follows:
• Connect an Ethernet cable from the
LAN1 port on the live monitor encoder to a
network router or sw itch.
• Connect Analog Audio and Video harness to the source that corresponds to the
desired feed for web-based monitoring.
December 16, 2004 NewsBrowse Installation and Configuration Guide 23
Page 24

Chapter 2 Installing NewsBrowse
Router Gateway instructions
The NewsBrowse Router Gateway is the host platform for the Router Gateway
Service. The NewsBrowse system supports SMS7000 router control and Encore
router control via SMS7000 Native Protocol over Ethernet. This device is driven from
the Ingest S cheduling process on the NewsBrowse server. The Router G ate way lets
NewsBrowse schedule and control ingest services by communicating with your
existing router, allowing you to have more ingest feeds than NewsBrowse channels.
The Router Gateway provides the bridge between the NewsBrowse Network
environment and the Audio/Video Router Control environment.
The Router Gateway is an optional component of the NewsBrowse system. Systems
without a stand-alone Router Gateway platform can install the Router Gateway
software components on another NewsBrowse system platform, such as the MDI
server.
Platform Specifications:
• Pentium 3 1Ghz or bette r (1 or 2 CPU)
•256 MB RAM
• CD-ROM Drive
• Minimum 20GB Program Drive
• Windows 2000 Workstation (SP3)
• .NET Framework 1.1
• Internet Explorer 6 (SP1)
• 100Tx LAN (x2)
Power
VGA cable
to KVM
Keyboard/mouse
port to pigtail
to KVM
LAN
port 1
LAN
port 2
Cable as illustrated and as follows:
• Connect an Ethernet cable from the LAN1 port on the Router Control Gateway to
the NewsBrowse network switch.
• Connect an Ethernet cable from the LAN2 port on the Router Gateway to the
network where the Router Control system can be accessed.
24 NewsBrowse Installation and Configuration Guide December 16, 2004
Page 25

Install NewsBrowse software
Refer to the installation programs listed below for NewsBrowse software installation.
Also check the NewsBrowse Release Notes fo r the version of so ftware you are
installing for any version-specific instructions.
The following installation programs are on the NewsBrowse Application CD:
• …\SingleChannelEncoder\Setup.exe — Use this setup file to install NewsBrowse
software on a single-channel encoder
• …\AdvancedEncoder\Setup.exe — Use this setup file to install NewsBrowse
software on an Advanced encoder
• …\Server\Setup.exe — Use this setup file to install NewsBrowse software on the
NewsBrowse server as well as other NewsBrowse machines. The following table
indicates the machines on which the software components are typically installed.
You might install components differently, depending on the design of your
particular N ewsBrowse system.
Install Components NB Server MDI server Router Gateway
Install NewsBrowse software
Core Services
Managed Devices:
Profile
Proxy
NTFS
Avalon Network Archive
DIVArchive
FlashNet Archive
NewsBrowse Application
Ingest
Router Gateway
Configure Tool
Conversion Utility
!
!
!
!
!
!
!
!
!
!
!
!
December 16, 2004 NewsBrowse Installation and Configuration Guide 25
Page 26
Chapter 2 Installing NewsBrowse
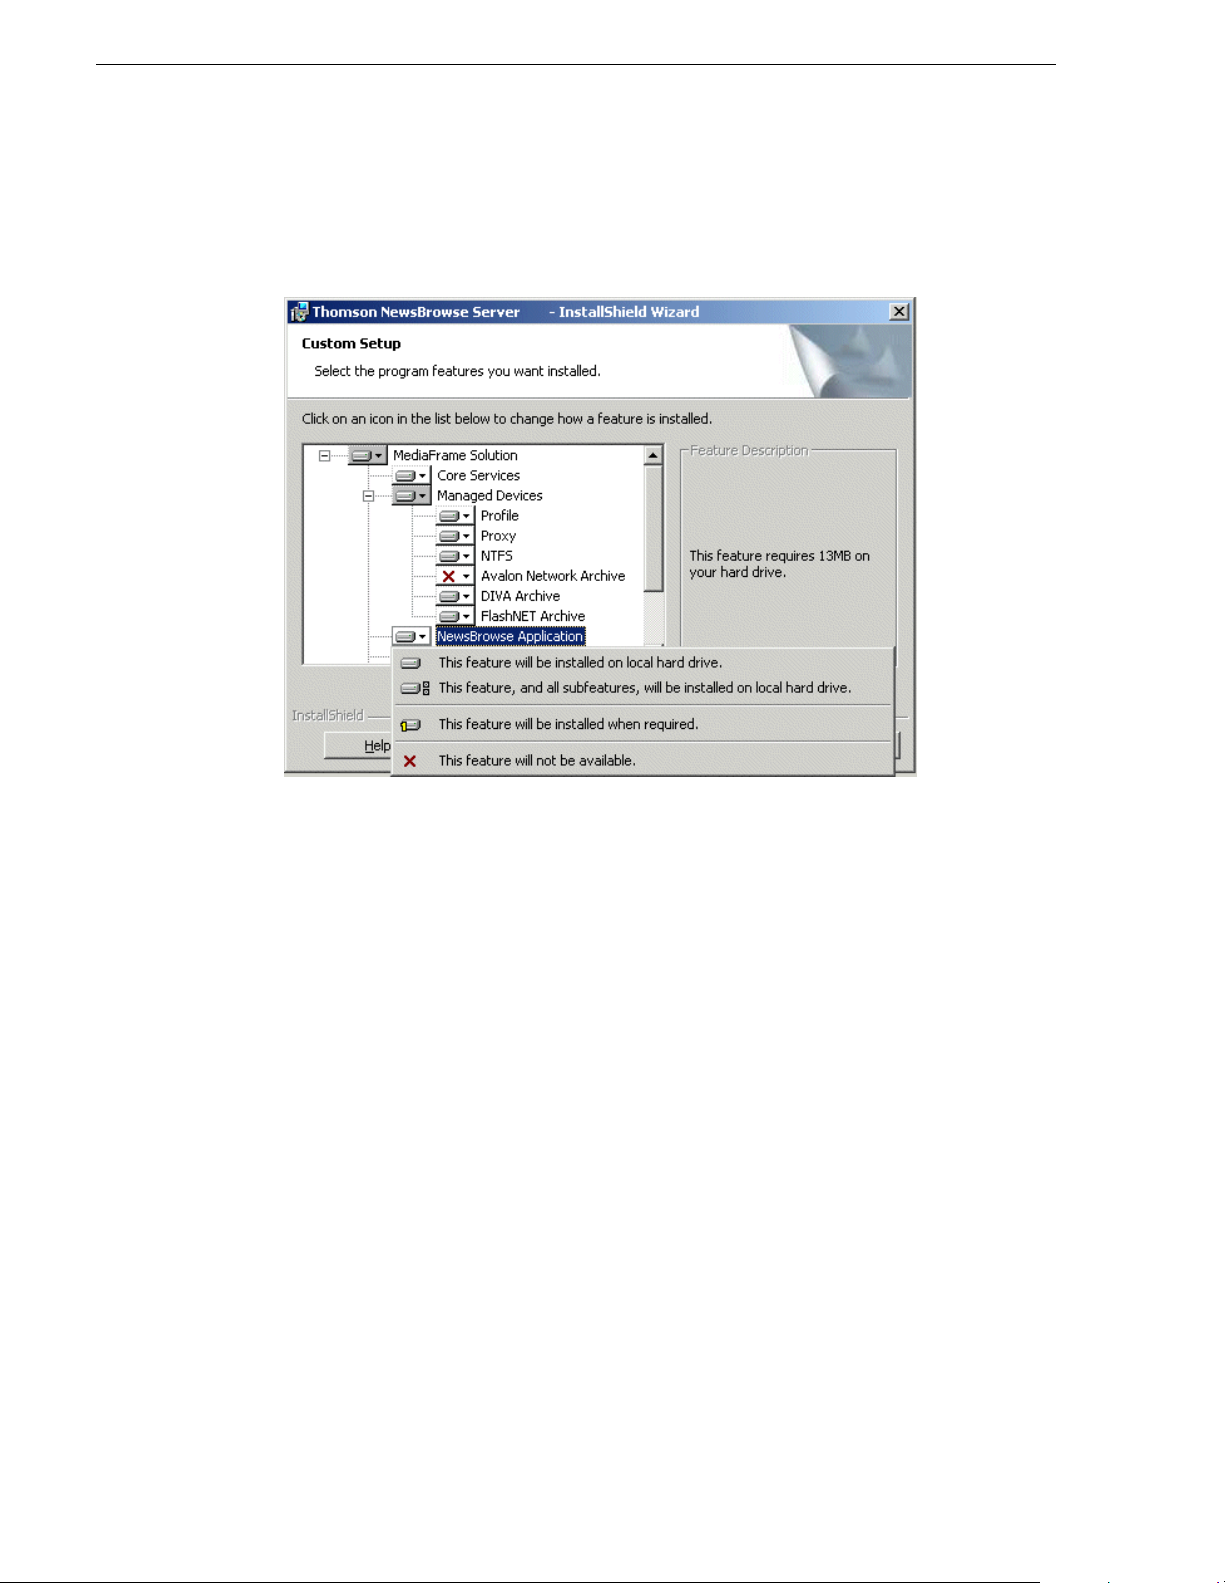
To install the software components listed in the preceding table, run the NewsBrowse
server install program and when you arrive at the Custom Setup screen, do the
following:
If a component that you want to install displays a red X, click the component and
select
This feature will be installed on local hard drive.
If a component that you do not want to install does not display a red X, click the
component and select
This feature will not be available.
Install Profile client software before installing the Profile MDI.
26 NewsBrowse Installation and Configuration Guide December 16, 2004
Page 27

Chapter
3
Configuring the NewsBrowse System
You can use the topics in this chapter in the following ways:
• Initial configuration — After your NewsBrowse system components are rack
mounted, cabled, and the physical installation process is complete, continue with
the configuration instructions in this chapter to create a working system. You can
follow the
as explained “Configuration overview” on page 28.
• Customizing — After the system is functioning, you can go back to the
configuration pages and modify the settings documented in this manual as
Advanced ! to customize the system to fit any special workflow requirements.
The topics in this chapter include the following:
• “Configuration overview” on p age 28
• “Establish conventions” on page 29
• “Configure network: Two tie r” on page 34
• “Prepare for core configuration stages” on page 38
Basic path or the Advanced path through the core configuration stages,
• “Stop NewsBrowse services” on page 49
• “ASK registration stage” on page 50
• “Encoder stand-alone stage” on page 61
• “Managed Device Interface (MDI) stage” on page 53
• “Encoder + Server stage” on page 68
• “Router Gateway stand-alone stage” on page 73
• “Router Gateway + Server stage” on page 76
• “Advanced encoder stand-alone stage” on page 79
• “Advanced encoder + Server stage” on page 87
• “EDL Expo rt, Save, Conform stage” on page 93
• “Archive stage” on page 99
• “Deploy remaining machines for full system” on page 111
• “Add live monitor enc oders” on page 111
• “Test system interactions with multiple machines” on page 112
• “Add News Browse Clients” on page 113
• “Administering NewsBrowse user access” on page 116
• “Adding custom fields” on page 119
• “Testing NewsBrowse client operations” on page 121
December 16, 2004 NewsBrowse Installation and Configuration Guide 27
Page 28
Chapter 3 Configuring the NewsBrowse System
Configuration overview
Start
Establish
Conventions
- page 29 -
Configure
Network
- page 34 -
Prepare Net-
Time, Profiles,
NAS
Basic Path
ASK
Registration
Stage
- page 50 -
MDI Stage
- page 53 -
Encoder
Stand-alone
Stage
- page 61 -
Encoder +
Server
Stage
- page 68 -
Rtr. Gateway
Stand-alone
Stage
- page 73 -
Rtr. Gateway
+ Server
Stage
- page 76 -
Adv. Enc.
Stand-alone
Stage
- page 79 -
Adv. Enc. +
Server
Stage
- page 87 -
EDL
Stage
- page 93 -
Archive
Stage
- page 99 -
Stop
NewsBrowse
Services
- page 50 -
Configure
Te st
Configure
Te st
Configure
Te st
Configure
Te st
Configure
Te st
Configure
Te st
Configure
Te st
Configure
Te st
Configure
Te st
Configure
Te st
- -- page 38 -
Advanced Path
Add remaining
Encoders
Add backup
Profiles, VTRs
Add
remaining
Adv. Enc.
page 111
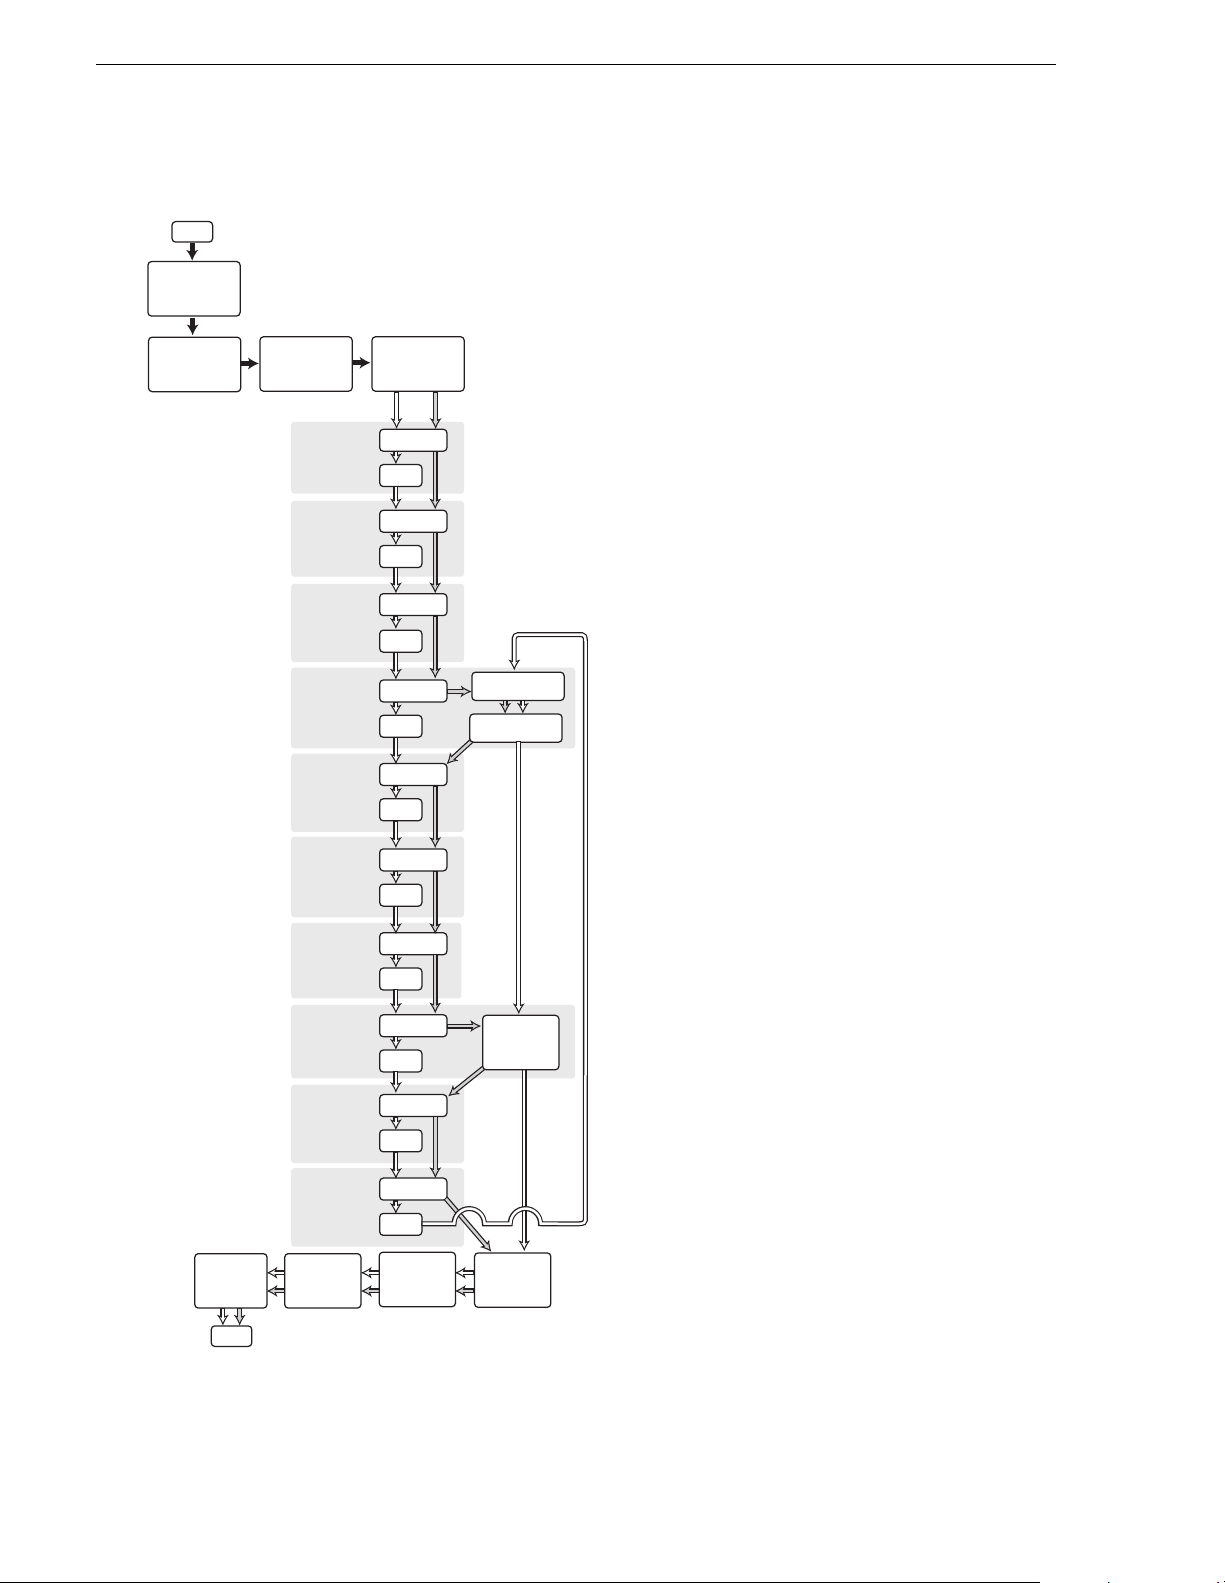
This flowchart illustrates the major tasks required
for configuring a NewsBrowse system . Core
configuration tasks are broken down into stages.
You can work through the configuration stages in
different ways, as foll ows:
If you are new to the NewsBrowse
system, follow the
Basic path. At
each configuration page, configure
only those settings documented in
this manual as
Basic !. This path
allows you to learn the system and
resolve configuration problems in
stages, with a minimal number of
configura tion variables and
machines added to the system at
each stage. Then, after you have
gained the understanding to make
each stage of the system work
proper ly, confi gure the re mainde r of
the system and add all machines.
If you are experienced with the
NewsBrowse system and you want
the fastest possible configuration,
follow the
Advanced path and
configure the entire system in one
pass, adding all machines at each
stage. At each configuration page,
you can configure settings
documented as
as those documented as
Advanced ! as well
Basic !.
You can also choose a combination
of Basic and Advanced paths to suit
your level of understanding and the
design of the particular
NewsBrowse system you are
configuring.
Refer to the topics in the remainder of this chapter
for detailed instructions on each task.
Administer
User
Access
End
Add
NewsBrowse
Clients
-page 113--page 116-
System
Interaction
Te st
-page 112-
Add LIve
Monitor En-
coders
-page 111-
28 NewsBrowse Installation and Configuration Guide December 16, 2004
Page 29

Establish conventions
The following conventions are recommended to make your NewsBrowse system
easier to work on and un derstand. R efer to these sections as necessary as you
configure your system.
Machine naming convention
Choose a root name (based on the site, etc.) and use the following convention for
naming ma chines.
Machine type Name
NewsBrowse server root-nb-svr
Network Attached Storage (NAS) root-nb-nas-1…n
Managed Device Interface (MDI) Server root-nb-mdi
Single-channel encoder root-nb-enc-1…n
Advanced Encoder root-nb-adv-1…n
Live monitor encoder root-nb-live-1…n
Establish co nventions
Router Gateway root-nb-rtr
Stand-alone Profile Media Server pvs-1…n
Open SAN Profile Media Server mpvs-1…n
Channel n am i ng convention
In general, channel counting begins at one (not zero), with the first channel assigned
to the first channel in the first Profile in the system. Keep channel names short, as they
need to fit across the Ingest Schedule pages. Here's an example for an Open SAN
system using MPVS1104:
NewsBrowse Encoder Channel Name Profile Channel
root-nb-enc-1 Ch1 Profile 1, VTR 1
root-nb-enc-2 Ch2 Profile 1, VTR 2
root-nb-enc-3 Ch3 Profile 1, VTR 3
root-nb-enc-4 Ch4 Profile 1, VTR 4
root-nb-enc-5 Ch5 Profile 2, VTR 1
root-nb-enc-6 Ch6 Profile 2, VTR 2
………
With this naming convention, if there is a problem, you can use the channel number
to quickly determine which encoder and which Profile are affected.
December 16, 2004 NewsBrowse Installation and Configuration Guide 29
Page 30

Chapter 3 Configuring the NewsBrowse System
MDI naming convention
You should use a consistent naming convention for the Managed Device Interfaces
(MDIs) in the system. The NewsBrowse system manages a device through an MDI.
Each typ e of device ha s its own MD I. The MDI sof tware component usua lly is not
hosted on the same machine that it manages. The following table illustrates a
suggested convention .
MDI type MDI name(s) Comments
Proxy PROXY1 There is but one Proxy MDI in the system. It manages the
storage locations on all the NAS machines.
Profile SAN1 Manages the one designated Profile on an Open SAN.
PROFILE1, PROFILE2,
PROFILE3,…
NTFS NTFS1 There is but one NTFS MDI in the system. It manages NTFS
Avalon, FlashNet,
DIVA
ARCHIVE1 Manages the archive device.
Manages a stand-alone Profile system.
storage on one or more machines—typically the server and the
NAS ma chines.
NOTE: If you are exporting NewsBrowse EDLs to NewsEdit, the NewsEdit
workstation must be able to resolve the Profile MDI name (present in the EDL) to
the IP address of the Profile XP system to which the MDI connects. You can do this
by either (a) mapping the MDI name to the Profile IP address in the NewsEdit
workstation’s host table, or (b) by naming the Profile MDI name the same as the
Profile host name.
Services naming con ven tion
Similar t o MDIs, you need to ha ve a naming con vention for the Ingest Contro l service
and the Proxy Transfer service. These services run on encoders, so the naming
convention should help you differentiate between the service itself and the host (table)
name of the encoder on which it runs. The following table illustrates a suggested
convention.
Service type S erv ice name(s) Comment s
Ingest Control INGEST-CH1, INGEST-CH2,
INGEST-CH3
Proxy Transfer ADV1, ADV2, ADV3 For Proxy Transfer service running on Advanced
The Ingest Control service runs on single-channel
encoders. Enumerate in parallel with the host (table)
names of the encoders.
encoders, use this naming convention. Enumerate in
parallel with the host (table) names of the encoders.
30 NewsBrowse Installation and Configuration Guide December 16, 2004
Page 31

Establish co nventions
Ports and services conven tion
NewsBrowse software components are distributed among the machines that make up
the NewsBrowse system. These software components run as Windows services,
which communicate over designated ports. As you configure the NewsBrowse
system, you must correctly designate port numbers for NewsBrowse software
components (services), such that the port numbers and components match between
configuration pages.
Do not create your own convention for port usage. Designate ports as specified in the
following table:
Services Port Comments
Core Services
Thomson Ask 9010 New service for version 2.0
Thomson Metadata 9014 Not visibl e on a configuration page
Thomson Resolver 9016 Not visibl e on a configuration page
Thomson Rules Wizard 9018 Not visibl e on a configuration page
Thomson Ingest Scheduler 8055 Starting range for first remote control. Not
visible on a configuration page.
Ingest Services
Thomson Ingest Control (single-channel encoder) 9330 Version 1.5 default port number was 8045.
Transfer Services
Thomson Proxy Transfer (Advanced encoder) 9230 Starting range for first control. Version 1.5
default port number was 8070.
Managed Device Interface (MDI) Services
Thomson Proxy MDI 9110 —
Thomson Profile MDI
a
9100 —
Thomson Avalon Archive MDI 9120
Thomson FlashNet MDI 9124 New service for version 2.7
Thomson DIVA MDI 9122 New service for version 2.7
Thomson NTFS MDI 9115
Miscellaneous Services
Thomson Router Gateway 8065 —
a.
The Profile MDI Service manages a number of host processes, one for each Profile that is being managed. These host processes require
ports 9130 - 9139. Stopping/starting the Profile MDI Service stops/starts all of the host processes.
The version 1.5 default port number for these processes was 8022, with no range.
These services are distributed on different machines in the system. They would not
normally run on any one machine, as explained in “Accessing NewsBrowse services”
on page 46.
The NewsBrowse system also depends upon Microsoft Internet Information Services
(IIS) and SQL services.
Topics later in this manual provide specific instructions for entering port numbers on
each configuration page.
December 16, 2004 NewsBrowse Installation and Configuration Guide 31
Page 32

Chapter 3 Configuring the NewsBrowse System
Site-specific configur atio n tab les
Create tables similar to the examples given here as required by the site’s specific
NewsBrowse system. Use conventions as described earlier in this chapter. The values
in
bold text in these example tables are pre-defined—you should not change them as
you might fill in your own site-specific table. Values with italic text are an example
of the entry you might make in your own table. Cells with a “NA” have no applicable
value.
In these examples the system root used for naming is “iron”. Replace “iron” with a
root name appropriate to the site.
Machine types Machine names
1. Open SAN
Profile Media
2. mpvs-2 NA
Server
The host (table) name
you give each machine
mpvs-1 Profile MDI SAN1
MDI types
The type of MDI
required for each
machine
MDI name
The name you
give each MDI
a
MDI host
The machine that
hosts the MDI(s)
Ports
The port
used by the
MDI
Other info
\\iron-nb-mdi 9100 Process port 9130
3. mpvs-3 NA
4. mpvs-4 NA
5. Stand-alone
Profile Media
6. pvs-2 Profile MDI PROFILE2 Process port 9132
Server
7. NAS (or other
storage device
for proxy
8. iron-nb-nas-2
assets)
9. iron-nb-nas-3
10. Avalon
Archive
11. Machines with
NTFS storage
12. iron-nas-1
pvs-1 Profile MDI PROFILE1 Proces s port 9131
iron-nb-nas-1 Proxy MDI
c
PROXY1 \\iron-nb-mdi 9110 File system folder(s):
\\iron-nb-nas-1\Media
\\iron-nb-nas-2\Media
\\iron-nb-nas-3\Media
<hostname>-idm
d
Avalon
\\iron-nb-mdi 9120
Archive MDI
iron-nb-svr NTFS MDI
e
NTFS1 iron-nb-svr
f
9115 File system folder(s):
\\iron-nb-svr\TempEDL
\\iron-nas-1\EDLs
\\iron-nas-1\Audio
13. iron-nas-2
a.
Only one Profile per Open SAN has a MDI
b.
Processes use ports 9130 - 9139. Refer to “Ports and services convention” on page 31.
c.
A single instance of the Proxy MDI manages all the proxy storage machines.
d.
The host table must have an entry with “-idm” appended to the name of the archive device.
Refer to “Configure Avalon Archive MDI” on page 105.
e.
A single instance of the NTFS MDI manages storage on multiple machines.
f.
The NTFS MDI must run on the NewsBrowse server.
\\iron-nas-2\Audio
b
32 NewsBrowse Installation and Configuration Guide December 16, 2004
Page 33

Establish co nventions
The following table lists other NewsBrowse machines and services. For Transfer and
Ingest services you assign a name associated with “Device Type”. This is similar to
assigning MDI names. Refer to “Configure Media Frame Core ASK: Register
component s” on page 51. These services always reside on the same machine that they
manage.
Machine types Machine names
14. NewsBrowse
The host (table) name
you give each machine
iron-nb-svr NA NA NA
Device types
The “Device Type” service
required on each machine
Service name
The name you give each
service, similar to MDI.
Ports
The port used
by the service
Other info
server
15. Singlechannel encoder
iron-nb-enc-1 Ingest INGEST-CH1 9330 Display Names:
Enc. Chan. 1
16. iron-nb-enc-2 Ingest INGEST-CH2 Enc. Chan. 2
17. MDI server iron-nb-mdi NA NA NA
18. Advanced
encoder
19. iron-nb-adv-2 Transfer ADV2
20. Live monitor
iron-nb-adv-1 Transfer ADV1 9110
iron-nb-live-1 NA NA NA
encoder
21. iron-nb-live-1 NA NA NA
22. Router Gateway iron-nb-rtr NA NA NA
December 16, 2004 NewsBrowse Installation and Configuration Guide 33
Page 34

Chapter 3 Configuring the NewsBrowse System
Configure network: Two tier
Configure a two tier network, as explained in the following topics. This is the
recommen ded arc hitect ure for NewsBrow se ver sion 2. 0 and hi gher. Unless oth erwise
indicated, all information in this chapter refers to the two tier network. Also refer to
“Two tier system diagram” on page 10.
Systems upgrading from version 1.5 may retain the three tier network (which was
required for version 1.5) as NewsBrowse 2.0 and higher supports both the three tier
architecture and the two tier architecture. Refer to “Three tier system diagram” on
page 141. If you are upgrading from version 1.5 to version 2.0 or higher, refer to
NewsBrowse Release Notes for three tier network configuration instructions.
Distribute ho st table s
Find host table files at C:\WINNT\system32\drivers\etc
All NewsBrowse devices share a common host table, which lists out the Production
Network IP settings. For security purposes, the IP addresses should be non-routable
(i.e. 192 .16 8.xxx. xxx) a nd b e part of th e same subnet s used by th e Pro file /Open SAN
systems. The customer may request a particular subnet (routable or not) depending on
the needs of the facility. The only client side IP address needed in the host table is for
the client switch itself, which is useful for accessing the web management page from
the NewsBrowse devices.
The following is an example of host table entries for the NewsBrowse system. Not
shown are entries for Profile systems, UIMs, and other machines on the network.
Refer to the documentation for these other machines for host table requirements.
#-------------------------------------------------------#General Host Table
#--------------------------------------------------------
#NewsBrowse server
192.168.30.21 iron-nb-svr
#NewsBrowse NAS
192.168.30.71 iron-nb-nas-1
192.168.30.72 iron-nb-nas-2
#NewsBrowse Advanced encoders
192.168.30.50 iron-nb-adv-1
192.168.30.51 iron-nb-adv-2
#NewsBrowse single-channel encoders
192.168.30.26 nb-enc-1 #Open SAN Profile mpvs-1 vtr 01
34 NewsBrowse Installation and Configuration Guide December 16, 2004
Page 35

Configure network: Two tier
192.168.30.27 nb-enc-2 #Open SAN Profile mpvs-1 vtr 02
192.168.30.28 nb-enc-3 #Open SAN Profile mpvs-1 vtr 03
192.168.30.29 nb-enc-4 #Open SAN Profile mpvs-1 vtr 04
#NewsBrowse MDI server
192.168.30.101 iron-nb-mdi
#NB Router Gateway
192.168.30.111 iron-nb-rtr
#The following Client LAN entries are included in this host table for
#reference only. Machines on client network use DNS lookup only.
#NewsBrowse live monitor encoder
10.16.37.91 iron-nb-live-1 #Client LAN
10.16.37.92 iron-nb-live-2 #Client LAN
#NewsBrowse Ethernet Switch
10.16.37.20 iron-nb-2950-client-1 #Client LAN
192.168.30.200 iron-nb-2950-prod-1
Host table tips:
• If you are exporting NewsBrowse EDLs to NewsEdit, the NewsEdit workstation
must be able to resolve the Profile MDI name (present in the EDL) to the IP address
of the Profile XP system to which the MDI connects. You can do this by either (a)
mapping the MDI name to the Profile IP address in the NewsEdit workstation’s
host table, or (b) by naming the Profile MDI name the same as the Profile host
name. Refer to “MDI na ming conven tion” on page30.
• The NAS and N ew sBrow s e ser ver IP addr ess ne ed to be res olv e d usin g th e Cl ient
side IP address via DNS lookup, not the host table.
• If the server has a canonical name, the host table for any machine that runs MDIs
that are subscribed to by the server must match case for the entire canonical name.
E.g., if the server’s canonical name is “NB-SERVER1.mycorp.net”, then the host
table entry in the MDI server(s) must match; if the entry is
“NB-SERVER1.MYCORP.NET”, then it will not work. Pinging will not show the
problem. The problem doesn’t show up until the MDIs attempt to notify the server.
Configu re network settings on Production network machines
Use the instructions in this section to configure Production network machines, which
are all those of the following types:
• Single-channel encoder
• Advanced Encoder
December 16, 2004 NewsBrowse Installation and Configuration Guide 35
Page 36

Chapter 3 Configuring the NewsBrowse System
• Router Gateway
From the factory, the machines are set with static IP and as members of
“WORKGROUP”. Change the IP addresses according to the host table. Use standard
Windows pr ocedures.
Configure HA F T pl at form
To configure the HAFT platform for the NewsBrowse networks, do the following:
1. On either CoServer 1 or CoServer 2, configure th e virtual server’s network settings
as follows:
a. Configure PCI-2 A for the Production network. This is the CoServer
Management port.
b. Configure PCI -2 B for the Production network.
c. Configure PCI-1 A for the Client network.
2. Copy the host table onto the virtual server.
Do not modify the IP addresses of the CoServer Link ports. They are used only for
communication between the servers.
Configure network sett ings on Clie nt network machines
Use the instructions in this section to configure Client network machines, which
include the following types:
• NewsBrowse server
• Managed Device Interface (MDI) Server
• Live monitor encoder
NAS machines are also on the Client network. You configure NAS machines in
“Prepare NAS - Windows Fastora” on page 40.
The DNS will provide the IP lookup for the NewsBrowse devices attached on the
client Domain. You must use static IP addresses because DHCP has not been
qualified.
You will need the following information from the customer's IT department:
• Verify that the subnet mask for the NewsBrowse machines should be
255.255.255.0.
• The IP address for the NewsBrowse server
• The IP address for each live monitor encoder
• The IP address for each NAS
• Extra IP addresses for future growth
• The IP address for the DNS server and alternate
• The name of the Domain connected on the client side (i.e. mycorp.com)
• The IP address for the WINS server if applicable
36 NewsBrowse Installation and Configuration Guide December 16, 2004
Page 37

In addition, the customer IT department must add these computers to their Domain.
Proceed with Client network machines as follows. Use standard Windows
procedures:
1. Name computer and add computer to Domain
2. Set IP address for each port, DNS servers
3. Set DNS settings
Test: Verify two tier network settings
Verify that you have basic connectivity in both directions along with the correct name
resolution. Run a test from the NewsBrowse configuration tool. Open the
configuration tool on the NewsBrowse server at
Utilities | Configuration Tool.
Configure network: Two tier
Start | Thomson | NewsBrowse |
December 16, 2004 NewsBrowse Installation and Configuration Guide 37
Page 38

Chapter 3 Configuring the NewsBrowse System
Prepare for core configuration stages
Do the following tasks in preparation for the configuration of core system
functionality.
Prepare NetTime
NetTime keeps the system clocks on NewsBrowse machines in sync. Since the Profile
Media Servers and single-channel encoders use the house timecode feeds, the other
machines need to be kept in sync as well. On systems that control ingest and have
single-channel encoders, the primary purpose of NetTime is to keep the Ingest
Scheduler, which runs on the NewsBrowse server, and the NewsBrowse client
machines synchronized to house time. On systems that do not control ingest, NetTime
is still useful to keep clocks synchronized so that system logs can be correlated.
The following procedure uses a single-channel encoder as the Adrienne Absolute
Time Server. If your system does not control ingest and has no single-channel
encoders, you can use any machine as the Adrienne Absolute Time Server.
The single-channel encoder runs the Adrienne Absolute Time Server. NetTime clients
on the production network reference the Adrienne Absolute Time Server. A NetTime
server runs on the NewsBrowse server, which rebroadcasts the time to the client
network. NetTime clients on the client network reference the NetTime server.
Refer to “NetTime system” on page 11 for a diagram of the NetTime system.
Set up NetTime with the following procedures:
• “Prepare NetTime servers” on page 38
• “Prepare NetTime client s” on page 39
Prepare NetTime servers
You use one single-channel encoder as the primary Adrienne Absolute Time Server,
and another single-channel encoder as the secondary (redundant) Adrienne Absolute
Time Server. A LTC connection to house timecode is required for single-channel
encoders functioning as Adrienne Absolute Time Servers.
NOTE: Make sure that the Th omson Ingest Control service is of f before starting
this procedure. If the service is on and you run AecPciPoll.exe, the single-channel
encoder locks up.
To prepare a single-channel encoder as a Adrienne Absolute Time Server, do the
following:
1. On the single-channel encoder, run the following:
C:\AecPciPoll.exe
38 NewsBrowse Installation and Configuration Guide December 16, 2004
Page 39

Prepare for core config urat ion stages
This verifies that the Adrienne card is properly installed and the house timecode is
valid.
2. Run C:\Load Service.bat and in Task Manager, verify that NtPciClk.exe is running.
3. Restart the encoder and verify that NtPCiClk.exe restarted automatically.
4. Open C:\ATCS10.exe and click
5. Restart the encoder and verify that the Absolute Time Server icon appears in the
system tray.
6. The encoder is now functioning as the primary Adrienne Absolute Time Server.
Repeat this procedure on a second single-channel encoder, to make it the secondary
Adrienne Absolute Time Server.
Prepare NetTime clients
Before you use a PC to run the NewsBrowse client application, it must be prepared as
a NetTime client. If you are following the basic configuration path, you must at a
minimum prepare the NewsBrowse server as a NetTime client, as it is temporarily
used as a NewsBrowse client in “Set up NewsBrowse client for configuration stage
tests” on pa ge71. Then, at the end of the basic configuration path, you can prepare
NetTime on your NewsBrowse client PCs. You can also optionally prepare encoders
and other NewsBrowse machines as NetTime clients, in case you want to use them to
run the NewsBrowse application for test purposes or to keep the PC clock in sync with
the rest of the system for the log files.
Some clients need special configuration to ensure time synchronization throughout
the NewsBrowse system. Since your single-channel encoder Adrienne Absolute Time
Server is on the Production Network, only NetTime clients on the Production
Network have access. You must provide access for the external (Client Network)
NetTime clients as well. To do this, you configure a NetTime client machine (in this
case, the NewsBrowse server) which has access to both Production and Client
Networks to rebroadcast the time sync to external networks. NetTime clients on
external networks can then look to the NewsBrowse server as their NetTime server.
You can optionally also configure the MDI server to rebroadcast the time sync, so it
can back up the NewsBrowse server should there be a problem.
Yes to install.
NOTE: Do not install NetTime client on a Profile XP system.
To prepare a NetTime client, do the following:
1. Open the following folder:
C:\Time Sync Software\Client
2. Open NetTime-2b6.exe and click
December 16, 2004 NewsBrowse Installation and Configuration Guide 39
Yes to install. Choose the defaults, including
Page 40

Chapter 3 Configuring the NewsBrowse System
***** Contact Grass Valley
Support for password.
configure as service.
3. Set Net Time options as follows:
a. Enter the host name for the primary and secondary server according to the
following table:
NetTim e C l ie n t Primar y Se r v er Secondary Server
A Production Network Client First Encoder Second Encoder
NewsBrowse server First Encoder Second Encoder
External (Client Network) Client NewsBrowse serve r MDI Server (optional )
b. Select the
RFC868(TCP) protocol for both servers
c. For the NewsBrowse server, select
computer.
d. Leave other fields at the defaults and click
4. The PC clock should automatically update to match the server. If not, check
network connectivity and review install steps. All machines must be set for the
same time zone to function properly.
Prepare Profile Medi a S ervers
On each Profile Media Server that is to interact with the NewsBrowse system, check
the following configurations and modify settings as necessary.
1. Set up as a NetTime client. Refer to preceding procedures.
2. Click
3. In the Registry Editor open the following key:
4. On the Profile XP, start
5. Add a shortcut to PortServer to the startup folder. This ensures that PortServer
Start | Run, enter regedit and press Enter. The Registry Editor opens.
HKEY_LOCAL_MACHINE/SOFTWARE/Tektronix/Profile/ShuttleAtMode
Set the key to
TRUE.
PortServer.
always runs on the Profile XP, as it is required for NewsBrowse operation.
Allow other computers to sync to this
Okay.
Prepare NAS - Windows Fastora
40 NewsBrowse Installation and Configuration Guide December 16, 2004
6. Verify that the following account has been added to the Profile system:
• username: nbadmin
• password:
*****
For the Linux version, refer to “Prepare NAS - Linux Fastora” on page 145.
NOTE: Procure IP addresses from the local network administrator prior to
configuring the NAS unit.
When you configure the Windows Fastora NAS for the NewsBrowse networks, you
can make network settings in the following ways:
Page 41

Prepare for core config urat ion stages
• Use the remote Windows desktop, as explained in step 4 of the following
procedure, and then use standard Windows procedures to make all settings. If you
do this, read the subsequent steps in the procedure to identify the required settings.
• Use the Fastora configuration pages (Web based), as documented in the
following procedure, and make settings as instructed.
NOTE: If you plan to change the name of the NAS unit and you intend to use the
underscore c h aracter, such as i n root_nb_nas_n , you must do so usi ng standard
Windows pro ce dur es via th e remo t e desk t op. T he Fas t ora c onf igur at io n pa ge do es
not allow the underscore character.
To configure the Windows Fastora NAS for the NewsBrowse networks, do the
following:
1. From any Production network machine, enable the network to recognize the NAS
by adding a n IP address within the subnet range of 192.168.50.0.
2. For the first NAS machine (nb-nas-1), open the NAS configuration software in
Internet Explorer by entering the following in the browser address bar:
https://192.168.50.31:8098
NOTE: Notice the s in the https: address. Also, make sure your browser allows
cookies and JavaScript (or JIT).
Subsequent NAS machines (nb-nas-2, nb-nas-3) have IP addresses incremented
accordingly (192.168.50 .32, 192.1 68 .5 0.33) .
t Fastora IP address is 192. 168.1.11.
3. Log on as follows:
Username: administrator
Password: triton
The Fastora Welcome page opens.
4. Do one of the following:
December 16, 2004 NewsBrowse Installation and Configuration Guide 41
Page 42

Chapter 3 Configuring the NewsBrowse System
• To use the remote Windows desktop rather than the Fastora configuration pages,
click
Maintenance | Remote D esktop. This feature prompts you to again log on to
the NAS unit, and then allows you to access the Windows desktop. Make
settings with standard Windows procedures.
• To use the Fastora configuration pages, continue with this procedure.
5. Click
Set Server Name and, if necessary, change the name, DNS suffix, and
Domain/Workgroup setting. Work with IT at the customer site to add the NAS to
a Domain.
If you make a change, click
OK.
NOTE: After making changes on a configuration page, you must click OK or else
your changes are lost.
6. Click
Set Administrator Password.
Set a password according to the customer site requirements. Click
OK to save
settings.
7. Click
Network | Interfaces. If required by the customer site network, change IP,
DNS, and WINS settings. A recommended configuration is to use the Gigabit port
for the Client network, leave LAN Port 1 at the default static IP for system
maintenance access, and use LAN Port 2 for the Production network.
8. Click
Administration Web Site. If required by the customer site security policies,
change the IP addresses and/or ports for encrypted and non-encrypted access used
to access the administration Web site. If you make a change, click
OK and then
reconnect via the new port and/or IP address.
9. Click
Shares | Folders. Share the media directory as follows:
a. Select
New Volume (E:)
b. Click Manage Folders.
c. Select
42 NewsBrowse Installation and Configuration Guide December 16, 2004
media.
Page 43

d. Click Share Folder.
e. Enter the following:
Share name: media
Prepare for core config urat ion stages
f. Click
Windows Sharing. After a pause, the Windows Sharing tab opens.
g. User privileges for the media folder should be as follows:
December 16, 2004 NewsBrowse Installation and Configuration Guide 43
Page 44

Chapter 3 Configuring the NewsBrowse System
Everyone — Read only access
nbadmin — Full Control
h. Click
OK.
10.Close the NAS configuration pages.
Prepare NAS - Serial ATA network platform
To configure the Serial ATA network (a.k.a. Ciprico 1700 or DiMedia) NAS for the
NewsBrowse networks, check the following configurations and modify settings as
necessary.
NOTE: Procure IP addresses from the local network administrator prior to
configuring the NAS unit. Access to configuration pages is dependent upon valid
IP addresses.
1. From any Pr oduction network m achine, enable the network to recognize the NAS
by adding an IP address within the subnet range of 192 .168.50.0.
2. For the first NAS machine (nb-nas-1), open the NAS configuration software in
Internet Explorer by entering the following in the browser address bar:
https://192.168.50.31:9890
NOTE: Notice the s in the https: address. Also, make sure your browser allows
cookies and JavaScript (or JIT) .
Subsequent NAS machines (nb-nas-2, nb-nas-3) have IP addresses incremented
accordingly (192.168.50.32, 192.168.50.33)
The NAS Administratio n Tool window opens at the Welcome page.
3. Enter the password. The default password is triton. The Status page opens.
4. In the tree v iew click
Network | Network Ports. The Config ure Network Ports p age
opens.
5. Configure network ports as follows:
a. Port 0 Client Network - Set the IP address and subnet mask for the Client
network as specified by the local network administrator.
NOTE: The DiMeda NAS requires a static IP address for the client port. Set this up
with the local network administrator.
b. Port 1 Produc t ion N et wor k - Set the IP address for the production network as
specified by the local network administrator, then set the subnet mask to
255.255.255.0.
NOTE: For detailed information about configuration options, click the Help icon
(?) in the upper right corner of each window.
c. Click
Save, then select the Restart option to res tart . Re boot ta kes 2- 10 mi nu tes.
Do not pow er-down th e e nclosure during reboot .
44 NewsBrowse Installation and Configuration Guide December 16, 2004
Page 45

Prepare for core config urat ion stages
6. After the NAS reboots, access the NAS configuration software as described earlier
in step 2 and step 3, except this time, enter the following in the browser address bar:
https://<Client IP Address>:9890
The Status page appears.
7. In the Status page tree view, click
Network | Names/IPs. The Names and IPs page
opens.
8. Set the following:
• Domain name - Enter the Client network Domain name.
• Gateway - Enter the IP address for the Client network gateway. Consult the
networ k administ rator.
• Node Name - For example: (root-nb-nas-n)
9. In the tree view click
System | System Administration | Date/Time. The Date/Time
page opens .
10.Select the correct time zone, date, and time.
11.Click
Save, then select the Restart option to restart.
Reboot tak es 2-10 minute s. Do not power-down the encl osure during reboot.
12.After the NAS reboots, access the NAS configuration software again as described
in step 6. The Status page appears.
13.In the Status page tree view, click
Storage | Shares | Cre ate and then click the Next
button. The CIFS Share page opens.
14.Specify CIFS options as follows:
a. Enter Media as the share name.
b. Set user privileges. Select all of the following options:
- Writeable
- Public
- Browseable
- Available
(Do not select Case Sensitive)
c. Click
Save.
15.Close the NAS Administration Tool.
Verify NAS access
Verify NAS access from production network machines, which are machines of the
following types:
• NewsBrowse server
• Single-channel encoder
• Advanced encoder
December 16, 2004 NewsBrowse Installation and Configuration Guide 45
Page 46

Chapter 3 Configuring the NewsBrowse System
***** Contact Grass Valley
Support for password.
To verify access, from each production network machine do the following:
1. Open Windows Exp lorer and na vigate to the medi a direct ory on th e NAS. You can
do this with the following path:
\\root-nb-nas-1\Media
2. Verify basic read/write capabilities by creating, modifying, and deleting a simple
text file.
To verify access from client network machines, choose a machine on the Client
network that can represent a NewsBrowse client PC and that is convenient for testing.
From this machine do the following:
1. Open Windows Exp lorer and na vigate to the medi a direct ory on th e NAS. You can
do this with the following path:
\\root-nb-nas-1\Media
2. Verify that NewsBrowse client PCs will have read only rights.
About Windows Domains an d the nb ad min acco un t
All NewsBrowse NAS machines require that an nbadmin account with a password of *****
has permission to the folder on the NAS that the encoders write to, and that
the web service running on the NewsBrowse server reads from.
From a Windows networki ng perspective, when a user account is defined on a loc al
computer rather than a Domain Controller, the account is a “local” account, whose
complete name is <computer name>\<username>, rather than
<domain>\<username>. For example, with an encoder named Encoder1, a
NewsBrowse server named Server1, and a NAS name d NAS1, there are three separate
local accounts: Encoder1\nbadmin, Server1\nbadmin, and NAS1\nbadmin.
The Windows network automatically maps a local account from one computer onto
the local account of another computer—as long as both the account name and the
password are identical. To enable this mapping to occur, the Windows Domain
Controller “synchronizes” the local accounts on computers at the time they join the
Domain. Therefore, if the nbadmin account is added to the NAS machine after the
Windows NAS has joined the Windows Domain, this synchronization does not occur.
This should not be a problem on factory-prepared NewsBrowse machines, as they
come with the nbadmin account pre-configured. However, if the proper sequence is
not followed and the problem does occur, the workaround is to remove the NAS from
the Windows Domain and then re-add it immediately thereafter.
Accessing NewsBrow se services
NewsBrowse software components are distributed among the machines that make up
the NewsBrowse system. These software components run as Windows services. A
NewsBrowse machine has the services that correspond to the NewsBrowse software
components it hosts.
When you change the configuration for a particular software component through the
NewsBrowse configuration pages, you must restart that software component’s
NewsBrowse service to put the changes into effect. Click
Panel | Administrative Tools | Services to access the services. All NewsBrowse service
names start with “Thomson…”, so they group together in the services list.
Start | Settings | Control
46 NewsBrowse Installation and Configuration Guide December 16, 2004
Page 47

Prepare for core config urat ion stages
***** Contact Grass Valley
Support for password.
Refer to “Ports and services convention” on page 31 for a list of NewsBrowse
services.
Accessing NewsBrowse system configuration pages
Use Internet Explorer to browse to port 280 of a NewsBrowse machine to access its
configuration pages. You must have administrator permissions on the NewsBrowse
machine. For example, to log on to the configuration pages on the NewsBrowse server
with administrator permissions, use the following:
Username: root-nb-svr\nbadmin
Passwo rd:
*****
The settings you find on a particular computer’s configuration pages depend on the
NewsBrowse software installed on the computer. For example, if your MDI
component are hosted on a single-channel encoder, you find the Profile Managed
Device and P roxy Managed Device configuration settings at port 280 of tha t
single-ch ann e l en cod e r. H owe v er, if yo ur M DI c o mpone n t a re h os ted on a de d icat ed
MDI serve r, you find th e Profile Ma naged Device and Proxy Managed Device
configuration settings at port 280 of the MDI server machine.
You can access a NewsBrowse computer’s configuration pages as follows:
• From the local computer, use the following URL:
http://localhost:280
• From the NewsBrowse server, you can also open the NewsBrowse launch page and
the click the
Configuration link. To open the NewsBrowse launch page, use the
following URL:
http://localhost/nbui
The NewsBrow se launch page resides on the NewsBrowse server only.
• From a network-connected computer, substitute localhost in the URL with the
computer’s network name. For example, to access the configuration pages or the
NewsBrowse launch page on a NewsBrowse server named iron-nb-svr, use the
following URLs:
December 16, 2004 NewsBrowse Installation and Configuration Guide 47
http://iron-nb-svr:280
http://iron-nb-svr/nbui
Page 48

Chapter 3 Configuring the NewsBrowse System
You must have network access to open configuration pages. With either a two tier or
a three tier network architecture, you can access all NewsBrowse devices from the
NewsBrowse server. However, devices on the Client Network, such as a
NewsBrowse client PC, do not have access to all NewsBrowse devices. From a
NewsBrowse client PC you cannot access devices that are on the Production network
only, such as single-channel encoders.
To access NewsBrowse configuration pages, do the following:
Enter the URL to the configuration page at port 280 and press Enter.
Verify the machine name and IP address, to confirm that you are configuring
the correct machine. There can be multiple IP addresses for the different
NewsBrowse networks.
Click links to open configuration pages.
48 NewsBrowse Installation and Configuration Guide December 16, 2004
Page 49

Stop NewsBrowse services
Before beginning your initial core configuration stages, you must stop all
NewsBrowse services. This prevents the creation of corrupt database records and
other errors that result from a partially configured system.
Go to each NewsBrowse machine and turn off all “Thomson…” services, as described
in “Accessing NewsBrowse services” on page 46. Then, when you configure each
stage, you start the appropriate services to put the settings into effect. This brings the
system on-line in an orderly fashion that allows you to verify system interactions and
identify configuration problems.
NOTE: It is especially important that the Rules Wizard is not running during
configuration stage tests that create assets. When a test asset is created, the Rules
Wizard can trigger the creation of various types of proxy media assets. This causes
problems because the partially configured system is unable to handle the assets
correctly.
Stop NewsBrowse services
December 16, 2004 NewsBrowse Installation and Configuration Guide 49
Page 50

Chapter 3 Configuring the NewsBrowse System
ASK registration stage
The ASK software component runs on the NewsBrowse server. It is the central
registry for all the software components of the NewsBrowse system. As software
components carry out tasks in a functioning system they regularly refer to the ASK
component to establish communication and exchange commands and data.
The NewsBrowse system configuration pages also refer to the ASK component to
populate fields and lists and to validate the values you enter as you configure the
system. For this reason you should configure the ASK component first.
To do the basic configuration and testing of the ASK software component, do the
following:
1. “Configure Media Frame Core ASK: Register components” on page 51
2. “Test: ASK registration stage” on page 52
3. “Checklist: ASK registration stage” on page 52
50 NewsBrowse Installation and Configuration Guide December 16, 2004
Page 51

ASK registration stage
Configure Media Frame Core ASK: Register components
Do not modify
Advanced
Basic
http://localhost:280 MediaFrameCore ASK
Open this configuration page locally on the NewsBrowse server machine.
!
!
!!
!
!
!
!
!
!
When you ad d an MDI
for this type of
machine/device…
Open SAN Profile
Stand-alone Profile Profile
NTFS storage on
Windows machines
Single-channel
encoder
Advanced encoder Transfer Advanced encoder host (table) name
Proxy Proxy PROXY1, as per
Archive device … Archive ARCHIVE1, as
a.
Enter only one Profile per Open SAN. As per convention, name the MDI for the Open SAN, rather than for the Profile.
Select “Device
Type”…
a
Profile As per
NTFS
Ingest As per
Enter “MD I
Name”…
convention.
Refer to “MDI
naming
convention” on
page30.
NTFS1, as per
convention.
convention.
Refer to
“Services
naming
convention” on
page30.
convention.
per convention.
All Domain names in the NewsBrowse system must be identical.
Port 9010 is required. See “Ports and services convention” on page 31.
Saves changes. Changes are lost if you leave the configuration page without
updating.
For the following settings, use the table below and refer to “Site-specific
configuration tables” on page 32. Add each MDI and “Devic e Type” servi ce in the
NewsBrowse system
Click to add an MDI.
Lists currently added MDIs.
Deletes the currently selected MDI.
Always click
To put changes into effect, start or restart the ASK service on the NewsBrowse
server.
Enter “Host Name or IP”… Enter “Port”… Comments
Host (table) name of the machine
hosting the Profile MDIs. Typically
the MDI server
NewsBrowse server host (table)
name, as the server is the required
NTFS MDI host.
Single-channel encoder host (table)
name
Host (table) name of the machine
hosting the Proxy MDI. Typically
the MDI server.
Host (table) name of the machine
hosting the archive MDI
Update… buttons after making changes
9130 - 9139 These are process ports, as
Leave field
blank. Correct
port number is
automatically
entered on
“Add MDI”.
Refer to “Ports
and services
convention”
on page 31 to
verify.
explained in “Ports and services
convention” on page 31. Assign
numbers in an intentional
sequence, so they are easy to match
in “Configure Profile MDIs” on
page 57.
The ASK settings page registers MDIs and services with the ASK software
component, which runs on the NewsBrowse server.
December 16, 2004 NewsBrowse Installation and Configuration Guide 51
Page 52

Chapter 3 Configuring the NewsBrowse System
Test: ASK registration stage
The following test verifies that configuration pages are correctly loading the
configured MDI information.
Test description: Open configuration pages and verify MDI lists.
Run the test as follows:
1. Make sure that the NewsBrowse system is not in use.
2. On the NewsBrowse server, open the
it is configured to
localhost and port 9010. These should be the default values. Refer
to “Configure ASK Location: NewsBrowse server” on page 69.
3. Open the
the
Media Frame Core | Rule s Automation pag e. For the Profile MDI field, click
… button. After a short pause, a list should appear. Verify that the configured
Profile MDI names are listed. Close the list without selecting anything.
4. Open the
Ingest Scheduler | Scheduler page. For the MDI Name field, click the …
button. After a short pause, a list should appear. Verify that the configured Ingest
MDI names are listed. Close the list without selecting anything.
Checklist: ASK registration stage
Use the following check list to verify that the basic configuration and testing of the
ASK registration stage is complete.
" All MDI names and “Device Type” service names are registered with ASK.
" Configuration pages load MDI names.
Ask Location configuration page. Verify that
52 NewsBrowse Installation and Configuration Guide December 16, 2004
Page 53

Managed Device Interface (MDI) stage
Managed Device Interface (MDI) stage
In this configuration stage you add a Managed Device Interface (MDI) server to the
NewsBrowse system and then set up managed device interfaces so that Profile video
servers and Proxy (NAS) devices are on-line as managed devices. Each type of device
has a MDI which represents the device’s assets in a way that is understandable by the
other components of the NewsBrowse system. This allows the NewsBrowse server to
coordinate the activity of the NewsBrowse system.
The Encoder + Server configuration stage and other similar configuration stages
require managed device interfaces to run their tests.
To bring Profile and Proxy managed devices on-line, do the following:
• “Prepare MDI server” on page 54
• “Configure ASK Location: MDI server” on page 55
• “Configure Proxy MDI” on page 56
• “Configure Profil e MDIs” on page 57
• “Test: MDI stage” on page 58
• “Checklist: MDI stage” on page 60
December 16, 2004 NewsBrowse Installation and Configuration Guide 53
Page 54

Chapter 3 Configuring the NewsBrowse System
Prepare MDI server
The machine that hosts the MDI services acts as the MDI server. Identify the machine
that is the MDI server as follows:
Dedicated MDI server — For medium to large NewsBrowse systems, the MDI services
are on a stand-alone MDI server machine, to ensure system performance. If your
system has a dedicated MDI server, it comes from the factory with Profile and Proxy
MDI services installed, so you do not need to do any further installation. The MDI
server requires only network communication in preparation for its use in the
NewsBrowse system.
NewsBrowse server as MDI server — For small NewsBrow se systems, the MDI
services can reside on the NewsBrowse server. The NewsBrowse server comes from
the factory with Profile and Proxy MDI service installed, to support these smaller
systems, so you do not need to do any further installation. The NewsBrowse server
also has the NTFS MDI service installed, as it is required to run on the server,
regardless of the size of the system.
For the remaining configuration steps in this stage, open configuration pages locally
(http://localhost:280) on the machine running the MDI services.
54 NewsBrowse Installation and Configuration Guide December 16, 2004
Page 55

Managed Device Interface (MDI) stage
Configure ASK Location: MDI server
Do not modify
Advanced
Basic
http://localhost:280 ASK Location
Access this page locally on the MDI server.
!
!
!
a.
If the MDI server is the NewsBrowse server, enter “localhost”.
This page tells the MDI server where to look for the ASK service, which runs on the
NewsBrowse server. The function of the ASK is to store the location of the software
components in the NewsBrowse system, so the components can find one another.
Enter the name of the NewsBrowse server
Port 9010 is required. See “Ports and services convention” on page 31.
Saves changes. Changes are lost if you leave the configuration page without
updating.
Always click
It is not necessary to restart a service to put these settings into effect.
Update… buttons after making changes
a
December 16, 2004 NewsBrowse Installation and Configuration Guide 55
Page 56

Chapter 3 Configuring the NewsBrowse System
Configure Proxy MDI
Do not modify
Advanced
Basic
http://localhost:280 Proxy MDI
Access this page locally on the MDI server.
!
!
!
!!
!
!
!
a.
You can define multiple locations on a single NAS machine, but for
each location you must enter and add the complete path.
This page configures the Managed Device Interface (MDI) for the NAS machines that
store the low-res proxy media. The NewsBrowse system depends on the Proxy MDI
to make proxy me d i a as s et s vi s ibl e across the syste m.
All Domain names in the NewsBrowse system must be identical.
Must be set to PROXY1, as per convention.
Port 9110 is required. See “Ports and services convention” on page 31.
Saves changes. Changes are lost if you leave the configuration page without
updating.
For each NAS machine, enter the UNC path to the “Media” folder. This is the
location to which the NewsBrowse system writes the proxy media assets.
Click to add as a location.
Lists the currently added locations. You can add multiple locations. You should
have one or more locations listed for each NAS machine.
Removes the currently selected location.
Always click Update… buttons after making changes
To put changes into effect, start or restart the Proxy MDI Service on the MDI
server.
a
For the Proxy MDI, there is but one managed device, with the logical name PROXY1.
This managed device can have multiple locations. The Media directory on each NAS
machine is entered as a location. Other directories can be entered as locations as well.
In this way the Proxy MDI knows where to look for the low-res assets.
56 NewsBrowse Installation and Configuration Guide December 16, 2004
Page 57

Managed Device Interface (MDI) stage
Configure Profile MDIs
Do not modify
Advanced
Basic
http://localhost:280 Profile MIDI
Access this page locally on the MDI server.
!!
!
!
!
!
!!
!
!
!
!
!
!
Port 9100 is required. See “Ports and services convention” on page 31.
All Domain names in the NewsBrowse system must be identical.
Saves changes. Changes are lost if you leave the configuration page without
updating.
Select a Profile MDI.
Enter the host (table) name of the Profile for the MDI selected above.
The time that the Profile MDI waits before it informs the NewsBrowse system
that a clip has finished recording. Leave at 2.
Automatically increments so each Profile MDI has a unique process port.
Click to add as an existing managed device. For stand-alone Profile Media
Servers, add a MDI for each one. For Open SAN Profile Media Servers, add
only one MDI per Open SAN.
Verify the MDIs currently on-line. A listing for a single Profile MDI includes
the values from all four “Add Profile MDI” fields above.
Click to remove the selected managed device.
The following settings specify Profiles to which assets can be transferred via
Fibre Channel from other Profiles. This is used by Conform-To-Air EDL and
other Fibre Channel transfers. Refer to “Configure Profile MDI: Conform to air
settings” on page 94.
Select the MDI for a Profile to which assets can be transferred.
Host (table) name of the Profile specified above.
Click to add as a transfer target. This makes the Profile available for selection
from the NewsBrowse application as a transfer destination.
a
!
a.
Make sure the Profile name is entered just as it is in the host table.
This page configures the Managed Device Interfaces (MDI) for the Profile Media
Servers that record and store the high-res media. The NewsBrowse system depends
on the Profile MDI to make high-res media assets visible across the system.
As you add Profile MDIs, refer to “Site-specific configuration tables” on page 32 and
make sure that you associate Profile MDIs and Profile host names correctly.
Multiple Profile MDIs run on a single machine (the MDI server), but they each need
their own process port number. For this purpose the “Port” field automatically
increments. To use the automatically incremented port numbers, make sure you add
Profile MDIs in the correct sequence. You can also manually enter port numbers. The
MDIs and their port numbers must match settings as in “Configure Media Frame Core
ASK: Register components” on page 51.
If you are configuring the basic MDI stage, do not yet configure transfer targets.
Profiles capable of receiving a Fibre Channel transfer.
Click to remove the selected transfer target.
Always click
To put changes into effect, start or restart Profile MDI Service on the MDI
server.
Update… buttons after making changes
December 16, 2004 NewsBrowse Installation and Configuration Guide 57
Page 58

Chapter 3 Configuring the NewsBrowse System
Test: MDI stage
The following test exercises system functionality exclusive to the Managed Device
Interfaces in this stage. A successful test verifies that the basic configurations are
correct.
Test description: Using the Managed Device Interfaces, view the assets on each
managed device and verify visibility into the machine’s file system.
Run the test as follows:
1. Make sure that the NewsBrowse system is not in use.
NOTE: Running these tests will tie up a channel and could collide with commands
from the Ingest Schedule page. Inform operators that they must not use the
channels under test.
2. On the machine that hosts the MDI services, click
NewsBrowse | Utilities | Remoting Host Controller. The Remoting Host Controller
Start | Programs | Thomson |
application starts up. Startup is verified by the icon in the Windows system tray as
it displays first a red X, then changes to a normally displayed icon.
3. Right-click the icon in the system tray and select
Remoting Host Controller. The
Remoting Host Controller application opens. The Profile MDI Service must be
running, as it supports the Remoting Host Controller application.
4. Verify that the number of processes running is the same as the number of Profile
Media Servers added as managed devices.
5. Close the Remoting Host Controller application.
58 NewsBrowse Installation and Configuration Guide December 16, 2004
Page 59

Managed Device Interface (MDI) stage
6. On the machine that hosts the MDI services, click Start | Programs | Thomson |
NewsBrowse | Diagnostic Tools | Asset System Client. The Asset System Client
application opens.
7. Configure as follows to check the connection to a Profile managed device:
• Host:
localhost
• Port: 9130 or another process port number for a Profile MDI. You can find t he
process port number for each Profile MDI on the Profile MDI Settings
configuration page in the Existing Profile MDIs box.
8. Click
Connect. Verify that the Get Asset List button and other buttons become
enabled, which means the connection is successful.
December 16, 2004 NewsBrowse Installation and Configuration Guide 59
Page 60

Chapter 3 Configuring the NewsBrowse System
9. Click Subscribe Events. This subscribes to notifications from the asset system.
With this enabled you should see a message when an asset is created or deleted.
10.Configure as follows to view assets on a Profile managed device:
• Enable the
Traverse All Containers check box.
• Location: Leave this field blank. With Traverse All Container enabled, when the
Get Asset List button is clicked it will get all of the assets for the MDI. If you
enter a path to a specific clip, you must use forward slashes in the path.
• Registered Type:
container/*
11.Click Get Asset List. Verify that a list of media assets appears.
12.Select an asset and click
Properties. Verify that properties for the asset appears.
13.Repeat step 9 through step 12 for each Profile managed device, as listed on the
Profile MDI Settings configuration page in the Existing Profile MDIs box.
14.Configure as follows to check the Proxy MDI connection:
• Host:
localhost
• Port: 9110
15.Click Connect. Verify that the Get Asset List button and other buttons become
enabled, which means the connection is successful.
16.Configure as follows to view assets at a Proxy location:
• Enable the
Traverse All Containers check box.
• Location: Leave this field blank.
• Registered Type:
17.Click Get Asset List. Verify that a list of media assets appears, for example, the
low-res assets created in “Test: Encoder stand-alone stage” on page 65.
18.Select an asset and click
19.On the NewsBrowse server, start the Asset System Client and click
Events as in step 9 above. When testing the notifications with the Asset System
Client, it should run on the server – the same machine on which the Rules Wizard
runs. This helps validate the networking configuration between the two machines.
Checklist: MDI stage
Use the following check list to verify that the basic configuration and testing of the
MDI stage is complete.
" The machine designated as the MDI server has the Proxy MDI service and the
Profile MDI service installed and running.
" Each Profile Media Server added as a managed device has a Profile Managed
Device Process running on the MDI server machine.
" From the Asset System Client application on the MDI server, assets and their
properties are visible from each Profile Media Server or Open SAN and from each
machine configured as a Proxy location.
container/*
Properties. Verify that properties for the asset appears.
Subscribe
60 NewsBrowse Installation and Configuration Guide December 16, 2004
Page 61

Encoder st and-alone stage
For this configuration stage you configure and test one single-channel encoder, one
NAS, and one Profile XP server to work together.
The portion of the NewsBrowse system configured and tested in this stage is
illustrated by the following diagram.
Encoder stand-alone stage
Refer to “Two tier system diagram” on page 16 for a view of the entire NewsBrowse
system.
To do the basic configuration and testing of a single-channel encoder, do the
following:
1. “Configu re ASK Loca tion: Sing le-channel encoder” o n page 62
2. “Configure Ingest Control: Singl e-channel encoder” on page 62
3. “Configure Proxy Asset (NAS): Single-channel encoder” on page 63
4. “Configure media server: Single-channel encoder” on page 64
5. “Configure MPEG encoder: Single-channel encoder” on page 65
6. “Test: Encoder stand-alone stage” on page 65
7. “Checklist: Encoder stand-alone stage” on page 67
December 16, 2004 NewsBrowse Installation and Configuration Guide 61
Page 62

Chapter 3 Configuring the NewsBrowse System
Configure ASK Location: Single-channel encoder
Do not modify
Advanced
http://
root
Basic
-nb-enc-n:280 ASK Location
!
!
!
This page tells the single-channel encoder where to look for the ASK service, which
runs on the NewsBrowse server. The function of the ASK is to store the location of
other services in the NewsBrowse system that the encoder might need to access.
Configure Ingest Control: Single-channel encoder
Do not modify
Advanced
Basic
!
!
!!
http://localhost:280 Single Channel Encoder Ingest Control
!
!
!
!
a.
Tune at a later time to make sure the VTR start matches the Profile
and encoder start time.
Enter the name of the NewsBrowse server
Port 9010 is required. See “Ports and services convention” on page 31.
Saves changes. Changes are lost if you leave the configuration page without
updating.
Always click
It is not necessary to restart a service to put these settings into effect.
Select the protocol that controls the Profile.
For Ethernet, enter IP Port
“Ports and services convention” on page 31.
360 minutes recommended
If using a backup VTR, select
If using a backup VTR, select a COM port.
Adjust as required by the backup VTR
Saves changes. Changes are lost if you leave the configuration page without
updating.
Always click Update… buttons after making changes
To put changes into effect, start or restart the Thomson Ingest Control service
on the single-channel encoder.
Update… buttons after making changes
Access this page from the local single-channel encoder.
9330. For Serial Port, select a COM Port. See
Enable
a
This page provides general information about the single-channel encoder and how it
controls the Profile Media Server and (if you use one) a backup VTR.
62 NewsBrowse Installation and Configuration Guide December 16, 2004
Page 63

Encoder stand-alone stage
Configure Proxy Asset (NAS): Single-channel encoder
Do not modify
Advanced
Basic
http://localhost:280 Single Channel Encoder Proxy Asset Information
Access this page from the local single-channel encoder.
!
!
!
a.
PROXY1 can have multiple folders (on multiple machines)
defined as locations for assets.
This page specifies the location (on a NAS machine) in which the single-channel
encoder places the proxy MPEG it creates.
When this page opens and when you click a
with valid information as currently defined on the ASK settings page and the Proxy
MDI settings page.
If you have not yet configured Proxy MDI settings (as in the MDI stage), you must
type in the File System Folder path (\\root-nb-nas-n\Media) rather than using the …
button and then selecting from a list. Refer to “Site-specific configuration tables” on
page 32. In this case you can ignore error messages about the Proxy MDI information
not being available.
There is but one logical Proxy Managed Device in the system, named
PROXY1.
Select the path to the folder (\Media) on the NAS (or other storage location)
that receives the MPEG this encoder creates.
Validates the current configurations with the Proxy MDI settings and saves
changes. Changes are lost if you leave the configuration page without
updating.
Always click
To put changes into effect, start or restart the Thomson Ingest Control service
on the single-channel encoder.
a
Update… buttons after making changes
… button, fields and lists are populated
December 16, 2004 NewsBrowse Installation and Configuration Guide 63
Page 64

Chapter 3 Configuring the NewsBrowse System
Configure media server: Single-ch annel encoder
Do not modify
Advanced
http://
root
Basic
-nb-enc-n:280 Single Ch annel Encoder Prim ar y Media Server
!
!
!
!
!
!
!
!!
a.
Normally the media server is enabled. Uncheck only when the
Profile is off line, but if you still need a second Profile or backup
VTR to run.
b.
This field is dependent upon the API/VDCP selection above.
c.
For API, this lis t is autom at icall y popu lat ed by re ad ing t he ch ann el
names, as in Configuration Manager, from the Profile specified in
the “Host Name…” field above.
d.
This field is dependent upon the API/VDCP selection above.
e.
This list is automatically populated by reading bins and volumes, as
in Media Manager, from the Profile specified in the “Host Name…”
field above
Leave this box checked unless the Profile is being taken off line.
Select API or VDCP (API is strongly recommended).
For API, enter the machine name of the Profile, as it is in the host table. For
VDCP, select the COM port connected.
For API, select the Profile channel. For VDCP, enter the signal port connected.
For API, set to 0. For VDCP, enter delay frames, tuned for the channel so that
the Profile and encoder start times are in sync.
Select the MDI name for the Profile specified under “Profile Control” above.
Select a bin on the Profile. Upon ingest, the high-res asset is saved here.
Validates and saves the current configurations. Changes are lost if you leave the
configuration page without updating.
Always click
To put changes into effect, start or restart the Thomson Ingest Control service
on the single-channel encoder.
Update… buttons after making changes
b
d
a
e
c
This page configures the connection between the single-channel encoder and the
Profile channel it controls. Make sure that you correctly associate the MDI with the
correct Profile Media Server. Refer to “Sit e-spec ific co nfigur ation t ables” o n page 32.
If you have a backup Profile, return to the
Server link and configure similarly. On the backup server configuration page, you
must check
Enable, as it is unchecked by default.
Single Channel Encoder Backup Media
64 NewsBrowse Installation and Configuration Guide December 16, 2004
Page 65

Encoder stand-alone stage
Configure MPEG encoder: Single-channel encoder
Do not modify
Advanced
http://
root
Basic
-nb-enc-n:280 Single Channel Encoder MPEG Encoder
!
!
!
!!
!
!
This page configures the parameters the encoder uses when it creates the MPEG
proxy assets.
Test: Encoder stand-al on e stage
The following test exercises system functionality exclusive to the basic
configurations for the single-channel encoder. A successful test verifies that the basic
configurations are correct.
Test description: A short test clip (high-res) is r ecorded on th e Pr ofile Media Server,
while at the same time the low-res proxy asset is created on the NAS.
Leave at default of 1000000.
Leave at default of 0. Modify only to debug server/encoder timecode problems.
Select
Composite
Select fields per second:
non-drop-frame NTSC,
The MPEG encoder audio output. Adjust to calibrate Advanced Edit audio, or
to improve the quality of the desktop audio (i.e. if the source is 'too hot')
Saves changes. Changes are lost if you leave the configuration page without
updating.
Always click
To put changes into effect, start or restart the Thomson Ingest Control service
on the single-channel encoder.
Update… buttons after making changes
FPS_5994 for drop-frame NTSC, FPS_60 for
FPS_50 for PAL.
NOTE: Run this test only in the stand-alone stage, with machines that have not yet
been added as managed devices (as in the + Server stage). Once the server is
connected, this test can result in corrupt database records.
Run the test as follows:
1. Make sure that the NewsBrowse system is not in use.
NOTE: Running these tests will tie up a channel and could collide with commands
from the Ingest Schedule page. Inform operators that they must not use the
channels under test.
2. Click
Start | Programs | Thomson | Event Viewer. Event Viewer opens.
December 16, 2004 NewsBrowse Installation and Configuration Guide 65
Page 66

Chapter 3 Configuring the NewsBrowse System
3. Click Start | Programs | Thomson NewsBrowse | Ingest Client. The Ingest Client
application opens.
If you open the Ingest Client application on an operational NewsBrowse system,
you'll see the status messages of the last encode job.
4. Configure as follows:
• Host Name or IP:
localhost
• Port: 9330
5. Click Connect to establish a connection with the Ingest Control service that
controls the target Profile. Look for the following report in the Status area to verify
the connection:
• State: IDLE
6. Configure as follows to create a high-res and a low-res asset:
• Asset Name: Enter a name for the test asset you are about to create.
• Start Time: Ent er ASAP. This starts recording immediately, similar to a crash
record. Or you can enter a start time a few minutes ahead of the current time.
• Duration: Enter
00.00.20.00 (this is 20 seconds, which is adequate for test
purposes)
7. Click
Ingest. The ingest job is submitted and a ProNet session is established with
the Profile. Watch the reports in the Status area to verify that the creation of the
assets is progressing. Look for the following report to verify completion:
66 NewsBrowse Installation and Configuration Guide December 16, 2004
Page 67

Encoder stand-alone stage
• State: SUCCEEDED
8. In Event Viewer, verify informational messages regarding the creation of the
assets.
NOTE: If you've not yet configured the MDIs, you may get some error messages in
Event Viewer as the encoder attempts to communicate completion information to
MDI services. In this case these m e ssages can be ignored.
9. In the Ingest Client application, click
low-res assets, look for the following report:
• COMPLETE_OK
10.On the Profile system, use Media Manager to verify that a clip with the correct
duration was created. Note the location of the clip, as it is used in configuration
stage tests later in this chapter.
11.On the NAS, use Windows Explorer to verify that the MPEG clip was created.
Open and play the clip. Validate video and audio.
Get Assets. For both the high-res and the
Checklist: Encode r stand - alone stage
Use the following check list to verify that the basic configuration and testing of the
single-channel encoder is complete.
" Audio/Video/Timecode connected properly
" NetTime server running
" Profile(s) record hi-res
" Encoder writes to NAS
" MPEG playback with audio
December 16, 2004 NewsBrowse Installation and Configuration Guide 67
Page 68

Chapter 3 Configuring the NewsBrowse System
Encoder + Server stage
For this configuration stage you configure the NewsBrowse server to work together
with the single-channel encoder, NAS, and Profile XP server from the Encoder
stand-alone stage. MDI services are also required, as configured in the MDI stage.
The portion of the NewsBrowse system configured and tested in this stage is
illustrated by the following diagram.
TC
Video
Server
mpg
AV
D to A
TC
1-Channel
Encoder
info
Production Network
info info
MDI Server
NewsBrowse Server
Refer to “Two tier system diagram” on page 16 for a view of the entire NewsBrowse
system.
To do the basic configuration and testing for the Encoder + Server stage, do the
following:
1. “Configure ASK Location: NewsBrowse server” on page 69
clk
mpg
Network Attached
Storage
2. “Configure Media Frame Core ASK: Single-channel encoder” on page 69
3. “Configure Ingest Scheduler: NewsBrowse server ” on page 70
4. “Set up NewsBrowse client for configuration stage tests” on page 71
5. “Test: Encoder + Server stage” on page 71
6. “Checklist: Encoder + Server stage” on page 72
68 NewsBrowse Installation and Configuration Guide December 16, 2004
Page 69

Encoder + Server stage
Configure ASK Location: NewsBrowse server
Do not modify
Advanced
Basic
http://localhost:280 ASK Location
Open this page locally on the NewsBrowse server machine.
!
!
!
Enter
localhost, since you are configuring on the NewsBrowse server itself.
Port 9010 is required. See “Ports and services convention” on page 31.
Saves changes. Changes are lost if you leave the configuration page without
updating.
Always click
It is not necessary to restart a service to put these settings into effect.
Update… buttons after making changes
This page tells the NewsBrowse server where to look for the ASK service. Since the
ASK service runs on the NewsBrowse server, you enter localhost for the ASK host
location. On all other machines you must enter the name of the NewsBrowse server.
Configure Media Frame Core ASK: Single-channel encoder
Make sure the single-channel encoder’s Ingest Control service is registered with the
ASK software component as a “Ingest” device, as explained in “Configure Media
Frame Core ASK: Register components” on page 51.
December 16, 2004 NewsBrowse Installation and Configuration Guide 69
Page 70

Chapter 3 Configuring the NewsBrowse System
Configure Ingest Schedul er: New sBrowse server
Do not modify
Advanced
Basic
http://localhost:280 Ingest Scheduler Scheduler
Open this page locally on the NewsBrowse server.
!
!
!
!!
!
!
!
!
!
!
Number of previous days of ingest history
Minimum back-to-back delay in seconds between records on the same channel.
Default value is 29.
Machine name (from host file) of Router Gateway.
!
8065 required.
Saves changes. Changes are lost if you leave the configuration page without
updating.
Select the MDI for the encoder. T his specifi es the encod er as an ingest chann el.
Enter a useful name for the channel. This is displayed in the NewsBrowse
application.
Select the router destination for the channel.
Adds the above specified encoder as an ingest channel
Currently added ingest channels
Removes the currently selected ingest channel
Adds the selected date suffix automatically to high-res clips
!
!
Adds the selected time suffix automatically to high-res clips
Saves date stamp and time stamp changes
Always click
To put changes into effect, start or restart the Thomson Ingest Scheduler
service.
Update… buttons after making changes
The page defines resources available and operating parameters for ingest jobs.
Add the encoder as an ingest channel.
For “Video/Audio Router…” settings, refer to “Add Router Gateway to Ingest
Schedu ler” on page 77. If you are configuring the basic Encoder + Server stage, do
not yet configure these settings.
70 NewsBrowse Installation and Configuration Guide December 16, 2004
Page 71

Encoder + Server stage
Set up NewsB rowse clie nt for configuration st age tests
Temporarily set up the NewsBrowse server as a NewsBrowse client. This is explained
in “Prepare NetTime clients” on page 39 and in “Set up client PCs” on page 114.
Using the NewsBrowse server as a NewsBrowse client is only for the purpose of the
staged configuration process. Once the entire NewsBrowse system is operating, you
should no longer use the NewsBrowse server as a NewsBrowse client.
Other configurations normally required for NewsBrowse clients, such as
NewsBrowse users and licenses, are not necessary when the NewsBrowse client runs
on the NewsBrowse server, because you log into the server as NewsBrowse
administrator. To use an external PC as a NewsBrowse client, refer to “Add
NewsBrowse Clients” on page 113 for the complete instructions.
Test: Encoder + Server stage
The following test exercises system functionality exclusive to the basic
configurations for the Encoder + Server stage. A successful test verifies that the basic
configurations are correct.
Test description: Using the NewsBrowse user interface, one test clip is manually
recorded (crash record) and one test clip is schedule recorded. The NewsBrowse
system correctly creates (at the right time) the high-res assets on the Profile Media
Server and the low-res proxy assets on the NAS.
Run the test as follows:
1. Make sure that the NewsBrowse system is not in use.
NOTE: Running these tests will tie up a channel and could collide with commands
from the Ingest Schedule page. Inform operators that they must not use the
channels under test.
2. From the NewsBrowse server, open the NewsBrowse application.
3. Click the
ingest tab at the t op o f th e Ne wsBr owse win do w. Th e In ges t page ope n s.
4. On the Ingest page, verify that you can see the single encoder with the correct
channel name at the top of the column.
5. Make sure you are on today's schedule, and enable auto-refresh.
6. If not already running, start Event Viewer by clicking
Event Viewer. You can view activity in Event Viewer as you run tests.
Start | Programs | Thomson |
7. Do a crash record as follows:
a. On the Ingest page, click the red record button at the top of the channel column.
The Add Schedule Event window appears showing the current time as the start
time of the record, with a default duration of 30 minutes.
b. Enter a meaningful test clip name
c. Change the duration to one minute. Duration uses the SMPTE timecode format:
hours:minutes:seconds:frames.
d. Click
Add Event. The event gets added to the Ingest Schedule in the current time
slot and begins recording.
December 16, 2004 NewsBrowse Installation and Configuration Guide 71
Page 72

Chapter 3 Configuring the NewsBrowse System
e. Change to List View and track progress until the job reports COMPLETED.
8. Do a scheduled record as follows:
a. On the Ingest page, double-click in the channel column at a time that is ahead of
the current time. The Add Schedule Event window appears.
b. Enter a meaningful test clip name.
c. Change the start time to a time that is a few minutes ahead of the current time.
Start Time uses a 24-hour clock.
d. Change the duration to one minute.
e. Click
Add Event. The event is added to the Ingest Schedule in the specified time
slot.
f. Ch ange to List View, wait until the recording begins, and track progress until
the job reports COMPLETED. Verify that the job starts at the correct time.
9. Check for the crash record and schedule record assets as follows:
a. Click the
browse tab at the top of the NewsBrowse window.
b. On the find tab, verify that the crash record and scheduled record clips are listed.
c. For each of these clips, select it, then click the
media and MPEG Video are listed.
Checklist: Encoder + Serve r stage
Use the following check list to verify that the basic configuration and testing of the
single-channel encoder plus NewsBrowse server is complete.
" Clock synched
" Crash record successful
" Scheduled record on time
" New assets in system
related tab. Verify that online
72 NewsBrowse Installation and Configuration Guide December 16, 2004
Page 73

Router Gateway stand-alone stage
For this configuration stage you configure the Router Gateway component for control
of your rou ter controll er (if used in your system).
Refer to “Two tier system diagram” on page 10 for a view of the entire NewsBrowse
system.
To do the basic configuration and testing of the Router Gateway stand-alone stage, do
the following:
1. “Add Route r Gateway” on page 73
2. “Configu re ASK Loca tion: Rout er Gateway” on page 74
3. “Configure Router Gateway” on page 74
4. “Test: Router Gateway stand-alone stage” on page 74
5. “Checklist: Router Gateway stand alone stage” on page 75
Add Router Gateway
Router Gateway stand -alone stage
The machine that hosts the Router Gateway software component acts as the Router
Gateway machine, as follows:
Dedicated Router Gateway — In some NewsBrowse systems, the Router Gateway
software component is on a stand-alone Router Gateway machine. If your system has
a dedicated Router Gateway machine, it comes from the factory with the Router
Gateway software component installed, so you do not need to do any further
installation. The Router Gateway machine requires only network connections in
preparation for its use in the NewsBrowse system.
MDI server as Router Gateway — The Router Gateway software component can also
reside on another NewsBrowse machine, such as the MDI server. If your system uses
the MDI server as the Router Gateway host, you must first install the Router Gateway
software component from the NewsBrowse server installation program. Ru n t he
installation program and install only
Router Gateway.
December 16, 2004 NewsBrowse Installation and Configuration Guide 73
Page 74

Chapter 3 Configuring the NewsBrowse System
Configure ASK Location: Router Gateway
Do not modify
Advanced
Basic
http://localhost:280 ASK Location
Open this page locally from the machine hosting the Router Gateway Service.
!
!
Advanced
Basic
!
!
!!
!
This page tells the Router Gateway where to look for the ASK service, which runs on
the NewsBrowse server. The function of the ASK is to store the location of
NewsBrowse components.
Configure Router Gateway
Do not modify
http://localhost:280 Router Gateway
!
!
!
Enter the name of the NewsBrowse server
Port 9010 is required. See “Ports and services convention” on page 31.
Saves changes. Changes are lost if you leave the configuration page without
updating.
Always click
It is not necessary to restart a service to put these settings into effect.
Open this page locally from the machine hosting the Router Gateway Service.
Port 8065 is required. See “Ports and services convention” on page 31.
Name (as it is in host table) of machine hosting Router Gateway service
12345 is the standard port for the SMS7000 native protocol.
If using a backup host, enter machine name.
Use the standard port for router controller. Defaults to 12345.
Saves changes. Changes are lost if you leave the configuration page without
updating.
Always click
To put changes into effect, start or restart the Router Gateway service.
Update… buttons after making changes
Update… buttons after making changes
This page specifies the machine or (backup) machines that host the Router Gateway
Service.
Test: Router Gateway stand-alone stage
The following test triggers the Router Gateway component to send a control signal to
the router controller. A successful test verifies that the basic configurations are
correct.
Test description: Using the Router Gateway Client application, change th e source and
destination of the router.
Run the test as follows:
1. Make sure that the NewsBrowse system is not in use.
NOTE: Running these tests will tie up a channel and could collide with commands
from the Ingest Schedule page. Inform operators that they must not use the
channels under test.
74 NewsBrowse Installation and Configuration Guide December 16, 2004
Page 75

Router Gateway stand -alone stage
2. From the Router Gateway host , click Start | Programs | Thomson | NewsBrowse |
Diagnostic Tools | Router Gateway Client. The Router Gateway Client application
opens.
3. Configure as follows:
•IP:
localhost
• Port: 8065.
4. Click
Connect. Verify that the Destinations and Sources drop-down lists are
populated, which means the connection is successful.
5. Configure as follows to trigger the router controller:
• Destinations: Select a destination from the list that is not the destination
currently used by the router.
• Sources: Select a source from the list that is not the source currently used by the
router
6. Monitor th e vide o and a udio curr ently routed. Clic k
Take. Verify that the video and
audio changes.
7. Repeat previous steps to validate that takes work for all destinations that are
configured to an ingest channel.
Checklist: Router Gateway stand alone stag e
Use the following check list to verify that the basic configuration and testing of the
Router Gateway stand alone stage is complete.
" The machine hosting the Router Gateway software component connects to the
router controller.
" The Router Gateway software component can change Destinations and Sources on
the router controller.
December 16, 2004 NewsBrowse Installation and Configuration Guide 75
Page 76

Chapter 3 Configuring the NewsBrowse System
Router Gateway + Server stage
For this configuration stage you configure the Router Gateway component for control
of your router controller (if used in your system).
The portion of the NewsBrowse system configured and tested in this stage is
illustrated by the following diagram.
Router
Gateway
POWERFAULTDATA ALARM
TC
Video
Server
mpg
AV
D to A
TC
1-Channel
Encoder
info
Production Network
info info
MDI Server
NewsBrowse Server
Refer to “Two tier system diagram” on page 10 for a view of the entire NewsBrowse
system.
To do the basic configuration and testing of the encoder plus server, do the following:
1. “Add Router G ateway to Ingest Scheduler” on page 77
clk
mpg
Network Attached
Storage
2. “Test: Router Gateway + Server stage” on page 78
3. “Checklist: Router Gateway + Server stage” on page 78
76 NewsBrowse Installation and Configuration Guide December 16, 2004
Page 77

Router Gatew ay + Se rve r stage
Add Router Gateway to Ingest Sc hed ul er
Do not modify
Advanced
http://
root
Basic
-nb-svr:280 Ingest Scheduler Scheduler
!
!
!
!!
!
!
!
!!
!
!
Number of previous days of ingest history
Minimum back-to-back delay between records on the same channel
Name (as it is in host table) of machine hosting Router Gateway service
!
8065. Refer to “Ports and services convention” on page 31.
Saves changes. Changes are lost if you leave the configuration page without
updating.
Select the M DI f or th e e ncoder . T his spec ifies the enco der as a n i ngest c han nel.
Enter a useful name for the channel. This is displayed in the NewsBrowse
application.
Select the router destination for the channel.
Adds the above specified encoder as an ingest channel
Currently added ingest channels
Removes the currently selected ingest channel
Adds the selected date suffix automatically to high-res clips
!
!
Adds the selected time suffix automatically to high-res clips
Saves date stamp and time stamp changes
Always click
To put changes into effect, start or restart the Thomson Ingest Scheduler service
on the NewsBrowse server.
Update… buttons after making changes
This page make the Router Gateway machine available to the Ingest Scheduler
service.
In the Router Gateway + Server stage, configure only Video/Audio Router Gateway
and Add/Update Ingest Channel settings.
If you have p rev iou sl y a dd ed a n i ngest channe l bu t h av e no t ye t c onf i gur e d its r o ute r
destination, you will have to remove the channel and then add it again but with the
router destination configured.
December 16, 2004 NewsBrowse Installation and Configuration Guide 77
Page 78

Chapter 3 Configuring the NewsBrowse System
Test: Router Gateway + Serve r stage
The following test triggers the router controller as part of Profile ingest. A successful
test verifies that the basic configurations are correct.
Test description: Using the NewsBrowse application, use the Router option in
conjunction with Profile ingest.
Run the test as follows:
1. Make sure that the NewsBrowse system is not in use.
NOTE: Running these tests will tie up a channel and could collide with commands
from the Ingest Schedule page. Inform operators that they must not use the
channels under test.
2. From the NewsBrowse server, open the NewsBrowse application.
3. Click the
ingest tab at t h e top of th e N ews Brow se wi n dow . Th e Inge st p age o pen s.
4. Make sure you are on today's schedule, and enable auto-refresh.
5. Verify that the router option is available as follows:
a. On the Ingest page, click the red record button at the top of the channel column.
The Add Schedule Event window appears showing the current time as the start
time of the record, with a default duration of 30 minutes.
b. Verify that the
router source list is present. Change the router source.
c. Enter a meaningful test clip name.
d. Change the duration to one minute. Duration uses the SMPTE timecode format:
hours:minutes:seconds:frames.
e. Click
Add Event. The event gets added to the Ingest Schedule in the current time
slot and begins recording.
f. Verify that the router changes the video and audio signal correctly.
Checklist: Router Gateway + Server stage
Use the following check list to verify that the basic configuration and testing of the
Router Gateway + Server stage is complete.
" Router-control connections successful between NewsBrowse server and Router
Gateway
" NewsBrows e application controls router at ingest
78 NewsBrowse Installation and Configuration Guide December 16, 2004
Page 79

Advanced encoder stand-alone stage
Advanced encoder stand-alone stage
For this configuration stage you configure and test one Advanced encoder and one
NAS to work together. The Advanced encoder functions as both an Image Support
Server to create thumbnail, storyboard, and Real Video assets, and as a Sequential
(scavenge) encoder to create MPEG proxy assets.
The portion of the NewsBrowse system configured and tested in this stage is
illustrated by the following diagram.
th/sb
Production Network
mpg
UIM
Advanced
Encoder
mpg
th/sb
Network Attached
Storage
Refer to “Two tier system diagram” on page 10 for a view of the entire NewsBrowse
system.
To do the basic configuration and testing of a Advanced encoder stand-alone, do the
following:
1. “Configure ASK Location: Advanced encoder” on page 80
2. “Configure Advanced Encoding Control” on page 80
3. “Configure Proxy Asset (NAS): Advanced encoder” on page 81
4. “Configure MPEG encode r: Advance d encoder” on page 81
5. “Configure Real Media Encoder: Advanced encoder” on page 82
6. “Test: Advanced encoder stand-alone stage - high-res source” on page 83
7. “Test: Advanced encoder stand-alone stage - MPEG proxy source” on page 85
8. “Checklist: Advanced encoder stand-alone stage” on page 86
December 16, 2004 NewsBrowse Installation and Configuration Guide 79
Page 80

Chapter 3 Configuring the NewsBrowse System
Configure ASK Location: Advanced encoder
Do not modify
Advanced
http://
root
Basic
-nb-adv-n:280 ASK Location
!
!
!
Enter the name of the NewsBrowse server
Port 9010 is required. See “Ports and services convention” on page 31.
Saves changes. Changes are lost if you leave the configuration page without
updating.
Always click
It is not necessary to restart a service to put these settings into effect.
Update… buttons after making changes
This page tells the Advanced encoder where to look for the ASK service, which runs
on the NewsBrowse server. The function of the ASK is to store the location of
NewsBrowse components.
Configure Advanc ed E nco di ng Control
Do not modify
Advanced
http://
root
Basic
!
!
!
!
-nb-adv-n:280 Advanced Encoder Advanced Encoding Control
Port 9230 is required. See “Ports and services convention” on page 31.
Always click
Enter the host name of the UIM.
Enter the maximum time the encoder waits for recording to begin after a clip is
created in the database. 60 seconds is the recommended setting.
Update… buttons after making changes
a
!
!!
!
a.
When you create a new clip name in the media database on the
Profile XP, the encoder is notified and waits for the media file to
appear. Set this value to be the maximum time allowed in your
workflow between the creation of a clip name and the
commencement of recording the clip.
b.
If the high-res stream for which the encoder is creating proxy
material is interrupted, the encoder waits this long for the stream to
continue.
This page configures the connections between the Advanced encoder and the server
from which it gets its media stream, such as a UIM.
Enter the maximum time the encoder waits for a break in the media stream to be
restored. 60 seconds is the recommended setting.
Click to add as a GXF server for this encoder.
GXF servers currently added for this encoder.
Remove the currently selected GXF server
Always click
To put changes into effect, start or restart the Thomson Proxy Transfer service
on the Advanced encoder.
Update… buttons after making changes
b
80 NewsBrowse Installation and Configuration Guide December 16, 2004
Page 81

Advanced encoder stand-alone stage
Configure Proxy Asset (NAS): Adv anced encoder
Do not modify
Advanced
http://
root
Basic
-nb-adv-n:280 Advanced Encoder Proxy Asset Information
!
!
!!
a.
PROXY1 can have multiple folders (on multiple machines)
defined as locations for assets. These locations are defined on the
Proxy MDI configuration page.
b.
This location is used when in Rules, Proxy Storage Location is
blank (*).
This page specifies the default location (on a NAS machine) in which the Advanced
encoder places the MPEG proxy, thumbnail, storyboard, and RealVideo assets it
creates.
When this page opens and when you click a
with valid information as currently defined on the Proxy MDI settings page.
Configure MPEG encoder: Advanced encoder
Do not modify
Advanced
http://
root
Basic
-nb-adv-n:280 Advanced Encoder MPEG Encoder
There is but one logical Proxy Managed Device in the system, named
PROXY1.
Select the path to the folder (\Media) on the NAS (or other storage location)
that receives the MPEG this encoder creates.
Validates the current configurations with the Proxy MDI settings and saves
changes. Changes are lost if you leave the configuration page without
updating.
Always click
To put changes into effect, start or restart the Proxy Transfer service on the
Advanced encoder.
a
b
Update… buttons after making changes
… button, fields and lists are populated
!
!
Leave at default of 1000000.
Saves changes. Changes are lost if you leave the configuration page without
updating.
Always click Update… buttons after making changes
Restart the Thomson Proxy Transfer service on the Advanced encoder.
This page configures the parameters the encoder uses when it creates the MPEG
proxy assets.
December 16, 2004 NewsBrowse Installation and Configuration Guide 81
Page 82

Chapter 3 Configuring the NewsBrowse System
Configure Real Media Encoder: Advanced encoder
Do not modify
Advanced
http://
root
Basic
-nb-adv-n:280 Advanced Encoder Real Media Encoder
!
!
Select
56K. Higher settings consume Advanced encoder system resources and
cause performance degradation.
Saves changes. Changes are lost if you leave the configuration page without
updating.
Always click
To put changes into effect, start or restart the Proxy Transfer service on the
Advanced encoder.
Update… buttons after making changes
This page sets the resolution for the Real Media assets created by the Advanced
encoder.
82 NewsBrowse Installation and Configuration Guide December 16, 2004
Page 83

Advanced encoder stand-alone stage
Test: Advanced encoder stand-alone stage - high-res source
The following test exercises Advanced encoder functionality for creating proxy assets
using a Profile high-res clip as the source. A successful test verifies that the basic
configurations are correct.
Test description: New asset-types (MPEG proxy, thumbnail, storyboard) are created
from a high-res asset and are transferred to a different location.
ASK configuration, as in “ASK registration stage” on page 50, is required for this test.
NOTE: Run this test only in the stand-alone stage, with machines that have not yet
been added as managed devices (as in the + Server stage). Once the server is
connected, this test can result in corrupt database records.
Run the test as follows:
1. Make sure that the NewsBrowse system is not in use.
2. Make sure the Rules Wizard Service, Thomson Resolver service, and the Thomson
Metadata service are off on the NewsBrowse server.
3. On the Advanced encoder, click
Diagnostic Tools | Transfer Client. The Transfer Client application opens.
Start | Programs | Thomson | NewsBrowse |
4. Configure as follows to check the connection:
December 16, 2004 NewsBrowse Installation and Configuration Guide 83
Page 84

Chapter 3 Configuring the NewsBrowse System
• Host: localhost
• Port: 9230
5. Click Connect. Verify that the …Update… and …Transfer… buttons become
enabled, which means the connection is successful.
6. Configure as follows to define the source clip on the Profile XP:
• Source Laid: Enter the path to a clip on a Profile. For example,
clip_name
to on a stand-alone Profile, V:/default/
clip_name
EXT:/default/
on an Open SAN. Do
not enter the *.cmf extension as part of the file name, as the Transfer Client
application adds it automatically.
NOTE: The Source path must use forward slashes. Also, the volume name of the
Profile is case sensitive.
• (Source) Format:
video/profile.cmf
7. Configure the first row as follows to transfer/transcode a proxy MPEG asset:
• Dest Laid: Enter a directory on the local Advanced encoder machine. This is for
test purposes only. The test MPEG file will be written to this directory.
NOTE: The Destination path must use back slashes
• (Destination) Format:
video/proxy.mpeg
8. Select the checkbox to enable the next row, then configure as follows to transfer/
transcode a thumbnail asset:
• Dest Laid: Enter a directory on the local Advanced encoder machine. This is for
this test only. The test files are written to the directory.
NOTE: The Destination path must use back slashes
• (Destination) Format:
stillImage/proxy.thumbnail
9. Select the checkbox to enable the next row, then configure as follows to transfer/
transcode a storyboard asset:
• Dest Laid: Enter a directory on the local Advanced encoder machine. This is for
this test only. The test files are written to the directory.
NOTE: The Destination path must use back slashes
• (Destination) Format:
stillImage/proxy.storyboard
10.Click Transfer (Wi th Auto update). Watch the report in the State column to verify
that the asset creation is successful.
11.Using Windows Explorer, verify the MPEG, storyboard, and thumbnail assets
created. Open and play the MPEG clip. Validate video and audio.
84 NewsBrowse Installation and Configuration Guide December 16, 2004
Page 85

Advanced encoder stand-alone stage
Test: Advanced encoder stand-alone stage - MPEG proxy source
The following test exercises system functionality exclusive to configurations for
creating thumbnail and storyboard assets from a MPEG proxy asset. A successful test
verifies that the basic configurations are correct.
Test description: Thumbnail and storyboard assets are created from an MPEG proxy
asset.
ASK configuration, as in “ASK registration stage” on page 50, is required for this test.
NOTE: Run this test only in the stand-alone stage, with machines that have not yet
been added as managed devices (as in the + Server stage). Once the server is
connected, this test can result in corrupt database records.
Run the test as follows:
1. Make sure that the NewsBrowse system is not in use.
2. Make sure the Rules Wizard Service, Thomson Resolver service, and the Thomson
Metadata service are off on the NewsBrowse server.
3. On the Advanced encoder, click
Diagnostic Tools | Transfer Client. The Transfer Client application opens.
Start | Programs | Thomson | NewsBrowse |
4. Configure as follows to check the connection:
December 16, 2004 NewsBrowse Installation and Configuration Guide 85
Page 86

Chapter 3 Configuring the NewsBrowse System
• Host: localhost
• Port: 9230
5. Click Connect. Verify that the …Update… and …Transfer… buttons become
enabled, which means the connection is successful.
6. Configure as follows to define the MPEG source clip on the NAS:
• Source Laid: Enter the path to a MPEG asset on a NAS machine. You can use
an asset created in an earlier test.
• (Source) Format:
video/proxy.mpeg
7. Configure the first row as follows to transfer/transcode a thumbnail asset from a
MPEG asset:
• Dest Laid: Enter the path to the directory on the NAS machine th at contains the
source MPEG asset. For the purposes of this test, the thumbnail and storyboard
assets must be written to the same location as the source MPEG asset.
• (Destination) Format:
stillImage/proxy.thumbnail
8. Select the checkbox to enable the next row, then configure as follows to transfer/
transcode a storyboard asset from a MPEG asset:
• Dest Laid: Enter the path to the directory on the NAS machine th at contains the
source MPEG asset. For the purposes of this test, the thumbnail and storyboard
assets must be written to the same location as the source MPEG asset.
• (Destination) Format:
stillImage/proxy.storyboard
9. Click Tra n sfer (With Auto update). Track progress in the State column until it
reports DONE.
10.Using Windows Explorer, verify that the thumbnail and storyboard test files were
written to the proper directory.
Checklist: Advanced encoder stand-alone stage
Use the following check list to verify that the basic configuration and testing of the
stand-alone Advanced encoder is complete.
" Advanced encoder is connected to NAS
" Encoder writes to NAS
" MPEG created
" MPEG playback with audio
" Thumbnails files are created.
" Storyboard files are created.
86 NewsBrowse Installation and Configuration Guide December 16, 2004
Page 87

Advanced encoder + Server stage
For this configuration stage you configure the NewsBrowse server to work together
with the Advanced encoder and NAS from the Advanced encoder stand-alone stage.
MDI services are also required, as configured in the MDI stage.
The portion of the NewsBrowse system configured and tested in this stage is
illustrated by the following diagram.
Advanced encoder + Server stage
TC
mpg
AV
1-Channel
Encoder
clk
TC
Video
Server
th/sb
UIM
Advanced
Encoder
mpg
Production Network
info
MDI Server
info
NewsBrowse Server
Refer to “Two tier system diagram” on page 10 for a view of the entire NewsBrowse
system.
To do the basic configuration and testing of the encoder plus server, do the following:
1. “Configure Media Frame Core ASK: Advanced encoder” on page 87
2. “Configure Rules Automa t ion: Advanced encoder” on page 88
3. “Test: Advanced encoder + Server stage - high-res source” on page 91
clk
mpg
th/sb
Network Attached
Storage
4. “Test: Advanced encoder + Server stage - MPEG proxy source” on page 92
5. “Checklist: Advanced encoder + Server stage” on page 92
Configure Media Frame Core ASK: Advanced encoder
Make sure the Advanced encoder’s Proxy Transfer service is registered with the ASK
software component as a “Transfer” device, as explained in “Configure Media Frame
Core ASK: Register components” on page 51.
December 16, 2004 NewsBrowse Installation and Configuration Guide 87
Page 88

Chapter 3 Configuring the NewsBrowse System
Configure Rules Automation : Advan ced encoder
Do not modify
Advanced
http://
root
Basic
!
!
!
!
!
!
!!
!
!
!
!
!
!!
-nb-svr:2 80 Media Frame Cor e Rules Automati on
The following settings define the creation of MPEG proxy assets.
Select a rule
Select the MDI for the Profile monitored by Advanced encoder.
Enter the path to the bin on the Profile that the NewsBrowse system monitors
for movies. Note: You must use forward slashes for this path.
Must be PROXY1
Set all rules to Normal to ensure all are processed
Defines the age of the MPEG asset after which it is automatically deleted from
the system the next time the purge rule runs. Leave blank to never expire.
Adds settings above as a Create Proxy MPEG encoder rule
The following settings define the creation of thumbnail, storyboard, and Real
Video assets
Select an asset type
Select a rule
Must be PROXY1
Leave blank, so the system can use any NAS and keep proxy assets together
Set all rules to Normal to ensure all are processed
Adds settings above as a Create Proxy rule
a
!
!
!
!
!
!
a.
When this field is left blank, the Rule specifies “*” as the Proxy
Storage Location, so the Default File System Folder is used, as
configured in “Configure Proxy Asset (NAS): Advanced encoder”
on page 81
This page defines the rules for an Advanced Encoder creating proxy material for an
asset. There are two groups of rules to create proxy material, as explained in the
following sections.
Displays all currently added rules.
Removes the currently selected rule
Specifies how many times the system retries a failed rule. Keep this setting at 3
or below for most rules to prevent degradation of system performance.
When a failed rule is retried, its priority can be changed in relation to other rules
currently being processed. Set to
Save Retry setting changes
Expired assets are purged from the system after this many days.
Saves Purge setting changes. Changes are lost if you leave the configuration
page without updating.
Always click
You must start or restart the Thomson Rules Wizard service on the
NewsBrowse server to put changes into effect, but if you are doing the initial
configuration of the Advanced encoder + Server stage, don’t start the service
until instructed to do so in the Advanced encoder + Server stage test.
Update… buttons after making changes
Increase to promote timely processing.
88 NewsBrowse Installation and Configuration Guide December 16, 2004
Page 89

Create Proxy MPEG Rules
These rules create MPEG material from a Profile or M-Series movie. This is also
known as a “scavenge” operation and is the same as Sequential encoder functionality.
Depending on the desired behavior of the system you may have to create multiple
rules for the MPEG creation. There are four types of rules for MPEG creation, as
follows:
•
Exists when Rules Wizard starts up — This rule will cause the Rules Wizard to
traverse a Profile/M-Series MDI to see if there are any Profile/M-Series files that
do not have MPEG asset associated with it. The Rules Wizard will only check the
system once after startup to see if it needs to create any of these assets.
•
Is recording — This rule causes MPEG to be created while the system is encoding
the Profile/M-Series asset. This MPEG will only be created if you have an
Advanced Encoder configured in the system.
NOTE: The “is recording” rule should not be configured with the “is created
(closed)” rule referencing the same Profile/M-Series storage location. Also if any
other process is associating MPEG and the high-resolution material together this
rule should not be configured for that location.
If you want to reserve an Advanced encoder to only create MPEG for assets that
are created by the ingest you will need to have the MPEG material be created in a
separate folder than the other scavenge MPEG material and configure the advance
encoder's to only use this folder.
Advanced encoder + Server stage
•
Is created (closed) — This rule causes MPEG to be created after the Profile/
M-Series asset is done recording. It is most commonly used with Sequential
Encoders. Refer to Appendix B, Legacy systems.
NOTE: The “is created (closed)” rule should not be configured with the “is
recording” rule referencing the same Profile/M-Series storage location.
•
Has its content modified — This rule will cause the system to delete the proxy
material associated to a Profile/M-Series movie if the movie has its content
modified. It will then recreate the MPEG material for the asset. Note: This rule is
normal not configured unless the site’s workflow frequently modifies content in an
asset.
Systems will usually have either “Is recording” or “Is created (closed)” rule set up (not
both) for directories that are being monitored for the scavenge process.
December 16, 2004 NewsBrowse Installation and Configuration Guide 89
Page 90

Chapter 3 Configuring the NewsBrowse System
The following table maps the “Create Proxy MPEG” rules and provides an example
text string for each rule, as appears in the Existing Rules box when the rule is added.
Create Proxy
MPEG if Profile
movie…
…exists when
Rules Wizard
Starts up
…is reco r ding
…is crea t ed
(closed)
…has its
content
modified
For movies in bin SCAV1, Profile 1 For movies in bin SCAV2, Profile 2
CreateIfSourceExist Source:DEFAULTDOMAIN/
PROFILE1/EXT:/SCAV1/*,video/profile.cmf
Destination:DEFAULTDOMAIN/PROXY1/*/*,video/
proxy.mpeg Priority:Normal
CreateIfSourceIsCreated Source:DEFAULTDOMAIN/
PROFILE1/EXT:/SCAV1/*,video/profile.cmf
Destination:DEFAULTDOMAIN/PROXY1/*/*, video/
proxy.mpeg Priority:Normal
CreateIfSourceIsCreatedClosed
Source:DEFAULTDOMAIN/PROFILE1/EXT:/SCAV1/
*,video/profile.cmf Destination:DEFAULTDOMAIN/
PROXY1/*/*,video/proxy.mpeg Priority:Normal
CreateIfSourceContentIsModifiedClosed
Source:DEFAULTDOMAIN/PROFILE1/EXT:/SCAV1/
*,video/profile.cmf Destination:DEFAULTDOMAIN/
PROXY1/*/*,video/proxy.mpeg Priority:Normal
Create Proxy Rules
These rules create thumbnails, storyboards, and Real Media video from an MPEG
asset. This is the same as Image Support Server (ISS) functionality. Most systems
only create thumbnail and storyboard material. There are two types of rules to create
the proxy material, as follows:
CreateIfSourceExist Source:DEFAULTDOMAIN/
PROFILE2/EXT:/SCAV2/*,video/profile.cmf
Destination:DEFAULTDOMAIN/PROXY1/*/*,video/
proxy.mpeg Priority:Normal
CreateIfSourceIsCreated Source:DEFAULTDOMAIN/
PROFILE1/EXT:/SCAV2/*,video/profile.cmf
Destination:DEFAULTDOMAIN/PROXY1/*/*, video/
proxy.mpeg Priority:Normal
CreateIfSourceIsCreatedClosed
Source:DEFAULTDOMAIN/PROFILE2/EXT:/SCAV2/
*,video/profile.cmf Destination:DEFAULTDOMAIN/
PROXY1/*/*,video/proxy.mpeg Priority:Normal
CreateIfSourceContentIsModifiedClosed
Source:DEFAULTDOMAIN/PROFILE2/EXT:/SCAV2/
*,video/profile.cmf Destination:DEFAULTDOMAIN/
PROXY1/*/*,video/proxy.mpeg Priority:Normal
Do not
configure
both to
reference
the same
storage
location
•
Exists when Rules Wizard starts up — This rule will cause the Rules Wizard to
traverse a Proxy MDI to see if it needs to create proxy material from the MPEG
asset.
•
Is created — This rule will key off of material being created and will create the
desired pro xy materi al. If yo u have a c reate prox y MPEG rul e “Is rec ording ” or “Is
created (c losed) ” yo u shoul d hav e thi s rule conf igured if yo u wan t any othe r prox y
material created.
90 NewsBrowse Installation and Configuration Guide December 16, 2004
Page 91

Advanced encoder + Server stage
The following table maps the “Create Proxy” rules and provides an example text
string for each rule, as appears in the Existing Rules box when the rule is added.
If Proxy MPEG… Create Thumbnail assets Create Storyboard assets Create Real Video assets
… exists when
Rules Wizard
Starts up
…is created
CreateIfSourceExist
Source:DEFAULTDOMAIN/
PROXY1/*/*,video/proxy.mpeg
Destination:DEFAULTDOMAIN/
PROXY1/*/*,stillImage/
proxy.thumbnail Priority: Nor mal
CreateIfSourceIsCreatedClosed
Source:DEFAULTDOMAIN/
PROXY1/*/*,video/proxy.mpeg
Destination:DEFAULTDOMAIN/
PROXY1/*/*,stillImage/
proxy.thumbnail Priority: Nor mal
CreateIfSourceExist
Source:DEFAULTDOMAIN/
PROXY1/*/*,video/proxy.mpeg
Destination:DEFAULTDOMAIN/
PROXY1/*/*,stillImage/
proxy.storyboard Priority:Normal
CreateIfSourceIsCreatedClosed
Source:DEFAULTDOMAIN/
PROXY1/*/*,video/proxy.mpeg
Destination:DEFAULTDOMAIN/
PROXY1/*/*,stillImage/
proxy.storyboard Priority:Normal
CreateIfSourceExist
Source:DEFAULTDOMAIN/
PROXY1/*/*,video/proxy.mpeg
Destination:DEFAULTDOMAIN/
PROXY1/*/*,video/proxy.rm
Priority:Normal
CreateIfSourceIsCreatedClosed
Source:DEFAULTDOMAIN/
PROXY1/*/*,video/proxy.mpeg
Destination:DEFAULTDOMAIN/
PROXY1/*/*,video/proxy.rm
Priority:Normal
Test: Advanced encoder + Server stage - high-res source
The following test exercises system functionality exclusive to the rules for creating
MPEG prox y, storyb oard, and t humbnai l assets fr om a Profi le high-r es source clip. A
successful test verifies that the basic configurations for the rules are correct.
Test descript ion: Trig ger rules by creating /modifyi ng a clip on a Prof ile Media se rver
while the Rules Wizard service is off, then on.
Run the test as follows:
1. Make sure that the NewsBrowse system is not in use.
2. Make sure the Thomson Rules Wizard service is off on the NewsBrowse server.
3. Start the Thomson Resolver service and the Thomson Metadata service on the
NewsBrowse server.
4. Click
Start | Programs | Thomson | Event Viewer to open Event Viewer.
5. On a Profile Media Server, copy a clip into a bin monitored by the Advanced
encoder.
6. On the NewsBrowse server, start the Thomson Rules Wizard. Watch Event Viewer
and verify that the proxy MPEG, storyboard, and thumbnail assets are created for
the clip.
7. On the Profile Media Server, copy another clip into the bin. Watch Event Viewer
and verify that the proxy MPEG, storyboard, and thumbnail assets are created for
the clip.
8. On the Profile Media Server, modify a clip (rename) in the bin. Watch Event
Viewer and verify that the proxy MPEG, storyboard, and thumbnail assets are
created for the modified clip.
9. If you have a “is rec ording” rule co nfigur ed for h igh-res c lips, on the P rofile Me dia
Server, record a clip into a bin monitored by the Advanced Encoder. Watch Event
Viewer and verify that the proxy MPEG, storyboard, and thumbnail assets are
created (in real-time) as the clip is recorded.
December 16, 2004 NewsBrowse Installation and Configuration Guide 91
Page 92

Chapter 3 Configuring the NewsBrowse System
Test: Advanced encoder + Server stage - MPEG proxy source
The following test exercises system functionality exclusive to the rules for creating
storyboar d and thum bnai l assets from a MPE G prox y asset. A successf ul test ve rif ies
that the basic configurations are correct. This test assumes that you are using
single-channel encoders for creating the MPEG proxy asset at ingest.
Test description: Trigger rules by creating a clip on a Profile Media server while the
Rules Wizard service is off, then on.
Run the test as follows:
1. Make sure that the NewsBrowse system is not in use.
NOTE: Running these tests will tie up a channel and could collide with commands
from the Ingest Schedule page. Inform operators that they must not use the
channels under test.
2. Stop the Thomson Ru l es Wi z ard service on the New s B row s e server.
3. Start the Thomson Resolver service and the Thomson Metadata service on the
NewsBrowse ser ve r.
4. From the NewsBrowse server, open the NewsBrowse application.
5. Ingest a short test clip. On the related tab, verify that only the MPEG proxy asset
is created.
6. Start the Thomson Rules Wizard service on the NewsBrowse server. In the
NewsBrowse application on the related tab, verify that the thumbnail and
storyboard assets are created for the MPEG asset, as per your currently configured
rules. This could take a few minutes, depending on clip length.
7. Ingest a short test clip. On the related tab, verify that the MPEG proxy asset is
created and the other assets are created as well. This could take a few minutes,
depending on clip leng th.
8. Stop the Thomson Rules Wizard service, Thomson Resolver service, and the
Thomson Metadata service on the NewsBrowse server.
Checklist: Advanced encoder + Server stage
Use the following check list to verify that the basic configuration and testing of the
single-channel encoder plus NewsBrowse server is complete.
" When the Rules Wizard starts up, rules work as configured for the creation of proxy
MPEG, thumbnail, and storyboard assets.
" When a clip is ingested, rules work as configured for the creation of proxy MPEG,
thumbnail, and storyboar d assets.
" When a Profile clip is copied into a monitored bin, rules work as configured for
creation of proxy MPEG, t humbnail, and storyboar d assets.
" When a Profile clip is modified, rules work as configured for creation of proxy
MPEG, thumbnail, and storyboard assets.
92 NewsBrowse Installation and Configuration Guide December 16, 2004
Page 93

EDL Export, Save, Conform stage
For this configuration stage you configure the settings for the following Edit Decision
List (EDL) features. These features are available in the NewsBrowse application
when EDLs are created:
• Export — Exports an EDL to a pre-defined location.
• Save — Saves the EDL as a NewsBrowse system asset for future use.
• Conform — Creates a high-res asset that matches the EDL on a Profile Media
Server.
• Conform to Air — Creates a high-res asset that matches the EDL on one Profile
Media Server, then transfers the asset to another Profile Media Server.
To do the basic configuration and testing of the EDL stage, do the following:
1. “Configure Profile MDI: Conform to air settings” on page 94
2. “Configure NTFS MDI” on page 95
EDL Export, Save, Conf orm stage
3. “Configure Media Fram e Core ASK: NT FS” on page 95
4. “Configure Conform Servi ces” on page 96
5. “Configure Export Services” on page 97
6. “Configure Save EDL settings” on page 97
7. “Test: EDL stage” on page 98
8. “Checklist: EDL stage” on page 98
December 16, 2004 NewsBrowse Installation and Configuration Guide 93
Page 94

Chapter 3 Configuring the NewsBrowse System
Configure Profile MDI: Conform to air settings
Do not modify
Advanced
http://
root
Basic
-mdi-svr:280 Profile MDI
This page resides on the machine hosting the Profile MDI service.
!!
!
!
!
!
!!
!
!
!
!
!
!
Port 9100 is required. See “Ports and services convention” on page 31.
All Domain names in the NewsBrowse system must be identical.
Saves changes. Changes are lost if you leave the configuration page without
updating.
Select a Profile MDI.
Enter the host (table) name of the Profile for the MDI selected above.
The time that the Profile MDI waits before it informs the NewsBrowse system
that a clip has finished recording. Leave at 2.
Automatically increments so each Profile MDI has a unique port.
Click to add as an existing managed device. For stand-alone Profile Media
Servers, add a MDI for each one. For Open SAN Profile Media Servers, add
only one MDI per Open SAN.
Verify the MDIs currently on-line. A listing for a single Profile MDI includes
the values from all four “Add Profile MDI” fields above.
Click to remove the selected managed device.
The following settings specify Profiles to which assets can be transferred via
Fibre Channel from other Profiles. This is used by Conform-To-Air EDL and
other Fibre Channel transfers.
Select the MDI for a Profile to which assets can be transferred.
Host (table) name of the Profile specified above.
Click to add as a transfer target. This makes the Profile available for selection
from the NewsBrowse application as a transfer destination.
a
!
a.
Make sure the Profile name is entered just as it is in the host table.
This page configures the Managed Device Interface (MDI) for the Profile Media
Servers that record and store the high-res media. The NewsBrowse system depends
on the Profile MDI to make high-res media assets visible across the system.
For the EDL stage, configure the settings related to the EDL Conform to air feature.
Specify one of more on-air Profiles as the targets to which conformed high-res clips
can be transferred for playout.
For other settings, refer to “Configure Profile MDIs” on page 57.
Profiles capable of receiving a Fibre Channel transfer.
Click to remove the selected transfer target.
Always click
To put changes into effect, start or restart Profile MDI Service on the MDI
server.
Update… buttons after making changes
94 NewsBrowse Installation and Configuration Guide December 16, 2004
Page 95

EDL Export, Save, Conf orm stage
Configu re NTFS MDI
Do not modify
Advanced
http://
root
Basic
-nb-svr:280 Managed Devices NTFS MDI
!
!
!
!
!
!
!
!
!
!
Name of NTFS MDI, as registered with ASK. Refer to “Configure Media
Frame Core ASK: Register components” on page 51.
All Domain names in the NewsBrowse system must be identical
Port
9115 required. See “Ports and services convention” on page 31.
Saves changes. Changes are lost if you leave the configuration page without
updating.
Machine (and folder) managed by the NTFS MDI. This must be a UNC path.
The machine must have NTFS storage. You can optionally specify the folder.
Adds the machine/folder) as managed by the NTFS MDI.
Lists currently added machines/folders accessible by the NTFS MDI.
Removes the currently selected machine/folder from the list.
Defines the types of files accessible by the NTFS MDI. Follow the example
syntax.
Adds the file-type as accessible the NTFS MDI.
Lists currently added file-types accessible by the NTFS MDI.
Removes the currently selected file-type from the list.
Always click
Restart the Thomson NTFS MDI Service on the NewsBrowse server.
Update… buttons after making changes
This page specifies the machines, directories, and file types that the NTFS MDI can
access. The NewsBrowse application makes these available as selections for saving
and managing assets, including EDLs.
• Enter a location for saving EDLs. Typically this would be on a NAS machine, such
as \\root-nas-n\EDLs.
• Enter a location for temporarily saving EDLs as they are being conformed.
Typically this would be on the NewsBrowse server, such as
\\root-nb-svr\TempEDL.
NOTE: Configure different locations for EDL operations. Do not use the same
locations for saving, temporary saving, conforming, and exporting EDLs.
• Enter a l ocatio n for savi ng aud io fil es. T ypica lly this wo uld be on a NAS ma chine ,
such as \\root-nas-n\Audio.
•Enter xml-edl/xml and wav-audio/wav as a file-types.
Configure Media Frame Core ASK: NTFS
Make sure the NTFS MDI is registered with the ASK software component as a
“NTFS” device, as explained in “Configure Media Frame Core ASK: Register
components” on page 51.
December 16, 2004 NewsBrowse Installation and Configuration Guide 95
Page 96

Chapter 3 Configuring the NewsBrowse System
Configure Conform Services
Do not modify
Advanced
http://
root
Basic
!
!
!
!
!
!
!
!
!!
-nb-svr:280 NewsBrowse Application Conform Services
When an EDL is conformed it is temporarily stored in the location specified
by the following settings.
Select the name for the NTFS MDI (NTFS1).
Enter a full UNC path to the directory (on a machine with NTFS storage) in
which the EDLs are temporarily stored.
Saves changes. Changes are lost if you leave the configuration page without
updating.
The following settings specify a Profile that can be used to conform an EDL.
Enter the label for display in the NewsBrowse application that identifies the
service of a Profile conforming an EDL.
Select the MDI for the Profile that does the conformance.
The Profile managed by this MDI is a play-to-air Profile to which
Conform-to-Air high-res assets are transferred.
Location (bin) on the play-to-air Profile where the Conform-to-Air high-res
asset is stored.
Select to make the EDL available to NewsQPro.
Add the service to conform EDLs.
b
a
!
a.
This directory must be shared so it can be accessed by the
NewsBrowse server.
b.
This list is automatically populated by reading the volume and
bin names, as in Media Manager, from the Profile indicated by
“Target MDI Name” above.
This page tells the NewsBrowse application where to store EDLs that are to be
conformed and specifies Profiles that are available to conform EDLs. You can add
multiple Profiles as Conform Services, each of which is then available for selection
from the NewsBrowse application.
NOTE: Configure different locations for EDL operations. Do not use the same
locations for saving, temporary saving, conforming, and exporting EDLs.
For a Conform-To-Air service, one Profile (often an Open SAN Profile) does the
work of conforming the EDL, then the resultant high-res asset is transferred to an
On-Air Profile (usually a stand-alone Profile) for playout. You must define the
NewsBrowse application display name, the Profiles, and the locations to make this
type of Conform-to-Air service available in the NewsBrowse application.
Currently added services available to conform EDLs. You can add services
using several Profiles, so that they can be selected in the NewsBrowse
application when conforming an EDL.
Removes the currently selected EDL service.
Always click
Restart the NewsBrowse application to put changes into effect.
Update… buttons after making changes
96 NewsBrowse Installation and Configuration Guide December 16, 2004
Page 97

EDL Export, Save, Conf orm stage
Configure Export Services
Do not modify
Advanced
http://
root
Basic
-nb-svr:280 NewsBrowse Application Export Services
!
!
!
!
a.
This directory must be shared so it can be accessed by the
NewsBrowse server.
This page tells the NewsBrowse application the locations available for exporting
EDLs. You can add multiple locations, each of which is then available for selection
from the NewsBrowse application. Name locations and add them according to
workflow needs.
NOTE: Configure different locations for EDL operations. Do not use the same
locations for saving, temporary saving, conforming, and exporting EDLs.
Configure Save EDL setti ng s
Do not modify
Advanced
http://
root
Basic
-nb-svr:280 NewsBrowse Application Save EDL
Enter the label for display in the NewsBrowse application that identifies the
location to which EDLs can be exported.
Enter a full UNC path to the directory to which the EDLs are exported.
Adds the location as an export location.
Currently added location available for exporting EDLs. You can add several
locations, so that they can be selected in the NewsBrowse application when
exporting an EDL.
Removes the currently selected location.
Always click
Restart the NewsBrowse application to put changes into effect.
Update… buttons after making changes
a
!
!
!
EDLs are saved to this location, usually a NAS machine.
After this many days, a saved EDL is deleted. Enter 0 to never delete.
Saves changes. Changes are lost if you leave the configuration page without
updating.
Always click
Restart the NewsBrowse application to put changes into effect.
Update… buttons after making changes
This page tells the NewsBrowse application where to save EDLs and how long to
keep them in the system.
NOTE: Configure different locations for EDL operations. Do not use the same
locations for saving, temporary saving, conforming, and exporting EDLs.
December 16, 2004 NewsBrowse Installation and Configuration Guide 97
Page 98

Chapter 3 Configuring the NewsBrowse System
Test: EDL stage
The following test exercises system functionality exclusive to the EDL
configurations. A successful test verifies that the basic configurations are correct.
Test description: Using the NewsBrowse application, create an EDL, then export,
save, and conform it.
Run the test as follows:
1. Make sure that the NewsBrowse system is not in use.
2. Load a clip in the NewsBrowse application.
3. Mark in/out region of the clip and press the Insert to Timeline button to add to the
timeline. Do this a couple of times with this and other assets.
4. Select Save from the timeline control. Enter and take note of the name used for
saving. The save should be successful.
5. Refresh the results list by clicking the Go button with no criteria selected. The EDL
asset name should appear in the results list.
6. Select the Export button from the timeline control. Select a destination and choose
export.
7. Select Conform from the timeline control. Enter and take note of the name used for
conformi ng. Select a target (not a Conform to Air target) and choose Co nform.
8. Select Conform again from the timeline control. Enter and take note of the name
used for conforming. Select a Conf orm to Air target and choose Conform.
9. To verify export, the EDL file should be in the export destination.
10.To verify Conform, on the Profile/Open SAN a resulting high-res asset should be
created with the exported EDL name. Playback the conformed asset from the
Profile/Open SAN.
11.To verify Conform with Transfer to On-Air, a high-res asset should exist on the
On-Air server. Playback the conformed asset from the On-Air server.
Checklist: ED L stage
Use the following check list to verify that the basic configuration and testing of the
EDL functionality is complete.
" EDL is created and saved.
" Saved EDL available as asset from NewsBrowse application
" EDL exports to specified location
" Profile correctly creates conformed EDL
" Transfer to On-Air EDL plays from On-Air Profile
98 NewsBrowse Installation and Configuration Guide December 16, 2004
Page 99

Archive stage
For this configuration stage you configure your archive MDI, Profile Media Servers,
and the NewsBrowse server to work together. This assumes that the archive devices
are already installed and connected.
The portion of the NewsBrowse system configured and tested in this stage is
illustrated by the following diagram.
Archive stage
TC
Video
Server
Archive
info
AV
Fibre Channel
info
Production Network
infoinfo
MDI Server
To configure and test the Archive stage, do the following:
1. “Add archive MDI” on page 100
2. “Verify archive preparations” on page 101
3. “Configure ASK Location: Archive MDI host” on page 104
4. “Configure Media Frame Core ASK: Archive” on page 104
NewsBrowse
Server
5. “Configure Avalon Archive MDI” on page 105
6. “Config ur e Flas hN et MDI” on page 1 07
7. “Configure DIVA MDI” on page 108
8. “Configure Archive Services.” on page 109
9. “Test: Archive stage” on page 109
10.“Checklist: Archive stage” on page 110
December 16, 2004 NewsBrowse Installation and Configuration Guide 99
Page 100

Chapter 3 Configuring the NewsBrowse System
Add archive MDI
The archive MDI software component runs as a service. The archive MDIs that are
available for the different types of archive devices are as follows:
• Avalon Archive MDI — runs as the Thomson Avalon Archive MDI service
• FlashNet MDI — runs as the Thomson FlashNet MDI service
• DIVA MDI — runs as the Thomson DIVA MDI service
The archive MDI software component must be installed on a network connected
computer. Similar to the other MDIs in the NewsBrowse system, the archive MDI can
be install ed on a MDI s erver or on the NewsBr owse serve r, depend ing on th e size and
design of yo ur N ew s Browse system.
You can install the archive MDI software component from the NewsBrowse server
installation program. Select the component for your archive from the Custom setup
page.
100 NewsBrowse Installation and Configuration Guide December 16, 2004
 Loading...