

Page 1

LET’S GET STARTED
Page 2
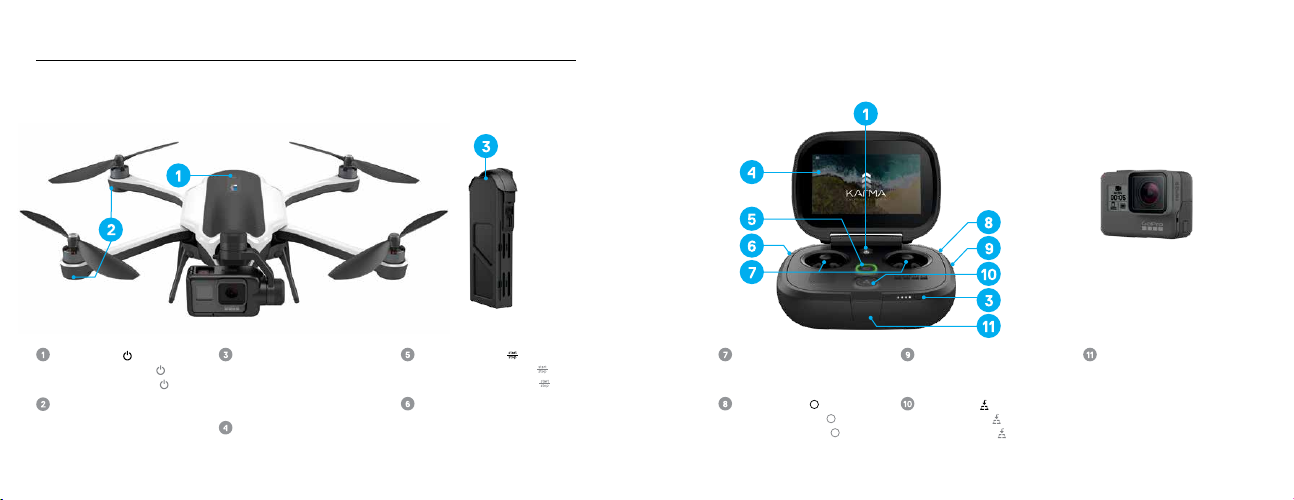
KARMA™ / KARMA / KARMA
DRONE / DRONE / DRONE BAT TERY / BATTERIE / BATTERIA CONTROLLER / CONTRÔLEUR / CONTROLLER CAMERA* / CAMÉRA* /
Power Button [ ]
Bouton d’alimentation [
Pulsante di accensione [
Orientation Lights
Témoins d’orientation
Spie di orientamento
Battery Status Button and Lights
]
]
Bouton et témoins d’état de
la batterie
Spie e pulsante di stato
della batteria
Touch Display
Écran tactile
Touch screen
Start/Stop Button [ ]
Bouton Démarrer/Arrêter [
Pulsante Avvia/Interrompi [
Camera Tilt Wheel
Molette d’inclinaison de la caméra
Rotellina di inclinazione
]
]
Joysticks
Joysticks
Strumentazioni
Shutter Button [ ]
Bouton Obturateur [
Pulsante Otturatore [
*
Camera not included with some Karma bundles. / *La caméra n’est pas incluse dans certains packs Karma. / *Fotocamera non inclusa con alcuni pacchetti Karma.
]
]
Mode/Tag Button
Bouton Mode/Balise
Pulsante Modalità/Tag
Land Button [ ]
Bouton Atterrir [
Pulsante Atterra [
]
]
FOTOCAMERA
Charging Port
Port de chargement
Porta di ricarica
*
Page 3
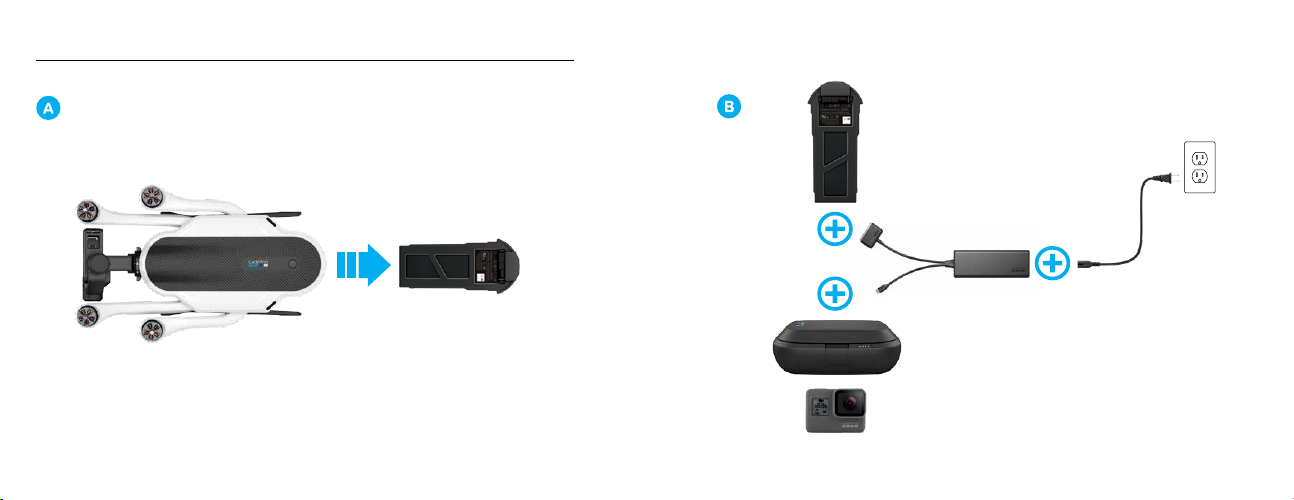
STEP 1: CHARGE / CHARGEMENT / RICARICARE
1
Take out the battery.
Retirez la batterie. / Estrarre la batteria.
Charge the devices.
Chargez les dispositifs. / Ricaricare i dispositivi.
Page 4
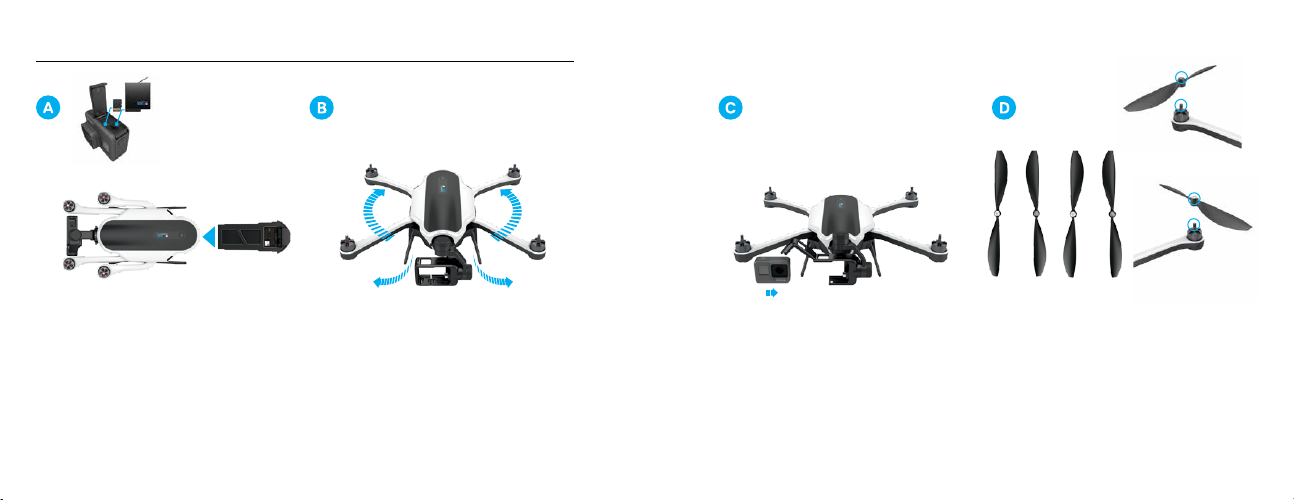
STEP 2: ASSEMBLE / ASSEMBLAGE / MONTARE
Insert the microSD™ card and batteries.
Insérez la carte microSD et les batteries.
Inserire la scheda microSD e le batterie.
/
Unfold the landing gear and arms.
Déployez le train d’atterrissage et les bras. /
Stendere i bracci e i piedini di atterraggio.
Open the harness and insert the camera.
Ouvrez le harnais et insérez la caméra. /
Aprire l’imbracatura e inserire la fotocamera.
Lightly tighten the propellers by hand. Propellers
are color-coded to match the correct motors.
Serrez légèrement les hélices à la main. Un code
couleur permet d’associer chaque hélice au
moteur correspondant. / Stringere leggermente
le eliche a mano. Le eliche hanno un codice
cromatico per inserirle sul motore giusto.
Page 5
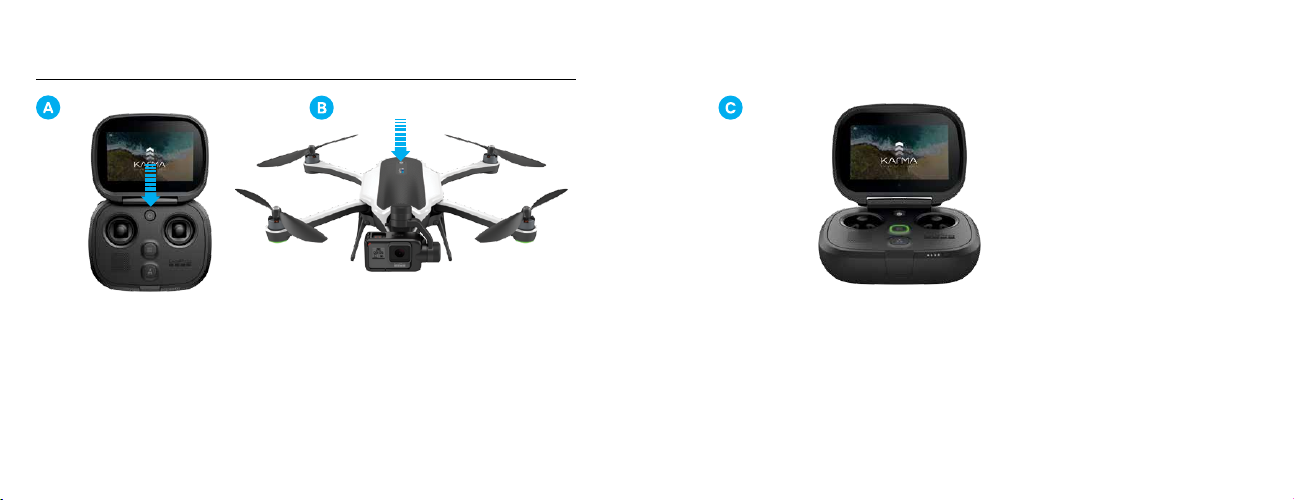
STEP 3: PREPARE TO FLY / PRÉPARATION AU VOL /
PREPARARSI A VOLARE
Power on the controller.
Allumez le contrôleur. / Accendere il controller.
Power on Karma.
Allumez Karma.
/ Accendere il Karma.
Follow the on-screen instructions.
Suivez les instructions à l’écran. / Seguire le
istruzioni visualizzate sullo schermo.
Page 6

JOYSTICK CONTROLS / COMMANDES DES JOYSTICKS / COMANDI
DELLA STRUMENTAZIONE
ROTATE
LEFT
TOURNER
VERS LA
GAUCHE
RUOTA A
SINISTRA
FLY HIGHER
AUGMENTER L’ALTITUDE
VOLA PIÙ IN ALTO
FLY LOWER
RÉDUIRE L’ALTITUDE
VOLA PIÙ IN BASSO
ROTAT E
RIGHT
TOURNER
VERS LA
DROITE
RU OTA A
DESTRA
FLY LEFT
VOLER VERS
LA GAUCHE
VOLA A
SINISTRA
FLY FORWARD
VOLER VERS L’AVANT
VOLA IN AVANTI
FLY BACKWARD
VOLER VERS L’ARRIÈRE
VOLA ALL’INDIETRO
FLY RIGHT
VOLER VERS
LA DROITE
VOLA A
DESTRA
Page 7

STEP 4: FLY SAFELY / CONSIGNES DE SÉCURITÉ / VOLARE
IN SICUREZZA
Don’t fly over people or animals.
Ne faites pas voler le drone au-dessus de personnes
ou d’animaux. / Non volare su persone o animali.
5 miles (8km)
Don’t fly within 5 miles (8km) of airports.
Ne faites pas voler le drone à moins de 8km
(5miles) d’un aéroport. / Non volare nel raggio di
8 km (5 miglia) dagli aeroporti.
Don’t fly in fog, high winds, rain or snow.
Ne faites pas voler le drone en cas de brouillard,
de vent violent, sous la pluie ou sous la neige. /
Non volare in presenza di nebbia, venti forti,
pioggia o neve.
Fly outdoors and within line of sight.
Faites voler le drone à l’extérieur en le gardant en
ligne de vue
linea di visuale.
*.
/ Volare all’aperto e all’interno della
*
*
Make sure your Karma isn’t damaged.
Assurez-vous que Karma n’est pas endommagé. /
Verificare che il Karma non sia danneggiato.
*
Flight restrictions vary by location. / *Les restrictions de vol varient selon l’emplacement. / *I divieti di volo vari ano a seconda della l ocalità.
Comply with all regulations.
Respectez toutes les réglementations. / Attenersi
a tutte le normative.
Page 8

STEP 5: TAKE OFF / DÉCOLLAGE / DECOLLARE
Place Karma on flat, firm ground
in an open area. Point the camera
away from you.
Placez Karma sur le sol, sur une
surface plane et ferme et dans
une zone dégagée. Pointez la
caméra dans la direction opposée
à la vôtre. / Collocare il Karma
su una superficie piatta e solida
in uno spazio aperto. Puntare la
fotocamera lontano da sé stessi.
Wait for the ready-for-flight
confirmation.
Attendez la confirmation
indiquant que le drone est prêt à
voler. / Attendere la conferma di
“pronto per il volo”.
Press and hold the Start/Stop
button to start the motors.
Maintenez le bouton Démarrer/
Arrêter enfoncé pour démarrer
les moteurs. / Premere e tenere
premuto il pulsante Avvia/
Interrompi per far partire i motori.
To take off, tap the Auto Takeoff button on
the screen.
Pour décoller, appuyez sur le bouton Décollage
auto à l’écran. / Per decollare, toccare il pulsante
Decollo automatico presente sullo schermo.
Use the joysticks to control the drone.
When you release them, Karma hovers in place.
Contrôlez le drone à l’aide des joysticks.
Relâchez-les pour placer Karma en vol
stationnaire. / Usare le strumentazioni per
controllare il drone. Se vengono rilasciati,
il Karma rimane sospeso sul posto.
Page 9

STEP 6: CAPTURE / CAPTUREZ / REGISTRARE STEP 7: AUTOMATED LANDING / ATTERRISSAGE AUTOMATIQUE /
ATTERRAGGIO AUTOMATIZZATO
Press the Mode/Tag button
to select a camera mode.
Appuyez sur le bouton Mode/
Balise pour sélectionner le
mode de la caméra. / Premere
il pulsante Modalità/Tag
per selezionare una modalità
della fotocamera.
Roll the Cam era Tilt wheel
to adjust the camera angle.
Faites tourner la molette
d’inclinaison de la cam éra
pour ajuster l’angle de prise
de vue.
/ Girare la rotellina
di inclinazione per regolare
l’angolo della fotocamera.
Press the Sh utter button
to start and stop recording.
Appuyez sur le bouton
Obturateur pour lancer et
arrêter l’enregistrement.
Premere il pulsante Otturatore
per avviare e interrompere
la registrazione.
/
Press the Land button [
and follow the on-screen
instructions.
Appuyez sur le bouton Atterrir
[
] et suivez les instructions
à l’écran. / Premere il pulsante
Atterra [ ] e seguire le
istruzioni riportate sullo schermo.
]
Use the joysticks to guide Karma
around obstacles.
Évitez les obstacles en guidant
Karma à l’aide des joysticks. /
Utilizzare le strumentazioni per
consentire al Karma di aggirare
gli ostacoli.
Karma automatically lands in the
desired location.
Karma se pose automatiquement
à l’emplacement souhaité. /
Karma atterra automaticamente
nel posto desiderato.
Page 10

GRIP
KARMA GRIP / KARMA GRIP / KARMA GRIP
HANDHELD WEARABLE
Shutter Button [ ]
Bouton Obturateur [
Pulsante Otturatore [
Power/Mode Button [ ]
Bouton Alimentation/Mode [
Pulsante Accensione/Modalità [
HiLight Tag Button [ ]
Bouton Balise HiLight [
Pulsante HiLight Tag [
]
]
]
]
Tilt Lock Button [ ]
Bouton Verrouillage de
l’inclinaison [
Pulsante Blocca inclinazione [
Battery Status Lights
Témoins d’état de la batterie
]
Spie di stato della batteria
Charging Port
Port de chargement
Porta di ricarica
Tether Point
]
Point d’attache pour dragonne
Punto di fissaggio
]
Mounting Ring
Anneau de fixation
Anello di montaggio
Page 11

STEP 1: ASSEMBLE / ASSEMBLAGE / MONTARE
Unlock the collar on the drone
and remove the stabilizer.
Déverrouillez le collier sur le
drone et retirez le stabilisateur. /
Sganciare la fascetta sul drone
e rimuovere lo stabilizzatore.
Unlock the collar on the
grip handle.
Déverrouillez le collier sur
la poignée du manche. /
Sganciare la fascetta sulla
maniglia del Grip.
Slide the stabilizer into the
handle and lock the collar.
Insérez le stabilisateur dans
la poignée et verrouillez le
collier./ Lasciare scorrere lo
stabilizzatore nella maniglia e
bloccare la fascetta.
Open the harness and insert
a camera.
Ouvrez le harnais et insérez une
caméra. / Aprire l’imbracatura e
inserire la fotocamera.
WARNING: Karma Grip is a sensitive instrument.To prevent damage, do not expose Karma Grip
to liquids, submerge in water, or subject to vibrations or shaking.
AVERTISSEMENT: Le Karma Grip est un instrument sensible. Pour éviter de l’endommager,
ne l’exposez pas aux liquides, ne l’immergez pas et ne le soumettez pas à des vibrations ou à des
secousses. / AVVERTENZA: il Karma Grip è uno strumento sensibile. Per evitare di danneggiarlo,
non esporre il Karma Grip a liquidi, immergerlo nell’acqua o sottoporlo a vibrazioni o scosse.
PRO TIP / CONSEIL DE PRO / SUGGERIMENTO PRO
When the grip is powered off, press the Tilt Lock button [
Lorsque la poignée est éteinte, appuyez sur le bouton Verrouillage de l’inclinaison [
pour vérifier l’état de la batterie. / Quando il Karma Grip è spento, premere il pulsante Blocca
inclinazione [
] per vedere lo stato della batteria.
] to see the battery status.
]
Page 12

STEP 2: CHARGE / CHARGEMENT / RICARICARE
STEP 3: CAPTURE / CAPTUREZ / REGISTRARE
Press the Power/Mode button [ ] to power
on the system.
Appuyez sur le bouton Alimentation/
Mode [
] pour allumer le système. / Premere
il pulsante Accensione/Modalità [ ] per
accendere il sistema.
Charge the battery. The battery status lights indicate the charge level.
Chargez la batterie. Les témoins d’état de la batterie indiquent le niveau de charge. / Ricaricare la
batteria. Le spie di stato della batteria indicano il livello di carica.
WARNING: To prevent damage to the stabilizer, charge Karma Grip through the handle with the included USB-C cable.Stabilizer cannot
be charged directly.
AVERTISSEMENT:
Le stabilisateur ne peut pas être chargé directement. / AVVERTENZA:
attraverso la maniglia utilizzando il cavo USB-C fornito in dotazione. Lo stabilizzatore non può essere ricaricato direttamente.
Pour éviter d’endommager le stabilisateur, chargez le Karma Grip en connectant le câble USB-C fourni à la poignée.
per evitare danni allo stabilizzatore, ricaricare il Karma Grip
Press the Power/Mode button [
the mode.
Appuyez sur le bouton Alimentation/
Mode [
] pour sélectionner un mode. / Premere
il pulsante Accensione/Modalità [ ] per
selezionare la modalità.
] to select
Page 13

ADJUSTING THE CAMERA ANGLE / RÉGLAGE DE L’ANGLE DE LA
CAMÉRA / REGOLARE L’ANGOLAZIONE DELLA FOTOCAMERA
Press the Sh utter button [ ] to start and
stop recording.
Appuyez sur le bouton Obturateur [
pour lancer et arrêter l’enregistrement. /
Premere il pulsante Otturatore [ ] per
avviare e interrompere la registrazione.
]
Press and hold the Power/Mode button [
to power off.
Maintenez le bouton Alimentation/Mode [
enfoncé pour éteindre le système. / Premere e
tenere premuto il pulsante Accensione/Modalità
[ ] per spegnere il sistema.
]
]
To capture an object above/below the horizon: While holding down the Tilt Lock [ ] button, move the
handle up or down to the desired position, then release the button to lock the angle.
To follow an object: Double-click the Ti lt Lock
Tilt Loc k [ ] button.
Pour capturer un objet situé au-dessus/en dessous de l’horizon: Tout en maintenant le bouton
Verrouillage de l’inclinaison
souhaitée, puis relâchez le bouton pour verrouiller l’angle. Pour suivre un objet: Double-cliquez sur le
bouton Verrouillage de l’inclinaison [ ]. Pour annuler l’un des réglages ci-dessus: Appuyez sur le
bouton Verrouillage de l’inclinaison [ ]. / Per riprendere un oggetto al di sopra/al di sotto della linea
dell’orizzonte: tenendo premuto il pulsante Blocca inclinazione [ ], spostare la maniglia in alto o
in basso nella posizione desiderata e rilasciare quindi il pulsante per bloccare l’angolo. Per seguire un
oggetto: fare doppio clic sul pulsante Blocca inclinazione [ ]. Per annullare le impostazioni descritte
in alto: premere il pulsante Blocca inclinazione [ ].
[ ] enfoncé, déplacez la poignée vers le haut ou le bas dans la position
[ ] button. To cancel either setting above: Press the
Page 14

USING THE GRIP WITH A MOUNT / UTILISATION DE LA POIGNÉE
AVEC UNE FIXATION / UTILIZZARE IL GRIP CON UN SUPPORTO
HELP / AIDE / ASSISTENZA
Unlock the grip handle and the
mounting ring.
Déverrouillez la poignée du
manche et l’anneau de fixation. /
Sbloccare la maniglia del Grip e
l’anello di montaggio.
Slide the mounting ring onto
the handle.
Insérez l’anneau de fixation sur la
poignée. / Fare scorrere l’anello
di montaggio sulla maniglia.
Slide the stabilizer into the
handle and lock the collar,
then lock the mounting ring.
Insérez le stabilisateur dans la
poignée et verrouillez le collier,
puis l’anneau de fixation. /
Lasciare scorrere lo stabilizzatore
nella maniglia e bloccare la
fascetta. Bloccare quindi l’anello
di montaggio.
GOPRO CARE
You break it, we’ll replace it. For details,
visit shop.gopro.com/care.
Vous cassez, nous remplaçons.
Pour en savoir plus, rendez-vous sur
shop.gopro.com/care. / Se lo rompi,
lo sostituiamo. Per maggiori informazioni,
visitate il sito shop.gopro.com/care.
Safety Info / Informations de sécurité / Informazioni sulla sicurezza
Before first use, carefully read Important Product + Safety Instructions.
Lisez attentivement les Instructions produit et sécurité importantes avant la
première utilisation. / Prima di utilizzare il prodotto per la prima volta, leggere
attentamente le Istruzioni importanti sul prodotto e sulla sicurezza.
ADDITIONAL RESOURCES
For tutorial videos, user manuals and more,
visit gopro.com/yourkarma.
Accédez à des tutoriels vidéo, aux manuels
de l’utilisateur et plus encore sur
gopro.com/yourkarma. / Per video tutorial,
manuali dell’utente e altro materiale, visitare il
sito gopro.com/yourkarma.
See the list of country certifications in Important Product + Safety Instructions.
Consultez la liste des homologations par pays dans les Instructions produit et
sécurité importantes. / Consultare l’elenco delle certificazioni dei paesi in Istruzioni
importanti sul prodotto e sulla sicurezza.
Page 15

130-22262-000 REVA
 Loading...