

Page 1

USER MANUAL
Page 2

To downlo ad this us er manual i n a differen t languag e, visit gopro.com/help.
Pour té lécharg er ce manue l de l’util isateur da ns une aut re langu e, rendez- vous
sur gopro.com/help.
/ Join the GoPro Movement
facebook.com/GoPro
twitter.com/GoPro
2 3
youtube.com/GoPro
instagram.com/GoPro
Wenn Si e dieses Be nutzer handbu ch in einer a nderen S prache h erunter laden
möch ten, besu chen Sie gopro.com/help.
Per sc aricar e questo ma nuale ute nte in un’altra l ingua, v isita gopro.com/help.
Para d escarg ar este man ual de usua rio en otro i dioma, vi site gopro.com/help.
Para b aixar est e manual do u suário e m outro idio ma, aces se gopro.com/help.
このユーザーマニュアルの他言語版をダウンロードするには、
gopro.com/helpにアクセスしてください。
若 要 下 載 其 他 語 言 版 本 的 使 用 說 明 書,請 前 往: gopro.com/help。
如需下载本用户手册的其他语言版本,请访问gopro.com/help。
Чтоб ы загру зить это р уководс тво пол ьзова теля на др угом язы ке, посет ите
страницу gopro.com/help.
Page 3

/ Table of Contents / Table of Contents
The Ba sics
Getting Started
QuikCapture
Camera Icons
Changing Modes + Settings
Capturing Video
Capturing Photos
Capturing Time Lapse C ontent
Playing Ba ck Your Content
Offloading Your Content
Acces sing All Modes and S ettings
4 5
104
4
8
15
18
21
23
28
32
36
39
Video Settings
Photo Settings
Time Lapse Settings
Pro tune™
Customizing Your Camera
Important Messages
Resetting Your C amer a
Mounting Your Camera
Removing the Door
Maintenance
Battery
49
64
70
72
84
98
101
104
114
116
118
Page 4
/ The Basic s
Troubleshooting
Customer Support
Trademarks
Regulatory Information
6 7
123
129
129
130
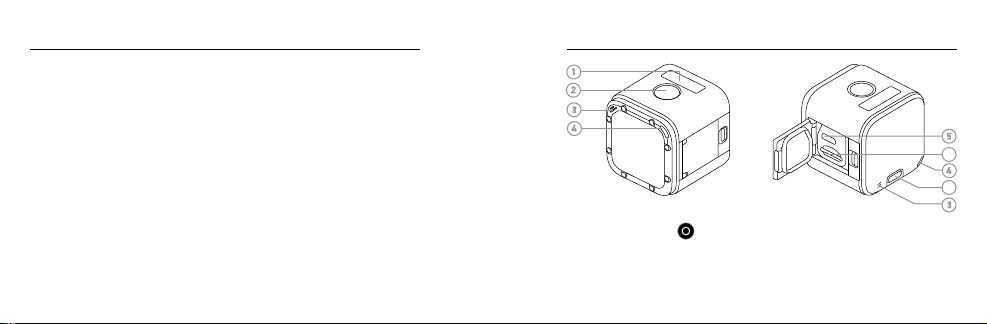
1. Camera Status Screen
2. Shutter But ton [
]
3. Microphone
4. Camera Status Light
5. USB-C Port
6. microSD Card Slot
7. HD Video Ou t Port
8. Menu Button
6
7
Page 5
/ Getting Started / Getting Started
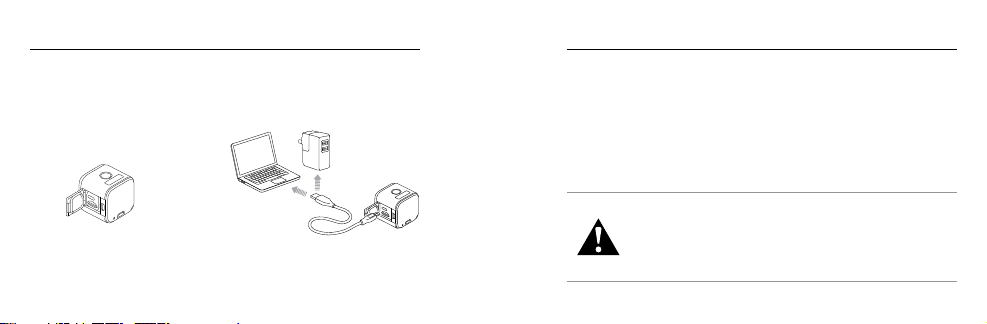
CHARGING THE BATTERY
For the b est experi ence with your new camer a, we recomm end fully
charging the battery before first use.
To Charge the Battery:
1. Open the door. 2. Charge the b attery using the
included USB cab le.
Note: The bat tery canno t be removed from t he camera.
8 9
The camera statu s lights tur n on during c harging an d turn off when
charging is complete. Whe n charging the cam era with a com puter, be
sure th at the computer is connec ted to a power source. I f the camera
status lights do not turn o n to indicate charging, u se a different USB
port.
For more batte ry information, see
WARNING: Us e cautio n when usin g your GoPr o as part o f your
active l ifest yle. Always b e aware of your surro undings t o avoid
injury t o yoursel f and other s.
Abide by a ll local l aws when us ing your Go Pro and rel ated
mounts a nd access ories, i ncludin g all priv acy laws , which may
restri ct record ing in cer tain area s.
Battery (page 118).
Page 6
/ Getting Started / Getting Started
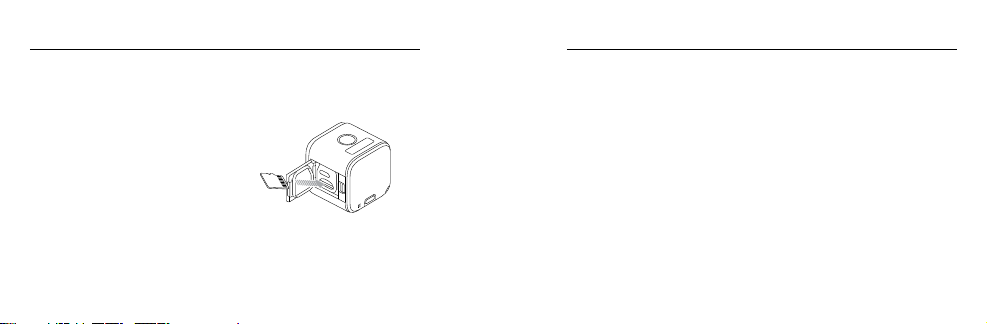
INSERTING + REMOVING MICROSD CARDS
• Insert the card (sold se parately) at a d ownward angle wi th the label
facing down.
• To remove the card , press it
in with your fingernail unt il it
pops out.
Use brand na me memory c ards
(that meet these requirements:
• microSD, microSDHC,
or microSDXC
• Clas s 10 or UHS-I r ating
• Capacit y up to
For a lis t of the recommend ed cards, v isit gopro.com/help.
10 11
64GB
NOTICE: Use care when handl ing memor y cards. Avoi d liquids, d ust,
and de bris. As a preca ution, powe r off the camer a before inserting or
removing the card. Check manufacturer guidelines regarding use in
acceptable temperature ranges.
UPDATING YOUR CAMERA SOFT WARE
To get the latest features and be st perfor mance from your GoP ro,
make sure your c amera is always usi ng the most cu rrent soware.
1. Download these apps:
• Capt ure from the A pple App Store or Goog le Play
• GoPro for Desk top from gopro.com/getstarted
Page 7
/ Getting Started
2. Conn ect your ca mera to your sm artphone/tablet or computer. The
app au tomatically noti fies you when c amera updates are avail able
and provides instruc tions for up dating.
PRO TIP: To see your c urrent so ware version, press the Menu
button. Your camera scrolls through several settings, including the
version number.
12 13
/ Getting Started
POWERING ON + OFF
HERO5 Sessio n powers on wh en you press t he
Shutter button to begin capturi ng video or time
lapse photos.
The camera autom atically powers off to cons erve
battery power wh en you press t he Shutter button to
stop captur ing or aer a period of i nactivity.
PRO TIP: When car rying you r camera in a bag or pocket, place t he
came ra upside down in a fr ame (with th e Shutter button covered) to
protect the c amera from accidentally captur ing video or photos . To
prevent the frame f rom markin g the surfa ce of the camera, le ave the
latch on the frame o pen.
Page 8

/ Getting Started
DISPLAYING STATUS INF O
Press the Menu but ton to cycle throu gh status information about yo ur
camera.
• Video resolution/fps/FOV
• Time Lapse p hoto resolution/
interval/FOV
• Remaining microSD card
memor y for each mode
14 15
• Protune status
• Spot Meter sta tus
• Vide o Stabilization (
• Wireless status
• Battery status
EIS) status
/ QuikCapture
QuikC apture is the fastest way to capture video or time la pse content
with HERO5 Session . Because the ca mera is power ed on only when it is
capturing, you al so conser ve batter y power.
CAP TURING VIDEO WITH QUIKCAP TURE
1. W ith the came ra powered off, p ress the Shutter button .
Your camera powers on , beeps sever al times, and begins recordi ng
in the video c apture mode that you last u sed (Vid eo, Video + Photo,
or Loop ing). The camera status light s blink while the ca mera is
recording.
Page 9

/ QuikCapture
2. To stop recordin g, press the Shutter butto n [
The camera stops recording, beeps sever al times, an d
autom atically powers off to maxi mize batter y life.
16 17
] again .
/ QuikCapture
CAP TURING TIME LAPSE CONTENT WITH QUIKCAP TURE
1. W ith the came ra powered off, p ress and hol d the Shutter button
] for a few s econds unt il recording begi ns.
[
Your camera powers on , beeps sever al times, and begins recordi ng
in the time lapse ca pture mode th at you last us ed (Time L apse
Photos, Time Laps e Video, or Nig ht Lapse). The c amera status
light s blink while the camera is reco rding.
2. To stop recordin g, press the Shutter butto n [
The camera stops recording, beeps sever al times, an d
autom atically powers off to maxi mize batter y life.
] again .
Page 10
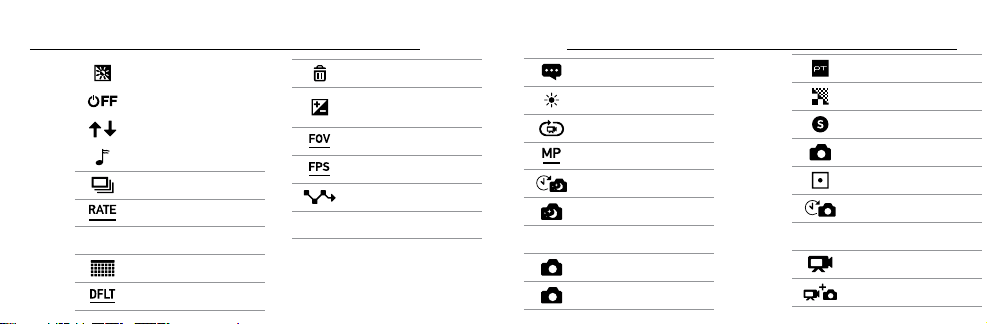
/ Camera Icons / Camera Icons
Auto Low L ight
Auto Off
Auto Rotation
Beeps
Burst Photos
Burst Rate
icon Color
Date/Time
18 19
Default Mod e
Delete
Exposure Value
Compensation
Field of View
Frame s per Second
Interval
icon ISO Limit
Language
LEDs
Looping
Megapixels
Night Lapse
Night Photo
icon On-Screen Display
Photo Mode
Photo (Single)
Protune
Sharpness
Shutter
Single Photo
Spot Meter
Time Lapse P hotos
icon Time L apse Video
Video
Vide o + Photo
Page 11
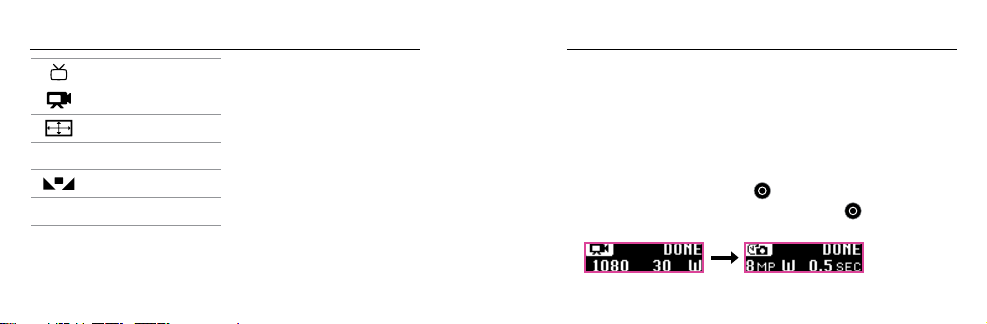
/ Camera Icons / Changing Modes + Settings
Video Format
Video Mode
Video Resolution
icon Video Stabilization
White Balance
icon Wireless
20 21
You can change many
on the c amera. To access all s ettings an d modes, see
Modes and Settings
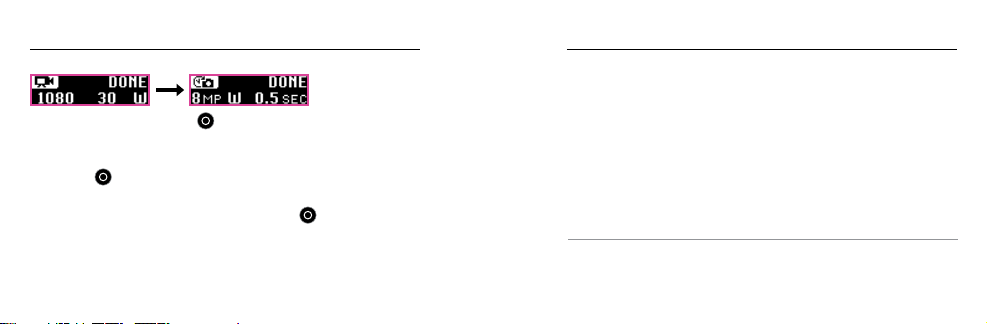
CHANGING MODES + SETTINGS
1. Press the Menu but ton to turn on the status sc reen.
2. Press the Menu button re peatedly to m ove to Camera Setting s,
then press the Shutter button [
3. To c hange the mo de, press t he Shutter button [ ] repeatedly to
displ ay the mode t hat you want ( Video, Tim e Lapse, or Ph oto).
video a nd photo settings u sing the but tons
Accessing All
(page 104).
] to sele ct it.
Page 12
/ Changing Modes + Settings
5. Press the Menu button to m ove to the next fi eld.
6. Press the Shutter button [ ] repea tedly to disp lay the capture
mode t hat you want.
7. Press th e Menu b utton to move to a setti ng, then press th e Shutter
button [
8. When you are finishe d, press the Menu butto n to move to [CHECK
MARK ICON
22 23
] to disp lay the option that you want.
], then press the Shutter button [
] to sele ct it.
/ Capturing Video
In Video mode, HERO5 Sessio n has three capture modes:
• [
ICON] Video: Ca ptures video. Available in all resolutions.
ICON] Video + Photo: While recording video, captures a photo
• [
at regular intervals . Available in 1440p24, 1080p30, 1080p24,
720p60 and 720p30.
ICON] Lo oping : Lets you c ontinuous ly record an d save only the
• [
moments that you wa nt to save. Avail able in 1080p30, 960p100,
720p120, and 720p60.
PRO TIP: When the camer a is off and you pre ss the Shutter button
[
ICON], th e camera pow ers on and ca ptures vide o in the mode that you
used most recently (Video, Video + P hoto, or Loopi ng).
Page 13

/ Capturing Video
CAPTURING VIDEO
The fa stest way to c apture video content in th e same mode t hat you
used l ast time is to use
change the video c apture mode or settings, follow the steps below.
1. Press the Menu but ton to turn on the status sc reen.
2. Select a ca pture mode ( Video, Video + Ph oto, or Loopin g) and
settings:
a. Press the Menu button re peatedly to m ove to Camer a Settings,
then press the Shutter button to se lect it.
24 25
QuikCapture (page 15). But if you want to
/ Capturing Video
b. Press the Shutter button repeatedly u ntil you get to th e Video
ICON ].
icon [
c. Press the Menu button to move to the ne xt field, the n press the
Shutter button repeatedly to select a c apture mode.
d. To change a s etting, press th e Menu b utton to move to t he
setting, then press the Shutter button r epeatedly to display
the opt ion that you wa nt.
e. Pres s the Menu button to m ove to [
press the Shutter button to s elect it.
CHECK MA RK ICON], then
Page 14

/ Capturing Video
3. Press the Shutter button . Your cam era beeps an d the status light s
blink during recording.
4. To stop recordin g, press the Shutter butto n again. The came ra
stops r ecording , beeps sever al times, and auto matically power s
off to maximize ba ttery life.
PRO TIP: When the camer a is off and you pre ss the Shutter button,
the ca mera powers on and b egins reco rding in the v ideo mode that
you use d most recently (Video, Video + Photo, or Looping).
/ Capturing Video
HILIGHT TAGGING
You can mark spe cific moment s in your video as
they happen with HiLight Tags . HiLight Tags make
it easy to find the best moments to sh are.
Note: HiLight Tags a re visible dur ing playbac k in Capture or
GoPro for Des ktop.
To Add HiLight Tags During Recording:
Press the Menu button.
PRO TIP: Yo u can also a dd HiLight Tags during recording with the
Capt ure app or the S mart Remote.
26 27
Page 15

/ Capturing Photos
In Photo mode, HERO5 Session has three capture modes. Photos
are captured at a resolution of 10MP.
ICON] Photo: Captures a single p hoto.
• [
• [
ICON] Burs t: Captu res up to 30 photos in 1 second, so it is perfe ct
for capturi ng the definitive mo ment in fast-action spo rts.
• [
ICON] Ni ght: Captures photos whe n the lightin g is dark.
The sh utter remai ns open long er to let in more li ght in dark
environments.
28 29
/ Capturing Photos
CAPTURING PHOTOS
1. Press the Menu but ton to turn on the status sc reen.
2. Select a ca pture mode (Photo, Burst , or Night) and s ettings:
a. Press the Menu button re peatedly to m ove to Camera Setting s,
then press the Shutter button [
b. Press the Shutter button [ ] repea tedly until yo u get to the
Photo icon [
c. Press the Menu button to move to the ne xt field, the n press the
Shutter button [
].
] to sele ct a capture mode.
] to sele ct it.
Page 16

/
Capturing Photos
d. To change a s etting, press th e Menu b utton to move to t he
setting, then press the Shutter button r epeatedly to display
the opt ion that you wa nt.
e. Pres s the Menu button to m ove to the check mark, the n press
the Shutter button to selec t it.
3. Press the Shutter button. Your camera beeps once, then beeps
once for each photo that is ca ptured. The cam era status lights blink
while t he camera is capturing photos .
Note: To capture co ntinous photo s at a rate of 5 photos p er second, sel ect the Photo ca pture
mode, then h old down the Shu tter button. Ph otos are captur ed until you rele ase the butto n.
4. To power off the came ra, press the Menu button to move to Exit
Photo Mode, then pre ss the Shutter button to select it.
30 31
/ Capturing Photos
CAP TURING PHO TOS IN THE MODE THAT YOU USED L AS T
TIME
To take a photo u sing the capture mode that you us ed most recently
(Phot o, Burst, or Night), us e the shortcut below.
1. Press the Menu but ton to turn on the status sc reen.
2. Press the Menu button to m ove to Enter Photo Mode, then press
the Shutter button t o select it.
3. Press the Shutter button. The camera beeps once, then beeps
once for each photo that is ca ptured. The cam era status lights blink
while t he camera is capturing photos .
4. To power off the came ra, press the Menu button to move to Exit
Photo Mode, then pre ss the Shutter button to selec t it.
Page 17

/ Capturing Time Lapse Content
In Time Lapse mode, HERO5 Session has three capture mod es:
ICON] Time Lapse: Captures a series of photos at specifie d
• [
inter vals. Use this mo de to capture photos of any activ ity, then
choose the best on es later.
• [
ICON] Ni ght La pse: Ca ptures a series of ph otos at set inter vals
when t he lighting i s dark. The shutter remains open lon ger to let in
more light in da rk environ ments.
• [ICON] Time Laps e Video: Creates video from frames captured at
specific intervals.
4:3, and 1080p resolutions
32 33
Time Lapse Video is avail able only in 4K, 2.7K
and is captured wit hout audio.
/ Capturing Time Lapse Content
CAP TURING TIME LAPSE CONTENT
The fa stest way to c apture time l apse content in the c apture mod e
that you used l ast time is to use
want to c hange the time lapse capture mode or settin gs, follow th e
steps below.
1. Press the Menu but ton to turn on the status sc reen.
2. Select a ca pture mode ( Time Laps e Photos, Night Lapse, or Time
Laps e Video) and settin gs:
a. Press the Menu button re peatedly to m ove to Camer a Settings,
then press the Shutter button to se lect it.
QuikCapture (page 15). But if you
Page 18

/ Capturing Time Lapse Content
b. Press the Shutter button repeatedly u ntil you get to th e Time
Lapse icon [
c. Press the Menu button to move to the ne xt field, the n press the
Shutter button repeatedly to select a c apture mode.
d. To change a s etting, press th e Menu b utton to move to t he
setting, then press the Shutter button r epeatedly to display
the opt ion that you wa nt.
e. Pres s the Menu button to m ove to the check mark, the n
press the Shutter button to s elect it.
3. Press the Shutter button. Your camera beeps once, then beeps
once for each photo that is ca ptured. The cam era status lights
blink during capture.
34 35
].
/ Capturing Time Lapse Content
4. To stop capturin g, press the the Shutter button.
5. For Time Lapse Photos or Night Lapse: To power off the ca mera,
press the Menu but ton to move to Ex it Photo Mode, then press the
Shutter button to select it.
Page 19

/ Playing Back Your Content
PLAYING BACK CONTENT ON A COMPUTER
To play bac k your video a nd photos on a co mputer, you must fi rst
offload t hese files to a co mputer.
1. Download an d install GoPro for D esktop from
gopro.com/getstarted.
2. Tra nsfer your fil es to your computer. For more infor mation,
see
Offloading Files to a Computer (p age 41).
3. Use t he app to play b ack the files .
36 37
/ Playing Back Your Content
PLAYING BACK CONTENT ON A MOBILE DEVICE
1. Connect your camera to C apture. For more information, s ee
Connec ting to the Capture App (page 4 3).
2. Use the controls on the ap p to play back your footage on your
smartphone/tablet.
PRO TIP: While playi ng back your v ideo on a comp uter or mobile
device, you can add HiLight Tags to mark the be st moments . In
Capt ure or GoPro for D esktop, tap the HiLi ght Tag icon.
Page 20

/ Playing Back Your Content / Offloading Your Content
PLAYING BACK VIDEOS AND PHOTOS ON YOUR TV
Play ing back videos a nd photos on your TV/HDTV requi res a
composite or combo c able (all sold separately).
1. Use a composite c able or combo cab le to connec t the USB-C po rt
on the c amera to a TV/HDTV.
2. Select th e input on your T V that correspo nds to the TV port into
whic h you plugged t he cable.
3. Power on the camera.
Mode butto n
4. Use the
5. Use the Shutter but ton to open a file i n full-scre en view.
6. When a file is sel ected, us e [
to see mo re media files o n your memor y card.
38 39
to navigate file s.
LEFT ARROW] an d [LEFT ARROW] to
OFFLOADING FILES TO THE CLOUD
With GoPro Plus, you c an upload yo ur content to th e cloud and then
view, edit, and shar e it from any of yo ur devices. Use
to edit c ontent from the clou d on your mobile devi ce and share it with
your friends.
1. If you have not alr eady done it, set up a GoPro Plus account :
a. Download C apture to your mobil e device from the Ap ple App
Store or G oogle Play.
b. In the app, ta p
up GoPr o Plus.
2. Connect your ca mera to a power outlet . When the batter y is fully
charged, a utomatic upload to t he cloud beg ins.
XXX and follow the on-scre en instru ctions to set
Quick or Splice
Page 21

/ Offloading Your Content
NOTICE: If you sell yo ur camera, be sure to resto re the fact ory
settings. Otherwi se, your GoPro P lus account can be a ccessed by the
new owner. For det ails, see
THIS PR OMINENT OR IN LEGAL DOC?
ACCESSING YOUR CONTENT FROM THE CLOUD
1. STEP 1
2. STEP 2
40 41
Restoring Factory Settings (page 100).
/ Offloading Your Content
OFFL OADING FILES TO A COMPUTER
To view your v ideo and photos on a co mputer, you must first tr ansfer
these files to a computer. Transferrin g also free s up space
on your m icroSD card for new c ontent.
1. Download an d install GoPro for Deskto p from
gopro.com/getstarted.
2. Conn ect the ca mera to your compute r using the in cluded
USB cable.
3. Press the Shutter button [
the importer in the app.
4. Follow the on-screen instructions.
] to power on the c amera and open
Page 22

/ Offloading Your Content / Accessing All Modes and Settings
PRO TIP: Yo u can also trans fer files to a computer using a card rea der
(sold s eparately). C onnect t he card reader to your comp uter and ins ert
the microSD c ard into the re ader. You can then t ransfer yo ur files to
your compute r or delete sele cted files on your ca rd.
42 43
To access a ll modes and settings, connect yo ur camera to a G oPro
remote (sold separately) or the Ca pture app. S ettings are saved a er
you disconnect the camera.
CONNECTING TO THE CAP TURE APP
Capt ure (free) lets you cha nge all modes and c amera settings u sing
a smar tphone or tablet . Features in clude full camera cont rol, live
previ ew, playback and s haring of content, and ca mera sow are
updates. To lear n more, visit gopro.com/getstarted.
Note: When you r camera is conn ected to the ap p or remote, it remai ns on in standb y mode aer
capturin g video or photo s.
Page 23

/ Accessing All Modes and Settings / Accessing All Modes and Settings
To Connec t to Capture:
1. Download Capture to your mobile d evice from the App le® App
Store or G oogle Play.
2. Follow the ap p’s o n-screen i nstruc tions to connect your ca mera.
For com plete pairin g instruc tions, visit
gopro.com/help
.
PAIRING WITH THE REMOTE
The Smart Remote lets you change capture modes and settings,
power your GoPro on/off, start/stop recording, and add HiLight Tags.
Note: HERO5 Ses sion is compati ble with the Smar t Remote and the Wi- Fi Remote.
44 45
To Pair with the Remote:
1. On the camer a, press the Menu button to turn o n the status
screen.
2. Press the Menu button re peatedly to m ove to Conne ction Settings ,
then press the Shutter button [
] to sele ct it.
3. Press the Menu button to m ove to Conne ct New Device, then
press the Shutter button [
] to sele ct it.
4. Press the Shutter button [ ] to disp lay GoPro RC.
5. Press the Menu button to m ove to the check mark, the n press the
Shutter button [
] to sele ct it. The camera autom atically begins
pairing.
Page 24

/ Accessing All Modes and Settings
6. Put the remote into pairing mode. For more information, see t he
user ma nual for your remote at gopro.com/help.
46 47
/ Accessing All Modes and Settings
CONNECTING AFTER PAIRING
Aer co nnectin g your camer a to the app or re mote for the first time,
you ca n connect in the f uture throu gh the Conn ection S ettings me nu.
1. On the camer a, press the Menu button to turn o n the status
screen.
2. Press the Menu button re peatedly to g et to Connec tion Settings,
then press the Shutter button [
3. Press the Shutter button [ ] to select Turn On Connec tion. The
Wireless icon [
ICON] app ears on the camera status screen.
] to sele ct it.
Page 25

/ Accessing All Modes and Settings
TURNING OFF W IRELESS FROM T HE CAMERA
When you turn off your c amera with C apture or a GoPro remote,
wireless remains o n so that you ca n quickly reconnect . To sa ve
battery power, turn off wireless when you a re finished u sing it.
1. Press the Menu but ton to turn on the status sc reen.
2. Press the Menu button re peatedly to g et to Connec tion Settings,
then press the Shutter button [
3. Press the Shutter button [ ] to select Turn Off Connec tion. The
Wireless icon [
48 49
ICON] disappe ars from the c amera status screen.
] to sele ct it.
/ Video Settings
Video mode contains three ca pture modes: Vide o, Video + Photo,
and Looping . You can ch ange some Video mo de setting s directly on
the ca mera. To acces s all settings, connec t HERO5 Sess ion
Capt ure app or a GoPro remote.
RESOLUTION, F PS, AND FOV
Vide o resolution refers to the number of horizonta l lines in the v ideo.
For example, 720p means that t he video has 720 hor izontal lines,
each w ith a width of 1280 pixels . Higher numbers of l ines and pixels
result in greater detail and clar ity. So, a video with r esolution of 2.7K is
consi dered high er quality t han 720p bec ause it consists of 2704 lines,
each w ith a width of 1520 pixels.
™
to the
Page 26

/ Video Settings
Frame s per second (fps) refers to th e number of vi deo frame s that are
captured in e ach secon d.
The field of view (FOV ) refers to how much of the scene (mea sured
in degrees) can be ca ptured through th e camera lens. Wide FOV
captures th e largest amount of the scene, while Nar row FOV captu res
the least.
HERO5 Session inclu des the vid eo resolutions, f ps, and FOVs listed
below. T he default resolution, fram e rate, and FOV are 2.7K30 Wide.
Note: The fps se tting does n ot apply to Time Laps e Video.
50 51
/ Video Settings
Video
Resolution
4K 3 0/25 Wide 38 40 x2160 , 16: 9
2.7K 48/48 Medium 2704x1520, 16:9
2.7K
FPS
(NTSC/PAL)
30/25
24/24
FOV
Wide,
SuperView,
Medium,
Linear*
Screen
Resolution
2704x1520, 16:9
Page 27

/ Video Settings
Video
Resolution
2.7K 4:3 30/25 Wide 2704x2028, 4:3
144 0p
108 0p 90/90 Wide 19 20x10 80, 16:9
52 53
FPS
(NTSC/PAL)
60/50
48/48
30/25
24/24
FOV
Wide 1920x1440, 4:3
Screen
Resolution
/ Video Settings
Video
Resolution
108 0p 60/50
108 0p
FPS
(NTSC/PAL)
30/25
24/24
FOV
Wide,
SuperView,
Linear*
Wide,
Medium,
Narrow,
SuperView,
Linear*
Screen
Resolution
192 0x1080 , 16:9
192 0x1080 , 16:9
Page 28

/ Video Settings
Video
Resolution
960p
720p 120 /120 Wide 1280x720, 16:9
720p
* Linear FOV is ava ilable only wh en HERO5 Session is c onnected to t he Karma drone (sol d separately).
54 55
FPS
(NTSC/PAL)
100 /100
60/50
30/25
60/50
30/25
FOV
Wide 1280x960, 4:3
Wide,
Medium,
SuperView
Screen
Resolution
1280x720, 16:9
/ Video Settings
Resolution Best Us e
144 0p
108 0p
960p
Good for advance d users who wa nt to
capture a ful l image and th en edit to the
desired aspect ratio.
Great fo r all shots. High res olution and fram e
rate yield stunning results.
Good for users who wa nt to capture a
full image and then edit to t he desired
aspect ratio.
Page 29

/ Video Settings / Video Settings
Resolution Best Us e
Good for hand held shots a nd when slow
720p
56 57
motion is desi red. 720p is optimal for sharing
on social media sites. 720p100 is great for
slow motion.
FOV Best Use
Largest field of view. Recommended for
Wide ( W)
Medium (M)
Narro w (N)
body-and g ear-mounted sh ots. Good fo r
action shots where you w ant to captur e
as muc h as possible within the frame.
Mid-range field of view. Good for shots where
you want the su bject to fill the fra me.
Smallest field of view, reduced image
stab ility. Reduced distor tion. Good fo r
capturing content at a distance.
Page 30

/ Video Settings / Video Settings
FOV Best Use
SuperView delivers th e world’s most
immer sive field of view. Good for bod y-or
SuperView (S)
gear-mounted shots . More verti cal 4:3
content is automati cally stret ched to
full-screen 16:9 for stu nning wide screen
play back on your c omputer.
Mid-range field of view that removes the
Linear (L)*
trad itional wid e angle distortion. Go od for
capturing aerial footage or any other shot
where you want to remove the distor tion.
* Linear FOV is ava ilable only wh en HERO5 Session is c onnected to t he Karma drone.
58 59
STABILIZING YOUR VIDEO
This setting results in smooth er video foot age, so is usef ul for
activiti es involving m otion or vibr ation. The options for th is setting a re
Auto (default) and Off.
Vide o stabilization is avail able for all resolu tions up to 60 fps.
Note: When thi s setting is on,
EIS (Electron ic Image Stabil ization) appea rs on the status s creen.
1. Press the Menu but ton to turn on the status sc reen.
2. Press the Menu button re peatedly to m ove to Stabili ze Video, then
pres s the Shutter button t o select it .
3. Press the Shutter butto n to display A uto.
4. Press the Menu butto n to move to the ch eck mark , then press t he
Shut ter button to s elect it.
Page 31

/ Video Settings
CAPTURING VIDEO IN LOW-LIGHT ENVIRONMENTS
Auto Low L ight allows you to shoot in low-light e nvironments or
when q uickly tra nsitioning in and o ut of low-light condition s. The
came ra automati cally adju sts fps accordi ng to lighting condition s to
achi eve the optima l exposure and bes t results.
Auto Low L ight is available at 48 fps a nd higher. Available option s are
Auto/On (de fault) and O ff.
60 61
/ Video Settings
ICON
MANUAL AUDIO CONTROL TITLE
By def ault, this settin g is off and your c amera automatic ally switc hes
betw een record ing in stereo a nd filtering w ind noise to a chieve the
best a udio balance. Wh en this sett ing is on, you can man ually select
whic h of these two fi lters to apply.
For example, yo u might want to tu rn on this set ting and select W ind
Only if y ou are recording ou tdoors on a wi ndy day. You might s elect
Stereo O nly f you are recording in a club or th eater where a udio is a
priority a nd wind is not a f actor.
This o ption is not ava ilable for Video + P hoto or Loopin g video.
Page 32

/ Video Settings
SPOT ME TER TITLE
Spot Meter is good for filming into a sett ing where th e lighting is
differ ent from where you are. Examples i nclude film ing the outdoors
/ Video Settings
Protune
For det ails abou t Protune set tings, see Protune (page 72).
from within a c ar or filming a shade d environment whi le standin g in
the sun. Spot M eter automat ically set s the exposure bas ed on a single
spot in t he middle of the imag erather than on th e entire frame. The
options for this set ting are Off (de fault) and O n.
Note: Chang es that you make to Sp ot Meter in Video setti ngs apply only t o video captur e. To adjust
this setti ng for photo capt ure, adjust Spo t Meter in Photo setti ngs. To adjust this s etting for time l apse
capture, ad just Spot Meter i n Time Lapse settings.
62 63
Page 33

/ Photo Settings
Photo mode co ntains three capture mo de: Photo, Burst, a nd Night.
You can change some Ph oto mode sett ings direc tly on the ca mera.
To access a ll settings, con nect HERO5 S ession
remote.
FOV TITLE
All photos are c aptured at a re solution of 10MP Wide. Linear FOV is
avail able for Photo capt ure mode only if your c amera is con nected to
the Karma drone (sold separately).
64 65
™
to Capture or a GoPro
/ Photo Settings
FOV Description
Wide
Medium
Linear
Narrow
Largest field of view, increased image
stability. Good for action shots to capture as
much a s possible within t he frame.
Mid-range field of view, mod erate
image stability.
Mid-range field of view that removes the
fisheye distortion. Good for capturing aerial
footage or any other s hot where you w ant to
remove the distortion.
Smallest field of view, reduced image
stab ility. Reduced distor tion. Good fo r
capturing content at a distance.
Page 34

/ Photo Settings
WIDE DYNAMIC RANGE (WDR) TITLE
Wide D ynamic Range improves t he level of detail in th e dark and
bright area s of an image. The resu lt is a photo that i s properly ex posed
for both of these extr emes. This setti ng is especially us eful for scenes
that are backlit or that have large bright regions.
WDR is available only for the Photo c atpure mod e. The option s for this
setting are O ff (default) a nd On.
66 67
/ Photo Settings
SHUTTER TITLE
This setting applies on ly to Night Photo and Night Lapse. Shutter lets
you determine the a mount of time that the s hutter is open. Options f or
this settin g are Auto (defa ult), 2 seconds, an d 5 seconds .
PRO TIP: For bes t results wh en using the S hutter set ting, mount your
came ra on a tripod o r other stab le surfac e to reduce th e amount of
blur in your video or photos.
Page 35

/ Photo Settings
RATE TITLE
Rate ap plies only to b urst photo s. Burst pho tos can be ca ptured at the
following rates:
3 photos in 1 second
5 photos in 1 second
10 photos in 1 s econd (defa ult)
10 photos in 2 s econds
68 69
/ Photo Settings
Protune
For det ails abou t Protune set tings, see Protune (page 72).
Page 36

/ Time Lapse Settings /
Time Lapse Settings
TIME LAPSE INTERVALS
The Interv al setting a pplies to all t ime lapse capture mode s. Interva l
deter mines the amount of time th at passes be tween eac h captured
frame.
Availa ble intervals r ange from 0.5 second (default) to 60 seconds .
Interval Examples
0.5-2 seconds Surfing, biking , or other spor ts
2 seconds Busy s treet corner
5-10 seconds Sunset
70 71
10-60 seconds
PRO TIP: Create a vid eo from your ti me lapse photos wit h
GoPro for Desk top (free). Learn more at gopro.com/getstarted.
Lengthy activities, such as construction
projects or family gatherings
Page 37

/ Protune
PROTUNE™ BENEFITS
Protune unlocks the camera’s full potential, yielding stunning
image q uality an d cinema-caliber video an d photos optim ized for
profession al productions. Protune gives content creators more
flexibility and workflow efficie ncy than ev er before.
Protune is compati ble with professio nal color cor rection to ols,
GoPro A pp for desktop, and other v ideo editing so ware.
Protune ena bles manual control of colo r, white balanc e, shutter
spped and mo re for advan ced control and cu stomizatio n of your video
footage and photos.
72 73
/ Protune
PROTUNE
The options for this setting are O ff (default) a nd On. When P rotune is
on, PT appears on the c amera status screen. Protune is not available
for Vid eo + Photo, Loo ping, or Time Laps e Video. Prot une is available
for all v ideo resolution s except 2.7K48.
Chan ges that you ma ke to Protune settings in one capture mod e apply
only to t hat capture m ode. For example, changing the White Ba lance
for Night Photo d oes not affec t that setti ng for Burst photos.
Page 38

/ Protune
/ Protune
COLOR
Colo r allows you t o adjust the c olor profile of y our video f ootage.
Color Setting Resulting Color Profile
GoPro Color
(defa ult)
Flat
74 75
Provides GoPro color-corrected profile (same
great color as w hen Protun e is turned off ).
Provi des neutra l color profile t hat can be colorcorrecte d to better match footage ca ptured with
other e quipment, offeri ng more flexibility in postproducti on. Due to its long curve, F lat captur es
more detail s in shadows and highlig hts.
WHITE BALANCE
White B alance let s you adjus t the color tem perature of v ideos and
photos to optim ize for cool or wa rm lightin g conditions. Opt ions for
this settin g range from 3000K to 6500K . Lower values result i n
warmer tones.
You can al so select Native t o create a minim ally color-correc ted file
from the imag e sensor tha t allows for mo re precise a djustmen ts in
post-production.
Page 39

/ Protune
PRO TIP: For bes t results wh en using the S hutter set ting, mount your
came ra on a tripod o r other stab le surfac e to reduce th e amount of
blur in your video or photos.
ISO LIMIT
ISO ap plies only to t he Video ca pture mode. T his setting deter mines
the ca mera’s sensitivit y to light in low-light envir onments, and creates
a bala nce between bri ghtness an d resulting image noise. Im age noise
refers to the degree of grai niness in th e image.
76 77
/ Protune
Optio ns for this set ting rang e from 400 to 1600. Hig her values r esult
in bri ghter video a nd the high est amount of i mage noise. T he default
value i s 160 0.
the le s ide and 640 0 on the right side. Le s ide says “Da rker image
and lower ima ge noise.” Right s ide says “Br ighter imag e and greater
image noise.”]
The wa y that ISO Limit is applied d epends on t he Shutter s etting:
• Shut ter set to Auto: T he ISO Limit t hat you selec t is used as the
maxim um ISO value. The IS O value that is appl ied might be lower,
depe nding on the lighting con ditions. Av ailable IS O modes are 1600,
800, an d 400.
[show a visual i nstead of tex t: horizont al line with 100 o n
Page 40

/ Protune
• Shutter not set to Au to: The ISO Li mit that you select i s either use d
as the m aximum ISO v alue (if you se lect Max as t he ISO Mode) or is
locke d at that value ( if you selec t Lock as the I SO Mode). Avail able
ISO mo des are 1600, 800, a nd 400.
/ Protune
ISO MINIMUM ISO MAXIMUM
ISO Minimum a nd Maximum a pply only to photos and let you s et a
rang e for the came ra’s sensitiv ity in low-light environ ments. IS O
settings cr eate a balan ce between brightnes s and resulting ima ge
noise. Image n oise refers to the degree of g rainines s in the image.
[show a visual i nstead of tex t: horizont al line with 100 o n the le side
and 80 0 on the right s ide. Le side s ays “Darker i mage and low er image
noise.” Right sid e says “Brighter im age and grea ter image noi se.”]
78 79
Page 41

/ Protune
/ Protune
ISO MODE
ISO Mode applies o nly to Video and dete rmines how t he ISO Limit
setting is interpreted. ISO Mode is enabled when S hutter is not set
to Auto.
Setting Description
Uses th e current IS O Limit setti ng as the
Max
Lock
80 81
maxim um ISO value. The IS O value that is
applied mig ht be lower, depending on the
lighting conditions.
Uses th e current IS O Limit setti ng as the ISO
value. This value does not c hange in response
to the lighting conditions.
SHARPNESS
Shar pness cont rols the quality of deta ils captured in yo ur video
footage or photos. Options f or this setting are High (def ault), Medium,
and L ow.
PRO TIP: If you plan to i ncrease sh arpness d uring editing, t urn this
set ting off.
Page 42

/ Protune
EXPOSURE VALUE COMPENSATION (EV COMP)
Exposure Val ue Compensatio n affects t he brightn ess of your vid eo or
photo. A djusting this set ting can improve image qualit y when shooting
in environments with contrasting lighting conditions. This setting is
avail able only if S hutter is set to Auto.
Optio ns for this set ting range from -2.0 to +2.0. Higher v alues result in
brighter ima ges. The de fault setti ng is 0.
82 83
/ Protune
PRO TIP: Exposure Value Compensation adjusts brightness
withi n the existing ISO Limit. If brightnes s has already rea ched the
ISO Limit in a low-ligh t environme nt, increa sing the Exposure Value
Comp ensation d oes not have any effec t.
RESET
This o ption reset s all Protune setti ngs to their default value s.
Page 43

/ Customizing Your Camera
To customize your c amera, con nect it to Capture or a GoPro Remote.
/ Customizing Your Camera
LANGUAGE
This setting changes the lan guage that that appears on the c amera
DATE /TI ME
Your camera’s date a nd time are automat ically set w hen you conn ect
screens.
Note: When you c onnect you r HERO5 Session to a Go Pro remote contro l (sold separate ly), only
English is a vailable on th e remote.
your ca mera to Capture or GoPro for Deskt op. This setting lets you
manually set the date and ti me, if neede d.
84 85
Page 44

/ Customizing Your Camera
Video Format
Vide o Format set s regional f rame rates fo r recordin g and playback
on T Vs.
Setting Description
NTSC (default)
PAL
86 87
Viewing video on a n NTSC TV/HDTV (m ost
televisions in Nor th Americ a)
Viewing video on a PAL T V/HDTV (most
televisions outs ide of North America)
/ Customizing Your Camera
AUTO-ROTATION
This setting lets y ou determin e if you want you r captured v ideo or
photo to b e upside dow n or right-sid e up.
Setting Description
(Auto Image Rot ation) Camera aut omatically
selects U p or Down, bas ed on the orientat ion
Auto (default)
of the camera when r ecording b egins. This
option elimi nates the need to flip your ima ge
duri ng editing w hen the cam era is mounte d
upside down.
Page 45

/ Customizing Your Camera
/ Customizing Your Camera
Setting Description
Up Camera is us ed right-sid e up.
Camera is us ed upside do wn. This option
Down
88 89
eliminates t he need to flip your ima ge during
editing when the camera is mounted
upside down.
BEEPS
You can set t he volume for t he sound ind icators to be 100% (defa ult),
70%, or Off.
LEDs
This setting determines whether the cam era status l ights are on o r off.
Page 46

/ Customizing Your Camera
VOICE COMMAND LANGUAGE
This setting applies on ly when usin g the camera with Remo (sold
separately). Sets the la nguage that you use f or voice commands . For
details about us ing your HERO5 S ession wit h Remo, see the u ser
manual for Rem o.
90 91
/ Customizing Your Camera
DEFAULT MODE
™
This setting applies on ly when HERO5 S ession
Capt ure or a GoPro rem ote. You can select the c apture mod e that
appears wh en the came ra is powered o n with the ap p or the remote.
The options are Vid eo (default), Loopi ng Video, Ph oto, Burst, a nd Time
Lapse.
is connected to
Page 47

/ Customizing Your Camera
DELETE
This setting lets y ou delete the most recently captured vi deo, photo,
burst sequence, o r time lapse s equence. You al so have the option
to delete all file s and reformat the memor y card. Th e camera status
light s blink until the operati on is complete.
NOTICE: If you sele ct All/Format, the memor y card is refor matted,
whic h deletes ever y video a nd photo file on yo ur card.
92 93
/ Customizing Your Camera
SETUP MODE SETTINGS
In Setup mode, you can chan ge settings that apply to a ll camera
modes. To chang e a setting in t his mode, your came ra must be
connecte d to Capture o r a GoPro remote. For more i nformation, see
Accessing All Modes and Settings (page 104).
When you disconnect your camera from the app or the remote, your
came ra saves the s ettings.
Wireless
This setting lets y ou connec t your camer a to Capture or a GoPro
Page 48

/ Customizing Your Camera
remote. When w ireless is on , a wireless status i con appears on the
camera status screen.
Accessing Wireless Options:
1. Press the Menu but ton to display the status i nfo.
2. Press the Menu button re peatedly until you g et to the wireless
option that you want, then press the Shutter button to se lect it.
PRO TIP: To quickl y exit the wireless menu or the status info screens,
press and hold the Menu button for three seconds.
94 95
/ Customizing Your Camera
Setting Description
App
RC
Conn ects the c amera to the Capture. For
details, see Connecting to the Capture App
(page 43).
Conn ects the c amera to a GoP ro remote
control. For i nstructions on pair ing, see
Pairing with the Remote (pa ge 41) .
Page 49

/ Customizing Your Camera
/ Customizing Your Camera
Setting Description
Turns off th e camera. T his option appears
only if w ireless is on and th e camera is
Turn Cam era Off
connecte d to the app or remote. If you sele ct
this option, the ca mera turns off, but wi reless
remains on.
Turns off wi reless. Th is option appears o nly
Turn WiFi O ff
if wireless is on. Wh en wireless i s off, the
avail able captu re modes on th e camera are
Setting Description
Pairs your ca mera with an addi tional GoPro
remote o r with the app on an ad ditional
Add New
smartphone/tablet. This option appears
only if you already p aired your camera with a
Note: If your sm artphone/t ablet uses Blu etooth® LE, the App and RC op tions are comb ined into one
(App & RC) aer you co nnect for the fir st time. App & RC lets y ou connect y our camera to eit her the
app or remote.
GoPro remote or a s martpho ne/tablet.
Vide o and Time La pse.
96 97
Page 50

/ Impor tant Messages
MICROSD CARD MESSAGES
NO SD CARD
SD FULL Card is full. Delete files or swap car d.
SD ERROR
98 99
No card prese nt. The cam era require s a
microSD, microSDHC or microSDXC card to
capture vid eos and photos.
Camera is un able to read c ard format ting.
Reformat the c ard in the ca mera.
NOTICE: If you sele ct Yes to reformat the
card , all of the content on the car d is deleted.
/ Impor tant Messages
PRO TIP: Reformat you r microSD card on a reg ular basis t o ensure
that th e card can co ntinue to rec eive inform ation from th e camera.
IMPORTANT CAMERA MESSAGES
If your l ast video fil e was corru pted during
recording , the camer a displays REPAIRING
REPAIRING FILE
FILE wh ile it tries to re pair the file. W hen this
proce ss is finishe d, the came ra powers off if
it is not co nnected to Capture or a GoPro
remote.
Page 51

/ Resetting Your Camera
RESETTING ALL SETTINGS TO THE DEFAULTS
This o ption reset s all of your camera settin gs to the defa ults, except
Date, Ti me, your camera’s usernam e and password, a nd remote
control pairing.
1. C onnect yo ur camera to a G oPro remote.
2. Select Ca mera Reset.
Note: If your ca mera is not respo nding but you d o not want to lose y our settings , press and hol d the
Shutter but ton until your c amera powers off.
REPAIRING FILE
(conti nued)
/ Impor tant Messages
If the camer a is connec ted to the app or
remote, tap th e Shutter button on the ap p or
press the Shutter button on the remote or the
cam era wh en the re pair is finish ed to contin ue
using the camera.
The Temperature icon and CAMERA TOO HOT
appear on th e camera status screen when
the ca mera becomes too h ot and needs to
cool down. Simply let it sit an d cool before
attem pting to use it a gain.
100 101
Page 52

/ Resetting Your Camera
RESETTING YOUR CAMERA’S WIRELESS NAME AND
PASSWORD
1. With your camera off, pr ess and hold t he Menu button until the
reset o ptions appear (ab out eight sec onds).
2. Press the Menu button again to highli ght Yes.
3. Press the Shutter button [
came ra name and password.
PRO TIP: When you turn off you r camera with Capture or a G oPro
remote, wireless remains o n so that you ca n quickly reconnect . To
save batter y power, turn off w ireless when you are finished using it.
102 103
] to sele ct Yes and reset your
/ Resetting Your Camera
RESTORING FACTORY SETTINGS
Follow the ste ps below to reset all settings and t he camera's password. T his option is useful if you are rese lling your camera and wa nt to
remove all customization.
1. With your camera off, pr ess the Menu button to tur n on the status
screen.
2. Press the Menu button re peatedly until you g et to Exit Menu.
3. Press the Shutter button [
4. Press the Menu button to m ove to Yes, then press the Shutter
button [
] to sele ct it.
] for 8 seconds.
Page 53

/Mounting Your Camera
Your HERO5 S ession™ comes with a Standard Frame.
Note: To prevent th e frame from mar king the surf ace of your came ra, leave the latc h on the frame
open when s toring your ca mera in a frame for a l ong period of ti me.
The HER O5 Session c amera is waterproof to 33’ (10m) with the d oor
close d—no additio nal housing i s needed when usi ng the camera in or
around water.
/ Mounting Your Camera
TO SECURE THE CAME RA IN THE FR AME:
1. Open the latch.
2. Rotate the camera to t he desired orient ation, and then sl ide it into
the fr ame. The back of the frame has a ra ised edge. B e sure the
back of the ca mera sits flu sh against it.
3. Close the latch.
NOTICE: The Sta ndard Fram e does not provide ad ditional waterproof
protection for your came ra.
104 105
Page 54

/ Mounting Your Camera
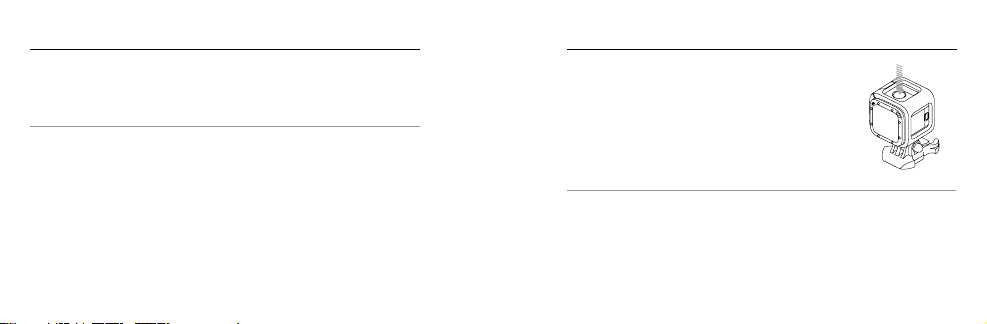
PRO TIP: For added security during water
activiti es, tether th e frame to the mount . By
loopi ng the tether o ver the small b ar behind
the mountin g fingers. Camera Tethers are
sold separately.
/ Mounting Your Camera
ATTACHING YOUR CAMERA TO MOUNTS
To attach your HER O5 Session c amera to a mount, you n eed a frame
and a mo unting buckle and /or t humb screw, d epending on the mount
you are u sing.
Mounting
Buckle
106 107
Thumb Screw Frame Complete Unit
Page 55

/ Mounting Your Camera
USING CURV ED + FLAT ADHESIVE MOUNTS
The Curve d + Flat Adhesive Mounts make it easy to at tach the ca mera
to cur ved and flat surfaces of helmets, vehicl es, and gear. Wit h the
mount ing buckle, t he frame ca n be clicked o n and off the secured
Cur ved or Flat Ad hesive Mounts.
Curved Adhesive Mount Flat Adhesive Mount
108 109
/ Mounting Your Camera
ATTACHING MOUNTING BUCK LES TO MOUNTS
1. Flip up t he mounting buckle plug.
2. Slide the bu ckle into the mount un til it clicks into place.
3. Press down on the plug so that it sit s flush with th e buckle.
Page 56

/ Mounting Your Camera
PRO TIP: If you mount yo ur HERO5 Session upside down, the cam era
autom atically changes the orientation of your image to b e right-side
up. For more informat ion, see
MOUNTING GUIDELINES
Follow these guidelines when attaching mounts:
• Attach the a dhesive mounts a t least 24 hour s before use.
• Adhesive mounts m ust be mounte d only on smooth sur faces.
Porou s or textured surf aces do not enable a proper b ond. When
applying the mount, firmly press it into place and en sure full
conta ct over the entire su rface.
110 111
Orientation (page 65).
/ Mounting Your Camera
• Apply adhe sive mounts to clea n surface s only. Wax, oil, dirt , or
other d ebris red uce adhesi on, which c an result in a weak bon d
and risk of losing the camera should the connecti on fail.
• Attach adhesive mount s in room temp erature con ditions.
Adhesives d o not bond properly if appl ied in cold or damp
environme nts to cold or da mp surfa ces.
Page 57

/ Mounting Your Camera
• Chec k state and lo cal regulation s and laws to en sure that
atta ching a camera to eq uipment (su ch as huntin g equipment)
is permitte d. Always comply with reg ulations that res trict the u se
of cons umer electroni cs or camer as.
WARNING: To avoid in jury, do no t use a tethe r when moun ting
the came ra on a helme t.
112 113
/ Mounting Your Camera
For more infor mation on mou nts, see gopro.com.
WARNING: If using yo ur camer a with a GoP ro mount or s trap
intended f or use with a helm et, always select a helm et that
meets th e applic able saf ety stan dard.
Choose t he right he lmet for yo ur parti cular sport or a ctivit y
and make su re that it is t he right fit a nd size for y ou. Insp ect
your helm et to ensure t hat it is in go od condit ion, and f ollow the
helmet ma nufact urer's ins truct ions on sa fe helmet u se.
Any helmet t hat has sustained a m ajor impa ct shoul d be
replace d. No helme t can prote ct again st injur y in every accident .
Page 58

/ Removing the Door
In some s ituations, such a s connecting th e Karma drone (sold
/ Removing the Door
REATTACHING THE DOOR
separately), it might be more c onvenient to a ccess the port s if the door
is removed.
WARNING: Remove the doo r only when yo u are using t he camera
in a dry, dus t-free environmen t. When th e door is op en or
removed, t he camer a is not water proof.
[IMAGE of r eattaching]
REMOVING THE SIDE DOOR
[IMAGE of r emoving: door ope n with arrow s indicati ng that you pul l it
off the camer a]
114 115
Page 59

Maintenance
/Maintenance
Follow these guide lines to get th e best performa nce from
your camera:
• The camera is waterproof to 33’ (10m)— no housing n eeded.
Ensure that t he door is closed bef ore using the c amera in
or arou nd water, dirt, or san d.
• Before closing the si de door, be sure the seal i s free of debr is.
If needed, c lean with a blower br ush or cann ed air.
• Befor e opening the door, be sure the came ra is free of wa ter or
debr is. If need ed, rins e the camer a with water an d dry it wit h a cloth.
• If san d or debris ha rdens around the door, soa k the camera in
warm t ap water for 15 minu tes and then r inse thoro ughly to
remove the de bris before o pening the door.
116 117
/
• For bes t audio per formance, shake t he camera or blow on t he mic
to remove water a nd debris f rom the micropho ne holes.
• Aer every use in sa lt water, rinse th e camera w ith fr esh wa ter,
and dr y with a so cloth.
• If the camer a lens becom es foggy, let it sit w ith the door o pen until
it dries.
PRO TIP: During water ac tivities, tether your ca mera for added
secu rity and use a Floa ty to keep your camera afloat (sold s eparately).
For more infor mation, visit gopro.com.
Page 60

/ Battery
Your HERO5 S ession™ came ra and battery are integrate d. You can not
remove the batter y from the ca mera.
The ba ttery ico n displaye d in the camera status screen blink s
when t he batter y drops below 10%. If the ba ttery rea ches 0% while
recording , the camer a saves the file a nd powers off.
MAXIMIZING BATTERY LIFE
Extreme cold temperatures can decrease batter y life. To maximize
/ Battery
When you are not using HERO5 Se ssion, rota te it in the fra me so the
Shutter button is covered to prevent the ca mera from ac cidental ly
turning on.
Note: To prevent th e frame from mar king the surf ace of your came ra, leave the latc h on the frame
open when s toring your ca mera in a frame for a l ong period of ti me.
If the memor y card becomes full or the battery r uns out of power
while c apturing video, your ca mera automatica lly stops recording
and saves the video before power ing off.
battery life in cold cond itions, keep cam era in a warm pl ace prior
to use.
CHARGING TIME
The ba ttery cha rges to 80% in approxi mately one hour and 100% i n
approximately two hours when using GoPro’s USB-compatible Wall
118 119
Page 61

/ Battery
Charger, Auto Charger, or other USB charging adapter. Other chargers
might charge at a slower rate.
WARNING: Us ing a wall ch arger oth er than a GoP ro Wall Charger
can dama ge the GoP ro camer a batter y and could result in fir e or
leakag e. Only use ch argers ma rked: Output 5V 1A . If you do not
know the vo ltage an d current of y our charg er, use the incl uded
USB cabl e to charge t he camer a from your co mputer.
USING THE CAMERA WHILE CHARGING
You can ca pture video and ph otos while the camera is plu gged in to
a USB cha rging adapter, or the GoPro Wall Charg er or Auto Char ger
with the include d USB cable. ( You cann ot record while cha rging the
came ra through a comput er.) W hen you stop record ing, the ca mera
120 121
/ Battery
battery begins to charge.
Note: Becau se the door is op en, the camera is n ot waterproof d uring chargi ng.
BATTERY STORAGE A ND HANDLING
The camera contains sensitive components, including the battery.
Avoid exp osing your ca mera to ver y cold or very h ot temperat ures.
Low or high temp erature con ditions may tempo rarily shorten t he
battery life or ca use the cam era to tempor arily stop worki ng properly.
Avoid dramati c changes in temperatur e or humidit y when using t he
came ra, as cond ensation may form on or wit hin the camera.
The integra ted batter y in the camera is no n-serviceab le. Contac t
GoPro C ustomer Se rvice for all battery related issues.
Page 62

/ Battery
Do not dr y the came ra or batter y with an externa l heat source such
as a microwave oven or hair dr yer. Damage to th e camera or batter y
caus ed by contac t with liqui d inside the c amera is not covered unde r
the warranty.
Do not make any un authorize d alterations to the came ra. Doing so
may com promise safety, regulatory compl iance, per formance, and
may void the warranty.
WARNING: Do n ot drop, di sasse mble, open , crush, b end, def orm,
punctu re, shred, m icrowave, i ncinera te, or paint t he camer a.
Do not inse rt forei gn objects into any o pening on t he camer a,
such as th e micro- USB por t. Do not us e the came ra if it has b een
damaged —for example, if cr acked, puncture d, or harm ed by
water. Disas sembling or punc turing t he integra ted batter y can
122 123
cause an ex plosion or fire.
/ Troubleshooting
MY GOPRO WON’T POWER ON
Make sure your Go Pro is charged. To char ge your camera, us e the
included USB cab le and a computer. You can al so use a charg ing
device manufac tured by GoPro.
MY GOPRO WON’T RE SPOND WHEN I PRE SS A BUTTON
Press and ho ld the
your ca mera power s off. This reset saves al l of your content and
settings.
Menu butto n
[ ] for abo ut eight seco nds until
Page 63

/ Troubleshooting / Troubleshooting
I WANT TO RESET MY GOPRO SETTINGS TO THE DEFAULTS
In Setup mode, select Ca mera Reset. T his option does not reset th e
Date/Time or y our camera’s usern ame and wireless p assword.
Note: Camera R eset is availa ble only when you r camera is conn ected to the GoPr o remote.
I FORGOT MY CAMERA’S USERNAME OR PASSWORD
TEXT
HOW DO I TURN OFF MY CAMERA?
If HERO5 Ses sion is not con nected to C apture or a GoP ro remote, it
power s off automatically aer you stop re cording.
When your ca mera is conn ected to the app or remote, tap the P ower
124 125
icon in the ap p or press the Power/Mode but ton on the rem ote to turn
off the camer a. Wireless remains on.
If your c amera goe s out of range of t he app or rem ote, or you c lose th e
app, pr ess the Menu button to dis play Turn Camera Off, then pres s the
Shutter
[ ] button t o select it . Wireless re mains on.
To turn off wireles s and power off the cam era, press t he Menu button,
Shutter
press it repeatedl y to display Turn W iFi Off, then pr ess the
[
] button to select it .
Page 64

/ Troubleshooting
MY PLAYBACK IS CHOPPY
Chop py playba ck is typic ally not a prob lem with the file. If your footage
skips , one of these s ituations is likely t he cause:
• Using a n incompatible vi deo player. Not all video players
support the H.264 c odec. For best res ults, use the late st version of
GoPro for Desktop.
• The co mputer does not meet the min imum requir ements for HD
play back. The highe r the resolution an d frame rate of your video,
the harder the computer has to wor k to play it bac k. If you are
using G oPro for Desktop to pl ay back your files, be sure that your
computer meets th e minimum sy stem requirement s, availa ble on
gopro.com/getstarted.
126 127
/ Troubleshooting
• Play ing content direc tly from your c amera over a USB conn ection.
Transfer the file to the co mputer to pla y back. If you r computer
does not meet t he minimum re quirement s, record with Protune
off and make sure t hat all other programs on your com puter
are clo sed.
WHAT SOFTWARE VERSION AM I RUNNING?
Press the Menu but ton to turn on t he status screen, then press it
repea tedly until yo u get to Exit. T he sowar e version num ber appears
in the upper le of the status s creen. To exit th e menu, pres s the
Shutter button
[ ].
Page 65

/ Troubleshooting
WHAT IS MY CAMERA’S SERIAL NUMBER?
The camera’s serial numb er is listed in s everal pla ces:
• On the inside of the camera’s side do or
• On your c amera’s microSD ca rd (in the version.t xt file in the
MISC folder)
• On your c amera’s orig inal packa ging
128 129
/ Customer Support
GoPro is dedicated to providing the best possible service. To reac h
GoPro Support, visit gopro.com/help.
/ Trademarks
GoPro, HERO, Protune, a nd SuperV iew are trad emarks or registered
trad emarks of GoPro, In c. in the U.S. a nd internat ionally. Oth er names
and ma rks are the p roperty of their respe ctive own ers.
Page 66

/ Regulatory Information
To see the co mplete list of countr y certifi cations, r efer to the Important
Product + S afety Inst ruction s included with yo ur camera or v isit
gopro.com/help.
130
Page 67

IMPORTANT PRODUCT + SAFETY INSTRUCTIONS
English Français Español
Page 68

WARNIN G (ENGLISH)
Important Product and Safety Instructions
For more detailed information about camera features and settings, download the user
manual for th e product online at gopro.com/help.
Exercise cau tion when using your GoP ro camera as part of your a ctive
lifestyle. Alwa ys be aware of your surroundin gs to avoid injury to yourself
Observe the following precautions to avoid a camera explosion or fire:
• Do not dro p, disassemble, ope n, crush, bend, deform, p uncture, shred, microwave,
• Do not in sert foreign objects in to any opening on the came ra, such as the USB port.
• Do not us e the camera if it has been d amaged—for example, if cr acked, punctured
• Do not dr y the camera or battery wi th an external heat source s uch as a microwave
WARNIN G: Do not place nake d flame sources, suc h as lighted candles, on o r near
the product.
and others.
incinerate o r paint the camera.
or harmed by wate r. Di sassembling or pu ncturing the battery (whether inte grated or
removable) can ca use an explosion or fire.
oven or hair dr yer.
When chargi ng the camera, do not hand le the plug or charger with we t
hands. Failure to observe this precaution could result in electric shock.
Using a wall ch arger other than a GoPro Wall Ch arger can damage the
GoPro came ra and could result in fir e or leakage. Only use ch argers
marked: Outp ut 5V 1A. If you do not know the volta ge and current of
your charge r, us e the included USB cabl e to charge the camera from
your computer.
If using your c amera with a GoPro helmet m ount, always select a helm et
that meets the ap plicable safety stan dard. Choose the right hel met for
your parti cular sport or activit y and make sure that it is the rig ht fit and
size for you. Insp ect your helmet to ensure that i t is in good condition a nd
follow the helm et manufacturer’s instructi ons on safe helmet use. Any
helmet that ha s sustained a major im pact should be replac ed. No helmet
can protect aga inst injury in every ac cident.
Your GoPro came ra lens is glass. Shou ld the lens break, care sho uld be
taken to avoid inju ry due to broken glass. Kee p out of reach of children.
Contact GoP ro Customer Support.
Page 69

The temperature icon and C AMERA TOO HOT appear on the camera
status scree n when the camera becom es too hot and needs to cool
down. Simply l et it sit and cool before attem pting to use it again.
CAUTION: When using Go Pro products near anoth er device, read that device’s use r guide
for any safety instructions. To limit potential interference with digital transceivers such as
avalanche beacons, consult with the transceiver’s user manual regarding the use of other
GPS or elec tronic devices, such as th e GoPro camera, when en gaged in the avalanch e
beacon se arch mode. Power your cam era off whenever it is forbid den to use it or when
it may cause i nterference. Do not bloc k any ventilation holes on the c amera as the heat
generated may hurt you and damage the apparatus.
NOTICES: Avoid exposing your camera or battery to very cold or very hot temperatures.
Low or high temperature conditions may temporarily shorten the batter y life or cause the
camera to temporarily stop working properly. Avoid dramatic changes in temperature or
humidity wh en using the camera, as c ondensation may form o n or within the product.
The microp hones in your camera are d esigned to provide optima l audio capture in a variet y
of environments . When Wi-Fi is on, microp hones may detect and captu re low-level noises.
To prevent this noise, tu rn off Wi-Fi when recording .
Abide by all l ocal laws when using your G oPro and related mounts an d accessories,
includin g all privacy laws, which ma y restrict recording in cer tain areas.
1. Read these instructions.
2. Keep these instructions.
3. Heed all warnings.
4. Follow all instructions.
5. Cle an only with a dry cloth.
6. Do n ot block any ventilation op enings.
7. D o not install near any heat s ources such as radiator s, heat registers, stoves or othe r
apparatus that produce heat.
8. Prote ct the power cord from being wa lked on or pinched par ticularly at plugs,
convenien ce receptacles, and th e point where they exit from the app aratus.
9. Only use attachments/accessories specified by the manufacturer.
10. Unp lug this apparatus duri ng lightning storms or whe n unused for long perio ds of time.
11. Refer all ser vicing to qualified services personnel. Servicing is required when the
apparatus h as been damaged in any w ay, s uch as when the plug is dam aged, liquid
has been sp illed or objects have fall en into the apparatus, or the a pparatus does not
operate norm ally or has been dropp ed.
AVERTISSEMENT (FRANÇAIS)
Informatio ns importantes rela tives au produit et à la séc urité
Pour de plus amples informations sur les fonctionnalités et paramètres de la caméra,
télécharge z le manuel de l’utilisateu r du produit à l’adresse gopro.com/help.
Soyez pruden t lorsque vous utilisez votre c améra GoPro dans le ca dre de
vos activités sp ortives. Faites attention à c e qui se passe autour de vo us
Veuillez respecter les consignes suivantes afin d’éviter que la caméra n’explose ou ne
prenne feu:
• Ne pas laisser tomber, démonter, ouvrir, écraser, plier, déformer, percer, lacérer,
• Ne pas i ntroduire de corps étrange rs par les ouvertures d e la caméra, comme le
• Ne pas u tiliser la caméra si ell e a été endommagée, par exe mple si elle est fissuré e,
• N’essayez p as de sécher la caméra o u la batterie avec une sou rce de chaleur comme
AVERTISSEM ENT: Ne placez aucune s ource de flamme nue, tel le qu’une bougie allumé e,
sur ou à proximité d u produit.
afin d’éviter de vous blesser ou de blesser autrui.
exposer aux micro-ondes, incinérer ou peindre la caméra.
portUSB.
percée ou si e lle a pris l’eau. Le démonta ge ou le percement de la ba tterie (qu’elle soit
intégrée ou am ovible) peut provoquer une expl osion ou un incendie.
un four micro- ondes ou un sèche- cheveux.
Lors du charg ement de la caméra, ne tou chez pas la prise ou le ch argeur
avec des mains mouillées. Le non-respect de cette consigne de sécurité
peut entraîner une électrocution.
L’utilisatio n d’un chargeur mural autre qu e le chargeur mural Go Pro peut
endomma ger la caméra GoPro et provo quer un incendie ou u ne fuite.
Utilisez uni quement un chargeur p ortant l’indication: S ortie 5V1A.
Si vous igno rez la tension et l’ampérage de vot re chargeur, utilisez le
câbleUSB fou rni pour charger la ca méra avec votre ordinateur.
Si vous utilis ez votre caméra avec une fixatio n pour casque GoPro,
choisissez toujours un casque conforme aux normes de sécurité en
vigueur. Choisi ssez un casque adapté a u sport ou à l’activité que vous
pratiquez et as surez-vous de choisir la tail le et la forme qui vous convie nnent. Examin ez votre casque afin de vérifi er qu’il est en bon état et suivez
les instruc tions du fabricant pou r une utilisation sûre du c asque. Tout
casque ayan t subi un choc violent do it être remplacé. Aucun ca sque n’est
en mesure de protéger contre toutes les blessures.
Page 70

La lentille d e votre caméraGoPro est en ver re. Si la lentille se brise, ve illez
à prendre des p récautions pour éviter to ute blessure causée p ar des
bris de verre. Tenir ho rs de la portée des enfants . Contactez le service
d’assistanc e clientèle de GoPro.
L’icône de température et le m essage SURCHAUFFE CAMÉRA
apparais sent sur l’écran d’état d e la caméra lorsque c elle-ci devient trop
chaude et doit refroidir. Laissez-la simplement refroidir avant de tenter
de la réutiliser.
ATTENTION: Lor sque vous utilisez des p roduits GoPro à proximité d’un aut re dispositif,
lisez le man uel de l’utilisateur du disp ositif en question pou r prendre connaissa nce des
instructions relatives à la sécurité. Pour limiter le risque d’interférences avec les émetteursrécepteurs numériques, comme des balises de détresse d’avalanche, reportez-vous aux
instructions relatives à l’utilisation d’autres GPS ou équipements électroniques tels que la
caméra Go Pro lorsque le dispos itif en question fonction ne en mode de recherche d e balise
de détresse. Étei gnez votre caméra lorsqu e son utilisation est interdi te ou peut provoquer
des interférences. N’obstruez aucune ouverture d’aération de la caméra, la chaleur générée
pouvant provoquer des blessures et endommager l’appareil.
MISES EN GAR DE: Évitez d’exposer votre caméra ou s a batterie à des températur es
trop basses ou trop élevées. Les températures extrêmes peuvent temporairement affecter
l’autonomie de l a batterie ou nuire à la foncti onnalité de la caméra . Évitez les variations
brusque s de température ou d’humi dité lors de l’utilisation de l a caméra, de la conden sation
pouvant se form er à l’intérieur et à l’extérieur du p roduit.
Les microphones de votre caméra sont conçus pour permettre un enregistrement audio
optimal dans une grande variété d’environnements. Lorsque la connexion Wi-Fi est activée,
les microphones peuvent capter et enregistrer des bruits de faible niveau. Pour éviter ces
bruits, dés activez la connexion Wi-F i lors de l’enregistrement.
Respectez toute s les lois locales en vi gueur lors de l’utilisati on de votre GoPro et de ses
fixations et ac cessoires, y compri s les lois sur la protection d e la vie privée, qui peuvent
interdire l’utilisation de caméras dans certaines zones.
1. Lisez ces instructions.
2. Conservez ces instructions.
3. Tenez compte de tous les avertissements.
4. Suivez toutes les instructions.
5. Net toyez uniquement à l’aide d’un chif fon sec.
6. N’obstruez aucune ouverture d’a ération.
7. N’i nstallez pas l’équip ement à proximité d’une sourc e de chaleur telle qu’un radia teur,
un conduit d e chauffage, une cuis inière ou tout autre appare il produisant de la cha leur.
8. Proté gez le cordon d’alimentatio n afin d’éviter de marcher d essus ou de le pincer,
particulièrement au niveau des prises, des boîtiers de prise et du point de sortie
de l’équipement.
9. Utilisez uniquement les pièces et accessoires spécifiés par le fabricant.
10. Déb ranchez cet équipem ent en cas d’orage ou de non uti lisation prolongée .
11. Faites réaliser toutes les réparations par du personnel qualifié. Une réparation est
nécessaire lorsque l’équipement est endommagé de quelque manière que ce soit, par
exemple lorsque la prise est endommagée, en cas de déversement d’un liquide ou de
présence d’un objet à l’intérieur de l’équipement, en cas de fonctionnement anormal,
ou si l’équ ipement est tombé à terre.
ADVERTENCIA (ESPAÑOL)
Información importante sobre el producto y la seguridad
Para encontr ar información más deta llada sobre las funci ones y la configuraci ón de la
cámara, descargue el manual del usuario del producto en línea de gopro.com/help.
Tenga cuidado cuando use su cámara GoPro como parte de su estilo
de vida activo. Siempre preste atención a sus alrededores para evitar
Tenga en cuenta las s iguientes precauci ones para evitar la explos ión de la cámara o
un incendio:
• No tire, de sarme, abra, aplaste, d oble, deforme, perfore, t riture, caliente en el
• No inse rte objetos extraños en ni nguna abertura de la c ámara, como el puer to USB.
• No utilice la cámara si se ha dañado; por ejemplo, si presenta grietas, perforaciones
• No intente se car la cámara con una f uente de calor externa, co mo un microondas o
ADVERTENCIA: No coloque fuentes de llama abierta, como velas encendidas, encima ni
cerca del producto.
lastimars e y lastimar a los demás .
microond as, incinere ni pinte la cá mara.
o daños provoc ados por el agua. De sarmar o perforar la ba tería (tanto si es integrada
como extraí ble) puede causar una expl osión o un incendio.
un secador de pelo.
Durante la carg a de la cámara, no agar re el enchufe ni el cargado r con
las manos h úmedas. Si no tiene en c uenta esta precaució n, se podría
provocar una descarga eléctrica.
Page 71

Si usa un carg ador de pared que no sea d e GoPro, podría dañar l a cámara
GoPro y caus ar un incendio o una fug a. Solo use los cargad ores con la
siguiente de scripción: Output 5V 1 A (Salida 5V 1A). Si desconoce el
voltaje o la corriente de su cargador, use el cable USB incluido para cargar
la cámara co n la computadora.
Si utiliza su cámara con un soporte de cascos GoPro, siempre seleccione
un casco qu e cumpla con las norma s de seguridad vige ntes. Elija el
casco correcto para el deporte o la actividad en particular y asegúrese
de que el cal ce y el tamaño sean los a decuados para usted. I nspeccione
el casco para asegurarse de que esté en buenas condiciones y siga
las instrucciones del fabricante de cascos sobre el uso seguro del
casco. Cualquier casco que haya recibido un impacto importante debe
reemplazarse. Ningún casco puede proteger contra lesiones en todos
los accidentes.
Las lentes de l a cámara GoPro son de vid rio. En caso de que las lente s se
rompan, se debe tener cuidado para evitar lesiones debido al vidrio roto.
Mantenga la cámara alejada del alcance de los niños. Comuníquese con el
Servicio d e atención al cliente de Go Pro.
El icono de tem peratura y la leyenda CAMER A TOO HOT
(TEMPERATURA DE L A CÁMARA MUY ALTA) aparecerán en la pantal la
de estado de la cámara cuando esta se haya calentado demasiado y
necesite enf riarse. Solo debe dej arla reposar hasta qu e se enfríe antes
de volver a utiliz arla.
ADVERTENCIA: Antes de usar pro ductos GoPro cerca de otros di spositivos, lea la guía d el
usuario de esos dispositivos para conocer las instrucciones de seguridad. A fin de limitar
interferencias potenciales con transmisores receptores digitales, como los indicadores
luminosos para aludes, los usuarios de estos transmisores deben consultar sus manuales
con respec to al uso de otros dispositivos G PS o electrónicos, co mo las cámaras GoPro,
cuando activan el modo de búsqueda con indicadores luminosos para aludes. Apague su
cámara siempre que esté prohibido usarla o cuando pueda ocasionar interferencias. No
bloquee l os orificios de ventila ción de la cámara, ya que e l calor generado pu ede causarle
lesiones y dañar el aparato.
AVISOS: Evite exponer la cámar a y la batería a temperaturas m uy frías o muy calientes.
Las tempera turas muy bajas o muy alta s pueden acortar tem poralmente la duració n de la
batería o hace r que la cámara deje de f uncionar temporalm ente de forma correcta. Evite
los cambi os drásticos de temperat ura o humedad cuando u se la cámara, ya que se pu ede
producir condensación en el exterior o el interior del producto.
Los micrófono s de su cámara están dise ñados para proporcio nar una captura de audi o
óptima en varios entornos. Cuando el Wi-Fi está encendido, los micrófonos pueden
detectar y captu rar ruido a un nivel bajo. Pa ra evitar este ruido, desa ctive el Wi-Fi cuando
vaya a grabar.
Respete todas las leyes locales al utilizar su GoPro y los accesorios y soportes relacionados,
incluida s todas las leyes de privac idad, que pueden rest ringir la grabación
en determinadas áreas.
1. Lea estas instrucciones.
2. Guarde estas instrucciones.
3. H aga caso a todas las adve rtencias.
4. Siga todas las instrucciones.
5. Lim pie solo con un paño se co.
6. No bloquee ninguna abertura de ventilación.
7. No coloque la cámara cerca de fuentes de calor, como calefactores, rejillas de aire
caliente, estufas, ni de otros aparatos que produzcan calor.
8. Evite q ue se camine sobre el ca ble de alimentació n o que se corte, en partic ular en el
enchufe, en la s tomas de corriente y en el pu nto donde salen del apa rato.
9. Solo utilice accesorios especificados por el fabricante.
10. Desenchufe este aparato durante tormentas eléctricas o cuando no lo utilice por
mucho tiempo.
11. Remita todas las tareas de servicio a personal calificado. Las tareas de servicio son
necesarias cuando el aparato haya sufrido algún tipo de daño, por ejemplo, si el
enchufe está dañado, si se derramaron líquidos sobre el aparato, si cayeron objetos
encima de l mismo, si no funciona n ormalmente o si ha sufrid o una caída.
WARRANTY + DISCLAIMERS
ENGLISH
Limited Warranty:
GoPro warrant s that for a period of one (1) year from ori ginal date of purchase, the pro duct
will be free from d efects in materials and workm anship under norm al use. In the event of a
defect, contac t GoPro Customer Suppo rt (gopro.c om/help) for assistance. GoP ro’s s ole
obligatio n under this warranty will b e, at its option, to repair or repl ace the product. This
warranty doe s not apply to products dama ged by misuse, accid ent, or normal wear and
tear. Damage resu lting from use with non-G oPro batteries, power ca bles, or other battery
charging/rec harging accessori es or devices is also not cov ered by this or any warranty.
ALL IMPLIED WARRANTIES OF MERCHANTABILITY OR FITNESS FOR A PARTICULAR
PURPOSE AR E LIMITED TO THE DURATION OF THIS WARR ANTY. GOPRO DISCLAIM S
ALL OTHER EXPRES SED OR IMPLIED WARRANTIES OR C ONDITIONS. TO THE EXT ENT
Page 72

NOT PROHIBIT ED BY LAW, IN NO EVENT WILL GOPRO BE LI ABLE FOR ANY LOSS OF
DATA, REVENUE OR PROFIT, OR FOR ANY SPECIAL, INDIRECT, CONSEQUENTIAL,
INCIDENTAL OR PUNI TIVE DAMAGES, HOWEVER CAUSED, AR ISING OUT OF OR
RELATED TO THE USE OF OR IN ABILITY TO USE THE PROD UCT, E VEN IF GOPRO
HAS BEEN ADVISED O F THE POSSIBILIT Y OF SUCH DAMAGES. IN NO EVENT WIL L
GOPRO’S LIA BILITY EXCEED THE AMOUN T PAID BY YOU FOR THE PR ODUCT. Some
jurisdicti ons do not allow limitatio ns on how long an implie d warranty lasts, or the exclus ion
or limitation of incidental or consequential damages, so the above limitations or exclusions
may not apply to yo u. This warranty gives you sp ecific legal rights, an d you may also have
other rights, whi ch vary by jurisdictio n.
European Union Consumers: GoPro grants for a perio d of two (2) y ears from the original
date of purchase of th e relevant GoPro product a nd free of charge a limited man ufacturer’s
guarantee to the e nd customer. This shall not li mit any consumer right s which you have
under con sumer law; instead it gra nts you additional rig hts.
by the following ter ms and conditions. G oPro guarantees that for a pe riod of two (2)
years from the or iginal date of purchase, yo ur GoPro product will be fre e from defects in
materials an d workmanship under n ormal use and provide d it has been
used in acc ordance with the instru ctions in the relevant Go Pro user manual (gopro.com/help).
In the event of a defect, co ntact GoPro Customer Sup port (gopro.com/help) fo r
assistan ce and be prepared to prese nt the original purchase re ceipt. GoPro’s sole
obligatio n under this guarantee will b e, at its option, to repair or repl ace the defective
product. This guarantee does not apply to products damaged by misuse, accident, or
normal wea r and tear. This guarantee does a lso not apply to products dam aged as a result
of repair works n ot performed by GoPro or an a uthorized GoPro deale r.
Australian Consumers: The benefits given by th e GoPro limited warranty ar e in addition to
other rights an d remedies available to yo u. Our goods come with gu arantees that cannot
be excluded u nder the Australian Con sumer Law. You are entitled to a repla cement or
refund for a major failure and to compensation for any other reasonably foreseeable loss
or damage. You are a lso entitled to have the produ ct repaired or replace d if it fails to be of
acceptab le quality and the failu re does not amount to a major fa ilure.
Open Sour ce Software: Disclosures and disclaimers in connection with GoPro’s
incorpor ation of certain open-s ource software into its produ cts can be found at
http://gopro.com/support/open-source.
The guarantee is governed
This symbol m eans that according to lo cal laws and regulatio ns your
product should be disposed of separately from household waste.
When this prod uct reaches its end of life, take i t to a collection point
designated by local authorities. Some collection points accept products
for free. The sep arate collection and re cycling of your product at the
time of dispos al will help conserve n atural resources and en sure that it is
recycled in a m anner that protects human he alth and the environment.
Hereby, GoPro, Inc . declares that the radio e quipment type GoPro
HERO5 Sess ion and HERO Session a re in compliance with Di rective
2014/53/EU.
The full text of the EU d eclaration of conformity i s available at the
following inter net address: gopro.com/help.
GoPro, Inc. 3 000 Clearview Way, San Mateo, C A 94402, USA
GoPro GmbH , Floessergasse 2, 81 369 München Deutsc hland
The GoPro HERO5 Session (HWMR1) and HERO Session (HWRP1) cameras transmit at
2412 MHz - 2462 MHz. The maximum power transmitted in this frequency band is 77mW.
The HERO5 Session (HWMR1) also transmits at the 5.15GHz - 5.35GHz and 5.47GHz -
5.85GHz freq uency bands. The maxi mum power transmitted in th ese frequency bands i s
34m W.
IC Regulati ons: This device complies with Industry Canada license-exempt RSS standards.
Operation i s subject to the following two co nditions: (1) This device may not c ause
interference and; (2) This device must accept any inter ference– including interference that
may cause un desired operation of the d evice.
This Class B digital apparatus complies with Canadian ICES-003.
The Countr y Code Selection feature i s disabled for produc ts marketed in the US/Canada.
For product ava ilable in the USA/Cana da markets, only chann el 1~11 can be operated.
Selectio n of other channels is not pos sible.
IMPORTANT NOTE:
IC Radiation Exposure Statement
This EUT is in compliance with SAR for general population/uncontrolled exposure limits
in IC RSS-102 an d has been tested in acco rdance with the measurem ent methods and
procedure s specified in IEEE 1528.
ELECTRICAL RATINGS
, 1A
5V
Page 73

FCC STATEM ENT
This device c omplies with Part 15 of the F CC Rules. Operation is s ubject to the
following two co nditions: (1) This device may not c ause harmful interfere nce; and (2)
This device m ust accept any interferen ce received, includi ng interference that may
cause undesired operation.
NOTE: This equi pment has been tested an d found to comply with the limit s for a Class
B digital devi ce, pursuant to part 15 of the F CC Rules. These limits a re designed to
provide reasonable protection against harmful interference in a residential installation.
This equip ment generates—and ca n radiate—radio frequ ency energy and, if not
installed and used in accordance with the instructions, m ay cause harmful interference
to radio communications.
However, there is no guar antee that interference will n ot occur in a particula r installation.
If this equipment does cause harmful interference to radio or television reception, which
can be determ ined by turning the equi pment off and on, the user is e ncouraged to try to
correct the interference by one or more of the following measures:
• Reorient or relocate the receiving antenna.
• Increase the separation between the equipment and the receiver.
• Conn ect the equipment into an ou tlet on a circuit different fro m that to which the
receiver is connected.
• Consult the dealer or an experienced radio/TV te chnician for help.
The provided s hielded USB cable m ust be used with this unit to en sure compliance with
the class B FC C limits.
Warning: Cha nges or modificatio ns to this unit not express ly approved by the party
responsible for compliance could void the user’s authority to operate the equipment.
RF Exposur e Information (SAR)
The camera s hould be attach to a plast ic mount when used near h uman body or head. The
minimum di stance from camera sur face to the human body or he ad is 19mm. This device
has been de signed and manufact ured to comply with the limits fo r exposure to RF energy
set by the Federa l Communications C ommission (FCC) of the United S tates, Industry
Canada (IC) and t he European Union and othe r countries.
The exposure standards for wireless devices employ a unit of measurement known as the
Specific A bsorption Rate, or SAR. The S AR limit set by the FCC/IC is 1.6W/kg avera ged
over 1 gram of tissu e. The SAR limit recomm ended by The Council of th e European Union is
2.0W/kg averaged over any 1 0 grams of tissue.
The FCC and IC h ave granted an Equipment Aut horization for this device wi th all reported
SAR levels eval uated as in complianc e with the FCC and IC RF exposure g uidelines. SAR
information o n this device is on file with the FC C and IC, and can be found u nder the
Display Gr ant section of www.fcc.gov/oet/ea/fccid after searchi ng on FCC ID: CNFHWRP1
and FCC ID: CNF HWMR1 and under the Ind ustry Canada Radio Eq uipment List databas e
http://www.ic.gc.ca/app/sitt/reltel/srch/nwRdSrch.do? lang=eng after searching FCC ID:
CNFHWMR1 and 10193A-HWMR1.
This device is in compliance with SAR for general population /uncontrolled exposure
limits in ANS I/IEEE C95.1-1999 and has been tes ted in accordance with the m easurement
methods and p rocedures specifi ed in OET Bulletin 65 Sup plement C.
FRANÇAIS
Garantie limitée:
GoPro garan tit que le produit ne prése ntera aucun défaut matérie l ou de fabrication
pendant un e période de un(1)an à compter de la d ate d’achat, à condition qu’il so it utilisé
dans des conditions normales. En cas d e d éfaut, contactez le service d’assistance clientèle
de GoPro (gopro.com/help). La seule obligation de GoPro, selon les termes de cette
garantie, est l a réparation ou le rempla cement du produit, à sa c onvenance. La présente
garantie ne s’applique pas aux produits endommagés par une mauvaise utilisation, un
accident ou une usure normale. Les dommages résultant de l’utilisation de batteries, de
câbles d’alimentation ou d’autres accessoires ou appareils de chargement/rechargement de
batterie aut res que ceux de GoPro ne so nt pas couverts non plus p ar la présente ou toute
autre garanti e. TOUTES LES GARANTIES IMPLI CITES DE QUALITÉ MARCHAN DE OU DE
CONFORMI TÉ À UN USAGE PARTICULIER SE LIM ITENT À LA DURÉE DE LA PR ÉSENTE
GARANTIE. GOPRO DÉCLINE TOUTE AUTRE GARANTIE OU DISPOSITION EXPRESSE
OU IMPLICI TE. DANS LA MESURE PERMISE PAR L A LOI, GOPRO NE POURRA EN
AUCUN CAS ÊTRE T ENU RESPONSABLE DES PER TES DE DONNÉES, DE REVENUS
OU DE BÉNÉFICES , OU DES DOMMAGES SPÉCIFIQ UES, INDIRECTS, DIRECTS ,
CONSÉCUTIFS OU PUNITIFS, QUELLE QU’EN SOIT LA CAUSE, OCCASIONNÉS PAR
OU EN RAPPOR T AV EC L’UTILI SAT ION OU L’IN CAPACITÉ D’UTILISER LE PRO DUIT,
MÊME SI GOPR O A ÉTÉ PRÉVENU DE L’ÉVENTUALITÉ DE TELS D OMMAGES. LA
RESPONSA BILITÉ DE GOPRO NE POU RRA EN AUCUN CAS ÊTRE ENGAGÉE AU -DELÀ
DU MONTANT ACQUIT TÉ POUR L’ACHAT DU PROD UIT. Les limitati ons de durée de
garantie imp licite, ou l’exclusion ou la li mitation des dommag es indirects ou directs n’éta nt
pas autorisées par certaines juridictions, il est possible que les limitations et exclusions
mentionné es ci-dessus ne s’appli quent pas à votre cas. La prés ente garantie vous procure
des droits sp écifiques et il se peut é galement que vous dis posiez d’autres droits, pouva nt
varier selon les juridictions.
Consommateurs de l’Union européenne: G oPro accorde une gara ntie de deux(2)ans à
compter de la da te d’achat initi ale du produit GoPro con cerné et fournit une gar antie limitée
gratuite du fabr icant au consommateu r final. Ceci n’affecte aucun droit du consommateur
dont vous dis posez au titre du droit de l a consommation;vous b énéficiez par aille urs de
droits supplémentaires.
La garantie est régie par les termes et conditions suivants. GoPro
Page 74

garantit que votr e produit GoPro ne prése ntera aucun défaut matériel ou de fabrication
pendant un e période de deux(2)ans à com pter de la date d’achat initi ale, à condi tion qu’il
soit utilisé dans des conditions normales et conformément aux instructions fournies dans le
manuel de l’utilisateur GoPro correspondant (gopro.com/help). En cas de défa ut, contactez
l’assistanc e clientèle de GoPro (gopro.com/help) en vous munissant a u préalable du reçu
d’achat origin al. La seule obligati on de GoPro, au titre de cette ga rantie, est la réparation
ou le rempla cement du produit défec tueux, à sa convenance. L a présente garantie ne
s’applique pas aux produits endommagés par une mauvaise utilisation, un accident ou une
usure norma le. En outre, la présente gara ntie ne s’applique pas aux pro duits endommagés
en raison d’une ré paration non réalisé e par GoPro ou par un distri buteur GoPro agréé.
Consommateurs en Australie: Les avantages accordés par la garantie limitée de GoPro
viennent s’ajou ter aux autres droits et recour s qui vous sont disponib les. Nos produits sont
accompa gnés de garanties qui n e peuvent pas être exclues en ver tu de la loi australien ne
de protection de s consommateurs (Australi an Consumer Law). Vous avez droit à un
remplace ment ou à un remboursem ent en cas de défaut maje ur et à une compensatio n
pour toute autre p erte ou tout autre domma ge raisonnableme nt prévisibles. Vous avez
égaleme nt droit à faire réparer ou remp lacer le produit s’il n’est pas de q ualité acceptable et
si le défaut n’é quivaut pas à un défaut maj eur.
Logiciels libres: Les déclarations et avis de non-resp onsabilité relatifs à l’intégration
par GoPro de certains logiciels libres dans ses produits sont disponibles à l’adresse
http://gopro.com/support/open-source.
Ce symbole s ignifie que vous devez éli miner votre produit sépa rément
des déchets ménagers, conformément aux normes et à la législation de
votre pays. Lorsq ue ce produit arrive en fin d e vie, déposez-le dans un
point de collecte de déchets agréé par les autorités locales. Certains
points de collecte acceptent les produits gratuitement. La collecte et le
recyclage s éparés de votre produit lors d e sa mise au rebut aidero nt à
préserver les ressources naturelles et à garantir un recyclage respectueux
de la santé et de l’enviro nnement.
GoPro,Inc. d éclare par les présentes q ue les types d’équi pement radio
GoPro HERO5 S ession et HERO Sessio n sont conformes à la directiv e
2014/53/UE.
Le texte intégral de l a déclaration de conform ité UE est disponible su r
Internet à l’adres se suivante: gopro.com/help.
GoPro, Inc. 3 000 Clearview Way, San Mateo, C A 94402, USA
GoPro GmbH , Floessergasse 2, 81 369 München Deutsc hland
Les caméra s GoPro HERO5 Session (HWM R1) et HERO Session (HWRP1) ém ettent sur la
bande de fré quences 2412MHz - 2462MHz. La pui ssance maximale tra nsmise sur cette
bande de fré quences est de 100mW. The HER O5 Session (HWMR1) émette nt également
sur les ban des de fréquences 5,15GHz - 5,25G Hz et 5,725GHz - 5,85GHz. La puiss ance
maximale tra nsmise sur ces band es de fréquences est de 2 00mW.
IC Règlements: Le présent appareil est conforme aux CNR d’Industrie Canada applicables
aux appareils radio exempts de licence. L’exploitation est autorisée aux deux conditions
suivantes : (1) l’apparei l ne doit pas produire d’inter férences, et (2) l’utilisateur de l’ap pareil
doit accepter toutes interférences subies, même si celles-ci sont susceptibles d’en
compromettre le fonctionnement.
Cet apparei l numérique de la clas se B est conforme à la norm e NMB-003 du Canad a.
NOTE IMPORTANTE :
IC Exposition Aux Radiations
Cet apparei l est conforme aux limites d’expo sition DAS incontrôlée p our la population
générale d e la norme CNR-102 d’Indus trie Canada et a été testé en conform ité avec les
méthodes de m esure et procédures sp écifiées dans IEEE 1528.
SPÉCIFICATIONS ÉLECTRIQUES
, 1A
5V
Informatio ns sur l’exposition aux RF (DAS)
Cet apparei l a été conçu et fabriqué confo rmément aux limites d’exposi tion aux
radiofréquences (RF) définies par la Commission fédérale des communications (FCC) aux
États-Unis, In dustrie Canada(IC), l’Unio n européenne et d’autres pay s.
Les normes d’exposition pour les appareils sans fil utilisent une unité de mesure appelée
Débit d’abso rption spécifique, ou D AS. La limite DAS fixée par la FC C/IC est de 1,6W/kg
en moyenne pa r gramme de tissu. La lim ite DAS recommandée p ar le Conseil de l’Unio n
européen ne est de 2,0W/kg en moyenne pour 10g rammes de tissu.
La FCC et IC ont ac cordé une Autorisation d ’équipement à cet ap pareil, avec tous les
niveaux DAS in diqués conformes aux di rectives de la FCC et d’IC relati ves à l’exposition aux
radiofréquences. Les informations DAS concernant cet appareil ont été déposées auprès de
la FCC et d’IC, et p euvent être consultées dan s la rubrique des autor isations sur www.fcc.
gov/oet/ea/fccid en rechercha nt les identifiants FCC: CN FHWRP1 et CNFHWMR1, ains i
que dans la b ase de données Nome nclature du matériel rad io du Canada sur http://www.
ic.gc.ca/app/sitt/reltel/srch/nwRdSrch.do? lang=eng en recherchant l’identifiant FCC:
CNFHWMR1 et le code 10193A-HWMR1.
Page 75

Cet appareil est conforme aux spécifications DAS relatives aux limites générales
d’exposition pour la population/dans les environnements non contrôlés, définies dans
la norme ANS I/IEEE C95.1-1999, et a été testé selon les m éthodes de mesure et les
procédure s spécifiées dans le B ulletin OET65 Suppl émentC.
ESPAÑOL
Garantía limitada:
GoPro garan tiza que, por un período d e un (1) a ño desde la fecha origi nal de compra, el
producto no presentará materiales ni mano de obra defectuosos bajo circunstancias de
uso norma l. En caso de que el producto p resente fallas, comuní quese con el Servic io de
atención al c liente de GoPro (gopro.com/help) para obtener ayuda. L a única obligación
de GoPro en vir tud de esta garantía será , a su criterio, reparar o reem plazar el producto.
Esta garantía no se aplica a productos dañados por mal uso, accidentes o desgaste normal.
Los daños ocasionados por el uso de baterías, cables de alimentación u otros accesorios
o dispositi vos de carga o recarga que n o sean GoPro tampoco es tán cubiertos por esta
ni ninguna otra garantía. TODAS LAS GARANTÍAS IMPLÍCITAS DE COMERCIABILIDAD
E IDONEIDAD PARA D ETERMINADO FIN ESTÁN LIMITADAS A LA D URACIÓN DE ESTA
GARANTÍA . GOPRO NO SE HACE RESPO NSABLE DE LAS DEMÁS C ONDICIONES O
GARANTÍA S EXPRESAS O IMPLÍCITAS. EN LA M EDIDA EN QUE LA LEY NO LO PROH ÍBA,
BAJO NING UNA CIRCUNSTANCIA GOPRO SER Á RESPONSABLE DE LA P ÉRDIDA
DE DATOS, INGRESOS O GA NANCIAS, NI DE CUALQUIER DAÑ O CUANTIFICABLE,
EMERGENTE, FO RTUITO O PUNITIVO, SEA CUAL FUERE L A CAUSA O MOTIVO POR
EL CUAL SURJA O ESTÉ REL ACIONADO CON EL USO O LA I NCAPACIDAD DE USAR
EL PRODUCTO, INCLUS O SI SE LE HA ADVERTIDO A GOPR O LA POSIBILIDAD DE
TALES DAÑOS. BAJO NI NGUNA CIRCUNSTANCIA LA RES PONSABILIDAD DE GO PRO
SUPERARÁ EL M ONTO QUE USTED PAGÓ POR EL PRODUCTO. Alg unas jurisdiccio nes
no permiten re stricciones sobre la d uración de una garantí a implícita, o la exclusió n
o restricción de daños for tuitos o emergentes, con lo cual las restricciones descritas
anteriormente pueden no aplicarse a su caso. Esta garantía le otorga derechos legales
específi cos, y usted también pue de tener otros derechos, q ue varían según la juri sdicción.
Clientes de l a Unión Europea: GoPro cu bre un período de dos (2) años d esde la fecha
original d e compra del producto pe rtinente de GoPro y ofrece un a garantía limitada del
fabricante, sin costo alguno, para el consumidor final. Esto no limita lo s derechos que el
consumidor tiene conforme a las leyes del consumidor, sino que le concede derechos
adicionales.
La garantía está regida por los siguientes términos y condiciones. GoPro
garantiza que , durante un período de dos (2) añ os desde la fecha origin al de compra,
su producto Go Pro no presentará materia les ni mano de obra defect uosos en
circunstan cias de uso normal y si empre que se haya utilizad o de acuerdo con las
instrucciones pertinentes incluidas en el manual del usuario de GoPro (gopro.com/help).
En caso de que e l producto presente fallas , comuníquese con el S ervicio de atención a l
cliente de Go Pro (gopro.com/help) para obtener ayuda y esté preparado para presentar el
recibo de co mpra original. La úni ca obligación de Go Pro en virtud de esta gara ntía será, a su
criterio, reparar o remplazar el producto defectuoso. Esta garantía no se aplica a productos
dañados por mal uso, accidentes o desgaste normal. Esta garantía tampoco se aplica a los
productos dañados como consecuencia de trabajos de reparación no realizados por GoPro
o un distribui dor autorizado de GoPro .
Clientes de Australia: Los beneficios otorgados por la garantía limitada de GoPro se
consideran adicionales a los demás derechos y recursos que tiene disponibles. Nuestros
productos cuentan con garantías que no pueden excluirse del marco de la ley australiana
del consumidor. Usted tiene el derecho de recibir un reemplazo o un reembolso por una falla
significativa y una compensación por otros daños o pérdidas razonablemente predecibles.
Además, ti ene el derecho de que se re pare o reemplace su pro ducto si su calidad no es
aceptabl e y si la falla no ocasiona u na falla significativa .
Software de c ódigo abierto: Toda la información y los descargos de
responsabilidad relacionados con la incorporación por par te de GoPro de
determinados software de código abierto en sus productos se pueden encontrar en
http://gopro.com/support/open-source.
Este símbolo significa que, según las leyes y regulaciones locales,
su producto debe desecharse por separado de la basura del hogar.
Cuando este p roducto llegue al final d e su vida útil, llévelo a un pu nto de
recolección designado por las autoridades locales. Algunos puntos de
recolección aceptan estos productos de manera gratuita. La recolección
por separa do y el reciclado de su pro ducto a la hora de desech arlo
permitirán preservar los recursos naturales y garantizarán su reciclado de
forma que protej a la salud humana y el me dioambiente.
Por medio de l a presente, GoPro, Inc. dec lara que el tipo de equip o de
radio al que pertenecen GoPro HERO5 Session y HERO Session cumplen
con la Direct iva 2014/53/EU.
El texto completo de l a declaración de confo rmidad para la UE se
encuentra disponible en la siguiente dirección web: gopro.com/help.
GoPro, Inc. 3 000 Clearview Way, San Mateo, C A 94402, USA
GoPro GmbH , Floessergasse 2, 81 369 München Deutsc hland
Las cámar as GoPro HERO5 Sessio n (HWMR1) y HERO Session (HWRP1) tr ansmiten en la
banda de fre cuencia 2412MHz - 2462MHz. La máxi ma potencia transmitid a en esta banda
de frecuen cia es de 100mW. The HERO5 Sess ion (HWMR1) transmiten en las b andas de
frecuenci a 5,15GHz - 5,25GHz y 5,725GHz - 5 ,85GHz. La máxima potenci a transmitida
en estas ban das de frecuencia es d e 200mW.
Page 76

VALORES ELÉCTRICOS NOMINALES
, 1A
5V
REGULATORY INFORMATION - HERO5 SESSION
New ZealandEurope China
R-NZ
Page 77

REGULATORY INFORMATION - HERO SESSION
Europe China
Ukraine
032
Philippines
Model HWRP1: NTC
ESD-1510896C
Malaysia
Oman
OMAN - TRA
TRA/TA-R/2607/15
D080134
New Zealand
R-NZ
Indonesia
39295/SDPPI/2015
PLG ID # 4156
Jamaica
This product has been
Type Approved by
Jamaica: SMA – HWRP1
AGREE PAR L’ANRT MAROC
Numéro d’agrément:
MR 10399 ANRT 2015
Date d’agrément: 19 Mai, 2015
Model HWRP1:
ETA #: NR-ETA/2063
Morocco
TRA
REGISTERED NO.
ER39560/15
DEALER NO.
DA0086360/12
Complies with
IDA Standards
UAE
India
Singapore
DA103787
Israel
לש יטוחלא רושיא רפסמ
51-48173 אוה תרושקתה דרשמ
לש תירוקמה הנטנאה תא ףילחהל רוסא
רחא ינכט יוניש לכ וב תושעל אלו רישכמה
GoPro
C0073220515AE01A2
IFETEL: RCPGOHW15-0700
Modelo: HWRP1
1809-15-8441
(01) 07898945098656
La operación de este equipo está sujeta a las siguientes dos
condicio nes: (1) es rejudic que este equ ipo o dispositivo no
cause interfe rencia rejudicia l y (2) este equipo o dispositi vo
debe aceptar cualquier interferencia, incluyendo la que pueda
causar su operación no deseada.
Este equipamento opera em caráter secundário, isto é, não
tem direito a proteçã o contra interferência p rejudicial, mes mo
de estaçõe s do mesmo tipo, e não po de causar interferê ncia a
sistemas operando em caráter primário.
Resoluçã o nº 303/533 – SAR – ANATEL: Este produ to está
homolgado pela Anatel, de acordo com os procedimentos
regulamentados pela Resolução 242/2000 e atende aos
requisitos técnicos aplicados, incluindo os limites de exposição
da Taxa de Absorção Específica referente a campos elétricos,
magnéticos e eletromagnéticos de radiofrequência, de acordo
com as Resol uções nº 303/2002 e 53 3/2009.
Connection and use of this
communications equipment
is permitted by the Nigerian
Communications Commission
Mexico
Brazil
Nigeria
RussiaVietnam
Page 78

Page 79

Visit gopro.com for more information
130-19599-000 REVB
 Loading...