

Page 1
USER MANUAL
Page 2

/ Join the GoPro Movement
facebook.com/GoPro
twitter.com/GoPro
youtube.com/GoPro
instagram.com/GoPro
To download this user ma nual in a different langua ge, visit
gopro.com/getstarted.
Pour télécharger ce manuel de l’utilis ateur dans u ne autre langue,
rend ez-vous sur gopro.com/getstarted.
Wenn Sie d ieses Benutzer handbuch in ein er anderen Spra che
herunterladen möchten, besuchen Sie gopro.com/getstarted.
Per sc aricare questo m anuale utente in un’altra ling ua, visita
gopro.com/getstarted.
Para d escargar este ma nual de usua rio en otro idioma, visite
gopro.com/getstarted.
Para b aixar este ma nual do usuá rio em outro id ioma, aces se
gopro.com/getstarted.
このユーザーマニュアルの他言 語版をダウンロードするに
は、 gopro.com/getstartedにアクセスしてください。
若要下載其他語言版本的使用說明書,請前往:
gopro.com/getstarted。
如需下载本用户手册的其他语言版本,请访问
gopro.com/getstarted。
Чтоб ы загрузить э то руковод ство пользов ателя на д ругом язы ке,
посетите страницу gopro.com/getstarted.
Page 3

/ Table of Contents
/ Table of Contents
The Ba sics
Getting Started
Camera Displays
Camera Modes
Navigating Settings Menus
Camera Icons
Camera Menus
Capturing Video
Capturing Photos
Capturing Burst Photos
Capturing Time Lapse P hotos
Conn ecting to the GoPro App
Transferring Files to a Computer
Playing Ba ck Video an d Photos
Settings
Setup Mode
Important Messages
Using the Mounts
4 5
6
8
15
18
19
21
22
24
26
27
28
29
30
31
36
42
48
52
Battery
Troubleshooting
Customer Support
Regulatory Information
55
57
59
59
Page 4
/ The Basic s
/ The Basic s
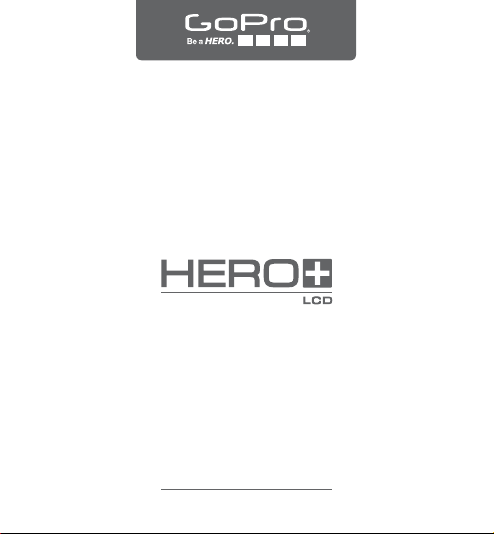
1. Shutter/Select Button
2. Camera Status Screen
3. Settings/Tag Button
6 7
4. Power/Mode Button
5. Wireless Status Light (blue)
6. Camera Status Light (red)
7. Micro-USB Port
8. microSD Card Slot
(microSD card not included)
9. Touch Display
Page 5
/ Getting Started/ Getting Started
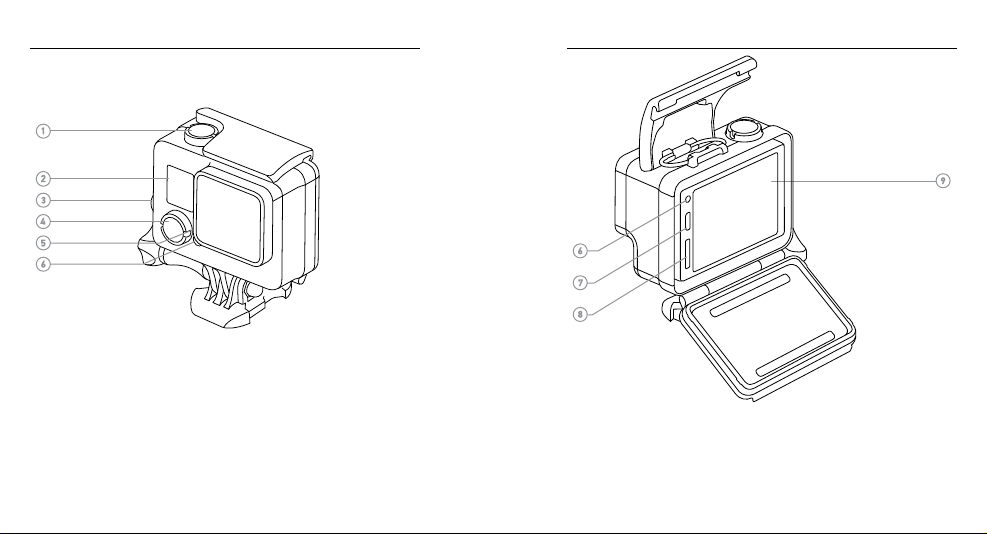
Slim housing remove camera
Slim housing insert camera
Slim housing closed Swapping housing doors
Quick Release Buckle + Thumb Screw + Slim housing = Complete Unit
CHARGING THE BATTERY
The integra ted batter y comes par tially cha rged. No damage oc curs to
the HER O+ LCD camer a or batter y if used befor e being fully charged.
1. Unlatch and o pen the bac kdoor.
Note: The came ra cannot be rem oved from the hou sing.
2. Charge the b attery using the included USB cab le.
Note: The bat tery canno t be removed from t he camera. When ch arging the cam era with a
computer, be sure t hat the compute r is connecte d to a power source. I f the camera statu s
lights do n ot turn on to ind icate that the ba ttery is cha rging, use a differ ent USB port.
8 9
WARNING: Us ing a wall ch arger oth er than a GoP ro Wall Charger
can dama ge the GoP ro camer a batter y and could result in fir e or
leakag e. Only use ch argers ma rked: Output 5V 1A . If you do not
know the vo ltage an d current of y our charg er, use the incl uded
USB cabl e to charge t he camer a from your c omputer.
For fastest c harging, make sure t he camera i s powered off aer
connecting it to a comput er or USB charging ad apter. When the
came ra is powered o ff, the ca mera statu s light turn s on during
charging and turns off when charging is complete.
For more batte ry information, see Battery (page 55).
WARNING: Us e cautio n when usin g your GoPr o as part o f your
active l ifest yle. Alway s be aware of yo ur surro undings t o avoid
injury t o yoursel f and other s.
Abide by a ll local l aws when us ing your Go Pro and rel ated
mounts a nd access ories, i ncludin g all priv acy laws , which may
restri ct record ing in cer tain area s.
Page 6

/ Getting Started
INSERTING + REMOVING MICROSD CARDS
Use brand na me memory c ards that meet the se requirements:
• microSD, microSDHC, or microSDXC (sold separately)
• Capacit y up to 64GB
• Minim um of Class 10 or UHS -I rating
For a lis t of the recommend ed microSD cards , visit gopro.com/support.
POWERING ON + OFF
To Power On:
Press the Power/Mode button onc e. The camer a status lig hts
flash t hree times a nd the sound i ndicator e mits three b eeps. Whe n
the ca mera statu s screen display s informati on, your cam era is on.
To Power Off:
Press and hold the Power/Mode but ton for two se conds. The
NOTICE: Use care when ha ndling mem ory card s. Avoid liquid s, dust,
and de bris. As a preca ution, powe r off the camer a before inserting
or removing the car d. Check ma nufactu rer guideli nes regarding use in
acceptable temperature ranges.
10 11
came ra status lights fl ash severa l times and th e sound indicato r
emits seven beeps.
/ Getting Started
Page 7
/ Getting Started / Getting Started
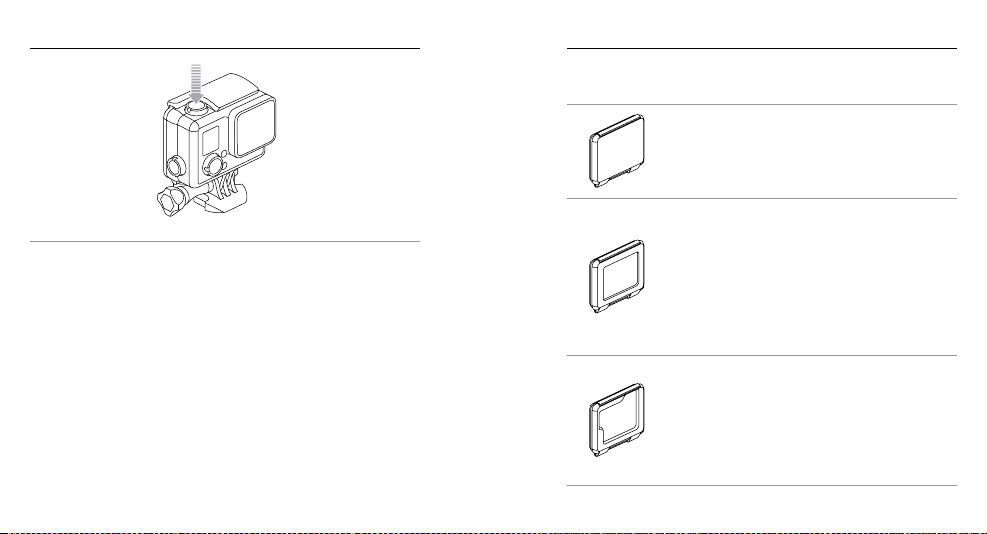
CAMERA BACKDOORS
Your HERO+ LCD cam era comes with thre e types of backdoors.
The Standa rd Backdoor makes t he housing
water proof to 131’ (40m). Us e this door to pr otect
the ca mera from wa ter, dirt, san d and other
environmental hazards. This backdoor reduces
wind noise at s peeds grea ter than 100mph .
The Touch Backdoor enables acce ss to the touc h
displ ay and provi des waterp roof protec tion to
PRO TIP: If QuikCa pture is enab led, you ca n quickly tu rn your c amera
on and immediately begin c apturing video or Time Lapse p hotos just
by pres sing the Shutter/Select button . Short pre ss for video, pres s and
hold for Time Lapse photos. For det ails, see QuikCapture (page 45).
12 13
10’ ( 3m).
NOTICE: To prevent d amage to the t ouch displ ay,
do not exc eed this de pth when using this b ackdoor.
Touch functi ons do not wor k underw ater.
In extr eme altitud e and temper atures, kee p the
housi ng unlatch ed until you us e the camera.
The Ske leton Backd oor is not waterproof. This
backdoor enables access to th e touch disp lay,
provides enhanced cooling, and allows more
direct access to the microphone. Use this
backdoor only when san d, excessiv e dirt/dust ,
and water damage ar e not a risk. Th is backdoo r
is also reco mmended for use in side vehic les.
Page 8
/ Getting Started
/ Camera Displays
CAMERA SOFTWARE UPDATES
To get the latest features and be st perfor mance from your HERO+ LCD
came ra, make sure you are using th e most curre nt camera so ware.
You can update your cam era soware via th e GoPro App or GoPro
Studio sow are. For more inform ation, visit gopro.com/getstarted.
CAMER A DEFAULT SET TINGS
The HER O+ LCD camera powe rs up with the follow ing defau lt settings :
Video 1080p30, Auto Low Light
Photo 8MP, Wide Field of View (FOV )
Burst 10 photos i n 2 seconds ( 5 fps)
Time Lapse 0.5 seconds
QuikCapture Off
Wireless Off
PRO TIP: To open th e settings m enu for the current mode, t ap the
Sett ings icon [
came ra setting s that apply to a ll modes, navigate to Setup mode.
14 15
] or pres s the Settings/Tag button. To change g eneral
HERO+ LC D features a st atus scree n on the front of the ca mera and a
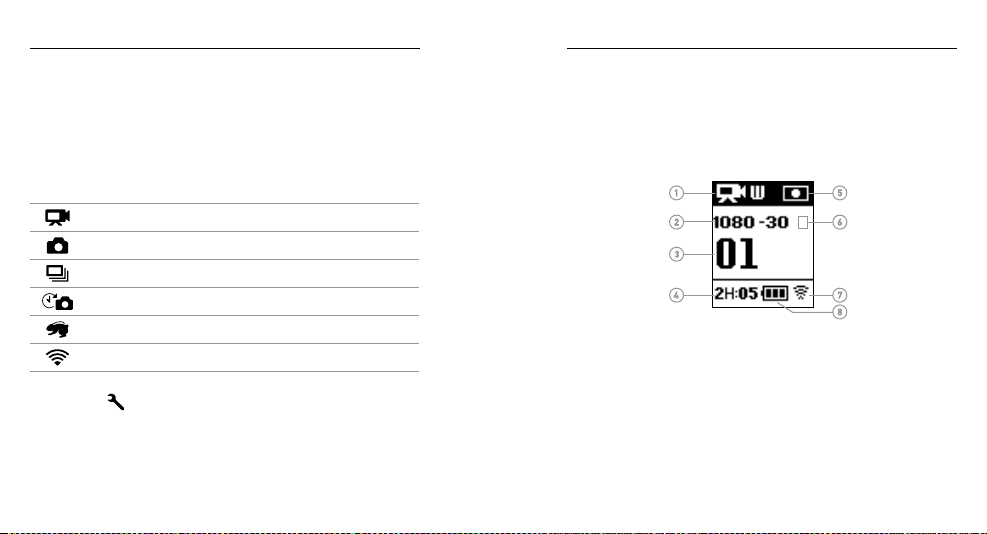
larger touc h display on the ba ck
CAMERA STATUS SCREEN
The camera status screen on the front of the c amera disp lays the
following in formation a bout modes and settings:
1. Camera Mode/FOV
(field of view)
2. Resolution/fps
(frames per s econd)
3. Number of Files Captured
4. Remainin g Time/Files o n
microSD Card
Note: The ico ns that appear o n the camera stat us screen var y by mode.
.
5. Spot Meter
(when feature is ena bled)
6. Time Lapse Interval/Burst
Rate (not s hown)
7. Wireless
8. Battery Life
Page 9
/ Camera Displays / Camera Displays
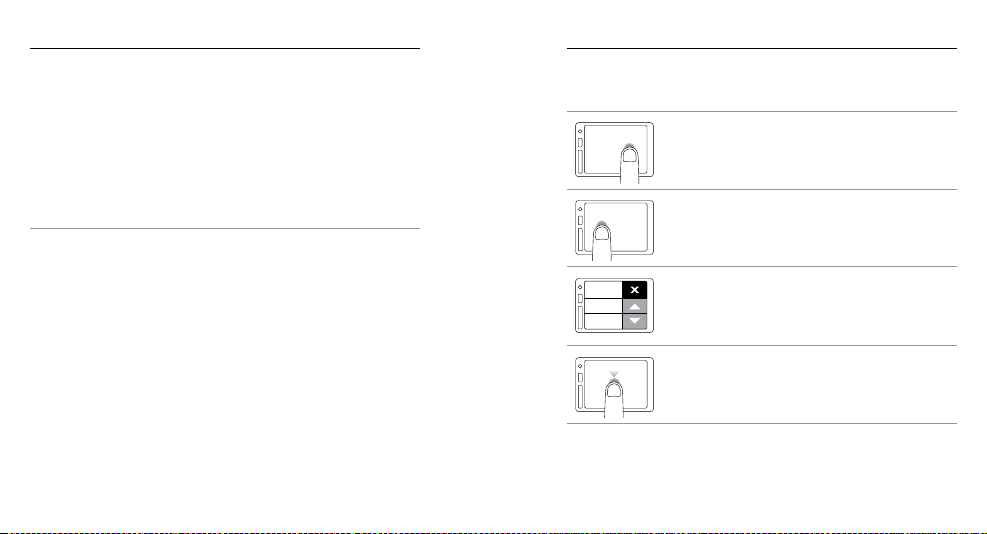
Tap Up/DownTap Tap Mode Tap Settings
Tap Up/DownTap Tap Mode Tap Settings
Tap Up/DownTap Tap Mode Tap Settings
Tap Up/DownTap Tap Mode Tap Settings
TOUCH DISPLAY
The integra ted touch display on the back of t he camera lets you c ontrol
Gestures
Use these ges tures to navi gate the touc h display:
your ca mera and its settings, and preview and play bac k videos and
photos. You can also use it as a viewfinder s o you can see what your
came ra sees for ea sy shot-framing.
To use the touch display with the housing do or closed, attach the
Tap the Mode Icon
Displ ay camera modes .
Touch Backdoo r or the Skeleto n Backdoor. For more informat ion, see
Camera Backdoors (p age 13).
PRO TIP: To conse rve battery power, the tou ch display is set to
Tap the Settings Icon
Open the settings menu for the current mode.
autom atically sleep a er 1 minute of ina ctivity. For details o n touch
displ ay setting s, see Touch Display (page 43).
Tap the Up/Down Arrows
Move through s ettings lists or gallery images.
Tap
Select an item, turn a set ting on/off.
16 17
Page 10

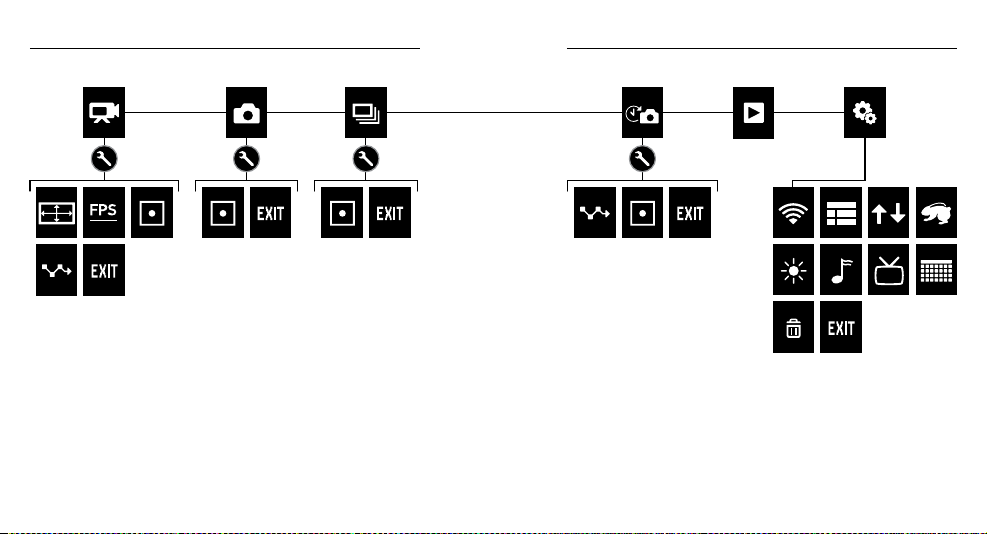
/ Camera Modes
/ Navigating Settings Menus
HERO+ LC D features several c amera mod es. Tap the mode i con on
the tou ch display, or press the
through the modes
These modes appear:
PRO TIP: To chang e settings for the current mode, press the
Settings/Tag button. To change gener al camera settings that apply
to all modes, navigate to Setup mode.
18 19
.
Video Record video
Photo Capture a single ph oto
Burst Capture 10 phot os in 2 second s (5 fps)
Time Lapse
Playback Play b ack videos and view photos
Setup Adjust general camera settings
Power/Mode button repeatedly to cycle
Capt ure a series of p hotos at spec ified
intervals
With the HERO+ LCD camera, you can navig ate the setti ngs menus
using t he touch dis play or the bu ttons on the came ra. Each camera
mode has its o wn setting s menu.
To Navigate with the Touch Displ ay:
1. Verif y that the camera is in the desire d camera mode. To selec t a
differ ent mode, tap the mode icon, and t hen tap the d esired mode.
2. Tap the Se ttings ico n [
Arrows indicate a dditiona l options, if avail able.
3. Ta p the down ar row to scroll throu gh the settings for t hat mode.
4. Tap a setti ng repeatedly to c ycle throug h the option s for that setting.
5. To exit the s ettings me nu, tap Exi t.
] to open t he settin gs menu for th at mode.
Page 11

/ Navigating Settings Menus / Camera Icons
To Navigate with the C amer a Butto ns:
1. Verif y that the cam era is in the desired came ra mode. If the icon
for that mode d oes not appear on th e camera status screen, pres s
Power/Mode button
the
2. Press the Settings/Tag button to ope n the settin gs menu for that
mode.
3. Use the Power/Mode button to cy cle through t he setting s.
4. Press the Shutter/Select button to cyc le through th e options
withi n a setting. To select a n option, leave the option hi ghlighted
when you move to a nother set ting.
5. To g o back to the pr evious screen or ex it the settings menu, pre ss
the Settings/Tag button.
20 21
repeatedly until it appears.
Beeps
Burst Photos
Date/Time
Delete
Frame s Per Second
Interval
LEDs
Looping
Orientation
Photo
Playback
QuikCapture
Setup Mode
Spot Meter
Time Lapse
Touch Display
Video
Video Format
Video Resolution
Wireless
Page 12
/ Camera Menus / Camera Menus
22 23
Page 13

/ Capturing Video
CAPTURING VIDEO
1. Tap the mod e icon to displ ay the came ra modes, a nd then
tap Video.
2. Press the Shutter/Select button. The c amera bee ps once and
the ca mera statu s lights flash while the camera is recordin g.
3. To s top captur ing, press t he Shutter/Select button. The ca mera
status lights fla sh three times and the camera beeps
three times.
If the memor y card is ful l or the battery is out of power, your camera
autom atically stops re cording. Your v ideo is save d before the camera
pow ers off.
PRO TIP: When QuikCapture is en abled, you c an turn the c amera
on and i mmediately begin captu ring video just by p ressing th e
Shutter/Select but ton. For deta ils, see QuikCapture (page 45).
24 25
HILIGHT TAGGING
You can mark spe cific moments in your video as th ey happen wi th
HiLight Tags. HiLight Tags make it easy to find th e best highl ights
to share.
You can ad d tags with yo ur camera, the GoP ro App, or the S mart
Remote (s old separa tely). Tags are visi ble in the timeline d uring
play back in the GoPro App or GoPro Stud io soware.
PRO TIP: In the GoPro A pp, tap the screen during playback to dis play
the HiLight Tags in t he timeline.
To Add a HiLight Tag with Your Camera:
While recording or playing ba ck video, press th e Settings/Tag button.
/ Capturing Video
Page 14

/ Capturing Photos
/ Capturing Burst Photos
In Photo mode, you can capture photos at a res olution of 8MP w ith
Ultra W ide FOV.
CAPT URING A SINGLE PHOTO
1. Tap the mod e icon to displ ay the came ra modes, a nd then
tap Photo.
2. Press the Shutter/Select button. The c amera bee ps two times ,
the ca mera statu s lights flash and t he counter on t he camera
status screen increases by one.
26 27
Burst mode is perf ect for capturing the d efinitive moment in f astaction spo rts. In this mode, you ca n capture 10 photo s in 2 seconds
(5 fps). T he resolution for these photos is 8MP with Ultra Wi de FOV.
CAPT URING BURST PHOTOS
1. Tap the mod e icon to displ ay the came ra modes, a nd then
tap Burst.
2. Press the Shutter/Select button. The c amera status lig hts flash
and th e camera be eps multiple t imes.
Page 15

/ Capturing Time Lapse Photos / Connecting to the GoPro App
Time Lapse mode captures a series photos at set intervals. You can
use Time Lapse to capture photos of any a ctivity, so you ca n choose
the be st ones later. You can also stitc h the photos togethe r in editing to
create a time la pse video. T he resolution for t hese photos is 8MP with
Ultra W ide FOV.
CAPT URING TIME LAPSE PHOTOS
1. Tap the mod e icon to displ ay the came ra modes, a nd then tap
Time Lapse [
].
2. Press the Shutter/Select button. The c amera initiates co untdown
and th e camera st atus lights flash each ti me a photo is captured.
3. To s top captur ing, press Shutter/Select butto n. The came ra status
light s flash thre e times and th e camera be eps three times.
PRO TIP: When QuikCapture is en abled, you c an turn the c amera on
and im mediately begin captur ing Time La pse photos jus t by pressing
and ho lding the Shutter/Select button for two seconds. For details ,
see QuikCapture (page 45).
28 29
The fr ee GoPro App lets you control your c amera remotely using
a smar tphone or tablet . Features in clude full camera cont rol, live
previ ew, playback and s haring of content, and ca mera sow are
updates.
TO CONNECT YOUR CAMERA TO THE GOPRO APP:
1. Download the GoPro A pp to your smar tphone or tablet from t he
®
App Sto re or Google Pl ay.
Apple
2. Open the app.
3. Follow the ap p’s on-sc reen instructions to conn ect your ca mera.
Note: If need ed, the defau lt password fo r your camera is go prohero.
For com plete pairin g instruc tions, visit gopro.com/support.
PRO TIP: To quickly turn wireless on, press and ho ld the Settings/Tag
button until the wireles s screen appears. To turn wi reless off, press
and ho ld this button until the wireless status lights blink rapidly a nd
then turn off.
Page 16

/ Transferring Files to a Computer / Playing Back Video and Photos
To play bac k your video a nd photos on a co mputer, you must fi rst
tran sfer these files to a compute r. Tra nsferring frees up space on
your microSD c ard for new co ntent. You can al so transfer files to a
computer usi ng a card read er (sold separate ly).
TO TRANSFER YOUR FILES TO A COMPUTER:
1. Download an d install GoPro Stu dio from gopro.com/getstarted.
The HER O+ LCD camer a was design ed to communicate with
GoPro St udio to help yo u easily locate and t ransfer yo ur files.
2. Connect the ca mera to your co mputer usin g the includ ed
USB cable.
3. Short press the
Power/Mode
button to power on the came ra.
GoPro St udio Impor ter automat ically ope ns.
4. Follow the on-screen instructions.
PRO TIP: Video files are written to your memory card in segm ents.
When v iewing this content on a com puter, you might se e separate files
You can play bac k your content o n the camer a’s touch displ ay, your
computer, or smartphone/tablet (u sing the GoPr o App). You can als o
play back co ntent by inserting the mi croSD card d irectly into a device,
such a s a computer or c ompatible T V.
PLAYING BACK VIDEOS AND PHOTOS ON YOUR CAMERA
With the HERO+ LCD touch display, you can pl ay back your v ideos and
photos direc tly on your camera.
To Play Back Content Using the Touch Display:
1. Tap the mod e icon, and then ta p Playback.
2. Ta p the up and down ar rows to scrol l through the thumbnails.
Note: For Burs t and Time Lapse pho tos, the thumbn ail displays t he first photo in the s eries.
3. Ta p a video or photo to ope n it in full-sc reen view.
4. For video, ta p [ ].
5. To r eturn to the thumb nails screen, tap [ ], and t hen tap [ ].
6. To exit Playback mode, ta p Exit.
for eac h segment. Use GoPro Studio so ware to combi ne the files into
a longe r video.
30 31
Page 17

/ Playing Back Video and Photos
/ Playing Back Video and Photos
CREATING SHORT CLIPS FROM A VIDEO
Vide o trimming le ts you create s hort clips of your favorite shot s
from yo ur video files. Clips are sa ved as new files that ca n be shared
throu gh the GoPro A pp and used d uring edit ing in GoPro Stu dio.
To Create a Short Clip from a Video:
1. In Playback mode, tap th e video that c ontains th e clip that you
want to s ave.
] to begi n playing th e video.
2. Ta p [
3. When you reach the p oint where yo u want to star t clipping,
].
tap [
4. Ta p [ ], and then ta p [ ]. B y default, t he duration of the clip
is 5 seconds .
5. If needed, select one o f these optio ns:
• To save a long er clip, tap the 5 sec i con repeate dly to cycle
throu gh the options. You can save a clip wit h a duration of 5,
15, or 30 seco nds.
• To save a photo of the frame in view, ta p Still.
] to review the clip before saving it .
6. Ta p [
7. If ne eded, adjust th e starting point of the cl ip by tapping the le
arrow at the to p of the progre ss bar. To adjust the e nding point ,
tap th e right arro w.
Note: If you ad just the start ing or ending po ints, the dura tion of the clip re mains the same.
32 33
8. Ta p Save. The cl ip is saved as a s eparate video file. Still photos ar e
saved as photo files. Your o riginal video file is unchanged.
PRO TIP: Aer you create clips from a v ideo, you ca n delete the
origi nal file to save space on your mi croSD card .
To Play Back Content Using the Camera Buttons:
1. Power on the ca mera.
2. Press the
3. In thumbna il preview, pre ss the
4. Press the Shutter/Select butto n to view a thum bnail.
5. To p lay a video, p ress the
6. To r eturn to the thumb nails:
7. To exit Playback mode, press the
Power/Mode button repeatedly
mode, then press the Shutter/Select butto n to select it .
through the thumbnails.
Power/Mode button to selec t
a. Press the
b. Press the
to cyc le to Exit, th en press the Shutter/Select butt on to select i t.
Power/Mode button
press the Shutter/Select button to sele ct it.
Power/Mode button
], and then press the Shutter/Select butto n to select it .
[
to cyc le to Playback
Power/Mode button
to cyc le to [ ], and then
to cyc le to the thumbnail icon
Power/Mode button repeatedly
to cyc le
[ ].
Page 18

/ Playing Back Video and Photos
/ Playing Back Video and Photos
PLAYING BACK VIDEOS A ND PHOTOS ON A COMPUTER
To play bac k your video a nd photos on a co mputer, you must
first trans fer these file s to your compu ter. For bes t results, v isit
gopro.com/getstarted to download GoP ro Studio so ware.
To Play Back Files on a Computer:
1. Download an d install GoPro Stu dio from gopro.com/getstarted.
The HER O+ LCD camer a was design ed to communicate with
GoPro St udio to help yo u easily locate and t ransfer yo ur files.
2. Connect the ca mera to your co mputer usin g the includ ed
USB cable.
3. Short press the
GoPro St udio Impor ter automat ically ope ns.
4. Follow the on -screen in structi ons to impor t the files.
5. Use the controls in G oPro Studio to p lay back your files.
34 35
Power/Mode
button to power on the came ra.
PLAYING BACK VIDEOS AND PHOTOS ON YOUR TV
Play ing back videos a nd photos on your TV/HDTV requi res a USB card
reader and a compatible T V.
Note: Some TVs do n ot support USB ca rd readers.
To Play Back Content on a TV:
1. Inser t the microSD card into a USB c ard reader (sold separ ately).
2. Connect the ca rd reader to yo ur TV.
3. Use the controls on the T V to play back your files.
PLAYING BACK CONTENT ON A SMARTPHONE/TABLET
1. Connect your camera to t he GoPro App. For det ails, see
Connec ting to the GoPro App (pa ge 29).
2. Use the controls on the ap p to play back your footage on your
smartphone/tablet.
Page 19

/ Settings
/ Settings
VIDEO SETTINGS
For ins tructio ns on changing set tings, see Navigating Settings Menus
(page 19).
Resolution, F PS, and FOV
HERO+ LC D includes the video resolutions li sted below. All
resolution s include Au to Low Light at th e 60 fps setting. Auto Low
Light automatically optimizes fps according to lighting conditions.
FPS refers to f rames per se cond. FOV refers to field of view.
Video
Resolution
108 0p 60/50 Ultra W ide 192 0x1080 , 16:9
108 0p 30/25 Ult ra Wide 19 20x108 0, 16:9
720p SuperView 60/50 Ultra Wide 1280x720, 16:9
720p 60/50 Ultra W ide 1280x720, 16:9
PRO TIP: To open th e settings m enu for the current mode, t ap the
Settings icon [
button. To change general camera settings that apply to all modes,
navigate to Setup mode.
36 37
FPS
(NTSC/
PAL)
] on the touch display or pres s the Settings/Tag
FOV (Field
of View)
Screen Resolution
Video Resolution Best Use
108 0p60
108 0p30
720p SuperView
720p60
PRO TIP: Easily create epic GoP ro-style v ideos usin g free
GoPro St udio soware. Lea rn more and d ownload th is soware
at gopro.com/getstarted.
Great fo r capturin g fast action at th e
highest resolution.
Good for capturing content in low- light
conditions.
SuperView delivers th e world’s most
immersive field of view. Great for point-of-view
shots or whe n you want to capture more
vert ical content, suc h as the sky or l and.
Great fo r capturin g fast action and when f ull
HD is not ne eded.
Page 20

/ Settings
/ Settings
SPOT METER
Spot Meter is good for filming in to a setting where th e lighting is
differ ent from where you are, such a s filming the o utdoors from within
a car or filming a s haded environm ent while standi ng in the sun. S pot
Meter automatically set s the exposu re based on a si ngle spot in the
middle of the i mage. When Spot Meter is turned on , [
] appears
on th e camera d isplays. T he options for this setti ng are Off (defa ult)
and On .
Note: Chang es that you make to th e Spot Meter set ting in Video mode ap ply only to video c apture.
To adjust this se tting for ano ther mode (Photo, Burst, o r Time Lapse), adjust the s etting within
that mode.
INTE RVA L
In Video mode, t his setting applies only to Looping. Loopin g lets you
continuously rec ord and save o nly the best m oments, w hich helps to
conserve space on your microS D card. Avail able inter vals for looping
are 5, 20, 6 0, and 120 minutes . For example, if you select a 5-minu te
inter val, the pr evious 5 minu tes are saved w hen you stop r ecording.
You can al so select M ax as the interval for Loo ping. With this option,
the ca mera recor ds until the memor y card is ful l, then over writes th e
content. Th e default opt ion for Looping is Off.
Note: To use Loopin g, be sure that you r microSD card has s ufficient space to cr eate the loop se gment
based on th e interval th at you select. I f the microSD card b ecomes full, Lo oping does not o verwrite
the content.
PRO TIP: Files are wr itten to your memor y card in segments. When
viewing thi s content on a compute r, y ou might see se parate files for
each time segment . Use GoPro Studio so ware to combine the files
into a longer vi deo.
38 39
Page 21

/ Settings
/ Settings
PHOTO SETTINGS
For ins tructio ns on changing set tings, see Navigating Settings Menus
(page 19).
SPOT METER
This setting applies to a ll photo capture mod es: Photo, Burst,
and Time Lapse. Spot Mete r is good for ca pturing photos where
INTE RVA L
This s etting ap plies only to Time Lapse mod e. Interva l determin es the
amount of time that pa sses betw een each ca ptured frame. Avail able
inter vals for Time Lapse ra nge from 0.5 se conds (default) to 6 0
seconds.
Interval Examples
0.5-2 seconds Surfing, biking , or other sport
the lighting is diffe rent from where you a re, such as ca pturing the
outdo ors from wit hin a car or capturi ng a shaded environment w hile
stan ding in the su n. Spot Meter a utomatica lly sets the e xposure based
on a sing le spot in the middle of the ima ge. When Spot M eter is turned
] ap pears o n the camera displays. T he options fo r this
on, [
setting are O ff (default) a nd On.
Note: Chang es that you make to th e Spot Meter set ting in one mode ( Photo, Burst, or Time Lapse)
apply onl y to that mode. To adjus t this setting fo r another mod e, adjust the set ting within tha t mode.
2 seconds Busy s treet corner
5-10 seconds Sunset
10-60 seconds
40 41
Lengthy activities, such as construction
projects
Page 22

/ Setup Mode
/ Setup Mode
In Setup mode, you can chan ge settings that apply to a ll camera
modes. For in structions on how to ch ange the followin g settings ,
see Navigating Settings Menus (page 19).
WIRELESS
When wireless is on, a wireless status icon ap pear s on the
camera status screen a nd touch display a nd the blue wireles s
lights blink intermittently.
Setting Description
Off (default)
GoPro A pp
Wi-Fi Remote
Control
Wi-Fi Reset Setting s
42 43
Camera con nects to t he GoPro App. For
instruc tions on con necting to this app, see
Connec ting to the GoPro App (pa ge 29).
Camera con nects to t he GoPro remote
control (sold separately). For instru ctions on
pairing, see the user manual fo r the remote.
Reset s your camer a's wireless na me and
password.
Resetting Your Camera's Wireless Name a nd Password
1. Power on the ca mera.
2. Ta p the mode icon, an d then tap Setup.
3. Tap Wireless.
4. Ta p the down ar row, and then tap Wi-Fi Reset Settings .
5. Ta p Reset. The p assword is r eset to the def ault: goprohero.
TOUCH DISPLAY
Thes e settings let you manage the touc h display to c onserve
battery power.
Setting Description
Touch Display
On/O ff
Sleep
Turns the touch displ ay on or off when the
came ra is powered o n. The optio ns for this
setting are O n (default) a nd Off.
Touch dis play automa tically go es dark aer a
period of ina ctivity. T he options for this s etting
are 1 min ute (default), 2 minutes, 3 minutes ,
an d Ne ver.
Page 23

/ Setup Mode
/ Setup Mode
ORIENTATION
This setting eliminates the ne ed to flip your vi deo during editi ng when
the ca mera is mounted upside down.
Setting Description
Up (default)
Down
44 45
Camera is us ed right-sid e up.
Camera is us ed upside do wn.
QUIKCAPTURE
With QuikCa pture, you ca n quickly tur n your camera on an d begin
capturing video or Time Laps e photos. The options for th is setting are
On and O ff (default).
Note: You cannot s tart QuikCap ture with the GoPro r emote or the GoPro Ap p.
To Capture V ideo with QuikCapture:
With the cam era powered o ff, press and release t he Shutter/
Select but ton. Your camera automatically power s on and begins
capturing video.
To Capture Time Lapse Photos with QuikCapture:
With the cam era powered o ff, press and ho ld the Shutter/Select
button for two seconds . Your cam era automat ically powers on a nd
begins capturing Time Lapse photos.
To Stop Recording:
Press and release the Shutter/Select button to stop recording and
power off the ca mera.
Page 24
/ Setup Mode
/ Setup Mode
LEDS
This setting determines whi ch camera status light s (red) to activate.
The options for this setting are B oth on (front a nd back), Bot h off, Front
on, or Rear on. T he default s etting is Bot h on.
BEEPS
You can set t he sound indicator to On (d efault) or Off.
VIDEO FORMAT
The Vi deo Format s etting governs frame r ates for recording and
play back when v iewing vid eo on a TV/HDTV.
Setting Description
NTSC (default)
PAL
46 47
Viewing video on a n NTSC TV/HDTV (m ost
televisions in Nor th Americ a)
Viewing video on a PAL T V/HDTV (most
televisions outs ide of North America)
DATE/TIME
Your camera’s date a nd time are automat ically set w hen you conn ect
your ca mera to the GoPro Ap p or GoPro Studio so ware. This se tting
lets yo u manually set the date and t ime.
DELETE
This setting lets y ou delete the l ast file, or delete all files and reformat
the memor y card. Deleting al l files is usefu l aer you transfer your
files to yo ur computer a nd want to make room on yo ur memory card
for more content. Th e camera status li ghts blink u ntil the oper ation
is complete.
NOTICE: If you select All /Format, the memo ry card is r eformatte d,
whic h deletes ever y file on the c ard.
Page 25

/ Impor tant Messages
/ Impor tant Messages
MICROSD CARD MESSAGES
NO SD
FULL Card is full . Delete files or s wap card.
SD ERR
PRO TIP: Reformat you r microSD card on a regular basis to ensure
that th e card remai ns in good con dition.
48 49
No card prese nt. The camera requires a
microSD, microSDHC, or microSDXC card
(sold s eparatel y) to capture v ideos and p hotos.
Camera is un able to read c ard format ting.
Reformat the c ard in the ca mera.
FILE REPAIR ICON
If your l ast video fil e was corru pted during recor ding,
the ca mera displ ays the File Re pair icon wh ile it tries to
repai r the file. When t his process is finis hed, press any
button to continue u sing the camera.
TEMPERATURE ICON
The Temperature icon appears on the cam era status
scre en when the c amera becomes to o hot and need s
to cool d own. Simply let it sit a nd cool before attem pting
to use it a gain. Your camera was designed to i dentify
condition s of overheating an d is designe d to respond
accordingly.
Page 26

/ Camera Housing
/ Camera Housing
SWAPPING BACKDOORS
You can sw itch the backdoor of your HERO+ LCD to suit your activit y
and shooting conditions.
To Change the Backdoor:
1. Open the bac kdoor of the ho using so that i t hangs downward s.
2. Firmly pull the ba ckdoor dow nwards until it sna ps free from the
main housing.
3. Line up the replac ement backdoor in to the hinge openin g.
4. Push upwar ds on the bac kdoor until it c licks into place.
PREVENTING WATER DAMAGE TO YOUR CAMER A
The r ubber sea l that lines t he camer a housing for ms a waterp roof barr ier
that protects you r HERO+ LCD in wet a nd under water condi tions.
Keep th e camera housing’s r ubber seal clean . A single hair or grain
of san d can cause a leak an d damage your camera.
Aer every use in sa lt water, rinse the out side of the ca mera housing
with fresh water and dry. Not doing this can eventually cause
corrosion of the hinge pin and salt buildup in the seal, which can
cause failure.
To clean the seal, carefully r emove it, rin se it in fresh water, and sh ake
it dr y (drying w ith a cloth may c ause lint to co mpromise th e seal).
Re-in stall the se al into the gro oves in the backdoo r of the camer a
housing.
WARNING: Fai lure to fol low thes e steps eac h time you us e
your GoPr o can resu lt in leaks t hat may damage or des troy your
Note: The came ra cannot be rem oved from the hou sing.
camera . Water will d amage bo th the cam era and th e batter y,
which cou ld cause a n explosi on or fire. Your wa rrant y does not
cover water d amage re sulting f rom user er ror.
PRO TIP: Apply Ra in-X® or a simil ar anti-beading solution to t he
came ra housing le ns to prevent water spots from forming when using
your ca mera in rain or water.
50 51
Page 27

/ Using the Mounts
/ Using the Mounts
ATTACHING YOUR CAMERA TO MOUNTS
To attach your HER O+ LCD camer a to a mount, you n eed a
Mounting Buckle and/or thumb screw, depending on the mount you
are usi ng. For more informa tion on mount s, visit gopro.com.
MOUNTING GUIDELINES
Follow these guidelines when attaching mounts:
• Atta ch the adhe sive mounts at leas t 24 hours prior to use. A llow
72 hours for com plete adhesion.
• Adhesive mounts m ust be mounted only o n smooth sur faces.
Porou s or textured surf aces do not enable a proper b ond. When
applying the mount, firmly press it into place and en sure full
conta ct over the entire su rface.
Mounting Buckle Thumb Screw Camera Complete Unit
USING CURV ED + FLAT ADHESIVE MOUNTS
The Curve d + Flat Adhesive Mounts make it ea sy to attach the ca mera
to cur ved and flat surf aces of helmets, vehicles, and gear. Using the
Mounting Buckle, the ass embled camera housin g can be clicked on
and off the sec ured Curved or Flat Adhesive Mount s.
• Apply adhesive mounts to clea n surface s only. Wax, oil, dirt o r
other d ebris red uce adhesi on, which c an result in a weak bon d
and risk of losing the came ra should the connection fail.
• Atta ch adhesive mounts in room temp erature con ditions.
Mount a dhesives d o not bond properly if applied in c old or damp
environme nts to cold or da mp surfa ces, or if the surface is not
room temperature.
For more infor mation on mou nts, visit gopro.com.
WARNING: If u sing your c amera wi th a GoPro h elmet moun t or
strap, a lways sel ect a helme t that meet s the appl icable s afety
standard.
Choose t he right he lmet for yo ur parti cular sp ort or ac tivit y
and make su re that it is t he right fit a nd size for y ou. Insp ect
Flat Adhesive Mount Curved Adhesive Mount
52 53
your helm et to ensure t hat it is in go od condit ion and fo llow the
helmet ma nufact urer’s inst ructi ons on saf e helmet us e.
Any helmet t hat has su stained a m ajor impa ct shoul d be
replace d. No helme t can prote ct again st injur y in every accident .
Page 28

/ Using the Mounts
/ Battery
LOCKING PLUG
If you are using HERO+ LCD in spor ts such as surfing or sk iing, use th e
locking plu g to securely lock th e Mounting Buckle fingers into place.
To Attach the Locking Plug:
1. Loop th e circular r ing over the thumbscrew. The cir cular ring
act s as a leash to prevent dropping or losing th e locking plug.
2. Slide the Mountin g Buckle into the mount until it clicks
into place.
3. Press the U-shaped par t of the plug into the U-shaped space in
the Mounting Buckle.
Your HERO+ LCD cam era, battery, an d housing are i ntegrated . You
cannot remove the c amera from t he housing, or remove the batter y
from the cam era.
The ba ttery ico n displaye d in the camera status screen blink s
when t he batter y drops below 10%. If the ba ttery rea ches 0% while
recording , the camer a saves the file a nd powers off.
MAXIMIZING BATTERY LIFE
To maximize b attery li fe, close the GoPro Ap p or turn off wir eless.
To maximize b attery li fe when shoot ing longer-d uratio n activ ities,
turn off the touch display. Extreme cold temperatures can decrease
battery life. To maxim ize batter y life in cold conditi ons, keep th e
came ra in a warm place pr ior to use.
PRO TIP: QuikCapture he lps maximize b attery life. For d etails, se e
QuikCapture (page 45).
WARNING: To avoid in jury in t he event of an a ccident, d o not use
the lock ing plug or tether wh en using a mo unting dev ice on a
helmet or o ther pers onal prot ective g ear.
54 55
Page 29

/ Battery / Troubleshooting
BATTERY STORAGE A ND HANDLING
The camera contains sensitive components, including the battery.
Avoid exp osing your ca mera to ver y cold or very h ot temperat ures.
Low or high temp erature con ditions may tempo rarily shorten t he
battery life or ca use the cam era to tempor arily stop worki ng properly.
Avoid dramati c changes in temperatur e or humidit y when using t he
came ra, as cond ensation may form on or wit hin the camera.
The integra ted camera h ousing prote cts the camera and ba ttery fro m
water damage. For mor e information, se e Camera Backdoors (page
13). Do not turn on your cam era if the camera (insid e the housing)
gets wet. If your cam era is already on, turn it o ff immediately. Allow
the ca mera to dry thoro ughly before using i t again. Do not d ry the
came ra or batter y with an externa l heat source such a s a microwave
oven or hair dr yer. Damage to th e camera or batter y caused by cont act
with liquid (insid e the housin g) is not covere d under the warra nty.
WARNING: Do n ot drop, di sasse mble, open , crush, b end, deform,
punctu re, shred, m icrowave, i ncinera te, or paint t he camer a.
Do not inse rt forei gn objects into any o pening on t he camer a,
such as th e micro- USB por t. Do not us e the came ra if it has b een
damaged —for example, if cr acked, puncture d, or harm ed by
water. Disas sembling or punc turing t he integra ted batter y can
cause an ex plosion or fire.
56 57
MY GOPRO WON'T POWER ON
Make sure your Go Pro is charged. To char ge your camera, us e the
included USB cab le and a computer. You can al so use the GoP ro Wall
or Auto Charger.
MY GOPRO WON'T RESPOND W HEN I PRE SS A BUT TON
Press and ho ld the
Power/Mode button
for eight seconds to reset your
came ra. This res et saves all of your content and settings , and powers
off your c amera.
MY PLAYBACK IS CHOPPY
Chop py playba ck is typic ally not a prob lem with the file. If your footage
skips , one of these s ituations is likely t he cause:
• Using a n incompatible video pl ayer. Not all video players su pport
the H.26 4 codec. For best result s, use GoPro St udio soware,
avail able for fre e at gopro.com/getstarted.
• The co mputer does not meet the min imum requir ements for
HD play back. Th e higher the resolution and fra me rate of your
vide o, the harder the computer has to wo rk to play it ba ck. If you
are usi ng GoPro Studio so ware to play back your files, be sure
that your computer meets the minimum system requirements,
avail able on gopro.com/getstarted.
Page 30

/ Troubleshooting
/ Customer Support
• Play ing a high bitr ate HD video file over a low b andwidth USB
connection. Tran sfer the file to t he computer to play b ack.
If your comput er does not meet the minimum r equirements,
make sure that a ll other programs o n your computer are closed .
I FORGOT MY CAMERA’S USERNAME OR PASSWORD
See Reset ting Your Camera's Wireless Name and Password
(page 43).
I POWERED OFF MY GOPRO, BUT THE BLUE LIGHT IS
STILL BLINKING
The bl ue light indi cates that wireless is on. To turn off wireles s,
press and hold the Settings/ Tag button until the w ireless status
light s blink rapidly and the n turn off.
For more answers to commonly asked question s, see
gopro.com/support.
REVB
58 59
GoPro is dedicated to providing the best possible service. To reach
GoPro Customer Support, visit gopro.com/support.
/ Regulatory Information
To see the co mplete list of countr y certifi cations, r efer to the Important
Product + S afety Infor mation include d with your camera .
/ Trademarks
GoPro, HERO, the GoPro logo, the GoPro B e a Hero logo, BacPac ,
Protune, Sup erView, and Wear It. Mount It . Love It. are tradem arks or
registered trademarks of GoPro, Inc. in the U.S. and internationally.
Other names and ma rks are the p roperty of their respe ctive own ers.
 Loading...