


WWW.MANUALSContents .WS
Section 1 Getting to Know Your Digital Camera |
....................1 |
Overview ..................................................................................... |
1 |
Front View ................................................................................... |
1 |
Rear View .................................................................................... |
2 |
Side View .................................................................................... |
2 |
Bottom View................................................................................. |
3 |
Section 2 Getting Up and Running........................................... |
4 |
Loading the Batteries.................................................................... |
4 |
Inserting and Removing a SD Card (Not Supplied) ........................ |
4 |
Protecting Data on an SD Card ............................................................. |
5 |
Opening and Closing the Lens Cover............................................. |
5 |
Turning the Camera On and Getting Started................................... |
6 |
Turning the Camera Off ................................................................ |
6 |
Section 3 Camera Mode .............................................................. |
7 |
Direction Button Functions ............................................................ |
7 |
LCD Monitor Information............................................................... |
7 |
Taking Photos .............................................................................. |
8 |
Taking Close-Up Photos................................................................ |
8 |
Taking Movies .............................................................................. |
9 |
Shooting Spur of the Moment Movie Clips ...................................... |
9 |
Using the Self-timer .................................................................... |
10 |
Using the Digital Zoom................................................................ |
10 |
Camera Mode Settings ............................................................... |
11 |
Taking Photos Continuously ........................................................ |
13 |
Changing Resolution .................................................................. |
13 |
Using the Flash .......................................................................... |
14 |
Setting the LCD Brightness ......................................................... |
14 |
Advanced Settings ..................................................................... |
15 |
Adjusting Exposure .............................................................................. |
16 |
Adjusting White Balance...................................................................... |
17 |
Sharpening Images .............................................................................. |
17 |
Quick Review Settings ......................................................................... |
18 |
Movie Format Settings ......................................................................... |
18 |
Sound Settings ..................................................................................... |
19 |
WWW.MANUALS.WS |
|
Formatting a Memory Card .................................................................. |
19 |
Selecting Interface Language .............................................................. |
20 |
2
WWW.MANUALS.WS |
|
Section 4 Playback Mode ......................................................... |
21 |
Direction Button Functions .......................................................... |
21 |
LCD Monitor Information............................................................. |
21 |
Displaying Single & Thumbnail Images ........................................ |
22 |
Displaying Single Images .................................................................... |
22 |
Displaying Thumbnail Images.............................................................. |
22 |
Making Slide Shows ................................................................... |
23 |
Playing Movie Clips .................................................................... |
23 |
Deleting Photos & Movie Clips .................................................... |
23 |
Deleting Images and Movie Clips ........................................................ |
24 |
Magnifying Photos...................................................................... |
24 |
Using DPOF Settings.................................................................. |
25 |
Printing a Single Image or All Images ................................................. |
25 |
Section 5 Viewing Photos and Movie Clips on a TV........... |
26 |
Connecting the Camera to a Television........................................ |
26 |
Viewing Photos and Movie Clips on a Television........................... |
26 |
Section 6 Transferring Data to a Computer .......................... |
27 |
Installing the Digital Camera Driver.............................................. |
27 |
Connecting Your Camera to a Computer ...................................... |
28 |
Mass Storage Mode ............................................................................. |
28 |
PC Camera Mode ................................................................................ |
28 |
Installing Bundled Software......................................................... |
29 |
Section 7 Troubleshooting....................................................... |
30 |
Can’t turn the camera on ..................................................................... |
30 |
Camera turns on but the LCD monitor is blank ................................... |
30 |
No photo is taken when the shutter button is pressed ........................ |
30 |
Photos are not in focus ........................................................................ |
30 |
Photos are too dark.............................................................................. |
30 |
Photos are too bright............................................................................ |
30 |
Section 8 Specifications and System Requirements ......... |
31 |
Specifications ............................................................................. |
31 |
System Requirements................................................................. |
32 |
WWW.MANUALS.WS
3

WWW.MANUALSSection.WS1
Getting to Know Your Digital Camera
Overview
Your new digital camera delivers high quality images at up to 2048x1536 resolution as well as short movie clips using a 3.2-Megapixel CMOS sensor. With the optical viewfinder and built-in 1.5" TFT color LCD monitor, you can compose images and then examine them in detail. The camera adjusts exposure and colour balance automatically or lets you change these settings manually and features a 4x digital zoom to increase your control over the pictures you take. A Movie Hotkey lets you switch rapidly between taking movie clips and taking photographs. The camera is also ideally suited for use as a PC camera hooked up to your home computer
16MB of memory is built in to your camera so you can take photos and movie clips without installing a memory card. The memory card slot allows you to increase the storage capacity if you wish. When you want to print out images, play movie clips to friends, post images on websites or inside emails, images and movie clips can be downloaded from the camera to a computer where you have the option of editing them using ArcSoft PhotoImpression and ArcSoft VideoImpression software provided.
Front View
Shutter Button |
Flash |
Viewfinder |
Lens Cover
Self-Timer LED
WWW.MANUALS.WS
1

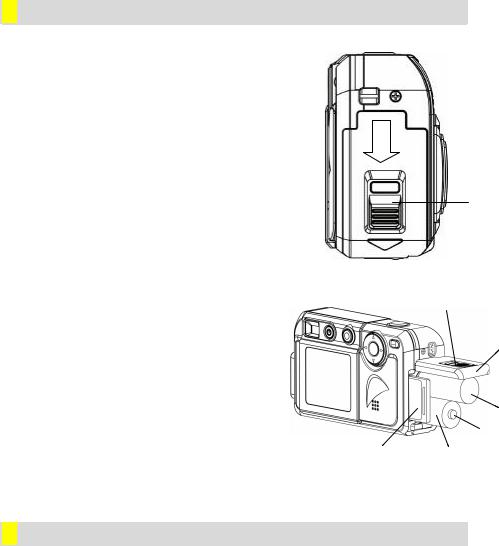
WWWRear View .MANUALS.WS
Power Button |
Direction Button |
||
Mode Button |
PC Mode / Movie Button |
||
|
|
||
|
|
||
|
|
|
|
|
|
|
|
LCD Monitor |
Speaker Wrist Strap |
ðThe mode button ( ) is used to switch between the two main operation modes. Turn to section 3, Camera Mode, and section 4, Playback Mode, for full details
ðThe direction button ( ) is used in Camera Mode for general setting, and in the Playback Mode to navigate through menus. Turn to section 3, Camera Mode, and section 4, Playback Mode, for full details
ðFor information on using the PC Mode/Movie button ( ), turn to Section 6,
Transferring Data to a Computer
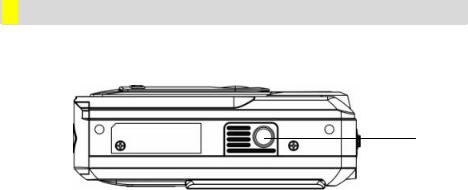
Side View
Eyelet for Wrist Strap
Battery / SD Card
Cover
Release Button
TV Out Port
USB Port
WWW.MANUALSMacro Switch .WS
2
WWW.MANUALS.WS
ðFor information on fitting batteries, turn to Loading the Battery in section 2.
ðTo learn how to install a memory card, turn to Inserting an SD Card ( Not Supplied) in section 2.
ðFor information on transmitting images and movie clips to a computer using the TV Out ( ) and USB (
 ) ports, turn to Section 5, Viewing Photos and Movie Clips on a TV, and Section 6, Transferring Data to a Computer respectively.
ðThe Macro Switch ( /
/ /
/ ) is used when taking photos with different lengths of focus. Turn to Taking Close-Up Photos in section 3 for full details.
Bottom View
Tripod Mount
WWW.MANUALS.WS
3
WWW.MANUALSSection.WS2
Getting Up and Running
Loading the Batteries
You must load 2 AA size alkaline batteries before the camera can be used:
1.Press down and hold the release button, and slide the battery/SD Card cover in the direction of the arrow to release the cover.
Release button
2.Insert the batteries according to the correct
polarity marks (+ or -). |
Release Button |
3. Close the battery/SD card cover firmly. |
Battery/SD |
|
Card Cover |
-
+
SD Card AA Size Battery
Inserting and Removing an SD Card (Not Supplied)
The camera comes with 16MB of built-in memory, allowing you to store images and movie clips. You can expand the memory capacity by using a SD (Secure Digital) memory card ( Not Supplied). To insert a memory card, refer to the figure above and:
1.Open the battery/SD card cover.
2.Insert the memory card with the metal surface facing the front of the camera.
3.Press the card into the slot until it locks into position.
To remove an installed SD card, press the card inwards to release it. When the card pops out, WWWgently slide it from its slot.. MANUALS.WS
4

WWW.MANUALS.WS
Note
A memory card that has previously been used in another device may have to be formatted before it can be used. Turn to Formatting a Memory Card in section 3 for details.
Note
When a memory card is fitted, images and movie clips are saved on the card rather than on the built-in memory..
Protecting Data on an SD Card
Valuable data on an SD Card can be protected by preventing any new data being written onto
the same card. To do this:
Slide the write-protected tab on
the side of the SD memory card
to LOCK.
Opening and Closing the Lens Cover
To open the lens cover, simply use a finger
to slide the cover across, as shown.
To close the lens cover, slide in the other
direction.
WWW.MANUALS.WS
5

WWWTurning the Camera.MANUALSOn and Getting Started .WS
To turn on once the batteries are loaded:
1.Open the lens cover first, and then press down and hold the power button for ONE second.
2.When the camera is turned on, the GREEN LED underneath the direction button will light up.


 Note
Note
If you only want to use the camera in Playback Mode (i.e. you don’t intend to take any photos) you do not have to open the lens cover before turning on the camera.


 Note
Note
The camera will turn itself off automatically if it is left unused for THREE minutes.
ðTo take a picture, press the shutter button. For full details turn to
Taking Photos in Section 3.
ðTo view stored photos press the mode button once to move to Playback Mode. Press a second time to return to Camera Mode. For full details turn to Section 4, Playback Mode.
ðTo take a movie clip, press the PC mode/movie button to temporarily switch to Movie Mode then the shutter button to start filming. For full details of taking movie clips turn to Taking Movies in Section 3.
Turning the Camera Off
To turn off the camera:
1.Press down and hold the power button for ONE second. The GREEN LED will light out.
2.Close the lens cover.
WWW.MANUALS.WS
6

WWW.MANUALSSection.WS3
Camera Mode
Direction Button Functions
The Camera Mode is for taking photos and short movies. In this mode, the direction button has the following functions:
Enter Button
Up Button
Left Button |
Right Button |
Down Button
Right button: LCD monitor on but information off → Monitor off → Monitor on with information
Left button: Self-timer on/off
Up button: Digital zoom in
Down button: Digital zoom out
Enter button: Enter options menu


 Note
Note
Press the mode button to switch between
Camera Mode and Playback Mode.
LCD Monitor Information
The indicators shown may display on the LCD monitor when images are recorded to indicate the following:
78 The number of images that can still be taken at current resolution.
Single Image (photograph) Mode Movie Mode
Multisnap (continuous shooting) Mode
SD card inserted |
|
Macro Mode |
|
Self-timer Mode |
|
Auto-flash |
|
Flash off |
|
Forced-flash |
|
Battery indicator: |
full power / |
medium power / |
low power / |
WWW.MANUALSpower empty .WS
7
WWWTaking Photos .MANUALS.WS
Once your camera is turned on, you can compose pictures using the viewfinder or the LCD monitor. Using the viewfinder will save battery power. You may find it easier to compose your pictures with the LCD monitor however. Close-up shots in particular will be more accurate if composed through the LCD monitor. The LCD monitor must be used when Digital Zoom is used.
1.Turn the camera on.
2.Ensure the macro switch on the side of the camera is turned to Normal ( )
)
3.If the LCD monitor is off, turn it on by pressing the right direction button.
4.Compose your shot in the viewfinder or on the LCD screen..
5.Press the shutter button to take the picture.
Macro Switch
Taking Close-Up Photos
Your camera has two close-up photo modes to allow you to take high quality photos at close range. The Macro Mode ( ) should be used for objects located at about 20cm from the camera, while the Portrait Mode (
 ) should be used for object located at 60cm to 130cm. You may use the LCD monitor to compose close-up pictures more easily. To take close-up photos:
1.Turn the camera on.
2.Turn the macro switch to Macro ( ) or Portrait (
 ) positions. In Macro Mode, the macro icon (
 ) will appear on the LCD monitor.
3.If the LCD monitor is off, turn it on by pressing the right direction button.
4.Compose your shot on the LCD monitor.
5.Press the shutter button to take the picture.


 Note
Note
WWW.MANUALSRemember to turn the macro switch.WSback to Normal ( ) when you are not taking close-up
photos.
8
 Loading...