


GHD1621F2 & GHD2521F2 Digital TV Recorder
Instruction Manual
DTVDTV |
CHCH |
19REC |
|
|
|
CH |
|
|
|
HDHDDD |
|
|
|
|
STANDBY/ON |
|
PLAY |
PAUSE |
STOP |
|
|
|
||
REC
IMPORTANT: Please read all instructions carefully before use and keep for future reference.
Digital TV and Aerials
Thank you for choosing this Goodmans Digital TV Recorder. Not only can it receive over 40 Freeview channels, you can also pause, record and rewind TV at the touch of a button.
It’s really easy to program; you can set it up to record a whole series in a matter of minutes. No need to key in times or dates, it’s all done using a clear on-screen programme schedule. You can even record two channels at the same time. All your recordings are stored on your Digital TV Recorder’s hard drive, which means an end to piles of DVDs.
This Digital TV Recorder has been given the Freeview Playback seal of approval, so you can be sure you’re getting a great product.
IMPORTANT: Use of any electrical equipment should be undertaken with care. Please read the safety section on page 18-19 before using your Digital TV Recorder. This appliance is for household use only.
A Set Top Box lets you access the free digital channels that are broadcast in the UK.
It uses a digital signal, received through your wideband aerial and lets you watch it through your existing television.
Freeview Playback digital TV recorders give you over 40 free channels that you can pause and record for no subscription. For more information on Digital Television and Freeview, and to check reception in your area please visit www.freeviewplayback.co.uk.
2
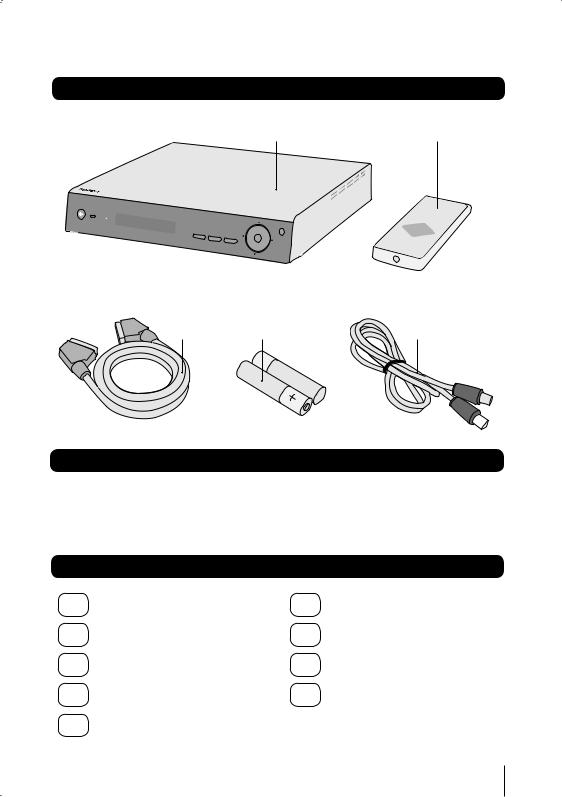
What’s in the box
Your new Digital TV Recorder |
Remote control |
STANDBY/ON
SCART lead |
2x AAA Batteries |
RF lead |
Other things you may need
Roof top aerial
You will need a wideband rooftop aerial in order for your Digital TV Recorder to work properly. For more information see the Quick Start guide or visit www.digitaluk.co.uk.
Contents
01
02
03
04
05
Your Digital TV Recorder.... 4 |
06 |
Advanced features...... |
12-13 |
|
Your remote control |
............ 5 |
07 |
Settings....................... |
14-15 |
Set up................................. |
6 |
08 |
Troubleshooting................ |
16 |
Get going............................ |
7 |
09 |
Specification..................... |
17 |
Daily use....................... |
8 - 11 |
|
|
|
3

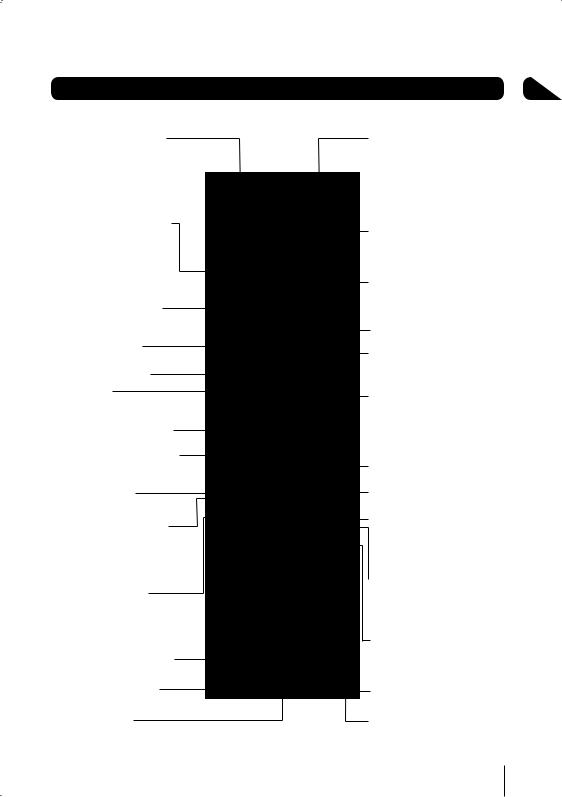
01Your Digital TV Recorder Front panel
Standby button |
PLAY Open the Library/Start |
PAUSE Pause playback |
Channel Up/Down |
|
playback of selected recording. |
or start timeshift. |
Skip forward/backwards |
|
|
|
REC |
STANDBY/ON |
PLAY |
PAUSE |
STOP |
Power indicator |
Display |
STOP Stop Playback/ |
RECORD |
|
|
Timeshift. |
Record Current Event |
Remote sensor |
|
|
|
Rear panel
Aerial Input |
|
|
|
TV Scart |
||||||||||||||||||||||||||||||||
Connect the aerial to this socket |
|
|
|
Connection to TV |
||||||||||||||||||||||||||||||||
|
|
Composite Video |
|
Serial port |
|
|
|
|
|
|
|
|
|
|
|
|
|
|
|
|
|
|
|
|
|
|
|
|
|
|
AC Mains cable |
|||||
|
|
|
|
|
|
|
|
|
|
|
|
|
|
|
|
|
|
|
|
|
|
|
|
|
|
|
|
|
||||||||
|
|
|
|
|
|
|
|
|
|
|
|
|
|
|
|
|
|
|
|
|
|
|
|
|
|
|
|
|
|
|
|
|
|
|
|
|
|
|
|
|
|
|
|
|
|
|
|
|
|
|
|
|
|
|
|
|
|
|
|
|
|
|
|
|
|
|
|
|
|
|
|
|
|
|
|
|
|
|
|
|
|
|
|
|
|
|
|
|
|
|
|
|
|
|
|
|
|
|
|
|
|
|
|
|
|
|
|
|
|
|
|
|
|
|
|
|
|
|
|
|
|
|
|
|
|
|
|
|
|
|
|
|
|
|
|
|
|
|
|
|
|
|
|
|
|
|
|
|
|
|
|
|
|
|
|
|
|
|
|
|
|
|
|
|
|
|
|
|
|
|
|
|
|
|
|
|
|
|
|
|
|
|
|
|
|
|
|
|
|
|
|
|
|
|
|
|
|
|
|
|
|
|
|
|
|
|
|
|
|
|
|
|
|
|
|
|
|
|
|
|
|
|
|
|
|
|
|
|
|
|
|
|
|
|
|
|
|
|
|
|
|
|
|
|
|
|
|
|
|
|
|
|
|
|
|
|
|
|
|
|
|
|
|
|
|
|
|
|
|
|
|
|
|
|
|
|
|
|
|
|
|
|
|
|
|
|
|
|
|
|
|
|
|
|
|
|
|
|
|
|
|
|
|
|
|
|
|
|
|
|
|
|
|
|
|
|
|
|
|
|
|
|
|
|
|
|
|
|
|
|
|
|
|
|
|
|
|
|
|
|
|
|
|
|
|
|
|
|
|
|
|
|
|
|
|
|
|
|
|
|
|
|
|
|
|
|
|
|
|
Tuner interconnect |
Coaxial Digital |
Down Mix Audio |
cable - do not |
|
2 Channel L/R |
disconnect |
|
|
RF Loop through Connect the supplied RF
loopthrough cable to the TV.
AUX Scart
for connection to a VCR or a DVD Recorder
4
Your Remote
STANDBY Power On/Standby.
|
STANDBY |
|
TV/AUX |
NUMBER PAD Enter values and |
|
|
|
select the channel directly by |
|
|
|
entering its number. |
1 |
2 |
3 |
|
4 |
5 |
6 |
WIDE Adjust the aspect ratio |
7 |
8 |
9 |
WIDE |
|
RECALL |
|
of the video output. |
|
0 |
|
GUIDE Display the EPG
Electronic Program Guide.
INFO Display the Info bar.
NAVIGATION
Navigate up/down/left/right in menus/on screen displays.
OK Confirm selection in menu/on screen displays.
PLAY Press once to open the video library and also to resume playback when video is paused.
SKIP BACKWARDS
GUIDE
SUBTITLE
|
CH |
i |
AUDIO |
|
CH |
PLAY |
REC |
SKIP BACK PAUSE |
STOP SKIP FWD |
Jump backwards during playback. |
FRW |
SLOW |
SEARCH |
FFW |
|
PAUSE When watching live TV, |
SETUP |
CH. LIST |
TEXT |
EXIT |
|
press to start Timeshift mode. |
|||||
|
|
|
|
||
During playback press once to |
|
|
|
|
|
pause playback, press again |
|
|
|
|
|
to play frame by frame. |
|
|
|
|
SEARCH BACKWARDS
Press this button repeatedly during playback to cycle through the available speeds for searching backwards.
SLOW
Cycle through the available slow motion playback speeds.
SETUP Display setup menu.
COLOUR BUTTONS
For interactive function
02
TV/AUX Cycle between internal
Audio/Video and AUX loopthrough
Audio/Video.
SUBTITLE
Cycle through the available subtitles for the current broadcast.
RECALL
Return to previous selected channel.
AUDIO
Cycle through available Audio languages.
CHANNEL UP/DOWN
RECORD During Live TV, press once to record the current event, press again to record the following event. When viewing the EPG, press once to select an event for recording.
STOP
Stop playback or recording.
SKIP FORWARD
Jump forwards during playback.
SEARCH FORWARDS Press this button repeatedly during playback to cycle through the available speeds for searching forwards.
SEARCH
During playback, press this button to go to a favourite section.
EXIT
TEXT Display Digital Teletext where available.
CH.LIST
Display the channel list.
5

03 |
Set up |
Getting connected
Connecting to the TV with SCART
TV
RF Cable* |
RF Cable |
SCART Cable |
|
|
Other connections
Connecting to the TV and DVD recorder with SCART
SCART Cable*
TV |
RF Cable* |
|
SCART Cable
RF Cable*
DVD
RF Cable
Connecting a Hi-Fi system
Coaxial Cable*
* Not included in the box
6
 Loading...