


GNAV10
INSTRUCTION
MANUAL
Model GNAV10
Satellite Navigation System

CONTENTS
Safety Information.............................................................................3
Installation..........................................................................................6
Views.................................................................................................11
Front View.............................................................................................................11
Back view .............................................................................................................12
Bottom View.........................................................................................................13
Left View...............................................................................................................13
Right View.............................................................................................................13
GPS (Global Positioning System)...................................................14
Memory Card Quick Installation...........................................................................14
Software Installation to a PC................................................................................15
Contents of the Navigation CDs...........................................................................15
Installing Microsoft Active Sync ...........................................................................16
Welcome to Destinator OP.............................................................17
Navigating a Route..........................................................................18
Options .............................................................................................29
Setting...............................................................................................32
Changing Map Views.......................................................................38
Auto & Favorites Alerts ...................................................................41
Importing Favourites ......................................................................42
P. 2
Goodmans Product Information Helpline (0870) 873 0080

SAFETY INFORMATION
Safety Instructions
Please read this section carefully and follow all the instructions given. This will help
ensure reliable operation and extend the service life for this produce.
Keep the packaging and the user instructions for future reference.
• Never open up the housing of the product or the power adapter. These
contain no user-serviceable parts. If the housing is opened there is a danger
to life from electric shock.
• Do not place any objects on the product and do not exert any pressure on
the display. Otherwise there is a danger that the screen will break.
• To avoid damage, do not touch the screen with sharp objects. Use only the
stylus provided.
• There is a risk of injury if the display breaks. If this should occur, use protective
gloves to the broken parts and contact customer support to arrange for
disposal. Then wash your hands with soap, as chemicals may have escaped.
• Never allow children to play with electrical equipment unsupervised.
…if the power adapter or the attached plug become scorched or damaged.
…if the housing of the appliance or the power pack becomes damaged or
fluids leak into it. Components must be checked by Customer Service in order
to avoid damage!
Data Security
• Goodmans will not accept liability for data loss or damage to data storage
cards, and no claims can be accepted for damages resulting from the loss of
data or for consequential damages.
Operating Environment
• Keep your navigation system and all connected devices away from moisture
and avoid dust, heat and excessive exposure to direct sunlight, especially in
the car.
• Make sure this unit is protected from getting wet. (e.g. from rain and hail, at
all times.)
Please pay attention that moisture can even build up in a protective pouch
because of condensation.
• Avoid heavy vibrations and shaking.
• Always ensure before driving that the unit is fully secured in it's mounting
bracket to remove the potential for accidents..
Ambient Temperature
• This unit will operate most reliably between 5 and 40 degrees centigrade
and at a relative humidity of between 10% to 90%.
• This unit can be stored between 0 and 60 degrees centigrade.
• Store the unit in a shaded location to avoid high temperatures (e.g. when
parking or from direct sunlight).
Battery Operation
This unit operates with an internal built in battery. In order to prolong the
life and efficiency of the battery and to ensure safe operation, follow the
P. 3
Goodmans Product Information Helpline (0870) 873 0080

SAFETY INFORMATION
instructions below:
• Warning: Danger of explosion if rechargeable batteries are not charged
properly. Do not dispose of this unit in a fire.
• Batteries cannot withstand heat. Avoid the unit becoming overheated. Failure
to comply with this instruction may lead to damage to and even explosion of
the battery.
• Use only the supplied AC adaptor to charge the battery or the car adapter.
• The batteries are special category waste. When disposing of the unit ensure
that this is done correctly. Contact Customer Service for more details.
Care of the Display
• Avoid scratching the display surface as this is easily damaged. The foil on the
display at delivery is purely for protection during transportation!
• Ensure that no traces of water remain on the screen. W ater can cause irreversible
discoloration.
• Use only a soft , lint-free cloth to clean the screen.
• Do not expose the screen to either strong sunlight or ultraviolet radiation.
• In the case of wide fluctuations in temperature or humidity condensation or
moisture may form inside the unt and this can cause and electrical short circuit.
• In order to protect the unit from dirt, knocks and scratching, use the
protective case.
• Before traveling be aware of the power and communications provision at
your destination. Before traveling obtain any power or communications
adapters(modem, LAN, etc.) That may be needed.
Connection
When connecting the unit to the household supply for charging, always use the supplied
adaptor other adaptors may damage the unit and will invalidate the warranty.
Power Through Car Adapter
• The car adapter should only be connected to the lighter socket of a car 12VDC
Positive centre pin , this unit is not suitable for use on 24V DC truck systems
If you are in any doubt about the power source in your car, contact your
car manufacturer.
Cabling
• Ensure all cabling is routed to avoid hazards.
WARNING
When the unit is not in use for a long time, please recharge the battery
periodically , otherwise the battery’s lifetime would be shortened.
P. 4
Goodmans Product Information Helpline (0870) 873 0080
INSTALLATION
Remove the protective film from the display and also ensure the unit is either fully
charged or connected to the car lighter socket before commencing initial installation.
Switching on the navigation system
Using the stylus switch the main switch (15) on the bottom of the device to ON.
Attention: Always leave the main switch in the ON position, unless conducting a
reinstallation. if the switch is set to OFF , All data will be lost and the initial installation
will have to be carried out again.
The GNAV10 will start the initial installation automatically. The Application start up
screen will appear after a few seconds. Set the date and the time using the Setting
Button (4) and select the local time zone and set the time and date in the date/time
setting submenu. This is necessary for calculating ETA' s on routes , also please note
this unit does not automatically adjust for Daylight saving, this has to be done manually
on the required dates during the year.
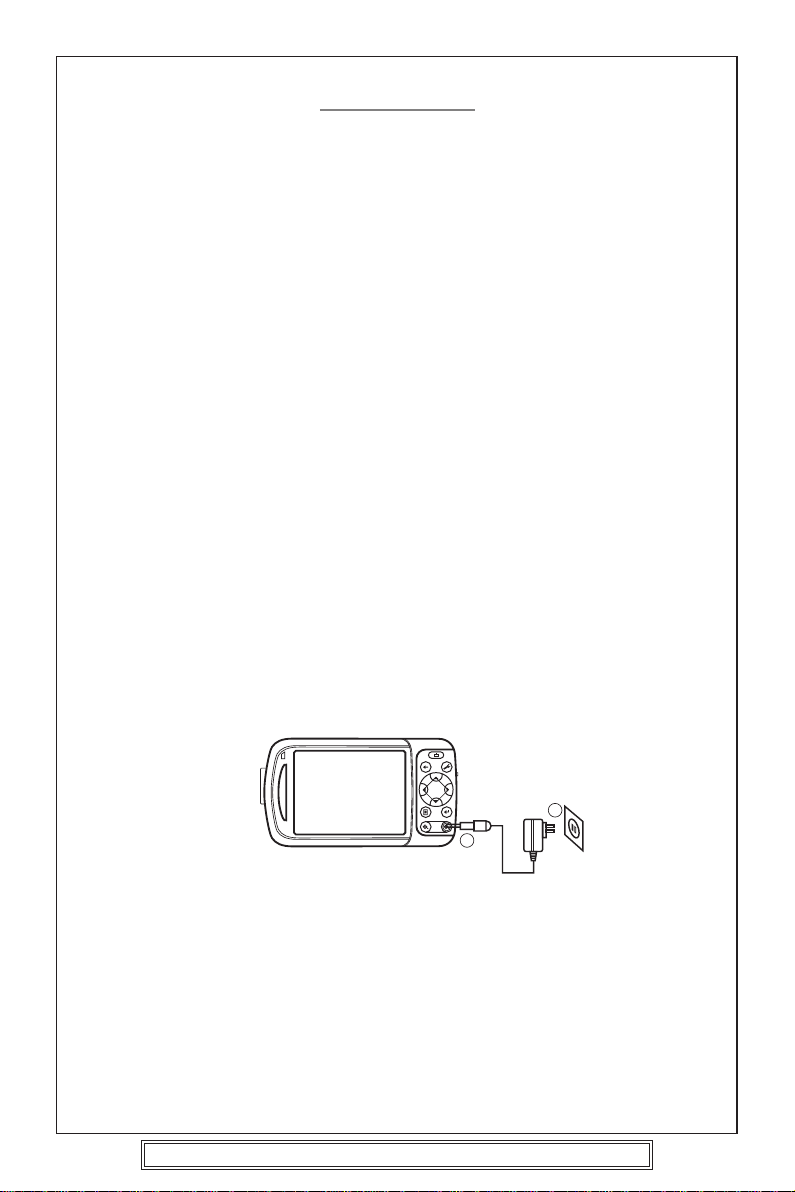
Charging Battery of the Navigation system
There are different ways to charge the battery of this navigation system:
• Using the USB socket via a PC.
• By means of the car adapter.
• The battery charge indicator will illuminate red until the navigation system is charged.
at which point it will change to Green. Don not interrupt the charging process before
the battery is fully charged. It will take a few hours for the navigation system to be
fully charged. When the battery is fully charged the battery indicator will turn to
green.
• Note: You can use the navigation system during the charging process, but the power
supply must not be interrupted during initial set-up.
2
1
To connect the unit for charging via the AC adaptor, connect the small DC plug into
the lower of the two sockets on the right hand side of the the unit , insert the 3 pin
mains plug into a local household mains socket.
If the socket is switched ensure the switch is in the ON position.
Working with memory cards
The GNAV10 supports MMC and SD memory cards.
Inserting memory cards
1. Carefully take the memory card out of its packing. Take care not to touch or dirty
P. 5
Goodmans Product Information Helpline (0870) 873 0080

INSTALLATION
the contacts.
2. Push the memory card carefully into the card slot. The Label side of the memory
card must point upwards. The memory card should slightly lock in place.
Removing memory cards
• Do not remove the memory card whilst it is in use. This could result in loss of
data.
1. To remove the card press lightly onto the upper edge until it ejects.
2. Pull the card out without touching the contacts.
3. Store the memory card in the packing or in another safe location.
• Memory cards are very fragile. Take care not to dirty the contacts.
Accessing Memory Cards
• The appliance only supports memory cards in the FAT16/32 file format. If you insert
a card prepared with a differ ent format (e.g. in cameras, MP3 players), your navigation
system may not recognize it and will suggest to format it again.
Warning:
• Likewise you cannot just copy files onto the memory card. In some cases they must
be converted by the Microsoft ActiveSync program.
Data Exchange VIA Card Reader
You can transfer or synchronise data via ActiveSync. This is also the correct method,
in particular, if files are to be transferred that must be converted into a navigation
system-readable format.
Resetting The Navigation System
There are two options for resetting the navigation system.
Soft Reset
This option restarts the navigation system, without reinstallation being necessary. A
soft-reset is often used in order to reorganize the memory. In doing so all programs
that are running are interrupted and the working memory is reinitialized. Choose this
option if your navigation system is not responding or working properly.
Perform the soft-reset as follows:
Use the stylus to press the reset button located on the underside of the unit.
Hard Reset
Warning:
It is not necessary to install the software on your synchronization computer again,
however. Perform the hard-reset as follows: Slide the ON/OFF switch on the bottom
of the device to the OFF position initially and back to ON after two seconds.
Safety Instructions for Navigation
Tips for Navigation
Formatting the memory card irretrievably wipes out all data contained on it
A hard-reset deletes all data on the unit and causes a new initial installation.
• Do not make adjustments or enter destination addresses whilst driving.
• In the event that you do not understand the voice instruction or if you are in any
doubt about what to do at the next intersection, then the map or arrow display
will provide you with a quick reminder. Only look at the display when you are
in a safe driving situation!
.
P. 6
Goodmans Product Information Helpline (0870) 873 0080

INSTALLATION
• Attention: The road layout and driving rules take precedence over the instructions
of the navigation system. Only follow the instructions when circumstances and
driving rules permit it! The navigation system will guide you to your destination
even when you have to deviate from your planned route.
• The direction statements of the navigation system given do not release the driver
of the vehicle from his or her duty of care or personal responsibility.
• Plan routes before you leave. If a new route is required whilst on the road stop
driving.
• In order to receive the GPS signal correctly, Attach the onto the inside of the
windscreen or near the windscreen with the sucker. Try out different positions
in your vehicle in order to find the best reception.
VERY IMPORTANT NOTE
The fold out GPS aerial must be positioned such that it is parallel to the sky
otherwise the unit will not find any satellites.
Notes for Use In A Vehicle
• Take care that the holder does not present any risk to safety, even in the case
of an accident, when installing it.
• Take care that the cable does not impede any safety components.
• Do not mount the components within the operating range of any airbags.
• Check the security of the suction cup at regular intervals.
• The power plug will consume power, even if no device is connected. Remove
it when not in use to avoid draining the car battery.
• Check all safety equipment in your car after installation.
Mounting The Navigation Set In A Car
Attention! Only fix the holder for the navigation system to the windscreen, if it does
not impede the view. Should this not be possible, Then mount the holder with the
enclosed suction drivers plate in any way that will allow safe operation. Installation Of
The Holder Of The Navigation System
• Hint: If you want to fix the holder to the wind screen, then you can skip steps
1 and 2.
1. Remove the protective foil from the sticky side of the suction plate.
2. Fix the suction plate to a suitable location on the dashboard. Take care, that
the surface of the dashboard is clean and press the suction plate strongly onto
the surface.
• To obtain a strong and secure hold the suction plate should not be used for
24 hours.
IMPORTANT NOTE:
Please note this unit will not function in the front windscreen of cars fitted with
either solar glass or an automatic rain sensor.As both systems prevent the
reception of the satellite broadcasts by the GPS antenna
P. 7
Goodmans Product Information Helpline (0870) 873 0080
INSTALLATION
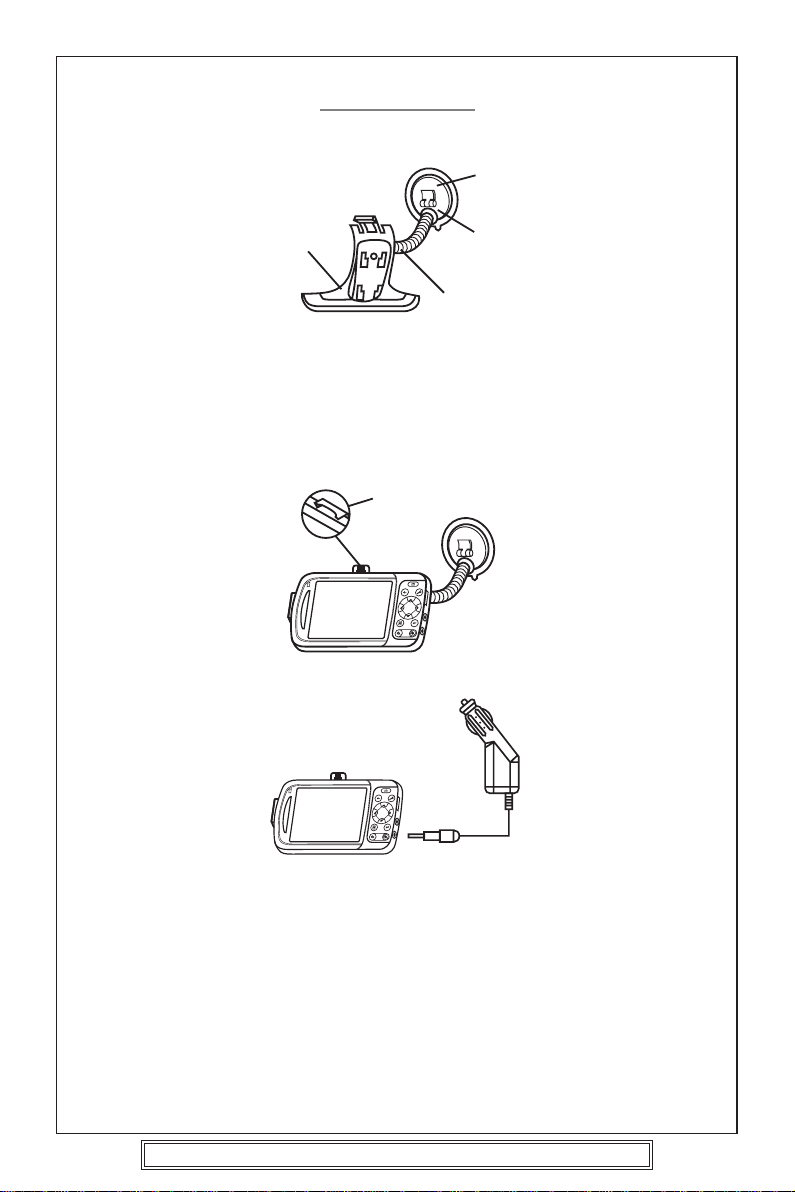
Suction
Car
Suction
Flexible
3. Mount the car holder to the flexible neck. Note the labels on the flexible neck.
The arrow labled CLOSE must point in the direction of the fixture. The
connection closes with a noticeable clicking sound.
4. Place the holder with the suction head onto the suction plate (or directly onto
the wind screen) and press the lever on the suction head downwards. The
suction head will stick itself firmly to the suction plate or windscreen.
5. Place the navigation system into the car holder by placing it initially in the
lower locating lugs and then pressing it down gently until the top clip clicks
into place.
Connecting The Navigation System In The Car
Holder
2
1
When the battery is exhausted it can be recharged in the car:
1. Plug the DC plug (1) of the connection cable into the corresponding DC socket
on the right side of the GNAV10.
2. Insert the power adapter (2) into the cigarette lighter socket and ensure, that
it will not lose contact Whilst driving. This could cause a malfunction.
•
Hint : Remove the power adapter from the cigarette lighter socket when ending
a trip or when parking the car for a extended period of time
For optimum GPS reception please always ensure the GPS antenna is parallel
to the sky.
P. 8
Goodmans Product Information Helpline (0870) 873 0080
.
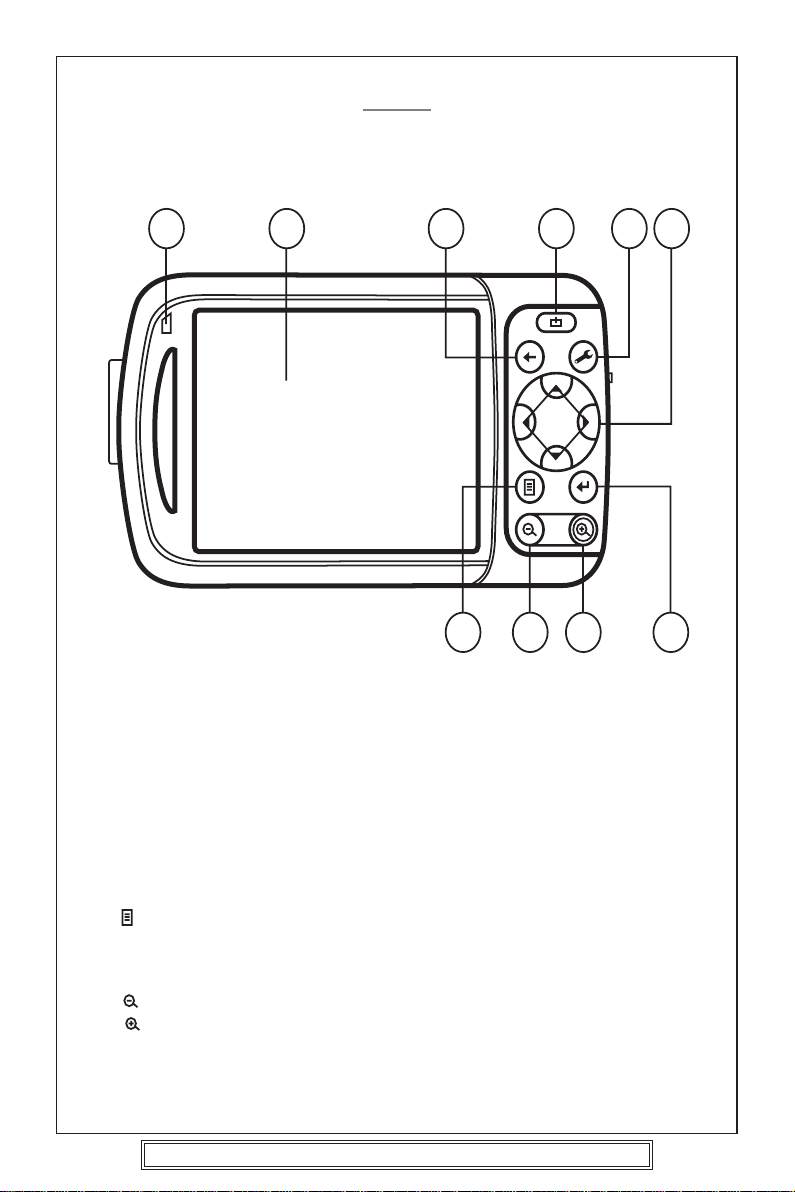
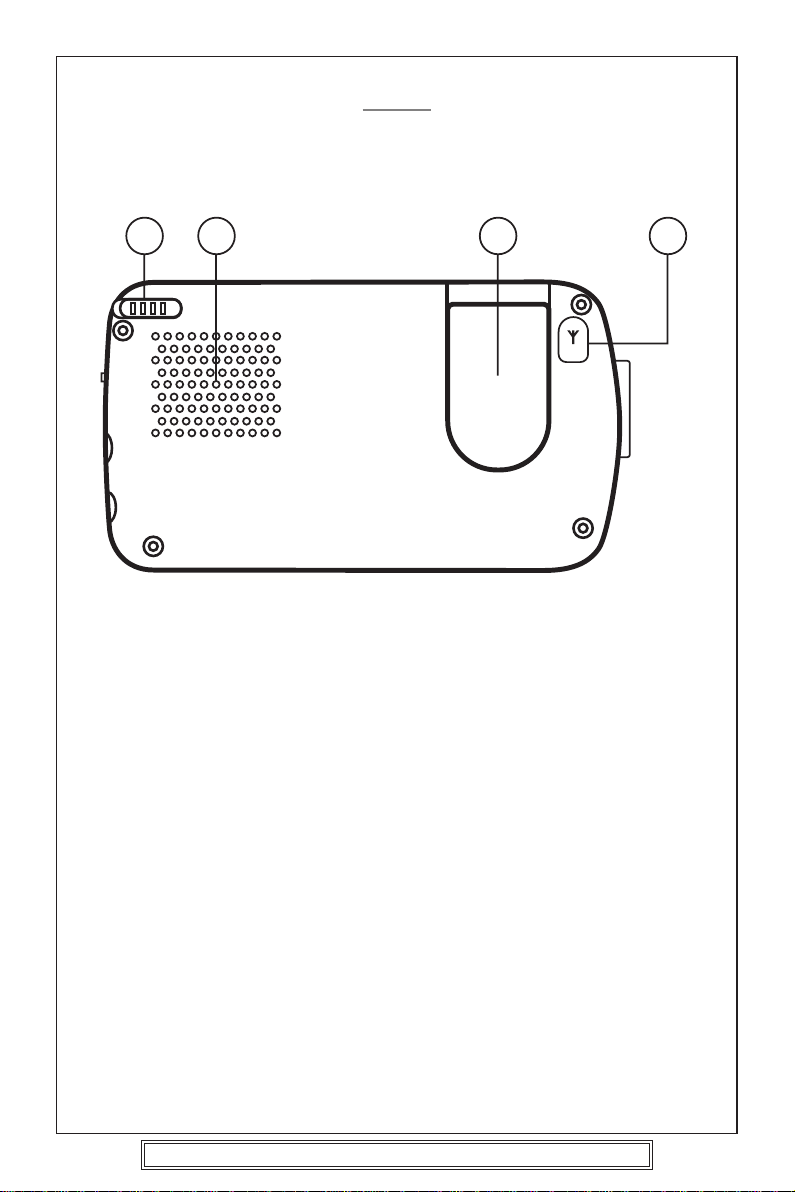
Front View
2 8 3 1 4 5
VIEWS
1097 6
1. Power ON/Standby Button
2. Battery Charge Indicator
3. Back Button
4. Setting Button
5.Navigaiton-pad
6. Enter Button
7.
8.Touch Screen
9.
10.
Goodmans Product Information Helpline (0870) 873 0080
Press and hold this button to power the
unit ON or OFF.
When the battery is charging the Iindicator
is red, When the battery is fully charged,
the Indicator will turn to green.
Press it to return to the previous menu.
Press it to enter into the setting menu.
Moves up/down/left/right by pushing the
corresponding area of the pad.
Press it to enter into the selected item
Press it to enter into the main menu.
LCD Map Display. Tap the screen with the
stylus to select menu commands or enter
information.
Button to zoom out.
Button to zoom in.
P. 9
VIEWS
Back View
11 12 13 14
11.Stylus
12.Loudspeaker
13.GPS antenna
14.External aerial interface
Goodmans Product Information Helpline (0870) 873 0080
Take the stylus out of its compartment in
order to use it, and replace it after use.
The Stylus is required for operating the
touch screen.
Must always be parallel to the sky.
Interface for an external GPS aerial (not
supplied)
P. 10
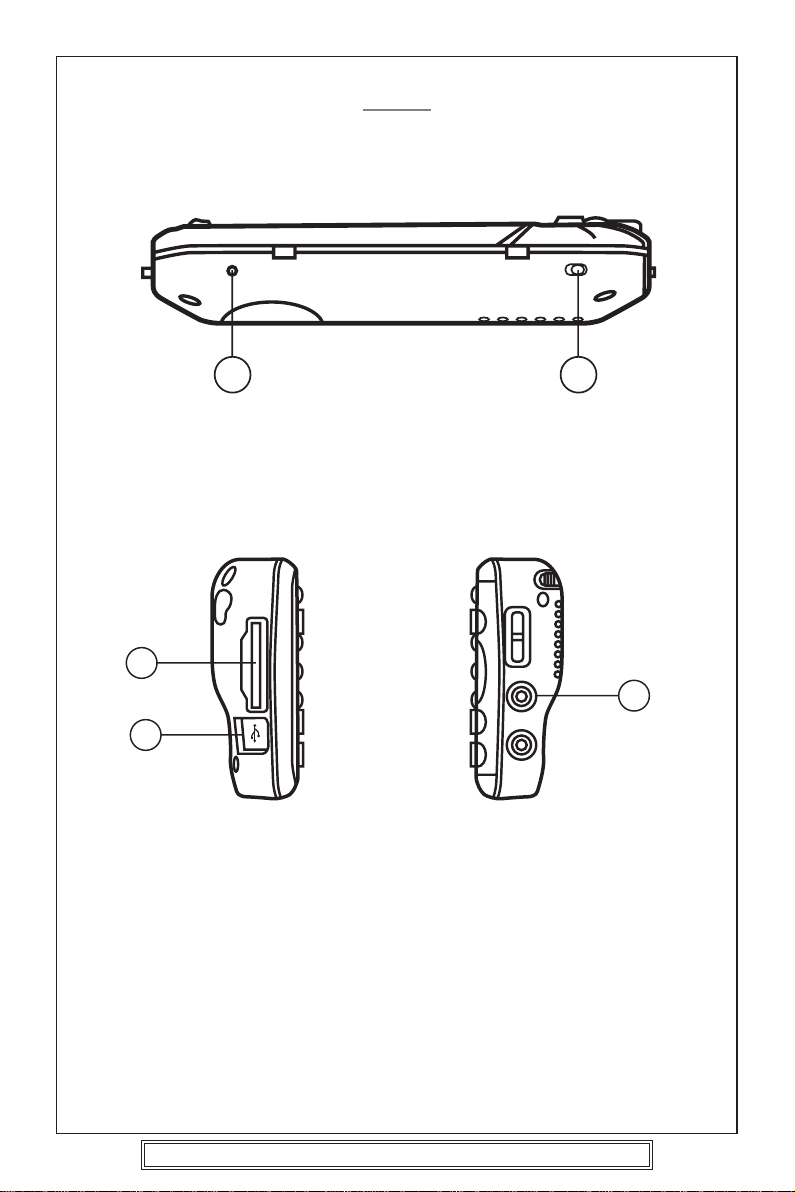
Bottom View
VIEWS
RESET
ON
BATTERY
OFF
1520
15. Battery Switch Disconnects the internal Battery, also acts as a Hard r eset switch
20. Reset button Press it to reset the unit.
Left View
16
17
16.SD/MMC Slot
Accepts SD (Secure Digital ) or
MMC (Multi Media Card )
Cards for removable storage.
17.USB Interface
Interface for connecting to a PC
by means of the supplied Cable.
18.Headphone
Right View
18
allows the connection of a pair of
headphones/earphones for private
listening.
P. 11
Goodmans Product Information Helpline (0870) 873 0080

GPS (Global Positioning System)
GPS is a satellite-based system for determining a position anywhere on the earth
where the satellite signals can be received , it is accurate to around 5 metres depending
on the number of satellites being used to fix a given position. With the help of 24
satellites in low level orbit around the earth, it is possible to determine a position on
earth with the accuracy of a few metres. The satellite signals are received by the
antenna fitted to the GNAV10, which must have a “line of sight” to at least 4 of these.
• Note: By limited line of sight (e.g. in tunnels, between houses, in woods or
also in vehicles with metal-coated windows) it is not possible to determine
the position. The satellite reception however automatically picks up again as
soon as the obstacle has been passed and the line of sight is re-established.
The GPS receiver consumes additional power. This is especially of concern, when
running on the internal battery. To conserve power do not turn on the GPS receiver
unnecessarily. However, you can also switch the device off by means of the ON/OFF
switch in the case of a shorter interruption to your journey. Pressing the same switch
again will activate a restart. The GPS receiver will also be reactivated at the same time,
if navigation software is still active. Upon reconnection it will take a short time for the
position to be updated again, subject to the reception conditions.
• Note: Please note that the GNAV10 is preset not to shut down automatically
after a few minutes without activity. This can be changed in the settings menu.
• If the GPS receiver has not been active for some hours, it must orientate itself
again. This process may take a while.
Memory Card Quick Installation
• The initial setting up must be carried out as described on page 16.
• The following installation limits the Navigation to the area which is pre-installed
on the supplied memory card.
You must carry out these steps to put the navigation into operation in your car:
1. Read and adhere to the safety instructions on p..2 and p.23.
2. Install the remaining components of the navigation system.
3. Press and hold the ON/OFF button to start the navigation system. If the
instructions of Step1 have not yet been executed, then do it now. The battery
should be charged. By means of the car power supply if necessary.
• Insert the pre-loaded memory card in the navigation system. The installation
of the navigation.
software will start automatically. Follow the instructions on the screen.
NOTES:
• The memory card must always be inserted into the device during the use of
the navigation system. A Soft Reset will have to be carried out to restart the
navigation system, if the memory card is removed during its use, even for a
short time.
• The software installation will have to be carried out again following a Hard
Reset.
Set the date and time by means of the Settings button and the date/time control button,
if this has not be done. set the time Zone if required.
P. 12
Goodmans Product Information Helpline (0870) 873 0080

GPS (Global Positioning System)
Starting Navigation
1. Switch on the GNAV10.
2. The navigation software will start automatically or select it from the start up menu.
3. Select the address function from the menu follow the on screen prompts to enter
the required destination and then press navigate. The unit will calculate a route to the
destination and generate the required voice prompts to navigate to the destination.
Note: The GPS-receiver will require some time for initialization when deployed for the
first time. Even when GPs signal reception is indicated the navigation could be
imprecise. In all future instances it will take about 30-60 seconds until a correct GPSsignal is available, sufficient “sight” of the satellite is a prerequisite.
Software Installation On Your PC
In order to use customised maps from the supplied CD's the Destinator console
software must be installed to a PC together with Microsoft Active sync. The GNAV10
cannot be used as a normal memory card reader.To Install Microsoft Activ sync insert
the disc marked Activ sync into the disc drive of the PC and follow the on screen
instructions for installation.
1. Before installing the navigation software ensure that ActiveSync is installed and the
navigation system is connected with your PC via the supplied USB cable.
2. Place CD 1 with the navigation software into the CD ROM drive of the PC. The
installation of the software should start automatically, if it does not , browse the CD
and double click on the setup file on the CD disc.
3. Follow the program instructions. Contents of The Navigation CDs. Content of the
CDs:
CD 1 contains the PC application, digitalized card material and the data material for
restoring the content of the memory card. Additional material on the card is located
on CD2. The PC application will be installed on the computer and used to transfer
maps to and from the unit.
Installing Microsoft ActiveSync
In order to transfer data between PC and the Microsoft ActiveSync program is requir ed.
Attention: Important files can be overwritten or changed during the installation of
software. Always create a hard disk backup, in order to be able to have access to the
original files should problems arise with the installation. Administrator rights are required
to install the software under Windows 2000/XP.
Attention: You should not connect the navigation system to your computer yet.
1. Insert the Active Sync CD and wait until the program starts automatically.
Note: Set up Auto Run function is probably deactivated If Auto Run does not occur ,
please browse the CD disc and locate the setup file and double click it.
2. Follow the on screen instructions to install active sync.
3. Connect the GNAV10 to the computer using the supplied USB cable. The hardware
installation assistant will recognise a new device has been connected and will install
the appropriate drivers.
4. Follow the instructions on the screen. Please note when the Active sync connection
wizard appears the NO[guest] button must be selected before proceeding otherwise
malfunction may occur.
P. 13
Goodmans Product Information Helpline (0870) 873 0080
Welcome To Destinator OP
1. Introduction
GNAV10 is a full-featured mobile satellite navigation system.
GNAV10 also assists in planning routes and providing Turn by Turn voice guidance
instructions for guidance to the chosen destination
2. Getting Help
An abbreviated Help file with basic Destinator OP navigational definitions
and instructions is available.
At the map screen, press the
by pressing the
3.
Technical Support
In Europe
For answers to common questions and quick assistance see the Destinator FAQ
for Registered Users online at: http://www.destinator eur ope.com, click Community,
login and choose FAQ.
If you have other questions about Destinator OP, please contact your supplier or
Destinator Technical Support via email at support@destinatoreurope.com or
telephone
The Goodmans product information helpline on 0870873 0080.
4. Getting Started
This GNAV 10 comes with the Destinator OP application already installed. Switch the
GNAV10 on and from the start up screen select the Navigation option , press
button, cycle to the Options Menu
button, and select .
P. 14
Goodmans Product Information Helpline (0870) 873 0080
Navigating a Route
1. Introduction
This chapter explains how to define and plan a route. Setting the origin
point, selecting the required destination or planning a journey. The route
calculated in real time is from the current GPS position.
There are several ways select a destination ( ).
• An Address
• An Intersection
• A Partial Postal Code
• A POI (Point Of Interest)
• An Address in Favorites
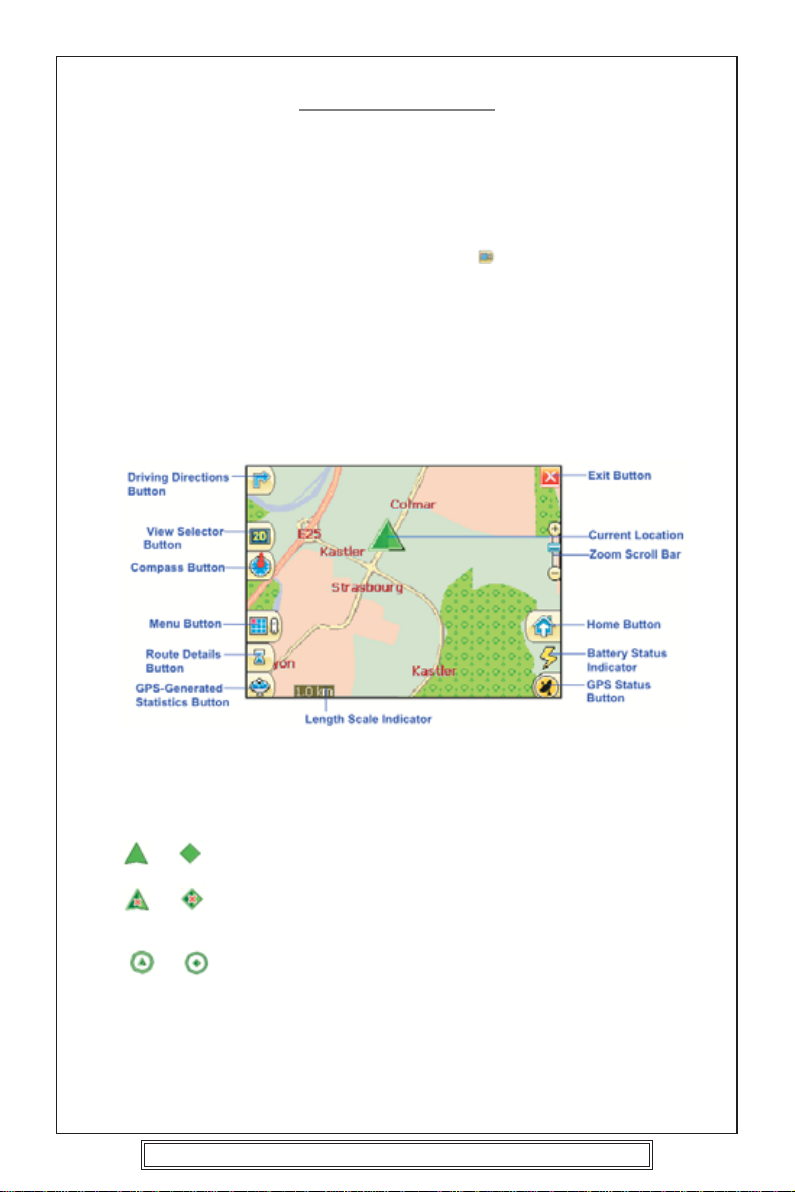
2. Map Description
There are various icons on the map screen that are used to plan and view
a route.
Figure - Main Map View
Location Icons
(or in Pedestrian Mode) shows the current location whilst in
Navigation Mode.
(or in Pedestrian Mode) shows the last known GPS location.
Note: This may not be the current location as reception of the GPS signal
may be poor
(or in Pedestrian Mode) shows the Origin in Planner Mode.
See Section 0 7.Route Settings for descriptions of Navigation Mode and
Planner Mode.
P. 15
Goodmans Product Information Helpline (0870) 873 0080
Navigating a Route
Dynamic cursor
Destinator OP's screen cursor has the capability to automatically change its appearance
so that you will be informed of several important navigation conditions:
• The cursor indicates the unit is in Car or Pedestrian mode
• The cursor indicates the vehicle is moving at high or low speeds. The cursor becomes
elongated at higher speeds and wider at lower speeds.
• The cursor displays a shadow that shows the position of the Sun. This is especially
important if using GNAV10 in Pedestrian mode. By positioning yourself so that the
shadow that you cast is in the same position as the shadow on the screen, you can
be assured that you are walking in the right direction.
• The cursor shadow disappears during night driving.
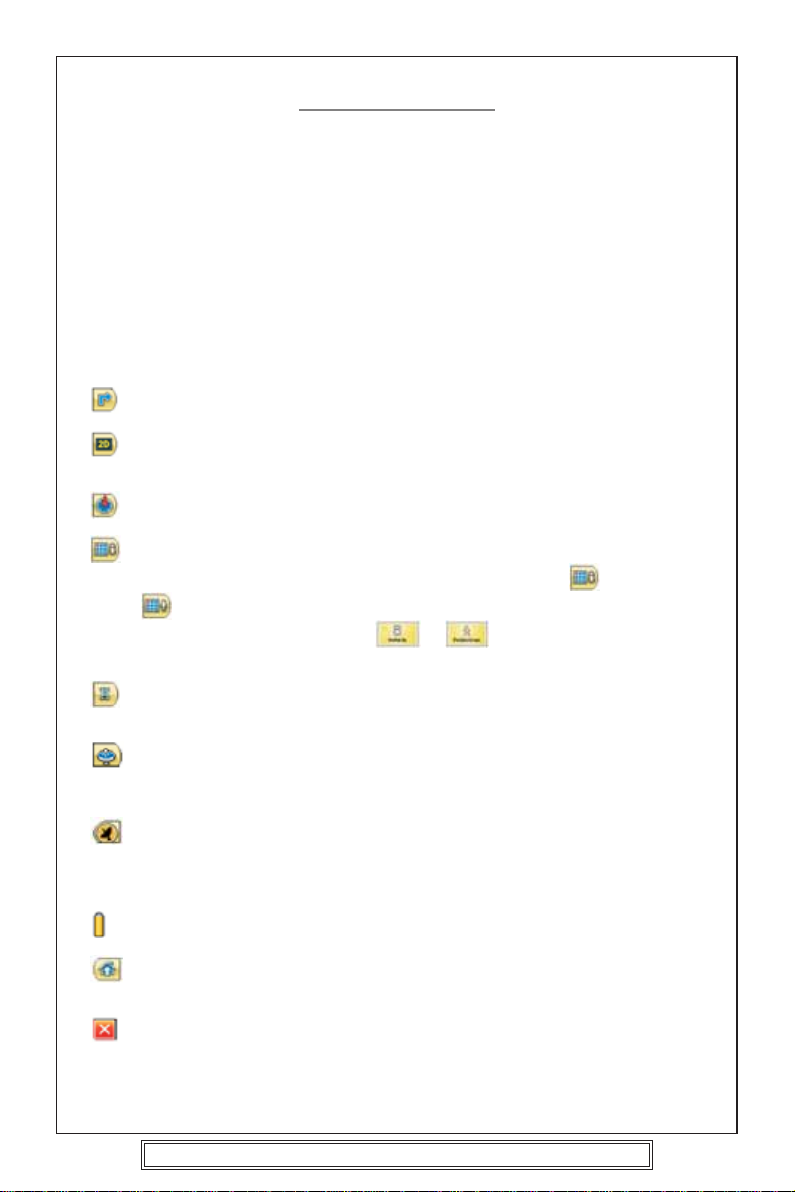
Map Screen Buttons
Toggles between Turn by Turn details and a complete list of Driving Directions.
Toggles between 2D, 2D Night, 3D and 3D Night views. The icon indicates the
next available view.
Indicates the direction of Magnetic North.
Enables the planning of a route via the Destination Menu. Also Enables access
to the Options and Settings Menu. Indicates whether Vehicle Mode (
Mode (
or in the Options Menu selecting either
navigation radius is restricted to 10 kilometres (6 miles).
)is selected. To toggle modes hold down the button for several seconds,
or . In Pedestrian Mode, the
) or Pedestrian
Displays details about the calculated route, such as ETA(Estimated time of Arrival),
ETR(Estimated time on route) and the distance to the destination.
Displays GPS–generated information, such as, geographic position, current
location, altitude, and speed. The icon indicates the next item to be displayedthe
function is cyclic keep touching the icon to change the displayed information.
Displays GPS status, such as information about the satellite fix, and the latitude,
longitude and altitude of the current position. The icon appears green when there is
a GPS fix, and red when there is no GPS fix. Also provides a link to the GPS Settings
screen.
Displays battery status. When the battery power is low, a message box will appear.
(Home) enables direct calculation of a route to an address stored as the home
address.
Exits from the Navigation function.
P. 16
Goodmans Product Information Helpline (0870) 873 0080
 Loading...