


contents
In the box |
2 |
|
AV Switching |
2 |
|
Over Air Download |
2 |
|
Wiring the plug |
3 |
|
Your Digital Receiver |
4 |
|
Remote control |
5 |
|
1 |
Preparation |
7 |
|
Connections |
7 |
|
Switching on |
8 |
|
Tuning in |
8 |
2 |
Everyday Operation |
10 |
|
Changing Channels |
10 |
|
Channel List |
12 |
|
Electronic Programme Guide |
13 |
|
Audio Control |
16 |
|
Digital Teletext |
17 |
|
Widescreen |
18 |
3 |
Advanced Operation |
19 |
|
Configuring Your Receiver |
19 |
|
Editing The Channel List |
21 |
|
Channel And Menu Protection |
23 |
|
Favourite Channels |
25 |
|
Programme Reminders And Timers |
26 |
|
Re-installation |
28 |
Appendix A - Safety |
31 |
|
Appendix B - Specification |
32 |
|
Appendix C - Connecting A VCR |
33 |
|
Appendix D - Troubleshooting Guide |
35 |
|
1

in the box
Inside your GDB 3 receiver package you should have:
This user guide Quick Start Guide
GDB 3 digital terrestrial television receiver Remote control handset
Set of batteries for the handset Aerial cable
SCART cable
1 year guarantee card
3 year extended warranty card
AV SWITCHING
If after connecting the GDB 3 to your TV as shown and you do not see a picture, press AV button on your TV remote until you see the “First Time Install” screen.
OVER AIR DOWNLOAD
Over Air Download: To ensure that your digital receiver always has the most up todate information. Please ensure that after use it is set to its standby mode. The GDB 3 automatically powers up at 3AM each day and searches for any new information which may be broadcast and will download this to your box automatically. This operation will normally take approximately 30 seconds.
If you have an important recording to make at 3AM which must not have a 30 second interrupt then you can disable the auto OAD search by performing the following:
1.Press Menu button and using the up / down buttons highlight CONFIG and press the SELECT button,
2.Use the up and down buttons to highlight "RECEIVER UPGRADE"
and press SELECT button.
3.Using the left / right button change function from Enable to Disable.
4.Press SELECT button then MENU and MENU to return to Normal l operation.
Do not forget to re enable the automatic OAD function after you have made your recording by repeating the above instructions but this time selecting ENABLE.
2
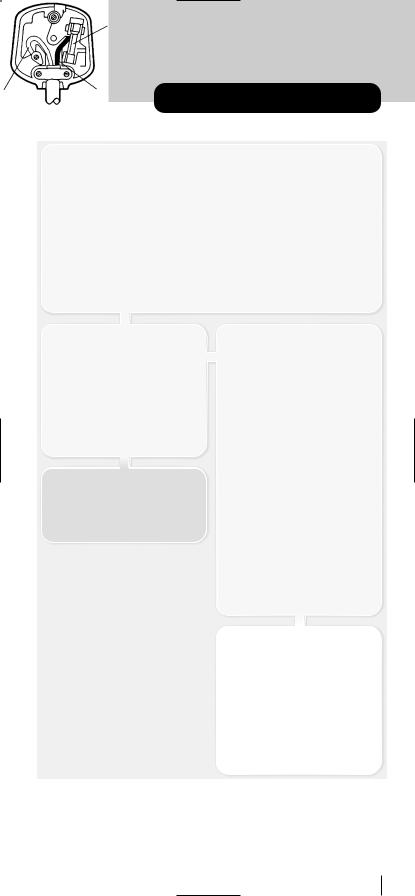
wiring the plug
If your receiver is fitted with a non-rewireable plug and you need to change the fuse, you will need to refit the fuse cover. If you lose or damage the fuse cover, do not use the plug until you have replaced the cover with a new one. You can get one from us. Make sure you replace the fuse cover with one which is the same colour as the markings on the fuse.
If you have to change the plug because it is not suitable for your socket or it is damaged, cut off the plug and fit another one following the wiring instructions below. Please throw away the plug you have removed, as insertion into a mains socket could cause injury.
For your own safety, read the following instructions carefully before attempting to connect this unit to the mains.
WIRING INSTRUCTIONS
Your receiver is designed to operate on 230 to 240V, 50Hz current only. Connecting it to another power source may damage the receiver.
The wires in the mains lead are coloured as follows.
Blue = Neutral Brown = Live
WARNING
To prevent electric shocks, remove the plug from the mains socket before you take off its cover.
IMPORTANT
The colours of the wires in the mains lead from your receiver may not be the same as the coloured markings identifying the terminals in your plug. So please follow these instructions.
Connect the blue wire to the terminal marked with the letter N or coloured black.
Connect the brown wire to the terminal marked with the letter L or coloured red.
Do not connect any wire to the other terminal on the plug.
If you use a 13 Amp (BS1363) plug, you will need a 5 Amp fuse.
If you use any other type of plug, you will also need a 5 Amp fuse either in the plug or on the distribution board.
FUSE
BLUE |
BROWN |
(Neutral) |
(Live) |
3
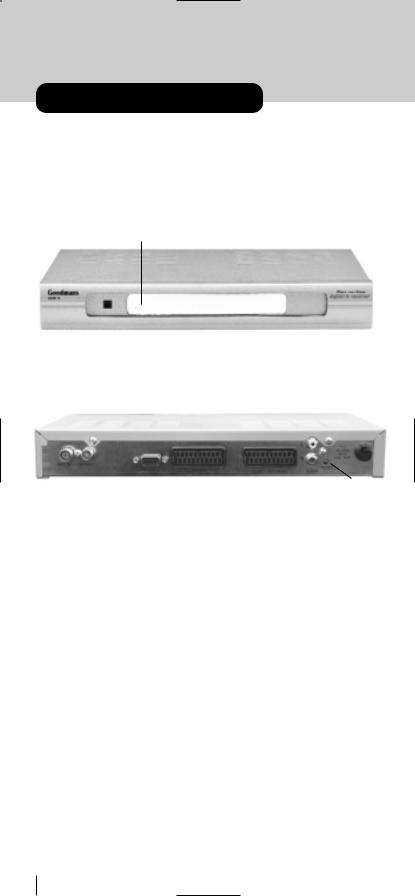
your digital receiver
Front
Standby Led
Rear
|
|
|
|
|
|
|
|
Audio |
|
Output |
|
|
|
|
|
|
|
|
|
|
|
|
|
||
|
|
|
|
|
|
|
|
(Left/Right) |
|
|
||
|
|
|
|
RS 232 socket |
|
|
|
|
||||
|
|
|
|
|
|
|
|
|
|
|
||
Antenna in |
LT out |
|
TV SCART socket |
VCR SCART socket |
Reset |
|||||||
|
|
|
|
|
|
|
|
|
||||
4

remote control handset
TV/DTV (3)
Stand-by (1)
Numeric (7)
Wide (15)
Programme up/ Programme down (10)
Volume up/Volume down (9)
Info/Help (16)
Page up/Red (11)
Up (5)
Left (11)
Page down/Green (12)
Exit (18)
Subtitle (19)
Mute (2)
Guide (8)
Menu (4)
Blue (14)
Select (6)
Yellow (13)
Down (5)
Text (17)
5
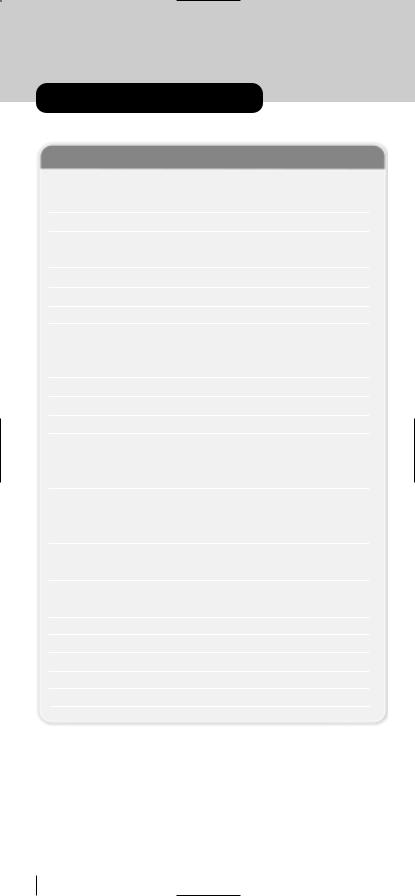
remote control handset
REMOTE BUTTONS
Button |
Function |
||
|
|
|
|
1 |
Standby |
Turn the receiver on and off |
|
2 |
Mute |
Silence received audio |
|
3 |
TV/DTV |
Exit most menus to return to television viewing |
|
|
|
Switch the TV set between analogue, digital TV and VCR |
|
4 |
Menu |
Display the Main Menu. Exits menus |
|
5 |
Up, Down, Left, Right |
Move between menu items |
|
6 |
Select |
Make selection in a menu |
|
7 |
Number keys |
Change channels |
|
|
|
Enter PIN code |
|
|
|
Enter numbers and letters into menus |
|
8 |
Guide |
Display and exit electronic programme guide |
|
9 |
V+, V- |
Adjust the received audio volume |
|
10 |
P+, P- |
Change channels |
|
11 |
Page Up/Red |
Move up a page through channel list |
|
|
|
Move to top in EPG programme details |
|
|
|
Select red option in digital teletext |
|
12 |
Page Down/Green |
Move down a page through channel list |
|
|
|
Select green option in digital teletext |
|
|
|
Move to bottom in EPG programme details |
|
13 |
Yellow |
Scroll up through EPG programme details |
|
|
|
Select yellow option in digital teletext |
|
14 |
Blue |
Scroll down through EPG programme details |
|
|
|
Select blue option in digital teletext |
|
15 |
Wide |
Select screen format |
|
16 |
i |
Display menu help |
|
17 |
Text |
Start and stop digital teletext |
|
18 |
Exit |
|
|
19 |
Subtitle |
Turn the subtitle ON and OFF |
|
6

preparation |
1 |
CONNECTIONS
Place your GDB 3 receiver on a firm, level surface with at least a 10cm gap around all sides of the case and in a position convenient for connection to your television, a mains power outlet and a TV aerial wall outlet (or the 'flying lead' from your TV aerial, as appropriate).
Please refer to the safety section in Appendix A.
Turn off your television at the mains and disconnect the lead going to the aerial wall outlet (or the flying aerial lead) and connect this to the ANT IN socket on the rear of the receiver. Connect the aerial cable supplied from the LT OUT socket on the receiver to the TV set's aerial socket.
Connect the TV SCART socket on the rear of the receiver to a suitable SCART socket on your television. There may be more than one SCART socket on your television and, if unsure which to use, you should refer to its manual for guidance.
If you have a VCR or other equipment connected to your television, please connect the receiver as described here and refer to Appendix D later when satisfied that the receiver is functioning normally.
Finally, plug the receiver into the mains outlet.
Remove the battery compartment cover from the rear of the remote control handset by lifting the catch at one side. Insert two AAA (MN2400) sized batteries, taking care to observe the correct orientation as marked on the inside of the compartment. Replace the compartment cover.
7
1 preparation
SWITCHING ON
Turn on your TV set and select the SCART input (with the AV key, or similar, on the television remote control). Turn on the mains supply to the GDB 3 receiver
(the indicator on the front of the receiver will glow red) and press the [STANDBY] key on the GDB 3 remote control handset. The indicator light will glow green and the receiver's menu will be seen on the TV screen.
If you do not see the receiver's menu on the television screen, refer to the Troubleshooting Guide in Appendix E.
TUNING IN
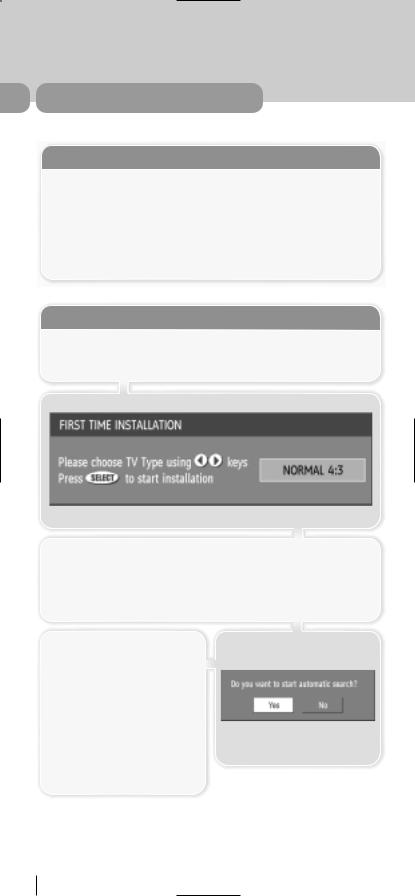
Because this is the first time that the receiver has been used, there are no channels stored in the receiver's memory and the First Time Installation menu is displayed on the screen.
First you should select the type of TV set you have connected to the GDB 3 receiver. Press the [LEFT] or [RIGHT] keys on the remote control handset to switch the indicator on the screen to show either 16:9, if you have a 16:9 or 'widescreen' TV, or to 4:3 if you have a standard TV set. Then press [SELECT] to start the installation process. The next menu will ask if you want to tune in the digital terrestrial television channels.
Using the [LEFT] or [RIGHT] keys on the remote control, make sure that the YES button is highlighted in yellow, and press the [SELECT] key to start the automatic search.
The GDB 3 receiver will automatically tune to the UHF transmission channels 21 to 68 looking for digital terrestrial TV broadcasts and displaying the names of channels found. This process will take about five minutes.
8

preparation |
1 |
When the search is finished, the first channel of the channel list and the information banner is displayed you can now watch digital terrestrial television, selecting the channel you require as described in the next section.
HINT
Depending on the reception conditions in your particular area, you may find that the list of channels found includes one or more repeated names. This is because the receiver may detect and store some channels, including those it cannot receive clearly, from adjacent areas alongside the strong channels from a transmitter nearby. This is not a problem and the weaker channels can be deleted from the receiver later, as described in Section 3 - ADVANCED OPERATION - Editing the channel list.
If no digital terrestrial television broadcasts are found the receiver will display a message:
You should then refer to the Troubleshooter Guide in Appendix E to establish the cause of the problem.
When you have finished watching digital terrestrial TV, you may wish to switch the receiver to standby to save power - although the GDB 3 receiver can remain powered up continuously, even when the television is turned off, without harm to the television or itself. The receiver is returned to standby by pressing the [STANDBY] key on the remote control handset.
Hint
In standby, the GDB 3 receiver still consumes power and thereby contributes to air and water pollution and the exhaustion of the World's natural resources. Overnight, or when your receiver is not going to be used for long periods of time, you can turn it off at the mains and this will save energy (and save you money). You will not have to re-install the receiver when it is turned on again.
9

2 everyday operation
While using the GDB 3 receiver to the full there are great many keys to use in different situations. Many of the menu screens displayed by the receiver have reminders as to which keys do what, at the base of the screen. In addition, many screens have further help available which is displayed when the [i] key is pressed, as prompted at the bottom right of the screen.
Providing your TV set SCART socket has switch control, pressing the [TV/DTV] key at any time while watching television programmes will switch the TV set between displaying the digital terrestrial television programme and its normal analogue television reception.
CHANGING CHANNELS
You can select the channel you wish to watch in one of four ways - stepping through the channel list, selection by number, from the on-screen channel list, and using the electronic programme guide (EPG).
To move through the channel list, press the [P+] or [P-] keys on the remote control. Pressing the [P+] key will select the channel next in the channel list. Pressing the [P-] key will select the previous channel in the list.
Pressing the [P+] key when the last channel in the list is being viewed will select the first channel. Similarly, pressing the [P-] key when the first channel is displayed will select the last channel in the channel list.
You can also select the required channel using its channel list number. Channel numbers are entered using the number keys on the remote control handset and can be up to three digits long.
Hint
The channel list numbers are assigned by the broadcasters. Because not all channels are broadcast free-to-air and stored by the receiver, the channel list numbers do not run continuously. The fifteenth channel in the list, for example, may not be channel number 15 but channel number 17.
When you press a number key on the remote control, a small box appears in the top left of the screen to show the entered number. After each digit is entered, the receiver will wait up to two seconds for the next digit to be pressed until either three digits have been entered or you do not press a digit in time. The channel corresponding to the entered number in the box will then be selected.
Hint
If you enter a number which does not correspond to a stored channel, the next valid channel number is selected instead. If you enter a number greater than the highest numbered channel in the channel list, the receiver will select the last channel in the list.
10
everyday operation |
2 |
INFORMATION BANNER
Whenever you change channel, using the [P+] and [P-] keys or the number keys, the receiver displays the channel picture along with an information banner at the bottom of the screen. This will remain on the screen for approximately three seconds. The information banner can also be displayed at any time while watching TV by pressing the [i] key on the remote control. Pressing the [i] key again removes the banner.
Hint
Not all channels broadcast the programme data. If the name and times of the programme is not available then 'Not available' is displayed in the information banner.
Icons are also displayed in the information banner and if this channel is a favourite channel (see Section 3 - ADVANCED OPERATION - Favourite Channels).
 favourite channel
The information banner gives a number of facts on the channel selected and the programmes on it. The name of the channel is displayed, along with its channel list number and an indication of the strength of the signal received on this tuning channel.
The name and the start and finish time of the programme currently showing on the selected channel are given, and the current time.
11
 Loading...