

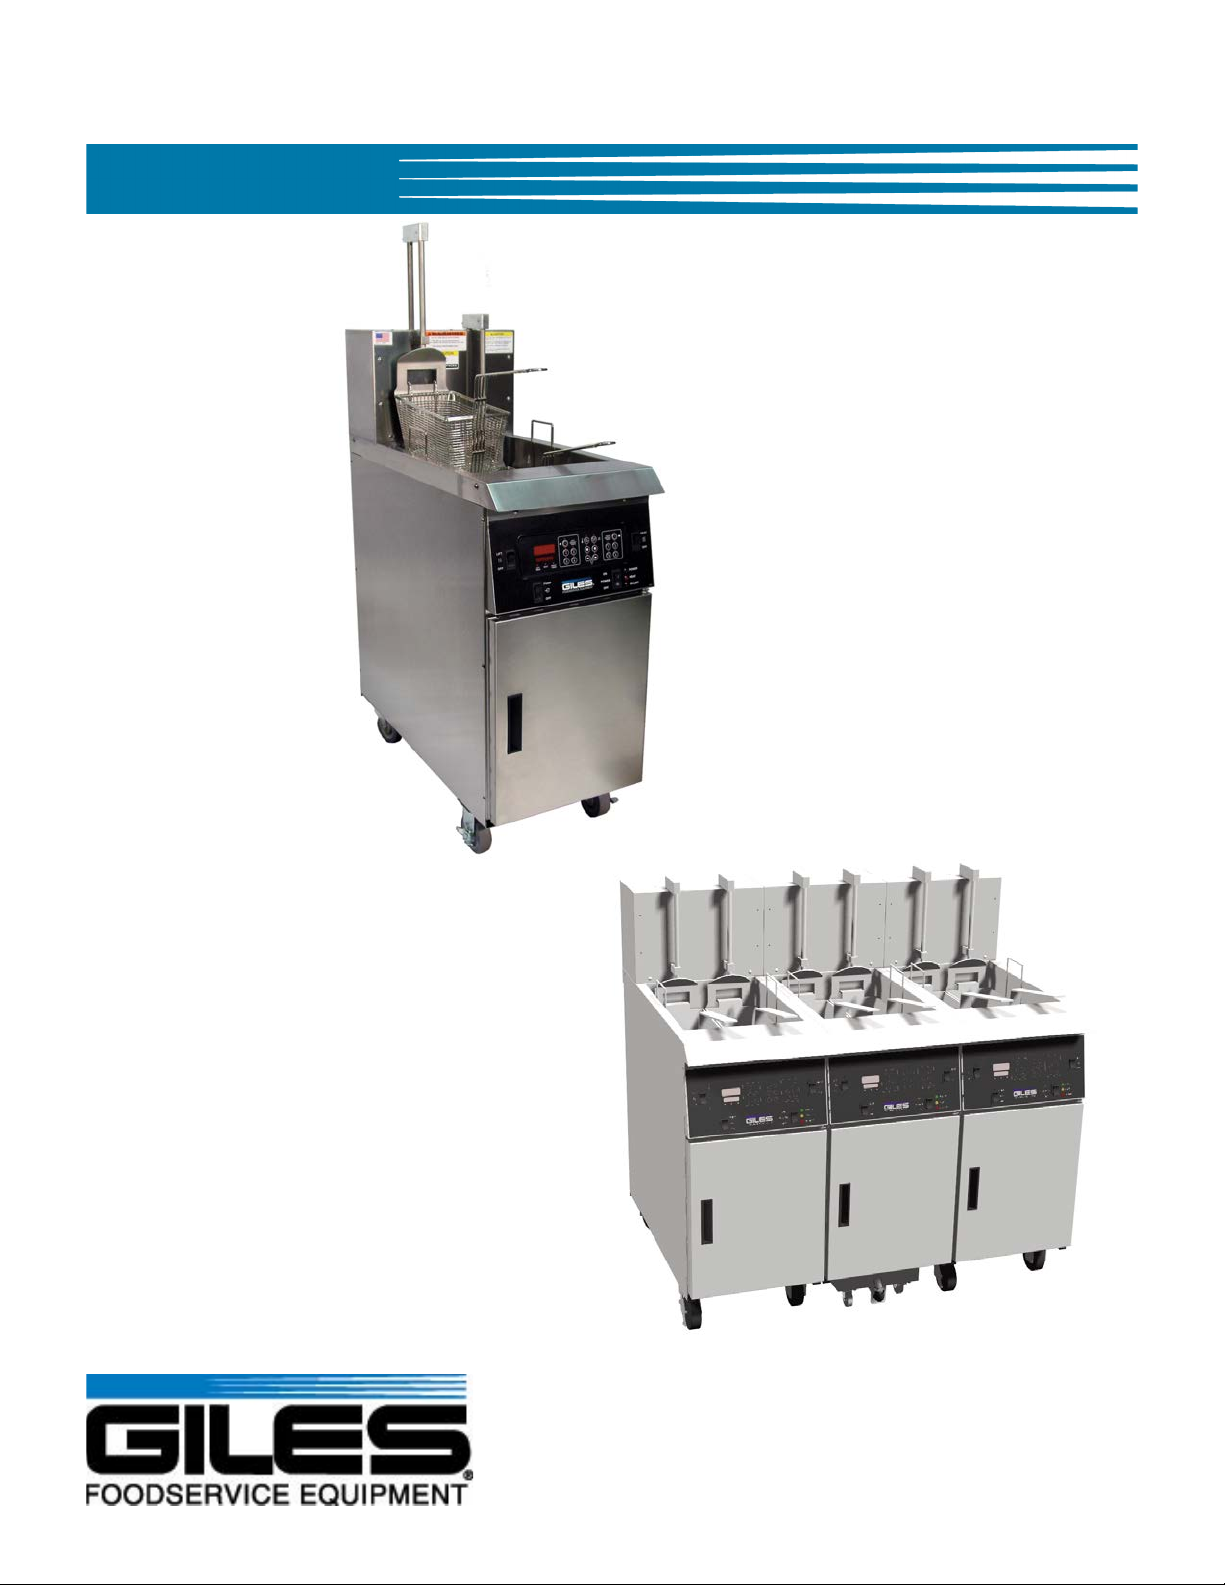
Giles GBF-35 Operators Manual
Operations & Service Manual
Model: GBF-35/50
Single
GBF Series Fryers
Model: GBF-35/50 Banked
Giles Enterprises, Inc.
2750 Gunter Park Drive West • Montgomery, AL 36109 USA
Phone Toll Free: 800.554.4537 (USA & Canada Only)
Phone: 334.272.1457
Fax: 334.239.4117 • Website: www.gfse.com
Form No. 65686 (Release date: 04/20/11) Rev. C

Record the following information here for easy, quick
reference
Model: ______________________________________
Serial Number(s) - record left fryer to right fryer for
“banked” systems; each unit has its own serial number:
______________________________________
______________________________________
______________________________________
______________________________________
______________________________________
Voltage: _______ Phase: _______
Date Installed: _______________
Be ready to provide this information when calling for
service or repair parts.

LIMITED WARRANTY
• Subject to the terms and conditions of this Limited Warranty as herein stated, all Giles Enterprises,
Inc., Foodservice Equipment and parts purchased new from an authorized Giles Enterprises, Inc.,
representative are warranted as to defects in material or workmanship for a period of 24 months
from the date of installation, provided, however, that with regard to labor costs in connection with
this warranty, see below. All installations must be made by a qualified installing agency in accordance with all applicable codes and/or regulations in the jurisdiction in which installed. Limited warranty coverage is extended to the original owner only and is void if the unit is resold.
• During the Limited Warranty period, Giles Enterprises, Inc. will replace or recondition, at its factory,
any part or parts of this unit which Giles Enterprises, Inc. inspectors judge defective, provided the
unit has been subjected to normal usage, properly installed, operated and serviced. This Limited
Warranty does not cover cosmetic damage, and damage due to acts of God, accident, misuse, alteration, negligence, abuse of the Giles Foodservice Equipment or the use of unorthodox repair methods. All parts replaced under this Limited Warranty carry only the unexpired term of this Limited
Warranty. Limited Warranty service may be furnished only by an authorized Giles Enterprises, Inc.,
representative.
• If Limited Warranty service is requested, Giles Enterprises, Inc., will send factory-authorized service representatives to repair, recondition, replace or inspect units of its manufacture with such labor
being rendered without cost to owner for 24 months from the date of installation. Otherwise, service, including labor and transportation charges or other expenses, in connection with the removal or
installation of any part or parts supplied under this Limited Warranty, are specified on the original
sales contract between the purchaser and the authorized Giles Enterprises, Inc., representative.
• Giles Enterprises, Inc. reserves the right to change or improve its equipment and parts in any way
without obligation to alter such equipment or parts previously manufactured.
• Giles Enterprises, Inc. makes no further warranties, express or implied including implied warranties
of merchantability or fitness for a particular purpose, and has no other obligation or liability not
specifically stated herein.
• Repair or replacement as provided under this limited warranty is the exclusive remedy. Giles
Enterprises, Inc., shall not be liable for any incidental or consequential damages for breach of any
express or implied warranty on this product, except to the extent prohibited by applicable law. Any
implied warranty of merchantability or fitness for a particular purpose on this product is limited in
duration to the duration of this limited warranty.
• Used Giles Enterprises, Inc., Foodservice Equipment or parts or Giles Enterprises, Inc., Foodservice
Equipment or parts not purchased from an authorized Giles Enterprises, Inc., representative, carry
no warranties, express or implied.


Table Of Contents
GBF-Series Fryers
Safety . . . . . . . . . . . . . . . . . . . . . . . . . . . . . . . . . . . . . . . . . . . . . . . . . . . . . . . . vi
Safety Overview . . . . . . . . . . . . . . . . . . . . . . . . . . . . . . . . . . . . . . . . . . . . . . . . . . . . . . . . . . . . . . . . . . . vi
Specific Safety Precautions . . . . . . . . . . . . . . . . . . . . . . . . . . . . . . . . . . . . . . . . . . . . . . . . . . . . . . . . . . vii
1. Introduction . . . . . . . . . . . . . . . . . . . . . . . . . . . . . . . . . . . . . . . . . . . . . . 1
1.01 Construction . . . . . . . . . . . . . . . . . . . . . . . . . . . . . . . . . . . . . . . . . . . . . . . . . . . . . . . . . . . . . . 1
1.02 Standard Features. . . . . . . . . . . . . . . . . . . . . . . . . . . . . . . . . . . . . . . . . . . . . . . . . . . . . . . . . . 1
1.03 Optional Features . . . . . . . . . . . . . . . . . . . . . . . . . . . . . . . . . . . . . . . . . . . . . . . . . . . . . . . . . . 1
1.04 Specifications . . . . . . . . . . . . . . . . . . . . . . . . . . . . . . . . . . . . . . . . . . . . . . . . . . . . . . . . . . . . . 2
1.04.1 Overall Dimensions for Single & “Banked” Fryer systems . . . . . . . . . . . . . . . . . . . . . . . . . . 2
1.04.2 Regulatory Listings . . . . . . . . . . . . . . . . . . . . . . . . . . . . . . . . . . . . . . . . . . . . . . . . . . . . . . . . . 3
1.04.3 Basket Size . . . . . . . . . . . . . . . . . . . . . . . . . . . . . . . . . . . . . . . . . . . . . . . . . . . . . . . . . . . . . . . 3
1.04.4 Vat Size and Capacity . . . . . . . . . . . . . . . . . . . . . . . . . . . . . . . . . . . . . . . . . . . . . . . . . . . . . . . 3
1.04.5 Shipping Specifications (Crated). . . . . . . . . . . . . . . . . . . . . . . . . . . . . . . . . . . . . . . . . . . . . . . 4
2. Installation . . . . . . . . . . . . . . . . . . . . . . . . . . . . . . . . . . . . . . . . . . . . . . . 5
2.01 Location . . . . . . . . . . . . . . . . . . . . . . . . . . . . . . . . . . . . . . . . . . . . . . . . . . . . . . . . . . . . . . . . . 5
2.02 Unpacking . . . . . . . . . . . . . . . . . . . . . . . . . . . . . . . . . . . . . . . . . . . . . . . . . . . . . . . . . . . . . . . . 6
2.03 Electrical Requirements . . . . . . . . . . . . . . . . . . . . . . . . . . . . . . . . . . . . . . . . . . . . . . . . . . . . . 7
2.04 Electrical Specifications (per Fryer Unit) . . . . . . . . . . . . . . . . . . . . . . . . . . . . . . . . . . . . . . . . . 7
2.05 Electrical Connections . . . . . . . . . . . . . . . . . . . . . . . . . . . . . . . . . . . . . . . . . . . . . . . . . . . . . . 8
2.05.1 Electrical Connection Diagram . . . . . . . . . . . . . . . . . . . . . . . . . . . . . . . . . . . . . . . . . . . . . . . . 8
2.06 Ventilation of Fryer . . . . . . . . . . . . . . . . . . . . . . . . . . . . . . . . . . . . . . . . . . . . . . . . . . . . . . . . . 9
2.07 Restraint Device . . . . . . . . . . . . . . . . . . . . . . . . . . . . . . . . . . . . . . . . . . . . . . . . . . . . . . . . . . . 9
3. Overview . . . . . . . . . . . . . . . . . . . . . . . . . . . . . . . . . . . . . . . . . . . . . . . 11
3.01 Auto-Basket Lifts & Baskets . . . . . . . . . . . . . . . . . . . . . . . . . . . . . . . . . . . . . . . . . . . . . . . . . 12
3.02 Control Panel. . . . . . . . . . . . . . . . . . . . . . . . . . . . . . . . . . . . . . . . . . . . . . . . . . . . . . . . . . . . . 14
3.02.1 Control Panel - Computer Controller. . . . . . . . . . . . . . . . . . . . . . . . . . . . . . . . . . . . . . . . . . . 14
3.02.2 Control Panel - Mechanical Controls . . . . . . . . . . . . . . . . . . . . . . . . . . . . . . . . . . . . . . . . . . . 16
3.03 Lower Cabinet Area - Single Fryer & Base Unit of “banked” systems . . . . . . . . . . . . . . . . 18
3.04 Lower Cabinet Area - Add-on Fryer for “banked” systems . . . . . . . . . . . . . . . . . . . . . . . . . 20
3.05 Filter Pan Unit - Single Fryer & Base Unit of “banked” systems . . . . . . . . . . . . . . . . . . . . . 22
3.06 Filter Pan Assembly . . . . . . . . . . . . . . . . . . . . . . . . . . . . . . . . . . . . . . . . . . . . . . . . . . . . . . . 24
3.07 Accessories (Included) . . . . . . . . . . . . . . . . . . . . . . . . . . . . . . . . . . . . . . . . . . . . . . . . . . . . . 26
3.08 Accessories (Not Included) . . . . . . . . . . . . . . . . . . . . . . . . . . . . . . . . . . . . . . . . . . . . . . . . . . 28
4. Unit Preparation . . . . . . . . . . . . . . . . . . . . . . . . . . . . . . . . . . . . . . . . . 31
4.01 Set-up Fryer(s) for Check-out . . . . . . . . . . . . . . . . . . . . . . . . . . . . . . . . . . . . . . . . . . . . . . . . 32
4.02 Power test . . . . . . . . . . . . . . . . . . . . . . . . . . . . . . . . . . . . . . . . . . . . . . . . . . . . . . . . . . . . . . 33
4.03 Heating Element Test . . . . . . . . . . . . . . . . . . . . . . . . . . . . . . . . . . . . . . . . . . . . . . . . . . . . . . 34
4.03.1 Heating Element Test - Computer Controller . . . . . . . . . . . . . . . . . . . . . . . . . . . . . . . . . . . . 34
4.03.2 Heating Element Test - Mechanical Controls . . . . . . . . . . . . . . . . . . . . . . . . . . . . . . . . . . . . 35
4.04 Filter Pump Test . . . . . . . . . . . . . . . . . . . . . . . . . . . . . . . . . . . . . . . . . . . . . . . . . . . . . . . . . . 37
4.05 Boil-Out Procedure . . . . . . . . . . . . . . . . . . . . . . . . . . . . . . . . . . . . . . . . . . . . . . . . . . . . . . . . 38
iii

GBF-Series Fryers
4.06 Clean Filter Pan. . . . . . . . . . . . . . . . . . . . . . . . . . . . . . . . . . . . . . . . . . . . . . . . . . . . . . . . . . . 38
Table Of Contents
5. Fryer Operation . . . . . . . . . . . . . . . . . . . . . . . . . . . . . . . . . . . . . . . . . . 39
5.01 Cooking Controller . . . . . . . . . . . . . . . . . . . . . . . . . . . . . . . . . . . . . . . . . . . . . . . . . . . . . . . . 40
5.01.1 Computer Controller - Overview. . . . . . . . . . . . . . . . . . . . . . . . . . . . . . . . . . . . . . . . . . . . . . 40
5.01.1.1 Keys and Functions. . . . . . . . . . . . . . . . . . . . . . . . . . . . . . . . . . . . . . . . . . . . . . . . . . . . . . . . 41
5.01.1.2 Programming Cooking Temperature . . . . . . . . . . . . . . . . . . . . . . . . . . . . . . . . . . . . . . . . . . . 42
5.01.1.3 Programming Cooking Time . . . . . . . . . . . . . . . . . . . . . . . . . . . . . . . . . . . . . . . . . . . . . . . . . 43
5.01.1.4 Start a Cooking Time . . . . . . . . . . . . . . . . . . . . . . . . . . . . . . . . . . . . . . . . . . . . . . . . . . . . . . 44
5.01.1.5 Cancel a Running Cooking Time . . . . . . . . . . . . . . . . . . . . . . . . . . . . . . . . . . . . . . . . . . . . . . 44
5.01.1.6 Manually Lowering and Raising the Cook Baskets (Basket Lift Option Only) . . . . . . . . . . . 44
5.01.1.7 Display Cook Time Remaining . . . . . . . . . . . . . . . . . . . . . . . . . . . . . . . . . . . . . . . . . . . . . . . 45
5.01.1.8 Displaying Actual Temperature of the Shortening. . . . . . . . . . . . . . . . . . . . . . . . . . . . . . . . . 45
5.01.2
5.01.2.1 Setting the Temperature Unit of Measure . . . . . . . . . . . . . . . . . . . . . . . . . . . . . . . . . . . . . . 47
5.01.2.2 Setting a Cooking Temperature. . . . . . . . . . . . . . . . . . . . . . . . . . . . . . . . . . . . . . . . . . . . . . . 48
5.01.2.3 Setting a Cooking Time. . . . . . . . . . . . . . . . . . . . . . . . . . . . . . . . . . . . . . . . . . . . . . . . . . . . . 49
5.02
5.02.1 Cooking Procedure - Computer Controller . . . . . . . . . . . . . . . . . . . . . . . . . . . . . . . . . . . . . . 52
5.02.2 Cooking Procedure - Mechanical Controls . . . . . . . . . . . . . . . . . . . . . . . . . . . . . . . . . . . . . . 55
5.03 Filtering Liquid Shortening . . . . . . . . . . . . . . . . . . . . . . . . . . . . . . . . . . . . . . . . . . . . . . . . . . 58
5-04 Removal of Used Liquid Shortening . . . . . . . . . . . . . . . . . . . . . . . . . . . . . . . . . . . . . . . . . . . 61
5.05 Normal Shut-Down . . . . . . . . . . . . . . . . . . . . . . . . . . . . . . . . . . . . . . . . . . . . . . . . . . . . . . . . 64
5.06 Emergency Shut-Down. . . . . . . . . . . . . . . . . . . . . . . . . . . . . . . . . . . . . . . . . . . . . . . . . . . . . 64
Mechanical Controls - Overview. . . . . . . . . . . . . . . . . . . . . . . . . . . . . . . . . . . . . . . . . . . . . . 46
Cooking Procedure . . . . . . . . . . . . . . . . . . . . . . . . . . . . . . . . . . . . . . . . . . . . . . . . . . . . . . . . 50
6. Cleaning . . . . . . . . . . . . . . . . . . . . . . . . . . . . . . . . . . . . . . . . . . . . . . . . 65
6.01 Boil-Out Procedure (Cleaning the Fry Vat) . . . . . . . . . . . . . . . . . . . . . . . . . . . . . . . . . . . . . . 65
6.02 Cleaning the Filter Pan & Refreshing Filter Media . . . . . . . . . . . . . . . . . . . . . . . . . . . . . . . . 68
7. Troubleshooting . . . . . . . . . . . . . . . . . . . . . . . . . . . . . . . . . . . . . . . . . 70
7.01 Temperature Control System . . . . . . . . . . . . . . . . . . . . . . . . . . . . . . . . . . . . . . . . . . . . . . . . 70
7.02 Oil Filtration System . . . . . . . . . . . . . . . . . . . . . . . . . . . . . . . . . . . . . . . . . . . . . . . . . . . . . . . 72
7.03 Basket Elevator System (Basket Elevator Option Only) . . . . . . . . . . . . . . . . . . . . . . . . . . . . 73
8. Parts Listing . . . . . . . . . . . . . . . . . . . . . . . . . . . . . . . . . . . . . . . . . . . . . 75
8.01 Parts Ordering & Service Information . . . . . . . . . . . . . . . . . . . . . . . . . . . . . . . . . . . . . . . . . 75
8.02 Control Panels (Computer & Mechanical) - Single or Main Unit of Battery . . . . . . . . . . . . . 76
8.03 Control Panels (Computer & Mechanical) - Add-on Unit of Battery . . . . . . . . . . . . . . . . . . . 78
8.04 Lower Cabinet - Single or Main Unit of Battery . . . . . . . . . . . . . . . . . . . . . . . . . . . . . . . . . . 80
8.05 Lower Cabinet - Add-on Unit of Battery . . . . . . . . . . . . . . . . . . . . . . . . . . . . . . . . . . . . . . . . 82
8.06 Control Box Front . . . . . . . . . . . . . . . . . . . . . . . . . . . . . . . . . . . . . . . . . . . . . . . . . . . . . . . . . 84
8.07 Rear Cabinet - Single Unit . . . . . . . . . . . . . . . . . . . . . . . . . . . . . . . . . . . . . . . . . . . . . . . . . . 86
8.08 Rear Cabinet - Banked Fryer Battery . . . . . . . . . . . . . . . . . . . . . . . . . . . . . . . . . . . . . . . . . . 88
8.09 Cabinet Underside - Banked Fryer Battery . . . . . . . . . . . . . . . . . . . . . . . . . . . . . . . . . . . . . . 90
iv

Table Of Contents
8.10 Fry Vat Assembly . . . . . . . . . . . . . . . . . . . . . . . . . . . . . . . . . . . . . . . . . . . . . . . . . . . . . . . . . 92
8.11 Filter Pan Assembly . . . . . . . . . . . . . . . . . . . . . . . . . . . . . . . . . . . . . . . . . . . . . . . . . . . . . . . 94
Notes:
GBF-Series Fryers
v
GBF-Series Fryers
Safety
Safety
Safety Overview
The instructions contained in this manual are intended to aid in learning the proper procedures for
installing, operating and servicing this unit.
Throughout this manual, safety precautions are identified by use of safety alert symbols and three alert
keywords: DANGER
to which it applies. Suggested, recommended, or other noteworthy information is identified by use of the
keyword NOTE
as follows:
Shall: understood to mean mandatory.
Should: understood to mean advisory.
May: understood to mean permissive or possible.
Will: indicates the occurrence of a future predictable event or condition.
. Additionally, certain key words are used to indicate a specific meaning or add emphasis
... WARNING ... CAUTION. Safety alert information precedes the step(s) or activity
Safety Alert Symbols
Used in conjunction with key alert words (DANGER ... WARNING ... CAUTION) to signify potential
personal injury hazards. These alerts immediately precede precautionary information. Adhere to all safety
notices following these symbols to avoid possible injury or death. Failure to comply with safety
precautions identified by the safety alert symbols may also void the manufacturer’s warranty.
DANGER
• Indicates an imminently hazardous situation, which will result in serious personal injury and possible
death, if not avoided. Use of this alert is limited to the most extreme situations.
WARNING
• Indicates a potentially hazardous situation, which could result in serious personal injury and possible
death, if not avoided.
CAUTION
• Indicates a potentially hazardous situation or unsafe practice, which may result in minor to moderate
personal injury, if not avoided.
CAUTION
• When used without the safety alert symbol, CAUTION indicates a potentially hazardous situation
which, may result in equipment or property damage and void the warranty, if not avoided.
NOTE:
•Identifies suggested, recommended or other noteworthy information.
vi
Safety
GBF-Series Fryers
Specific Safety Precautions
For your safety, please read and observe the following precautions when operating or servicing this unit.
Adherence to this important safety information will help prevent personal injury and/or equipment
damage.
DANGER
• Turn off the Fryer and disconnect supply power to it before cleaning or performing any maintenance activity.
• DO NOT wash down the unit’s interior or exterior with water from a spray hose.
• Failure to comply with these DANGER
damage and void the warranty.
notices can result in death or serious injury, equipment or property
WARNING
• Consult a qualified electrician to ensure that:
> all electrical specification and code requirements are met, and
> circuit breakers and wiring are of sufficient rating and gauge for this equipment.
• During installation, the unit must be properly grounded and must comply with all electrical requirements.
• Improper installation or adjustment, unauthorized alteration, or improper service and maintenance could result in
death or serious personal injury, equipment or property damage, and void the warranty.
• DO NOT use or store gasoline, other flammable liquids, or materials that release flammable vapors in the vicinity
of this or any other electrical appliance!
• During cooking operations, the oil level MUST be maintained above the indicated minimum level. If not
maintained above that level the heating elements will shutdown.
• Failure to comply with WARNING
damage, and void the warranty.
notices could result in death or serious personal injury, equipment or property
vii
GBF-Series Fryers
Safety
CAUTION
• The unit must remain in an upright (vertical) position.
• Exercise care when unwrapping and removing the unit from the shipping skid.
• DO NOT operate this unit unless its components and their intended functions are fully understood. Before
attempting to operate the unit, refer to Section 3 and become familiar with the various controls.
• Certain parts of this unit become extremely HOT during normal operation. To avoid personal injury, exercise due
caution when operating, loading and unloading food product, cleaning, or servicing the equipment. As
appropriate, it is recommended that thermal oven mitts be worn when attending this unit.
• Allow the unit to cool down a minimum of 15 to 20 minutes before cleaning or servicing.
• Introducing overly wet food items or larger than recommended load sizes into the cook vat can lead to a surge
boil, resulting in an overflow of HOT cooking oil from the vat. Exercise due caution when loading food for
cooking and observe how the hot oil reacts before continuing.
• Cooked food products must be maintained at a minimum temperature of 150°F (65.5°C) or in accordance with
local and state health regulations, while being held prior to serving or sale.
• Fryers must be properly grounded. Improper grounding may result in electrical shock. Always refer to local
electrical code for proper grounding technique of this or any other electrical equipment. Always consult a
certified electrician or other qualified service person to ensure that circuit breakers and wiring are of
sufficient rating and gauge for this equipment, and that the equipment is properly grounded.
• Giles electric Fryers are manufactured to operate with a specific voltage, phase and frequency. Check the rating
label, or plate, on the rear panel or inside the front door of the Fryer cabinet to determine correct required supply
power.
• Ensure that the Fryer is positioned in a secure, safe location with casters locked and an appropriate restraining
device installed.
• The wiring diagram provided with this equipment should aid electricians/technicians with installation of Fryer.
• Be careful not to puncture the Filter Pan’s filter media if using a Drain Brush, or other implement, to clean the
Fryer’s drain valve and tube in the event of a clog.
• Failure to comply with CAUTION
damage, and void the warranty.
notices may result in minor to moderate personal injury, equipment or property
viii
Safety
GBF-Series Fryers
CAUTION
• This appliance is not intended for use by persons (including children) with reduced physical, sensory, or mental
capabilities, or lack of experience and knowledge, unless they have been given adequate instruction and/or
supervision concerning its use by a person responsible for their safety. Children should be supervised, or
otherwise restricted, to ensure they do not play with or around this appliance.
• The electronic components on the Control Panel face and inside the control box, are impact-sensitive. To prevent
damage, exercise care when operating the Fryer and when maneuvering carts or other rolling fixtures in the
vicinity of the Fryer.
• DO NOT install the unit immediately adjacent to combustible walls or materials. Failure to maintain safe
distances from combustibles may present a risk of fire.
• When cleaning the Fryer:
> DO NOT steam clean unit.
> DO NOT use products containing chlorine.
> DO NOT use abrasive products, steel wool or scouring pads.
> DO NOT use oven cleaners.
• Failure to comply with these CAUTION
warranty.
• Failure to comply with these CAUTION notices may violate local health codes.
• DO NOT modify, alter or install unauthorized attachments on this equipment!
notices may result in equipment or property damage and void the
NOTE:
• It is the responsibility of the customer to inspect the equipment upon receipt and report any shipping damages
to the freight company. If the palletized unit shows evidence of damage, immediately inspect the unit and
accompanying accessories. Note any damages on the freight bill and notify the carrier. It is at the discretion of
the customer whether or not to refuse delivery of freight damaged equipment.
• To aid installation technicians and electricians, a wiring diagram is provided with this manual. Refer to it during
installation or service.
• Comply with all appropriate state and/or local heath regulations regarding cleaning and sanitation of this
equipment.
ix

x

Introduction
GBF-Series Fryers
1. Introduction
Congratulations on the purchase of a new Giles GBF-Series Fryer, manufactured by Giles Enterprises, Inc.,
Montgomery, Alabama (USA). All of the equipment we manufacture is thoroughly inspected and tested
prior to shipment and with proper care and maintenance, it will provide years of trouble-free service.
To help protect your investment in this state-of-the-art cooking equipment, we recommend that you take a
few moments to familiarize yourself with the installation, operational, and maintenance procedures
contained in this manual. Adherence to these recommended procedures will minimize potential for
unnecessary repair expense and costly “down-time”.
Please retain this manual and keep it handy for future reference.
1.01 Construction
The GBF Model Fryer’s exterior and fry vat are constructed of 18 and 20 gauge stainless steel. The inner
cabinet structure is of welded tubular stainless steel.
1.02 Standard Features
Computer Controller: Electronic, micro-processor, cooking controller regulates cook cycle and monitors
fryer’s status ... Two (2) basket timers, each with four (4) programmable menu keys ... Features included:
cool-mode, force filter function & low oil level safety shutdown.
Filtration System
configurations.
Bankable
Reusable, Stainless Micro-Mesh Filter Screen
“Green” initiatives ... reduces long term cost of operation.
: Can be ordered as a banked battery of 2, 3, 4, or 5 fryer units.
: On-board oil filtration system ... designed to service multi-fryer banked
: Environmently friendly solution for “Sustainability” and
1.03 Optional Features
Automatic Basket Lift: Two (2) Basket Lifts per vat ... automatically lifts cooked product from hot oil at
the end of set cook cycle.
Mechanical Cooking Controls
replaces computer controller.
: Two (2) mechanical 30-minute basket timers and a digital thermostat ...
1
GBF-Series Fryers
1.04 Specifications
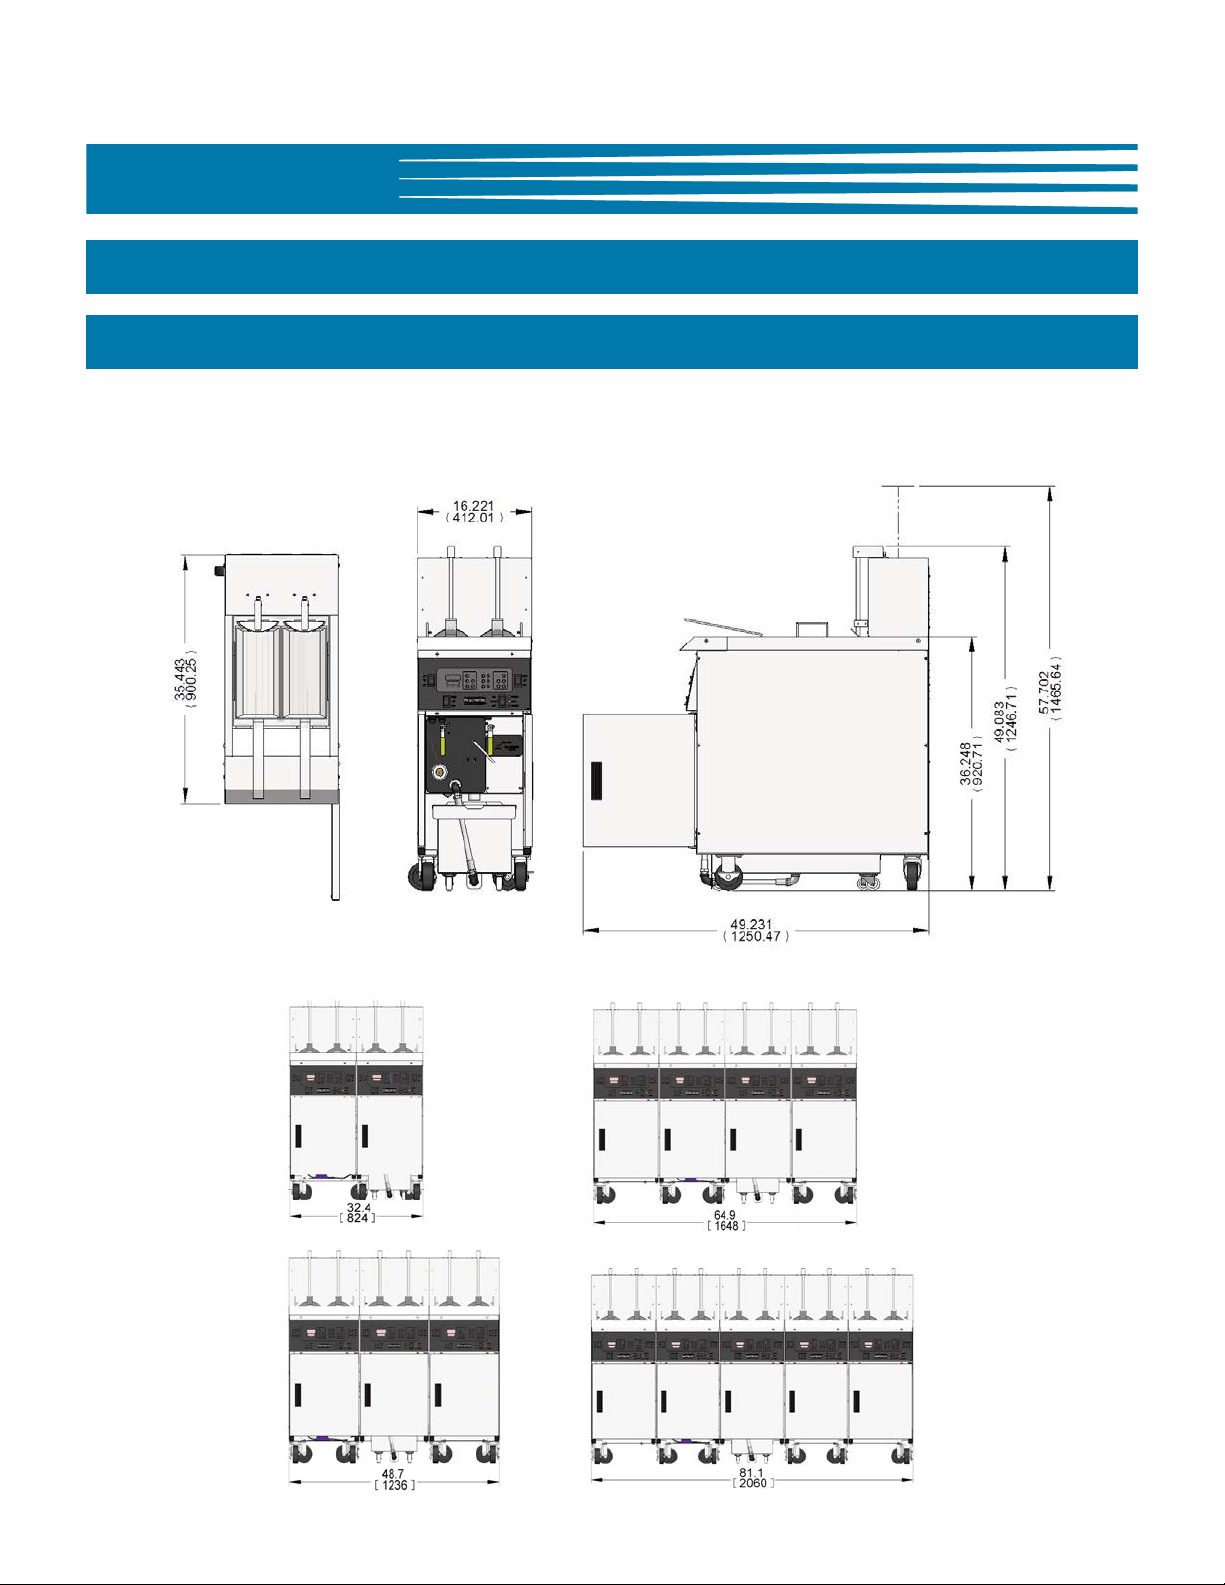
1.04.1 Overall Dimensions - Single & Banked Systems
SINGLE FRYER UNIT:
Introduction
INCHES [mm]
FRONTTOP
SIDE
BANKED FRYER UNITS:
2
Introduction
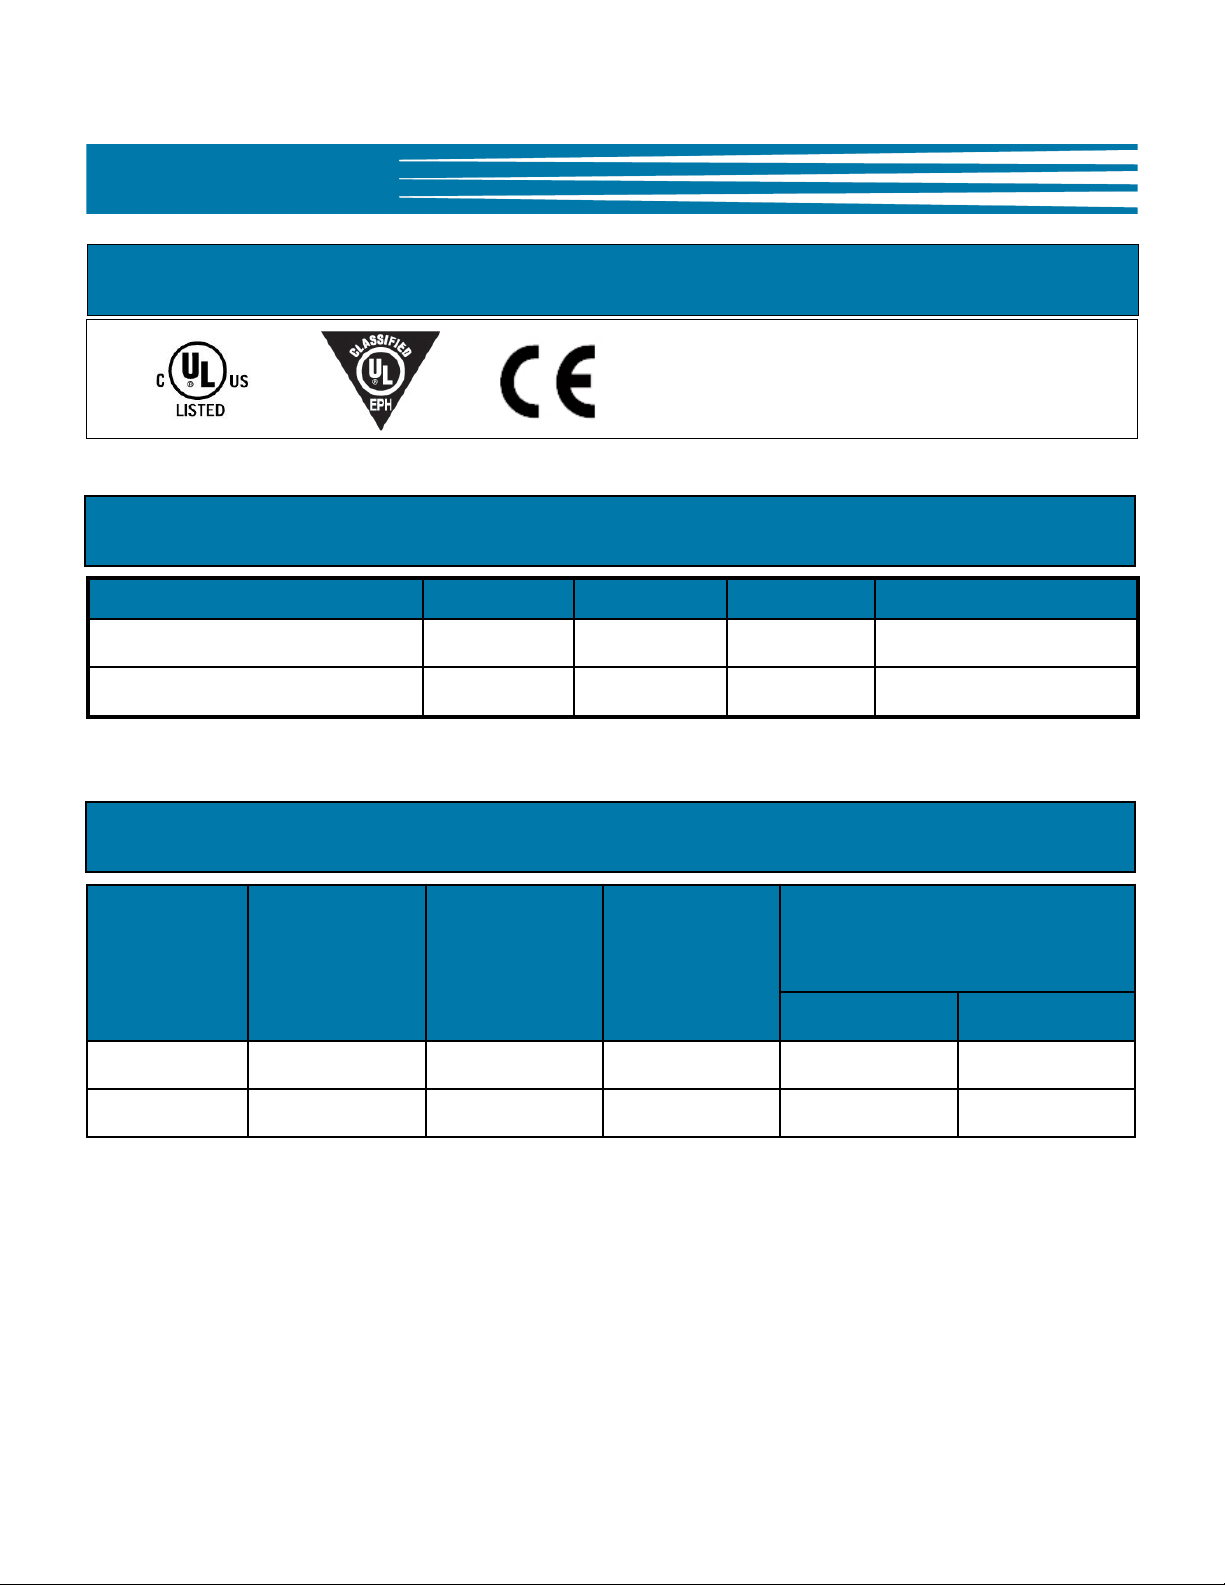
1.04.2 Regulatory Listings
1.04.3 Basket Size
Description Length Width Height Volume
Standard (2 per vat) 13.25 [336.6] 6.50 [165.1] 6.00 [152.4] 423.6 cu.in [6,942.8 cc]
GBF-Series Fryers
Only 380-415V models with computer
controls are CE listed.
INCHES [mm]
1.04.4 Vat Size & Capacity
Model
GBF-50 16.25 [412.8] 13.90 [353.1] 4.97 [126.2] 50 [22.7] 7.1 [26.9]
GBF-35 16.25 [412.8] 13.90 [353.1] 3.50 [88.9] 35 [15.9] 5.0 [18.9]
INCHES [mm]
Length
(Inside)
Width
(Inside)
Height
(Top of element
to “Full” Level)
Liquid Shortening Capacity
(Bottom of vat to “Full” Level)
Lbs [kg] Gal [l]
3
GBF-Series Fryers
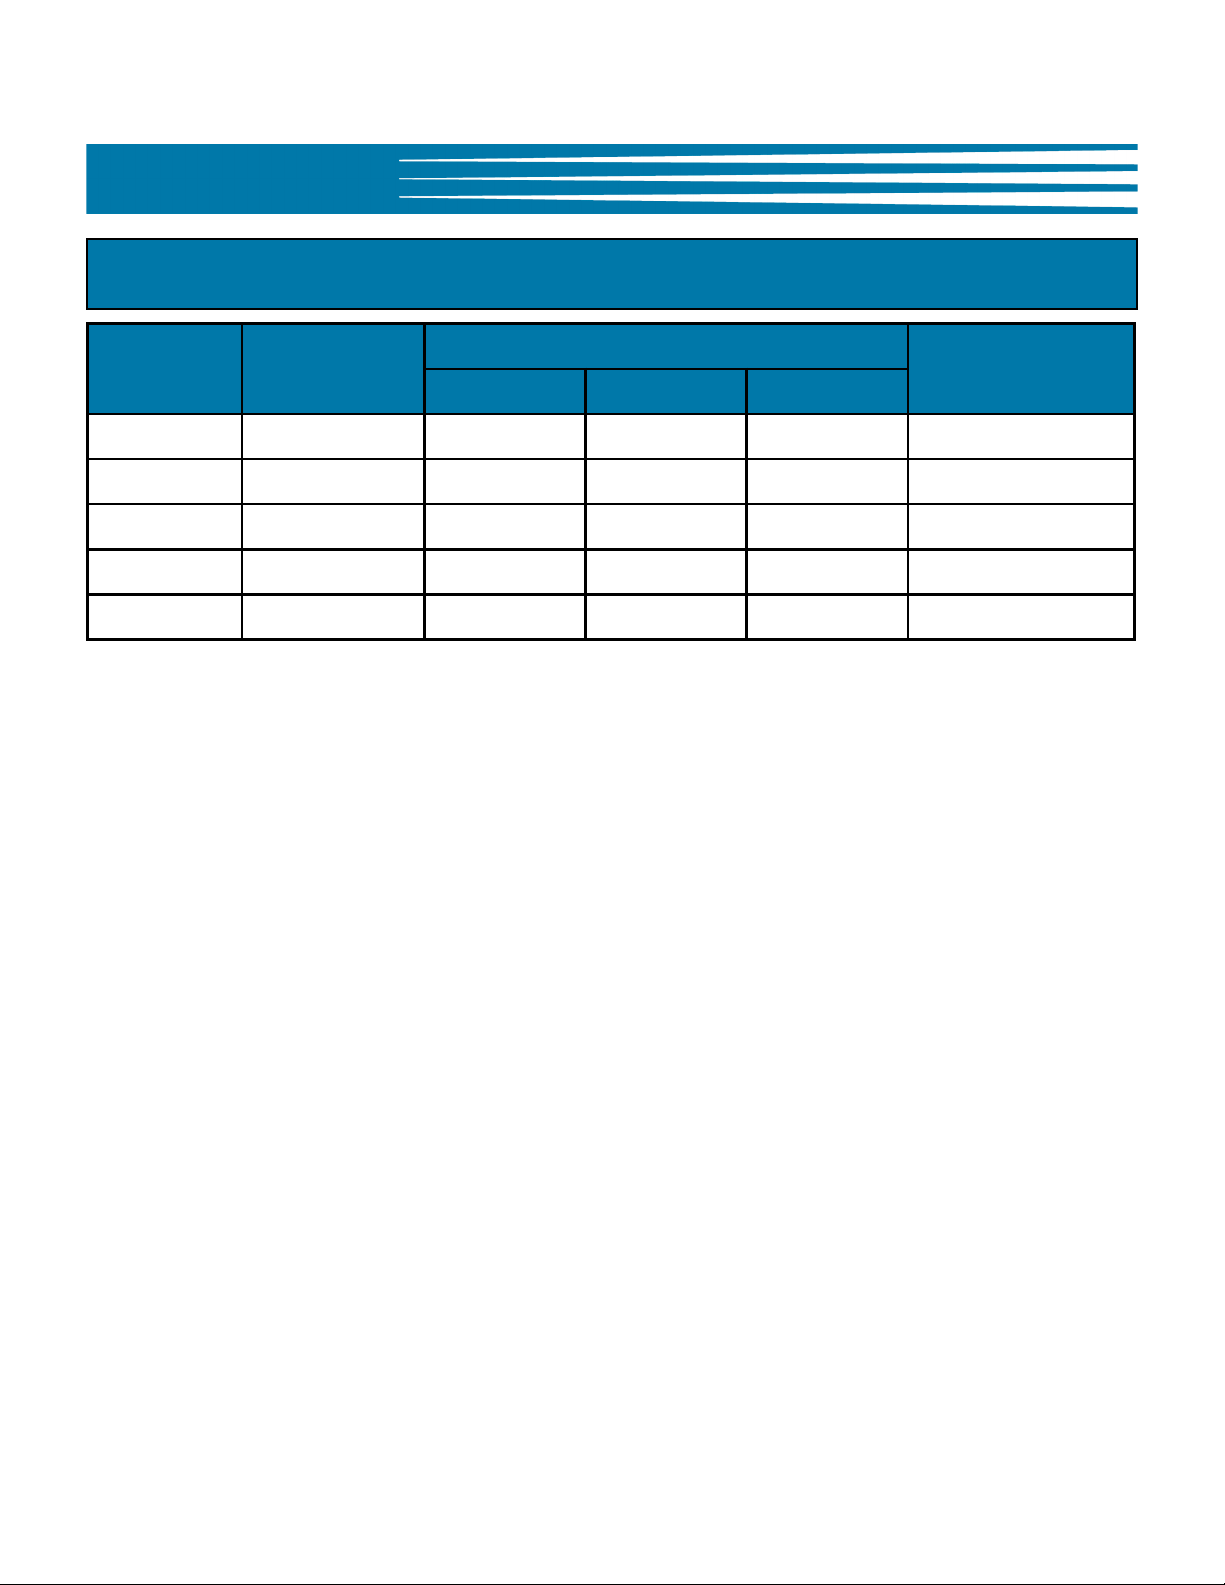
1.04.5 Shipping Specifications (Crated)
Crated Size
Model Gr. Wt.
Length Width Height
Introduction
Cube
GBF35/50-1
GBF35/50-2
GBF35/50-3
GBF35/50-4
GBF35/50-5
NOTE: Gross weight may vary ... unit weights can change depending on options ordered.
326 lbs (147.9 kg)
593 lbs (269.0 kg)
895 lbs (406.0 kg)
1162 lbs (527.1 kg)
1415 lbs (642.8 kg)
48” (1.22 m) 40” (1.02 m) 55.7” (1.41 m) 61.9 cu.ft (1.75 cu.m)
48” (1.22 m) 40” (1.02 m) 55.7” (1.41 m) 61.9 cu.ft (1.75 cu.m)
96” (2.44 m) 40” (1.02 m) 55.7” (1.41 m) 123.8 cu.ft (3.51 cu.m)
96” (2.44 m) 40” (1.02 m) 55.7” (1.41 m) 123.8 cu.ft (3.51 cu.m)
96” (2.44 m) 40” (1.02 m) 55.7” (1.41 m) 123.8 cu.ft (3.51 cu.m)
4
Installation
GBF-Series Fryers
2. Installation
This section summarizes procedures necessary for proper installation of your new unit. To prevent personal
injury or damage to the equipment, please ensure the following steps are followed.
2.01 Location
CAUTION
• DO NOT MODIFY, ALTER OR ADD UNAUTHORIZED ATTACHMENTS TO THIS EQUIPMENT
1. Keep the appliance and surrounding area free and clear of combustible materials; maintain 3 in. (7.6
cm) clearance.
2. Please note the wiring diagram provided with this appliance. Ensure that it corresponds with the
equipment being installed.
3. Please ensure this appliance is electrically grounded in accordance with local codes, or in the
absence of local codes, with the National Electrical Code, ANSI/NFPA NO. 70-1999.
4. Please provide adequate room for proper operation and servicing of the appliance.
5. Provide adequate ventilation in the operating area in compliance with local codes.
6. Always consult with an electrician or other qualified technician prior to installation.
7. Ensure that the voltage and amperage rating of the supply circuit meet the specifications indicated
on the Fryer’s data plate/label.
8. Locate the unit in a secure position and ensure that it will not unintentionally move. The unit is
equipped with locking casters ... please use them!
9. This appliance is to be installed, operated, and maintained in accordance with the Standard for
Ventilation Control and Fire Protection of Commercial Cooking Operations, NFPA 96-1994.
Compliance with the above items will help to ensure safe and proper installation. If you have any questions
concerning these procedures, contact a Giles Representative or other qualified service agency.
5
GBF-Series Fryers
Installation
2.02 Unpacking
The Giles Fryer is shipped as a palletized unit. It is secured to a wooden skid by high-tensile strength
plastic strapping and wrapped by machine applied stretch-wrap.
CAUTION
• Exercise care when lifting or moving the palletized unit, and when removing packing materials
or removing unit from the shipping skid.
• Failure to comply with these CAUTION notices may result in minor to moderate personal injury,
damage to equipment or property, and void the warranty.
NOTE:
• If there is evidence of damage to the palletized load, immediately inspect the equipment and all
accessories, and notify the freight company of any damages. Make a note of damages on the
freight bill. Giles’ responsiblity for damages to the unit ended when the freight company’s agent
signed for the freight at the time of shipment.
1. Carefully cut and remove the plastic stretch wrap, strapping and all other packing material.
2. Carefully remove Fryer from the shipping skid. Fryers are very heavy, especially when in “banked”
configurations. It is advisable to use appropriate material handling equipment when lifting unit from
the skid, particularly when handling “banked” units of three (3) or more fryers.
NOTE:
• Giles shall not be liable for damages caused to the unit by improper use of material handling
equipment or poor work practices. Giles shall not be liable for personal injuries or property
damage which may be incurred during installation of this equipment. Installation is the sole
responsibility of the purchaser, unless previous arrangements have been made in writing.
6
Installation
GBF-Series Fryers
2.03 Electrical Requirements
CAUTION
• Fryers must be adequately and properly grounded. Improper grounding may result in electrical
shock. Always refer to local electrical codes for proper grounding procedures on this or any other
electrical equipment. Always consult with an electrician or other qualified service person to ensure
circuit breakers and wiring are of sufficient rating and gauge for the equipment being installed.
GBF Series Fryers are available from the factory to operate with the voltages and phases listed below.
Check the rating label/plate on the rear panel to determine the correct supply power requirement.
Each fryer unit of a banked battery, requires separate power service.
2.04 Electrical Specifications (per Fryer Unit)
Voltage
Phase Hz
Watts
L1 L2 L3
+
208
208 3 60 18,000 50 50 50 60
+
240
240 3 60 18,000 43 43 43 50
+
380
380 3 50 16,485 41 41 41 45
+
415
415 3 50 18,000 43 43 43 50
+
Denotes fryer unit which powers the filtration pump.
3 60 18,250 53 53 50 65
3 60 18,250 46 46 43 55
3 50 16,720 43 43 40 50
3 50 18,250 46 46 43 55
Amps
Circuit Breaker
Required
7
GBF-Series Fryers
Installation
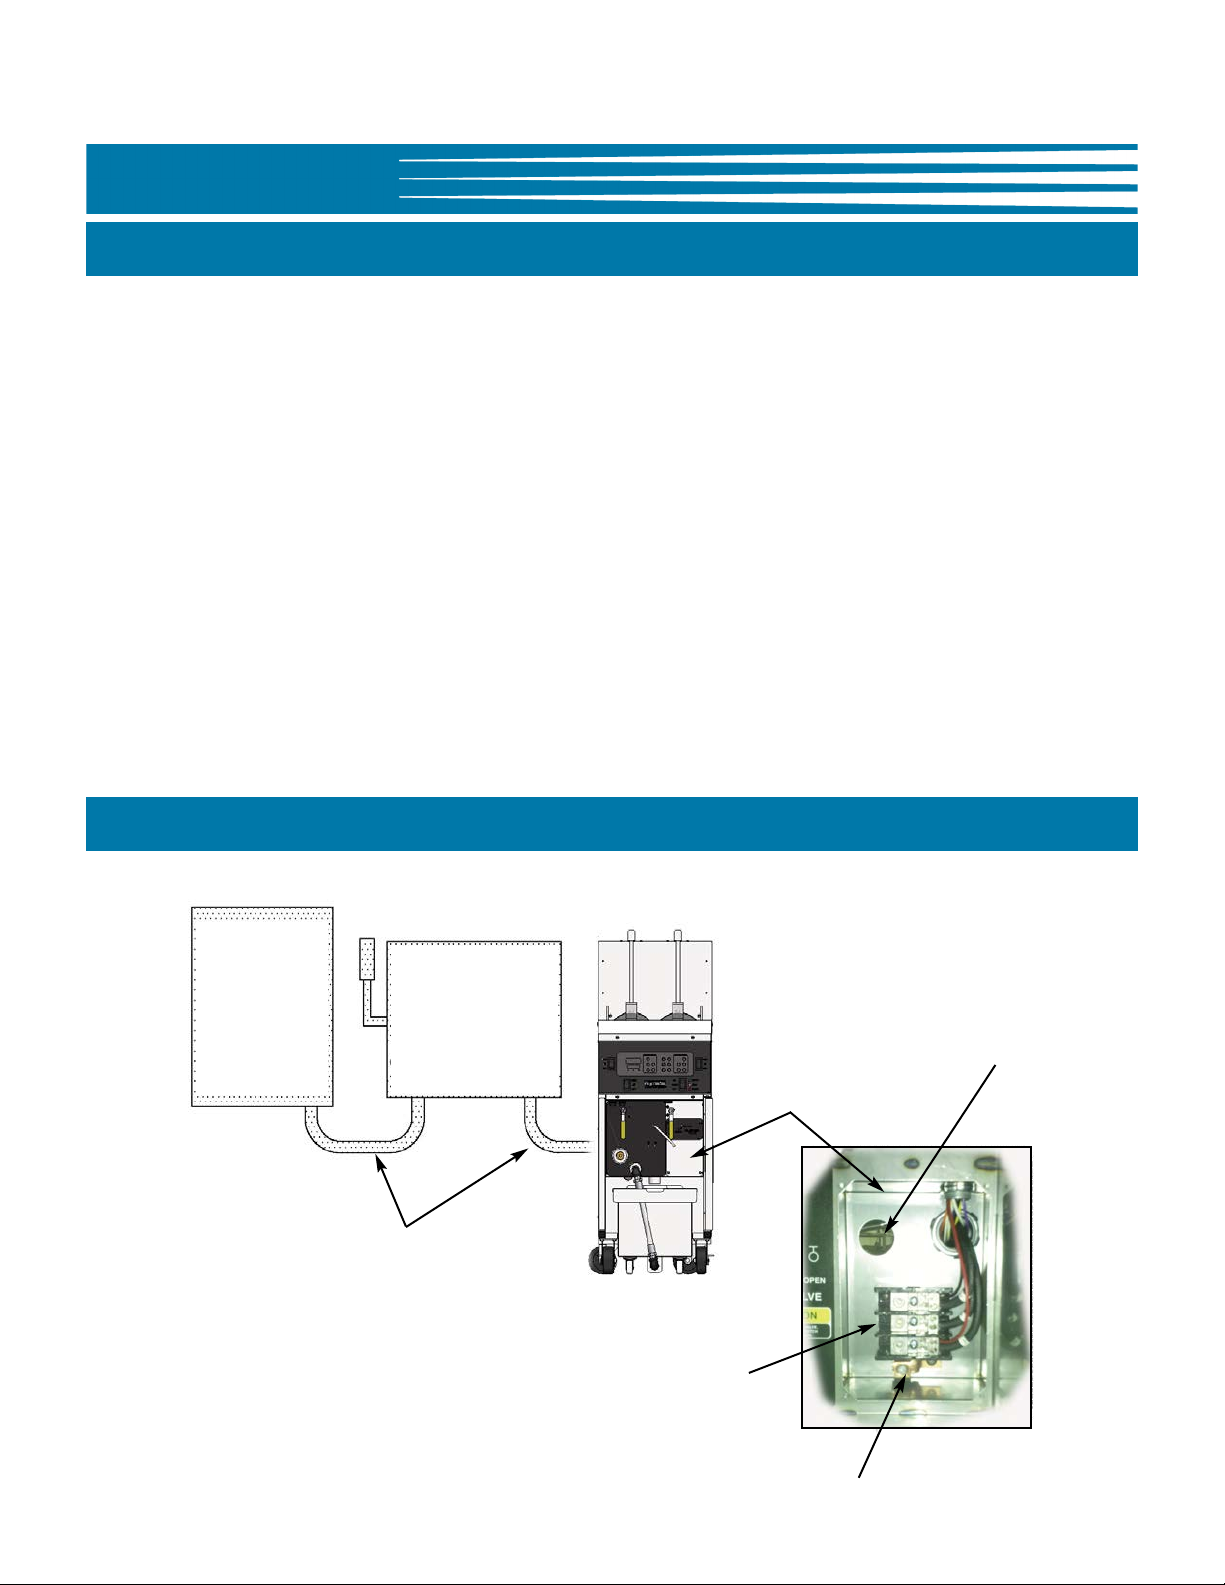
2.05 Electrical Connections
NOTE: Electrical installation materials (disconnects, breakers, conduit, connectors, wire, etc) shall
be supplied by the purchaser.
1. Install appropriate circuit breaker(s) in Main Breaker Box! See Section 2.04.
2. (Recommended) Install a Quick-Disconnect between Main Box and Fryer; connect using flexible
conduit.
3. Connect flexible conduit from Quick-Disconnect through Fryer back panel to the Fryer Service Box at
the front of unit. Allow enough conduit slack so that the Fryer can be moved to provide clearance for
cleaning or service. See Figure 2.05.1.
4. Open Fryer door and remove Service Box Cover. See Figure 2.05.1.
5. Connect a ground wire between the Ground Lug and a proper earth ground.
6. Route appropriately sized supply power wires to the Fryer.
7. Connect the supply power wires at the Distribution Block located in the Service Box. See Figure
2.05.1.
8. Reinstall Service Box Cover.
9. For “banked” installations, each Fryer in the battery will be connected in like manner.
2.05.1 Electrical Connections Diagram
Main Breaker
Box
Flexible Conduit
Quick-Disconnect
Box
(Recommended)
Distribution Block:
connect supply
power to this side.
Connect flex conduit
from incoming supply
power here.
Service Box
Ground Lug
8
Installation
GBF-Series Fryers
2.06 Ventilation of Fryer
NOTE:
• Ventilation system requirements for commercial foodservice establishments differ from location
to location. Always consult with local authorities to ensure proper compliance.
Consult a professional ventilation or HVAC company for assistance in determining whether existing
systems are sufficient the accommodate this equipment, or in designing a ventilation hood system to
comply with code requirements.
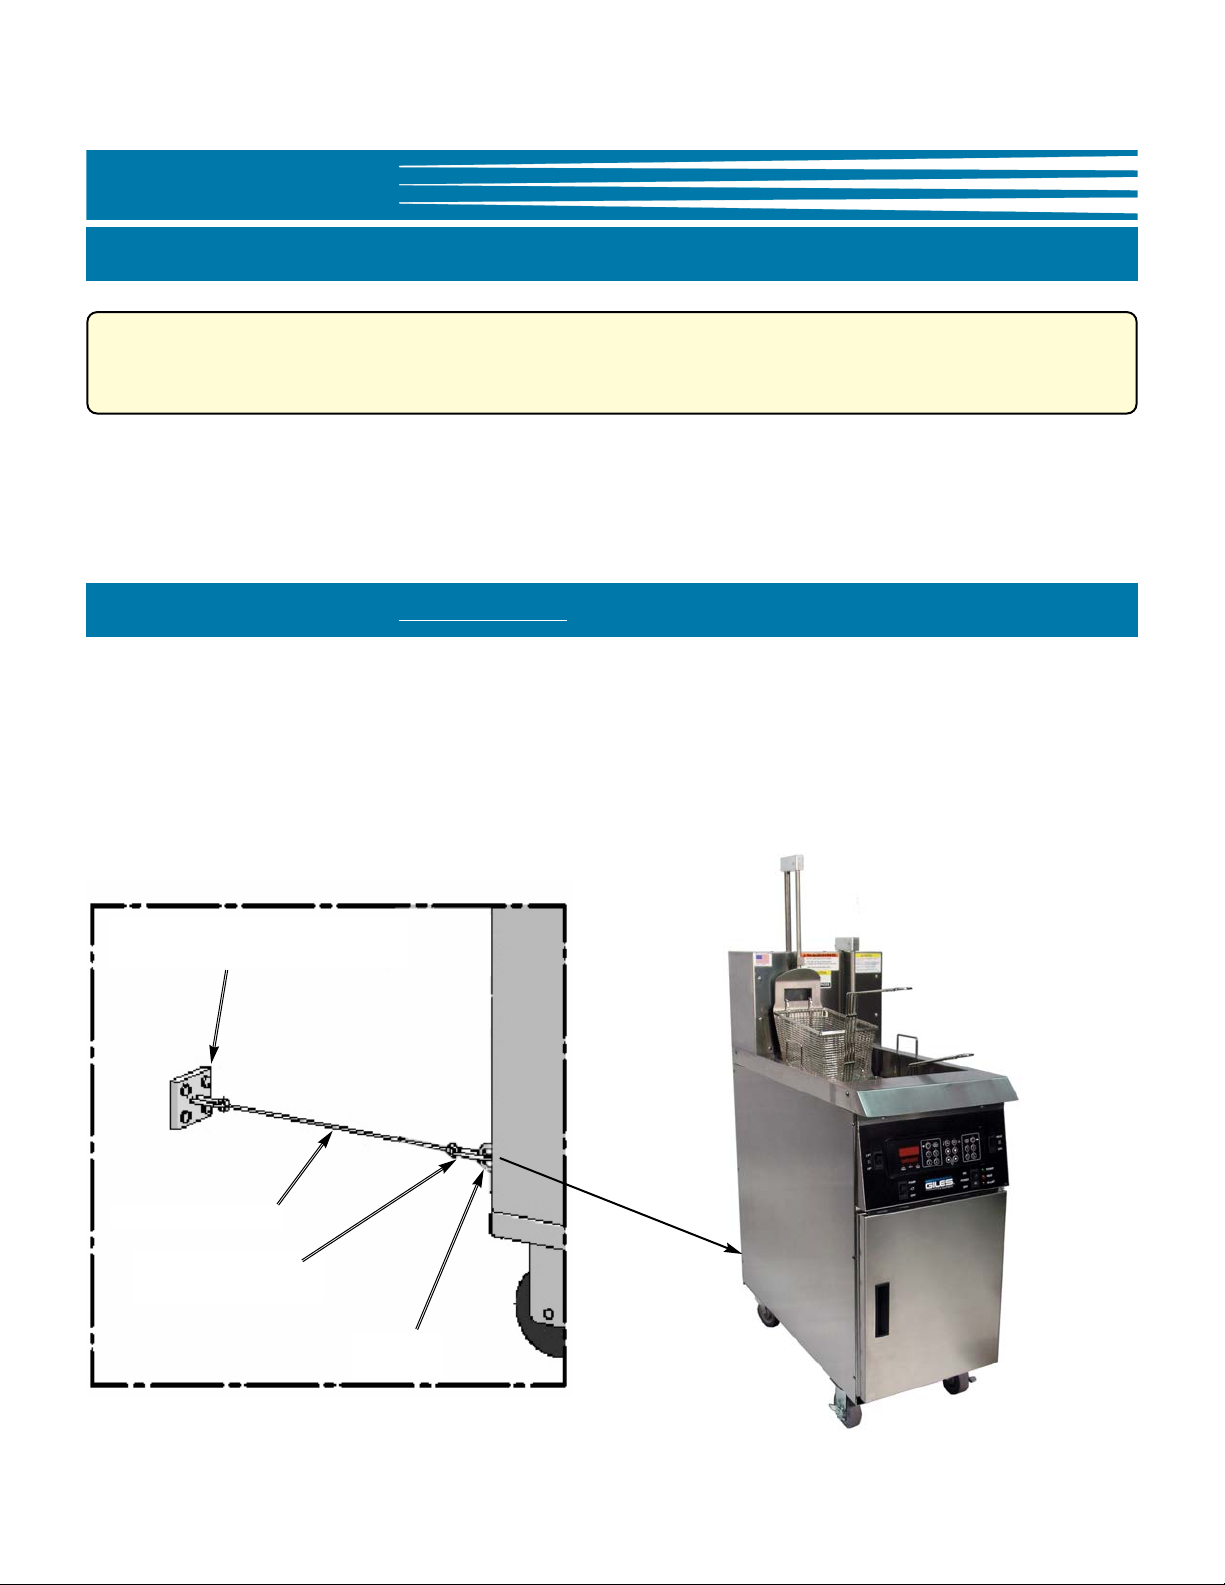
2.07 Restraint Device (Not Included)
This equipment requires installation of an appropriate Restraint Device to prevent unintentional movement,
which might cause undue strain on electrical connections. The length of Restraint Cable must be shorter than
the electrical supply cord or conduit. A restraint anchor shall be fastened to a non-movable wall or structure.
Use a quick-release latch on one end of the Cable for connecting to the factory-installed Eye Bolt(s) on the rear
of the unit. This can easily be disconnected during maintenance or service. “Banked” systems require a
Restraint Device on each end of the banked battery.
* Anchor attached to non-
movable wall
* Restraint Cable
* Quick-release
Latch
* Customer Supplied
Eye Bolt
9

GBF-Series Fryers
Notes:
Installation
10

Overview
GBF-Series Fryers
3. Overview
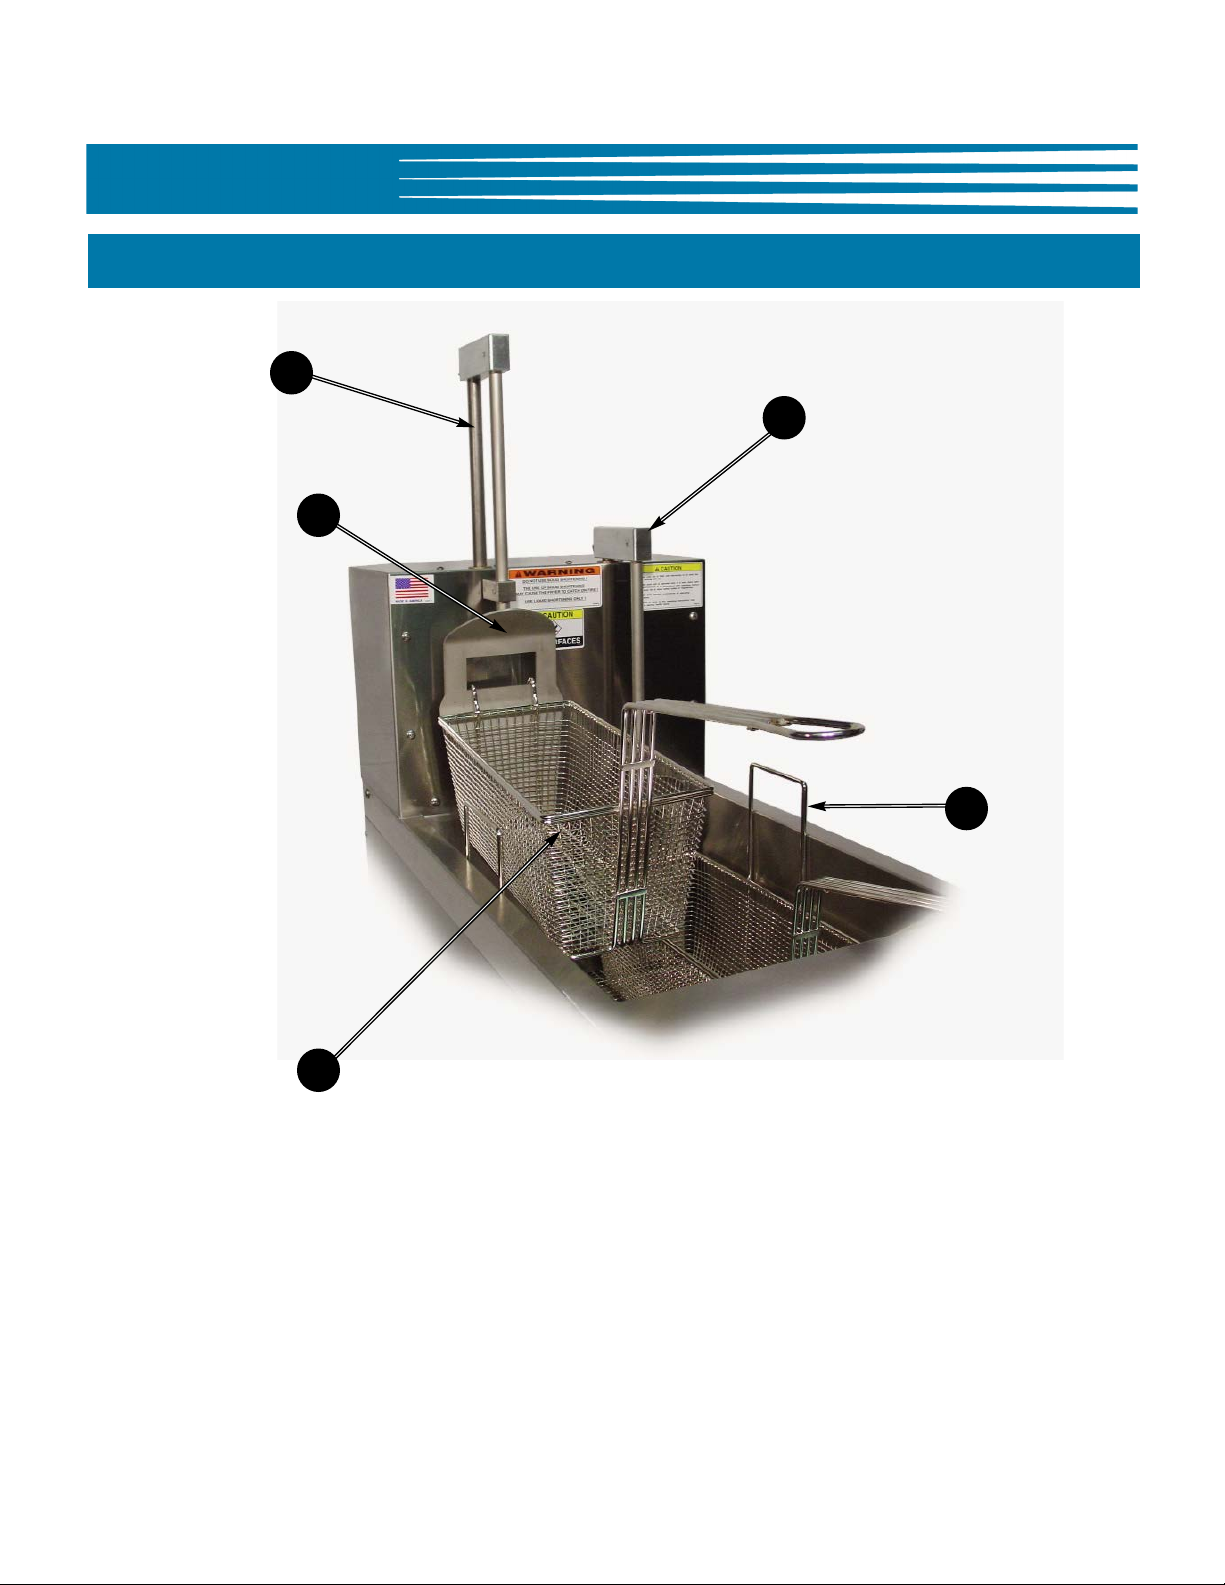
The following section gives a brief overview of the components, functions, and accessories of the GBF
Series Fryer. Please review this section carefully before proceeding further.
Auto-Basket Lifts
(Optional)
Baskets, 6-1/2” Std
Lower Cabinet
Area
Computer
Controller Shown
Filter Pan Assembly
11
GBF-Series Fryers
3.01 Auto-Basket Lifts (Optional) & Baskets
2*
1
Overview
1
* Not fully seen
3*
4
12
Overview
GBF-Series Fryers
CAUTION
• Always use Thermal Oven Mitts when handling any of these parts during normal operations;
they can become very hot!
3.01 Auto-Basket Lifts (Optional) & Baskets
Item Description Function
1 Basket Carrier (2)
2* Auto-Basket Lift (2) Lowers or lifts basket at beginning and end of cook cycle.
3*
4 Basket (2) Contains product during cooking.
Basket Support/
Fry Screen
Holds basket in a proper position while it is being lifted from
or lowered into the cook vat by the Basket Lift.
Provides support surface for Baskets when Auto-Lifts are not
installed or used. Serves as a Fry Screen to prevent
excessive crumbs and cooking residue from accumulating
around the heating elements.
* Not fully seen
13

GBF-Series Fryers
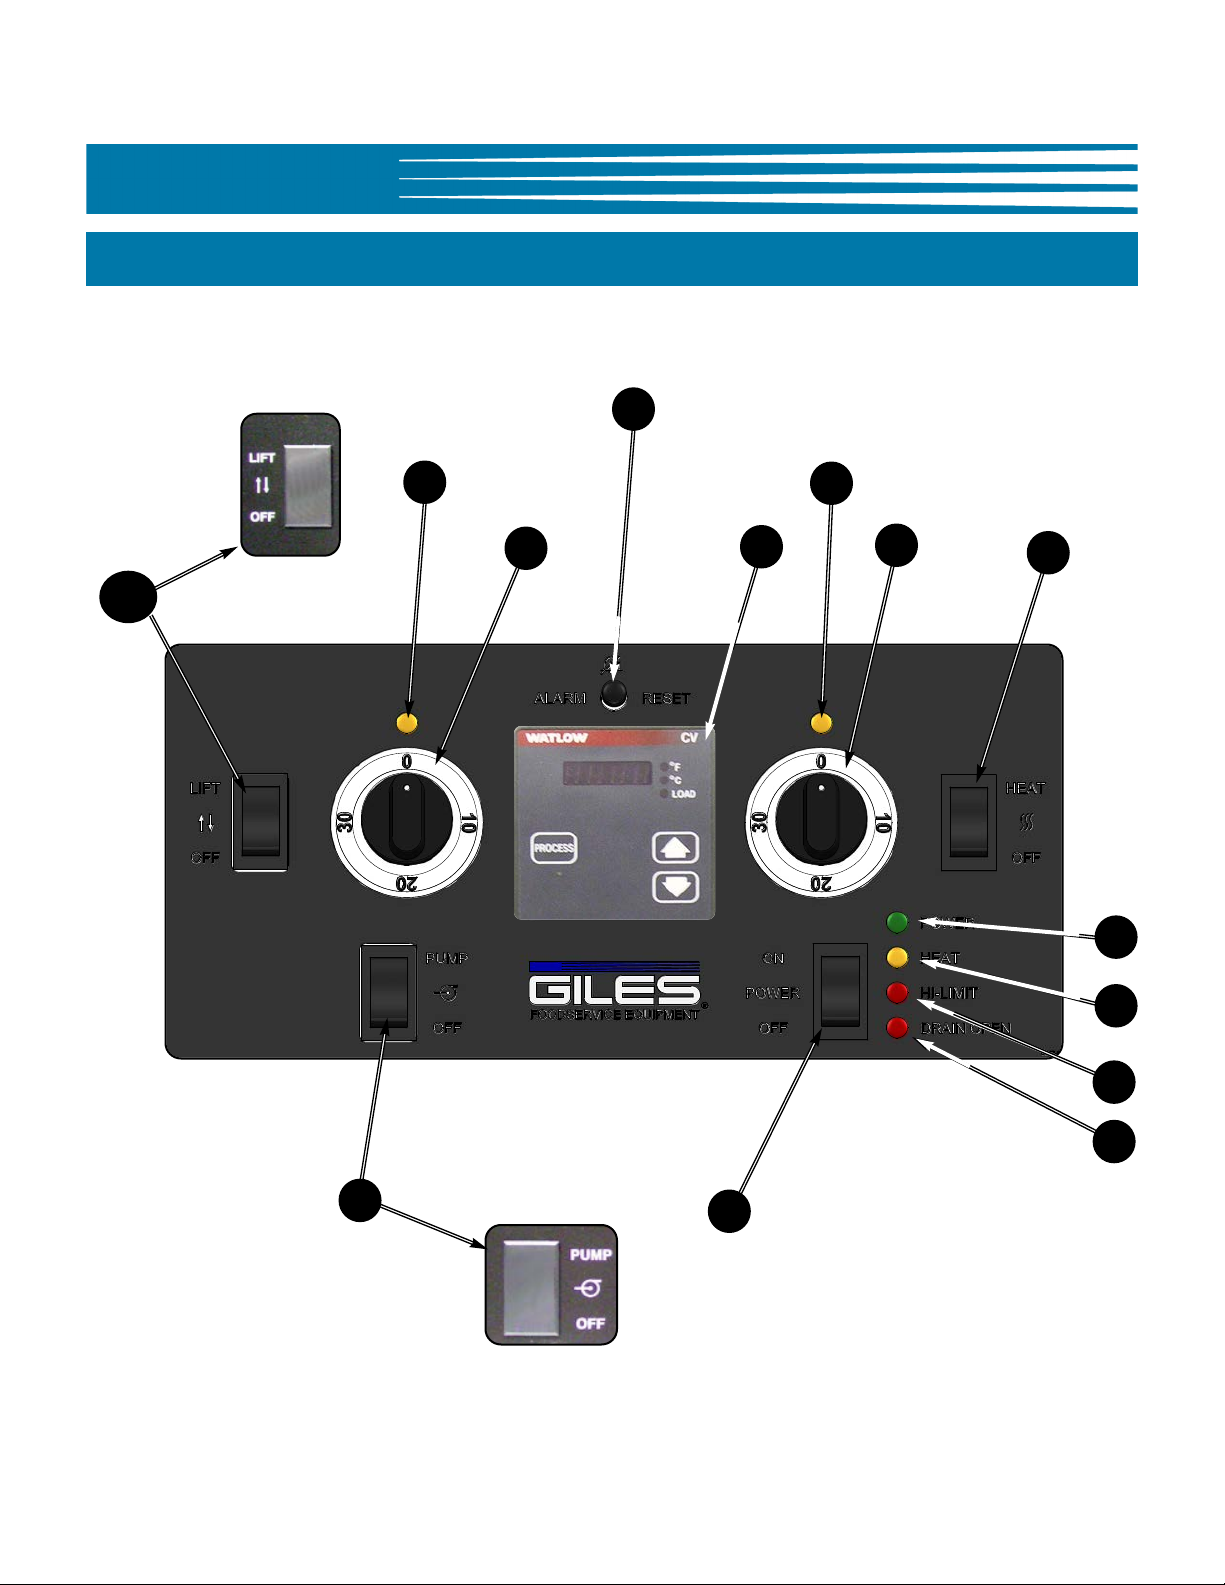
3.02 Control Panel
3.02.1 Control Panel - Computer Controller (N7)
3
9*
4
Overview
4
2
8*
* NOTE: Switch location will be plugged if not required.
5
6
7
1
14

Overview
GBF-Series Fryers
3.02.1 Control Panel - Computer Controller (N7)
Item Description Function
1 Power Switch Main Power Switch ... turns Fryer power on or off.
Heat Switch turns power to heating elements on or off.
2 Heat Switch
3 Controller
Place in OFF position when programming controller or
shutting down. Place in the HEAT position when ready to
heat for cooking or boil-out.
Micro-processor Cooking Controller ... set cooking
temperature and cook times ... controls and monitors fryer
functions ... displays alarm conditions.
4
5 Power Indicator Light (Green)
6 Heat Indicator Light (Amber)
7 High-Limit Indicator (Red)
*
8
Programmable Basket Timer
(Right & Left Basket)
Pump Switch
Two (2) programmable basket timers ... each holds four (4)
different cook cycles ... menu keys for one-touch selection.
The Power indicator is illuminated whenever the Fryer’s main
Power Switch is in the ON position.
The Heat indicator is illuminated when the Heat Switch is in
the HEAT position and the heating elements are energized.
This light will cycle on and off during normal operation as the
Controller maintains oil at the set-point temperature.
The High-Limit indicator is illuminated to alert of power
shutdown to the heating elements due to an overheating
condition. Should this light turn on during operation,
DISCONTINUE COOKING ACTIVITY and refer to
Troubleshooting, Section 7 of this manual. DO NOT
ATTEMPT TO CONTINUE COOKING UNTIL THE CAUSE
OF THIS CONDITION IS DETERMINED!
Controls the Oil Filtration System pump for filtering oil or
pumping used oil to the Oil Discharge Hose. NOTE: This
switch is only present on the Fryer unit that houses the
Filter Pan for “Banked” systems.
Enables or disables Basket Lifts. In the LIFT position, lift
*
9
Basket Lift Switch
(Optional)
will lower when a cook cycle starts and be raised when
cook time expires. In the OFF position, both lifts are
disabled and will not operate. NOTE: This switch is
present only if the Basket Lift option is installed.
15
GBF-Series Fryers
3.02.2 Control Panel - Mechanical Controls
12
Overview
10*
11
11
4
3
4
2
5
6
9*
* NOTE: Switch location will be plugged if not required.
16
7
8
1

Overview
GBF-Series Fryers
3.02.2 Control Panel - Mechanical Controls
Item Description Function
1 Power Switch Main Power Switch ... turns Fryer power on or off.
Heat Switch turns power to heating elements on or off.
2 Heat Switch
Place in the HEAT position when ready to heat for cooking or
boil-out. Place in OFF to shutdown elements.
3
4
5 Power Indicator Light (Green)
6 Heat Indicator Light (Amber)
7 High-Limit Indicator (Red)
8 Drain Open Indicator (Red)
Digital Temperature
Control (Thermostat)
Mechanical Basket Timer
(Right & Left Basket)
Digital thermostat is used to set and control temperature of
the cooking oil. Displays actual temperature when
PROCESS key is pressed.
Two (2) eletro-mechanical basket timers, 30 minute range.
The Power indicator is illuminated whenever the Fryer’s main
Power Switch is in the ON position.
The Heat indicator is illuminated when the Heat Switch is in
the HEAT position and the heating elements are energized.
This light will cycle on and off during normal operation as the
Controller maintains oil at set point temperature.
The High-Limit indicator is illuminated as an alert to power
shutdown to the heating elements due to an overheating
condition. Should this light turn on during operation,
DISCONTINUE COOKING ACTIVITY and refer to
Troubleshooting, Section 7 of this manual. DO NOT
ATTEMPT TO CONTINUE COOKING UNTIL THE CAUSE
OF THIS CONDITION IS DETERMINED!
The Drain Open indicator is illuminated if the cook vat drain
valve is not fully closed. Fryer will not heat if drain valve
is not fully closed.
Controls the Oil Filtration System pump for filtering oil or
*
9
*
10
11 Cycle End Indicator (Amber)
12 Alarm Reset Button Pressing silences audible alert alarm.
Pump Switch
Basket Lift Switch
(Optional)
pumping used oil to the Oil Discharge Hose. NOTE: This
switch is only present on the Fryer unit that houses the
Filter Pan for “Banked” systems.
Enables or disables Basket Lifts. In the LIFT position, lift
will lower when a cook cycle starts and be raised when
cook time expires. In the OFF position, both lifts are
disabled and will not operate. NOTE: This switch is
present only if the Basket Lift option is installed.
Illuminates to indicate which Basket Timer has completed a
cook cycle - audible alert also sounds.
17
GBF-Series Fryers
Overview
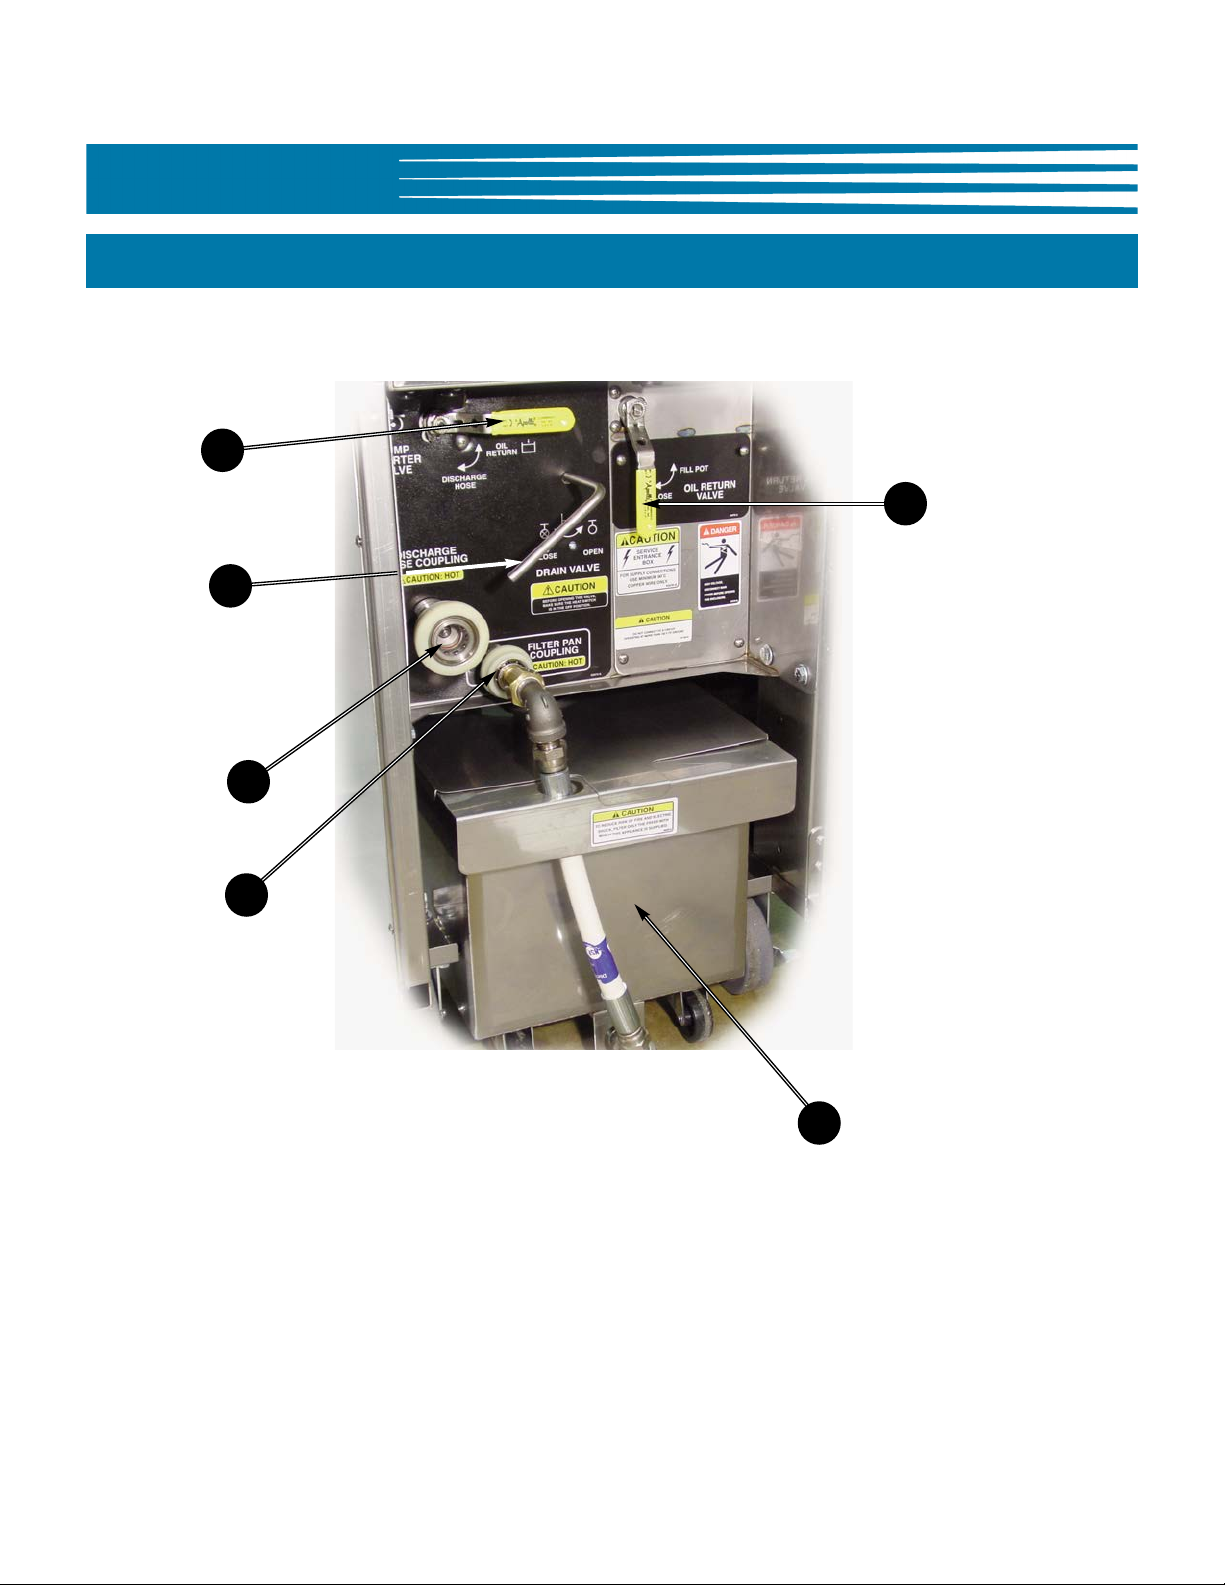
3.03 Lower Cabinet Area - Single Fryer & Base Unit of “Banked” Systems
2
3
1
4
5
6
18
 Loading...