


Operations & Service Manual
CF-400G
Giles Enterprises, Inc.
An ISO9001 Registered Company
2750 Gunter Park Drive West • Montgomery, AL 36109 USA Fax: (334) 272-3561 • Internet: www.gilesent.com
Service Hotline (Toll Free): 1-800-554-4537 (USA & Canada Only)
Form No. 60201 (Revised 01/04/07)

Safety
FOR YOUR SAFETY
!DO NOT store or use gasoline or use gasoline or other flammable vapors and liquids in the vicinity of this or any other appliance!
!WARNING
Improper installation, adjustment, alteration, service or maintenance can cause property damage, injury or death. Read the installation, operating, and maintenance instructions thoroughly before installing or servicing this equipment.
POST IN A PROMINENT LOCATION instructions to be followed in the event the user smells gas. This information shall be obtained by consulting the local gas supplier.

Table of Contents |
Model: CF-400G |
I |
Introduction . . . . . . . . . . . . . . . . . . . . . . . . . . . . . . . . . . . . . . . . . . . . . . . . . . . . . . . . . . . . . . . . . . . . . . . . . . . . . . . . . . . . . . . . . . . . . . . . . . . . . . . . . . . . . . . . . . |
2 |
1 |
Installation |
|
1 - 1 |
Installation Instructions . . . . . . . . . . . . . . . . . . . . . . . . . . . . . . . . . . . . . . . . . . . . . . . . . . . . . . . . . . . . . . . . . . . . . . . . . . . . . . . . . . . . . . . . . . . . . . . . . . . . . . . |
3 |
1 - 2 |
Removal of Fryer From Crate . . . . . . . . . . . . . . . . . . . . . . . . . . . . . . . . . . . . . . . . . . . . . . . . . . . . . . . . . . . . . . . . . . . . . . . . . . . . . . . . . . . . . . . . . . . . . . |
7 |
1 - 3 |
Ventilation of Fryer . . . . . . . . . . . . . . . . . . . . . . . . . . . . . . . . . . . . . . . . . . . . . . . . . . . . . . . . . . . . . . . . . . . . . . . . . . . . . . . . . . . . . . . . . . . . . . . . . . . . . . . . . . . . . |
7 |
1 - 4 |
Electrical Requirements . . . . . . . . . . . . . . . . . . . . . . . . . . . . . . . . . . . . . . . . . . . . . . . . . . . . . . . . . . . . . . . . . . . . . . . . . . . . . . . . . . . . . . . . . . . . . . . . . . . . . . |
7 |
2 |
Operating Instructions . . . . . . . . . . . . . . . . . . . . . . . . . . . . . . . . . . . . . . . . . . . . . . . . . . . . . . . . . . . . . . . . . . . . . . . . . . . . . . . . . . . . . . . . . . . . . . . . . |
8 |
3 |
Fryer Components and Their Functions |
|
3 - 1 |
Control Panel . . . . . . . . . . . . . . . . . . . . . . . . . . . . . . . . . . . . . . . . . . . . . . . . . . . . . . . . . . . . . . . . . . . . . . . . . . . . . . . . . . . . . . . . . . . . . . . . . . . . . . . . . . . . . . . . . . . . . |
11 |
3 - 2 |
Lower Cabinet Area . . . . . . . . . . . . . . . . . . . . . . . . . . . . . . . . . . . . . . . . . . . . . . . . . . . . . . . . . . . . . . . . . . . . . . . . . . . . . . . . . . . . . . . . . . . . . . . . . . . . . . . . . . . . |
12 |
3 - 3 |
Cooking Vessel . . . . . . . . . . . . . . . . . . . . . . . . . . . . . . . . . . . . . . . . . . . . . . . . . . . . . . . . . . . . . . . . . . . . . . . . . . . . . . . . . . . . . . . . . . . . . . . . . . . . . . . . . . . . . . . . . . . |
14 |
3 - 4 |
Cooking Computer Features . . . . . . . . . . . . . . . . . . . . . . . . . . . . . . . . . . . . . . . . . . . . . . . . . . . . . . . . . . . . . . . . . . . . . . . . . . . . . . . . . . . . . . . . . . . . . . . |
16 |
3 - 5 |
Cooking Computer Function Keys . . . . . . . . . . . . . . . . . . . . . . . . . . . . . . . . . . . . . . . . . . . . . . . . . . . . . . . . . . . . . . . . . . . . . . . . . . . . . . . . . . . . . . . . |
17 |
3 - 6 |
Cooking Computer Programming . . . . . . . . . . . . . . . . . . . . . . . . . . . . . . . . . . . . . . . . . . . . . . . . . . . . . . . . . . . . . . . . . . . . . . . . . . . . . . . . . . . . . . . . |
18 |
4 |
Testing the Fryer |
|
4 - 1 |
Proper Control Settings for Check-Out . . . . . . . . . . . . . . . . . . . . . . . . . . . . . . . . . . . . . . . . . . . . . . . . . . . . . . . . . . . . . . . . . . . . . . . . . . . . . . . . . |
20 |
4 - 2 |
Operational Check of Burner System . . . . . . . . . . . . . . . . . . . . . . . . . . . . . . . . . . . . . . . . . . . . . . . . . . . . . . . . . . . . . . . . . . . . . . . . . . . . . . . . . . . |
20 |
4 - 3 |
Operational Check-Out of the Filter Pump . . . . . . . . . . . . . . . . . . . . . . . . . . . . . . . . . . . . . . . . . . . . . . . . . . . . . . . . . . . . . . . . . . . . . . . . . . . . |
21 |
5 |
Preparing the Fryer for Operation |
|
5 - 1 |
Fryer Boil-Out Procedure . . . . . . . . . . . . . . . . . . . . . . . . . . . . . . . . . . . . . . . . . . . . . . . . . . . . . . . . . . . . . . . . . . . . . . . . . . . . . . . . . . . . . . . . . . . . . . . . . . . . . |
22 |
5 - 2 |
Cleaning of Filter Pan / Replacement of Filter Pan . . . . . . . . . . . . . . . . . . . . . . . . . . . . . . . . . . . . . . . . . . . . . . . . . . . . . . . . . . . . . . . . . |
27 |
5 - 5 |
Operating Fryer Controls for Cooking . . . . . . . . . . . . . . . . . . . . . . . . . . . . . . . . . . . . . . . . . . . . . . . . . . . . . . . . . . . . . . . . . . . . . . . . . . . . . . . . . . . |
29 |
5 - 6 |
Filtering the Fryer . . . . . . . . . . . . . . . . . . . . . . . . . . . . . . . . . . . . . . . . . . . . . . . . . . . . . . . . . . . . . . . . . . . . . . . . . . . . . . . . . . . . . . . . . . . . . . . . . . . . . . . . . . . . . . . |
30 |

Table of Contents |
Model: CF-400G |
6 |
Troubleshooting |
|
|
6-1 |
Temperature Control System . . . . . . . . . . . . . . . . . . . . . . . . . . . . . . . . . . . . . . . . . . . . . . . . . . . . . . . . . . . . . . . . . . . . . . . . . . . . . . . . . . . . . . . . . . . . . . . |
31 |
|
6-2 |
Automatic Basket Lift and Oil Filtration System . . . . . . . . . . . . . . . . . . . . . . . . . . . . . . . . . . . . . . . . . . . . . . . . . . . . . . . . . . . . . . . . . . . . |
32 |
|
7 |
Parts |
|
|
7-1 |
Front Control Panel . . . . . . . . . . . . . . . . . . . . . . . . . . . . . . . . . . . . . . . . . . . . . . . . . . . . . . . . . . . . . . . . . . . . . . . . . . . . . . . . . . . . . . . . . . . . . . . . . . . . . . . . . . . . . |
34 |
|
7-2 |
Rear View of Lower Cabinet . . . . . . . . . . . . . . . . . . . . . . . . . . . . . . . . . . . . . . . . . . . . . . . . . . . . . . . . . . . . . . . . . . . . . . . . . . . . . . . . . . . . . . . . . . . . . . . . |
35 |
|
7-3 |
Rear View of Header Section . . . . . . . . . . . . . . . . . . . . . . . . . . . . . . . . . . . . . . . . . . . . . . . . . . . . . . . . . . . . . . . . . . . . . . . . . . . . . . . . . . . . . . . . . . . . . . . |
36 |
|
7-5 |
Filter Pan Assembly . . . . . . . . . . . . . . . . . . . . . . . . . . . . . . . . . . . . . . . . . . . . . . . . . . . . . . . . . . . . . . . . . . . . . . . . . . . . . . . . . . . . . . . . . . . . . . . . . . . . . . . . . . . . |
37 |
|
8 |
Wiring Diagrams |
|
|
8-1 |
Model CF-400G 208/240/60/1 . . . . . . . . . . . . . . . . . . . . . . . . . . . . . . . . . . . . . . . . . . . . . . . . . . . . . . . . . . . . . . . . . . . . . . . . . . . . . . . . . . . . . . . . . . . . . . |
38 |
|
8-2 |
Model CF-400G |
208/240/60/1 . . . . . . . . . . . . . . . . . . . . . . . . . . . . . . . . . . . . . . . . . . . . . . . . . . . . . . . . . . . . . . . . . . . . . . . . . . . . . . . . . . . . . . . . . . . . . . |
40 |
8-3 |
Model CF-400G |
220/50/1 or 240/50/2 . . . . . . . . . . . . . . . . . . . . . . . . . . . . . . . . . . . . . . . . . . . . . . . . . . . . . . . . . . . . . . . . . . . . . . . . . . . . . . . . . . |
42 |
8-4 |
Model CF-400G |
120/60/1 . . . . . . . . . . . . . . . . . . . . . . . . . . . . . . . . . . . . . . . . . . . . . . . . . . . . . . . . . . . . . . . . . . . . . . . . . . . . . . . . . . . . . . . . . . . . . . . . . . . . |
44 |

Introduction
Congratulations on the purchase of your new Giles Gas Fryer. The Giles Model
CF-400G fryer is equipped with a high quality Cooking Computer. This new “User friendly” easily programmable Cooking Computer incorporates extensive design detail by its manufacture WATLOW, and extensive cooking application by the “Giles” engineering team. The new cooking computer along with the Giles fryer is truly a “world class” product.
To help protect your investment in this state-of-the-art cooking equipment, we recommend you
take a few moments to familiarize yourself with the installation, cleaning and maintenance procedures contained in this manual. Adherence to these recommended procedures minimizes the potential for costly “Down-Time” and equipment repairs.
Parts Ordering and Service Information
If you require repair or assistance, please contact your local independent distributor. If you require further assistance please contact our corporate office in Montgomery, Alabama at 1-800-554-4537.
Please have the following information available when calling for assistance. It may be helpful to record this information in the blanks provided below for a quick reference.
1.Model Number:
2.Serial Number:
3.Gas Type (L.P or Nat.):
4.Voltage:
5.Nature of Problem:
2

Installation
1 - 1 Installation Instructions
This section provides a summary of the procedures necessary for proper installation of your new Giles Gas Fryer. To prevent personal injury or equipment damage, please ensure the following steps are taken:
ForYour Safety do not store or use gasoline or other flammable vapors and liquids in
!the vicinity of this or any other appliance!
1.POST IN A PROMINENT LOCATION instructions to be followed in the event the user smells gas.This information can be obtained by consulting your local gas supplier.
2.Keep the appliance and surrounding area free and clear from combustible materials:
For CF-400G allow a minimum clearance from combustible oil construction of 4" (10.2cm) from bottom, side and back of the Fryer.
3.Do not obstruct the flow of combustion and ventilation of air.
4.Please retain this manual for future reference.
5.Please note wiring diagrams for this appliance are located in the rear of the manual. Ensure the wiring diagram which you consult corresponds to the model being operated.
6.The installation must conform with local codes or, in the absence of local codes, with National Fuel Gas Code ANSI Z223.1 - 1988. When in Canada, installation must be in accordance with CN 1-B149.1 or .2 . Installation must also conform with ANSI/NFPA 96.
7.The Fryer and its individual shutoff valve must be disconnected from the gas piping system during any pressure testing of that system at test pressure in excess of 1/4 psig (3.45 kPa).
8.The Fryer must be isolated from the gas supply piping system by closing its individual manual shutoff valve during any pressure testing of the gas supply piping system at test pressures equal to or less than 1/4 psig (3.45 kPa), (14" water column).
CAUTION
!The flue gases of this appliance must be vented to the outside in accordance with National Fuel Gas Code, ANSI Z223.1-1988 and terminate in a UL listed outside vent terminal. When in Canada reference CANI-B149.1 or .2 “Installation Codes for Gas Burning Appliances and Equipment”.
9.Please ensure this appliance is electrically grounded in accordance with local codes, or in the absence of local codes, with the National Electrical Code, ANSI/NFPA 70 - 1990. When in Canada reference CSA C22-1 “Canadian Electrical Code Part 1”.
10.Please provide adequate room for servicing and proper operation of this appliance. Also, provide adequate ventilation in the operating area where necessary.
3

Installation
11.Make sure the Gas Connector complies with Standard for Movable Gas Appliance, ANSI, 69-1987 and Addenda Z21.69-1989 (in Canada CANI-6-10-88), and the quick disconnect device complies with the Standard for QuickDisconnect Devices for Use with Gas Fuel, ANSI Z21.41-1989, (in Canada CANI 6.9 M79). Adequate means must be provided to limit the movement of the fryer. A ring which is located on the lower right hand side of the fryers back is to be used for the attachment of a restraining devise.
12.Please provide for adequate air intake into combustion chamber.
13.Always consult with an electrician or other individual prior to installation.
14.Ensure voltage, amperage, and gas type (PROPANE OR NATURAL GAS ONLY) supplied to the unit are as specified on the fryer’s rating plate.
IMPORTANT NOTE
The wrong Fuel Source can damage the Fryer Unit and void the warranty.
15.To avoid the splashing of hot liquid make sure this unit is in a secure position such as connected to a battery of appliances or adequately tied and will not move or tip. Locking casters are supplied on this unit—use them!
17.This appliance is to be installed, used and maintained in accordance with the Standard for Ventilation Control, and Fire Protection of Commercial Cooking Operations, NFPA 96-1994.
!DO NOT Modify, Alter or Add Attachments toThis Equipment!
The above steps will help to ensure safe and proper installation of your fryer. If you have any questions concerning these procedures, contact your local Giles distributor or other qualified service person.
4

Gas Fryer Setup Instructions “All Units”
1.Check location elevation and verify unit is setup for proper elevation.
2.Fill the cooking vessel with water.
3.Turn off gas supply.
4.Turn off power.
5.Remove the back panel(s) upper and lower.
6.Remove the gas line (tube) from the orfice holder (bottom of the burner).
7.Remove the orfice holder by turning it counter clockwise. The altitude is stamped on the orfice. Verfiy that the orfice size is for the correct altitude.
8.Put the orfice holder back in place.
9.Locate the pressure tap on the gas valve and take out the plug.
10.Connect a water column (manometer) to the gas valve. (Where you removed the plug from).
11.Turn the power on.
12.Turn on gas supply and read water column 10.5 inches LP or 3.5 inches natural.
13.Adjust gas pressure as required. By removing the cap on the valve covering the pressure adjustment screw. (If pressure is correct, do not adjust).
14.Turn off gas supply.
15.Turn off the power.
16.Remove the water column from the gas valve.
17.Put the plug back in place.
18.Put the back panel(s) back on the unit.
19.Turn on the gas supply.
20.Turn on the power.
21.The unit is ready for operation.
22.Proceed with the boil out procedure.
*Check Vacuum Switch Operation With Procedure, 2nd Page*
5

Gas Fryer Setup Instructions “All Units”
1.Using a non-combustible cover, place it over the vent stack covering half of the stack.
2.The unit burner should be shut off, after removing the cover, the unit will re-ignite.
3.Adjust the vacuum switch if the unit doesn’t shut off when covered.
4.Turning the adjusting screw clockwise increases sensitivity.
5.If it takes more coverage to shut down the unit, the switch is not sensitive enough,
if covering only 1/4 shuts the unit down, it too sensitive.
6
Installation
1 - 2 Removal of Fryer from Crate
Your Giles Fryer may arrive enclosed by a wooden crate. If your unit arrived uncrated, go to Section 1-3. The Fryer is secured to a wooden platform by means of high-tensile strength strapping.
1.Carefully cut and remove the plastic shipping wrap and the strapping mentioned above.
2.Use pliers to loosen wire hooks which secure the wooden crate around the fryer. Remove the wooden crate.
3.Carefully remove the fryer from the shipping platform. Your new fryer is extremely heavy and great care should be taken in lifting or moving the unit to prevent personal injury or equipment damage.
1 - 3 Ventilation of Fryer
Your new Giles Gas Fryer has been designed for operation beneath a traditional exhaust hood. We strongly recommend you consult a professional ventilation or heating and air conditioning
company for assistance in designing a hood for an exhaust system.
IMPORTANT NOTE
Guidelines for proper ventilation system requirements may differ. Always consult with local authorities to ensure compliance.
1 - 4 Electrical Requirements
!WARNING
Fryers must be adequately and properly grounded. Improper grounding may result in electrical shock. Always refer to your local electrical code to ensure proper grounding of this or any other electrical equipment. Always consult with an electrician or other qualified service person to ensure breakers and wiring are of sufficient rating and gauge for the equipment being operated.
Giles Fryers are available from the factory wired for 120, 208 or 240 volts, and single phase only, 50/60HZ. service and set for either Natural or LP Gas. Check the rating plate on the door of the fryer to determine the correct power supply and fuel type.
7

Operating Instructions
2 Operating Instructions
For your safety, please observe the following precautions when operating your Giles Fryer:
1.Ensure the fry kettle is positioned in a secure, safe location with the casters in the locked position. A restraining device attachment ring is located on the lower right hand side of the Fryer.
2.Due to the high temperature of shortening in your fryer during cooking, it is extremely important the user exercise caution in operating this equipment to avoid personal injury.
3.Never move a fryer that contains hot oil! To avoid hazards associated with moving a fryer with liquid in the vessel, always allow adequate time for the liquid to cool.
4.If for any reason it becomes necessary to disconnect the fryer’s restraining device, ensure the restraining device is reconnected and the Fryer is returned to its original installed position.
5.Make sure all electrical and gas specifications have been met and the unit is grounded (see wiring diagram in Section 10).
6.In the event of power failure, DO NOT try to operate the unit.
Lighting and Shut-Down Instructions
1.Open the Main Gas Valve, turn Power Switch on.
2.Set the Thermostat to the desired temperature. (Giles Gas Fryers are provided with an automatic direct ignition system which eliminates the need for a pilot light).
3.In the event the burner does not ignite, a beeper will sound. Wait 5 minutes before attempting to restart the Fryer.
4.To RESTART, switch the Fryer’s main Power Switch to the “OFF” position. Return the Main Power Switch to the “ON” position and set the desired temperature.
5.To SHUT-DOWN the Fryer, turn the thermostat and the Fryer’s Main Power Switch to the “OFF” position, then CLOSE the Gas Supply Valve.
8
Model CF-400G
9

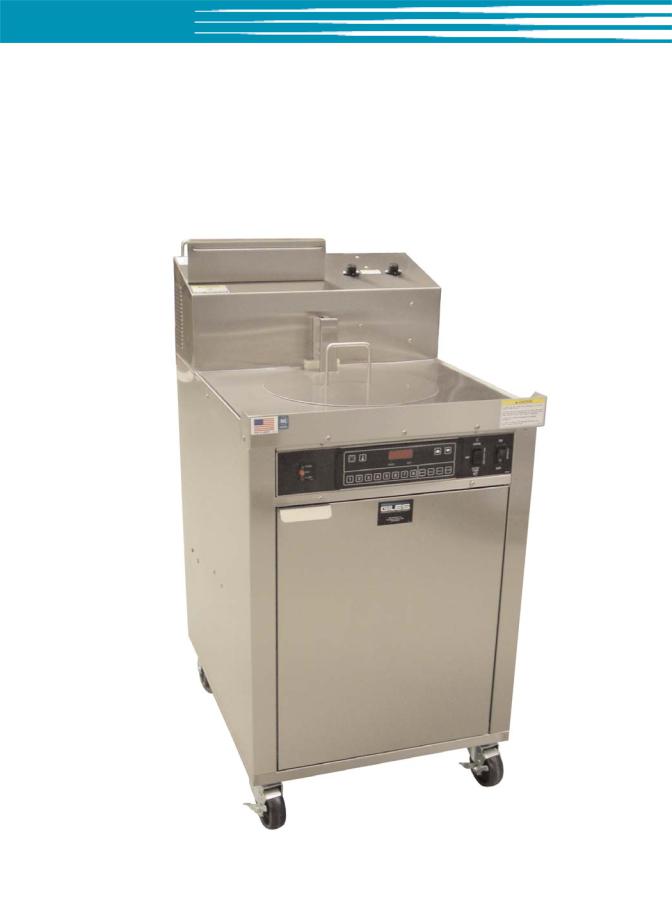
Fryer Components and Their Functions
3 Fryer Components andTheir Functions
The following section is designed to introduce you to the controls used in operating this equipment.
! |
DO NOT attempt operation of this unit until you have located each control discussed and fully |
|
|
|
understand their intended function. Failure to do so may result in improper operation resulting in |
|
equipment damage or personal injury to the operator. |
Please review this section carefully before proceeding any further.
Refer to the accompanying photographs for the location of the components discussed.
Cooking Computer Control Panel Components andTheir Functions
ITEM |
DESCRIPTION |
FUNCTION |
|
1. |
Fig. 1 |
Power Switch |
The Power Switch is a two-position switch. |
|
|
|
Move the switch upward to the “ON” position |
|
|
|
for operation. |
2. |
Fig. 1 |
Selector Switch |
The Selector Switch is a three-position switch which is |
|
|
|
used to select either the cook, off or filter mode of |
|
|
|
operation. The fryer’s Heat Exchanger will only operate |
|
|
|
in the “COOK” position. The switch should be placed |
|
|
|
in the “FILTER” position to filter the shortening which |
|
|
|
will allow the pump to operate. |
3. Fig. 1 |
Cooking computer |
The Cooking Computer is used to select oil tempera- |
|
|
|
|
tures, cooking times and basket lift operations. |
|
|
|
Programming of the cooking computer is covered later |
|
|
|
in the manual. |
10

Model CF-400G
3 - 1 Control Panel
Figure 1
2 1
8 |
3 |
|
9
10
ITEM |
DESCRIPTION |
FUNCTION |
|
8. |
Fig. 1 |
Power Indicator Light |
The Green Power Light is on whenever the fryer’s |
|
|
|
Master Power Switch is in the “ON” position. |
9. |
Fig. 1 |
Heat Indicator Light |
The Orange Heat Indicator Light will be on when the |
|
|
|
fryer’s Heat Exchanger is operating. When the selected |
|
|
|
operating temperature is reached, the light will go off. |
10. Fig 1 |
High-Limit Indicator |
The High-Limit Indicator Light is illuminated as a result |
|
|
|
|
of power being shut off to the fryer’s Heat Exchanger |
by the built-in solid-state control circuit. If it comes on during operation, refer to the trouble-shooting section of this manual.
NEVER cook in a fryer with the High-Limit Light on!
11

Fryer Components and Their Functions
3 - 2 Lower Cabinet Area |
|
||
ITEM |
DESCRIPTION |
FUNCTION |
|
1. |
Fig. 2 |
Filter Pan Hold-Down |
The Hold-Down Bracket is contained in the filter pan |
|
|
Bracket and Latches |
and serves to ensure the filter paper is held tightly |
|
|
|
in place by means of the four locking latches. The |
|
|
|
fryer’s filtering action will be reduced or eliminated if |
|
|
|
these latches are not properly secured. |
2. |
Fig. 2 |
T-Handle/Drain Valve |
Turning this T-Handle counter-clockwise allows shorten- |
|
|
|
ing to drain from the frying vessel into the filter pan. |
|
|
|
Open the valve slowly to avoid burns from |
|
|
|
splashing of hot oil. Always ensure the valve is closed |
|
|
|
prior to adding shortening. Your fryer will not operate |
|
|
|
if this DrainValve is not completely closed. (i.e., |
|
|
|
clockwise) |
3. |
Fig. 2 |
Drain Valve Pipe-Drain |
This Pipe-Drain attaches to the Drain Valve and helps |
|
|
|
to minimize splashing of hot oil when the fry-kettle is |
|
|
|
filtered or drained. The Pipe-Drain must be removed |
|
|
|
before sliding the filter pan out of the fryer. Always |
|
|
|
use insulated gloves to remove this hand tightened |
|
|
|
pipe. |
4. |
Fig. 2 |
Quick Disconnect |
This Quick-Disconnect Fitting is used in conjunction |
|
|
Oil Discharge Wand |
with the oil discharge wand to remove oil from the |
|
|
|
fryer that is to be discharged. |
5. |
Fig. 2 |
Diverter Valve |
The Diverter Valve may be identified by its colored |
|
|
|
lever-type handle. During a normal operation, it should |
|
|
|
be positioned so it points outward toward the |
|
|
|
operator. For removal of oil with the discharge hose |
|
|
|
connected, the diverter valve handle should be turned |
|
|
|
inward and counter-clockwise. After removal of oil for |
|
|
|
discard it should be returned to its normal position |
|
|
|
pointing toward the operator. Details of the oil |
|
|
|
procedure are covered in the operations section of |
|
|
|
this manual. |
6. |
Fig. 2 |
Quick Disconnect For filter Pan |
This Quick Disconnect fitting serves to connect the |
|
|
|
hose from the filter pan to the fryer’s oil return lines. |
The hose must be disconnected at this fitting prior to sliding the filter pan outward for cleaning or removal. The fitting is operated by pushing upward on the insulating ring and exerting downward pressure on the connecting end of the hose. For reconnection, push upward on the insulating ring while inserting the hose. Release the insulating ring when the hose fitting is fully inserted to lock it in position.
12
 Loading...