

Giles EH-5 User Manual

Operations & Service Manual
EH-5 & 6
Giles Enterprises, Inc.
ISO 9001 Registered Company • Committed to Quality
2750 Gunter Park Drive West • Montgomery, AL 36109 USA
Phone: 334.272.1457 • Fax: 334.239.4117 • Website: www.gfse.com
Service Hotline (Toll Free): 800.554.4537 (USA & Canada Only)
Form No. 60073 (Revised: 08/25/11 - Rev. E)


LIMITED WARRANTY
• Subject to the terms and conditions of this Limited Warranty as herein stated, all Giles Enterprises,
Inc., Foodservice Equipment and parts purchased new from an authorized Giles Enterprises, Inc.,
representative are warranted as to defects in material or workmanship for a period of 12 months
from the date of installation, provided, however, that with regard to labor costs in connection with
this warranty, see below. All installations must be made by a qualified installing agency in accordance with all applicable codes and/or regulations in the jurisdiction in which installed. Limited warranty coverage is extended to the original owner only and is void if the unit is resold.
• During the Limited Warranty period, Giles Enterprises, Inc. will replace or recondition, at its factory,
any part or parts of this unit which Giles Enterprises, Inc. inspectors judge defective, provided the
unit has been subjected to normal usage, properly installed, operated and serviced. This Limited
Warranty does not cover cosmetic damage, and damage due to acts of God, accident, misuse, alteration, negligence, abuse of the Giles Foodservice Equipment or the use of unorthodox repair methods. All parts replaced under this Limited Warranty carry only the unexpired term of this Limited
Warranty. Limited Warranty service may be furnished only by an authorized Giles Enterprises, Inc.,
representative.
• If Limited Warranty service is requested, Giles Enterprises, Inc., will send factory-authorized service representatives to repair, recondition, replace or inspect units of its manufacture with such labor
being rendered without cost to owner for ninety (90) days from the date of installation. Otherwise,
service, including labor and transportation charges or other expenses, in connection with the
removal or installation of any part or parts supplied under this Limited Warranty, are specified on the
original sales contract between the purchaser and the authorized Giles Enterprises, Inc., representative.
• Giles Enterprises, Inc. reserves the right to change or improve its equipment and parts in any way
without obligation to alter such equipment or parts previously manufactured.
• Giles Enterprises, Inc. makes no further warranties, express or implied including implied warranties
of merchantability or fitness for a particular purpose, and has no other obligation or liability not
specifically stated herein.
• Repair or replacement as provided under this limited warranty is the exclusive remedy. Giles
Enterprises, Inc., shall not be liable for any incidental or consequential damages for breach of any
express or implied warranty on this product, except to the extent prohibited by applicable law. Any
implied warranty of merchantability or fitness for a particular purpose on this product is limited in
duration to the duration of this limited warranty.
• Used Giles Enterprises, Inc., Foodservice Equipment or parts or Giles Enterprises, Inc., Foodservice
Equipment or parts not purchased from an authorized Giles Enterprises, Inc., representative, carry
no warranties, express or implied.


Model: EH-5 & 6Table Of Contents
Safety . . . . . . . . . . . . . . . . . . . . . . . . . . . . . . . . . . . . . . . . . . . . . . . . . . . . . . . . v
Safety Overview . . . . . . . . . . . . . . . . . . . . . . . . . . . . . . . . . . . . . . . . . . . . . . . . . . . . . . . . . . . . . . . . . . . . v
Specific Safety Precautions . . . . . . . . . . . . . . . . . . . . . . . . . . . . . . . . . . . . . . . . . . . . . . . . . . . . . . . . . . . vi
1. Introduction . . . . . . . . . . . . . . . . . . . . . . . . . . . . . . . . . . . . . . . . . . . . . . 1
1-1. Construction . . . . . . . . . . . . . . . . . . . . . . . . . . . . . . . . . . . . . . . . . . . . . . . . . . . . . . . . . . . . . . 1
1-2. Standard Features. . . . . . . . . . . . . . . . . . . . . . . . . . . . . . . . . . . . . . . . . . . . . . . . . . . . . . . . . . 1
1-3. Optional Features . . . . . . . . . . . . . . . . . . . . . . . . . . . . . . . . . . . . . . . . . . . . . . . . . . . . . . . . . . 1
1-4. Specifications . . . . . . . . . . . . . . . . . . . . . . . . . . . . . . . . . . . . . . . . . . . . . . . . . . . . . . . . . . . . . 2
1-4.1 Overall Dimensions for EH-5 . . . . . . . . . . . . . . . . . . . . . . . . . . . . . . . . . . . . . . . . . . . . . . . . . 2
1-4.2 Overall Dimensions for EH-6 . . . . . . . . . . . . . . . . . . . . . . . . . . . . . . . . . . . . . . . . . . . . . . . . . 3
1-4.3 Regulatory Listings . . . . . . . . . . . . . . . . . . . . . . . . . . . . . . . . . . . . . . . . . . . . . . . . . . . . . . . . . 4
1-4.4 Hood Weights . . . . . . . . . . . . . . . . . . . . . . . . . . . . . . . . . . . . . . . . . . . . . . . . . . . . . . . . . . . . . 4
2. Installation . . . . . . . . . . . . . . . . . . . . . . . . . . . . . . . . . . . . . . . . . . . . . . . 5
2.1 Unpacking . . . . . . . . . . . . . . . . . . . . . . . . . . . . . . . . . . . . . . . . . . . . . . . . . . . . . . . . . . . . . . . . 5
2.2 Location . . . . . . . . . . . . . . . . . . . . . . . . . . . . . . . . . . . . . . . . . . . . . . . . . . . . . . . . . . . . . . . . . 6
2.3 Hood Mounting Detail . . . . . . . . . . . . . . . . . . . . . . . . . . . . . . . . . . . . . . . . . . . . . . . . . . . . . . 6
2.3.1 Hood Skirt Installation . . . . . . . . . . . . . . . . . . . . . . . . . . . . . . . . . . . . . . . . . . . . . . . . . . . . . . 7
2.4 Cooking Appliance limitations and clearances . . . . . . . . . . . . . . . . . . . . . . . . . . . . . . . . . . . . 8
2.4.1 Fryer limitations . . . . . . . . . . . . . . . . . . . . . . . . . . . . . . . . . . . . . . . . . . . . . . . . . . . . . . . . . . . 8
2.4.2 Fryer clearances . . . . . . . . . . . . . . . . . . . . . . . . . . . . . . . . . . . . . . . . . . . . . . . . . . . . . . . . . . . 8
2.4.3 Oven limitations . . . . . . . . . . . . . . . . . . . . . . . . . . . . . . . . . . . . . . . . . . . . . . . . . . . . . . . . . . . 9
2.4.4 Oven clearances . . . . . . . . . . . . . . . . . . . . . . . . . . . . . . . . . . . . . . . . . . . . . . . . . . . . . . . . . . . 9
2.4.5 Griddle limitations. . . . . . . . . . . . . . . . . . . . . . . . . . . . . . . . . . . . . . . . . . . . . . . . . . . . . . . . . 10
2.4.6 Griddle clearances. . . . . . . . . . . . . . . . . . . . . . . . . . . . . . . . . . . . . . . . . . . . . . . . . . . . . . . . . 10
2.4.7 Range limitations . . . . . . . . . . . . . . . . . . . . . . . . . . . . . . . . . . . . . . . . . . . . . . . . . . . . . . . . . 11
2.4.8 Range clearances . . . . . . . . . . . . . . . . . . . . . . . . . . . . . . . . . . . . . . . . . . . . . . . . . . . . . . . . . 11
2.5 Hood Electrical Requirements . . . . . . . . . . . . . . . . . . . . . . . . . . . . . . . . . . . . . . . . . . . . . . . 12
2.5.1 Electrical Connections . . . . . . . . . . . . . . . . . . . . . . . . . . . . . . . . . . . . . . . . . . . . . . . . . . . . . 12
2.5.2 Routing Power Wires . . . . . . . . . . . . . . . . . . . . . . . . . . . . . . . . . . . . . . . . . . . . . . . . . . . . . . 13
2.5.3 Hood and Appliance Interlock Diagram. . . . . . . . . . . . . . . . . . . . . . . . . . . . . . . . . . . . . . . . . 13
2.6 Fire Suppression System Installation . . . . . . . . . . . . . . . . . . . . . . . . . . . . . . . . . . . . . . . . . . 14
2.6.1 Fire Suppression System Routing . . . . . . . . . . . . . . . . . . . . . . . . . . . . . . . . . . . . . . . . . . . . 14
2.6.2 Fire Suppression Fusible Links . . . . . . . . . . . . . . . . . . . . . . . . . . . . . . . . . . . . . . . . . . . . . . . 15
2.6.3 Appliance Nozzles . . . . . . . . . . . . . . . . . . . . . . . . . . . . . . . . . . . . . . . . . . . . . . . . . . . . . . . . . 15
2.6.4 Fire Extinguisher Nozzle Locations. . . . . . . . . . . . . . . . . . . . . . . . . . . . . . . . . . . . . . . . . . . . 16
2.6.5 General Maintenance . . . . . . . . . . . . . . . . . . . . . . . . . . . . . . . . . . . . . . . . . . . . . . . . . . . . . . 16
3. Overview . . . . . . . . . . . . . . . . . . . . . . . . . . . . . . . . . . . . . . . . . . . . . . . 17
3.1 Control Panel . . . . . . . . . . . . . . . . . . . . . . . . . . . . . . . . . . . . . . . . . . . . . . . . . . . . . . . . . . . . 18
3.2 Filter Chamber and Exhaust . . . . . . . . . . . . . . . . . . . . . . . . . . . . . . . . . . . . . . . . . . . . . . . . . 20
3.3 Accessories (Included) . . . . . . . . . . . . . . . . . . . . . . . . . . . . . . . . . . . . . . . . . . . . . . . . . . . . . 22
iii

Model: EH-5 & 6 Table Of Contents
4. Operation & Filter Maintenance . . . . . . . . . . . . . . . . . . . . . . . . . . . . 25
4.1 Hood Operation . . . . . . . . . . . . . . . . . . . . . . . . . . . . . . . . . . . . . . . . . . . . . . . . . . . . . . . . . . 25
4.2 Filters and Filter Maintenance . . . . . . . . . . . . . . . . . . . . . . . . . . . . . . . . . . . . . . . . . . . . . . . 25
4.2.1 Ventless Hood Filter Table . . . . . . . . . . . . . . . . . . . . . . . . . . . . . . . . . . . . . . . . . . . . . . . . . . 25
4.2.2 Baffle Filter Removal. . . . . . . . . . . . . . . . . . . . . . . . . . . . . . . . . . . . . . . . . . . . . . . . . . . . . . . 26
4.2.3 Baffle Filter Installation . . . . . . . . . . . . . . . . . . . . . . . . . . . . . . . . . . . . . . . . . . . . . . . . . . . . . 27
4.2.4 Baffle Filter Missing . . . . . . . . . . . . . . . . . . . . . . . . . . . . . . . . . . . . . . . . . . . . . . . . . . . . . . . 27
4.2.5 Baffle Filter Cleaning. . . . . . . . . . . . . . . . . . . . . . . . . . . . . . . . . . . . . . . . . . . . . . . . . . . . . . . 28
4.2.6 Pre-Filter Removal. . . . . . . . . . . . . . . . . . . . . . . . . . . . . . . . . . . . . . . . . . . . . . . . . . . . . . . . . 28
4.2.7 Pre-Filter Installation . . . . . . . . . . . . . . . . . . . . . . . . . . . . . . . . . . . . . . . . . . . . . . . . . . . . . . . 29
4.2.8 Pre-Filter Filter Missing. . . . . . . . . . . . . . . . . . . . . . . . . . . . . . . . . . . . . . . . . . . . . . . . . . . . . 29
4.2.9 Pre-Filter Replacement . . . . . . . . . . . . . . . . . . . . . . . . . . . . . . . . . . . . . . . . . . . . . . . . . . . . . 30
4.2.10 EAC Filter Removal . . . . . . . . . . . . . . . . . . . . . . . . . . . . . . . . . . . . . . . . . . . . . . . . . . . . . . . . 30
4.2.11 EAC Filter Installation . . . . . . . . . . . . . . . . . . . . . . . . . . . . . . . . . . . . . . . . . . . . . . . . . . . . . . 31
4.2.12 EAC Filter Status. . . . . . . . . . . . . . . . . . . . . . . . . . . . . . . . . . . . . . . . . . . . . . . . . . . . . . . . . . 32
4.2.13 EAC Filter Cleaning . . . . . . . . . . . . . . . . . . . . . . . . . . . . . . . . . . . . . . . . . . . . . . . . . . . . . . . . 32
4.2.14 Charcoal Filter Removal . . . . . . . . . . . . . . . . . . . . . . . . . . . . . . . . . . . . . . . . . . . . . . . . . . . . 33
4.2.15 Charcoal Filter Installation . . . . . . . . . . . . . . . . . . . . . . . . . . . . . . . . . . . . . . . . . . . . . . . . . . 34
4.2.16 Charcoal Filter Missing . . . . . . . . . . . . . . . . . . . . . . . . . . . . . . . . . . . . . . . . . . . . . . . . . . . . . 34
4.2.17 Charcoal Filter Replacement. . . . . . . . . . . . . . . . . . . . . . . . . . . . . . . . . . . . . . . . . . . . . . . . . 35
4.3 Filter Alarm Chart . . . . . . . . . . . . . . . . . . . . . . . . . . . . . . . . . . . . . . . . . . . . . . . . . . . . . . . . . 35
5. Hood Cleaning and Maintenance . . . . . . . . . . . . . . . . . . . . . . . . . . . 36
5.1 Monthly Interlock Check . . . . . . . . . . . . . . . . . . . . . . . . . . . . . . . . . . . . . . . . . . . . . . . . . . . . 36
5.2 Quarterly Hood Cleaning . . . . . . . . . . . . . . . . . . . . . . . . . . . . . . . . . . . . . . . . . . . . . . . . . . . 36
5.3. Semi-Annual Fire Suppression System . . . . . . . . . . . . . . . . . . . . . . . . . . . . . . . . . . . . . . . . 37
5.4 Annual Fire Suppression System . . . . . . . . . . . . . . . . . . . . . . . . . . . . . . . . . . . . . . . . . . . . . 37
5.5 12 Year Fire Suppression System . . . . . . . . . . . . . . . . . . . . . . . . . . . . . . . . . . . . . . . . . . . . . 37
5.6 Maintainence & Service Log . . . . . . . . . . . . . . . . . . . . . . . . . . . . . . . . . . . . . . . . . . . . . . . . 38
6. Troubleshooting . . . . . . . . . . . . . . . . . . . . . . . . . . . . . . . . . . . . . . . . . 40
6.1 Troubleshooting Procedures . . . . . . . . . . . . . . . . . . . . . . . . . . . . . . . . . . . . . . . . . . . . . . . . . 40
7. Parts List . . . . . . . . . . . . . . . . . . . . . . . . . . . . . . . . . . . . . . . . . . . . . . . 42
7.1 Parts Ordering and Service Information . . . . . . . . . . . . . . . . . . . . . . . . . . . . . . . . . . . . . . . . 42
7.2 Electrical Component Drawer EH-5 and EH-6 . . . . . . . . . . . . . . . . . . . . . . . . . . . . . . . . . . . 44
7.3 Front View - Doors and Panel removed . . . . . . . . . . . . . . . . . . . . . . . . . . . . . . . . . . . . . . . . 46
7.4 Baffle Filters and Switches . . . . . . . . . . . . . . . . . . . . . . . . . . . . . . . . . . . . . . . . . . . . . . . . . . 48
7.5 Doors and Front Panel . . . . . . . . . . . . . . . . . . . . . . . . . . . . . . . . . . . . . . . . . . . . . . . . . . . . . 50
iv
Model: EH-5 & 6Safety
Safety
Safety Overview
The information contained in this manual has been prepared to aid in learning the proper procedures for
installing, operating and servicing this unit.
Throughout this manual, safety precautions are identified through the use of the safety alert symbol and
three signal words: DANGER, WARNING, and CAUTION. All safety alert information precedes the
step(s) to which it applies. Suggested, recommended, or other noteworthy information is identified
through the use of NOTES. Additionally, certain words are used to indicate a specific meaning or to add
emphasis.
The following words are used as indicated throughout the manual:
Shall: understood to be mandatory.
Should: understood to be advisory.
May: understood to be permissive.
Will: indicates a future event/condition to occur.
!!
or
(Safety Alert Symbol)
Used in conjunction with signal words (DANGER,WARNING, or CAUTION) as alerts to potential personal
injury hazards, immediately preceding precautionary measures that pertain to subsequent step(s). Obey
all safety messages that follow this symbol to avoid possible injury or death. Failure to adhere to safety
precautions identified by the safety alert symbol may also void the warranty.
DANGER
!
• Indicates an imminently hazardous situation which, if not avoided, will result in death or serious injury.
Use of this is limited to the most extreme situations.
WARNING
!
• Indicates a potentially hazardous situation which, if not avoided, could result in death or serious injury.
CAUTION
!
• Indicates a potentially hazardous situation which, if not avoided, may result in minor or moderate injury.
Also used to alert against unsafe practices.
CAUTION
• When used without the safety alert symbol, CAUTION indicates a potentially hazardous situation
which, if not avoided, may result in equipment/property damage, and void the warranty.
NOTE:
•Identifies suggested, recommended, or other noteworthy information.
v

Model: EH-5 & 6 Safety
Specific Safety Precautions
For your safety, please observe the following precautions when operating or servicing your Environmental
Hood, Model EH-5 or EH-6. Read the following important safety information to avoid personal injury
and/or damage to the equipment.
DANGER
!
• Always disconnect the source of the main power before removing the service entrance box cover.
• Failure to ensure the Power switch is in the “OFF” position during servicing and when replacing filters
could result in equipment damage, electrical shock and/or personal injury.
• Failure to comply with these DANGER notices will result in death or serious injury, equipment/property
damage, and void the warranty.
WARNING
!
• DO NOT use or store flammable liquids or items that produce flammable vapors, in the vicinity of this
or any other appliance!
• Consult a qualified electrician to ensure all electrical specifications have been met and the unit is prop-
erly grounded.
• Before installing or servicing this equipment, read the contents of this manual thoroughly.
• Improper installation, adjustment, alteration, service or maintenance could result in death or serious
injury, equipment or property damage, and void the warranty.
• Failure to comply with these WARNING notices could result in death or serious injury and equipment
or property damage.
CAUTION
!
• Exercise care when lifting or moving the unit. Refer to Section 1-4.4, Hood Weights.
• Exercise care when removing the wooden crating from around the unit.
vi
Model: EH-5 & 6Safety
CAUTION
!
• DO NOT operate the unit unless you fully understand the components and their intended function.
• Be careful not to bend the fins or break the ionizer wires on the EAC (Electrostatic Air Cleaner), as this
will prevent it from working properly and will possibly shut down power to the appliance being used
with the hood.
•
Failure to comply with these CAUTION notices may result in minor or moderate injury, equipment or property damage, and void the warranty.
CAUTION
• The electronic components of the Control Panel are impact-sensitive. Exercise care around the Control
Panel to maintain proper operation.
• Do not try to dry the EAC either by running the hood to air dry or by operating an appliance below to
heat dry. This could potentially damage the EAC causing improper operation and voiding the warranty.
• When cleaning:
•• DO NOT steam clean.
•• DO NOT use products containing chlorine.
•• DO NOT use abrasive products, steel wool or scouring pads.
• Failure to comply with these CAUTION notices may result in equipment or property damage and void
the warranty.
NOTE:
• Upon arrival, if the palletized unit shows any signs of damaged, immediately inspect the Hood and all
other components contained on the pallet, and notify the freight company of any damage to the unit.
• To aid electricians and technicians, an electrical wiring diagram is contained in this manual. Refer to the
wiring diagram during installation or servicing.
• Comply with all appropriate state and/or local heath regulations regarding the cleaning and sanitation of
equipment.
• For difficult areas with excessive particulate build up, a mild bio-degradable non-toxic degreaser (such as
Clear Magic or Simple Green) may be used.
• Always ensure the unit is electrically grounded and installed in accordance with local codes, or in the
absence of local codes, in accordance with the National Electrical Code ANSI/NFPA No. 70-1984.
vii

Model: EH-5 & 6 Safety
NOTES:
viii

Model: EH-5 & 6Introduction
1. Introduction
Congratulations on the purchase of your new Giles Environmental Hood System (EH-5 or EH-6)
manufactured by Giles Enterprises, Inc., Montgomery, Alabama (USA). Standard mounting for this hood is
suspension from the ceiling. Proper care and maintenance will ensure years of trouble-free service.
To help protect your investment in this equipment, we recommend taking a few moments to familiarize
yourself with the installation, operational, cleaning, and maintenance procedures contained in this manual.
Please read this manual before installing and operating the Hood. Adherence to these recommended
procedures minimizes the potential for costly future "down-time" or equipment repairs. Please retain this
manual for future reference.
1.1 Construction
The Environmental Hood System exterior and interior is constructed of stainless steel.
1.2 Standard Features
Control Panel
• Control panel LED indicators display the status of the EAC Filters (left & right).
• Missing Filter Light indicates if one, or more, of the two (2) Baffle Filters, Pre-Filters, or Charcoal Filters
is missing or improperly installed.
Filters
• Baffle Filters capture large grease particulate and drain condensate into the grease gutter to be captured
in the Drip Cup.
• Pre-Filters capture smaller grease particulate and moisture.
• Electronic Air Cleaners (EAC) capture smoke & other fine contaminates in the air stream.
• Activated Charcoal Filters help eliminate cooking odors from the air stream.
1.3 Optional Features
Inter-Locking Start System (ILS)
• Inter-Locking Start System (ILS) - Should there be a power interruption to the the hood, this system will
not allow the Hood and the served Appliance(s) to restart without the attendance of an operator. This
system is required by code in some cities and/or states. Please consult with your local code officials to
see if this option is required.
1
Model: EH-5 & 6 Introduction
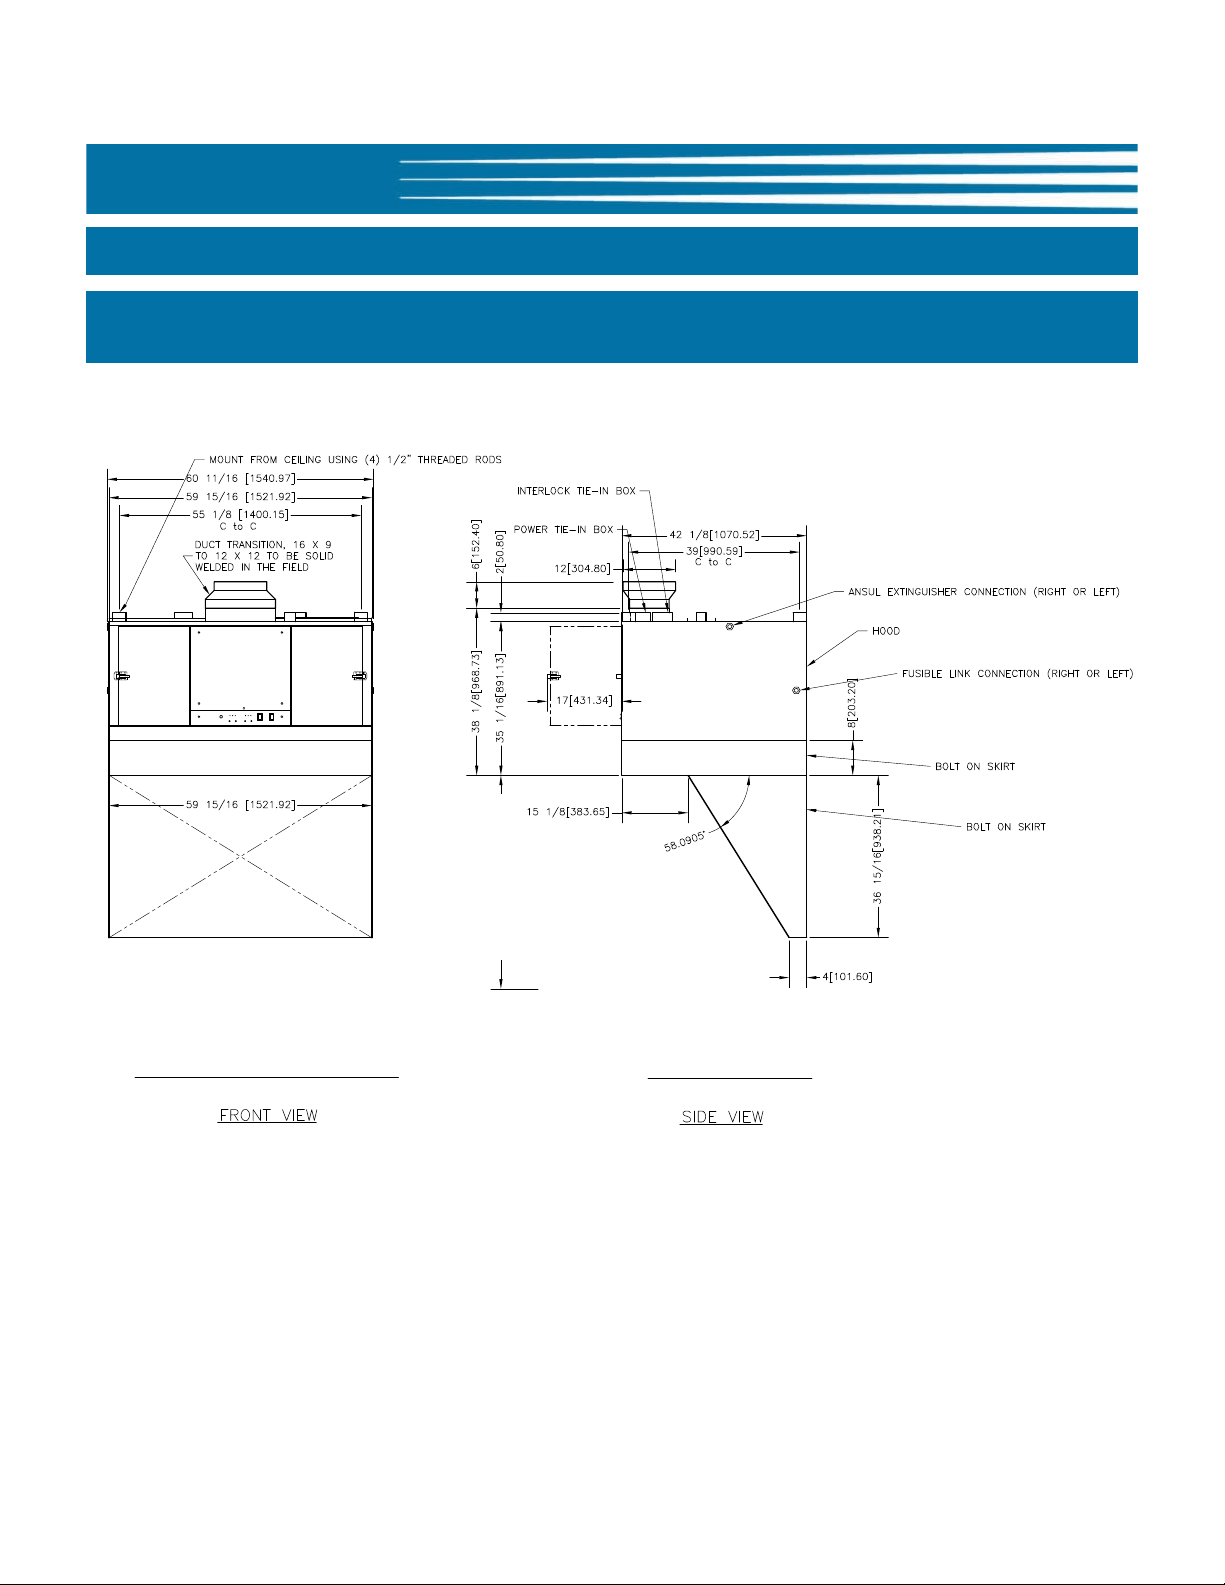
1.4 Specifications
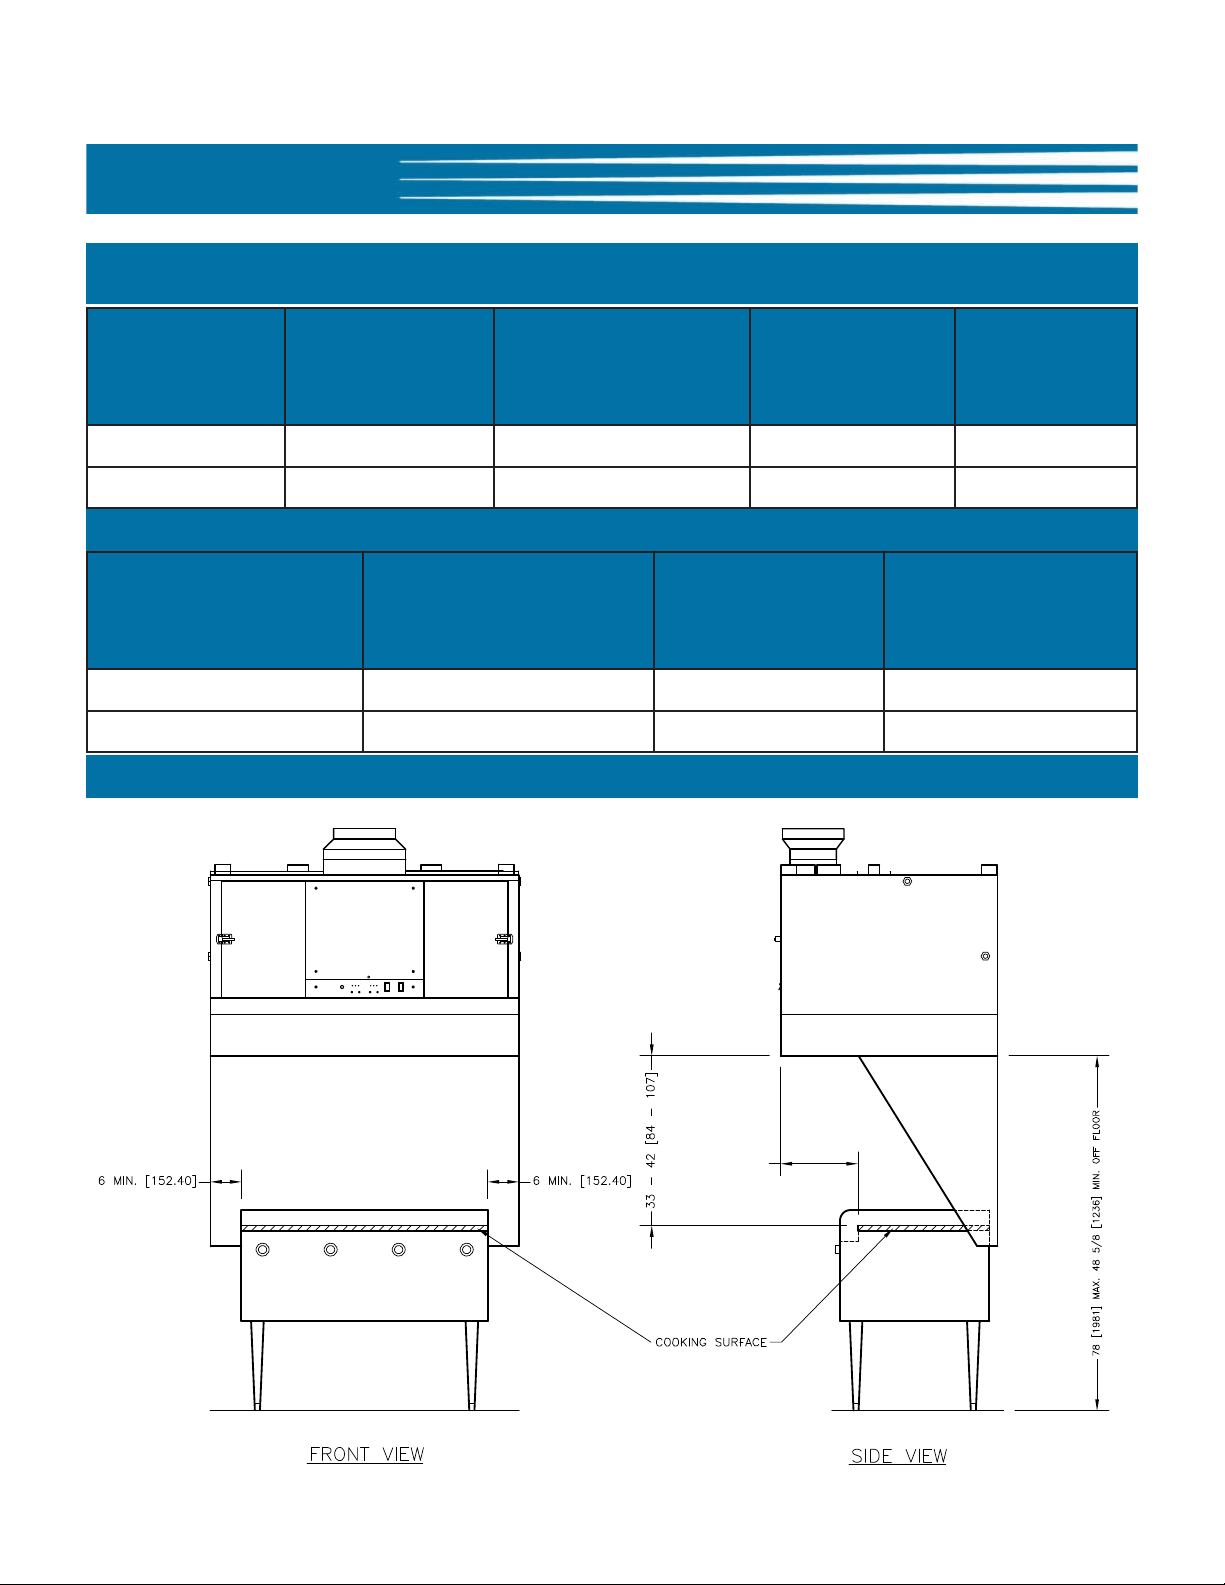
1.4.1 Overall Dimensions - EH-5
33”[838.2] MIN.
44”[1066.8] MAX.
DISTANCETOCOOKINGSURFACE
2
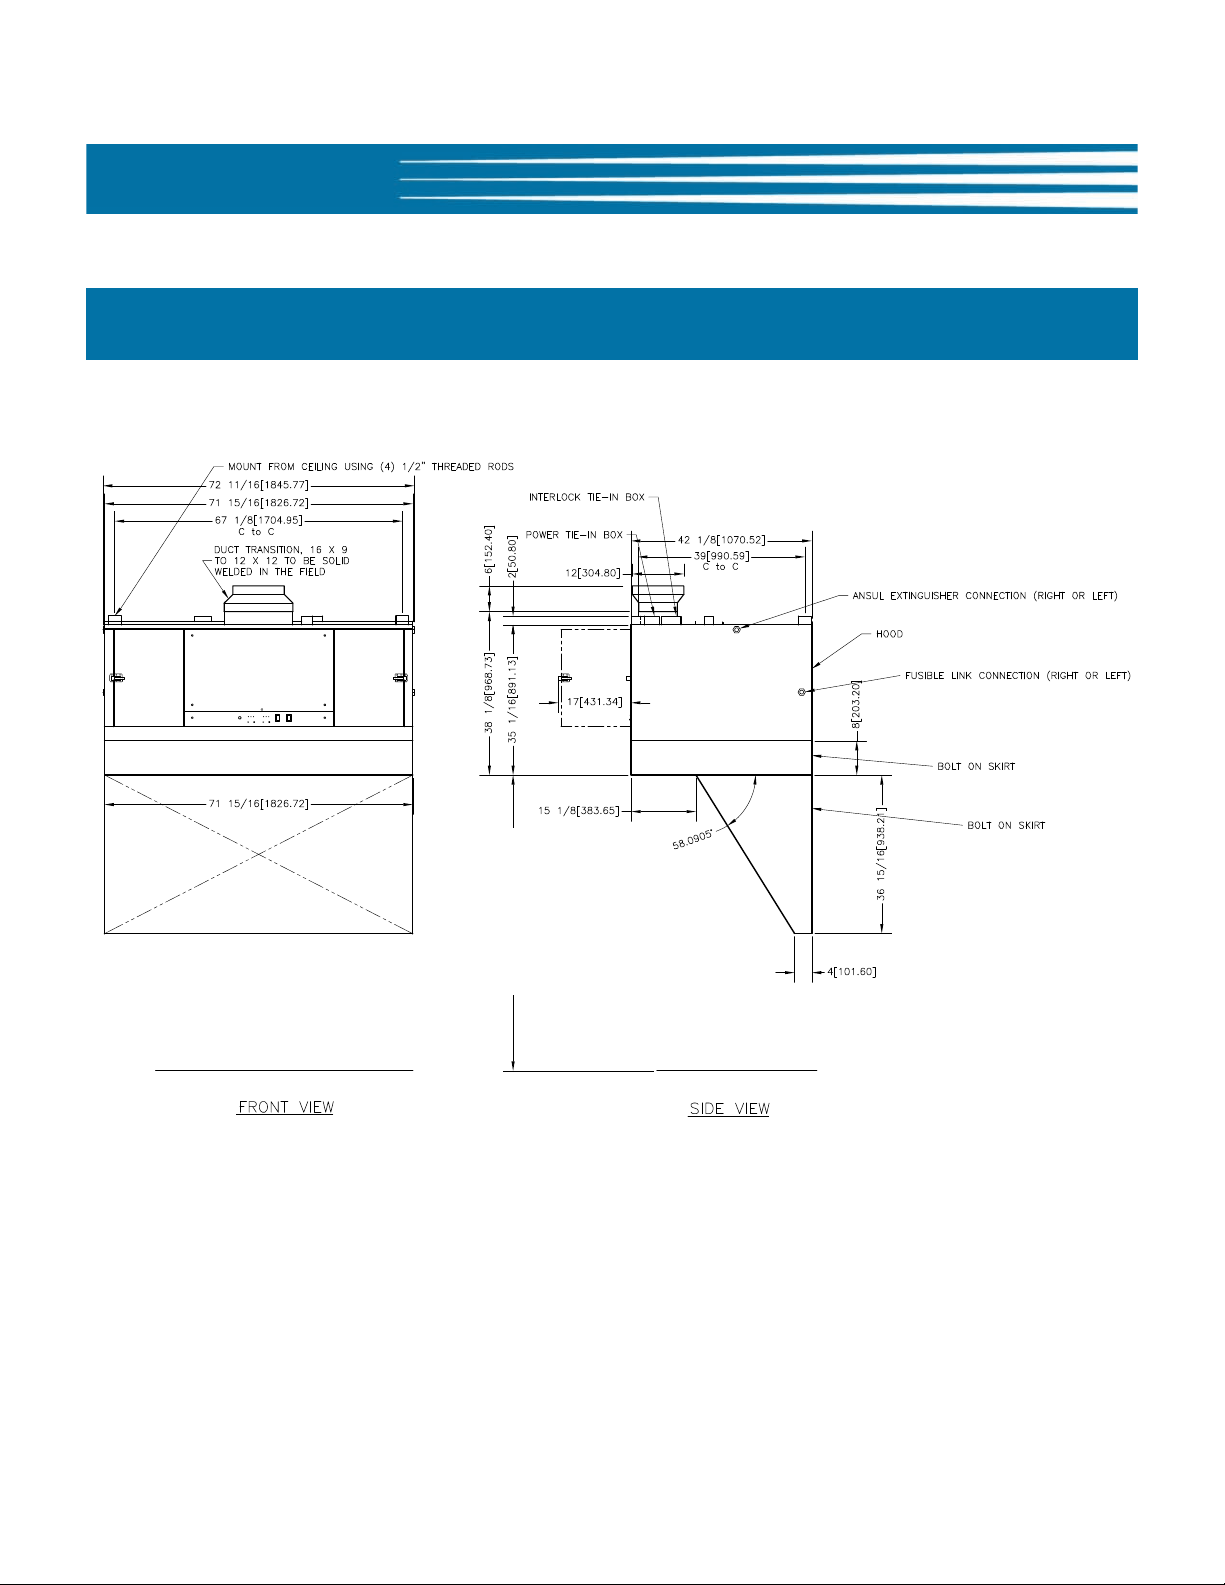
1.4.2. Overall Dimensions for EH-6
Model: EH-5 & 6Introduction
33”[838.2] MIN.
44”[1066.8] MAX.
DISTANCETOCOOKINGSURFACE
3
Model: EH-5 & 6 Introduction
1.4.3 Regulatory Listings
1.4.4 Hood Weights
Hood Crated Weight Uncrated Weight
EH-5 664 lbs [302 kg] 464 lbs [211 kg]
EH-6 733 lbs [333 kg] 553 lbs [251 kg]
4
Model: EH-5 & 6Installation
2. Installation
This section provides a summary of procedures necessary to install your new EH-5 or EH-6 Environmental
Hood. Before installing or servicing this equipment, please read the contents of this manual thoroughly.
Following these procedures will help ensure a safe and proper installation.
NOTE:
The Giles Environmental Hood is a conventional type ventilation hood that must be connected by
ductwork to an appropriately sized exhaust fan that discharges to the outside atmosphere. Prior to
beginning installation, it is recommended to consult a qualified ventilation specialist to assess the site and
determine fan and ductwork requirements, as well as address any local regulatory permit requirements.
If desired, a “Fan Quotation Form” is available from Giles Services to help guide customers through this
process. It is the sole responsibility of the purchaser to supply the appropriate exhaust fan,
ductwork, installation, all permits, and any consulting services deemed necessary, as this is NOT
included with the hood purchase.
2.1 Unpacking
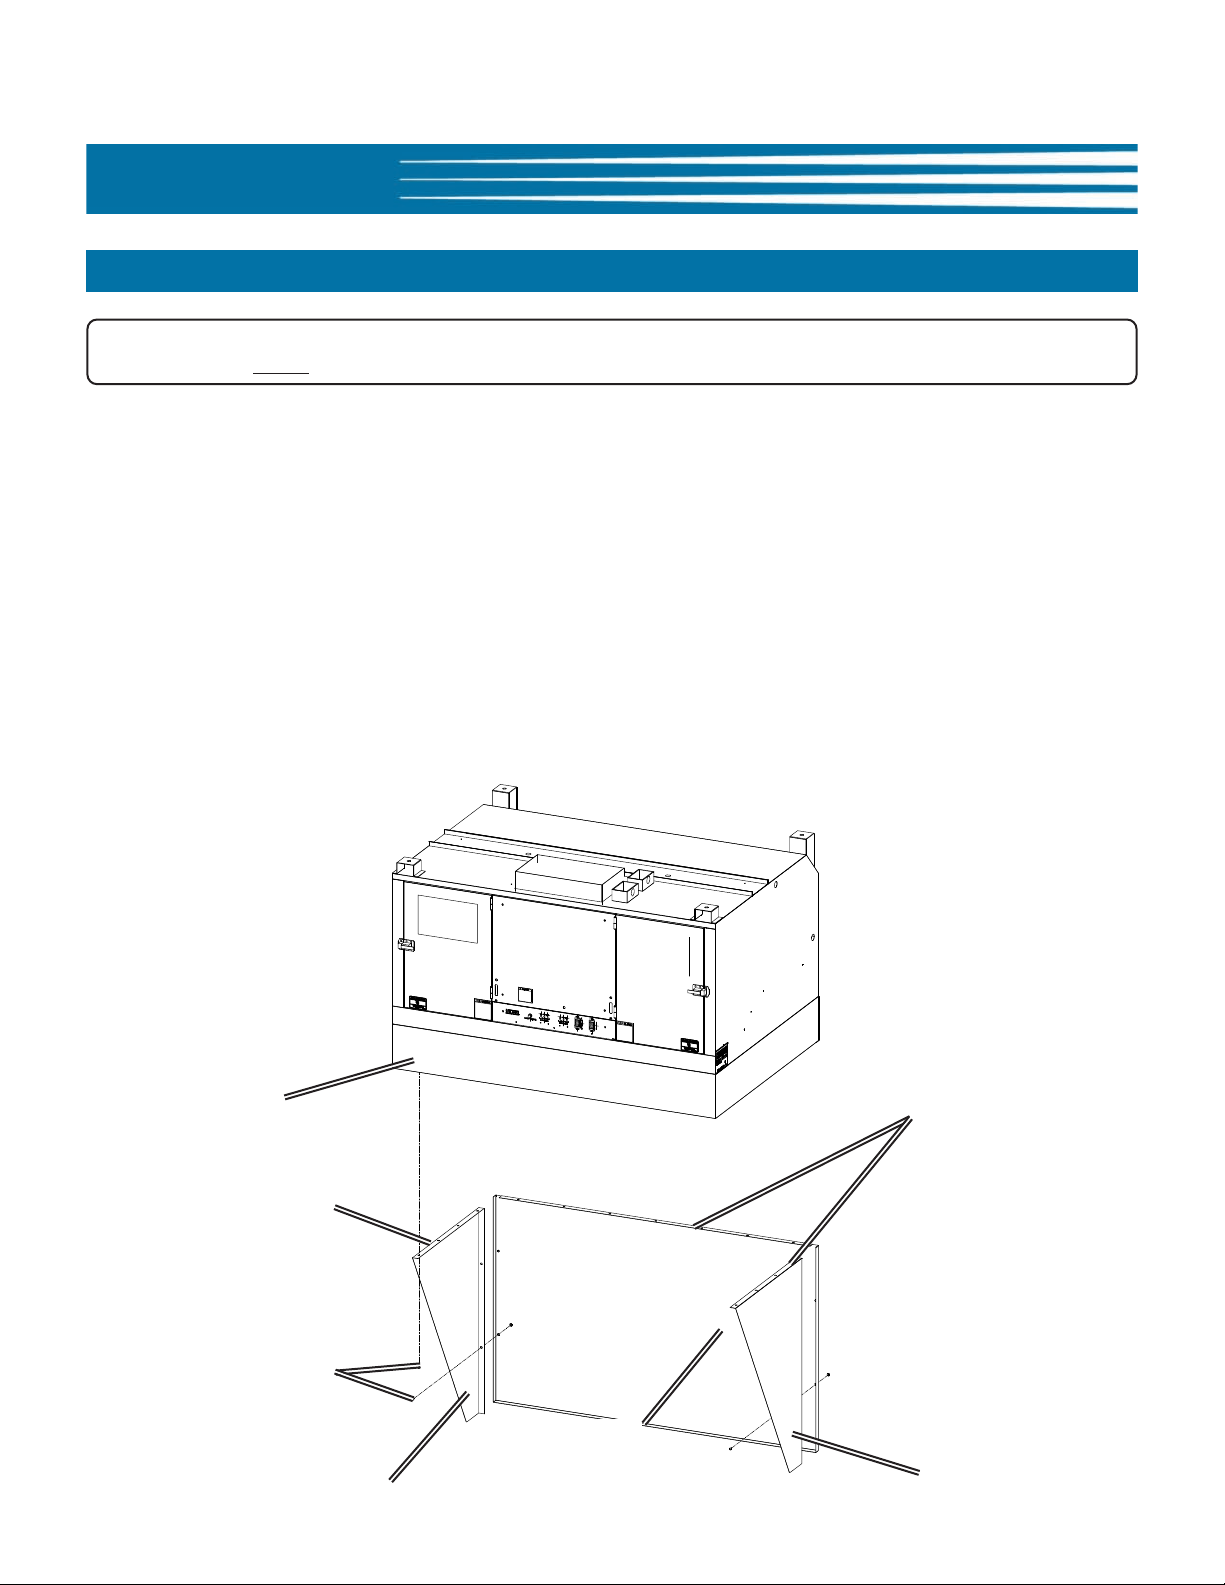
The Hood should arrive palletized with a wooden protective frame, wrapped in machine applied stretchwrap, and secured by means of high-tensile plastic strapping. The Backslpash, two (2) Side Skirts and
Baffle Filters should be packed on top of Hood. Perform the following steps to unpack the unit.
1. Position the palletized unit in an area that has sufficient space for unpacking.
!! IMPORTANT NOTE:
• If the palletized unit shows any signs of damage, immediately inspect the equipment and other packed
components, and notify the freight company of any and all damages. Giles is not responsible for
shipping damage claims.
2. Cut and remove stretch-wrap and all strapping.
3. Use a hammer and pry-bar to remove the wooden framing from around the unit.
4. Carfully remove and set aside Skirts, Backsplash, Baffle Filters and envelope containing hardware and
silicone sealant.
CAUTION
!
• Use suitable equipment to lift the hood and carefully move it away from the pallet ... refer to Section
1.4.4,
advisable to rig and lift the hood from the topside, utilizing the hood’s hanging brackets.
•
Exercise care when removing the wooden framing from around the unit.
Hood Weights. Take precautions not to damage to the hood’s bottom skirting. If possible, it is
• Failure to comply with these CAUTION notices may result in minor or moderate injury, equipment or
property damage, and void the warranty.
5

Model: EH-5 & 6 Installation
2.2 Location
CAUTION
!
• DO NOT MODIFY, ALTER OR ADD ATTACHMENTS TOTHIS EQUIPMENT
1. Ensure intended mounting site is sound and that roof or ceiling structure is capable of supporting the
hood’s weight; refer to Section 1.4.4, Hood Weights.
2.3 Hood Mounting Detail
1/2” All thread
1/2” Nut
1/2” Lock washer
1/2” Flat washer
1/2” Flat washer
1/2” Lock washer
1/2” Nut
1. Ensure the hood is level, left to right and front to back.
Exhaust Air Outlet
2. Ensure all mounting fasteners are secure.
6
Model: EH-5 & 6Installation
2.3.1 Hood Skirt Installation
NOTE:
• All hood Skirts MUST be installed to ensure proper and effective capture of vapors.
1. Apply a bead of Hi-Temp Silicone (tube enclosed) to the top flanges of both Side Skirts.
2. Attach Left and Right Side Skirts to hood with enclosed fasteners (do not tighten completely).
3. Apply a bead of the Hi-Temp Silicone to the top flange of the Rear Skirt.
4. Attach Rear Skirt to hood with enclosed fasteners (do not tighten completely) .
5. Fasten Left and Right Skirts to Rear Skirt.
6. Completely tighten all fasteners and wipe any excess silicone from the assembled Skirt.
NOTE: Peel all protective film from parts before assembling.
(21) 1/4-20 Nut
Bead of enclosed
Hi-Temp Silicone
Bead of enclosed
Hi-Temp Silicone
(21) 1/4-20 X 3/8 Screw
Left Skirt
Rear Skirt
Right Skirt
7
Model: EH-5 & 6 Installation
2.4 Cooking Appliance limitations and clearances
Hood Max. Temp.
EH-5 400 775/1107@1.25 wc 6 In. 12 In.
EH-6 400 846/1208@1.25 wc 6 In. 12 In.
2.4.1 Griddle Limitations
Hood Max. Temp. Max. KW Input Max. Cooking Surface
EH-5 400 25 48 x 26
EH-6 400 25 60 x 26
2.4.2 Griddle Clearances
Recommended
Exhaust Airflow CFM
Side Overhang Front Overhang
Inches [Millimeters]
8
12” min.[304.8]
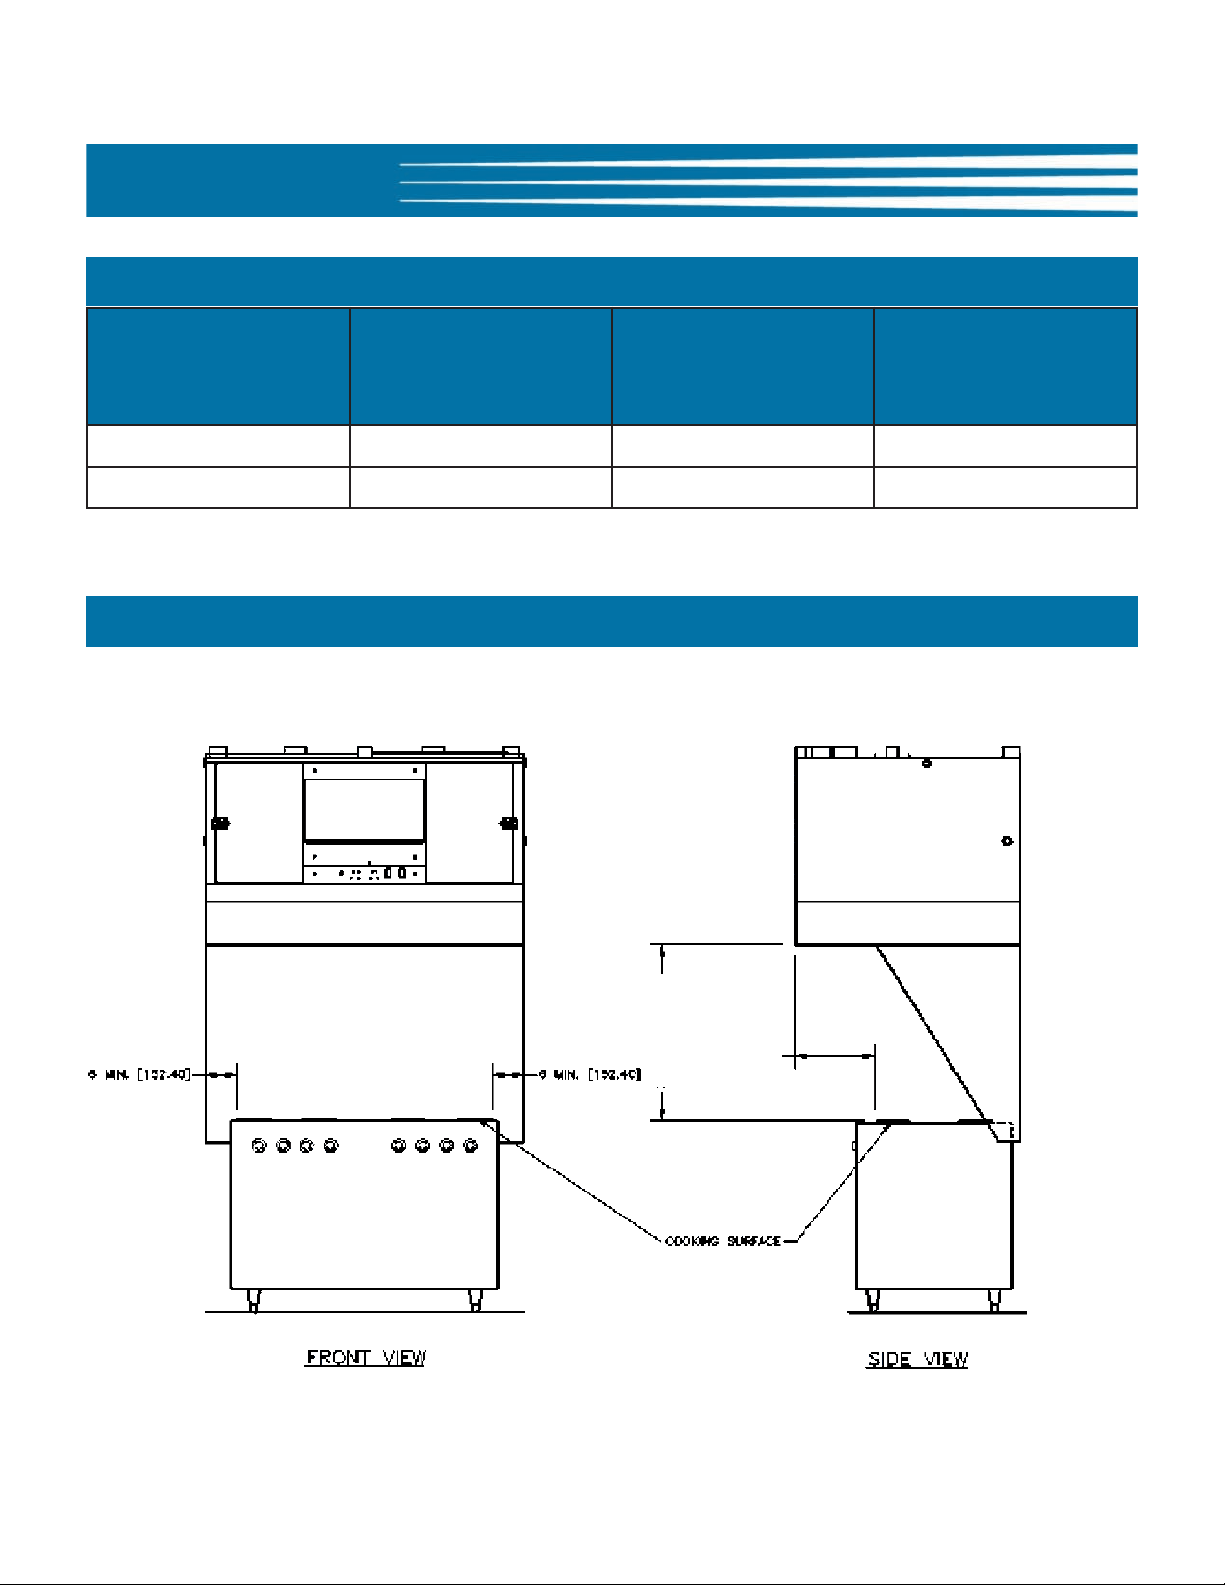
2.4.3 Range limitations
Hood Max. Temp. Max. kW Input Max Burners
EH-5 400 25 8
EH-6 400 25 8
2.4.4 Range clearances
Model: EH-5 & EH-6Installation
Inches [Millimeters]
12” min.[304.8]
33” min.[304.8]
42” max [1066.8]
9
 Loading...