

Gigaset C 100, Gigaset C 150, C 150 User Manual

EN Dear Customer,
Gigaset Communications GmbH is the legal successor to
Siemens Home and Office Communication Devices GmbH &
Co. KG (SHC), which in turn continued the Gigaset business
of Siemens AG. Any statements made by Siemens AG or
SHC that are found in the user guides should therefore be
understood as statements of Gigaset Communications
.
GmbH
We hope you enjoy your Gigaset.
DE Sehr geehrte Kundin, sehr geehrter Kunde,
FR Chère Cliente, Cher Client,
IT Gentile cliente,
NL Geachte klant,
ES Estimado cliente,
PT SCaros clientes,
die Gigaset Communications GmbH ist Rechtsnachfolgerin
der Siemens Home and Office Communication Devices
GmbH & Co. KG (SHC), die ihrerseits das Gigaset-Geschäft
der Siemens AG fortführte. Etwaige Erklärungen der
Siemens AG oder der SHC in den Bedienungsanleitungen
sind daher als Erklärungen der Gigaset Communications
GmbH zu verstehen.
Wir wünschen Ihnen viel Freude mit Ihrem Gigaset.
la société Gigaset Communications GmbH succède en droit
à Siemens Home and Office Communication Devices GmbH
& Co. KG (SHC) qui poursuivait elle-même les activités Gigaset de Siemens AG. Donc les éventuelles explications de Siemens AG ou de SHC figurant dans les modes d’emploi
doivent être comprises comme des explications de Gigaset
Communications GmbH.
Nous vous souhaitons beaucoup d’agrément avec votre
Gigaset.
la Gigaset Communications GmbH è successore della Siemens Home and Office Communication Devices GmbH &
Co. KG (SHC) che a sua volta ha proseguito l’attività della
Siemens AG. Eventuali dichiarazioni della Siemens AG o
della SHC nei manuali d’istruzione, vanno pertanto intese
come dichiarazioni della Gigaset Communications GmbH.
Le auguriamo tanta soddisfazione con il vostro Gigaset.
Gigaset Communications GmbH is de rechtsopvolger van
Siemens Home and Office Communication Devices GmbH &
Co. KG (SHC), de onderneming die de Gigaset-activiteiten
van Siemens AG heeft overgenomen. Eventuele uitspraken
of mededelingen van Siemens AG of SHC in de gebruiksaanwijzingen dienen daarom als mededelingen van Gigaset
Communications GmbH te worden gezien.
Wij wensen u veel plezier met uw Gigaset
la Gigaset Communications GmbH es derechohabiente de la
Siemens Home and Office Communication Devices GmbH &
Co. KG (SHC) que por su parte continuó el negocio Gigaset
de la Siemens AG. Las posibles declaraciones de la
Siemens AG o de la SHC en las instrucciones de uso se
deben entender por lo tanto como declaraciones de la Gigaset Communications GmbH.
Le deseamos que disfrute con su Gigaset.
Gigaset Communications GmbH é a sucessora legal da Siemens Home and Office Communication Devices GmbH &
Co. KG (SHC), que, por sua vez, deu continuidade ao sector
de negócios Gigaset, da Siemens AG. Quaisquer declarações por parte da Siemens AG ou da SHC encontradas nos
manuais de utilização deverão, portanto, ser consideradas
como declarações da Gigaset Communications GmbH.
Desejamos que tenham bons momentos com o seu Gigaset.
DA Kære Kunde,
FI Arvoisa asiakkaamme,
SV Kära kund,
NO Kjære kunde,
EL Αγ α πητή πελάτισσα, αγαπητέ πελάτη,
HR Poštovani korisnici,
.
SL Spoštovani kupec!
Gigaset Communications GmbH er retlig efterfølger til Siemens Home and Office Communication Devices GmbH &
Co. KG (SHC), som fra deres side videreførte Siemens AGs
Gigaset-forretninger. Siemens AGs eller SHCs eventuelle
forklaringer i betjeningsvejledningerne skal derfor forstås
som Gigaset Communications GmbHs forklaringer.
Vi håber, du får meget glæde af din Gigaset.
Gigaset Communications GmbH on Siemens Home and
Office Communication Devices GmbH & Co. KG (SHC)-yri-
tyksen oikeudenomistaja, joka jatkoi puolestaan Siemens
AG:n Gigaset-liiketoimintaa. Käyttöoppaissa mahdollisesti
esiintyvät Siemens AG:n tai SHC:n selosteet on tämän
vuoksi ymmärrettävä Gigaset Communications GmbH:n
selosteina.
Toivotamme Teille paljon iloa Gigaset-laitteestanne.
Gigaset Communications GmbH övertar rättigheterna från
Siemens Home and Office Communication Devices GmbH &
Co. KG (SHC), som bedrev Gigaset-verksamheten efter Siemens AG. Alla förklaringar från Siemens AG eller SHC i
användarhandboken gäller därför som förklaringar från
Gigaset Communications GmbH.
Vi önskar dig mycket nöje med din Gigaset.
Gigaset Communications GmbH er rettslig etterfølger etter
Siemens Home and Office Communication Devices GmbH &
Co. KG (SHC), som i sin tur videreførte Gigaset-geskjeften i
Siemens AG. Eventuelle meddelelser fra Siemens AG eller
SHC i bruksanvisningene er derfor å forstå som meddelelser
fra Gigaset Communications GmbH.
Vi håper du får stor glede av din Gigaset-enhet.
η Gigaset Communications GmbH είναι η νομική διάδοχος της
Siemens Home and Office Communication Devices GmbH &
Co. KG (SHC), η οποία έχει αναλάβει την εμπορική
δραστηριότητα Gigaset της Siemens AG. Οι δηλώσεις της
Siemens AG ή της SHC στις
επομένως δηλώσεις της Gigaset Communications GmbH.
Σας ευχόμαστε καλή διασκέδαση με τη συσκευή σας Gigaset.
Gigaset Communications GmbH pravni je sljednik tvrtke
Siemens Home and Office Communication Devices GmbH &
Co. KG (SHC), koji je nastavio Gigaset poslovanje tvrtke
Siemens AG. Zato sve izjave tvrtke Siemens AG ili SHC koje
se nalaze u uputama za upotrebu treba tumačiti kao izjave
tvrtke Gigaset Communications GmbH.
Nadamo se da sa zadovoljstvom koristite svoj Gigaset
uređaj.
Podjetje Gigaset Communications GmbH je pravni naslednik
podjetja Siemens Home and Office Communication Devices
GmbH & Co. KG (SHC), ki nadaljuje dejavnost znamke
Gigaset podjetja Siemens AG. Vse izjave podjetja Siemens
AG ali SHC v priročnikih za uporabnike torej veljajo kot izjave
podjetja Gigaset Communications GmbH.
Želimo vam veliko užitkov ob uporabi naprave Gigaset.
οδηγίες χρήσ
ης αποτ
ελούν
Issued by
Gigaset Communications GmbH
Schlavenhorst 66, D-46395 Bocholt
Gigaset Communications GmbH is a trademark
licensee of Siemens AG
© Gigaset Communications GmbH 2008
All rights reserved.
Subject to availability. Rights of modifications
reserved.
www.gigaset.com

CS Vážení zákazníci,
společnost Gigaset Communications GmbH je právním
nástupcem společnosti Siemens Home and Office
Communication Devices GmbH & Co. KG (SHC), která dále
přejala segment produktů Gigaset společnosti Siemens AG.
Jakékoli prohlášení společnosti Siemens AG nebo SHC, které
naleznete v uživatelských příručkách, je třeba považovat za
prohlášení společnosti Gigaset Communications GmbH.
Doufáme, že jste s produkty Gigaset spokojeni.
SK Vážený zákazník,
Spoločnosť Gigaset Communications GmbH je právnym
nástupcom spoločnosti Siemens Home and Office
Communication Devices GmbH & Co. KG (SHC), ktorá zasa
pokračovala v činnosti divízie Gigaset spoločnosti Siemens
AG. Z tohto dôvodu je potrebné všetky vyhlásenia
spoločnosti Siemens AG alebo SHC, ktoré sa nachádzajú v
používateľských príručkách, chápať ako vyhlásenia
spoločnosti Gigaset Communications GmbH.
Veríme, že budete so zariadením Gigaset spokojní.
PL Szanowny Kliencie,
Firma Gigaset Communications GmbH jest spadkobiercą
prawnym firmy Siemens Home and Office Communication
Devices GmbH & Co. KG (SHC), która z kolei przejęła
segment produktów Gigaset od firmy Siemens AG. Wszelkie
oświadczenia firm Siemens AG i SHC, które można znaleźć
w instrukcjach obsługi, należy traktować jako oświadczenia
firmy Gigaset Communications GmbH.
Życzymy wiele przyjemności z korzystania z produktów
Gigaset.
TR Sayın Müşterimiz,
Gigaset Communications GmbH, Siemens AG'nin Gigaset
işletmesini yürüten Siemens Home and Office
Communication Devices GmbH & Co. KG (SHC)'nin yasal
halefidir. Kullanma kılavuzlarında bulunan ve Siemens AG
veya SHC tarafından yapılan bildiriler Gigaset
Communications GmbH tarafından yapılmış bildiriler olarak
algılanmalıdır.
Gigaset'ten memnun kalmanızı ümit ediyoruz.
RO Stimate client,
Gigaset Communications GmbH este succesorul legal al
companiei Siemens Home and Office Communication
Devices GmbH & Co. KG (SHC), care, la rândul său, a
continuat activitatea companiei Gigaset a Siemens AG.
Orice afirmaţii efectuate de Siemens AG sau SHC şi incluse
în ghidurile de utilizare vor fi, prin urmare, considerate a
aparţine Gigaset Communications GmbH.
Sperăm ca produsele Gigaset să fie la înălţimea dorinţelor
dvs.
SR Poštovani potrošaču,
Gigaset Communications GmbH je pravni naslednik
kompanije Siemens Home and Office Communication
Devices GmbH & Co. KG (SHC), kroz koju je nastavljeno
poslovanje kompanije Gigaset kao dela Siemens AG. Stoga
sve izjave od strane Siemens AG ili SHC koje se mogu naći u
korisničkim uputstvima treba tuma
Gigaset Communications GmbH.
Nadamo se da ćete uživati u korišćenju svog Gigaset
uređaja.
BG Уважаеми потребители,
Gigaset Communications GmbH е правоприемникът на
Siemens Home and Office Communication Devices GmbH
& Co. KG (SHC), която на свой ред продължи бизнеса на
подразделението Siemens AG. По тази причина
всякакви изложения, направени от Siemens AG или
SHC, които се намират в ръководствата за
потребителя, следва да се разбират като изложения на
Gigaset Communications GmbH.
Надяваме се да ползвате с удоволствие вашия Gigaset.
izjave kompanije
čiti kao
RU Уважаемыи покупатель!
Компания Gigaset Communications GmbH является
правопреемником компании Siemens Home and Office
Communication Devices GmbH & Co. KG (SHC), которая,
ою очередь, приняла подразделение Gigaset в свое
в св
управление от компании Siemens AG. Поэтому любые
заявления, сделанные от имени компании Siemens AG
или SHC и встречающиеся в руководствах
пользователя, должны восприниматься как заявления
компании Gigaset Communications GmbH.
Мы надеемся, что продукты Gigaset удовлетворяют
вашим требованиям.
HU T
isztelt Vásárló!
A Siemens Home and Communication Devices GmbH & Co.
KG (SHC) törvényes jogutódja a Gigaset Communications
GmbH, amely a Siemens AG Gigaset üzletágának utódja.
Ebből következően a Siemens AG vagy az SHC felhasználói
kézikönyveiben található bármely kijelentést a Gigaset
Communications GmbH kijelentésének kell tekinteni.
Reméljük, megelégedéssel használja Gigaset készülékét.
Issued by
Gigaset Communications GmbH
Schlavenhorst 66, D-46395 Bocholt
Gigaset Communications GmbH is a trademark
licensee of Siemens AG
© Gigaset Communications GmbH 2008
All rights reserved.
Subject to availability. Rights of modifications
reserved.
www.gigaset.com

s
Be inspired

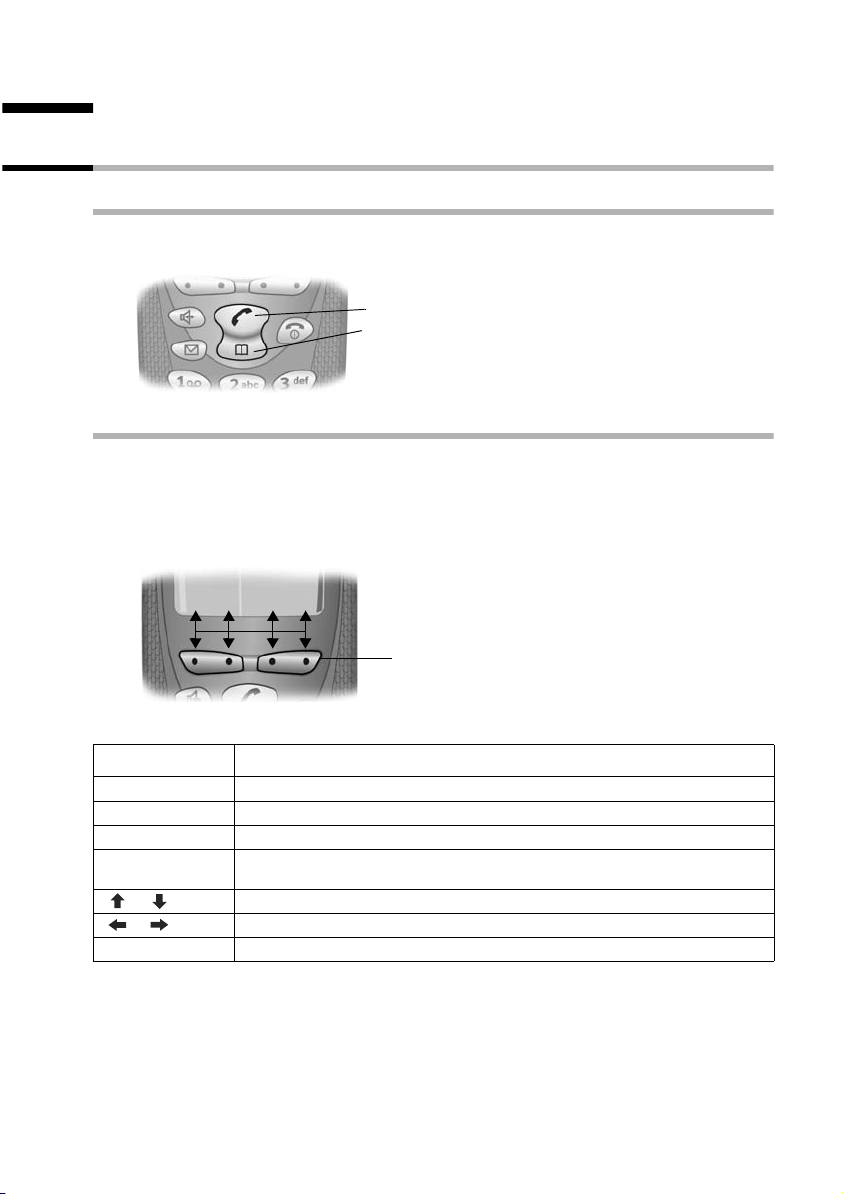
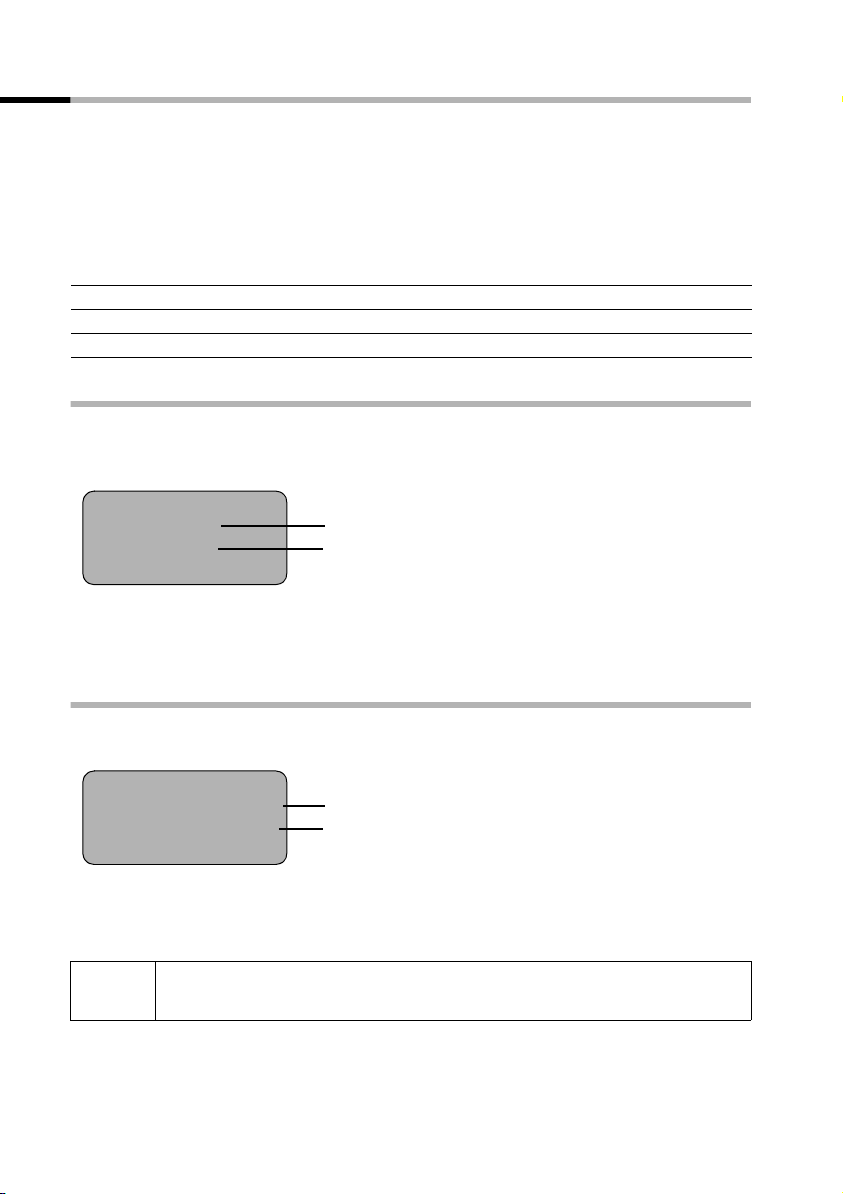
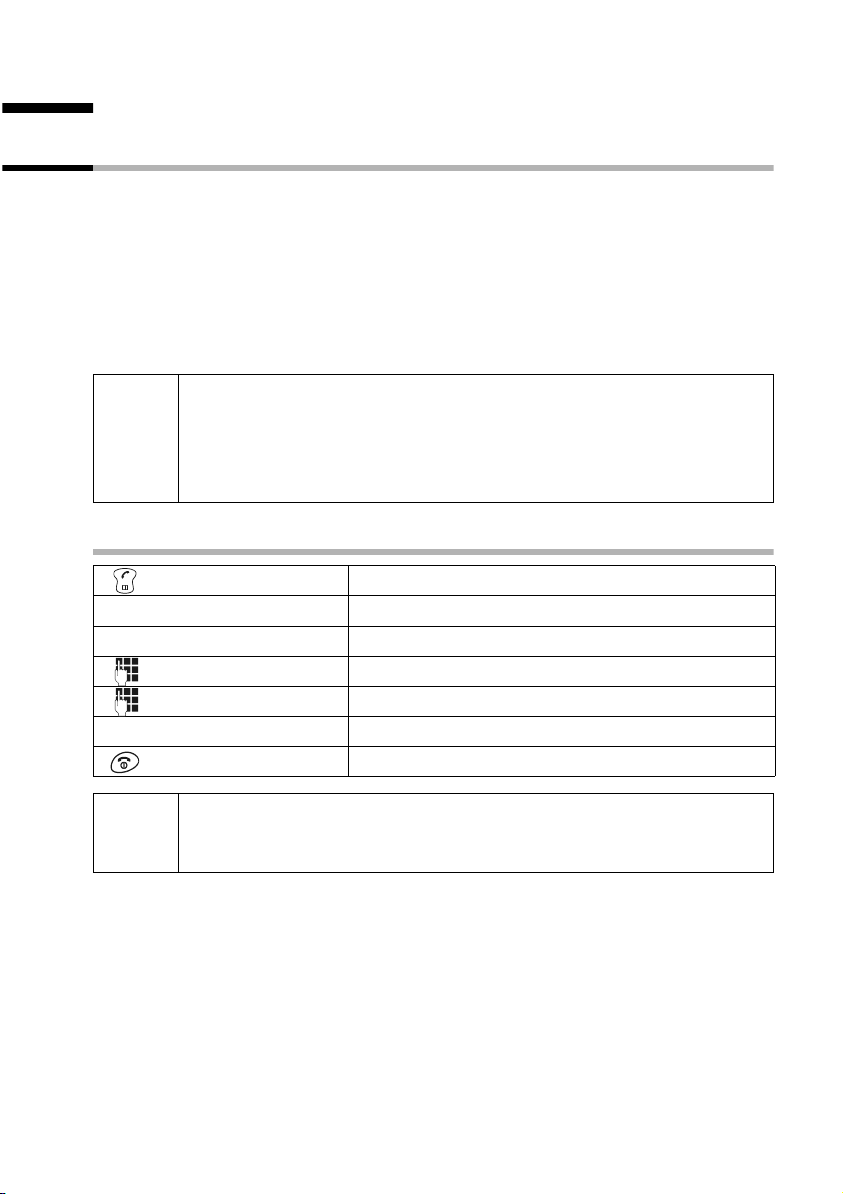
The handset at a glance
The handset at a glance
Tal k/
directory key:
Top half:
◆ Answer a call
◆ Initiate dialling
◆ Switch from handsfree
to "earpiece" mode
Bottom half:
◆ Open directory
Handsfree key:
◆ Switch from "earpiece"
to handsfree mode
◆ Lights up: Handsfree is
activated
◆ Flashes: Incoming call
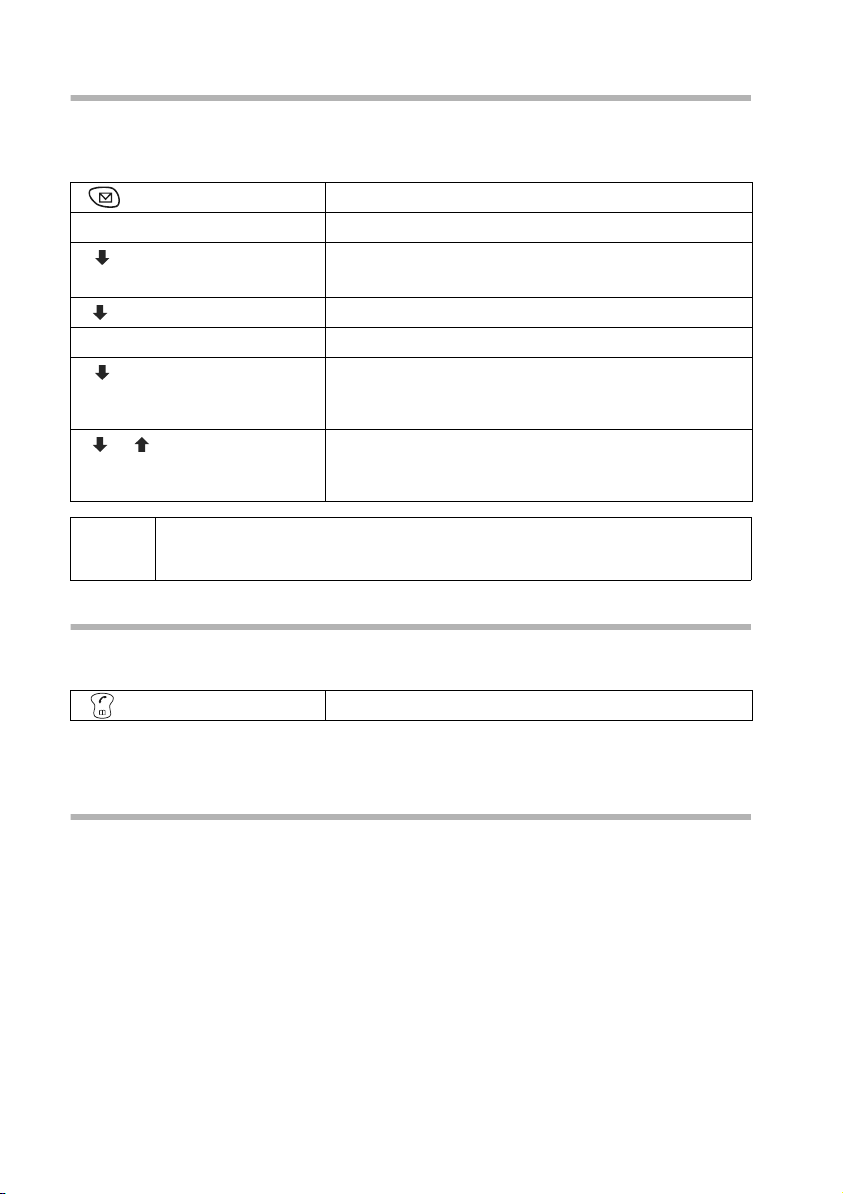
Message key
Accesses the lists of SMS,
network mailbox, caller
list/answering machine
(C 150 only)
Key 1
Select answering machine
(C 150 only)/network
mailbox (press for
approx. 2 seconds)
Star key
◆ Ringer on/off
(press for around
2seconds)
◆ When texting: Toggles
between upper/lower
case and digits
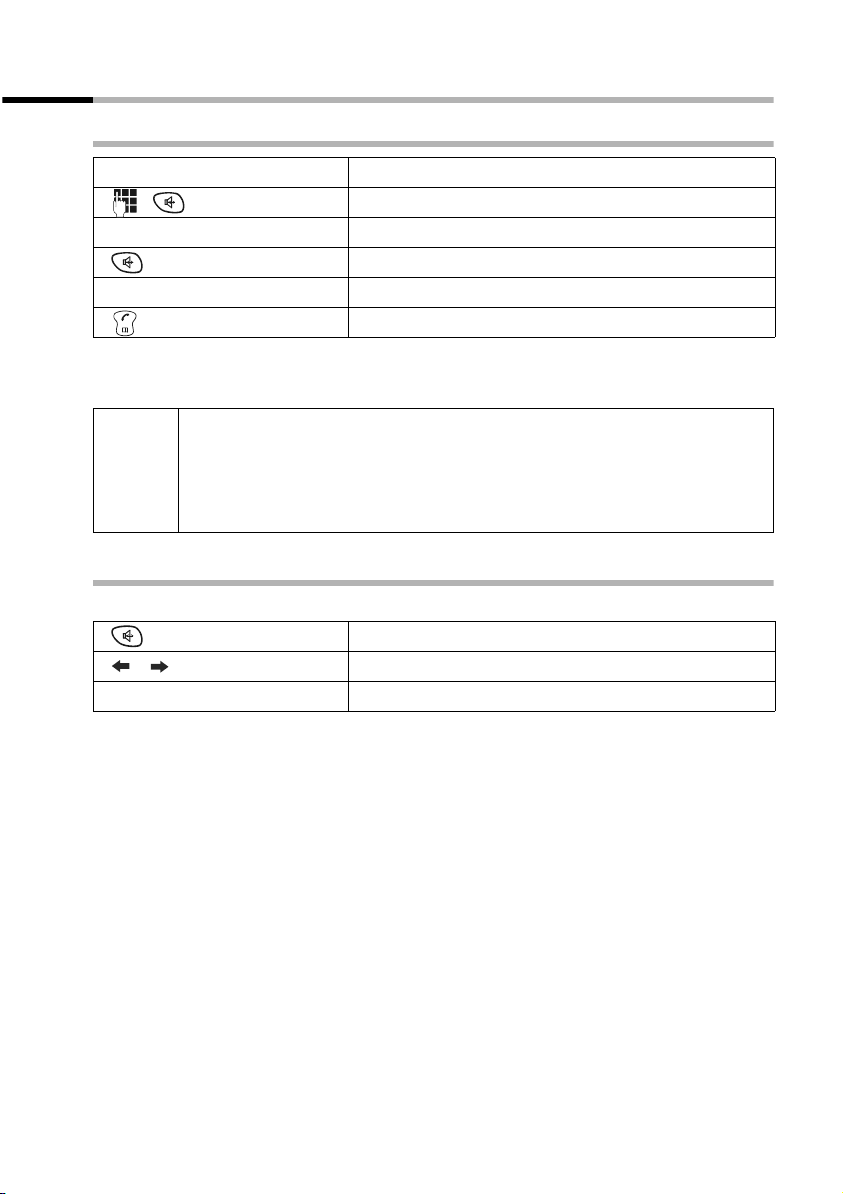
Display (display screen)
Charge status
= flat U fully
charged
= flashes: battery is
almost flat or is charging
Current functions and
display keys
U
vuÛ
MENU
The display keys give you
access to the functions
shown in the display.
End call key and
On/Off key
◆ End call
◆ Cancel function
◆ One menu level back
(press briefly)
◆ Back to idle status
(press for
approx.1 second)
◆ Handset on/off (press
for approx. 2 seconds)
Hash key
Keypad lock on/off (press
for approx. 1 second)
Speed dial key
Open speed dial list
(press briefly)
Microphone
Recall key
Insert a dial pause (hold
key down)
1

Tab l e of Contents
Table of Contents
The handset at a glance . . . . . . . . . . . . . . . . . . . . . . 1
Safety Precautions . . . . . . . . . . . . . . . . . . . . . . . . . . . 5
Preparing to use your phone . . . . . . . . . . . . . . . . . . 6
Installing the base . . . . . . . . . . . . . . . . . . . . . . . . . . . . . . . . . . . . . . . . . . . . . . . . . . . . . 6
Connecting the base . . . . . . . . . . . . . . . . . . . . . . . . . . . . . . . . . . . . . . . . . . . . . . . . . . . 7
Preparing to use the handset . . . . . . . . . . . . . . . . . . . . . . . . . . . . . . . . . . . . . . . . . . . . . 8
Activating/deactivating the handset . . . . . . . . . . . . . . . . . . . . . . . . . . . . . . . . . . . . . . 10
Activating/deactivating the keypad lock . . . . . . . . . . . . . . . . . . . . . . . . . . . . . . . . . . . 10
Operating the telephone, menu guidance . . . . . . 11
Keys . . . . . . . . . . . . . . . . . . . . . . . . . . . . . . . . . . . . . . . . . . . . . . . . . . . . . . . . . . . . . . . 11
Correcting wrong inputs . . . . . . . . . . . . . . . . . . . . . . . . . . . . . . . . . . . . . . . . . . . . . . . 12
Idle status . . . . . . . . . . . . . . . . . . . . . . . . . . . . . . . . . . . . . . . . . . . . . . . . . . . . . . . . . . . 12
Menu operation, with "Setting Handsfree Volume" as an example . . . . . . . . . . . . . . 13
Date and Time . . . . . . . . . . . . . . . . . . . . . . . . . . . . . 14
Setting the date and the time . . . . . . . . . . . . . . . . . . . . . . . . . . . . . . . . . . . . . . . . . . . 14
Changing the time mode . . . . . . . . . . . . . . . . . . . . . . . . . . . . . . . . . . . . . . . . . . . . . . 14
Making calls . . . . . . . . . . . . . . . . . . . . . . . . . . . . . . . 15
Making external calls and ending a call . . . . . . . . . . . . . . . . . . . . . . . . . . . . . . . . . . . . 15
Answering a call . . . . . . . . . . . . . . . . . . . . . . . . . . . . . . . . . . . . . . . . . . . . . . . . . . . . . . 15
Calling Line Identification . . . . . . . . . . . . . . . . . . . . . . . . . . . . . . . . . . . . . . . . . . . . . . 16
Handsfree . . . . . . . . . . . . . . . . . . . . . . . . . . . . . . . . . . . . . . . . . . . . . . . . . . . . . . . . . . . 17
Activating/deactivating open listening (call screening at the base) (C 150 only) . . . 18
Handset muting . . . . . . . . . . . . . . . . . . . . . . . . . . . . . . . . . . . . . . . . . . . . . . . . . . . . . . 18
Select Services . . . . . . . . . . . . . . . . . . . . . . . . . . . . . 19
Function that is set for the next call . . . . . . . . . . . . . . . . . . . . . . . . . . . . . . . . . . . . . . 19
Functions that are set for all subsequent calls . . . . . . . . . . . . . . . . . . . . . . . . . . . . . . . 19
Functions during a call . . . . . . . . . . . . . . . . . . . . . . . . . . . . . . . . . . . . . . . . . . . . . . . . . 20
Function that is set after a next call . . . . . . . . . . . . . . . . . . . . . . . . . . . . . . . . . . . . . . . 20
Using the directory and other lists . . . . . . . . . . . . 21
Directory and speed dial list . . . . . . . . . . . . . . . . . . . . . . . . . . . . . . . . . . . . . . . . . . . . . 21
Last number redial list . . . . . . . . . . . . . . . . . . . . . . . . . . . . . . . . . . . . . . . . . . . . . . . . . 24
Opening lists with the Message key . . . . . . . . . . . . . . . . . . . . . . . . . . . . . . . . . . . . . . 25
Caller list and answering machine list (C 150 only) . . . . . . . . . . . . . . . . . . . . . . . . . . 25
2

Table of Contents
Making cost-effective calls . . . . . . . . . . . . . . . . . . 29
Linking a call-by-call number with a phone number . . . . . . . . . . . . . . . . . . . . . . . . . 29
SMS (Text Messages) . . . . . . . . . . . . . . . . . . . . . . . 30
General . . . . . . . . . . . . . . . . . . . . . . . . . . . . . . . . . . . . . . . . . . . . . . . . . . . . . . . . . . . . 30
Before you can send and receive text messages . . . . . . . . . . . . . . . . . . . . . . . . . . . . . 31
Sending and receiving text messages . . . . . . . . . . . . . . . . . . . . . . . . . . . . . . . . . . . . . 31
Text message sending and the draft message list . . . . . . . . . . . . . . . . . . . . . . . . . . . 33
Receiving text messages and the incoming message list . . . . . . . . . . . . . . . . . . . . . . 37
Text messages to PABX's . . . . . . . . . . . . . . . . . . . . . . . . . . . . . . . . . . . . . . . . . . . . . . . 40
Errors when sending and receiving a text message . . . . . . . . . . . . . . . . . . . . . . . . . . 40
Using the answering machine in the C 150 Base 42
Operating the answering machine from the base . . . . . . . . . . . . . . . . . . . . . . . . . . . 42
Operating the answering machine from the handset . . . . . . . . . . . . . . . . . . . . . . . . 43
Operating the answering machine while you are away from home
(remote operation) . . . . . . . . . . . . . . . . . . . . . . . . . . . . . . . . . . . . . . . . . . . . . . . . . . . 49
Setting the Answering Machine of the
C 150 Base . . . . . . . . . . . . . . . . . . . . . . . . . . . . . . . . 51
Ring delay and charge saving function for remote operation . . . . . . . . . . . . . . . . . . 51
Setting the recording time . . . . . . . . . . . . . . . . . . . . . . . . . . . . . . . . . . . . . . . . . . . . . 52
Activating/deactivating call screening . . . . . . . . . . . . . . . . . . . . . . . . . . . . . . . . . . . . . 52
Resetting fast access on the answering machine . . . . . . . . . . . . . . . . . . . . . . . . . . . . 53
Using the network mailbox . . . . . . . . . . . . . . . . . . 54
Configuring the network mailbox for fast access . . . . . . . . . . . . . . . . . . . . . . . . . . . . 54
Viewing a message from the network mailbox . . . . . . . . . . . . . . . . . . . . . . . . . . . . . . 54
Registering and de-registering handsets . . . . . . . 55
Automatic registration: Gigaset C 1 on Gigaset C 100 or C 150 . . . . . . . . . . . . . . . . . 55
Manual registration: Gigaset C 1 on Gigaset C 100 or C 150 . . . . . . . . . . . . . . . . . . . 56
Manual registration:
Gigaset 1000 to 4000 and other handsets with GAP functionality . . . . . . . . . . . . . . 56
De-registering handsets . . . . . . . . . . . . . . . . . . . . . . . . . . . . . . . . . . . . . . . . . . . . . . . 57
Page handset . . . . . . . . . . . . . . . . . . . . . . . . . . . . . . . . . . . . . . . . . . . . . . . . . . . . . . . . 57
Using several handsets . . . . . . . . . . . . . . . . . . . . . 58
Internal calls, ending a call . . . . . . . . . . . . . . . . . . . . . . . . . . . . . . . . . . . . . . . . . . . . . 58
Changing the name of a handset . . . . . . . . . . . . . . . . . . . . . . . . . . . . . . . . . . . . . . . . 58
Changing a handset's internal number . . . . . . . . . . . . . . . . . . . . . . . . . . . . . . . . . . . . 59
Internal consultation calls . . . . . . . . . . . . . . . . . . . . . . . . . . . . . . . . . . . . . . . . . . . . . . 60
Accepting/rejecting call waiting during an internal call . . . . . . . . . . . . . . . . . . . . . . . 60
3

Tab l e of Contents
Handset settings . . . . . . . . . . . . . . . . . . . . . . . . . . . 61
Changing the display language . . . . . . . . . . . . . . . . . . . . . . . . . . . . . . . . . . . . . . . . . . 61
Activate/deactivate Auto Answer . . . . . . . . . . . . . . . . . . . . . . . . . . . . . . . . . . . . . . . . 61
Adjusting the loudspeaker volume . . . . . . . . . . . . . . . . . . . . . . . . . . . . . . . . . . . . . . . 62
Changing the ringer tone . . . . . . . . . . . . . . . . . . . . . . . . . . . . . . . . . . . . . . . . . . . . . . . 62
Activating/deactivating advisory tones . . . . . . . . . . . . . . . . . . . . . . . . . . . . . . . . . . . . 64
Restoring the handset factory settings . . . . . . . . . . . . . . . . . . . . . . . . . . . . . . . . . . . . 65
Setting the base . . . . . . . . . . . . . . . . . . . . . . . . . . . 66
Protecting the telephone from unauthorized access . . . . . . . . . . . . . . . . . . . . . . . . . . 66
Changing the loudspeaker volume of the base (C 150 only) . . . . . . . . . . . . . . . . . . . 66
Changing the ringer volume and the ringer melody (C 150 only) . . . . . . . . . . . . . . . 67
Activating/cancelling the key click on the base: (C 150 only) . . . . . . . . . . . . . . . . . . . 68
Repeater support . . . . . . . . . . . . . . . . . . . . . . . . . . . . . . . . . . . . . . . . . . . . . . . . . . . . . 68
Restoring the base factory settings . . . . . . . . . . . . . . . . . . . . . . . . . . . . . . . . . . . . . . . 68
Connecting the base to a PABX . . . . . . . . . . . . . . . 70
Dialling modes and recall . . . . . . . . . . . . . . . . . . . . . . . . . . . . . . . . . . . . . . . . . . . . . . . 70
Setting pauses . . . . . . . . . . . . . . . . . . . . . . . . . . . . . . . . . . . . . . . . . . . . . . . . . . . . . . . 71
Appendix . . . . . . . . . . . . . . . . . . . . . . . . . . . . . . . . . 72
Care . . . . . . . . . . . . . . . . . . . . . . . . . . . . . . . . . . . . . . . . . . . . . . . . . . . . . . . . . . . . . . . 72
Contact with liquid . . . . . . . . . . . . . . . . . . . . . . . . . . . . . . . . . . . . . . . . . . . . . . . . . . . 72
Questions and Answers . . . . . . . . . . . . . . . . . . . . . . . . . . . . . . . . . . . . . . . . . . . . . . . . 72
Service (Customer Care) . . . . . . . . . . . . . . . . . . . . . . . . . . . . . . . . . . . . . . . . . . . . . . . 74
Specifications . . . . . . . . . . . . . . . . . . . . . . . . . . . . . . . . . . . . . . . . . . . . . . . . . . . . . . . . 75
Answering machine remote operation (C 150 only) . . . . . . . . . . . . . . . . . . . . . . . . . 77
Character set table . . . . . . . . . . . . . . . . . . . . . . . . . . . . . . . . . . . . . . . . . . . . . . . . . . . . 77
Guarantee certificate Ireland . . . . . . . . . . . . . . . . . . . . . . . . . . . . . . . . . . . . . . . . . . . . 79
Guarantee certificate United Kingdom . . . . . . . . . . . . . . . . . . . . . . . . . . . . . . . . . . . . 80
Accessories . . . . . . . . . . . . . . . . . . . . . . . . . . . . . . . . 81
Menu Tree . . . . . . . . . . . . . . . . . . . . . . . . . . . . . . . . 83
Main menu . . . . . . . . . . . . . . . . . . . . . . . . . . . . . . . . . . . . . . . . . . . . . . . . . . . . . . . . . . 83
Directory key and speed dial list key . . . . . . . . . . . . . . . . . . . . . . . . . . . . . . . . . . . . . . 85
Caller List/Answering Machine List (C 150 only) . . . . . . . . . . . . . . . . . . . . . . . . . . . . . 85
Index . . . . . . . . . . . . . . . . . . . . . . . . . . . . . . . . . . . . . 86
4
Safety Precautions
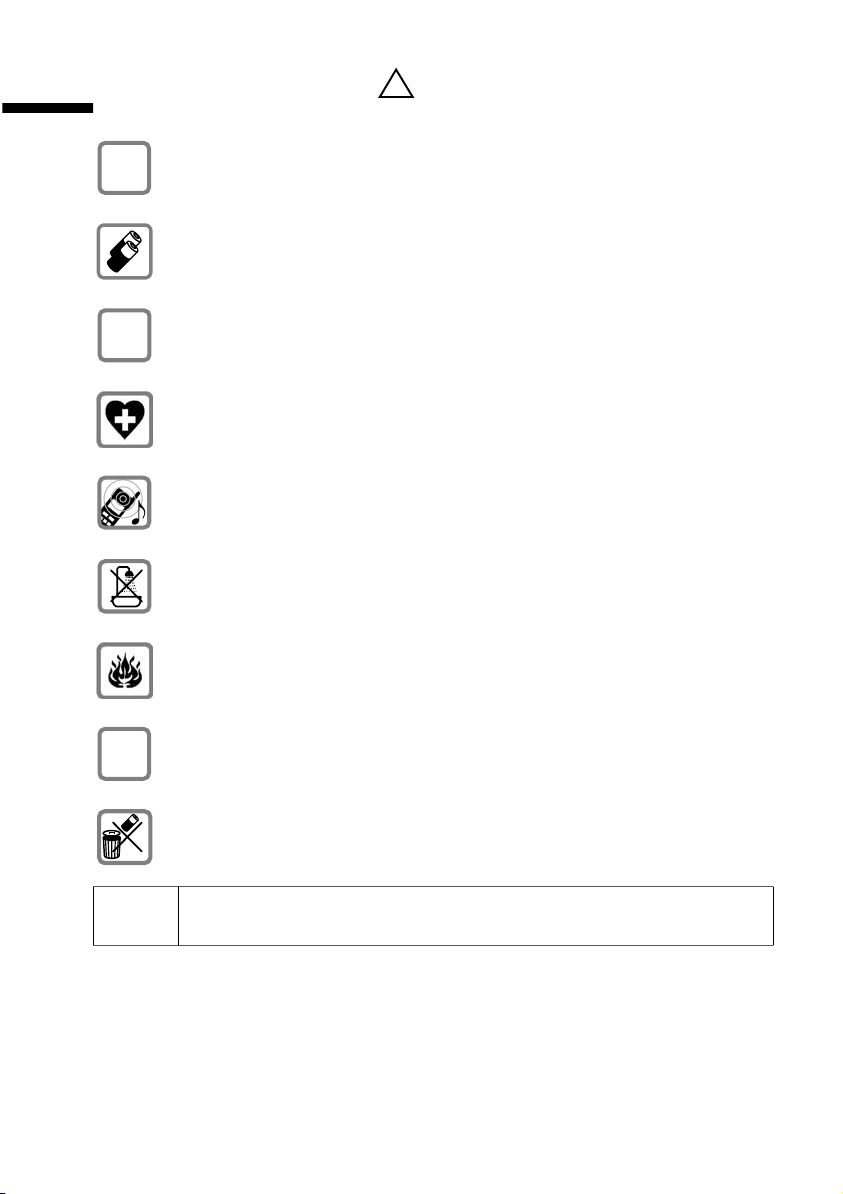
Safety Precautions
Only use the power supply unit supplied, as indicated on the underside of
$
the device.
Fit only the recommended rechargeable batteries (page 75) of the same
type! Use no other types of batteries or non-rechargeable batteries, as they
could damage health and cause personal injury.
‹
Œ
Ensure correct polarity when fitting rechargeable batteries, and use the battery type according to these instructions (you will see polarity symbols in the
handset's
The operation of medical appliances may be affected. Be aware of the technical conditions within the particular environment (e.g. doctor's practice).
The handset may cause an intrusive 'hum' in hearing aids.
Do not install the base in bathrooms or shower rooms (page 72). The handset
and base are not watertight.
Do not use the phone in environments subject to explosion hazard (e.g. auto
paint shops).
battery compartments)
!
.
ƒ
Ensure that your Gigaset is accompanied by these instructions when you give
it to others to use.
Dispose of the batteries and phone in accordance with environmental regulations.
i
Not all of the functions described in these instructions are available in all
countries.
5
Preparing to use your phone
Preparing to use your phone
The pack contains:
◆ one Gigaset C 100 or C 150 base
◆ one Gigaset C 1 handset,
◆ one power supply unit with power cord,
◆ one telephone cord,
◆ two batteries,
◆ one set of operating instructions.
Installing the base
Hints on installing
The base is designed to be operated in enclosed, dry areas at temperatures ranging from
+5 °C to +45 °C. Instal the base at a central location in your home, e.g. in the hall.
◆ Never expose the telephone to heat sources, direct sunlight, other
W
Range
The base has a range of approx. 300 m outdoors and up to 50 m indoors.
electrical appliances.
◆ Protect your Gigaset from moisture, dust, corrosive liquids and
vapours.
6
Preparing to use your phone
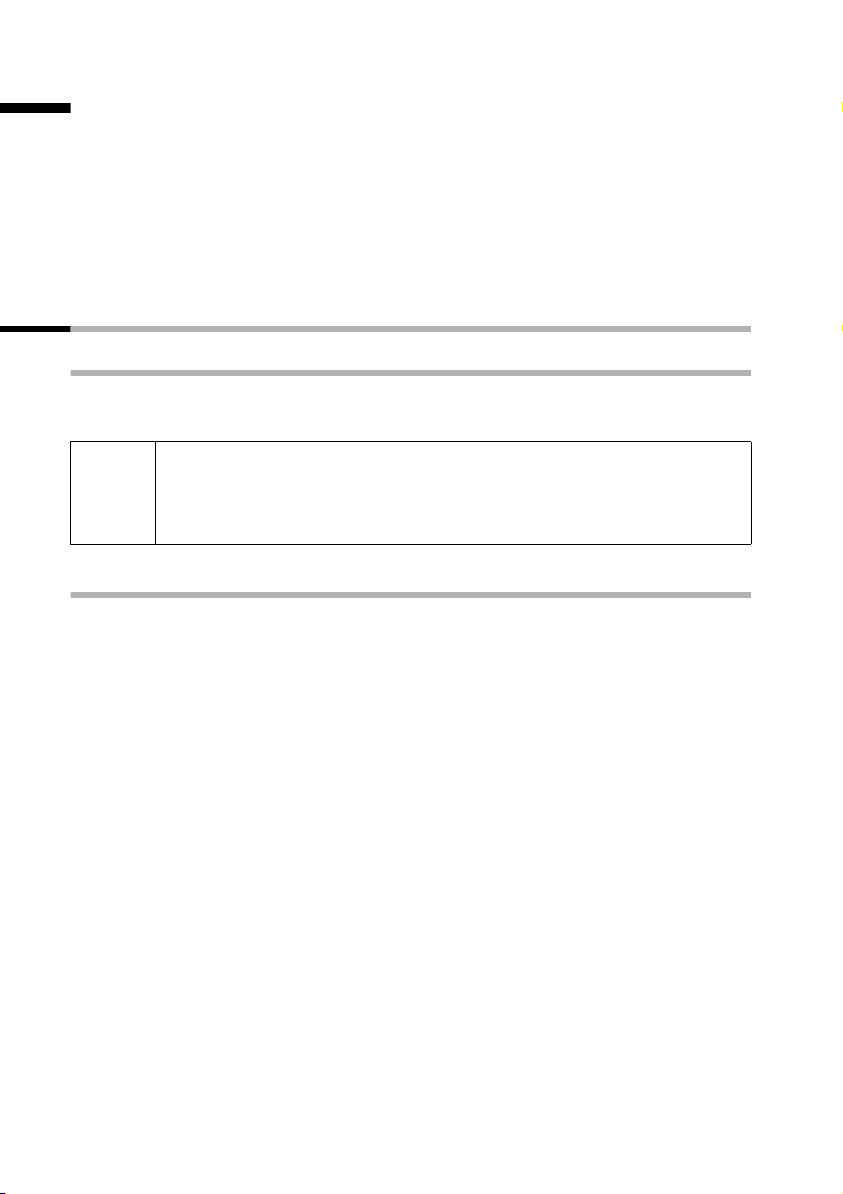
Connecting the base
Cable recess
1.
Underside of
base (enlarged
view)
Phone jack with
phone cord
1.
◆
Fit the small jack on the phone cord into the socket in the base (it clips into place),
◆ Place cord in cable recess,
◆ Fit phone jack into phone outlet.
Cable recess
Phone outlet
Outlet
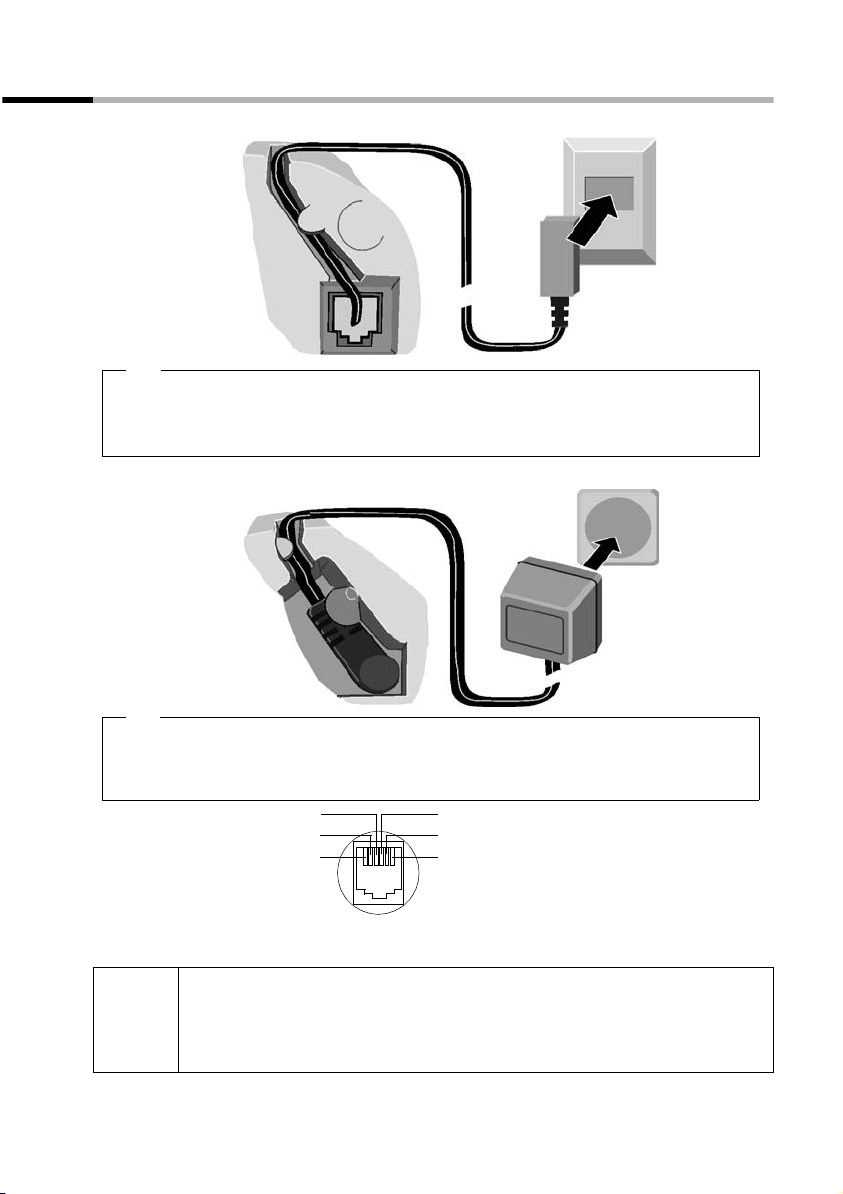
2.
Underside of
base (enlarged
view)
2.
◆
Insert the small jack on the power cord into the socket on the underside of the base,
◆ Place cord in cable recess,
◆ Plug the power supply unit into your power outlet.
Internal phone jack connections:
◆ Keep the power supply unit plugged in at all times to ensure your
i
phone is ready for use whenever you need it.
◆ If ever you purchase a phone cord from a store, ensure that the phone
3
2
1
4
5
6
unassigned
1
unassigned
2
a
3
b
4
unassigned
5
unassigned
6
Power supply unit
230 V with power
cord
conductors are correctly connected (3-4 connection).
7
Preparing to use your phone
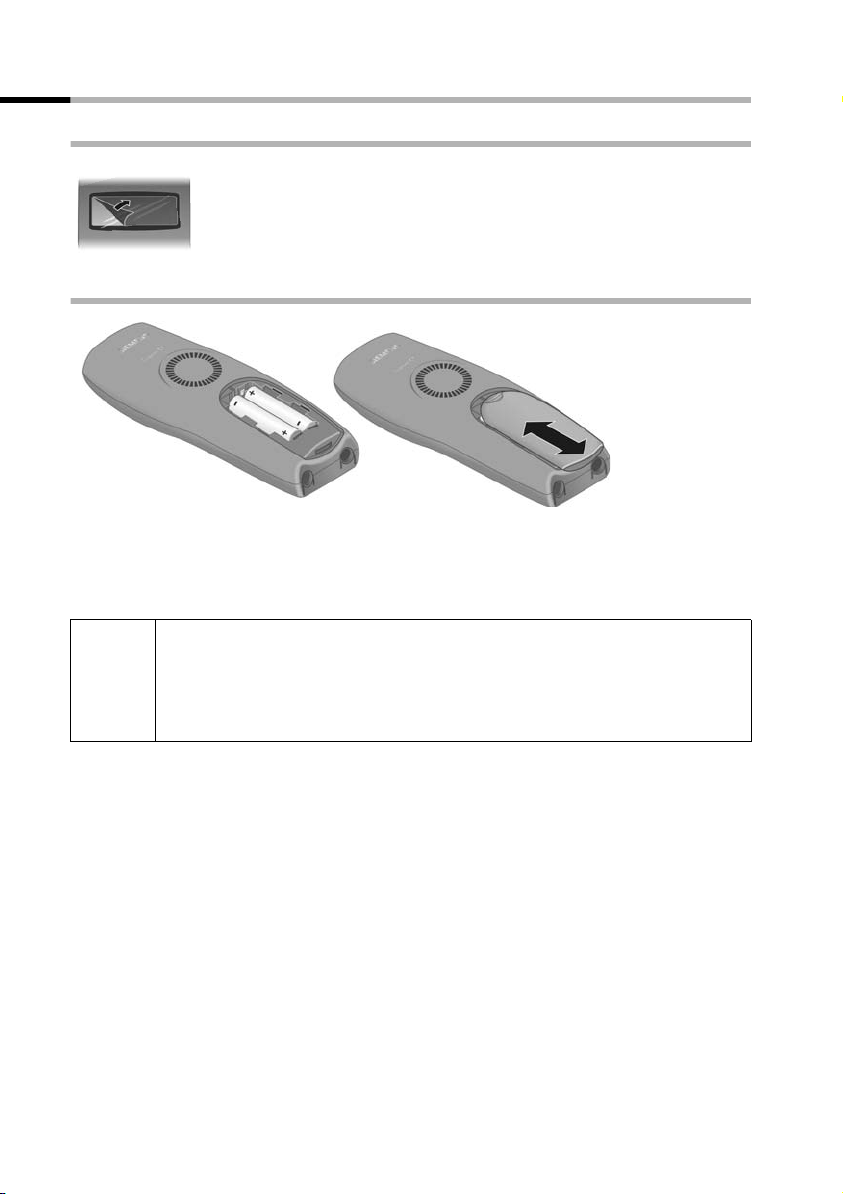
Preparing to use the handset
Removing protective film
The display is protected by a plastic film.
Remove the protective plastic film!
Inserting the batteries
◆ Insert the batteries ensuring correct polarity – see figure on left.
◆ Position the battery cover so that it is open by around 3 mm, then slide up until it
closes with a click,
◆ To o pen the battery cover, press on the checkered area and slide down.
Use only the rechargeable batteries recommended by Siemens on
page 75! Never use conventional batteries (non-rechargeable) or other
W
battery types as this may cause significant damage to health and property. For example, the jacket of the battery could be destroyed (hazardous). The phone could also malfunction or be damaged.
8

Preparing to use your phone
Placing the handset into the base and charging the batteries
When you place the handset into the base, the handset will register automatically to
the base. Proceed step by step as follows:
1. Place the handset in the base with the display up.
2. Wait till the handset has registered automatically to the base (page 55): This operation takes around one minute. While registration is in progress the screen displays
Registering and Base 1 flashes. After registration, you will see a '1' in the top left
of the display – this means that the handset has been assigned the first internal
number.
3. Now leave the handset in the base for the batteries to charge – the batteries are supplied uncharged. Battery charging is indicated in the top right of the display by the
battery icon
= Batteries flat V Batteries
e Batteries
Should automatic registration be interrupted, register the handset manually as
described starting on page 56. You can get help from a table containing basic questions
and answers (page 72).
= flashing:
1
/3 charged U Batt. fully charged
2
/3 charged
i
W
The battery charging status is correctly displayed only after uninterrupted charging/
discharging . You should therefore avoid removing the batteries unnecessarily and end-
ing the charging process prematurely.
i
To r e g i s ter additional handsets , refer to page 56.
For the initial charge we recommend a continuous, uninterrupted chargin g pe rio d of five hou rs, w hat ever ch arg e st atu s is ind ica ted. Afte r a w hil e
the charge capacity of the batteries will decrease for technical reasons.
◆ Once initial charging is complete, you can replace your handset in the
base after each call. Charging is controlled electronically. This ensures
that the batteries are charged in a way that optimizes their life.
◆ The batteries heat up during charging. This is normal and not danger-
ous.
Note
Your telephone is now ready for operation. With the Gigaset C 150, the answering
machine with pre-recorded announcement is also activated. To correctly record the time
of calls and messages (C 150) you should now set the date and time (page 14).
9
Preparing to use your phone
To activate the handset, press the 'end call' key a and hold. You will hear a confirmation tone (rising tone sequence).
To deactivate the handset, press the 'end call' key again
(confirmation tone).
a in the idle status and hold
i
The handset activates automatically when placed in the base or charger.
Activating/deactivating the keypad lock
You can 'lock' the keys on your handset, e.g. when carrying the unit in your pocket or
bag. This protects the keypad against inadvertent activation.
To deactivate the keypad lock, press the hash key
tone).
◆ The keypad lock deactivates automatically when you receive a call. It
i
re-activates when the call is finished.
◆ When the keypad lock is active, you cannot even call emergency num-
bers.
Press the hash key and hold (confirmation tone).
The
Ø icon appears in the display
R again and hold (confirmation
10
Operating the telephone, menu guidance
Operating the telephone, menu guidance
Keys
Talk/di r ec tor y ke y
The talk/directory key c is a rocker key that has two functions. You press the top half
of this key to initiate a call. You press the bottom half of the key to open the directory.
Rocker key:
Top half of the key = Talk key
Bottom half of the key = Directory key
Display keys
The display keys are the horizontal rocker keys just below the display. Depending on
the particular operating situation, their function changes according to whether you
press the left or right side of the key. The current function is shown in the display directly
above the key to which it relates.
Example
MENU
vuÛ
Display keys
The various functions are explained below:
Display icon Meaning when key is pressed
[_________ ]
•
[_______ ]
INT
[_______]
OK
[______________]MENU
[_______]
Û
Last number redial key: Open the list of the last 10 numbers you dialed.
INT key: Open the list of handsets when in idle status.
OK key: Confirm menu function or confirm an input and store.
Menu key: Open the main menu when in idle status
Open a status-dependent menu while making a call.
Scroll up/down.
Move cursor left/right.
Delete key: Delete input from right to left one character at a time.
11

Operating the telephone, menu guidance
Correcting wrong inputs
After a correct input you will hear a confirmation tone (rising tone sequence), an incorrect input is indicated by an error tone (falling tone sequence). You can repeat the input.
If you have entered incorrect characters in the text, you can correct this as follows:
Deleting characters to the left of the cursor with
To correct a telephone number or text, use the display keys uv to move the cursor
to the right of the incorrect character. Now press the display key
deleted. Now enter the correct character.
Inserting characters on the right of the cursor
If you have omitted a character, use the display keys uv to go to the place where
you want to insert the character, and key it in.
Û
Û. The character is
Idle status
Display in idle status
Gigaset C 100
1
12:50
12.04.03
INT Þ MENU
or
Gigaset C 150
1
INT Þ MENU
×V
12:50
12.04.03
V
Time and date
already set
Time and date
already set
Reverting to idle status from anywhere in the menu
◆ Press the end call key a for around 1 second, or
◆ Press no key: The display automatically reverts to the idle status after 2 minutes.
Changes which you have not confirmed/stored by pressing
OK will be rejected.
12

Operating the telephone, menu guidance
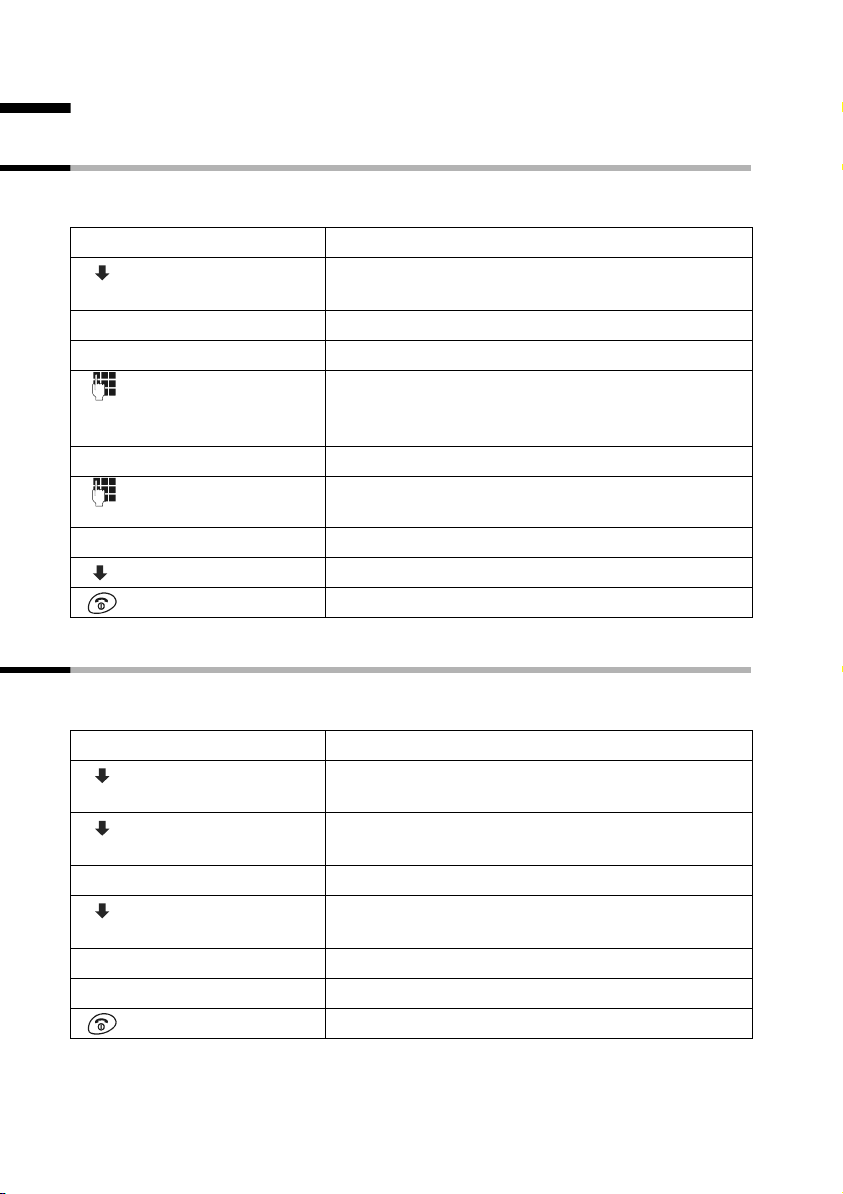
Menu operation, with "Setting Handsfree Volume" as an example
1. MENU Press the display key. The menu opens.
2.
s
3. OK Confirm with the display key.
4.
s
5. OK Confirm with the display key.
6. uv Press the left or right display key to select the required volume (1–5).
7. OK Now press the display key to confirm the setting.
8.
a
Press the display key repeatedly until Audio Settings appears on the
screen.
Press the display key repeatedly until Handsfree Volume appears on the
screen.
Press and hold the 'end call' key to return to the idle status.
13
Date and Time
Date and Time
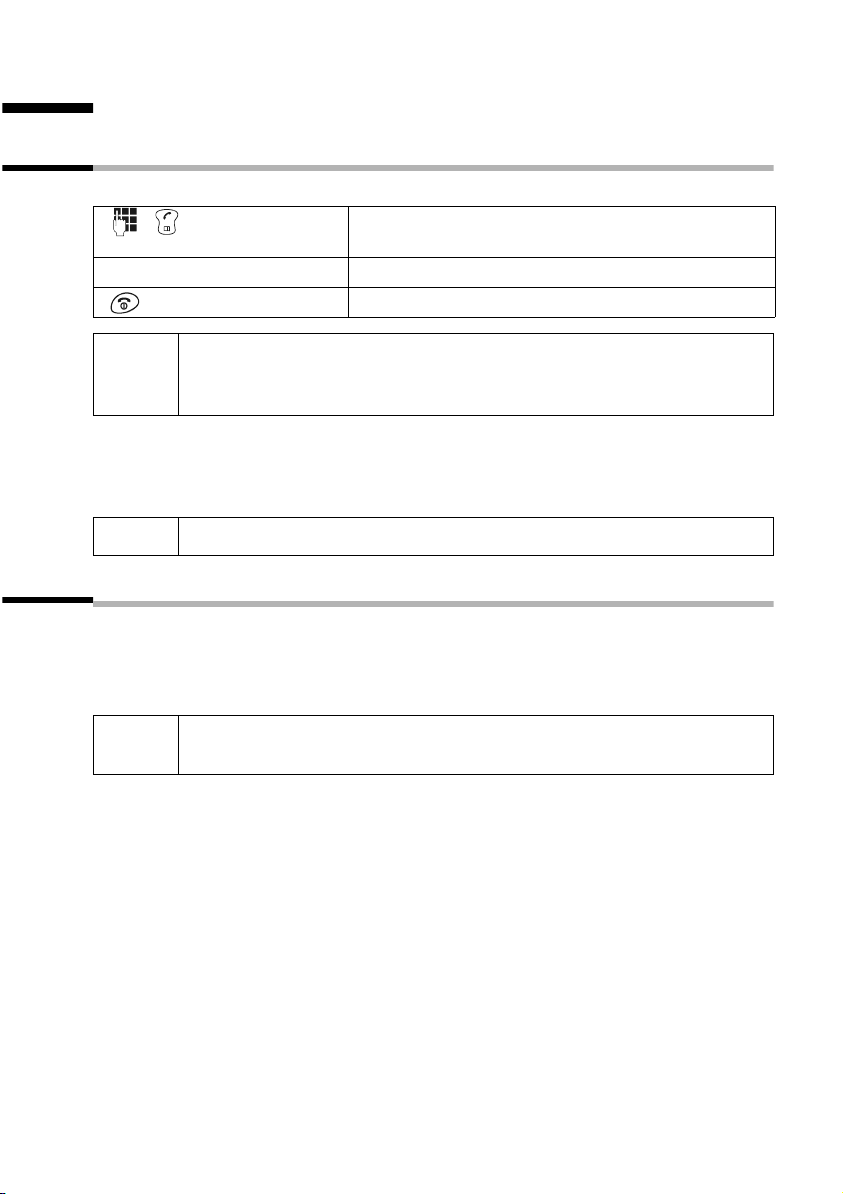
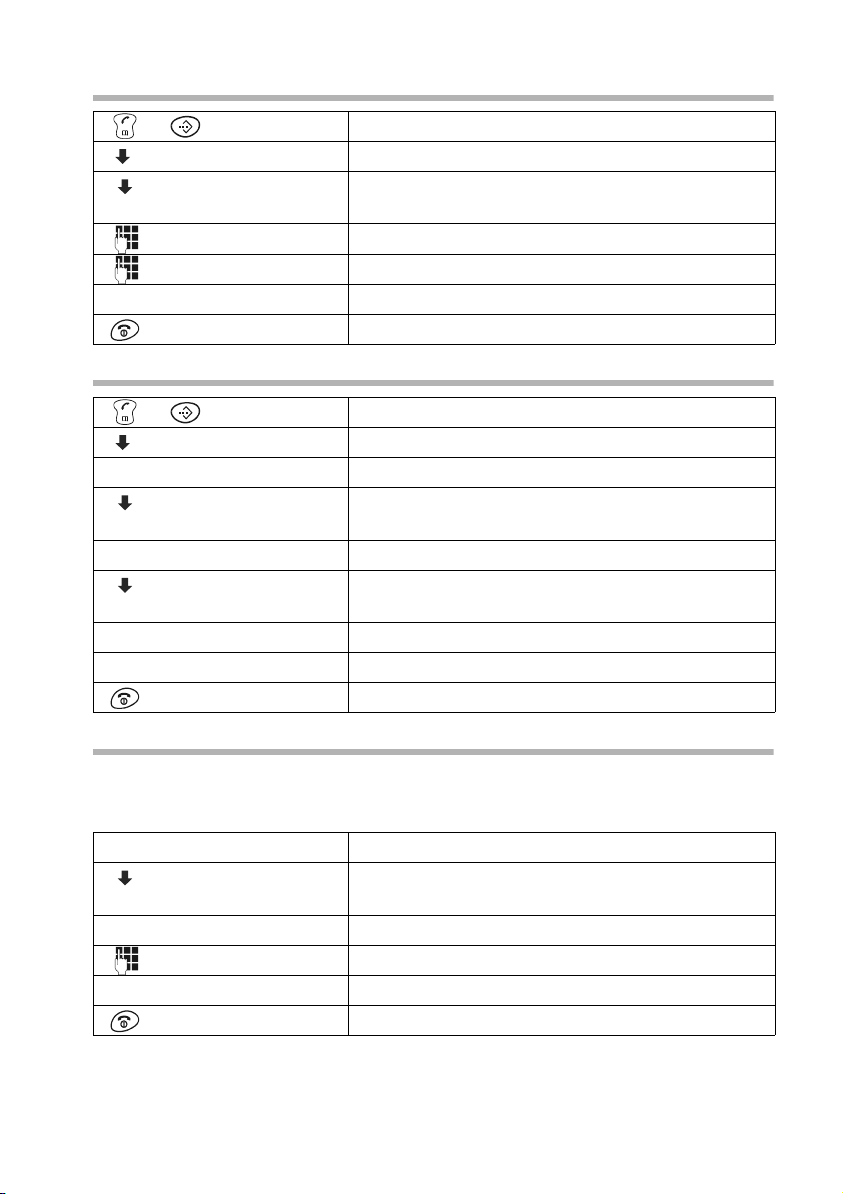
Setting the date and the time
Correct date and time settings are essential if you want to know exactly when
calls/messages (C 150) were received.
[_________]OK
Open the menu.
Select the menu item and confirm.
Confirm.
Enter the date:
Enter the day/month/year and confirm.
Example: For the 20.05.2003, enter
2QQ5QI.
Enter the time:
Enter hours/minutes and confirm.
Example: For 9.35 a.m., enter
Only when the 12-hour display is selected:
Select the half of the day and confirm.
Long press (back to idle status).
QOI5.
[_______________]
MENU
[__________] [_____________________________________________________________]
Calender/Clock
[_____________________________________________________________] [__________]
Date/Time OK
[________]
OK
[________]
OK
[_________] [_________ ]
OK
Changing the time mode
You can choose between the 12 hour and the 24 hour display (factory setting) for the
time (a.m. = 1
[_______________]
MENU
[__________] [_____________________________________________________________]
[__________] [_____________________________________________________________]
either ...
[__________] [_____________________________________________________________]
or ...
[_____________________________________________________________] [__________]
12 hour OK
14
st
half of the day; p.m. = 2nd half of the day).
Calender/Clock
Time Mode
24 hour
[_________]
OK
[_________]
OK
[_________]
OK
Open the menu.
Select the menu item and confirm.
Select the menu item and confirm.
Select the menu item and confirm (‰ = On).
Confirm (‰ = On).
Long press (back to idle status).
Making calls
Making calls
Making external calls and ending a call
External calls are calls into the public telephone network.
Enter the telephone number and press the top half of
the key. The number is dialled.
End the call:
Press the end call key.
◆ You can also press the top half of the c key first (you hear a ringback
i
Inserting a dialling pause
You can insert a dialling pause between the prefix and the actual telephone number.
To do this, press
tone) and then enter the number.
◆ You can use the end call key a to cancel the dialling operation.
S for around 2 seconds. Now enter the telephone number.
i
To call another handset, see the description on page 58.
Answering a call
Your handset rings, the call is displayed on the screen and the handsfree key d flashes.
Press the top half of the c key to take the call. If the handset is in the base/charger and
the Auto Answer function is activated (page 61), then you just need to lift the handset
out of the base/charger to take the call.
i
If the ringer is intrusive, press P for around 1 second. You can take the
call so long as it is displayed on the screen.
15
Making calls
Calling Line Identification
When you get a call, you will see the caller's number and/or name displayed on the
screen.
Preconditions:
1. You have asked your network provider for the caller's number (CLIP) or name (CNIP)
to be displayed on your handset screen.
2. The caller has asked the network provider for his number to be identified (CLI).
3. Your network provider supports CLIP, CLI and CNIP.
CLIP Calling Line Identification Presentation
CNIP Calling Name Identification Presentation
CLI Calling Line Identification
Screen display with CLIP/CLI
With calling line identification, the caller's telephone number is displayed on the handset screen. If you have stored an entry for this number is your directory, then that entry
will be displayed instead of the number, e.g. 'Anna'.
Å
1234567890
The screen displays External Call if the number is not identified.
The screen displays Withheld if the caller withholds his number (page 19), or Unavail-
ableif he has not requested CLI.
Ringer symbol
Telephone number or 'Anna'
Screen display with CNIP
If you have CNIP, then the name (town) that is registered with your network provider for
the calling number will also be displayed on your handset.
Anna Lechner, Berlin
1234567890
MENU
The screen displays External Call if the number is not identified.
The screen displays Withheld if the caller withholds his number, (page 19) or Unavail-
able if he has not requested CLI.
i
You may have to pay a charge to use calling line identification. Please ask
your network provider for details.
Name and town
Telephone number
16
Making calls
Handsfree
Activating/deactivating handsfree
Activate while dialling:
Enter the number and press the handsfree key.
Activate during a call:
Press the handsfree key.
Deactivate handsfree:
Press the top half of the key.
As soon as you terminate the handsfree mode you switch to 'earpiece mode' and continue the call on the handset.
◆ If you wish to place the handset in the base during a call you must
press the handsfree key d and hold it down while you position the
i
Adjusting the volume while in handsfree mode
A call is in progress and handsfree is activated.
[___ _____] [___ _____]
[___ _____]
OK
handset in the base.
◆ You should inform your caller that you intend to use the handsfree
function before you activate it.
Press the handsfree key again.
Decrease or increase the volume.
Now press the display key to store the setting.
17
Making calls
Activating/deactivating open listening (call screening at the base)
(C 150 only)
You can activate the built-in base loudspeaker to allow other people in the room to hear
what your external caller is saying.
Precondition: A call is in progress.
[_________]
OK
Press the display key to open the menu.
Activate open listening:
Select the menu item and confirm.
Deactivate open listening:
Confirm.
Long press (back to idle status).
[_______________ ]MENU
either ...
[__________] [_____________________________________________________________]
Open Listening On
or ...
[_____________________________________________________________] [__________]Open Listening Off OK
◆ You should inform your caller that you intend to use the open
i
listening function before you activate it.
◆ You can adjust the volume on the base with the ð and ñ keys
(page 67).
Handset muting
You can mute your handset during external calls, e.g. if you wish to talk confidentially
to another person in the room. The external caller cannot hear your conversation during
this time (hold melody). You do not hear your caller either.
[_________]
OK
Open list of handsets. The call is 'held' (wait melody).
Cancel muting:
Press the display key to open the menu.
Select and confirm, or press the end call key a.
[_______]
INT
[_______________ ]
MENU
[__________] [_____________________________________________________________]******Back******
18
Select Services
Select Services
Select services are functions which your network provider offers on his network. You
can only use these services if you have applied to your network provider. Please ask
your network provider which services are available free of charge and which you have
to pay for.
◆ Please contact your network provider if you experience any
i
Function that is set for the next call
Before you carry out the procedure described below, press: MENU (open menu);
s Select Services OK. When the procedure is complete, a code will be sent which is dis-
played on your handset's screen.
Withhold Calling Line
Identification once (CLIR):
Functions that are set for all subsequent calls
Before you carry out any of the procedures described below, press: MENU (open
menu);
code will be sent which is displayed on your handset's screen.
You can exit the particular procedure by pressing the end call key
mation from the phone network.
s Select Services OK; s For All Calls OK. When a procedure is complete, a
Activate/deactivate call
waiting (in external call only):
problems with select services.
◆ You will find a description of the services at Deutsche Telekom, e.g. at
www.telekom.de/faq
or at any T-Point.
Withhold Number OK
~
(enter number) OK
a after the confir-
s Call Waiting OK
On OK or s Off OK
19
Select Services
Functions during a call
Initiate ringback: You hear the busy tone: MENU; s Ringback OK
Initiate consultation call:
End consultation call:
Toggling:
End toggling:
Initiate conference call: You toggle with two callers:
End conference call:
With one caller: MENU;
MENU; s External Call OK
~
(enter number of user) OK
MENU;
s End Active Call OK
st (switching between two callers)
MENU;
MENU;
s End Active Call OK
s Conference Call OK
s End Conference OK
s (switch to caller if necessary)
MENU;
With both callers:
Accept call waiting: MENU; Accept Call Waiting OK
Reject call waiting: MENU;
a
s End Active Call OK
sReject Call Waiting OK
Function that is set after a next call
Before you carry out the procedure, press: MENU; s Select Services OK.
Cancel ringback: s Cancel Ringback OK
20
Using the directory and other lists
Using the directory and other lists
Directory and speed dial list
You can store up to 50 entries max. in the directory and the speed dial list (depending
on the size of individual entries).
The directory makes dialling easier for you. To open the directory, press the bottom half
of the h key.
The speed dial list is a special directory in which you can store particularly important
numbers such as private telephone numbers and prefixes of network providers
(so-called"call-by-call numbers"). You open the speed dial list with the C key.
The speed dial list is operated in just the same way as the directory.
◆ Please refer to the Character Set Table (page 77) to see how to enter
text correctly.
i
Storing a telephone number in the directory
◆ You can enter up to 32 digits for a number and up to 16 letters for a
name.
◆ Turn to page 15 for instructions on how to insert a dial pause.
[_______________]
MENU
[_____________________________________________________________] [__________]
New Entry OK
[________ ]OK
[_________________]
MENU
[_____________________________________________________________] [__________]
Save Entry OK
If your phone is connected to a PABX you may have to enter the access
i
code (outside line code) as the first digit of your directory entry (refer to
the operating instructions of your PABX).
Open directory.
Press the display key to open the menu.
Confirm.
Enter the number and confirm.
Enter the name and press the display key.
Confirm. The entry is stored.
Long press (back to idle status).
21

Using the directory and other lists
Storing a telephone number in the speed dial list
You can assign a digit (0, 2–9) to up to nine entries on your speed dial list. When you
press and hold one of these digits, e.g. '3', and press the top half of the
immediately connected to the telephone number that is assigned '3'.
Open the speed dial list.
[_________]
OK
[_________]
OK
Press the display key to open the menu.
Confirm.
Enter the number and confirm.
Enter the name and press the display key.
Confirm. The entry is stored.
Press the display key to open the menu.
Select the menu item and confirm.
Select the digit and confirm.
[______________ ]MENU
[_____________________________________________________________] [__________]
New Entry OK
[_______]
OK
[______________]
MENU
[_____________________________________________________________] [__________]
Save Entry OK
[______________ ]
MENU
[__________] [_____________________________________________________________]Shortcut
[__________] [_____________________________________________________________]
Shortcut: 2
Long press (back to idle status).
c key you are
i
Speed dial digits cannot be assigned more than once at a time.
Dialling with the directory/speed dial list
or
either ...
or ...
Open directory or speed dial list
Scroll to the entry:
Select entry.
Press the top half of the key. The number is dialled.
Enter the first letter:
Enter the first letter of the name.
Select the desired entry.
Press the key. The number is dialled.
22
Using the directory and other lists
Changing an entry in the directory/speed dial list
or
[__________] [________________ ]
MENU
[__________] [_____________________________________________________________]
Edit Entry
Open directory or speed dial list
Select the entry and press the display key.
Select the menu item and confirm.
[_________ ]OK
[_______]
OK
[________________ ]
MENU
[_____________________________________________________________] [__________]
Save Entry OK
Change the number and confirm.
Change the name and press the display key.
Confirm. The entry is stored.
Long press (back to idle status).
Deleting a single entry or directory/speed dial list
or
[__________] [________________ ]
MENU
either ...
[__________] [_____________________________________________________________]
Delete Entry
[_________ ]
or ...
[__________] [_____________________________________________________________]
Delete List
[_________ ]
[___ _____]
OK
... then
Open directory or speed dial list
Select the entry and press the display key.
Delete a single entry:
Select the menu item and confirm.
OK
Delete the entire directory/speed dial list:
Select the menu item and confirm.
OK
Press the display keyto confirm the prompt.
Long press (back to idle status).
Adding a displayed telephone number to the directory
When a telephone number appears in the display (CLIP) you can add it to your directory.
This can be done while dialling from the last number redial list, from the caller
list/answering machine list (C 150 only) or during a call.
[_______________]
MENU
[__________] [_____________________________________________________________]
Copy to Directory
[_________ ]
[___ _____]
OK
[______________]
MENU
[_____________________________________________________________] [__________]
Save Entry OK
Press the display key to open the menu.
Select the menu item and confirm.
OK
Confirm the telephone number.
If required, enter the name and press the display key.
Confirm. The entry is stored.
Long press (back to idle status).
23
Using the directory and other lists
i
If you have CNIP (page 16) as well as CLIP, then the name that goes with
the telephone number will also be displayed (up to 16 characters).
Picking a phone number from the directory/speed dial list
If you are prompted to enter a telephone number while you are operating your telephone, you can use the directory to do this.
Precondition: The entry field for external telephone numbers is displayed.
or
[_________] [_________ ]
OK
The telephone number is added to the entry field.
Open directory or speed dial list
Select the entry and confirm.
Last number redial list
The last number redial list contains the ten last dialed numbers. If names have been
stored for these numbers in the directory, then both the names and the numbers will be
displayed. You can use the last number redial list to redial the telephone numbers.
Dialling telephone numbers from the last number redial list
[_________ ]
•
[_________ ]
◆ To add or change the telephone number, press MENU and confirm
i
Use Number with OK.
◆ To add a telephone number from the last number redial list to the
directory (page 23), press
Open the last number redial list.
Select an entry and press the top half of the key.
The number is dialed.
MENU, Copy to Directory OK.
Deleting a single telephone number or the entire last number redial list
[_________]
OK
[_________]
OK
Open the last number redial list.
Select an entry and open the menu.
Delete a single telephone number:
Select the menu item and confirm.
If there still entries on the list, press the key and hold
(back to idle status).
Delete the entire last number redial list:
Select the menu item and confirm.
[_________ ]
•
[_________] [_________________]
MENU
either ...
[__________] [_____________________________________________________________]
Delete Entry
or ...
[__________] [_____________________________________________________________]
Delete List
24

Using the directory and other lists
Opening lists with the Message key
You can use the Message key f to open the following lists:
1. SMS list,
2. Answering machine list (C 150 only),
3. Messages in the network mailbox (if your network provider supports this function
and the network mailbox is configured for fast access, page 54),
4. Caller list.
You hear an advisory tone as soon as a new entry (SMS, messages on the built-in
answering machine) arrives in one or more lists. The
Û icon appears in the display.
When you press the f key and open one of the lists, the Û icon disappears after you
quit the list even though there are still new entries in one of the other lists.
The following lists are displayed when you press
◆ If only one list has new entries, you will see the first new entry in that list.
◆ If several lists have new entries, those lists are offered for your selection.
◆ If there are no new messages in any of the lists, then all the lists are offered for your
f:
selection.
◆ If calls are stored in the network mailbox, you will see a message if the correct set-
ting has been made (refer to the network mailbox operating instructions).
Caller list and answering machine list (C 150 only)
The numbers of the last 10 calls are saved in the caller list. The oldest entry is deleted
when the caller list is full and new entries are added.
Precondition: The caller's number has been identified (page 16).
Here is an example of how the caller list (
Number of new entries in the list
Calls List: 01+05
Number of old, read entries in the list
Calls List: ) appears in the display:
You can use the answering machine list to listen to the messages that are on the
answering machine on the Gigaset C 150 . Provided they were transmitted, the date and
time of arrival of each message and the caller's number are displayed.
Once you have listened to them, the new messages are added after the old messages in
the answering machine list.
Here is an example of how the answering machine list (Answering Mach.: ) appears in
the display:
Number of new entries/messages in the list
Answering Mach.: 01+05
Number of old, played entries/messages in the list
25
Using the directory and other lists
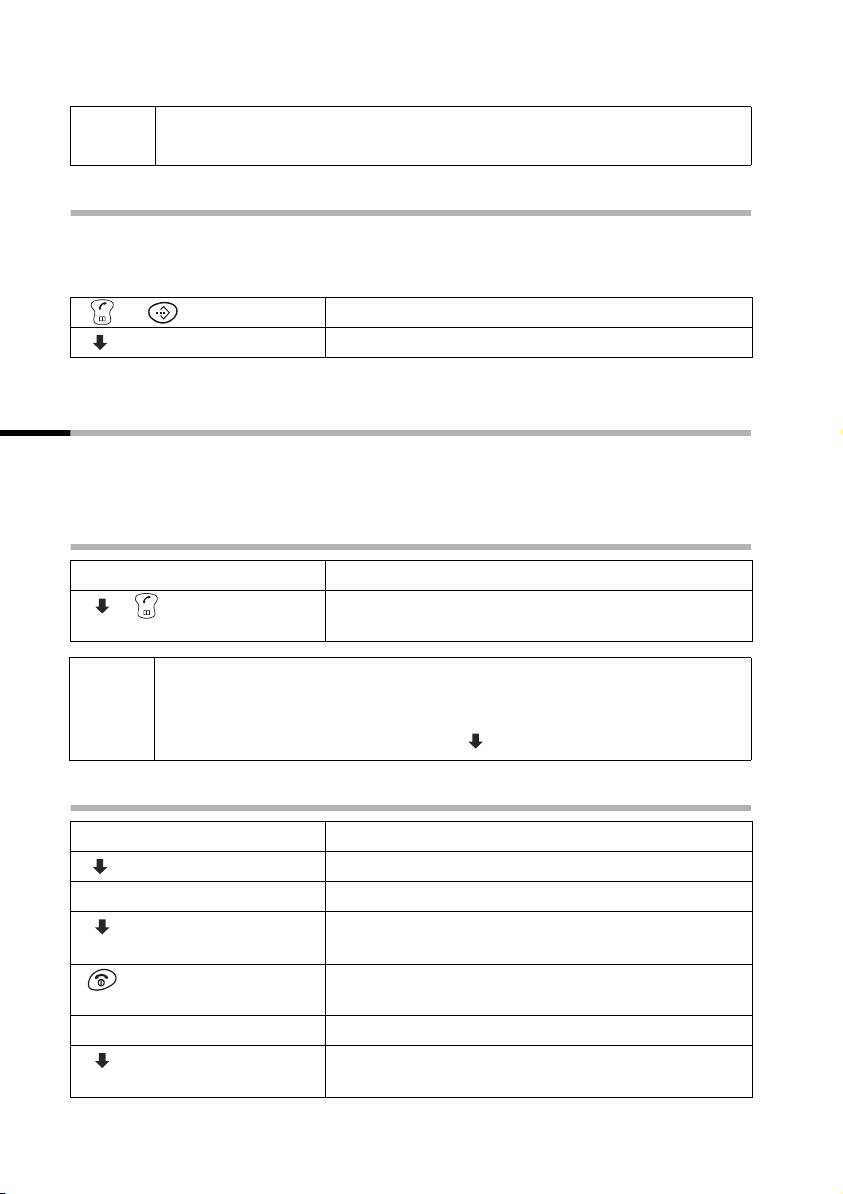
Opening the caller list/answering machine list (C 150 only)
New calls (caller list) and new messages (answering machine) are shown on screen by
the letter icon
either ...
[__________] [_____________________________________________________________]
or ...
[__________] [_____________________________________________________________]
Û, messages are indicated by an advisory tone as well.
Open the caller list.
Open the caller list:
[_________]OK
[_________]
OK
Select the menu item and confirm.
The entry received last is displayed.
Select entry.
Open the answering machine list:
Select the menu item and confirm. The entry of the
first new message to arrive is displayed. The loudspeaker activates. Message playback begins.
Scroll to the next or previous message. The entry of
the message appears in the display. Message playback begins.
Calls List: 01+02
Answering Mach.: 01+02
i
An entry or a message is deleted by pressing MENU,
Delete Entry OK.
Calling back a caller
Precondition: The caller's number has been identified (page 16).
Open the caller list/answering machine list (C 150 only) and select an entry. Now:
Press the top half of the key.
The telephone number is entered in the last number redial list.
Viewing an entry in the caller list/answering machine list (C 150 only),
adding a number to the directory
You can view the time when a call arrived and add the telephone number to your directory.
Open the caller list/answering machine list and select an entry. Now:
26
 Loading...