

Page 1

allrounder /
allrounder A
You can find the most up-to-date
user guide at
www.gigaset.com/manuals
Page 2

Contents
Contents
Overview . . . . . . . . . . . . . . . . . . . . . . . . . . . . . . . . . . . . . . . . . . . . . . . . . . . . . . . . . . . . . . . . . . . . . . . . . . . . . 4
Safety precautions . . . . . . . . . . . . . . . . . . . . . . . . . . . . . . . . . . . . . . . . . . . . . . . . . . . . . . .
Getting started . . . . . . . . . . . . . . . . . . . . . . . . . . . . . . . . . . . . . . . . . . . . . . . . . . . . . . . .
Package contents . . . . . . . . . . . . . . . . . . . . . . . . . . . . . . . . . . . . . . . . . . . . . . . . . . . . . . .
Base . . . . . . . . . . . . . . . . . . . . . . . . . . . . . . . . . . . . . . . . . . . . . . . . . . . . . . . . . . . . .
Handset . . . . . . . . . . . . . . . . . . . . . . . . . . . . . . . . . . . . . . . . . . . . . . . . . . . . . . . . . . . . . . .
Using the phone . . . . . . . . . . . . . . . . . . . . . . . . . . . . . . . . . . . . . . . . . . . . . . . . . . . . . . . .
Switch the handset on and off . . . . . . . . . . . . . . . . . . . . . . . . . . . . . . . . . . . . . . . . . . . . . . . . .
Lock/unlock the keypad . . . . . . . . . . . . . . . . . . . . . . . . . . . . . . . . . . . . . . . . . . . . . . . . . . . . . .
Control key . . . . . . . . . . . . . . . . . . . . . . . . . . . . . . . . . . . . . . . . . . . . . . . . . . . . . . . . . . . .
Display . . . . . . . . . . . . . . . . . . . . . . . . . . . . . . . . . . . . . . . . . . . . . . . . . . . . . . . . . . . .
Menu navigation . . . . . . . . . . . . . . . . . . . . . . . . . . . . . . . . . . . . . . . . . . . . . . . . . . . . . . . .
Making calls . . . . . . . . . . . . . . . . . . . . . . . . . . . . . . . . . . . . . . . . . . . . . . . . . . . . . . . . . .
Making a call . . . . . . . . . . . . . . . . . . . . . . . . . . . . . . . . . . . . . . . . . . . . . . . . . . . . . . . . . . .
Accepting a call . . . . . . . . . . . . . . . . . . . . . . . . . . . . . . . . . . . . . . . . . . . . . . . . . . . . . . . .
Handsfree mode . . . . . . . . . . . . . . . . . . . . . . . . . . . . . . . . . . . . . . . . . . . . . . . . . . . . . . . .
Changing the receiver/speaker volume . . . . . . . . . . . . . . . . . . . . . . . . . . . . . . . . . . . . . . . . . . . . . .
Muting . . . . . . . . . . . . . . . . . . . . . . . . . . . . . . . . . . . . . . . . . . . . . . . . . . . . . . . . . . . . . . . .
Making internal calls . . . . . . . . . . . . . . . . . . . . . . . . . . . . . . . . . . . . . . . . . . . . . . . . . . . . .
Calling Line Identification . . . . . . . . . . . . . . . . . . . . . . . . . . . . . . . . . . . . . . . . . . . . . . . . . . . .
Automatic network provider selection (preselection) . . . . . . . . . . . . . . . . . . . . . . . . . . . . . . . . . . . 18
Call/message lists . . . . . . . . . . . . . . . . . . . . . . . . . . . . . . . . . . . . . . . . . . . . . . . . . . . . . . .
Call list . . . . . . . . . . . . . . . . . . . . . . . . . . . . . . . . . . . . . . . . . . . . . . . . . . . . . . . . . . .
Message list . . . . . . . . . . . . . . . . . . . . . . . . . . . . . . . . . . . . . . . . . . . . . . . . . . . . . . . . . . . .
Directory . . . . . . . . . . . . . . . . . . . . . . . . . . . . . . . . . . . . . . . . . . . . . . . . . . . . . . . . . . .
Local answer machine (if available) . . . . . . . . . . . . . . . . . . . . . . . . . . . . . . . . . . . . . . . . . . . . . . . . . . .
Setting up the answer machine . . . . . . . . . . . . . . . . . . . . . . . . . . . . . . . . . . . . . . . . . . . . . . . . . . . . . .
Operation using the handset . . . . . . . . . . . . . . . . . . . . . . . . . . . . . . . . . . . . . . . . . . . . . . . . . .
Operation when on the move (remote operation) . . . . . . . . . . . . . . . . . . . . . . . . . . . . . . . . . . . . . . 26
Network mailbox . . . . . . . . . . . . . . . . . . . . . . . . . . . . . . . . . . . . . . . . . . . . . . . . . . . . . . . .
Entering a number . . . . . . . . . . . . . . . . . . . . . . . . . . . . . . . . . . . . . . . . . . . . . . . . . . . . . . . . . . . .
Playing messages . . . . . . . . . . . . . . . . . . . . . . . . . . . . . . . . . . . . . . . . . . . . . . . . . . . . . . .
Assigning key 1 . . . . . . . . . . . . . . . . . . . . . . . . . . . . . . . . . . . . . . . . . . . . . . . . . . . . . . . .
Additional functions . . . . . . . . . . . . . . . . . . . . . . . . . . . . . . . . . . . . . . . . . . . . . . . . . . . . .
Alarm clock . . . . . . . . . . . . . . . . . . . . . . . . . . . . . . . . . . . . . . . . . . . . . . . . . . . . . . . . . . . .
ECO DECT . . . . . . . . . . . . . . . . . . . . . . . . . . . . . . . . . . . . . . . . . . . . . . . . . . . . . . . . . . . . . .
Protection from undesired calls . . . . . . . . . . . . . . . . . . . . . . . . . . . . . . . . . . . . . . . . . . . . . . . .
. . . . . . . . . . . . . 7
. . . . . . . . . . . . . . . 8
. . . . . . . . . . . . . . . 8
. . . . . . . . . . . . . . . . . . . . . . 8
. . . . . . . . . . . . . . . . 9
. . . . . . . . . . . . . 12
. . . . . . . . 12
. . . . . . . . . 12
. . . . . . . . . . . . . . . 12
. . . . . . . . . . . . . . . . . . . 13
. . . . . . . . . . . . . . 14
. . . . . . . . . . . . . . . 15
. . . . . . . . . . . . . . . 15
. . . . . . . . . . . . . . . 16
. . . . . . . . . . . . . . 16
. . 16
. . . . . . . . . . . . . . . 16
. . . . . . . . . . . . . 16
. . . . . . . . . 18
. . . . . . . . . . . . . 19
. . . . . . . . . . . . . . . . . . . . . 20
. . . . . . . . . . . . . . . 20
. . . . . . . . . . . . . . . . . 21
23
. . 23
. . . . . . . . 24
. . . . . . . . . . . . 27
. . . . . . . . 27
. . . . . . . . . . . . . . 27
. . . . . . . . . . . . . . . 27
. . . . . . . . . . . . 28
. . . . . . . . . . . . . . . 28
. . . . . . . . . . . . . . . 28
. . . . . . . . 29
2
Page 3

Contents
Extending the functionality of the phone . . . . . . . . . . . . . . . . . . . . . . . . . . . . . . . . . . . . . . . . . . . . . 30
Multiple handsets . . . . . . . . . . . . . . . . . . . . . . . . . . . . . . . . . . . . . . . . . . . . . . . . . . . . . . .
Repeater support . . . . . . . . . . . . . . . . . . . . . . . . . . . . . . . . . . . . . . . . . . . . . . . . . . . . . . .
Operating the base on a router/PABX . . . . . . . . . . . . . . . . . . . . . . . . . . . . . . . . . . . . . . . . . . . . . . . .
Phone settings . . . . . . . . . . . . . . . . . . . . . . . . . . . . . . . . . . . . . . . . . . . . . . . . . . . . . . . .
Date and time . . . . . . . . . . . . . . . . . . . . . . . . . . . . . . . . . . . . . . . . . . . . . . . . . . . . . . . . . .
Display language . . . . . . . . . . . . . . . . . . . . . . . . . . . . . . . . . . . . . . . . . . . . . . . . . . . . . . . .
Display . . . . . . . . . . . . . . . . . . . . . . . . . . . . . . . . . . . . . . . . . . . . . . . . . . . . . . . . . . . .
Audio . . . . . . . . . . . . . . . . . . . . . . . . . . . . . . . . . . . . . . . . . . . . . . . . . . . . . . . . . . . . .
Off for anonymous calls . . . . . . . . . . . . . . . . . . . . . . . . . . . . . . . . . . . . . . . . . . . . . . . . . . . . . .
System . . . . . . . . . . . . . . . . . . . . . . . . . . . . . . . . . . . . . . . . . . . . . . . . . . . . . . . . . . . . .
. . . . . . . . . . . . . . 30
. . . . . . . . . . . . . . 31
. . 31
. . . . . . . . . . . . . . 33
. . . . . . . . . . . . . . . 33
. . . . . . . . . . . . . . 33
. . . . . . . . . . . . . . . . . . . 33
. . . . . . . . . . . . . . . . . . . . 34
. . . . . . . . . 36
. . . . . . . . . . . . . . . . . . . 36
Service (Customer Care) . . . . . . . . . . . . . . . . . . . . . . . . . . . . . . . . . . . . . . . . . . . . . . . . . . . . . . . . . . . . . . 3
Questions and answers . . . . . . . . . . . . . . . . . . . . . . . . . . . . . . . . . . . . . . . . . . . . . . . . . . . . . . .
. . . . . . . . . 39
Guarantee Certificate - United Kingdom and Ireland . . . . . . . . . . . . . . . . . . . . . . . . . . . . . . . . . . . . 39
Manufacturer‘s advice . . . . . . . . . . . . . . . . . . . . . . . . . . . . . . . . . . . . . . . . . . . . . . . . . . . . . . . .
Authorisation . . . . . . . . . . . . . . . . . . . . . . . . . . . . . . . . . . . . . . . . . . . . . . . . . . . . . . . . . .
Data protection . . . . . . . . . . . . . . . . . . . . . . . . . . . . . . . . . . . . . . . . . . . . . . . . . . . . . . . .
Environment . . . . . . . . . . . . . . . . . . . . . . . . . . . . . . . . . . . . . . . . . . . . . . . . . . . . . . . . . . .
Care . . . . . . . . . . . . . . . . . . . . . . . . . . . . . . . . . . . . . . . . . . . . . . . . . . . . . . . . . . . . .
. . . . . . . . . . . . . . . . . . . . . 41
Contact with liquid . . . . . . . . . . . . . . . . . . . . . . . . . . . . . . . . . . . . . . . . . . . . . . . . . . . . .
Technical data . . . . . . . . . . . . . . . . . . . . . . . . . . . . . . . . . . . . . . . . . . . . . . . . . . . . . . . .
Menu tree . . . . . . . . . . . . . . . . . . . . . . . . . . . . . . . . . . . . . . . . . . . . . . . . . . . . . . . . . . .
Index . . . . . . . . . . . . . . . . . . . . . . . . . . . . . . . . . . . . . . . . . . . . . . . . . . . . . . . . . . . . .
. . . . . . . . . . . . . . . . . . . 47
. . . . . . . . . 40
. . . . . . . . . . . . . . . 40
. . . . . . . . . . . . . . . 40
. . . . . . . . . . . . . . . 41
. . . . . . . . . . . . . . 42
. . . . . . . . . . . . . . . 42
. . . . . . . . . . . . . . . . 45
8
Not all functions described in the user guide are available in all countries or from all
network providers.
3
Page 4
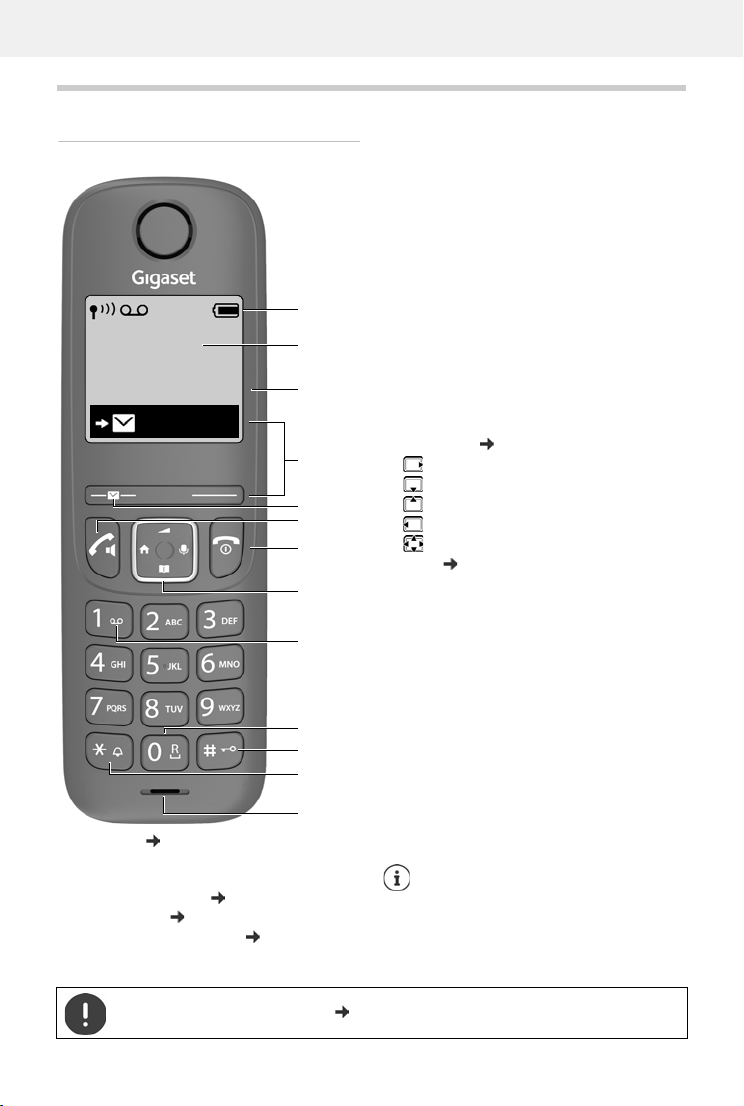
Overview
Handset
1 Status bar ( p. 13)
Icons display current settings and operating
status of the telephone
2 Name of the handset ( p. 30)
3 Date and time ( p. 33)
4 Display keys and functions ( p. 13)
Various functions, depending on the operating
situation
2
7
8
9
10
11
12
5
13
Menu
INT 1
6
16.12. 09:30
3
4
1
5 Message key
Access to the call and message lists;
flashes: new message or new call
New messages in the call list / network mailbox
list are shown on the display by message New
messages.
6 Talk key / Handsfree key
Accepting call; selecting
displayed number; open
redial list
Press briefly
Start dialling
Press and hold
7 End call key / On/Off key
End call; Cancel function;
one level back
Press briefly
Back to idle mode, switch
handset on/off
Press and hold
8 Control key ( p. 12)
Open menu; mute;
Open directory;
Adjust volume;
Make internal calls;
Navigate in menus and entry fields
9 Key 1 ( p. 24)
Call answering machine /
network mailbox
Press and hold
10 Recall key
Consultation call (flash)
Press and hold
11 Hash key / Lock key
Lock/unlock the keypad;
enter a dialling pause
Press and hold
Toggle between upper/
lower case and digits
Press briefly
12 Star key
Switching the ringtone on/
off
Press and hold
Switch from pulse dialling to
tone dialling
Press briefly
13 Microphone
If multiple functions are listed, the button
function depends on the situation.
The colour and shape of your device may be
different from the illustration.
Overview
4
Setting the display language ( p. 10)
Page 5
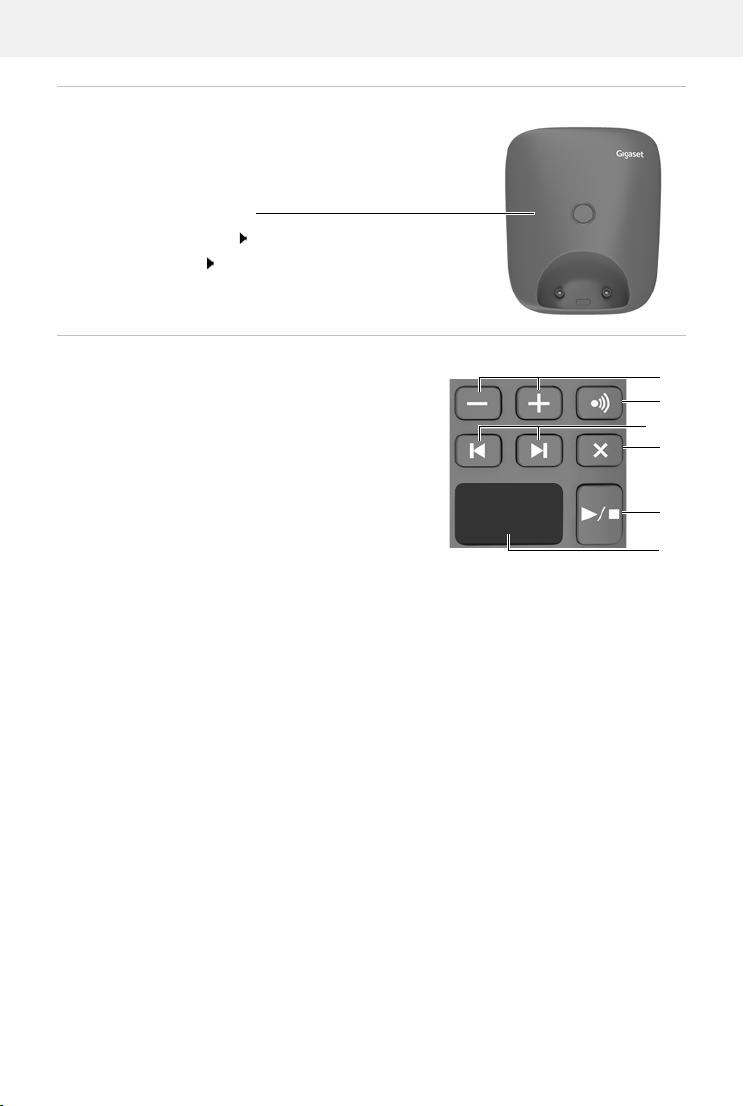
Base without answer machine
Registration/paging key
Locate a handset (paging): Press briefly
Registering handsets: Press and hold
D
F
A
E
C
G
B
Base with answer machine
AVolume keys (– = quieter; + = louder)
During message playback:
adjust the speech volume
While the phone is ringing:
adjust the ringtone volume
B Registration/paging key
Locate a handset (paging):
Register the handset:
CForward key
During message playback: Skip to the next message
DBack key
During message playback:
Go to the start of the current message:
Go to the previous message:
E Delete key
During message playback: Delete current message.
F On/Off and Playback/Stop key
Switch the answer machine on/off:
During message playback:
Play back messages:
Cancel playback:
Lights up: Answer machine switched on, no new messages
Flashes: New message; message is being played or recorded
Flashes very quickly: Memory full
GDisplay
Press briefly
Press and hold
Press once
Press twice
Press and hold
Press briefly
Press briefly
Overview
5
Page 6
Overview
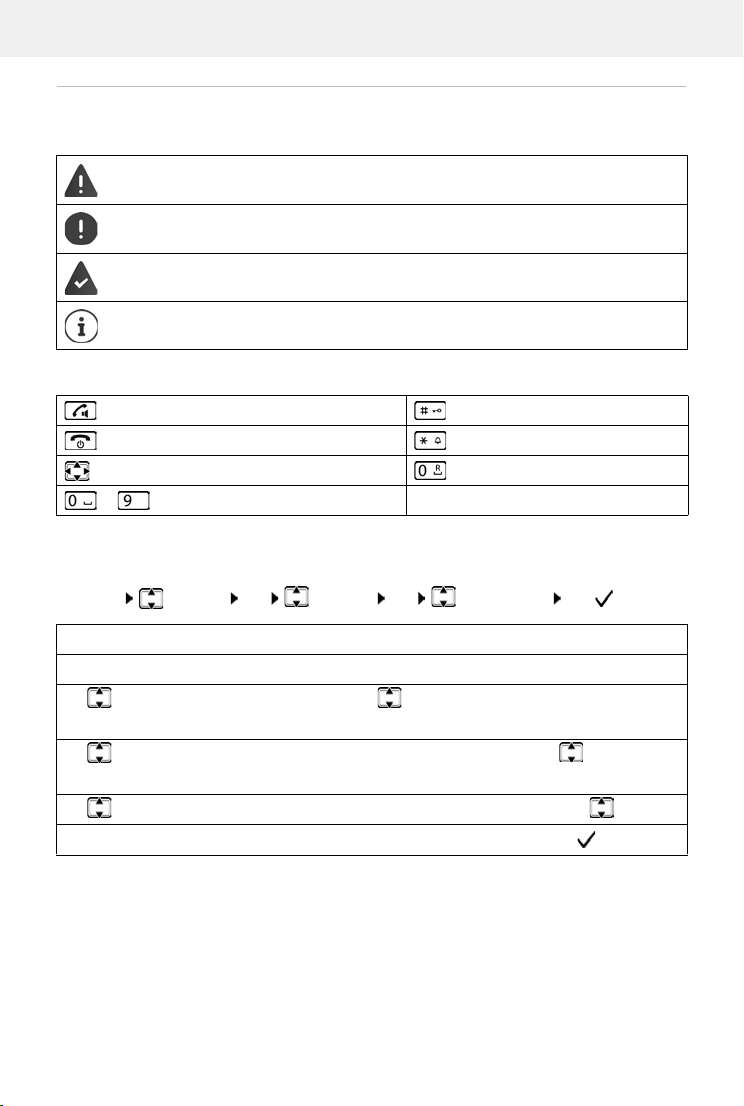
Symbols used in the user guide
Icons
Warnings, the non-adherence to which can result in damage to devices or personal
injury.
Important information regarding function and appropriate handling or functions
that could generate costs.
Prerequisite for carrying out the following action.
Additional helpful information.
Buttons
Talk/Handsfree key Hash key
End call key Star key
Control key Recall key
to Digit/letter keys Menu, OK Display keys
Procedures
Example: Enabling/disabling Auto Answer:
Menu Settings OK Handset OK Auto An swer OK ( = enabled)
Step Actions required
Menu Press the Menu display key.
Settings
OK
Handset
OK
Use the control key to navigate to entry Settings.
Press OK to confirm. The Settings submenu is opened.
Select the Handset entry using the control key .
Press OK to confirm. The Handset submenu is opened.
Auto Answer Select the Auto Answer entry using the control key .
OK Enable or disable it using OK. Function is enabled .
6
Page 7
Safety precautions
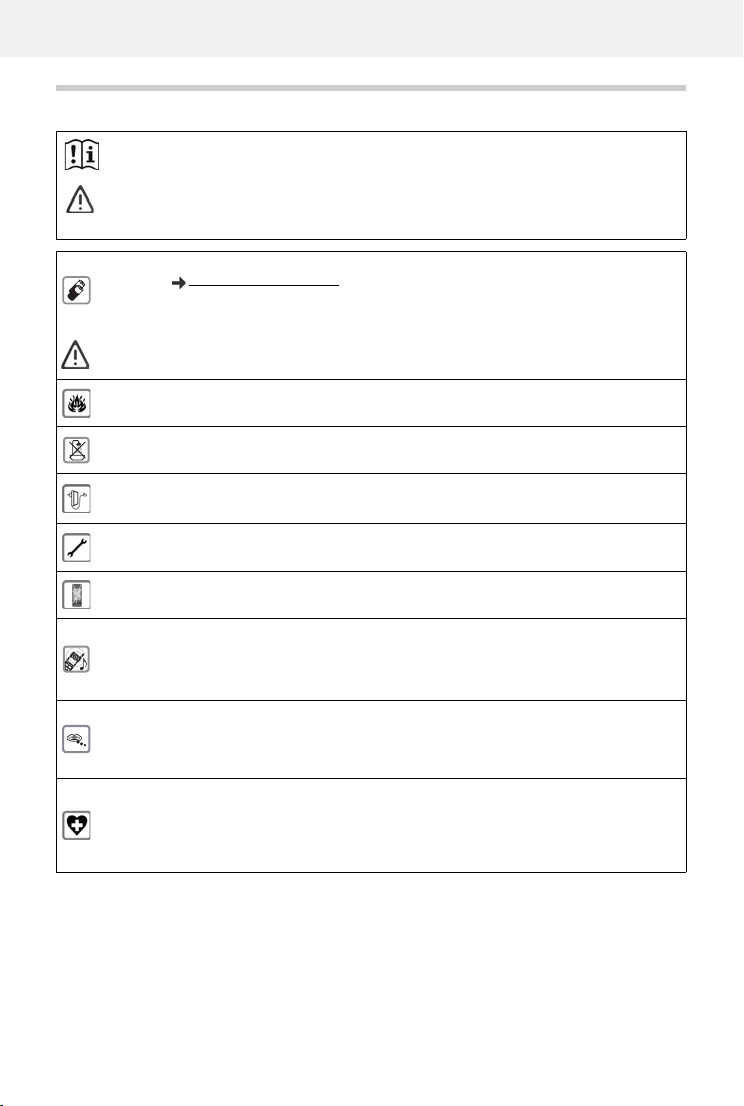
Read the safety precautions and the user guide before use.
The device cannot be used in the event of a power failure. It is also not possible to transmit emer-
gency calls.
Emergency numbers cannot be dialled if the keypad/display lock is activated!
Safety precautions
Use only rechargeable batteries that correspond to the specification (see list of permitted
batteries www.gigaset.com/service
other battery types as this could result in significant health risks and personal injur y. Rechargeable
batteries, which are noticeably damaged, must be replaced.
The handset must not be operated if the battery cover is open.
Ensure that the batteries can not be short-circuited by objects in the battery compartment.
Do not use the devices in environments with a potential explosion hazard (e.g., paint shops).
The devices are not splashproof. For this reason do not install them in a damp environment such
as bathrooms or shower rooms.
Use only the power adapter indicated on the device.
Whilst charging, the power socket must be easily accessible.
Remove faulty devices from use or have them repaired by our Service team, as these could interfere with other wireless services.
Do not use the device if the display is cracked or broken. Broken glass or plastic can cause injury
to hands and face. Send the device to our Service department to be repaired.
Do not hold the rear of the handset to your ear when it is ringing or when speaker mode is activated. Otherwise you risk serious and permanent damage to your hearing.
The phone may cause interference in analogue hearing aids (humming or whistling) or cause
them to overload. If you require assistance, please contact the hearing aid supplier.
Keep small cells and batteries, which can be swallowed, out of the reach of children.
Swallowing a battery can lead to burns, perforation of soft tissue and death. Severe burns can
occur within 2 hours of swallowing.
In the case of a swallowed cell or battery, seek medical care immediately.
Using your telephone may affect nearby medical equipment. Be aware of the technical conditions
in your particular environment, e.g., doctor's surgery.
If you use a medical device (e.g., a pacemaker), please contact the device manufacturer. They will
be able to advise you regarding the susceptibility of the device to external sources of high
frequency energy (for the specifications of your Gigaset product see "Technical data").
). Never use a conventional (non-rechargeable) battery or
7
Page 8
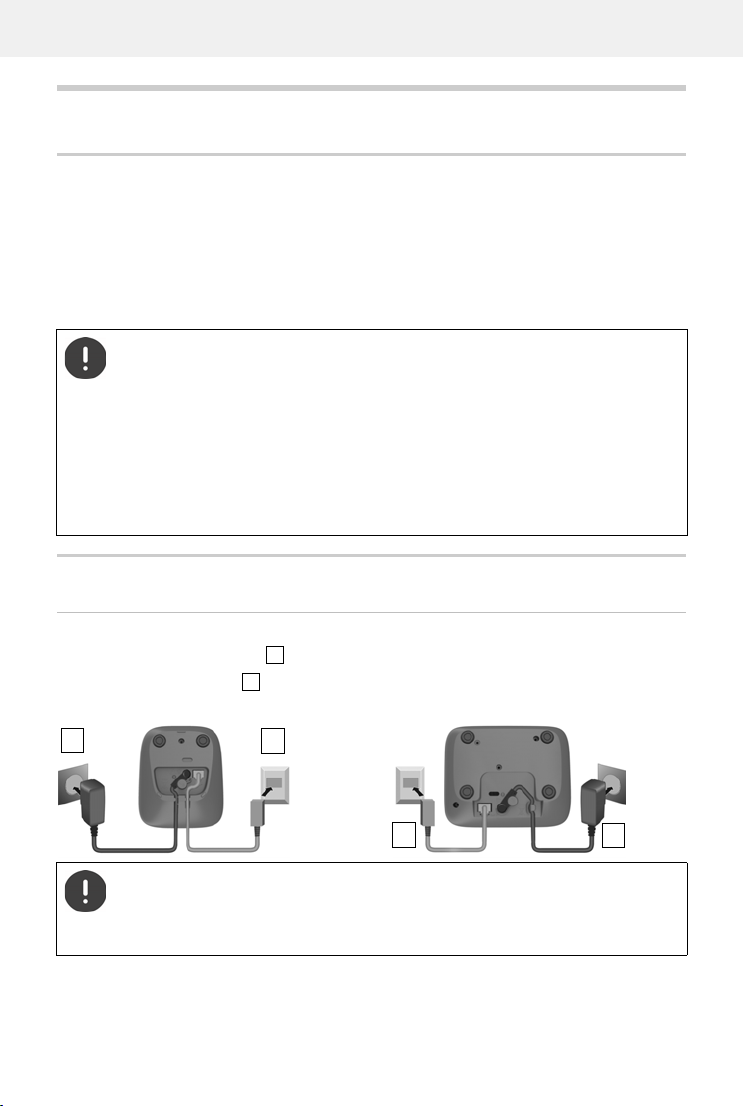
Getting started
1
2
Device without answer machine
2
1
Device with answer machine
2
1
Getting started
Package contents
• One base, one power adapter, one phone cable
• One handset, two batteries, one battery cover
• One user guide
Models with multiple handsets, per handset:
• One handset, one charging cradle with power adapter, two batteries and one battery cover
The base and charging cradle are designed for use in closed, dry rooms within a
temperature range of +5°C to +45°C.
Position the base on a level, non-slip surface at a central point in the flat or house. The
device's feet do not usually leave any marks on surfaces. However, due to the multitude of different varnishes and polishes used on furniture, contact marks on the
surfaces cannot be completely ruled out.
Never expose the telephone to heat sources, direct sunlight or other electrical devices.
Protect your telephone from moisture, dust, corrosive liquids and vapours.
This device is only suitable for a maximum installation height of 2 m.
Base
Connecting the base to power supply and telephone network
Connect the power adapter .
Connect the phone jack and insert the cables into the cable channels.
The power adapter must always be connected as the phone does not work without
a power supply.
The local answer machine (if available) is not ready until about 30 seconds after the
8
base has been connected.
Page 9
Getting started
1
2
Device without answer machine
1
Device with answer machine
1
2
2
(if included)
1
2
3
4
1
2
3
4
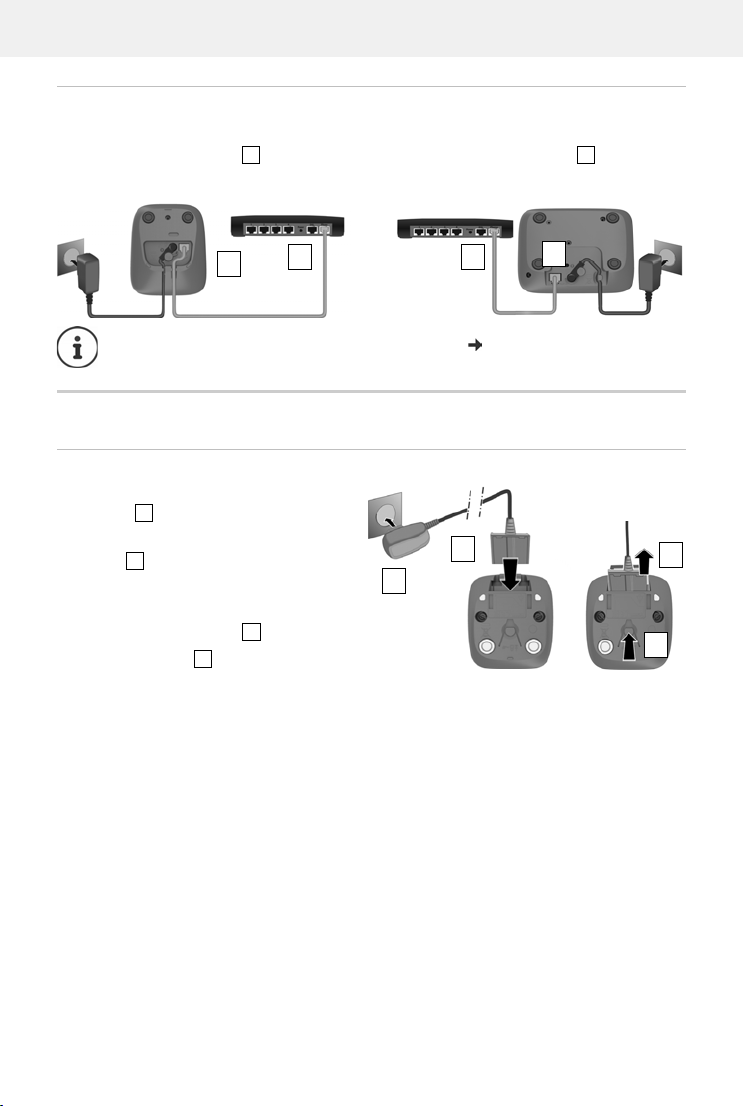
Connecting the base to the router
You can also operate the telephone on the analogue connection of a router.
Connect the phone jack and connect it to the analogue port of a router .
Any echoes can be reduced by enabling XES Mode ( p. 31).
Handset
Connect the charging cradle
Connect the flat plug of the power
adapter
Plug the power adapter into the
socket
To remove the plug from the charging cradle
again:
Press the release button .
Pull out the plug .
9
Page 10
Getting started
5h
Setting up the handset for use
The display is protected by a plastic film. Please remove the protective film.
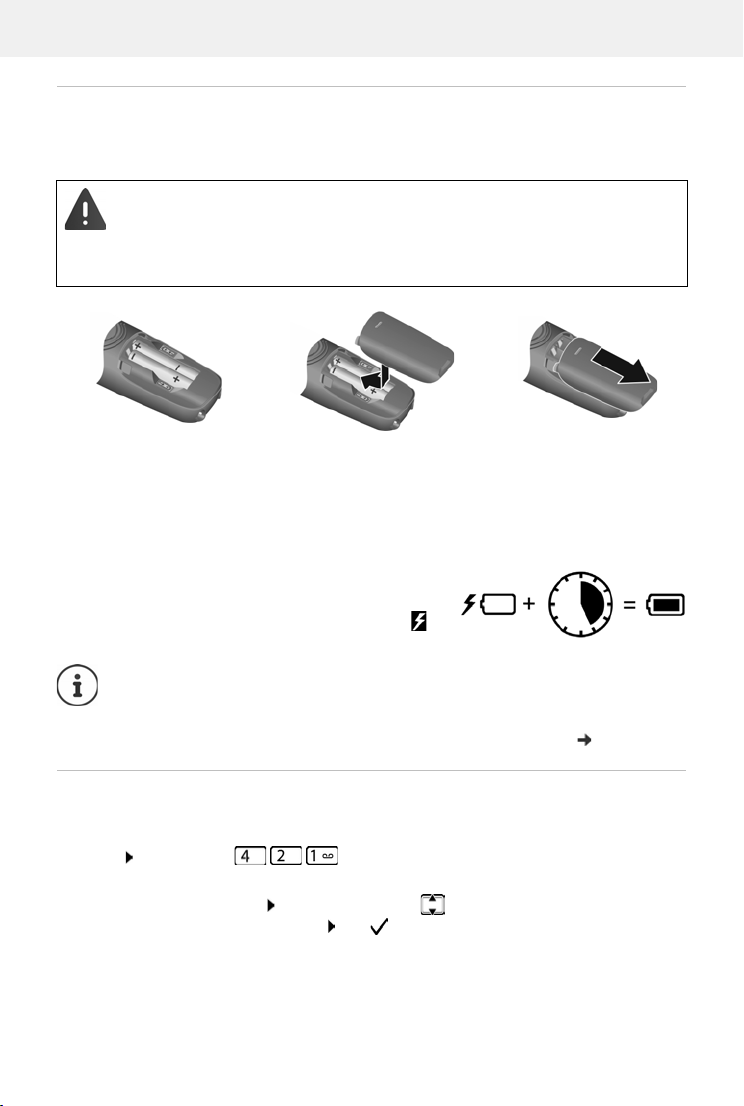
Inserting the batteries
Only use rechargeable batteries, as this could otherwise result in significant health
risks and personal injury. For example, the outer casing of the batteries could be
damaged beyond repair or the batteries could explode. The device could also
malfunction or be damaged as a result of using batteries that are not of the recommended type.
Insert the batteries with
the polarity in the right
direction (refer to the
picture for +/- positions).
Fit the battery cover from
the top.
Push the cover closed until
it clicks into place.
To re-open the battery cover:
Grip the notch on the
cover and slide it downwards.
Charging the batteries
Fully charge the batteries in the charging slot prior to
initial use.
The batteries are fully charged when the battery icon
disappears from the display.
Batteries can heat up during the charge process. This is not dangerous.
Over time, the charging capacity of the batteries will decrease for technical reasons.
Handsets contained in the package have already been registered to the base. If a
handset has not been registered however, please register it manually ( p. 30).
Changing the display language
You can change the display language, if the phone has been set to an incomprehensible
language.
Menu Press the keys slowly in succession . . . the language set
(e.g. English) is displayed
Select a different language: Press the control key until the language required is
selected on the display, e.g. Francais OK ( = selected)
10
Page 11

Getting started
Setting date and time
Set the date/time so that the correct date and time can be assigned to incoming calls and to
enable the alarm to be used.
Menu Settings OK Date/Time OK Enter the date (day, month and year)
in 6-digit format OK Enter the time (hours and minutes) in 4-digit format OK
(Display: Saved)
Moving the input position to the left or right:
Your phone is now ready for use.
Press the control key to the left/right
11
Page 12
Using the phone
Using the phone
Switch the handset on and off
Switching on:
Switching off:
If you place a deactivated handset into the charging slot, it will automatically activate itself.
Lock/unlock the keypad
The keypad lock prevents any accidental use of the phone.
Lock/unlock the keypad: Press and hol
Keypad lock enabled: The symbol is shown on the display
Control key
When the handset is switched off, press and hold the End call key
When the handset is in idle mode, press and hold the End call key
d
If a call is indicated on the handset, the keypad automatically unlocks and you can
accept the call. It then locks again when the call is finished.
It is also not possible to call emergency numbers when keypad lock is enabled.
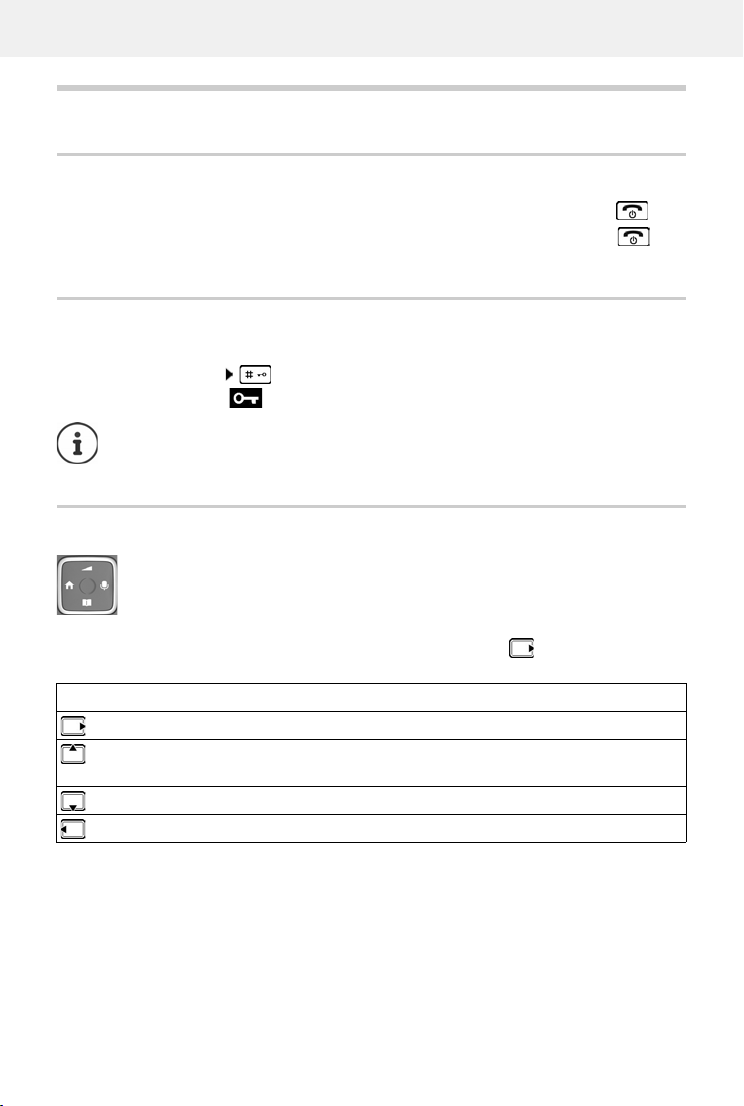
The control key enables you to navigate the menus and input fields, and also to call
up certain functions depending on the situation.
In the description below, the side of the control key is marked with an arrow (up, down, left,
right) that must be pressed in the different operating situations, e.g. for “press right on the
control key”.
In idle mode During a conversation
Open the menu Mute the microphone
Select audio settings Adjust the loudspeaker volume for receiver
Open the directory Open the directory
Make internal call / Open list of handsets Initiate an internal consultation call
12
and handsfree mode
Page 13
Using the phone
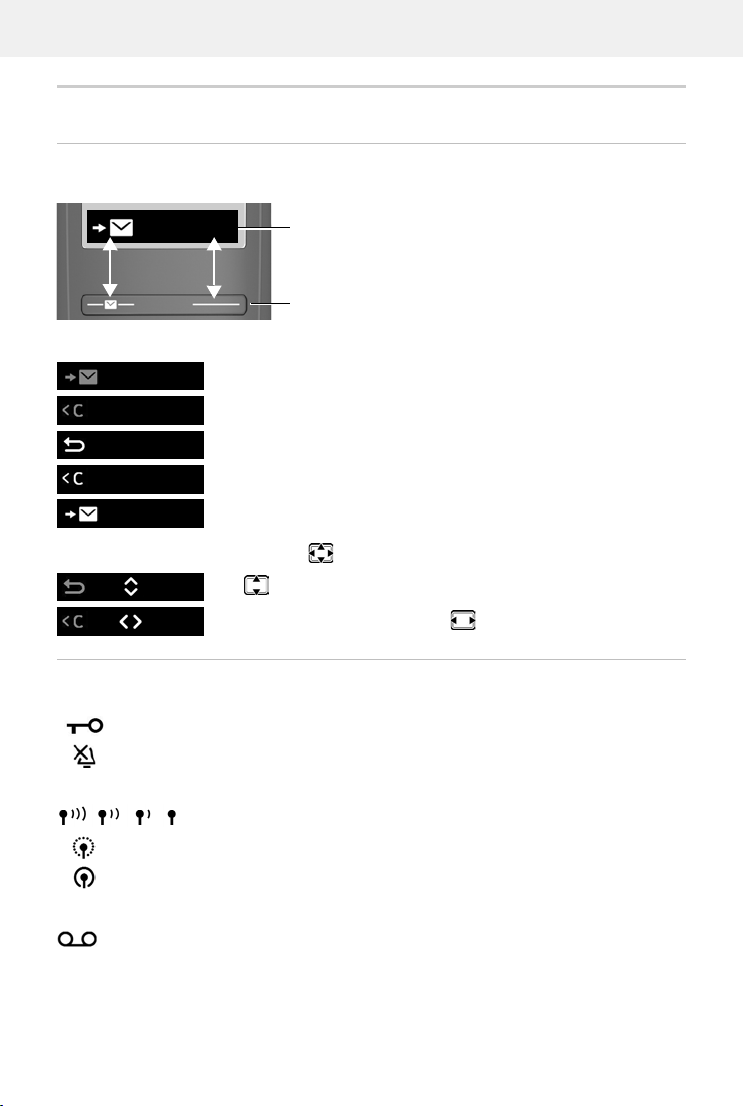
Display
Display keys
The display keys perform a range of functions depending on the operating situation.
Menu
Current display key functions
Display keys
Press the display key . . . Function shown in display above.
Open the main menu / submenu
Menu
Confirm menu function / save entry
OK
Back one menu level
Menu
Delete character by character to the left
OK
Access the call list / message list
Menu
Display functions accessed from the control key
Use
Menu
OK
Status bar
Icons display current settings and the status of the phone.
Radio contact between the base and handset
to scroll up/down and set the volume
Move the cursor left and right with
Keypad lock activated
Ringtone deactivated
Good to poor
No reception
ECO DECT mode No Radiation enabled
Answer machines
Local answer machine switched on (if available)
13
Page 14
Using the phone
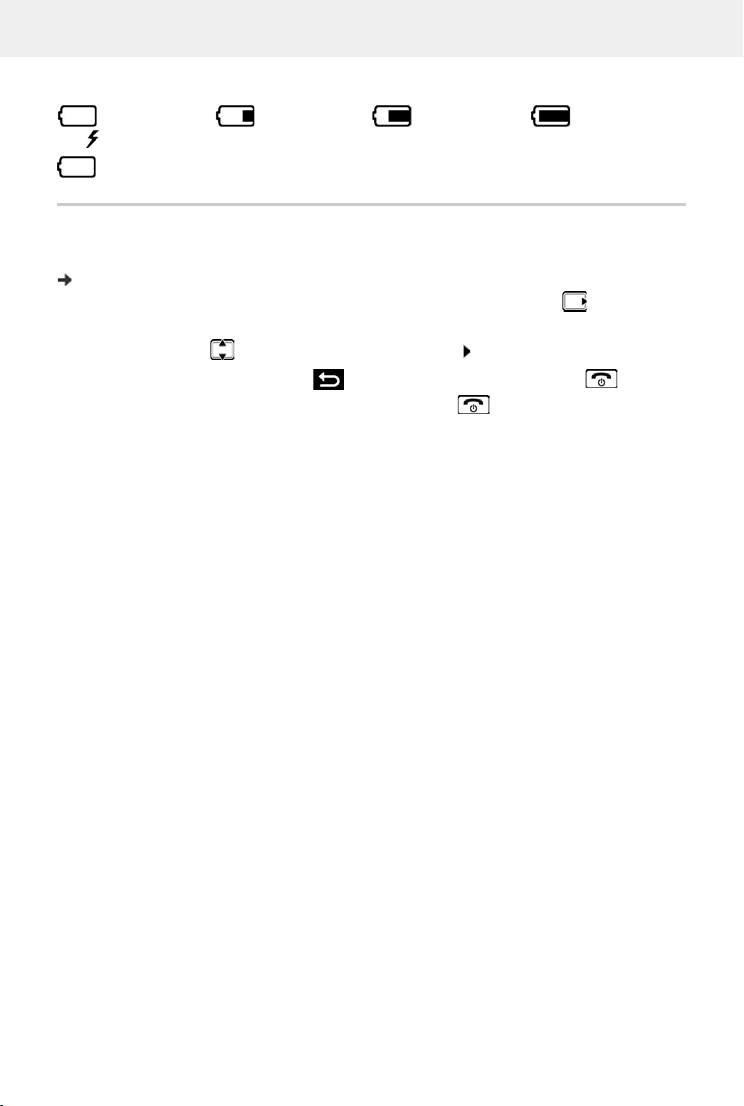
Battery charge level
0 - 10% 11 - 33% 34 - 66% > 66%
The symbol is shown at the front during the charge process.
Flashing Battery almost flat (less than 10 minutes of talk time)
Menu navigation
The functions of your phone are displayed in a menu comprising several levels. Menu overview:
p. 45
When the phone is in idle, press the Display key Menu or the control key (right) . . . the
menu opens
Use the control key to scroll to the function required Confirm with OK
Back one level:
Return to idle:
The display automatically returns to idle mode after two minutes of inactivity.
Press the key or briefly press the End call key
Press and hold the End call key
14
Page 15
Making calls
Making calls
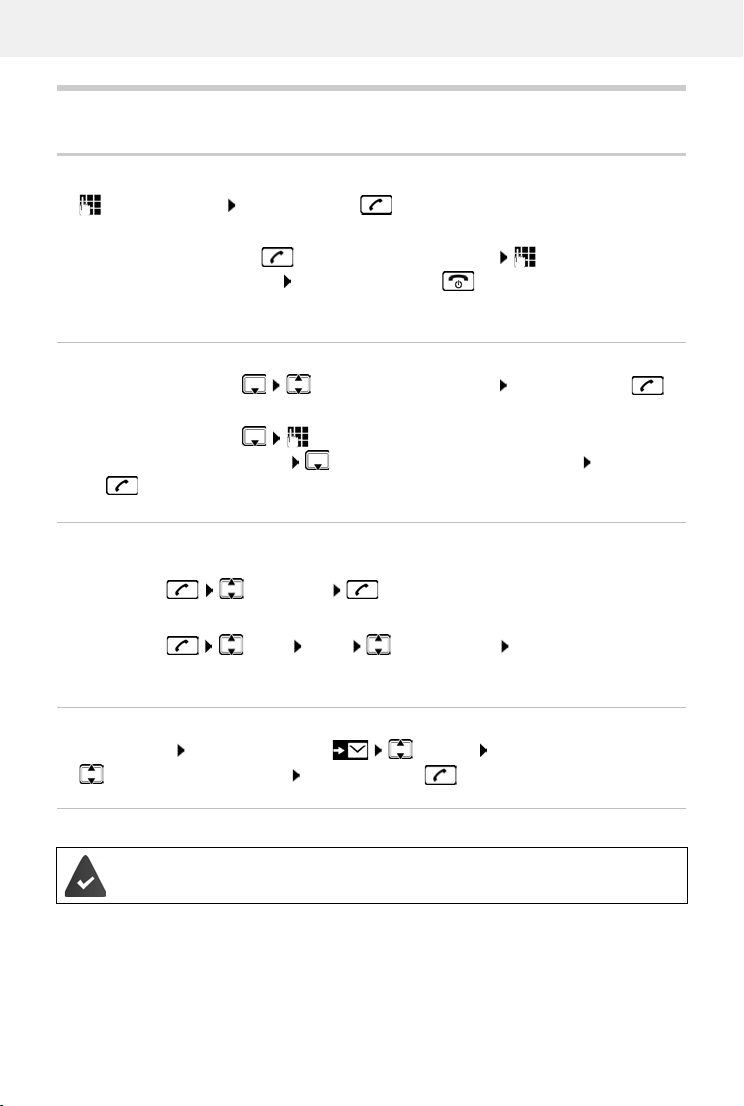
Making a call
Enter the number Press the Talk key . . . The number is dialled
or
Press and hold the Talk key . . . The dial tone can be heard Enter the number
Ending a call / cancelling dialling: Press the End call key
You can automatically prefix every number with a network provider prefix (Preselection).
Dialling from the directory
Open the directory with Scroll to the required entry Press the Talk key
or
Open the directory with Enter the first letter of the name . . . The first entry
matching the input is displayed Scroll as needed to the entry required Press the Talk
key
Dialling from the redial list
The list contains the 10 numbers last dialled with the handset.
Press briefly Select entry
Managing entries in the redial list
Press briefly Select Menu Select function OK
Possible functions: Use Number / Copy to Dir. / Delete Entry / Delete List
Dialling from the call list
Open the call list: Press the Display key CallsList OK
Scroll to the required entry Press the Talk key
Dialling with speed dial key
Entries from the directory are assigned to keys 2 to 9.
Press and hold the quick dial key to which the required number is assigned
15
Page 16
Making calls
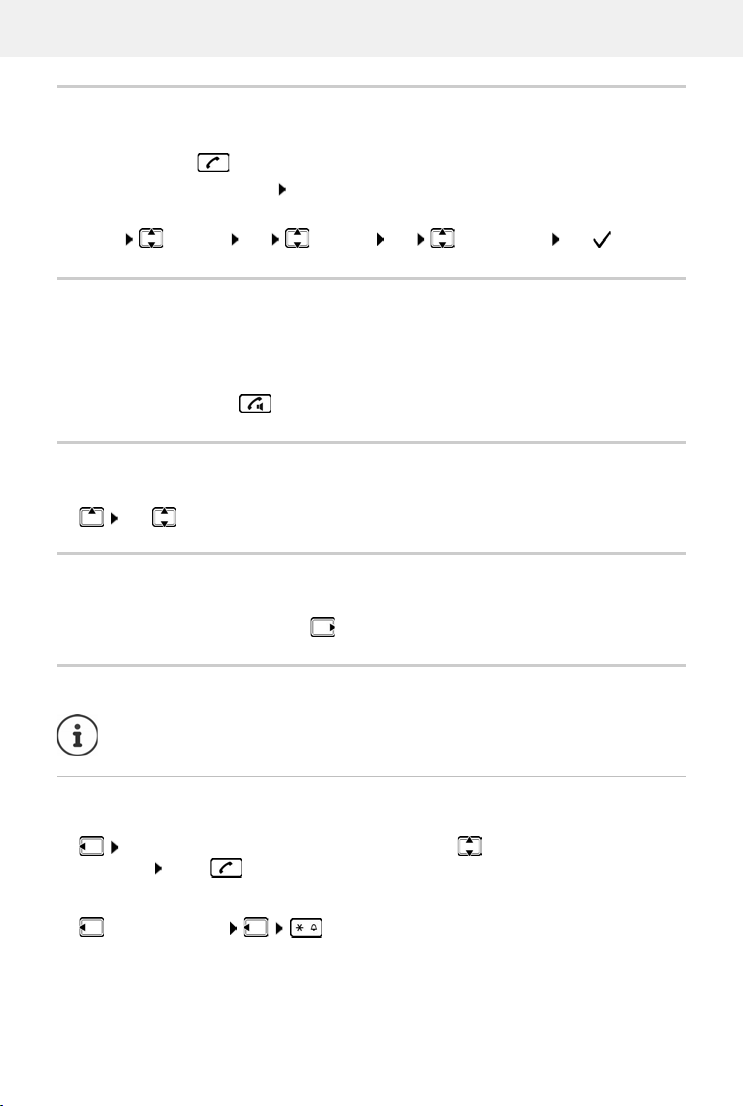
Accepting a call
The handset indicates an incoming call by ringing and by a display on the screen.
Press the Talk key
Func tion Au
Enabling function Auto Answer:
to Answer enabled: Simply take the handset out of the charging slot
Menu Settings OK Handset OK Auto Answer OK ( = enabled)
Handsfree mode
In handsfree mode, you switch on the loudspeaker so that you can hear the caller without
holding the handset to your ear.
Enabling/disabling handsfree mode during a call and when listening to the answer machine:
Press the handsfree key
Changing the receiver/speaker volume
To change the receiver/speaker volume during a call:
Use to set the volume
Muting
When the microphone is switched off, the people you are talking to can no longer hear you.
During a call, press the control key (right) . . . The handset microphone is switched off
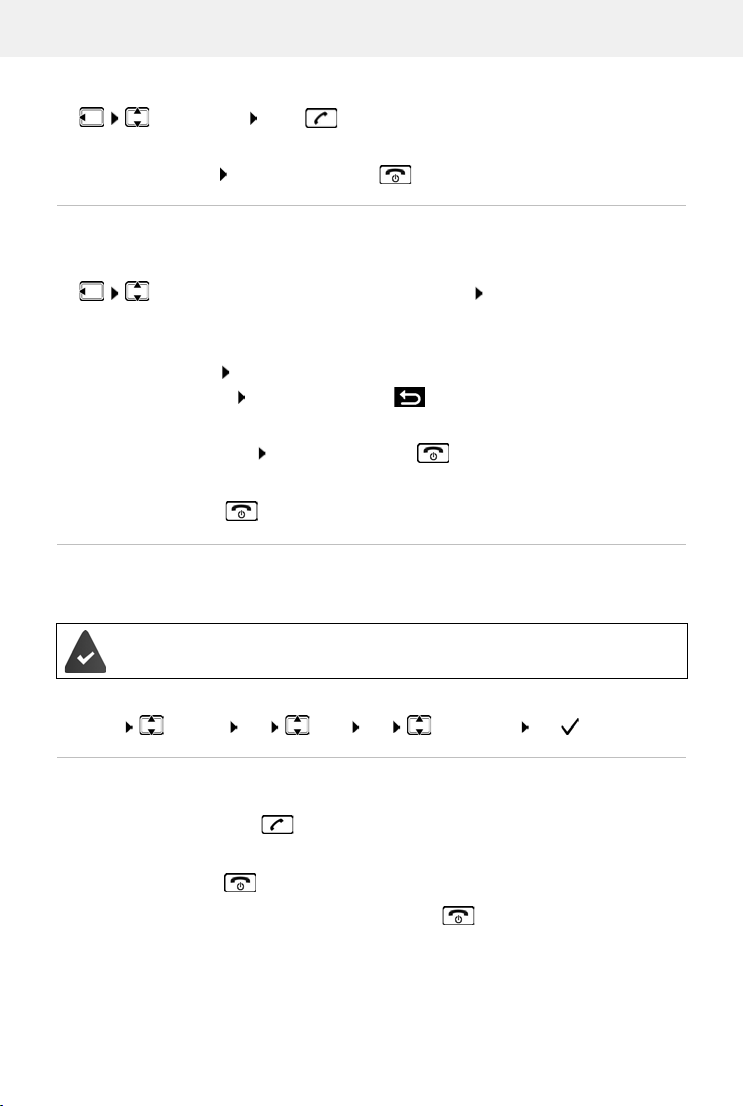
Making internal calls
Internal calls are free calls to other handsets registered to the same base.
Making internal calls
Calling a specific internal subscriber:
when more than two handsets are registered: Use to select the internal
subscriber OK or . . . The handset selected is called
Calling all handsets ("group call"):
Press and hold or
16
Page 17
Making calls
or
Calling all HS OK or . . . All registered handsets are called. You speak to
the first internal subscriber to pick up.
Ending the internal call: Press the End call key .
Making an internal consultation call / Forwarding a call
Call an external subscriber and transfer the call to an internal subscriber or hold a consultation
call with him or her.
Select as required the handset or Calling all HS OK . . . The internal
subscriber(s) is/are called, the external subscriber hears music on hold
Possible options:
Hold a consultation call: Speak to the internal subscriber
Return to the external call: Press the Display key
Transfer the external call when the internal subscriber has answered:
Announce an external call Press the End call key
Transfer the external call before the internal subscriber answers:
Press the End call key . . . The external call is forwarded immediately
Listening in to an external call
You are holding an external call. An internal subscriber can listen in to this call and take part in
the conversation (conference).
The Listening in function is enabled.
Enabling/disabling internal listening in
Menu Settings OK Base OK Listening in OK ( = enabled)
Initiating an internal conference call
You want to join an existing external call on a different handset.
Press and hold the Talk key . . . All subscribers hear a signal tone
Ending a conference call:
Press the End call key . . . All subscribers hear a signal tone
When the first internal subscriber presses the End call key , the handset which joined the
conference call remains connected to the external subscriber.
17
Page 18
Making calls
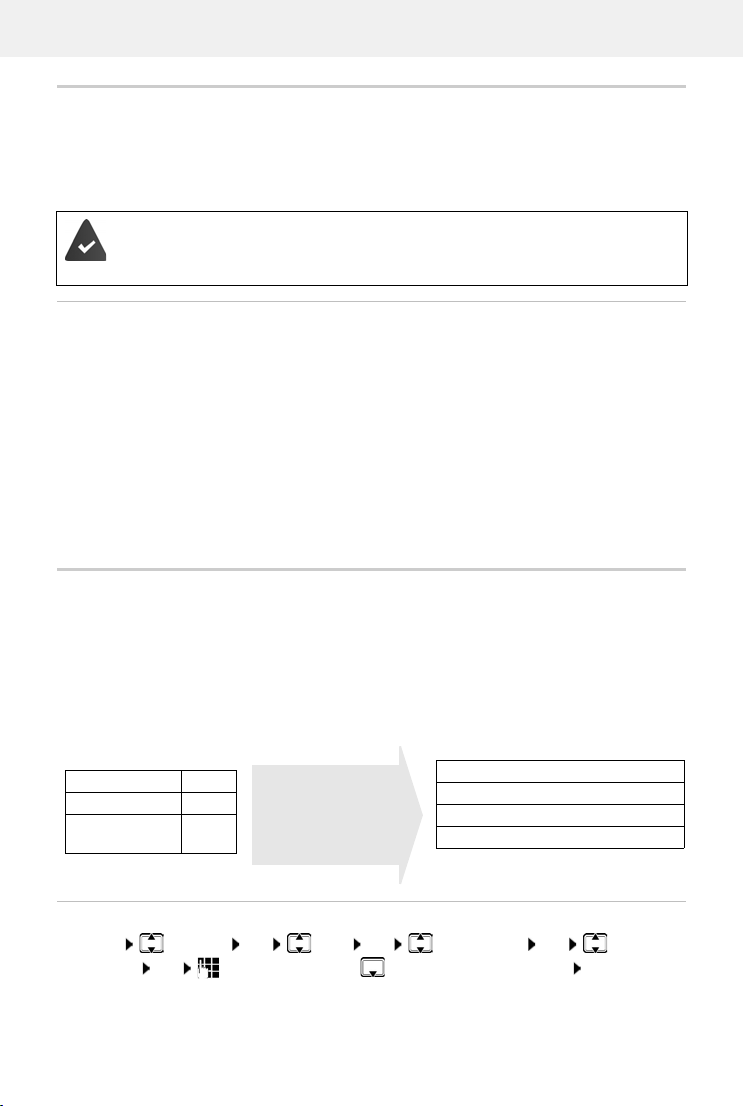
Example:
Presel. Number 0999
With Preselect 08
Without Presel. 081
084
Number Selected number
07112345
07112345
08912345
0999 08912345
08412345
08412345
All numbers beginning
with 08, with the exception of 081 and 084, are
dialled using preselection number 0999.
Calling Line Identification
During a call, the caller's number is transferred (CLI = Calling Line Identification) and can be
displayed on the recipient's display (CLIP = CLI Presentation). When the caller's number is withheld, it is not show on the called party’s display. T
tion).
You have authorised your network provider to show the number of the caller (CLIP)
on your display.
The caller has authorised the network provider to send the phone number (CLI).
he cal l is ma de a non ymo usl y (C LIR = CL I Re st ric -
Caller display for incoming calls
Calling Line Identification
The caller's phone number is displayed. If the caller's number is saved in the directory, the name
is displayed.
No Calling Line Identification
Instead of name and number, the following is displayed:
• External Call: No number is transferred.
• Withheld: Caller has withheld Calling Line Identification.
• Unavailable: Caller has not authorised Calling Line Identification.
Automatic network provider selection (preselection)
You can store a Call-by-Call number (preselection number), which automatically prefixes the
number you dial. If you want to make calls abroad through a particular network provider for
example, you can store its prefix here.
In the W
ith Presele ct list, enter the (initial digits of the) prefix numbers for which you want to use
the preselection number.
In the W
ithout Presel. list, enter the exceptions to the With Preselect list.
Entering a preselection number
Menu Settings OK Base OK Preselection OK Presel.
Number OK Enter the number or use number from directory OK
18
Page 19
Call/message lists
97
975 SET: [0
]
975 SET: [1
]
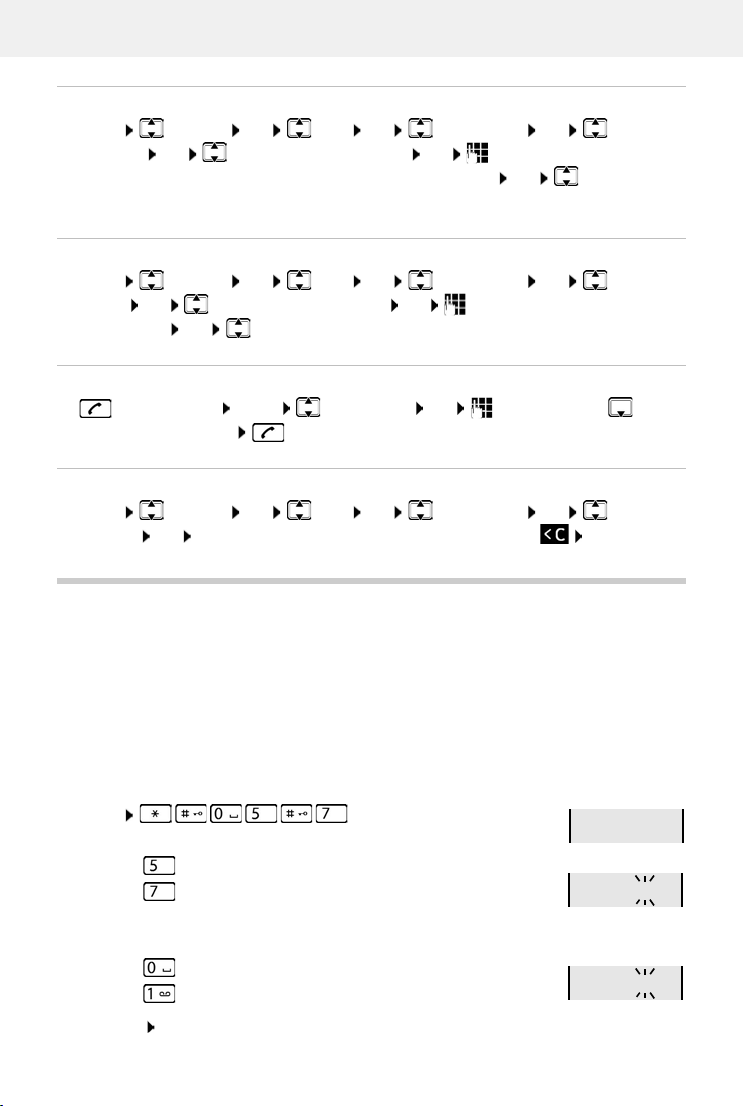
Create list of prefix numbers with preselection
Menu Settings OK Base OK Preselection OK With
Preselect OK Select the list entry (1 – 11) OK Enter (the initial digits of) the
prefix number for which the preselection number is to be used OK Select different
list entry as required and enter more numbers
Create list of prefix numbers without preselection
Menu Settings OK Base OK Preselection OK Without
Presel. OK Selec t the list entry (1 – 11) OK Enter the exceptions for the With
Preselect list OK Select another list entry as required and enter more numbers
Cancelling preselection for current call
Press and hold Menu Preselect off OK Enter number or take
number from directory . . . The number is selected without preselection.
Disabling preselection permanently
Menu Settings OK Base OK Preselection OK Presel.
Number OK Clear the preselection number with the Display key OK
Call/message lists
The phone saves information about various events in lists:
• Call list: Numbers of all incoming and missed calls
• Answer machine list: Messages on the local answer machine (if available)
• Network mailbox list: Messages on the network mailbox
An advisory tone sounds as soon as a new en
message key (on the left Display key) flashing and New messages being shown on the display.
Disabling the display of new messages
Menu
Select the type of message:
Press key for missed calls
Press key for messages on the local answer machine
(if available)/network mailbox
Setting the actions for new messages:
Press key The presence of new messages is displayed (default).
Press key The presence of new messages is not displayed.
Save setting: OK
try appears on one of the lists. The default is the
19
Page 20
Call/message lists
CallsList 01+02
A change to the setting only becomes effective once the next new message is
received.
If calls are stored in the network mailbox, you receive a message when the setting is
configured (dependent on the network provider).
Call list
Prerequisite: CLIP
Depending on the type of list set, all numbers for the last 25 incoming calls are saved, or only the
missed calls are saved.
Setting the list type
Menu Settings OK Base OK Call list t ype OK Missed Calls / All
Calls OK ( = selected)
Opening the call list
Press the Display key . . . The list selection is opened CallsList
The entry shows: number of new entries + number of old, read
entries
Open list: OK . . . The last incoming call is displayed
Use to scroll through the list
Using other functions
Select entry Menu Use to select the function:
Delete Entry Delete current entry
Copy to Dir. Copy an entry to the directory
Copy to Blacklist Copy a number to the black list
Date/Time Show date and time of the call (if set)
Status New Call: New missed call. Old Call: Entry already read
Delete List Delete all entries
Note: All old and new entries are deleted
Message list
You can listen to messages on the answering machine (if available) or the network mailbox. from
the answering machine list / network mailbox list.
Open the answer machine list:
Press the Display key . . . The list selection is opened Answer M. OK
Open the network mailbox list:
Press the Display key . . . The list selection is opened Net. MBX OK
20
Page 21
Directory
Directory
The local directory is unique to a handset. Entries can be sent to other handsets however
( p. 22).
Up to 100 phone numbers (max. 22 digits) with associated names (max. 16 characters)
ca
n be stored.
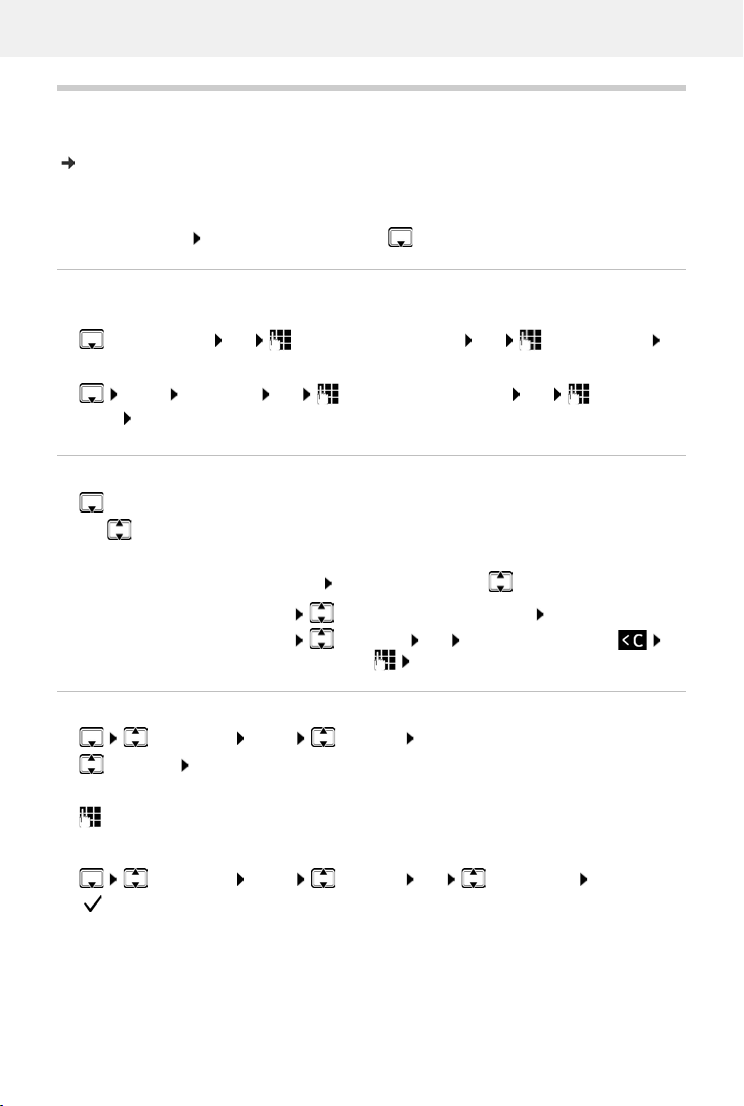
Open the directory: Press down the control key
Creating a directory entry
First entry:
. . . New Entry? OK Enter the phone number OK Enter the name OK
More numbers:
Menu New Entry OK Enter the phone number OK Enter the
name OK
Selecting/editing the directory entry
Open the directory
Use to scroll to the entry until the required name is selected
or
Enter the first character of the name Scroll as required with to the entry
Display entry:
Change entry:
Menu Show Number / Show Name OK
Menu Edit Entry OK Delete characters with
change entry with OK
Assigning quick-dial keys
Select entry Menu Shortcut OK
Select key OK
or
Press the key for which the entry is to be saved
Clearing a key assignment:
Select entry Menu Shortcut OK No Shortcut OK
( = selected)
21
Page 22
Directory
Deleting a directory (entry)
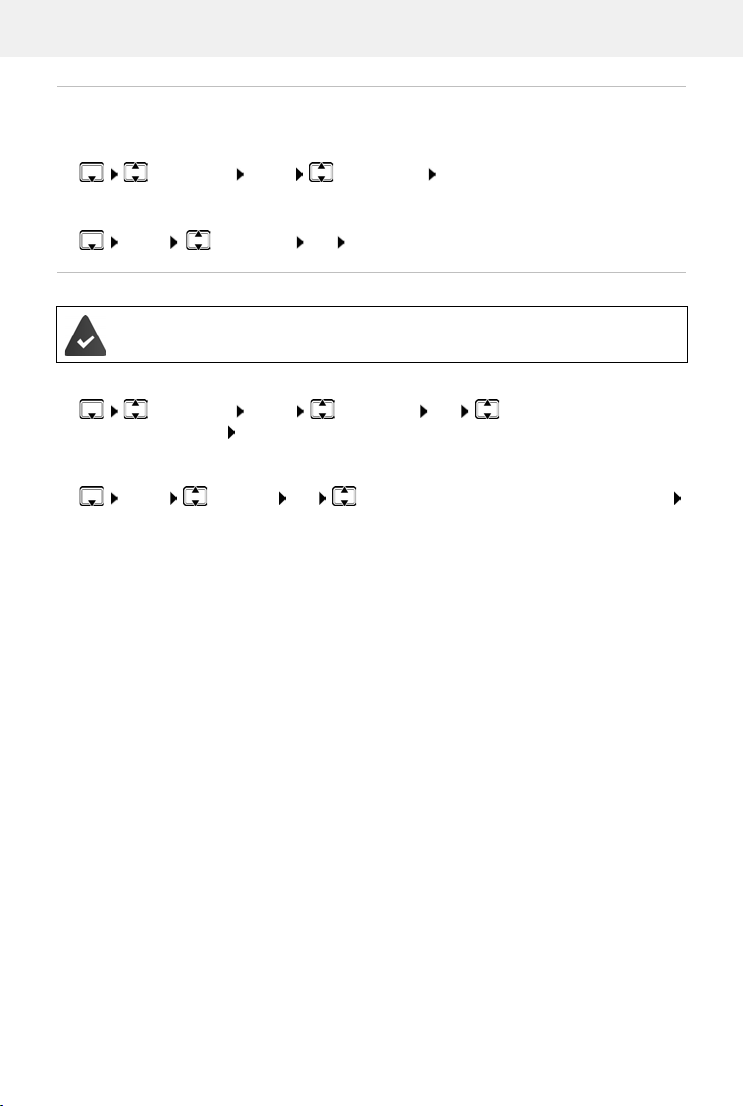
Deleting a directory entry
Select entry Menu Delete Entry OK
Deleting a directory
Menu Delete List OK Confirm deletion with OK
Transferring a directory (entry) to another handset
The sending and receiving handsets must both be registered with the same base.
The other handset and the base are able to send and receive directory entries.
Transferring a directory entry to another handset
Select entry Menu Send Entry OK Select internal number of
the recipient handset OK
Transferring a directory to another handset
Menu Send List OK Select internal number of the recipient handset
OK
22
Page 23
Local answer machine (if available)
Local answer machine (if available)
Either the handset or the keys on the base are used to personalise settings on and operate the
answering machine. The following sections describe operation from the handset. Operation
from the keys on the base Overview – Base.
Setting up the answer machine
The default setting is answer machine already set up. You can change this.
Recording your own announcements
You can record your own announcements using the handset. The pre-recorded announcement
is used if no personal announcement is available.
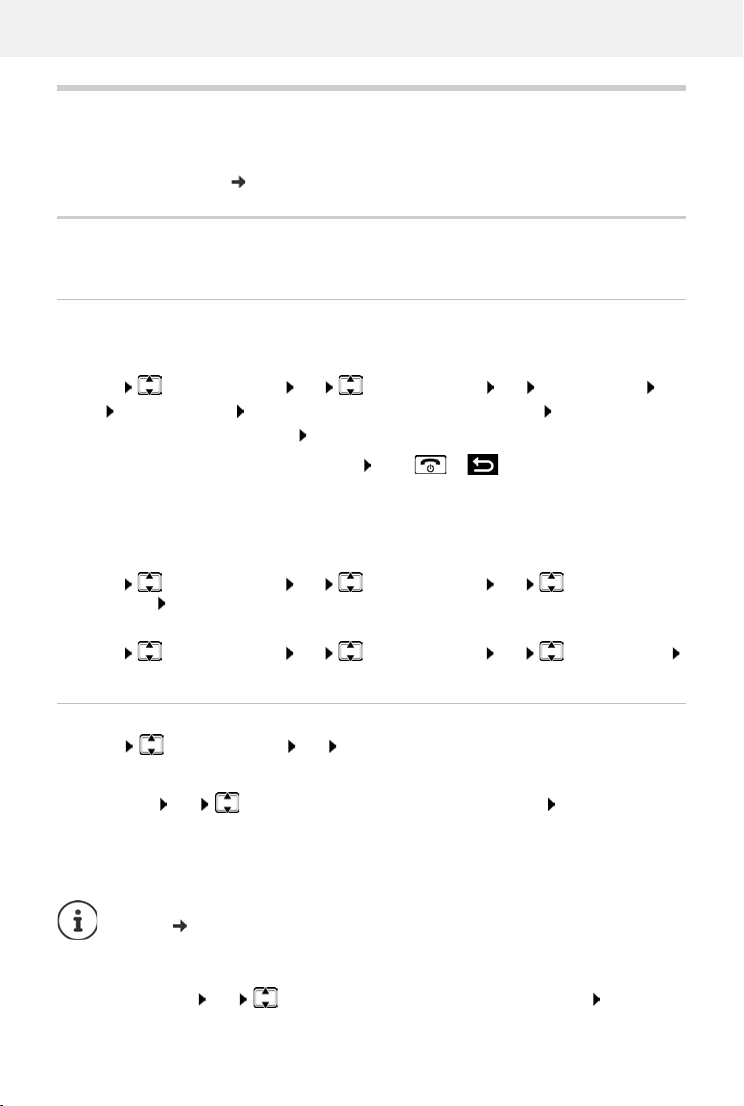
Menu Answer Machine OK Announcements OK Rec announce.
OK Start recording? OK . . . You hear the ready tone (short tone) Record the
announcement (min. 3 seconds)
Cancelling and discarding an announcement:
After the recording, the announcement is played back for you to check.
Recording ends automatically when the max. recording time of 170 seconds is reached or there
is
a pause in speaking of longer than 2 seconds.
Play back the announcement:
Menu Answer Machine OK Announcements OK Play
announce.
Delete announcement:
OK
Menu Answer Machine OK Announcements OK Del announce.
OK
Confirm with OK
Press or
Changing settings
Menu Answer Machine OK Select the setting you want to change
Time to Auto Answer:
Ring Delay OK Immediately / 10 sec / 18 sec / 30 sec / Auto OK
Auto: the answer machine answers a call:
• after 18 seconds if there are no new messages.
• after 10 seconds if there are new messages.
Select Auto when you want to retrieve messages while you are out. So for remote
access ( p. 26), it is clear after 10 seconds that there are no new messages. No call
costs are incurred if the call is ended immediately.
Recording time:
Message Length OK Maximum / 1 Minute / 2 Minutes / 3 Minutes OK
23
Page 24
Local answer machine (if available)
Answer M. 01+02
Listening in during recording:
Call Screening OK Handset / Base OK ( = enabled)
Disable listening in for the current recording:
Press the End call key .
Setting a different language (if available)
You can change the voice prompt language and language of the standard announcement.
Menu Answer Machine OK Language OK Select the
language OK
Operation using the handset
Enabling/disabling an answer machine
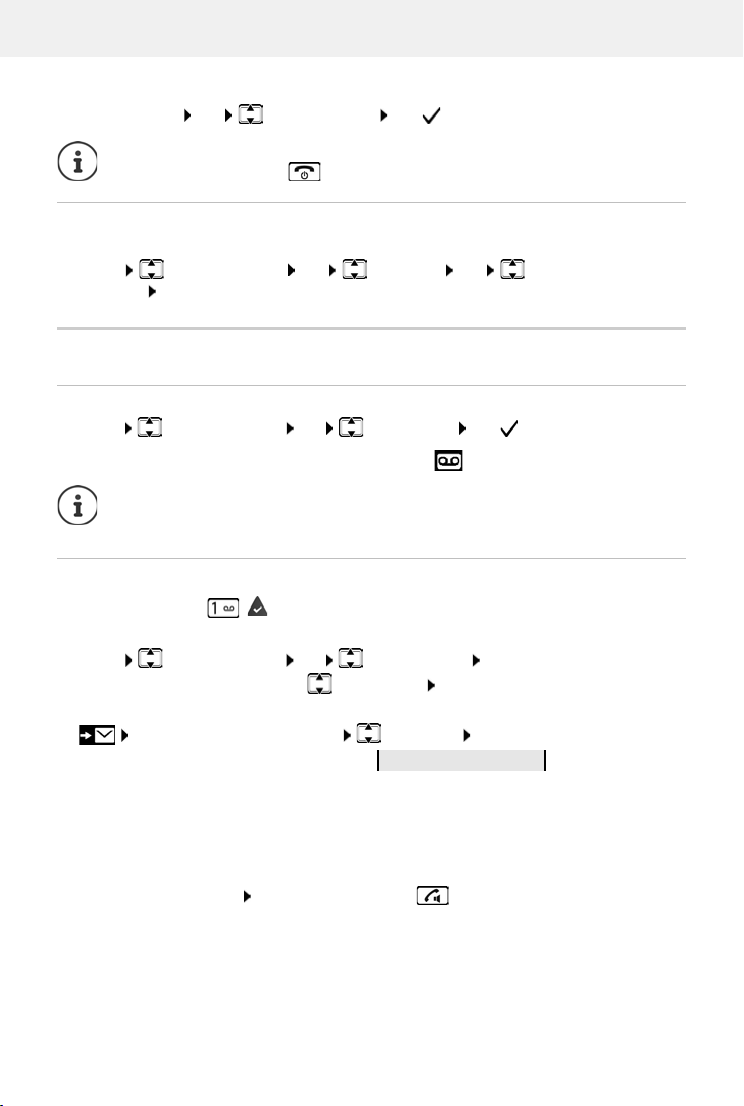
Menu Answer Machine OK Answ. Mach. OK ( = enabled)
If the answer machine is enabled, the display shows icon .
If the memory is full, the display shows
switches off automatically. Delete old messages so that it switches on again automatically.
Memory full!
and the answer machine
Playing back messages
Press and hold key ( key 1 is assigned to the answer machine)
or
Menu Answer Machine OK Play Messages OK
If the network mailbox is enabled: Answ. Mach.
or
OK
. . . The list selection is opened Answer M. OK
The answer machine list is shown as follows:
Number of new messages + number of old entries which have already been played back
If there are new messages, playback starts with the first new message
old message. First an info block is played, then the content. The display shows the caller's
number or the caller's name.
The handset loudspeaker switches on aut
Switch off the loudspeaker:
Press the handsfree key
omatically.
, otherwise with the first
24
Page 25
Local answer machine (if available)
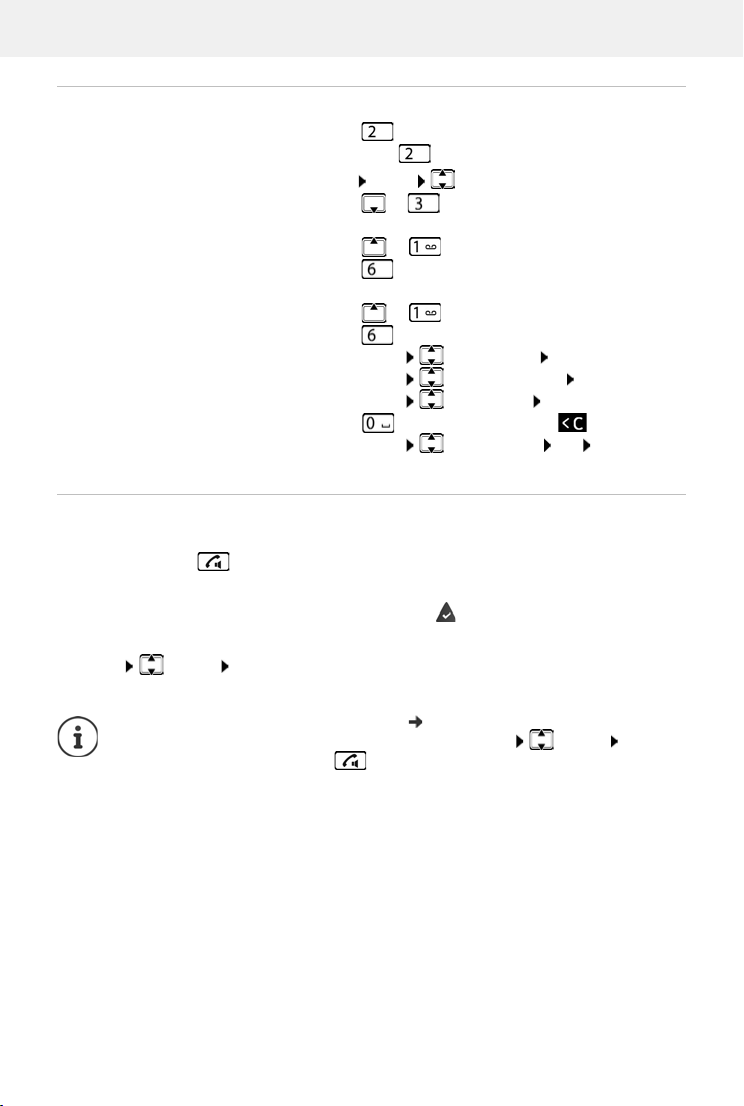
Actions during playback
Stop playback:
Continue playback: Press again
Menu Continue
or
Go to the next message:
During playback of the info block
Go to the start of the previous message:
Skip the information block:
During playback of the content
Go to the start of the current message:
Go to the content of the next message:
Call back a caller: Menu Dial Number OK
Change volume:
Copy a number to the directory:
Delete a single message:
Delete all old messages:
or
or
or
Menu Handset Volume OK
Menu Copy to Dir. OK
or press the Display key
Menu Delete all old OK Confirm the
prompt
Picking up a call from the answer machine
Even if the answer machine has already answered or is recording a call, you can still take it:
Press the Talk key
or
Remove the handset from the base / charging cradle ( Ring Delay is enabled)
or
Menu Accept OK
Recording stops and you can speak to the caller.
If Call Screening via the handset is enabled ( p. 23) and the call can already be heard
through the handset, you can only take the call with Menu
Pressing the Talk/handsfree key only enables and disables handsfree mode.
Accept OK.
25
Page 26
Local answer machine (if available)
Operation when on the move (remote operation)
You can check and enable your answer machine from any other phone (hotel, pay phone, etc.).
The system PIN is not 0000.
T
he other phone has tone dialling (DTMF).
Enabling the answer machine
Call the telephone connection and let it ring until the announcement Please enter your PIN
(approx. 50 seconds). . . . Use to enter the phone's system PIN within 10 seconds . . . The
answer machine is enabled, the remaining memory is announced and messages are played
back
The answer machine cannot be disabled remotely.
Checking an answer machine
The answer machine is enabled.
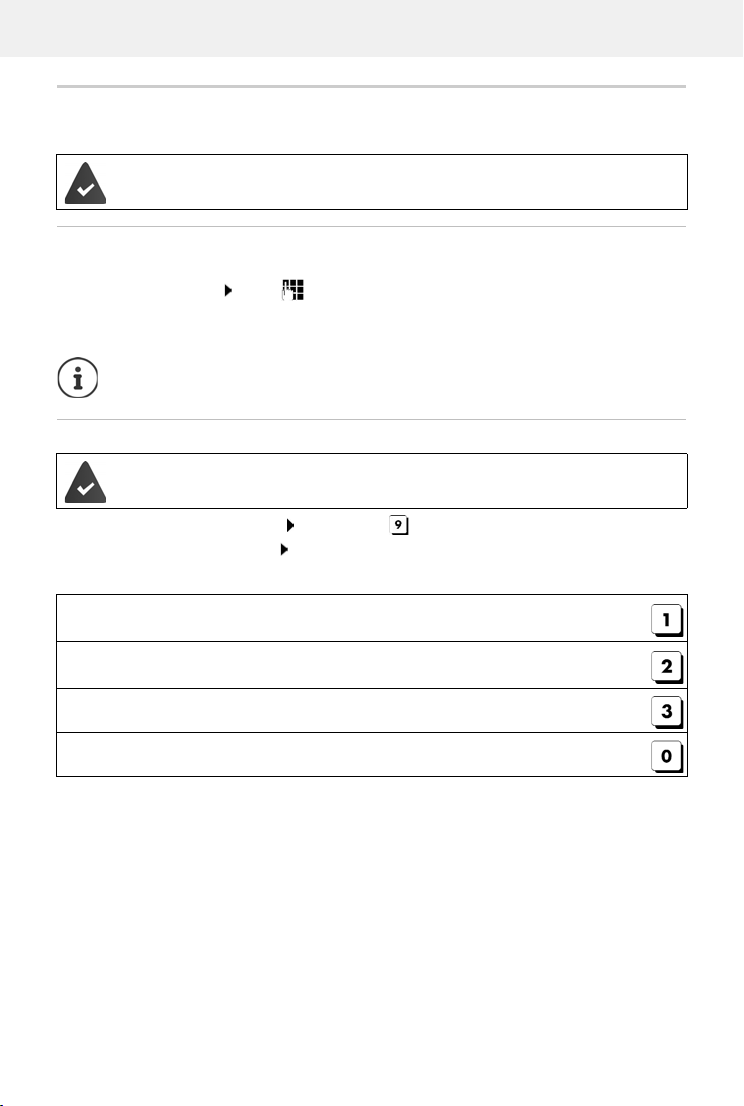
Call the telephone connection . . . press key during the announcement . . . the
announcement is interrupted
The answer machine is operated using the following keys:
During playback of the info block: Skip to previous message.
During message playback: Go to the start of the current message.
Pause playback. Press again to resume.
After a pause of approx. 60 seconds, the connection is ended.
Go to the next message.
enter the system PIN
During message playback: Delete current message.
26
Page 27
Network mailbox
Network mailbox
The network mailbox is registered with the network provider.
Entering a number
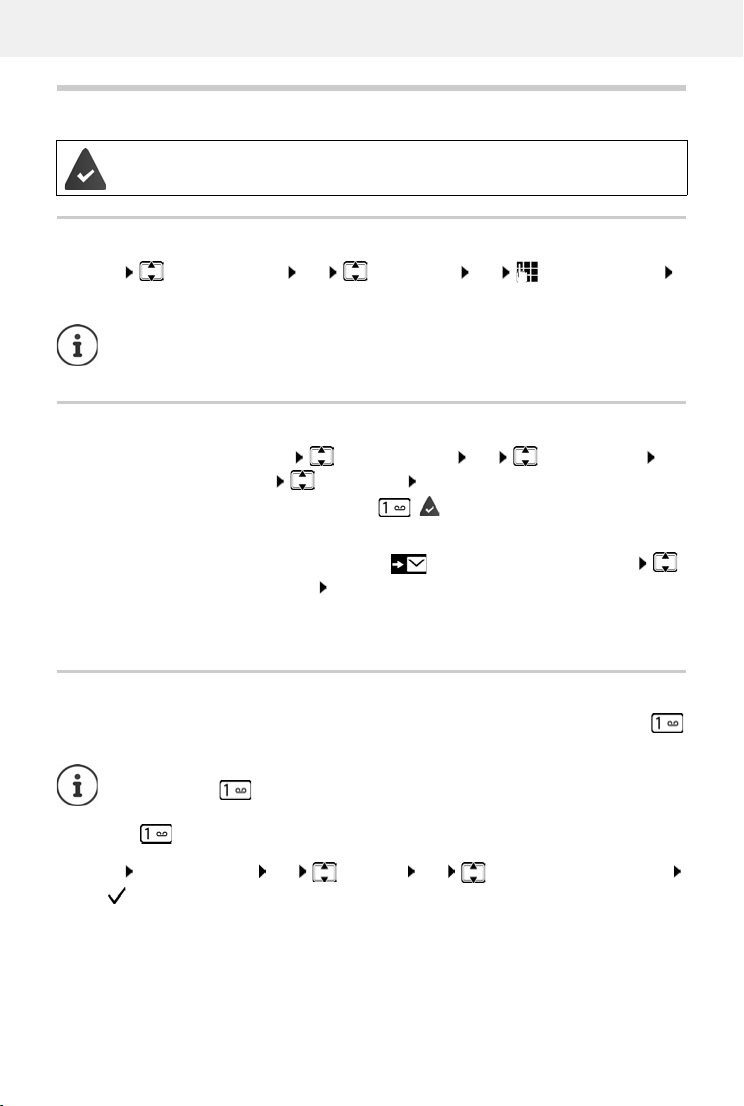
Menu Answer Machine OK Net Mailbox OK Enter the number
OK . . . The network mailbox is enabled
To enable and disable the network mailbox, use the number and a function code from
your network provider. Contact the network provider if you require any further information.
Playing messages
From the menu:
Using key 1:
Menu Answer Machine OK Play Messages
OK Net Mailbox OK
Press and hold key ( key 1 is assigned to the network
mailbox)
From the message list:
. . . The network mailbox is called and the voice menu of the network operator is used for subsequent use
Press the Display key . . . The list selection is opened
Net. MBX OK
Assigning key 1
When you use a local and a network mailb ox, you can specify which one is opened with the
key.
Settings for quick access are handset-specific. A different answer machine can be
assigned to key on every handset registered.
Device without network mailbox: the network mailbox is automatically linked to
key .
Menu Answer Machine OK Set Key 1 OK Answ. Mach. / Net Mailbox
OK ( = selected)
27
Page 28
Additional functions
Additional functions
Alarm clock
Date and time have been set.
Turning the alarm clock on and off
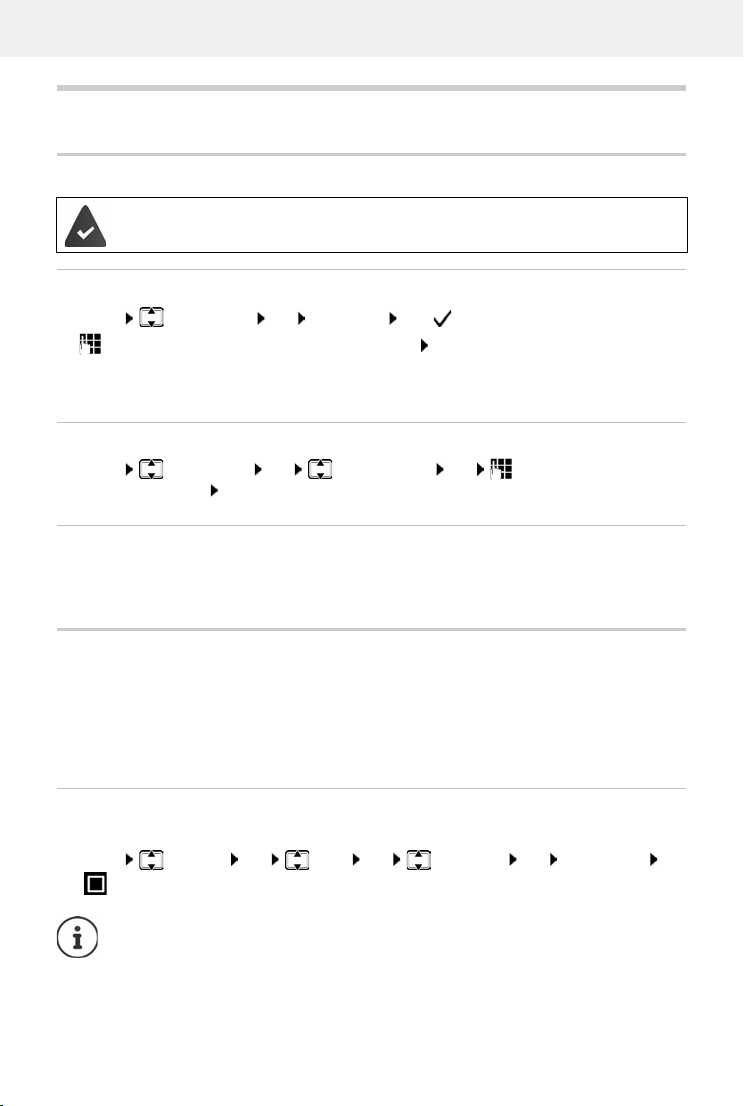
Menu Alarm Clock OK Activation OK ( = turned on)
Enter the wake-up time in minutes and second OK
Alarm clock turned on: Instead of the date, the display shows the wake-up time and left of it the
alarm clock symbol.
Setting/changing the wake-up time
Menu Alarm Clock OK Wake -upTime OK Enter the wake-up time in
hours and minutes OK
Turning off the wake-up call
A wake-up call is shown on the display and indicated by the ringtone melody selected.
Press any key . . . The alarm call is turned off for 24 hours
ECO DECT
The device range is set to maximum by default. This guarantees the best connection between
handset and base. In idle mode, the handset does not transmit (it is radiation-free). Only the base
maintains contact with the handset, using weak wireless signals. During a call, the transmit
power automatically adapts to the distance between base and handset. The shorter the distance
to the base, the lower the radiation.
Reducing radiation by up to 80%
Enabling/disabling the maximum range:
Menu Settings OK Base OK ECO DECT OK Max. Range OK
= range and radiation reduced)
(
It is not possible to use a repeater to increase the range.
28
Page 29
Additional functions
Disabling radiation in idle mode
The wireless signals of the base are also disabled with the No Radiation setting.
Menu Settings OK Base OK ECO DECT OK No Radiation
= Radiation disabled)
OK (
All handsets registered must support this feature.
For speedy set-up of connections for incoming calls, the handset keeps switching to
“ready to receive” momentarily. This increases the power consumption and so
reduces the standby and talk times.
When No Radiation is enabled, there is no range display / range alarm on the
handset. Contactability can be tested by attempting to establish a connection.
Press and hold the Talk key . . . the ringing tone sounds.
Protection from undesired calls
Black list
You can enter up to 32 numbers in a black list. When the black list is enabled, calls from black list
numbers are not signalled acoustically. These settings apply to all registered handsets.
Enabling/disabling the black list
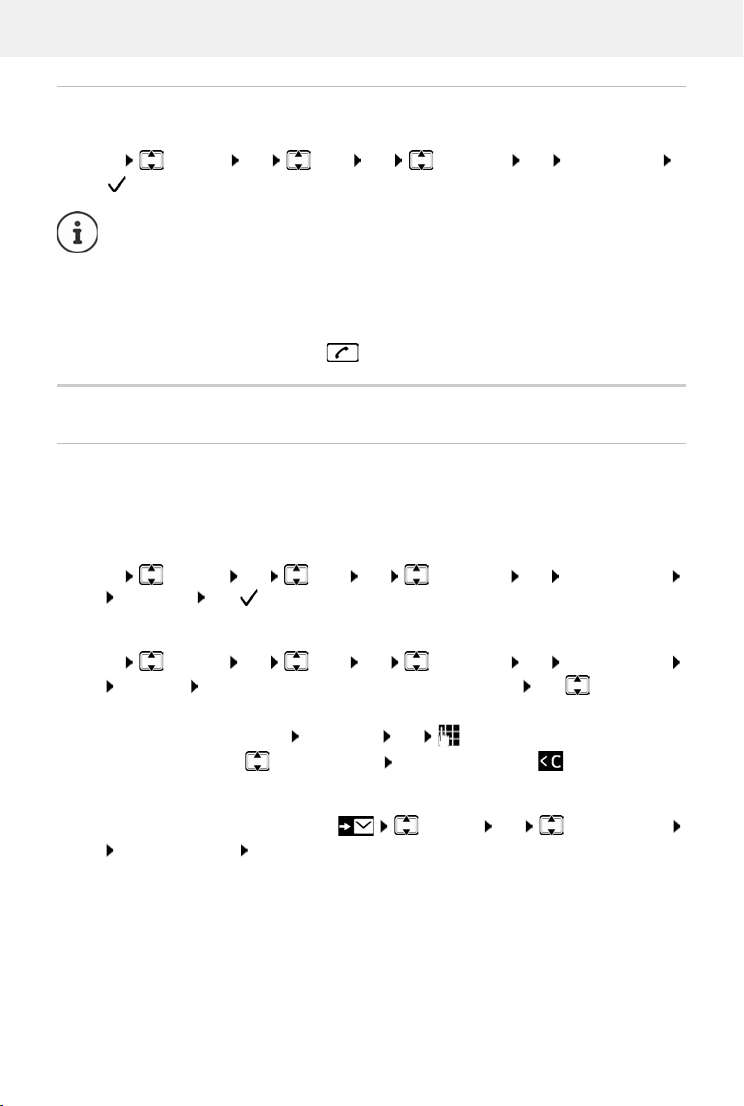
Menu Settings OK Base OK Additional OK Call Protection
OK Activation OK ( = enabled)
Displaying/editing the black list
Menu Settings OK Base OK Additional OK Call Protection
OK Black List OK . . . The list of blocked numbers is displayed Use to scroll
through the list
Create an entry:
Delete entry:
Transferring a number from a call list to the black list
Menu New Entry OK Enter the number
Select the entry Press the display key
Open the call list: Press the Display key CallsList OK Select an entry
OK Copy to Blacklist OK
29
Page 30
Extending the functionality of the phone
Extending the functionality of the phone
Multiple handsets
Up to four handsets can be registered with the base.
Every device is assigned an internal name and internal number (INT 1 – INT 4). The assignment
n be changed.
ca
All internal numbers are already assigned: De
Registering a handset
Register HS or Put into base flashes on the display.
Registering by placing the handset in the base
Place the handset in the base . . . Registering is shown on the display, the handset is regis-
tered automatically
Registering from the menu
Registration must be initiated both on the base and on the handset. Both must be
within 60 seconds.
On the handset
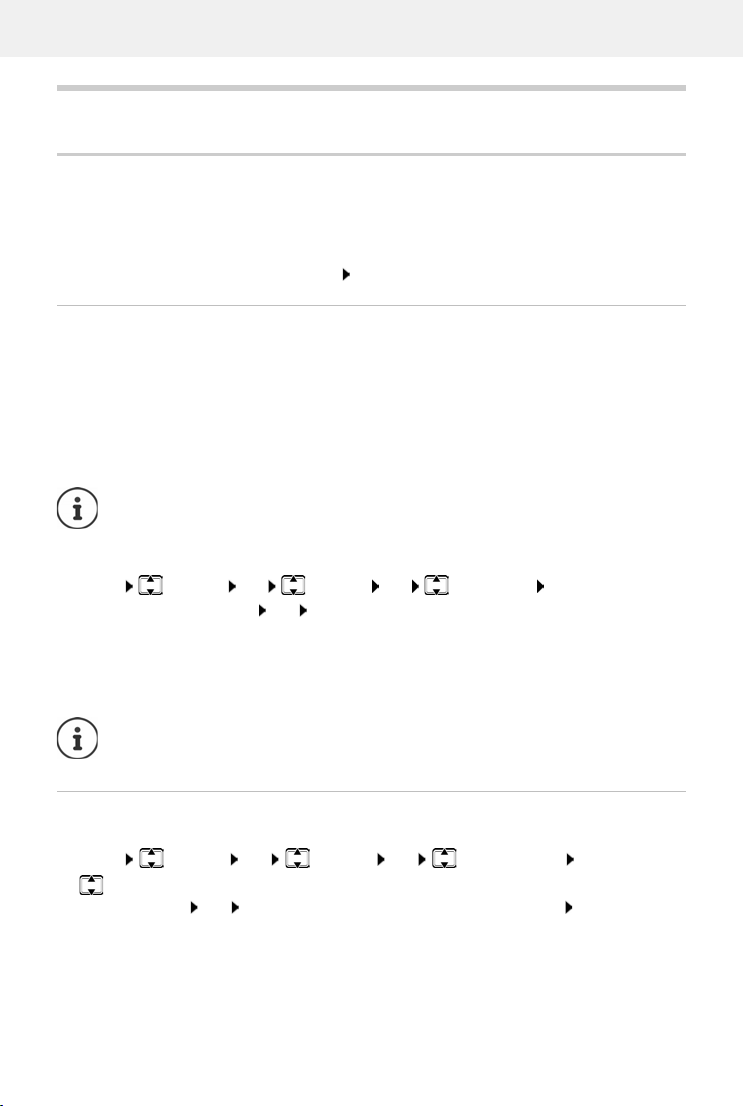
Menu Settings OK Handset OK Register HS Enter the system PIN
of the base (default: 0000) OK The display shows Registering.
-register any devices no longer needed
On the base
Within 60 seconds of entering the system PIN, press and hold the registration/paging key for
a minimum of 3 seconds.
The registration process takes about 1 minute. Handsets are assigned the lowest available internal number (1 to 4). If internal numbers 1 to 4 are already assigned to other
devices, number 4 is overwritten.
De-registering a handset
You can de-register any other registered handset from any registered Gigaset handset.
Menu Settings OK Handset OK De-register HS OK
Select the internal user to be de-registered. (The handset you are currently using is
marked with <.) OK Enter the system PIN of the base (default: 0000) OK . . . the
handset is registered. Put into base flashes on the display
30
Page 31
Extending the functionality of the phone
Locating a handset (paging)
Locate a handset using the base.
Briefly press the Register/Paging key on the base . . . all handsets registered ring at the same
time even when their ringtones are turned off
Exit:
Briefly press the Register/Paging key on the base
or
Press or on a handset
Repeater support
A repeater increases the receiving range between the Gigaset handset and base.
Enabling Repeater mode for the base:
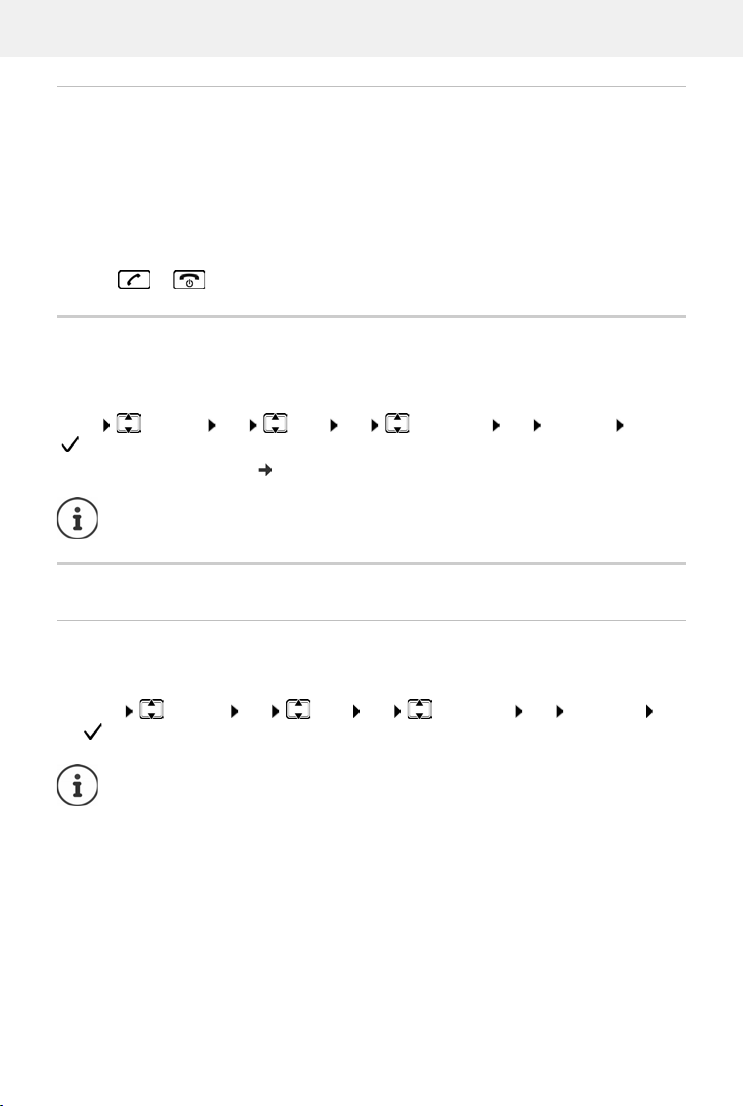
Menu Settings OK Base OK Additional OK Repeater OK
( = enabled)
Register repeater on the base: User guide for the repeater
Repeater support and ECO DECT mode No Radiation are mutually exclusive.
Operating the base on a router/PABX
Operation with a router
When operating on the analogue connection of a router, any echoes occurring can be reduced
by enabling XES Mode (XES = eXtended Echo Suppression).
Menu Settings OK Base OK Additional OK XES Mode OK
( = enabled)
If there are no problems with echoes, this function should be disabled.
31
Page 32
Extending the functionality of the phone
Operation with a PABX
The following settings are only necessary when your PABX requires them ( refer to the PABX
user guide). Enter the digits slow
ly one after the other.
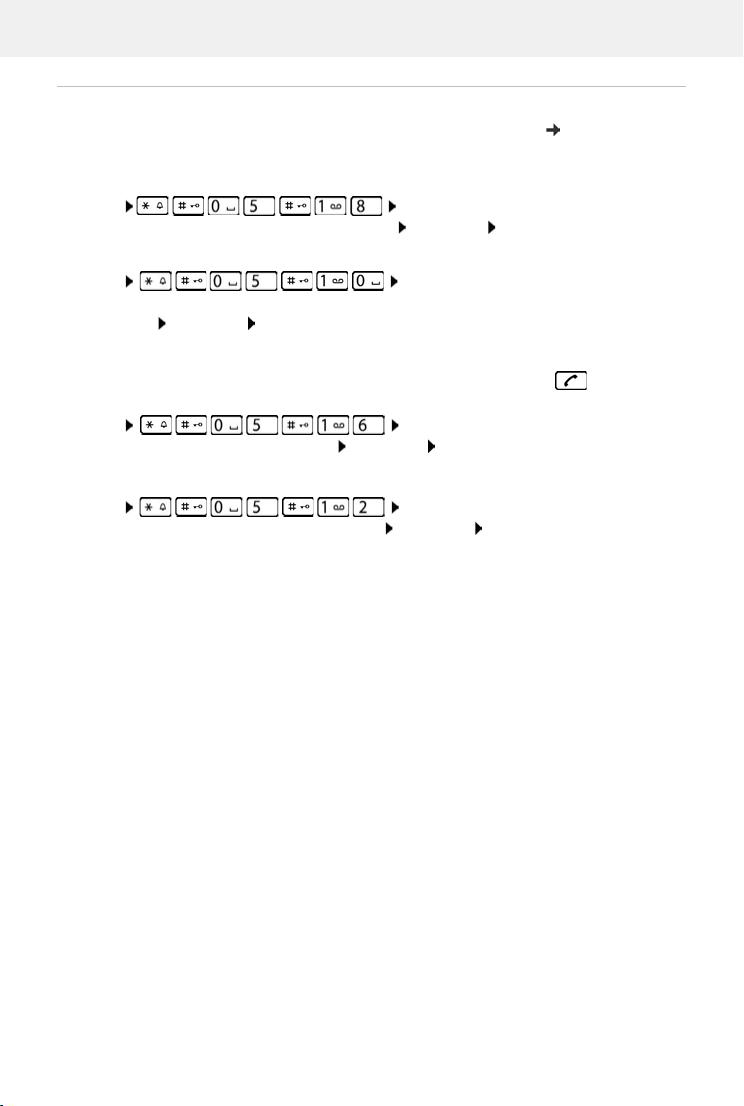
Changing the dialling mode
Menu The digit for the dialling mode set flashes:
0 = Tone dialling (DTMF); 1 = Pulse dialling (PD) Enter digit OK
Setting the flash time
Menu The digit for the current flash time flashes:
0 = 80 ms; 1 = 100 ms; 2 = 120 ms; 3 = 400 ms; 4 = 250 ms; 5 = 300 ms; 6 = 600 ms;
7 = 800 ms Enter digit OK
Changing pause after line seizure
You can set the length of the pause inserted between pressing the Talk key and sending
the phone number.
Menu The digit for the current pause length
flashes: 1 = 1 sec.; 2 = 3 sec.; 3 = 7 sec. Enter digit OK
Changing pause after recall key
Menu The digit for the current pause length
flashes: 1 = 800 ms; 2 = 1600 ms; 3 = 3200 ms Enter digit OK
32
Page 33
Phone settings
Phone settings
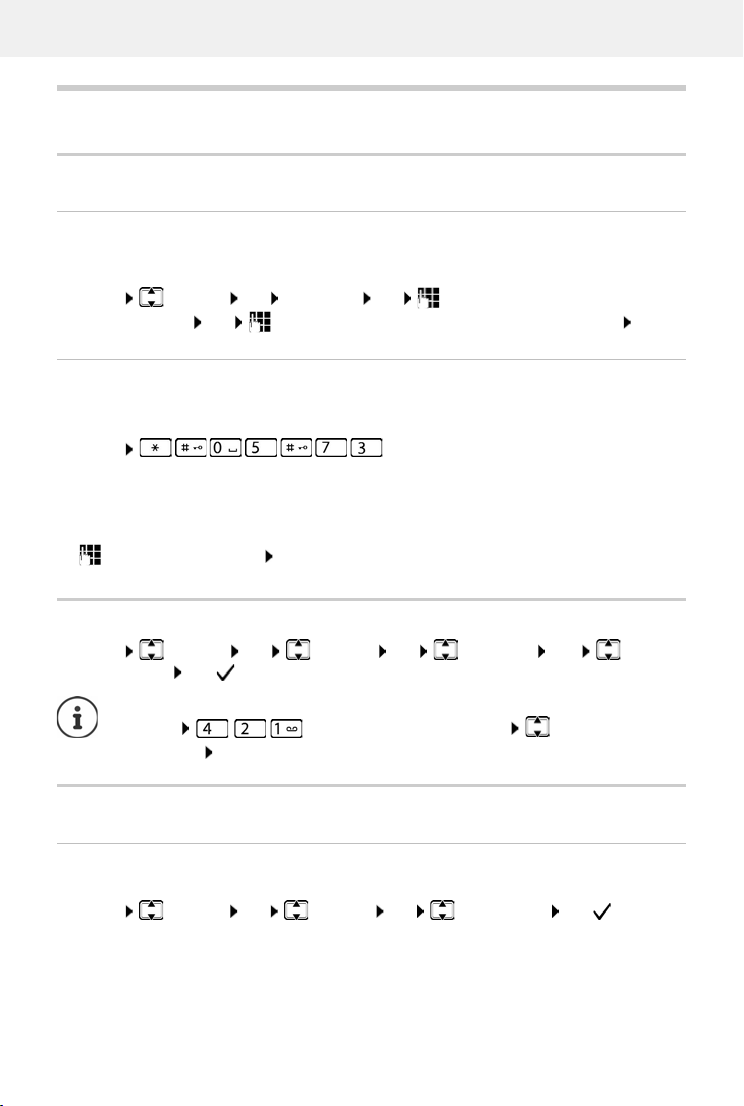
Date and time
Setting
Set the date/time so that the correct date and time can be assigned to incoming calls and to enable the alarm to be used.
Menu Settings OK Date/Time OK Enter the date (day, month and year)
in 6-digit format OK Enter the time (hours and minutes) in 4-digit format OK
Using the network time
If date and time are also to be sent to your phone by your network operator (or a router/PABX)
during calling line identification, you can specify whether and when these are accepted:
Menu . . . The digit for the current setting flashes:
1 = Never
2 = Once, if the dat
3 = Always
Enter the required digit OK
e and time are not set on your phone or
Display language
Menu Settings OK Handset OK Language OK Select
the language OK ( = enabled)
If you accidentally choose a language you do not understand:
Menu Press keys one after the other Select the
language OK
Display
Large dial keys
Show large dial keys when dialling
Menu Settings OK Handset OK Big Dial Font OK ( = enabled)
33
Page 34
Phone settings
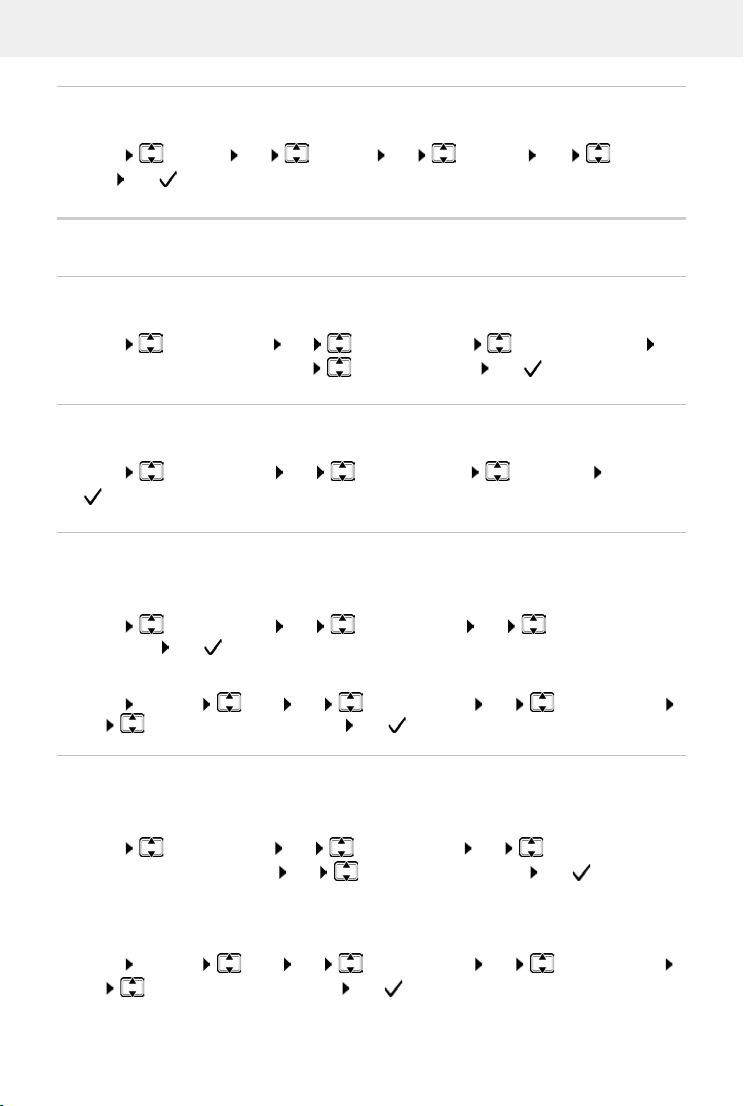
Contrast
Adjust the display contrast on 9 levels.
Menu Settings OK Handset OK Contrast OK Select the
level OK ( = selected)
Audio
Call volume
Adjust the receiver volume or handsfree function on 5 levels.
Menu Audio Settings OK Handset Volume Earpiece / Speaker OK
. . . The current setting is displayed Select the volume OK ( = selected)
Tone quality
Change the tone quality of the receiver to how you want it.
Menu Audio Settings OK Handset Sound Low / High OK
( = selected)
Ringtone volume (ringer volume)
Adjust the volume of the ringtone on 5 levels or select Crescendo.
For the handset:
Menu Audio Settings OK Ringer Volume OK Select volume or
Crescendo OK ( = selected)
For the base (with answer machine):
Menu Settings Base OK Audio Settings OK Ringer Volume
OK Select volume or Crescendo OK ( = selected)
Ringtone melody
For the handset:
Set the ringtone melody for external cal
ls, internal calls and/or the alarm.
Menu Audio Settings OK Ringer Melody OK Select External Calls
/ Internal Calls
For the base (with answer machine):
Adjusting the ringtone melody for external calls.
/ Alarm Clock OK Select ringtone required OK ( = selected)
Menu Settings Base OK Audio Settings OK Ringer Melody
OK Select the ringtone required OK ( = selected)
34
Page 35
Phone settings
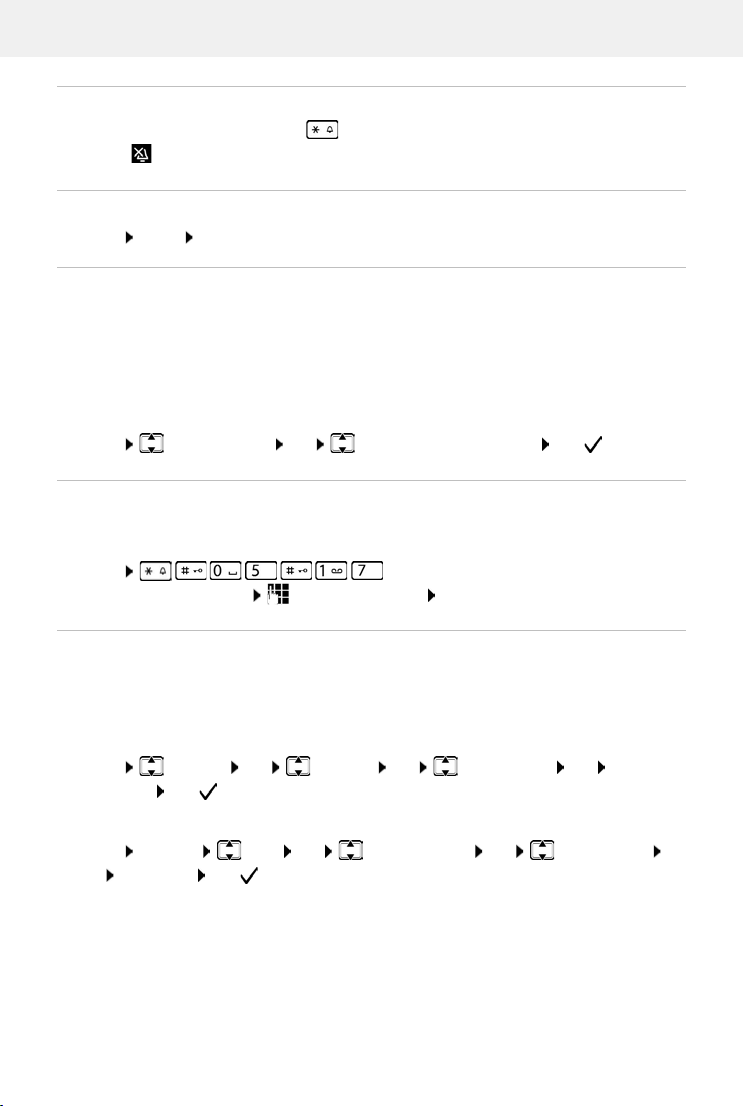
Disabling/re-enabling the ringtone permanently
When the phone is idle, press and hold the Star key. When the ringtone is disabled,
symbol is shown on the display.
Deactivating the ring tone for the current call
Menu Silent OK
Enabling/disabling advisory and warning tones
The handset provides acoustic notification of different activities and statuses.
Advisory tone: e.g. keypress tones, error tone, a new message
Battery warning tone:
The battery charge falls below a certain level during a call.
You can enable and disable advisory and warning tones separately.
Menu Audio Settings OK Advis.Tones / Battery Low OK ( = enabled)
Music on hold
You can choose whether an external caller hears music on hold during an internal consultation
or when a call is being forwarded.
Menu . . . The digit for the current setting flashes:
0 = disabled; 1 = enabled enter required digit OK
Enabling/disabling ringtone with time control
Enter a time period during which the handset should suspend ringing to indicate external calls,
such as during the night.
Enabling/disabling time control
For the handset:
Menu Settings OK Handset OK Time Control OK
Activation OK ( = enabled)
For the base (with answer machine):
Menu Settings Base OK Audio Settings OK Time Control
OK Activation OK ( = enabled)
35
Page 36
Phone settings
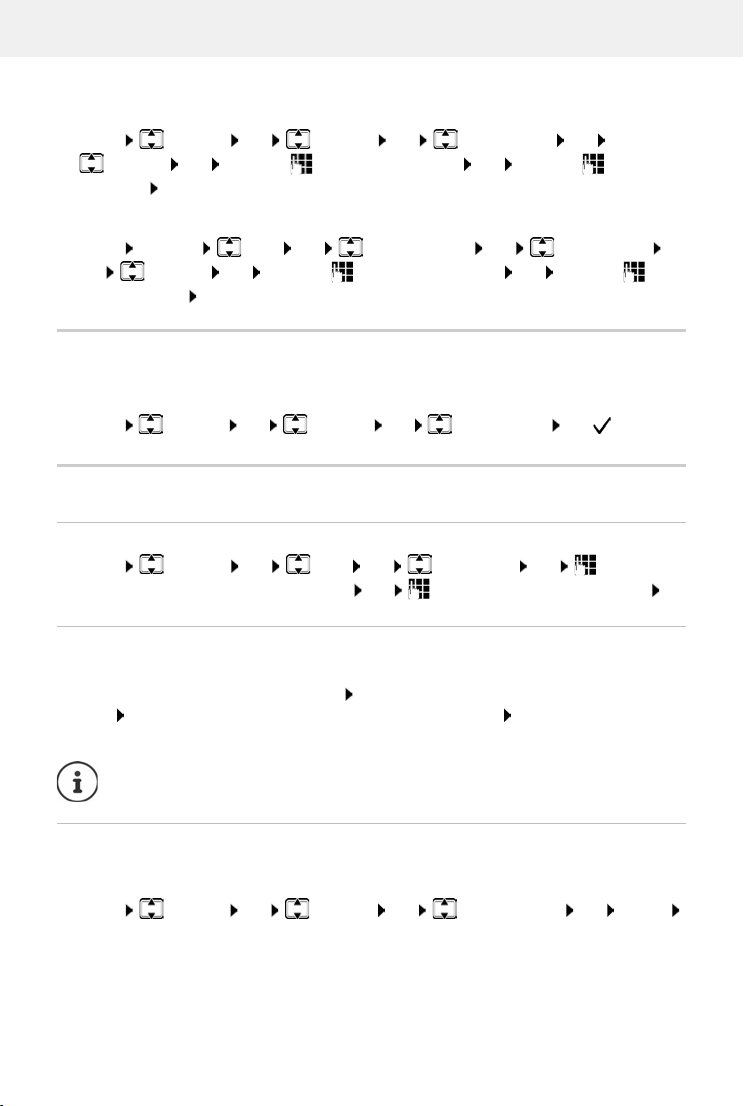
Setting the time period
For the handset:
Menu Settings OK Handset OK Time Control OK
Settings OK Off from: Enter the 4-digit time OK Off until: Enter the 4-
digit time OK
For the base (with answer machine):
Menu Settings Base OK Audio Settings OK Time Control
OK Settings OK Off from: Enter the 4-digit time OK Off until: Enter
the 4-digit time OK
Off for anonymous calls
You can set you r handset so that it does not ring for calls where Calling Line Identification
has been withheld. The call is only signalled on
the display.
Menu Settings OK Handset OK An.Call Silent OK ( = enabled)
System
Changing the system PIN
Menu Settings OK Base OK System PIN OK Enter the
current 4-digit system PIN (default: 0000) OK Enter the new 4-digit system PIN OK
Resetting the system PIN
Resetting the base to the original PIN code 0000:
Remove the power cable from the base Keep pressed the Registration/paging key on the
base At the same time, reconnect the power cable to the base
at least 5 seconds . . . The base is reset and the system PIN is set to 0000
All handsets are de-registered and must be re-registered. All settings are reset to the
defaults.
Resetting the handset
You can reset individual settings. Entries in the directory and call list, and the handset’s registration to the base, are maintained.
Press and hold the key for
Menu Settings OK Handset OK Reset Handset OK Reset?
OK
36
Page 37

Phone settings
Resetting the base
A reset disables mode No Radiation, resets individual settings and deletes all lists.
The system PIN is reset to the original code 0000.
The time and date are not affected. The answer machine (if a
about 15 seconds after the base is reset.
vailable) is not ready until after
Resetting the base from the menu
The handsets remain registered. The system PIN is not reset.
Menu Settings OK Base OK Base Reset OK Reset? OK
Resetting the base using a key on the base
All handsets are de-registered. The system PIN is set back to the original code 0000.
Remove the power cable from the base Keep pressed the Registration/paging key on the
base At the same time, reconnect the power cable to the base Keep the key pressed
for at least another 5 seconds
37
Page 38

Service (Customer Care)
Service (Customer Care)
Step by step towards your solution with Gigaset Customer Care
www.gigaset.com/service
Visit our Customer Care pages
Here you will find:
• Frequently asked questions
• Free software and user manual downloads
• Compatibility checks
Contact our Customer Care team
Couldn't find a solution in the FAQs section?
We are happy to help...
... online:
via our contact form on the customer service page
... by telephone:
United Kingdom
Service Hotline: 020 36953111
(local call cost charge)
Ireland
Service Hotline: 0818 200 033
(6.6561 Ct./Call)
Please have your proof of purchase ready when calling.
Please note that if the Gigaset produc t is not sold by authorised dealers in the national territor y the product
may not be fully compatible with the national telephone network. It is clearly specified on the box near the
CE mark for which country/countries the equipment has been developed. If the equipment is used in a
manner inconsistent with this advice or with the instructions of the manual and on the product itself, this
may have implications on the conditions for warranty or guarantee claims (repair or exchange of product).
In order to make use of the warranty, the product purchaser is asked to submit a receipt which proves the
date of purchase (date from which the warranty period starts) and the type of goods that have been
purchased.
.
38
Page 39
Service (Customer Care)
Questions and answers
If you have any questions about the use of your telephone, please go to www.gigaset.com/service where help
is available at any time. The table below contains a li
Problem Nothing on the display.
Cause The handset is not switched on.
The batteries are flat.
Solution Press the End call key for about 5 seconds or place the handset into the base.
Charge or replace the batteries.
Problem No radio connection to the base.
Cause The handset is outside the range of the base.
Handset is not yet registered.
The base is not switched on.
Solution
Move the handset closer to the base.
st of common problems and possible solutions.
Register the handset.
Check the power plug on the base.
Problem You cannot hear a ring or dial tone from the fixed line network.
Cause The phone cable supplied has not been used or it has been replaced by a new cable with the
Solution
Problem Error tone sounds after system PIN prompt.
Cause You have entered the wrong system PIN.
Solution
wrong pin connections.
Please always use the telephone cable supplied or ensure that the pin connections are
correct when purchasing from a retailer.
PIN forgotten.
Reset the system PIN to the default 0000.
All the handsets are de-registered. All settings are reset. All lists are deleted.
Guarantee Certificate - United Kingdom and Ireland
Without prejudice to any claim the user (customer) may have in relation to the deal er or retailer, t he customer
shall be granted a manufacturer’s Guarantee under the conditions set out below:
• In the case of new devices and their components exhibiting defects resulting from manufacturing and/or
material faults within 24 months of purchase, Gigaset Communications shall, at its own option and free of
charge, either replace the device with another device reflecting the current state of the art, or repair the
said device. In respect of parts subject to wear and tear (including but not limited to, batteries, keypads,
casing), this warranty shall be valid for six months from the date of purchase.
• Th is Guaran tee shall be invali d if the de vice defec t is attr ibutable to improp er care or use and/o r failure to
comply with information contained in the user manuals. In particul ar claims under the Guarantee cannot
be made if:
• The device is opened (this is classed as third party intervention)
• Repairs or other work done by persons not authorised by Gigaset Communications.
• Components on the printed circuit board are manipulated
• The software is manipulated
• Defects or damage caused by dropping, breaking, lightning or ingress of moisture. This also applies if
defects or damage was caused by mechanical, chemical, radio interference or thermal factors (e.g.: microwave, sauna etc.)
39
Page 40

Service (Customer Care)
• Devices fitted with accessories not authorised by Gigaset Communications
• This Guarantee shall not apply to or extend to services performed by the authorised dealer or the
customer themselves (e.g. installation, configuration, software downloads). User manuals and any software supplied on a separate data medium shall be excluded from the Guarantee.
• The purchase receipt, together with the date of purchase, shall be required as evidence for invoking the
Guarantee. Claims under the Guarantee must be submitted within two months of the Guarantee default
becoming evident.
• Ownership of devices or components replaced by and returned to Gigaset Communications shall vest in
Gigaset Communications.
• This Guarantee shall apply to new devices purchased in the European Union. For Products sold in the
United Kingdom and in the Republic of Ireland the Guarantee is issued by: Gigaset Communications UK
Limited, 2 White Friars, Chester, CH1 1NZ.
• Any other claims resulting out of or in connection with the device shall be excluded from this Guarantee.
Nothing in this Guarantee shall attempt to limit or exclude a Customers Statutory Rights, nor the manufacturer’s liability for death or personal injury resulting from its negligence.
• The duration of the Guarantee shall not be extended by services rendered under the terms of the Guar-
antee.
• Insofar as no Guarantee default exists, Gigaset Communications reserves the right to charge the customer
for replacement or repair.
• The above provisions do not imply a change in the burden of proof to the detriment of the customer.
To invoke this Guarantee, please contact the Gigaset Communications helpdesk. This number is also to be
found in the accompanying user guide.
Manufacturer‘s advice
Authorisation
This device is intended for analogue phone lines in the UK and on the Irish network.
Country-specific requirements have been taken into consideration.
Hereby, Gigaset Communications GmbH declares that the radio equipment type Gigaset A694(A) –
et A694H is in compliance with Directive 2014/53/EU and the UK Radio Equipment Regulations 2017.
Gigas
The full text of the EU declaration of conformity is available at the following internet address:
www.gigaset.com/docs.
This declaration could also be availabl
rations of Conformity" files.
Therefore please check all of these files.
e in the "International Declarations of Conformity" or "European Decla-
Data protection
We at Gigaset take the protection of our customers’ data very seriously. It is precisely for this reason that we
are ensuring all our products feature "Privacy by Design" as standard. All information we collect is used to
make our products as good as possible. In the process, we ensure your details are protected and only used for
the purposes of making available to you a product or service. We k now which path your data takes through
the company and ensure this happens in line with data protection specifications in a secure and protected
manner.
The full text of the privacy policy is available from: www.gigaset.com/privacy-policy
40
Page 41
Service (Customer Care)
Environment
Our environmental statement
We at Gigaset Communications GmbH are aware of our social resp onsib ility. Th at is why we act ively t ake ste ps
to create a better world. In all areas of our business – from product planning and production to sales and waste
of disposal – following our environmental conscience in everything we do is of utmost importance to us.
Learn more about our earth-friendly products and processes online at
Environmental management system
Gigaset Communications GmbH is certified pursuant to the international st andards ISO 14001 and
ISO 9001.
ISO 14001 (Environment):
GmbH.
ISO 9001 (Quality): C
Certified since September 2007 by TÜV SÜD Management Service
ertified since 17/02/1994 by TÜV SÜD Management Service GmbH.
Disposal
Batteries should not be disposed of in general household waste. Obser ve the local waste disposal regulations,
details of which can be obtained from your local authority.
All electrical and electronic products should be disposed
designated collection facilities appointed by the government or the local authorities.
This crossed-out wheeled bin symbol on the pro
European Directive 2012/19/EU (UK: the Waste Electrical and Electronic Equipment Regulations
3 (as amended)).
201
The correct disposal and separate collection of y
negative consequences for the environment and human health. It is a precondition for reuse and
recycling of used electrical and electronic equipment.
council refuse centre or the original supplier of the product.
For more detailed information about disposal of yo
of separately from the municipal waste stream via
www.gigaset.com.
duct means the product is covered by the
our old appliance will help prevent potential
ur old appliance, please contact your local
Care
Wipe the device with a damp cloth or an antistatic cloth. Do not use solvents or microfibre cloths.
a dry cloth; this can cause static.
Never use
In rare cases, contact with chemical substances can cause
variety of chemical products available on the market, it was not possible to test all substances.
Impairments in high-gloss finishes can be carefully removed using display polishes for mobile phones.
changes to the device’s exterior. Due to the wide
41
Page 42
Technical data
Contact with liquid
If the device comes into contact with liquid:
1 Unplug all cables from the device.
2
Remove the batteries and leave the battery compartment open.
3 Allow the liquid to drain from the device.
4Pat all parts dry.
5 Place the device i n a dry, warm place for at least 72 hours (not in a microwave, oven etc.) with the battery
compartment open and the keypad facing down (if applicable).
6 Do not switch on the device again until it is completely dry.
When it has fully dried out, you will normally be able to use it again.
Technical data
Batteries
Technology: Nickel metal hydride (NiMH)
Size: AAA (Micro, HR03)
Voltage: 1.2 V
Capacity: 400 - 1000 mAh
Handset operating times/charging times
The operating time of your Gigaset depends on the capacity of the battery, its age and the way it is used.
(All times are maximums).
Standby time (hours) 180 / 110*
Talktime (hours) 14
Operating time for 1.5 h of calls per day (hours) 70 / 65*
Charging time in charging cradle (hours) 4.5
Charging time in base (hours) 5
* No Radiation switched off / No Radiation switched on, without display backlight in idle status
Power consumption of the handset in the charging cradle
When charging: approx. 2.10 W
To maintain the charge status: approx. 1.30 W
Base power consumption
Standby: Without answer machine With answer machine
- Handset in the charging cradle (charging) approx. 2.00 W approx. 2.80 W
- Handset in the charging cradle
(sustained charge)
- Handset away from the charging cradle approx. 0.55 W approx. 0.65 W
During a call: approx. 0.65 W approx. 0.75 W
42
approx. 0.60 W approx. 1.00 W
Page 43
Technical data
3
2
1
4
5
6
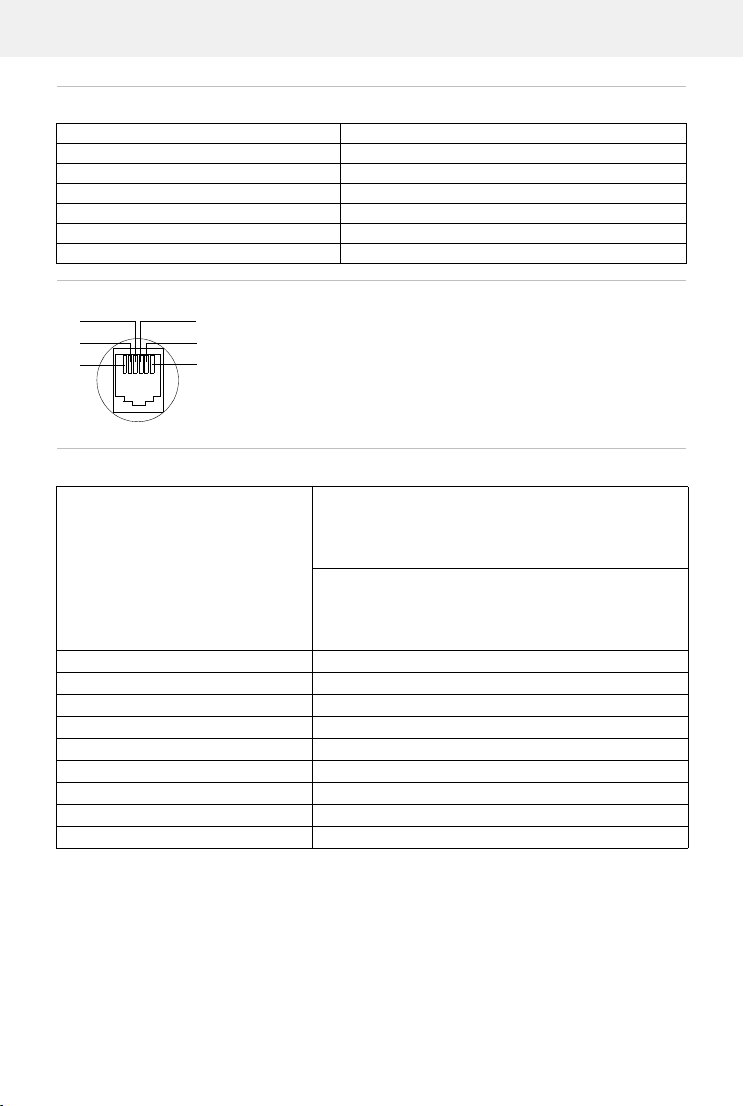
1unused
2unused
3a
4b
5unused
6unused
General technical specifications
DECT standard supported
GAP standard supported
Radio frequency range 1880 - 1900 MHz
Range up to 300 m outdoors, up to 50 m indoors
Power supply for base 230 V ~/50 Hz
Transmission power 10 mW average power per channel, 250 mW pulse power
Ambient conditions for operation +5°C to +45°C, 20% to 75% relative humidity
Pin connections on the telephone jack
Power adapter for the handset
Manufacturer Salom Electric (Xiamen) Co. Ltd.
Commercial registration number: 91350200612003878C
31 Building, Huli Industrial District,
Xiamen, Fujian 361006, P.R. China
Salcomp (Shenzen) Co. Ltd.
Commercial registration number: 91440300618932635P
Salcomp Road, Furond Industrial Area,
Xinqiao, Shajing, Baoan District, Shenzen 518125 China
Model identifier C705 / C710
Input voltage 230 V
Input AC frequency 50 Hz
Output voltage 4 V
Output current 0.15 A
Output power 0.6 W
Average active efficiency > 46%
Efficiency at low load (10%) not relevant – only at output power > 10 W
No-load power consumption < 0.10 W
43
Page 44
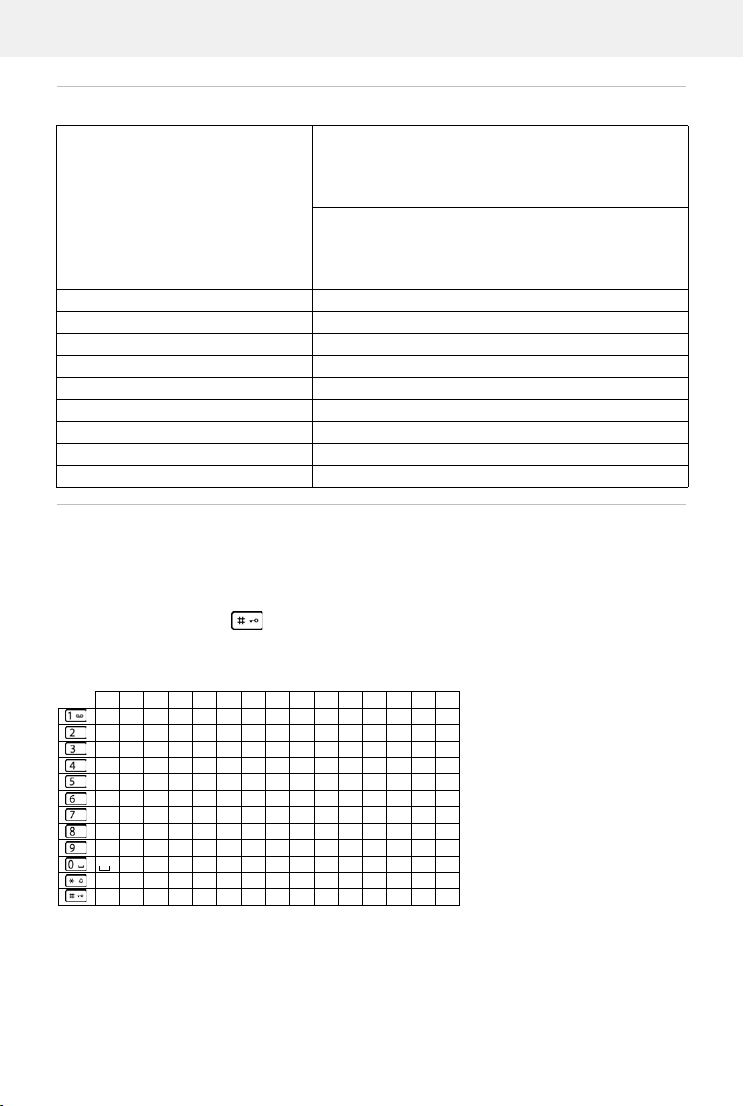
Technical data
1) Space
1x 2x 3x 4x 5x 6x 7x 8x 9x 10x 11x 12x 13x 14x 15x
1£$¥¤
abc2дбавгз
def 3лйик
gh i4пнмо
jkl5
mno6цсутфх
pqr s7ß
tuv8üúùû
wx y z 9ÿ ýæøå
.,?!0+- :¿¡"’ ;_
*/( )<=>%
#@\ &§
1)
Power adapter for the base
Manufacturer Salom Electric (Xiamen) Co. Ltd.
Commercial registration number: 91350200612003878C
31 Building, Huli Industrial District,
Xiamen, Fujian 361006, P.R. China
Salcomp (Shenzen) Co. Ltd.
Commercial registration number: 91440300618932635P
Salcomp Road, Furond Industrial Area,
Xinqiao, Shajing, Baoan District, Shenzen 518125 China
Model identifier C707/C769 / C771/C785
Input voltage 230 V
Input AC frequency 50 Hz
Output voltage 6.5 V
Output current 0.3 A
Output power 1.95 W
Average active efficiency > 71.5 %
Efficiency at low load (10%) not relevant – only at output power > 10 W
No-load power consumption < 0.10 W
Character set tables
The character set used on the handset is dependent on the language set.
Entering letters/characters
Press the relevant key several times.
Briefly pr es s t he H as h k ey t o s wit ch fr om mo de “A bc” to “1 23 ”, fr om “1 23 ” to “ab c” a nd fr om “ ab c” t o
“Abc”.
Standard characters
44
Page 45
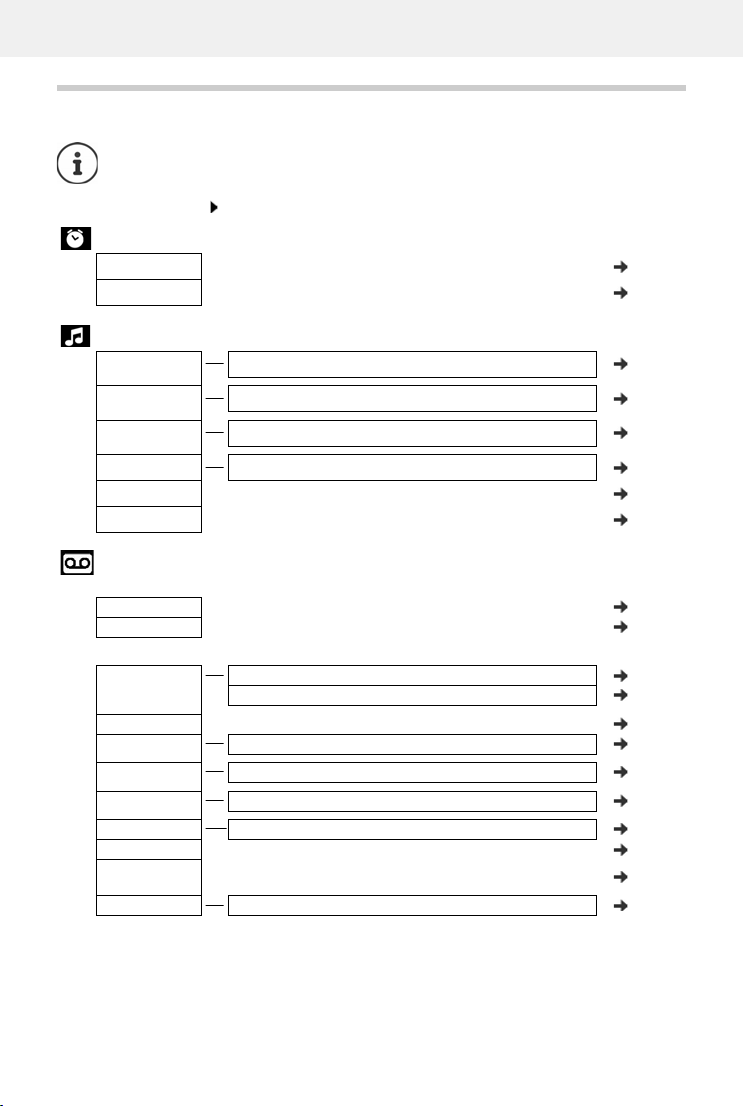
Menu tree
Menu tree
Not all functions described in the user guide are av
providers.
Opening the main menu: Press the display key Menu when the handset is in the idle mode.
ailable in all countries or from all network
Alarm Clock
Activation p. 28
Wake -upTi me p. 28
Audio Settings
Handset Volume
Handset Sound
Ringer Volume
Ringer Melody External Calls / Internal Calls / Alarm Clock p. 34
Advis.Tones p. 36
Battery Low p. 36
Earpiece / Speaker p. 34
Low / High p. 34
Loudsp. Volume 1-5 p. 34
Answer Machine
System without local answer machine
Play Messages p. 27
Net Mailbox p. 27
System with local answer machine
Play Messages Net Mailbox * p. 27
Answ. Mach. p. 24
Call Screening Handset / Base p. 23
Announcements Rec announce. / Play announce. / Del announce. p. 23
Message Length Maximum / 1 Minute / 2 Minutes / 3 Minutes p. 23
Ring Delay Immediately / 10 sec / 18 sec / 30 sec / Auto p. 23
Net Mailbox p. 27
Language
(if available)
Set Key 1 Net Mailbox / Answ. Mach. p. 27
* When the network mailbox is set up
Answ. Mach. * p. 24
p. 24
45
Page 46
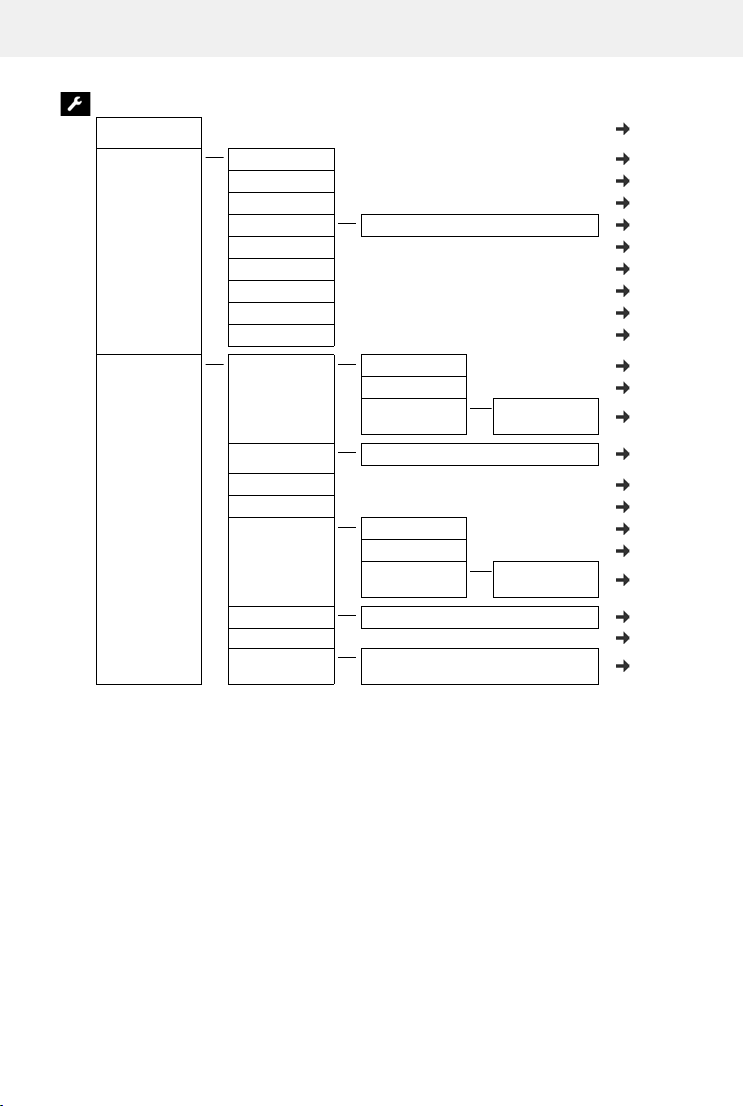
Menu tree
Settings
Date/Time
Handset Language
Big Dial Font
Contrast
Time Control Activation / Settings
An.Call Silent
Auto Answer
Register HS
De-register HS
Reset Handset
Base Audio Settings Ringer Volume
Call list type Missed Calls / All Calls
System PIN
Base Reset
Additional Repeater
ECO DECT No Radiation / Max. Range
Listening in p. 17
Preselection Presel. Number / With Preselect /
Ringer Melody
Time Control Answ. Mach. /
XES Mode
Call Protection Answ. Mach. /
Without Presel.
Settings
Black List
p. 33
p. 33
p. 33
p. 34
p. 36
p. 36
p. 16
p. 30
p. 30
p. 36
p. 34
p. 34
p. 36
p. 20
p. 36
p. 37
p. 31
p. 31
p. 29
p. 28
p. 18
46
Page 47

Index
A
Accepting a call . . . . . . . . . . . . . . . . . . . . . . . . . . . . 16
Adjusting the call volume (handset). . . . . . . . . . . 34
Adjusting the ringtone melody
. . . . . . . . . . . . . . . . . . . . . . . . . . . . . . . . . . . 34
base
handset . . . . . . . . . . . . . . . . . . . . . . . . . . . . . . . . 34
Answer . . . . . . . . . . . . . . . . . . . . . . . . . . . . . . . . . . . 16
Answer machine
actions during playback
announcement. . . . . . . . . . . . . . . . . . . . . . . . . . 23
back key . . . . . . . . . . . . . . . . . . . . . . . . . . . . . . . . .5
delete key . . . . . . . . . . . . . . . . . . . . . . . . . . . . . . . .5
display . . . . . . . . . . . . . . . . . . . . . . . . . . . . . . . . . . .5
enabling and disabling . . . . . . . . . . . . . . . . . . . 24
forward key . . . . . . . . . . . . . . . . . . . . . . . . . . . . . . .5
listening to message . . . . . . . . . . . . . . . . . . . . . 24
operation from the handset . . . . . . . . . . . . . . . 23
operation on the base . . . . . . . . . . . . . . . . . . . . . .5
play/stop key . . . . . . . . . . . . . . . . . . . . . . . . . . . . .5
recording time . . . . . . . . . . . . . . . . . . . . . . . . . . 23
remote operation . . . . . . . . . . . . . . . . . . . . . . . . 26
time to call accept . . . . . . . . . . . . . . . . . . . . . . . 23
Answer machine list . . . . . . . . . . . . . . . . . . . . . . . . 20
Authorisation . . . . . . . . . . . . . . . . . . . . . . . . . . . . . . 40
Automatic network provider
. . . . . . . . . . . . . . . . . . . . . . . . . . . . . 18
selection
B
Base
connecting
connecting to the router. . . . . . . . . . . . . . . . . . . .9
restore to defaults . . . . . . . . . . . . . . . . . . . . . . . 37
Battery
charge level
charging . . . . . . . . . . . . . . . . . . . . . . . . . . . . . . . 10
insert . . . . . . . . . . . . . . . . . . . . . . . . . . . . . . . . . . 10
recommended batteries . . . . . . . . . . . . . . . . . . 42
Black list . . . . . . . . . . . . . . . . . . . . . . . . . . . . . . . . . . 29
Broken display . . . . . . . . . . . . . . . . . . . . . . . . . . . . . . .7
. . . . . . . . . . . . . . . . . . . . . . . . . . . . . . .8
. . . . . . . . . . . . . . . . . . . . . . . . . . . . . 14
C
Call
Call list . . . . . . . . . . . . . . . . . . . . . . . . . . . . . . . . . . . 20
Call volume, see Ringtone volume
Calling
. . . . . . . . . . . . . . . . . . . . . . . . . . . . . . . . 15
external
internal . . . . . . . . . . . . . . . . . . . . . . . . . . . . . . . . 16
copy a number to the black list . . . . . . . . . . . . 29
functions . . . . . . . . . . . . . . . . . . . . . . . . . . . . . . . 20
opening. . . . . . . . . . . . . . . . . . . . . . . . . . . . . . . . 20
set the list type. . . . . . . . . . . . . . . . . . . . . . . . . . 20
. . . . . . . . . . . . . . . . . . . . . . . . . . . . . . . . 15
external
internal . . . . . . . . . . . . . . . . . . . . . . . . . . . . . . . . 16
. . . . . . . . . . . . . . . . . . 25
Index
Calls
making an external call
transferring (connecting). . . . . . . . . . . . . . . . . . 17
Care . . . . . . . . . . . . . . . . . . . . . . . . . . . . . . . . . . . . . . 41
Care of the device . . . . . . . . . . . . . . . . . . . . . . . . . . 41
Change the recording time. . . . . . . . . . . . . . . . . . . 23
Changing the call volume
during a call
permanently . . . . . . . . . . . . . . . . . . . . . . . . . . . . 34
Changing the display language . . . . . . . . . . . .10, 33
Character set (handset) . . . . . . . . . . . . . . . . . . . . . . 44
Charging time of handset. . . . . . . . . . . . . . . . . . . . 42
CLI, Calling Line Identification . . . . . . . . . . . . . . . . 18
CLIP, CLI Presentation . . . . . . . . . . . . . . . . . . . . . . . 18
CLIR, CLI Restriction. . . . . . . . . . . . . . . . . . . . . . . . . 18
Connecting . . . . . . . . . . . . . . . . . . . . . . . . . . . . . . . . 17
Connecting the charger cradle. . . . . . . . . . . . . . . . . 9
Consultation call (internal) . . . . . . . . . . . . . . . . . . . 17
Contact with liquid . . . . . . . . . . . . . . . . . . . . . . . . . 42
Control key . . . . . . . . . . . . . . . . . . . . . . . . . . . . . .4, 12
accessing display functions . . . . . . . . . . . . . . . . 13
Customer Care . . . . . . . . . . . . . . . . . . . . . . . . . . . . . 38
. . . . . . . . . . . . . . . . . . . . . . . . . . . . . 16
. . . . . . . . . . . . . . . . . . . 15
D
Data protection . . . . . . . . . . . . . . . . . . . . . . . . . . . . 40
Date and time
accept
. . . . . . . . . . . . . . . . . . . . . . . . . . . . . . . . . . 33
Set. . . . . . . . . . . . . . . . . . . . . . . . . . . . . . . . . . . . . 33
set . . . . . . . . . . . . . . . . . . . . . . . . . . . . . . . . . . . . . 11
Dialling mode. . . . . . . . . . . . . . . . . . . . . . . . . . . . . . 32
Directory . . . . . . . . . . . . . . . . . . . . . . . . . . . . . . . . . . 21
assign quick-dial key . . . . . . . . . . . . . . . . . . . . . 21
delete . . . . . . . . . . . . . . . . . . . . . . . . . . . . . . . . . . 22
opening . . . . . . . . . . . . . . . . . . . . . . . . . . . . . . . . 21
saving the first number . . . . . . . . . . . . . . . . . . . 21
selecting an entry . . . . . . . . . . . . . . . . . . . . . . . . 21
sending entry/list to handset . . . . . . . . . . . . . . 22
Directory entry
. . . . . . . . . . . . . . . . . . . . . . . . . . . . . . . . . . 22
delete
Disabling
answer machine
Disabling wireless module . . . . . . . . . . . . . . . . . . . 29
Display
adjust contrast
anonymous . . . . . . . . . . . . . . . . . . . . . . . . . . . . . 18
broken . . . . . . . . . . . . . . . . . . . . . . . . . . . . . . . . . . 7
disable new messages . . . . . . . . . . . . . . . . . . . . 19
external call . . . . . . . . . . . . . . . . . . . . . . . . . . . . . 18
icons . . . . . . . . . . . . . . . . . . . . . . . . . . . . . . . . . . . . 6
large dial keys . . . . . . . . . . . . . . . . . . . . . . . . . . . 33
phone number (CLIP) . . . . . . . . . . . . . . . . . . . . . 18
unknown . . . . . . . . . . . . . . . . . . . . . . . . . . . . . . . 18
Display functions . . . . . . . . . . . . . . . . . . . . . . . . . . . 13
Display keys . . . . . . . . . . . . . . . . . . . . . . . . . . . . . . . . 4
functions . . . . . . . . . . . . . . . . . . . . . . . . . . . . . . . 13
. . . . . . . . . . . . . . . . . . . . . . . . . 24
. . . . . . . . . . . . . . . . . . . . . . . . . . 34
47
Page 48

Index
Display, answer machine . . . . . . . . . . . . . . . . . . . . . .5
Disposal . . . . . . . . . . . . . . . . . . . . . . . . . . . . . . . . . . 41
E
ECO DECT . . . . . . . . . . . . . . . . . . . . . . . . . . . . . . . . . 28
Emergency numbers
not possible
Enable/disable warning tones . . . . . . . . . . . . . . . . 35
Enabling
answer machine
Enabling/disabling advisory tones . . . . . . . . . . . . 35
Enabling/disabling music on hold . . . . . . . . . . . . 35
Enabling/disabling the batter y tone. . . . . . . . . . . 35
End call key . . . . . . . . . . . . . . . . . . . . . . . . . . . . . 4, 12
Entering characters . . . . . . . . . . . . . . . . . . . . . . . . . 44
Environment . . . . . . . . . . . . . . . . . . . . . . . . . . . . . . 41
. . . . . . . . . . . . . . . . . . . . . . . . . . . . . .7
. . . . . . . . . . . . . . . . . . . . . . . . . 24
G
Guarantee Certificate . . . . . . . . . . . . . . . . . . . . . . . 39
H
Handset
de-registering
display language . . . . . . . . . . . . . . . . . . . . . . . . 33
locating . . . . . . . . . . . . . . . . . . . . . . . . . . . . . . . . 31
registering . . . . . . . . . . . . . . . . . . . . . . . . . . . . . . 30
resetting . . . . . . . . . . . . . . . . . . . . . . . . . . . . . . . 36
setting (personalisation) . . . . . . . . . . . . . . . . . . 33
setting up . . . . . . . . . . . . . . . . . . . . . . . . . . . . . . 10
switching on/off . . . . . . . . . . . . . . . . . . . . . . . . . 12
transferring a call . . . . . . . . . . . . . . . . . . . . . . . . 17
using multiple. . . . . . . . . . . . . . . . . . . . . . . . 16, 30
Handsfree
. . . . . . . . . . . . . . . . . . . . . . . . . . . . . . . . . . 4, 16
key
mode . . . . . . . . . . . . . . . . . . . . . . . . . . . . . . . . . . 16
volume . . . . . . . . . . . . . . . . . . . . . . . . . . . . . . . . 34
Hash key . . . . . . . . . . . . . . . . . . . . . . . . . . . . . . . . . . . .4
Hearing aids . . . . . . . . . . . . . . . . . . . . . . . . . . . . . . . . .7
. . . . . . . . . . . . . . . . . . . . . . . . . . . 30
I
Insert a dialling pause. . . . . . . . . . . . . . . . . . . . . . . . .4
Internal
consultation
consultation call . . . . . . . . . . . . . . . . . . . . . . . . . 17
making calls . . . . . . . . . . . . . . . . . . . . . . . . . . . . 16
Internal call . . . . . . . . . . . . . . . . . . . . . . . . . . . . . . . 16
Internal listening in. . . . . . . . . . . . . . . . . . . . . . . . . 17
enable/disable . . . . . . . . . . . . . . . . . . . . . . . . . . 17
. . . . . . . . . . . . . . . . . . . . . . . . . . . . 17
K
Key 1 . . . . . . . . . . . . . . . . . . . . . . . . . . . . . . . . . . . . . . .4
Keys
control key
end call key. . . . . . . . . . . . . . . . . . . . . . . . . . . 4, 12
handsfree . . . . . . . . . . . . . . . . . . . . . . . . . . . . 4, 16
hash key . . . . . . . . . . . . . . . . . . . . . . . . . . . . . . . . .4
key 1. . . . . . . . . . . . . . . . . . . . . . . . . . . . . . . . . 4, 27
. . . . . . . . . . . . . . . . . . . . . . . . . . . 4, 12
messages . . . . . . . . . . . . . . . . . . . . . . . . . . . . .4, 19
recall key . . . . . . . . . . . . . . . . . . . . . . . . . . . . . . . . 4
star key . . . . . . . . . . . . . . . . . . . . . . . . . . . . . . . . . . 4
talk key . . . . . . . . . . . . . . . . . . . . . . . . . . . . . . .4, 15
L
Language
for voice prompting
(answer machine)
set for display . . . . . . . . . . . . . . . . . . . . . . . . . . . 10
Last number redial. . . . . . . . . . . . . . . . . . . . . . . . . . 15
Liquid . . . . . . . . . . . . . . . . . . . . . . . . . . . . . . . . . . . . 42
List
answer machine
calls. . . . . . . . . . . . . . . . . . . . . . . . . . . . . . . . . . . . 20
network mailbox. . . . . . . . . . . . . . . . . . . . . . . . . 20
Listening in
call participant
Listening in to a call . . . . . . . . . . . . . . . . . . . . . . . . . 17
Listening to a message (network mailbox) . . . . . . 27
Locating
handset
Lock/unlock the keypad . . . . . . . . . . . . . . . . . . .4, 12
. . . . . . . . . . . . . . . . . . . . . . . . . . . . . . . . 31
. . . . . . . . . . . . . . . . . . . 24
. . . . . . . . . . . . . . . . . . . . . . . . . 20
. . . . . . . . . . . . . . . . . . . . . . . . . . 17
M
Mains unit
base
. . . . . . . . . . . . . . . . . . . . . . . . . . . . . . . . . . . 44
handset . . . . . . . . . . . . . . . . . . . . . . . . . . . . . . . . 43
Making calls
accepting a call
internal. . . . . . . . . . . . . . . . . . . . . . . . . . . . . . . . . 16
Manufacturer‘s advice. . . . . . . . . . . . . . . . . . . . . . . 40
Medical equipment . . . . . . . . . . . . . . . . . . . . . . . . . . 7
Menu
opening
tree . . . . . . . . . . . . . . . . . . . . . . . . . . . . . . . . . . . . 45
Menu navigation . . . . . . . . . . . . . . . . . . . . . . . . . . . 14
Message (answer machine)
deleting
playback. . . . . . . . . . . . . . . . . . . . . . . . . . . . . . . . 24
Messages key . . . . . . . . . . . . . . . . . . . . . . . . . . . . 4, 19
Messages list. . . . . . . . . . . . . . . . . . . . . . . . . . . . . . . 20
Microphone . . . . . . . . . . . . . . . . . . . . . . . . . . . . . . . . 4
Muting. . . . . . . . . . . . . . . . . . . . . . . . . . . . . . . . . . . . 16
. . . . . . . . . . . . . . . . . . . . . . . . . . 16
. . . . . . . . . . . . . . . . . . . . . . . . . . . . . . . . 12
. . . . . . . . . . . . . . . . . . . . . . . . . . . . . . . . 25
N
Network mailbox . . . . . . . . . . . . . . . . . . . . . . . . . . .27
enable . . . . . . . . . . . . . . . . . . . . . . . . . . . . . . . . . 27
listening to message. . . . . . . . . . . . . . . . . . . . . . 27
Network mailbox list . . . . . . . . . . . . . . . . . . . . . . . . 20
Network provider selection,
Number
dialling from the directory
displaying caller's number (CLIP) . . . . . . . . . . . 18
entering . . . . . . . . . . . . . . . . . . . . . . . . . . . . . . . . 15
. . . . . . . . . . . . . . . . . . . . . . . . . . . . 18
automatic
. . . . . . . . . . . . . . . . . 15
48
Page 49

Index
O
On/Off button . . . . . . . . . . . . . . . . . . . . . . . . . . . . . . .4
Operating time of handset. . . . . . . . . . . . . . . . . . . 42
Overview
handset
. . . . . . . . . . . . . . . . . . . . . . . . . . . . . . . . . .4
P
PAB X
set pause after line seizure
set pause after R key . . . . . . . . . . . . . . . . . . . . . 32
setting dialling mode. . . . . . . . . . . . . . . . . . . . . 32
setting flash time . . . . . . . . . . . . . . . . . . . . . . . . 32
Package contents . . . . . . . . . . . . . . . . . . . . . . . . . . . .8
Paging . . . . . . . . . . . . . . . . . . . . . . . . . . . . . . . . . . . . 31
Paging key
device with answer machine
device without answer machine . . . . . . . . . . . . .5
Pause after line seizure . . . . . . . . . . . . . . . . . . . . . . 32
Pause after R key . . . . . . . . . . . . . . . . . . . . . . . . . . . 32
Phone number
select from call list
select from redial list . . . . . . . . . . . . . . . . . . . . . 15
Picking up
a call from answer machine
Pin connections . . . . . . . . . . . . . . . . . . . . . . . . . . . . 43
Playing back
messages (answer machine)
messages (network mailbox) . . . . . . . . . . . . . . 27
Power adapter . . . . . . . . . . . . . . . . . . . . . . . . . . . 7, 43
base . . . . . . . . . . . . . . . . . . . . . . . . . . . . . . . . . . . 44
handset . . . . . . . . . . . . . . . . . . . . . . . . . . . . . . . . 43
Power consumption (base) . . . . . . . . . . . . . . . . . . 42
Power consumption (handset) . . . . . . . . . . . . . . . 42
Preselection . . . . . . . . . . . . . . . . . . . . . . . . . . . . . . . 18
Problem solutions . . . . . . . . . . . . . . . . . . . . . . . . . . 39
Protection from calls, black list . . . . . . . . . . . . . . . 29
. . . . . . . . . . . . . . . . 32
. . . . . . . . . . . . . . . .5
. . . . . . . . . . . . . . . . . . . . . . . 15
. . . . . . . . . . . . . . . 25
. . . . . . . . . . . . . . . 24
Q
Quick dial number. . . . . . . . . . . . . . . . . . . . . . . . . . 15
Quick-dial key
. . . . . . . . . . . . . . . . . . . . . . . . . . . . . . . . . . 21
assign
R
Radiation-free . . . . . . . . . . . . . . . . . . . . . . . . . . . . . 29
Recall key . . . . . . . . . . . . . . . . . . . . . . . . . . . . . . . . . . .4
Receiver
change volume (during a call)
change volume (permanently). . . . . . . . . . . . . 34
tone quality. . . . . . . . . . . . . . . . . . . . . . . . . . . . . 34
Reception booster, see Repeater
Recording an announcement
Reducing radiation . . . . . . . . . . . . . . . . . . . . . . . . . 28
Remote operation. . . . . . . . . . . . . . . . . . . . . . . . . . 26
Repeater. . . . . . . . . . . . . . . . . . . . . . . . . . . . . . . . . . 31
Reset (base) . . . . . . . . . . . . . . . . . . . . . . . . . . . . . . . 37
Reset (handset) . . . . . . . . . . . . . . . . . . . . . . . . . . . . 36
. . . . . . . . . . . . . 16
. . . . . . . . . . . . . . . . 23
Ringtone
enable/disable time control
Ringtone (handset)
disable for anonymous calls
switch on/off from menu . . . . . . . . . . . . . . . . . . 35
switch on/off with key . . . . . . . . . . . . . . . . . .4, 35
Ringtone volume . . . . . . . . . . . . . . . . . . . . . . . . . . . 34
Router, operation with . . . . . . . . . . . . . . . . . . . . . . 31
. . . . . . . . . . . . . . . 35
. . . . . . . . . . . . . . . 36
S
Safety precautions. . . . . . . . . . . . . . . . . . . . . . . . . . . 7
Searching
in the directory
Sending a directory entry to a handset. . . . . . . . . 22
Service. . . . . . . . . . . . . . . . . . . . . . . . . . . . . . . . . . . . 38
Set call accept time for answer
machine
Setting flash time (PABX). . . . . . . . . . . . . . . . . . . . . 32
Setting the list type . . . . . . . . . . . . . . . . . . . . . . . . . 20
Setting the wake-up time . . . . . . . . . . . . . . . . . . . . 28
Setting up handset . . . . . . . . . . . . . . . . . . . . . . . . . 10
Speed dial key . . . . . . . . . . . . . . . . . . . . . . . . . . . . . 15
Speed dialling
network mailbox
Star key . . . . . . . . . . . . . . . . . . . . . . . . . . . . . . . . . . . . 4
Status bar . . . . . . . . . . . . . . . . . . . . . . . . . . . . . . .4, 13
Switching off
handset
Switching on
handset
Symbol . . . . . . . . . . . . . . . . . . . . . . . . . . . . . . . . . . . . 6
answer machine . . . . . . . . . . . . . . . . . . . . . .13, 24
battery charge level . . . . . . . . . . . . . . . . . . . . . . 14
keypad lock . . . . . . . . . . . . . . . . . . . . . . . . . . . . . 12
keys. . . . . . . . . . . . . . . . . . . . . . . . . . . . . . . . . . . . . 6
procedures. . . . . . . . . . . . . . . . . . . . . . . . . . . . . . . 6
radio contact . . . . . . . . . . . . . . . . . . . . . . . . . . . . 13
ringtone . . . . . . . . . . . . . . . . . . . . . . . . . . . . . . . . 35
System PIN
changing
resetting . . . . . . . . . . . . . . . . . . . . . . . . . . . . . . . . 36
. . . . . . . . . . . . . . . . . . . . . . . . . . 21
. . . . . . . . . . . . . . . . . . . . . . . . . . . . . 23
. . . . . . . . . . . . . . . . . . . . . . . . . 27
. . . . . . . . . . . . . . . . . . . . . . . . . . . . . . . . 12
. . . . . . . . . . . . . . . . . . . . . . . . . . . . . . . . 12
. . . . . . . . . . . . . . . . . . . . . . . . . . . . . . . 36
T
Talk k ey . . . . . . . . . . . . . . . . . . . . . . . . . . . . . . . . . 4, 15
Telephone jack, pin connections . . . . . . . . . . . . . . 43
Three-party conference . . . . . . . . . . . . . . . . . . . . . . 17
Tone quality (receiver) of the handset. . . . . . . . . . 34
Turning off the wake-up call. . . . . . . . . . . . . . . . . . 28
Turning the alarm clock on and off . . . . . . . . . . . . 28
49
Page 50

Index
All rights reserved. Rights of modification reserved.
U
Upper/lower case and digits . . . . . . . . . . . . . . . . . . .4
V
Volume keys ( base) . . . . . . . . . . . . . . . . . . . . . . . . . . .5
X
XES mode . . . . . . . . . . . . . . . . . . . . . . . . . . . . . . . . . 31
50
Page 51

Issued by
Gigaset Communications GmbH
Frankenstr. 2a, D-46395 Bocholt
© Gigaset Communications GmbH 2021
Subject to availability.
All rights reserved. Rights of modification reserved.
www.gigaset.com
 Loading...