


A690IP - AS690IP
The most up-to-date user guide
can be found at
www.gigaset.com/manuals

Contents
Contents
Overview . . . . . . . . . . . . . . . . . . . . . . . . . . . . . . . . . . . . . . . . . . . . . . . . . . . . . . . . . . . . . . . . . . . . . . . . . . . . . 4
Safety precautions . . . . . . . . . . . . . . . . . . . . . . . . . . . . . . . . . . . . . . . . . . . . . . . . . . . . . . . . . . . . . . . . . . . . 7
Getting started . . . . . . . . . . . . . . . . . . . . . . . . . . . . . . . . . . . . . . . . . . . . . . . . . . . . . . . . . . . . . . . . . . . . . . . 8
Package contents . . . . . . . . . . . . . . . . . . . . . . . . . . . . . . . . . . . . . . . . . . . . . . . . . . . . . . . . . . . . . . . . . . . . . . 8
Base station . . . . . . . . . . . . . . . . . . . . . . . . . . . . . . . . . . . . . . . . . . . . . . . . . . . . . . . . . . . . . . . . . . . . . . . . . . . . 8
Handset . . . . . . . . . . . . . . . . . . . . . . . . . . . . . . . . . . . . . . . . . . . . . . . . . . . . . . . . . . . . . . . . . . . . . . . . . . . . . . 11
Setting up an IP account . . . . . . . . . . . . . . . . . . . . . . . . . . . . . . . . . . . . . . . . . . . . . . . . . . . . . . . . . . . . . . . 13
Using the phone . . . . . . . . . . . . . . . . . . . . . . . . . . . . . . . . . . . . . . . . . . . . . . . . . . . . . . . . . . . . . . . . . . . . . 16
Switch the handset on and off . . . . . . . . . . . . . . . . . . . . . . . . . . . . . . . . . . . . . . . . . . . . . . . . . . . . . . . . . 16
Lock/unlock the keypad . . . . . . . . . . . . . . . . . . . . . . . . . . . . . . . . . . . . . . . . . . . . . . . . . . . . . . . . . . . . . . . 16
Control key . . . . . . . . . . . . . . . . . . . . . . . . . . . . . . . . . . . . . . . . . . . . . . . . . . . . . . . . . . . . . . . . . . . . . . . . . . . 16
Display . . . . . . . . . . . . . . . . . . . . . . . . . . . . . . . . . . . . . . . . . . . . . . . . . . . . . . . . . . . . . . . . . . . . . . . . . . . . . . . 17
Menu navigation . . . . . . . . . . . . . . . . . . . . . . . . . . . . . . . . . . . . . . . . . . . . . . . . . . . . . . . . . . . . . . . . . . . . . . 18
Making calls . . . . . . . . . . . . . . . . . . . . . . . . . . . . . . . . . . . . . . . . . . . . . . . . . . . . . . . . . . . . . . . . . . . . . . . . . 19
Making a call . . . . . . . . . . . . . . . . . . . . . . . . . . . . . . . . . . . . . . . . . . . . . . . . . . . . . . . . . . . . . . . . . . . . . . . . . . 19
Accepting a call . . . . . . . . . . . . . . . . . . . . . . . . . . . . . . . . . . . . . . . . . . . . . . . . . . . . . . . . . . . . . . . . . . . . . . . 20
Handsfree mode . . . . . . . . . . . . . . . . . . . . . . . . . . . . . . . . . . . . . . . . . . . . . . . . . . . . . . . . . . . . . . . . . . . . . . 20
Muting . . . . . . . . . . . . . . . . . . . . . . . . . . . . . . . . . . . . . . . . . . . . . . . . . . . . . . . . . . . . . . . . . . . . . . . . . . . . . . . 20
Making internal calls . . . . . . . . . . . . . . . . . . . . . . . . . . . . . . . . . . . . . . . . . . . . . . . . . . . . . . . . . . . . . . . . . . 21
Network services . . . . . . . . . . . . . . . . . . . . . . . . . . . . . . . . . . . . . . . . . . . . . . . . . . . . . . . . . . . . . . . . . . . . . . 23
Call/message lists . . . . . . . . . . . . . . . . . . . . . . . . . . . . . . . . . . . . . . . . . . . . . . . . . . . . . . . . . . . . . . . . . . . . 27
Call list . . . . . . . . . . . . . . . . . . . . . . . . . . . . . . . . . . . . . . . . . . . . . . . . . . . . . . . . . . . . . . . . . . . . . . . . . . . . . . . . 28
Message list . . . . . . . . . . . . . . . . . . . . . . . . . . . . . . . . . . . . . . . . . . . . . . . . . . . . . . . . . . . . . . . . . . . . . . . . . . . 28
Directory . . . . . . . . . . . . . . . . . . . . . . . . . . . . . . . . . . . . . . . . . . . . . . . . . . . . . . . . . . . . . . . . . . . . . . . . . . . . 29
Local directory . . . . . . . . . . . . . . . . . . . . . . . . . . . . . . . . . . . . . . . . . . . . . . . . . . . . . . . . . . . . . . . . . . . . . . . . 29
Online directories . . . . . . . . . . . . . . . . . . . . . . . . . . . . . . . . . . . . . . . . . . . . . . . . . . . . . . . . . . . . . . . . . . . . . 31
Private online directory . . . . . . . . . . . . . . . . . . . . . . . . . . . . . . . . . . . . . . . . . . . . . . . . . . . . . . . . . . . . . . . . 33
Gigaset.net directory . . . . . . . . . . . . . . . . . . . . . . . . . . . . . . . . . . . . . . . . . . . . . . . . . . . . . . . . . . . . . . . . . . 34
Network mailbox . . . . . . . . . . . . . . . . . . . . . . . . . . . . . . . . . . . . . . . . . . . . . . . . . . . . . . . . . . . . . . . . . . . . 37
Enabling/disabling a network mailbox / Entering a number . . . . . . . . . . . . . . . . . . . . . . . . . . . . . 37
Playing messages . . . . . . . . . . . . . . . . . . . . . . . . . . . . . . . . . . . . . . . . . . . . . . . . . . . . . . . . . . . . . . . . . . . . . 37
Assigning key 1 . . . . . . . . . . . . . . . . . . . . . . . . . . . . . . . . . . . . . . . . . . . . . . . . . . . . . . . . . . . . . . . . . . . . . . . 37
Additional functions . . . . . . . . . . . . . . . . . . . . . . . . . . . . . . . . . . . . . . . . . . . . . . . . . . . . . . . . . . . . . . . . . 38
Alarm clock . . . . . . . . . . . . . . . . . . . . . . . . . . . . . . . . . . . . . . . . . . . . . . . . . . . . . . . . . . . . . . . . . . . . . . . . . . . 38
Baby monitor (Room monitoring) . . . . . . . . . . . . . . . . . . . . . . . . . . . . . . . . . . . . . . . . . . . . . . . . . . . . . . 39
ECO DECT . . . . . . . . . . . . . . . . . . . . . . . . . . . . . . . . . . . . . . . . . . . . . . . . . . . . . . . . . . . . . . . . . . . . . . . . . . . . . 40
Blocking of unwanted calls . . . . . . . . . . . . . . . . . . . . . . . . . . . . . . . . . . . . . . . . . . . . . . . . . . . . . . . . . . . . 41
SMS (text messages) . . . . . . . . . . . . . . . . . . . . . . . . . . . . . . . . . . . . . . . . . . . . . . . . . . . . . . . . . . . . . . . . . . 41
Managing email messages . . . . . . . . . . . . . . . . . . . . . . . . . . . . . . . . . . . . . . . . . . . . . . . . . . . . . . . . . . . . 47
2

Contents
Extending the functionality of the phone . . . . . . . . . . . . . . . . . . . . . . . . . . . . . . . . . . . . . . . . . . . . . 50
Multiple handsets . . . . . . . . . . . . . . . . . . . . . . . . . . . . . . . . . . . . . . . . . . . . . . . . . . . . . . . . . . . . . . . . . . . . . 50
Repeater support . . . . . . . . . . . . . . . . . . . . . . . . . . . . . . . . . . . . . . . . . . . . . . . . . . . . . . . . . . . . . . . . . . . . . 51
Operation with a PABX . . . . . . . . . . . . . . . . . . . . . . . . . . . . . . . . . . . . . . . . . . . . . . . . . . . . . . . . . . . . . . . . 52
Phone settings . . . . . . . . . . . . . . . . . . . . . . . . . . . . . . . . . . . . . . . . . . . . . . . . . . . . . . . . . . . . . . . . . . . . . . 53
Date and time . . . . . . . . . . . . . . . . . . . . . . . . . . . . . . . . . . . . . . . . . . . . . . . . . . . . . . . . . . . . . . . . . . . . . . . . . 53
Country and language (if available) . . . . . . . . . . . . . . . . . . . . . . . . . . . . . . . . . . . . . . . . . . . . . . . . . . . . 53
Display . . . . . . . . . . . . . . . . . . . . . . . . . . . . . . . . . . . . . . . . . . . . . . . . . . . . . . . . . . . . . . . . . . . . . . . . . . . . . . . 53
Tones and signals . . . . . . . . . . . . . . . . . . . . . . . . . . . . . . . . . . . . . . . . . . . . . . . . . . . . . . . . . . . . . . . . . . . . . 54
System . . . . . . . . . . . . . . . . . . . . . . . . . . . . . . . . . . . . . . . . . . . . . . . . . . . . . . . . . . . . . . . . . . . . . . . . . . . . . . . . 56
Web configurator . . . . . . . . . . . . . . . . . . . . . . . . . . . . . . . . . . . . . . . . . . . . . . . . . . . . . . . . . . . . . . . . . . . . 59
Start web configurator . . . . . . . . . . . . . . . . . . . . . . . . . . . . . . . . . . . . . . . . . . . . . . . . . . . . . . . . . . . . . . . . 59
Carry out initial configuration . . . . . . . . . . . . . . . . . . . . . . . . . . . . . . . . . . . . . . . . . . . . . . . . . . . . . . . . . 61
Network . . . . . . . . . . . . . . . . . . . . . . . . . . . . . . . . . . . . . . . . . . . . . . . . . . . . . . . . . . . . . . . . . . . . . . . . . . . . . . 62
Telephony . . . . . . . . . . . . . . . . . . . . . . . . . . . . . . . . . . . . . . . . . . . . . . . . . . . . . . . . . . . . . . . . . . . . . . . . . . . . 63
Messaging . . . . . . . . . . . . . . . . . . . . . . . . . . . . . . . . . . . . . . . . . . . . . . . . . . . . . . . . . . . . . . . . . . . . . . . . . . . . 68
Info Services . . . . . . . . . . . . . . . . . . . . . . . . . . . . . . . . . . . . . . . . . . . . . . . . . . . . . . . . . . . . . . . . . . . . . . . . . . 69
Directories . . . . . . . . . . . . . . . . . . . . . . . . . . . . . . . . . . . . . . . . . . . . . . . . . . . . . . . . . . . . . . . . . . . . . . . . . . . . 69
Management . . . . . . . . . . . . . . . . . . . . . . . . . . . . . . . . . . . . . . . . . . . . . . . . . . . . . . . . . . . . . . . . . . . . . . . . . 71
Status of the phone . . . . . . . . . . . . . . . . . . . . . . . . . . . . . . . . . . . . . . . . . . . . . . . . . . . . . . . . . . . . . . . . . . . 72
Menu overview . . . . . . . . . . . . . . . . . . . . . . . . . . . . . . . . . . . . . . . . . . . . . . . . . . . . . . . . . . . . . . . . . . . . . . . 73
Customer Service & Assistance . . . . . . . . . . . . . . . . . . . . . . . . . . . . . . . . . . . . . . . . . . . . . . . . . . . . . . . 74
Questions and answers . . . . . . . . . . . . . . . . . . . . . . . . . . . . . . . . . . . . . . . . . . . . . . . . . . . . . . . . . . . . . . . . 75
Manufacturer‘s advice . . . . . . . . . . . . . . . . . . . . . . . . . . . . . . . . . . . . . . . . . . . . . . . . . . . . . . . . . . . . . . . 76
Authorisation . . . . . . . . . . . . . . . . . . . . . . . . . . . . . . . . . . . . . . . . . . . . . . . . . . . . . . . . . . . . . . . . . . . . . . . . . 76
Data protection . . . . . . . . . . . . . . . . . . . . . . . . . . . . . . . . . . . . . . . . . . . . . . . . . . . . . . . . . . . . . . . . . . . . . . . 76
Environment . . . . . . . . . . . . . . . . . . . . . . . . . . . . . . . . . . . . . . . . . . . . . . . . . . . . . . . . . . . . . . . . . . . . . . . . . . 76
Care . . . . . . . . . . . . . . . . . . . . . . . . . . . . . . . . . . . . . . . . . . . . . . . . . . . . . . . . . . . . . . . . . . . . . . . . . . . . . . . . . . 77
Contact with liquid . . . . . . . . . . . . . . . . . . . . . . . . . . . . . . . . . . . . . . . . . . . . . . . . . . . . . . . . . . . . . . . . . . . 77
Open Source Software . . . . . . . . . . . . . . . . . . . . . . . . . . . . . . . . . . . . . . . . . . . . . . . . . . . . . . . . . . . . . . . . 77
Technical data . . . . . . . . . . . . . . . . . . . . . . . . . . . . . . . . . . . . . . . . . . . . . . . . . . . . . . . . . . . . . . . . . . . . . . . 78
Character set tables . . . . . . . . . . . . . . . . . . . . . . . . . . . . . . . . . . . . . . . . . . . . . . . . . . . . . . . . . . . . . . . . . . . 80
Menu tree . . . . . . . . . . . . . . . . . . . . . . . . . . . . . . . . . . . . . . . . . . . . . . . . . . . . . . . . . . . . . . . . . . . . . . . . . . . 82
Index . . . . . . . . . . . . . . . . . . . . . . . . . . . . . . . . . . . . . . . . . . . . . . . . . . . . . . . . . . . . . . . . . . . . . . . . . . . . . . . . 85
Licence texts . . . . . . . . . . . . . . . . . . . . . . . . . . . . . . . . . . . . . . . . . . . . . . . . . . . . . . . . . . . . . . . . . . . . . . . . 90
Not all functions described in the user guide are available in all countries or from all
network providers.
3
Overview
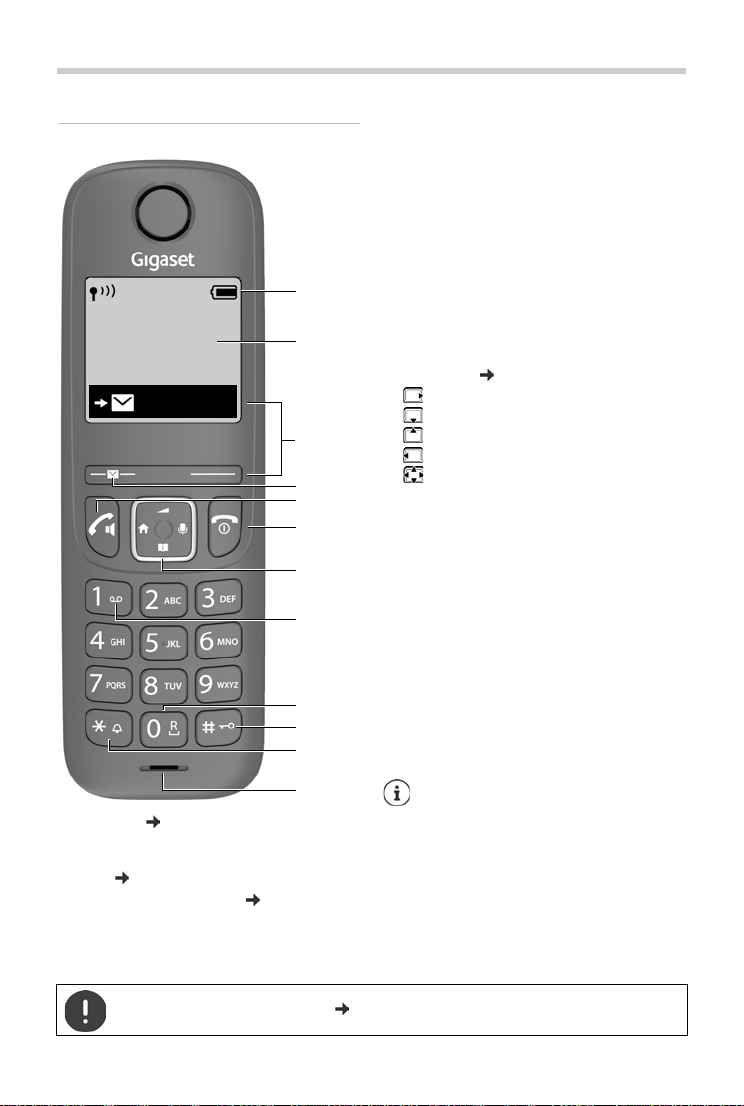
Handset
1 Status bar ( p. 18)
Icons display current settings and operating
status of the telephone
2Time (p.53)
3 Display keys and functions (p.17)
Various functions, depending on the operating
situation
2
6
7
8
9
10
11
4
12
Menu
5
3
1
12:05
4 Message key
Access to the call and message lists;
flashes: new message or new call
5 Talk key / Handsfree key
Accepting call; selecting
displayed number; open
redial list
¥ Press briefly
Start dialling
¥ Press and hold
6 End call key / On/Off key
End call; Cancel function;
one level back
¥ Press briefly
Back to idle mode, switch
handset on/off
¥ Press and hold
7 Control key ( p. 16)
Open menu; mute;
Open directory;
Adjust volume;
Make internal calls;
Navigate in menus and entry fields
8 Key 1
Call network mailbox
¥ Press and hold
9 Recall key
Consultation call (flash)
¥ Press and hold
10 Hash key / Lock key
Lock/unlock the keypad;
enter a dialling pause
¥ Press and hold
Toggle between upper/
lower case and digits
¥ Press briefly
11 Star key
Switching the ringtone on/
off
¥ Press and hold
Switch from pulse dialling to
tone dialling
¥ Press briefly
12 Microphone
If multiple functions are listed, the button
function depends on the situation.
The colour and shape of your device may be
different from the illustration.
Overview
4
Setting the display language (p.12)

Base
A
A Registration/paging key
Locate a handset (paging);
Show IP address on handset
Register a handset Press and
Lights up: LAN connection active (phone is
Flashes: Base station in registration mode
connected to router)
The colour and shape of your device
may be different from the illustration.
Press briefly
hold
Overview
5

Overview
Symbols used in the user guide
Icons
Warnings, the non-adherence to which can result in damage to devices or personal
injury.
Important information regarding function and appropriate handling or functions
that could generate costs.
Prerequisite for carrying out the following action.
Additional helpful information.
Buttons
Talk/Handsfree key Hash key
End call key Star key
Control key Recall key
to Digit/letter keys Menu, OK Display keys
Procedures
Example: Enabling/disabling Auto Answer:
¤ Menu Settings OK Te le ph on y OK Auto Answer OK
(=enabled)
Step Actions required
¤ Menu Press the Menu display key.
¤ Settings
¤ OK
¤ Tel epho ny
¤ OK
Use the control key to navigate to entry Settings.
Press OK to confirm. The Settings submenu is opened.
Select the Tel ep h on y entry using the control key .
Press OK to confirm. The Tele p ho ny submenu is opened.
¤ Auto Answer Select the Auto Answer entry using the control key .
¤ OK Enable or disable it using OK. Function is enabled .
6
Safety precautions
Read the safety precautions and the user guide before use.
The device cannot be used in the event of a power failure. In case of a power failure it is also
not possible to make emergency calls.
If the LAN or Internet connection is down, functions that require an Internet connection are not
available, such as Internet telephony (VoIP), online directories and the Info Center. You are able to
make and receive calls if the phone is connected to an analogue landline.
Emergency numbers cannot be dialled if the keypad/display lock is activated!
Safety precautions
Use only rechargeable batteries that correspond to the specification (see list of permitted
batteries www.gigaset.com/service
other battery types as this could result in significant health risks and personal injur y. Rechargeable
batteries, which are noticeably damaged, must be replaced.
The handset must not be operated if the battery cover is open.
Do not use the devices in environments with a potential explosion hazard (e.g. paint shops).
The devices are not splashproof. For this reason do not install them in a damp environment such
as bathrooms or shower rooms.
Use only the power adapter indicated on the device.
Whilst charging, the power socket must be easily accessible.
Use only the cables supplied for fixed line and LAN connection and connect thes e to the intended
ports only.
Remove faulty devices from use or have them repaired by our Service team, as these could interfere with other wireless services.
Do not use the device if the display is cracked or broken. Broken glass or plastic can cause injury
to hands and face. Send the device to our Service department to be repaired.
Do not hold the rear of the handset to your ear when it is ringing or when speaker mode is activated. Otherwise you risk serious and permanent damage to your hearing.
The phone may cause interference in analogue hearing aids (humming or whistling) or cause
them to overload. If you require assistance, please contact the hearing aid supplier.
Keep small cells and batteries, which can be swallowed, out of the reach of children.
Swallowing a battery can lead to burns, perforation of soft tissue and death. Severe burns can
occur within 2 hours of swallowing.
In the case of a swallowed cell or battery, seek medical care immediately.
Using your telephone may affect nearby medical equipment. Be aware of the technical conditions
in your particular environment, e.g. doctor's surgery. If you use a medical device (e.g. a pacemaker), please contact the device manufacturer. They will be able to advise you regarding the
susceptibility of the device to external sources of high frequency energy (for the specifications of
your Gigaset product see "Technical data").
). Never use a conventional (non-rechargeable) battery or
7
Getting started
1
3
2
123
Getting started
Package contents
• One base station, one power adapter for the base station, one phone cable, one LAN cable,
• One handset, two batteries, one battery cover, one charging cradle with power adapter
• One user guide
The base and charging cradle are designed for use in closed, dry rooms within a
temperature range of +5°C to +45°C.
Position the base on a level, non-slip surface at a central point in the flat or house. The
device's feet do not usually leave any marks on surfaces. However, due to the multitude of different varnishes and polishes used on furniture, contact marks on the
surfaces cannot be completely ruled out.
Never expose the telephone to heat sources, direct sunlight or other electrical devices.
Protect your telephone from moisture, dust, corrosive liquids and vapours.
This device is only suitable for a maximum installation height of 2 m.
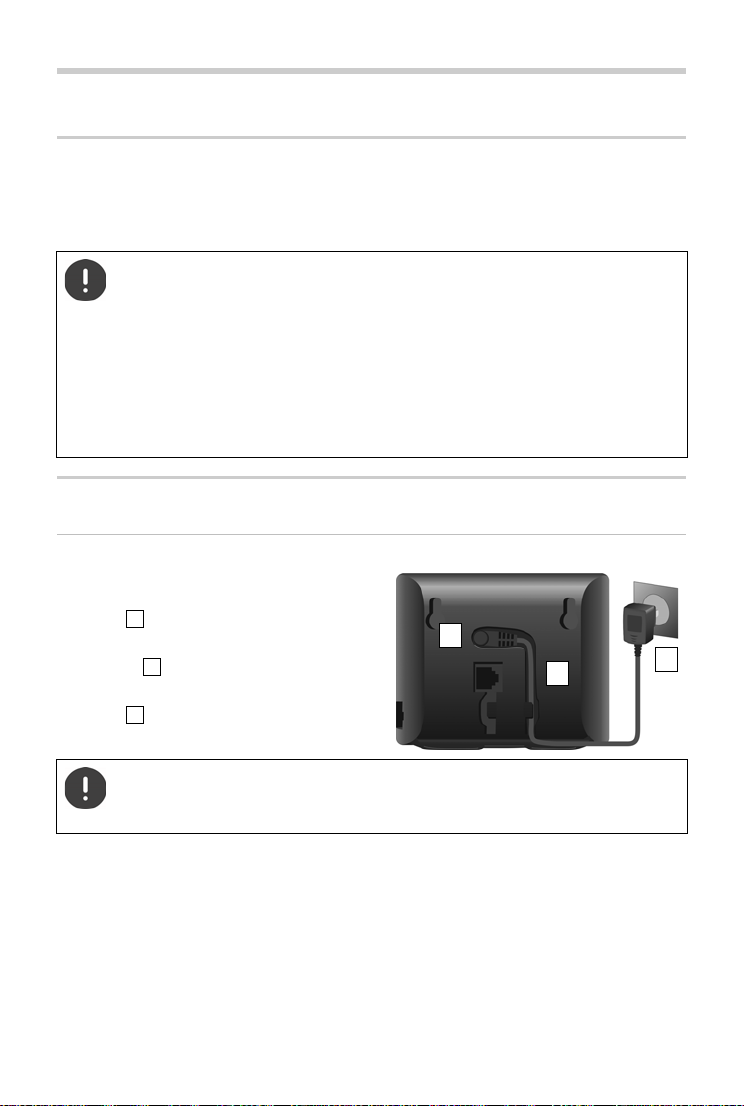
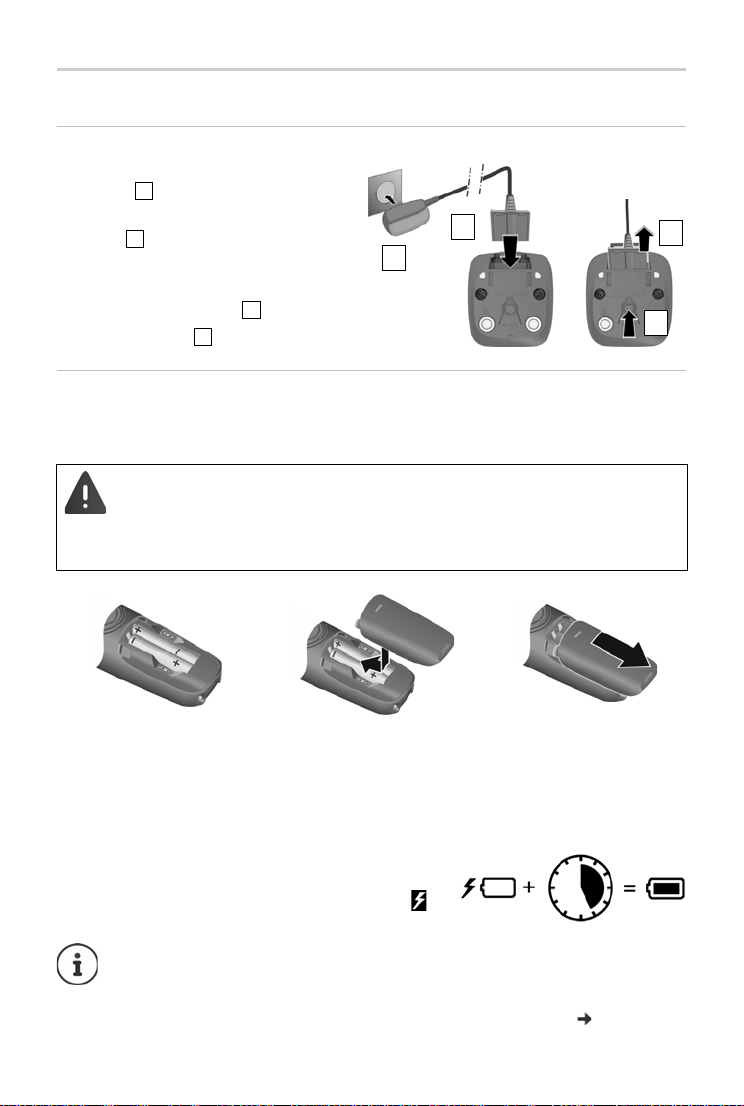
Base station
Connecting to the mains power supply
¤ Insert the power cable of the power
adapter into the upper connection
socket at the rear of the base station.
¤ Push both cables into the appropriate cable
channels .
¤ Insert the power adapter into the power
socket .
Only use the supplied network cable.
The network cable must always be connected in order to function, as the phone will
not operate without a power supply.
8
Getting started
1
3
2
4
123
4
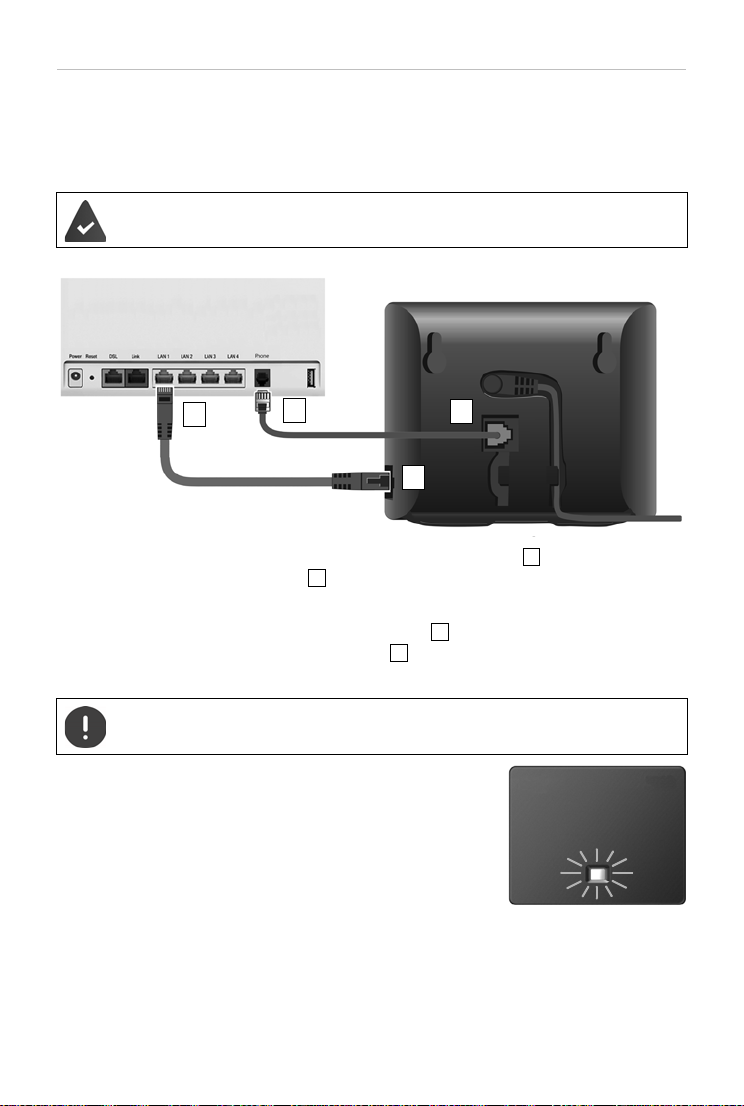
Connecting the phone cable and connecting to the Internet
You establish a phone connection over the landline connection on the router or using a LAN
connector on the router depending on the contract with your phone provider.
You must connect the phone to the router for Internet telephony (VoIP), and access to the
Internet and home network.
For the connection: a router connected to the Internet.
For Internet telephony: a broadband Internet connection (e.g. DSL) with a flat rate.
¤ For the landline connection: Plug the phone cable into the socket and connect it to the
landline connector on your router .
¤ For Internet telephony and Internet connection: Connect one plug of the Ethernet cable
provided into the LAN socket on the side of the base . Insert the second jack of the
Ethernet cable into a LAN socket on the router .
¤ Push the cables into the cable channels provided.
Only use the supplied phone cable. The pin connections on telephone cables may
vary.
As soon as the cable between the telephone and the router is
plugged in and the router is switched on, the key on the front of
the base station lights up (paging key).
You can now make calls over the landline or Internet, and you
can be called. The phone is connected to the Internet.
9

Getting started
Data protection notice
When the device is connected to the router, it will automatically contact the Gigaset Support Server. It will
send the following device-specific information daily:
• Serial number/item number
• MAC address
• Private IP address for the Gigaset in the LAN/its port numbers
• Device name
• Software version
On the support server, this information is linked to the existing device-specific information:
• Gigaset.net phone number
• System-related/device-specific passwords
Further information about the data stored in relation to the Gigaset.net Service can be found at:
www.gigaset.net/privacy-policy
10
Handset
1
2
3
4
123
4
4,5h
Connect the charging cradle
¤ Connect the flat plug of the power
adapter
¤ Plug the power adapter into the
socket
To remove the plug from the charging cradle
again:
¤ Press the release button .
¤ Pull out the plug .
Setting up the handset for use
The display is protected by a plastic film. Please remove the protective film.
Inserting the batteries
Only use rechargeable batteries, as this could otherwise result in significant health
risks and personal injury. For example, the outer casing of the batteries could be
damaged beyond repair or the batteries could explode. The device could also
malfunction or be damaged as a result of using batteries that are not of the recommended type.
Getting started
¤ Insert the batteries with
the polarity in the right
direction (refer to the
picture for +/- positions).
¤ Fit the battery cover from
the top.
¤ Push the cover closed until
it clicks into place.
Charging the batteries
¤ Fully charge the batteries in the charging slot prior to
initial use.
The batteries are fully charged when the battery icon
disappears from the display.
Batteries can heat up during the charge process. This is not dangerous.
Over time, the charging capacity of the batteries will decrease for technical reasons.
Handsets contained in the package have already been registered to the base. If a
handset has not been registered however, please register it manually ( p. 50).
To re-open the battery cover:
¤ Grip the notch on the
cover and slide it downwards.
11

Getting started
Changing the display language
You can change the display language, if the phone has been set to an incomprehensible
language.
¤ Menu Press the keys slowly in succession . . . the language set (e.g. English) is
displayed
¤ Select a different language: Press the control key until the language required is
selected on the display, e.g. Français OK ( = selected)
Setting date and time
Set the date/time so that the correct date and time can be assigned to incoming calls and to
enable the alarm to be used.
¤ Menu Settings OK Date and Time OK Enter the date (day, month and
year) in 8 -digit format OK Enter the time (hours and minutes) in 4-digit format OK
(Display: Saved)
Moving the input position to the left or right:
Press the control key to the left/right
12
Getting started
Setting up an IP account
So that you are able to make calls via the Internet (VoIP), you must have at least one IP account
with an Internet telephony provider. You can register using the access details you receive from
your provider (user name, authentication name, password, etc.) or using an auto-configuration
code (activation code).
To register the phone with your provider, please use:
• The VoIP wizard on the handset
• Or the web configurator on a PC or tablet ( p. 62)
You can configure up to six IP accounts.
Registering using the VoIP wizard on the handset
¤ Press the Message key Yes . . . the wizard starts . . . scroll through the
displayed text OK
If the wizard does not start properly or you have terminated it: Start the VoIP wizard
using the handset menu
¤ Menu Settings OK Te l ep h on y OK VoI P Wiza rd OK
If New firmware available. is shown on the display, there is a firmware update
available for your phone.
To u pda te f irmware: Yes ... the new firmware is loaded (takes approx. 6 mins.)
The Message key will then flash again.
¤ To start configuration: Press the Message key .
The display shows the first of the possible IP accounts (IP 1 to IP 6).
¤ Use to select the required account . . . Accounts already configured are marked with
OK ... Prompt Do you have auto conf code? is displayed
Registration using an authentication name and password:
Registration using an activation code:
If no Internet connection can be established, a corresponding error message will be
generated. For more information, see "Questions and answers" Appendix
¤ No
¤ Ye s
¤ Terminate the VoIP wizard: OK . . . The VoIP wizard will close Troubleshoo t if
necessary Open the wizard again later via the menu to configure the IP account.
13
Getting started
Registration using user data
The wizard establishes a connection to the Gigaset configuration server on the Internet. Various
profiles with general configuration data for different providers can be downloaded here.
Select provider
A list of countries is loaded.
¤ . . . Use to select the country in which you want to use the phone OK ... a list of
providers in this country is displayed . . . use to select provider OK ... the general
configuration data for your provider is downloaded and stored in the phone
If your provider does not appear in the list:
Terminate the wizard: Press and hold the End call key . . . the handset returns to
idle status . . . set up the IP account using the web configurator ( p. 63)
Entering user data for your IP account
You are required to enter your personal access data for your IP account, e. g. Name, Password,
. . . (depending on the provider).
¤ Enter registration data confirm each entry using OK
Pay attention when entering access data, as it is case sensitive.
¤ To switch between lowercase, uppercase and number entry mode: Press the
key
¤ To delete incorrectly entered characters: Press the display key
¤ To navigate within an entry field: Press right/left on the control key
Message on successful transfer: Your IP account is registered at your provider
Registration using an activation code
¤ . . . use to enter the auto configuration code (max. 32 characters) OK ... all data
required for IP telephony is loaded directly from the Internet onto your phone
Message on successful transfer: Your IP account is registered at your provider
The configuration file is transferred via a secure connection (TLS authentication). If the
TLS authentication fails, the Message key flashes .
¤ . . . the message Certificate error - Please check your certificates in the Web
configurator. is displayed end display: press the right Display key
Further information on the error can be found on page Security of the web
configurator.
If the configuration file fails to download (e.g. because the configuration server is not
available), the phone keeps trying to establish a connection until the file is
downloaded successfully to the phone.
The fixed line connection is assigned to the handsets as a send connection. Please change the
send connection to make calls over the Internet. For this, use the connection assistant (it is
started automatically) or the web configurator ( p. 64).
14

Getting started
Send and receive connections
Assign the available phone connections (fixed line network, Gigaset.net and up to six IP
connections) to the end devices as receive and, where necessary, send connections. End devices
are the registered handsets.
• Receive connection: Phone numbers you may be called on. Incoming calls are forwarded to
the end devices for which the relevant connection is assigned as receive connection.
• Send connection: A line that you use for an outgoing call. The corresponding number will be
transferred to the recipient. You can assign each end device a number or the associated
connection as a send connection.
Each connection (number) of your phone can be both a send as well as a receive connection and
can be assigned to several end devices.
Default assignment
• All configured connections are assigned to the handsets as receive connections on delivery.
• The fixed line network connection is assigned to the handsets as a send connection. If you
have no fixed line network connection, no send connection is assigned.
The connection assistant is started automatically.
Select handset
Connections for INT 1:
¤ Answer question Assign connect. to INT1? with Ye s
Connections for other handset :
¤ Answer question Assign connect. to INT1? with No . . . The handset with the next highest
number is offered
You can now change the default assignment one after the other for all registered handsets.
Changing the assignment
As soon as you have selected a handset, the receive connections assigned are displayed, e.g. IP1,
Fixed Line, Gigaset (for Gigaset.net).
¤ Use to scroll through the list
¤ Edit . . . The first receive connection is displayed Use Ye s or No to select (Ye s = Calls
to this connection are forwarded to the handset) Select the connection and configure
a setting
Once you have assigned all receive connections: Confirm the settings with OK
¤ Continue with OK . . . The send connection assigned is displayed.
¤ Edit Use to select the connection OK
Your phone is now ready for use.
15

Using the phone
Using the phone
Switch the handset on and off
Switching on:
Switching off:
If you place a deactivated handset into the charging slot, it will automatically activate itself.
Lock/unlock the keypad
The keypad lock prevents any accidental use of the phone.
Lock/unlock the keypad: Press and hold
Keypad lock enabled: The symbol is shown on the display
Control key
In the description below, the side of the control key is marked with an arrow (up, down, left,
right) that must be pressed in the different operating situations, e.g. for “press right on the
control key”.
¤ When the handset is switched off, press and hold the End call key
¤ When the handset is in idle mode, press and hold the End call key
If a call is indicated on the handset, the keypad automatically unlocks and you can
accept the call. It then locks again when the call is finished.
It is also not possible to call emergency numbers when keypad lock is enabled.
The control key enables you to navigate the menus and input fields, and also to call
up certain functions depending on the situation.
In idle mode During a conversation
Open the menu Mute the microphone
Select audio settings Adjust the loudspeaker volume for receiver
and handsfree mode
Open the directory Open the directory
Make internal call / Open list of handsets Initiate an internal consultation call
16
Using the phone
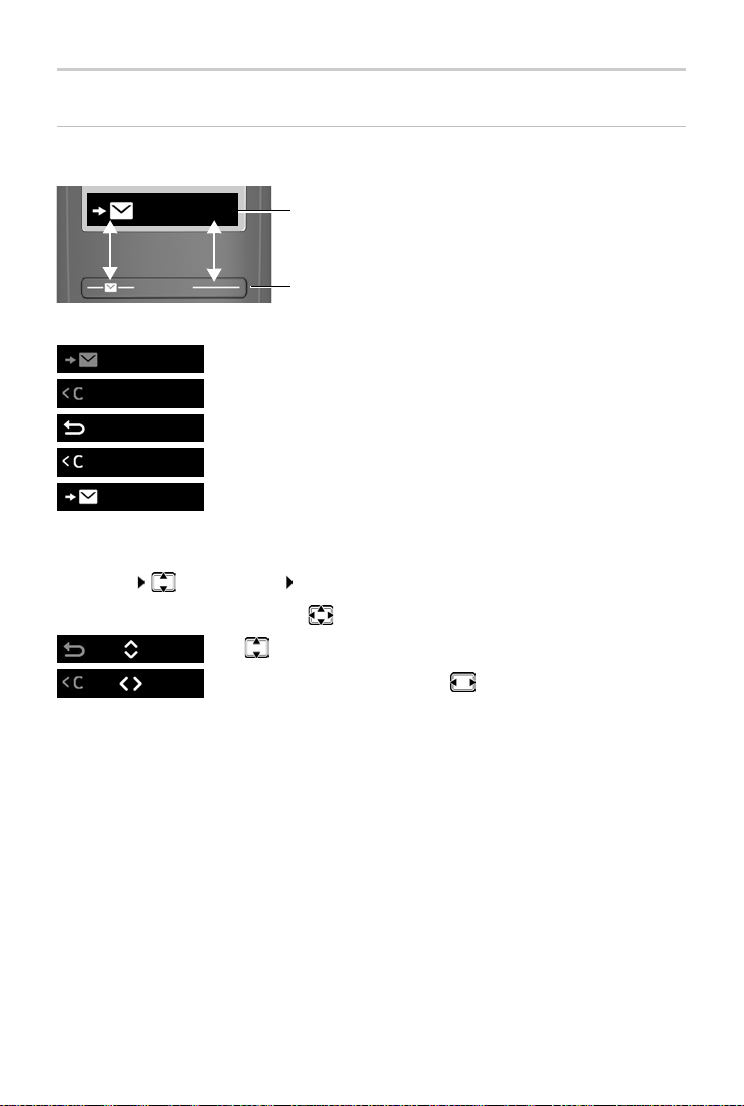
Display
Display keys
The display keys perform a range of functions depending on the operating situation.
Menu
Current display key functions
Display keys
¤ Press the display key . . . Function shown in display above.
Open the main menu / submenu
Menu
Confirm menu function / save entry
OK
Back one menu level
Menu
Delete character by character to the left right
OK
Access the call list / message list
Menu
Changing the assignment of the right display key in idle mode
¤ Press and hold the right-hand display key . . . The list of possible key assignments is
opened Select function OK
Display functions accessed from the control key
Use
Menu
OK
to scroll up/down and set the volume
Move the cursor left and right with
17

Using the phone
Status bar
Icons display current settings and the status of the phone.
Keypad lock activated
Ringtone deactivated
Radio contact between the base and handset
Good to poor
No reception
ECO DECT mode No Radiation enabled
Battery charge level
0 - 10% 11 - 33% 34 - 66% > 66%
The symbol is shown at the front during the charge process.
Flashing Battery almost flat (less than 10 minutes of talk time)
Menu navigation
The functions of your phone are displayed in a menu comprising several levels.
Menu tree: p. 82
¤ When the phone is in idle, press the Display key Menu or the control key (right) . . . the
menu opens
¤ Use the control key to scroll to the function required Confirm with OK
Back one level:
Return to idle:
The display automatically returns to idle mode after two minutes of inactivity.
¤ Press the key or briefly press the End call key
¤ Press and hold the End call key
18
Making calls
Making a call
¤ Enter the number Press the Talk key . . . The number is dialled
Making calls
To change the receiver volume during a call: Use
Ending a call / cancelling dialling: Press the End call key
The number is selected via the send connection (line) set for the handset. To use another line:
to set the volume
¤ Press and hold the Talk key Select the line Dial Enter the phone
number . . . The number is dialled about 3 seconds after the last digit is entered
Dialling from the directory
¤ Open the directory with Scroll to the required entry Press the Talk key
Or
¤ Open the directory with Enter the first letter of the name . . . The first entry
matching the input is displayed Scroll as needed to the entry required Press the Talk
key
Dial from a public directory or the Gigaset.net directory:
¤ Press and hold the Control key . . . The available public directories are displayed
Select the directory OK
Dialling from the redial list
The list contains the 10 numbers last dialled with the handset.
¤ Press briefly Select entry
Managing entries in the redial list
¤ Press briefly Select Menu Select function OK
Possible functions: Use Number / Copy to Directory / Delete Entry / Delete List
Dialling from the call list
Open the call list: Press the Display key Call List OK
¤ Scroll to the required entry and press the Talk key
Dialling with speed dial key
Entries from the directory are assigned to keys 2 to 9.
¤ Press and hold the quick dial key to which the required number is assigned
19
Making calls
One touch call
A predefined number is dialled by pressing any key . Thi s al low s ch ild ren , wh o ar e un abl e to ent er
a number, to call a certain number for example.
Enabling one touch call mode:
¤ Menu Call Manager OK One Touch Call OK Activation OK
Enter the number or use to take it from the directory OK (=enabled)
Make a one touch call:
Cancel dialling:
End one touch call:
¤ Press any key . . . the saved number is dialled
¤ Press the End call key
¤ Press and hold the key
Accepting a call
The handset indicates an incoming call by ringing and by a display on the screen.
¤ Press the Talk key
Func tion Auto Answer enabled: Simply take the handset out of the charging slot
Enabling function Auto Answer:
¤ Menu Settings OK Te le ph on y OK Auto Answer OK
(=enabled)
Switch the ringtone off:
Reject the call:
¤ Silence
¤ Reject
Handsfree mode
In handsfree mode, you switch on the loudspeaker so that you can hear the caller without
holding the handset to your ear.
Enabling/disabling handsfree mode during a call and when listening to the answer machine:
¤ Press the handsfree key
Placing the handset in the charging cradle during a call:
¤ Press and hold down the Handsfree key Place the handset into the charging cradle
Adjusting the loudspeaker volume:
¤ Menu Audio Settings OK Call Volume OK Handsfree OK
Use to adjust the volume OK
Muting
¤ During a call, press the control key (right) . . . The handset microphone is switched off
20
Making calls
Making internal calls
Making internal calls
Internal calls are free calls to other handsets registered to the same base.
Calling a specific internal subscriber:
¤ when more than two handsets are registered: Use to select the internal
subscriber . . . The handset selected is called
Calling all handsets ("group call"):
Press and hold or
or
¤ Call All . . . All registered handsets are called. You speak to the first
internal subscriber to pick up.
Ending the internal call: Press the End call key .
Making an internal consultation call / Forwarding a call
Call an external subscriber and transfer the call to an internal subscriber or hold a consultation
call with him or her.
¤ Select as required the handset or Call All OK . . . The internal subscriber(s) is/
are called, the external subscriber hears music on hold
Possible options:
Hold a consultation call: Speak to the internal subscriber
Return to the external call: Press the Display key
Transfer the external call when the internal subscriber has answered:
¤ Announce an external call Press the End call key
Transfer the external call before the internal subscriber answers:
¤ Press the End call key . . . The external call is forwarded immediately
Initiating an internal conference call
You want to join an existing external call on a different handset.
¤ Press and hold the Talk key . . . All subscribers hear a signal tone
Ending a conference call:
¤ Press the End call key . . . All subscribers hear a signal tone
When the first internal subscriber presses the End call key , the handset which joined the
conference call remains connected to the external subscriber.
21

Making calls
Changing a handset's name or internal number
Changing name:
¤ Select the handset (your own is marked < Menu Rename OK Use
to delete characters Enter the name OK
Changing the internal number:
¤ Select Call All or handset Menu Assign Handset No. OK Select
the handset Select the number OK
If the number is already assigned, an error message is displayed. In this case, use a different
number.
22
Network services
Network services
Network services depend on the network (analogue fixed line network or Internet telephony)
and on the network provider (service provider) and must be requested from that provider if
required.
You will find a description of the features on your network provider's website or at one of their
store branches.
If you require assistance, please contact your network provider.
Requesting network services may incur additional costs. Please consult your network
provider.
Calling Line Identification
During a call, the caller's number is transferred (CLI = Calling Line Identification) and can be
displayed on the recipient's display (CLIP = CLI Presentation). When the caller's number is withheld, it is not show on the called party’s display. The cal l is mad e an ony mou sly (CL IR = CL I Re str iction).
You have authorised your network provider to show the number of the caller (CLIP)
on your display.
The caller has authorised the network provider to send the phone number (CLI).
Caller display for incoming calls
Calling Line Identification
The caller's phone number is displayed. If the caller's number is saved in the directory, the name
is displayed.
No Calling Line Identification
Instead of name and number, the following is displayed:
• External Call: No number is transferred.
• Withhold Number: Caller has withheld Calling Line Identification.
• Private: Caller has not authorised Calling Line Identification.
Withhold no. next call is anonymous
Disabling Calling Line Identification for the next call. The setting applies to all the phone's
connections.
¤ Menu Select Services OK Withhold No. Next Call OK Enter the
phone number Send . . . The call is initiated
23
Network services
Call divert
When diverting a call, the call is forwarded to another connection.
Diversion of call to an external number (fixed line or IP):
¤ Menu Select Services OK Call Divert OK Select the receive
connection OK
Enable/disable:
Enter destination:
Setting a rule:
Enable a service:
Forwarding to internal party
¤ Status: Use to select On/Off
¤ Phone number: Enter the number
¤ When: Select with
All Calls All calls are forwarded immediately.
No Answer Calls are diverted if no one accepts the call within
several rings.
When Busy Calls are diverted if the line is busy.
¤ Send
¤ Menu Select Services OK Call Divert OK Int OK
Enable/disable:
Enter destination:
Setting a rule:
Enable a service:
Any call that has been diverted is entered in the call lists.
¤ Status: Use to select On/Off
¤ To handset: Use to select the handset
¤ Ring delay: Use to select the delay time for accepting a call
¤ Send
Permit/block Call Waiting
During an external call, a call waiting tone indicates another external caller. If the number is
being transferred, you will see the number or the name of the caller on the display.
Enabling/disabling call waiting:
¤ Menu Select Services OK Call Waiting OK Use to enable/disable
Call Waiting Send . . . The request is sent to the provider
Call waiting is enabled/disabled for all connections to the phone and all registered handsets.
To enable/disable the function for the fixed line connection, the phone establishes a connection
to the exchange to send the relevant code.
¤ After confirmation from the fixed line network, press the End call key
24
Network services
Permit/block Call Transfer
Du ring cal l swa ppi ng, i n a co nfe renc e cal l or in an ext ern al co nsu ltat ion c all , two ext erna l pa rti es
are connected to each other by hanging up.
¤ Menu Select Services OK Tran sfer (ECT) OK (=enabled)
You can use the web configurator to make further settings for call transfer over a VoIP
connection ( p. 67).
Actions during an external call
For VoIP telephony, the services described below are only available if parallel IP
connections are permitted.
Accepting a waiting call
You are making an external call and hear the call waiting tone.
With Calling Line Identification: Accept
Without Calling Line Identification (fixed line): Menu Accept Call Waiting
VoIP: Once you have accepted the waiting call, you can switch between the two callers
or speak to both at the same time (“Conference calling (VoIP)” p. 26).
Without CLIP, a waiting call is only announced with a signal tone.
An internal waiting call is shown on the display. You can neither accept the internal call
nor reject it.
Rejecting a waiting call (VoIP)
You can hear the call waiting tone but do not want to speak to the caller.
¤ Reject . . . The waiting caller hears the busy tone.
You can also press the End call key to end the current call, and then press the Talk
key to accept the second call.
Consult externally
Call a second external party. The first call is placed on hold.
During an external call:
¤ ExtCall . . . The previous call is put on hold, the person hears an announcement or hold
music Enter the number of the second subscriber . . . The number is dialled. You are
connected to the second subscriber.
This person does not pick up or you want to end the call to the second subscriber:
¤ End . . . You are reconnected to the first subscriber
The consultation call is established via the same send connection as the first call.
You can also select the second subscriber's phone number from the directory, redial
list or a call list on the handset.
25

Network services
Ending a consultation call (VoIP)
¤ Menu End Active Call . . . You are reconnected to the first subscriber
or
¤ Press the End call key . . . The connection is interrupted briefly and you receive a call
back. As soon as the receiver is lifted, you are reconnected to the first subscriber.
VoIP connections: In the web configurator, the Transfer call by on-hook function is
not enabled (
Configuring call transfer via VoIP, p. 67).
Conference calling (VoIP)
You can speak to two people simultaneously.
You are conducting an external call and have called a second person (internal or external consul-
tation call) or have accepted a waiting external call.
¤ Conf. . . . You and the two other callers (both marked by the > icon) can hear and speak to
each other simultaneously
Ending a conference call
¤ EndCon . . . You return to "call swap" status. You will be reconnected to the subscriber with
whom you started the conference call.
or
¤ Press the End call key to end the call with both people
Each of the subscribers can end their participation in the conference call by pressing the End call
key and replacing the receiver.
Transferring a call to an internal party
You are making an external call and would like to transfer it to another handset.
¤ Initiating an internal call: Select the internal subscriber Press the Talk key
. . . The internal subscriber is called Press the End call key (also before announcing)
Transferring a call to an external number (VoIP) – ECT (Explicit Call Transfer)
In the web configurator, the Transfer call by on-hook function is enabled
( Configuring call transfer via VoIP
You are making an external call via a VoIP connection and wish to transfer the call to another
external party by hanging up.
, p. 67).
¤ Putting the call on hold: ExtCall Initiate the second call Press the End call key
(even before announcing) to forward the call
26
Call/message lists
97
975 SET: [0
]
975 SET: [1
]
Call/message lists
The phone saves information about various events in lists:
• Call list: Numbers of all incoming and missed calls
• Network mailbox list: Messages on the network mailbox
An advisory tone sounds as soon as a new entry appears on one of the lists. The default setting
is the message key flashing (= left display key) and the following shown on the display:
+ number for missed calls
+ number for new voice messages
+ number for new text messages (SMS)
Disabling the display of new messages
¤ Menu
Select the type of message:
¤ Press key for missed calls
¤ Press key for messages on the network mailbox
Setting the actions for new messages:
¤ Press key The presence of new messages is displayed (default).
¤ Press key The presence of new messages is not displayed.
Save setting: OK
A change to the setting only becomes effective once the next new message is
received.
If calls are stored in the network mailbox, you receive a message when the setting is
configured (dependent on the network provider).
27
Call/message lists
Call List 01+02
Call list
Prerequisite: CLIP
Depending on the type of list set, all numbers for the last 25 incoming calls are saved, or only the
missed calls are saved.
Setting the list type
¤ Menu Settings OK Te l ep ho n y OK Calls List Type OK Missed
calls / All Calls OK (=selected)
Opening the call list
¤ Press the display key . . . The list selection is opened Call List
The entry shows: number of new entries + number of old, read
entries
Open list: OK . . . The last incoming call is displayed
¤ Use to scroll through the list
Show information about a call: Select entry View
Using other functions
¤ Select entry Menu Use to select the function:
SMS Enquiry Request SMS information about call number (might require
Copy to Directory Copy an entry to the directory
Delete Entry Delete current entry
Delete List Delete all entries.
payment)
Note: All old and new entries are deleted.
Message list
You can use the network mailbox list to listen to messages on the network mailbox.
Open the network mailbox list:
¤ Press the Display key . . . The list selection is opened Network Mailbox OK
28
Directory
Directory
The options are:
• The local handset directory
• Public online and classified directories
• Private online directory
• Gigaset.net directory
Local directory
The local directory is unique to a handset. Entries can be sent to other handsets however
( p. 30).
Up to 150 phone numbers (max. 30 digits) with associated names (max. 16 characters)
can be stored.
Open the directory:
or:
Menu Directory OK
Creating a directory entry
¤ Menu New Entry OK Enter the phone number OK Enter the
name OK
Marking an entry as VIP
Every existing entry can be marked as a VIP contact. VIP contacts are assigned their own ringtones and are displayed with symbol in the directory and when they call.
Creating a VIP entry:
¤ Use to scroll to the entry you want to make a VIP contact Menu Select
VIP Caller Melody OK ( = enabled) Select the ringtone melody OK
Resetting a VIP mark: Select No Melody as the ringtone melody
Press down the control key
Selecting/editing the directory entry
¤ Open the directory
¤ Use to scroll to the entry until the required name is selected
or
¤ Enter the first character of the name scroll as required with to the entry
Display number:
Change entry:
¤ Menu Show Number OK
¤ Menu Edit Entry OK Delete characters with
change entry with OK
29

Directory
Assigning quick-dial keys
¤ Select entry Menu Shortcut OK Select key OK
(=selected)
Clearing a key assignment:
¤ Select entry Menu Shortcut OK No Shortcut OK
(=selected)
Deleting a directory (entry)
Deleting a directory entry
¤ Select entry Menu Delete Entry OK
Deleting a directory
¤ Menu Delete List OK Confirm deletion with OK
Transferring a directory (entry) to another handset
The sending and receiving handsets must both be registered with the same base.
The other handset and the base are able to send and receive directory entries.
Transferring a directory entry to another handset
¤ Select entry Menu Send Entry OK Select internal number of
the recipient handset OK
Transferring a directory to another handset
¤ Menu Send List OK Select internal number of the recipient handset
OK
30

Directory
Online directories
Depending on the provider, you can use public directories such as the classified directory
(Yellow Pages).
The online directory is configured from the web configurator.
Exclusion of liability
Gigaset Communications GmbH assumes no guarantee or liability for the availability of this
service. The service may be discontinued at any time.
Opening an online directory
¤ Press and hold
or
¤ Menu Directory OK Online Directory Accept
. . . The list of online directories is displayed with provider-specific names
¤ Select online directory from the list OK
Calls to the online directory are always free of charge.
Searching for an entry
¤ Press and hold Select the online directory OK Enter the search criteria
Use to switch between the entry fields OK ... then
Searching for a telephone number: Enter name and town/city
Name/category:
Tow n /c it y :
Start search:
Town/city details ambiguous:
¤ Enter the name or category (max. 30 chars)
¤ Enter the name of the city/location where the person you are
looking for lives (max. 30 chars).
¤ OK . . . the search is started
¤ OK . . . possible town names are displayed Select a town
name OK
Searching for a name (reverse search): Enter the number
Number:
Start search:
¤ Enter number Use to enter a number (max. 30 chars)
¤ OK . . . the search is started
The selected online directory supports the number search.
31

Directory
No entries found to match the search criteria given:
• Start a new search: New
• Change the search criteria: Edit
Too many entries found:
• Start a refined search: Refine
• The number of hits appears in the display (depends on the provider).
Show the hit list: View
Starting a refined search
The refined search limits the number of hits returned by a previous search using additional
search criteria (first name and/or street).
¤ Menu Refine Search OK
. . . The search criteria are transferred from the previous search and are entered into the corresponding fields . . . Edit or add search criteria, e.g. enter first name or street OK
Search result (hit list)
The first entry found is displayed. The consecutive number of the entry displayed and the hit
number are in the top right (e.g. 1/50).
Scroll through the list:
Display the full entry:
¤ View . . . All entry information is displayed in full . . . Use to scroll through the entry
Refine search criteria and restrict hit list:
¤ Menu Refine Search OK
Start a new search:
¤ Menu New Search OK
Copy an entry to the local directory:
¤ Menu Copy to Directory OK . . . The phone number is displayed OK ... The
name is displayed Change the name as required OK . . . The entry is saved
Calling subscribers
¤ Select the entry Press the Talk key . . . The number is dialled
32

Directory
Private online directory
Some providers offer the option of creating and managing a private online address book / directory on the Internet. You can call up online directory entries from any phone or PC, e.g. from
a VoIP phone in the office or a PC in a hotel.
The following details can be displayed (provider-specific): nickname, name, first name, phone
number, mobile number, VoIP number, street, house number, post code, town/city, company
name, business type, date of birth, email.
A personal online directory is set up (via a PC web browser), entries are displayed.
The online directory is activated on the telephone via a Web configurator. The user-
name and password for accessing the personal online directory are saved on the
phone.
The directory is available on any registered handset.
Opening an online directory
¤ Press and hold
or
¤ Menu Directory OK Online Directory Accept
. . . The list of online directories is displayed with provider-specific names
¤ Select a private online directory from the list OK
The entries in the online directory are sorted alphabetically according to the first non-space field
in the entry. This is generally the nickname or surname.
Selecting, viewing and managing entries in the online directory
¤ Scroll to the required entry OK
or
¤ Enter the first letter of the name Use as required to scroll to the entry View
The detailed view with the complete entry is opened scroll through the entry.
Changing/deleting the name:
¤ Menu Edit nickname OK Use to delete the entry name and to change
it OK
Transfer a number to the local directory:
¤ Menu Copy to Directory OK Copy the number to the local directory.
Calling up an entry from the online directory
¤ Select the entry (open the detailed view as required and select the number) Press the
Talk key Select the number OK . . . The number is dialled
33

Directory
Transferring the local directory to the private online directory
The provider supports transferring vCards to the online directory. Find out more on
your provider's website.
¤ Use the web configurator to save entries in the local directory as a vcf file on a PC Copy files
to the online directory
Gigaset.net directory
Gigaset.net is a VoIP service offered by Gigaset Communications GmbH. All users of a Gigaset
VoIP device can make calls over the Internet directly and free of charge to other Gigaset.net
users – without setting up an account with a phone provider and without making any further
settings. Connections to/from other networks are not possible.
Every Gigaset IP device is assigned a Gigaset.net phone number by default. When you open the
Gigaset.net directory for the first time, you are asked to enter a name for your connection.
Gigaset.net is a voluntary service provided by Gigaset Communications GmbH
without guarantee or liability for the availability of the network and service provision.
If you do not use your Gigaset.net connection for six months, it is automatically
disabled.
Re-activating your connection:
¤ Start search in Gigaset.net directory
¤ Make a call from Gigaset.net (dial a number with #9 at the end)
¤ Activate the connection via the web configurator.
Opening the Gigaset.net directory
¤ Press and hold . . . The list of online directories is opened Gigaset.net OK
or
¤ Menu Directory OK Online Directory Accept . . . The list of online direc-
tories is displayed OK Gigaset.net OK
Registering with Gigaset.net
When you open the Gigaset.net directory for the first time, you are asked to enter a name for
your connection.
¤ Enter the Name (max. 25 chars) OK . . . The name is assigned to the phone number and
entered in the Gigaset.net directory.
You can also enter/change the Gigaset.net name via the web configurator:
¤ Settings Tel e ph on y Connections
34

Directory
Data protection notice
The nickname is saved on a central Gigaset server. It appears in the Gigaset.net directory and other users
of the Gigaset.net service can call you using this name.
By entering your information, you agree for this data to be saved.
If you do not wish this to happen, you can cancel the operation at this point:
• Cancel without leaving the Gigaset.net director y: Do not enter a name OK . . . You can use the
directory to search for other Gigaset.net subscribers and call them, but no nickname will be recorded.
• Leave Gigaset.net directory without search: Press and hold the End call key
Further information about data stored in relation to the Gigaset.net service can be found at
www.gigaset.net/privacy-policy
Searching for subscribers on the Gigaset.net directory
¤ Enter the name or part of a name (max. 25 chars) Menu Search OK
Search successful
A hit list is displayed containing all the names that begin with the specified character string. The
consecutive number of the marked entry and the number of hits are in the top right (e.g. 1/5).
¤ Use to scroll through the hit list
No matching entry found
Start a new search: New
Change search criteria: Edit . . . The name specified before is used Change or extend the
name Restart the search
Too many matching entries, no hit list
Starting a refined search: Refine . . . The name specified before is used Extend the
name Restart the search
Displaying an entry
¤ Select a subscriber from the hit list View . . . The Gigaset.net number and the
subscriber's name. The name may appear over more than one line.
Calling a Gigaset.net subscriber
From the Gigaset.net directory:
¤ Press and hold Select Gigaset.net OK Select the subscriber in the hit
list Press the Talk key
or enter the number directly (in idle mode):
¤ Enter a Gigaset.net number (including #9) Press the Talk key
or from the local directory:
¤ Briefly press Use to select a Gigaset.net phone number Press the Talk key
Every number ending with #9 is automatically dialled via Gigaset.net.
Calls to the Gigaset.net directory are always free of charge.
35

Directory
Copying an entry to the local directory
¤ Select the entry Menu Copy to Directory OK Change the entry as
required OK . . . The entry is saved, and the number and name (possibly truncated, max.
16 chars) are copied to the local directory
Changing and deleting your own entry
¤ Open the Gigaset.net directory Menu Own Details OK ... The Gigaset.net
number and name currently entered are displayed
Entering/editing a name:
¤ Edit Use to delete the name if necessary Use to change the name or enter a
new name (max. 25 chars). OK
If the name is deleted, the entry is deleted from the directory and is no longer "visible"
to other Gigaset.net subscribers. The Gigaset.net number can still be reached.
Display the number during a call: Menu Service Info OK
36

Network mailbox
Network mailbox
A network mailbox can be set up for every phone connection.
The network mailbox is registered with the network provider and enabled.
Enabling/disabling a network mailbox (IP connection)
Enable/disable network mailbox.
¤ Menu Select Services OK Network Mailbox OK Use to enable/
disable the network mailbox
Enabling/disabling a network mailbox / Entering a number
¤ Menu Answering Machine OK Network Mailbox OK Select
connection OK
Fixed line network:
IP connection:
To enable and disable the network mailbox for the fixed line connection, use the number and a function code from your network provider. Contact the network provider if
you require any further information.
¤ Enter or change the activation code for the network mailbox
OK
¤ Use to enable/disable the answering machine
¤ Phone number of the network mailbox OK
With some VoIP providers, the phone number is downloaded already
together with the general VoIP provider data to the base station.
Playing messages
From the menu:
Using key 1:
From the message list:
¤ Menu Answering Machine OK Play Messages
OK Select connection OK
¤ Press and hold key
¤ Press the Display key . . . The list selection is opened
Select the required network mailbox OK
Assigning key 1
Specify which answering machine you want to open with the key.
Settings for fast access are handset-specific. A different answer machine can be
assigned to key on every handset registered.
¤ Menu Answering Machine OK Set Key 1 OK Select connection
OK ( = selected)
37

Additional functions
Additional functions
Alarm clock
Date and time have been set.
Turning the alarm clock on and off
¤ Menu Alarm Clock OK Activation OK (=turned on)
¤ Enter the wake-up time in minutes and second OK
Alarm clock turned on: Instead of the date, the display shows the wake-up time and left of it the
alarm clock symbol.
Setting/changing the wake-up time
¤ Menu Alarm Clock OK Wake-up Ti me OK Enter the wake-up time
in hours and minutes OK
Setting days
Select when the alarm is to be active, daily or only on workdays.
¤ Menu Alarm Clock OK Occurrence OK Select Daily / Monday-
Friday OK
Turning off the wake-up call
A wake-up call is shown on the display and indicated by the ringtone melody selected.
¤ Off . . . The alarm call is switched off for 24 hours
or
¤ Press Later or any key . . . Snooze is shown on the display, the alarm call is repeated after five
minutes
38

Additional functions
Baby monitor (Room monitoring)
When the baby monitor is switched on, the stored external phone numbers or all handsets registered to the phone (internal) are called as soon as a defined noise level is exceeded in the vicinity of the handset. The alarm to an external number is cancelled after about 90 seconds.
You can answer the alarm using the Two- Way Tal k function. This function is used to switch the
loudspeaker of the handset located in the baby's room on or off.
In baby monitor mode, incoming calls are only indicated on the display (without ringtone). The
display backlight is reduced to 50%. Advisory tones are deactivated. Advisory tones are disabled.
All keys with the exception of the display keys are disabled.
If you accept a n incoming ca ll, the ba by monito r mode is suspended for the duration of the call,
but the function remains activated. The baby monitor mode is not deactivated by switching the
handset off and on again.
The handset should be positioned 1 to 2 metres away from the baby. The microphone
must point towards the baby.
Activating the function reduces the operating time of your handset. For that reason,
place the handset in the charging cradle if necessary.
The baby monitor is activated 20 seconds after switching on.
The answer machine for the destination number must be switched off.
After switching on:
¤ Test sensitivity.
¤ Test the connection, if the alarm is being forwarded to an external number.
Activating and setting the baby monitor
¤ Menu Baby Monitor OK
Enable/disable:
¤ Activation OK ( = enabled) . . . if a phone number to call is already entered, the baby
monitor is enabled immediately
Entering/changing call number:
¤ Call Target OK Select Internal or External Call OK for External Call, enter
phone number OK
Baby Monitor and the number to call are displayed when the baby monitor is enabled and in
idle mode.
Activate/deactivate two-way talk:
¤ Two-Way Talk OK (=enabled)
Deactivate baby monitor / Cancel alarm
Deactivate the baby monitor:
¤ In idle status press the display key Off
Cancel the alarm:
¤ Press the End call key during an alarm
39

Additional functions
Deactivate the baby monitor remotely
The alarm is forwarded to an external destination number.
The receiving phone supports tone dialling.
¤ Accept alarm call Press keys
The baby monitor is deactivated and the handset is in idle status. The baby monitor settings
on the handset (e.g. no ringtone) will remain activated until you press the display key Off.
The baby monitor cannot be reactivated remotely.
Reactivate: p. 39
ECO DECT
The device range is set to maximum by default. This guarantees the best connection between
handset and base. In idle mode, the handset does not transmit (it is radiation-free). Only the base
maintains contact with the handset, using weak wireless signals. During a call, the transmit
power automatically adapts to the distance between base and handset. The shorter the distance
to the base, the lower the radiation.
Reducing radiation by up to 80%
Enabling/disabling the maximum range:
¤ Menu Settings OK Maximum Range OK ( = range and radiation reduced)
It is not possible to use a repeater to increase the range.
Disabling radiation in idle mode
The wireless signals of the base are also disabled with the No Radiation setting.
¤ Menu Settings OK No Radiation OK ( = Radiation disabled)
All handsets registered must support this feature.
For speedy set-up of connections for incoming calls, the handset keeps switching to
“ready to receive” momentarily. This increases the power consumption and so
reduces the standby and talk times.
When No Radiation is enabled, there is no range display / range alarm on the
handset. Contactability can be tested by attempting to establish a connection.
¤ Press and hold the Talk key . . . the ringing tone sounds.
40

Additional functions
Blocking of unwanted calls
Enabling/disabling ringtone with time control
Enter a time period during which the handset should suspend ringing to indicate external calls,
such as during the night.
Enabling/disabling time control
¤ Menu Call Manager OK Time Control OK Activation OK
(=enabled)
Setting the time period
¤ Menu Call Manager OK Time Control OK Settings OK Off
from: Enter the 4-digit time OK Off until: Enter the 4-digit time OK
Permit/block VIP calls
Specify whether, when time control is enabled, calls from those marked as VIP contacts in the
directory are also suppressed.
¤ Menu Call Manager OK Time Control OK Suppress VIP Calls OK
(=enabled)
Off for anonymous calls
You can set you r handset so that it does not ring for calls where Calling Line Identification
has been withheld. The call is only signalled on the display.
¤ Menu Call Manager OK Mute Anonym. Calls OK (=enabled)
SMS (text messages)
You can use your phone to send and receive SMS messages over the landline and using VoIP.
Calling Line Identification is enabled.
The network provider supports the SMS service.
The call number of at least one SMS service centre has been entered ( p. 44).
If no SMS service centre is entered, the
SMS messages can also be sent and received via VoIP. The lines for sending SMS
messages must be expressly set. It is not possible to receive SMS messages via
Gigaset.net.
SMS submenu only comprises entry Settings.
41

Additional functions
Writing and sending SMS messages
An SMS may be up to 160 characters in length.
¤ Menu SMS OK
Write an SMS:
Send SMS:
Enter the number: From the directory: Select the number OK
Send:
The number must include the local area code (even if you are in that area).
In the case of an external call, or if you interrupt writing by more than 2 minutes, the
text is automatically saved in the draft message list.
You can also send an SMS to an email address. In this case, put the email address at the
start of the message.
Sending SMS messages may incur additional costs. Please consult your network
provider.
Temporary storing of an SMS (draft message list)
You can temporarily store, change later and send SMS messages.
Saving SMS in the draft message list
¤ Write Message OK Enter the SMS text
¤ Menu Send Text OK SMS OK
or use to enter it directly
If sending SMS messages to an SMS mailbox: add the mailbox ID to the
end of the number.
¤ Send Text
¤ Menu SMS OK Write Message OK Enter the SMS text Menu Save
Tex t
Opening and editing an SMS from the draft message list
¤ Menu SMS OK Outgoing OK Select draft
Read draft:
Edit:
Send SMS:
Delete entry:
Delete all entries:
Receiving an SMS
New SMS messages are signalled on all Gigaset handsets by the symbol (on the display) and
an advisory tone.
All received SMS messages are saved in the incoming message list. If an SMS is too long or is not
sent in full, it is split into individual messages. Since an SMS remains in the list even after it has
been read, you should regularly delete SMS messages from the list.
The display tells you if the SMS memory is full.
42
¤ Read
¤ Menu Use text OK
¤ Menu Send Text OK
¤ Menu Delete Entry OK
¤ Menu Delete List OK OK

Additional functions
SMS:
002+003
Activating/deactivating first ring muting
Every incoming SMS on the fixed line connection is signalled by a single ring (ring tone as for
external calls). If you accept such a "call" on the first ring, the SMS is lost. To prevent this ring,
suppress the first ring tone for all external calls.
¤ Menu Press the keys in sequence
Make the first ringtone audible: ¤ OK
Mute the first ringtone:
¤ OK
Incoming message list
The incoming message list contains:
• All received SMS messages regardless of the connections they are intended for. All received
SMS messages are displayed on all handsets.
• SMS messages that could not be sent due to an error.
Opening the SMS inbox
¤ Press the Message key Select SMS
or
¤ Menu SMS OK Incoming
The incoming list is displayed with the number of new entries and number
of old, read entries.
Open list: OK Use to scroll through the list
An entry in the list is displayed with the number, status (old or new) and date of receipt:
Read/delete SMS
¤ Open the incoming list Select the SMS Read Scroll through the SMS with
Delete SMS: Menu Delete Entry OK
Deleting the incoming list
¤ Open the incoming list Menu Delete List OK Confirm with OK . . . All new and
old SMS messages are deleted from the list
Response to and forward an SMS
¤ Reply an SMS Menu
Write and send a new SMS to the number of the sender: Reply
Change the text in the SMS and return it to the sender: Use text
Forward the SMS to another number: Send Text
Copying the number to the directory
¤ Open the incoming list and select SMS Menu Copy to Direc tory Complete the entry
if required
43

Additional functions
Receiving notifications via SMS
You can arrange to be notified about missed calls by SMS.
The caller's number (CLI) must have been sent in the missed call.
Notification is sent to your mobile phone or another phone with SMS functionality. Save the
number to which the notification is to be sent.
Your provider will usually charge for SMS notifications.
¤ Menu SMS OK Settings Notification OK Enter the number to call
(with local area code) to which the SMS is to be sent OK
When you want to be sent a notification SMS for a missed call:
¤ Missed calls Enable/disable the function with OK
Do not enter your own network number for the notification of missed calls. This can
create an endless loop that will incur charges.
Setting the SMS service centre / Defining the send line
SMS messages are exchanged between SMS service centres by service providers. You must enter
the SMS service centre through which you wish to send and receive SMS messages into your
phone. You can receive SMS messages from every SMS service centre that is entered, provided
you have registered with your service provider. This happens automatically when you send the
first SMS via the relevant service centre.
Your SMS messages are sent via the SMS service centre that is entered as the active send centre.
However, you can activate any other SMS centre as the active send service centre to send a
current message (
If no SMS service centre is entered, the submenu only comprises entry Settings.
¢ p. 44).
Entering/changing the SMS service centre
¤ Find out about the services and special functions offered by your service provider before you
make a new application and/or before you delete pre-configured numbers.
¤ Menu SMS OK Settings OK Service OK Select the SMS centre
(e.g. Service Centre 1) OK Configure the settings OK
Active Send Serv. Centre:
¤ Select Ye s if you want to send the SMS via the SMS service centre.
For the SMS service centres 2 to 4, the setting only applies to the
next SMS.
SMS centre #:
Email Centre:
Send via:
44
¤ Enter the number of the SMS service.
¤ Enter the number of the email service.
¤ Select the fixed line or VoIP connection that you want to use to
send the SMS messages.

Additional functions
If you have selected a VoIP connection and the attempt to transmit the SMS message
fails, the SMS is stored in the incoming message list with error status. Even if you have
enabled option Automatic fallback to fixed line ( p. 64), your phone will not
attempt to send the SMS over the fixed line network.
If the selected send connection is deleted from the configuration, the fixed line
network connection is used.
Sending an SMS via another SMS centre
¤ Activate SMS service centre 2, 3 or 4 as the active send service centre.
¤ Send the SMS.
This setting only applies to the next SMS sent. Afterwards, the Service Centre 1setting is used
again.
SMS to PABXs
You can only receive an SMS when Calling Line Identification is forwarded to the extension on
the PABX (CLIP). The CLIP of the phone number for the SMS centre is evaluated in your Gigaset.
Depending on your PABX, you may have to put the access code (outside line code) before the
number of the SMS centre.
If in doubt, test your PABX, e.g. by sending an SMS to your own number, once with the access
code and once without.
When you send SMS messages, your sender number may be sent without your extension
number. In this case the recipient cannot reply to you directly.
Enabling/disabling the SMS function
When you disable the SMS function, you cannot send or receive any further SMS messages with
your phone.
The settings you have entered for sending and receiving SMS messages (e.g. the numbers of the
SMS service centres) and the entries in the incoming and draft lists are saved even after deactivation.
¤ Menu Press the keys in sequence
Deactivate the SMS function:
Activate the SMS function (default setting):
¤ OK
¤ OK
SMS status report
If the function is activated, you will receive an SMS with status information from the SMS service
centre for each SMS that has been sent.
¤ Menu SMS OK Settings OK Status Report OK (=enabled)
45

Additional functions
SMS troubleshooting
Error codes when sending
E0 Calling Line Identification permanently withheld (CLIR) or Calling Line Identification not activated.
FE Error occurred while sending SMS.
FD Connection to SMS service centre failed, see self-help.
Self-help with errors
The following table lists error situations, possible causes and advice on troubleshooting.
You cannot send messages.
1. You have not requested the CLIP service (Calling Line Identification Presentation).
¥ Ask your service provider to enable this service.
2. SMS transfer was interrupted (e.g. by a call).
¥ Re-send the SMS.
3. The network provider does not support this feature.
4. No number or an invalid number is entered for the SMS service centre set as the active send centre.
¥ Enter the number (¢p. 4 4).
SMS text is incomplete.
Your phone's memory is full.
1.
¥ Delete old SMS messages (¢ p. 43).
The service provider has not yet sent the rest of the SMS.
2.
The SMS message is played back.
The "display call number" service is not activated.
1.
¥ Ask your service provider to enable this feature (there is a charge for this).
Your mobile phone operator and SMS service provider are not working together.
2.
¥ Obtain information from your SMS service provider.
The phone is not registered with your SMS service provider.
3.
¥ Send an SMS to register the phone for receiving SMS.
Messages are only received during the day.
The device is recorded in the database of your SMS provider as having no fixed line network SMS
functionality, i.e. you are not registered with the provider.
¥ Obtain information from your fixed line SMS service provider.
¥ Send any SMS to automatically register your telephone to receive SMS messages.
46

Additional functions
Managing email messages
Your phone notifies you when new email messages have been received on your incoming email
server. You can read the emails from your handset.
On the web configurator, the name of the incoming email server (e.g. Yahoo, Gmail)
and your personal access details (account name, password) are stored in the phone
(p.59).
You can save the access details for six different email accounts on different POP3 servers, and
assign them to different handsets. The phone can regularly set up connections to the incoming
email servers and check for new messages.
The receipt of a new email message is displayed on the handsets assigned to the associated
email account. An advisory tone sounds and the icon is displayed on the idle display.
The icon is also displayed when you have new SMS messages.
You can display the sender, date/time of receipt and subject for every email in the incoming
email list ( p. 47).
If you have also activated the authentication of the phone with an incoming email
server via a secure connection in the Web configurator (TLS authentication) and this
fails, the email messages are not downloaded to your phone.
In this case, pressing the flashing message key displays message Certificate error
Please check certificates in the web configurator.
¤ Confirm message by pressing OK.
¤ Registering with the web configurator ( p. 59). The Security ( p. 62) website
tells you why the secure connec tion could not be established and what you can do.
Opening the incoming email list
The email account is assigned to the handset.
The incoming email server uses the POP3 protocol.
The name of the incoming ema il server and your personal access data (account name,
password) are stored in the phone.
On the handset:
¤ Menu Settings eMail E-mail 1 ... E-mail 6
Or, if there are new email messages:
¤ Press the Message key Select E-mail 1 ... E-mail 6
Only email lists E-mail 1 ... E-mail 6 of the email accounts assigned to the handset
are displayed.
The phone establishes a connection to the incoming email server. A list of email messages that
are stored there is displayed.
New, unread messages appear above old read messages. The most recent entry appears at the
top of the list.
47

Additional functions
The following details are displayed for each email: name or email address of the sender (on one
line, abbreviated if necessary) and date and time (date and time will only display correct values
if sender and recipient are located in the same time zone).
If the incoming message list on the incoming email server is empty, No entries appears on the
display.
Many email providers activate spam protection by default. Email messages classified
as spam are stored in a separate folder and are therefore not shown in the incoming
email list.
Some email providers allow you to change this setting: Deactivate spam protection
or display spam emails in the incoming email list.
Other email providers may send a message to the inbox when a new spam email
is received. This is to inform you that a suspected spam email has been received.
The date and sender of this mail are repeatedly updated, so that it is always displayed
as a new message.
Troubleshooting
The following problems may occur when connecting to the incoming email server.
The messages are displayed in the display for a few seconds.
Server not accessible
The connection to the incoming email server could not be established.
• Incorrect entry for the name of the incoming email server ( Web configurator, p. 59).
• Temporary problems with the incoming email server (server is down or is not connected
to the Internet).
¤ Check the settings in the web configurator.
¤ Try again later.
Currently not possible
The resources your phone requires to make the connection are busy.
• One of the registered handsets is currently connected to the incoming email server.
¤ Try again later.
Login failed
Error when logging in to the incoming email server.
• Incorrect entries for the name of the incoming email server, user name and/or password.
¤ Check the settings ( Web configurator)
Parameters incomplete
Incomplete entries for name of incoming email server, user name and/or password.
¤ Check/complete the settings ( Web configurator)
48

View the message header of an email
Additional functions
An incoming email list is opened
( p. 47).
¤ Select the email entry Read . . . The subject of the email message is displayed
(maximum 120 characters)
Return to inbox: Back
View an email sender's address
An email notification is open for reading ( p. 49) .
¤ Menu From OK . . . The sender's email address is displayed, over several lines if
necessary (maximum 60 characters)
Return to email notification: Back
Deleting email messages
The incoming email list is open ( p. 47) or you are looking at the header or sender's
address for an email ( p. 49).
¤ Del.
or
¤ Menu Delete OK Confirm with OK . . . The email message is deleted from the
incoming email server
49

Extending the functionality of the phone
Extending the functionality of the phone
Multiple handsets
Up to six handsets can be registered with the base.
Every device is assigned an internal name and internal number (INT 1 – INT 6). The assignment
can be changed.
All internal numbers are already assigned: de-register any devices no longer needed
Registering a handset
The Please register handset display flashes or you want to register the handset with a different
base.
Registering from the display key or menu
Registration must be initiated both on the base and on the handset. Both must be
within 60 seconds.
On the handset
¤ Press the display key Registr.
or
¤ Menu Settings OK Registration Register Handset Enter as
required the system PIN of the base (default: 0000) OK . . . The display shows Registering...
On the base
¤ Within 60 seconds, press and hold the registration/paging key for a minimum of 3 seconds.
The registration process takes about 1 minute. Handsets are assigned the lowest available internal number (1 to 4). If internal numbers 1 to 4 are already assigned to other
devices, number 4 is overwritten.
Some Gigaset bases and bases/routers from third party manufacturers might not be
fully compatible with the handset and not all functions are displayed correctly. In
such cases, use menu entry Legacy (GAP) Registration. This guarantees correct displays on the handset, but can entail restrictions for some functions.
Registering a handset with multiple bases
Your handset can be registered with up to four bases. The active base station is the base station
to which the handset was last registered. The other base stations remain saved in the list of available base stations.
¤ Menu Settings OK Registration Select Base OK
Change active base station:
¤ Select base or Best Base OK (=selected)
Best Base: The handset chooses the base with the best reception as soon as it loses the
connection to the current base.
50

Extending the functionality of the phone
De-registering a handset
You can de-register any other registered handset from any registered Gigaset handset.
¤ Menu Settings OK Registration Deregister Handset OK
¤ Select the internal user to be de-registered. (The handset you are currently using is
marked with <.) OK Enter the system PIN of the base (default: 0000) OK ... the
handset is registered. Please register handset flashes on the display
Locating a handset (paging)
Locate a handset using the base.
¤ Briefly press the Register/Paging key on the base . . . all handsets registered ring at the same
time even when their ringtones are turned off
Exit:
¤ Briefly press the Register/Paging key on the base
or
¤ Press or on a handset
Repeater support
A repeater increases the receiving range between the Gigaset handset and base.
Encryption is activated (default setting).
¤ Menu Settings OK System OK Encryption OK
(=enabled)
Registering a repeater:
¤ Connect the repeater to the mains power supply Press and hold the Registration/paging
key on the phone base (for a minimum of 3 seconds) . . . The repeater is registered automatically
The ECO DECT Maximum Range function is enabled and No Radiation is disabled. The settings
cannot be changed whilst the repeater is registered.
As soon as a repeater is registered, it will appear in the repeater list under
¤ Menu Settings OK System OK Repeater
De-registering a repeater:
¤ Menu Settings OK System OK Repeater OK
(=de-registered)
Repeater support and ECO DECT mode
No Radiation are mutually exclusive.
51

Extending the functionality of the phone
Operation with a PABX
The following settings are only necessary when your PABX requires them ( refer to the PABX
user guide).
Changing pause after line seizure
Setting the access code
Set the access code (e.g. "0") for dialling using the fixed line network and using VoIP.
¤ Menu Settings OK Te le ph o ny OK Access Code OK
Fixed line network:
VoIP:
Rule:
Save:
Setting the flash time
¤ Access ext line with: Enter or change the access code
(max. 3 digits)
¤ Access IP line with: Enter or change the access code
(max. 3 digits)
¤ For Use to select when the access code is dialled
Call Lists: The access code will only prefix numbers from a list (list
of answered calls, list of missed calls, SMS list).
All Calls: The access code prefixes all numbers dialled.
Off: The access code is deactivated and does not prefix any tele-
phone number.
¤ OK
¤ Menu Settings OK Te le ph o ny OK Recall OK Select flash
time OK
You can set the length of the pause inserted between pressing the Talk key and sending
the phone number.
¤ Menu The digit for the current pause length
flashes: 1 = 1 sec.; 2 = 3 sec.; 3 = 7 sec. Enter digit OK
Changing pause after recall key
¤ Menu The digit for the current pause length
flashes: 1 = 800 ms; 2 = 1600 ms; 3 = 3200 ms Enter digit OK
52

Phone settings
Phone settings
Date and time
Set the date/time so that the correct date and time can be assigned to incoming calls and to
enable the alarm to be used.
¤ Menu Settings OK Date and Time OK Enter the date (day, month and
year) in 8 -digit format OK Enter the time (hours and minutes) in 4-digit format OK
Country and language (if available)
Country
Select the country where you use the phone.
¤ Menu Settings OK Country OK Select the country OK
(=enabled)
Display language
¤ Menu Settings OK Language OK Select the language OK
(=enabled)
If you accidentally choose a language you do not understand:
¤ Menu Press keys one after the other Select the language
OK
Display
Screensaver
The screensaver is enabled when the phone is not used over a longer period of time. The time or
an information ticker is shown as the screensaver.
¤ Menu Settings OK Display OK Screensaver OK Select the
required option ( = enabled)
When Info Ticker is selected as the screensaver:
¤ Enable Info services in the web configurator and configure them as required in Gigaset.net
(p.69).
Large dial keys
Show large dial keys when dialling
¤ Menu Settings OK Display OK Larger Font OK (=enabled)
53

Phone settings
Contrast
Adjust the display contrast on 9 levels.
¤ Menu Settings OK Display OK Contrast OK Select the
level OK (=selected)
Backlight
The display light is switched off when the handset is not used over a long period of time. You can
enable/disable this function separately for situations handset in charging cradle and handset
not in charging cradle.
¤ Menu Settings OK Display OK Backlight Control OK
Display On Out of Charg. or Display On In Charger OK (=enabled)
The Display On Out of Charg. setting reduces the standby time.
During a call, the display is off
During a call, the display normally stays on. When the function is enabled, the display is switched
off during calls.
¤ Menu Settings OK Display OK Backlight Control OK
Display Off During Calls OK (=enabled)
If the function is disabled, talk time is reduced.
The display flashes for new messages
¤ Menu Settings OK Display OK Backlight Control OK
Flash Display for Notifications OK (=enabled)
Tones and signals
Call volume
Adjust the receiver volume or handsfree function on 5 levels.
¤ Menu Audio Settings OK Call Volume OK Earpiece / Handsfree
OK . . . The current setting is displayed Select the volume OK (=selected)
Changing the volume during a call
During a call, set the volume of the receiver on 5 levels.
¤ Press the control key set the volume with
54

Phone settings
Tone quality
Change the tone quality of the receiver to how you want it.
¤ Menu Audio Settings OK Acoustic Profile OK Low / High OK
(=selected)
Ringtone volume (ringer volume)
Adjust the volume of the ringtone on 5 levels or select Crescendo.
¤ Menu Audio Settings OK Ringer Volume OK Select volume or
Crescendo OK (=selected)
Ringtone melody
Set the ringtone melody for external calls, internal calls or the alarm.
¤ Menu Audio Settings OK Ringtones (Handset) OK Select External
Calls / Internal Calls / Alarm Clock OK Select ringtone required OK
(=selected)
Disabling/re-enabling the ringtone permanently
¤ When the phone is idle, press and hold the Star key. When the ringtone is disabled,
symbol is shown on the display.
Deactivating the ring tone for the current call
¤ Press the Silence Display key
Enabling/disabling advisory and warning tones
The handset provides acoustic notification of different activities and statuses.
Advisory tone: e.g. keypress tones, error tone, a new message
Battery warning tone:
The battery charge falls below a certain level during a call.
Range warning tone:
The handset moves outside the range of the base.
You can enable and disable advisory and warning tones separately.
¤ Menu Audio Settings OK Advisory Tones / Battery Low / Out-of-Range
War ning OK (=enabled)
Music on hold
You can choose whether an external caller hears music on hold during an internal consultation
or when a call is being forwarded.
¤ Menu Settings Tel ep h on y OK Music on hold OK (=enabled)
55

Phone settings
System
Changing the system PIN
¤ Menu Settings OK System OK System PIN OK Enter the
current 4-digit system PIN (default: 0000) OK Enter the new 4-digit system PIN OK
Resetting the system PIN
Resetting the base to the original PIN code 0000:
¤ Remove the power cable from the base Keep pressed the Registration/paging key on the
base At the same time, reconnect the power cable to the base press and hold the key
for at least 5 seconds . . . the base is reset and the system PIN is set to 0000
All handsets are de-registered and must be re-registered. All settings are reset to the
defaults.
Resetting the handset
You can reset individual settings. Entries in the directory and call list, and the handset’s registration to the base, are maintained.
¤ Menu Settings OK System OK Reset Handset OK ... Per form
factory reset? OK
Resetting the base
A reset disables mode No Radiation, resets individual settings and deletes all lists.
The system PIN is reset to the original code 0000.
The time and date are not affected.
Resetting the base from the menu
The handsets remain registered. The system PIN is not reset.
¤ Menu Settings OK System OK Reset Base OK ... Reset? OK
Resetting the base using a key on the base
All handsets are de-registered. The system PIN is set back to the original code 0000.
¤ Remove the power cable from the base Keep pressed the Registration/paging key on the
base At the same time, reconnect the power cable to the base Keep the key pressed
for at least another 5 seconds
Restarting a base
¤ Menu Settings OK System OK Base Restart OK Enter the
system PIN (default: 0000) OK
56

Phone settings
Updating the base firmware
¤ Menu Settings OK System OK Base Update OK Enter the
system PIN (default: 0000) OK . . . The system checks whether there is new firmware for the
base and issues a message Start the firmware update as required with OK
Checking/changing the network settings
An IP address is required in order for the home network to "recognise" your phone. The IP
address can be assigned to the phone automatically (by the router) or manually.
• If the address is assigned dynamically, the router's DHCP server automatically assigns an IP
address to the phone. The IP address can be changed according to the router settings.
• With manual/static assignment, you assign a static IP address to the phone. This may be
necessary depending on your network configuration (e.g. if your phone is connected directly
to a PC).
To assign the IP address dynamically, the DHCP server on the router must be activated.
Please also read the user guide for your router.
¤ Menu Settings OK System OK Local Network OK Use to
select the setting Change the setting as required OK
IP addr. type
IP address
Subnet mask
Default gateway
DNS server
¤ Use to select Static or Dynamic
For IP addr. type Dynamic: The following fields show the current
settings that the phone obtained from the router. These settings
cannot be changed.
For IP addr. type Static: Configure the settings for the following
fields.
¤ Enter the IP address (overwriting the current setting).
¤ Enter the subnet mask (overwriting the current setting).
¤ Enter the IP address of the standard gateway.
The local network is connected to the Internet via the standard
gateway. This is generally your router.
¤ Enter the IP address of the preferred DNS server
The DNS server (Domain Name System) converts the symbolic
name of a server (DNS name) into the public IP address for the
server when the connection is made. You can specify here the IP
address of your router. The router forwards phone address requests
to its DNS server.
57

Phone settings
Firmware update
The handset supports firmware updating via the DECT radio link to the base (SUOTA = Software
Update Over The Air).
¤ Menu Settings OK Firmware Update OK
Showing the current firmware version:
¤ Current Version OK
Updating firmware:
The update process may take up to 30 minutes. During this time, only restricted
handset use is available.
Automatically check whether there is new firmware:
¤ Update OK . . . If there is new firmware, the update
is started
¤ Menu Settings OK Firmware Update Automatic Check OK
(=enabled)
If new firmware is available for the handset, a message to this effect is displayed.
¤ Start the firmware update with OK.
58

Web conf igurator
Web configurator
You can use the web configurator to make settings for the phone on a PC or tablet.
• You can make settings that can also be made on your phone handset, e.g. set date and time
or perform a firmware update
• You can make additional settings that are not possible via the handset, meet particular
prerequisites for connecting the phone to a company network or adjust the voice quality on
IP connections
• You can save data on the base where this is required for access to certain Internet services,
e.g. public online directories, the incoming e-mail server for your e-mail account and the
synchronisation of the date/time with a time server
• You can save data for your phone (base and handsets) in files on the PC and, in the event of
an error, you can download them onto your phone again.
See the online help for the web configurator for a detailed description of the web pages and the
required entries
Start web configurator
Connecting to the web configurator
( p. 60) .
Your phone is connected to the local network.
In most cases, this connection is established automatically as soon as the device is
connected to the network. If this is not the case, connect to the local network via the
handset.
You may not be able to change some settings in the web configurator, depending on
the provider.
The web configurator cannot be accessed by more than one user at any one time.
You can still make phone calls while working on the web configurator.
Establishing a connection via the phone's IP address
¤ Finding out the current IP address of the phone: Briefly press the registration/paging key
on the base . . . the IP address is displayed on the handset
The IP address can sometimes change, depending on the settings of the DHCP server
in your network.
¤ Start your web browser on the PC/tablet Enter IP-address of phone in the browser address
field (example: 192.168.2.2) . . . A connection is established to the phone's web configurator
59

Web configurator
Establishing a connection via the phone's domain name
PC/tablet and phone are connected to the Internet.
¤ Start your web browser on the PC/tablet In the web browser address field, enter
www.gigaset-config.com
If you can contact multiple Gigaset devices via your Internet connection: Select device
The connection between the PC and the web configurator is a local connection
(LAN connection). The Internet is only accessed to establish the connection.
Registering/de-registering with the web configurator
Registering, setting the interface language
Once you have successfully established the connection, the website Welc ome is displayed in the
web browser.
¤ Select the desired language Enter PIN (default setting: 0000) OK
For your security, you should change the default PIN ( p. 71).
De-registering
¤ Click on Log off at the top right in the menu bar.
Always end the web configurator with the command Log off. If the web browser is
closed without de-registering first, access to the web configurator may be blocked for
a few minutes.
Help
¤ Click on the question mark on the top right of a web page . . . Online help opens in a
separate window
Searching in help: Click inside the Help window Press Ctrl and F. A search dialog opens.
The help pages are downloaded directly from the configuration server.
You may need to change your browser settings to display the help pages correctly.
Internet Explorer and Firefox require the following settings, for example:
¤ You must allow blocked active content for help (right-click the information bar at
the top of the browser window).
¤ Allow the pages to use their own fonts or set Arial as the standard font (general
option).
60

Web conf igurator
Entering Cyrillic and Turkish characters
In the following section, the specified maximum number of characters permitted in a field refers
to Latin characters and digits (1 character = 1 byte), i.e.1 character means 1 byte.
Cyrillic and Turkish characters require 2 bytes each, e.g. with a field length of 16 characters, you
can enter a maximum of eight Cyrillic or Turkish characters.
If you enter too many characters into a field, the entry is rejected (not saved in the phone). The
"old" field content (or the default settings) is retained and displayed again when the web page
is updated. No warning/confirmation is given.
Carry out initial configuration
A wizard is available for initial configuration when no VoIP connection (IP account) has been set
up. The wizard will help you configure an IP account.
The phone offers a range of provider profiles that make it easier to configure an IP account. Each
profile contains the most important configuration settings for the provider concerned.
¤ Home Quick Start Wizard Next
¤ Country Select from list Next
If the phone is connected to a PABX that provides IP accounts, you can select the PABX here.
¤ Provider Select from list Next
If the provider does not appear in the list: Select Other provider ... You must now enter
the provider data yourself
For help, see page Settings Tel ep h on y Connections
¤ Enter the provider's access data Next . . . The phone is registered with the provider
¤ If the provider has a network mailbox: Enter the phone number . . . The mailbox will be
activated once you close the wizard
¤ If all outgoing calls from the registered handset are to be made via this VoIP connection as
standard: Mark Ye s
Default setting: No . . . Outgoing calls are made via fixed line network connection
Detailed assignments for multiple handsets, multiple VoIP connections and incoming calls
Number Assignment (p.64)
¤ Finish . . . The connection is recorded in the phone connection list ( p. 63)
Change settings for this connection and/or set up further VoIP connections:
¤ Settings Te le ph on y Connections (p.63).
61

Web configurator
Network
IP Configuration
Connect phone to local network (LAN)/router.
¤ Settings Network IP Configuration
In most cases, special settings are not required to connect the phone to the router/a local
network. Your phone is preconfigured for dynamic assignment of the IP address by default
(DHCP). In order for your router to "recognise" the phone, dynamic IP address assignment must
also be activated on the router, i.e. the router's DHCP server must be activated.
If the DHCP server cannot or should not be activated, you must assign a fixed/static IP address
to the phone. A fixed IP address is useful, for example, if port forwarding or a DMZ is set up on
the router for the phone.
You can use the web configurator to make further settings that are required if you connect your
phone to a large (company-wide or organisation-wide) network, or if you want to manage the
phone remotely.
• Specify the address of an HTTP proxy server within the LAN that the phone can use to
establish connections to the Internet if direct access is not allowed in the LAN.
• VLAN identifier / VLAN priority Store for access to a tagged VLAN.
• Allow PCs outside your LAN to connect to the web configurator.
Authorising access from other networks increases the risk of unauthorised access. It
is therefore recommended that you disable remote access if you no longer require it.
The web configurator can only be accessed from other networks if your router passes
on the service requests from "outside" to port 80 (the default port) of the phone.
Make sure you read the user guide for your router.
Security
The phone supports the establishment of secure data connections on the Internet with the TLS
security protocol (Transport Layer Security). With TLS, the client (the phone) uses certificates to
identify the server. These certificates must be stored on the base.
¤ Settings Network Security
On this page, you will find the Server certificates / CA cer tificates lists with the certificates saved
on the base.
The Invalid certificates list contains the certificates received from servers that have not passed
the certificate check when establishing a connection, and certificates from the Server
certificates / CA certificates lists that have become invalid (e. g. because they have expired).
You can remove certificates and download new certificates to the base, and you can also accept
or reject invalid certificates.
If the connection to a data server on the Internet is not made because the phone does not accept
the certificate received from the server (e.g. when downloading your e-mail messages from the
POP3 server), you will be prompted to open the Security settings web page.
62

Web conf igurator
The Invalid certificates list contains the certificate used to make the connection. Click on
[Details] to display information about who issued the certificate (certification authority) and for
whom, as well as its validity period.
If you accept the certificate, depending on its type, it is transferred to one of the Server
certificates / CA certificates lists (even if it has already expired). If a server responds again with
this certificate, this connection is accepted immediately.
If you decline the certificate, it is transferred to the Server certificates list with the label
(rejected). If a server responds again with this certificate, this connection is rejected
immediately.
Telephony
Connections to base
Manage connections to base:
¤ Settings Te le ph on y Connections
This web page displays a list with all possible connections and their status (e.g. Connected,
Registered, Not configured):
Fixed line
You do not have to configure the fixed line network connection. You can make or receive calls
on the fixed line network connection once your phone is connected to the fixed line network
connection.
Making changes via [Edit]:
• Name of the fixed line network connection. The name entered is shown, e.g. for calls to your
fixed line network connection, in the displays of the registered handsets and in the call list.
• Setting Dialling Mode and Flash time. The flash time is set by default for operating the
phone on the main connection. You must change it if necessary if you connect the phone to
a PABX (see the user guide for your PABX).
Gigaset.net
The Gigaset.net connection is preconfigured in your phone. Your phone is preassigned a
Gigaset.net number. You can activate and deactivate the Gigaset.net connection. If the
connection is deactivated, the phone will not register with the Gigaset.net service. You are then
not available via the Gigaset.net connection.
Making changes via [Edit]:
• Name of Gigaset.net connection
• Deactivate STUN. The Gigaset.net connection uses a STUN server as standard. In the sent
data packets, Gigaset.net replaces the private IP address of your phone with its public
IP- address. If you operate your phone behind a router with symmetric NAT, STUN cannot be
used. You must deactivate it. Otherwise, when making Gigaset.net calls you will not be able
to hear the caller.
IP1 - IP6
You can assign up to six VoIP connections (VoIP phone numbers) to your phone. You need an IP
account from a provider for each VoIP phone number. Save the access data in your phone.
Set up/change VoIP connections via [Edit]
63

Web configurator
Send and receive connections
For the number assignment, open the web page:
¤ Settings Te le ph on y Number Assignment
Assign send and receive connections to the registered handsets :
• The fixed line network connection is assigned to each handset automatically when they are
registered.
• You can assign each handset either a fixed phone number or a line selection. With line
selection, you choose the connection to be used for each call.
• The Gigaset.net number is assigned as the fixed send connection for each registered
handset. Numbers that end in #9 are automatically dialled via Gigaset.net.
You can avoid having to assign connections to certain phone numbers by using a
dialling plan for these phone numbers.
Activating a fixed line network connection as a fallback send connection
You can activate the fixed line network connection on your phone as a fallback connection. If a
call attempt fails via VoIP (IP connection or Gigaset.net), an attempt is automatically made
(without prompting) to establish a connection via the fixed line network.
¤ ... In Alternative Connection, activate the Automatic fallback to fixed line option
A fallback is used in the following situations:
• The IP connections are busy (you can make calls on a maximum of two IP lines at the same
time)
• The SIP server for the VoIP connection cannot be accessed
• The VoIP connection has not yet been configured or has not been configured correctly
(e.g. incorrect password)
• The phone does not have a connection to the Internet, e.g. because your router is
deactivated or not connected to the Internet.
SMS messages that are to be sent via a VoIP connection are not sent via the fallback connection.
Deactivate option if you are not connected to a fixed line network (default setting).
Otherwise, you will be switched automatically to the fixed line network if no IP
connection can be established temporarily, e. g. if the phone starts faster than the
router. The phone would therefore not be functional.
64

Web conf igurator
Voice quality for VoIP connections
Functions to improve the voice quality on VoIP connections (IP or Gigaset.net) are available on
the web page:
¤ Settings Te le ph on y Audio
The voice quality for VoIP connections is mainly determined by the voice codec used for
transferring the data and the available bandwidth of your DSL connection.
In the case of the voice codec, the voice data is digitised (coded/decoded) and compressed. A
"better" codec (better voice quality) means more data needs to be transferred, i.e. it requires a
DSL connection with a larger bandwidth. You can change the voice quality by selecting (bearing
in mind the bandwidth of your DSL connection) the voice codecs your phone is to use, and
specifying the order in which the codecs are to be suggested when a VoIP connection is
established. Default settings for the codecs used are stored in your phone; one setting optimised
for low bandwidths and one for high bandwidths. The following voice codecs are supported:
G.722
Excellent voice quality. The broadband voice codec G.722 works at the same bit rate as G.711
(64 kbit/s per speech connection) but with a higher sampling rate. You can use this to play
back higher frequencies. The speech tone is therefore clearer and better than with the other
codecs (High Definition Sound Performance).
G.711 a law / G.711 μ law
Excellent voice quality (comparable with ISDN). The required bandwidth is 64 kbit/s per voice
connection.
G.726
Good voice quality (inferior to that with G.711 but better than with G.729). Your phone
supports G.726 with a transmission rate of 32 kbit/s per voice connection.
G.729
Average voice quality. The necessary bandwidth is less than or equal to 8 kbit/s per voice
connection.
To save additional bandwidth and transmission capacity on VoIP connections that use the
G.729 codec you can suppress the transmission of voice packets in pauses ("silence
suppression"). Instead of the background noises in your environment, your caller then hears
a synthetic noise generated in the receiver (option: Enable Annex B for codec G.729).
Network mailbox
If the provider (fixed line network and/or Internet telephony) has a network mailbox, this is
displayed on the following web page:
¤ Settings Te le ph on y Network mailboxes
You can enter the phone numbers for the network mailbox here and switch the network mailbox
for the configured VoIP connections on and off.
65

Web configurator
User-defined dialling plans
You can define your own dialling plans on the web page:
¤ Settings Te le ph on y Dialling Plans
You can specify the following dialling plans:
• Specify a connection for phone numbers (Fixed line , Gigaset.net or IP1 - IP6), which should
always be used to dial these phone numbers and therefore also for billing.
If you enter just a few digits (e.g. local area, national or mobile network code) any call to a
number beginning with these digits will be made via the selected connection.
• If you block phone numbers, your phone will not establish a connection to these numbers
(e.g. 0190 or 0900 numbers).
These dialling plans apply to all registered handsets. The send connection settings are inactive
when you dial numbers that are governed by a dialling plan.
You can activate and deactivate the dialling plans as required.
Dialling plans, with the exception of a block, are not effective if you have assigned the
line selection to a display key on the handset and you explicitly choose a send
connection from the list of available connections before dialling.
Emergency numbers
Dialling plans for emergency numbers (e.g. the local police emergency number) are preset for
certain countries. The fixed line network is set as the Connec tion.
You should only change these dialling plans if the phone is not connected to the fixed line
network. If you choose an IP connection, please make sure the provider supports calls to
emergency numbers. If the VoIP connection is deleted from the configuration, the emergency
call can no longer be made.
Access codes – dialling plans when connecting to a PABX
If your phone is connected to a PABX, you may have to enter an access code for external calls
(outside line code, e.g. "0").
Save one access code each for fixed line network and VoIP calls and specify when the phone
numbers should be automatically prefixed with the digits.
These settings are available in the Access Code area on the web page:
¤ Settings Te le ph on y Dialling Plans
Local area codes – dialling plans for local calls using VoIP
If you use VoIP to make a call to the fixed line network, you may also have to dial the area code
for local calls (depending on the provider). You can avoid having to enter your own local area
code by entering the full area code (with the international code) for the location where you are
using the phone in the phone configuration and activating the Predial area code for local calls
via VoIP option.
These settings are available in the Area Codes area on the web page:
¤ Settings Management Local Settings
66

Web conf igurator
Special settings for Internet telephony
Activating Call Forwarding for VoIP connections
The settings for Call Forwarding are on the web page:
¤ Settings Te le ph on y Call Divert
You can divert calls to your VoIP connections and to your Gigaset.net number.
You can divert calls to your VoIP connections to any external number (VoIP, fixed line network or
mobile number). Call Forwarding takes place via VoIP.
You can divert calls to your Gigaset.net number within the Gigaset.net, i.e. to another
Gigaset.net number.
Setting DTMF signalling for VoIP
You can cha nge the set tin gs f or D TMF sig nal lin g in the DTMF o ver VoIP Connec tion s area on the
web page:
¤ Settings Te le ph on y Advanced VoIP Settings
DTMF signalling is required, for example, for querying and controlling certain network
mailboxes via digit codes or for remote operation of a local answer machine.
To send DTMF signals via VoIP you must first define how key codes should be converted into and
sent as DTMF signals: as audible information via the speech channel or as an "SIP Info" message.
Ask your provider which type of DTMF transmission it supports.
You can configure your phone in such a way that it attempts with each call to set the most
suitable DTMF signalling for the current codec (Automatic).
Or you can explicitly define the type of DTMF signalling:
• Audio or RFC 2833, if DTMF signals are to be transmitted acoustically (in voice packets).
• SIP info, if DTMF signals are to be transmitted as code.
DTMF signals cannot be transmitted in the audio path (Audio) on broadband
connections (the G.722 codec is used).
Configuring call transfer via VoIP
You can change the settings for call transfer in the Call Transfer area on the web page:
¤ Settings Te le ph on y Advanced VoIP Settings
You can transfer an external call to a VoIP connection to a second external participant by
pressing the Recall key (depending on the provider).
Add/change settings for call transfer:
• Activate call transfer by ending the call. The two external participants will be connected
when you press the End call key .
• Activate direct call transfer. The call can be transferred before the second participant has
answered.
• Press the Recall key to deactivate call transfer if you want to assign a different feature to the
Recall key ( "Defining Recall key functions for VoIP (hook flash)").
67

Web configurator
Defining Recall key functions for VoIP (hook flash)
You can specify the function for the Recall key on the web page:
¤ Settings Te le ph on y Advanced VoIP Settings
Your provider may support special performance features. To make use of these features, your
phone needs to send a specific signal (data packet) to the SIP server. You can assign this "signal"
as the Recall function to the Recall key on the handsets. Prerequisite: The Recall key is not used
for call transfer (default setting).
If you press this key during a VoIP call, the signal is sent. This requires that DTMF signalling via
SIP info messages is activated on the phone (see above).
Defining local communication ports for VoIP
The settings for the communication ports are on the web page:
¤ Settings Te le ph on y Advanced VoIP Settings
The following communication ports are used for Internet telephony:
• SIP port: The communication port via which the phone receives (SIP) signalling data. The
default standard port number is set to 5060 for SIP signalling.
• RTP port: Two consecutive RTP ports (consecutive port numbers) are required for each VoIP
connection. Voice data is received via one port and control data via the other. The default
standard port number is set to 5004 - 5020.
This setting only has to be changed if the port numbers are already being used by other
participants in the LAN. You can then specify other fixed port numbers or port number ranges
for the SIP and RTP port.
If seve ral V oIP p hon es ar e op erat ed on the same rou ter w ith N AT, it m ake s sen se to use rand oml y
selected ports. The phones must then use different ports so that the router's NAT is only able to
forward incoming calls and voice data to one (the intended) phone. Use the web configurator to
specify a port number range for the SIP and RTP port that the ports are chosen from.
Messaging
E-mail notifications
Save the address of the incoming e-mail server and personal access data for your mailbox in the
base. Specify the time interval at which the phone should check whether the incoming e-mail
server has received new e-mail messages. Specify whether authentication on the incoming
e-mail server should be carried out via a secure connection.
¤ Settings Messaging Email
Message Notification
The LED in the message key on the base connected with the handset indicates when a new
message, e. g. a new e-mail, has been received. You can specify for each individual handset what
kind of new message should be displayed.
¤ Settings Messaging Message Notification
68

Web conf igurator
Info Services
You can display the text information of a selected Info service from the idle display of your
handset. To do this, you must enable the screensaver Info Ticker on the handset. The default
setting for this is the weather report. From the Gigaset.net web portal, you can put together your
personal services for the screensaver Info Ticker.
¤ Settings Info Services
On this page, you will be able to access the Gigaset.net server and view your personal access
data.
Directories
Online Directory
Select provider for online directory. You can set the Display of caller’s name option, depending
on the provider selected. This means that the name of the caller is read from the online directory
for incoming calls and shown on the display (where the handset's local directory does not
contain an entry for the caller's number).
¤ Settings Directories Online Directory
Directory Transfer
Deleting handset directories and downloading to/from the PC.
¤ Settings Directory Transfer
• Save directories on a PC. Entries are stored in vCard format in a vcf file on the PC. You can
download these files onto every registered handset. You can also copy directory entries to
your PC address book.
• Copy contact details from your PC address book to handset directories. Expor t contacts in vcf
files (vCards) and transfer to handset directories.
• Delete a directory on the handset. If you have edited the directory file (vcf file) on the PC and
would like to load this modified directory to the handset, you can delete the current directory
on the handset before the transfer.
Tip: Back up the current directory on your PC before deleting it. You can then reload it if the
modified directory is affected by formatting errors and some, or all, of it cannot be loaded
onto the handset.
If you wish to copy a directory (vcf file) with multiple entries stored on the PC to the
Microsoft Outlook™ address book, please note the following:
Microsoft Outlook™ only ever transfers the first (directory) entry from the vcf file to its
address book.
69

Web configurator
Transfer rules
The directory entries from a vcf file that are loaded onto the handset will be added to the
directory. If an entry already exists for a name, it will either be supplemented or a new entry for
the name will be created. The process will not overwrite or delete any phone numbers.
Depending on your device type, up to three entries with the same name are created in
the directory for each vCard – one entry per entered number.
Contents of directory file (vcf-file)
The following data (if available) is written into the vcf file for entry into the directory or
transferred from a vcf file into the handset directory:
• Name
• First name
• Number
• Number (office)
• Number (mobile)
• E-mail address
• Anniversary date (YYYY-MM-DD) and the time of the reminder call (HH:MM) separated by a
"T" (example: 2008-12-24T11:00).
Other information that a vCard may contain is not entered into the handset directory.
Example of an entry in vCard format:
BEGIN:VCARD
VERSION:2.1
N:Smith;Anna
TEL;HOME:1234567890
TEL;WORK:0299123456
TEL;CELL:0175987654321
E-MAIL:anna@musterfrau.de
BDAY:2008-12-24T11:00
END:VCARD
70

Web conf igurator
Management
Date and Time
Managing the synchronisation of the base with a time server. By default, your phone is
configured so that the date/time is transferred from a time server on the Internet. Changes to
time server settings via web page:
¤ Settings Management Date and Time
Changing the base settings, registering handsets
Switch the base to registration mode to register more handsets to the base. This setting
•
corresponds to pressing and holding the registration/paging key on the front of the base.
• Activate or deactivate Eco Mode or Eco Mode+.
• Change the system PIN for your phone.
• Activate and deactivate the LED for the registration/paging key on the front of the base.
• Activate or deactivate the display of VoIP status messages on your handset.
The base settings are on the web page
¤ Settings Management Miscellaneous
Rebooting the device or restoring the factory settings
If your phone suddenly does not work as expected, restart it. This frequently resolves problems.
You can also reset all of the settings on the phone to the default settings e.g. if you want to give
your phone to a third participant. This deletes all settings, lists and directory entries!
¤ Settings Management Reboot & Reset
Saving and restoring system settings
Once you have configured your base and after each configuration change, you can save the
current base settings in a file on the PC (suffix .cfg). You can reload the file onto the phone again
when necessary.
¤ Settings Management Save and Restore
The contents of the .cfg file include:
• The settings for the local network (IP configuration)
• The data for the (VoIP) connections established
• The assignment of send and receive connections
• Your own local area code and access code
• The network mailbox number
• The Internet services settings
• The ECO DECT settings
71

Web configurator
Firmware Update
Regular updates to the base firmware and the provider profile for VoIP connections (general
provider data) are made available on an Internet configuration server. You can download these
updates onto your base as required. The URL for this server is stored in the base.
¤ Settings Management Firmware Update
Starting firmware update
If a new version of the firmware is available, this is downloaded to the base and the base is
restarted. A firmware update lasts approx. six minutes. The duration also depends on the
bandwidth of your DSL connection.
Enabling/disabling the automatic version check
When the version check is enabled, the phone checks every day whether the Gigaset configuration server has a new version of the phone firmware.
If the phone is not connected to the Internet at the time when the check is to be performed
(e.g. because the router is disabled), the check is performed as soon as the phone is reconnected
to the Internet.
If a new version is available, a message to this effect is shown on the display of the registered
handsets. You can start the update of the firmware on one of the handsets.
Downgrading firmware
¤ You can reload the firmware version that was loaded before the last update on the base.
or
¤ You can reload the firmware version that was loaded by default onto the phone.
The selected firmware is reloaded onto the phone and the current firmware is overwritten.
Status of the phone
¤ Status Device
Information about the phone is displayed:
• IP and MAC address for the base
• Version of the firmware currently loaded, format: aa.bbb (aabbbxxyyyzz)
aa Phone product variant
bbb Firmware version
xx Sub-version
yyyzz only significant for the service
Example: 42.020 (420200000000 / V42.00) means that version 20 of the firmware is currently
loaded on your base.
• A list of the registered handsets
¤ Status Connections
The page displays the currently available connections and their status.
72

Menu overview
Web conf igurator
Quick Start Wizard
Settings Network IP Configuration
Security
Telephony Connections
Audio
Number Assignment
Call Divert
Dialling Plans
Network mailboxes
Advanced VoIP Settings
Messaging Email
Message Notification
Info Services
Directories Online Directory
Directory Transfer
Management Date and Time
Local Settings
Miscellaneous
Reboot & Reset
Save and Restore
Firmware Update
p. 61
p. 62
p. 62
p. 63
p. 65
p. 64
p. 67
p. 66
p. 65
p. 67
p. 69
p. 68
p. 69
p. 69
p. 69
p. 71
p. 66
p. 71
p. 71
p. 71
p. 72
Status Device
Connections
p. 72
p. 72
73

Customer Service & Assistance
Australia- - - - - - - - - - - - - - - - - - - +61 1300 780 878
Austria - - - - - - - - - - - - - - - - - - - - - -0043 1 311 3046
Bahrain - - - - - - - - - - - - - - - - - - - - - - - -31 73 11 173
Belgium - - - - - - - - - - - - - - - - - - - - - - - - 07815 6679
Bosnia Herzegovina - - - - - - - - - - - - - - - 033 276 649
Brazil
Grandes Capitais e Regiões Metropolitanas:
- - - - - - - - - - - - - - - - - - - - - - - - - - - - - - - 4003 3020
- - - - - - - - - - - - - - - - - - (Preço de uma ligação local)
Demais localidades:
- - - - - - - - - - - - - - - - - - - - - - - - - - - - 0800 888 3020
- - - - - - - - - - - - - - - - - - - - - - - - - - - - - - - - -(Gratuito)
Bulgaria - - - - - - - - - - - - - - - - - - - - - +359 2 9710666
Canada - - - - - - - - - - - - - - - - - - - - - 1-866 247-8758
China - - - - - - - - - - - - 0 21 400 670 6007 (RMB 0.11)
Croatia - - - - - - - - - - - - - - - - - - - - - - - - 01 / 2456 555
Czech Republic - - - - - - - - - - - - - - - - - - 233 032 727
Denmark - - - - - - - - - - - - - - - - - - - - - +45 43682003
Finlan d- - - - - - - - - - - - - - - - - - -+358 (0)9725 19734
France - - - - - - - - - - - - - - - - - - - - - - (0)1 57 32 45 22
Germany - - - - - - - - - - - - - - - - - - - - 02871 / 912 912
Greece - - - - - - - - - - - - - - - - - - - - +30 2111 98 1778
Hong Kong - - - - - - - - - - - - - - - - - - - - - - 2763 0203
- - - - - - - - - - - - - - - - - - - - - - - - - - - - - - - 2389 7285
Hungary- - - - - - - - - - - - - - - - - - - - - - 06(1)267-2109
India - - - - - - - - - - - - - - - - - - - - - Please refer to your
- - - - - - - - - - - - - - - - - - - - - - - - - local warranty card
Indonesia- - - - - - - - - - - - - - - - - - - -(62-21) 5673813
- - - - - - - - - - - - - - - - - - - - - - - - -(62-21) 888856000
Ireland - - - - - - - - - - - - - - - - - - - - - - - - 0818 200 033
Italy - - - - - - - - - - - - - - - - - - - - - - - - - 02.600.630.45
(Il numero è di tipo “urbano nazionale” e può essere
chiamato da qualunque operatore di rete fissa o
mobile. Il costo della chiamata è inerente al proprio
piano tariffario definito con l’operatore telefonico,
ad esempio in caso di un contratto con tariffa FLAT,
non ci sono costi aggiuntivi per la chiamata a questo
numero, in quanto si tratta di un numero urbano
nazionale.)
Jordan - - - - - - - - - - - - - - - - - 00962 6 5625460/1/2
Kuwait - - - - - - - - - - - - +965 -22458737/22458738
Lebanon - - - - - - - - - - - - - - - - - - - - - -+9611240259/
- - - - - - - - - - - - - - - - - - - - - - - - - - - - - +9611236110
Luxembourg - - - - - - - - - - - - - - - (+352) 8002 3811
Malaysia - - - - - - - - - - - - - - - - - - - - +603-8076 9696
Malta - - - - - - - - - - - - - - - +39 02360 46111 (0,10 €)
Mexico - - - - - - - - - - - - - - - - - - -01800 999 4442738
- - - - - - - - - - - - - - - - - - - - - - - (01800 999 GIGASET)
Netherlands - - - - - - - - - - - - - - - - - - - 0900-3333102
New Zealand - - - - - - - - - - - - - - - - - - -0800 780 878
Norway- - - - - - - - - - - - - - - - - - - - - - -+47 2231 0845
Oman - - - - - - - - - - - - - - -+968 70928 Ext. 49/21/75
Polan d - - - - - - - - - - - - - - - - - - - - - - - - - 801 140 160
Port ugal - - - - - - - - - - - - - - - - - - (+351) 308 804 760
- - - - - - - - - - - - - - - - - (custo de uma chamada local)
Romania- - - - - - - - - - - - - - - - - - - +40 021 204 9190
Russia - - - - - - - - - - - - - - - - - - - - - - - 8-800 333 4956
Serbia - - - - - - - - - - - - - - - - - - - - - - - - -0800 222 111
Singapore- - - - - - - - - - - - - - - - - - - - - - - - 6735 9100
Slovak Republic - - - - - - - - - - - - - - - - -0905 035 305
Slovenija- - - - - - - - - - - - - - - - - - - +386 (1) 5466 511
South Africa - - -
- - - - - - - - - - - - - - - - 0800 98 08 42
Spain - - - - - - - - - - - - - - - - - - - - - (+34) 910 920 931
Sweden - - - - - - - - - - - - - - - - - - +46 (0)8502 52347
Switzerland - - - - - - - - - - - - - - - - - - - -0848 212 000
Tai wan - - - - - - - - - - - - - - - - - - - - - - - - 02 266 24343
Turk ey- - - - - - - Son kullanıcı için +90 212 888 6346
- - - - - - - - - - - - - - - - - - - Bayi için +90 212 888 6347
Ukraine- - - - - - - - - - - - - - - - - - - +380-44-451-71-72
United Arab Emirates - - - - - - - - - - - +971 44504288
United Kingdom- - - - - - - - - - - - - - - - 020 36953111
USA - - - - - - - - - - - - - - - - - - - - - - - - 1-866 247-8758
- - - - - - - - - - - - - - - - - - - - - - - - - - - - - - - - - - - -tollfree
Customer Service & Assistance
Do you have any questions? As a Gigaset customer, you can find help quickly in this User Manual and in the
service section of our Gigaset online portal www.gigaset.com/service
Please register your phone online right after purchase.
This enables us to provide you with even better service regarding questions or a warranty claim. In order to
contact our customer service via email, please use the email contact form from our Gigaset online portal after
selecting your home country.
Our representatives are also available on the telephone hotlines for consultation.
.
For questions about VoIP access, please contact the respective service provider.
Please have your record of purchase ready when calling.
Replacement or repair services are not offered in countries where our product is not sold by authorised
dealers.
74

Customer Service & Assistance
Questions and answers
If you have any questions about the use of your telephone, please go to www.gigaset.com/service where help
is available at any time. The table below contains a list of common problems and possible solutions.
Problem Nothing on the display.
Cause The handset is not switched on.
The batteries are flat.
Solution Press the End call key for about 5 seconds or place the handset into the base.
Problem No radio connection to the base.
Cause The handset is outside the range of the base.
Solution
Charge or replace the batteries.
Handset is not yet registered.
The base is not switched on.
¥ Move the handset closer to the base.
¥ Register the handset.
¥ Check the power plug on the base.
Problem You cannot hear a ring or dial tone from the fixed line network.
Cause Th e phone cable supplied has not been used or it has been replaced by a new cable with the
Solution
Problem Error tone sounds after system PIN prompt.
Cause You have entered the wrong system PIN.
Solution
wrong pin connections.
¥
Please always use the telephone cable supplied or ensure that the pin connections are
correct when purchasing from a retailer.
PIN forgotten.
¥ Reset the system PIN to the default 0000.
All the handsets are de-registered. All settings are reset. All lists are deleted.
75

Manufacturer‘s advice
Manufacturer‘s advice
Authorisation
This device is intended for analogue phone lines in your network.
Voice over IP telephony is possible via the LAN interface (IEEE 802.3).
Depending on your telecommunication network interface, an additional router/switch could be necessary.
For further information please contact your Internet provider.
Country-specific requirements have been taken into consideration.
Hereby, Gigaset Communications GmbH declares that the radio equipment type Gigaset A690IP-AS690IP –
Gigaset A690HX-AS690HX is in compliance with Directive 2014/53/EU.
The full text of the EU declaration of conformity is available at the following internet address:
www.gigaset.com/docs
This declaration could also be available in the "International Declarations of Conformity" or "European
Declarations of Conformity" files.
Therefore please check all of these files.
Data protection
We at Gigaset take the protection of our customers’ data very seriously. It is precisely for this reason that we
are ensuring all our products feature "Privacy by Design" as standard. All information we collect is used to
make our products as good as possible. In the process, we ensure your details are protected and only used for
the purposes of making available to you a product or service. We know which path your data takes through
the company and ensure this happens in line with data protection specifications in a secure and protected
manner.
The full text of the privacy policy is available from: www.gigaset.com/privacy-policy
.
Environment
Our environmental statement
We at Gigaset Communications GmbH are aware of our social resp onsib ility. Th at is why we act ively t ake ste ps
to create a better world. In all areas of our business – from product planning and production to sales and waste
of disposal – following our environmental conscience in everything we do is of utmost importance to us.
Learn more about our earth-friendly products and processes online at www.gigaset.com
Environmental management system
Gigaset Communications GmbH is certified pursuant to the international standards ISO 14001 and
ISO 9001.
ISO 14001 (Environment): Certified since September 2007 by TÜV SÜD Management Service
GmbH.
ISO 9001 (Quality): Certified since 17/02/1994 by TÜV SÜD Management Service GmbH.
76
.

Manufacturer‘s advice
Disposal
Batteries should not be disposed of in general household waste. Obser ve the local waste disposal regulations,
details of which can be obtained from your local authority.
All electrical and electronic products should be disposed of separately from the municipal waste stream via
designated collection facilities appointed by the government or the local authorities.
This crossed-out wheeled bin symbol on the product means the product is covered by the
European Directive 2012/19/EU.
The correct disposal and separate collection of your old appliance will help prevent potential
negative consequences for the environment and human health. It is a precondition for reuse and
recycling of used electrical and electronic equipment.
For more detailed information about disposal of your old appliance, please contact your local
council refuse centre or the original supplier of the product.
Care
Wipe the device with a damp cloth or an antistatic cloth. Do not use solvents or microfibre cloths.
Never use a dry cloth; this can cause static.
In rare cases, contact with chemical substances can cause changes to the device’s exterior. Due to the wide
variety of chemical products available on the market, it was not possible to test all substances.
Impairments in high-gloss finishes can be carefully removed using display polishes for mobile phones.
Contact with liquid
If the device comes into contact with liquid:
1 Unplug all cables from the device.
2 Remove the batteries and leave the battery compartment open.
3 Allow the liquid to drain from the device.
4Pat all parts dry.
5 Pla ce the device in a dry, wa rm place for at least 72 hours (not in a microwave, oven etc.) with the battery
compartment open and the keypad facing down (if applicable).
6 Do not switch on the device again until it is completely dry.
When it has fully dried out, you will normally be able to use it again.
Open Source Software
General
Your Gigaset product includes Open Source software that is subject to various license conditions.
With regard to Open Source software, the granting of usage rights that go beyond the operation of the
product in the form supplied by Gigaset Communications GmbH is governed by the relevant license conditions of the Open Source software.
For further information on Open Source Software please visit
www.gigaset.com/opensource
.
77

Technical data
3
2
1
4
5
6
1unused
2unused
3a
4b
5unused
6unused
Technical data
Batteries
Technology: Nickel metal hydride (NiMH)
Size: AAA (Micro, HR03)
Volt age: 1.2 V
Capacity: 400 - 1000 mAh
Handset operating times/charging times
The operating time of your Gigaset depends on the capacity of the battery, its age and the way it is used.
(All times are maximums).
Standby time (hours) 180 / 110*
Talktime (hours) 12
Operating time for 1.5 h of calls per day (hours) 90 / 70*
Charging time in charging cradle (hours) 4.5
* No Radiation switched off/on, without display backlight in idle mode
Power consumption of the handset in the charging cradle
When charging: approx. 2.10 W
To maintain the charge status: approx. 1.30 W
Base power consumption
Standby: approx. 1.30 W
During a call: approx. 1.40 W
General technical specifications
DECT standard supported
GAP standard supported
Radio frequency range 1880 - 1900 MHz
Range up to 300 m outdoors, up to 50 m indoors
Power supply for base 230 V ~/50 Hz
Transmission power 10 mW average power per channel, 250 mW pulse power
Ambient conditions for operation +5°C to +45°C, 20% to 75% relative humidity
Pin connections on the telephone jack
78

Power adapter for the handset
Manufacturer Salom Electric (Xiamen) Co. Ltd.
Commercial registration number: 91350200612003878C
31 Building, Huli Industrial District,
Xiamen, Fujian 361006, P.R. China
Salcomp (Shenzen) Co. Ltd.
Commercial registration number: 91440300618932635P
Salcomp Road, Furond Industrial Area,
Xinqiao, Shajing, Baoan District, Shenzen 518125 China
Model identifier C705
Input voltage 230 V
Input AC frequency 50 Hz
Output voltage 4 V
Output current 0.15 A
Output power 0.6 W
Average active efficiency > 46%
Efficiency at low load (10%) not relevant – only at output power > 10 W
No-load power consumption < 0.10 W
Power adapter for the base
Manufacturer Salom Electric (Xiamen) Co. Ltd.
Commercial registration number: 91350200612003878C
31 Building, Huli Industrial District,
Xiamen, Fujian 361006, P.R. China
Salcomp (Shenzen) Co. Ltd.
Commercial registration number: 91440300618932635P
Salcomp Road, Furond Industrial Area,
Xinqiao, Shajing, Baoan District, Shenzen 518125 China
Model identifier C557
Input voltage 230 V
Input AC frequency 50 Hz
Output voltage 6.5 V
Output current 0.6 A
Output power 3.9 W
Average active efficiency > 76.1 %
Efficiency at low load (10%) not relevant – only at output power > 10 W
No-load power consumption < 0.10 W
Technical data
79

Technical data
1) Space
1x 2x 3x 4x 5x 6x 7x 8x 9x 10x 11x 12x 13x 14x 15x
1£$¥¤
abc2дбавгз
def 3лйик
gh i4ïíìî
jkl5
mno6цсутфх
pqr s7ß
tuv8üúùû
wx y z 9яэжше
.,?!0+-:¿¡"’ ;_
*/( )<=>%
#@\ &§
1)
1) Space
1x 2x 3x 4x 5x 6x 7x 8x 9x 10x 11x 12x 13x
1$¤
abc2ąäáâćçč
def 3đďęëéě
gh i 4 í î
jkl5ł
mno6ńňóöőô
pqr s7 ř ß ś š
tuv8t’űüúů
wxy z 9 ý ź ż ž
.,?!0+-:"’;_
*/( )<=>%
#@\ &§
1)
Character set tables
The character set used on the handset is dependent on the language set.
Entering letters/characters
¥ Press the relevant key several times.
¥ Briefly pre ss th e H ash ke y to sw it ch f ro m m ode “ Ab c” t o “1 23 ”, f ro m “ 123 ” to “a bc ” and fr om “ab c” t o
“Abc”.
Standard characters
Central Europe
80

Cyrillic
1) Space
1x 2x 3x 4x 5x 6x 7x 8x 9x 10x 11x 12x 13x
1$
AБВГ2ABC
ДЕËЖЗ 3D E F
ИЙК Л4GH I
МНО 5 J K L
ПРС6MNO
ТYФX7PQRS
ЦЧШЩЪ8T UV
ЬL Ь Э ЮЯ9WXY Z
.,?!0+-:"’;_
*/( )<=>%
#@\ & §
1)
Technical data
81

Menu tree
Menu tree
Not all functions described in the user guide are available in all countries or from all network
providers.
Opening the main menu: Press the display key Menu when the handset is in the idle mode.
Alarm Clock
Activation
Wake -up Time
Occurrence
Audio Settings
Call Volume Earpiece / Handsfree p. 54
Acoustic Profile
Ringer Volume
Battery Low
Advisory Tones
Out-of-Range Warning
Ringtones (Handset)
Answering Machine
Play Messages
Network Mailbox
Settings
Date and Time
Language
Country (if available)
Display Larger Font . . . . . . . . . . . . . . . . . . . . . . . . . . . . . . . . p. 53
. . . . . . . . . . . . . . . . . . . . . . . . . . . . . . . . . . . . . . . . . . . . . . . . . . . .
. . . . . . . . . . . . . . . . . . . . . . . . . . . . . . . . . . . . . . . . . . . . . . . . . . . .
. . . . . . . . . . . . . . . . . . . . . . . . . . . . . . . . . . . . . . . . . . . . . . . . . . . .
Backlight Control Display On In Charger p. 54
. . . . . . . . . . . . . . . . . . . . . . . . . . . . . . . . . . . .
. . . . . . . . . . . . . . . . . . . . . . . . . . . . . . . . . . . .
. . . . . . . . . . . . . . . . . . . . . . . . . . . . . . . . . . . .
. . . . . . . . . . . . . . . . . . . . . . . . . . . . . . . . . . . .
. . . . . . . . . . . . . . . . . . . . . . . . . . . . . . . . . . . .
. . . . . . . . . . . . . . . . . . . . . . . . . . . . . . . . . . . .
. . . . . . . . . . . . . . . . . . . . . . . . . . . . . . . . . . . .
. . . . . . . . . . . . . . . . . . . . . . . . . . . . . . . . . . . .
. . . . . . . . . . . . . . . . . . . . . . . . . . . . . . . . . . . .
. . . . . . . . . . . . . . . . . . . . . . . . . . . . . . . . . . . .
. . . . . . . . . . . . . . . . . . . . . . . . . . . . . . . . . . . .
Display On Out of Charg. p. 54
Display Off During Calls p. 54
Flash Display for Notifications p. 54
p. 38
p. 38
p. 38
p. 55
p. 55
p. 55
p. 55
p. 55
p. 55
p. 37
p. 37
p. 53
p. 53
p. 53
82
Screensaver No Screensaver p. 53
Digital Clock p. 53
Info Ticker p. 53
Contrast . . . . . . . . . . . . . . . . . . . . . . . . . . . . . . . . p. 54

Menu tree
Registration Register Handset . . . . . . . . . . . . . . . . . . . . . . . . . . . . . . . . p. 50
Legacy (GAP) Registration . . . . . . . . . . . . . . . . . . . . . . . . . . . . . . . . p. 50
Deregister Handset . . . . . . . . . . . . . . . . . . . . . . . . . . . . . . . . p. 51
Select Base . . . . . . . . . . . . . . . . . . . . . . . . . . . . . . . . p. 50
Firmware Update Current Version . . . . . . . . . . . . . . . . . . . . . . . . . . . . . . . . p. 57
Update . . . . . . . . . . . . . . . . . . . . . . . . . . . . . . . . p. 57
Automatic Check . . . . . . . . . . . . . . . . . . . . . . . . . . . . . . . . p. 57
System Reset Handset . . . . . . . . . . . . . . . . . . . . . . . . . . . . . . . . p. 56
Reset Base . . . . . . . . . . . . . . . . . . . . . . . . . . . . . . . . p. 56
Base Restart . . . . . . . . . . . . . . . . . . . . . . . . . . . . . . . . p. 56
Encryption . . . . . . . . . . . . . . . . . . . . . . . . . . . . . . . . p. 51
Repeater only when at least one repeater
Local Network . . . . . . . . . . . . . . . . . . . . . . . . . . . . . . . . p. 57
Base Update . . . . . . . . . . . . . . . . . . . . . . . . . . . . . . . . p. 57
System PIN . . . . . . . . . . . . . . . . . . . . . . . . . . . . . . . . p. 56
Telephony Auto Answer . . . . . . . . . . . . . . . . . . . . . . . . . . . . . . . . p. 20
VoIP Wizard . . . . . . . . . . . . . . . . . . . . . . . . . . . . . . . . p. 13
Calls List Type Missed Calls p. 28
Recall . . . . . . . . . . . . . . . . . . . . . . . . . . . . . . . . p. 52
Access Code . . . . . . . . . . . . . . . . . . . . . . . . . . . . . . . . p. 52
Music on hold . . . . . . . . . . . . . . . . . . . . . . . . . . . . . . . . p. 55
Maximum Range . . . . . . . . . . . . . . . . . . . . . . . . . . . . . . . .. . . . . . . . . . . . . . . . . . . . . . . . . . . . . . . . p. 40
No Radiation . . . . . . . . . . . . . . . . . . . . . . . . . . . . . . . .. . . . . . . . . . . . . . . . . . . . . . . . . . . . . . . . p. 40
eMail E-mail 1 ... E-mail 6 . . . . . . . . . . . . . . . . . . . . . . . . . . . . . . . . p. 47
has been registered
All Calls p. 28
p. 51
83

Menu tree
Directory
Local Handset
Directory
Online Directory (Online directories) p. 31
SMS
Write Message
Incoming
Outgoing
Settings Service Centres p. 44
Select Services
Withhold No. Next Call
Call Divert Int / Fixed Line p. 24
Call Waiting
Transfe r (ECT)
Baby Monitor
Activation
Call Target Internal Call / External Call p. 39
Two -Way Tal k
Menu New Entry p. 29
Show Number p. 29
Edit Entry p. 29
Delete Entry p. 30
Send Entry p. 30
Delete List p. 30
Send List p. 30
Shortcut p. 30
VIP Caller Melody p. 29
. . . . . . . . . . . . . . . . . . . . . . . . . . . . . . .
. . . . . . . . . . . . . . . . . . . . . . . . . . . . . . .
. . . . . . . . . . . . . . . . . . . . . . . . . . . . . . .
Status Report p. 45
Notification p. 44
. . . . . . . . . . . . . . . . . . . . . . . . . . . . . . .
. . . . . . . . . . . . . . . . . . . . . . . . . . . . . . .
. . . . . . . . . . . . . . . . . . . . . . . . . . . . . . .
. . . . . . . . . . . . . . . . . . . . . . . . . . . . . . .
. . . . . . . . . . . . . . . . . . . . . . . . . . . . . . .
p. 42
p. 43
p. 42
p. 23
p. 24
p. 25
p. 39
p. 39
Call Manager
Mute Anonym. Calls
One Touch Call Activation p. 20
Time Control Activation p. 41
84
. . . . . . . . . . . . . . . . . . . . . . . . . . . . . . .
Call Target p. 20
Suppress VIP Calls p. 41
Settings p. 41
p. 41

Index
A
Accepting a call . . . . . . . . . . . . . . . . . . . . . . . . . . . . 20
Access code (PABX) . . . . . . . . . . . . . . . . . . . . . . . . . 66
Activating
muting ringtone
Activation code for VoIP account . . . . . . . . . . . . . 14
Adjusting the call volume (handset). . . . . . . . . . . 55
Adjusting the ringtone melody (handset) . . . . . . 55
Answer . . . . . . . . . . . . . . . . . . . . . . . . . . . . . . . . . . . 20
Arabic characters, entering . . . . . . . . . . . . . . . . . . 61
Assigning key 1 . . . . . . . . . . . . . . . . . . . . . . . . . . . . 37
Authorisation . . . . . . . . . . . . . . . . . . . . . . . . . . . . . . 76
Auto configuration code . . . . . . . . . . . . . . . . . . . . 13
Automatic versions check . . . . . . . . . . . . . . . . . . . 72
B
Baby monitor . . . . . . . . . . . . . . . . . . . . . . . . . . . . . . 39
activation . . . . . . . . . . . . . . . . . . . . . . . . . . . . . . 39
deactivation . . . . . . . . . . . . . . . . . . . . . . . . . . . . 39
Backlight. . . . . . . . . . . . . . . . . . . . . . . . . . . . . . . . . . 54
Base
changing
connect to mains power supply . . . . . . . . . . . . . .8
connect to phone network . . . . . . . . . . . . . . . . . .9
connect to the Internet . . . . . . . . . . . . . . . . . . . . .9
overview . . . . . . . . . . . . . . . . . . . . . . . . . . . . . . . . .5
restarting. . . . . . . . . . . . . . . . . . . . . . . . . . . . . . . 56
restore to defaults . . . . . . . . . . . . . . . . . . . . . . . 56
Base settings
change in web configurator
Battery
charge level
charging . . . . . . . . . . . . . . . . . . . . . . . . . . . . . . . 11
insert . . . . . . . . . . . . . . . . . . . . . . . . . . . . . . . . . . 11
recommended batteries . . . . . . . . . . . . . . . . . . 78
Best base station . . . . . . . . . . . . . . . . . . . . . . . . . . . 50
Broadband voice codec . . . . . . . . . . . . . . . . . . . . . 65
Broken display . . . . . . . . . . . . . . . . . . . . . . . . . . . . . . .7
C
Call
external
internal . . . . . . . . . . . . . . . . . . . . . . . . . . . . . . . . 21
Call divert . . . . . . . . . . . . . . . . . . . . . . . . . . . . . . . . . 24
Call Forwarding
for VoIP connections
Gigaset.net . . . . . . . . . . . . . . . . . . . . . . . . . . . . . 67
Call list . . . . . . . . . . . . . . . . . . . . . . . . . . . . . . . . . . . 28
functions . . . . . . . . . . . . . . . . . . . . . . . . . . . . . . . 28
opening. . . . . . . . . . . . . . . . . . . . . . . . . . . . . . . . 28
set the list type. . . . . . . . . . . . . . . . . . . . . . . . . . 28
Call transfer . . . . . . . . . . . . . . . . . . . . . . . . . . . . . . . 25
Call volume, see Ringtone volume
Call waiting
accepting/rejecting . . . . . . . . . . . . . . . . . . . . . . 25
. . . . . . . . . . . . . . . . . . . . . . . . . 43
. . . . . . . . . . . . . . . . . . . . . . . . . . . . . . . 50
. . . . . . . . . . . . . . . 71
. . . . . . . . . . . . . . . . . . . . . . . . . . . . . 18
. . . . . . . . . . . . . . . . . . . . . . . . . . . . . . . . 19
. . . . . . . . . . . . . . . . . . . . . 67
. . . . . . . . . . . . . . . . . . . . . . . . . . . . . . . 24
Index
Calling
anonymous
external . . . . . . . . . . . . . . . . . . . . . . . . . . . . . . . .19
from online directory . . . . . . . . . . . . . . . . . . . . . 32
Gigaset.net . . . . . . . . . . . . . . . . . . . . . . . . . . . . . 35
internal. . . . . . . . . . . . . . . . . . . . . . . . . . . . . . . . . 21
Calls
making an external call
transferring (connecting). . . . . . . . . . . . . . . . . . 21
Cancel the alarm (baby monitor) . . . . . . . . . . . . . . 39
Care . . . . . . . . . . . . . . . . . . . . . . . . . . . . . . . . . . . . . . 77
Care of the device . . . . . . . . . . . . . . . . . . . . . . . . . . 77
Certificate error . . . . . . . . . . . . . . . . . . . . . . . . .14, 47
Changing the call volume
during a call
permanently . . . . . . . . . . . . . . . . . . . . . . . . . . . . 54
Changing the display language . . . . . . . . . . . .12, 53
Character set (handset) . . . . . . . . . . . . . . . . . . . . . . 80
Charging time of handset. . . . . . . . . . . . . . . . . . . . 78
CLI, Calling Line Identification . . . . . . . . . . . . . . . . 23
CLIP, CLI Presentation . . . . . . . . . . . . . . . . . . . . . . . 23
CLIR, CLI Restriction. . . . . . . . . . . . . . . . . . . . . . . . . 23
Communication ports, local . . . . . . . . . . . . . . . . . . 68
Conference call. . . . . . . . . . . . . . . . . . . . . . . . . . . . . 26
Configuration wizard . . . . . . . . . . . . . . . . . . . . . . . . 61
Connecting . . . . . . . . . . . . . . . . . . . . . . . . . . . . . . . .21
Connecting the charger cradle. . . . . . . . . . . . . . . . 11
Connecting the PC to the web configurator . . . . . 59
Connecting to the web configurator . . . . . . . . . . . 59
Connections
fixed line network
Gigaset.net . . . . . . . . . . . . . . . . . . . . . . . . . . . . . 63
IP . . . . . . . . . . . . . . . . . . . . . . . . . . . . . . . . . . . . . . 63
manage . . . . . . . . . . . . . . . . . . . . . . . . . . . . . . . . 63
status . . . . . . . . . . . . . . . . . . . . . . . . . . . . . . . . . . 72
Consultation call (external). . . . . . . . . . . . . . . . . . . 25
Consultation call (internal) . . . . . . . . . . . . . . . . . . . 21
Contact with liquid . . . . . . . . . . . . . . . . . . . . . . . . .77
Control key . . . . . . . . . . . . . . . . . . . . . . . . . . . . . .4, 16
accessing display functions . . . . . . . . . . . . . . . . 17
Country . . . . . . . . . . . . . . . . . . . . . . . . . . . . . . . . . . . 53
Customer Care . . . . . . . . . . . . . . . . . . . . . . . . . . . . .74
Customer Service & Assistance. . . . . . . . . . . . . . . . 74
Cyrillic characters, entering. . . . . . . . . . . . . . . . . . . 61
. . . . . . . . . . . . . . . . . . . . . . . . . . . . . 23
. . . . . . . . . . . . . . . . . . . 19
. . . . . . . . . . . . . . . . . . . . . . . . . .19, 54
. . . . . . . . . . . . . . . . . . . . . . . . 63
D
Data protection . . . . . . . . . . . . . . . . . . . . . . . . . . . . 76
Data protection notice . . . . . . . . . . . . . . . . . . . . . . 10
Gigaset.net . . . . . . . . . . . . . . . . . . . . . . . . . . . . . 35
Date and time
. . . . . . . . . . . . . . . . . . . . . . . . . . . . . . . . . .12, 53
set
Deactivating
muting ringtone
De-registering (web configurator) . . . . . . . . . . . . . 60
Dialling plans
emergency numbers
. . . . . . . . . . . . . . . . . . . . . . . . . 43
. . . . . . . . . . . . . . . . . . . . . 66
85

Index
Directory
. . . . . . . . . . . . . . . . . . . . . . . . . . . . . . . . . 29
assign quick-dial key . . . . . . . . . . . . . . . . . . . . . 30
delete. . . . . . . . . . . . . . . . . . . . . . . . . . . . . . . . . . 30
Gigaset.net . . . . . . . . . . . . . . . . . . . . . . . . . . . . . 35
opening. . . . . . . . . . . . . . . . . . . . . . . . . . . . . 29, 31
saving number of sender (SMS) . . . . . . . . . . . . 43
selecting an entry. . . . . . . . . . . . . . . . . . . . . . . . 29
sending entry/list to handset . . . . . . . . . . . . . . 30
transferring to/from PC . . . . . . . . . . . . . . . . . . . 69
VIP contacts . . . . . . . . . . . . . . . . . . . . . . . . . . . . 29
Directory entry
. . . . . . . . . . . . . . . . . . . . . . . . . . . . . . . . . . 30
delete
Directory file
contents (vCard format)
Directory transfer . . . . . . . . . . . . . . . . . . . . . . . . . . 69
Disabling wireless module . . . . . . . . . . . . . . . . . . . 40
Display
adjust contrast
anonymous. . . . . . . . . . . . . . . . . . . . . . . . . . . . . 23
broken . . . . . . . . . . . . . . . . . . . . . . . . . . . . . . . . . . .7
disable new messages. . . . . . . . . . . . . . . . . . . . 27
external call. . . . . . . . . . . . . . . . . . . . . . . . . . . . . 23
icons. . . . . . . . . . . . . . . . . . . . . . . . . . . . . . . . . . . . .6
large dial keys. . . . . . . . . . . . . . . . . . . . . . . . . . . 53
phone number (CLIP). . . . . . . . . . . . . . . . . . . . . 23
unknown. . . . . . . . . . . . . . . . . . . . . . . . . . . . . . . 23
Display backlight. . . . . . . . . . . . . . . . . . . . . . . . . . . 54
Display functions. . . . . . . . . . . . . . . . . . . . . . . . . . . 17
Display keys . . . . . . . . . . . . . . . . . . . . . . . . . . . . . . . . .4
functions . . . . . . . . . . . . . . . . . . . . . . . . . . . . . . . 17
Disposal . . . . . . . . . . . . . . . . . . . . . . . . . . . . . . . . . . 77
DNS server
preferred
Draft message list (SMS) . . . . . . . . . . . . . . . . . . . . . 42
DTMF signalling for VoIP. . . . . . . . . . . . . . . . . . . . . 67
. . . . . . . . . . . . . . . . . . . . . . . . . . . . . . . 57
. . . . . . . . . . . . . . . . . . 70
. . . . . . . . . . . . . . . . . . . . . . . . . . 54
E
ECO DECT . . . . . . . . . . . . . . . . . . . . . . . . . . . . . . . . . 40
ECT . . . . . . . . . . . . . . . . . . . . . . . . . . . . . . . . . . . . . . 26
Email
. . . . . . . . . . . . . . . . . . . . . . . . . . . . . . . . . . 49
delete
messages while connecting . . . . . . . . . . . . . . . 48
settings . . . . . . . . . . . . . . . . . . . . . . . . . . . . . . . . 68
viewing the sender's address . . . . . . . . . . . . . . 49
Email list . . . . . . . . . . . . . . . . . . . . . . . . . . . . . . . . . . 47
Emergency number, dialling plans . . . . . . . . . . . . 66
Emergency numbers
not possible
Enable Annex B for codec G.729 . . . . . . . . . . . . . . 65
Enable/disable warning tones . . . . . . . . . . . . . . . . 55
Enabling/disabling advisory tones . . . . . . . . . . . . 55
Enabling/disabling music on hold . . . . . . . . . . . . 55
Enabling/disabling the batter y tone. . . . . . . . . . . 55
End call key . . . . . . . . . . . . . . . . . . . . . . . . . . . . . 4, 16
Entering characters . . . . . . . . . . . . . . . . . . . . . . . . . 80
Entering Cyrillic/Arabic characters . . . . . . . . . . . . 61
Environment . . . . . . . . . . . . . . . . . . . . . . . . . . . . . . 76
. . . . . . . . . . . . . . . . . . . . . . . . . . . . . .7
F
Factory settings . . . . . . . . . . . . . . . . . . . . . . . . . . . . 71
Fast access, network mailbox . . . . . . . . . . . . . . . . . 37
Firmware (base)
automatic update
reset (downgrade) . . . . . . . . . . . . . . . . . . . . . . . 72
update . . . . . . . . . . . . . . . . . . . . . . . . . . . . . .57, 72
update from web configurator . . . . . . . . . . . . . 72
Firmware (handset)
check automatically
Firmware update . . . . . . . . . . . . . . . . . . . . . . . . . . . 58
Fixed line network connection. . . . . . . . . . . . . . . . 63
. . . . . . . . . . . . . . . . . . . . . . . . 72
. . . . . . . . . . . . . . . . . . . . . . 58
G
G.711 a law . . . . . . . . . . . . . . . . . . . . . . . . . . . . . . . . 65
G.711 μ law . . . . . . . . . . . . . . . . . . . . . . . . . . . . . . . . 65
G.722 . . . . . . . . . . . . . . . . . . . . . . . . . . . . . . . . . . . . . 65
G.722 broadband voice codec . . . . . . . . . . . . . . . . 65
G.726 . . . . . . . . . . . . . . . . . . . . . . . . . . . . . . . . . . . . . 65
G.729 . . . . . . . . . . . . . . . . . . . . . . . . . . . . . . . . . . . . . 65
Gigaset.net . . . . . . . . . . . . . . . . . . . . . . . . . . . . .34, 63
Call Forwarding . . . . . . . . . . . . . . . . . . . . . . . . . . 67
calling a subscriber . . . . . . . . . . . . . . . . . . . . . . . 35
changing/deleting own name. . . . . . . . . . . . . . 36
directory. . . . . . . . . . . . . . . . . . . . . . . . . . . . . . . . 35
entering name. . . . . . . . . . . . . . . . . . . . . . . . . . . 36
register . . . . . . . . . . . . . . . . . . . . . . . . . . . . . . . . . 34
searching for subscribers . . . . . . . . . . . . . . . . . .35
Gigaset.net directory
opening
Gigaset-config . . . . . . . . . . . . . . . . . . . . . . . . . . . . . 60
. . . . . . . . . . . . . . . . . . . . . . . . . . . . . . . . 34
H
Handset
changing name
changing the number . . . . . . . . . . . . . . . . . . . . 22
changing to a different base station. . . . . . . . . 50
changing to best reception . . . . . . . . . . . . . . . . 50
de-registering . . . . . . . . . . . . . . . . . . . . . . . . . . . 51
display language. . . . . . . . . . . . . . . . . . . . . . . . . 53
locating . . . . . . . . . . . . . . . . . . . . . . . . . . . . . . . . 51
registering to another base . . . . . . . . . . . . . . . . 50
resetting . . . . . . . . . . . . . . . . . . . . . . . . . . . . . . . . 56
setting (personalisation) . . . . . . . . . . . . . . . . . . 53
setting up. . . . . . . . . . . . . . . . . . . . . . . . . . . . . . . 11
switching on/off . . . . . . . . . . . . . . . . . . . . . . . . . 16
transferring a call . . . . . . . . . . . . . . . . . . . . . . . . 21
update . . . . . . . . . . . . . . . . . . . . . . . . . . . . . . . . . 58
use as a baby monitor . . . . . . . . . . . . . . . . . . . . 39
using multiple. . . . . . . . . . . . . . . . . . . . . . . .21, 50
Handsfree
. . . . . . . . . . . . . . . . . . . . . . . . . . . . . . . . . .4, 20
key
mode . . . . . . . . . . . . . . . . . . . . . . . . . . . . . . . . . . 20
volume . . . . . . . . . . . . . . . . . . . . . . . . . . . . . . . . . 54
Hash key . . . . . . . . . . . . . . . . . . . . . . . . . . . . . . . . . . . 4
Hearing aids . . . . . . . . . . . . . . . . . . . . . . . . . . . . . . . . 7
. . . . . . . . . . . . . . . . . . . . . . . . . . 22
86

Index
I
Icon
Incoming message list
Insert a dialling pause. . . . . . . . . . . . . . . . . . . . . . . . .4
Installation wizard. . . . . . . . . . . . . . . . . . . . . . . . . . 13
Internal
Internal call . . . . . . . . . . . . . . . . . . . . . . . . . . . . . . . 21
Internet
Internet connection . . . . . . . . . . . . . . . . . . . . . . . . . .9
Internet security . . . . . . . . . . . . . . . . . . . . . . . . . . . 62
IP address
IP connections . . . . . . . . . . . . . . . . . . . . . . . . . . . . . 63
IP telephony provider . . . . . . . . . . . . . . . . . . . . . . . 13
. . . . . . . . . . . . . . . . . . . . . . . . . . . . . . . 42
new SMS
opening (email)
consultation
making calls . . . . . . . . . . . . . . . . . . . . . . . . . . . . 21
security
Outage. . . . . . . . . . . . . . . . . . . . . . . . . . . . . . . . . . .7
obtaining automatically
. . . . . . . . . . . . . . . . . . . . . . . . . 47
. . . . . . . . . . . . . . . . . . . . . . . . . . . . 21
. . . . . . . . . . . . . . . . . . . . . . . . . . . . . . . . 62
. . . . . . . . . . . . . . . . . . 57
K
Key 1 . . . . . . . . . . . . . . . . . . . . . . . . . . . . . . . . . . . . . . .4
Keys
control key
end call key. . . . . . . . . . . . . . . . . . . . . . . . . . . 4, 16
handsfree . . . . . . . . . . . . . . . . . . . . . . . . . . . . 4, 20
hash key . . . . . . . . . . . . . . . . . . . . . . . . . . . . . . . . .4
key 1. . . . . . . . . . . . . . . . . . . . . . . . . . . . . . . . . 4, 37
messages. . . . . . . . . . . . . . . . . . . . . . . . . . . . . 4, 27
recall key . . . . . . . . . . . . . . . . . . . . . . . . . . . . . . . . .4
star key . . . . . . . . . . . . . . . . . . . . . . . . . . . . . . . . . .4
talk key . . . . . . . . . . . . . . . . . . . . . . . . . . . . . . . . . .4
. . . . . . . . . . . . . . . . . . . . . . . . . . . 4, 16
L
LAN connection
Language
Last number redial . . . . . . . . . . . . . . . . . . . . . . . . . 19
Liquid . . . . . . . . . . . . . . . . . . . . . . . . . . . . . . . . . . . . 77
List
Listening to a message (network mailbox) . . . . . 37
Local area code
Locating
Lock/unlock the keypa d. . . . . . . . . . . . . . . . . . . 4, 16
. . . . . . . . . . . . . . . . . . . . . . . . . . . . . . . . . . .7
Outage
set for display
calls
email notifications . . . . . . . . . . . . . . . . . . . . . . . 47
network mailbox . . . . . . . . . . . . . . . . . . . . . . . . 28
SMS draft message list. . . . . . . . . . . . . . . . . . . . 42
SMS message list . . . . . . . . . . . . . . . . . . . . . . . . 43
for VoIP calls
handset
. . . . . . . . . . . . . . . . . . . . . . . . . . . 12
. . . . . . . . . . . . . . . . . . . . . . . . . . . . . . . . . . . 28
. . . . . . . . . . . . . . . . . . . . . . . . . . . . 66
. . . . . . . . . . . . . . . . . . . . . . . . . . . . . . . . 51
M
Mains unit
. . . . . . . . . . . . . . . . . . . . . . . . . . . . . . . . . . . 79
base
handset . . . . . . . . . . . . . . . . . . . . . . . . . . . . . . . . 79
Making calls
accepting a call
internal. . . . . . . . . . . . . . . . . . . . . . . . . . . . . . . . . 21
Medical equipment . . . . . . . . . . . . . . . . . . . . . . . . . . 7
Menu
opening
tree . . . . . . . . . . . . . . . . . . . . . . . . . . . . . . . . . . . .82
web configurator overview . . . . . . . . . . . . . . . . 73
Menu navigation . . . . . . . . . . . . . . . . . . . . . . . . . . . 18
Message
delete (email)
Message display . . . . . . . . . . . . . . . . . . . . . . . . . . . . 68
Message key
open SMS arrival list
Message list
. . . . . . . . . . . . . . . . . . . . . . . . . . . . . . . . . . . 47
email
SMS. . . . . . . . . . . . . . . . . . . . . . . . . . . . . . . . . . . . 42
Messages key . . . . . . . . . . . . . . . . . . . . . . . . . . . .4, 27
Messages list. . . . . . . . . . . . . . . . . . . . . . . . . . . . . . . 28
Microphone . . . . . . . . . . . . . . . . . . . . . . . . . . . . . . . . 4
Muting. . . . . . . . . . . . . . . . . . . . . . . . . . . . . . . . . . . . 20
first ring . . . . . . . . . . . . . . . . . . . . . . . . . . . . . . . . 43
. . . . . . . . . . . . . . . . . . . . . . . . . . 20
. . . . . . . . . . . . . . . . . . . . . . . . . . . . . . . . 16
. . . . . . . . . . . . . . . . . . . . . . . . . . . . 49
. . . . . . . . . . . . . . . . . . . . . . 42
N
Network mailbox . . . . . . . . . . . . . . . . . . . . . . . . . . .37
enable . . . . . . . . . . . . . . . . . . . . . . . . . . . . . . . . . 37
enter phone number . . . . . . . . . . . . . . . . . . . . .65
fast access . . . . . . . . . . . . . . . . . . . . . . . . . . . . . . 37
listening to message. . . . . . . . . . . . . . . . . . . . . . 37
Network mailbox list . . . . . . . . . . . . . . . . . . . . . . . . 28
Network provider. . . . . . . . . . . . . . . . . . . . . . . . . . . 23
Network services . . . . . . . . . . . . . . . . . . . . . . . . . . . 23
Number
dialling from the directory
displaying caller's number (CLIP) . . . . . . . . . . . 23
. . . . . . . . . . . . . . . . . 19
O
On/Off button . . . . . . . . . . . . . . . . . . . . . . . . . . . . . . 4
Online directory. . . . . . . . . . . . . . . . . . . . . . . . . . . . 31
Gigaset.net . . . . . . . . . . . . . . . . . . . . . . . . . . . . . 35
search for entry . . . . . . . . . . . . . . . . . . . . . . . . . . 31
select . . . . . . . . . . . . . . . . . . . . . . . . . . . . . . . . . . 69
Online directory, private . . . . . . . . . . . . . . . . . . . . . 33
Opening the incoming email list . . . . . . . . . . . . . . 47
Operating time of handset . . . . . . . . . . . . . . . . . . .78
Outage
Internet connection
LAN connection . . . . . . . . . . . . . . . . . . . . . . . . . . 7
Overview
base
. . . . . . . . . . . . . . . . . . . . . . . . . . . . . . . . . . . . 5
handset . . . . . . . . . . . . . . . . . . . . . . . . . . . . . . . . . 4
. . . . . . . . . . . . . . . . . . . . . . . 7
87

Index
P
PAB X
set pause after line seizure
set pause after R key . . . . . . . . . . . . . . . . . . . . . 52
setting flash time . . . . . . . . . . . . . . . . . . . . . . . . 52
SMS . . . . . . . . . . . . . . . . . . . . . . . . . . . . . . . . . . . 45
Package contents . . . . . . . . . . . . . . . . . . . . . . . . . . . .8
Paging . . . . . . . . . . . . . . . . . . . . . . . . . . . . . . . . . . . . 51
Pause after line seizure . . . . . . . . . . . . . . . . . . . . . . 52
Pause after R key . . . . . . . . . . . . . . . . . . . . . . . . . . . 52
PC address book entries to the directory
Phone number
Pin connections . . . . . . . . . . . . . . . . . . . . . . . . . . . . 78
Playing back
Power adapter . . . . . . . . . . . . . . . . . . . . . . . . . 7, 8, 79
Power consumption (base) . . . . . . . . . . . . . . . . . . 78
Power consumption (handset) . . . . . . . . . . . . . . . 78
Preferred DNS server. . . . . . . . . . . . . . . . . . . . . . . . 57
Private online director y . . . . . . . . . . . . . . . . . . . . . 33
Problem resolution
Problem solutions . . . . . . . . . . . . . . . . . . . . . . . . . . 75
. . . . . . . . . . . . . . . . . . . . . . . . . . . . . . . . 69
copying
select from call list
select from redial list . . . . . . . . . . . . . . . . . . . . . 19
messages (network mailbox)
base . . . . . . . . . . . . . . . . . . . . . . . . . . . . . . . . . . . 79
handset . . . . . . . . . . . . . . . . . . . . . . . . . . . . . . . . 79
. . . . . . . . . . . . . . . . . . . . . . . . . . . . . . . . . . 48
email
SMS . . . . . . . . . . . . . . . . . . . . . . . . . . . . . . . . . . . 46
. . . . . . . . . . . . . . . . 52
. . . . . . . . . . . . . . . . . . . . . . . 19
. . . . . . . . . . . . . . 37
Q
Quick dial number. . . . . . . . . . . . . . . . . . . . . . . . . . 19
Quick-dial key
. . . . . . . . . . . . . . . . . . . . . . . . . . . . . . . . . . 30
assign
R
Radiation-free . . . . . . . . . . . . . . . . . . . . . . . . . . . . . 40
Recall key . . . . . . . . . . . . . . . . . . . . . . . . . . . . . . . . . . .4
function for VoIP. . . . . . . . . . . . . . . . . . . . . . . . . 68
Receive connection. . . . . . . . . . . . . . . . . . . . . . . . . 15
assigning . . . . . . . . . . . . . . . . . . . . . . . . . . . . . . . 64
Receiver
change volume (during a call)
change volume (permanently). . . . . . . . . . . . . 54
tone quality. . . . . . . . . . . . . . . . . . . . . . . . . . . . . 55
Receiving notifications
Reception booster, see Repeater
Reducing radiation
Registering
Registering the handset to multiple bases. . . . . . 50
Repeater. . . . . . . . . . . . . . . . . . . . . . . . . . . . . . . . . . 51
Reset (base) . . . . . . . . . . . . . . . . . . . . . . . . . . . . . . . 56
Reset (handset) . . . . . . . . . . . . . . . . . . . . . . . . . . . . 56
Restarting. . . . . . . . . . . . . . . . . . . . . . . . . . . . . . . . . 71
RFC 2833 (DTMF signalling) . . . . . . . . . . . . . . . . . . 67
. . . . . . . . . . . . . . . . . . . . . . . . . . . . . . . . 44
via SMS
. . . . . . . . . . . . . . . . . . . . . . . . . 40
with web configurator
. . . . . . . . . . 19, 54
. . . . . . . . . . . . . . . . . . . . 60
Ringtone
enable/disable time control
muting . . . . . . . . . . . . . . . . . . . . . . . . . . . . . . . . . 43
Ringtone (handset)
disable for anonymous calls
switch on/off from menu . . . . . . . . . . . . . . . . . . 55
switch on/off with key . . . . . . . . . . . . . . . . . .4, 55
Ringtone volume . . . . . . . . . . . . . . . . . . . . . . . . . . . 55
Room monitoring . . . . . . . . . . . . . . . . . . . . . . . . . . 39
. . . . . . . . . . . . . . . 41
. . . . . . . . . . . . . . . 41
S
Safety precautions. . . . . . . . . . . . . . . . . . . . . . . . . . . 7
Screensaver. . . . . . . . . . . . . . . . . . . . . . . . . . . . . . . . 53
Searching
in the directory
Searching for subscribers on Gigaset.net . . . . . . . 35
Send connection . . . . . . . . . . . . . . . . . . . . . . . . . . . 15
assigning . . . . . . . . . . . . . . . . . . . . . . . . . . . . . . . 64
Sender's address (email) . . . . . . . . . . . . . . . . . . . . . 49
Sending
SMS messages
Sending a directory entry to a handset. . . . . . . . . 30
Service provider, see Network provider
Services
online directory
Setting flash time (PABX). . . . . . . . . . . . . . . . . . . . . 52
Setting the list type . . . . . . . . . . . . . . . . . . . . . . . . . 28
Setting the wake-up time . . . . . . . . . . . . . . . . . . . . 38
Setting up handset . . . . . . . . . . . . . . . . . . . . . . . . . 11
Settings
saving and restoring
Silence, suppressing . . . . . . . . . . . . . . . . . . . . . . . . 65
SMS
deleting
draft message list . . . . . . . . . . . . . . . . . . . . . . . . 42
forwarding . . . . . . . . . . . . . . . . . . . . . . . . . . . . . . 43
message list . . . . . . . . . . . . . . . . . . . . . . . . . . . . . 43
notification via SMS . . . . . . . . . . . . . . . . . . . . . . 44
reading . . . . . . . . . . . . . . . . . . . . . . . . . . . . . . . . . 43
receiving . . . . . . . . . . . . . . . . . . . . . . . . . . . . . . . 42
replying to or forwarding. . . . . . . . . . . . . . . . . . 43
saving number . . . . . . . . . . . . . . . . . . . . . . . . . . 43
self help with error messages . . . . . . . . . . . . . . 46
send centre . . . . . . . . . . . . . . . . . . . . . . . . . . . . . 44
temporary storing. . . . . . . . . . . . . . . . . . . . . . . . 42
to PABXs. . . . . . . . . . . . . . . . . . . . . . . . . . . . . . . . 45
troubleshooting . . . . . . . . . . . . . . . . . . . . . . . . . 46
writing/sending . . . . . . . . . . . . . . . . . . . . . . . . . 42
SMS message list (SMS). . . . . . . . . . . . . . . . . . .42, 43
SMS service centre
changing number
setting . . . . . . . . . . . . . . . . . . . . . . . . . . . . . . . . . 44
Speech pauses, suppressing . . . . . . . . . . . . . . . . . . 65
Speed dial key . . . . . . . . . . . . . . . . . . . . . . . . . . . . . 19
Star key . . . . . . . . . . . . . . . . . . . . . . . . . . . . . . . . . . . . 4
Status bar . . . . . . . . . . . . . . . . . . . . . . . . . . . . . . .4, 18
Status information . . . . . . . . . . . . . . . . . . . . . . . . . . 72
SUOTA . . . . . . . . . . . . . . . . . . . . . . . . . . . . . . . . . . . . 58
. . . . . . . . . . . . . . . . . . . . . . . . . . 29
. . . . . . . . . . . . . . . . . . . . . . . . . . . 42
. . . . . . . . . . . . . . . . . . . . . . . . . . 69
. . . . . . . . . . . . . . . . . . . . . . 71
. . . . . . . . . . . . . . . . . . . . . . . . . . . . . . . . 43
. . . . . . . . . . . . . . . . . . . . . . . . 44
88

Index
Switching off
Switching on
Symbol . . . . . . . . . . . . . . . . . . . . . . . . . . . . . . . . . . . . .6
System PIN
. . . . . . . . . . . . . . . . . . . . . . . . . . . . . . . . 16
handset
handset
. . . . . . . . . . . . . . . . . . . . . . . . . . . . . . . . 16
battery charge level. . . . . . . . . . . . . . . . . . . . . . 18
keypad lock. . . . . . . . . . . . . . . . . . . . . . . . . . . . . 16
keys . . . . . . . . . . . . . . . . . . . . . . . . . . . . . . . . . . . . .6
procedures . . . . . . . . . . . . . . . . . . . . . . . . . . . . . . .6
radio contact. . . . . . . . . . . . . . . . . . . . . . . . . . . . 18
ringtone. . . . . . . . . . . . . . . . . . . . . . . . . . . . . . . . 55
changing
. . . . . . . . . . . . . . . . . . . . . . . . . . . . . . . 56
resetting . . . . . . . . . . . . . . . . . . . . . . . . . . . . . . . 56
T
Tal k ke y. . . . . . . . . . . . . . . . . . . . . . . . . . . . . . . . . . . . .4
Telephone jack, pin connections. . . . . . . . . . . . . . 78
Tex t inf orm ati on
in idle display
Three-party conference . . . . . . . . . . . . . . . . . .21, 26
Time control
VIP contact
Time ser ver. . . . . . . . . . . . . . . . . . . . . . . . . . . . . . . . 71
TLS (Transport Layer Security) . . . . . . . . . . . . . . . . 62
Tone quality (receiver) of the handset . . . . . . . . . 55
Troubleshooting
email
SMS . . . . . . . . . . . . . . . . . . . . . . . . . . . . . . . . . . . 46
Turning off the wake-up call . . . . . . . . . . . . . . . . . 38
Turning the alarm clock on and off. . . . . . . . . . . . 38
. . . . . . . . . . . . . . . . . . . . . . . . . . . 69
. . . . . . . . . . . . . . . . . . . . . . . . . . . . . 41
. . . . . . . . . . . . . . . . . . . . . . . . . . . . . . . . . . 48
U
Upper/lower case and digits . . . . . . . . . . . . . . . . . . .4
V
vCard format. . . . . . . . . . . . . . . . . . . . . . . . . . . . . . . 70
vcf file . . . . . . . . . . . . . . . . . . . . . . . . . . . . . . . . . . . .69
Version check, automatic . . . . . . . . . . . . . . . . . . . . 72
VIP contact . . . . . . . . . . . . . . . . . . . . . . . . . . . . . . . . 29
time control. . . . . . . . . . . . . . . . . . . . . . . . . . . . . 41
Voice qualit y for VoIP connections. . . . . . . . . . . . . 65
VoIP acco unt
VoIP provide r . . . . . . . . . . . . . . . . . . . . . . . . . . . . . . 63
. . . . . . . . . . . . . . . . . . . . . . . . . . . . . . . . 13
provider
registration using an activation code . . . . . . . .14
set up with web configurator . . . . . . . . . . . . . . 63
setting up. . . . . . . . . . . . . . . . . . . . . . . . . . . . . . . 13
setting up using the web configurator
configuration wizard
user data . . . . . . . . . . . . . . . . . . . . . . . . . . . . . . . 14
. . . . . . . . . . . . . . . . 61
W
Weather forecast, in idle display mode . . . . . . . . . 69
Web co nfigurator
configuration wizard
connecting with PC . . . . . . . . . . . . . . . . . . . . . . 59
de-registration . . . . . . . . . . . . . . . . . . . . . . . . . . 60
DTMF signalling for VoIP . . . . . . . . . . . . . . . . . . 67
menu . . . . . . . . . . . . . . . . . . . . . . . . . . . . . . . . . . 73
registration . . . . . . . . . . . . . . . . . . . . . . . . . . . . . 60
set up VoIP connection. . . . . . . . . . . . . . . . . . . . 63
wizard. . . . . . . . . . . . . . . . . . . . . . . . . . . . . . . . . . 61
Wizard for quick initial configuration . . . . . . . . . . 61
Writing (SMS) . . . . . . . . . . . . . . . . . . . . . . . . . . . . . . 42
. . . . . . . . . . . . . . . . . . . . . 61
Y
Yel low P age s . . . . . . . . . . . . . . . . . . . . . . . . . . . . . . . 31
All rights reserved. Rights of modification reserved.
89

Licence texts
Licence texts
GNU LESSER GENERAL PUBLIC LICENSE
Version 2.1, February 1999
Copyright (C) 1991, 1999 Free Software Foundation, Inc. 51 Franklin Street, Fifth Floor, Boston, MA 02110-1301
USA
Everyone is perm itted to copy and distribute verbatim copi es of this license docum ent, but changin g it is not
allowed.
[This is the first released version of the Lesser GPL. It also counts as the successor of the GNU Library Public
License, version 2, hence the version number 2.1.]
Preamble
The lic ens es fo r mo st s oft ware are des igne d to tak e awa y your freedom to share and change it. By contrast, t he
GNU General Public Licenses are intended to guarantee your freedom to share and change free software--to
make sure the software is free for all its users.
This license, the Lesser General Public License, applies to some specially designated software packages--typically libraries--of the Free Software Foundation and other authors who decide to use it. You can use it too, but
we suggest you first think carefully about whether this license or the ordinary General Public License is the
better strategy to use in any particular case, based on the explanations below.
When we speak of free software, we are referring to freedom of use, not price. Our General Public Licenses are
designed to make sure that you have the freedom to distribute copies of free software (and charge for this
service if you wish); that you receive source code or can get it if you want it; that you can change the software
and use pieces of it in new free programs; and that you are informed that you can do these things.
To protect your rights, we need to make restrictions that forbid distributors to deny you these rights or to ask
you to surrender these rights. These restrictions translate to certain responsibilities for you if you distribute
copies of the library or if you modify it.
For example, if you distribute copies of the library, whether gratis or for a fee, you must give the recipients all
the rights that we gave you. You must make sure that they, too, receive or can get the source code. If you link
other code with the library, you must provide complete object files to the recipients, so that they can relink
them with the library after making changes to the library and recompiling it. And you must show them these
terms so they know their rights.
We protect your rights with a two-step method: (1) we copyright the library, and (2) we offer you this license,
which gives you legal permission to copy, distribute and/or modify the library.
To protect each distributor, we want to make it very clear that there is no warranty for the free library. Also, if
the library is modified by someone else an d passed on, the recipients should know that what they have is not
the original version, so that the original author's reputation will not be affected by problems that might be
introduced by others.
Finally, software patents pose a constant threat to the existence of any free program. We wish to make sure
that a company cannot effectively restrict the users of a free program by obtaining a restrictive license from a
patent holder. Therefore, we insist that any patent license obtained for a version of the library must be
consistent with the full freedom of use specified in this license.
Most GNU software, including some libraries, is covered by the ordinary GNU General Public License. This
license, the GNU Lesser General Public License, applies to certain designated libraries, and is quite different
from the ordinary General Public License. We use this license for certain libraries in order to permit linking
those libraries into non-free programs.
When a program is linked with a library, whether statically or using a shared library, the combination of the
two is legally speaking a combined work, a derivative of the original library. The ordinary General Public
License therefore permits such linking only if the entire combination fits its criteria of freedom. The Lesser
General Public License permits more lax criteria for linking other code with the library.
We call this license the "Lesser" General Public License because it does Less to protect the us er's freedom than
the or dinary G eneral Pub lic Licen se. It als o provides other fre e softwar e develope rs Less of a n advanta ge over
competing non-free programs. These disadvantages are the reason we use the ordinary General Public
License for many libraries. However, the Lesser license provides advantages in certain special circumstances.
90

Licence texts
For example, on rare occasions, there may be a special need to encourage the widest possible use of a certain
library, so that it becomes a de-facto standard. To achieve this, non-free programs must be allowed to use the
library. A more frequent case is that a free library does the same job as widely used non-free libraries. In this
case, there is little to gain by limiting the free library to free software only, so we use the Lesser General Public
License.
In other cases, permission to use a particular library in non-free programs enables a greater number of people
to use a large body of free software. For example, permission to use the GNU C Library in non-free programs
enables many more people to use the whole GNU operating system, as well as its variant, the GNU/Linux operating system.
Although the Lesser General Public License is Less protective of the users' freedom, it doe s ensure that the user
of a program that is linked with the Library has the freedom and the wherewithal to run that program using a
modified version of the Library.
The precise terms and conditions for copying, distribution and modification follow. Pay close attention to the
difference between a "work based on the librar y" and a "work that uses the library". The former contains code
derived from the library, whereas the latter must be combined with the library in order to run.
TERMS AND CONDITIONS FOR COPYING, DISTRIBUTION AND MODIFICATION
0. This License Agreement applies to any software library or other program which contains a n otice placed by
the copyright holder or other authorized party saying it may be distributed under the terms of this Lesser
General Public License (also called "this License"). Each licensee is addressed as "you".
A "library" means a collection of softwar e func tions and/or data p repare d so as t o be co nvenien tly li nked wi th
application programs (which use some of those functions and data) to form executables.
The "Library", below, refers to any such software library or work which has been dist ributed under these terms.
A "work based on the Library" means either the Library or any derivative work under copyright law: that is to
say, a work containing the Library or a portion of it, either verbatim or with modifications and/or translated
straightforwardly into another language. (Hereinafter, translation is included without limitation in the term
"modification".)
"Source code" for a work means the preferred form of the work for making modifications to it. For a library,
complete source co de means all the source code for all modules it contains, plus any associated interface definition files, plus the scripts used to control compilation and installation of the library.
Activities other than copying, distribution and modification are not covered by this License; they are outside
its scope. The act of running a program using the Library is not restricted, and output from such a program is
covered only if its contents constitute a work based on the Library (independent of the use of the Librar y in a
tool for writing it). Whether that is true depends on what the Library does and what the program that uses the
Library does.
1. You may copy and d istribute verbatim copies of the Library's com plete source code as you re ceive it, in any
medium, provided that you conspicuously and appropriately publish on each copy an appropriate copyright
notice and disclaimer of warranty; keep intact all the notices that refer to this License and to the absence of
any warranty; and distribute a copy of this License along with the Library.
You may charge a fee for the physical act of transferring a copy, and you may at your option offer warranty
protection in exchange for a fee.
2. You may modify your copy or copies of the Library or any portion of it, thus forming a work based on the
Lib rary, and c opy a nd di stri bute such m odif icat ions or wor k und er th e ter ms of Sect ion 1 abov e, pro vide d that
you also meet all of these conditions:
a) The modified work must itself be a software library.
b) You must cause the files modified to carry prominent notices stating that you changed the files and the date
of any change.
c) You must cause the whole of t he work to be license d at no ch arge to all third par ties und er the ter ms of this
License.
d) If a facility in the modified Library refers to a function or a table of data to be supplied by an application
program that uses the facility, other than as an argument passed when the facility is invoked, then you must
make a good faith effort to ensure that, in the event an application does not suppl y such function or table, the
facility still operates, and performs whatever part of its purpose remains meaningful.
91

Licence texts
(For example, a function in a library to compute square roots has a purpose that is entirely well-defined independent of the application. Therefore, Subsection 2d requires that any application-supplied function or table
use d by t his f unct ion m ust be opti onal : if t he ap plic ation does not s uppl y it, t he sq uare root f unct ion m ust s till
compute square roots.)
These requirements apply to the modified work as a whole. If identifiable sections of that work are not derived
from the Library, and can be reasonably considered independent and separate works in them selves, then this
License, and its terms, do not apply to those sections when you distribute them as separate works. But when
you distribute the same sections as part of a whole which is a work based on the Library, the distribution of
the whole must be on the terms of this License, whose permissions for other licensees extend to the entire
whole, and thus to each and every part regardless of who wrote it.
Thus, it is not the intent of this section to claim rights or contest your rights to work written entirely by you;
rather, the intent is to exercise the right to control the distribution of derivative or collective works based on
the Library.
In addition, mere aggregation of another work not based on the Library with the Library (or with a work based
on the Library) on a volume of a storage or distribution medium does not bring the other work under the
scope of this License.
3. You may opt to apply the terms of the ordinary GNU General Public License instead of this License to a given
copy of the Library. To do this, you must alter all the notices that refer to this License, so that they refer to the
ordinary GNU General Public License, version 2, instead of to this License. (If a newer version than version 2 of
the ordinary GNU General Public License ha s appeared, then you can specify that version instead if you wish.)
Do not make any other change in these notices.
Once this change is made in a given copy, it is irreversible for that copy, so the ordinary GNU General Public
License applies to all subsequent copies and derivative works made from that copy.
This option is useful when you wish to copy part of the code of the Library into a program that is not a librar y.
4. You may copy and distribute the Library (or a portion or derivative of it, under Section 2) in object code or
executable form under the terms of Sections 1 and 2 above provided that you accompany it with the complete
corresponding machine-readable source code, which must be distributed under the terms of Sections 1 and
2 above on a medium customarily used for software interchange.
If distribution of object code is made by offering access to copy from a designated place, then offering equivalent access to copy the source code from the same place satisfies the requirement to distribute the source
code, even though third parties are not compelled to copy the source along with the object code.
5. A program that c ontain s no de rivati ve of an y port ion of t he Lib rary, b ut is de signe d to wor k with t he Lib rary
by being compiled or linked with it, is called a "work that uses the Library". Such a work, in isolation, is not a
derivative work of the Library, and therefore falls outside the scope of this License.
However, linking a "work that uses the Library" with the Library creates an executable that is a derivative of the
Library (because it contains portions of the Library), rather than a "work that uses the library". The executable
is therefore covered by this License. Section 6 states terms for distribution of such executables.
When a "work th at uses th e Library " uses mat erial fro m a header file that is pa rt of the L ibrary, t he object code
for the work may be a derivative work of the Library even though the source code is not. Whether this is true
is especially significant if the work can be linked without the Library, or if the work is itself a library. The
threshold for this to be true is not precisely defined by law.
If such an object file uses only numerical parameters, data structure layouts and accessors, and small macros
and small inline functions (ten lines or less in length), then the use of the object file is unrestricted, regardless
of whether it is legally a deri vative work. (Executables containing this object code plus portions of the Library
will still fall under Section 6.)
Othe rwise, i f the work is a deri vative of t he Librar y, you may distribute the object code for the work under the
terms of Section 6. Any executables containing that work also fall under Section 6, whether or not they are
linked directly with the Library itself.
6. As a n excepti on to the S ections above, you may also co mbine or link a "w ork that u ses the Li brary" w ith the
Library to produce a work containing portions of the Library, and distribute that work under terms of your
choice, provided that the terms permit modification of the work for the customer's own use and reverse engineering for debugging such modifications.
You must give prominent notice with each copy of the work that the Library is used in it and that the Library
and its use are covered by this License. You must supply a copy of this License. If the work during execution
displays copyright notices, you must include the copyright notice for the Library among them, as well as a
reference directing the user to the copy of this License. Also, you must do one of these things:
92

Licence texts
a) Accompany the work with the complete corresponding machine-readable source code for the Library
inc ludi ng wh ateve r cha nges were u sed i n the work (whic h mus t be d istr ibut ed un der S ecti ons 1 and 2 a bove );
and, if the work is an executable linked with the Library, with the complete machine-readable "work that uses
the Library", as object code and/or source code, so that the user can modify the Library and then relink to
produce a modified executable containing the modified Library. (It is understood that the user who changes
the contents of definitions files in the Library will not necessarily be able to recompile the application to use
the modified definitions.)
b) Use a suitable shared library mechanism for linking with the Library. A suitable mechanism is one that (1)
uses at run time a copy of the library already present on the user's computer system, rather than copying
library functions into the executable, and (2) will op erate properly with a modified version of the librar y, if the
user installs one, as long as the modified version is interface-compatible with the version that the work was
made with.
c) Accompany the work with a written offer, valid for at least three years, to give the same user the materials
specified in Subsection 6a, above, for a charge no more than the cost of performing this distribution.
d) If distribution of the work is made by offering access to copy from a designated place, offer equivalent
access to copy the above specified materials from the same place.
e) Verify that the user has already received a copy of these materials or that you have already sent this user a
copy.
For an executable, the required form of the "work that uses the Library" must include any data and utility
programs needed for reproducing the executable from it. However, as a special exception, the materials to be
distributed need not include anything that is normally distributed (in either source or binary form) with the
major components (compiler, kernel, and so on) of the operating system on which th e executable runs, unless
that component itself accompanies the executable.
It may happen that this requirement contradicts the license restrictions of other proprietary libraries that do
not normally accompany the operating system. Such a contradiction means you cannot use both them and
the Library together in an executable that you distribute.
7. You may place library facilities that are a work based on the Library side-by-side in a single library together
with other library facilities not covered by this License, and distribute such a combined library, provided that
the separate distribution of the work based on the Library and of the other library facilities is otherwise
permitted, and provided that you do these two things:
a) Accompany the combined library with a copy of the same work based on the Library, uncombined with any
other library facilities. This must be distributed under the terms of the Sections above.
b) Give prominent notice with the combined library of the fact that part of it is a work based on the Library,
and explaining where to find the accompanying uncombined form of the same work.
8. You may not copy, modify, sublicense, link with, or distribute the Library except as expressly provided under
this License. Any attempt otherwise to copy, modify, sublicense, link with, or distribute the Librar y is void, and
will automatically terminate your rights under this License. However, parties who have received copies, or
rights, from you under this License will not have their licenses terminated so long as such parties remain in full
compliance.
9. You are not required to accept this License, since you have not signed it. However, nothing else grants you
permission to modify or distribute th e Library or its derivative works. These actions are prohibited by law if you
do not accept this License. Therefore, by modifying or distributing the Library (or any work based on the
Library), you indicate your acceptance of this License to do so, and all its terms and conditions for copying,
distributing or modifying the Library or works based on it.
10. Each time you redistribute the Library (or any work based on the Library), the recipient automatically
receives a license from the original licensor to copy, distribute, link with or modify the Library subject to these
terms and conditions. You may not impose any further restrictions on the recipients' exercise of the rights
granted herein. You are not responsible for enforcing compliance by third parties with this License.
11. If, as a consequence of a court judgment or allegation of patent infringement or for any other reason (not
limited to patent issues), conditions are imposed on you (whether by court order, agreement or otherwise)
th at co ntr adic t th e co ndi tion s of thi s Lic ens e, t hey d o no t exc use you from the cond iti ons of t his L ice nse. If y ou
cannot distribute so as to satisfy simultaneously your obligations under this License and any other pertinent
obligations, then as a consequence you may not distribute the Library at all. For example, if a patent license
would no t permit royal ty-free redi stribution of the Librar y by all those who receive copies directly or indirectly
through you, then the only way you could satisfy both it and this License would be to refrain entirely from
distribution of the Library.
93

Licence texts
If any portion of this section is held invalid or unenforceable under any particular circumstance, the balance
of the section is intended to apply, and the section as a whole is intended to apply in other circumstances.
It is not the purpose of this section to induce you to infringe any patents or other property right claims or to
contest validity of any such claims; this sectio n has the sole purpose of protecting the integrity of the free softwar e di str ibut ion sys tem w hic h is impl eme nte d by p ubl ic li cen se p rac tice s. M any p eop le h ave m ade gene rou s
contributions to the wide range of software distributed through that system in reliance on consistent application of that system; it is up to the author/donor to decide if he or she is willing to distribute software through
any other system and a licensee cannot impose that choice.
This section is intended to make thoroughly clear what is believed to be a consequence of the rest of this
License.
12. If the distribution and/or use of the Library is restricted in certain countries either by patents or by copyrighted interfaces, the original copyright holder who places the Librar y under this License may add an explicit
geographical distribution limitation excluding those countries, so that distribution is permitted only in or
among countries not thus excluded. In such case, this License incorporates the limitation as if written in the
body of this License.
13. The Free Software Foundation may publish revised and/or new versions of the Lesser General Public
License from time to time. Such new versions will be similar in spirit to the present version, but may differ in
detail to address new problems or concerns.
Each version is given a distinguishing version number. If the Library specifies a version number of this License
which applies to it and "any later version", you have the option of following the terms and conditions either of
that version or of any later version published by the Free Software Foundation. If the Library does not specify
a license version number, you may choose any version ever published by the Free Software Foundation.
14. If you wish to incorporate parts of the Library into other free programs whose distribution conditions are
incompatible with these, write to the author to ask for permission. For software which is copyrighted by the
Free S oftw are Foun datio n, wri te to th e Free S oftwa re Foundation; we sometimes make exceptions for this. Our
dec isio n wil l be g uided by th e two goal s of p reser vin g the f ree s tatu s of a ll der ivat ives of ou r free soft ware and
of promoting the sharing and reuse of software generally.
NO WARRANTY
15. BECAUSE THE LIBRARY IS LICENSED FREE OF CHARGE, THERE IS NO WARRANTY FOR THE LIBRARY, TO THE
EXTENT PERMITTED BY APPLICABLE LAW. EXCEPT WHEN OTHERWISE STATED IN WRITING THE COPYRIGHT
HOLDERS AND/OR OTHER PARTIES PROVIDE THE LIBRARY "AS IS" WITHOUT WARRANTY OF ANY KIND, EITHER
EXPRESSED OR IMPLIED, INCLUDING, BUT NOT LIMITED TO, THE IMPLIED WARRANTIES OF MERCHANTABILITY
AND FITNESS FOR A PARTICULAR PURPOSE. THE ENTIRE RISK AS TO THE QUALITY AND PERFORMANCE OF THE
LIBRARY IS WITH YOU. SHOULD THE LIBRARY PROVE DEFECTIVE, YOU ASSUME THE COST OF ALL NECESSARY
SERVICING, REPAIR OR CORRECTION.
16. IN NO EVENT UNLESS REQUIRED BY APPLICABLE LAW OR AGREED TO IN WRITING WILL ANY COPYRIGHT
HOLDER, OR ANY OTHER PARTY WHO MAY MODIFY AND/OR REDISTRIBUTE THE LIBRARY AS PERMITTED
ABOVE, BE LIABLE TO YOU FOR DAMAGES, INCLUDING ANY GENERAL, SPECIAL, INCIDENTAL OR CONSEQUENTIAL DAMAGES ARISING OUT OF THE USE OR INABILITY TO USE THE LIBRARY (INCLUDING BUT NOT LIMITED
TO LOSS OF DATA OR DATA BEING RENDERED INACCURATE OR LOSSES SUSTAINED BY YOU OR THIRD PARTIES
OR A FAILURE OF THE LIBRARY TO OPERATE WITH ANY OTHER SOFTWARE), EVEN IF SUCH HOLDER OR OTHER
PARTY HAS BEEN ADVISED OF THE POSSIBILITY OF SUCH DAMAGES.
END OF TERMS AND CONDITIONS
How to Apply These Terms to Your New Libraries
If you develop a new library, and you want it to be of the greatest possible use to the public, we recommend
making it free software that ever yone can redistribute and change. You can do so by permitting redistribution
under these terms (or, alternatively, under the terms of the ordinary General Public License).
To apply these terms, attach the following notices to the library. It is safest to attach them to the start of each
source file to most effectively convey the exclusion of warranty; and each file should have at least the "copyright" line and a pointer to where the full notice is found.
<one line to give the library's name and a brief idea of what it does.>
Copyright (C) <year> <name of author>
94

Licence texts
This library is fre e software; you can redistribute it an d/or modify it under the terms of the GNU Lesser General
Public License as published by the Free Software Foundation; either version 2.1 of the License, or (at your
option) any later version.
This library is distributed in the hope that it will be useful, but WITHOUT ANY WARRANTY; without even the
implied warranty of MERCHANTABILITY or FITNESS FOR A PARTICULAR PURPOSE. See the GNU Lesser General
Public License for more details.
You should have received a copy of the GNU Lesser General Public License along with this library ; if not, write
to the Free Software Foundation, Inc., 51 Franklin Street, Fifth Floor, Boston, MA 02110-1301 USA
Also add information on how to contact you by electronic and paper mail.
You should also get your employer (if you work as a programmer) or your school, if any, to sign a "copyright
disclaimer" for the library, if necessary. Here is a sample; alter the names:
Yoyodyne, Inc., hereby disclaims all copyright interest in the library `Frob' (a library for tweaking knobs) written
by James Random Hacker.
<signature of Ty Coon>, 1 April 1990
Ty Coon, President of Vice
That's all there is to it!
95

Issued by
Gigaset Communications GmbH
Frankenstr. 2a, D-46395 Bocholt
© Gigaset Communications GmbH 2020
Subject to availability.
All rights reserved. Rights of modification reserved.
www.gigaset.com
 Loading...