

Gigaset CL390HX, A690HX, AS690HX User Manual

CL390 HX
You can find the most up-to-date user guide at
www.gigaset.com/manuals
You will also find here the user guide
for your Gigaset phone.
Other phone system or router:
Documentation for your base/router

Gigaset HX – the universal handset
With your Gigaset HX handset, you have purchased a high-quality, multifunctional
and future-proof device.
You can use your handset with several different DECT bases. If the base has Internet access, the
handset sof
tware can be updated over the Internet (SUOTA).
On a Gigaset base
Connect your HX handset to a Gigaset base and use the many features with the quality you
would expect from Gigaset.
In this guide, functions that are available for your HX handset are detailed/described.
Th
e complete functionality with Gigaset bases is descri
system.
All Gigaset user guides can be found at
www.gigaset.com/manuals
bed in the guide relevant to your Gigaset
On a DECT/GAP telephone or router from another manufacturer
The handset also functions with DECT/GAP telephones from other manufacturers, of course, as
well as DECT routers. Additional information can be found at
www.gigaset.com/compatibility
On DECT routers with CAT-iq 2.0
Your Gigaset HX handset is certified in accordance with the DECT/CAT-iq 2.0 standard. As a result,
operation with a DECT router with CAT-iq functionality is possible.
Handset functions on a CAT-iq router (amongst others):
• full access to the central directory on the router as well as the local directory integrated in the
handset,
• convenient calling and using of call lists,
• using several lines and call numbers (the relevant scope of the function is dependent on the
country, network and router),
• enjoy excellent audio quality (certified HD-Voice
Details can be found in the relevant user guide for your router.
™
quality).
Additional information regarding your HX handset can be found at
Details regarding the functionality of the handset on various bases and routers can be found at
www.gigaset.com/compatibility
2
Availability and operation of the functions
may differ on your telephone.
www.gigaset.com/hx

Contents
Contents
Overview . . . . . . . . . . . . . . . . . . . . . . . . . . . . . . . . . . . . . . . . . . . . . . . . . . . . . . . . . . . . . . . . . . . . . . . . . . . . . 5
Safety precautions . . . . . . . . . . . . . . . . . . . . . . . . . . . . . . . . . . . . . . . . . . . . . . . . . . . . . . .
Getting started . . . . . . . . . . . . . . . . . . . . . . . . . . . . . . . . . . . . . . . . . . . . . . . . . . . . . . . .
Package contents . . . . . . . . . . . . . . . . . . . . . . . . . . . . . . . . . . . . . . . . . . . . . . . . . . . . . . .
Connecting a handset . . . . . . . . . . . . . . . . . . . . . . . . . . . . . . . . . . . . . . . . . . . . . . . . . . . . . . . . . . . . . . . . . . 8
Setting up and registering a handset . . . . . . . . . . . . . . . . . . . . . . . . . . . . . . . . . . . . . . . . . . . . . . . . . . . 9
Using the phone . . . . . . . . . . . . . . . . . . . . . . . . . . . . . . . . . . . . . . . . . . . . . . . . . . . . . . . .
Switch the handset on and off . . . . . . . . . . . . . . . . . . . . . . . . . . . . . . . . . . . . . . . . . . . . . . . . .
Lock/unlock the keypad . . . . . . . . . . . . . . . . . . . . . . . . . . . . . . . . . . . . . . . . . . . . . . . . . . . . . . . . . . . . . . . 11
Control key . . . . . . . . . . . . . . . . . . . . . . . . . . . . . . . . . . . . . . . . . . . . . . . . . . . . . . . . . . . . . . . . . . . . . . . . . . . 11
Display . . . . . . . . . . . . . . . . . . . . . . . . . . . . . . . . . . . . . . . . . . . . . . . . . . . . . . . . . . . . . . . . . . . . . . . . . . . . . . . 12
Menu navigation . . . . . . . . . . . . . . . . . . . . . . . . . . . . . . . . . . . . . . . . . . . . . . . . . . . . . . . . . . . . . . . . . . . . . . 13
Making calls . . . . . . . . . . . . . . . . . . . . . . . . . . . . . . . . . . . . . . . . . . . . . . . . . . . . . . . . . .
Making a call . . . . . . . . . . . . . . . . . . . . . . . . . . . . . . . . . . . . . . . . . . . . . . . . . . . . . . . . . . .
Accepting a call . . . . . . . . . . . . . . . . . . . . . . . . . . . . . . . . . . . . . . . . . . . . . . . . . . . . . . . . . . . . . . . . . . . . . . . 15
Handsfree mode . . . . . . . . . . . . . . . . . . . . . . . . . . . . . . . . . . . . . . . . . . . . . . . . . . . . . . . . . . . . . . . . . . . . . . 15
Muting . . . . . . . . . . . . . . . . . . . . . . . . . . . . . . . . . . . . . . . . . . . . . . . . . . . . . . . . . . . . . . . . . . . . . . . . . . . . . . . 16
Call with three subscribers . . . . . . . . . . . . . . . . . . . . . . . . . . . . . . . . . . . . . . . . . . . . . . . . . . . . . . . . . . . . . 16
Calling Line Identification . . . . . . . . . . . . . . . . . . . . . . . . . . . . . . . . . . . . . . . . . . . . . . . . . . . . . . . . . . . . . 17
Network services . . . . . . . . . . . . . . . . . . . . . . . . . . . . . . . . . . . . . . . . . . . . . . . . . . . . . . . . . . . . . . . . . . . . . . 17
Call/message lists . . . . . . . . . . . . . . . . . . . . . . . . . . . . . . . . . . . . . . . . . . . . . . . . . . . . . . .
Call list . . . . . . . . . . . . . . . . . . . . . . . . . . . . . . . . . . . . . . . . . . . . . . . . . . . . . . . . . . .
Message list . . . . . . . . . . . . . . . . . . . . . . . . . . . . . . . . . . . . . . . . . . . . . . . . . . . . . . . . . . . . . . . . . . . . . . . . . . . 19
Directory . . . . . . . . . . . . . . . . . . . . . . . . . . . . . . . . . . . . . . . . . . . . . . . . . . . . . . . . . . .
Local directory . . . . . . . . . . . . . . . . . . . . . . . . . . . . . . . . . . . . . . . . . . . . . . . . . . . . . . . . .
Base directory . . . . . . . . . . . . . . . . . . . . . . . . . . . . . . . . . . . . . . . . . . . . . . . . . . . . . . . . . . . . . . . . . . . . . . . . . 21
Changing the assignment of the control key to a directory . . . . . . . . . . . . . . . . . . . . . . . . . . . . . 21
Transferring directory (entry) . . . . . . . . . . . . . . . . . . . . . . . . . . . . . . . . . . . . . . . . . . . . . . . . . . . . . . . . . . 21
Answering machine . . . . . . . . . . . . . . . . . . . . . . . . . . . . . . . . . . . . . . . . . . . . . . . . . . . . . . .
Local answer machine . . . . . . . . . . . . . . . . . . . . . . . . . . . . . . . . . . . . . . . . . . . . . . . . . . . . . . .
Network mailbox . . . . . . . . . . . . . . . . . . . . . . . . . . . . . . . . . . . . . . . . . . . . . . . . . . . . . . . . . . . . . . . . . . . . . . 22
Additional functions . . . . . . . . . . . . . . . . . . . . . . . . . . . . . . . . . . . . . . . . . . . . . . . . . . . . .
Alarm clock . . . . . . . . . . . . . . . . . . . . . . . . . . . . . . . . . . . . . . . . . . . . . . . . . . . . . . . . . . . .
Baby monitor (Room monitoring) . . . . . . . . . . . . . . . . . . . . . . . . . . . . . . . . . . . . . . . . . . . . . . . . . . . . . . 24
ECO DECT . . . . . . . . . . . . . . . . . . . . . . . . . . . . . . . . . . . . . . . . . . . . . . . . . . . . . . . . . . . . . . . . . . . . . . . . . . . . . 26
Protection from undesired calls . . . . . . . . . . . . . . . . . . . . . . . . . . . . . . . . . . . . . . . . . . . . . . . . . . . . . . . . 27
. . . . . . . . . . . . . 7
. . . . . . . . . . . . . . . 8
. . . . . . . . . . . . . . . 8
. . . . . . . . . . . . . 11
. . . . . . . . 11
. . . . . . . . . . . . . . . 14
. . . . . . . . . . . . . . . 14
. . . . . . . . . . . . . 18
. . . . . . . . . . . . . . . . . . . . . 18
. . . . . . . . . . . . . . . . . 19
. . . . . . . . . . . . . . . 19
. . . . . . . . . . . 22
. . . . . . . . . 22
. . . . . . . . . . . . 23
. . . . . . . . . . . . . . . 23
Availability and operation of the functions
may differ on your telephone.
3

Contents
Phone settings . . . . . . . . . . . . . . . . . . . . . . . . . . . . . . . . . . . . . . . . . . . . . . . . . . . . . . . . . . . . . . . . . . . . . . 29
Date and time . . . . . . . . . . . . . . . . . . . . . . . . . . . . . . . . . . . . . . . . . . . . . . . . . . . . . . . . . .
. . . . . . . . . . . . . . . 29
Country and language (if available) . . . . . . . . . . . . . . . . . . . . . . . . . . . . . . . . . . . . . . . . . . . . . . . . . . . . 30
Display . . . . . . . . . . . . . . . . . . . . . . . . . . . . . . . . . . . . . . . . . . . . . . . . . . . . . . . . . . . . . . . . . . . . . . . . . . . . . . . 30
Tones and signals . . . . . . . . . . . . . . . . . . . . . . . . . . . . . . . . . . . . . . . . . . . . . . . . . . . . . . . . . . . . . . . . . . . . . 31
System . . . . . . . . . . . . . . . . . . . . . . . . . . . . . . . . . . . . . . . . . . . . . . . . . . . . . . . . . . . . . . . . . . . . . . . . . . . . . . . . 33
Firmware update . . . . . . . . . . . . . . . . . . . . . . . . . . . . . . . . . . . . . . . . . . . . . . . . . . . . . . . . . . . . . . . . . . . . . . 34
Connections . . . . . . . . . . . . . . . . . . . . . . . . . . . . . . . . . . . . . . . . . . . . . . . . . . . . . . . . . . . . . . . . . . . . . . . . . . 35
Service (Customer Care) . . . . . . . . . . . . . . . . . . . . . . . . . . . . . . . . . . . . . . . . . . . . . . . . . . . . . . . . . . . . . . 3
Customer Service & Assistance . . . . . . . . . . . . . . . . . . . . . . . . . . . . . . . . . . . . . . . . . . . . . . . . . . . . . . .
37
Guarantee Certificate - United Kingdom and Ireland . . . . . . . . . . . . . . . . . . . . . . . . . . . . . . . . . . . . 38
Manufacturer's advice . . . . . . . . . . . . . . . . . . . . . . . . . . . . . . . . . . . . . . . . . . . . . . . . . . . . . . . . . . . . . . .
Authorisation . . . . . . . . . . . . . . . . . . . . . . . . . . . . . . . . . . . . . . . . . . . . . . . . . . . . . . . . . .
. . . . . . . . . . . . . . . 39
39
Data protection . . . . . . . . . . . . . . . . . . . . . . . . . . . . . . . . . . . . . . . . . . . . . . . . . . . . . . . . . . . . . . . . . . . . . . . 39
Environment . . . . . . . . . . . . . . . . . . . . . . . . . . . . . . . . . . . . . . . . . . . . . . . . . . . . . . . . . . . . . . . . . . . . . . . . . . 39
Care . . . . . . . . . . . . . . . . . . . . . . . . . . . . . . . . . . . . . . . . . . . . . . . . . . . . . . . . . . . . . . . . . . . . . . . . . . . . . . . . . . 40
Contact with liquid . . . . . . . . . . . . . . . . . . . . . . . . . . . . . . . . . . . . . . . . . . . . . . . . . . . . . . . . . . . . . . . . . . . 40
Technical data . . . . . . . . . . . . . . . . . . . . . . . . . . . . . . . . . . . . . . . . . . . . . . . . . . . . . . . .
Index . . . . . . . . . . . . . . . . . . . . . . . . . . . . . . . . . . . . . . . . . . . . . . . . . . . . . . . . . . . . .
. . . . . . . . . . . . . . . 41
. . . . . . . . . . . . . . . . . . . 44
Not all functions described in the user guide are available in all countries, from all
network providers or with all bases.
6
4
Availability and operation of the functions
may differ on your telephone.
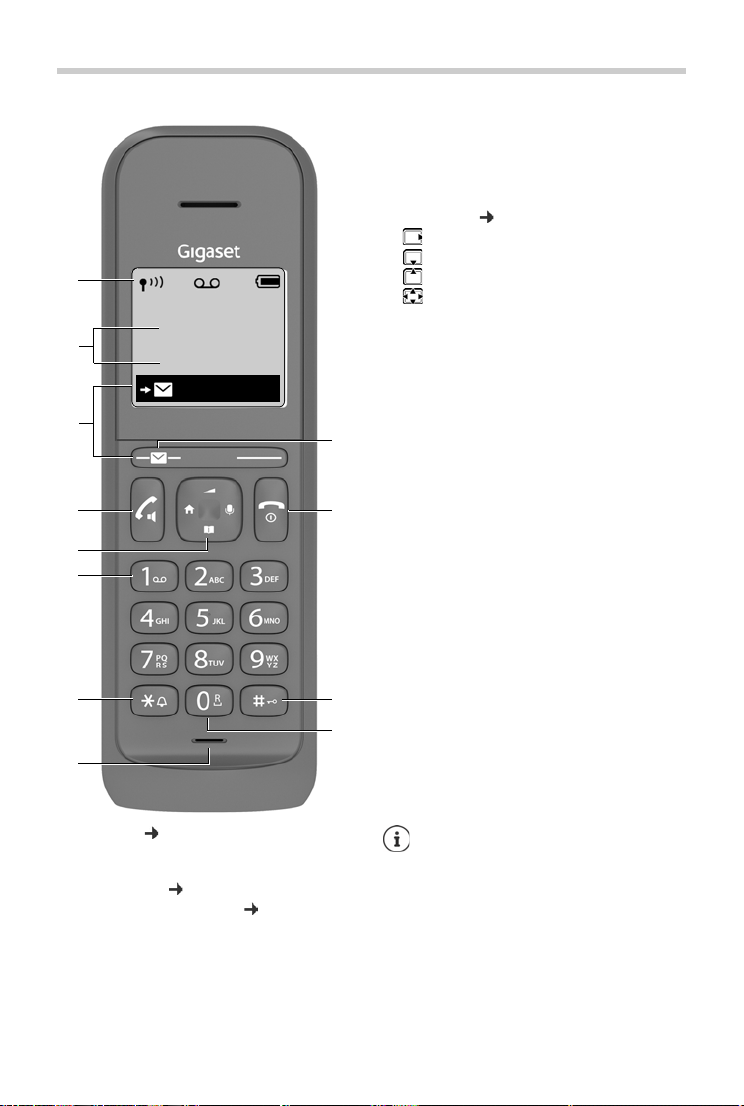
Overview
2
5
7
3
Menu
9
10:30
4
1
24.06.2019
6
8
10
11
12
1 Status bar ( p. 13)
2 Date and time ( p. 29)
3 Display keys and functions ( p. 12)
Icons display current settings and operating
status of the telephone
Various functions, depending on the operating
situation
Overview
4Talk key / Handsfree key
Accepting call; selecting
displayed number; open
redial list
Start dialling
5 Control key ( p. 11)
Open menu; mute;
Open directory;
Adjust volume;
Navigate in menus and entry fields
6 Key 1
Call answering machine /
network mailbox
7 Star key
Enable/disable ringtone
Switch from pulse dialling
to tone dialling
8 Microphone
9 Message key
Access to the call and message lists;
flashes: new message or new call
New messages in the call list / network mailbox
list are shown on the display by message
New messages.
10 End call key / On/Off key
End call; Cancel function;
one level back
Back to idle mode;
Switch the handset
on and off
11 Hash key / Lock key
Lock/unlock the keypad;
enter a dialling pause
Toggle between upper/
lower case and digits
12 Recall key
Consultation call (flash)
If multiple functions are listed, the button
function depends on the situation.
The colour and shape of your device may be
different from the illustration.
¥ Press briefly
¥ Press and hold
¥ Press and hold
¥ Press and hold
¥ Press briefly
¥ Press briefly
¥ Press and hold
¥ Press and hold
¥ Press briefly
¥ Press and hold
Availability and operation of the functions
may differ on your telephone.
5

Overview
Symbols used in the user guide
Icons
Warnings, the non-adherence to which can result in damage to devices or personal
inju
ry.
Important information regarding function and appropriate handling or functions
that could generate costs.
Prerequisite for carrying out the following action.
Additional helpful information.
Buttons
Talk/Handsfree key Hash key
End call key Star key
Control key Recall key
to Digit/letter keys Menu, OK Display keys
Procedures
Example: Enabling/disabling Auto Answer:
¤ Menu Settings OK Te le ph o ny OK Auto Answer OK
( = enabled)
Step Actions required
¤ Menu Press the Menu display key.
¤ Settings
¤ OK
¤ Tel epho ny
¤ OK
Use the control key to navigate to entry Settings.
Press OK to confirm. The Settings submenu is opened.
Select the Tel ep h on y entry using the control key .
Press OK to confirm. The Tele p ho ny submenu is opened.
¤ Auto Answer Select the Auto Answer entry using the control key .
¤ OK Enable or disable it using OK. Function is enabled .
6
Availability and operation of the functions
may differ on your telephone.
Safety precautions
Read the safety precautions and the user guide before use.
The device cannot be used in the event of a power failure. In case of a power failure it is also not
possible to make emergency calls.
If the LAN or Internet connection is down, functions that require an Internet connection are not
available, such as Internet telephony (VoIP), online directories and the Info Center. You are able to
make and receive calls if the phone is connected to an analogue landline.
Emergency numbers cannot be dialled if the keypad/display lock is activated!
Safety precautions
Use only rechargeable batteries that correspond to the specification (see list of permitted
batteries www.gigaset.com/service
other battery types as this could result in significant health risks and personal injur y. Rechargeable
batteries, which are noticeably damaged, must be replaced.
The handset must not be operated if the battery cover is open.
Do not use the devices in environments with a potential explosion hazard (e.g. paint shops).
The devices are not splashproof. For this reason do not install them in a damp environment such
as bathrooms or shower rooms.
Use only the power adapter indicated on the device.
Whilst charging, the power socket must be easily accessible.
Remove faulty devices from use or have them repaired by our Service team, as these could interfere with other wireless services.
Do not use the device if the display is cracked or broken. Broken glass or plastic can cause injury
to hands and face. Send the device to our Service department to be repaired.
Do not hold the rear of the handset to your ear when it is ringing or when speaker mode is activated. Otherwise you risk serious and permanent damage to your hearing.
The phone may cause interference in analogue hearing aids (humming or whistling) or cause
them to overload. If you require assistance, please contact the hearing aid supplier.
Keep small cells and batteries, which can be swallowed, out of the reach of children.
Swallowing a battery can lead to burns, perforation of soft tissue and death. Severe burns can
occur within 2 hours of swallowing.
In the case of a swallowed cell or battery, seek medical care immediately.
Using your telephone may affect nearby medical equipment. Be aware of the technical conditions
in your particular environment, e.g. doctor's surgery. If you use a medical device (e.g. a pacemaker), please contact the device manufacturer. They will be able to advise you regarding the
susceptibility of the device to external sources of high frequency energy (for the specifications of
your Gigaset product see "Technical data").
). Never use a conventional (non-rechargeable) battery or
Availability and operation of the functions
may differ on your telephone.
7
Getting started
1
2
3
4
1
234
Getting started
Package contents
• One handset, one charging cradle with power adapter, two batteries, one battery cover and
one user guide
The charging cradle is designed for use in closed, dry rooms within a temperature
range of +5°C to +45°C.
Never expose the telephone to heat sources, direct sunlight or other electrical devices.
Protect your telephone from moisture, dust, corrosive liquids and vapours.
The device's feet do not usually leave any marks on surfaces. However, due to the
multitude of different varnishes and polishes used on furniture, contact marks on the
surfaces cannot be completely ruled out.
This device is only suitable for a maximum installation height of 2 m.
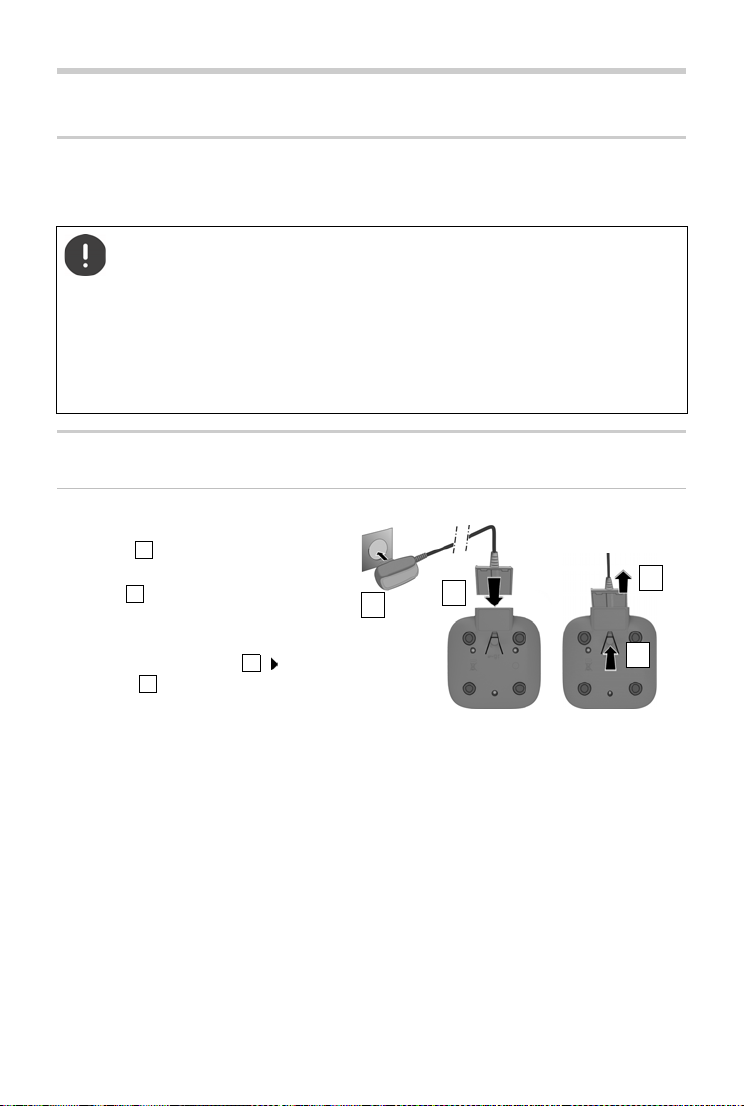
Connecting a handset
Connect the charging cradle
¤ Connect the flat plug of the power
adapter
¤ Plug the power adapter into the
socket
To remove the plug from the charging cradle
again:
¤ Press the release button . Pull out
the plug .
8
Availability and operation of the functions
may differ on your telephone.
Setting up the handset for use
4.5 hours
The display is protected by a plastic film. Please remove the protective film.
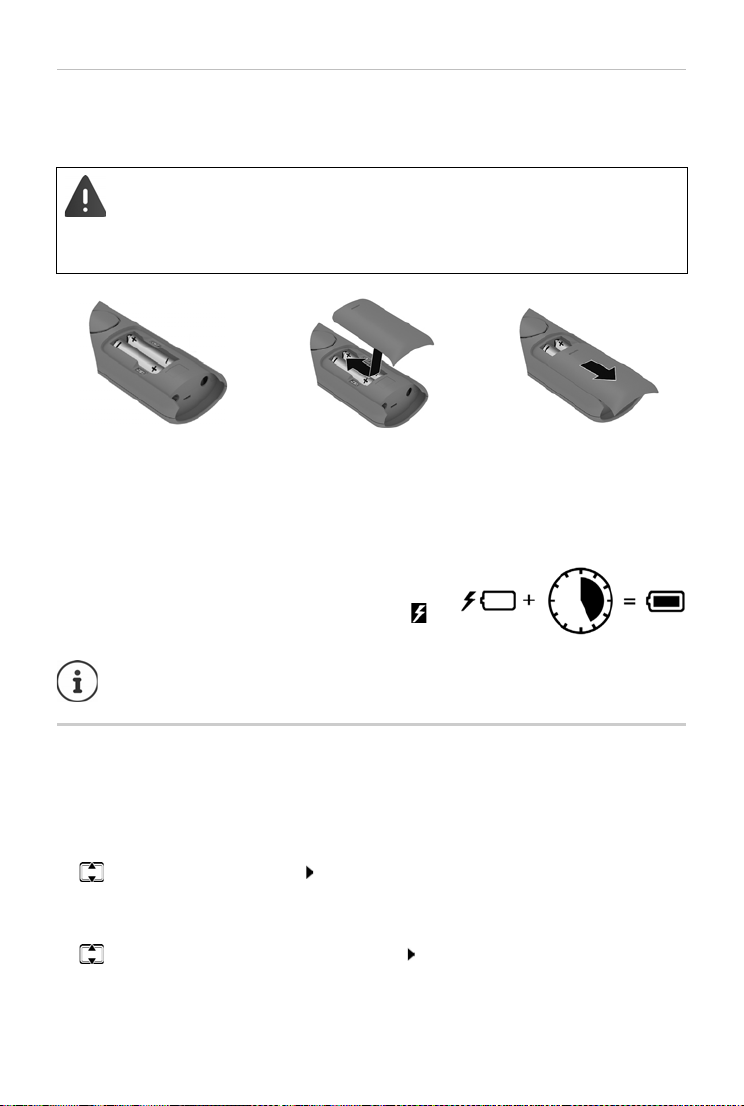
Inserting the batteries
Only use rechargeable batteries, as this could otherwise result in significant health
risks and personal injury. For example, the outer casing of the batteries could be
damaged beyond repair or the batteries could explode. The device could also
malfunction or be damaged as a result of using batteries that are not of the recommended type.
Getting started
¤ Insert the batteries with
the polarity in the right
direction (refer to the
picture for +/- positions).
¤ Fit the battery cover from
the top.
¤ Push the cover closed until
it clicks into place.
To re-open the battery cover:
¤ Grip the notch on the
cover and slide it downwards.
Charging the batteries
¤ Prior to initial use, fully charge the batteries in the
charging cradle.
The batteries are fully charged when the battery icon
disappears from the display.
Batteries can heat up during the charge process. This is not dangerous.
Over time, the charging capacity of the batteries will decrease for technical reasons.
Setting up and registering a handset
When you switch on the handset for the first time, an installation assistant starts automatically,
with which you can select the language and country (if available), and register the handset to a
base/router.
Selecting the language
¤ Select the required language OK . . . The language selected is set as the display
language
Selecting the country (if available)
¤ Select the country where you use the phone OK . . . Country-specific settings are
configured
Availability and operation of the functions
may differ on your telephone.
9
Getting started
Registering a handset
The handset is in Register mode.
On the base / router
Gigaset base:
Other base/router:
Once registration is complete, the handset returns to idle mode.
Cancelling the register process: Press the End call key
¤ Press and hold the Register/Paging key on the base for about
3 seconds.
¤ Information on the registration procedure Documentation for your
base/router
The phone is now ready for use.
If the assistant is interrupted, such as by an incoming call or because the charge level
is too low, the installation assistant restarts as soon as the handset is back in idle mode.
Manually register the handset
A handset can also be registered manually.
¤ Menu Settings OK Registration Register Handset
Some Gigaset bases and bases/routers from third party manufacturers might not be fully compatible with the handset and not all functions are displayed correctly. In such cases, register the
handset manually and use option Legacy (GAP) Registration.
¤ Menu Settings OK Registration Legacy (GAP) Registration
This registering guarantees correct displays on the handset, but can entail restrictions for some
functions.
De-registering a handset
¤ Menu Settings OK Registration Deregister Handset
Data protection notice
Connecting the device to the Internet via an IP
nection to the Gigaset Support Ser ver with regular
device. This information is used for firmware updates for example, or for the provision of Internet services.
For more information on data stored:
10
Availability and operation of the functions
may differ on your telephone.
base or a router automatically creates a con-
transmission of information specific to the
www.gigaset.com
Using the phone
Using the phone
Switch the handset on and off
Switching on:
Switching off:
When you place a switched off handset into the charging cradle, it switches itself
on automatically.
Lock/unlock the keypad
The keypad lock prevents any accidental use of the phone.
Lock/unlock the keypad: Press and hol
Keypad lock enabled: The symbol is shown on the display
Control key
¤ When the handset is switched off, press and hold the End call key
¤ When the handset is in idle mode, press and hold the End call key
d
If a call is indicated on the handset, the keypad automatically unlocks and you can
accept the call. It then locks again when the call is finished.
It is also not possible to call emergency numbers when keypad lock is enabled.
The control key enables you to navigate the menus and input fields, and also to call
up certain functions depending on the situation.
In the description below, the side of the control key is marked with an arrow (up, down, left,
right) that must be pressed in the different operating situations, e.g. for “press right on the
control key”.
In idle mode During a conversation
Open the menu Mute the microphone
Select audio settings Adjust the loudspeaker volume for receiver
Open the directory Open the directory
Make internal call / Open list of handsets Initiate an internal consultation call
Availability and operation of the functions
may differ on your telephone.
and handsfree mode
11
Using the phone
Display
Display keys
The display keys perform a range of functions depending on the operating situation.
Menu
Current display key functions
Display keys
¤ Press the display key . . . Function shown in display above.
Open the main menu / submenu
Menu
Confirm menu function / save entry
OK
Back one menu level
Menu
Delete character by character to the left
OK
Access the call list / message list
Menu
Changing the assignment of the right display key in idle mode
¤ Press and hold the right display key Select the function OK
Display functions accessed from the control key
Use
Menu
OK
to scroll up/down and set the volume
Move the cursor left and right with
12
Availability and operation of the functions
may differ on your telephone.

Using the phone
Status bar
Icons display current settings and the status of the phone.
Keypad lock activated
Ringtone deactivated
Radio contact between the base and handset
Good to poor
No reception
ECO DECT mode No Radiation enabled
Answer machines
Local answer machine switched on (if available)
Battery charge level
0 - 10% 11 - 33% 34 - 66% > 66%
The symbol is shown at the front during the charge process.
Flashing Battery almost flat (less than 10 minutes of talk time)
Menu navigation
The functions of your phone are displayed in a menu comprising several levels.
¤ When the phone is in idle, press the Display key Menu or the control key (right) . . . the
menu opens
¤ Use the control key to scroll to the function required Confirm with OK
Back one level:
Return to idle:
The display automatically returns to idle mode after two minutes of inactivity.
¤ Press the key or briefly press the End call key
¤ Press and hold the End call key
Availability and operation of the functions
may differ on your telephone.
13
Making calls
Making calls
Making a call
¤ Enter the number Press the Talk key . . . The number is dialled
To change the receiver volume during a call: Use
Ending a call / cancelling dialling: Press the End call key
On a base with several phone connections (e.g.
router)
The number is selected via the send connection (line) set for the handset. To use another line:
a Gigaset base with Internet access or a
¤ Press and hold the Talk key Select the line OK Enter the number Dial
Dialling from the directory
¤ Open the directory with Scroll to the required entry Press the Talk key
Or
¤ Open the directory with Enter the first letter of the name . . . The first entry
matching the input is displayed Scroll as needed to the entry required Press the Talk
key
When a directory is also provided by the base:
¤ Press and hold the button . . . The base directory is opened Scroll to the required
entry Press the talk key
or
¤ Menu Directory Selec t directory Scroll to the required entry Press the Talk
key
to set the volume
Briefly pressing the control key normally opens the local directory of the handset.
Press and hold the button to open the base directory. You can change this assignment.
Dialling from the redial list
The list contains the 10 numbers last dialled with the handset.
¤ Press briefly Select entry
Managing entries in the redial list
¤ Press briefly Select Menu Select function OK
Possible functions: Use Number / Copy to Directory / Delete Entry / Delete List
Dialling from the call list
Open the call list: Press the Display key Call List OK
¤ Scroll to the required entry and press the Talk key
14
Availability and operation of the functions
may differ on your telephone.
Making calls
Dialling with speed dial key
Entries from the directory are assigned to keys 2 to 9.
¤ Press and hold the quick dial key to which the required number is assigned
One touch call
A predefined number is dialled by pressing any key . Thi s al low s ch ild ren , wh o ar e un abl e to ent er
a number, to call a certain number for example.
Enabling one touch call mode:
¤ Menu Call Manager OK One Touch Call OK Activation OK
Enter the number or use to take it from the directory OK ( = enabled)
Make a one touch call:
Cancel dialling:
End one touch call:
¤ Press any key . . . the saved number is dialled
¤ Press the End call key
¤ Press and hold the key
Accepting a call
The handset indicates an incoming call by ringing and by a display on the screen.
¤ Press the Talk key
Func tion Auto Answer enabled: Simple take the handset out
Enabling function Auto Answer:
of the charging cradle
¤ Menu Settings OK Te le ph o ny OK Auto Answer OK
( = enabled)
Switch the ringtone off: Mute . . . The ca ll can continue to be accepted whilst it is being show n
on the display
Handsfree mode
In handsfree mode, you switch on the loudspeaker so that you can hear the caller without
holding the handset to your ear.
Enabling/disabling handsfree mode during
a call and when listening to the answer machine:
¤ Press the handsfree key
Placing the handset in the charging cradle during a call:
¤ Press and hold down the Handsfree key Place the handset into the charging cradle
Adjusting the loudspeaker volume:
¤ Menu Audio Settings OK Call Volume OK Handsfree OK
to adjust the volume OK
Use
Availability and operation of the functions
may differ on your telephone.
15
 Loading...