

Page 1
GE
Sensing
XDP-STD
Panametrics Explosion-Proof Display Package
User’s Manual
910-204D1
January 2008
The XDP Panametrics Explosion-Proof Display Package is a GE Panametrics product. GE Panametrics has
joined other GE high-technology sensing businesses under a new name—GE Sensing.
This manual is for use with XDP units
with standard software (E=1) only.
Attention!
Page 2

January 2008
Warranty Each instrument manufactured by GE Sensing, Inc. is warranted to be
free from defects in material and workmanship. Liability under this
warranty is limited to restoring the instrument to normal operation or
replacing the instrument, at the sole discretion of GE. Fuses and
batteries are specifically excluded from any liability. This warranty is
effective from the date of delivery to the original purchaser. If GE
determines that the equipment was defective, the warranty period is:
• one year for general electronic failures of the instrument
• one year for mechanical failures of the sensor
If GE determines that the equipment was damaged by misuse,
improper installation, the use of unauthorized replacement parts, or
operating conditions outside the guidelines specified by GE, the
repairs are not covered under this warranty.
The warranties set forth herein are exclusive and are in lieu of
all other warranties whether statutory, express or implied
(including warranties of merchantability and fitness for a
particular purpose, and warranties arising from course of
dealing or usage or trade).
Return Policy If a GE Sensing, Inc. instrument malfunctions within the warranty
period, the following procedure must be completed:
1. Notify GE, giving full details of the problem, and provide the model
number and serial number of the instrument. If the nature of the
problem indicates the need for factory service, GE will issue a
RETURN AUTHORIZATION number (RA), and shipping instructions
for the return of the instrument to a service center will be
provided.
2. If GE instructs you to send your instrument to a service center, it
must be shipped prepaid to the authorized repair station indicated
in the shipping instructions.
3. Upon receipt, GE will evaluate the instrument to determine the
cause of the malfunction.
Then, one of the following courses of action will then be taken:
• If the damage is covered under the terms of the warranty, the
instrument will be repaired at no cost to the owner and returned.
• If GE determines that the damage is not covered under the terms
of the warranty, or if the warranty has expired, an estimate for the
cost of the repairs at standard rates will be provided. Upon receipt
of the owner’s approval to proceed, the instrument will be repaired
and returned.
iii
Page 3

January 2008
Table of Contents
Chapter 1: General Information
Introduction. . . . . . . . . . . . . . . . . . . . . . . . . . . . . . . . . . . . . . . . . . . . . . . . . . . . . . . . . . . . . . . . . . . . . . . . . . . . 1-1
Basic Features . . . . . . . . . . . . . . . . . . . . . . . . . . . . . . . . . . . . . . . . . . . . . . . . . . . . . . . . . . . . . . . . . . . . . . . . . 1-1
System Overview. . . . . . . . . . . . . . . . . . . . . . . . . . . . . . . . . . . . . . . . . . . . . . . . . . . . . . . . . . . . . . . . . . . . . . . 1-2
Chapter 2: Installation
Introduction. . . . . . . . . . . . . . . . . . . . . . . . . . . . . . . . . . . . . . . . . . . . . . . . . . . . . . . . . . . . . . . . . . . . . . . . . . . . 2-1
Choosing an Installation Site . . . . . . . . . . . . . . . . . . . . . . . . . . . . . . . . . . . . . . . . . . . . . . . . . . . . . . . . . . . . 2-2
Mounting the XDP System . . . . . . . . . . . . . . . . . . . . . . . . . . . . . . . . . . . . . . . . . . . . . . . . . . . . . . . . . . . . . . 2-3
Mounting the XDP Enclosure . . . . . . . . . . . . . . . . . . . . . . . . . . . . . . . . . . . . . . . . . . . . . . . . . . . . . . . . 2-3
Mounting the Remote Transmitter/Sample System . . . . . . . . . . . . . . . . . . . . . . . . . . . . . . . . . . . 2-3
Wiring the XDP . . . . . . . . . . . . . . . . . . . . . . . . . . . . . . . . . . . . . . . . . . . . . . . . . . . . . . . . . . . . . . . . . . . . . . . . . 2-4
Wiring the Analog Input and 24 VDC Output - J6 . . . . . . . . . . . . . . . . . . . . . . . . . . . . . . . . . . . . . 2-5
Wiring The System Fault Alarm - J2. . . . . . . . . . . . . . . . . . . . . . . . . . . . . . . . . . . . . . . . . . . . . . . . . . 2-6
Wiring The XDP Alarms - J3 . . . . . . . . . . . . . . . . . . . . . . . . . . . . . . . . . . . . . . . . . . . . . . . . . . . . . . . . . 2-6
Wiring the Calibration Relays - J7 . . . . . . . . . . . . . . . . . . . . . . . . . . . . . . . . . . . . . . . . . . . . . . . . . . . 2-7
Wiring the System Analog Output - J5 . . . . . . . . . . . . . . . . . . . . . . . . . . . . . . . . . . . . . . . . . . . . . . . 2-7
Wiring the XDP Analog Output - J8 . . . . . . . . . . . . . . . . . . . . . . . . . . . . . . . . . . . . . . . . . . . . . . . . . . 2-8
Wiring the Serial Port - J4. . . . . . . . . . . . . . . . . . . . . . . . . . . . . . . . . . . . . . . . . . . . . . . . . . . . . . . . . . . 2-8
Wiring The Line Power - TB1. . . . . . . . . . . . . . . . . . . . . . . . . . . . . . . . . . . . . . . . . . . . . . . . . . . . . . . . . 2-8
Chapter 3: Operation
Introduction. . . . . . . . . . . . . . . . . . . . . . . . . . . . . . . . . . . . . . . . . . . . . . . . . . . . . . . . . . . . . . . . . . . . . . . . . . . . 3-1
Preventing Common Problems . . . . . . . . . . . . . . . . . . . . . . . . . . . . . . . . . . . . . . . . . . . . . . . . . . . . . . . . . . 3-1
Cleaning the Enclosure . . . . . . . . . . . . . . . . . . . . . . . . . . . . . . . . . . . . . . . . . . . . . . . . . . . . . . . . . . . . . . . . . 3-1
Powering Up the System. . . . . . . . . . . . . . . . . . . . . . . . . . . . . . . . . . . . . . . . . . . . . . . . . . . . . . . . . . . . . . . . 3-2
The Enclosure Window. . . . . . . . . . . . . . . . . . . . . . . . . . . . . . . . . . . . . . . . . . . . . . . . . . . . . . . . . . . . . . 3-2
Initial Screen Displays. . . . . . . . . . . . . . . . . . . . . . . . . . . . . . . . . . . . . . . . . . . . . . . . . . . . . . . . . . . . . . . 3-3
Starting the Sample Gas . . . . . . . . . . . . . . . . . . . . . . . . . . . . . . . . . . . . . . . . . . . . . . . . . . . . . . . . . . . . 3-4
Accessing the User Program . . . . . . . . . . . . . . . . . . . . . . . . . . . . . . . . . . . . . . . . . . . . . . . . . . . . . . . . . . . . 3-4
Exiting the User Program . . . . . . . . . . . . . . . . . . . . . . . . . . . . . . . . . . . . . . . . . . . . . . . . . . . . . . . . . . . . . . . 3-5
Error Codes . . . . . . . . . . . . . . . . . . . . . . . . . . . . . . . . . . . . . . . . . . . . . . . . . . . . . . . . . . . . . . . . . . . . . . . . . . . . 3-6
v
Page 4

January 2008
Table of Contents (cont.)
Chapter 4: Setup
Introduction . . . . . . . . . . . . . . . . . . . . . . . . . . . . . . . . . . . . . . . . . . . . . . . . . . . . . . . . . . . . . . . . . . . . . . . . . . . 4-1
Programming Steps . . . . . . . . . . . . . . . . . . . . . . . . . . . . . . . . . . . . . . . . . . . . . . . . . . . . . . . . . . . . . . . . . . . . 4-1
Setting Up the Display . . . . . . . . . . . . . . . . . . . . . . . . . . . . . . . . . . . . . . . . . . . . . . . . . . . . . . . . . . . . . . . . . . 4-2
Switching Display Windows . . . . . . . . . . . . . . . . . . . . . . . . . . . . . . . . . . . . . . . . . . . . . . . . . . . . . . . . . 4-2
Configuring the Display . . . . . . . . . . . . . . . . . . . . . . . . . . . . . . . . . . . . . . . . . . . . . . . . . . . . . . . . . . . . . 4-2
Adjusting the Display Contrast . . . . . . . . . . . . . . . . . . . . . . . . . . . . . . . . . . . . . . . . . . . . . . . . . . . . . . 4-4
Setting the Display Backlight . . . . . . . . . . . . . . . . . . . . . . . . . . . . . . . . . . . . . . . . . . . . . . . . . . . . . . . . 4-4
Setting Up the Analog Input. . . . . . . . . . . . . . . . . . . . . . . . . . . . . . . . . . . . . . . . . . . . . . . . . . . . . . . . . . . . . 4-5
Entering Calibration Data . . . . . . . . . . . . . . . . . . . . . . . . . . . . . . . . . . . . . . . . . . . . . . . . . . . . . . . . . . . 4-5
Setting the Analog Input Error Limits . . . . . . . . . . . . . . . . . . . . . . . . . . . . . . . . . . . . . . . . . . . . . . . . 4-5
Setting Up the Alarms . . . . . . . . . . . . . . . . . . . . . . . . . . . . . . . . . . . . . . . . . . . . . . . . . . . . . . . . . . . . . . . . . . 4-6
Setting Up the System Fault Alarm . . . . . . . . . . . . . . . . . . . . . . . . . . . . . . . . . . . . . . . . . . . . . . . . . . 4-6
Setting Up the Four XDP Alarms . . . . . . . . . . . . . . . . . . . . . . . . . . . . . . . . . . . . . . . . . . . . . . . . . . . . . 4-6
Setting Up the Analog and Digital Outputs. . . . . . . . . . . . . . . . . . . . . . . . . . . . . . . . . . . . . . . . . . . . . . . 4-8
Setting Up the System Analog Output . . . . . . . . . . . . . . . . . . . . . . . . . . . . . . . . . . . . . . . . . . . . . . . 4-8
Setting Up the XDP Analog Output . . . . . . . . . . . . . . . . . . . . . . . . . . . . . . . . . . . . . . . . . . . . . . . . . . 4-9
Setting Up the Serial Port Digital Output . . . . . . . . . . . . . . . . . . . . . . . . . . . . . . . . . . . . . . . . . . . .4-13
Using the XDP Utilities . . . . . . . . . . . . . . . . . . . . . . . . . . . . . . . . . . . . . . . . . . . . . . . . . . . . . . . . . . . . . . . . . 4-13
Lock Menus . . . . . . . . . . . . . . . . . . . . . . . . . . . . . . . . . . . . . . . . . . . . . . . . . . . . . . . . . . . . . . . . . . . . . . . 4-13
Lock All . . . . . . . . . . . . . . . . . . . . . . . . . . . . . . . . . . . . . . . . . . . . . . . . . . . . . . . . . . . . . . . . . . . . . . . . . . . 4-14
Versions . . . . . . . . . . . . . . . . . . . . . . . . . . . . . . . . . . . . . . . . . . . . . . . . . . . . . . . . . . . . . . . . . . . . . . . . . . 4-14
vi
Page 5

January 2008
Table of Contents (cont.)
Chapter 5: Calibration
Introduction. . . . . . . . . . . . . . . . . . . . . . . . . . . . . . . . . . . . . . . . . . . . . . . . . . . . . . . . . . . . . . . . . . . . . . . . . . . . 5-1
Programming Steps . . . . . . . . . . . . . . . . . . . . . . . . . . . . . . . . . . . . . . . . . . . . . . . . . . . . . . . . . . . . . . . . . . . . 5-1
Configuring AutoCal . . . . . . . . . . . . . . . . . . . . . . . . . . . . . . . . . . . . . . . . . . . . . . . . . . . . . . . . . . . . . . . . . . . . 5-2
Enabling AutoCal . . . . . . . . . . . . . . . . . . . . . . . . . . . . . . . . . . . . . . . . . . . . . . . . . . . . . . . . . . . . . . . . . . . 5-2
Selecting the AutoCal Type. . . . . . . . . . . . . . . . . . . . . . . . . . . . . . . . . . . . . . . . . . . . . . . . . . . . . . . . . . 5-2
Setting Calibration Gas Flow Times . . . . . . . . . . . . . . . . . . . . . . . . . . . . . . . . . . . . . . . . . . . . . . . . . . 5-3
Scheduling AutoCal. . . . . . . . . . . . . . . . . . . . . . . . . . . . . . . . . . . . . . . . . . . . . . . . . . . . . . . . . . . . . . . . . 5-4
Indicating an AutoCal. . . . . . . . . . . . . . . . . . . . . . . . . . . . . . . . . . . . . . . . . . . . . . . . . . . . . . . . . . . . . . . 5-5
Initiating an AutoCal . . . . . . . . . . . . . . . . . . . . . . . . . . . . . . . . . . . . . . . . . . . . . . . . . . . . . . . . . . . . . . . . 5-5
Setting the AutoCal Drift Limits . . . . . . . . . . . . . . . . . . . . . . . . . . . . . . . . . . . . . . . . . . . . . . . . . . . . . . 5-6
Setting AutoCal Verification . . . . . . . . . . . . . . . . . . . . . . . . . . . . . . . . . . . . . . . . . . . . . . . . . . . . . . . . . 5-6
Viewing the Drift Data . . . . . . . . . . . . . . . . . . . . . . . . . . . . . . . . . . . . . . . . . . . . . . . . . . . . . . . . . . . . . . . . . . 5-7
Clearing the Drift Data. . . . . . . . . . . . . . . . . . . . . . . . . . . . . . . . . . . . . . . . . . . . . . . . . . . . . . . . . . . . . . . . . . 5-8
Resetting the Verification Alarm. . . . . . . . . . . . . . . . . . . . . . . . . . . . . . . . . . . . . . . . . . . . . . . . . . . . . . . . . 5-8
Abort AutoCAL . . . . . . . . . . . . . . . . . . . . . . . . . . . . . . . . . . . . . . . . . . . . . . . . . . . . . . . . . . . . . . . . . . . . . . . . . 5-8
Chapter 6: Factory-Level Programming
Introduction. . . . . . . . . . . . . . . . . . . . . . . . . . . . . . . . . . . . . . . . . . . . . . . . . . . . . . . . . . . . . . . . . . . . . . . . . . . . 6-1
Programming Levels. . . . . . . . . . . . . . . . . . . . . . . . . . . . . . . . . . . . . . . . . . . . . . . . . . . . . . . . . . . . . . . . . . . . 6-1
Programming Steps . . . . . . . . . . . . . . . . . . . . . . . . . . . . . . . . . . . . . . . . . . . . . . . . . . . . . . . . . . . . . . . . . . . . 6-1
Setup-Level Programming . . . . . . . . . . . . . . . . . . . . . . . . . . . . . . . . . . . . . . . . . . . . . . . . . . . . . . . . . . . . . . 6-2
Configuring the Display . . . . . . . . . . . . . . . . . . . . . . . . . . . . . . . . . . . . . . . . . . . . . . . . . . . . . . . . . . . . . 6-2
Factory-Level Programming . . . . . . . . . . . . . . . . . . . . . . . . . . . . . . . . . . . . . . . . . . . . . . . . . . . . . . . . . . . . 6-3
The Adv Menu . . . . . . . . . . . . . . . . . . . . . . . . . . . . . . . . . . . . . . . . . . . . . . . . . . . . . . . . . . . . . . . . . . . . . . 6-3
The Opt>Setup Menu . . . . . . . . . . . . . . . . . . . . . . . . . . . . . . . . . . . . . . . . . . . . . . . . . . . . . . . . . . . . . . . 6-8
vii
Page 6

January 2008
Table of Contents (cont.)
Chapter 7: Specifications
Performance Specifications . . . . . . . . . . . . . . . . . . . . . . . . . . . . . . . . . . . . . . . . . . . . . . . . . . . . . . . . . . . . 7-1
Physical Specifications . . . . . . . . . . . . . . . . . . . . . . . . . . . . . . . . . . . . . . . . . . . . . . . . . . . . . . . . . . . . . . . . . 7-1
Functional Specifications . . . . . . . . . . . . . . . . . . . . . . . . . . . . . . . . . . . . . . . . . . . . . . . . . . . . . . . . . . . . . . . 7-1
Environmental Specifications . . . . . . . . . . . . . . . . . . . . . . . . . . . . . . . . . . . . . . . . . . . . . . . . . . . . . . . . . . . 7-2
Transmitter Specifications . . . . . . . . . . . . . . . . . . . . . . . . . . . . . . . . . . . . . . . . . . . . . . . . . . . . . . . . . . . . . . 7-2
The XDP Model Number . . . . . . . . . . . . . . . . . . . . . . . . . . . . . . . . . . . . . . . . . . . . . . . . . . . . . . . . . . . . . . . . 7-3
Appendix A: CE Mark Compliance
Introduction . . . . . . . . . . . . . . . . . . . . . . . . . . . . . . . . . . . . . . . . . . . . . . . . . . . . . . . . . . . . . . . . . . . . . . . . . . . A-1
EMC Compliance . . . . . . . . . . . . . . . . . . . . . . . . . . . . . . . . . . . . . . . . . . . . . . . . . . . . . . . . . . . . . . . . . . . . . . . A-1
LVD Compliance. . . . . . . . . . . . . . . . . . . . . . . . . . . . . . . . . . . . . . . . . . . . . . . . . . . . . . . . . . . . . . . . . . . . . . . . A-1
Appendix B: PanaView Programming
Introduction . . . . . . . . . . . . . . . . . . . . . . . . . . . . . . . . . . . . . . . . . . . . . . . . . . . . . . . . . . . . . . . . . . . . . . . . . . . B-1
Initial Setup . . . . . . . . . . . . . . . . . . . . . . . . . . . . . . . . . . . . . . . . . . . . . . . . . . . . . . . . . . . . . . . . . . . . . . . . . . . . B-1
Remote Programming . . . . . . . . . . . . . . . . . . . . . . . . . . . . . . . . . . . . . . . . . . . . . . . . . . . . . . . . . . . . . . . . . . B-1
Viewing Data . . . . . . . . . . . . . . . . . . . . . . . . . . . . . . . . . . . . . . . . . . . . . . . . . . . . . . . . . . . . . . . . . . . . . . . . . . B-2
Logging Data . . . . . . . . . . . . . . . . . . . . . . . . . . . . . . . . . . . . . . . . . . . . . . . . . . . . . . . . . . . . . . . . . . . . . . . . . . B-4
Appendix C: Menu Maps
Appendix D: Factory Default Values
Introduction . . . . . . . . . . . . . . . . . . . . . . . . . . . . . . . . . . . . . . . . . . . . . . . . . . . . . . . . . . . . . . . . . . . . . . . . . . . D-1
Default Values . . . . . . . . . . . . . . . . . . . . . . . . . . . . . . . . . . . . . . . . . . . . . . . . . . . . . . . . . . . . . . . . . . . . . . . . . D-1
Display. . . . . . . . . . . . . . . . . . . . . . . . . . . . . . . . . . . . . . . . . . . . . . . . . . . . . . . . . . . . . . . . . . . . . . . . . . . . . D-1
Cal Data . . . . . . . . . . . . . . . . . . . . . . . . . . . . . . . . . . . . . . . . . . . . . . . . . . . . . . . . . . . . . . . . . . . . . . . . . . . D-1
4-20 mA Input. . . . . . . . . . . . . . . . . . . . . . . . . . . . . . . . . . . . . . . . . . . . . . . . . . . . . . . . . . . . . . . . . . . . . . D-1
Slot Analog Output . . . . . . . . . . . . . . . . . . . . . . . . . . . . . . . . . . . . . . . . . . . . . . . . . . . . . . . . . . . . . . . . . D-1
Alarms. . . . . . . . . . . . . . . . . . . . . . . . . . . . . . . . . . . . . . . . . . . . . . . . . . . . . . . . . . . . . . . . . . . . . . . . . . . . . D-1
AutoCAL . . . . . . . . . . . . . . . . . . . . . . . . . . . . . . . . . . . . . . . . . . . . . . . . . . . . . . . . . . . . . . . . . . . . . . . . . . . D-2
viii
Page 7

Chapter 1
Page 8

General Information
Introduction. . . . . . . . . . . . . . . . . . . . . . . . . . . . . . . . . . . . . . . . . . . . . . . . . . . . 1-1
Basic Features. . . . . . . . . . . . . . . . . . . . . . . . . . . . . . . . . . . . . . . . . . . . . . . . . . 1-1
System Overview . . . . . . . . . . . . . . . . . . . . . . . . . . . . . . . . . . . . . . . . . . . . . . . 1-2
Page 9

January 2008
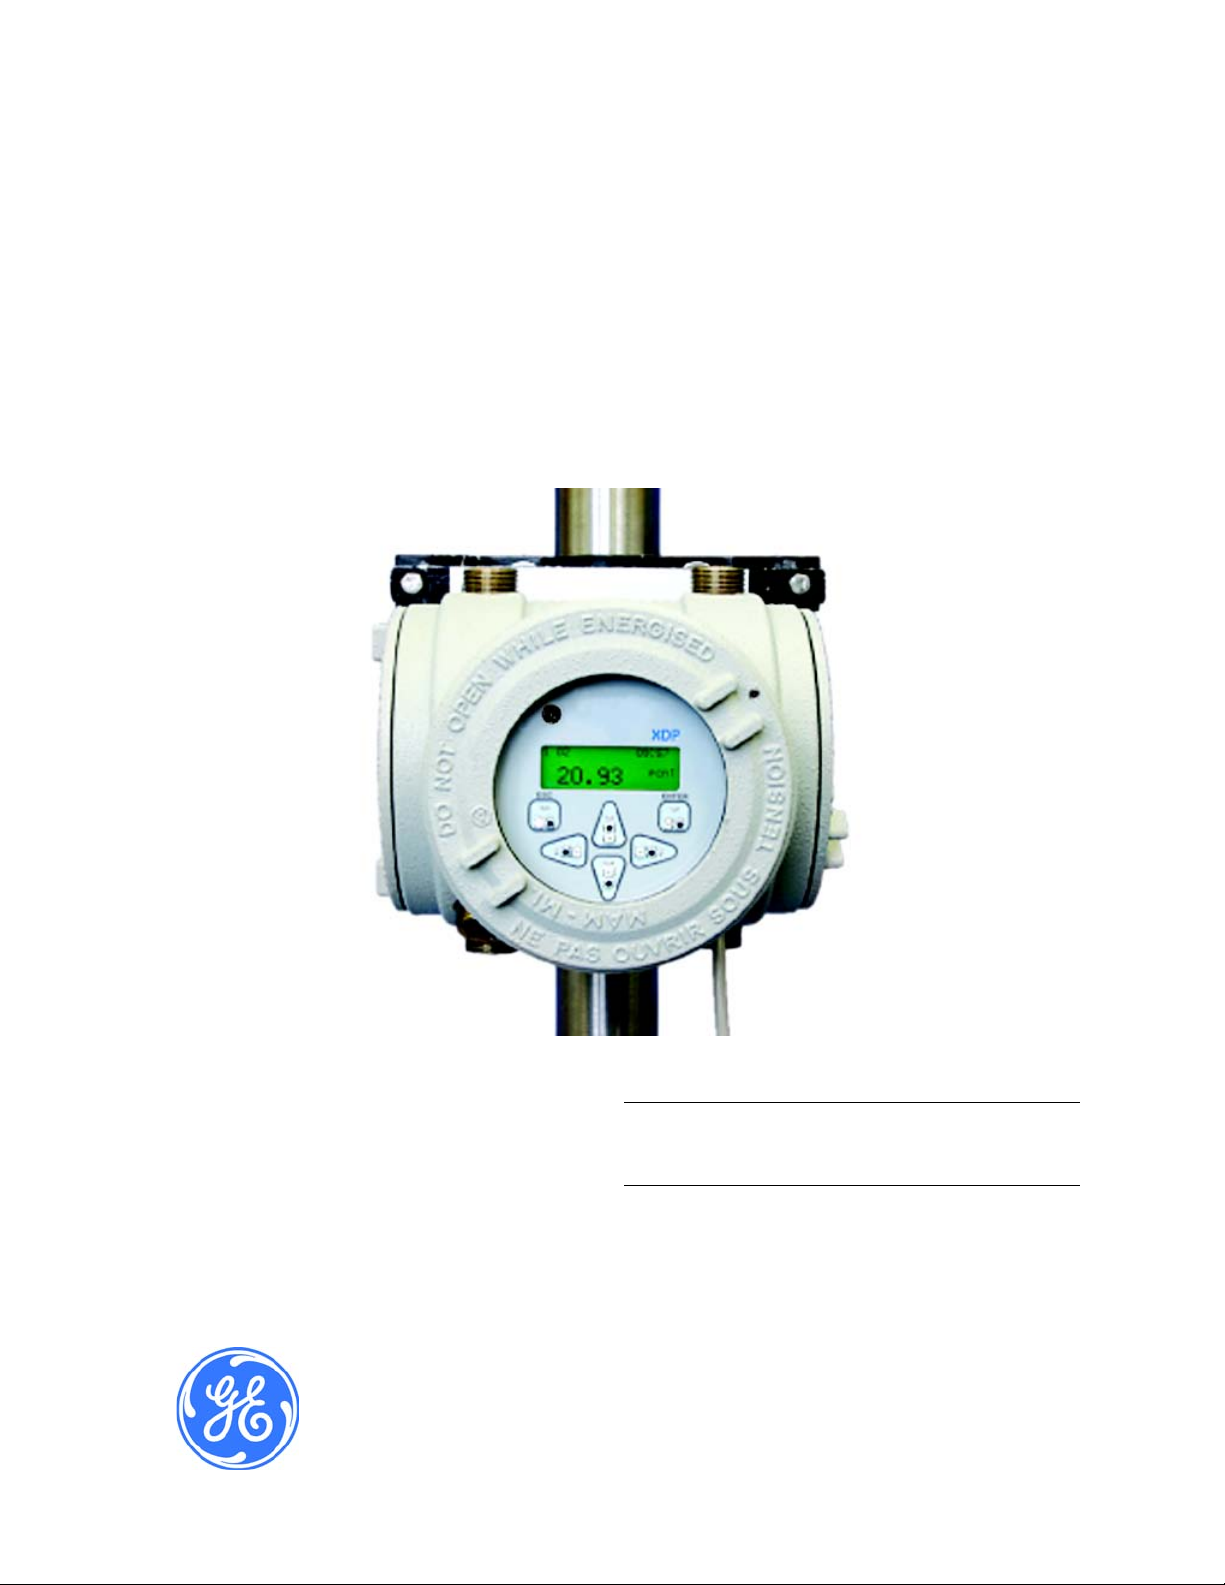
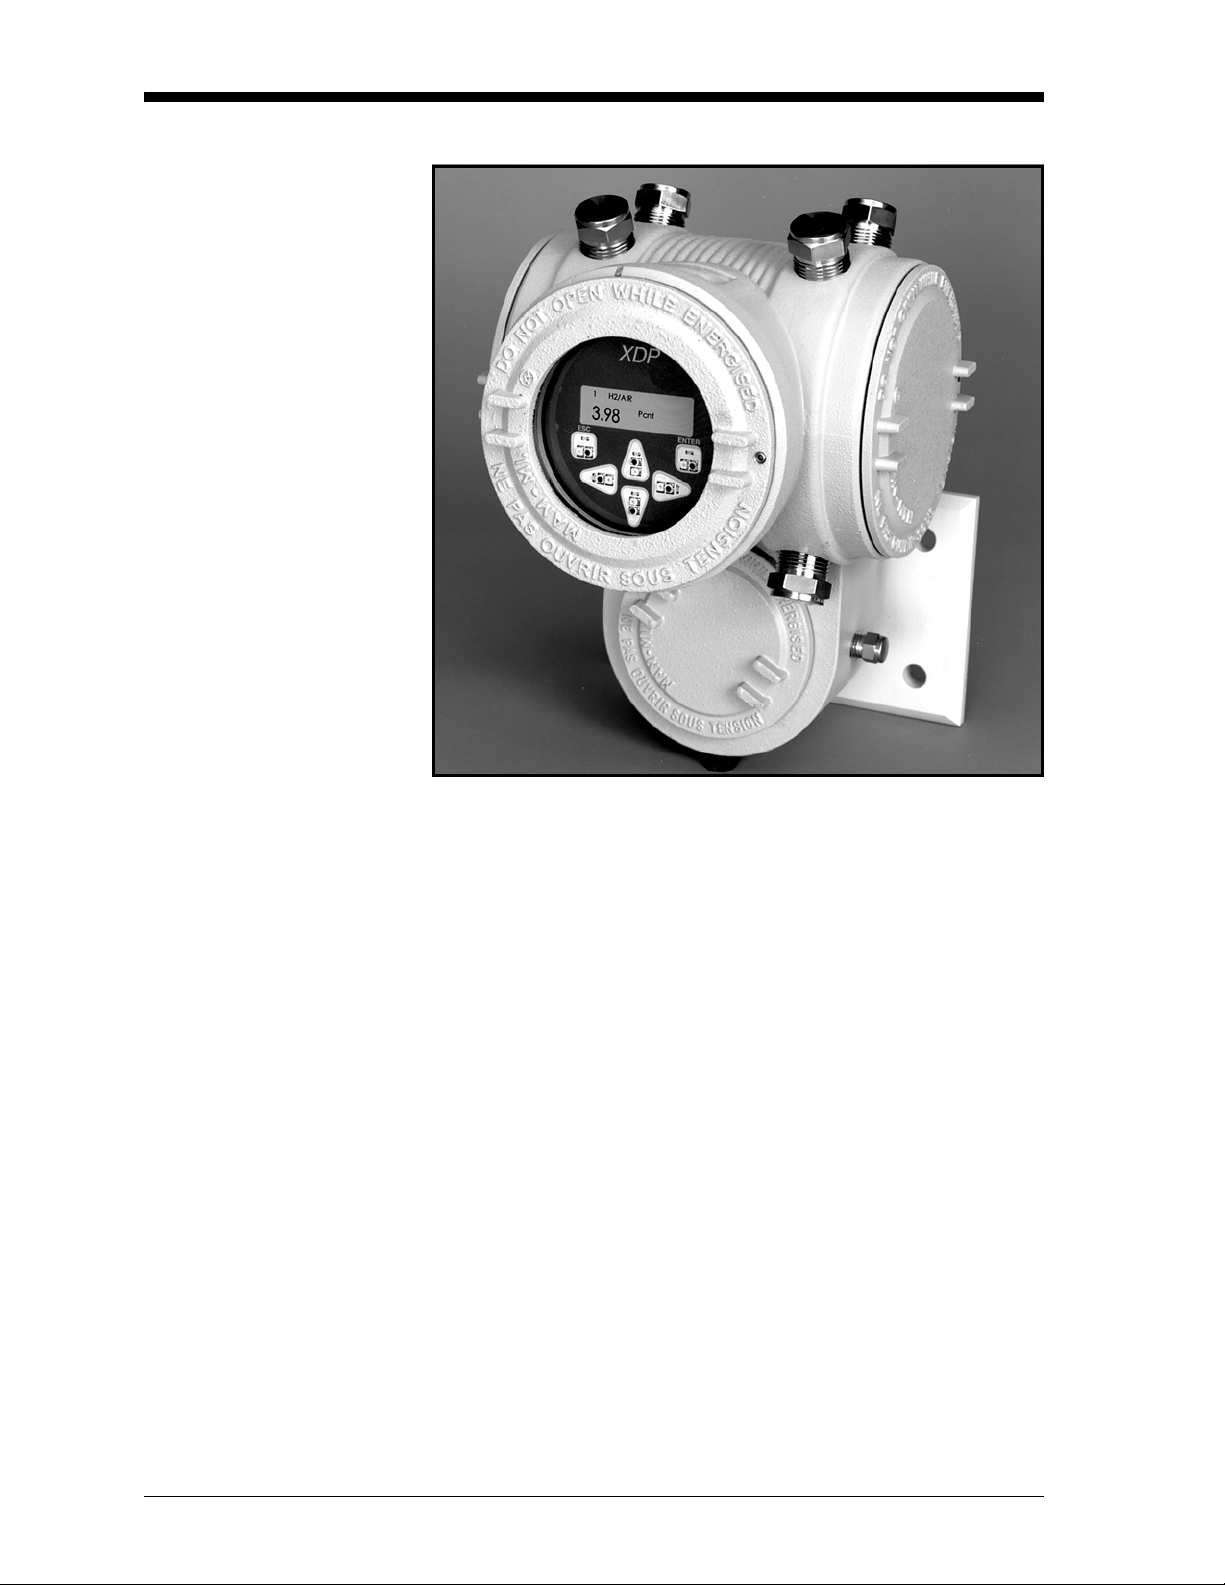
Introduction The XDP Explosion-proof Display Package is a general-purpose
display/control unit used for oxygen and thermal conductivity
measurement applications in Zone 1 environments. A second part of
the system is a remotely-mounted sensor/transmitter, such as the GE
Sensing XMO2, XMTC or O2X1.
Note: Refer to the documentation supplied with the specific
transmitter for complete information on the transmitter.
The XDP performs the following basic functions:
• supplies 24 VDC to power the transmitter
• accepts and processes a 4-20 mA output from the transmitter
• shows a selected process parameter on a digital display
• provides a user interface for programming the system
• provides user-configurable alarm relays and an analog output
The XDP is wall-mounted via its integral mounting plate and it is
connected to the transmitter with an electrical conduit. It is certified
for use in Zone 1 hazardous areas.
Basic Features The XDP incorporates the following basic features:
• wall-mountable, explosion-proof enclosure
• universal 100-240 VAC power input
• 24 VDC power output
• 4-20 mA analog input
• 4-20 mA/0-20 mA/0-2 V analog output
• RS-232/RS-485 serial port
• high-resolution, backlit LCD digital display
• six-key, infrared (“through-the-glass”) keypad
• five general-purpose alarm relays
• automatic calibration
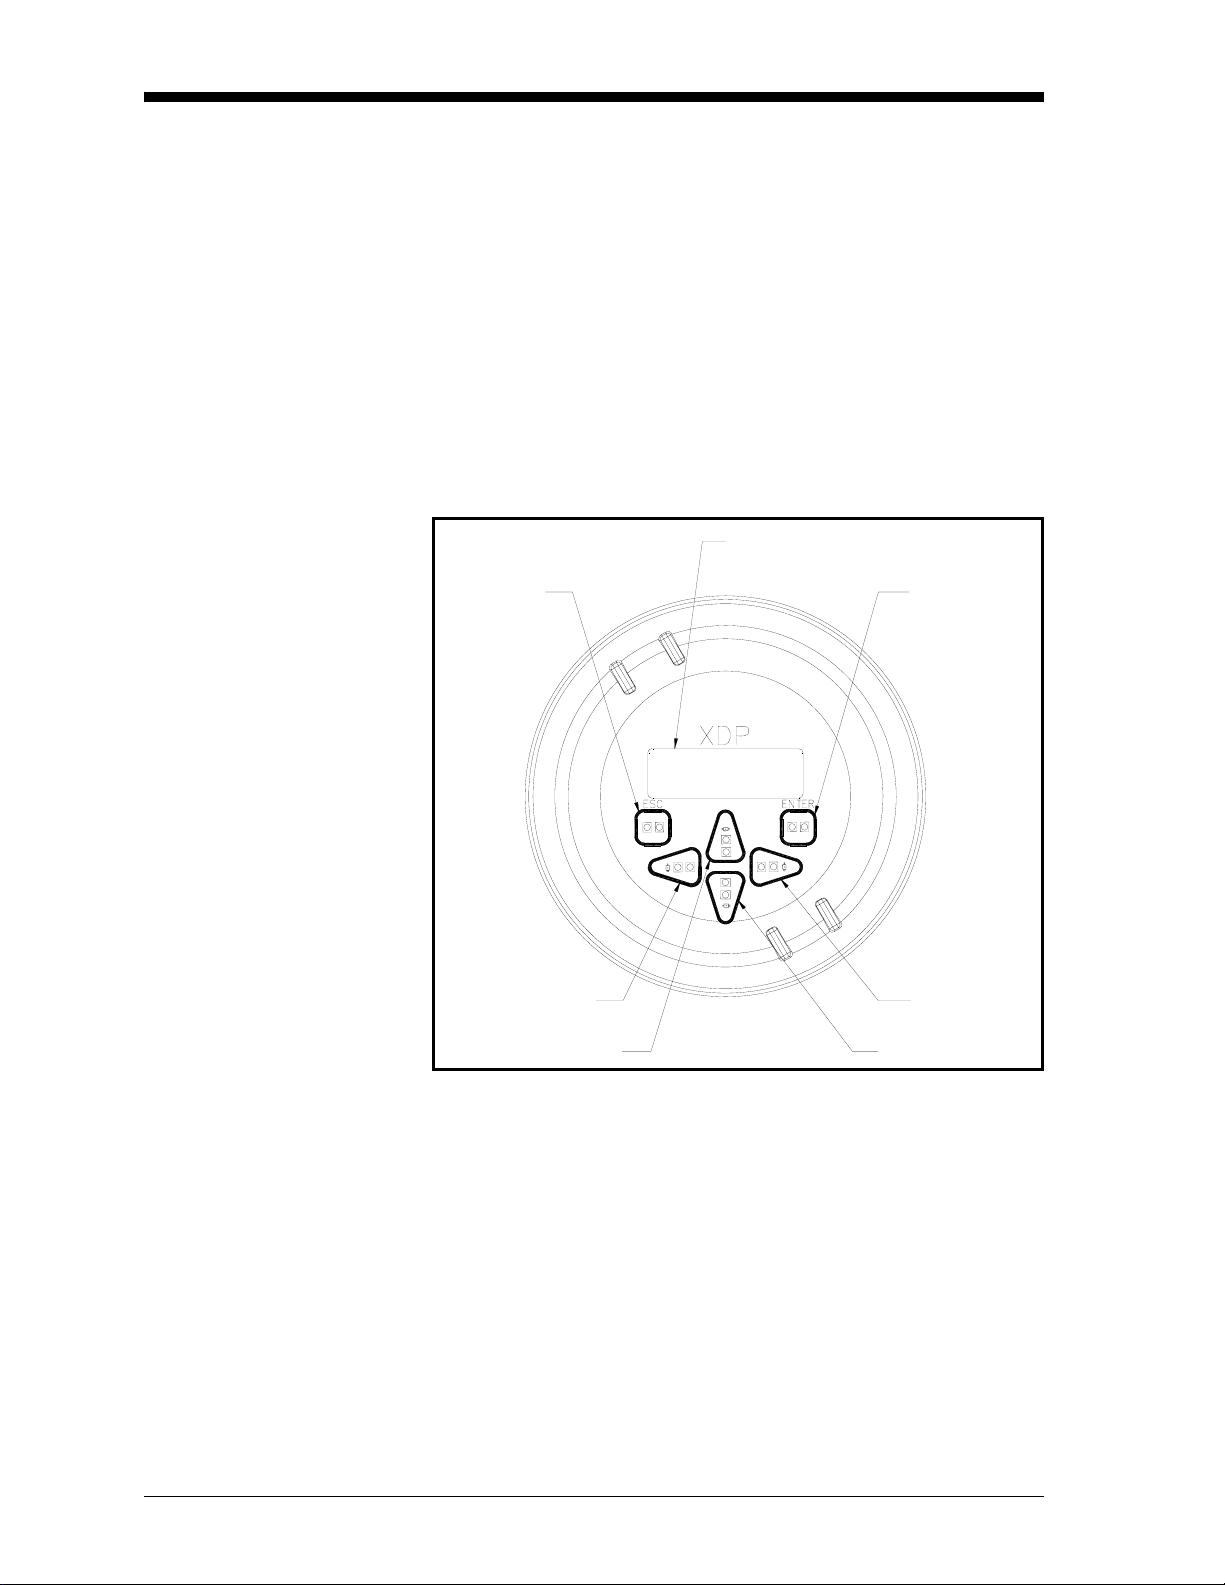
See Figure 1-1 on page 1-2 for a picture of the XDP.
General Information 1-1
Page 10
January 2008
Basic Features (cont.)
Figure 1-1: The XDP
System Overview In a binary gas mixture, the transmitter measures the concentration of
a target gas in a known background gas (see the transmitter
documentation for a discussion of the specific technology employed
by the sensor mechanism). To be suitable for use in an XDP system,
the transmitter must:
• be self-powered or powered by the +24 VDC output fro m the XDP
• output a 4-20 mA signal to the XDP analog input
• comply with all performance specifications for the system
• be suitable for use in the specified environment
The XDP accepts the 4-20 mA analog output from the transmitter and
processes the information. Then, the results are displayed on the
built-in digital display window . In addition, the data may be output as
a linear analog signal to drive a data recorder or similar device.
1-2 General Information
Page 11

Chapter 2
Page 12

Installation
Introduction. . . . . . . . . . . . . . . . . . . . . . . . . . . . . . . . . . . . . . . . . . . . . . . . . . . . 2-1
Choosing an Installation Site. . . . . . . . . . . . . . . . . . . . . . . . . . . . . . . . . . . . . 2-2
Mounting the XDP System . . . . . . . . . . . . . . . . . . . . . . . . . . . . . . . . . . . . . . . 2-3
Wiring the XDP . . . . . . . . . . . . . . . . . . . . . . . . . . . . . . . . . . . . . . . . . . . . . . . . . 2-4
Page 13

January 2008
Introduction This chapter provides a general description of the XDP Explosion-
proof Display Package and gives directions on how to install and wire
the unit for proper operation.
IMPORTANT: The XDP requires an external power disconnect
device such as a switch or circuit breaker. The
disconnect device must be marked as such, clearly
visible, directly accessible, and located within 1.8 m
(6 ft) of the unit.
Be sure to observe all installation limits and precautions described in
this chapter. Pay particular attention to the ambient temperature range
of –10° to +60°C (14° to +140°F) specified for the instrument.
!WARNING!
To ensure safe operation of the XDP, the unit must be
installed and operated as described in this manual. Also, be
sure to follow all applicable local safety codes and
regulations for installing electrical equipment. In addition,
all procedures should be performed by trained service
personnel.
Proceed to the next page to begin the installation.
Installation 2-1
Page 14

January 2008
Choosing an Installation Site
All environmental and installation factors should have been discussed
with a GE Sensing applications engineer or field sales person at the
time the XDP was ordered. Thus, the equipment should be suited to
the application and the planned installation site. However, before
installing the unit, read these guidelines to verify that the best
installation site has been chosen for optimum instrument accuracy
and reliability.
• Make sure that the XDP and transmitter enclosures are suitable for
the environmental conditions at the installation site.
• Install the system in a location with little or no vibration.
• Mount the transmitter in accordance with the instructions provided
in its accompanying documentation.
• Make sure the ambient temperature at the XDP installation site is
–10° to 60°C (14° to 140°F).
• Use a suitable electrical conduit to interconnect the remote
transmitter and the XDP enclosure.
• Use a suitable sample system between the gas source and the
sample inlet of the transmitter.
• Observe all normal safety precautions. Specifically, do not exceed
the maximum pressure and temperature ratings of the transmitter
or the sample system.
• Install the XDP system in a location that provides ready access for
programming, testing, and servicing the unit.
• Protect all cables from excessive physical strain (bending, pulling,
twisting, etc.). Do not subject the cables to temperatures above
65°C (149°F) or below –50°C (–58°F).
• Be sure that the line voltage at the planned installation site is
within the specified power input rating for the XDP
(100-240 VAC; 50/60 Hz; 40 W max.).
2-2 Installation
Page 15

January 2008
Mounting the XDP System
Mounting the XDP Enclosure
This section explains how to mount the XDP system components and
the transmitter/sample system at the installation site.
IMPORTANT: The XDP requires an external power disconnect
device such as a switch or circuit breaker. The
disconnect device must be marked as such, clearly
visible, directly accessible, and located within 1.8 m
(6 ft) of the unit.
IMPORTANT: This symbol indicates Caution - risk of electric
shock:
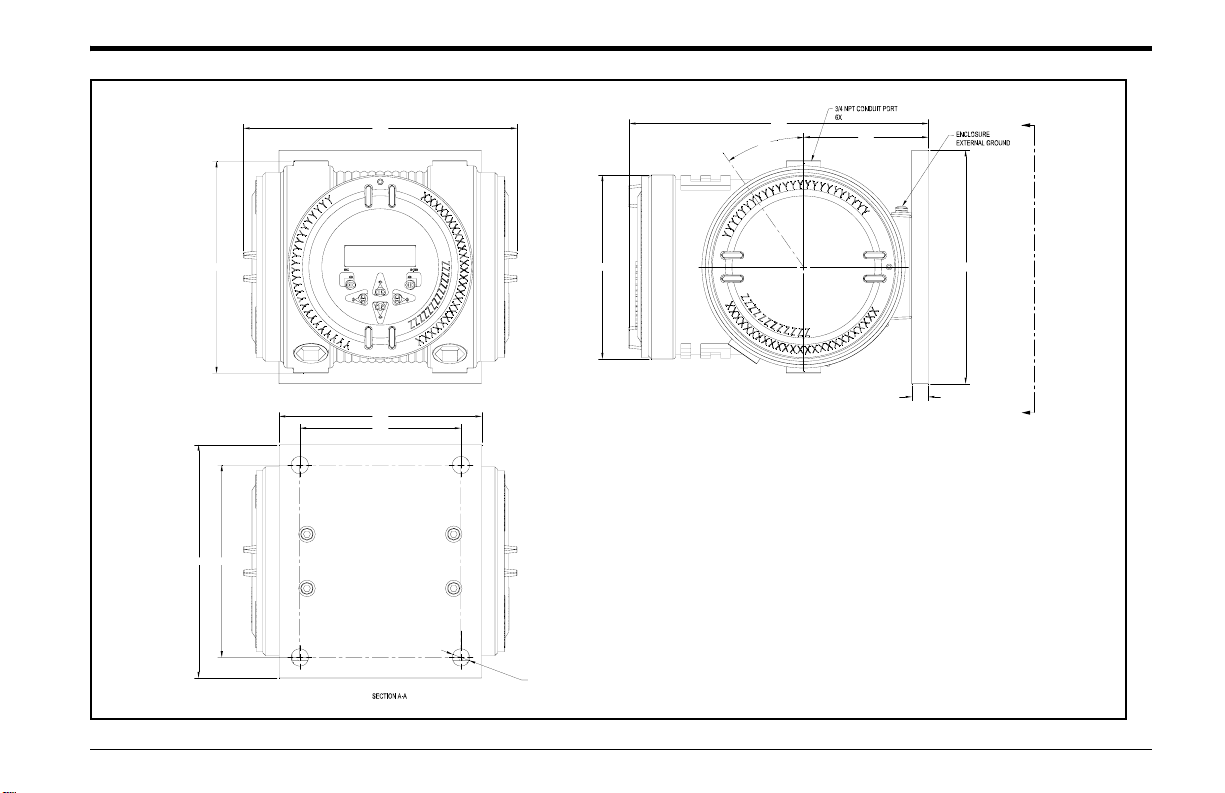
Refer to Figure 2-2 on page 2-11, and complete the following steps to
mount the XDP enclosure:
1. Select a flat surface on a vertical wall or instrument panel with
sufficient space to hold the XDP enclosure.
2. Using the mounting dimensions shown in Figure 2-2 on page
2-11, locate and prepare four (4) mounting ho les or two (2)
horizontal mounting rails on the vertical surface.
Mounting the Remote Transmitter/Sample System
3. Secure the XDP enclosure to the mounting surface with four (4)
sets of mounting hardware. Be sure that the enclosure is in a
vertical position, with the display window upright.
Mount the remote transmitter in accordance with the instructions in
its accompanying documentation.
Note: Most GE Sensing transmitters may be located up to
2,800 ft (850 m) from the XDP enclosure.
To provide reliable and accurate results, the transmitter is often
installed in a suitable sample system. The sample system must deliver
a clean, representative gas sample to the inlet of the transmitter at the
proper temperature, pressure and flow rate.
Note: A suitable sample system may be ordered directly from GE
Sensing. The sample system would be supplied fully assembled
on a flat plate with four (4) mounting holes. See the sample
system and/or transmitter manuals for more details.
Installation 2-3
Page 16

January 2008
Wiring the XDP To completely wire the XDP, connect the following items:
• analog input (terminal J6)
• +24 VDC output (terminal J6)
• system fault alarm (terminal J2)
• XDP alarms (terminal J3)
• additional relays (terminal J7)
• system analog output (terminal J5)
• XDP analog output (terminal J8)
• serial port (terminal J4)
• line power (terminal TB1)
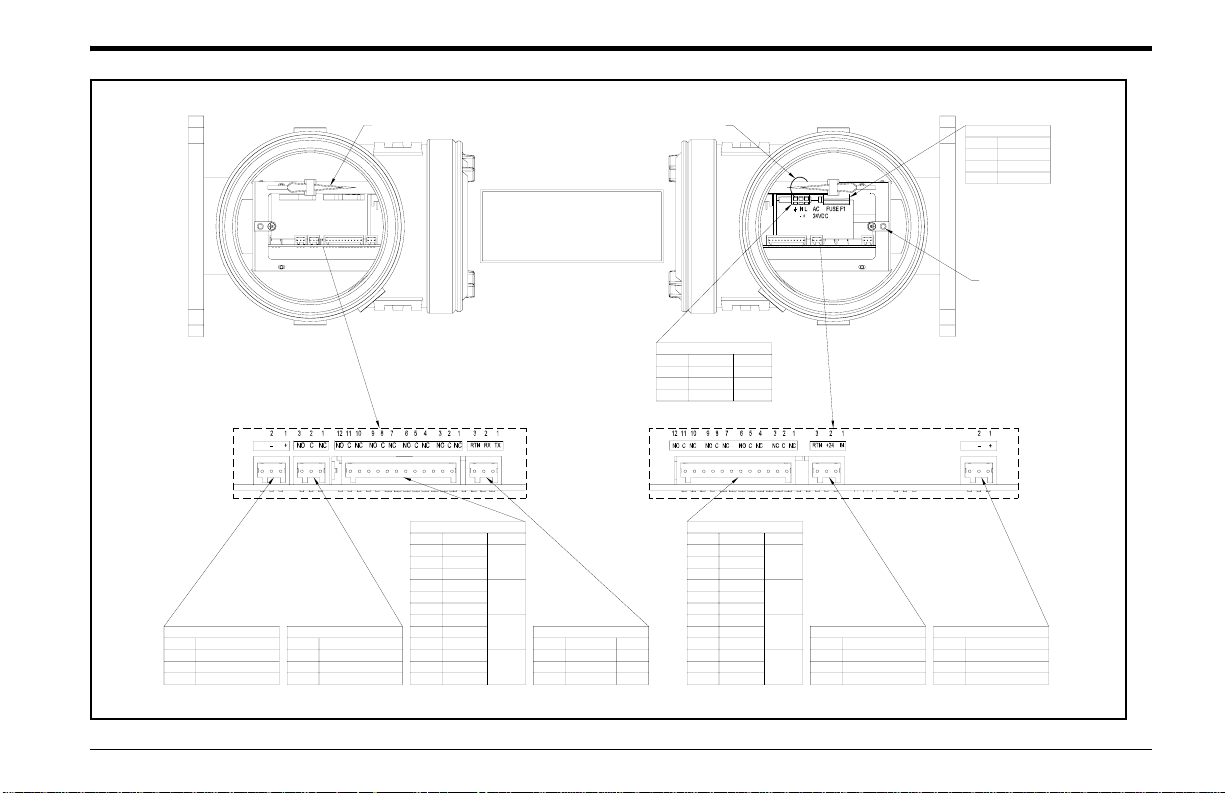
Refer to the wiring diagram shown in Figure 2-3 on page 2-12 and the
interconnect label (which is located inside of both covers) shown in
Figure 2-1 below, while completing the instructions in this section.
TB 1
L
N
AC
-
+
RELAY 3
RELAY 4
12 11 10 9 8 7 6 5 4 3 2 1 3 2 1
J7
RELAY 1
RELAY 2
NO C NC NO C NC NO C NC NO C NC
24VDC
ANALOG IN
RTN +24 IN
J6
BOTH PORTS SHOWN ON LABEL
ANALOG OUT 1
ARTN AOUT
3 2 1
2 1
- +
NO C NC NO C NC NO C NC NO C NC NO C NC
J5 J2 J4
ALARM 4
SYSTEM
FAULT
12 11 10 9 8 7 6 5 4 3 2 1 3 2 1
ALARM 3
J3
FUSE F1
ALARM 2
ALARM 1
XDP
4-20mA OUT
RTN OUT
2 1
RS232/485
COMM
RTN RX TX
- +
J8
Figure 2-1: Interconnect Label (Drawing #420-790E)
2-4 Installation
Page 17

Wiring the XDP (cont.) !Attention European Customers!
To meet CE Mark requirements, install all cables as
described in Appendix A, CE Mark Compliance.
IMPORTANT: The XDP requires an external power disconnect
device such as a switch or circuit breaker. The
disconnect device must be marked as such, clearly
visible, directly accessible, and located within 1.8 m
(6 ft) of the unit.
!WARNING!
To ensure safe operation of the XDP, the unit must be
installed and operated as described in this manual. Also, be
sure to follow all applicable local safety codes and
regulations for installing electrical equipment. In addition,
all procedures should be performed by trained service
personnel.
January 2008
Wiring the Analog Input and 24 VDC Output - J6
Remove the two side covers on the XDP enclosure. This is
accomplished by loosening the set screw in the cover and using a long
screwdriver or rod in the slots provided to unscrew the cover. Proceed
to the appropriate sub-section to wire each of the terminal blocks.
Note: A long, pin-like, plastic wiring tool is stored inside both ports
of the XDP enclosure. Insert the tool into a connector pin to
open the hole, and then insert the wire. When the tool is
removed, the wire is clamped into the connector.
Terminal block J6 contains the analog input and power connections
for the remote transmitter. To wire the transmitter, complete the
following steps:
Note: Refer to the transmitter manual for details on wiring the
transmitter’s terminal block(s).
1. Connect pin #1 to the positive terminal of the analog output from
the transmitter.
2. Connect pin #2 to the +24 VDC loop power input on the
transmitter.
3. Connect pin #3 to the return connection of the analog output from
the transmitter.
Installation 2-5
Page 18

January 2008
Wiring The System Fault Alarm - J2
Wiring The XDP Alarms J3
Terminal block J2 contains the system fault alarm connections. To
wire this alarm, complete the following steps:
Note: The system fault alarm on terminal block J2 is usually factory-
configured as a “fail-safe” alarm. That is, it is energized
during normal operation and de-energized when tripped.
1. Connect pin #1 (NC) to the alarm device input.
2. Connect pin #2 (C) to the alarm device return.
3. Pin #3 (NO) is not used for fail-safe operation.
Note: For non-fail-safe operation, repr ogram the alarm or move the
pin #1 connection to pin #3.
Terminal block J3 contains connections for the four XDP alarms. To
wire these alarms, complete the following steps:
Note: The following instructions show the wiring for fail-safe
operation. For non-fail-safe operation reprogram the alarm
or move the pin #1 connection to pin #3 for that alarm.
1. Connect the XDP High alarm (alarm 1) as follows:
a. Connect pin #1 (NC) to the alarm device input.
b. Connect pin #2 (C) to the alarm device return.
c. Pin #3 (NO) is not used for fail-safe operation
2. Connect the XDP High High alarm (alarm 2) as follows:
a. Connect pin #4 (NC) to the alarm device input.
b. Connect pin #5 (C) to the alarm device return.
c. Pin #6 (NO) is not used for fail-safe operation
3. Connect the XDP Low alarm (alarm 3) as follows:
a. Connect pin #7 (NC) to the alarm device input.
b. Connect pin #8 (C) to the alarm device return.
c. Pin #9 (NO) is not used for fail-safe operation.
4. Connect the XDP Low Low alarm (alarm 4) as follows:
a. Connect pin #10 (NC) to the alarm device input.
b. Connect pin #11 (C) to the alarm device return.
c. Pin #12 (NO) is not used for fail-safe operation.
2-6 Installation
Page 19

January 2008
Wiring the Calibration Relays - J7
T erminal block J7 contains connections for the four calibration relays.
To wire these relays, complete the following steps:
Note: These relays are configured for non-fail-safe operation.
1. Connect the Pr ocess/Cal relay (Relay 1) as follows:
a. Pin #1 (NC) is not used for non-fail-safe operation.
b. Connect pin #2 (C) to the alarm device return.
c. Connect pin #3 (NO) to the alarm device input.
2. Connect the Zero/Span Cal relay (Relay 2) as follows:
a. Pin #4 (NC) is not used for non-fail-safe operation.
b. Connect pin #5 (C) to the alarm device return.
c. Connect pin #6 (NO) to the alarm device input.
3. Connect the AutoCal Indication alarm (Relay 3) as follows:
a. Pin #7 (NC) is not used for non-fail-safe operation.
b. Connect pin #8 (C) to the alarm device return.
Wiring the System Analog Output - J5
c. Connect pin #9 (NO) to the alarm device input.
4. Connect the Auto Verification alarm (Relay 4) as follows:
a. Pin #10 (NC) is not used for non-fail-safe operation.
b. Connect pin #11 (C) to the alarm device return.
c. Connect pin #12 (NO) to the alarm device input.
T e rminal block J5 contains connections for the system an alog out put.
To wire the system analog output, complete the following steps:
1. Connect pin #1 to positive input on the device.
2. Connect pin #2 to the return line from the device.
3. Pin #3 has no connection.
Installation 2-7
Page 20

January 2008
Wiring the XDP Analog Output - J8
Terminal block J8 contains connections for the XDP analog output.
To wire the XDP analog output, complete the following steps:
1. Connect pin #1 to positive input on the device.
2. Connect pin #2 to the return line from device.
3. Pin #3 has no connection.
Wiring the Serial Port - J4 Terminal block J4 contains connections for the RS-232/RS-485
(RS-485 supports multi-drop installations) serial port. To wire the
serial port, complete the following steps:
1. Connect pin #1 to the transmit pin on the PC serial port.
2. Connect pin #2 to the receive pin on the PC serial port.
3. Connect pin #3 to the return pin on the PC serial port.
Note: This connection may be made with a GE Sensing
#704-668 cable. If this cable is used, connect the red wire to
pin #1, the white wire to pin #2, and the green wire to pin #3.
See EIA-RS Serial Communications (document 916-054) for a
detailed discussion of serial port wiring.
Wiring The Line Power TB1
Terminal block TB1 on the power supply board contains connections
for the line power to the XDP. Make these connections only with wire
that meets the following specifications:
• individual conductor gauge of 18 AWG minimum (maximum
current capacity of 12 Amps)
• voltage rating of 600 Vo lts minimum
• insulation temperature rating of 105°C minimum
!WARNING!
The rating of the wire insulation must be at least 15°C
above the expected ambient temperature.
2-8 Installation
Page 21

January 2008
Wiring The Line Power - J1
(cont.)
Refer to Figure 2-3 on page 2-12 and complete the following steps:
!WARNING!
Before proceeding with the section, verify that the line
power has been turned off at the external disconnect
device.
1. Attach a cable or conduit with the three line power conductors to a
cable entry port on the XDP enclosure.
Caution!
Be sure that the input voltage complies with the input
power rating for the XDP (see Chapter 7, Specifications).
2. Connect the line power leads to terminal block J1 as follows:
a. Connect the line power lead (black or brown) to pin
L on the
power connector.
b. Connect the neutral power lead (white or blue) to pin
N on the
power connector.
c. Connect the ground power lead (green or green/yellow) to the
chassis ground screw shown in Figure 2-2 on page 2-10.
3. Make sure that the factory-installed jumper wire at pin
G on the
power connector is secure.
This completes the wiring of the XDP. Proceed to Chapter 3,
Operation, for instructions on using the meter.
Installation 2-9
Page 22
January 2008
8.28
9.05
35°
3.77
A
XDP
6.44
6.13
4.88
5.857.10
Ø.53 THRU
MTG HOLES
Ø5.60
4X
(7.10)
.50
A
Figure 2-2: XDP Mounting Dimensions (Drawing #712-1095B)
Installation 2-11
Page 23
January 2008
SYSTEM ANALOG OUTPUT - J5
Pin No.
Description
Analog Output (AOUT)
1
2
Return (ARTN)
No Connection
3
SYSTEM FAULT ALARM - J2
Description
Pin No.
Normally Closed (NC)
1
2
Common (C)
Normally Open (NO)
3
Wiring Tool
This unit requires an external power
NOTE:
disconnect device such as a switch or
circuit breaker. The disconnect device
must be marked as such, clearly visible,
directly accessible and located within 1.8
m (6 ft) of the XDP.
Factory Jumper
POWER INPUT - TB1
Pin No.
L/+
N/-
Gnd
100-240 VAC
Line
Neutral
Ground
+24 VDC
Positive
Negative
Ground
LEFT SIDE CONNECTIONS RIGHT SIDE CONNECTIONS
XDP ALARMS - J3
Description
Pin No.
1
2
3
4
5
6
7
8
9
10
11
12 Return (RTN)
Alarm
High
NC
C
Alarm
(Alarm 1)
NO
High High
NC
Alarm
C
(Alarm 2)
NO
NC
C
NO
NC
C
NO
Low
Alarm
(Alarm 3)
Low Low
Alarm
(Alarm 4)
[* wire colors for Panametrics
#704-668 serial cable]
RS232/485 COMM - J4
Description
Pin No.
Transmit (TX)
1
2
Receive (RX)
3
Color*
White
Green
Red
CALIBRATION RELAYS - J7
Description
Pin No.
1
NC
2
C
3
NO
4
NC
5
C
6
NO
7
NC
8
C
9
NO
10
NC
11
C
NO
12
Alarm
Process/
Cal
(Relay 1)
Zero/Span
Cal
(Relay 2)
AutoCal
Indication
(Relay 3)
Auto
Verification
(Relay 4)
ANALOG INPUT/LOOP POWER - J6
Pin No.
Analog Input (IN)
1
2
Power Output (+24)
3
Return (RTN)
Rating
Voltage
Size
Type
Ground Terminal
XDP ANALOG OUT PUT - J8
Pin No.
DescriptionDescription
1
Analog Output (OUT)
2
Return (RTN)
3
No Connection
FUSE
1.25 Amp
250 V
5 x 20 mm
T
Figure 2-3: XDP Wiring Connections (from Drawing #442-790E)
Installation 2-12
Page 24

Chapter 3
Page 25

Operation
Introduction. . . . . . . . . . . . . . . . . . . . . . . . . . . . . . . . . . . . . . . . . . . . . . . . . . . . 3-1
Preventing Common Problems . . . . . . . . . . . . . . . . . . . . . . . . . . . . . . . . . . . 3-1
Cleaning the Enclosure . . . . . . . . . . . . . . . . . . . . . . . . . . . . . . . . . . . . . . . . . . 3-1
Powering Up the System. . . . . . . . . . . . . . . . . . . . . . . . . . . . . . . . . . . . . . . . . 3-2
Accessing the User Program . . . . . . . . . . . . . . . . . . . . . . . . . . . . . . . . . . . . . 3-4
Exiting the User Program . . . . . . . . . . . . . . . . . . . . . . . . . . . . . . . . . . . . . . . . 3-5
Error Codes . . . . . . . . . . . . . . . . . . . . . . . . . . . . . . . . . . . . . . . . . . . . . . . . . . . . 3-6
Page 26

January 2008
Introduction The XDP is an easily operated monitoring/control device. Make sure
that the system has been installed in accordance with the instructions
given in Chapter 2, Installation, before applying power. This chapter
includes discussions of the following topics:
• preventing common problems
• powering up the system
• programming the meter
• taking measurements
!WARNING!
To ensure safe operation of the XDP, it must be installed
and operated as described in this manual. In addition, be
sure to follow all applicable local safety codes and
regulations for installing electrical equipment.
Preventing Common Problems
The complexity of accurately measuring the target gas mixtures
dictates that some basic precautions be observed in using the XDP.
Failure to observe these simple procedures is often the cause of some
common problems. Compliance with the following points will help to
eliminate such problems:
• The transmitter must be properly connected to the XDP before
applying power to the system. Connecting or disconnecting the
transmitter while the XDP is powered up may generate a 24 Volt
Power Fault message. If this should occur, cycle the power to the
system OFF and then ON to clear the problem.
• The automatic calibration feature should be enabled and scheduled
to be run on a regular basis. The optimum calibration interval
depends on the application (consult the factory).
• Never use thread sealant on any connection in the sample gas flow
path. Thread sealant emits combustible vapors that can cause
reading errors.
• The infrared keypad may not function properly if direct sunlight
strikes the face of the XDP or if the XDP is installed in an area that
has other infrared devices in operation. To minimize such factors,
provide suitable shading at the installation site.
Cleaning the Enclosure If the glass window or the case of the XDP becomes soiled, use a soft
cloth dampened with water for cleaning. Never use solvents or
detergents to clean the XDP.
Operation 3-1
Page 27
January 2008
Powering Up the System Check the wiring connections and close both the XDP and transmitter
enclosures before applying power. Energize the external disconnect
device to power up the XDP. Allow the transmitter to warm up for at
least thirty minutes, before taking measurements.
IMPORTANT: The XDP requires an external power disconnect
device such as a switch or circuit breaker. The
disconnect device must be marked as such, clearly
visible, directly accessible, and located within 1.8 m
(6 ft) of the unit.
The Enclosure Window The window at the top of the XDP enclosure includes the components
shown in Figure 3-1 below.
Display Window
ESC Key
LEFT Arrow
UP Arrow
ENTER Key
RIGHT Arrow
DOWN Arrow
Figure 3-1: The Enclosure Window
The XDP is factory-configured to display O2 ppm/pcnt with a
resolution of 0.01 as the default. However, changing the gas label, the
gas units, and the display resolution are easily accomplished. See
Chapter 4, Setup, for programming instructions.
IMPORTANT: The XDP’s infrared keypad permits programming of
the instrument through the glass faceplate without
removing the cover. Thus, all programming
procedures may be performed while the unit is
installed in a hazardous area.
3-2 Operation
Page 28

January 2008
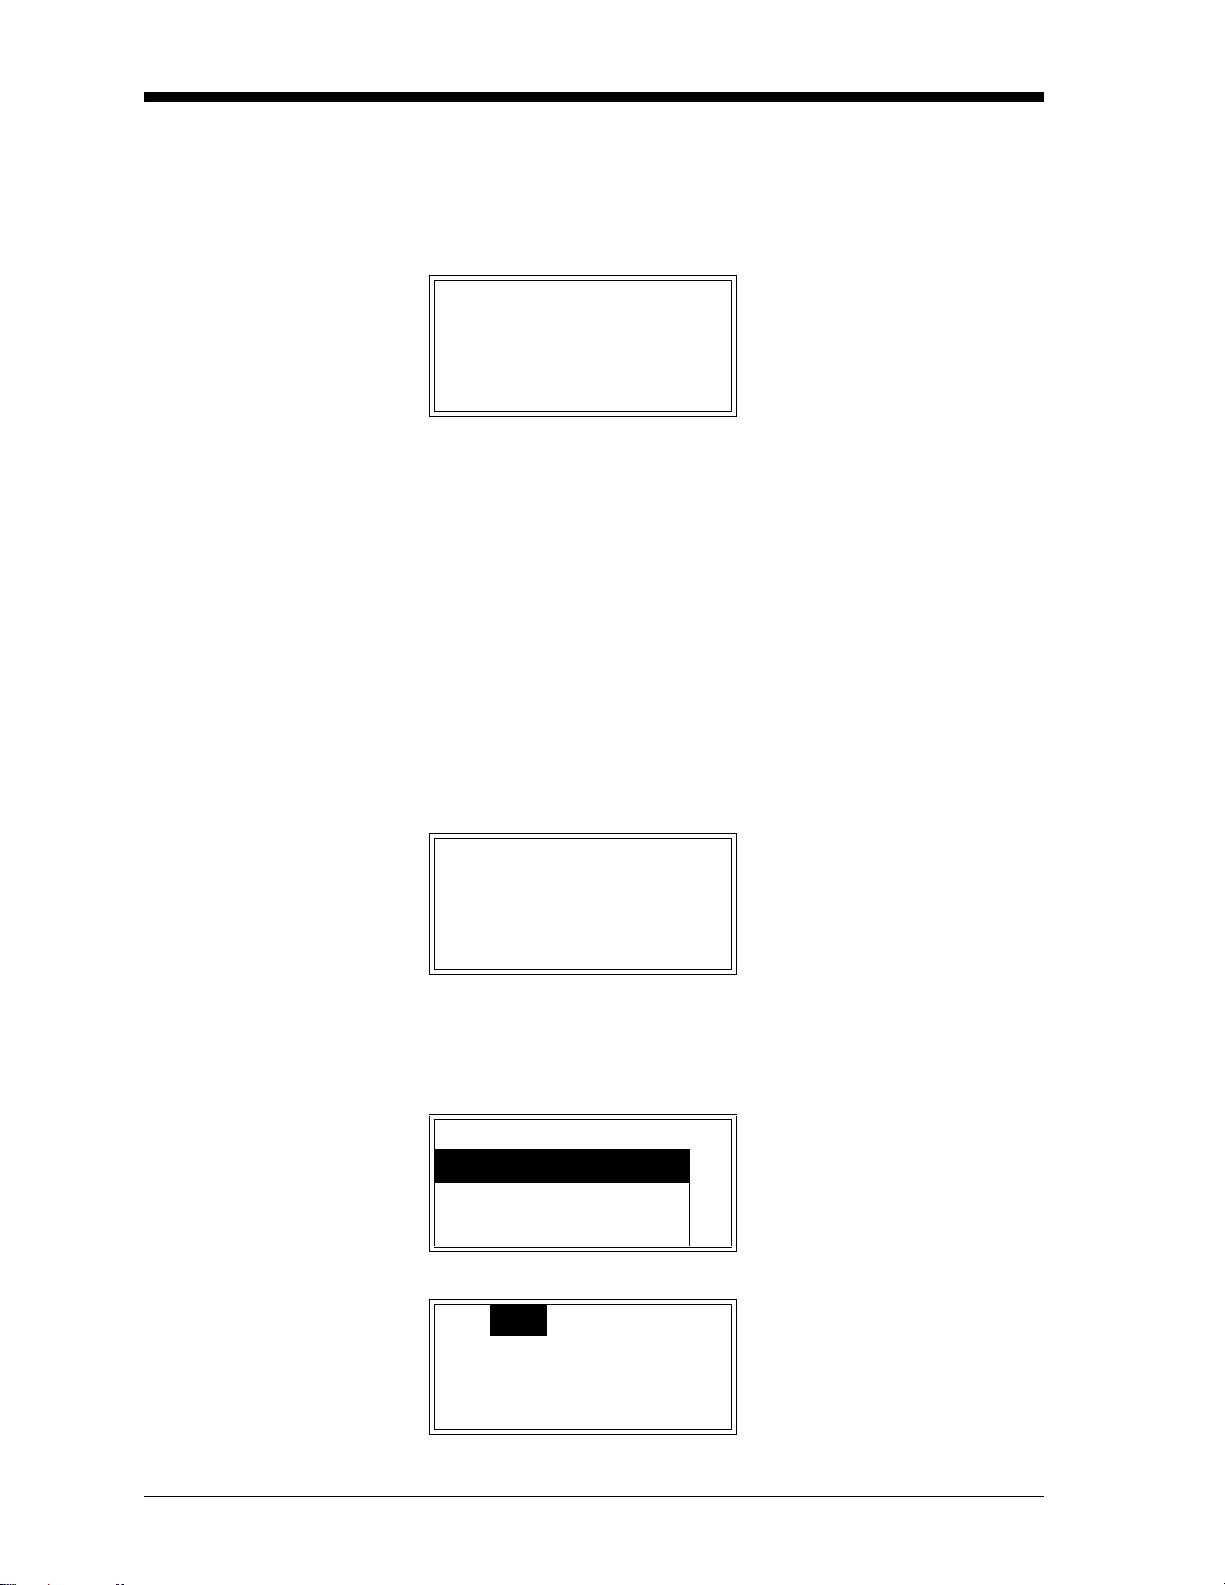
Initial Screen Displays Immediately upon power up, the digital display shows the following
sequence of informational screens, as the meter performs its internal
systems checks.
BSeries Loader v1.05
Boot is Flash.
Program CRC valid.
Booting from Flash
Scanning Hardware
Found Image Slot 1
Downloading Slot 1
Scanning Hardware
Initializing Machine
Initializing UI
If the meter passes all of its internal system checks, the following
initial data screen appears:
This is a typical example of
the first initialization screen.
This is a typical example of
the second initialization
screen.
This is a typical example of
the final initialization screen.
1 O2 HH:MM
0.00
Note: The padlock icon at the upper right hand corner of the above
display indicates that the User Program is locked with
password protection.
±
pcnt
LL
Notice that the absence of a
valid signal has triggered the
Low Low alarm (the LL symbol in the lower right corner).
Operation 3-3
Page 29
January 2008
Starting the Sample Gas Start the sample gas flow to the transmitter and allow a few minutes
for the system to reach equilibrium. The following data screen should
appear if the oxygen level is above the Low alarm setpoint and below
the High alarm setpoint.
Accessing the User Program
1 O2 HH:MM±
pcnt
X.XX
Note: Allow approximately 30 minutes for the sensor to reach
temperature equilibrium, to ensure accurate readings
Notice that the display shows the slot number, the ga s label, and the
current time on the top line. The current data value along with the
units are displayed across the bottom of the screen.
Note: Slot 0 is the main circuit board, slot 1 holds the XDP circuit
board, and slots 2-4 are normally not used.
To configure the XDP for a specific application, it is necessary to
leave measurement mode and enter the User Program as follows (see
the menu maps in Figures C-1 and C-2 on pages C-1 and C-2):
1 O2 HH:MM±
pcnt
X.XX
This is a typical display. The
actual oxygen concentration of
your sample gas will be shown
here.
While in measurement mode,
press the
[ESC], [ENTER], and [ESC] keys
in sequence.
[ENTER], [ENTER],
Enter the operator-level password (2719) at the next screen to access
the menus available to the end user. (A different password is required
to access the factory-level menus.)
Password
Enter Password
XXXX
s
Cal Opt Disp
3-4 Operation
Use [W] and [X] to position the
cursor under the desired character. Then, use [
increment the value. Press
[ENTER] when done.
This screen shows the highest
level of the User Program,
which is referred to as the
Main Menu.
S] and [T] to
Page 30

January 2008
Exiting the User Program T o leave the User Program, proceed as follows from the main menu:
Cal Opt Disp
1 O2 HH:MM
pcnt
Press the [ESC] key.
You are now back in normal
measurement mode.
X.XX
Notice that the padlock is no longer visible at the upper right corner
of the display window. Once the User Program has been accessed
with a valid password, the menus at that programming level remain
unlocked when you return to measurement mode. With the menus
unlocked, you may reenter the User Program by simply pressing the
[ESC] key only. To re-lock the menus, see the instructions in Chapter
4, Setup.
Note: If the unit is powered down, the User Program will be locked
when the unit is powered up again.
To program a specific feature of the XDP, proceed to the appropriate
section of Chapter 4, Setup.
Operation 3-5
Page 31

January 2008
Error Codes As an aid in monitoring the status of your system, the XDP may
display a variety of blinking error codes on the LCD. These error
codes are listed in Table 3-1 below.
Table 3-1: LCD Error Codes
Code Meaning
LL
L the Low alarm has been tripped
H the High alarm has been tripped
HH
CV the Auto Verification alarm has been tripped
Input Under Range the analog input is below the programmed range
Input Over Range the analog input is above the programmed range
Zero Drift/Cal Zero Drift/Cal is over programmed limit
Zero Drift/Total Zero Drift/Total is over programmed limit
the Low Low alarm has been tripped
(Low alarm normally also tripped)
the High High alarm has been tripped
(High alarm normally also tripped)
Span Drift/Cal Span Drift/Cal is over programmed limit
Span Drift/Total Span Drift/Total is over programmed limit
3-6 Operation
Page 32

Chapter 4
Page 33

Setup
Introduction. . . . . . . . . . . . . . . . . . . . . . . . . . . . . . . . . . . . . . . . . . . . . . . . . . . . 4-1
Programming Steps. . . . . . . . . . . . . . . . . . . . . . . . . . . . . . . . . . . . . . . . . . . . . 4-1
Setting Up the Display. . . . . . . . . . . . . . . . . . . . . . . . . . . . . . . . . . . . . . . . . . . 4-2
Setting Up the Analog Input. . . . . . . . . . . . . . . . . . . . . . . . . . . . . . . . . . . . . . 4-5
Setting Up the Alarms . . . . . . . . . . . . . . . . . . . . . . . . . . . . . . . . . . . . . . . . . . . 4-6
Setting Up the Analog and Digital Outputs . . . . . . . . . . . . . . . . . . . . . . . . 4-8
Using the XDP Utilities. . . . . . . . . . . . . . . . . . . . . . . . . . . . . . . . . . . . . . . . . . 4-13
Page 34

January 2008
Introduction Although the XDP is set up at the factory with default values that are
suitable for most applications (see Appendix D), the User Program
provides a means for customizing many of the meter parameters.
Proper setup and calibration of the XDP is important to ensure
accurate readings.
!WARNING!
To ensure safe operation of the XDP, it must be installed
and operated as described in this manual. In addition, be
sure to follow all applicable local safety codes and
regulations for installing electrical equipment. In addition,
all procedures should be performed by trained service
personnel.
The following procedures are described in this chapter:
• setting up the display
• setting up the analog input
• setting up the alarms
• setting up the analog and digital outputs
• using up the XDP utilities
Programming Steps To program your XDP, use the following steps:
Note: The factory default values for all of the programmable XDP
parameters are listed in Appendix D.
1. Access the User Program as described on page 3-4.
2. Use the menu maps in Figures C-1 and C-2 on pages C-1 and C-2
as guide in navigating to the desired menu option.
3. Follow the instructions in the appropriate section of this chapter to
program the selected menu option.
4. Exit the User Program as described on page 3-5.
Note: While in the User Program, press
current operation and move back up one menu level.
[ESC] at any time to abort the
Proceed to the appropriate section to perform the desired task.
Setup 4-1
Page 35

January 2008
Setting Up the Display Use the instructions in this section to configure the display window as
desired.
Switching Display Windows
If multiple XDP display windows have been set up (see Chapter 6,
Factory-Level Pr ogramming, for instructions), the display may easily
be switched between these windows from the within the User
Program. To accomplish this, navigate to the Disp option in the main
menu and proceed as follows:
Note: As a shortcut, the display windows may be switched from
measurement mode by using the [
1. At the Disp menu option press
2. Use the [
3. Press
S] and [T] keys to highlight the desired display window.
[ENTER].
S] and [T] keys.
[ENTER].
Configuring the Display For any display window, the Clock, Gas Label, Gas Units, and
Resolution may be adjusted as desired.
Begin by navigating to the Cal>1:Cal>Setup>Disp menu and
proceed as follows:
1. At the Disp menu, press
2. Use the [
press
S] and [T] keys to highlight the Gas Label option and
[ENTER].
[ENTER].
3. A gas label of up to eight characters may be entered as follows:
a. Use the [
the square brackets ([xxxxxxxx]) and press
W] and [X] keys to select a character position within
[ENTER].
b. Use the four arrow keys to highlight the desired character in
the table and press
[ENTER]. Repeat until all of the characters
have been entered.
c. Use the [
4. Use the [
press
X] key to move the cursor to Done and press [ENTER].
S] and [T] keys to highlight the Gas Unit option and
[ENTER].
5. The gas unit may be specified as follows:
a. Use the [
S] and [T] keys to highlight either the pcnt or the
ppm option.
b. Press
[ENTER].
4-2 Setup
Page 36

January 2008
Configuring the Display
(cont.)
6. Use the [S] and [T] keys to highlight the Resolution option and
[ENTER].
press
7. The resolution (number of digits after the decimal point) may be
specified as follows:
a. Use the [
S] and [T] keys to highlight either the 1, 0.1 or 0.01
option.
b. Press
[ENTER].
The real-time clock is set in a different menu. To set the date and
time, navigate to the Cal>1:Cal>Setup>Clock menu and proceed as
follows:
1. At the Clock menu, press
2. Use the [
press
S] and [T] keys to highlight the Set Date option and
[ENTER].
[ENTER].
3. Set the date as follows:
a. Use the [
W] and [X] keys to select a character position within
the MM/DD/YY field.
b. Use the [
S] and [T] keys to set the desired value for that
position.
c. After the date has been completely set, press
4. Use the [
press
S] and [T] keys to highlight the Set Time option and
[ENTER].
5. Set the date as follows:
Note: The date must be entered in 24-hour format.
a. Use the [
W] and [X] keys to select a character position within
the HH:MM field.
b. Use the [
S] and [T] keys to set the desired value for that
position.
c. After the time has been completely set, press
[ENTER].
[ENTER].
Setup 4-3
Page 37

January 2008
Adjusting the Display Contrast
Setting the Display Backlight
To adjust the contrast of the LCD display, navigate to the
Opt>User>Contrast menu and proceed as follows:
1. At the Contrast menu, press
2. Use the [
S] and [T] keys to increment the value to a number
[ENTER].
between 0 (min. contrast) and 99 (max. contrast).
3. When done, press
[ENTER].
The display backlight has three possible settings:
• Off - the backlight is permanently turned off
• On - the backlight is continuously on
• Timed - the backlight comes on whenever a key is pressed and
remains on until a specified time interval has elapsed with no
keypad activity
To adjust the LCD display backlight, navigate to the
Opt>User>Backlight menu and proceed as follows:
1. At the Backlight menu, press
[ENTER].
2. Use the [
[ENTER].
S] and [T] keys to highlight the desired setting and press
3. If On or Off was selected, the programming is complete. However,
if Timed was selected, continue with the following steps.
4. Use the [
5. Use the [
W] and [X] keys to select a character position.
S] and [T] keys to increment the values in each position
to set to a time between 0 and 99 minutes.
6. When done, press
[ENTER].
4-4 Setup
Page 38

January 2008
Setting Up the Analog Input
Use the instructions in this section to configure the manner in which
the XDP responds to the 4-20 mA input signal from the transmitter.
Entering Calibration Data The XDP converts the 4-20 mA analog input signal from the
transmitter into either ppm or pcnt of the target gas for output on the
display. Program this conversion process by entering up to nine data
points on the conversion curve. To accomplish this, navigate to the
Cal>1:Cal>Setup>Cal Data menu and proceed as follows:
1. At the Cal Data menu option press
2. Use the [
press
3. Use the [
data points (2-9). Press
4. Use the [
press
S] and [T] keys to highlight the Cal Points option and
[ENTER].
S] and [T] keys to set the value to the desired number of
[ENTER].
S] and [T] keys to highlight the Cal Table option and
[ENTER].
5. Using the four arrow keys, program the mA value and the
corresponding ppm/pcnt value for the first data point.
6. At the Up/Down arrows symbol at the end of the data line, use the
S] and [T] keys to move to the next data point number.
[
[ENTER].
Setting the Analog Input Error Limits
7. Repeat steps 5 and 6 until all of the data points have been entered.
8. Press
[ENTER].
The XDP system fault alarm is tripped whenever the 4-20 mA analog
input signal is outside a specified signal range. To program this range,
navigate to the Cal>1:Cal>Setup>4-20mA Input menu and proceed
as follows:
1. At the 4-20mA Input menu option press
2. Use the [
and press
S] and [T] keys to highlight the Over Range Limit option
[ENTER].
[ENTER].
3. Using the four arrow keys, program the mA value for the upper
end of the acceptable range (usually 20 mA). Press
4. Use the [
option and press
S] and [T] keys to highlight the Under Range Limit
[ENTER].
[ENTER].
5. Using the four arrow keys, program the mA value for the lower
end of the acceptable range (usually 4 mA). Press
[ENTER].
If the system fault alarm is configured (see the next section) and the
error handler is enabled (see Chapter 5), the fault alarm will be
tripped and the designated error message will be displayed whenever
the analog input signal is outside the range programmed above.
Setup 4-5
Page 39

January 2008
Setting Up the Alarms Use the instructions in this section to configure the system fault alarm
and the four XDP alarms.
Setting Up the System Fault Alarm
The system fault alarm is tripped whenever the 4-20 mA analog input
signal from the transmitter is outside the range that was programmed
in the previous section or the Zero Drift/Cal, Zero Drift/Total, Span
Drift/Cal, or Span Drift/Total exceeds the programmed limit. The
system fault alarm has two possible operating modes:
• Non-Fail-Safe: The alarm is wired to the normally-open (NO) and
common (C) contacts, and the alarm relay is de-energized until a
fault condition energizes the alarm relay to close these contacts and
trip the alarm.
• Fail-Safe: The alarm is wired to the normally-closed (NC) and
common (C) contacts, and the alarm relay is energized until a fault
condition de-energizes the alarm relay to allow these contacts to
close and trip the alarm.
To specify the system fault alarm type, navigate to the
Opt>User>Fault Alarm menu and proceed as follows:
1. At the Fault Alarm menu option press
2. Use the [
option or the Fail-Safe option.
S] and [T] keys to highlight either the Non-Fail-Safe
[ENTER].
Setting Up the Four XDP Alarms
3. Press
The XDP has four general-purpose, programmable alarms that are
linked to the ppm/pcnt value. These alarms are designated as:
[ENTER].
• Low Low alarm
• Low alarm
• High alarm
• High High alarm
4-6 Setup
Page 40

January 2008
Setting Up the Four XDP
Alarms (cont.)
The following parameters may be programmed for each alarm:
• Trip Point - the “low” and “low low” alarms will be tripped if the
current ppm/pcnt value is below this setpoint; the “high” and “high
high” alarms will be tripped if the current ppm/pcnt value is above
this setpoint. When an alarm trips, the corresponding symbol (LL,
L, H, or HH) is shown in the lower right corner of the display.
• Deadband - this specifies the amount by which the measurement
must change before a tripped alarm will be reset. This is to prevent
the relay from constantly tripping and resetting in response to
minor measurement fluctuations right near the trip point.
• Alarm Type - the alarm may be set for either non-fail-safe or fail-
safe operation (see the previous section).
To program the four XDP alarms, navigate to the
Cal>1:Cal>Setup>Alarms menu and proceed as follows:
1. At the Alarms menu option press
2. Use the [
desired alarm and press
S] and [T] keys to highlight the menu option for the
[ENTER].
[ENTER].
3. Program the three alarm parameters as follows:
a. Use the [
option and press
S] and [T] keys to highlight the Trip Point menu
[ENTER].
b. Using the four arrow keys, program the mA/pcnt value for the
desired alarm trip point. Press
[ENTER].
c. Use the [S] and [T] keys to highlight the Deadband menu
option and press
[ENTER].
d. Using the four arrow keys, program the mA/pcnt value for the
desired alarm deadband. Press
[ENTER].
e. Use the [S] and [T] keys to highlight the Fail-Safe menu
option and press
[ENTER].
f. Use the [S] and [T] keys to highlight the desired Alarm Type
menu option and press
[ENTER].
4. To test the alarm that was just programmed, Use the [S] and [T]
keys to highlight the Test menu option and press
[ENTER].
a. Use the [S] and [T] keys to highlight either the Trip or Reset
menu option and press
[ENTER]. The alarm relay should respond
accordingly.
b. When done, press
[ESC].
5. Repeat steps 2-4 until all of the alarms have been programmed.
Setup 4-7
Page 41

January 2008
Setting Up the Analog and Digital Outputs
Setting Up the System Analog Output
Use the instructions in this section to configure the system analog
output, the XDP analog output, and the digital serial port output.
The system analog output has the following programmable features:
• Analog Output Type - the 0-20 mA, 4-20 mA, 0-2 V, and NAMUR
output types are available.
Note: The NAMUR NE43 specification requires a 4-20 mA analog
output to be clamped in specific bands to indicate out-ofrange errors.
• Zero Setpoint - enter the measurement value that corresponds to
the low end of the system analog output range.
• Span Setpoint - enter the measurement value that corresponds to
the high end of the system analog output range minus the zero
setpoint.
• Test - manually generate a system analog output with a known value.
• Zero Trim - adjust the system analog output to equal the low end of
the recorder range.
• Span Trim - adjust the system analog output to equal the high end
of the recorder range minus the zero setpoint.
To set up the system analog output, navigate to the
Opt>User>Analog Output menu and proceed as follows:
1. At the Analog Output menu option press
2. Use the [
press
3. Use the [
desired output type and press
4. Use the [S] and [T] keys to highlight the Zero Setpoint option and
press
5. Using the four arrow keys, program the ppm/pcnt measurement
value that corresponds to the low end of the chosen analog output
range. Press
6. Use the [S] and [T] keys to highlight the Span Setpoint option
and press
7. Using the four arrow keys, program the ppm/pcnt measurement
value that corresponds to the upper end of the chosen analog
output range. Press
S] and [T] keys to highlight the Aout Type option and
[ENTER].
S] and [T] keys to highlight the menu option for the
[ENTER].
[ENTER].
[ENTER].
[ENTER].
[ENTER].
[ENTER].
4-8 Setup
Page 42

January 2008
Setting Up the System
Analog Output (cont.)
Having set the basic parameters for the analog output, the output
should now be tested and trimmed by continuing as follows:
1. Use the [
[ENTER].
2. Enter a test percentage (0-100%) based on the full scale value for
the chosen analog output type (e.g. a 50% test value for the 4-20
mA range would be 12 mA). Press
and press
menu choice to send the test value to the analog output device.
3. Repeat step 2 for as many test percentages as desired, then press
[ENTER].
IMPORTANT: Before proceeding, make sure the output percentage
4. Use the [
press
5. Use the [
device reads the exact value for the low end of the chosen analog
output range (e.g. 4 mA for a 4-20 mA range). Press
6. Use the [
press
S] and [T] keys to highlight the Test option and press
[ENTER] to leave the edit box
[ENTER] again at either the Test, Zero Trim, or Span Trim
to be trimmed has been entered in the Test menu.
S] and [T] keys to highlight the Zero Trim option and
[ENTER].
S] and [T] keys to trim the zero point until your output
[ENTER].
S] and [T] keys to highlight the Span Trim option and
[ENTER].
Setting Up the XDP Analog Output
7. Use the [
device reads the exact value for the high en d o f the chosen analog
output range (e.g. 20 mA for a 4-20 mA range). Press
The XDP analog output has the following programmable features:
S] and [T] keys to trim the span point until your output
[ENTER].
• Analog Output Type - the 0-20 mA, 4-20 mA, and 0-2 V output
types are available (there is no NAMUR option).
• Zero Setpoint - enter the measurement value that corresponds to
the low end of the system analog output range.
• Span Setpoint - enter the measurement value that corresponds to
the high end of the system analog output range.
• Error Handlers - enable/disable six different error handlers.
• Test - manually generate a system analog output with a known
value.
• Zero Trim - adjust the system analog output to equal the low end of
the recorder range.
• Span Trim - adjust the system analog output to equal the high end
of the recorder range.
Setup 4-9
Page 43

January 2008
Setting Up the XDP Analog
Output (cont.)
To configure the XDP output, navigate to the
Cal>1:Cal>Setup>Analog Output menu and proceed as follows:
1. At the Analog Output menu option press
2. Use the [
press
3. Use the [
desired output type and press
4. Use the [S] and [T] keys to highlight the Zero Setpoint option and
press
5. Using the four arrow keys, program the mA/pcnt measurement
value that corresponds to the low end of the chosen analog output
range. Press
6. Use the [S] and [T] keys to highlight the Span Setpoint option
and press
7. Using the four arrow keys, program the ppm/pcnt measurement
value that corresponds to the upper end of the chosen analog
output range. Press
S] and [T] keys to highlight the Aout Type option and
[ENTER].
S] and [T] keys to highlight the menu option for the
[ENTER].
[ENTER].
[ENTER].
[ENTER].
[ENTER].
[ENTER].
Error Handlers At this point, the programming of the XDP analog output dif fers from
that of the system analog output described in the previous section.
The difference lies in the programming of error handlers for the
following six fault conditions:
• input mA over range
• input mA under range
• Zero Drift/Cal > Max Drift/Cal
• Zero Drift/Total > Max Drift/Total
• Span Drift/Cal > Max Drift/Cal
• Span Drift/Total > Max Drift/T otal
Note: See Chapter 5, Calibration, for instruction on viewing the
current values for last four parameters listed above.
4-10 Setup
Page 44

January 2008
Setting Up the XDP Analog
Output (cont.)
To set up the error handlers, continue the programming as follows:
1. At the Error Handlers menu option press
2. Use the [
error handler (see list on previous page) and press
3. Use the [
disable option and press
4. If you disabled this error handler, skip to step 7. If you enabled
this error handler continue with the next step.
5. Use the [
want the XDP to respond to a fault in this parameter:
S] and [T] keys to highlight the desired Fault Condition
S] and [T] keys to highlight either the enable or the
[ENTER].
S] and [T] keys to highlight the manner in which you
[ENTER].
[ENTER].
• Force High - displays a value equal to the high point of the
selected analog output range (e.g. 20 mA for a 4-20 mA range).
• Force Low - displays a value equal to the low point of the
selected analog output range (e.g. 4 mA for a 4-20 mA range).
• Force to Value - displays a preprogrammed value.
• No Effect - displays the current live value
• Hold Last Value - displays the last valid measurement prior to
the fault condition.
[ENTER].
Press
6. If you selected Force High, Force Low, No Effect, or Hold Last
Value, go to step 7. If you selected Force to Value, proceed as
follows:
a. Using the four arrow keys, program the ppm/pcnt measurement
value that should be displayed if there is a fault condition in
this parameter. Press
b. Press [ESC] twice.
7. Return to step 2 to program additional error handlers, until all of
the error handlers have been configured.
[ENTER].
Setup 4-11
Page 45

January 2008
Setting Up the XDP Analog
Output (cont.)
Having set the basic parameters for the analog output, th e output
should now be tested and trimmed by continuing as follows:
1. Use the [
[ENTER].
S] and [T] keys to highlight the Test option and press
2. Enter a test percentage (0-100%) based on the full scale value for
the chosen analog output type (e.g. a 50% test value for the 4-20
mA range would be 12 mA). Press
and press
[ENTER] again at either the Test, Zero Trim, or Span Trim
[ENTER] to leave the edit box
menu choice to send the test value to the analog output device.
3. Repeat step 2 for as many test percentages as desired, then press
[ENTER].
IMPORTANT: Before proceeding, make sure the output percentage
to be trimmed has been entered in the Test menu.
4. Use the [
press
5. Use the [
S] and [T] keys to highlight the Zero Trim option and
[ENTER].
S] and [T] keys to trim the zero point until your output
device reads the exact value for the low end of the chosen analog
output range (e.g. 4 mA for a 4-20 mA range). Press
[ENTER].
6. Use the [
press
7. Use the [
S] and [T] keys to highlight the Span Trim option and
[ENTER].
S] and [T] keys to trim the span point until your output
device reads the exact value for the high end of the chosen analog
output range (e.g. 20 mA for a 4-20 mA range). Press
[ENTER].
4-12 Setup
Page 46

January 2008
Setting Up the Serial Port Digital Output
The serial port digital output, which is used to interface the XDP with
a personal computer, has the following programmable features:
• Node ID - 16, 32, 48, 64, 80, 96, 112 , 128, 144, 160, 176, 192, 20 8,
224, and 240 are the available options.
• Baud Rate - 300, 1200, 2400, 9600, 19200, 38400, 57600, and
115200 are the available options.
• Data Length - 7 bits and 8 bits are the available options.
• Parity - none, odd, and even are the available options.
• Stop Bits - 1 bit and 2 bits are the available options.
• Comm Type - RS-232 and RS-485 (multi-drop installations are
supported) are the available options.
To configure the serial port digital output, navigate to the
Opt>User>Comm menu and proceed as follows:
1. At the Comm menu option press
2. Use the [
and press
S] and [T] keys to highlight the desired Feature option
[ENTER].
[ENTER].
3. Use the [
[ENTER].
4. Repeat steps 2 and 3 until all of the features have been
programmed.
S] and [T] keys to select the desired setting and press
Using the XDP Utilities Complete the instructions in this section to use the following XDP
utility functions:
• Lock Menus
• Lock All
• Versions
Lock Menus To protect against unauthorized reprogramming, password protection
may be reinstated. To accomplish this, navigate to the
Opt>Lock Menus menu and proceed as follows:
1. At the Lock Menus menu option press
2. Notice that you have exited the User Program and the outline of a
padlock now appears in the upper right corner of the display.
[ENTER].
To program the XDP, you must now use the instructions on page 3-4
to reenter the User Program.
Setup 4-13
Page 47

January 2008
Lock All To lock all meter functions (such as display window selection) in
addition to the User Program, navigate to the Opt>Lock All menu
and proceed as follows:
1. At the Lock All menu option press
2. Notice that you have exited the User Program and a solid padlock
now appears in the upper right corner of the display.
To program the XDP, you must now use the instructions on page 3-4
to reenter the User Program.
[ENTER].
Versions To view the current software versions installed in your meter,
navigate to the Opt>Versions menu and proceed as follows:
1. At the Versions menu option press
2. The following information is presented in the screen that appears:
[ENTER].
• 0: BSERIES.STD.OO2.Z
• 1: XDP-STD.002.A
• 2:
• 3:
• 4:
3. When you have finished viewing the information, press
The above information represents the software versions installed in
the hardware located in each of the XDP slots. Slots 2-4 are usually
not used for the XDP, and these lines are usually blank.
Note: The versions of the software installed in Slots 0 and 1 at the
above prompt are used only as an example. The actual
versions of your software will appear instead.
[ENTER].
4-14 Setup
Page 48

Chapter 5
Page 49

Calibration
Introduction. . . . . . . . . . . . . . . . . . . . . . . . . . . . . . . . . . . . . . . . . . . . . . . . . . . . 5-1
Programming Steps. . . . . . . . . . . . . . . . . . . . . . . . . . . . . . . . . . . . . . . . . . . . . 5-1
Configuring AutoCal . . . . . . . . . . . . . . . . . . . . . . . . . . . . . . . . . . . . . . . . . . . . 5-2
Viewing the Drift Data . . . . . . . . . . . . . . . . . . . . . . . . . . . . . . . . . . . . . . . . . . 5-7
Clearing the Drift Data . . . . . . . . . . . . . . . . . . . . . . . . . . . . . . . . . . . . . . . . . . 5-8
Resetting the Verification Alarm . . . . . . . . . . . . . . . . . . . . . . . . . . . . . . . . . 5-8
Abort AutoCAL . . . . . . . . . . . . . . . . . . . . . . . . . . . . . . . . . . . . . . . . . . . . . . . . . 5-8
Page 50

January 2008
Introduction The XDP has been designed to perform periodic automatic self-
calibrations, based on the current live ppm/pcnt measurement. To
ensure accurate readings, the automatic calibration (hereafter referred
to as AutoCal) should be scheduled and configured in a manner that
best suits your specific application. The optimum calibration interval
and configuration depends on the specific application and is best
determined by periodic calibration checks after the initial installation.
!WARNING!
To ensure safe operation of the XDP, it must be installed
and operated as described in this manual. In addition, be
sure to follow all applicable local safety codes and
regulations for installing electrical equipment. In addition,
all procedures should be performed by trained service
personnel.
In order to complete the calibration procedure, the following items
are required:
• the chosen calibration gas(es)
• a sample system capable of providing the calibration gas(es) to the
transmitter at the correct flow rate and pressure.
IMPORTANT: Each gas cylinder must be certified as to the exact
composition of the gas. The accuracy of the
calibration is only as good as the accuracy of the
calibration gas(es) used.
Programming Steps To program your XDP, use the following steps:
1. Access the User Program as described on page 3-4.
2. Use the menu maps in Figures C-1 and C-2 on pages C-1 and C-2
as guide in navigating to the desired menu option.
3. Follow the instructions in the appropriate section of this chapter to
program the selected menu option.
4. Exit the User Program as described on page 3-5.
Note: While in the User Program, press
current operation and move back up one menu level.
[ESC] at any time to abort the
Proceed to the appropriate section to perform the desired task.
Calibration 5-1
Page 51

January 2008
Configuring AutoCal Use the instructions in this chapter to configure the AutoCal process
as desired. Begin by navigating to the Cal>1:Cal>AutoCal menu.
Then, proceed to the next section to begin.
Enabling AutoCal The first step in configuring AutoCal is to program whether this
process is activated or deactivated. To perform this task, proceed as
follows:
Selecting the AutoCal Type
1. At the AutoCal menu, press
2. Use the [
and press
3. Use the [
the Disable option and press
4. If you chose to Disable AutoCal, no additional AutoCal
programming is required. If you chose to Enable AutoCal,
continue the programming in the next section.
After enabling AutoCal, the next step is to select the type of
calibration to perform. The following three options are available:
Œ] and [´] keys to highlight the Enable/Disable option
[ENTER].
Œ] and [´] keys to highlight either the Enable option or
[ENTER].
[ENTER].
• Offset Calibration - this is a one-point calibration that uses an
offset correction at one specified ppm/pcnt value.
• Zero/Span Calibration - this is a two-point calibration that uses an
offset correction at both the zero and span (full-s ca le ) ppm/pcnt
values.
Note: The instructions in this manual assume that the XDP has been
programmed to calibrate the zero point first (see page 6-6). If
your unit is configured to calibrate the span point first, the
option above will be shown as “Span/Zero Calibration” and
steps 5a and 5c on the next page will be reversed.
• Slope Calibration - this is a one-point calibration that uses an
offset correction at just the span (full-scale) ppm/pcnt value.
Note: The Slope calibration is really just a special case of the Zero/
Span calibration where ther e is no offset corr ection at the zer o
point.
5-2 Calibration
Page 52

January 2008
Selecting the AutoCal
Type (cont.)
To select the AutoCal type, proceed as follows:
1. Enable AutoCal as described in the previous section.
2. Use the [
option and press
3. Use the [
method and press
Œ] and [´] keys to highlight the AutoCal Types menu
[ENTER].
Œ] and [´] keys to highlight the desired calibration
[ENTER].
Proceed to the appropriate step below for the type of calibration you
chose in step 3 above.
4. For the Offset Cal method, proceed as follows:
a. Using the four arrow keys, program the ppm/pcnt value that
you wish to use for the offset correction.
b. Press
[ENTER] to complete the programming.
5. For the Zero/Span Cal method, proceed as follows:
a. Using the four arrow keys, program the ppm/pcnt value that
you wish to use for the zero correction.
b. Press
[ENTER].
Setting Calibration Gas Flow Times
c. Using the four arrow keys, program the ppm/pcnt value that
you wish to use for the span (full-scale) correction.
d. Press
[ENTER] to complete the programming.
6. For the Slope Cal method, proceed as follows:
a. Using the four arrow keys, program the ppm/pcnt value that
you wish to use for the span (full-scale) correction.
b. Press
[ENTER] to complete the programming.
To optimize the AutoCal process, you may program the length of the
gas flow times during a calibration. To do so, proceed as follows:
1. Enable AutoCal as described on page 5-2.
2. Use the [
option and press
3. Use the [
and press
Œ] and [´] keys to highlight the AutoCal Control menu
[ENTER].
Œ] and [´] keys to highlight the Zero Gas On T i me option
[ENTER].
4. Using the four arrow keys, program the time in minutes that you
wish to allow for the zero gas to settle. Press
[ENTER].
5. Use the [
option and press
Calibration 5-3
Œ] and [´] keys to highlight the Span Gas On Time
[ENTER].
Page 53

January 2008
Setting Calibration Gas
Flow Times (cont.)
6. Using the four arrow keys, program the time in minutes that you
wish to allow for the span gas to settle. Press
7. Use the [
and press
Œ] and [´] keys to highlight the Gas Settling Time option
[ENTER].
[ENTER].
8. Using the four arrow keys, program the time in minutes that you
wish the allow for the process gas to settle. Press
9. Use the [
option and press
Œ] and [´] keys to highlight the Gas Measuring Time
[ENTER].
[ENTER].
10. Using the four arrow keys, program the time in minutes that you
wish to allow for the data collection. Press
[ENTER].
Scheduling AutoCal To customize the AutoCal process, you must program the calibration
schedule. To do so, proceed as follows:
IMPORTANT: The following steps are required for the AutoCAL
process to function properly. The date and time
entered below are used by the XDP to trigger the
initial AutoCAL. Subsequently, the date and time are
updated by the interval specified below to let the
XDP know when to initiate another AutoCAL.
Failure to pr ogram the date and time accurately may
result in AutoCALs occurring at unexpected times.
1. Enable AutoCal as described on page 5-2.
2. Use the [
option and press
Œ] and [´] keys to highlight the Schedule AutoCal menu
[ENTER].
3. Using the four arrow keys, program the date (MM/DD/YY) on
which the first AutoCal will occur. Press
[ENTER].
4. Using the four arrow keys, program the time (HH:MM in 24-hour
mode) at which the first AutoCal will occur. Press
[ENTER].
5. Use the [Œ] and [´] keys to highlight either the Days option or the
Hours option to specify the unit of measure for the interval
between AutoCals. Press
[ENTER].
6. Using the four arrow keys, program the interval (in the units
selected in step 5) between AutoCals. Press
[ENTER].
5-4 Calibration
Page 54

January 2008
Indicating an AutoCal The XDP analog output may be programmed to indicate that an
AutoCal is in progress by forcing it to one of the following values:
• Force High - outputs a value equal to the high point of the selected
analog output range (e.g. 20 mA for a 4-20 mA range).
• Force Low - outputs a value equal to the low point of the selected
analog output range (e.g. 4 mA for a 4-20 mA range).
• Force to Value - outputs a preprogrammed value.
• Track Cal Gas - outputs the current live calibration gas value
• Hold Last Value - outputs the last valid measurement prior to the
start of the AutoCal.
To program the manner in which the XDP analog output indicates an
AutoCal in progress, proceed as follows:
1. Enable AutoCal as described on page 5-2.
2. Use the [
option and press
3. Use the [
indication method. Press
4. If you selected Force High, Force Low, Track Cal Gas, or Hold
Last Value, the programming is complete. If you selected Force to
Value, use the four arrow keys to program the analog output value
that should be forced during an AutoCal. Press
Œ] and [´] keys to highlight the Aout Indication menu
[ENTER].
Œ] and [´] keys to highlight the desired analog output
[ENTER].
[ENTER].
Initiating an AutoCal In addition to the regularly scheduled AutoCals, you may manually
initiate an AutoCal at any time. To do so, proceed as follows:
1. Enable AutoCal as described on page 5-2.
2. Use the [
option and press
3. Use the [Ã] and [Õ] keys to highlight the Yes or No response to the
question about initiating an AutoCal now. Press
If you responded No in step 3, no AutoCal is performed. If you
responded Yes in step 3, an AutoCal is initiated immediately.
Œ] and [´] keys to highlight the Initiate AutoCal menu
[ENTER].
[ENTER].
Note: If you attempt to initiate an AutoCal while a regularly
scheduled AutoCal is in progress, the request is ignored.
Calibration 5-5
Page 55

January 2008
Setting the AutoCal Drift Limits
Setting AutoCal Verification
If the calibration drift exceeds the preset drift limits during an
AutoCal, an error condition is indicated via the analog output error
handlers (see page 4-10), if they have been enabled. T o program these
maximum calibration drift limits, proceed as follows:
1. Enable AutoCal as described on page 5-2.
2. Use the [
option and press
3. Use the [
option and press
4. Using the four arrow keys, enter the ppm/pcnt value for the
maximum drift since the previous AutoCal that will not generate
an error condition. Press
5. Use the [
option and press
6. Using the four arrow keys, enter the ppm/pcnt value for the
maximum drift from this AutoCal that will not generate an error
condition. Press
The Auto Verification function permits you to specify a calibration
drift limit that will trip a verification alarm and alter the manner in
which the drift data is handled immediately following AutoCal. If this
function is disabled, the drift data is always updated and the
verification alarm will not be tripped. However, if Auto Verification
is enabled, the following events may occur after an AutoCal:
Œ] and [´] keys to highlight the AutoCal Limits menu
[ENTER].
Œ] and [´] keys to highlight the Max Drift/Cal menu
[ENTER].
[ENTER].
Œ] and [´] keys to highlight the Max Drift/Total menu
[ENTER].
[ENTER].
• If the drift was lower than the preset Auto Verification limit, the
drift data is not updated and the verification alarm is not tripped.
This situation means that the AutoCal did not detect any
significant calibration drift, and the results are ignored.
• If the drift exceeded the preset Auto Verification limit but
remained below both the Max Drift/Cal and Max Drift/T otal limits,
the drift data is updated and the Auto Verification alarm is tripped.
This situation means that the AutoCal detected a significant but
acceptable amount of calibration drift, and the verification alarm
informs you that the drift data has been updated.
• If the drift exceeds either the Max Drift/Cal or the Max Drift/Total
limits, the system fault alarm is tripped and an error message is
displayed on the LCD. This situation means that the AutoCal
detected an unacceptable amount of calibration drift, and the fault
alarm informs you of the error condition.
5-6 Calibration
Page 56

January 2008
Setting AutoCal
To program the Auto Verification function, proceed as follows:
Verification (cont.)
1. Enable AutoCal as described on page 5-2.
2. Use the [
option and press
3. Use the [
the Disable option and press
4. If you chose the Disable option in step 3, no additional
programming is required. If you chose the Enable option in step 3,
continue the programming with step 5.
5. Using the four arrow keys, enter the ppm/pcnt value for the Verif
Limit/Cal. This is the amount of drift since the previous AutoCal
that will trigger the Auto Verification process. Press
Note: When the Auto Ve rification alarm is tripped, a blinking “CV”
Œ] and [´] keys to highlight the Auto Verification menu
[ENTER].
Œ] and [´] keys to highlight either the Enable option or
[ENTER].
[ENTER].
symbol is displayed on the LCD. You must follow the
instructions on page 5-8 to manually reset the alarm.
Viewing the Drift Data The calibration drift data that has been accumulated during the
previous AutoCals is stored internally by the XDP. Y ou may view this
data at any time by completing the following steps:
1. At the AutoCal menu, press
2. Use the [
and press
3. Read the following data from the screen that appears:
Œ] and [´] keys to highlight the View Drift Data option
[ENTER].
[ENTER].
• Zero/Cal: ±xx.xx (zero drift since last AutoCal)
• Zero/Tot: ±xx.xx (total zero drift from this AutoCal)
• Span/Cal: ±xx.xx (span drift since last AutoCal)
• Zero/Tot: ±xx.xx (total span drift from this AutoCal)
4. When you have completed viewing the drift data, press
[ENTER].
Calibration 5-7
Page 57

January 2008
Clearing the Drift Data The calibration drift data that has been accumulated during the
previous AutoCals is stored internally by the XDP. Y ou may clear this
data at any time by completing the following steps:
IMPORTANT: If you clear the drift data, the XDP will no longer
apply any drift compensation to the measurements.
Resetting the Verification Alarm
1. At the AutoCal menu, press
2. Use the [
and press
Œ] and [´] keys to highlight the Clear Drift Data option
[ENTER].
[ENTER].
3. Use the [Ã] and [Õ] keys to highlight the Yes or No response to the
question about clearing the drift data. Press
[ENTER].
If you responded No in step 3, the existing drift data is retained. If you
responded Yes in step 3, all of the drift data values shown in step 3 of
the previous section are reset to zero.
Whenever the Auto Verification alarm is tripped (see page 5-6), it
must be reset manually. To do this, complete the following steps:
1. At the AutoCal menu, press
2. Use the [
and press
Œ] and [´] keys to highlight the Reset Verif Alarm option
[ENTER].
[ENTER].
3. Use the [Ã] and [Õ] keys to highlight the Yes or No response to the
question about resetting the verification alarm. Press
[ENTER].
If you responded No in step 3 above, the verification alarm remains
tripped. If you responded Yes in step 3 above, the verification alarm is
reset.
Abort AutoCAL You may terminate an AutoCAL that is already in progress at any
time. To do this, complete the following steps:
1. At the AutoCal menu, press
2. Use the [
and press
Œ] and [´] keys to highlight the Abort AutoCAL option
[ENTER].
3. Use the [Ã] and [Õ] keys to highlight the OK or Cancel response
at the confirmation screen. Press
If you chose OK in step 3 above, the AutoCAL currently in progress
is terminated and you are returned to normal measurement mode. If
you chose Cancel in step 3 above, the AutoCAL currently in progress
will continue uninterrupted.
5-8 Calibration
[ENTER].
[ENTER].
Page 58

Chapter 6
Page 59

Factory-Level Programming
Introduction. . . . . . . . . . . . . . . . . . . . . . . . . . . . . . . . . . . . . . . . . . . . . . . . . . . . 6-1
Programming Levels . . . . . . . . . . . . . . . . . . . . . . . . . . . . . . . . . . . . . . . . . . . . 6-1
Programming Steps. . . . . . . . . . . . . . . . . . . . . . . . . . . . . . . . . . . . . . . . . . . . . 6-1
Setup-Level Programming . . . . . . . . . . . . . . . . . . . . . . . . . . . . . . . . . . . . . . . 6-2
Factory-Level Programming . . . . . . . . . . . . . . . . . . . . . . . . . . . . . . . . . . . . . 6-3
Page 60

January 2008
Introduction The XDP is factory-configured to provide optimum performance in
the specified application. Because many of the critical settings
programmed into the meter during this procedure are essential for
reliable and accurate operation, the operator does not see these menu
items during routine programming of the XDP. However, in order to
address operational problems or to fine-tune the performance of the
system for a specific application, these factory-level programming
options are made available to authorized service personnel.
Caution!
Always consult GE Sensing before programming any of
these factory-level features. Improper setup may impair
the performance of the XDP system and/or prevent it
from meeting its design specifications.
Programming Levels Factory-Level programming of the XDP is divided into two
categories, which require passwords that are different from each other
and from the operator-level password noted on page 3-4. All three of
the programming levels are summarized below:
• Operator-Level: password = 2719
• Setup-Level: password = Consult Factory
• Factory-Level: password = Consult Factory
Programming Steps To program the factory-level XDP features, use the following steps:
1. Access the User Program as described on page 3-4, but enter the
password for one of the advanced programming le vels.
2. Use the menu map in Figure C-3 on page C-3 as guide in
navigating to the desired menu option.
3. Follow the instructions in the appropriate section of this chapter to
program the selected menu option.
4. Exit the User Program as described on page 3-5.
Note: While in the User Program, press
current operation and move back up one menu level.
Proceed to the appropriate section to perform any programming task
that is not included in the Operator-Level programming.
[ESC] at any time to abort the
Factory-Level Programming 6-1
Page 61

Janaury 2008
Setup-Level Programming
At this programming level, the Cfg menu option is now available. As
you will recall, this option is blank at the Operator-Level (2719
password).
Configuring the Display On page 4-2, we discussed the procedures for using the Disp menu to
switch the LCD between a list of available oxygen measurement
windows. This section provides instructions on how to create and edit
that list. To perform this task, navigate to the Cfg>1:Cfg>O2 menu
and proceed as follows:
1. At the O2 menu, press
2. Use the [
[ENTER].
S] and [T] keys to highlight the mA option and press
3. Select the outputs (0:Display, 0:Fault Alarm, 0:Analog Output)
that you wish to receive the oxygen measurement values in mA:
a. Use the [
S] and [T] keys to highlight a specific system output.
(Make sure that 0:Display is included on the list).
b. Use the [
[ENTER] key to change the status of the selected output. An
W] and [X] keys to select Add or Remove and press the
output is selected if an asterisk (*) appears next to it.
[ENTER].
c. Change the status of any additional outputs that you wish.
d. When the list of outputs is complete, use the [
to select OK and press
[ENTER].
W] and [X] keys
Note: You may also abort the display configuration by selecting
Cancel in step 3D above.
4. Use the [
[ENTER].
S] and [T] keys to highlight the pcnt option and press
5. Select the outputs (0:Display, 0:Fault Alarm, 0:Analog Output)
that you wish to receive the oxygen measurement values in pcnt:
a. Use the [
S] and [T] keys to highlight a specific system output.
(Make sure that 0:Display is included on the list).
b. Use the [
[ENTER] key to change the status of the selected output. An
W] and [X] keys to select Add or Remove and press the
output is selected if an asterisk (*) appears next to it.
c. Change the status of any additional outputs that you wish.
d. When the list of outputs is complete, use the [
to select OK and press
[ENTER].
W] and [X] keys
Note: You may also abort the display configuration by selecting
Cancel in step 5D above.
6-2 Factory-Level Programming
Page 62

January 2008
Factory-Level Programming
At this programming level, all menu options are available. The new
menus, which are available only at this level, are the Cal>1:Cal>Adv
menu and the Opt>Setup menu. Proceed to the appropriate section for
instructions on using these menus.
Caution!
Always consult GE Sensing before programming any of
these factory-level features. Improper setup may impair
the performance of the XDP system and/or prevent it
from meeting its design specifications.
The Adv Menu This menu includes the following submenus:
• Edit Drift Data
• 4-20mA Input Trim
• AutoCal Relays Test
• Zero/Span Cal Type
Instructions for programming these features begin on the next page.
Factory-Level Programming 6-3
Page 63

Janaury 2008
Edit Drift Data The XDP stores the results of its calibration process as drift data. This
data is then used to compensate the live input so that an accurate
measurement result is shown on the LCD. This menu provides the
means to manually edit the drift data that resulted from the AutoCal
process. T o use this menu, navigate to the Cal>1:Cal>Adv menu and
proceed as follows:
IMPORTANT: Always consult the factory before editing the drift
data via this menu.
1. At the Adv menu, press
2. Use the [
and press
3. Use the [
press
S] and [T] keys to highlight the Edit Drift Data option
[ENTER].
S] and [T] keys to highlight the Zero Drift option and
[ENTER].
[ENTER].
4. Program the following zero drift values:
a. Use the [
and press
ppm/pcnt value. Then, press
b. Use the [
option and press
new ppm/pcnt value. Then, press
c. Use the [
and press
ppm/pcnt value. Then, press
5. Press
6. Use the [
press
S] and [T] keys to highlight the Zero Drift/Cal option
[ENTER]. Using the four arrow keys, enter the new
[ENTER].
S] and [T] keys to highlight the Zero Drift/Total
[ENTER]. Using the four arrow keys, enter the
[ENTER].
S] and [T] keys to highlight the Zero Setpoint option
[ENTER]. Using the four arrow keys, enter the new
[ENTER].
[ESC].
S] and [T] keys to highlight the Span Drift option and
[ENTER].
7. Program the following span drift values:
a. Use the [
option and press
new ppm/pcnt value. Then, press
b. Use the [
option and press
new ppm/pcnt value. Then, press
c. Use the [
and press
ppm/pcnt value. Then, press
6-4 Factory-Level Programming
S] and [T] keys to highlight the Span Drift/Cal
[ENTER]. Using the four arrow keys, enter the
[ENTER].
S] and [T] keys to highlight the Span Drift/Total
[ENTER]. Using the four arrow keys, enter the
[ENTER].
S] and [T] keys to highlight the Span Setpoint option
[ENTER]. Using the four arrow keys, enter the new
[ENTER].
Page 64

January 2008
4-20mA Input Trim The XDP obtains its measurements via the 4-20 mA analog input
from the transmitter. It then converts that signal to the digital ppm/
pcnt value that is shown on the LCD. This menu is used to adjust the
circuit that processes the analog input so that maximum accuracy is
ensured. T o use this menu, navigate to the Cal>1:Cal>Adv menu and
proceed as follows:
1. At the Adv menu, press
2. Use the [
option and press
3. Use the [
press
S] and [T] keys to highlight the 4-20mA Input trim
[ENTER].
S] and [T] keys to highlight the Zero Trim option and
[ENTER].
[ENTER].
4. To trim the zero point of the 4-20 mA analog input:
a. Make sure an accurate current source is connected to the 4-20
mA analog input terminals (J6), and set the current source to
supply exactly 4.00 mA.
b. Use the [
exactly 4.00. Then, press
5. Use the [
press
S] and [T] keys to adjust the displayed value to read
[ENTER].
S] and [T] keys to highlight the Span Trim option and
[ENTER].
6. To trim the span point of the 4-20 mA analog input:
a. Make sure an accurate current source is connected to the 4-20
mA analog input terminals (J6), and set the current source to
supply exactly 20.00 mA.
b. Use the [
exactly 20.00. Then, press
S] and [T] keys to adjust the displayed value to read
[ENTER].
Factory-Level Programming 6-5
Page 65

Janaury 2008
AutoCal Relays Test The XDP includes four alarm relays that are related to the calibration
process. This menu is used to manually test the relays. To use the
menu, navigate to the Cal>1:Cal>Adv menu and proceed as follows:
Note: All of these alarms/relays are non-fail-safe types.
1. At the Adv menu, press
2. Use the [
S] and [T] keys to highlight the AutoCal Relays Test
option and press
3. Use the [
and press
a. Use the [
S] and [T] keys to highlight the AutoCal Alarm option
[ENTER]. Continue as follows:
S] and [T] keys to highlight either the Trip or Reset
menu option and press
[ENTER].
[ENTER].
[ENTER]. The alarm relay should respond
accordingly.
b. When done, press
[ESC].
Note: Upon leaving the test loop, the alarm is automatically reset to
its normal state.
4. Use the [
and press
a. Use the [
S] and [T] keys to highlight the Auto Verif Alarm option
[ENTER]. Continue as follows:
S] and [T] keys to highlight either the Trip or Reset
menu option and press
[ENTER]. The alarm relay should respond
accordingly.
b. When done, press
[ESC].
5. Use the [S] and [T] keys to highlight the Process Cal Relay
option and press
[ENTER]. Continue as follows:
a. Use the [
menu option and press
S] and [T] keys to highlight either the Trip or Reset
[ENTER]. The alarm relay should respond
accordingly.
b. When done, press
[ESC].
6. Use the [S] and [T] keys to highlight the Zero/Span Cal Relay
option and press
a. Use the [
menu option and press
[ENTER]. Continue as follows:
S] and [T] keys to highlight either the Trip or Reset
[ENTER]. The alarm relay should respond
accordingly.
b. When done, press
6-6 Factory-Level Programming
[ESC].
Page 66

January 2008
Zero/Span Cal Type If the XDP is programmed to perform a zero gas/span gas two-point
calibration, it is necessary to provide both the zero gas and the span
gas to the XDP at the appropriate time in the AutoCAL cycle. This
menu is used to specify which of the two gases is called for first in the
calibration cycle. To use the menu, navigate to the Cal>1:Cal>Adv
menu and proceed as follows:
1. At the Adv menu, press
2. Use the [
option and press
3. Use the [
S] and [T] keys to highlight the Zero/Span Cal Type
[ENTER].
S] and [T] keys to highlight either the Zero Gas First or
[ENTER].
Span Gas First menu option and press
[ENTER].
Factory-Level Programming 6-7
Page 67

Janaury 2008
The Opt>Setup Menu This menu is used to restore corrupted software or to download new
software to the XDP. The following items are required:
• a hardware connection between the XDP serial port and the serial
port on a personal computer
• the new main code and slot code software files, as provided by GE
Sensing
• an ASCII data transfer program, such as Windows Hyperterminal
When you have all of the above items, proceed as follows:
Loading the New Main
Code
The first step in the process is to download the new main code to the
XDP. To do this, navigate to the Opt>Setup menu on the XDP and
proceed as follows:
1. From the PC, open the data transfer program and configure the
serial port as follows: baud rate = 19200, data bits = 8,
stop bits = 1, parity = none, and hardware flow control = none.
2. From the XDP, at the Setup menu, press
3. Use the XDP [
and press
4. From the PC, when asked, press the
5. Select
6. Browse to the main code *.cod file provided by GE Sensing, and
7. Press
After the new main code has been downloaded, the XDP will reboot.
Re-enter the factory-level password and proceed to the next section.
<Transfer> and then <Send File>.
<Xmodem> for the transfer protocol.
select
<Send>.
S] and [T] keys to highlight the Load Main option
[ENTER].
[ENTER].
<Y> key to proceed.
6-8 Factory-Level Programming
Page 68

January 2008
Erasing the Old Main Code
and Slot Code
The next step in the process is to erase the old software from the XDP .
To do this, navigate to the Opt>Setup menu on the XDP and proceed
as follows:
1. At the Setup menu, press
2. Use the [
press
S] and [T] keys to highlight the Erase Main option and
[ENTER]. All the current customer configuration data will be
[ENTER].
erased and the XDP will reboot.
3. During the reboot process, Scanning Hardware will appear on the
XDP display . When it does, use the [
W] and [X] keys to select Skip
Slot Download and then select Yes.
4. Re-enter the factory-level password when prompted, and the XDP
will reboot again. When the reboot is complete, re-enter the
factory-level password and navigate to the Opt>Setup menu
5. Use the [
press
S] and [T] keys to highlight the Erase Slot option and
[ENTER]. The old slot code will be erased and the XDP will
reboot.
Re-enter the factory-level password and proceed to the next section.
Loading the New Slot Code The final step in the process is to load the new slot code. To do this,
navigate to the Opt>Setup menu on the XDP and proceed as follows:
1. At the Setup menu, press
2. Use the XDP [
and press
S] and [T] keys to highlight the Load Slot option
[ENTER].
3. From the PC, when asked, press the
4. Select
<Transfer> and then <Send File>.
5. Browse to the slot code *.cod file provided by GE Sensing, and
<Xmodem> for the transfer protocol.
select
6. Press
<Send>.
After the new slot code has been downloaded, the XDP will reboot.
The XDP software upgrade has now been completed, but all
programming options will now be in the factory default state. You
will need to reprogram the unit with your preferred settings.
[ENTER].
<Y> key to proceed.
Factory-Level Programming 6-9
Page 69

Chapter 7
Page 70

Specifications
Performance Specifications. . . . . . . . . . . . . . . . . . . . . . . . . . . . . . . . . . . . . . 7-1
Physical Specifications . . . . . . . . . . . . . . . . . . . . . . . . . . . . . . . . . . . . . . . . . . 7-1
Functional Specifications. . . . . . . . . . . . . . . . . . . . . . . . . . . . . . . . . . . . . . . . 7-1
Environmental Specifications . . . . . . . . . . . . . . . . . . . . . . . . . . . . . . . . . . . . 7-2
Transmitter Specifications. . . . . . . . . . . . . . . . . . . . . . . . . . . . . . . . . . . . . . . 7-2
The XDP Model Number . . . . . . . . . . . . . . . . . . . . . . . . . . . . . . . . . . . . . . . . . 7-3
Page 71

January 2008
Performance Specifications
Display Accuracy:
±0.5% of full scale
Display Linearity:
±0.15% of full scale
Ambient Temperature Effect:
±0.5% of full scale over –10° to 60°C (14° to 140°F) range
Physical Specifications Enclosure:
Panel-Mount, Explosion-Proof
(Class I, Division 1, Groups B, C and D)
Fuse:
1.25 A, 250 V, 5x20 mm, IEC Type T
Power Input:
100-240 VAC; 50/60 Hz; 40 W max.
Power Output to Tr ansmitter:
24.0 ± 2.0 VDC; 1 A max.
Note: The power supply meets CISPR 55022 and CISPR 55014,
Level B EMI requirements and IEC1010-1 safety standards.
Functional Specifications Alarms (terminal blocks J2, J3):
Five general-purpose contacts,
Contact rating: 2 A, 28 V, SPDT
System Fault (J2): fail-safe or non-fail-safe type
XDP Low (J3): fail-safe or non-fail-safe type
(setpoint is programmable)
XDP Low Low (J3): fail-safe or non-fail-safe type
(setpoint is programmable)
XDP High (J3): fail-safe or non-fail-safe type
(setpoint is programmable)
XDP High High (J3):fail-safe or non-fail-safe type
(setpoint is programmable)
Analog Input (terminal block J6):
4–20 mA
Specifications 7-1
Page 72

January 2008
Functional Specifications
(cont.)
Environmental Specifications
System Analog Output (terminal block J5):
0-20 mA, 4-20 mA, 0-2 V, NAMUR type
XDP Analog Output (terminal block J8):
0-20 mA, 4-20 mA, 0-2 V type
Communications (terminal block J4):
Standard RS232/RS485 Serial Port
(RS485 supports multi-drop installations)
Display:
4-line, backlit liquid crystal display (LCD)
Keypad:
6-key, infrared
The design, manufacture, and certification of the XDP have been
conducted in a manner that allows its operation in Zone 1,
Gas Group IIC, flameproof protection method in an ambient
operating temperature of –10° to 60°C (14° to 140°F).
Transmitter Specifications
This unit complies with EMC Directive 89/336/EEC and the
73/23/EEC Low Voltage Directive (Installation Category II, Pollution
Degree 2). Compliance with ATEX directive 94/9/EC Annex II, per
the document at the back of this manual, is pending.
For complete transmitter specifications, refer to the documentation
provided with the transmitter.
7-2 Specifications
Page 73

January 2008
The XDP Model Number To ensure that the appropriate XDP is supplied, a full and accurate
model number must be specified at the time of purchase. This model
number should be constructed as follows:
Model XDP - B C D - E
B: Package: 2 = Explosion-Proof
C: Power: 1 = 100 VAC
2 = 115 VAC
3 = 220 VAC
4 = 240 VAC
D: Keypad: 1 = Infrared
5. Software:1 = Standard Software
2 = H2-Cooled Generator Software
For example, an XDP system in an explosion-proof enclosure with
standard software, an infrared keypad, and a 115 VAC input voltage
requirement would be specified as:
Model XDP-221-1.
Specifications 7-3
Page 74

Appendix A
Page 75

CE Mark Compliance
Introduction. . . . . . . . . . . . . . . . . . . . . . . . . . . . . . . . . . . . . . . . . . . . . . . . . . . . A-1
EMC Compliance. . . . . . . . . . . . . . . . . . . . . . . . . . . . . . . . . . . . . . . . . . . . . . . . A-1
LVD Compliance . . . . . . . . . . . . . . . . . . . . . . . . . . . . . . . . . . . . . . . . . . . . . . . . A-1
Page 76

January 2008
Introduction For CE Mark compliance, the XDP must meet both the EMC and
LVD directives.
IMPORTANT: CE Mark compliance is required for units used in
EEC countries.
EMC Compliance For EMC compliance, the electrical connections must be shielded and
grounded as shown in Table A-1 below. After all the necessary
electrical connections have been made, seal any unused cable entry
holes with standard conduit plugs or equivalent.
Note: If the instructions in this appendix are followed, the unit will
comply with the EMC Directive 89/336/EEC.
Table A-1: Wiring Modifications for EMC Compliance
Connection Wiring Modification
Power 1. When connecting the power, select the cable
entry closest to the chassis ground.
2. Use shielded cable* to connect the power to the
XDP enclosure. Connect the shield to the
nearest chassis ground terminal.
3. Connect the power line ground wire to the
nearest chassis ground terminal.
Input/Output 1. Use shielded cable* to interconnect the Model
XDP enclosure with any external I/O devices.
2. Connect the shields to the nearest chassis
ground terminal.
*Wires enclosed in a properly-grounded metal conduit do not
require additional shielding.
LVD Compliance For compliance with the European Union’s Low Voltage Directive
(73/23/EEC), the analyzer requires an external power disconnect
device such as a switch or circuit breaker. The disconnect device must
be marked as such, clearly visible, directly accessible, and located
within 1.8 m (6 ft) of the XDP.
Note: If the instructions in this appendix are followed, the unit will
comply with the Low Voltage Directive (73/23/EEC).
CE Mark Compliance A-1
Page 77

Appendix B
Page 78

PanaView Programming
Introduction. . . . . . . . . . . . . . . . . . . . . . . . . . . . . . . . . . . . . . . . . . . . . . . . . . . . B-1
Initial Setup . . . . . . . . . . . . . . . . . . . . . . . . . . . . . . . . . . . . . . . . . . . . . . . . . . . . B-1
Remote Programming. . . . . . . . . . . . . . . . . . . . . . . . . . . . . . . . . . . . . . . . . . . B-1
Viewing Data . . . . . . . . . . . . . . . . . . . . . . . . . . . . . . . . . . . . . . . . . . . . . . . . . . . B-2
Logging Data. . . . . . . . . . . . . . . . . . . . . . . . . . . . . . . . . . . . . . . . . . . . . . . . . . . B-4
Page 79

January 2008
Introduction GE Sensing has developed a Windows-based instrument interface
software called PanaView. This software is installed on a personal
computer (PC) and communicates with most GE Sensing instruments
via an RS-232 serial port link. The purpose of PanaView is to permit
remote access to and programming of the instrument.
Initial Setup Before you can use P anaV iew with the XDP, the following setup steps
must be completed:
1. install PanaView on the PC
2. connect the XDP serial port to the PC serial port
3. power up the XDP
4. launch PanaView
5. use PanaView to establish communications with the XDP
A detailed User’s Manual is included with the PanaView software.
All of the above steps are thoroughly described in that manual
(document 910-211); that information is not reproduced here.
With the PanaView network tree fully expanded, your PanaView
screen should look similar to Figure B-1 below .
Figure B-1: XDP PanaView Screen
Remote Programming The remote programming functionality of the XDP via PanaView is
in development at this time. When full programming capability
becomes available, the appropriate instructions will be added to this
appendix.
PanaView Programming B-1
Page 80

January 2008
Viewing Data PanaView may be used to view the live measurement data being
collected by the XDP. This display is in addition to the standard LCD
screen on the face of the instrument. There are several advantages to
using PanaView to view your live data. Among these are:
• The data display (i.e. the PC) may be located in a safe area remote
from the XDP installation site.
• The data may be displayed in either text or graphical format.
• Both text and graphical displays may be viewed at the same time.
• Multiple parameters may be viewed simultaneously. For example,
the transmitter signal may be displayed in both mA and ppm/pcnt
values in separate windows at the same time.
For detailed instructions on setting up and customizing the text and
graphical data displays, see the PanaView User’s Manual (910-211).
As an example, Figure B-2 below shows the simultaneous text
displays of an oxygen signal input in both mA and ppm/pcnt values.
Figure B-2: mA and ppm/pcnt Text Displays
B-2 PanaView Programming
Page 81

January 2008
Viewing Data (cont.) As a further example of using PanaView to view your live data,
Figure B-3 below shows a typical display that includes both the text
and graphical windows for the oxygen ppm/pcnt values.
Figure B-3: ppm/pcnt Text & Graphical Displays
Note: The above information is just a brief overview of how to view
your live XDP data with PanaV iew. For complete instructions
on using all of the available features and capabilities, refer to
the PanaView User’s Manual (910-211).
PanaView Programming B-3
Page 82

January 2008
Logging Data In addition to viewing your live XDP data, PanaView allows you to
accumulate the live data readings in the form of a data log file that is
stored on the hard drive of the PC. As with the live data, the log files
may be viewed on the PC screen in either text or graphical format.
After setting up the parameters for the logging procedure, the
progress of the log file may be monitored as the data is accumulated.
When the log file has been completed, it may be named and stored on
the PC. The resulting log file may be opened for viewing and/or
printing at any time. Figure B-4 below shows the contents of a typical
log file in progress.
Figure B-4: A Typical Log File in Progress
Note: The above information is just a brief overview of how to log
your live XDP data with PanaV iew. For complete instructions
on using all of the available features and capabilities, refer to
the PanaView User’s Manual (910-211).
B-4 PanaView Programming
Page 83

Appendix C
Page 84

Menu Maps
Operator-Level [Cal] and [Disp] Menu Map . . . . . . . . . . . . . . . . . . . . . . . .C-1
Operator-Level [Opt] Menu Map. . . . . . . . . . . . . . . . . . . . . . . . . . . . . . . . . . C-2
Factory-Level Menu Map . . . . . . . . . . . . . . . . . . . . . . . . . . . . . . . . . . . . . . . . C-3
Page 85

January 2008
ENT
Display
ENT
Gas Label
Gas Unit
Resolution
ESC E NT ESC
Clock
ENT
Set Date
Set Time
ENTENT
Cal Data
ENT
Cal Points
Cal Table
X.XX pcnt
4-20mA Input
ENT
Over Range Limit
Under Range Limit
Cal
ENT
1:Cal
ENT
Setup
ENT
Analog Output
ENT
Aout Types
Zero Setpoint
Span Setpoint
Error Handlers
Test
Zero Trim
Span Trim
AutoCal
ENT
Low Low Alarm
Low Alarm
High Alarm
High High Alarm
Alarms
ENT
ENT
[see page C-2]
Enable/Disable
ENT
Enable
Disable
AutoCal Types
AutoCal Control
Schedule AutoCal
Aout Indication
Initiate AutoCal
AutoCal Limits
Auto Verification
MAIN MENU
Opt
View Drift Data
ENT
Zero/Cal
Zero/Tot
Clear Drift Data
ENT
Yes
No
Reset Verif Alarm
ENT
Yes
No
Span/Cal
Span/Tot
Disp
ENT
O2 mA
O2 pcnt
Abort AutoCAL
ENT
OK
Cancel
Figure C-1: Operator-Level [Cal] and [Disp] Menu Map
Menu Maps C-1
Page 86

January 2008
ESC ENT ESC
ENT
User Versions
X.XX pcnt
ENTENT
MAIN MENU
Cal
[see page C-1]
Opt
ENT
Lock Menus Lock All
ENT
ENT
ENTENT
Disp
[see page C-1]
X.XX pcntX.XX pcnt
[These are basic XDP system (Slot 0) functions]
Fault Alarm* Contrast
ENT ENT
Non Fail-Safe
Fail-Safe
Analog Output*
ENT
Aout Type
Zero Setpoint
Span Setpoint
Test
Zero Trim
Backlight
ENT
On
Off
Timed
Comm
ENT
Node ID
Baud Rate
Data Length
Parity
Stop Bits
Figure C-2: Operator-Level [Opt] Menu Map
Span Trim
Comm Type
Menu Maps C-2
Page 87

January 2008
1:Cfg
ESC ENT ESC
ENT
Cfg
ENT
X.XX pcnt
ENTENT
MAIN MENU
Cal
ENT
Opt Disp
ENT
[see page C-1]
1:Cal
ENT
Setup
ENT
AutoCal Alarm
Auto Verif Alarm
Process Cal Relay
Lock Menus
[see page C-2] [see page C-2]
Lock All Versions
[see page C-2]
Adv
ENT
Z/S Cal Type
ENTENTENT
ENT
Zero Gas First
Span Gas First
Load Slot
Load Main
[Erase Slot]
Erase Main
Figure C-3: Factory-Level Menu Map
ENT
O2
ENT
mA
ENT
pcnt
0:Display
0:Fault Alarm
0:Analog Output
ENT
User
[see page C-2]
Setup
AutoCal
[see page C-1] [see page C-1]
Edit Drift Data
Zero Drift
Span Drift
4-20mA Input Trim
Zero Trim
ENT
Span Trim
Z/S Drift/Cal
Z/S Drift/Total
Z/S Setpoint
Trip
Reset
Menu Maps C-3
Page 88

Appendix D
Page 89

Factory Default Values
Introduction. . . . . . . . . . . . . . . . . . . . . . . . . . . . . . . . . . . . . . . . . . . . . . . . . . . .D-1
Default Values. . . . . . . . . . . . . . . . . . . . . . . . . . . . . . . . . . . . . . . . . . . . . . . . . .D-1
Page 90

January 2008
Introduction Prior to shipment, each XDP is programmed with values that are
suitable for many applications. Although these values are readily
reprogrammed to meet specific application requirements, the default
values usually allow for an easy initial startup of the instrument.
Default Values The default values for an XDP using the standard software are listed
below.
Display Gas Label: O2
Gas Unit: %
Gas resolution: 0.01
Cal Data Cal Points: 2 points
Cal Table: 0.00/4.00, 20.0, 100.0
4-20 mA Input INPUT_UNDER_RANGE_LIMIT: 2.0
INPUT_OVER_RANGE_LIMIT: 22.0
Slot Analog Output Type: 4-20mA
Zero Setpoint: 0.0
Span Setpoint: 100
All Error Handlers: Disabled
Error Handler: No Effect
Error Handler Force to Value: 0.0
Alarms Trip Point: HH=100, H=100, L=0, LL=0
Deadband: 0.2
Type: Non-Fail-Safe
Factory Default Values D-1
Page 91

January 2008
AutoCAL Type: Offset Cal
Zero/Span Cal Type: Span Gas First
Zero Setpoint: 0.0
Span Setpoint: 100
Offset Cal Setpoint: 0.0
Slope Cal Setpoint: 20.93
Zero Drift/Cal: 0.0
Zero Drift/Total: 0.0
Span Drift/Cal: 0.0
Span Drift/Total: 0.0
Verify Drift/Cal: 5.0 (Verification Limit)
Max Drift/Cal: 10.0 (Cal Limit)
Max Drift/Total: 25.0 (Cal Limit)
Analog Output Indication: Hold Last Value
Analog Output Force to Value: 0.0
Zero Gas ON: 4.0 min.
Span Gas ON: 4.0 min.
Gas Settling Time: 2.0 min.
Measuring Time: 0.25 min.
Schedule AutoCAL: MM/DD/YY = 12/31/99
HH:MM = 01:01
Interval Type = days
Interval = 1
AutoCal: Disabled
Auto Verification: Disabled
D-2 Factory Default Values
Page 92

Index
January 2008
A
Aborting AutoCAL . . . . . . . . . . . . . . . . . . . . 5-8
Accessing the User Program . . . . . . . . . . . . . 3-4
Adjusting Display Contrast . . . . . . . . . . . . . . 4-4
Adv Menu. . . . . . . . . . . . . . . . . . . . . . . . . . . . 6-3
Alarms
Calibration Relays . . . . . . . . . . . . . . . . . . . 2-7
Fail-Safe Mode. . . . . . . . . . . . . . . . . . . . . . 4-6
Setting Up. . . . . . . . . . . . . . . . . . . . . . . . . . 4-6
Specifications. . . . . . . . . . . . . . . . . . . . . . . 7-1
System Fault. . . . . . . . . . . . . . . . . . . . . . . . 2-6
Wiring. . . . . . . . . . . . . . . . . . . . . . . . . 2-6, 2-7
XDP . . . . . . . . . . . . . . . . . . . . . . . . . . . . . . 2-6
Ambient Temperature. . . . . . . . . . . . . . . . . . . 2-1
Analog Input
Entering Calibration Data . . . . . . . . . . . . . 4-5
Entering Error Limits. . . . . . . . . . . . . . . . . 4-5
Setting Up. . . . . . . . . . . . . . . . . . . . . . . . . . 4-5
Trimmimg. . . . . . . . . . . . . . . . . . . . . . . . . . 6-5
Analog Output (System)
Setting Up. . . . . . . . . . . . . . . . . . . . . . . . . . 4-8
Wiring. . . . . . . . . . . . . . . . . . . . . . . . . . . . . 2-7
Analog Output (XDP)
Setting Up. . . . . . . . . . . . . . . . . . . . . . . . . . 4-9
Testing . . . . . . . . . . . . . . . . . . . . . . . . . . . 4-12
Trimming . . . . . . . . . . . . . . . . . . . . . . . . . 4-12
Wiring. . . . . . . . . . . . . . . . . . . . . . . . . . . . . 2-8
AutoCAL
Aborting . . . . . . . . . . . . . . . . . . . . . . . . . . . 5-8
Configuring . . . . . . . . . . . . . . . . . . . . . . . . 5-2
Enabling . . . . . . . . . . . . . . . . . . . . . . . . . . . 5-2
Gas Flow Times . . . . . . . . . . . . . . . . . . . . . 5-3
Indicating . . . . . . . . . . . . . . . . . . . . . . . . . . 5-5
Initiating. . . . . . . . . . . . . . . . . . . . . . . . . . . 5-5
Relays, Testing . . . . . . . . . . . . . . . . . . . . . . 6-6
Scheduling . . . . . . . . . . . . . . . . . . . . . . . . . 5-4
Selecting Type . . . . . . . . . . . . . . . . . . . . . . 5-2
Setting Auto Verification . . . . . . . . . . . . . . 5-6
Setting Drift Limits . . . . . . . . . . . . . . . . . . 5-6
B
Backlight, Setting Up. . . . . . . . . . . . . . . . . . . 4-4
Basic Features . . . . . . . . . . . . . . . . . . . . . . . . 1-1
C
Cable, Serial Port . . . . . . . . . . . . . . . . . . . . . .2-8
Calibration
Automatic . . . . . . . . . . . . . . . . . . . . . . . . . .3-1
Gases. . . . . . . . . . . . . . . . . . . . . . . . . . . . . .5-1
Interval . . . . . . . . . . . . . . . . . . . . . . . . 3-1, 5-1
Preparation . . . . . . . . . . . . . . . . . . . . . . . . .5-1
Tools . . . . . . . . . . . . . . . . . . . . . . . . . . . . . .5-1
CE Mark Compliance . . . . . . . . . . . . . . .2-5, A-1
Cleaning the XDP. . . . . . . . . . . . . . . . . . . . . .3-1
Clearing Drift Data . . . . . . . . . . . . . . . . . . . . .5-8
Clock, Real-Time . . . . . . . . . . . . . . . . . . . . . .4-3
Common Problems, Preventing . . . . . . . . . . .3-1
Connecting
See Part Name
Contrast, Adjusting. . . . . . . . . . . . . . . . . . . . .4-4
D
Default Values. . . . . . . . . . . . . . . . . . . . . . . . D-1
Digital Display
Backlight Setup. . . . . . . . . . . . . . . . . . . . . .4-4
Boot-Up Screens. . . . . . . . . . . . . . . . . . . . .3-3
Components . . . . . . . . . . . . . . . . . . . . . . . .3-2
Configuring. . . . . . . . . . . . . . . . . . . . . 4-2, 6-2
Contrast Adjustment . . . . . . . . . . . . . . . . . .4-4
Data Screen. . . . . . . . . . . . . . . . . . . . . . . . .3-4
Diagram. . . . . . . . . . . . . . . . . . . . . . . . . . . .3-2
Run-Mode Screen . . . . . . . . . . . . . . . . . . . .3-3
Switching Windows . . . . . . . . . . . . . . . . . .4-2
Disconnect Device . . . . . . . . . . . . . . . . . 2-1, 2-3
Display Windows, Switching . . . . . . . . . . . . .4-2
Drift Data
Clearing. . . . . . . . . . . . . . . . . . . . . . . . . . . .5-8
Edit . . . . . . . . . . . . . . . . . . . . . . . . . . . . . . .6-4
Viewing. . . . . . . . . . . . . . . . . . . . . . . . . . . .5-7
Drift Limits, Setting . . . . . . . . . . . . . . . . . . . .5-6
E
EMC Compliance . . . . . . . . . . . . . . . . . . . . . A-1
Enabling AutoCAL. . . . . . . . . . . . . . . . . . . . .5-2
Environmental Rating. . . . . . . . . . . . . . . . . . .1-1
Error Messages
24-Volt Power Fault . . . . . . . . . . . . . . . . . .3-1
Table of Codes . . . . . . . . . . . . . . . . . . . . . .3-6
Errors Handlers, Programming. . . . . . . . . . .4-10
Index 1
Page 93

January 2008
Index (cont.)
F
Factory Default Values . . . . . . . . . . . . . . . . . D-1
Factory-Level Programming. . . . . . . . . . . . . .6-3
Fail-Safe Alarm Mode . . . . . . . . . . . . . . . . . .4-6
Features, Basic . . . . . . . . . . . . . . . . . . . . . . . .1-1
Flow Times, Cal Gas . . . . . . . . . . . . . . . . . . .5-3
Forcing AutoCAL. . . . . . . . . . . . . . . . . . . . . .5-5
Fuse. . . . . . . . . . . . . . . . . . . . . . . . . . . . . . . . .7-1
G
Gas Label . . . . . . . . . . . . . . . . . . . . . . . . . . . .4-2
Gas Units . . . . . . . . . . . . . . . . . . . . . . . . . . . .4-2
H
Hazardous Location Rating . . . . . . . . . . . . . .1-1
I
Indicating AutoCAL. . . . . . . . . . . . . . . . . . . .5-5
Infrared Keypad . . . . . . . . . . . . . . . . . . . . . . .3-2
Initiating AutoCAL. . . . . . . . . . . . . . . . . . . . .5-5
Installation Site
Choosing. . . . . . . . . . . . . . . . . . . . . . . . . . .2-2
Requirements . . . . . . . . . . . . . . . . . . . . . . .2-2
Installing the Sample System . . . . . . . . . . . . .2-3
K
Keypad
Common Problems . . . . . . . . . . . . . . . . . . .3-1
Diagram . . . . . . . . . . . . . . . . . . . . . . . . . . .3-2
Infrared . . . . . . . . . . . . . . . . . . . . . . . . . . . .3-2
Specifications . . . . . . . . . . . . . . . . . . . . . . .7-2
L
Line Power
Requirements . . . . . . . . . . . . . . . . . . . 2-2, 7-1
Wiring. . . . . . . . . . . . . . . . . . . . . . . . . . . . .2-8
Locking All Meter Functions . . . . . . . . . . . .4-14
Locking the User Program . . . . . . . . . . . . . .4-13
LVD Compliance . . . . . . . . . . . . . . 2-1, 2-3, A-1
M
Main Menu . . . . . . . . . . . . . . . . . . . . . . . . . . 3-4
Menu Map
Factory-Level . . . . . . . . . . . . . . . . . . . . . . C-3
Operator-Level. . . . . . . . . . . . . . . . . . C-1, C-2
Model Number. . . . . . . . . . . . . . . . . . . . . . . . 7-3
Mounting
Dimensions . . . . . . . . . . . . . . . . . . . . . . . 2-11
The Sample System. . . . . . . . . . . . . . . . . . 2-3
The Transmitter . . . . . . . . . . . . . . . . . . . . . 2-3
The XDP . . . . . . . . . . . . . . . . . . . . . . . . . . 2-3
N
Namur Analog Output. . . . . . . . . . . . . . . . . . 4-8
P
Padlock Symbol. . . . . . . . . . . . . . . . . . . . . . . 3-3
PanaV iew
Initial Setup . . . . . . . . . . . . . . . . . . . . . . . . B-1
Logging Live Data. . . . . . . . . . . . . . . . . . . B-4
Remote Programming . . . . . . . . . . . . . . . . B-1
Software. . . . . . . . . . . . . . . . . . . . . . . . . . . B-1
Viewing Live Data. . . . . . . . . . . . . . . . . . . B-2
Password
Factory-Level . . . . . . . . . . . . . . . . . . . . . . 6-1
Operator-Level. . . . . . . . . . . . . . . . . . . . . . 3-4
Setup-Level . . . . . . . . . . . . . . . . . . . . . . . . 6-1
User Program. . . . . . . . . . . . . . . . . . . . . . . 6-1
Photograph, XDP. . . . . . . . . . . . . . . . . . . . . . 1-2
Power Fault Error . . . . . . . . . . . . . . . . . . . . . 3-1
Powering Up . . . . . . . . . . . . . . . . . . . . . . . . . 3-2
Preventing Common Problems . . . . . . . . . . . 3-1
Programming
AutoCAL. . . . . . . . . . . . . . . . . . . . . . . . . . 5-2
Error Handlers . . . . . . . . . . . . . . . . . . . . . 4-10
Factory-Level . . . . . . . . . . . . . . . . . . . . . . 6-3
Setup-Level . . . . . . . . . . . . . . . . . . . . . . . . 6-2
XDP. . . . . . . . . . . . . . . . . . . . . . . . . . . . . . 4-1
R
Rating, Environmental. . . . . . . . . . . . . . . . . . 1-1
Resolution, Display . . . . . . . . . . . . . . . . . . . . 4-3
2 Index
Page 94

Index (cont.)
January 2008
S
Safe Operation . . . . . . . . . . . . . . . . . . . . . . . . 2-1
Sample System. . . . . . . . . . . . . . . . . . . . . . . . 2-3
Scheduling AutoCAL. . . . . . . . . . . . . . . . . . . 5-4
Serial Port
Cable . . . . . . . . . . . . . . . . . . . . . . . . . . . . . 2-8
Setting Up. . . . . . . . . . . . . . . . . . . . . . . . . 4-13
Wiring. . . . . . . . . . . . . . . . . . . . . . . . . . . . . 2-8
Setup Menu . . . . . . . . . . . . . . . . . . . . . . . . . . 6-8
Setup-Level Programming. . . . . . . . . . . . . . . 6-2
Site Preparation . . . . . . . . . . . . . . . . . . . . . . . 2-3
Software Versions. . . . . . . . . . . . . . . . . . . . . 4-14
Software, Updating . . . . . . . . . . . . . . . . . . . . 6-8
Span Gas. . . . . . . . . . . . . . . . . . . . . . . . . . . . . 5-1
Specifications
Environmental . . . . . . . . . . . . . . . . . . . . . . 7-2
Functional. . . . . . . . . . . . . . . . . . . . . . . . . . 7-1
Perfomance. . . . . . . . . . . . . . . . . . . . . . . . . 7-1
Physical . . . . . . . . . . . . . . . . . . . . . . . . . . . 7-1
Transmitter. . . . . . . . . . . . . . . . . . . . . . . . . 7-2
System Overview. . . . . . . . . . . . . . . . . . . . . . 1-2
T
Temperature, Ambient . . . . . . . . . . . . . . . . . . 2-1
Testing AutoCAL Relays . . . . . . . . . . . . . . . . 6-6
Thread Sealant . . . . . . . . . . . . . . . . . . . . . . . . 3-1
Tool, Wiring . . . . . . . . . . . . . . . . . . . . . . . . . . 2-5
Transmitter
Documentation. . . . . . . . . . . . . . . . . . . . . . 1-1
Mounting . . . . . . . . . . . . . . . . . . . . . . . . . . 2-3
Requirements . . . . . . . . . . . . . . . . . . . . . . . 1-2
Specifications. . . . . . . . . . . . . . . . . . . . . . . 7-2
Wiring. . . . . . . . . . . . . . . . . . . . . . . . . . . . . 2-5
V
Verification Alarm, Resetting . . . . . . . . . . . . .5-8
Verification, Auto . . . . . . . . . . . . . . . . . . . . . .5 -6
Versions, Software . . . . . . . . . . . . . . . . . . . .4-14
Viewing Drift Data . . . . . . . . . . . . . . . . . . . . .5-7
W
Warm-Up Time . . . . . . . . . . . . . . . . . . . . 3-2, 3-4
Wiring
Diagram. . . . . . . . . . . . . . . . . . . . . . . . . . .2-12
Insertion Tool . . . . . . . . . . . . . . . . . . . . . . .2-5
Label . . . . . . . . . . . . . . . . . . . . . . . . . . . . . .2-4
Transmitter . . . . . . . . . . . . . . . . . . . . . . . . .2-5
XDP. . . . . . . . . . . . . . . . . . . . . . . . . . . . . . .2-4
X
XDP
Calibrating. . . . . . . . . . . . . . . . . . . . . . . . . .5-1
Cleaning . . . . . . . . . . . . . . . . . . . . . . . . . . .3-1
Mounting. . . . . . . . . . . . . . . . . . . . . . . . . . .2-3
Mounting Dimensions. . . . . . . . . . . . . . . .2-11
Photograph . . . . . . . . . . . . . . . . . . . . . . . . .1-2
Powering Up . . . . . . . . . . . . . . . . . . . . . . . .3-2
Programming. . . . . . . . . . . . . . . . . . . . . . . .4-1
Removing Covers . . . . . . . . . . . . . . . . . . . .2-5
Wiring . . . . . . . . . . . . . . . . . . . . . . . . . . . . .2-4
Wiring Diagram . . . . . . . . . . . . . . . . . . . .2-12
Z
Zero Gas . . . . . . . . . . . . . . . . . . . . . . . . . . . . .5-1
Zero/Span Cal Type . . . . . . . . . . . . . . . . . . . .6-7
U
Updating Software . . . . . . . . . . . . . . . . . . . . . 6-8
User Program
Accessing . . . . . . . . . . . . . . . . . . . . . . . . . . 3-4
Factory-Level Menu Map . . . . . . . . . . . . .C-3
Levels. . . . . . . . . . . . . . . . . . . . . . . . . . . . . 6-1
Locking/Unlocking . . . . . . . . . . . . . . . . . 4-13
Moving Back One Level . . . . . . .4-1, 5-1, 6-1
Operator-Level Menu Map. . . . . . . . .C-1, C-2
Passwords. . . . . . . . . . . . . . . . . . . . . . . . . . 6-1
Index 3
Page 95

GE
Sensing
DECLARATION
OF
CONFORMITY
We, Panametrics Limited
Shannon Industrial Estate
Shannon, County Clare
Ireland
declare under our sole responsibility that the
XDP Explosion-Proof Display Package
to which this declaration relates, are in conformity with the following standards:
• EN 61326:1998, Class A, Annex A, Continuous Unmonitored Operation
(For EN 61000-4-3, the above units meet performance Criteria A, and in a limited number of frequencies,
performance Criteria B per EN 61326.)
• EN 61010-1:1993 + A2:1995, Overvoltage Category II, Pollution Degree 2
following the provisions of the 89/336/EEC EMC Directive and the 73/23/EEC Low Voltage Directive.
The units listed above and any ancillary sample handling systems supplied with them do not bear CE marking for the
Pressure Equipment Directive, as they are supplied in accordance with Article 3, Section 3 (sound engineering
practices and codes of good workmanship) of the Pressure Equipment Directive 97/23/EC for DN<25.
Shannon - June 1, 2002
Mr. James Gibson
GENERAL MANAGER
TÜV
TÜV ESSEN
ISO 9001
U.S.
CERT-DOC-H1 August 2004
Page 96

GE
Sensing
DÉCLARATION
DE
CONFORMITÉ
Nous, Panametrics Limited
Shannon Industrial Estate
Shannon, County Clare
Ireland
déclarons comme étant de notre seule responsabilité que les produits
Unité d’affichage antidéflagrante XDP
sur lesquels porte ce document, sont conformes aux spécifications suivantes :
• EN 61326:1998, Classe A, Annexe A, Fonctionnement continu sans surveillance
(Pour EN 61000-4-3, les appareils ci-dessus sont conformes au critère A de performance et, dans un
nombre limité de fréquences, au critère B de performance, selon EN 61326.)
• EN 61010-1:1993 + A2:1995, Catégorie surtensions II, Degré de pollution 2
conformément aux dispositions des directives 89/336/EEC (compatibilité électromagnétique) et 73/23/EEC
(basse tension).
Les appareils indiqués plus haut et tous les accessoires d’échantillonnage fournis avec ne portent pas la marque CE
pour la directive concernant les équipements de pression, dans la mesure où ils sont fournis conformément à
l’article 3, section 3 (pratiques d’ingénierie sûres et codes de bienfacture) de la directive concernant les équipements
de pression 97/23/EC pour DN<25.
Shannon - 1er juin 2002
Mr. James Gibson
DIRECTEUR GÉNÉRAL
TÜV
TÜV ESSEN
ISO 9001
U.S.
CERT-DOC-H1 August 2004
Page 97

GE
Sensing
KONFORMITÄTS-
ERKLÄRUNG
Wir, Panametrics Limited
Shannon Industrial Estate
Shannon, County Clare
Irland
erklären unter alleiniger Eigenverantwortlichkeit, dass die Produkte
XDP explosionsgeschütztes Anzeigegerät
auf die sich diese Deklaration bezieht, die folgenden Normen erfüllen:
• EN 61326:1998, Class A, Annex A, kontinuierlicher, überwachungsfreier Betrieb
(Für EN 61000-4-3 erfüllen die obigen Geräte die Leistungskriterien A und in bei einer begrenzten Anzahl
von Frequenzen die Leistungskriterien B gemäß EN 61326.)
• EN 61010-1:1993 + A2:1995, Überspannung, Kategorie II, Emissionsgrad 2
und dass sie die Anforderungen der EMC-Direktive 89/336/EEC und der Niederspannungsdirektive 73/23/EEC
einhalten.
Die oben angeführten Produkte sowie Zusatzvorrichtungen zur Probenhandhabung tragen keine CE-Markierung für
die Druckbehälterdirektive, da sie unter Einhaltung von Artikel 3, Abschnitt 3 (zuverlässige Ingenieurspraktiken und
Codes für gute Fertigungspraktiken) der Druckbehälterdirektive 97/23/EC für DN<25 geliefert werden.
Shannon - 1. Juni 2003
Hr. James Gibson
GENERAL MANAGER
TÜV
TÜV ESSEN
ISO 9001
U.S.
CERT-DOC-H1 August 2004
Page 98

GE
ATEX COMPLIANCE
Sensing
We, GE Infrastructure Sensing, Inc.
1100 Technology Park Drive
Billerica, MA 01821-4111
U.S.A.
as the manufacturer, declare under our sole responsibility that the product
XDP Explosion-Proof Display Package
to which this document relates, in accordance with the provisions of ATEX Directive 94/9/EC Annex II, meets the
following specifications:
II 2 GD EEx d IIC T6
1180
Furthermore, the following additional requirements and specifications apply to the product:
KEMA01ATEX2128 T85°C, -20°C to +65°C
• Having been designed in accordance with EN 50014, EN 50018, and EN 50281, the product meets the fault
tolerance requirements of electrical apparatus for category “d”.
• The product is an electrical apparatus and must be installed in the hazardous area in accordance with the
requirements of the EC Type Examination Certificate. The installation must be carried out in accordance with all
appropriate international, national and local standard codes and practices and site regulations for flameproof
apparatus and in accordance with the instructions contained in the manual. Access to the circuitry must not be
made during operation.
• Only trained, competent personnel may install, operate and maintain the equipment.
• The product has been designed so that the protection afforded will not be reduced due to the effects of corrosion
of materials, electrical conductivity, impact strength, aging resistance or the effects of temperature variations.
• The product cannot be repaired by the user; it must be replaced by an equivalent certified product. Repairs should
only be carried out by the manufacturer or by an approved repairer.
• The product must not be subjected to mechanical or thermal stresses in excess of those permitted in the
certification documentation and the instruction manual.
• The product contains no exposed parts which produce surface temperature infrared, electromagnetic ionizing, or
non-electrical dangers.
CERT-ATEX-D (Rev. August 2004)
 Loading...