

Page 1
Quick Start Guide
GV-CS1320 Camera Access Controller
Thank you for purchasing GV-CS1320 Camera Access Controller. This guide is designed to assist the new
user in getting immediate results from the controllers. For advanced information on how to use GV-CS1320,
please refer to GV-CS1320 Camera Access Controller User's Manual on Software CD / DVD.
CS1320V11-QG-A
Page 2
© 2016 GeoVision, Inc. All rights reserved.
Under the copyright laws, this manual may not be copied, in whole or in part,
without the written consent of GeoVision.
Every effort has been made to ensure that the information in this manual is
accurate. GeoVision, Inc. makes no expressed or implied warranty of any kind
and assumes no responsibility for errors or omissions. No liability is assumed
for incidental or consequential damages arising from the use of the information
or products contained herein. Features and specifications are subject to
change without notice.
Note: No memory card slot or local storage function for Argentina.
GeoVision, Inc.
9F, No. 246, Sec. 1, Neihu Rd.,
Neihu District, Taipei, Taiwan
Tel: +886-2-8797-8377
Fax: +886-2-8797-8335
http://www.geovision.com.tw
Trademarks used in this manual: GeoVision, the GeoVision logo and GV
series products are trademarks of GeoVision, Inc. Windows is the registered
trademark of Microsoft Corporation.
May 2016
Page 3

Contents
Installation Considerations ..................................................................ii
Optional Accessories ..........................................................................iii
1. Introduction ....................................................................................1
1.1 Packing List ........................................................................................................... 2
1.2 Compatible Software Versions............................................................................... 3
1.3 Overview................................................................................................................ 4
2. Installation ...................................................................................... 5
3. Connecting the Camera ................................................................. 7
3.1 Connecting RS485 Readers .................................................................................. 7
3.2 Connecting Network Readers ................................................................................ 8
3.3 Connecting Input Devices ...................................................................................... 9
3.4 Connecting Output Devices ..................................................................................10
3.5 Connecting GV-CS1320 to PC..............................................................................11
3.6 Connecting the Power...........................................................................................13
4. Accessing the GV-Fisheye Camera............................................. 14
4.1 Web Browser ........................................................................................................14
4.2 Looking Up the Dynamic IP Address.....................................................................15
4.3 Configuring the IP Address ...................................................................................17
5. The Web Interface......................................................................... 19
6. Upgrading System Firmware .......................................................20
7. Restoring to Factory Default........................................................21
i
Page 4
Installation Considerations
To make sure the finger and face of the cardholder can be detected, follow the instructions
below to set up GV-CS1320.
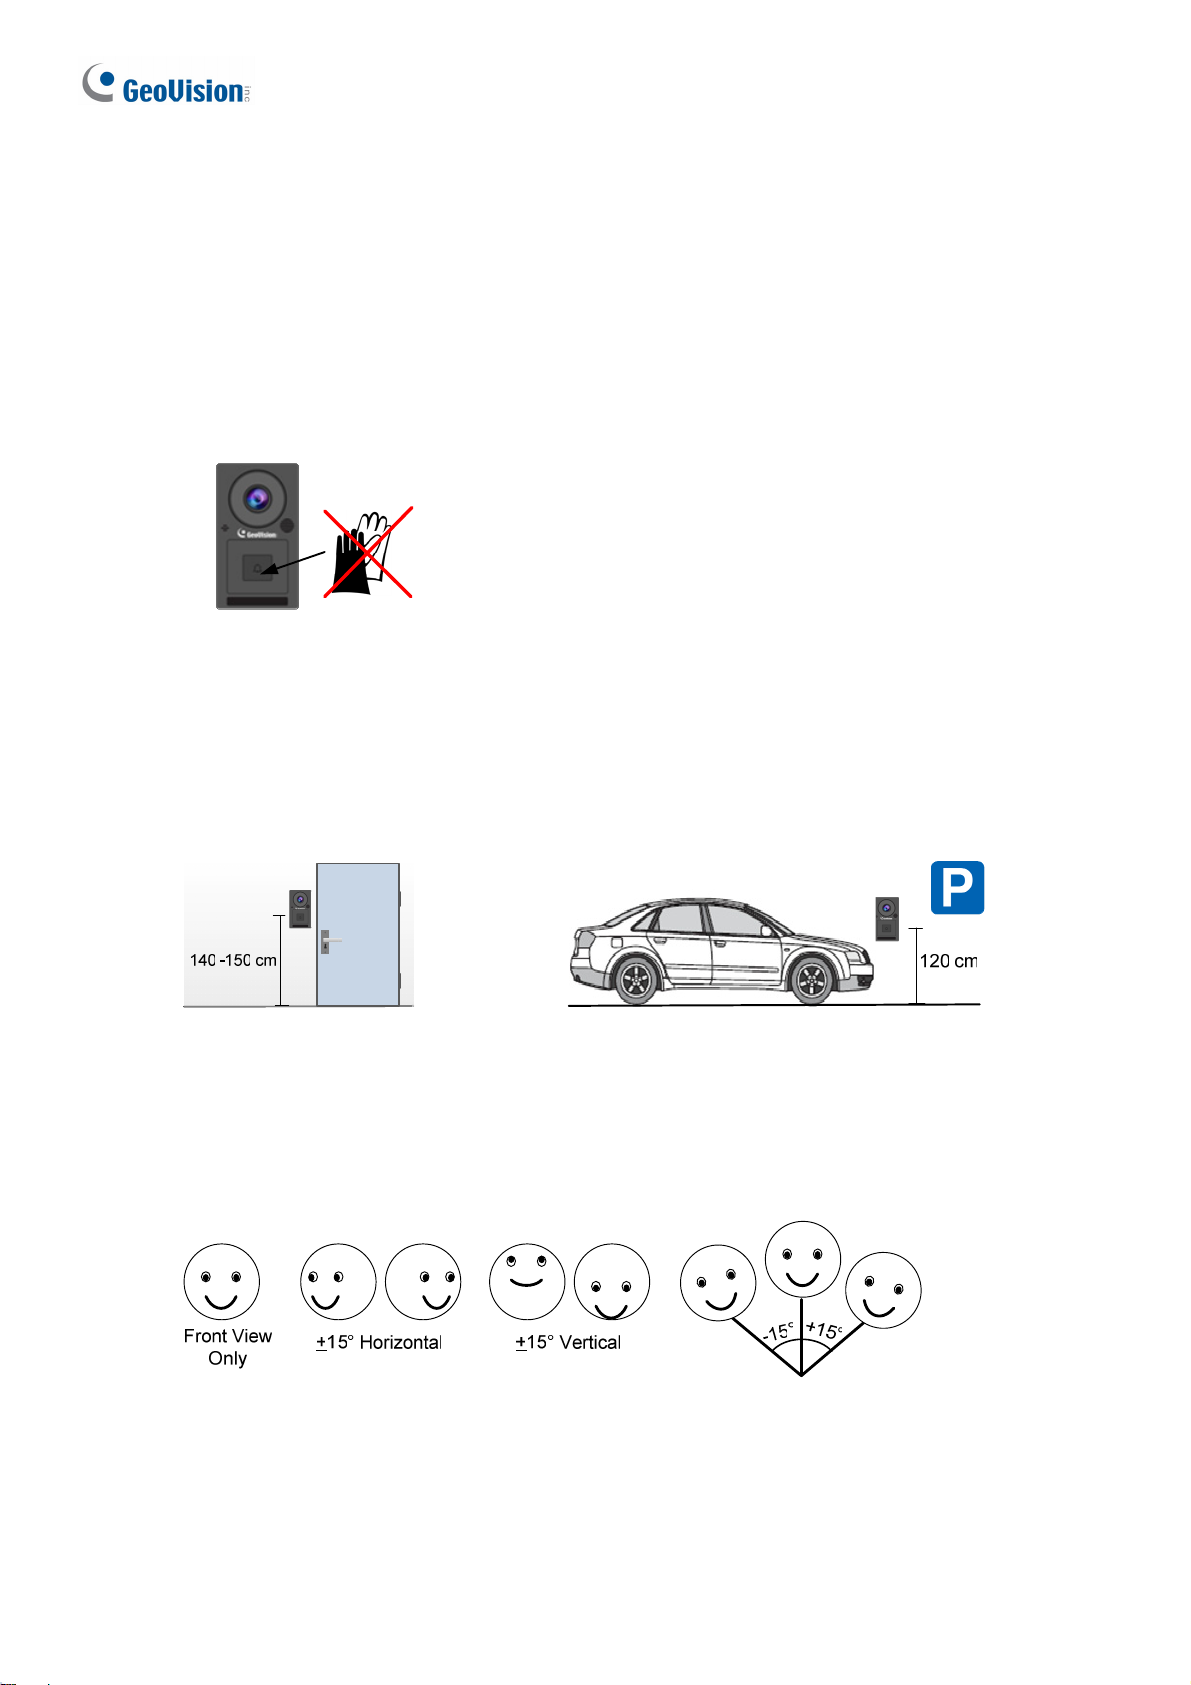
Bell Button Recognition:
• The bell button cannot be responded with gloves on.
Installation Height:
• When placed at a building gate, GV-CS1320 should be about 1.4-1.5 meters above the
ground.
• When placed at a parking lot gate, GV-CS1320 should be about 1.2 meters above the
ground to match the height of vehicles.
Face Detection Limitations
• GV-CS1320 cannot detect the face of cardholders wearing facial masks or sunglasses.
• GV-CS1320 is designed to detect front-view faces only. If the face is slightly tilted
horizontally or vertically, the tilt angle cannot exceed 15° degree.
Lighting Conditions
• Avoid placing GV-CS1320 where the light source is directly behind the subject.
• Prevent light from directly falling onto the GV-CS1320’s camera lens.
ii
Page 5
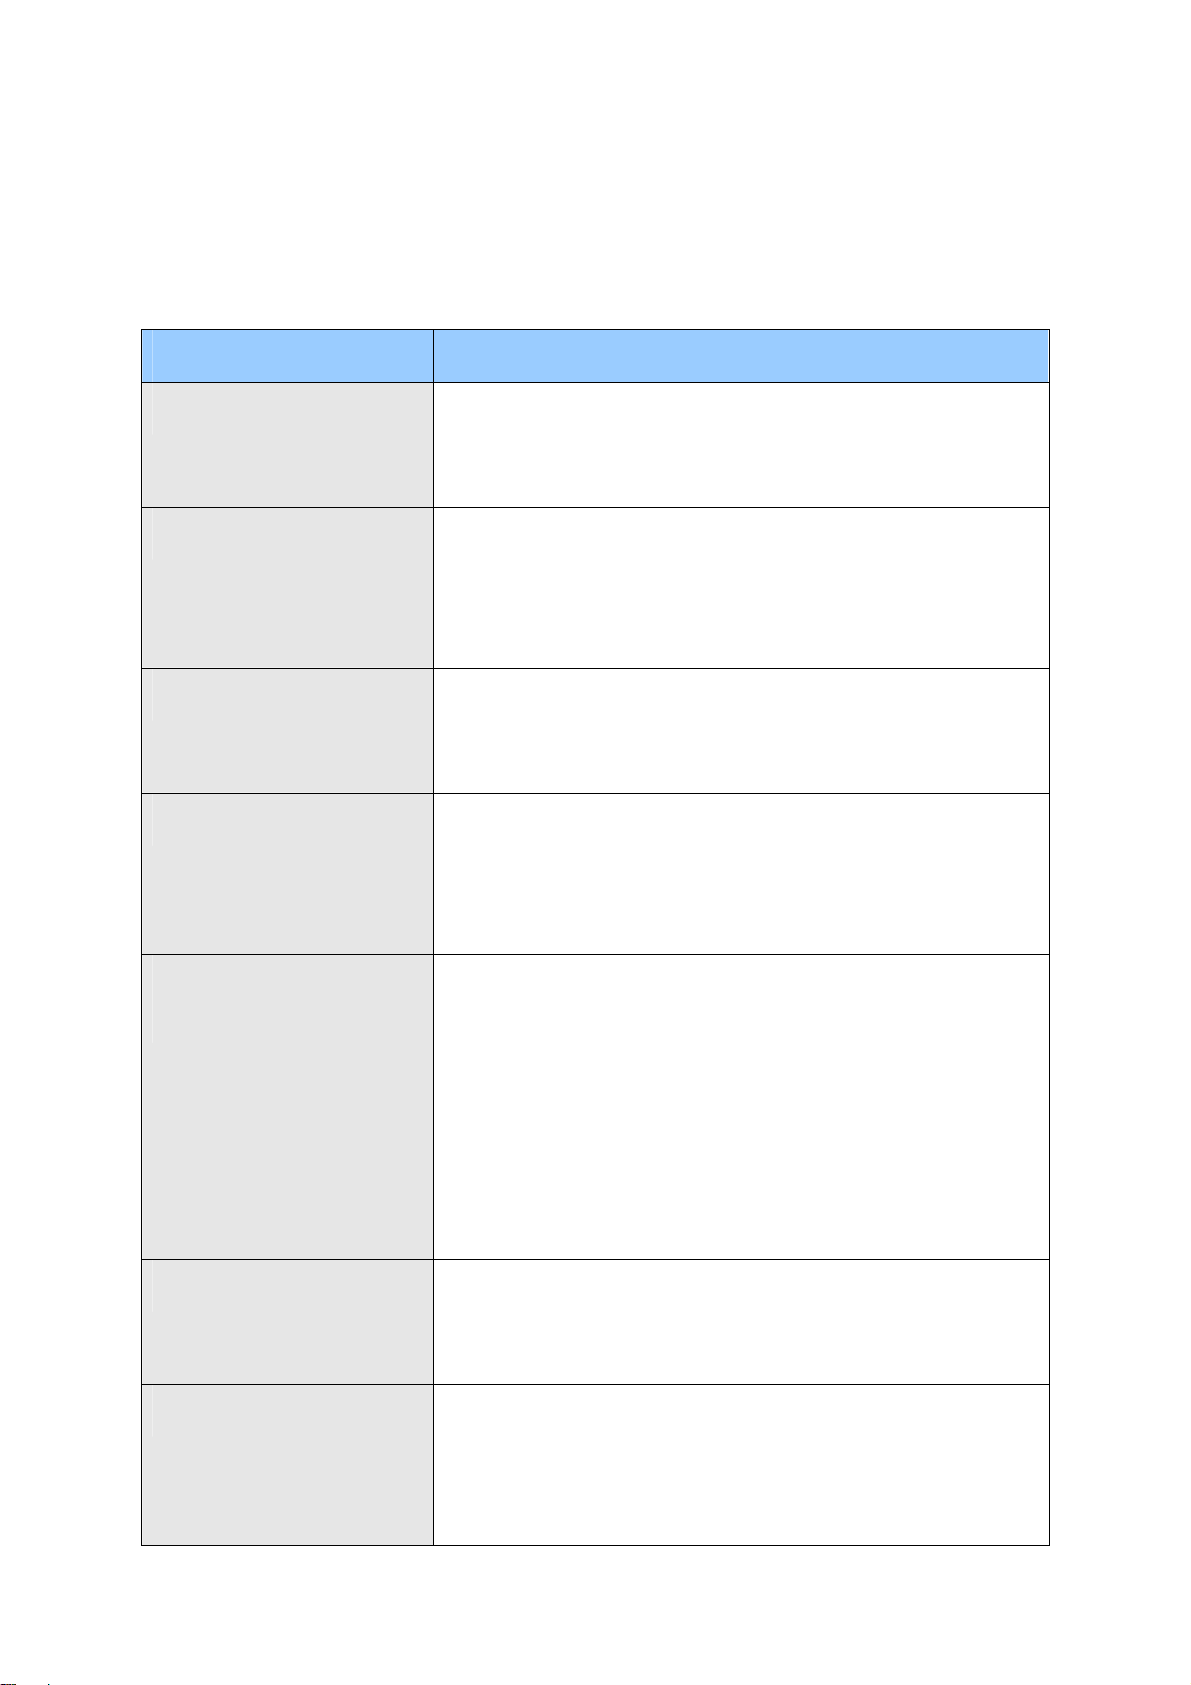
Optional Accessories
Optional devices can expand the capabilities and versatility of your GV-CS1320. Contact your
dealer for more information.
Name Details
GV-Reader 1352 V2
GV-RK1352
GV-R1352
GV-DFR1352
GV-GF Fingerprint
GV-Reader 1352 V2 is a card reader that uses a 13.56 MHz
frequency. It has both Wiegand and RS-485 outputs that can
be connected to any standard access control panel.
GV-RK1352 is a card reader with keypad that uses a 13.56
MHz frequency. The reader has both Wiegand and RS-485
outputs that can be connected to any standard access control
panel.
GV-R1352 is a card reader that uses a 13.56 MHz frequency.
The reader has both Wiegand and RS-485 outputs that can
be connected to any standard access control panel.
GV-DFR1352 is a card reader that uses a 13.56 MHz
frequency. The reader has both Wiegand and RS-485
outputs that can be connected to any standard access control
panel.
GV-CS1320 is compatible with GV-GF1921 / 1922. The
Readers
GV-CR420
Push Button Switch
reader supports three operation modes: Fingerprint Only,
Fingerprint + Card and Card Only. In Fingerprint Only mode,
the fingerprints are enrolled through GV-ASManager. In
Fingerprint + Card mode, the fingerprint templates are stored
on the user card. In Card Only mode, the users only need to
swipe the card to be granted access. Readers with optical
and capacitance sensors are available.
GV-CR420 is a card reader with a built-in 4MP wide angle IP
camera. The card reader recognizes identification cards and
transmits live view through network connection.
The push button switch can be integrated with access control
system, allowing door exit by momentarily activating or
deactivating the electric locking device. Both American
standard and European standard push buttons are available.
iii
Page 6
Name Details
GV-IB25 / 65 / 85 Infrared
Button
Electric Lock
GV-AS ID Card & GV-AS
ID Tag
Power Adapter
The GV-IB25 / 65 / 85 Infrared Button detects infrared
movement within 3 to 12 cm and allows you to open the door
with a wave of hand.
Three types of electric locks are available: electromagnetic
lock, electric bolt and electric strike.
GV-AS ID Cards and GV-AS ID Tags are ideal for business
and residential environment, where access control is
important for security reasons. 13.56 MHz cards and tags are
available.
Contact your sales representative for the countries and areas
supported.
iv
Page 7

Introduction
1
1. Introduction
Welcome to the GV-CS1320 Camera Access Controller Quick Start Guide. In the following
sections, you will learn the basic installations and configurations of GV-CS1320. For a
detailed user manual, see the GV-CS1320 Camera Access Controller User’s Manual on the
Software DVD.
1
Page 8
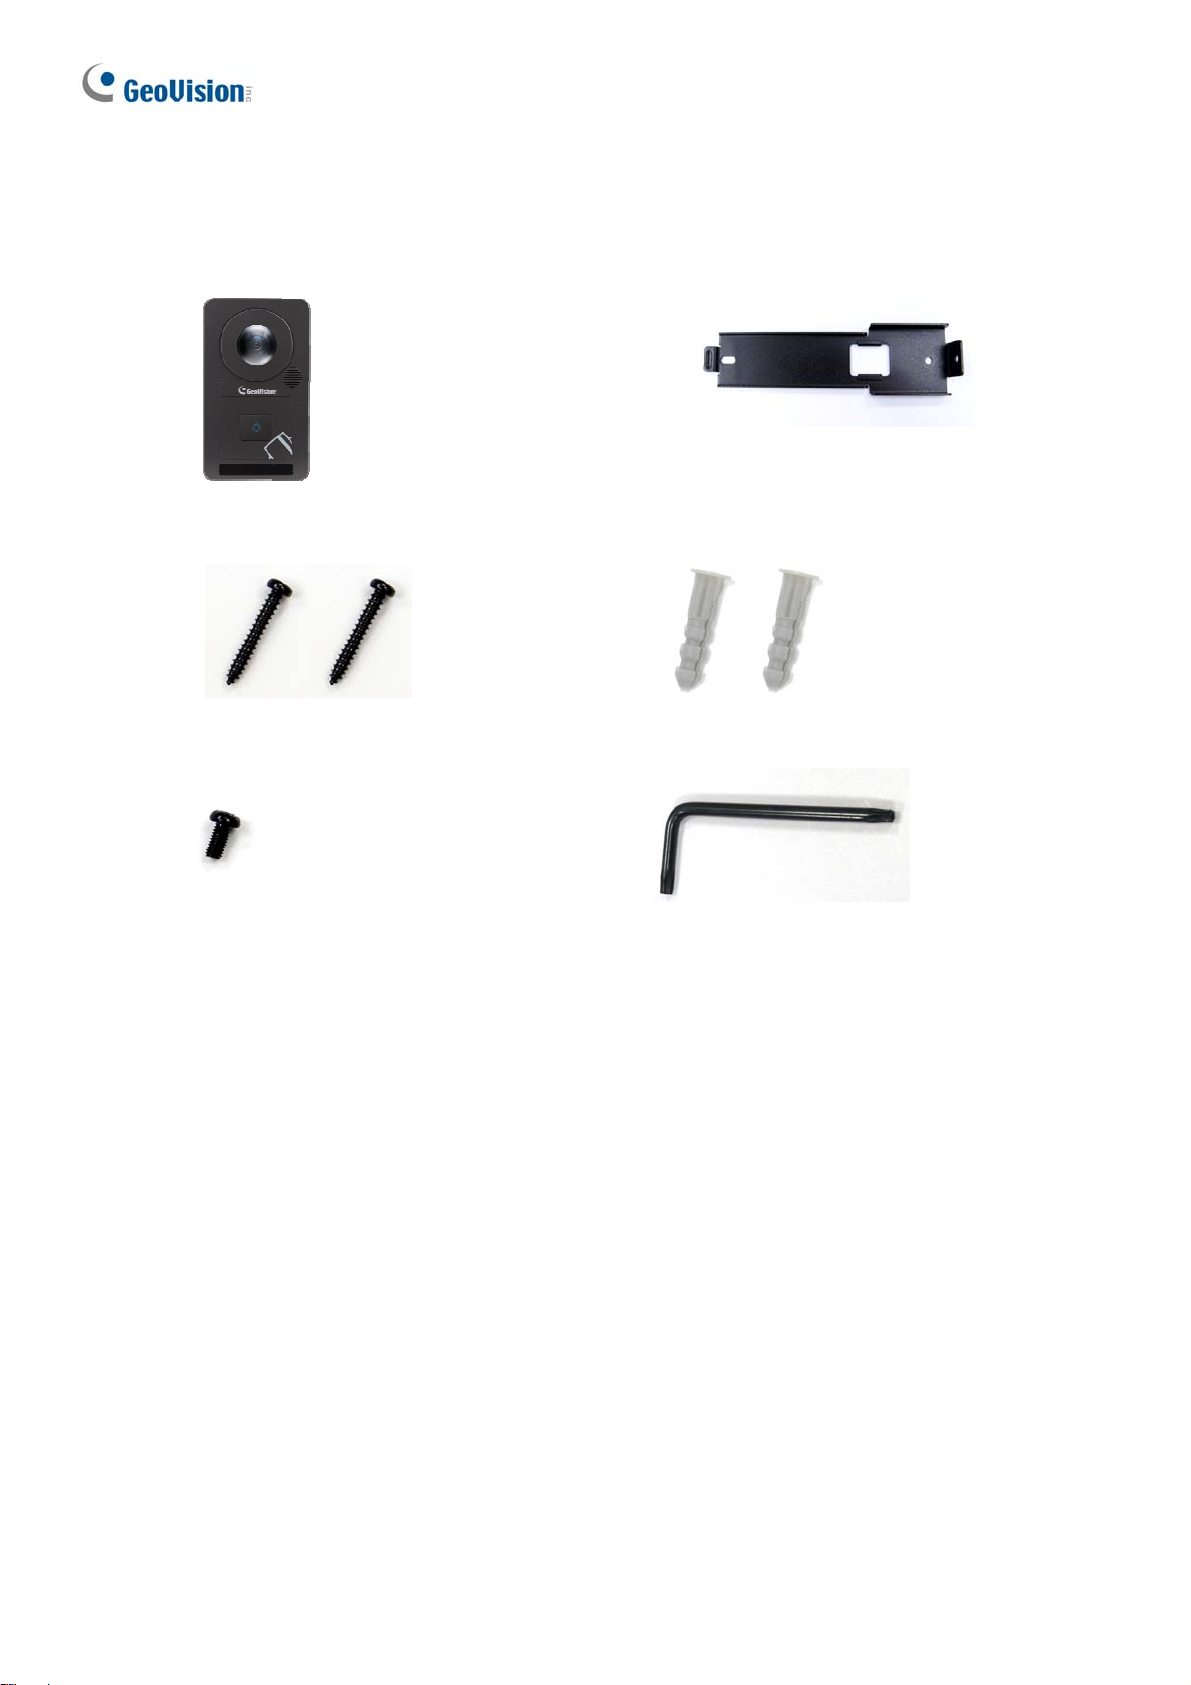
1.1 Packing List
GV-CS1320
Standard Screw x 2
Security Tube
Mounting Plate
Plastic Screw Anchor x 2
Torx Wrench
Silica Gel Bag
Software DVD
Micro SD Card 2 GB
Warranty Card
2
Page 9
Introduction
1
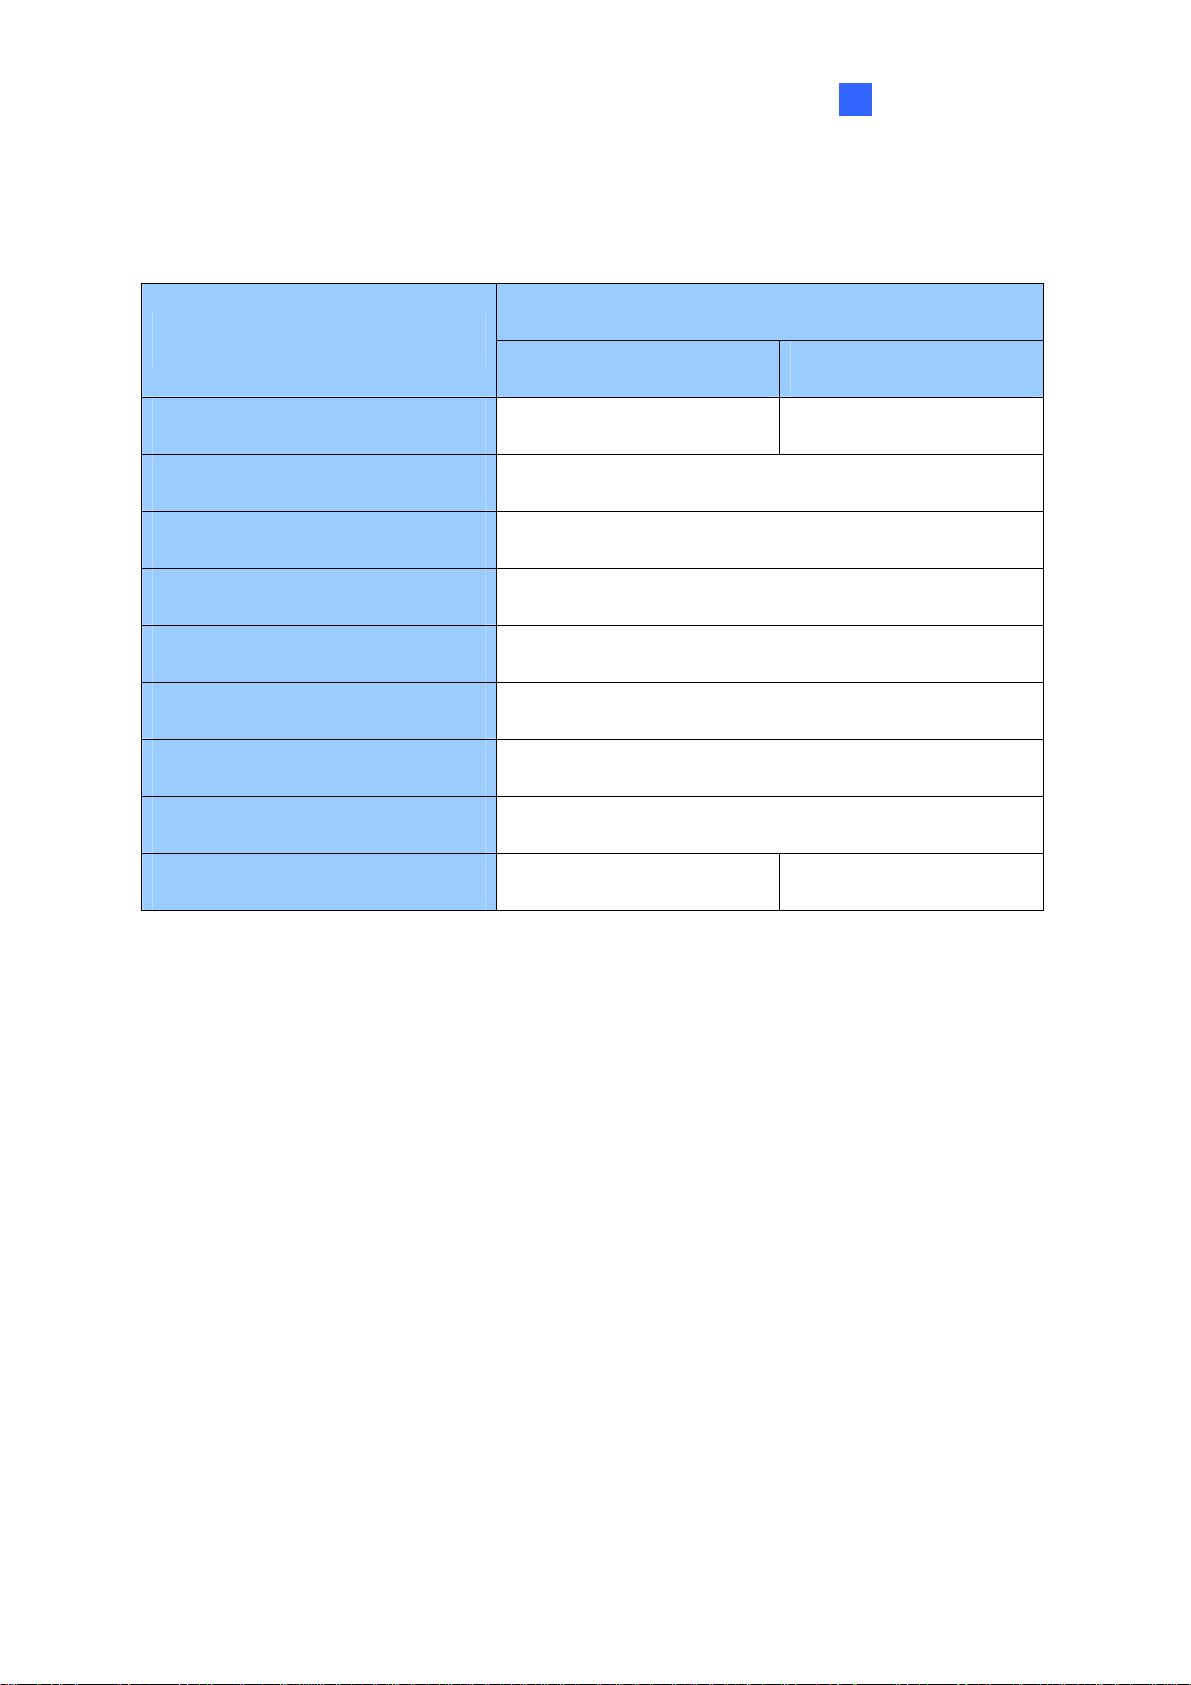
1.2 Compatible Software Versions
The GeoVision software versions compatible with GV-CS1320 are listed below.
GV-CS1320 Firmware Version
Software
V1.0 V1.10
GV-ASManager
GV-VMS
GV-System (DVR/NVR)
GV-Control Center
GV-Failover Server
GV-Redundant Server
GV-GIS
GV-Recording Server
GV-Edge Recording Manager
V4.3.5.0 V4.3.5.0 / V4.4.0.0
V15.10
V8.6.2.0 with Patch
V3.3.0.0 with Patch
V1.1.0.0 with Patch
V1.1.0.0 with Patch
V3.1.1.0 with Patch
V1.2.5.0 with Patch
V1.1.0.0 with Patch V1.2.0.0
3
Page 10

1.3 Overview
No. Name Function
1 Lens Receives image.
2 Microphone Receives sound from GV-CS1320.
3 Card Reader Reads ID cards or ID tags.
4 IR LEDs Automatically illuminates for night time use.
5 Speaker Talks to the surveillance area from the local computer.
Bell Button (touch
6
pad)
7 Default Button
8 Power Cable Connects to power supply. See 3.6 Connecting the Power.
9 Ethernet Port
Touch to activate the talk mode.
Resets all configurations to default factory settings. See 7
Restoring to Factory Default.
Connects to network and power supply. See 3.5 Connecting
GV-CS1320 to PC.
4
Page 11

Installation
2
2. Installation
After the location of your GV-CS1320 is decided, follow the steps below to install the camera
access controller.
1. Attach the single gang power box to the wall.
2. Place the mounting plate on the single gang power box and secure with the 2 standard
screws provided.
3. Place GV-CS1320 on the mounting plate togeth
thread the cables through the holes.
er with the single gang power box and
5
Page 12

4. Secure the security screw on the bottom with the mounting plate.
6
Page 13

Connecting GV-CS1320
3
3. Connecting GV-CS1320
3.1 Connecting RS485 Readers
You can establish RS-485 connection with any GV-Readers. GV-CS1320 can connect with up
to 2 readers. You need two power wires and two RS-485 wires from one reader to
GV-CS1320. When connecting a second reader to GV-CS1320, you will need to set up a
separate power source to power the second reader if the total power consumption (including
output devices) exceeds 12V.
The table below shows the wire assignments of RS485 connection on GV-CS1320.
Wire color Definition
Red 12V DC
Black GND
Blue RS-485 +
Light Blue RS-485 -
7
Page 14

3.2 Connecting Network Readers
GV-CS1320 supports network connection with GV-CR420 and GV-GF1921 / 1922.
8
Page 15

Connecting GV-CS1320
3
3.3 Connecting Input Devices
GV-CS1320 supports 2 types of inputs:
1. Sensor inputs, e.g. door status sensor
2. Button inputs, e.g. door opener and exit button
All inputs are dry contact and can be configured as normally open (NO) or normally closed
(NC) through the GV-CS1320 Web interface. The default value is NO. To change the input
status, see Input Setting, Chapter 4, GV-CS1320 Camera Access Controller User’s Manual.
The table below shows the wire assignments of input connectors on GV-CS1320.
Wire color Definition
Yellow Sensor IN1
Light Red Button IN2
Brown IN COM
9
Page 16

3.4 Connecting Output Devices
GV-CS1320 supports 1 type of output: Door outputs, e.g. electronic lock.
The table below shows the wire assignments of output connectors on GV-CS1320.
Wire color Definition
Purple Door COM
Orange Door NC
Gray Door NO
Check if your output device meets the following absolute maximum ratings before connecting
it to the Door outputs.
Breakdown Voltage
Continuous Load Current
Note: Absolute Maximum Ratings are those values beyond which damage to GV-CS1320
circuit board may occur. Continuous operation of GV-CS1320 at the absolute rating level
may affect GV-CS1320’s reliability.
To connect an output device:
The example below illustrates the connection of a locking device to GV-CS1320. Connect the
(+) point on the locking device to the Door COM wire on GV-CS1320, connect the two (-)
points of the locking device and the external power supply together, and connect the (+) point
on the external power supply to the Door NO or Door NC wire on GV-CS1320 based on the
state of the locking device.
250V AC, 220V DC
1A (30V DC), 0.3A (125V AC)
10
Page 17

Connecting GV-CS1320
3
3.5 Connecting GV-CS1320 to PC
Connecting GV-CS1320 to a computer enables you to access its Web interface and connect it
to GV-ASManager if the computer is installed with GV-ASManager. The computer running
GV-ASManager software can be used to monitor the access information and alarm messages
from GV-CS1320. The communication link between the computer and GV-CS1320 requires a
network connection.
The figure below illustrates the network connection between GV-CS1320 and the computer.
11
Page 18

When GV-CS1320 is connected to GV-ASManager, GV-ASNotify will generate a notification
message whenever the bell button (touch pad) on GV-CS1320 is activated. You can use
GV-ASNotify to watch live view and communicate with the surveillance site with the
microphone and speaker functions of GV-ASNotify. For details, see Chapter 15, GV-ASNotify
in the GV-ASManager User’s Manual.
Note:
1. GV-CS1320 is only compatible with GV-ASManager V4.3.5.0 or later.
2. While GV-CS1320 is performing a power reset, duplicate messages may be displayed in
the System Event Log on GV-ASManager.
12
Page 19

Connecting GV-CS1320
3
3.6 Connecting the Power
You can choose to supply power using a power adapter or using a Power over Ethernet (PoE)
adapter.
z When using a Power Adaptor, connect 12V and GND wires to a 12V, 3A power adapter
and then connect the power adapter to a power source.
The table below shows the pin assignments of the power connectors on GV-CS1320.
Wire color GV-CS1320 Definition
Red 12V DC
Black GND
z When using PoE adapter, power will be provided to the device through the Ethernet
cable.
Note:
1. Power should only be applied to the unit when all connections are completed and tested.
2. GV-CS1320 produces an output voltage of 12V. You will need to connect an external
power supply if the total power consumption exceeds 12V after readers and output
devices are connected
13
Page 20

4. Accessing GV-CS1320
4.1 Web Browser
To access the functions and settings of GV-CS1320 on the Web interface, ensure your PC
use one of the following web browsers.
Browser Internet Explorer 9.x or later
Firefox
Google Chrome
Safari
Note: For users of non-IE browsers, download GV-Web Viewer to access full functioning
user interface. See 3.1 Accessing Your Surveillance Images, Chapter 3, GV-CS1320
Camera Access Controller User’s Manual.
14
Page 21

4
Accessing GV-CS1320
4.2 Looking Up the Dynamic IP Address
By default, when GV-CS1320 is connected to LAN with a DHCP server, it is automatically
assigned with a dynamic IP address. Follow the steps below to look up its IP address.
Note: The PC installed with GV-IP Device Utility must be under the same LAN with
GV-CS1320.
1. Install the GV-IP Device Utility program included on the Software DVD.
2. On the GV-IP Utility window, click the
button to search for the IP devices connected in
the same LAN. Click the Name or Mac Address column to sort.
3. Click on the IP address of GV-CS1320 and select Web Page.
15
Page 22

4. The login page appears.
5. Type the default ID and password admin and click Apply to login.
16
Page 23

4
Accessing GV-CS1320
4.3 Configuring the IP Address
By default, GV-CS1320, connected to LAN without a DHCP server, is assigned with a static IP
address of 192.168.0.10.
Follow the steps below to assign a new IP address to avoid IP conflict with other GeoVision
devices.
Note: If your router supports the DHCP server, GV-CS1320 will obtain a dynamic IP
address from the DHCP server each time it connects to the LAN, instead of using
192.168.0.10.
1. Open your web browser, and type the default IP address http://192.168.0.10
2. In both Login and Password fields, type the default value admin. Click Apply.
3. In the left menu, select Network an
d then LAN to begin the network settings.
17
Page 24

4. Select Static IP address. Type the IP Address, Subnet Mask, Router/Gateway, Primary
DNS and Secondary DNS.
5. Click Apply. GV-CS1320 is now accessible by entering the assigned IP address on the
web browser.
Important:
1. If Dynamic IP Address or PPPoE is enabled, you need to know which IP address the
camera will get from the DHCP server or ISP to log in. If your camera in installed in a
LAN, use the GV-IP Device Utility to look up its current dynamic address. See
Checking the Dynamic IP Address, Chapter 2, GV-CS1320 Camera Access Controller
User’s Manual.
If your GV-CS1320 uses a public dynamic IP address, via PPPoE, use the Dynamic
DNS service to obtain a domain name linked to the camera’s changing IP address
first. For details on Dynamic DNS Server settings, see Advanced TCP/IP, Chapter 4,
GV-CS1320 Camera Access Controller User’s Manual.
2. If Dynamic IP Address and PPPoE is enabled and you cannot access the unit, you
may have to reset it to the factory default settings and then perform the network
settings again. Refer to section 7 to see how to restore to factory default settings.
18
Page 25

5. The Web Interface
5
The Web Interface
8
1
No. Name Function
1 Play Plays live video.
2 Stop Stops playing video.
3 Microphone Talks to the surveillance area from the local computer.
4 Speaker Listens to the audio around GV-CS1320.
5 Snapshot Takes a snapshot of live video.
6 File Save Records live video to the local computer.
Switches to full screen view. Right-click the image to have these
7 Full Screen
Show System
8
Menu
options: Snapshot, Digital PTZ, Wide Angle Lens Dewarping, Wide
Angle Setting, PIP and PAP.
Brings up these functions: Alarm Notify, Video and Audio
Configuration, Remote Config, Show Camera Name and Image
Enhance.
765432
For details, see Chapter 3, GV-CS1320 Camera Access Controller User’s Manual.
19
Page 26

6. Upgrading System Firmware
GeoVision periodically releases the updated firmware on the website. To load the new
firmware into the GV-CS1320, follow the instructions below.
1. In the Live View window, click the Show System Menu button and select Remote Config.
This dialog box appears.
2. Click the Browse button to locate the firmware file (.img) saved at your local computer.
3. Click the Upgrade button to process the upgrade.
20
Page 27

7. Restoring to Factory Default
7
Restoring to Factory Default
You can restore GV
the camera.
-CS1320 to factory default settings using the Web interface or directly on
7.1 Using the Web Interface
1. In the left menu, select Management and select Tools.
2. Under the System Settings section, click the Load Default button.
7.2 Directly on the Camera
1. Unplug the power cable.
2. Use a point object such as the tip of a pen to hold down the Load default button while
plugging the power cable.
3. Wait until the status LED blinks twice to release the Load default button. The process
takes about 5 seconds.
21
 Loading...