

GE Healthcare Portascan User Manual

GE Healthcare
Portascan
Ultrasound Scanner
Users’ Guide

Table of Contents
Explanation of Symbols . . . . . . . . . . . . . . . . . . . . . . . . . . . . . . . . . . . . . . . . . . . . . . . . . .1
Important Information . . . . . . . . . . . . . . . . . . . . . . . . . . . . . . . . . . . . . . . . . . . . . . . . . . . 2
Cautions . . . . . . . . . . . . . . . . . . . . . . . . . . . . . . . . . . . . . . . . . . . . . . . . . . . . . . . . . . . . . . . .3
Installation - Printer set up . . . . . . . . . . . . . . . . . . . . . . . . . . . . . . . . . . . . . . . . . . . . . . .4
Battery Installation . . . . . . . . . . . . . . . . . . . . . . . . . . . . . . . . . . . . . . . . . . . . . . . . . . . . . . 5
Operating the Bladder Scanner . . . . . . . . . . . . . . . . . . . . . . . . . . . . . . . . . . . . . . . . . .6
Printing . . . . . . . . . . . . . . . . . . . . . . . . . . . . . . . . . . . . . . . . . . . . . . . . . . . . . . . . . . . . . . . . .8
Training Video . . . . . . . . . . . . . . . . . . . . . . . . . . . . . . . . . . . . . . . . . . . . . . . . . . . . . . . . . . . 8
Storing Images . . . . . . . . . . . . . . . . . . . . . . . . . . . . . . . . . . . . . . . . . . . . . . . . . . . . . . . . . .9
Setting the Date and Time . . . . . . . . . . . . . . . . . . . . . . . . . . . . . . . . . . . . . . . . . . . . . . . 10
Adjusting the Brightness . . . . . . . . . . . . . . . . . . . . . . . . . . . . . . . . . . . . . . . . . . . . . . . . . 11
Charging the Battery . . . . . . . . . . . . . . . . . . . . . . . . . . . . . . . . . . . . . . . . . . . . . . . . . . . .12
General Probe Cleaning . . . . . . . . . . . . . . . . . . . . . . . . . . . . . . . . . . . . . . . . . . . . . . . . . .13
Handling and Care . . . . . . . . . . . . . . . . . . . . . . . . . . . . . . . . . . . . . . . . . . . . . . . . . . . . . . 14
Safety and Performance . . . . . . . . . . . . . . . . . . . . . . . . . . . . . . . . . . . . . . . . . . . . . . . . . 14
Warnings and Precautions . . . . . . . . . . . . . . . . . . . . . . . . . . . . . . . . . . . . . . . . . . . . . . . 15
Troubleshooting . . . . . . . . . . . . . . . . . . . . . . . . . . . . . . . . . . . . . . . . . . . . . . . . . . . . . . . . .16
Avoiding or identifying and resolving . . . . . . . . . . . . . . . . . . . . . . . . . . . . . . . . . . . . 17
adverse elecromagnetic effects
Warranty . . . . . . . . . . . . . . . . . . . . . . . . . . . . . . . . . . . . . . . . . . . . . . . . . . . . . . . . . . . . . . . . 18
Disclaimer of additional guarantees . . . . . . . . . . . . . . . . . . . . . . . . . . . . . . . . . . . . . . 18
Technical Information . . . . . . . . . . . . . . . . . . . . . . . . . . . . . . . . . . . . . . . . . . . . . . . . . . . 19
Acoustic Output Information . . . . . . . . . . . . . . . . . . . . . . . . . . . . . . . . . . . . . . . . . . . . .20

Explanation of Symbols
Refer to Instructions
Class II
Type BF
Conforms to European Community
CE
Directive 93/42/EEC
External Supply, centre positive
ON / OFF Keypad
Menu
Sagittal Scan
Brightness Control
Printer
Display Zoom IN & OUT
Freeze / Scan
1

Important Information
Product Description
The Portascan bladder volume instrument is a battery operated, portable B-mode ultrasonic scanner,
intended for the non-invasive measurement of urinary bladder volume. The scanner includes a
6.5”colour LCD screen to display cross sectional images of the bladder. A mechanical sector scanning
transducer (with a round crystal) provides a symmetrical ultrasound beam giving high lateral and
transverse resolution with high sensitivity and low signal to noise ratio. The estimated bladder volume
is automatically calculated in millilitres and displayed on the screen.
Notice To All Operators
Caution: United States Federal law restricts this device to use by or on the order of the Physician.
The Portascan should be used only by individuals who have been trained and authorised by their
physician. All operators should read this Operator's Manual. Do not attempt to operate the Portascan
until all instructions and procedures in this manual have been read and thoroughly understood.
Failure to comply with instructions may compromise the performance of the instrument.
This a class A product. The product is suitable for use in all establishments other than domestic.
This product is allowed in domestic establishments under the jurisdiction of a health care
professional (according to IEC60601-1--2 clause 36.201.1.8).
Biological Safety
To date, exposure to pulsed diagnostic ultrasound has not been shown to produce adverse effects.
Ultrasound, however, should be used only by a medical professional when clinically indicated, using
the lowest exposure times possible commensurate with clinical utility.
The ultrasonic output power of the Portascan is not user-adjustable and is limited to the minimum
level necessary for effective performance. Data on acoustic output levels can be found in the
"Technical Description" section of this manual.
Statement of Intended Use
The portascan projects ultrasound energy through the lower abdomen of the patient to obtain an
image of the bladder that is used to determine bladder volume non-invasively.
Warning: Not intended for fetal use.
Warning: Not intended to be used on pregnant patients.
Warning: There is a possible explosion hazard if the
Portascan is used in the presence of flammable
anaesthetics.
2

Cautions
Ultrasound coupling gel
Use an ultrasound coupling gel to prepare the probe for an exam. Certain ultrasound gels may be
toxic to human reproductive cells. It is recommended that you check with the product's
manufacturer to determine appropriate use.
Agents and procedures that may damage the probes.
Some agents and procedures damage probes. Use of any of the following procedures or products
WILL VOID your probe warranty.
Agents that contain the following chemicals are known to damage the probe:
Acetone
Methanol
Denatured ethyl alcohol
Mineral oil
Iodine
Any lotions or gels containing perfume
Check with the ultrasound gel manufacturer regarding gel contents. If you have additional questions
please contact your representative.
3

Installation - Printer Set Up
Access to the inner compartment is gained by pressing the catch situated on
the front of the case (see fig 1).
Lift the lid until it stays in the upright position.
fig 1
Installation of the the Thermal Paper
To install the paper roll in the printer:
1. Lift the printer lid and push forward the green release bar located at
the front of the paper well (fig 2).
2. Feed the paper in under this bar and gently push the paper forward
until the paper emerges from front paper slot (fig 3).
3. Lock the green release bar by pushing down until it clicks into
position.
fig 2
4. Drop the roll into the well and rotate the roll to take up the excess
paper.
5. Finally close the printer lid ready for operation.
fig 3
Paper jam
If the paper type will not feed:
1. Push the print green release bar located at the front of the paper well
(fig 2).
2. Gently pull the paper either forward or backward to clear the paper
jam. Lock the green release bar by pushing down until it clicks into
position.
Paper Roll Replacement
Use only the recommended thermal paper type AFP-235 or equivalent longterm preservable paper, or mid-term preservable paper type
FH65BC-3C or equivalent 58mm wide.
4
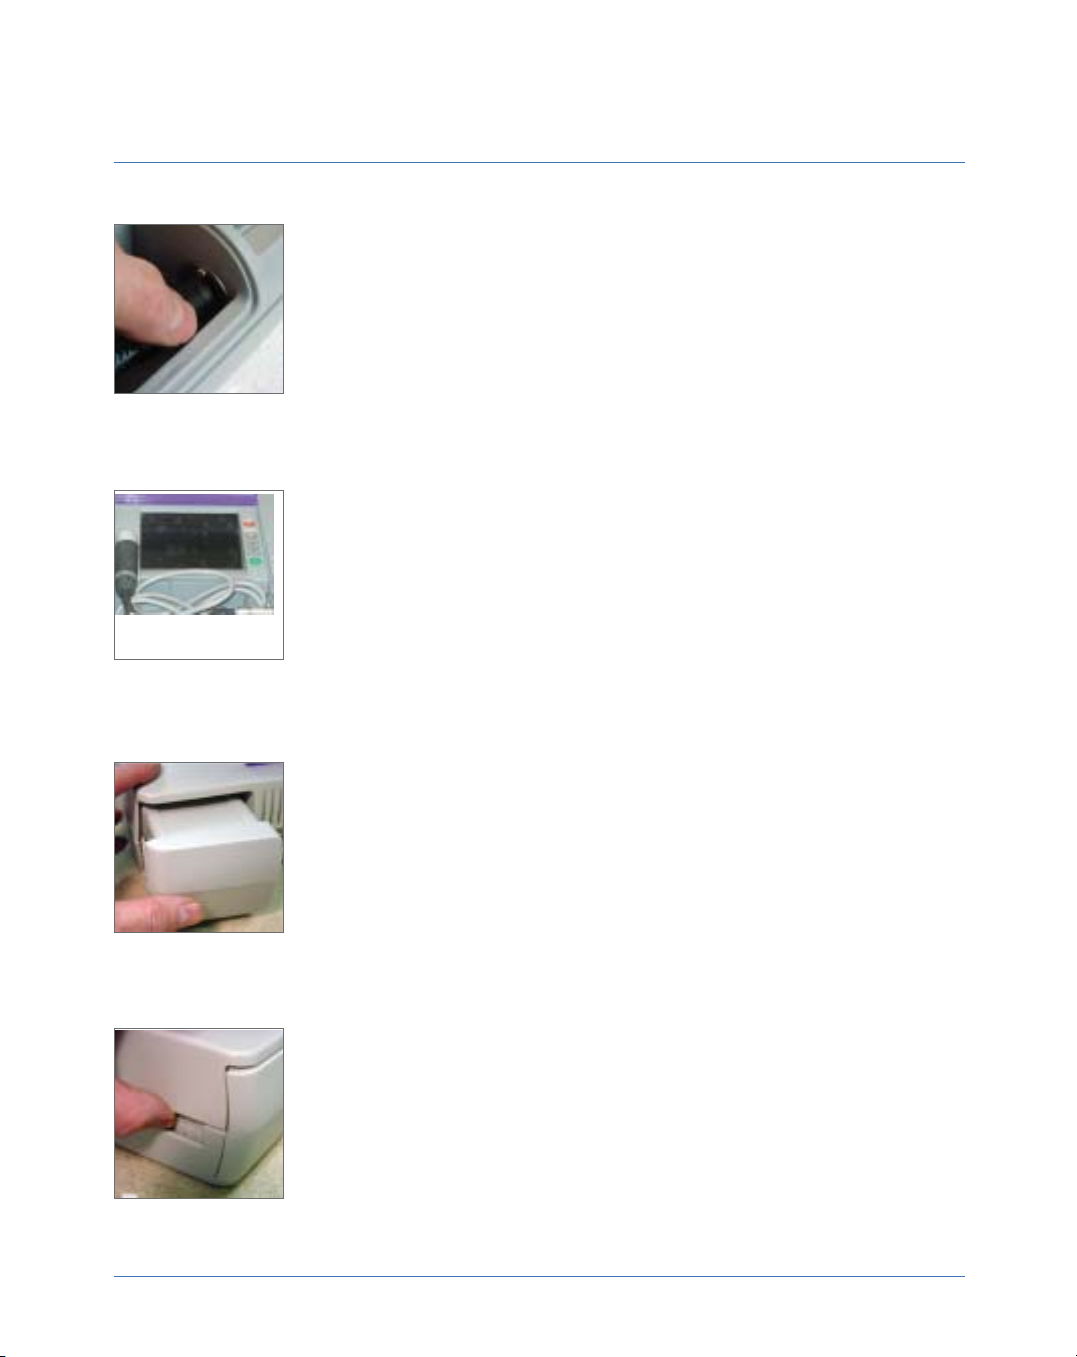
Battery Installation
Connecting the Probe
Insert the probe plug into the socket mounted on the right hand side of the
probe well (see fig 4). Push the connector home and turn the ring clockwise to
lock. To remove, reverse the above actions.
fig 4
Probe Storage
To store the probe, position the probe into the cradle provided on the left side
of the display screen (see fig 5)
The probe may be stowed with the connection made to the case.
Ensure the lid catch is securely latched when closed to keep the probe firmly
in place.
fig 5
fig 6
fig 7
Inserting the Battery
1. Insert the battery (fig 6) into the recess located in the rear of the case.
2. Push until the latch clicks to lock it in place.
3. To remove, press the latch on the side of the case (fig 7). The battery
can then easily be removed.
When the battery is almost empty, a low-battery indication will appear on the
screen. The battery will operate for a further 10 minutes.
(For Battery charging see page 12)
Caution
Do not open, throw in a fire, heat or short circuit .
Charge only with provided Mediwatch charger.
Do not use the battery pack in other devices than specified.
Be sure the battery is within a temperature range of 0° to 40°C.
Storage temperature: -20°C to 30°C.
5

Operating the Bladder Scanner
Turn the scanner on by pressing the ON / OFF button ( fig 8 ). Assuming
that the training video is not shown it will take roughly 20 seconds before
the unit is ready for operation.
fig 8
To perform an estimated reading:
1. Apply a squirt of ultrasound gel to the head of the probe (fig 9)
2. Gently place the probe approximately two finger widths above the pubic
bone. A ridge in the plastic of the probe and a logo are used to indicate
the probe orientation (fig 10). The probe should be orientated so that
fig 9
these are facing the right hand side of the patient.
3. Press the Scan button to activate scanning (fig 11).
fig 10
fig 11
4. Adjust the location of the probe so that the displayed bladder is
positioned as near central as possible in the scanned image (fig 12)
5. Adjust the location of the probe so that the largest possible cross
section of the bladder is displayed.
6. Hold the probe steady and press the Scan button to activate
the volume measurement.
6
 Loading...