

Page 1

This product may be purchased from Connevans Limited secure online store
at www.DeafEquipment.co.uk
DeafEquipment.co.uk
Solutions to improve the quality of life
SSoolluuttiioonnss ttoo iimmpprroovvee tthhee qquuaalliittyy ooff lliiffee
Connevans
Page 2
&/
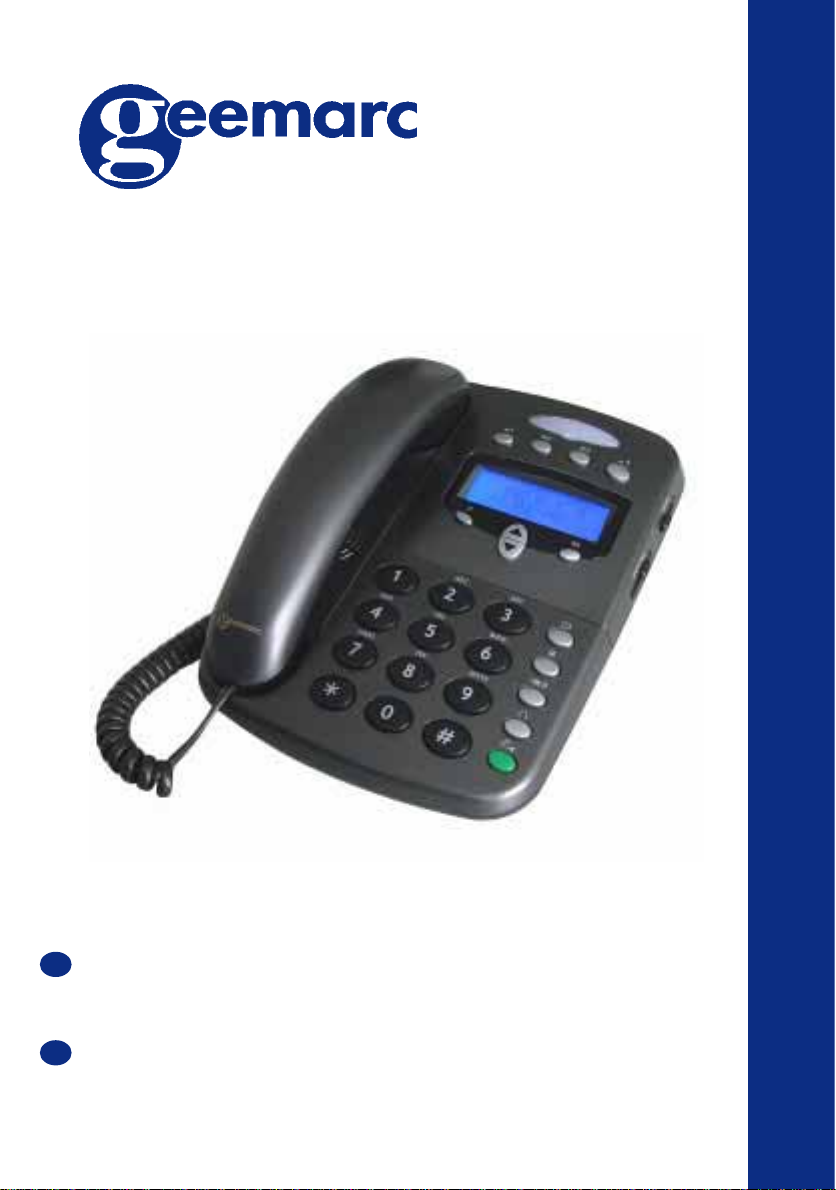
AMPLIFIED DESK TELEPHONE WITH
CALLER IDENTIFICATION
TELEPHONE MULTIFONCTIONS
User guide p.2
Notice d’utilisation p.47
CAUTION:THIS TELEPHONE PRODUCT IS SPECIFICALLY DESIGNED FOR PEOPLE WITH HEARING DIFFICULTIES
*%
AND IS PROVIDED WITH A HANDSET EARPIECE VOLUME CONTROL FOR INDIVIDUAL REQUIREMENTS. DUE CARE
MUST BE TAKEN BY ALL USERS THAT THE HANDSET EARPIECE VOLUME CONTROL IS SET TO THE LOWEST LEVEL
ACCEPTABLE BY EACH RESPECTIVE USER. CARE SHOULD THEREFORE BE EXERCISED TO ENSURE THAT ANY NEW
USERS ARE FAMILIAR WITH THIS REQUIREMENT.
ATTENTION: CE TELEPHONE PEUT ETRE DESTINE AUX PERSONNES AYANT DES PROBLEMES D’AUDITION. IL
)
POSSEDE UN ECOUTEUR A VOLUME VARIABLE. A LA PREMIERE UTILISATION, ASSUREZ VOUS QUE LE BOUTON
DE REGLAGE DU VOLUME SOIT POSITIONNE SUR LA POSITION VOLUME MINIMUM. LES PERSONNES
MALENTENDANTES POURRONT PAR LA SUITE AUGMENTER LE VOLUME POUR L’ADAPTER A LEUR AUDITION.
Telephone
Page 3

INDEX
DESCRIPTION
- General description 4
- LCD screen 6
- Screen display 7
INSTALLATION
- Connecting 8
SETTINGS
- Ringer level adjustment 10
- Shaker option setting 11
- Date / Hour format 11
- Time & date setting 13
- Set the language 14
- Screen contrast adjustment 16
- Auto-on-hook 16
- Auto-screen sizing 17
- Area and Long distance code 18
- Time break recall - “R” 19
- Dialing types and grounding 20
USING THE PHONE
- Answering a call 21
- Making a call 22
- Last number redial 23
- Recall last 30 number dialled 24
2
Page 4

INDEX
- Delete last 30 numbers dialled 24
- R, * and # keys 25
- Storing a number in memory 26
- Dialling stored numbers 26
RECEIVING VOLUME AND TONE 27
PHONE BOOK
- Creating a phone book entry 29
- Create an entry from the incoming call list 31
- Delete a phone book entry 32
- Modify a phone book entry 32
- Make a call from a phone book entry 33
ADVANCED FUNCTIONS
- Use the incoming call list 34
- Recall a number from the CID list 37
- Delete a record from the CID list 38
- Delete all records from the CID list 38
- Call waiting 39
- Message waiting 41
OPTIONS
- Headset and neck loop 42
- Shaker 43
GUARANTEE 44
3
Page 5
DESCRIPTION
1- DESCRIPTIF GENERAL
Flashing
Direct
memories
LCD screen
Delete /
Cancel
incoming call
indicator
Message waiting /
new call LED
Extra volume &
vone activation
Validation
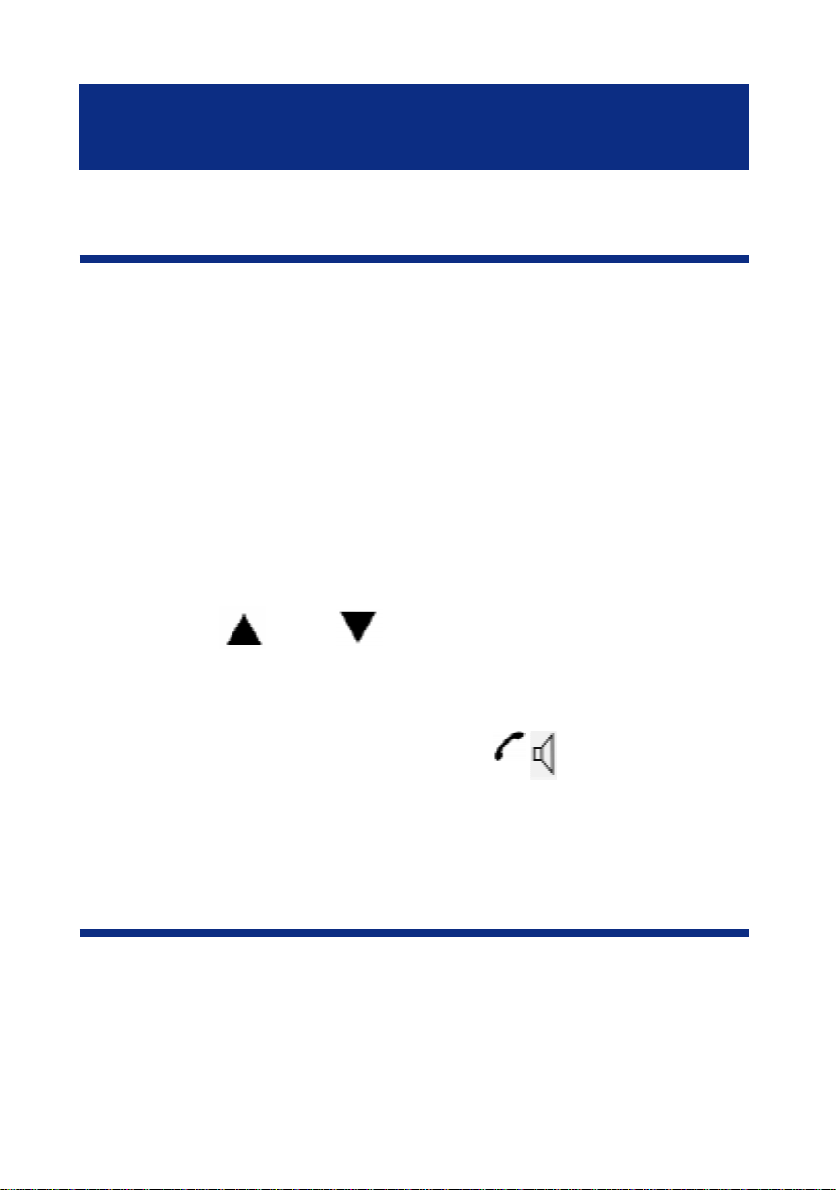
Up / Down
scroll
Hands free /
Speakerphone
4
Phone book
Time break recall
Last number redial
Headset or
Neck loop
Hands free microphone
Page 6
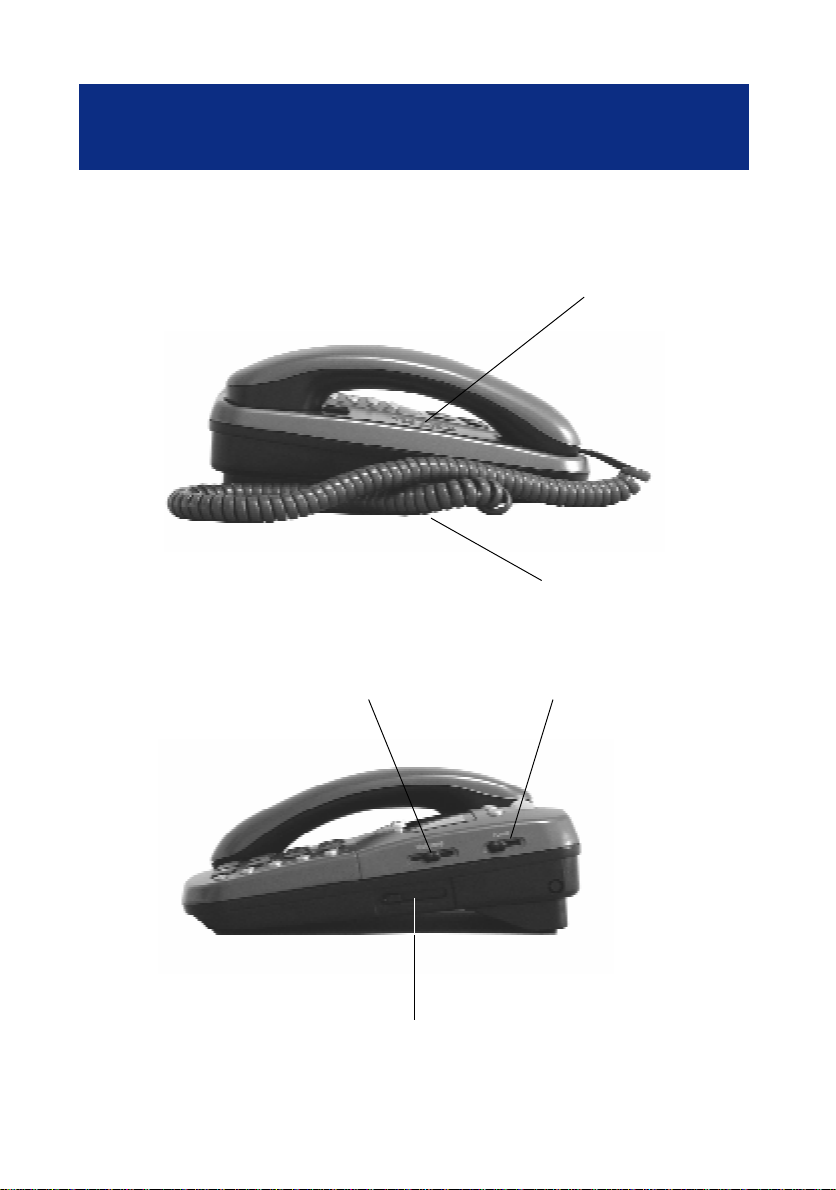
DESCRIPTION
Handset cord
Speaker
Reception volume
adjustment
Speaker volume adjustment
Reception tone
adjustment
5
Page 7
DESCRIPTION
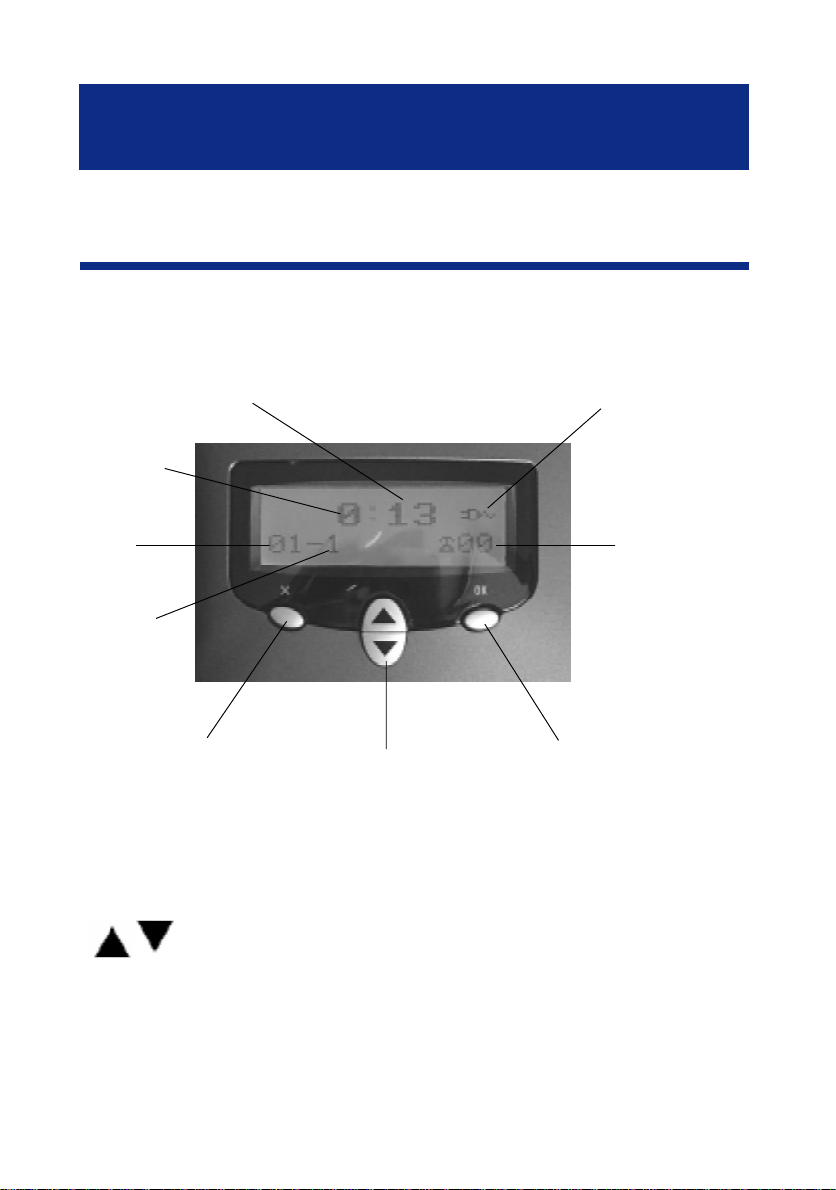
2 - LCD SCREEN
Screen example (On hook position)
Minutes
Hours
Day
Month
Cancel key
Up/down keys
Power network icon
Received calls
record
Validation key
- OK key is used to confirm action or a choice on
the screen.
-
keys are used to scroll through the menu.
- In general, the X key is used to cancel an action/
entry, it can also be used to confirm a choice (for
example to cancel a stored number).
6
Page 8
DESCRIPTION
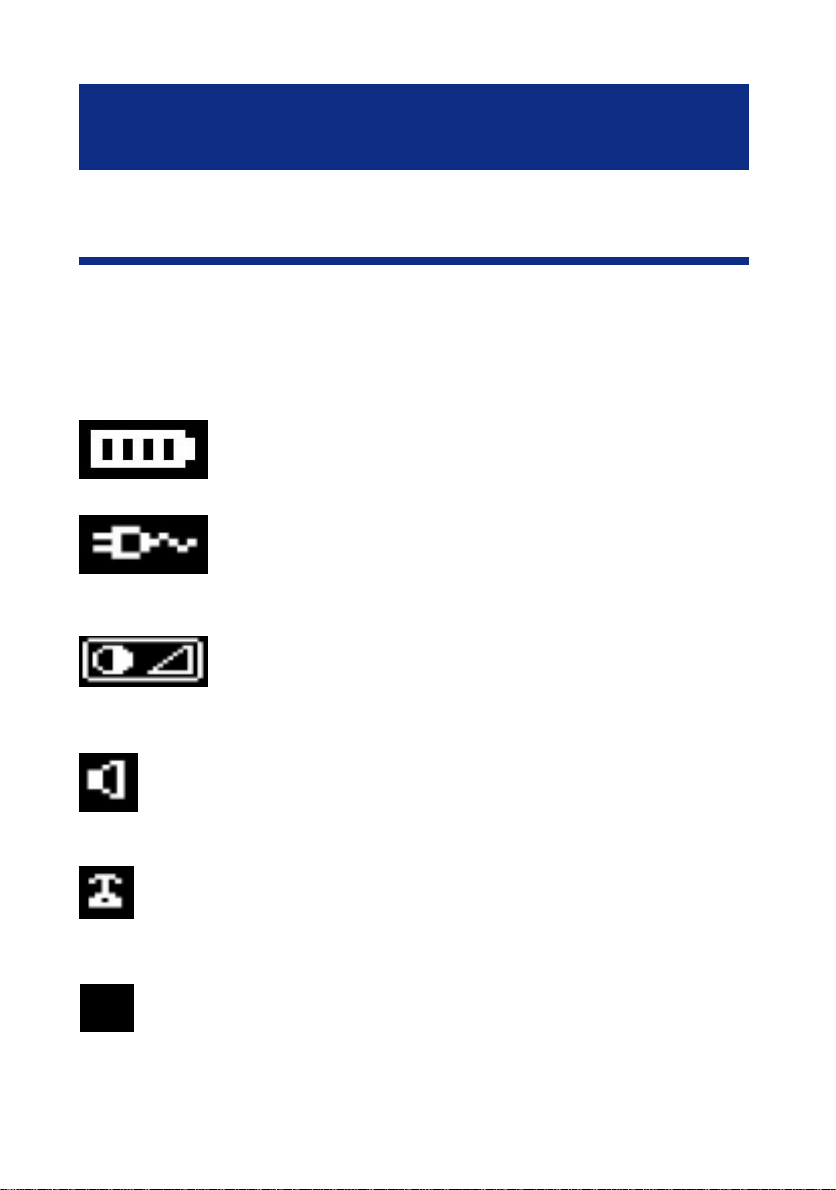
3 - SCREEN DISPLAY
Your CL1400 shows on the LCD screen different
icons to help you using the telephone.
The telephone is supplied by battery
+ battery indicator
The telephone is supplied by adaptor
Screen contrast level.
N
Speaker is activated.
Precede the CID call record number.
To show new records.
7
Page 9
INSTALLATION
CONNECTING
Line cord
socket*
Shaker socket*
Only Geemarc reference
Headset / Neck loop
socket*
Only Geemarc reference
Important: Only Shaker, Headset and Adaptor with Geemarc reference
can be connected to the sockets.
- Connect the handset.
- Open the battery compartment.
- Insert 4 alcaline batteries without mercury (AAA
1.5V type not supplied) with good polarity into the
Adaptor socket**
Only Geemarc
reference
Tone / Pulse /
Grouding switch
Volume & Tone
adjustment
ON/OFF switch
Shaker ON/OFF
switch
Ringer level
adjustment switch
compartment located on the telephone base.
Note : Do not use rechargable batteries, do not do
not dispose batteries in household waste. Pay attention to your local battery disposal regulations.
8
(*) Classified TNV-3 according to EN60950 standard.
(**) Classified “hazardous voltage” according to EN60950 standard.
Page 10

INSTALLATION
- Replace the battery cover.
- Connect the line cord to the socket located at the
rear of telephone, then connect the plug to the
wall socket(*).
- Connect the adaptator plug to the adaptor socket
located on the back of the telephone, then connect it to the wall socket (**). Please choose an
adaptor wall socket near your line plug to enable
you to unplug the adaptor quickly in case of a problem.
Note: The adaptor is required to make the telephone work properly. Batteries are necessary in
case of network power failure to save a stored
number in memory and are required for phone book
use.
If the adaptor is accidentally unplugged (or in case
of power failure) and if the batteries are empty or
not in place, minimal restricted phone features only
will work (such as making a call or answering an
incoming call).
9
Page 11
SETTINGS
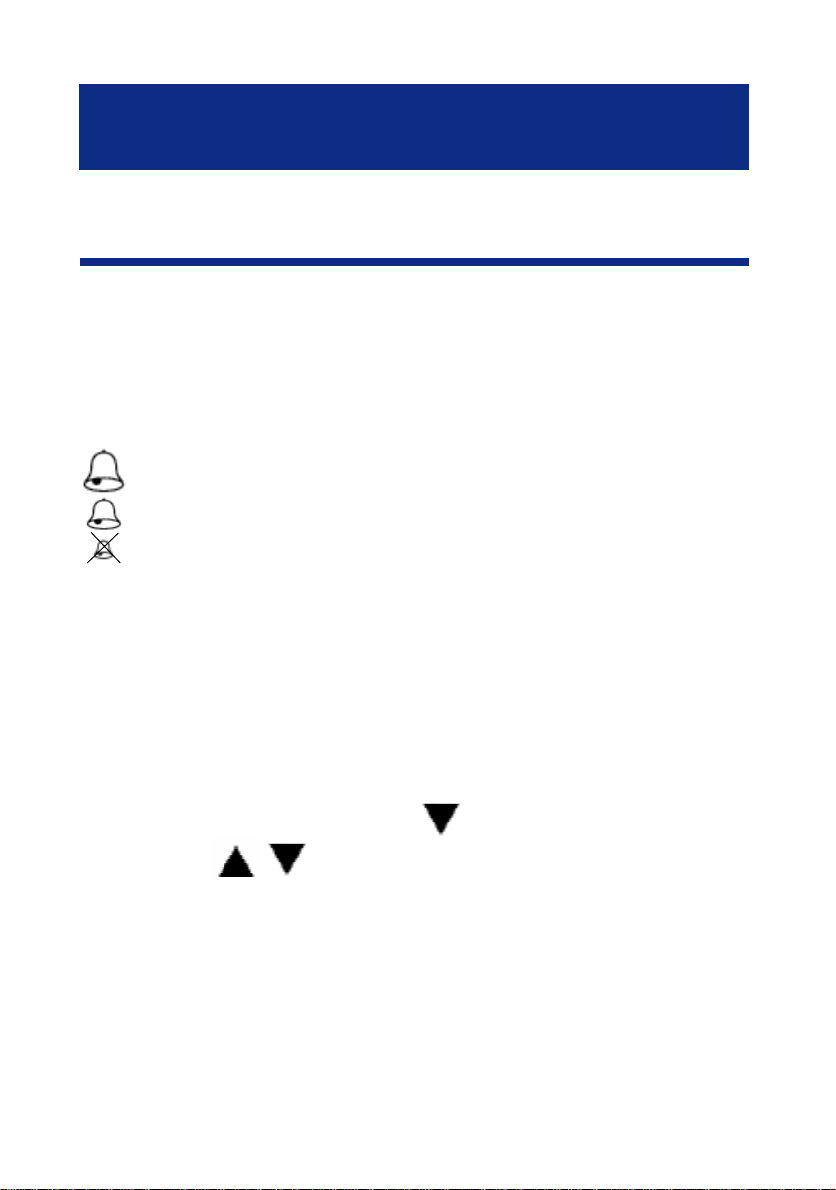
1 - RINGER LEVEL ADJUSTMENT
You can change the ringer volume to a desired
level. Ringer level adjustment switch located on
the upper side allows the ringer to be switched
HI, LOW or OFF:
: Hi
: Low
: Off
Your phone comes with the ringer switched to
«High».
If you don’t like the ringer melody, you can
choose a new one by changing the settings as
follows:
In on hook position,
- Press and hold OK and
- Use the keys to select «SET PHONE».
- Press the OK key to confirm.
- Select «SET RING»
- Press the OK key to confirm.
- Select the ring you would like.
- Press the OK key to confirm.
- New ring will be heard.
- Press the X key 3 times to exit.
10
keys together.
Page 12

SETTINGS
2 - SHAKER OPTION SETTING
A two-position switch located on the upper side
allows to activate (ON) or deactivate (OFF) the
shaker CLA2 (not included).
For more information on this option please refer to
p.43.
3 - CHOOSING DATE / HOUR FORMAT
Date format
You can choose between two date formats:
Day - Month or Month - Day.
In on hook position,
- Press and hold OK and
- Use the or keys to select «SET PHONE».
- Press the OK key to confirm.
- Select «DATE FORMAT».
- Press the OK key to confirm.
- Select «DAY-MONTH» or «MONTH-DAY».
- Press the OK key to confirm.
- Press the X key twice to exit.
11
keys together.
Page 13

SETTINGS
Hour format
You can choose between two hour formats:
12 hours or 24 hours.
In on hook position,
- Press and hold OK and
- Use the
- Press the OK key to confirm.
- Select «HOUR FORMAT».
- Press the OK key to confirm.
- Select «12 HOUR» or «24 HOUR».
- Press the OK key to confirm.
- Press the X key twice to exit.
If you choose «12 HOUR», hours before noon will
be displayed with «AM» and «PM» for the hours
after noon.
or keys to select «SET PHONE».
keys together.
12
Page 14

SETTINGS
4 - TIME & DATE SETTING
In on hook position,
- Press and hold OK and
- Use the
- Press the OK key to confirm.
- Select «HOUR FORMAT».
- Press the OK key to confirm.
- Use the or keys to select the correct
hour.
- Press the OK key to confirm the Hour and move
to Minutes setting.
- Use the
minute.
- When the time is set press OK to pass to Month
and Day setting.
- Press the X key to exit.
or keys to select «SET TIME».
or keys to select the correct
keys together.
Note: When you receive your first call, date and
time will be set autoumatically if you have the CID
feature.
13
Page 15

SETTINGS
5 - SET THE LANGUAGE
You can choose between 16 different languages
including English and French.
To change the language, follow the instructions
below:
In on hook position,
- Press and hold OK and
- Use the or keys to select «SET PHONE».
- Press OK key to confirm.
- Use the
LANGUAGE».
- Press OK key to confirm.
- Select the desirable language using
- Press the OK key to confirm.
- Press X key twice to exit.
or keys to select «SET
keys together.
keys.
14
Page 16

SETTINGS
6 - SCREEN CONTRAST ADJUSTMENT
Your screen has a backlight which automatically
switches off after 15 seconds of inactivity.
Follow the instructions below to set the screen
contrast:
In on hook position,
- Press and hold OK and
- Use the keys to select «SET PHONE».
- Press the OK key to confirm.
- Select «LCD CONTRAST».
- Press the OK key to confirm.
- Scroll with
- Press the X key to exit.
keys to adjust the contrast level.
keys together.
16
Page 17

SETTINGS
7 - AUTO- ON HOOK
This function automatically cancels the line after
8 seconds if the line is busy.
In on hook position,
- Press and hold OK and
- Use the
- Press the OK key to confirm.
- Use the keys to select «AUTO ON HOOK».
- Press the OK key to confirm.
- Use the
activate or deactivate the function.
- Press the OK key to confirm.
- Press the X key twice to exit.
keys to select «SET PHONE».
keys to select «ON» or « OFF» to
keys together.
16
Page 18

SETTINGS
8 - AUTO-SCREEN SIZING
If the auto-screen sizing is activated, the screen
can display up to 18 digits of the number you dial,
otherwise only 8 digits will be displayed on the
screen.
To activate/deactivate the auto-screen sizing
follow the instructions below:
In on hook position,
- Press and hold OK and
- Use the keys to select «SET PHONE».
- Press the OK key to confirm.
- Use the
- Press the OK key to confirm.
- Use the
to activate or deactivate the function.
- Press the OK key to confirm.
- Press the X key twice to exit.
keys to select «DIM:X---->x».
keys to select «ON» or « OFF»
17
keys together.
Page 19

SETTINGS
9 - AREA & LONG DISTANCE CODE SETTING
Your telephone needs to distinguish between local
and long distance calls.
First of all you have to program your area code.
In on hook position,
- Press and hold the OK and
- Use the keys to select «SET PHONE».
- Press the OK key to confirm.
- Use the
AREA&LDS».
- Press the OK key to confirm.
- Use the keys to select the correct area
code.
- Press the OK key to move from digit to digit.
- When the area code is set, press the OK key
and this will lead you to LDS (long distance code)
setting.
- The LCD will show SET LDS CODE.
- Set the LDS code in the same manner as the
area code.
keys to select «SET
keys together.
- Press the X key to exit.
18
Page 20

SETTINGS
10 - TIME BREAK RECALL SETTING - “R”
FUNCTION
Check the Time Break Recall setting of your
CL1400. For the UK the Time Break Recall should
be set to 100 mS. Other settings - 300 mS and
600 mS are used outside the UK.
If you wish to change this value, follow instructions below:
In on hook position,
- Press and hold OK and
- Use the keys to select «SET PHONE».
- Press the OK key to confirm.
- Use the
- Press the OK key to confirm.
- Select a new setting, 300 or 600ms and press
OK to confirm.
- Press the X key twice to exit.
keys to select «SET FLASH».
19
keys together.
Page 21

SETTINGS
11 - DIALING TYPES AND GROUNDING
Switch ETR/PR/T is located on the upper side of
english type models. If you wish to connect your
CL1400 to a public UK/French switch-board (PBX),
move switch ETR/PR/T to position 3 (T). This will
ensure optimal compatibility of your phone with
most (99%) PBX.
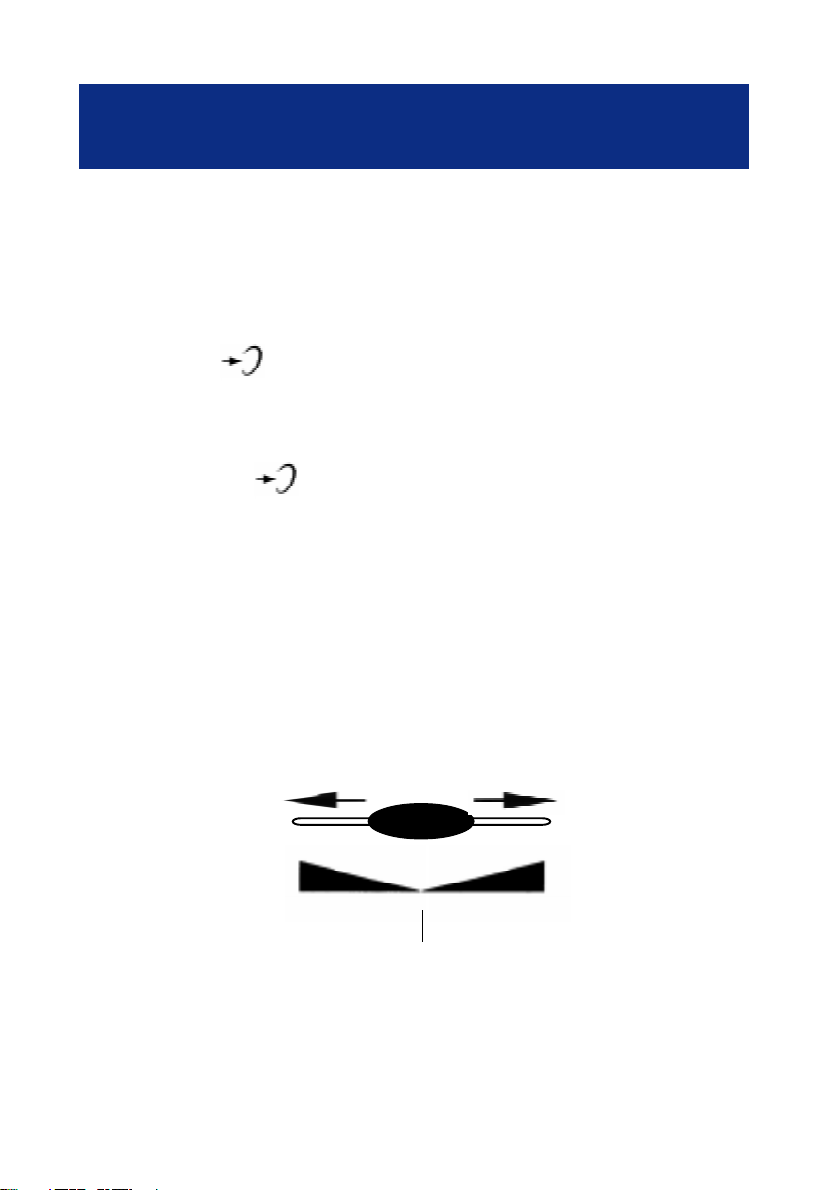
P T
ETR R
Positions: 1 2 3
Position 1:
Pulse dialing. The R is grounded. This option can
be used only within the UK in very special cases.
Position 2:
Pulse dialing. The R is set according to the
determined adjustment (see «Time Break Recall
Setting for R Function» p.19).
Position 3:
Tone dialing. The R is set according to the
determined adjustment (see «Time Break Recall
Setting for R Function» p.19).
20
Page 22

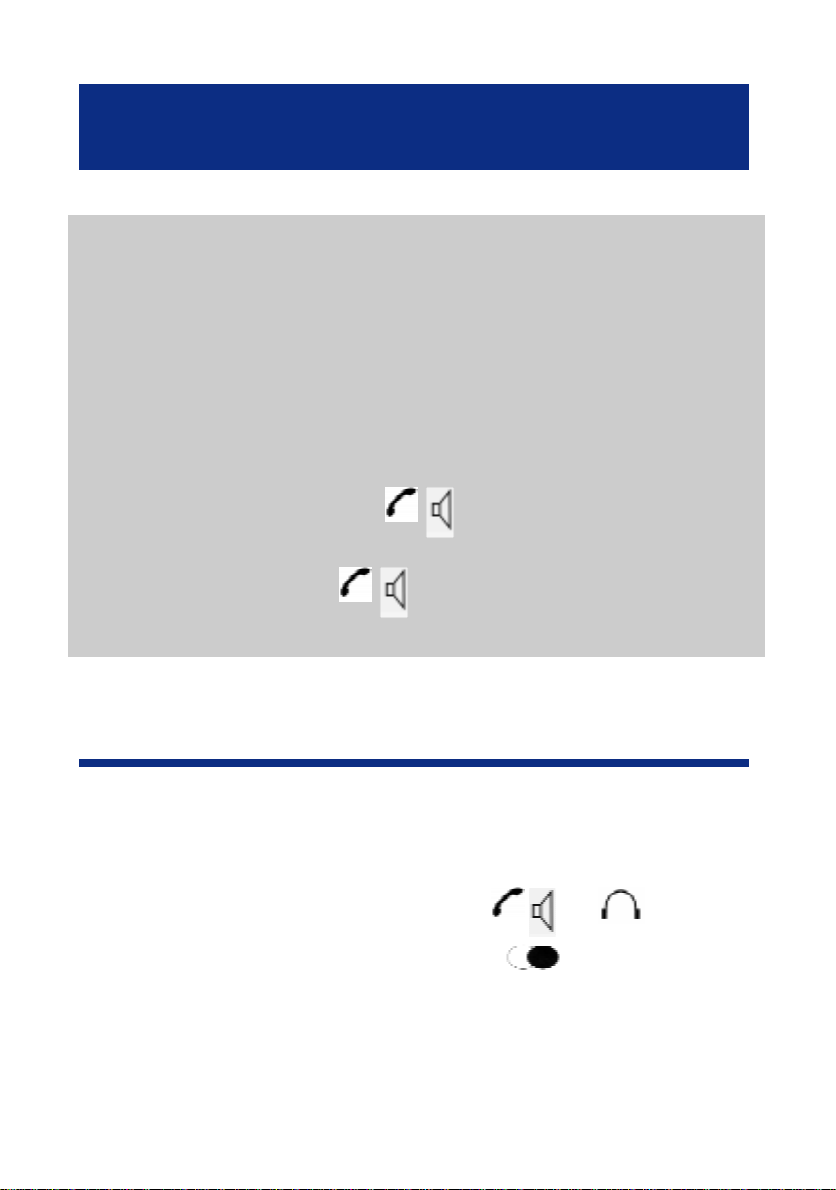
USING THE PHONE
1 - ANSWERING A CALL
During an incoming call, your phone will ring and
bright indicator of incoming call will flash. The
Number or/and the Name of the caller will be
displayed on the screen, if you have subscribed to
the CID service.
When the phone is calling:
- Lift the handset and speak.
- On completion of the call, carefully replace the
handset in the cradle to release the line.
Your CL1400 allows you to speak “hands free”, so
that surrounding people could also hear the
conversation.
- Press the
hands free.
- Press the
/ key to speak with your caller
/ key again to release the line.
21
Page 23

USING THE PHONE
2 - MAKING A CALL
- Lift the handset.
- Await the dial tone and dial required number (it
will be dispalyed on the screen while dialing).
- On completion of the call carefully replace the
handset in the cradle to release the line.
You can also use the «hands free» function to make
a call:
- Press the
- Dial the desired number as soon as you hear the
dial tone.
- When the person answers you, you can speak
hands free. You can adjust the volume using slide
buttons (VOLUME) located on the right side of your
telephone.
- On completion of the call, press the
clear the line.
/ key without lifting the handset.
/ key to
22
Page 24
USING THE PHONE
Note:
To deactivate the «hands free» function during a
call, lift the handset.
Call time counter will be displayed a second after
the call is engaged.
During a call, if you wish to use the «hands free»
function:
- Press and hold the
handset on the cradle at the same time.
- Then release the
- Hands free function is activated.
3 - LAST NUMBER REDIAL
With this function you can redial the last previousely
dialed number.
- Lift the handset or press the / or key.
- Await the dial tone and press
- A previously dialed number will be automatically
redialed.
/ key and replace the
/ key.
/P key.
23
Page 25
USING THE PHONE
4 - RECALL LAST 30 DIALED NUMBERS
You can call back the last 30 dialed numbers.
To call back one of them, follow instructions below:
In on hook position,
- Press the OK key.
The screen will display “DIALED”, the last number
dialed, the total of numbers, date and hour of call
records.
- Use the
record menu and select the number you wish to
dial.
- Lift the handset or press the
The number will be automatically dialled.
5 - DELETING LAST 30 DIALED NUMBERS
In on hook position,
- Press the OK key.
The screen will display “DIALED”.
or keys to scroll through the
/ .
24
Page 26

USING THE PHONE
- Use the or keys to scroll through the
record menu and select the number you wish to
delete.
- Press the X key.
The screen will display “DEL ?”.
- Press again the X key to confirm .
- Press the OK key to exit.
6 - R, * and # KEYS
These are used with the new services provided on
digital exchanges. For details please contact your
network operator.
25
Page 27

USING THE PHONE
7 - STORING A NUMBER IN MEMORY
Your phone can store 3 direct memories. (30 digits maximum for each memory).
To store a number in direct memory please follow
the instructions below:
In on hook position,
- Dial the desired number.
- Press and hold one of the buttons M1, M2 or M3
for 2-3 seconds.
The LCD display will show SAVE OK.
- The number is stored.
- Press the X key to exit.
8 - DIALING STORED NUMBERS
- Lift the handset or press
the dial tone.
- Press one of direct memories M1, M2 or M3, the
stored number will be dialed automatically.
26
/ or and await
Page 28

RECEIVING VOLUME AND TONE
You can increase the volume and adjust the
receiving tone according to your own hearing
requirements.
The button allows extra-receiving volume and
tone functions to be activated during the conversation.
When the function is activated, the red light of
extra-receiving and tone function located near the
button is lit.
Use the TONE and VOLUME buttons to adjust the
level according to your own hearing requirements.
Tone and volume adjustment (15dB to 30dB) is
only activated when the switch
upper side of your phone is set to ON. When this
button is set to OFF only the volume can be adjusted
from 0dB to 15dB.
27
located at the
Page 29

RECEIVING VOLUME AND TONE
TONE
Bass
+10dB max
Normal
Treble
+10dB max
VOLUME
0dB
+15dB +30dB
+15dB
OFF
ON
Note: When the tone (treble), earpiece volume and
sending levels are set to the maximum, whistling
may appear. If whistling occurs the sending level
settings should be decreased (sending level switch
is located at the upper side of your phone. When
the switch located behind the phone is ON, the
extra-receiving and tone functions are
automatically activated each time you use the
phone.When the switch is switched to OFF, you
will need to activate the function by pressing the
button .
28
Page 30

PHONE BOOK
You can store 99 entries into the phone book with
the name and phone numbers of your correspondant.
1 - CREATING A PHONE BOOK ENTRY
In on hook position,
- Press and hold OK and
- Use the
- Press the OK key to confirm.
- Use the keys to select «ADD».
- Press the OK key to confirm.
- Enter the number (30 digits max. per memory).
- Use the X key to delete a wrong digit.
- Press the OK key to confirm the number and
enter the name corresponding to entered number.
- Select the desired letter by pressing the
corresponding key.
While typing the name you can use the following
table or the letters printed on the keypad to help
you.
or keys to select «PHONE BOOK».
keys together.
29
Page 31

PHONE BOOK
웍
- To insert a «space», press on the OK key twice.
- If the next letter is the same as the previous letter
(or located on the same key), press first on the OK
key to move and select the desired letter.
- Use the X key to delete a wrong letter.
- When the name is correct, press the OK key for
3 seconds to confirm the Number and Name
storage.
- Now you can create a new entry.
- Press the X key to exit.
Note : If you wish to insert a pause in the stored
number, press the key whilst entering (a P will
be displayed on the screen).
30
Page 32

PHONE BOOK
2 - CREATING AN ENTRY FROM THE INCOMING
CALL LIST
If you have subscribed to a Caller Idendification
Service (CID feature), you have the possibility to
create an entry from the incoming call list because
each call is stored into the phone book as a CID
entry.
In on hook position,
- Press
Incoming calls will be displayed on the screen.
- Use and keys to select the number that
you wish to store in the phone book from incoming
calls list.
- Press and hold the OK key until the last number
digit flashes. You may update the number at this
stage.
- Confirm the number by pressing the OK button.
- You can now modify and enter the name of the
caller with the correct number or press and hold
for 3 seconds the OK key to confirm the proposed
CID name.
- Press the X key to exit.
or key.
31
Page 33

PHONE BOOK
3 - DELETING A PHONE BOOK ENTRY
In on hook position,
- Press the
- Use
delete.
- Press the X key, the screen will display «DEL?»
- Press the X key again to confirm.
- Press the OK key to exit.
4 - MODIFYING A PHONE BOOK ENTRY
In on hook position,
- Press the key.
- Use
modify.
- Press and hold the OK key until the last digit
key.
keys to select the number you wish to
keys to select the number you wish to
flashes.
- Press the X key to modify the number and insert
a new number.
- Press the OK key.
- You can now modify the name.
- Press the X key to delete a letter.
32
Page 34

PHONE BOOK
For help see the «CREATING A PHONE BOOK
ENTRY» p.29 to modify the name.
- Press the OK key for 3 seconds to confirm the
new entry.
- Press the X key to exit.
5 - DIALING FROM A PHONE BOOK ENTRY
In on hook position,
- Press the
- Use keys to select the number you wish to
dial. You can also get access quickly to a phone
book entry by entering the first letter of the name.
- Lift the handset or press
- The number will be dialled automatically.
Note : You can review the incoming call list during
a call by pressing the OK key, then use the
keys to move through the phone book list.
key.
/ or .
33
Page 35

ADVANCED FUNCTIONS
CID FEATURES
1 - USE THE INCOMING CALL LIST
Associated with the CID feature, the call list allows
you to store the incoming calls. When the call list
memory is full, a new call will take the place of the
oldest one. Each call is stored as an entry with the
date, the hour and in rotation order as received.
Call hour and
Caller name
date
-$0(6
Call number
(arrival order)
Caller number
Note : If the caller does not wish to show his phone
number or his name, the screen will display
PRIVATE.
35,9$7(
34
Page 36

ADVANCED FUNCTIONS
CID FEATURES
If the number is unknown by the telephone center
(international incoming call for example), the screen
will display OUT OF AREA:
287 2) $5($
When the same caller calls several times, only the
last call will be stored in the incoming call records
list and the screen will display + after the number
of records.
1
+(/(1
Note : During the entries review, the screen will
display N for a new entry which has not been
reviewed.
35
Page 37

ADVANCED FUNCTIONS
CID FEATURES
When a new call is received, the new call LED will
flash and the screen displays:
727$/ 1(:
To review the new calls, use the
The total number of incoming call entries on the
incoming call list will still be displayed on the screen.
This example shows the
total number of calls in the
incoming call list is 28 with
a new one.
& keys.
When all new calls have
been reviewed, the new call
LED will disappear and the
screen will return to idle
state after a few seconds.
When the incoming call list
is empty (if records have
been deleted for example)
the screen will display 00.
36
Page 38

ADVANCED FUNCTIONS
CID FEATURES
2 - RECALL A NUMBER FROM THE CID LIST
In on hook position,
- Use the
records and select the required number to dial.
- Lift the handset or press the
keys.
- The number will be dialled automatically.
Note : The call back function from incoming call
list is not availaible for a number which displays
PRIVATE or OUT OF AREA.
or keys to scroll through the
/ or the
37
Page 39

ADVANCED FUNCTIONS
CID FEATURES
3 - DELETE A SELECTED RECORD FROM
THE CID LIST
In on hook position,
- Use the & keys to move into the list and
select the required number to delete.
- Press the X key.
The screen display «DEL?».
- Press the X key again to confirm.
- Press the OK key to exit.
4 - DELETING ALL RECORDS FROM THE CID
LIST
In on hook position,
- Press the or key.
- Press and hold the X key until the screen displays
«ALL DEL?».
- Press the X key again to confirm.
- Press the OK key to confirm.
38
Page 40

ADVANCED FUNCTIONS
CALL WAITING
With this function you are made aware that a new
call is coming through while you are conversing
with your other caller. You can switch between
callers at this stage - take the new call without
disconnecting the previous one.
This function is available if you have
subscribed for call waiting service at your local
network provider.
The call waiting function is factory set to “OFF”. To
activate this function, follow the instructions below:
In on hook position,
- Press and hold OK and
- Use the or keys to select «SET PHONE».
- Press the OK key to confirm.
- Use the
WAITING».
- Press the OK key to confirm.
- Use the
- Press the OK key to confirm.
- Press the X key twice to exit.
or keys to select «CALL
or keys to select «ON».
39
keys together.
Page 41

ADVANCED FUNCTIONS
CALL WAITING
Note : When the call waiting function is
activated on your telephone and you wish to
deactivate it, simply select «OFF» within the
«CALL WAITING» menu.
- When you are in conversation with caller N°1.
CID information will be displayed on the screen
(Name and Number).
&$//(5 1
- A beep tone will be heard when a second call is
incoming. Caller N°2 CID information will be
displayed on the screen (Name and Number).
&$//(5 1
For more information about the «CALL WAITING»
service contact your network provider.
Note : If you don’t answer call N°2, the call will be
recorded into the incoming call list. Then you will
be able to call them later.
40
Page 42

ADVANCED FUNCTIONS
MESSAGE WAITING
Your CL1400 gives a possibility to your caller to
leave a message for you.
You will be informed about the new message by
the screen note «MSG WAITING», the message
waiting LED will be also activated.
1
06* :$,7,1*
Note : «MSG WAITING» will be displayed to
indicate message not read. After call redords
review note «MSG WAITING» will be automatically
removed from the screen.
41
Page 43

OPTIONS
HEADSET AND NECK LOOP
The Geemarc Headset CLA3 allows you to make
or receive calls hands free.
The Geemarc Neck Loop CLA7 is an inductive appliance for the hearing impaired using their hearing aid in T position. It allows to adjust the level of
reception for better hearing.
- Connect the Headset or the Neck Loop to the
socket marked
phone.
- Press the key to initialize the dial tone.
- Compose your number and speak.
Note: You may adjust reception volume and tone
using VOLUME and TONE keys located on the
right side of your telephone. You have to connect
first the adaptor to activate the VOLUME and TONE
adjustment function.
located on the back of your
42
Page 44

OPTIONS
SHAKER
The Geemarc Shaker CLA2 is desgned for hearing impaired to allow them “feel” the phone call.
The shaker also allows to discretely get a phone
call.
If you want to use the shaker, connect it to the
shaker socket marked
your phone.
When you get an incoming call, the shaker is
activated simultaneousely with the phone ring.
Note: To activate the shaker function, make sure
that switch ON/OFF located on the back of
your phone is switched to ON.
Important: For your safety’s sake do not
connect other shaker model but Geemarc
model CLA2, any other shaker model may
damage your phone.
located on the back of
43
Page 45

GUARANTEE
From the moment your Geemarc product is purchased, Geemarc
guarantee it for the period of one year. During this time, all repairs or
replacements (at our discretion) are free of charge.Should you
experience a problem then contact our helpline or visit our website at
www.geemarc.com.The guarantee does not cover accidents,
negligence or breakages to any parts. The product must not be
tampered with or taken apart by anyone who is not an authorised
Geemarc representative.The Geemarc guarantee in no way limits your
legal rights.
IMPORTANT: YOUR RECEIPT IS PART OF YOUR GUARANTEE AND
MUST BE RETAINED AND PRODUCED IN THE EVENT OF A
WARRANTY CLAIM
Please note: The guarantee applies to the United Kingdom only.
DECLARATION: Geemarc Telecom SA hereby declares that this
product is in compliance with the essential requirements and other
relevant provisions of the Radio and Telecommunications Terminal
Equipment Directive 1999/5/EEC and in particular article 3 section 1a,
1b and section 3. The telephone does not operate if the line current is
lower than 18 mA.
Electrical connection : The apparatus is designed to operate from a
230V 50Hz supply only. (Classified as «hazardous voltage» according
to EN60950 standard).The apparatus does not incorporate an integral
power on/off switch. To disconnect the power, either switch off supply
at the mains power socket or unplug the AC adaptor. When installing
the apparatus, ensure that the mains power socket is readily accessible.
Telephone connection : Voltages present on the telecommunication
network are classified TNV-3 (Telecommunication Network Voltage)
according to the EN60950 standard.
44
Page 46

)RU SURGXFW VXSSRUW DQG KHOS YLVLW RXU ZHEVLWH DW
ZZZJHHPDUFFRP
WHOHSKRQH
RU ID[
45
Page 47

46
Page 48

SOMMAIRE
DESCRIPTION
- Description générale 49
- L’afficheur LCD 51
- Les pictogrammes de l’afficheur 52
INSTALLATION 53
PREMIERS REGLAGES
- Réglage de la sonnerie 55
- Option vibreur 56
- Choix du format date / heure 56
- Réglage de la date et de l’heure 58
- Sélection du langage 59
- Réglage du contraste de l’afficheur 60
- Raccroché automatique 61
- Auto-dimensionnement de l’affichage 62
- Appel local et longue distance 63
- Réglage du temps de coupure pour la fonction“R” 64
- Réglage du type de numérotation 64
UTILISATION
- Répondre à un appel 66
- Appeler 67
- Utilisation de l’amplificateur 69
- Rappel du dernier numéro (Bis) 69
- Rappel de l’un des 30 derniers numéros composés 70
- Effacer un des 30 derniers numéros composés 71
- Touches R, * et # 71
47
Page 49

SOMMAIRE
- Mémoriser un numéro de téléphone 72
- Appel d’un numéro en mémoire 73
REGLAGE DE LA RECEPTION 74
REPERTOIRE
- Création d’une fiche 76
- Création d’une fiche à partir du journal des appels 78
- Effacer une fiche du répertoire 79
- Modifier une fiche du répertoire 80
- Appeler un correspondant à partir du répertoire 81
FONCTIONS AVANCEES
- Utilisation du journal des appels 82
- Rappel d’un numéro du journal 85
- Effacer un enregistrement du journal 86
- Effacer tous les enregistrements du journal 86
- Le signal d’appel 87
- La messagerie vocale 89
OPTIONS
- Casque avec microphone / Boucle magnétique 90
- Vibreur 91
GARANTIE 92
48
Page 50

DESCRIPTION
DESCRIPTION
1- DESCRIPTIF GENERAL
Mémoires
directes
Afficheur
Effacement
Touches de
navigation
Flash lumineux
de sonnerie
Voyant journal /
message en attente
Activation de la correction de tonalité et du
volume de réception
Validation
Répertoire
Touche R
Rappel du dernier
numéro composé
Mains libres,
écoute amplifiée
49
Activation du casque
ou de la boucle
magnétique
Microphone mains libres
Page 51

DESCRIPTION
Cordon de combiné
Haut-parleur
Réglage du volume
de réception
Réglage du volume du
Réglage de la tonalité
de réception
haut-parleur
50
Page 52

DESCRIPTION
2 - L’AFFICHEUR
Exemple d’affichage (en position raccroché)
Minutes
Heures
Jour
Mois
Effacement
Touches de navigation
Icône présence secteur
Nombre de fiches
dans le journal
des appels
Validation
- La touche OK confirme une saisie ou un choix
figurant sur l’écran.
- Les touches
permettent de naviguer dans
les rubriques.
- En général, la touche X annule une saisie ou les
informations enregistrées, elle peut aussi confirmer
un choix (par exemple dans le cas de l’effacement
d’un enregistrement du journal).
51
Page 53

DESCRIPTION
3 - LES PICTOGRAMMES DE L’AFFICHEUR
Votre CL1400 possède un afficheur avec différents
pictogrammes qui vous guideront dans l’utilisation
du téléphone.
Alimentation de l’appareil par les piles
+ indication de l’état de charge.
Alimentation par l’adaptateur secteur.
Niveau du contraste de l’écran.
N
Haut-parleur activé.
Précède le nombre de fiches dans le
journal.
Indique que la fiche est nouvelle.
52
Page 54

INSTALLATION
RACCORDEMENTS
Prise cordon
Prise cordon
de ligne*
Prise vibreur*
Réf Geemarc seulement
Prise boucle
magnétique*/
casque*
Réf Geemarc seulement
* Classé TRT-3 selon la norme EN60950.
** Classé «tension dangereuse» selon la norme EN60950.
Important: Connectez seulement le vibreur, la boucle magnétique, le casque et l’adaptateur ayant une référence Geemarc.
d’adaptateur**
Réf Geemarc seulement
Interrupteur
ON/OFF vibreur
Réglage du niveau
de sonnerie
- Branchez le cordon du combiné.
- Ouvrez le compartiment à piles situé en dessous
de l’appareil.
- Insérez 4 piles alcalines sans mercure (type AAA
Activation
automatique de
la correction
d’écoute au
décroché
1.5V non fournies) en respectant les polarités dans
le compartiment.
Note : n’utilisez pas de batteries, ne jetez pas vos
piles usagées dans les ordures ménagères.
Respectez la réglementation locale concernant
l’élimination des piles usées.
53
Page 55

INSTALLATION
- Refermez le compartiment.
- Branchez le cordon de ligne à l’arrière de votre
téléphone puis dans votre prise murale(*).
- Branchez l’adaptateur secteur 12V AC/DC (**).
Votre prise murale doit être proche de l’appareil et
facilement accessible pour pouvoir débrancher
rapidement l’adaptateur en cas de danger.
Note: L’adaptateur secteur est nécessaire pour
assurer un fonctionnement correct de votre
téléphone. Les piles sont toutefois utiles en cas
de coupure secteur pour sauvegarder les mémoires
ainsi que pour l’utilisation du répertoire.
Si l’adapteur secteur est accidentellement
débranché (ou en cas de coupure secteur) et que
les piles sont hors d’usage ou non installées, un
fonctionnement restreint de votre téléphone est
assuré (vous pouvez appeler et recevoir des
appels).
54
Page 56

REGLAGES
1 - REGLAGE DE LA SONNERIE
Un commutateur situé à l’arrière de l’appareil permet
de régler la puissance de la sonnerie:
: désactivée
: faible
: forte.
Votre téléphone est positionné sur “forte” par défaut.
Si la mélodie de la sonnerie ne vous convient pas,
sélectionnez-en une nouvelle parmi les 4
proposées.
Suivez la procédure décrite ci-dessous:
En position raccrochée,
- Appuyez simultanément sur les touches OK et
- Utilisez le navigateur (touches & ) pour
sélectionner «REG TEL».
- Appuyez sur la touche OK pour confirmer.
- Sélectionnez «REG SONNERIE».
- Appuyez sur la touche OK pour confirmer.
- Sélectionnez la tonalité de sonnerie désirée.
- Appuyez sur la touche OK pour confirmer.
- La nouvelle mélodie est émise.
- Appuyez 3 fois sur la touche X pour sortir.
55
.
Page 57

REGLAGES
2 - OPTION VIBREUR
Un commutateur
permet d’activer (ON) ou de désactiver (OFF) le
vibreur CLA2 (option non inclue).
Voir page 91 pour plus d’informations sur l’option
vibreur.
3 - CHOIX DU FORMAT DATE / HEURE
Format de la Date
Vous pouvez choisir d’afficher la date de deux
façons; Jour - Mois ou Mois - Jour.
En position raccrochée,
- Appuyez simultanément sur les touches OK et .
- Utilisez le navigateur (touches
situé à l’arrière de l’appareil
& ) pour
sélectionner «REG TEL».
- Appuyez sur la touche OK pour confirmer.
- Sélectionnez «FORMAT DATE».
- Appuyez sur la touche OK pour confirmer.
- Sélectionnez «JOUR-MOIS» ou «MOIS-JOUR».
56
Page 58

REGLAGES
- Appuyez sur la touche OK pour confirmer.
- Appuyez 2 fois sur la touche X pour sortir.
Format de l’heure
Vous pouvez choisir d’afficher l’heure de deux façons: sur 12 heures ou sur 24 heures.
En position raccrochée,
- Appuyez simultanément sur les touches OK et
- Utilisez le navigateur (touches & ) pour
sélectionner «REG TEL».
- Appuyez sur la touche OK pour confirmer.
- Sélectionnez «FORMAT HEURE».
- Appuyez sur la touche OK pour confirmer.
- Sélectionnez «12 HEURES» ou «24 HEURES».
- Appuyez sur la touche OK pour confirmer.
- Appuyez 2 fois sur la touche X pour sortir.
Si vous avez choisi l’affichage «12 HEURES»,
l’indication «AM» apparaît pour les heures avant
midi et «PM» pour les heures après midi.
.
57
Page 59

REGLAGES
4 - REGLAGE DE LA DATE ET DE L’HEURE
En position raccrochée,
- Appuyez simultanément sur les touches OK et
- Utilisez le navigateur (touches
sélectionner «REG HORLOGE».
- Appuyez sur la touche OK pour confirmer.
- Utilisez le navigateur (touches & ) pour
sélectionner le chiffre désiré.
- Appuyez sur la touche OK pour confirmer et passer au digit suivant.
Vous allez ainsi régler dans l’ordre:
HEURES - MINUTES - MOIS - JOUR
- Appuyez sur la touche X pour sortir.
Note : Si vous disposez du service Présentation
du Numéro, ces paramètres se régleront automatiquement lorsque vous recevrez votre premier
appel.
& ) pour
.
58
Page 60

PREMIERS REGLAGESREGLAGES
5 - SELECTION DU LANGAGE
Vous avez le choix entre seize langues différentes
dont le Français ou l’Anglais comme langage de
présentation de l’afficheur.
Pour choisir votre langue d’utilisation, suivez la
procédure décrite ci-dessous:
En position raccrochée,
- Appuyez simultanément sur les touches OK et
- Utilisez le navigateur (touches & ) pour
sélectionner «REG TEL».
- Appuyez sur la touche OK pour confirmer.
- Sélectionnez «LANGUE».
- Appuyez sur la touche OK pour confirmer.
- Sélectionnez «ENGLISH» (par exemple).
- Appuyez sur la touche OK pour confirmer votre
choix et appuyez 2 fois sur la touche X pour sortir.
59
.
Page 61

REGLAGES
6 - REGLAGE DU CONTRASTE DE
L’AFFICHEUR
Votre afficheur dispose d’un rétro-éclairage qui
s’éteint automatiquement après 15 secondes
d’inactivité.
Suivez la procédure décrite ci-dessous pour diminuer ou augmenter le contraste:
En position raccrochée,
- Appuyez simultanément sur les touches OK et
- Utilisez le navigateur (touches & ) pour
sélectionner «REG TEL».
- Appuyez sur la touche OK pour confirmer.
- Sélectionnez «CONTR ECRAN».
- Appuyez sur la touche OK pour confirmer.
- Utilisez les touches
traste.
- Appuyez sur la touche X pour sortir.
& pour régler le con-
60
.
Page 62

REGLAGES
7 - RACCROCHE AUTOMATIQUE
Cette fonction permet de raccrocher
automatiquement au bout de 8 secondes si la ligne
de votre correspondant est occupée.
En position raccrochée,
- Appuyez simultanément sur les touches OK et
- Utilisez le navigateur (touches
sélectionner «REG TEL».
- Appuyez sur la touche OK pour confirmer.
- Utilisez le navigateur (touches & ) pour
sélectionner «RACCRO. AUTO».
- Appuyez sur la touche OK pour confirmer.
- Sélectionnez «MARCHE» pour activer la fonction ou «ARRET» pour la désactiver.
- Appuyez sur la touche OK pour confirmer.
- Appuyez 2 fois sur la touche X pour sortir.
& ) pour
.
61
Page 63

REGLAGES
8 - AUTO-DIMENSIONNEMENT DE
L’AFFICHAGE
Si l’auto-dimensionnement est activé, l’afficheur
pourra afficher jusqu’a 18 chiffres du numéro que
vous composez, si non l’affichage sera limité à 8
chiffres.
- Appuyez simultanément sur les touches OK et
- Utilisez le navigateur (touches & ) pour
sélectionner «REG TEL».
- Appuyez sur la touche OK pour confirmer.
- Utilisez le navigateur (touches
sélectionner «DIM:X---->x».
- Appuyez sur la touche OK pour confirmer.
- Sélectionnez «MARCHE» pour activer l’autodimensionnement ou «ARRET» pour le désactiver.
- Appuyez sur la touche OK pour confirmer.
- Appuyez 2 fois sur la touche X pour sortir.
& ) pour
.
62
Page 64

REGLAGES
9 - APPEL LOCAL ET LONGUE DISTANCE
Ces codes, AREA (appel local) et LDS (appel longue distance), n’ont pas besoin d’être réglés pour
la France.
Si vous utilisez votre téléphone en Angleterre, aux
USA ... cette fonction permet de distinguer un appel local d’un appel longue distance pour la fonction «présentation du numéro».
Pour régler ces codes, suivez la procédure décrite
ci-dessous:
En position raccrochée,
- Appuyez simultanément sur les touches OK et
- Utilisez le navigateur (touches & ) pour sélectionner «REG TEL».
- Appuyez sur la touche OK pour confirmer.
- Utilisez le navigateur (touches
lectionner «REG ZONE&LDS».
- Appuyez sur la touche OK pour confirmer.
- Utilisez le navigateur pour régler le code «LOCAL».
- Appuyez sur la touche OK pour confirmer.
- Utilisez le navigateur pour régler le code «LDS».
- Appuyez sur la touche OK pour confirmer.
- Appuyez sur la touche X pour sortir.
63
& ) pour sé-
.
Page 65

REGLAGES
10 - REGLAGE DU TEMPS DE COUPURE
POUR LA FONCTION “R”
Vérifier le réglage du temps de coupure (touche R)
de votre téléphone.
Pour la France, il doit être réglé à 300 mS.
D’autres réglages (100 et 600 mS) sont disponibles pour une utilisation hors de la France.
En position raccrochée,
- Appuyez simultanément sur les touches OK et
- Utilisez le navigateur (touches & ) pour
sélectionner «REG TEL».
- Appuyez sur la touche OK pour confirmer.
- Utilisez le navigateur (touches
sélectionner «REG FLASH».
- Appuyez sur la touche OK pour confirmer.
- Sélectionnez un nouveau réglage, 100 ou 600
ms et appuyez sur la touche OK pour confirmer.
- Appuyez 2 fois sur la touche X pour sortir.
11 - REGLAGE DU TYPE DE NUMEROTATION
Un interrupteur ETR/PR/T est disponible sur certain modèle (type anglais) à l’arrière de l’appareil.
& ) pour
.
64
Page 66

REGLAGES
Si cet interrupteur est présent sur votre appareil et
que vous désirez connecter votre téléphone au
réseau public européen, placé l’interrupteur en position3 (T). Cette position assure un fonctionnement optimal dans plus de 99% des cas.
P T
ETR R
Position : 1 2 3
Position 1:
La numérotation est de type décimale.
Le flash est référencé par rapport à la terre.
Cette position est utilisée dans certains cas très
particuliers en Angleterre.
Position 2:
La numérotation est de type décimale.
Le flash (Touche R) est calibré suivant le réglage
effectué (voir «REGLAGE DU TEMPS DE COUPURE POUR LA FONCTION R» page 64).
Position 3:
La numérotation est de type multifréquences.
Le flash (Touche R) est calibré suivant le réglage
effectué (voir «REGLAGE DU TEMPS DE COUPURE POUR LA FONCTION R» page 64).
65
Page 67

FONCTIONS DE BASE
Votre CL1400 permet de converser avec vos
correspondants sans décrocher le combiné. Vous
êtes libre de vos gestes et vous pouvez faire
participer votre entourage à la communication.
1 - REPONDRE A UN APPEL
Votre téléphone sonne. Le Numéro et/ou le Nom
de l’appelant s’affiche si vous êtes abonnés au
service «Présentation du Numéro» et/ou au service «Présentation du Nom».
1ère solution :
- Décrochez le combiné pour parler à votre correspondant.
- Raccrochez le combiné pour libérer la ligne.
2ème solution :
Vous pouvez utiliser la fonction «mains libres» pour
décrocher et converser avec votre correspondant.
- Appuyez sur la touche
correspondant sans décrocher le combiné.
- Appuyez sur la touche
/ pour parler à votre
/ pour libérer la ligne.
66
Page 68

FONCTIONS DE BASE
2 - APPELER
1ère solution
- Décrochez le combiné.
- Composez le numéro de votre correspondant.
(Le numéro de votre correspondant s’affiche).
- Raccrochez le combiné pour libérer la ligne lorsque votre conversation est terminée.
2ème solution (prénumérotation)
- Composez le numéro de votre correspondant
sans décrocher.
La touche X permet de corriger et retourner en
arrière dans la composition de votre numéro.
- Décrochez le combiné, votre numéro se compose automatiquement.
- Raccrochez le combiné pour libérer la ligne lorsque votre conversation est terminée.
3ème solution (mains libres)
Vous pouvez utiliser la fonction «mains libres» pour
appeler votre correspondant.
67
Page 69

FONCTIONS DE BASE
- Composez le numéro de votre correspondant
sans décrocher.
La touche X permet de corriger et retourner en
arrière dans la composition de votre numéro.
- Appuyez sur la touche
compose automatiquement.
- Vous pouvez alors parler sans décrocher le combiné. Vous pouvez ajuster le volume du haut parleur
à l’aide du bouton de réglage situé sur la droite de
votre téléphone.
- Appuyez sur la touche / pour libérer la ligne
lorsque votre conversation est terminée.
Notes :
Pour désactiver la fonction «mains libres» en cours
de conversation, décrochez le combiné.
Le symbole
Pour activer la fonction «mains libres», appuyez
et maintenez la touche
le combiné.
est remplacé par le symbole .
/ , votre numéro se
/ tout en raccrochant
Le chronomètre se déclenche à la prise de ligne.
Pour arrèter le chronomètre, appuyez sur la touche X. Un deuxième appui sur la touche X le remet
à 0.
68
Page 70

FONCTIONS DE BASE
3 - UTILISATION DE L’AMPLIFICATEUR
Vous êtes en communication, combiné décroché,
vous souhaitez mettre en service le haut-parleur:
- Appuyez sur la touche
- Réglez le niveau sonore du haut-parleur à l’aide
de la touche VOLUME située sur le côté gauche
de votre appareil.
Vous êtes en communication, combiné décroché,
vous souhaitez passer en «mains libres» :
- Appuyez et maintenez la touche / tout en raccrochant le combiné.
- Relâchez la touche
4 - RAPPEL DU DERNIER NUMERO (BIS)
Cette fonction permet de rappeler automatique-
/ .
/ .
ment le dernier numéro composé.
- Décrochez le combiné.
- Appuyez sur la touche /P, le numéro de votre
correspondant se recompose automatiquement.
69
Page 71

FONCTIONS DE BASE
5 - RAPPEL DE L’UN DES 30 DERNIERS N°
COMPOSES (Journal des appels émis)
Votre téléphone vous permet de rappeler l’un des
30 derniers numéros composés.
Suivez la procédure décrite ci-dessous pour rappeler automatiquement l’un des 30 derniers numéros:
En position raccrochée,
- Appuyez sur la touche OK.
Le message “NUMEROTER” s’affiche sur votre
écran ainsi que le dernier numéro composé, le
nombre total d’enregistrements, la date et l’heure
de l’appel.
- Utilisez le navigateur (touches
sélectionner le numéro que vous désirez recomposer.
- Décrochez le combiné ou appuyez sur l’une des
touches
automatiquement.
/ ou , le numéro se recompose
70
& ) pour
Page 72

FONCTIONS DE BASE
6 - EFFACER UN DES 30 DERNIERS NUMEROS
COMPOSES
En position raccrochée,
- Appuyez sur la touche OK.
L’afficheur indique “NUMEROTER”.
- Utilisez le navigateur (touches
sélectionner le numéro que vous désirez effacer.
- Appuyez sur la touche X.
L’afficheur indique “EFFACER ?”.
- Appuyez à nouveau sur la touche X pour confirmer
l’effacement de l’enregistrement.
- Appuyez sur la touche OK pour sortir.
8 - TOUCHES R, * et #
Touches d’accès aux Services de France Télécom.
Pour tout renseignement concernant ces services
et l’utilisation de ces touches, contactez votre
opérateur.
& ) pour
71
Page 73

FONCTIONS DE BASE
9 - MEMORISER UN NUMERO DE TELEPHONE
Votre téléphone possède 3 mémoires directes (30
chiffres maximum par mémoire).
Suivez la procédure décrite ci-dessous pour mémoriser vos numéros:
En position raccrochée,
- Composez le numéro à mémoriser.
- Appuyez et maintenez une des touches M1, M2
ou M3 pour enregistrer votre numéro.
L’afficheur indique «OK SAUVEGARD».
- Relachez la touche.
- Appuyez sur la touche X pour sortir.
Notes: si vous déconnectez votre téléphone, tous
les numéros mémorisés s’effacent automatiquement.
Un nouvel enregistrement dans une mémoire efface le précédent.
72
Page 74

FONCTIONS DE BASE
10 - APPEL D’UN NUMERO EN MEMOIRE
- Décrochez le combiné (ou prenez la ligne sans
décrocher).
- Appuyez sur une des touches M1, M2 ou M3,le
numéro en mémoire se recompose automatiquement.
73
Page 75
REGLAGE DE LA RECEPTION
Vous pouvez régler le volume et la tonalité de réception de votre combiné.
La touche
permet d’activer ou de désactiver le
correcteur de réception durant la conversation.
Lorsque la fonction est activée, le voyant rouge
de la touche
est allumé.
Les boutons TONALITE et VOLUME situés sur le
côté droit de l’appareil permettent de corriger la
tonalité et le volume de réception.
TONALITE
Graves
+10db max
Aigus
+10db max
Normal
74
Page 76

REGLAGE DE LA RECEPTION
VOLUME
Normal +15dB
+15dB +30dB
Notes: Lorsque l’interrupteur situé à l’arrière de
l’appareil est sur ON, la fonction correction est
automatiquement activée à chaque décroché de
votre combiné (le voyant rouge de la touche
est allumé en continu).
Lorsque l’interrupteur est sur la position OFF, il
faut appuyer sur la touche
tion de correction.
Le réglage de la tonalité est accessible uniquement lorsque l’interrupteur est sur ON.
Le volume est réglable de l’état «NORMAL» à
+15dB lorsque l’interrupteur est sur OFF.
pour activer la fonc-
OFF
ON
Il est réglable de +15dB à +30dB lorsque l’interrupteur est sur ON.
75
Page 77

REPERTOIRE
Vous disposez de 99 fiches répertoire permettant
d’enregistrer les noms et les numéros de vos correspondants habituels.
1 - CREATION D’UNE FICHE
En position raccrochée,
- Appuyez simultanément sur les touches OK et
- Utilisez le navigateur (touches
sélectionner «REPERTOIRE».
- Appuyez sur la touche OK pour confirmer votre
choix.
- Sélectionnez «AJOUTER».
- Appuyez sur la touche OK pour confirmer.
- Saisissez le numéro (30 digits max. par mémoires).
Pour corriger une erreur de saisie, appuyez sur la
touche X.
- Lorsque le numéro est correct, appuyez sur la
touche OK pour confirmer et passer à la saisie du
nom correspondant au numéro enregistré.
- Sélectionnez la lettre désirée par appuis successifs sur la touche correspondante. Aidez-vous du
& ) pour
.
76
Page 78

REPERTOIRE
tableau ci-dessous ou des lettres situées au-dessous des chiffres du clavier pour la saisie.
웍
- Pour insérer un «espace», appuyez 2 fois sur la
touche OK.
- Si vous devez saisir deux caractères identiques
ou deux caractères correspondant à une même touche, appuyez sur la touche OK pour passer au suivant.
- Pour corriger une erreur de saisie appuyez sur la
touche X.
- Lorsque le nom est correct, appuyez sur la touche
OK pendant 3 secondes pour confirmer l’enregistrement du numéro avec son nom associé dans le
répertoire.
- Vous pouvez maintenant créer une nouvelle fiche.
- Appuyez sur la touche C pour sortir.
77
Page 79

REPERTOIRE
Note :
- Si vous souhaitez introduire une pause dans le
numéro mis en mémoire, appuyez sur la touche
/P, (Un P apparaît à l’écran).
2 - CREATION D’UNE FICHE A PARTIR DU JOURNAL DES APPELS
Si vous êtes abonnés au service Présentation du
Numéro, vous avez la possibilité de créer une fiche à partir du journal des appels. Chaque appel
étant en effet mémorisé sous la forme d’une fiche.
En position raccrochée,
- Appuyez sur une des touches du navigateur.
L’écran affiche alors le journal.
- A l’aide du navigateur, placez-vous sur la fiche
que vous désirez enregistrer dans votre répertoire.
- Appuyez et maintenez la touche OK jusqu’à ce
que le dernier digit du numéro sélectionné clignote.
- Appuyez sur la touche OK .
78
Page 80

REPERTOIRE
- Vous pouvez maintenant entrer le nom que vous
désirez associer à ce numéro ou si le nom vous
convient, appuyer pendant 3 secondes sur la touche OK pour confirmer le nom proposé par l’identificateur d’appel.
- Appuyez sur la touche X pour sortir.
3 - EFFACER UNE FICHE DU REPERTOIRE
En position raccrochée,
- Appuyez sur la touche
- A l’aide du navigateur, placez-vous sur la fiche
à effacer.
- Appuyez sur la touche X, l’afficheur indique
EFFACER?
- Appuyez à nouveau sur la touche X pour confirmer l’effacement de l’enregistrement.
- Appuyez sur la touche OK pour sortir.
.
79
Page 81

REPERTOIRE
4 - MODIFIER UNE FICHE DU REPERTOIRE
En position raccrochée,
- Appuyez sur la touche
- A l’aide du navigateur, placez-vous sur la fiche à
effacer ou à modifier.
- Appuyez et maintenez la touche OK jusqu’à ce
que le dernier chiffre du numéro sélectionné clignote.
- Appuyez sur la touche X pour corriger votre numéro et insérer vos nouveaux chiffres.
- Appuyez sur la touche OK .
- Vous pouvez maintenant corriger le nom.
- Appuyez sur la touche X pour supprimer un caractère, référez-vous au paragraphe «CREATION
D’UNE FICHE» p.76 pour corriger le nom.
- Appuyez sur la touche OK pendant 3 secondes
pour confirmer votre nouvel enregistrement.
- Appuyez sur la touche X pour sortir.
.
80
Page 82

REPERTOIRE
5 - APPELER UN CORRESPONDANT A PARTIR DU REPERTOIRE
En position raccrochée,
- Appuyez sur la touche
- A l’aide du navigateur, placez-vous sur la fiche
recherchée. Vous pouvez aussi accéder plus rapidement à une fiche en tapant la première lettre du
nom enregistré que vous recherchez.
- Décrochez le combiné, ou appuyez sur l’une des
touches
- Le numéro se compose automatiquement.
Note : vous pouvez consulter votre répertoire en
cours de communication en appuyant sur la touche
placer.
/ ou .
, utilisez alors le navigateur pour vous dé-
.
81
Page 83

FONCTIONS AVANCEES
La Présentation du Numéro et du Nom*
1 - UTILISATION DU JOURNAL DES APPELS
Associé au service «Présentation du Numéro*»,
le journal des appels permet de mémoriser les appels reçus. Lorsque la mémoire de votre journal
est pleine, tout nouvel appel prendra la place du
plus ancien. Chaque appel est mémorisé sous la
forme d’une fiche avec la date et l’heure et classé
par ordre d’arrivée.
Heure et date
Nom de
l’appelant
de l’appel
*(5$/',1(
Numéro de l’appel
(ordre d’arrivée)
Numéro de
l’appelant
Note : Si votre correspondant ne souhaite pas
communiquer son numéro de téléphone ou son identité, l’afficheur indique PRIVE.
35,9(
82
* Service accessible seulement par abonnement. Contactez votre opérateur
Page 84

FONCTIONS AVANCEES
La Présentation du Numéro et du Nom*
Si le numéro de votre correspondant n’est pas
connu du central téléphonique (appel de l’étranger
par exemple), l’afficheur indique INDISPONIBLE
,1',6321,%/(
Lorsqu’un même correspondant appelle plusieurs
fois, seul le dernier appel est mémorisé dans le
journal et l’afficheur indique +.
1
$11(
Note : lors de la visualisation des fiches, l’afficheur indique N pour les nouvelles fiches non
visualisée.
Lorsqu’un ou des nouveaux appels ont été reçus,
le voyant indicateur d’appel clignote et l’afficheur
indique :
Dans cet exemple, le
727$/ 1289
* Service accessible seulement par abonnement. Contactez votre opérateur
nombre total de fiches
dans le journal est 28 dont
une nouvelle.
83
Page 85

FONCTIONS AVANCEES
La Présentation du Numéro et du Nom*
Pour visualiser les nouveaux appels reçus, utilisez le navigateur (touches
déplacer dans les enregistrements.
Dès que tous les nouveaux
Le nombre total de fiches contenues dans le journal reste indiqué.
appels ont été visualisés,
le voyant journal s’éteint et
l’écran revient à son affichage normal.
Lorsque le journal ne contient aucun appel (suite à
effacement des enregistrements par exemple) l’afficheur indique 00.
& ) pour vous
84
* Service accessible seulement par abonnement. Contactez votre opérateur
Page 86

FONCTIONS AVANCEES
La Présentation du Numéro et du Nom*
2 - RAPPEL D’UN NUMERO DU JOURNAL
En position raccrochée,
- Utilisez le navigateur (touches
vous déplacer dans les fiches et sélectionnez le
numéro que vous désirez recomposer.
- Décrochez le combiné ou prenez la ligne sans
décrocher en appuyant sur la touche
- Le numéro se recompose automatiquement.
Note : La fonction rappel d’un numéro du journal
n’est pas possible pour un numéro affiché
PRIVE ou INDISPONIBLE.
& ) pour
/ .
* Service accessible seulement par abonnement. Contactez votre opérateur
85
Page 87

FONCTIONS AVANCEES
La Présentation du Numéro et du Nom*
3 - EFFACER UN ENREGISTREMENT DU
JOURNAL
En position raccrochée,
- Utilisez le navigateur (touches
déplacer dans les enregistrements et sélectionnez la
fiche que vous désirez effacer.
- Appuyez sur la touche X.
L’afficheur indique “EFFACER ?”.
- Appuyez à nouveau sur la touche X pour
confirmer l’effacement de l’enregistrement.
- Appuyez sur la touche OK pour sortir.
4 - EFFACER TOUS LES ENREGISTREMENTS
DU JOURNAL
En position raccrochée,
- Appuyez sur une des touches & .
- Appuyez et maintenez la touche X jusqu’à
& ) pour vous
visualiser “EFFACER TOUT?” sur l’afficheur.
- Appuyez à nouveau sur la touche X pour
confirmer l’effacement de tous les enregistrements.
- Appuyez sur la touche OK pour sortir.
86
* Service accessible seulement par abonnement. Contactez votre opérateur
Page 88

FONCTIONS AVANCEES
Le Signal d’Appel*
Par ce service, vous êtes prévenus de l’arrivée
d’un nouvel appel alors que vous êtes déjà en
communication, vous pouvez ainsi prendre cet
appel et passer d’un correspondant à l’autre.
Par défaut, la fonction signal d’appel de votre
téléphone est désactivée “ARRET”. Pour
activer cette fonction, suivez la procédure
décrite ci-dessous:
En position raccrochée,
- Appuyez simultanément sur les touches OK et
- Sélectionnez «REG TEL».
- Appuyez sur la touche OK.
- Sélectionnez «SIGNAL D’APP».
- Appuyez sur la touche OK.
- Sélectionnez «MARCHE».
- Appuyez sur la touche OK pour confirmer.
- Appuyez 2 fois sur la touche X pour sortir.
Note : lorsque cette fonction est activée sur votre
téléphone et que vous désirez la désactiver, il suffit de sélectionner «ARRET» dans le menu
«SIGNAL D’APP».
* Service accessible seulement par abonnement. Contactez votre opérateur
87
.
Page 89

FONCTIONS AVANCEES
Le Signal d’Appel*
- Vous êtes en communication avec votre interlocuteur N°1.
Les informations le concernant (nom et numéro)
sont affichées.
,17(5/2&87(85 1
- Vous êtes avertis de l’arrivée d’un second
appel par un bip sonore.
Les informations concernant cet interlocuteur
N°2 sont alors affichées.
,17(5/2&87(85 1
Note : si vous ne répondez pas à l’interlocuteur
N°2, ce dernier est enregistré dans le journal des
appelants. Vous pourrez ainsi par la suite facilement
le rappeler.
88
* Service accessible seulement par abonnement. Contactez votre opérateur
Page 90

FONCTIONS AVANCEES
La Messagerie Vocale*
La messagerie vocale accueille vos
correspondants lorsque vous êtes absent ou déjà
en ligne et leur offre la possibilité de déposer un
message à votre attention.
De votre côté, la messagerie vocale vous prévient
d’un message en instance par le journal des appels.
Cet appel est distingué des autres appels par
l’affichage “MSG EN ATTEN”, le voyant journal
est également activé.
1
06* (1$77(1
Note : tant que vous n’avez pas interrogé votre
messagerie, l’affichage “MSG EN ATTEN” reste
dans le journal.
“MSG EN ATTEN” est donc considéré comme un
enregistrement dans votre journal.
Après consultation de l’appel, “MSG EN ATTEN”
s’éfface automatiquement du journal.
Contactez votre opérateur pour tout renseignement
concernant l’utilisation de votre messagerie.
* Service accessible seulement par abonnement. Contactez votre opérateur
89
Page 91

OPTIONS
Casque / Boucle magnétique
Le casque Geemarc réf.: CLA3 permet de recevoir
ou d’effectuer un appel les mains libres.
La boucle magnétique Geemarc réf.: CLA7 est un
dispositif à induction pour les porteurs de prothèses
auditives à bobines en T.
Elle permet d’ajuster le niveau du signal de
réception pour une meilleur audition.
- Connectez le casque ou la boucle magnétique
dans la prise située à l’arrière de votre
téléphone.
- Appuyez sur la touche
- Composez le numéro.
Notes:
Vous pouvez ajuster le volume et la tonalité de
reception avec les boutons VOLUME et TONE
situés sur le côté du téléphone.
L’adaptateur secteur doit être connecté pour utiliser ces options.
pour obtenir la tonalité.
90
Page 92

OPTIONS
Vibreur
Le vibreur Geemarc ref: CLA2 a été conçu pour
les personnes ayant des problèmes auditifs ou
souhaitant se faire avertir en toute discrétion d’un
appel téléphonique.
Si vous désirez utiliser le vibreur, connectez le sur
la prise
Lorsque vous recevez un appel, le vibreur est
activé en même temps que la sonnerie.
Note: Pour que cette fonction puisse être activée,
assurez vous que l’interrupteur
à l’arrière de l’appareil soit sur ON.
Important: Pour votre sécurité, ne connectez
que le modèle Geemarc CLA2, tout autre modèle de vibreur risquerait d’endomager votre
téléphone.
située à l’arrière de votre téléphone.
ON/OFF situé
91
Page 93

GARANTIE
Cet appareil est garanti ans pièces et main-d'oeuvre. La date d'achat
figurant sur le ticket de caisse fera foi. Cette garantie s'exerce sous
réserve d'une utilisation normale de l'appareil. Les dommages occasionnés par les surtensions électriques, la foudre ou par un choc sur
l'appareil ne peuvent en aucun cas être couverts par la garantie.
Raccordement électrique : l’appareil est prévu pour fonctionner avec
4 piles (type AAA 1.5V) ou éventuellement un adaptateur secteur 230V
50Hz. (Tension classée “dangereuse” selon les critères de la norme
EN60950). Par précaution en cas de danger, le bloc alimentation
secteur sert de dispositif de sectionnement de l’alimentation 230V. Il
doit être installé à proximité du matériel et être aisément accessible.
Raccordement téléphonique : les tensions présentes sur ce réseau
sont classées TRT-3 (Tension de Réseau de Télécommunication) au
sens de la norme EN60950.
Ce produit respecte les exigences de compatibilité électro-magnétique et de sécurité électrique demandées par la directive européenne
RTTE. Par ailleurs, il est compatible avec les différents réseaux téléphoniques européens (normes TBR21/37/38). Le fonctionnement de
l’appareil n’est pas garanti si le courant de ligne est inférieur à 18 mA.
3DUF GH O(WRLOH
UXH *DOLOpH
*UDQGH 6\QWKH
3RXU WRXW UHQVHLJQHPHQW WHFKQLTXH RX WRXWH FRPPDQGH YLVLWH] QRWUH
VLWH ZHE VXU ZZZJHHPDUFFRP
TEL. SERVICE APRES VENTE :
03 28 58 75 99
8*&/ ('
 Loading...