

Page 1
CL1100
AMPLIFIED DESK TELEPHONE
WITH VOLUME AND TONE CONTROL
TELEPHONE MULTIFONCTIONS AVEC REGLAGE DU
VOLUME ET DE LA TONALITE
User guide / Notice d’utilisation
E
CAUTION:THIS TELEPHONE PRODUCT IS SPECIFI-
CALLY DESIGNED FOR PEOPLE WITH HEARING DIFFICULTIES AND IS PROVIDED WITH A HANDSET EARPIECE VOLUME CONTROL FOR INDIVIDUAL REQUIREMENTS. DUE CARE MUST BE TAKEN BY ALL USERS
THAT THE HANDSET EARPIECE VOLUME CONTROL IS
SET TO THE LOWEST LEVEL ACCEPTABLE BY EACH
RESPECTIVE USER. CARE SHOULD THEREFORE BE
EXERCISED TO ENSURE THAT ANY NAIVE USERS ARE
ARE FAMILIAR WITH THIS REQUIREMENT.
F
ATTENTION: CE TELEPHONE PEUT ETRE DESTINE
AUX PERSONNES A Y ANT DES PROBLEMES D’AUDITION.
IL POSSEDE UN ECOUTEUR A VOLUME V ARIABLE. A
LA PREMIERE UTILISA TION, ASSUREZ VOUS QUE LE
BOUTON DE REGLAGE DU VOLUME SOIT POSITIONNE
SUR LA POSITION VOLUME MINIMUM. LES PERSONNES
MALENTENDANTES POURRONT PAR LA SUITE
AUGMENTER LE VOLUME POUR L’ADAPTER A LEUR
AUDITION.
Telephone
Page 2

E F
INDEX
SOMMAIRE
Description 4
Setting up
- Connecting the telephone 6
- Ringer settings 6
- Dialling types and grounding
(UK version) 8
- Time break recall switch 9
Volume and tone adjustment
- Receiving volume and tone 10
- Sending volume level adjustment 11
Using the phone
- Answering incoming call 12
- Making a call 12
- Last number redial 12
- Recall, * & # buttons 13
- Mute button 13
- Storing telephone numbers 13
- Dialling stored number 14
Description 16
Installation
- Raccordements 18
- Réglage de la sonnerie 19
- Fréquence décimale/vocale
(Interrupteur T erre/Pulse/T one)
Option pour l’Angleterre 19
- Interrupteur 300ms/100ms 20
Réglage du volume et de la tonalité
- Volume et tonalité de réception 21
- Réglage du volume d’émission 22
Utilisation
- Recevoir un appel 23
- Appeler 23
- Rappel du dernier numéro 23
- Touches R, * & # 24
- Fonction secret 24
- Mémoriser un numéro de téléphone 24
- Appel d’un numéro en mémoire 25
Guarantee 15
2 3
Garantie 26
Page 3
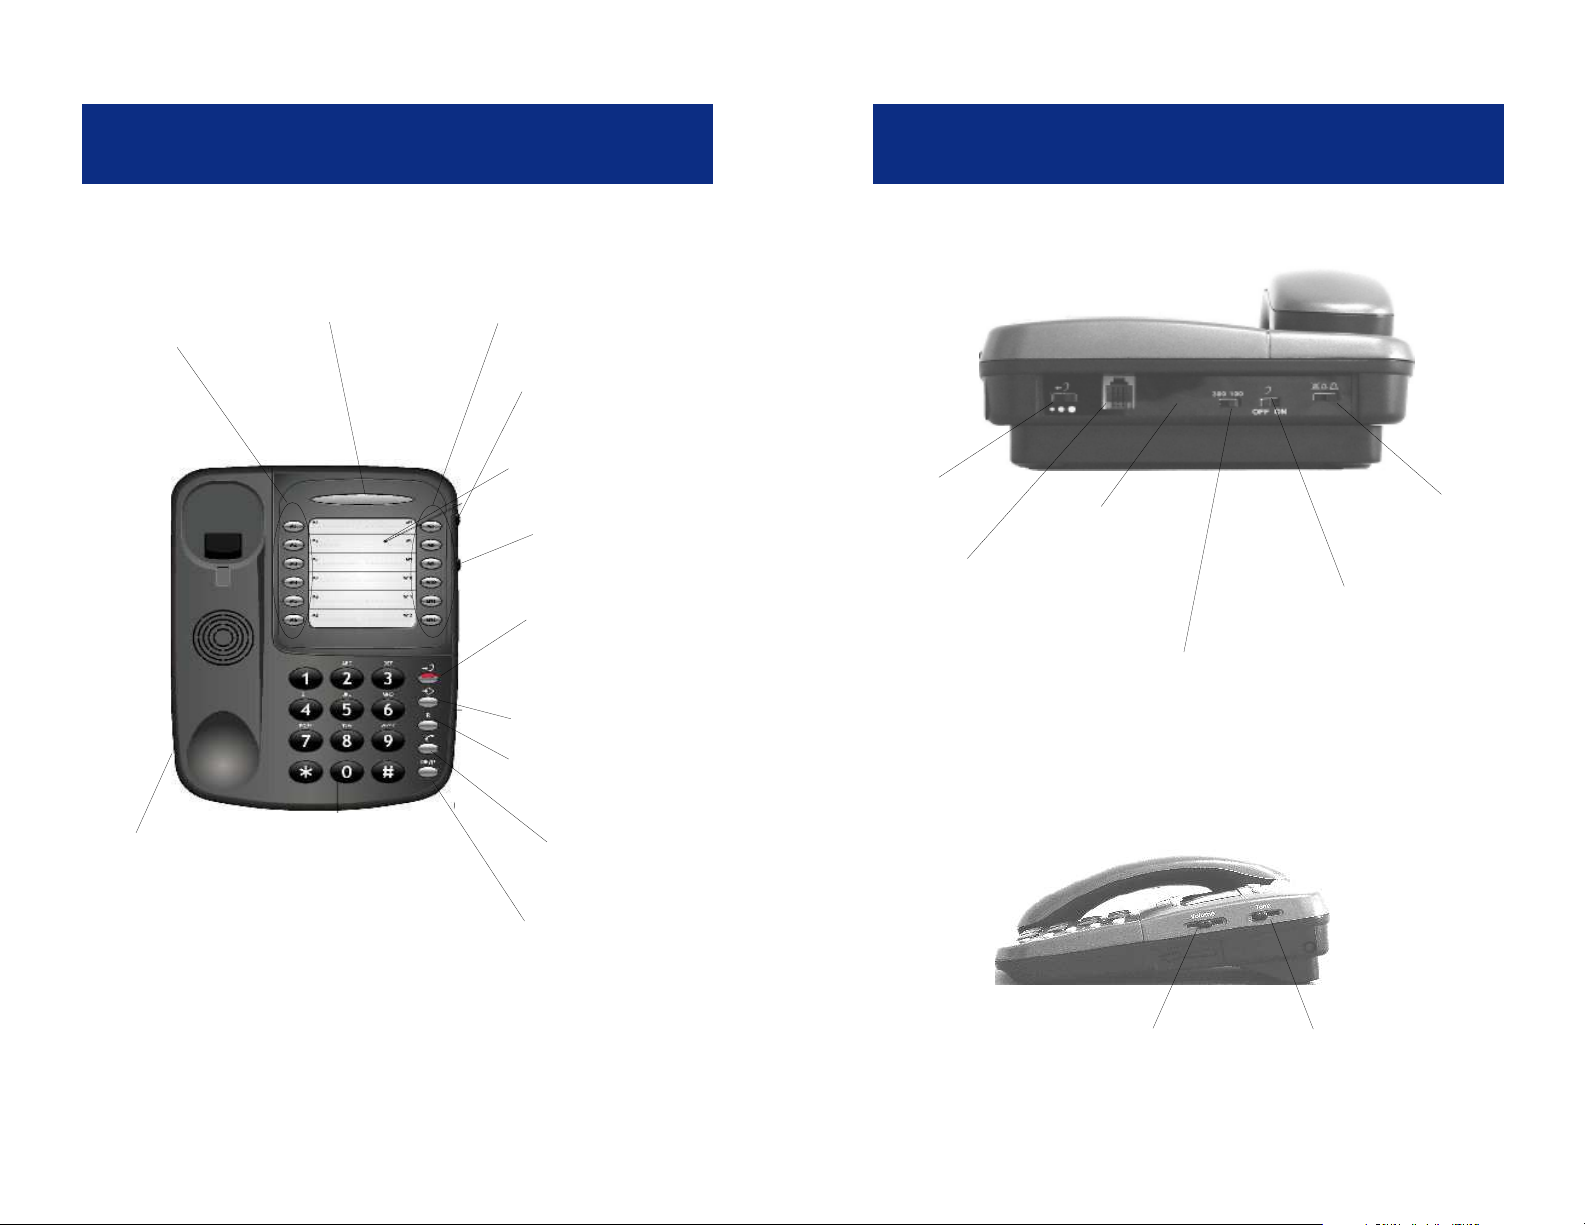
DESCRIPTION
DESCRIPTION
DESCRIPTION
Direct
memory
buttons
Handset
cord
socket
Flashing incoming ring
indicator
Direct
memory
buttons
Tone reception
adjustment
Phonebook insert
card
Volume recep-
tion adjustment
Red light for tone
and volume
activation
Memory storing key
Time break recall
button
Mute button
Last number
redial
Sending
level switch
Line cord
socket*
(*) Classified TNV-3 according to EN60950 standard.
TONE/PULSE/
EARTH switch
(UK option)
Time break recall
switch
(R=100ms/300ms)
Ringer level
adjustment switch
Volume & Tone
adjustment ON/OFF
switch
4 5
ToneVolume
Page 4

SETTING UP
SETTING UP
1 - CONNECTING THE TELEPHONE
1 - Connect the handset cord.
2 - Open the battery compartment by pulling back
the latch.
3 - Insert correctly 4 x AAA 1.5V alkaline batteries
(not supplied) in the battery compartment (*). Batteries are required if you wish to increase the
ringer level up to 10 dB.
4 - Snap the battery door back in place.
5 - Connect the line cord to the socket (*).
2 - RINGER SETTINGS
A switch located on the upper side allows the
ringer to be switched HI,LOW ,OFF:
Your phone comes with the ringer switched to
«High» and the melody set to «6»:
Low Mid High
Melody 1 1 2 3
Melody 2 4 5 6 (by default)
Melody 3 7 8 9
If you don’t like the ringer melody , you can choose
a new one by changing the settings as per
instructions below:
- Lift the handset.
- Press button.
- Press # button.
- Press any of the 1 - 9 dial keys.
: Off,
: Low,
: Hi
(*) Classified TNV-3 according to EN60950 standard.
6
The new ringer settings will be activated with the
next incoming call.
Note: The ringer level will be increased up to 10
dB if you insert batteries into the battery
compartment.
7
Page 5

SETTING UP
SETTING UP
3 - DIALING TYPES AND GROUNDING
Switch ETR/PR/T is located on the upper side of
english type models. If you wish to connect your
CL1100 to a public UK/French switch-board (PBX),
move switch ETR/PR/T to position 3 (T). This will
ensure optimal compatibility of your phone with
most (99%) PBX.
P T
ETR R
Positions: 1 2 3
Position 1:
Pulse dialing. The R is grounded. This option can
be used only within the UK in very special cases.
Position 2:
Pulse dialing. The R is set according to the
If you are using your CL1100 with a
hearing aid, set your hearing aid to
“T” position.
4 -TIME BREAK RECALL SWITCH (300/100)
Check the Time Break Recall setting of your
CL1400. For the UK the T ime Break Recall should
be set to 100 mS. It can be switched to 300 mS for
other locations or PBX’s.
determined adjustment (see «Time Break Recall
Setting for R Function» p.9).
Position 3:
Tone dialing. The R is set according to the
determined adjustment (see «Time Break Recall
Setting for R Function» p.9).
8
9
Page 6

TONE AND VOLUME ADJUSTMENT
TONE AND VOLUME ADJUSTMENT
1-RECEIVING VOLUME AND TONE
ADJUSTMENT
You can adjust the receiving volume and tone
according to your own hearing requirements.
The button allows extra volume and tone
functions to be activated or deactivated during the
conversation.
T one and volume adjustment (15dB to 30dB) is
only activated when the switch located at the
upper side of your phone is set to ON. When this
button is set to OFF only the volume can be adjusted
from 0dB to 15dB.
When the function is activated, the red light of extra
receiving and tone function button is lit.
Adjust the TONE and VOLUME buttons to fit the
levels to your own hearing requirements.
TONE
Bass
+10db max
Normal
Treble
+10db max
VOLUME
+30db max
0dB
15dB
15dB OFF
30dB
ON
2 - SENDING VOLUME LEVEL ADJUSTMENT
If your voice is quiet or called parties have difficulty
hearing you, you can increase the sending level
volume with the switch located on the upper side.
Note: When the tone (treble), earpiece volume and
sending levels are set to the maximum, whistling
may occur. If whistling occurs the sending level
settings should be decreased with the switch .
10
Y ou can also decrease the sending volume if
required. Min Normal Maxi
11
Page 7

USING THE PHONE
USING THE PHONE
1 - ANSWERING INCOMING CALLS
- When an incoming call is received the phone will
ring and the incoming call indicator will flash. To
answer the call lift the handset and speak.
- On completion of the call, carefully replace the
handset in the cradle to release the line.
2 - MAKING A CALL
- Lift the handset.
- Await the dial tone and dial required number .
- On completion of the call, carefully replace the
handset in the cradle.
3 - LAST NUMBER REDIAL
4 - RECALL, * & # BUTTONS
These are used with the new services provided on
digital exchanges. For details please contact your
network operator .
5 - MUTE BUTTON
If you wish to speak privately to someone else in
the room without your caller overhearing,press and
hold the button.You will still be able to hear the
callers but they cannot hear you during the mute
operation.To resume normal conversation, release
the button.
6 - STORING TELEPHONE NUMBERS
- Lift the handset.
- Await the dial tone and press button.
- A previously dialled number will be automaticaly
redialled (not in use for memory numbers).
12 13
Your telephone CL1100 can store 12 direct
memories.
To store a number please follow instructions below:
- Lift the handset.
- Press button.
- Press M1, M2, ... M12 to locate the number.
Page 8

GUARANTEEUSING THE PHONE
- Dial the number .
- Press again Button.
Numbers will be lost after few hours if you
disconnect your phone. Entering a new number in
the same location will automatically erase the
previous number .
7 - DIALING STORED NUMBERS
- Lift the handset and
await the dial tone
- Press the appropriate location button
M1, M2... M12 and
the number stored in
this location will be dialed automatically.
To register your
stored phone numbers, use the index
located on the front of
your phone. Use this
table to prepare your
phone book.
Pierre 01 64 57 .. ..
Example:
1
2
3
4
5
6
7
8
9
1
GUARANTEE
From the moment your Geemarc product is purchased, Geemarc
guarantee it for the period of one year. During this time, all repairs
or replacements (at our option) are free of charge.Should you
experience a problem then contact our helpline or visit our website
at www.geemarc.com.The guarantee does not cover accidents,
negligence or breakages to any parts. The product must not be
tampered with or taken apart by anyone who is not an authorised
Geemarc representative.The Geemarc guarantee in no way limits
your legal rights.
IMPORT ANT : YOUR RECEIPT IS P ART OF YOUR GUARANTEE
AND MUST BE RETAINED AND PRODUCED IN THE EVENT
OF A W ARRANTY CLAIM
Please note: The guarantee applies to the United Kingdom only .
Declaration : Hereby Geemarc Telecom SA declares that this product is in
compliance with the essential requirements and other relevant provisions of
the Radio and T elecommunications T erminal Equipment Directive 1999/5/EEC
and in particular article 3 section 1a, 1b and section 3.
T elephone connection : V oltages present on the telecommunication network
are classified TNV -3 (Telecommunication Network Volt age) according to the
EN60950 standard.
The telephone does not operate if the line current is lower than 18 mA.
For product support and help visit our website
at www.geemarc.com
telephone 01707 384438
or fax 01707 372529
14 15
 Loading...