

Page 1

CL100
EASY-DIALPHONE WITH VOLUME AND TONE ADJUSTMENT
TELEPHONE MULTIFONCTIONS A GRANDES TOUCHES
User guide / Notice d’utilisation
E
CAUTION:THIS TELEPHONE PRODUCT IS SPECIFI-
CALLY DESIGNED FOR PEOPLE WITH HEARING DIFFICULTIES AND IS PROVIDED WITH A HANDSET EARPIECE VOLUME CONTROL FOR INDIVIDUAL REQUIREMENTS. DUE CARE MUST BE TAKEN BY ALL USERS
THAT THE HANDSET EARPIECE VOLUME CONTROL IS
SET TO THE LOWEST LEVEL ACCEPTABLE BY EACH
RESPECTIVE USER. CARE SHOULD THEREFORE BE
EXERCISED TO ENSURE THA T ANY NAIVE USERS ARE
ARE FAMILIAR WITH THIS REQUIREMENT.
F
ATTENTION: CE TELEPHONE PEUT ETRE DESTINE
AUX PERSONNES A Y ANT DES PROBLEMES D’AUDITION.
IL POSSEDE UN ECOUTEUR A VOLUME V ARIABLE. A
LA PREMIERE UTILISA TION, ASSUREZ VOUS QUE LE
BOUTON DE REGLAGE DU VOLUME SOIT POSITIONNE
SUR LA POSITION VOLUME MINIMUM. LES PERSONNES
MALENTENDANTES POURRONT PAR LA SUITE
AUGMENTER LE VOLUME POUR L’ADAPTER A LEUR
AUDITION.
Telephone
Page 2

E2F
INDEX
Description 4
Setting up
- Connecting the telephone 6
- Ringer settings 7
- Pulse/T one switch 8
- Time breack recall switch 8
- Wall mounting 8
Using the phone
- Answering incoming call 9
- V olume and tone receiving
adjustment 9
- Making a call 11
- Sending volume adjustment 11
- Last number redial 12
- Recall, * & # buttons 12
- Mute button 12
- Storing telephone numbers 13
- Dialling stored number 14
Guarantee 15
Page 3

SOMMAIRE
Description 16
Installation
- Raccordements 18
- Sonnerie 19
- Fréquence décimale/vocale
(Interrupteur Pulse/T one) 20
- Interrupteur 300ms / 100ms 20
- Position murale 20
Utilisation
- Recevoir un appel 21
- Réglage du volume et de la tonalité
de réception 21
- Appeler 23
- Réglage du volume d’émission 23
- Rappel du dernier numéro 24
- Touches R, * & # 24
- Fonction secret 24
- Mémoriser un numéro de téléphone 25
- Appel d’un numéro en mémoire 26
Garantie 27
3
Page 4
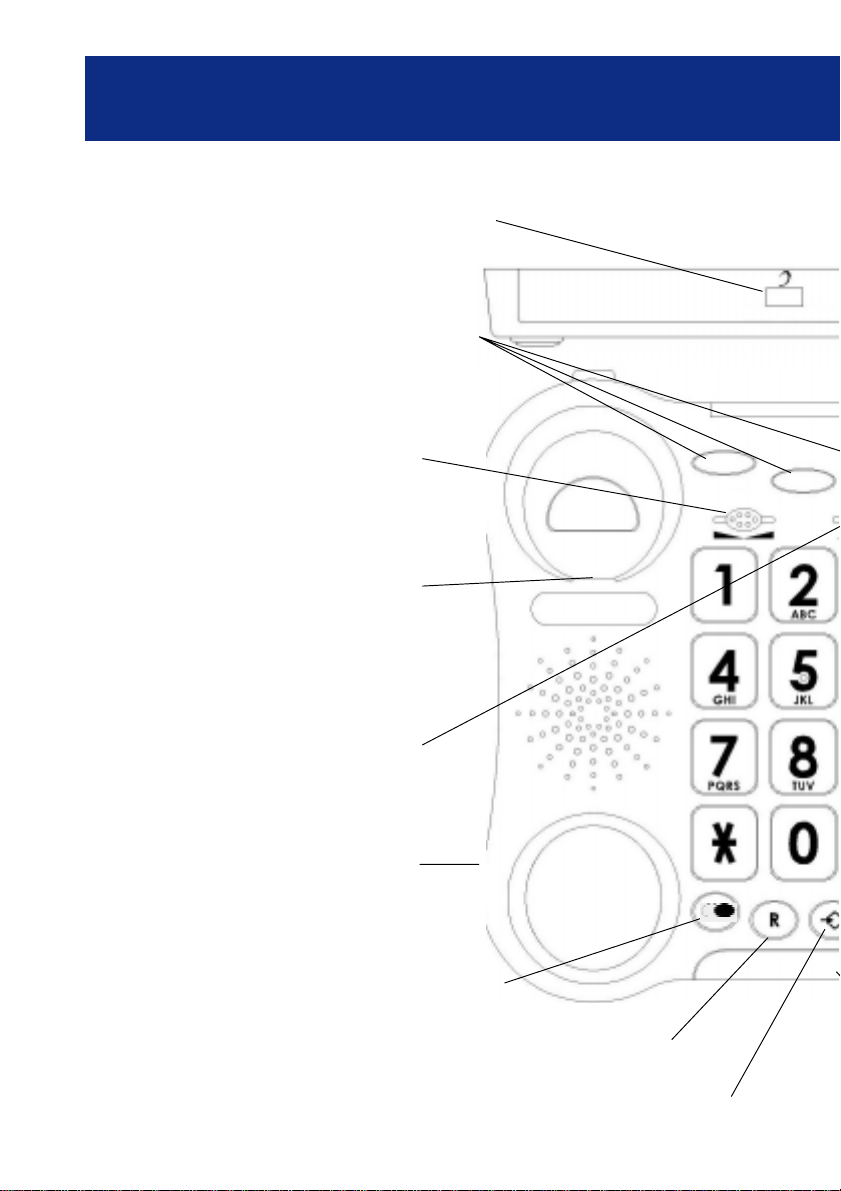
DESCRIPTION
Tone and volume adjustment automatically activated each time you
hang-up the phone
3 emergency
numbers
Tone reception
adjustment
Clip for wall mounting
OFF ON
TONE
Volume reception
adjustment
Handset cord
socket
Last number redial
Time break recall button
Memory storing key
4
Page 5
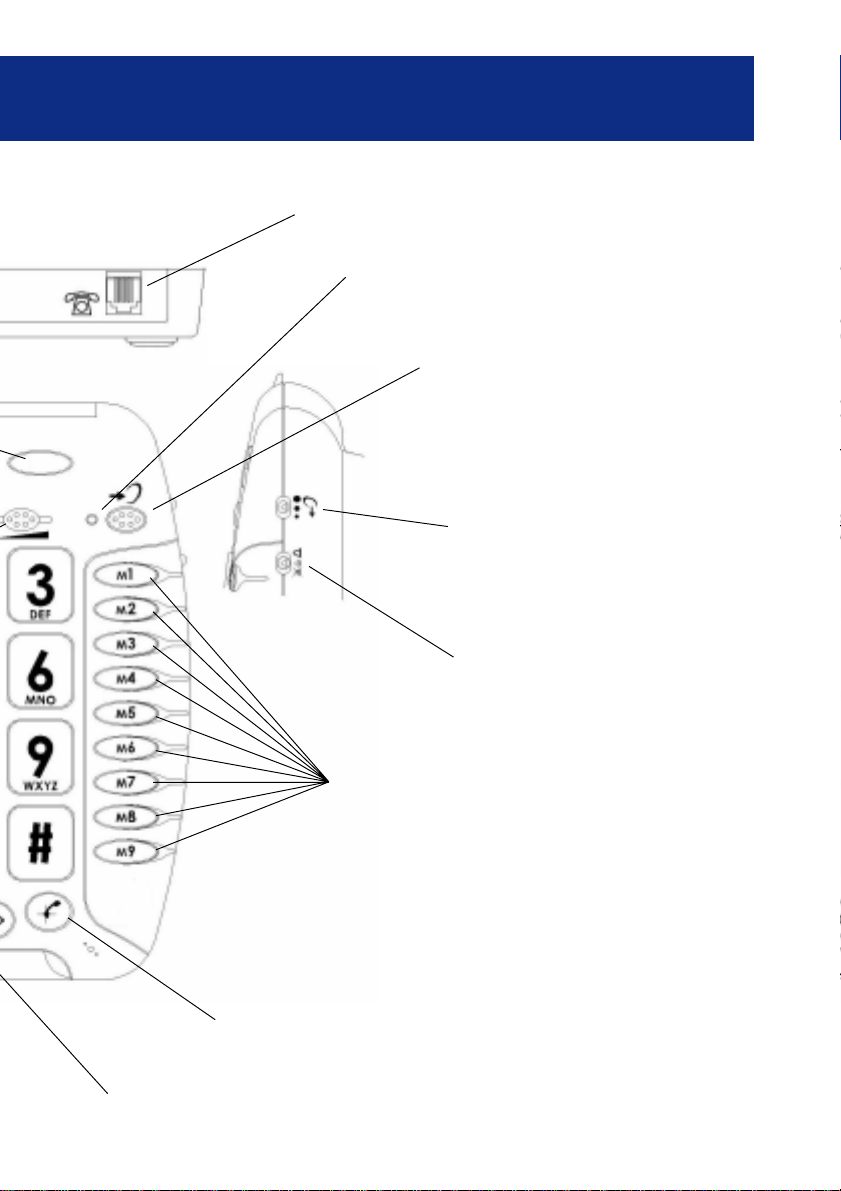
VOLUME
Line socket
Red light for tone and
volume activation
Key to activate tone and
volume adjustment
function
Sending volume
adjustment
Ring level adjustment
Direct memory buttons
Mute button
Flashing incoming ring indicator
5
Page 6

SETTING UP
Line cord
PTT Plug (*)
3
(*) Classified TNV-3 according
to EN60950 standard.
index card
Battery
compartment (*)
Handset cord
1 - CONNECTING TELEPHONE
1 - Connect the handset cord.
Wall mounting
screw holes
2
1
Tone/Pulse
switch
Time break
recall switch
(E=100ms)
2 - Open the battery compartment by unscrewing
the retaining screw and pulling back the latch.
3 - Insert correctly 4 x AAA 1.5V alkaline battery
(not supplied) in the battery compartment (*). Batteries are required if you wish to increase the ring
level of 10 dB.
4 - Snap the battery door back in place and replace the retaining screw.
5 - Connect the line cord.
6
Page 7
SETTING UP
6 - Connect the PTT plug in the wall socket.
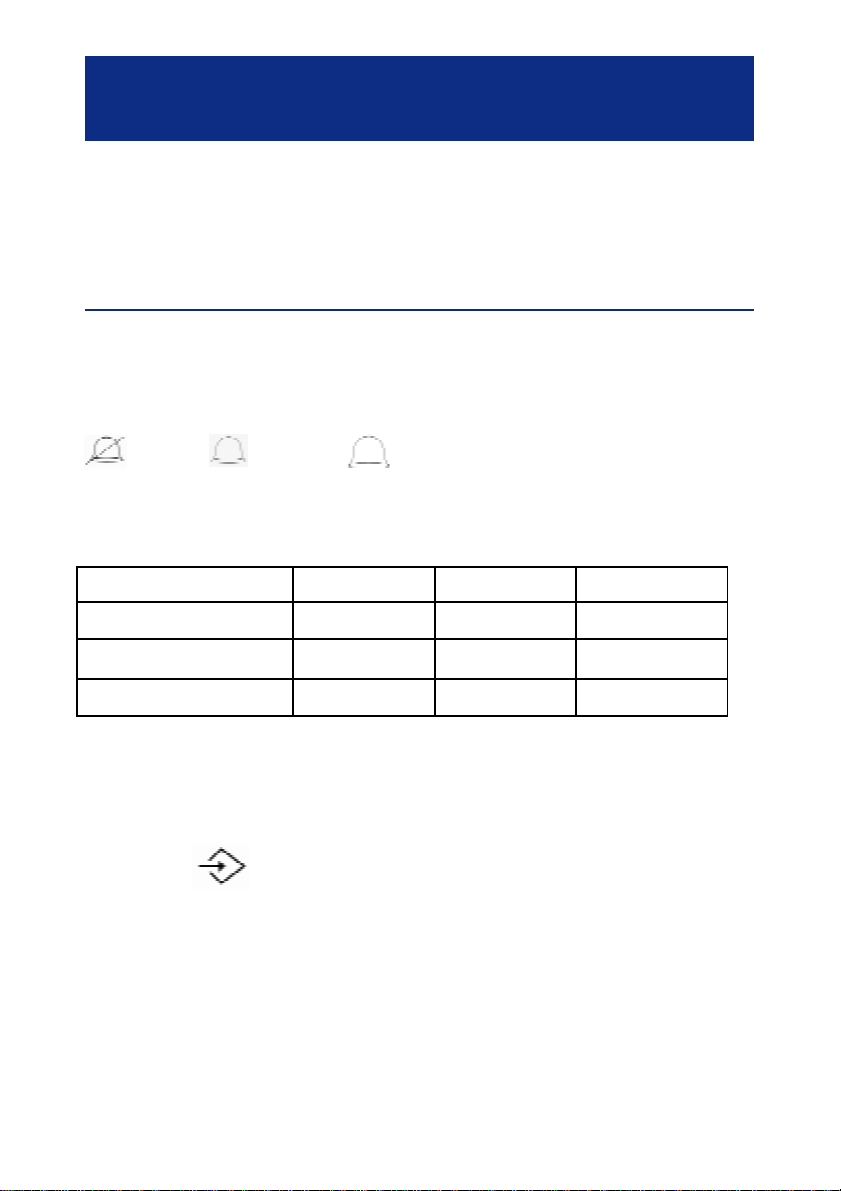
2 - RINGER SETTINGS
A switch located on right side allows the ringer to
be switched HI,LOW ,OFF:
: Off, : Low, : Hi
Y our phone comes with the ringer switched to
«High» and the melody set to «6»:
Low Mid High
Melody 1 1 2 3
Melody 2 4 5 6
Melody 3 7 8 9
If you don’t like the ringer melody ,you can choose
a new one by changing the settings as follow:
- Lift the handset.
- Press button.
- Press # button.
- Press any button 1 to 9.
Ringer will be activated on next call.
Note: The ring level will be increased of 10 dB if
you insert batteries into the battery compartment.
7
(by default)
Page 8

SETTING UP
3 - TONE/PULSE SWITCH (T/P)
The Tone/Pulse switch is factory pre-set to Tone
position.In the UK,all telephone exchanges now
use Tone dialing.If your phone does not dial out it
is probably being used from an older private switch
board (PBX).In this case,the Tone/Pulse switch
must be moved to Pulse.
4 -TIME BREAK RECALL SWITCH (300/100)
For UK, the TBR switch is factory pre-set to 100ms.
It can be switched to 300ms for other locations or
PBX’s.
5 - W ALL MOUNTING
T o wall-mount your telephone,slide out the clip turn
around and slide back into the wall mounting position (located in the base unit, just below the ear
piece).This will ensure that the handset stays firmly
in position.Make 2 holes in the wall 80mm apart,
insert the wall plugs and the wall mounting screws.
8
Page 9

USING THE PHONE
The screws should protrude from wall by 6-7 mm.
Place the phone onto the screw-heads and slide
down to secure.
If you are using this telephone with a
hearing aid, set your hearing aid to
the “T” setting.
1 - ANSWERING INCOMING CALL
- When an incoming call is received the phone will
ring and flash,to answer the call lift the handset
and speak.
- On completion of the call, carefully replace the
handset in the cradle to release the line.
2-VOLUME AND TONE RECEIVING
ADJUSTMENT
You can increase the volume and adjust the
receiving tone according to your own hearing
requirements.
9
Page 10

USING THE PHONE
The button allows extra receiving and tone
functions to be activated or not during the conversation. When the function is activated, the red light
of extra receiving and tone function located near
the button is lit. Adjust the TONE and VOLUME
buttons to remove the levels according to your own
hearing requirements.
TONE
Bass
+10db max
Normal
Treble
+10db max
VOLUME
+30db max
0dB
15dB
15dB OFF
30dB
ON
Note: When the tone (treble), earpiece volume and
sending levels are set to the maximum, whistling
may occur. If whistling occurs the sending level
10
Page 11

USING THE PHONE
settings should be decreased with the switch .
When the switch located behind the phone is
ON, the extra-receiving and tone functions are
automatically activated each time you use the
phone.When this switch is switched OFF, you will
need to activate the function by pressing the button
. Tone and volume adjustment (15dB to 30dB)
is only activated when the button is set to ON.
When this button is set to OFF only the volume
can be adjusted from 0dB to 15dB.
3 - MAKING A CALL
- Lift the handset.
- Await the dial tone and dial required number .
- On completion of the call,carefully replace the
handset in the cradle.
4 - SENDING VOLUME ADJUSTMENT
If your voice is quiet or called parties have difficulty
hearing you, you can increase the sending level
volume with the switch located on the right
side.Y ou can also decrease the sending volume if
required.
11
Page 12

USING THE PHONE
Min Normal Maxi
5 - LAST NUMBER REDIAL
- Lift the handset.
- Await the dial tone and press button.
-The previously dialled number will be automaticaly
redialled (not in use for memory numbers).
6 - RECALL, * & # BUTTONS
These are used with the new services provided on
digital exchanges.For details please contact your
network operator .
7 - MUTE BUTTON
If you wish to speak privately to someone else in
the room without your caller overhearing,press and
12
Page 13
USING THE PHONE
hold the button.You will still be able to hear the
callers but they cannot hear you during the mute
operation.T o resume normal conversation, release
the button.
8 - STORING TELEPHONE NUMBERS
Y our phone can store12 direct memories including
3 emergency numbers (21 digits maximum for each
memory). For example, the 3 special memories allow
you to store the 3 numbers below:
- Fire,Police,
Ambulance:999
- Your doctor
T o store a number please follow instructions below:
- Lift the handset.
- Press button.
- Press M1, M2, ..., or M9 or one of 3 emergency
numbers to store your number .
- Dial the number .
- Press again Button.
Numbers will be lost after few hours if you disconnect
It is recommended to
store this numbers
during installation
13
Page 14

USING THE PHONE
your phone. Entering a new number in memory will
automatically erase the previous number .
9 - DIALLING STORED NUMBER
- Lift the handset and await the dial tone.
- Press appropriate button M1, M2, ..., or M9 or one
of the 3 special numbers,the stored number will be
dialled automatically. To register your stored phones numbers, use the index located under the base.
Use this table below to prepare the phone book:
1
2
Example :
3
4
5
6
7
8
9
Bruce 01 64 57 .. ..
1
14
Page 15

GUARANTEE
GUARANTEE
From the moment your Geemarc product is purchased, Geemarc
guarantee it for the period of one year. During this time, all rep airs
or replacements (at our option) are free of charge.Should you
experience a problem then contact our helpline or visit our website
at www.geemarc.com.The guarantee does not cover accidents,
negligence or breakages to any parts. The product must not be
tampered with or taken apart by anyone who is not an authorised
Geemarc representative.The Geemarc guarantee in no way limits
your legal rights.
IMPORT ANT : YOUR RECEIPT IS P ART OF YOUR GUARANTEE
AND MUST BE RETAINED AND PRODUCED IN THE EVENT
OF A WARRANTY CLAIM
Please note: The guarantee applies to the United Kingdom only .
Declaration : Hereby Geemarc Telecom SA declares that this product is in
compliance with the essential requirements and other relevant provisions of
the Radio and T elecommunications T erminal Equipment Directive 1999/5/EEC
and in particular article 3 section 1a, 1b and section 3.
T elephone connection : Volt ages present on the telecommunication network
are classified TNV -3 (Telecommunication Network Voltage) according to the
EN60950 standard.
The telephone does not operate if the line current is lower than 18 ma.
For product support and help visit our website
at www.geemarc.com
telephone 01707 384438
or fax 01707 372529
15
Page 16

DESCRIPTION
Activation automatique de la
correction d’écoute au décroché
3 mémoires
d’urgence
Réglage de la tonalité
de réception
Ergot à retourner pour
maintenir le téléphone en
position murale
OFF ON
TONE
Réglage du volume
de réception
Connecteur
du cordon combiné
Rappel du dernier
numéro composé
Mise en mémoire
16
Page 17

VOLUME
Connecteur de ligne
Voyant du correcteur de
tonalité et volume
Activation de la correction
de tonalité et de volume
de réception
Réglage du volume
d’émission
Réglage du niveau
de sonnerie
Mémoires directes
Secret d’appel
Flash lumineux de sonnerie
17
Page 18

INSTALLATION
Prise téléphonique (*)
3
Cordon de ligne
Répertoire
Compartiment piles (*)
(*) Classée TRT-3 selon
la norme EN60950
1 - RACCORDEMENTS
1 - Branchez le cordon du combiné.
Cordon du
combiné
Ouvertures
pour vis de
2
position murale
Interrupteur
Tone / Pulse
Interrupteur
300/100ms
1
2 - Dévissez la vis et ouvrez le compartiment à
piles situé en dessous de votre téléphone.
3 - Inserez correctement 4 x AAA 1.5V piles
alkalines (non fournies) dans le compartiment (*).
Les piles sont necessaires si vous désirez augmenter de le niveau de sonnerie de 10 dB.
4 - Replacez et revissez le couvercle du compartiment à piles.
5 - Branchez le cordon de ligne.
18
Page 19

INSTALLATION
6 - Branchez le conjoncteur téléphonique PTT
dans votre prise téléphonique murale.
2 - SONNERIE
Un commutateur situé sur le côté de l’appareil
permet de régler la sonnerie:
: désactivée, : faible, : forte
Si la mélodie de sonnerie ne vous convient pas,
sélectionnez un nouveau réglage parmi les 9 proposés ci-dessous:
Faible Moyen Fort
Mélodie 1 1 2 3
Mélodie 2 4 5 6
Mélodie 3 7 8 9
Suivez la procédure décrite ci-dessous pour changer le réglage :
- Décrochez le combiné.
- Appuyez sur la touche .
- Appuyez sur la touche #.
- Appuyez sur un chiffre de 1 à 9.
Le réglage sera effectif au prochain appel.
Note: Si vous connectez les piles, le niveau de sonnerie sera augmenté de 10 dB.
19
(par défaut)
Page 20

INSTALLATION
3 - FREQUENCE VOCALE OU DECIMALE? (T/
P)
Au moment de sa livraison, votre téléphone est en
mode fréquence vocale (T). Si le central téléphonique dont vous dépendez fonctionne en mode fréquence décimale (P), vos appels n’aboutiront pas,
il vous suffira alors de commuter l’interrupteur T/P
situé en dessous du téléphone sur la position P
pour remédier à ce problème.
4 - INTERRUPTEUR 300/100ms
Cet interrupteur doit être positionné sur 300 pour
la France, il peut être positionné sur 100 pour
d’autres pays ou utilisation avec un PABX.
5 - POSITION MURALE
Pour maintenir votre combiné en position verticale,
retirez l’ergot situé sur la base (voir descriptif page
précédente) le tourner et le réinsérer. Percez 2 trous
verticaux distant de 80 mm dans votre mur pour y
20
Page 21

UTILISATION
insérer 2 chevilles avec leurs vis. Laissez dépasser
les vis de 6-7mm. Placez votre téléphone sur les
têtes de vis et faites glisser ensuite votre téléphone
dans les têtes de vis.
1 - RECEVOIR UN APPEL
- Lorsque le téléphone sonne (flash lumineux de
sonnerie de votre téléphone activé), décrochez le
combiné pour parler à votre correspondant.
- La conversation terminée, raccrochez le combiné pour libérer la ligne.
2 - REGLAGE DU VOLUME ET DE LA TONALITE DE RECEPTION
V ous pouvez amplifier le volume et régler la tonalité de réception de votre combiné. La touche
permet d’activer ou de désactiver le correcteur de
réception durant la conversation.
Lorsque la fonction est activée, le voyant rouge
du correcteur de réception situé à côté de la touche est allumé.
21
Page 22

UTILISATION
Les touches, TONE et VOLUME, vous permettent
de corriger la tonalité et le volume de réception.
TONE
Graves
+10db max
Normal
Aigus
+10db max
VOLUME
+30db max
0dB
15dB
15dB OFF
30dB
ON
Note: Des sifflements dans l’écouteur peuvent
apparaître dans certaines configurations de
réglage (tonalité des aigus, volume de réception
et volume d’émission au max), dans ce cas
diminuez le niveau d’émission avec l’interrupteur
. L ’interrupteur sur ON situé à l’arrière de
l’appareil active automatiquement la correction à
chaque décroché de votre combiné.
22
Page 23

UTILISATION
Sur OFF, il faudra activer la fonction en appuyant
sur la touche .
Le réglage de la tonalité et du volume (de 15dB à
30 dB) n’est activé que lorsque la touche est
sur ON. Lorsque cette touche est sur OFF seul le
volume peut être réglé de 0dB à 15dB.
3 - APPELER
- Décrochez le combiné.
- Composez le numéro de votre correspondant.
- La conversation terminée, raccrochez le combiné pour libérer la ligne.
4 - REGLAGE DU VOLUME D’EMISSION
Si votre correspondant vous entend faiblement,
vous pouvez augmenter le volume d’émission à
l’aide du commutateur situé sur le coté de l’appareil. V ous pouvez aussi choisir de diminuer le volume d’émission.
23
Page 24

UTILISATION
Mini Normal Maxi
5 - RAPPEL DU DERNIER NUMERO
- Décrochez le combiné.
- Appuyez sur la touche le numéro de votre
correspondant se recompose automatiquement (ne
fonctionne pas pour les numéros en mémoire).
6 - TOUCHES R,* & #
T ouches d’accès aux Services de France Télécom
(Signal d’Appel, Conversation à T rois).
7 - FONCTION SECRET
Cette touche permet de couper ponctuellement le
microphone en cours de communication.
- Appuyez et maintenez enfoncé la touche
correspondant ne vous entend plus.
- Relâchez la touche
tion.
pour rétablir la conversa-
24
. Votre
Page 25

UTILISATION
8 - MEMORISER UN NUMERO DE TELEPHONE
Votre téléphone possède 12 mémoires directes
dont 3 d’urgences, (21 chiffres maximum par mémoire).
Les 3 mémoires spéciales permettent de mémoriser par exemple les 3 numéros suivants:
- POMPIER : 18
- POLICE : 17
- VOTRE MEDECIN
Suivez la procédure décrite ci-dessous pour mémoriser vos numéros:
- Décrochez le combiné.
- Appuyez sur la touche .
- Appuyez sur une des touches M1, M2, ..., ou M9
ou sur une des trois touches d’urgence pour enregistrer votre numéro.
- Composez le numéro à mémoriser .
- Appuyez à nouveau sur la touche .
Les numéros seront perdus après quelques heu-
res si vous déconnectez votre téléphone.
Un nouvel enregistrement dans une mémoire ef-
Pensez à enregistrer
ces numéros
lors de l’installation
face la précédente.
25
Page 26

UTILISATION
9 - APPEL D’UN NUMERO EN MEMOIRE
- Décrochez le combiné.
- Appuyez sur une des touches M1, M2, ..., ou M9
ou sur une des trois touches spéciales, le numéro
en mémoire se recompose automatiquement.
Pour repérer vos numéros enregistrés, utilisez le
répertoire situé en dessous de la base.
Aidez vous du tableau ci-dessous pour le préparer:
Exemple :
1
2
3
4
5
6
7
8
9
Pierre 01 64 57 .. ..
1
26
Page 27

GARANTIE
GARANTIE
Cet appareil est garanti 1 an pièces et main-d'oeuvre. La date
d'achat figurant sur le ticket de caisse fera foi. Cette garantie
s'exerce sous réserve d'une utilisation normale de l'appareil.
Les dommages occasionnés par les surtensions électriques, la
foudre ou par un choc sur l'appareil ne peuvent en aucun cas être
couverts par la garantie. En cas de problème fonctionnel et avant
de nous retourner votre appareil, contactez notre service après
vente de : 8h30 à 12h30 et de 14h00 à 17h00 du Lundi au Jeudi
et de 8h30 à 12h30 et de 14h00 à 16h30 le Vendredi.
TEL. SERVICE APRES VENTE :
03 28 58 75 99
Parcd’Activités duBasroch
2, rue Galilée
59760GrandeSynthe
Ce produit respecte les exigences de compatibilité électro-magnétique et de sécurité électrique demandées par la directive européenne
RTTE.
Par ailleurs, il est compatible avec les différents réseaux téléphoniques européens (normes TBR21/37/38).
Raccordement téléphonique : les tensions présentes sur ce
réseau sont classées TRT-3 (Tension de Réseau de
Télécommunication) au sens de la norme EN60950.
Le fonctionnement de l’appareil n’est pas garanti
si le courant de ligne est inférieur à 18 mA.
27
Page 28

EXTRA RECEIVING CORRECTION
CORRECTION DE LA RECEPTION
dB
+30
+20
+10
Correction
bass max.
graves max.
CL100
300 1K 3.4K Hz
Correction
treble max.
aïgus max.
Volume max.
+ 30 dB
ON
Volume max.
+ 15 dB
OFF
T elephone without
correction
Téléphone sans
correction
www.geemarc.com
UGCL100 ED04
 Loading...