

Page 1

CL100
English
Page 2

!!!User manual to read carefully before start to
use!!!
!!!Manuel d’utilisation à lire impérativement avant
la mise en service!!!
!!! Bevor Ihr neues Telefongerät zu benutzen,
bitte lesen Sie dies Benutzerhandbuch sehr
sorgfältig!!!
CAUTION: this telephone is specifically designed for the people with hearing
difficulties and is provided with a handset earpiece volume control for individual
requirements. Due care must be taken by all users that the handset earpiece
volume control is set to the lowest level acceptable by each respective user .
Care should therefore be exercised to ensure that any naive users are familiar
with this requirement.
A TTENTION: Ce téléphone peut être destiné aux personnes ayant des
problèmes auditifs. il possède un écouteur a volume variable. A la première
utilisation, assurez vous que le volume soit réglé au minimum. Les personnes
malentendantes pourront par la suite augmenter le volume pour l’adapter à leur
besoin.
WARNUNG: Dieses T elefon wurde speziell für schwerhörige Personen
konzipiert und besitzt eine auf die individuellen Bedürfnisse einstellbare
Hörerlautstärke. In Folge dessen sollten alle Nutzer darauf achten, dass der
Lautstärkeregler des Hörers, in Rücksicht auf andere Nutzer , auf das
niedrigste Niveau gestellt wird. Es ist darauf zu achten, dass unwissende
Benutzer mit der Handhabung dieser Apparatur vertraut gemacht werden.
2
Page 3

Index
Description 4
Setting up 7
- Connecting the telephone 7
- Ringer volume setting 7
- T one/Pulse switch 8
- T ime breack recall setting 8
- Wall mounting 8
V olume and tone adjustment 10
- Receiving volume and tone adjustment 10
- Sending volume adjustment 12
Using the phone 13
- Answer a call 13
- Making a call 13
- Last number redial 14
- Recall, * & # buttons 14
- Mute button 14
- Storing telephone numbers 15
- Dialling stored number 16
General informations 17
3
Page 4

Description
3 emergency
numbers
Reception volume
adjustment
Reception tone
adjustment
Clip for wall
mounting
Handset cord socket
Red light of tone/
volume activation
Extra volume and
tone adjustment
Direct memories
Last number redial
Time break recall
Flashing incoming ring indicator
Mute
Memory storing
4
Page 5

Memo card
Description
Holes for wall
mounting
Time break
recall
Dialling mode
Pulse/T one
Battery
compartment
Handset
cord socket
5
Page 6

Description
Ring volume
setting
V olume and tone
adjustment ON/OFF switch
Sending volume
setting
Line socket
6
Page 7

Setting up
1 - Connecting the telephone
- Connect the handset cord.
- Open the battery compartment.
- Insert 4 alkaline batteries (type AAA 1.5V, not
supplied) in the compartment (*). Batteries are
required if you wish to increase the ringer level up
to 10 dB.
- Snap the battery door back in place.
- Connect the line cord plug into the line socket on
the rear of the unit (*).
- Connect the other end of the line cord into the
wall PTT socket (*).
2 - Ringer volume setting
A switch located on the right side allows the ringer
to be switched to Hi,Low or Off:
: Off,
: Low,
: Hi
Note: The ring level will be increased of 10 dB if
you insert batteries.
7
(*) Classified TNV-3 according to EN60950 standard.
Page 8

Setting up
3 - Dialling mode (T one/Pulse) settings
The Tone/Pulse switch is factory pre-set to Tone
position. In the UK,all telephone exchanges now
use Tone (T) dialing.If your phone does not dial
out, it is probably being used from an older private
switch board (PBX).In this case,the Tone/Pulse
switch must be changed to Pulse (P).
4 - Time Break Recall setting (270/100)
Y our phone works with a time break recall for United
Kingdom (R=100ms). It can be switched to 270ms
for other locations or PBX’s.
5 - Wall mounting
T o wall-mount your telephone, turn the “clip” (located
in the base unit, just below the ear piece).
This will ensure that the handset stays firmly in
position.
8
Page 9

Setting up
7
7
7
7
7
7
7
7
7
7
7
7
7
7
7
7
7
7
7
7
7
7
7
7
7
7
7
7
7
7
7
7
7
7
7
7
7
7
7
7
Drill 2 holes in the wall (80mm apart).
Insert the wall plugs and the screws leaving about
6 mm of the screws projecting from the wall.
Slide the telephone downwards to secure.
23456
23456
23456
23456
23456
23456
23456
23456
23456
23456
23456
23456
23456
23456
23456
23456
23456
23456
23456
23456
23456
23456
23456
23456
23456
23456
23456
23456
23456
23456
23456
23456
23456
23456
23456
23456
23456
23456
23456
23456
Screw
80 mm
6 mm
9
Page 10
Volume and tone adjustment
1 - Receiving volume and tone adjustment
You can increase the volume and adjust the
receiving tone according to your own hearing
requirements.
The button allows extra receiving and tone
functions to be activated or not during the conversation.
When the function is activated, the red light of extra
receiving and tone function located near the button
is lit.
Adjust the TONE and VOLUME buttons to fit the
levels to your own hearing requirements.
VOLUME
+30db max
0dB
15dB
15dB OFF
30dB
10
ON
Page 11

V olume and tone adjustment
TONE
Bass
+10db max
Normal
Treble
+10db max
Note: When the tone (treble), earpiece volume
and sending levels are set to the maximum,
whistling may occur. Then the sending level
settings should be decreased with the switch .
When the switch located behind the phone is
ON, the extra-receiving and tone functions are
automatically activated each time you use the
phone.
When this switch is OFF, you will need to activate
the function by pressing the button .
Tone and volume (15dB to 30dB) adjustment is
only activated when the button is set to ON.
When this button is set to OFF only the volume
can be adjusted from 0dB to 15dB.
11
Page 12

V olume and tone adjustment
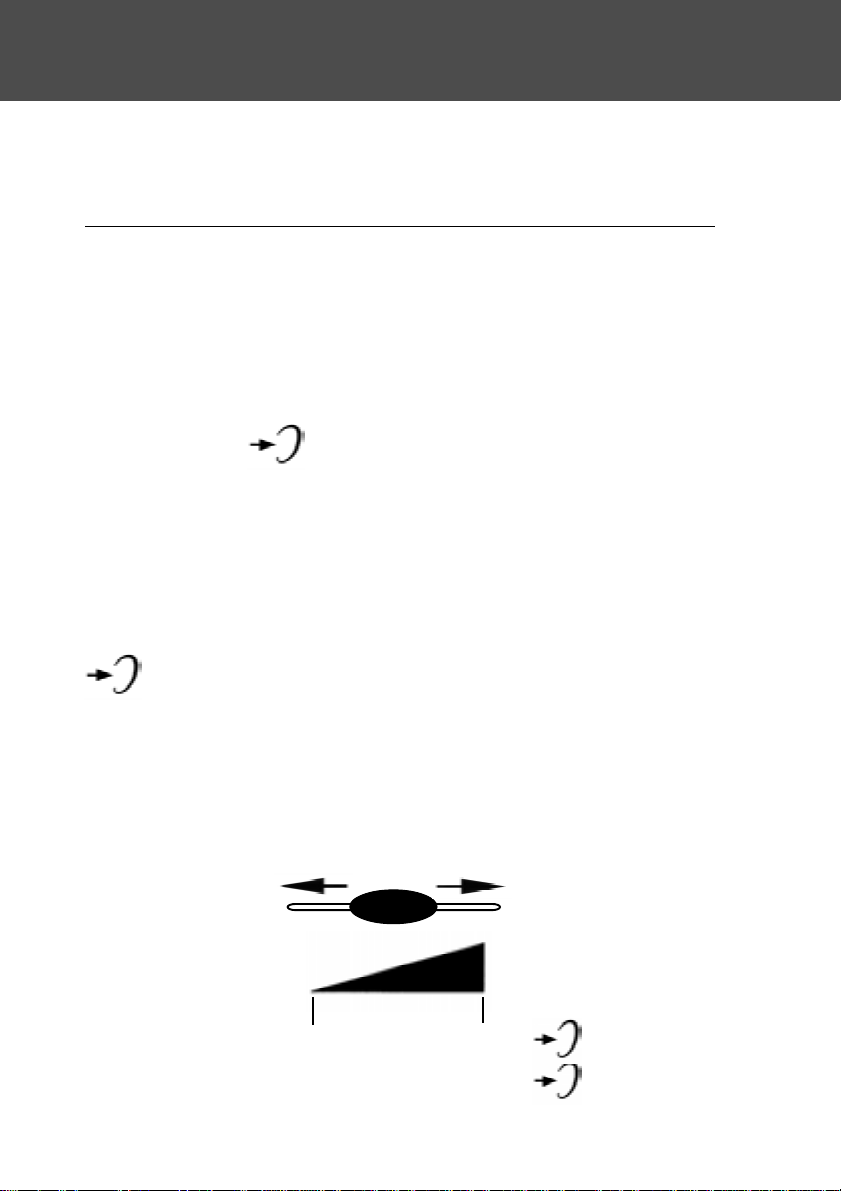
2 - Sending volume adjustment
If your voice is quiet or called parties have difficulty
hearing you, you can increase the sending level
volume with the switch located on the right side.
You can also decrease the sending volume if
required.
Min Normal Maxi
12
Page 13

Using the phone
If you are using this telephone with a
hearing aid, set your hearing aid to
the “T” setting.
1 - Answer a call
- When an incoming call is received the phone will
ring and flash, to answer the call lift the handset
and speak.
- On completion of the call, carefully replace the
handset in the cradle to release the line.
2 - Making a call
- Lift the handset.
- Await the dial tone and dial required number .
- On completion of the call,carefully replace the
handset in the cradle.
13
Page 14

Using the phone
3 - Last number redial
- Lift the handset.
- Await the dial tone and press button.
-The previously dialled number will be automaticaly
redialled (not in use for memory numbers).
4 - Recall (R), * & # buttons
These are used with the new services provided on
digital exchanges. For details please contact your
network operator .
5 - Mute button
If you wish to speak privately to someone else in
the room without your caller overhearing, press
and hold the button.Y ou will still be able to hear
the callers but they cannot hear you during the
mute operation. To resume normal conversation,
release the button.
14
Page 15

Using the phone
6 - Storing telephone numbers
Your telephone can store12 direct memories
including 3 priority numbers (24 digits maximum
for priority memory and 32 digits for M1, M2...M9).
For example, the 3 priority P1, P2, P3 memories
allow you to store the 3 numbers below:
P1=Fire
P2=Police
P3=Doctor
T o store a number please follow instructions below:
- Lift the handset.
- Press button.
- Dial the number .
- Press button.
- Press M1, M2, ..., or M9 or one of 3 priority
memories to store your number .
Note: Entering a new number in memory will
automatically erase the previous one.
15
Page 16

Using the phone
7 - Dialing stored numbers
- Lift the handset and await the dial tone.
- Press appropriate button M1, M2, ..., or M9 or
one of 3 priority memories, the stored number will
be dialled automatically .
To register your stored phones numbers, use the
index located under the base.
16
Page 17

General informations
Recycling directives:
The WEEE (Waste Electrical and Electronic Equipment) has been
put in place for the products in end of life are recycled in the best
way .
When this product is out of order, please do not put it in your
domestic waste bin.
Please use one of the following disposal options :
- Remove the batteries and deposit them in an appropriate WEEE skip.
Deposit the product in in a appropriate WEEE skip.
- Or hand the old product to the retailer . If you purchase a new one, they should
accept it.
Thus if you respect these instructions you ensure human health and
environmental protection.
Guarantee:
From the moment your Geemarc product is purchased, Geemarc guarantee it
for the period of one year. During this time, all rep airs or replacements (at our
option) are free of charge.Should you experience a problem then contact our
helpline or visit our website at www.geemarc.com. The guarantee does not
cover accidents, negligence or breakages to any parts. The product must not
be tampered with or taken apart by anyone who is not an authorised Geemarc
representative. The Geemarc guarantee in no way limits your legal rights.
Important: YOUR RECEIPT IS PART OF YOUR GUARANTEE AND MUST
BE RET AINED AND PRODUCED IN THE EVENT OF A WARRANTY CLAIM.
T elephone connection: Voltages present on the telecommunication network
are classified TNV -3 (Telecommunication Network V oltage) according to the
EN60950 standard.
The telephone does not operate if the line current is lower than 18 mA.
Declaration: Hereby Geemarc Telecom SA declares that this product is in
compliance with the essential requirements and other relevant provisions of
the Radio and T elecommunications T erminal Equipment Directive 1999/5/EEC
and in particular article 3 section 1a, 1b and section 2.
The declaration of conformity may be consulted at www.geemarc.com
17
Page 18

UGCL100V2_Ver:03
United Kingdom
5 Swallow Court
Swallowfields
Welwyn Garden City
Hertfordshire, AL7 1SB
For product support:
01707 384438
www.geemarc.com
FRANCE
Parc de l’Etoile
2, rue Galilée BP20061
59791 Grande Synthe CEDEX
Tél. service après vente :
03 28 58 75 99
www.geemarc.com
Deutschland
Siemensstrasse 10,
53121 Bonn
Germany
Tel: +49(0)228/ 74 87 09 0
Fax: +49(0)228/ 74 87 09 20
www.geemarc.com
 Loading...