

Page 1

AmpliPOWER 40/50
Page
English
3
Français
Deutsch
!!!Warning, AmpliPOWER40/50 has an extra loud receiving
volume gain!!! (Risk of acoustic shock)
Page 2
Page 3
2
4
!!!Attention, l’AmpliPOWER40/50 possède un amplifiacteur
de volume très puissant!!! (Risque de choc accoustique)
!!!Seien Sie vorsichtig: der AmpliPOWER40/50 hat ein sehr
starke Lautstärke!!! (Akustisches Schockrisiko)
Page 2

!!!User manual to read carefully before start to
use!!!
!!!Manuel d’utilisation à lire impérativement avant
la mise en service!!!
!!! Bevor Ihr neues Telefongerät zu benutzen,
bitte lesen Sie dies Benutzerhandbuch sehr
sorgfältig!!!
CAUTION: this telephone is specifically designed for the people with hearing
difficulties and is provided with a handset earpiece volume control for individual
requirements. Due care must be taken by all users that the handset earpiece
volume control is set to the lowest level acceptable by each respective user .
Care should therefore be exercised to ensure that any naive users are familiar
with this requirement.
A TTENTION: Ce téléphone peut être destiné aux personnes ayant des
problèmes auditifs. il possède un écouteur a volume variable. A la première
utilisation, assurez vous que le volume soit réglé au minimum. Les personnes
malentendantes pourront par la suite augmenter le volume pour l’adapter à leur
besoin.
WARNUNG: Dieses T elefon wurde speziell für schwerhörige Personen
konzipiert und besitzt eine auf die individuellen Bedürfnisse einstellbare
Hörerlautstärke. In Folge dessen sollten alle Nutzer darauf achten, dass der
Lautstärkeregler des Hörers, in Rücksicht auf andere Nutzer , auf das
niedrigste Niveau gestellt wird. Es ist darauf zu achten, dass unwissende
Benutzer mit der Handhabung dieser Apparatur vertraut gemacht werden.
2
Page 3

Index
Description 5-7
Setting up
1 - Connecting the telephone 8
2 - Alarm and ring options 8
-Ring only
-Ring and shaker
-Ring and flash LED
3 - Ringer settings 9
4 - Tone/Pulse switch (T/P) 10
5 - T ime break recall switch (270/100) 10
6 - Hotel message waiting switch 10
7 - Wall mounting 11
INDEX
Using the phone
8- Answering incoming calls 12
-Without headset
-With headset (option)
-In handsfree mode
9- V olume and tone receiving 13
3
Page 4

Index
10 - Making a call 15
- Without headset
- With headset (option)
- In handsfree mode
11 - Last number redial 16
12 - Recall, * & # buttons 16
13 - Mute button 17
14 - S toring telephone numbers 17
15 - Dialling stored numbers 18
Options:
16 - Direct Vibe handset 19
17 - Shaker 20
18 - Headset with microphone 20
Guarantee 21
For product support and help visit our
website at www .geemarc.com
telephone 01707 384438
or fax 01707 832529
4
Page 5

3 emergency
numbers
IndexDescription
Reception volume
adjustment
Reception tone
adjustment
Speaker volume
adjustement
Clip for wall
mounting
Red light of tone/
volume activation
Extra volume and
tone adjustment
Direct memories
Handset cord socket
Last number redial
Time break recall
Handsfree /
Headset button
Mute
Memory storing
Flashing incoming ring indicator
5
Page 6
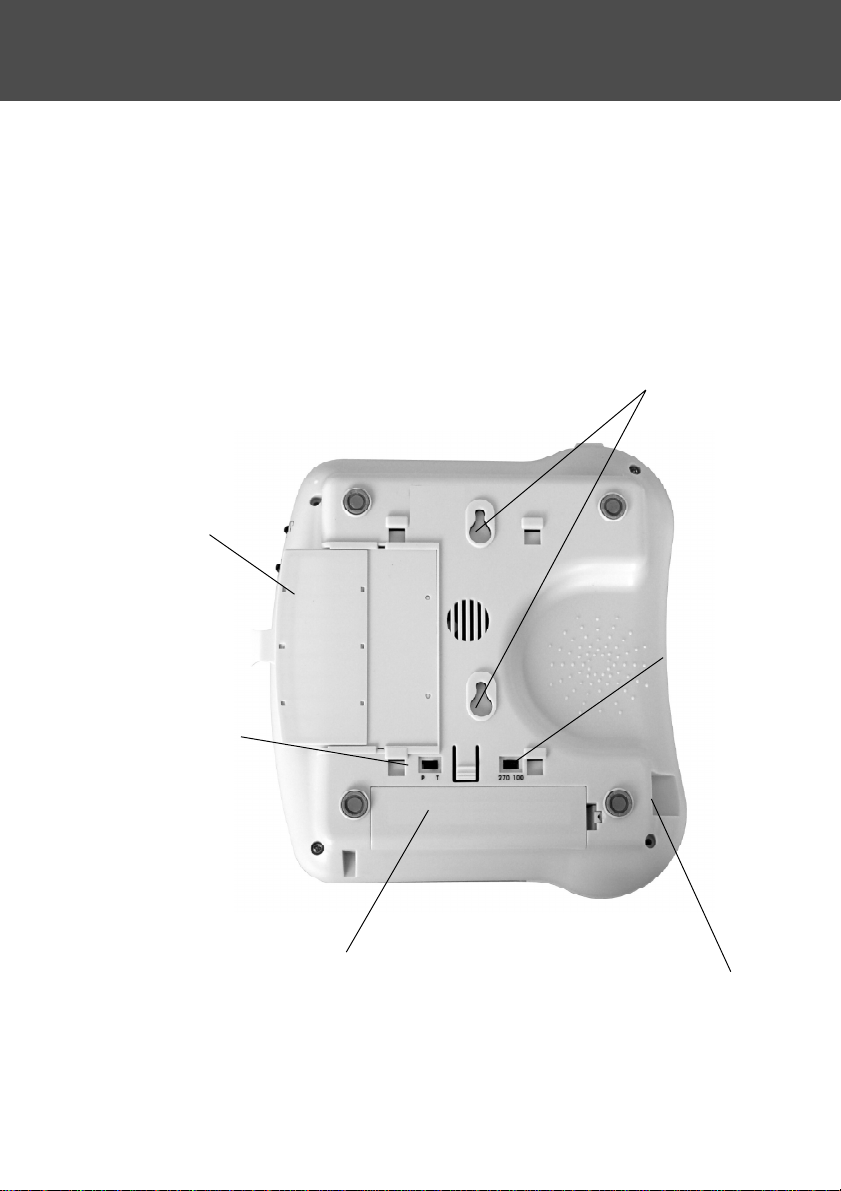
Description
Memo card
Holes for wall
mounting
Time break
recall
Dialling mode
Pulse/T one
Battery
compartment
6
Handset
cord socket
Page 7
Description
Headset socket
Shaker socket
Ring alarm
setting
Hotel switch
message
Volume and tone
adjustment ON/OFF switch
7
Adaptator
socket
Ring Hi/Low/
OFF Switch
Line socket
Page 8

Setting up
1- Connecting the telephone
- Connect the handset cord.
- Open the battery door by unscrewing the
retaining screw . Insert 4 x AAA alkaline batteries
(not included).
Snap the battery door in place.
In case of power failure, batteries are required
for the ring.
- Connect the line cord.
- Connect the shaker cord (optional).
- Connect the headset cord (optional).
- Connect the PTT plug to the wall socket.
- Connect the 12V DC adaptor cord to the
telephone.
- Connect the 12V DC adaptor to your
wall socket (**).
(**) Classified “hazardous voltage” according to EN60950 standard.
2- Alarm and ringer volume setting
A 3 position switch located on the right side
of the phone allows the settings below:
8
Page 9
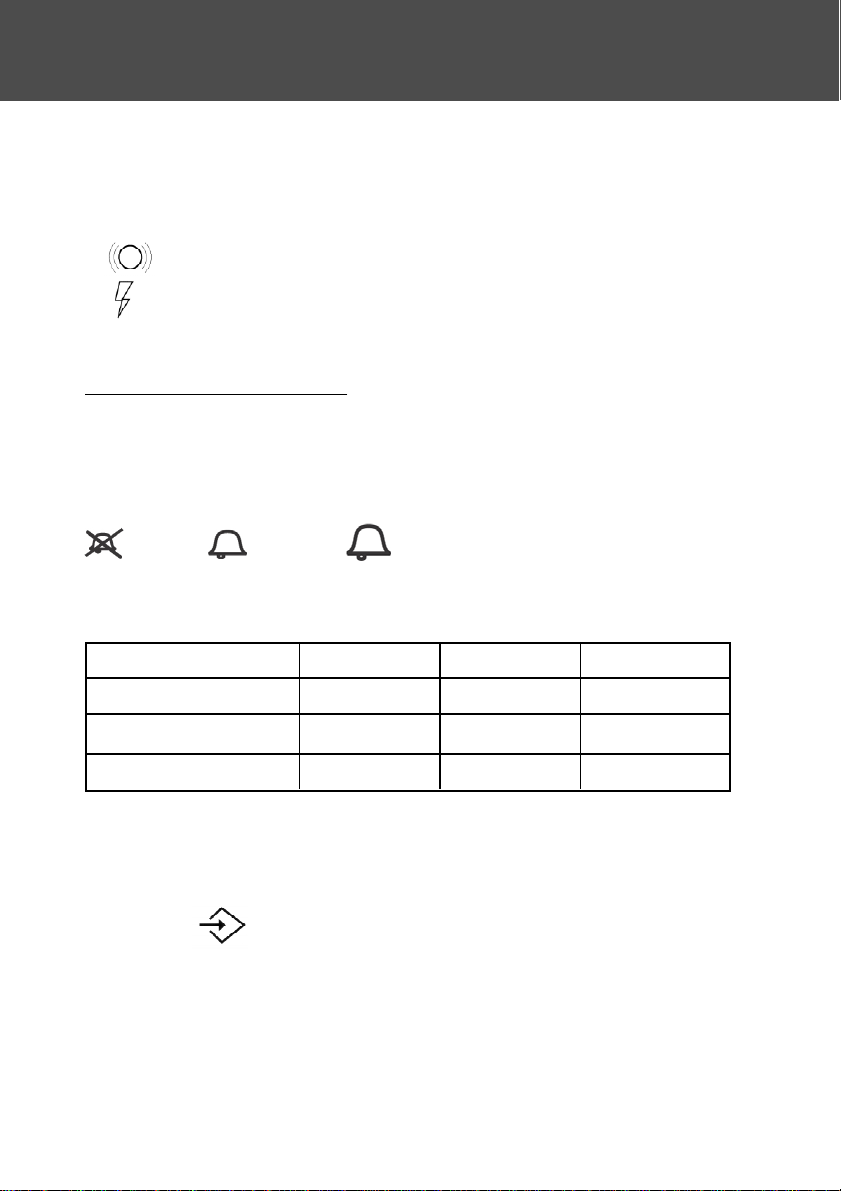
Setting up
- 0 : Only the ringer is activated.
- : Ringer and shaker are activated.
-
: Ringer and flash LED are activated.
3- Ringer settings
A switch located on right side allows the ringer to
be switched HI,LOW ,OFF:
: Off, : Low, : Hi
Y our phone comes with the ringer switched to
«High» and the melody set to «6».
Low Mid High
Melody 1 1 2 3
Melody 2 4 5 6
(by default)
Melody 3 7 8 9
If you don’t like the ringer melody ,you can choose
a new one by changing the settings as follow:
- Lift the handset.
- Press
button.
- Press # button.
- Press any button 1 to 9.
Ringer will be activated on next call.
9
(*) Classified TNV-3 according to EN60950 standard.
Page 10

Setting up
4- T one/Pulse switch (T/P)
The Tone/Pulse switch is factory pre-set to
Tone position (T). In the UK,all telephone
exchanges now use Tone dialling.If your phone
does not dial out, it is probably being used from
an older private switch- board (PBX). In this
case,theTone/Pulse switch must be moved to
Pulse.
5- Time break recall switch (270/100)
For the UK, the TBR switch is factory pre-set to
100ms. It can be switched to 270ms for other
locations or PBX’s.
6- Hotel message waiting switch
These are used with the new services provided on
hotel network. A switch
located behind your
phone allows to set ON the hotel message waiting
function.When the switch is setting ON and when
you receive a message, the red light is
10
Page 11
Setting up
7
7
7
7
7
7
7
7
7
7
7
7
7
7
7
7
7
7
7
7
7
7
7
7
7
7
7
7
7
7
7
7
7
7
7
7
7
7
lit to inform you that you have a message on the
phone.
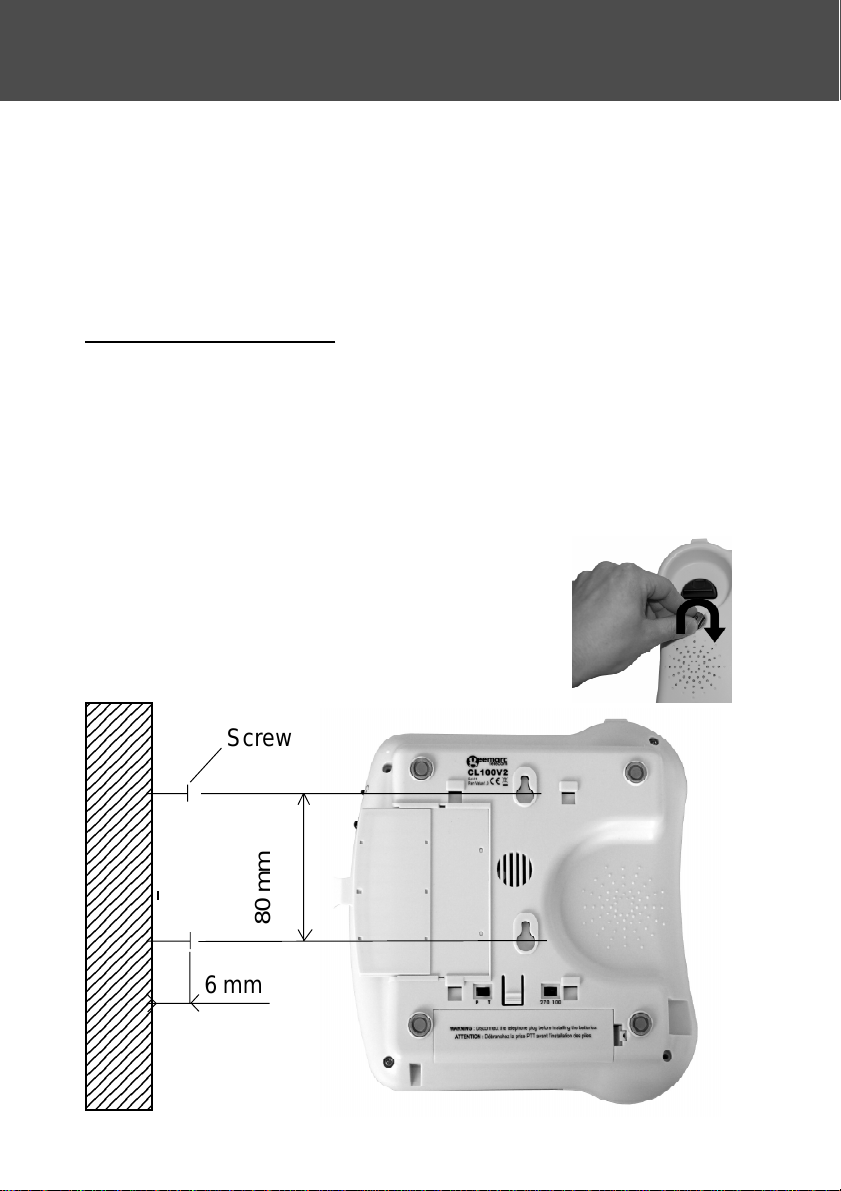
7- Wall mounting
Drill 2 holes in the wall (80 mm apart).
Insert the wall plugs and the screws leaving about
6 mm of the screws projecting from the wall. Slide
the telephone downwards to secure
23456
23456
23456
23456
23456
23456
23456
23456
23456
23456
23456
23456
23456
23456
23456
23456
23456
23456
23456
23456
23456
23456
23456
23456
23456
23456
23456
23456
23456
23456
23456
23456
23456
23456
23456
23456
23456
23456
Screw
80 mm
6 mm
11
Page 12

Using the phone
8- Answering incoming call
Without headset:
- When an incoming call is received the phone
will ring, to answer the call lift the handset and
speak.
- On completion of the call, carefully replace the
handset in the cradle to release the line.
With headset (option):
- When an incoming call is received and if you
wish to answer the call with the headset, press
the / button and speak.
- On completion of the call, press the /
button again to release the line.
In handsfree mode:
- When an incoming call is received the phone
will ring, to answer the call press the
button.
- On completion of the call, press the /
button to release the line.
12
/
Page 13

Using the phone
9 - V
olume and tone receiving adjustment
You can increase the volume and adjust the
receiving tone according to your own hearing
requirements.The button +40 dB allows extrareceiving and tone functions to be activated or not
during the conversation.
When the function is activated, the red light for extra
receiving and tone function located near the button
+40 dB is lit. Adjust the
TONE and VOLUME
buttons to move the level according to your own
hearing requirements.
TONE
Bass
+10db max
Treble
+10db max
Normal
13
Page 14

Using the phone
AmpliPOWER40
Volume
O dB 20 dB
20 dB* 40 dB*
*press button +40 dB
O dB 30 dB
30 dB** 60 dB**
**press button +60 dB
AmpliPOWER50
Volume
Note:
When the switch
located behind the phone
is ON, the extra-receiving and tone functions are
automatically activated each time you use the
phone.When the switch
is switched OFF, you
will need to activate the function by pressing the
button + 40dB (or +60 dB for the AmpliPOWER
50). Tone and volume adjustment (20dB to 40dB
for the AmpliPOWER 40 and 30 dB to 60 dB for
the AmpliPOWER 50) is only activated when the
button is set to ON. When this button is set to OFF
only the volume can be adjusted from 0 dB to 20
dB (0 dB to 30 dB for the AmpliPOWER 50)
14
Page 15

Using the phone
10- Making a call
Without headset:
- Lift the handset.
- Await the dial tone and dial required number .
- On completion of the call,carefully replace the
handset in the cradle.
With headset (option):
- Press the / button.
- Await the dial tone and dial required number .
- On completion of the call, press the / button
again to clear the line.
In handsfree mode
- Press the / button.
- Await the dial tone and dial required number .
- On completion of the call, press the
/ button
to release the line.
- If your correspondent doesn’t answer your call,
press the / button again to release the line.
15
Page 16

Using the phone
Note:
- T o deactivate the handsfree function during a call,
lift the handset.
To activate the handsfree function during a call,
press the / button and place the handset on
the cradle.
- During a call in handsfree, you can adjust the
speaker volume to a desirable level.
Simply use the slide control VOLUME located on
the left of the unit.
1 1- Last number redial
- Lift the handset.
- Await the dial tone and press button.
- The previously dialled number will be automatically
redialled (not in use for memory numbers).
12- Recall, * & # Buttons
These are used with the new services provided on
digital exchanges.For details please contact your
network operator .
16
Page 17
Using the phone
13- Mute button
If you wish to speak privately to someone else in
the room without your caller overhearing, press
and hold the button.Y ou will still be able to hear
the callers but they cannot hear you during the
mute operation.To resume normal conversation,
release the button.
14- Storing telephone number
Y our phone can store12 direct memories including
3 priorities numbers (21 digits maximum for each
memory).
For example, the 3 priority P1, P2, P3 memories
allow you to store the 3 numbers below:
- Local,Police station,
- Your doctor
- 1471
17
Page 18

Using the phone
T o store a number please follow instructions below:
- Lift the handset.
- Press button.
- Press M1, M2, ..., or M9 or one of 3 priorities
numbers to store your number .
- Dial the number .
- Press button again.
Numbers will be lost after a few hours if you
disconnect your phone. Entering a new number in
memory will automatically erase the previous
number.
15- Dialling stored number
- Lift the handset and await the dial tone.
- Press appropriate button M1, M2, ..., or M9 or
one of the 3 priorities P1, P2, P3 numbers, the
stored number will be dialled automatically .
To register your stored phone numbers,use the
index card located under the base.
18
Page 19

Options
16- Direct vibe handset (optional)
If you have conductive hearing loss you can use a
Direct Vibe Handset, try placing the Direct Vibe
handset on your telephone,in front and slightly
below your ear or behind your ear to see which
position works best for you.
If you don’t have hearing loss you can use your
phone normally and put the receiver on your ear .
If you require a Direct Vibe Handset ref: CLA4 you
may purchase it from your retailer or audiologist.
In case of difficulty please visit our website
(www.geemarc.com) or phone our HELPLINE
01707 384 438 .
T o set up the Direct V ibe handset, disconnect the
standard handset from the curly cord, then replace
it with the Direct Vibe handset.
19
Page 20

Options
17- Shaker (Optional)
If you wish to compliment your phone by using a
SHAKER ref: CLA2 connect the shaker plug in the
socket
located over the back edge of the
telephone. When an incoming call is received,
the shaker will be activated when the phone rings.
Note: This option must be set in the ALARM AND
RINGER OPTIONS item (page 9) to be activated.
To purchase a SHAKER see item 1 above.
18- Headset with microphone (optional)
If you wish to answer or make calls by using a
Geemarc headset ref: CLA3, connect the headset
plug in the headset socket
located over the back
edge of the telephone.
Note:When using a headset, the speaker will be
activated and it’s recommended to adjust the speaker to the low position.
20
Page 21

General information
Recycling directives
The WEEE (Waste Electrical and Electronic Equipment) has been
put in place for the products at the end of their useful life are
recycled in the best way.
When this product is finished with, please do not put it in your domestic
waste bin.
Please use one of the following disposal options:
- Remove the batteries and deposit them in an appropriate WEEE skip.
Deposit the product in an appropriate WEEE skip.
- Or, hand the old product to the ret ailer . If you purchase a new one, they
should accept it.
Thus if you respect these instructions you ensure human health and
environmental protection.
:
Guarantee :
From the moment your Geemarc product is purchased, Geemarc guarantee it
for the period of one year. During this time, all repairs or replacement s (at our
option) are free of charge.Should you experience a problem then contact our
helpline or visit our website at www.geemarc.com.The guarantee does not cover
accidents, negligence or breakages to any parts. The product must not be
tampered with or taken apart by anyone who is not an authorised Geemarc
representative.The Geemarc guarantee in no way limits your legal rights.
Important : YOUR RECEIPT IS PART OF YOUR GUARANTEE AND MUST
BE RET AINED AND PRODUCED IN THE EVENT OF A WARRANTY CLAIM.
Telephone connection
network are classified TNV -3 ( T elecommunication Network V oltage) according
to the EN60950 standard.
Declaration
compliance with the essential requirements and other relevant of the Radio
and Telecommunications Terminal Equipment 1999/5/EEC and in particular
article 3 section 1a, 1b and section2.
The declaration of conformity may be consulted at www.geemarc.com
: Hereby Geemarc Telecom SA declares that this product is in
: Voltages present on the telecommunication
21
Page 22

Sommaire
Descriptif 24-26
Installation
1 - Raccordements 27
2 - Options d’alarme et de sonnerie 27
- Sonnerie seule
- Sonnerie et vibreur
- Sonnerie et flash
3 - Réglage de la sonnerie 28
4 - Fréquence vocale/décimale (T/P) 29
5 - Interrupteur 270ms/100ms 29
6 - Service messagerie d’hôtel 29
7 - Position murale 30-31
Utilsation
8 - Répondre à un appel 32
- Sans le casque
- Avec le casque (option)
- En mode mains libres
9 - Réglage du volume et de la tonalité de
réception 33
22
Page 23

Sommaire
10 - Appeler 35
- Sans le casque
- Avec le casque (option)
- En mode mains libres
11 - Rappel du dernier numéro (bis) 36
12 - Touches R, * & # 36
13 - Fonction secret 37
14 - Mémoriser un numéro de téléphone 37
15 - Appel d’un numéro en mémoire 38
Options
16 - Combiné Direct Vibe 39
17 - Vibreur 40
18 - Casque avec microphone 40
Garantie 42
Pour tout renseignement technique ou toute
commande visitez notre site web sur
www.geemarc.com.
tel : 03 28 58 75 99
23
Page 24

Description
Réglage de la tonalité
de réception
Réglage du volume
du haut parleur
3 mémoires
d’urgence
Réglage du volume de
réception
Voyant du correcteur
de tonalité et volume
Activation de la
correction de
tonalité et volume
de réception
Ergot de
position murale
Prise de cordon combiné
Rappel du dernier
numéro composé
T ouche R
Mémoires directes
Mains libres /
Casque
Secret
Mise en mémoire
Flash lumineux de sonnerie
24
Page 25

Index mémoires
Description
Orifices de
fixation murale
Réglage du
temps de
coupure de la
fonction R
(270/100ms)
Numérotation
Décimale (P)
ou
Multifréquences (T)
Compartiment
à piles
25
Prise de cordon
combiné
Page 26

Description
Prise casque
Vibreur
Option d’alarme et de
sonnerie
Service de
messagerie
d’hôtel
Activation automatique de
la correction d’écoute au
Adaptateur
décroché
Réglage du volume de
sonnerie(arrêt, faible, fort)
Prise cordon
de ligne
26
Page 27

Installation
1 - Raccordements
- Branchez le cordon du combiné.
- Inserez 4 piles (AAA) dans le compartiment
situé en dessous de l’appareil ( piles non
incluses).En cas de coupure secteur, les piles sont
necessaires au fonctionnement de la sonnerie.
- Branchez le cordon de ligne.
- Branchez le cordon du vibreur si besoin.
- Branchez le cordon du casque si besoin.
- Branchez le conjoncteur téléphonique dans
votre prise téléphonique murale.
- Branchez le cordon d’adaptateur secteur .
- Branchez l’adaptateur secteur au réseau
électrique.
2 - Options d’alarme et de sonnerie
Un commutateur 3 positions situé sur le côté
droit de l’appareil vous permet de choisir le type
d’alarme:
- 0 : seule la sonnerie est activée.
- : la sonnerie et le vibreur sont activés.
: la sonnerie et le flash sont activés.
-
.
27
Page 28

Installation
3 - Réglage de la sonnerie
Un commutateur situé sur le côté droit de
l’appareil permet de régler la sonnerie:
désactivée, : faible : forte
V otre téléphone est positionné sur «Forte» et la
mélodie est positionnée sur «6».
Si la sonnerie ne vous convient pas,sélectionnez
un nouveau réglage parmi les 9 proposés cidessous:
Faible Moyen Fort
Melodie 1 1 2 3
Melodie 2 4 5 6(par défault)
Melodie 3 7 8 9
Suivez la procédure décrite ci-dessous pour
changer le réglage :
- Décrochez le combiné.
- Appuyez sur la touche .
- Appuyez sur la touche #.
- Appuyez sur un chiffre de 1 à 9.
28
Page 29

Installation
4 - Fréquence vocale/décimale(T/P)
Au moment de sa livraison, votre téléphone est en
mode fréquence vocale (T). Si le central
téléphonique dont vous dépendez fonctionne en
mode fréquence décimale (P), vos appels
n’aboutiront pas,il vous suffira alors de commuter
l’interrupteur T/P situé en dessous du téléphone
sur la position P pour remédier à ce problème.
5 - Interrupteur 270/100ms
Cet interrupteur doit être positionné sur 270 pour
la France. Il peut être positionné sur 100 pour
d’autres pays ou pour une utilisation avec un P ABX.
6 - Service messagerie d’hôtel
Ce service , uniquement utilisé sur certains
autocommutateurs privés (hôtel par exemple),
permet de prévenir de l’arrivée d’un message, fax,
colis ... par l’intermédiaire du voyant qui s’allume.
Un interrupteur situé derrière votre téléphone permet d’activer cette fonction (ON).
29
Page 30

Installation
7 - Position murale
Pour maintenir votre combiné en position verticale,
tournez l’ergot situé sur la base de 180°.
Percez 2 trous verticaux distant de 80 mm dans votre
mur.
Insérez 2 chevilles avec leurs vis.
Laissez dépasser les vis de 6mm.
Faites glisser votre téléphone dans les têtes de vis.
30
Page 31

7
7
7
7
7
7
7
7
7
7
7
7
7
7
7
7
7
7
7
7
7
7
7
7
7
7
7
7
7
7
7
7
7
7
7
7
7
7
7
7
23456
23456
23456
23456
23456
23456
23456
23456
23456
23456
23456
23456
23456
23456
23456
23456
23456
23456
23456
23456
23456
23456
23456
23456
23456
23456
23456
23456
23456
23456
23456
23456
23456
23456
23456
23456
23456
23456
23456
23456
Installation
Visser
80 mm
6 mm
31
Page 32

Utilisation
8 - Répondre à un appel
Sans casque:
- Lorsque le téléphone sonne, décrochez le combiné pour parler à votre correspondant.
- Raccrochez le combiné pour libérer la ligne.
Avec casque (option):
- Lorsque le téléphone sonne et si vous avez choisi
de répondre aux appels avec votre casque, appuyez sur la touche / pour parler à votre correspondant.
- La conversation terminée, appuyez sur la touche
/ pour libérer la ligne.
En mode mains libres:
- Lorsque le téléphone sonne, appuyez sur la touche / .
- La conversation terminée, appuyez sur la touche
/ pour libérer la ligne.
32
Page 33

Utilisation
9 - Réglage du volume et de la tonalité de réception
V ous pouvez amplifier le volume et la tonalité de
réception de votre combiné.
La touche +40dB (ou +60dB pour le modèle
AmpliPOWER50) permet d’activer ou de désactiver le correcteur de réception durant la conversation.
Lorsque la fonction est activée, le voyant rouge
du réglage de volume et de tonalité situé près de
la touche +40dB (ou +60dB) est allumé. Les touches, TONE et VOLUME, vous permettent de cor-
riger la tonalité ou le volume de réception.
TONE
Graves
+10db max
Normal
33
Aigus
+10db max
Page 34

Utilisation
AmpliPOWER40
Volume
O dB 20 dB
20 dB* 40 dB*
*appuyez sur le bouton +40 dB
O dB 30 dB
30 dB** 60 dB**
**appuyez sur le bouton +60 dB
AmpliPOWER50
Volume
Note:
Lorsque l’interrupteur
situé à l’arrière de l’appareil est sur ON , la fonction est automatiquement
activée à chaque décroché de votre combiné.Si
l’interrupteur est sur la position OFF, il faudra activer la fonction en appuyant sur la touche + 40 dB
(ou + 60 dB pour le modèle AmpliPOWER 50). Le
réglage de la tonalité et du volume(de 20 dB à 40
dB pour le modéle AmpliPOWER 40 et de 30 db à
60 db pour le modèle AmpliPOWER 50) n’est activé que lorsque la touche + 40 dB (ou + 60 dB) est
sur ON. Lorsque cette touche est sur OFF seul le
volume peut être réglé de 0 dB à 20 dB( ou de 0 db
à 30 db pour le modéle AmpliPOWER 50).
34
Page 35

Utilisation
10 - Appeler
- Sans casque:
- Décrochez le combiné.
- Composez le numéro de votre correspondant.
- La conversation terminée, raccrochez le combiné pour libérer la ligne.
- Avec casque:
- Appuyez sur la touche / .
- Composez le numéro de votre correspondant.
- La conversation terminée, appuyez sur la touche
/ pour libérer la ligne.
- En mode mains libres
- Appuyez sur la touche / , vous entendez la
tonalité à travers le haut parleur.
- Composez le numéro de votre correspondant.
- La conversation terminée, appuyez sur la touche
/ pour libérer la ligne.
- Si votre correspondant ne répond pas, libérez la
ligne en appuyant sur la touche / .
35
Page 36

Utilisation
Note:
- Pour désactiver le mode mains libres durant une
conversation, décrochez le combiné.
Pour activer le mode mains libres durant une conversation, appuyez sur la touche / puis raccrochez le combiné
- En mode mains libres, vous pouvez ajuster le
volume du haut-parleur à l’aide du bouton VOLUME
situé sur le côté gauche de votre appareil.
1 1 - Rappel du dernier numéro (BIS)
- Décrochez le combiné.
- Appuyez sur la touche , le numéro de votre
correspondant se recompose automatiquement (ne
fonctionne pas pour les n° en mémoire).
12 - Touches R, * & #
T ouches d’accès aux Services de France Télécom
(Rappel d’enregistreur , Signal d’Appel, Conversation à Trois ).
36
Page 37

Utilisation
13 - Fonction secret
Cette touche permet de couper ponctuellement le
microphone en cours de communication.
- Appuyez et maintenez la touche . V otre correspondant ne vous entend plus.
- Relâchez la touche pour rétablir la conversation.
14 - Mémoriser un numéro de téléphone
Votre téléphone possède 12 mémoires directes
dont 3 prioritaires (21 chiffres maximum par
mémoire).Les 3 mémoires prioritaires P1, P2, P3
permettent de mémoriser par exemple les 3 numéros suivants:
- POMPIER : 18
P
- POLICE : 17
- VOTRE MEDECIN
Suivez la procédure décrite ci-dessous pour mémoriser vos numéros:
- Décrochez le combiné.
- Appuyez sur la touche .
37
Page 38

Utilisation
- Appuyez sur une des touches M1, M2, ..., ou M9
ou sur une des trois touches prioritaires pour enregistrer votre numéro.
- Composez le numéro à mémoriser .
- Appuyez de nouveau sur la touche .
Les numéros seront perdus après quelques heu-
res si vous déconnectez votre téléphone.
Un nouvel enregistrement dans une mémoire efface la précédente.
15 - Appel d’un numéro en mémoire
- Décrochez le combiné.
- Appuyez sur une des touches M1, M2, ..., ou M9
ou sur une des trois touches P1, P2, P3 le numéro
en mémoire se recompose automatiquement.
Pour repérer vos numéros enregistrés, utilisez le
répertoire situé en dessous de la base.
Aidez vous du tableau ci-dessous pour le préparer:
38
Page 39

Options
16 - Combiné direct vibe (option)
Si vous avez des problèmes auditifs, placez votre
combiné Direct Vibe sur votre boîte crânienne (sur
la tampe, autour ou derrière l’oreille) et essayez
de trouver la position qui vous semblera la
meilleure. En plaçant l’écouteur à un de ces
endroits,les vibrations émises par le transducteur
stimule votre nerf auditif par conduction osseuse
et vous permet d’entendre.
Si vous n’avez pas de problèmes auditif utilisez
votre téléphone de façon normale, c’est à dire en
plaçant l’écouteur à l’oreille.
Pour installer le combiné Direct Vibe ref: CLA4,
déconnectez simplement le combiné standard et
remplacez le par le combiné Direct Vibe. En cas
de problèmes fonctionnels et avant de nous retourner votre téléphone contactez notre service
après vente au numéro suivant:
TEL. SERVICE APRES VENTE :
03 28 58 75 99
39
Page 40

Options
17 - Vibreur (option)
Le vibreur ref: CLA2 a été conçu pour les
personnes ayant des problèmes auditifs ou
souhaitant se faire avertir en toute discrétion d’un
appel téléphonique, sans déranger leur partenaire
endormi par exemple.
Si vous désirez utiliser le vibreur , connectez le sur
la prise située derrière votre téléphone.
Lorsque vous recevrez un appel, le vibreur sera
actif pendant la sonnerie.
Note: Cette option doit être sélectionnée dans le
paragraphe OPTION D’ALARME ET DE SONNERIE pour être activée.
18 - Casque avec microphone (option)
Le casque Geemarc ref: CLA3 vous permettra
de recevoir ou d’effectuer un appel les mains libres.
Si vous désirez passez ou répondre à un appel
avec le casque, connectez le dans la prise casque
située derrière votre téléphone.
40
Page 41

Options
Note:Pendant un appel le haut parleur sera actif
même avec le casque connecté. pour un un bon
confort d’écoute ou simplement si vous ne désirez
pas que quelqu’un entende votre conversation,
vous pouvez diminuer le volume du haut parleur .
41
Page 42

Informations générales
Recommandations pour le recyclage:
Lla directive DEEE (Déchetd’Equipement Electrique et Electronique)
a été mise en place dans le but d’assurer la collecte sélective en
vue de la valorisation,
réutilisation ou recyclage des produits en fin de vie.
Lorsque votre produit ne fonctionne plus, ne le jeter pas dans votre poubelle
ménagère.Suivez l’une des procédures décrite ci-dessous:
- Déposez les piles et votre ancien appareil dans un lieu de collecte approprié.
- Ou rapportez votre ancien appareil chez le distributeur qui vous vendra le
nouveau. Il devra l’accepter.
Ainsi, si vous respectez ces instructions vous faites un geste pour
l’environnement et vous contribuez à la préservation des ressources naturelles
et à la protection de la santé humaine.
Garantie: cet appareil est garanti 1 an pièces et main-d’oeuvre. La date d’achat
figurant sur le ticket de caisse fera foi. Cette garantie s’exerce sous réserve
d’une utilisation normale de l’appareil. Les dommages occasionnés par les
surtensions électriques, la foudre ou par un choc sur l’appareil ne peuvent en
aucun cas être couverts par la garantie. En cas de problème fonctionnel
rapprochez-vous de votre point de vente.
Raccordement téléphonique: les tensions présentes sur ce réseau sont
classées TRT -3 (Tension de Réseau de Télécommunication) au sens de la
norme EN60950.
Déclaration: ce produit respecte les exigences de compatibilité électromagnétique
et de sécurité électrique demandées par la directive européenne RTTE.
Par ailleurs, il est compatible avec les différents réseaux téléphoniques
européens(normes TBR21/37/38). Le fonctionnement de l’appareil n’est pas
garantisi le courant de ligne est inférieur à 18 mA.
La déclaration de conformité peut être consultée sur le site :
www.geemarc.com
42
Page 43

Inhalt
Betätigungstasten 45-47
Installation
1 - Einrichtung des AmpliPOWER 40/50 48
2 - Klingeltonmelodie 49
3 - Mitteilungsanzeige beim Eingang
eines Anrufs 49
4 - Schalter Tonwahl/Pulswahl (T-P) 50
5 - Schalter Flashzeit 50
6 - Mitteilungsanzeige 50
7 - Wandinstallation 51
8 - Einsetzen der Batterien 52
Benutzung des Telefons
9 - Eingehende Anrufe annehmen 53
10 - Lautstärke- und Toneinstellung 54
11 - Einen Anruf tätigen 55
12 - Mit der Freisprechfunktion 55
13 - Wiederwahl der zuletzt angerufenen
Nummer 56
14 - S tummtaste 56
43
Page 44

Inhalt
15 - S peichern von Telefonnummern 56
16 - Anruf mit gespeicherter Nummer
tätigen 57
Options
17 - Benutzung des Kopfhörers mit Mikrofon 58
18 - Benutzung des Inuktionsschleife 58
19 - Benutzung des Vibrationkissens 60
Generelle Information 61
Für informationen und Hilfe besuchen Sie unsere
Website
www.geemarc.com/de
TelFon : +49(0)228/ 74 87 09 0
Fax : +49(0)228/ 74 87 09 20
44
Page 45

BetätigungstastenInhalt
Schnellwahltasten
Zum unmittelbaren Anruf von 3
Notrufnummern.
Kontrolle Hochfrequenz
Funktioniert, wenn die
Verstärkungsfunktion aktiviert
wird, und ermöglicht das
Einstellen von Hoch/Tiefton.
Lautsprecher-Lautstärke
Lautstärke einstellen
Rotes LED-Anzeige
Verstärkung
Leuchtet wenn die
Verstärkungsfunktion aktiviert wird.
Betätigundstaste
Verstärkung
Auf diese Taste
drücken, um die
Funktion “Verstärkung”
zu aktivieren.
Clip für die
Wandmontage
Wiederwahltaste
Speichertaste
«Flash»-T aste
Auf diese Taste drücken, um
auf einen anderen Anruf zu
antworten, der angezeigt
wird
Memory-Tasten
Um 9 T elefonnummern
unmittelbar zu wählen
Freisprechsfunktion /
Kopfhörer
«Mute» T aste
Leuchtender Anrufanzeiger
Leuchtet rot beim eingehenden Anruf
45
Page 46

Betätigungstasten
T elefonregister
Schraubenlöcher für
Wandmontage
Umschalter
Flashzeit
Umschalter T on- /
Pulswahl
Batteriefach
46
Page 47

Steckdose Kopfhörer
Steckdose
Vibrationseinrichtung
Betätigungstasten
T elefonsteckdose
Selbstwählanlage
Verstärkung Steckdose 12 V olt
Schalter ON/OFF
Verbindung Mitteilung
(Hotel)
Allarmmodus
Lautstärkeregler
Klingel
47
Page 48

Installation
1 - Einrichtung des AmpliPOWER 40/50
1 – S tecken Sie die Ende des spiralförmigen
Kabels in das Telefon, die andere in den Hörer .
2 – S tecken Sie ein Ende des Telefonkabels in
die Buchse hinten am Telefon.
3 – S tecken Sie die andere Kabelende in die
T elefonsteckdose Ihrer W ohnung.
4 – S tecken Sie den Stecker für die
S tromversorgung in die Dose hinten am T elefon.
S tecken Sie den S tecker in die S teckdose.
Klingelton
Der an der rechten Seite des Geräts liegende
Schalter ermöglicht es, den Klingelton
auszuschalten oder die Lautstärke einzustellen.
Ausgeschalteter Klingelton
Mittlere Lautstärke
Hohe Lautstärke
48
Page 49

Installation
2 - Klingeltonmelodie
Der Klingelton Ihres Telefons AmpliPOWER 40/
50 wird über die Tastatur ausgewählt, Sie
können zwischen den Tasten 1 bis 9 wählen:
Niedrig Mittel Hoch
Melodie A 1 2 3
Melodie B 4 5 6 standard
Melodie C 7 8 9
- Den Hörer abnehmen.
- Auf die Taste
- Auf die Taste
- Auf eine der Tasten 1 bis 9 drücken.
drücken.
# drücken.
Die neue Melodie und die gewünschte
Lautstärke werden beim nächsten Gespräch
aktiviert. Die ursprüngliche Einstellung ist:
Melodie B - Max
3 - Mitteilungsanzeige beim Eingang eines
Anrufs
Ein an der rechten Seite des Geräts liegender 3fach-Umschalter ermöglicht die Einstellung für
49
Page 50

Installation
das Signal bei einem eingehenden Anruf :
0 Nur Klingel Klingel und Vibration
Klingel & Lichtblitz
4 - Schalter T onwahl/Pulswahl (T -P)
Der unter dem Gerät liegende T/P-Schalter ist
ab Werk auf “T“ voreingestellt.
5 - Schalter Flashzeit
Der Schalter für die Flashzeit wurde bei der
Herstellung auf 270ms eingestellt. Sie können,
wenn notwendig, 100 ms wählen.
6 - Mitteilungsanzeige
Diese Funktion ist nützlich, wenn das
AmpliPOWER 40/50 mit dem Telefonnetz eines
Hotels verbunden wird.
Über den Schalter hinten am Gerät kann diese
Funktion aktiviert oder deaktiviert werden. Wenn
der Schalter auf ON steht und das Lämpchen
neben dem Symbol leuchtet, wird eine
eingegangene Mitteilung angezeigt.
50
Page 51

7
7
7
7
7
7
7
7
7
7
7
7
7
7
7
7
7
7
7
7
7
7
7
7
7
7
7
7
7
7
7
7
7
7
7
7
7
Installation
7 - Wandinst allation
Zwei Schrauben (3,5 mm, Abstand 8 cm) an der
Wand befestigen; der Kopf soll 6-7 cm
herausstehen. Das Gerät an den Schrauben in der
Wand befestigen. Die kleine Plastikstütze nach
oben drehen und in die dazu geeigneten
Vorrichtungen wieder einsetzen, so dass sie
umgekehrt eingebaut ist und wie ein Haken
vorsteht. Das erlaubt die Befestigung des
Hörers,wenn des Gerät an des Wand eingebaut
wird.
23456
23456
23456
23456
23456
23456
23456
23456
23456
23456
23456
23456
23456
23456
23456
23456
23456
23456
23456
23456
23456
23456
23456
23456
23456
23456
23456
23456
23456
23456
23456
23456
23456
23456
23456
23456
23456
Schraube
80 mm
6 mm
51
Page 52

Installation
8 - Einsetzen der Batterien
Die Deckelschraube des Batteriefachs hinter dem
AmpliPOWER 40/50 abschrauben.4 MicroBatterien (T yp AAA) in der angegebenen Polarität
einsetzen. Die Batterien dienen dazu, die
gespeicherten T elefonnummern beizubehalten, falls
der Netzanschluss ausfällt.
Nach 6 Monaten müssen die Batterien gewechselt
werden.
Hinweis:
Verwenden Sie keine wiederaufladbaren
Batterien.Entsorgen Sie alte Batterien an einem
dafür geeigneten Ort.
INSTALLATION
52
Page 53

Benutzung des telefons
9 - Eingehende Anrufe annehmen
Mit dem Hörer
Beim Eingang eines Anrufs wird das Gerät
AmpliPOWER 40/50 diesen Anruf signalisieren. Um
den Anruf anzunehmen, den Hörer abnehmen. Am
Ende des Gesprächs den Hörer wieder auflegen.
Mit dem Kopfhörer
Beim Eingang eines Anrufs wird das Gerät
AmpliPOWER 40/50 diesen Anruf signalisieren.
Um den Anruf anzunehmen, auf die T aste /
drücken. Die Taste erneut drücken, um das
Gespräch zu beenden.
Mit der Freisprechfunktion
Wenn das Telefon klingelt, drücken Sie auf den
Knopf / um Anruf entgegen zu nehmen.
Am Ende des Telefonats einfach auf denselben
Knopf drücken,um das Gespräch zu beenden.
53
Page 54

Benutzung des telefons
10 - Lautstärke- und Toneinstellung
Sie können die Lautstärke und den Ton nach Ihren
Hörbedürfnissen einstellen. Um die Einstellung der
beiden Lautstärke- und Tonregler zu verändern, auf
die Taste + 40 dB (oder +60 dB für die
AmpliPOWER 50) oben rechts drücken. Wenn die
V erstärkerfunktion genutzt wird, leuchtet die LED
neben der oben genannten Taste rot.
Wenn der hinter dem Gerät liegende Schalter +40
dB (oder +60 dB für die AmpliPOWER 50) auf
“ON”steht, wird die Verstärkungsfunktion
automatisch, wenn der Hörer abgenommen wird.
Deswegen ist es nicht nötig, auf die Taste +40 dB
zu drücken. Wenn der Umschalter auf “ON”ist, bleibt
die LED-Anzeige immer an.
TONE
Niedrige
Normal
54
Höhen
Page 55

Benutzung des telefons
AmpliPOWER40
Volume
O dB 20 dB
20 dB* 40 dB*
*Drücken Sie auf die Taste +40 dB
O dB 30 dB
30 dB** 60 dB**
**Drücken Sie auf die Taste +60 dB
AmpliPOWER50
Volume
11- Einen Anruf tätigen
Über den Hörer
Den Hörer abnehmen. Auf das Freizeichen
warten, die gewünschte Nummer wählen. Am
Ende des Telefonats den Hörer wieder auflegen.
Über den Kopfhörer
Auf die Taste drücken, auf das Freizeichen
warten. Die Nummer wählen. Die Taste erneut
drücken, um den Anruf zu beenden.
12 - Mit der Freisprechfunktion
Am Ende des Telefonats einfach auf die Taste
/ drücken, um das Gespräch zu beenden. Um
die Freisprecheinrichtung während eines
Telefonats auszuschalten,heben Sie den Hörer
ab.Um die Freisprecheinrichtung während eines
55
Page 56

Benutzung des telefons
Telefonats einzuschalten,drücken Sie auf den
Knopf, dann legen Sie den Hörer auf die
Basisstation.Während eines Gespräches können
Sie die Lautstärke der Freisprechfunktion auf die
gewünschte Höhe einstellen, benutzen Sie einfach
der Regler auf den linken Seite des Geräts.
13 - Wiederwahl der zuletzt angerufenen
Nummer
Den Hörer abnehmen, auf das Freizeichen warten,
auf die Taste drücken.
Automatisch wird das AmpliPOWER 40 die zuletzt
angerufene Nummerwählen.
(Die schon gespeicherten T elefonnummern können
durch die Tasten M1-M9 nicht gewählt werden).
14 - Stummtaste
Wenn Sie mit jemandem im Raum reden möchten,
ohne Ihren Gesprächspartner das Gesagte hören
zu lassen, müssen Sie die Taste gedrückt
halten. Solange Sie die T aste gedrückt halten, wird
das Mikrofon außer Betrieb gesetzt. Um das
Telefongespräch weiterzuführen, lassen Sie die
56
Page 57

Benutzung des telefons
Taste wieder los.
15 - Speichern von Telefonnummern
Ihr Gerät AmpliPOWER 40/50 kann 9 (M1-M9) +
3 (rote, blaue und grüne Tasten) T elefonnummern
speichern. Zum Beispiel können die drei
Farbtasten als Notrufbenutzt werden
(z.B.:Polizei,Feuerwehr ,Krankenwagen).NG DES
- Den Hörer abheben.
- Die Taste drücken.
- Auf die Direktwahltaste (M1 - M9) oder auf eine
der Farbtasten drücken.
- Die Nummer, die gespeichert werden soll,
eingeben.
- Die Taste erneut drücken.
Falls der Telefonstecker einige Stunden aus der
Steckdose herausgezogen wird, gehen die
gespeicherten Telefonnummern verloren. Wenn
man wie oben beschrieben vorgeht und auf eine
Taste drückt, auf der bereits eine Telefonnummer
gespeichert worden ist, wird die vorher
gespeicherte Nummer gelöscht.
57
Page 58

Options
16- Anruf mit gespeicherter Nummer tätigen
Den Hörer abnehmen und auf das Freizeichen
warten. Auf eine der Direktwahltasten (M1-M9) oder
eine der Farbtasten (rote, blaue, grüne Taste)
drücken. Die gespeicherten Telefonnummern ins
(auf der rechten Seite des Geräts herausziehbare)
T elefonverzeichnis eintragen.
17- Benutzung des Kopfhörers mit Mikrofon
(optional)
Wenn Sie einen Anruf mit einem Geemarc
Headset entgegennehmen oder damit einen
Anruf tätigen wollen, stecken Sie den S tecker
des Headsets in die Buchse auf der Rückseite
Ihres Telefons.
- Drücken Sie um das Freizeichen zu bekommen
- Wählen Sie die Nummer
Achtung: Sie können die Lautstärke und den
T on mit den VOLUME und TONE Reglern oben
an Ihrem Telefon einstellen (sofern die Funktion
aktiviert ist) sowie die Sendelautstärke mit dem
Schalter (3 Positionen) auf der rechten Seite
Ihres Telefons.
58
Page 59

Options
18- Benutzung der Induktionsschleife
(optional)
Wenn Sie einen Anruf mit einer Induktionsschleife
annehmen oder damit einen Anruf tätigen wollen,
stecken Sie den Stecker in die –Buchse auf der
Rückseite Ihres Telefons. Die Induktionsschleife
ist nun bereit.DS
Sie haben 3 V erwendungsmöglichkeiten:
Möglichkeit:
Drücken Sie um die Induktionsschleife und den
Kopfhörer zu aktivieren, sprechen Sie in das
Mikrofon des Kopfhörers.
Möglichkeit:
Drücken Sie um die Induktionsschleife und die
Lautsprecher zu aktivieren und sprechen Sie in
das Mikrofon an der Unterseite Ihres Telefons.
Möglichkeit:
Heben Sie den Hörer ab und sprechen Sie in die
Muschel.
Achtung: Um die Induktionsschleife nutzen zu
können, muss das Telefon am Strom
angeschlossen sein. Sie können auch die
Empfangslautstärke einstellen.
59
Page 60

Options
19 - Benutzung des vibrationkissens (Optional)
Wenn Sie Ihr Telefon durch ein Vibrationskissen
ergänzen wollen, schließen Sie das Geemarc
Vibrationskissen an in die Buchse auf der
Rückseite Ihres Telefons. Wenn ein Anruf eingeht,
wird das Vibrationskissen während des Klingelns
aktiviert.
Achtung: Diese Option muss unter dem Punkt
„Alarm und Klingeltoneinstellungen“ (S. 12) aktiviert
sein.
Wichtig: Schließen Sie zu Ihrer Sicherheit nur das
Geemarc Vibrationskissen an. Andere Geräte
können das Telefon beschädigen.
60
Page 61

Generelle Informationen
Auf Ihr Geemarc Produkt wird von Geemarc Telecom SA eine
einjährige Garantie ab Kaufdatum gemäß diesen
Garantiebestimmungen gewährt. Während dieser Zeit werden im
Garantie- fall nach Wahl der Geemarc Telecom SA Material- und
Fabrikationsfehler unentgeltlich beseitigt oder Ihr Geemarc Produkt
ausgetauscht. Bei Störungen oder Fragen
wenden Sie sich an unsere Hotline oder besuchen Sie unsere Homepage
www.geemarc.com . Von dieser Herstellergarantie ausgeschlossen sind
Schäden durch unsachgemäße Benutzung, mangelnde Sorgfalt oder Unfälle.
Die Garantie erlischt bei Eingriffen von Dritten, die von Geemarc Telecom SA
oder deren Vertriebspartnern dazu nicht ermächtigt wurden.
Die Geemarc T elecom SA Garantie schränkt Ihre gesetzlichen Rechte in keiner
Weise ein.
WICHTIG: IHR KAUFBELEG IST TEIL IHRER GARANTIE UND MUSS
AUFBEWAHRT UND IM GARANTIEFALL VORGELEGT WERDEN.
Bitte beachten Sie: Die Garantie gilt nur für Deutschland.
ERKLÄRUNG: Geemarc T elecom SA erklärt hiermit, dass dieses Produkt die
notwendigen Vorraussetzungen sowie die weiteren betreffenden Bestimmungen
der Radio- und T elecommunications Terminal Equipment Directive 1999/5/EEC,
insbesondere Artikel 3 Absatz 1a, 1b und Absatz 3, erfüllt.
Das T elefon benötigt eine Mindest stromstärke von 18mA in der Leitung.
Die Konformit tserkl rung kann unter folgender Adresse gefunden werden :
www.geemarc.com/de/supportdoc.asp
Die WEEE-Richtlinie (Elektro- und Elektronikaltgeräte) wurde aufgestellt, damit
Altgeräte auf beste Art und W eise verwertet werden.
Wenn dieses Produkt defekt ist, werfen Sie es bitte nicht in Ihren Hausmüll.
Bitte nutzen Sie eine der folgenden Entsorgungsmöglichkeiten:
- Entfernen Sie die Batterien und werfen Sie diese in einen geeigneten
Rücknahmecontainer.
Geben Sie das Produkt bei einer Altgerätesammelstelle ab.
- Oder geben Sie das alte Produkt dem Händler zurück. Bei Kauf eines neuen
Gerätes sollte der Händler das Altgerät annehmen.
Wenn Sie sich an diese Anweisungen halten, stellen Sie den Schutz der
Gesundheit und Umwelt sicher.
ä ä
61
Page 62

2.4
UGAmpliPOWER40_50 Ver.
United Kingdom
5 Swallow Court
Swallowfields
Welwyn Garden City
Hertfordshire, AL7 1SB
For product support:
01707 384438
www.geemarc.com
FRANCE
Parc de l’Etoile
2, rue Galilée BP20061
59791 Grande Synthe CEDEX
Tél. service après vente :
03 28 58 75 99
www.geemarc.com
Deutschland
Siemensstrasse 10,
53121 Bonn
Deutschland
Tel: +49(0)228/ 74 87 09 0
Fax: +49(0)228/ 74 87 09 20
www.geemarc.com
 Loading...