

Page 1
Ampli DECT150Ampli DECT150
Ampli DECT150
Ampli DECT150Ampli DECT150
GB
User guide p.2
F
Notice d’utilisation p.30
CAUTION:THIS TELEPHONE PRODUCT IS
SPECIFICALLY DESIGNED FOR PEOPLE WITH HEARING
DIFFICULTIES AND IS PROVIDED WITH A HANDSET
EARPIECE WITH VOLUME CONTROL FOR INDIVIDUAL
REQUIREMENTS. DUE CARE MUST BE TAKEN BY ALL
USERS THAT THE HANDSET EARPIECE VOLUME
CONTROL IS SET TO THE LOWEST LEVEL ACCEPTABLE
BY EACH RESPECTIVE USER. CARE SHOULD THEREFORE
BE EXERCISED TO ENSURE THAT ANY NEW USERS ARE
FAMILIAR WITH THIS REQUIREMENT.
ATTENTION: CE TELEPHONE PEUT ETRE DESTINE
AUX PERSONNES A Y ANT DES PROBLEMES D’AUDITION.
IL POSSEDE UN ECOUTEUR A VOLUME V ARIABLE. A
LA PREMIERE UTILISA TION, ASSUREZ VOUS QUE LE
BOUTON DE REGLAGE DU VOLUME SOIT POSITIONNE
SUR LA POSITION VOLUME MINIMUM. LES PERSONNES
MALENTENDANTES POURRONT PAR LA SUITE
AUGMENTER LE VOLUME POUR L’ADAPTER A LEUR
AUDITION.
Telephone
Page 2

GB
DESCRIPTION
- Handset and base unit controls 6
GENERAL SETTINGS
- How to connect thephone and set the batteries 10
- Charging the batteries 10
- Phone range 11
- Clean the phone 11
BASE SETTINGS
- Base ringer volume 12
HANDSET SETTINGS
- General settings icons displayed 13
- Ringer volume, melody and shaker 13
- Handset registration 14
- Handset dereigistration 14
- Network features, Flash time, Dial pause 15
INDEX
PAGE
USING THE PHONE
- Making a call 16
- Answering a call 16
- Use the call back features 16
- How to use the volume and tone functions 16
- Paging the handset 17
- Timer 17
PHONE BOOK
-About the phone book 18
- Phone book handset ring tone settings 18
- Storing a number with a name 19
- Dialling using the phone book 19
- Modify a phone book entry 20
- Delete a phone book entry 20
2
Page 3

CALLER IDENTIFICATION
- Caller ID features 21
- Dial Caller ID numbers 21
- Store numbers and names into the phone book 21
- Delete stored names and numbers 22
ADDITIONAL HANDSETS
- General settings 23
- Using several handsets 23
- Deregister all additional handsets from the base 24
- Internal calls 24
- Call transfer to another registered handset 25
- Headset option 25
ADDITIONAL BASE UNIT
- General settings 26
- How to add a base unit 26
TROUBLE SHOOTING
- Generality 27
- A warning tone is heard during a call 27
- The phone does not work 27
- No number is displayed when the phone rings 27
GUARANTEE 28
For product support and help visit our website at
www.geemarc.com
telephone 01707 384438
or fax 01707 372529
3
Page 4

F
DESCRIPTION
- Description du combiné et de la base 6
INSTALLATION
- Raccordements du téléphone et mise en place des batteries 30
- Chargement des batteries 30
- Rayon d’action 31
- Entretien du téléphone 31
REGLAGE DE LA BASE
- Réglage du volume de sonnerie de la base 32
REGLAGE DU COMBINE
- Présentation des icônes 33
- Volume, mélodie de la sonnerie et vibreur 33
- Enregistrement d’un combiné sur la base 34
- Annuler l’enregistrement d’un combiné de la base 35
- Propiétés du réseau, touche R (Flash) , insertion d’une Pause 35
SOMMAIRE
PAGE
UTILISATION DU TELEPHONE
-Appeler 37
- Répondre à un appel 37
- Rappeler le dernier numéro composé (BIS) 37
- Réglage du volume et de la tonalité de l’écouteur 37
- Recherche du combiné (pagination) 39
- Minuterie (durée des appels) 39
REPERTOIRE
-Apropos du répertoire 40
- Réglage de la sonnerie du combiné 40
- Répertoire 40
- Enregistrement d’un numéro et d’un nom 41
- Appeler en utilisant le répertoire 42
- Modifier un numéro du répertoire 42
- Effacer un numéro du répertoire 42
4
Page 5

AFFICHAGE DU NUMERO DE L’APPELANT
- Affichage des numéros d’appels 43
- Sélectionner et appeler un numéro 43
- Transfert de numéros dans le répertoire 44
- Effacer un ou plusieurs numéros enregistrés 44
COMBINES ADDITIONNELS
- Généralités 45
- Utilisation de plusieurs combinés 45
- Annuler l’enregistrement de tous les combinés de la base 46
- Communications internes 46
- Transfert d’appel vers un autre combiné enregistré 47
- Option casque 47
BASE ADDITIONNELLE
- Généralités 48
- Ajouter une base supplémentaire 48
PROBLEMES DIVERS
- Généralités 49
- Emission d’un signal d’alarme pendant la conversation 49
- Le téléphone ne fonctionne pas 49
- Aucun numéro ne s’affiche lorsque le téléphone sonne 49
GARANTIE 50
TEL. SERVICE APRES VENTE :
03 28 58 75 99
Pour tout renseignement technique ou toute
commande visitez notre site web sur
www.geemarc.com.
Parc d’Activités du Basroch
2, rue Galilée
59760 Grande Synthe
5
Page 6
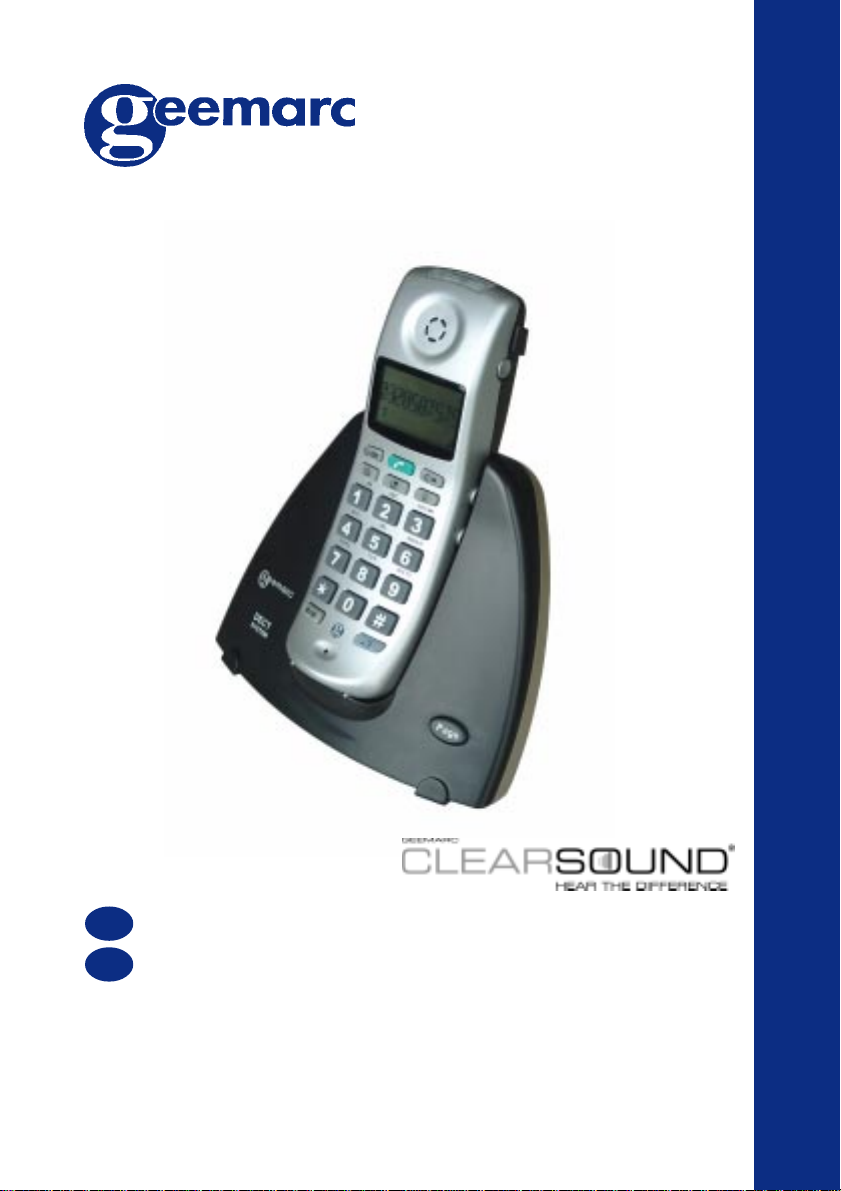
LCD display
Afficheur LCD
Function and
phonebook keys
Touches de fonction et
de répertoire
DESCRIPTION
HANDSET DESCRIPTION
DESCRIPTION DU COMBINE
Speaker
Ecouteur
Pick up and hang up key
Touche de décroché et de
raccroché
Amplifier switch
Interrupteur ampli
Tone adjustment
Réglage de la
tonalité
Flash Key
Touche flash
Microphone
6
Shaker switch
Interrupteur vibreur
Keypad
Clavier
Amplifier key
Touche ampli
Page 7
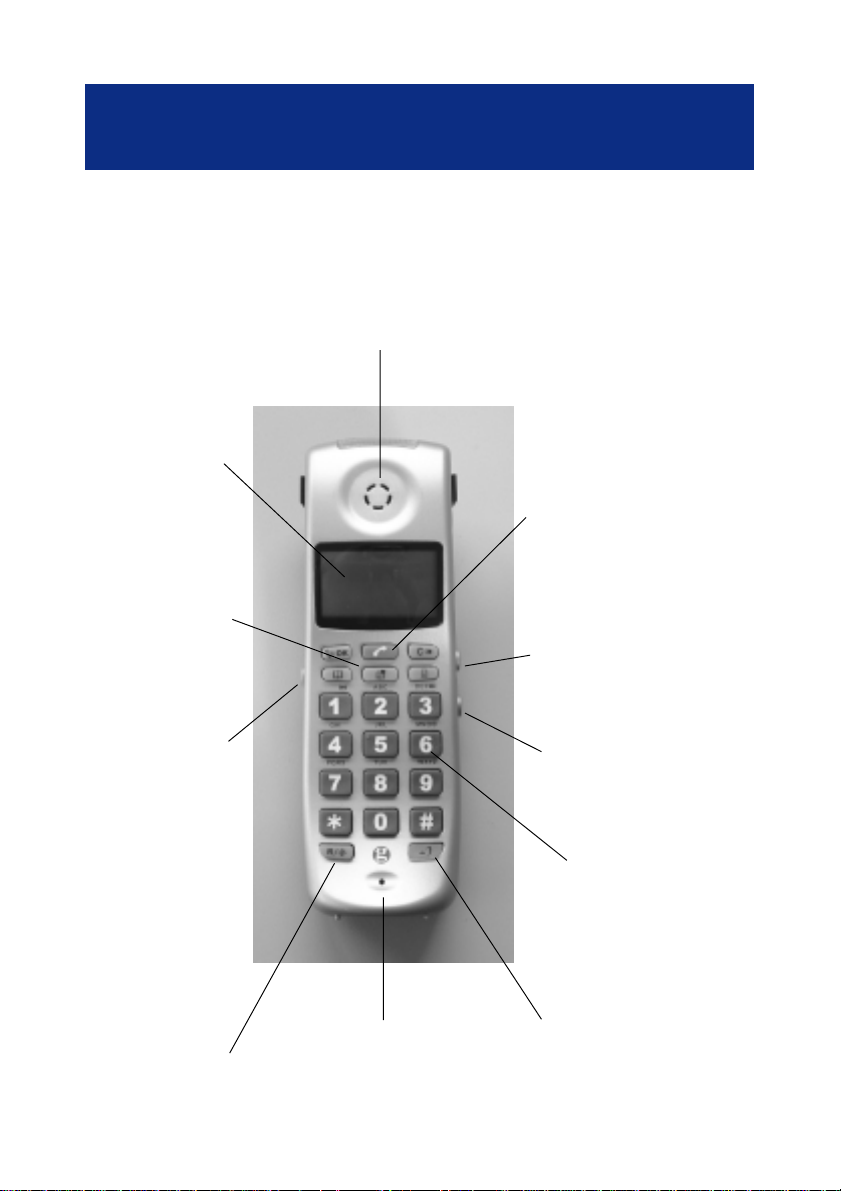
Amplifier volume
button adjustment
Bouton de réglage
volume ampli
DESCRIPTION
DESCRIPTION
HANDSET DESCRIPTION
DESCRIPTION DU COMBINE
Belt clip
Clip ceinture
7
Batteries cover
Couvercle de batteries
Page 8

DESCRIPTION
BASE CONTROLS
CONTROLES SUR LA BASE
Handset cradle
Support combiné
Charge contacts
Contacts de charge
Page key
T ouche de pagination
8
Page 9
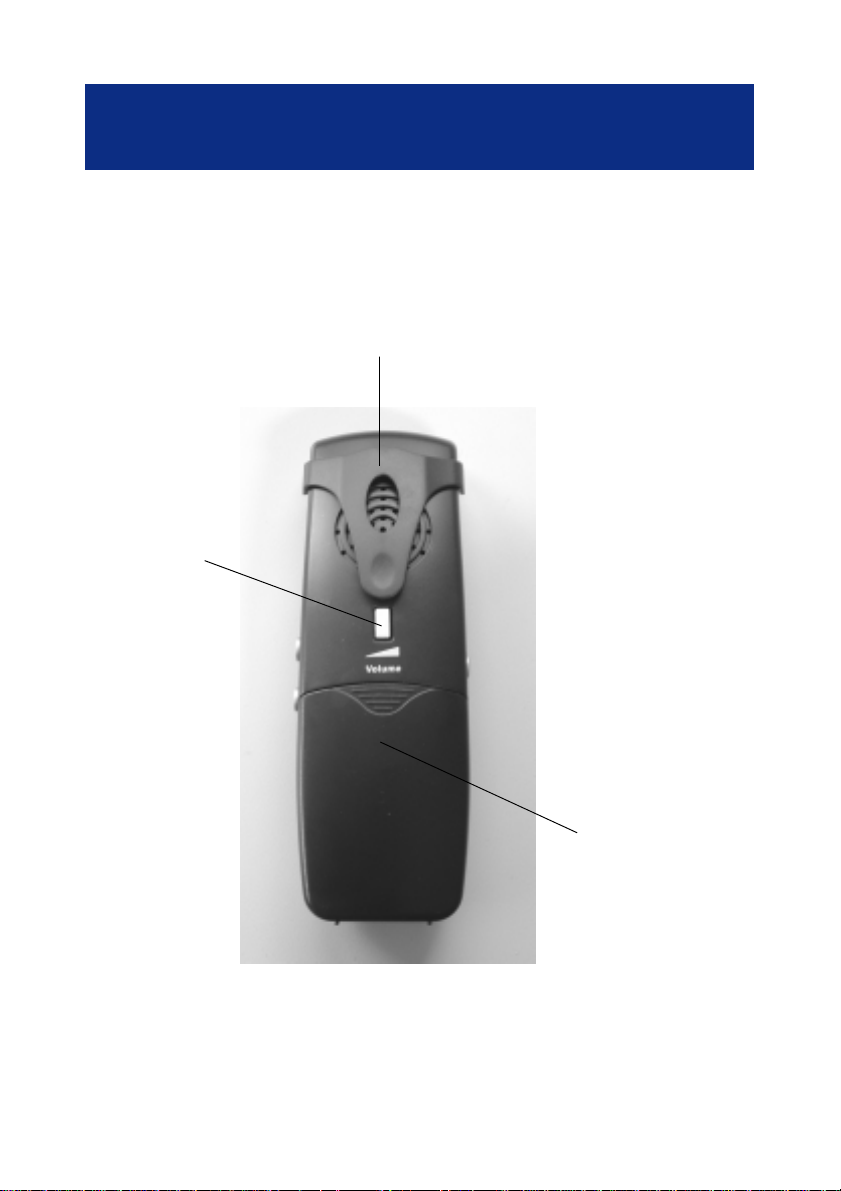
DESCRIPTION
BASE CONNECTIONS
CONNECTIONS SUR LA BASE
Ringer volume setting switch
Interrupteur de réglage sonnerie
* Power adaptor socket
* Connecteur adaptateur
secteur
(*) Classified “hazardous voltage” according to EN60950 standard.
Classé “tension dangereuse” selon la norme EN60950.
(**) Classified TNV-3 according to EN60950 standard.
Classée TNT-3 selon la norme EN60950
** Connecteur cordon de ligne
** Line socket
9
Page 10

GENERAL SETTINGS
1 - HOW TO CONNECT THE PHONE AND SET THE BATTERIES
1 - Plug the adaptor in the power wall socket and the power plug in the
base socket (*).
2 - Connect the line cord plug to the base socket (**).
3 - Connect the line cord to the PTT socket.
4-Insertthebatterieswiththecorrectpolarityintothebatteriescompartment
and replace the battery cover.
5 - Place the handset on the base unit then a short beep will be heard
and the battery symbol will flash on the display,exceptif the batteries are
totallyempty.
NOTE: Do not expose the base to electric equipment like TV, radio, monitors,
sunlight, heat or other phones...to avoid any disturbances of your phone.
(*) Classified “hazardous voltage” according to EN60950 standard.
(**) Classified TNV-3 according to EN60950 standard.
2 - CHARGING THE BATTERIES
ThephoneissuppliedwithNiMHrechargeablebatteries.Instandbymode,batteries
are fully charged around 170 hours and talk time is around 8 hours. The battery
charge icon
the charging process is complete. The phone has an automatic charging control to
avoid excessive charging.
IMPORTANT: Batteries must be charged during 24 hours before using the
phone for the first time.
Battery charge icon:
The handset display shows
signal is heard. If the phone does not have enough power or is not completly
recharged, it switches itself off automatically until it is returned to the base unit.
will flash as long as the phone is being charged and will stop when
when the batteries are flat and when a warning
10
Page 11

GENERAL SETTINGS
3 - PHONE RANGE
The phone radio range can work up to 300 m and radio signal can be affected by
many factors like a wall, obstacles...The maximum range if there are no obstacles
between the phone and the base unit is around 300 m.
If the range is restricted by walls in a house or in the office, the base unit should be
in a slightly elevated position.
A warning signal (beep) will be heard when the handset is out of the range, the call
will be stopped if the handset does not come nearer to the base unit.
4 - CLEAN THE PHONE
Clean the phone with a soft cloth. Keep the base and handset charging contacts
clean. Never use polishes or cleaning agents - they could damage the finish or the
electrics inside.
Note:Weadviseyoutoplacethetelephone on a table cloth orsimilar,asrubberfeet
can mark some surfaces.
Thunderstorms: unplug your phone from the telephone socket during
thunderstorms because it could damage your phone. Your guarantee does not
cover thunderstorm damage.
11
Page 12

BASE SETTINGS
BASE RINGER VOLUME
The base ringer volume can be adjusted by using the slider switch located on the
base rear panel.
Remark: It is only possible to adjust the ring volume, the ring tone melody cannot
be adjusted.
The following settings are available:
Switch position Symbol Function
Pos 1 Off
Pos 2 Min
Pos 3 Med
Pos 4 Max
For product support and help visit our website at
www.geemarc.com
telephone 01707 384438
or fax 01707 372529
12
Page 13

HANDSET SETTINGS
1 - GENERAL SETTINGS ICONS DIPSPLAYED
There are three settings icons displayed on the handset:
Ringer volume icon
to set the ring volume and melody.
Register handsets icon
Network settings, Flash time and Dial Pause icon settings
Flash time and Pause. The whole menu is controlled by using the following keys:
- To activate or deactivate the menu and programing mode use the
-Tomove forwardin themenu pressthe
backward.
- To move forward to another step or confirm a selection press the
2 - HANDSET RINGER VOLUME, MELODY AND SHAKER
To set the volume and melody please follow instructions below:
1 - Press the
2 - Press the
on the display. The selected icon will flash on the display.
3 - Press the
4 - Now you can select one of the possibilities below:
1/4 ++++ for the Ringer volume.
2/4 for the Normal calls ringer melody.
3/4 for the Phone book
4/4 for the Phone book
Pressthe toscrollthrough the menu. If you want tomodifyentries press
( ) and ( )keys.
5 - Press the
6 - If you want to exit to the menu press
( )orthe ( ) key to select the desired icon shown
to register / deregister handsets.
to set Network,
key.
( )and ( ) keys tomove
key.
key.
key to select the icon.
ringer melody.
ringer melody.
key to confirm the settings and exit to the menu.
.
7- Inaddition to thering, you canuse the shakerfunctionwith theswitch
set to the position.
13
Page 14

HANDSET SETTINGS
IMPORTANT: If you connect several bases together, the handsets registered
to the additional bases will ring for a few seconds during an incoming call
even if you take the line with one of the first base handsets.
3 - HANDSET REGISTRATION
How to register a handset to a base unit:
1 - Unplug the mains adaptor from the base unit during few seconds.
2 - Replace the adaptor to the power socket.
3 - Press the
key.
4-Pressthe
display.The selected icon will flash on thedisplay, then press
will be displayed.
5 - Enter the base unit PIN code (factory setting to 1111),then press key.
6 - The handset is now searching for the base unit to be registered, a beep will be
heard when the handset is registered to the base.
Note: the handset supplied with the base unit is already registered to the base unit.
So it is not necessary to register this handset.
4 - HANDSET DEREGISTRATION
To deregister the current handset from the base unit follow the instructions
below:
1 - Press the key.
2-Pressthe
3 - Enter the base unit PIN code (factory setting to 1111), then press key.
The handset is deregistered from the base unit and a beep will be heard when the
handsetis registeredtothe base.Ifyou wish touse several handsetsand base units,
all handsets must be registered. Each handset you want to use must be registered
separately to the base unit. Youcan register up to 2 base units for one handset and
up to 4 handsets can be registered to one base unit.
( )orthe ( )keyto selectthe iconshownonthe
key; 1/1 0000
andthe keystoenter number,1/1 0000willbedisplayed.
14
Page 15

HANDSET SETTINGS
5 - NETWORK FEATURES, FLASH TIME, DIAL PAUSE
1 - Press the
2 - Press the
on the display. The selected icon will flash on the display.
3 - Press the key to select the icon.
4 - You can choose from the menu below:
1/5 1/2 : 1 For UK, 2 for France (CID features).
2/5 Tone/Pulse for dialling must be set to Tone.
3/5 A,B,C,D (Telephone network settings)
4/5 Flash time R key
5/5 Dial pause to insert a pause in the mumber
You can scroll into the menu by pressing the
the
5 - Press the
Network settings
You can choose between 4 network settings:
A Factory setting (default value), B, C, D
These settings are used to match the signal level when working on different
phone networks.
Note: The setting should be left to A
Flash time settings for
( ) key to modify entries, press to confirm modification.
key.
( )orthe ( ) key to select the desired icon shown
key.Press the ( )or
key to exit the menu.
. You can choose between 2 settings:
a) *** 100 ms for United Kingdom
b) ****** 300 ms for France
Dial pause settings
You can insert a pause time in a phone number after the first digit, the digits after
the pause time are dialled after a 3 seconds delay. Two settings are available to
use this feature Yes or No.
15
Page 16

USING THE PHONE
1 - MAKING A CALL
1 - Dial the phone number you want to call, you can press the
an incorrect entry.
2 - Press the , the number is automatically dialled.
3-Oncompletion of the call simply press the
the handset on the base.
2 - ANSWERING A CALL
When an incoming call is received proceed by:
1 - Press the
2-Oncompletion of the call simply press the
the handset on the base.
3 - USE THE CALL BACK FEATURES
The five last dialled call numbers will be shown on the display when pressing the
key.
1 - Press the
( ) keys until you select the number you want.
2 - Press the
key to take the line and speak.
key and scroll through the list by pressing the ( )or
key to dial the number.
againtorelease the line or put
againtorelease the line or put
key to cancel
Note: Pressing the
can be deleted by pressing the
4 - HOW TO USE THE VOLUME AND TONE FUNCTIONS
Setting the handset volume, treble and bass:
The handset hearing volume can be set during a call by using the volume key
located on the handset rear side. Pressing the volume key increases the handset
volume by 4 steps of 4 dB each time. The phone amplification can be increased
with the V slider switch and the
key again will cancel this process. The displayed entry
key,a short beep will be heard to confirm.
key.
16
Page 17

USING THE PHONE
The following settings are available:
1 - The V switch set to
The handset volume can be adjusted within the following values range :
4dB/8dB/12dB/16dB.
2 - The V switch set to
The handset volume can be adjusted within the following values range:
16dB/20dB/24dB/28dB.
In addition for both settings, you can use the tone control
to increase treble and bass up to 10 dB.
Notes:
- Pressing the
control functions (Key is not lighting).
- You can leave the V slider switch to
impaired hearing user.
5 - PAGING THE HANDSET
If you wish to locate your handset simply follow the instructions below:
1 - Press the
2 - All registered handsets will be paged and will ring.
3 - Press twice the
and activated (key is lighting).
and activated (key is lighting).
slider switch
key deactivates the additional amplification and the tone
position if the phone is always used by
key on the base unit located on the base front side.
on the located handset to stop the paging mode.
Pressing the key on the base unit has the same effect.
6- TIMER
A timer will be displayed on the screen after starting the call. You can check the
call length by using this function.
17
Page 18

PHONE BOOK
1 - ABOUT THE PHONE BOOK
Names and phone numbers can be stored in the phone book. Each phone number
storedin the phone bookcanbe called by pressingonly few buttons. IfyourCaller ID
service is available, the name and the number of the caller will be displayed during
the incoming call. This will be done only if the caller name and number have been
stored in the phone book.
The phone book is divided into two parts (2 x 10 entries). One phone book can be
used for friends and family numbers and the second one for business contacts. The
entries in both phone books are sorted out by using an alphabetic list. Each name
can contain up to 10 characters and each phone number can have up to 25 digits.
2 - PHONE BOOK HANDSET RING TONE SETTINGS
It is possible to have a different ring to identify which phone book is being used.
You can set it as below:
1 - Normal phone call
2 - Calls from phone numbers and names in the first phone book
3 - Calls from phone numbers and names in the second phone book
Differentiated ring tones are only available when the caller ID is activated.
IMPORTANT :
Even if a caller is stored in a phone book, it can happen that only the normal ring
toneistriggered,inthiscasecallermayhaveusedhisorherprivatenumberfunction.
.
.
18
Page 19

PHONE BOOK
3 - STORING A NUMBER WITH A NAME
Follow instructions below to store new entries in the phone book:
1 - Enter the phone number and dialling codes you wish to set in the phone book.
2- Selectoneof thetwo phone booksby pressing the
will be heard and the phone book icon selected will flash.
3 - Enter the corresponding name and number by pressing the corresponding
number key once or twice to select the desired letter (see the table below).
Key Characters
1 [space] - 1
2 ABC2
3 DEF3
4 GHI4
5 JKL5
6 MNO6
7 PQRS7
8 TUV8
9 WXYZ9
00
* or # To confirm the key and go to another one
Example: forAB pressA*B
4 - Press the key to store the entry then a beep will be heard to confirm.
Note: To cancel the process only press and hold the key.
4 - DIALLING USING THE PHONE BOOK
or key,a beep
1 - Select the desired phone book by pressing the
2- Select the desired entry in the list by using the
3 - Press the
Note: The process can be cancelled by pressing the
key then the number will be automatically dialled.
19
or .
( )or ( ) key .
or key.
Page 20

PHONE BOOK
5 - MODIFY A PHONE BOOK ENTRY
1 - Select the desired phone book by pressing the
2 - Select the desired number tomodify by pressing the
keys.
3 - Press the
4 - The number will be displayed and can be deleted by pressing the key.
5 - Enter the new number and press the key to store.
6 - DELETE A PHONE BOOK ENTRY
1 - Select the desired phone book by pressing the
2 - Select the desired number to delete by pressing the
keys.
3 - Press the
4 - Press the
5 - Display will show OK?
5 - Press the
key.
key.
key to delete the entry.
to confirm then a beep will be heard.
or key.
( )or ( )
or key.
( )or ( )
For product support and help visit our website at
www.geemarc.com
telephone 01707 384438
or fax 01707 372529
20
Page 21

CALLER IDENTIFICA TION
1 - CALLER ID FEATURES
IMPORTANT: You need to subscribe to a Caller ID service from your local phone
company if you wish to use this feature.
Caller ID will show the caller name and phone number on the handset display. If the
phonenumber isstoredin thephone book, thecorresponding name willbe displayed
with the correct ring tone (phone book ring tone).
The display shows ****** for private call (caller does not want to show his or her
name and number).
The 10 last incoming calls are automatically stored in Caller ID list.
When the memory is full, the oldest call will be replaced by the last one.
Note: The
2 - DIAL CID NUMBERS
1 - Press the key.
2- Selectthe desirednumber todial bypressing the
Two short beeps will be heard if you reach the end of the list.
3 - Press the
time and the date of the call or press the key to exit the menu.
3 - STORE NUMBERS AND NAMES INTO THE PHONE BOOK
1 - Press the
2 - Select the desired number to store in the phone book by pressing the
or
3-Select the desired phone book in whichyouwant to store the number by pressing
the
4 - Store the name as described in “PHONEBOOK” item.
5 - Press the to confirm the storage in the phone book.
( )keys.Twoshort beeps will be heardifyoureach the end of thelist.
or key.
symbol will be displayed if you receive a call in your absence.
( )or ( )key.
key to dial the number or press the to display the
key.
( )
21
Page 22

CALLER IDENTIFICA TION
4 - DELETE STORED NAMES AND NUMBERS
1 - Press the key.
2 - Select the desired number to delete by pressing the
key.Two short beeps will be heard when you reach the end of the list.
3 - Press the
key to delete the entry, a short beep will be heard to confirm.
( )or ( )
For product support and help visit our website at
www.geemarc.com
telephone 01707 384438
or fax 01707 372529
22
Page 23

ADDITIONAL HANDSETS
1 - GENERAL SETTINGS
With the DECT standard you have the possible settings below:
- Register up to 4 handsets to one base unit.
- Register up to 2 base units to each handset.
- Make internal call handset to handset and transfer call between handsets
registered to the same base unit.
- You can increase the phone range by using 2 base units (move between the
phone coverage areas).
2 - USING SEVERAL HANDSETS
For practical applications and to make life easier,you can register several handsets
to the same base unit. Youwill be able to answer a call anywhere in the office or the
home at any time because all handsets will ring at the same time. You can call
another place in the office or home by calling another registered handset.
You can transfer an incoming call to another handset.
Note: only one incoming or internal call can be made at the same time.
How to use several handsets:
All handsets you wish to use in the base unit must be registered to this base unit.
To add another handset please follow instructions below for each handset:
1 - Unplug the mains adaptor from the base unit during few seconds.
2 - Replace the adaptor to the power socket.
3- Pressthe
4-Pressthe
display.The selected icon will flash on the display, then press
5 - Enter the base unit PIN code (factory setting to 1111),then press key.
6 - The handset is now searching for the base unit to be registered.
key.
( )orthe ( )key toselectthe iconshown onthe
key.
23
Page 24

ADDITIONAL HANDSETS
Note: to get the maximum efficiency and maximum range you must put the handset
near the base unit. The handset range will be the same for each handset.
3 - DEREGISTER ALL ADDITIONAL HANDSETS FROM THE BASE
To deregister all handsets from the base unit follow the instructions below:
1 - Take one handset.
2- Pressthe key.
3-Pressthe
4 - Enter the base unit PIN code (factory setting to 1111), then press key.
All additional handsets are deregistered from the base unit.
Note: handset used to deregister the additional handsets is not deregistered.
4 - INTERNAL CALLS
When you are using several handsets registered to the same base unit, you can
make internal calls handset to handset. To make a call handset to handset please
follow instructions below:
1 - Press the
2 - All other handsets will ring.
3 - Press the
A tone signal will be heard during a call when you receive an external call. To
answer the external call you must finish your internal call first.
andthe keysto enter number1/10000 willbe dispalyed.
key.
key to answer the call.
24
Page 25

ADDITIONAL HANDSETS
5 - CALL TRANSFER TO ANOTHER REGISTERED HANDSET
External calls can be transfered to another registered handset from the answering
handset (both handsets must be registered to the same base unit).
During an incoming call:
1 - Press the keyto answer the call.
1 - Press the
2 - All others handsets will ring.
3 - Press the key on the requested handsets to answer the call.
If you do not wish to come back to your call and do not wish to transfer the call to
other handsets simply press the key on your called handset.
Note : You cannot transfer an external call to a handset which is not registered to
the same base station.
6 - HEADSET OPTION
key to transfer the call.
If you wish you can connect a headset ref: HEADCL_BLK to the headset socket
located on the side of your phone,with this headset you can use all phone functions
as described before. To answer a call simply press the
press a second time to release the line.
to take the line and
For product support and help visit our website at
www.geemarc.com
telephone 01707 384438
or fax 01707 372529
25
Page 26

ADDITIONAL BASE UNIT
1 - GENERAL SETTINGS
Several base units can be connected to the network in order to extend the range of
the handsets. When several base units are registered to a handset, it can
automatically search for the next base unit if you go outside the range of the first
base unit. The transfer between base units is handled automatically, although this
cannot be done whilst a call is in progress. Handset will keep its connection with
one of the base units until it loses connection due to having moved out of range. In
this case, the handset searches for a new base unit in its registration list.
The base units coverage areas must overlap to ensure there are no gaps in the
coverage. Otherwise the radio connection will be lost.
2 - HOW TO ADD A BASE UNIT
1 - Connect the additional base on the network phone socket.
2 - Plug in the adaptor.
3 - Register the handset to the base unit as described before.
Remark:The first registered handsethaspriority on the firstbase.It will be activated
when the handset will move to the second base (move to the new radio range).
To check if your handset or all handsets registered to this base are registered
simplypress thepagebutton
to this base will ring.
IMPORTANT: If you connect several bases together, the handsets registered
to the additional bases will ring for a few seconds during an incoming call
even if you take the line with one of the first base handsets.
onthe newbase,all newhandsets registered
26
Page 27

TROUBLE SHOOTING
IF THE PHONE DOES NOT WORK
Generality:
Make sure that the phone line cord and adaptor are correctly plugged in and are not
damaged.
Make sure that the batteries are fully charged.
Connectanother phone on your phone socketormove your phone to anothersocket
to check if the failure is coming from your phone or your PTT socket.
A warning tone is heard during a call:
The batteries are empty and the handset needs to be replaced in the base unit
.
The phone does not work:
Make sure that the line cord and the power adaptor are correctly connected to the
base unit or to the PTT plug and wall power socket.
No number is displayed when the phone rings:
- Please contact your phone network provider to get the caller identification service.
- When the caller does not want to show his or her number (private number), the
displaywill show ******. However, it could be acallfrom a PBX and caller IDmaynot
work properly if the phone is connected to a PBX.
27
Page 28

GUARANTEE
GUARANTEE
From the moment your Geemarc product is purchased, Geemarc
guarantee the product for one year. During this time, all rep airs or
replacements (at our option) are free of charge. Should you
experience a problem then contact our helpline or visit our website
at www.geemarc.com. The guarantee does not cover accidents,
negligence or breakages to any parts. The product must not be
tampered with or taken apart by anyone who is not an authorised
Geemarc representative. The Geemarc guarantee in no way limits
your legal rights.
IMPORT ANT : YOUR RECEIPT IS P ART OF YOUR GUARANTEE
AND MUST BE RETAINED AND PRODUCED IN THE EVENT
OF A WARRANTY CLAIM
Please note: The guarantee applies to the United Kingdom only .
DECLARA TION: Geemarc Telecom SA hereby declares that this
product is in compliance with the essential requirements and other
relevant provisions of the Radio and Telecommunications Terminal Equipment Directive 1999/5/EEC and in particular article 3 section 1a, 1b and section 3. The telephone does not operate if the
line current is lower than 18 mA.
28
Page 29

GUARANTEE
Electrical connection : The apparatus is designed to operate
from a 230V 50Hz supply only . (Classified as «hazardous voltage»
according to EN60950 standard).
The apparatus does not incorporate an integral power on/off switch.
T o disconnect the power , either switch off supply at the mains power
socket or unplug the AC adaptor . When installing the app aratus,
ensure that the mains power socket is readily accessible.
Telephone connection : Voltages present on the
telecommunication network are classified TNV-3
(T elecommunication Network V oltage) according to the EN60950
standard.
Forproduct support and helpvisit our website at
www .geemarc.com
telephone01707 384438
or fax 01707 372529
29
 Loading...