

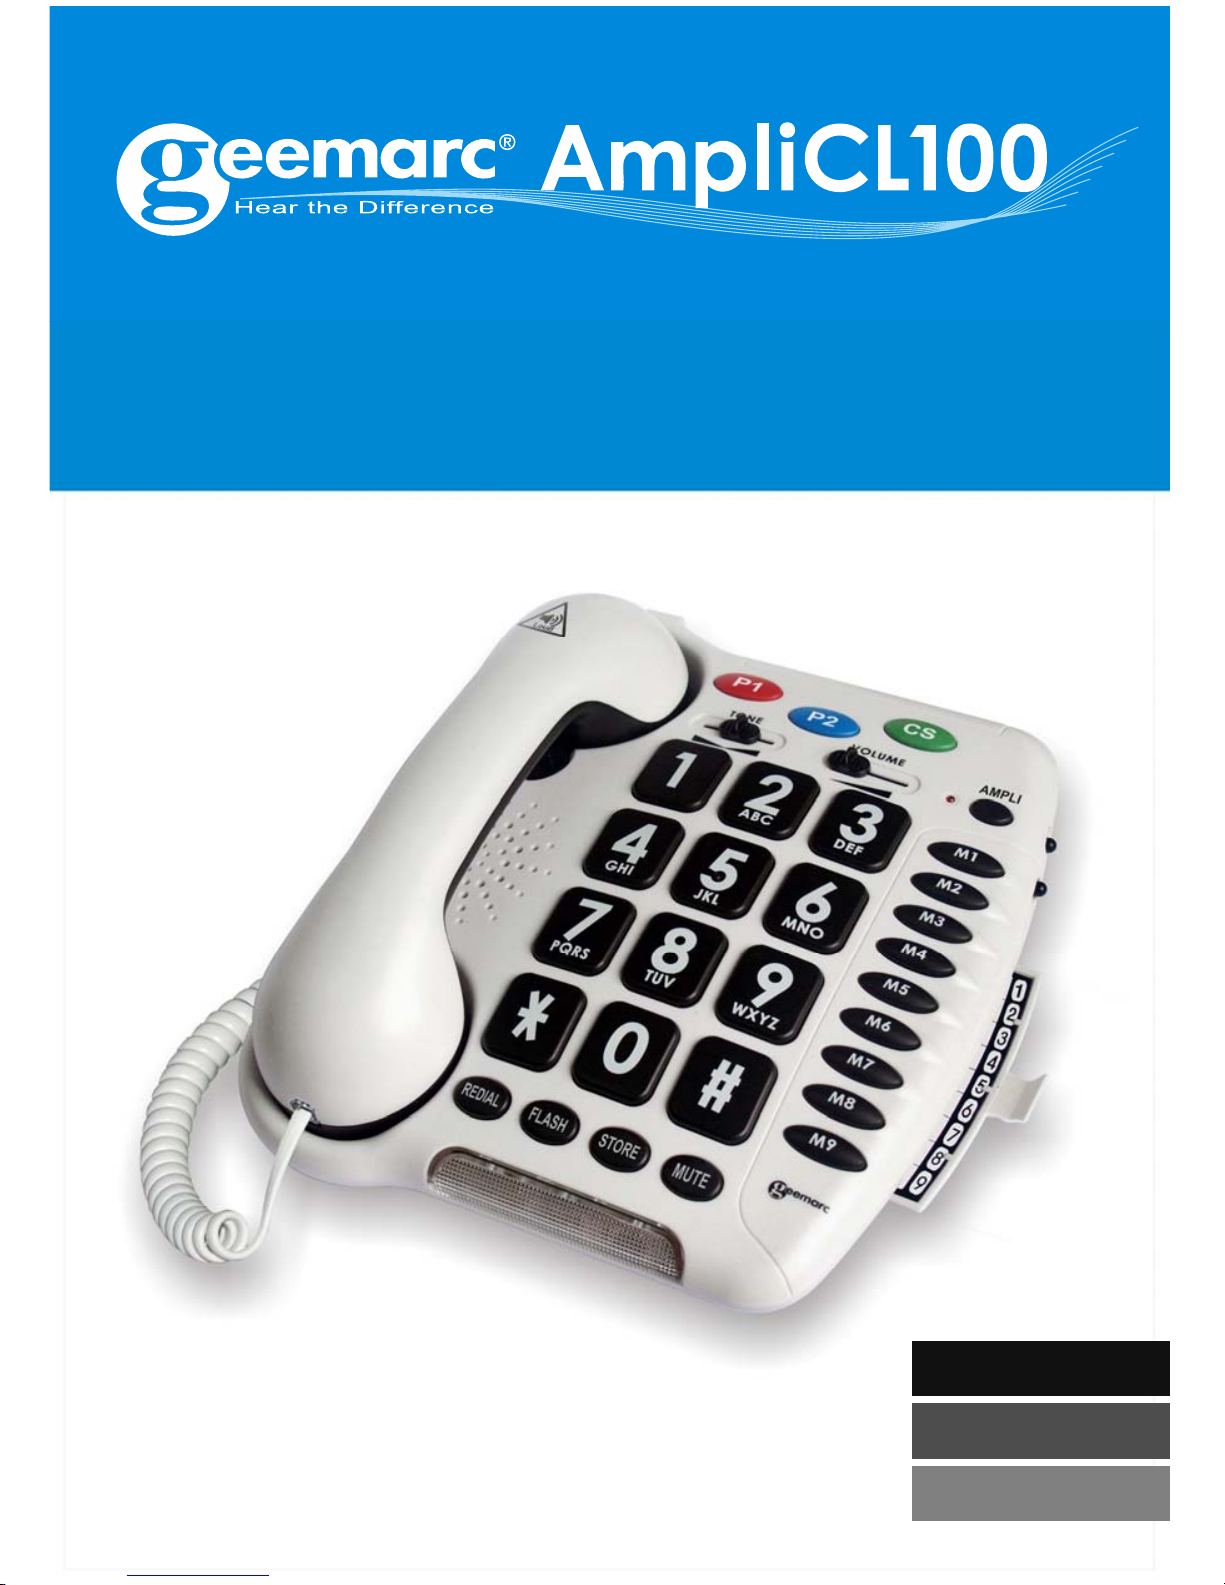
Page 1
Multifunction telephone
Téléphone multifonctions
Teléfono multifunción
English P2
Français P20
Español P38
Page 2

1
Page 3

2
!!!User manual to read carefully before
start to use!!!
CAUTION: this telephone is specifically designed for the people
with hearing difficulties and is provided with a handset earpiece
volume control for individual requirements. Due care must be
taken by all users that the handset earpiece volume control is set
to the lowest level acceptable by each respective user. Care
should therefore be exercised to ensure that any naive users are
familiar with this requirement.
When using your telephone equipment, basic safety precautions
should always be followed to reduce the risk of fire, electric shock
and injury to person, including the following.
WARNING: To avoid the possibility of electrical shock, do not use
this product near water (For example, near a bathtub, wash basin,
kitchen sink or laundry tub, in a wet basement or near a swimming
pool);
WARNING: Avoid using the telephone during electrical storms.
There may be a remote risk of electric shock from lightning. If the
electrical storm is present in your immediate area, possibility of
electrical shock exists;
WARNING: Do not use the phone if you suspect a gas leak in the
area. The phone’s electrical contacts could create a spark, which
could ignite any heavy concentration of leaking gas.
English
Page 4

3
Description ................................................................... 4
Setting up ...................................................................... 6
1- Connecting the telephone .......................................... 6
2- Ringer volume setting ................................................ 6
3- Tone/Pulse switch ...................................................... 7
4- Time break recall setting ............................................ 7
5- Wall mounting ............................................................ 7
Volume and tone adjustment ...................................... 9
1- Receiving volume and tone adjustment ..................... 9
2- Sending volume adjustment ..................................... 10
Using the phone ......................................................... 11
1- Answer a call ............................................................ 11
2- Making a call ............................................................ 11
3- Last number redial ................................................... 11
4- Recall(FLASH), * & # buttons .................................. 11
5- Mute button .............................................................. 11
6- Storing telephone numbers ...................................... 12
7- Dialling stored number ............................................. 13
Safety informations .................................................... 14
Regulatory compliance .............................................. 15
Guarantee ................................................................... 18
Index
Page 5
4
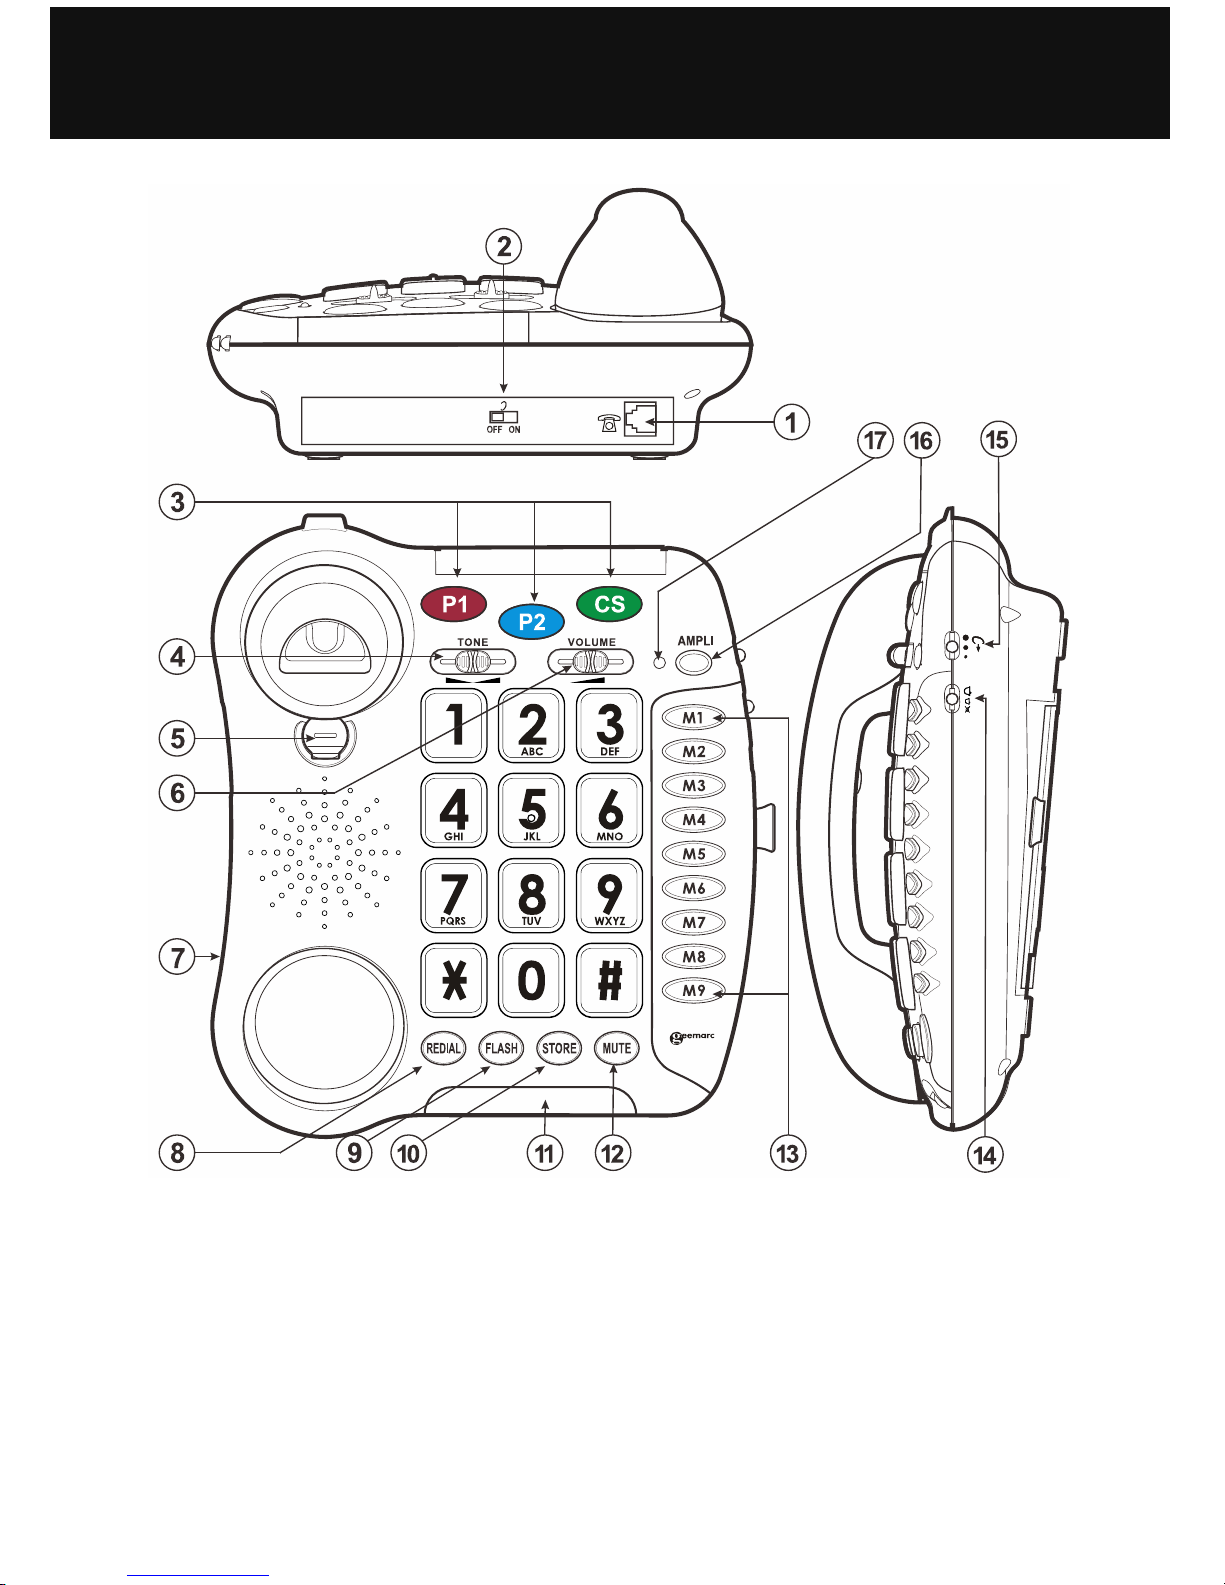
1. Line socket.
2. Volume and tone adjustment ON/OFF switch.
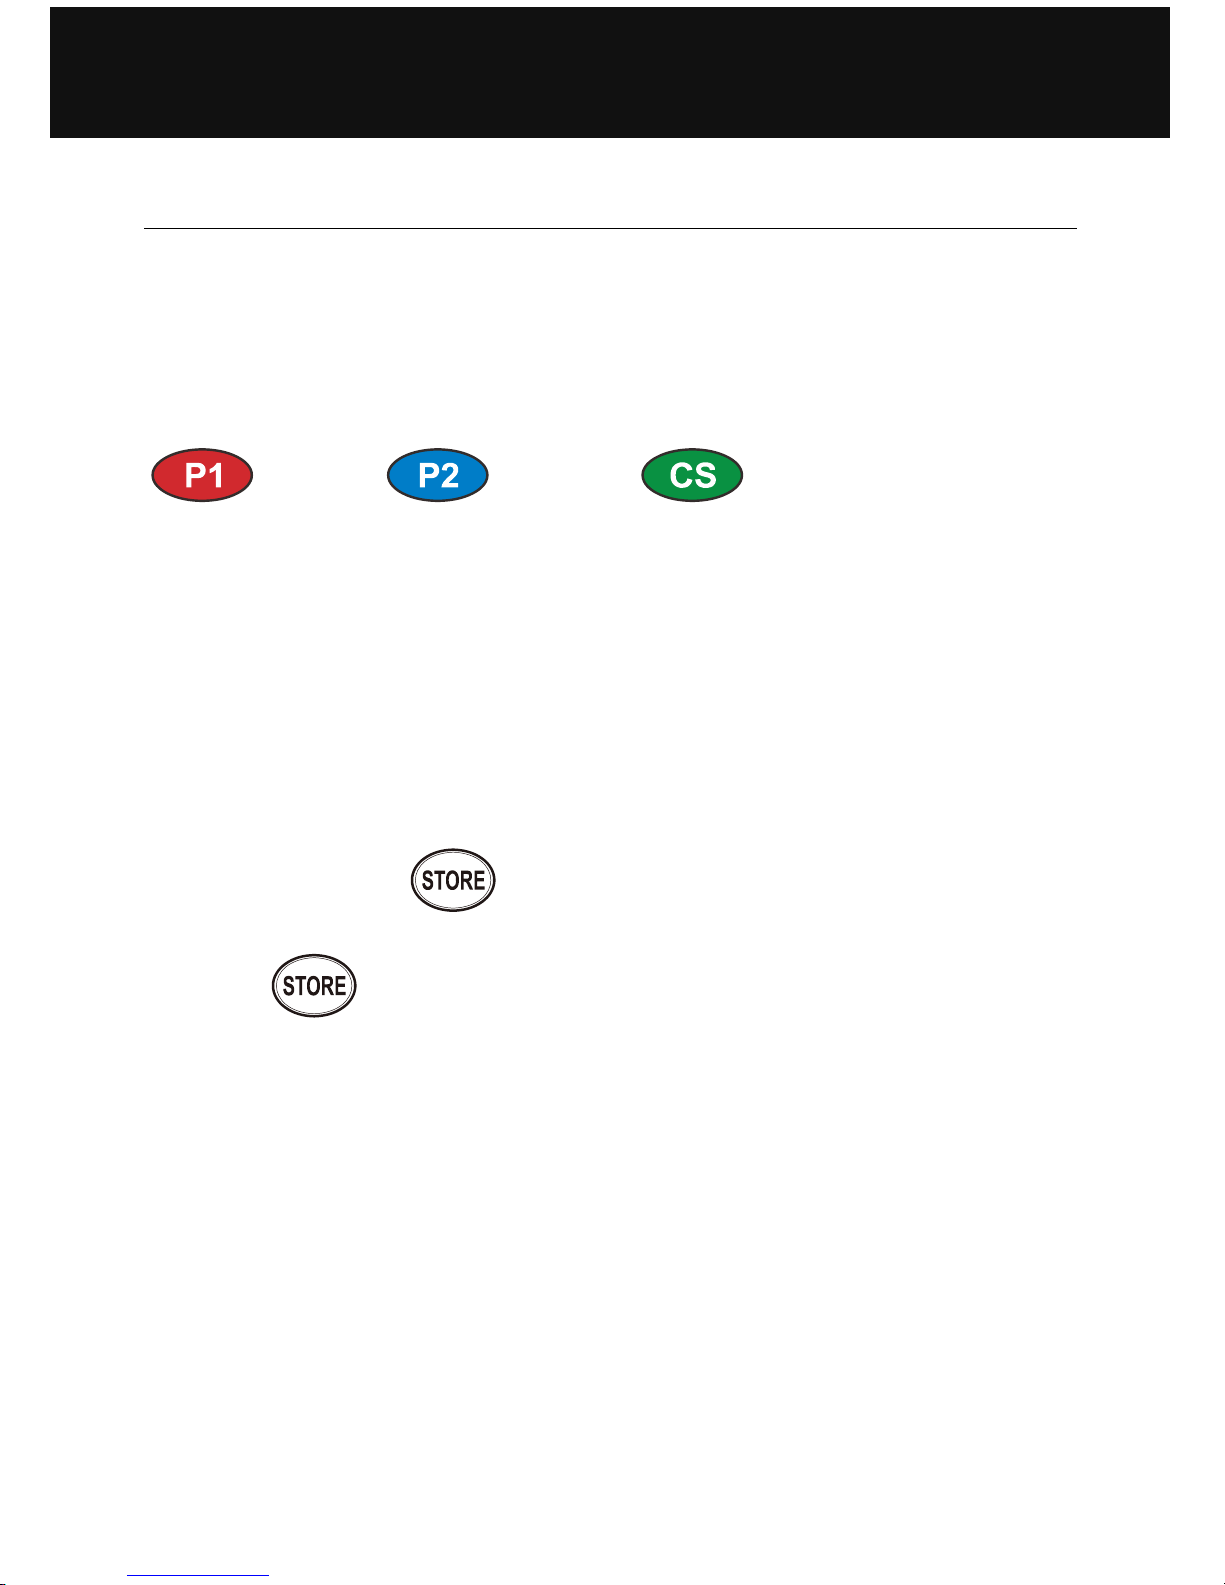
3. 3 emergency numbers.(P1, P2, QuikDialCS™)
4. Reception tone adjustment.
5. Clip for wall mounting.
6. Reception volumen adjustment.
7. Handset cord socket.
8. Last number redial.
Description
Page 6
5
9. Time break recall.
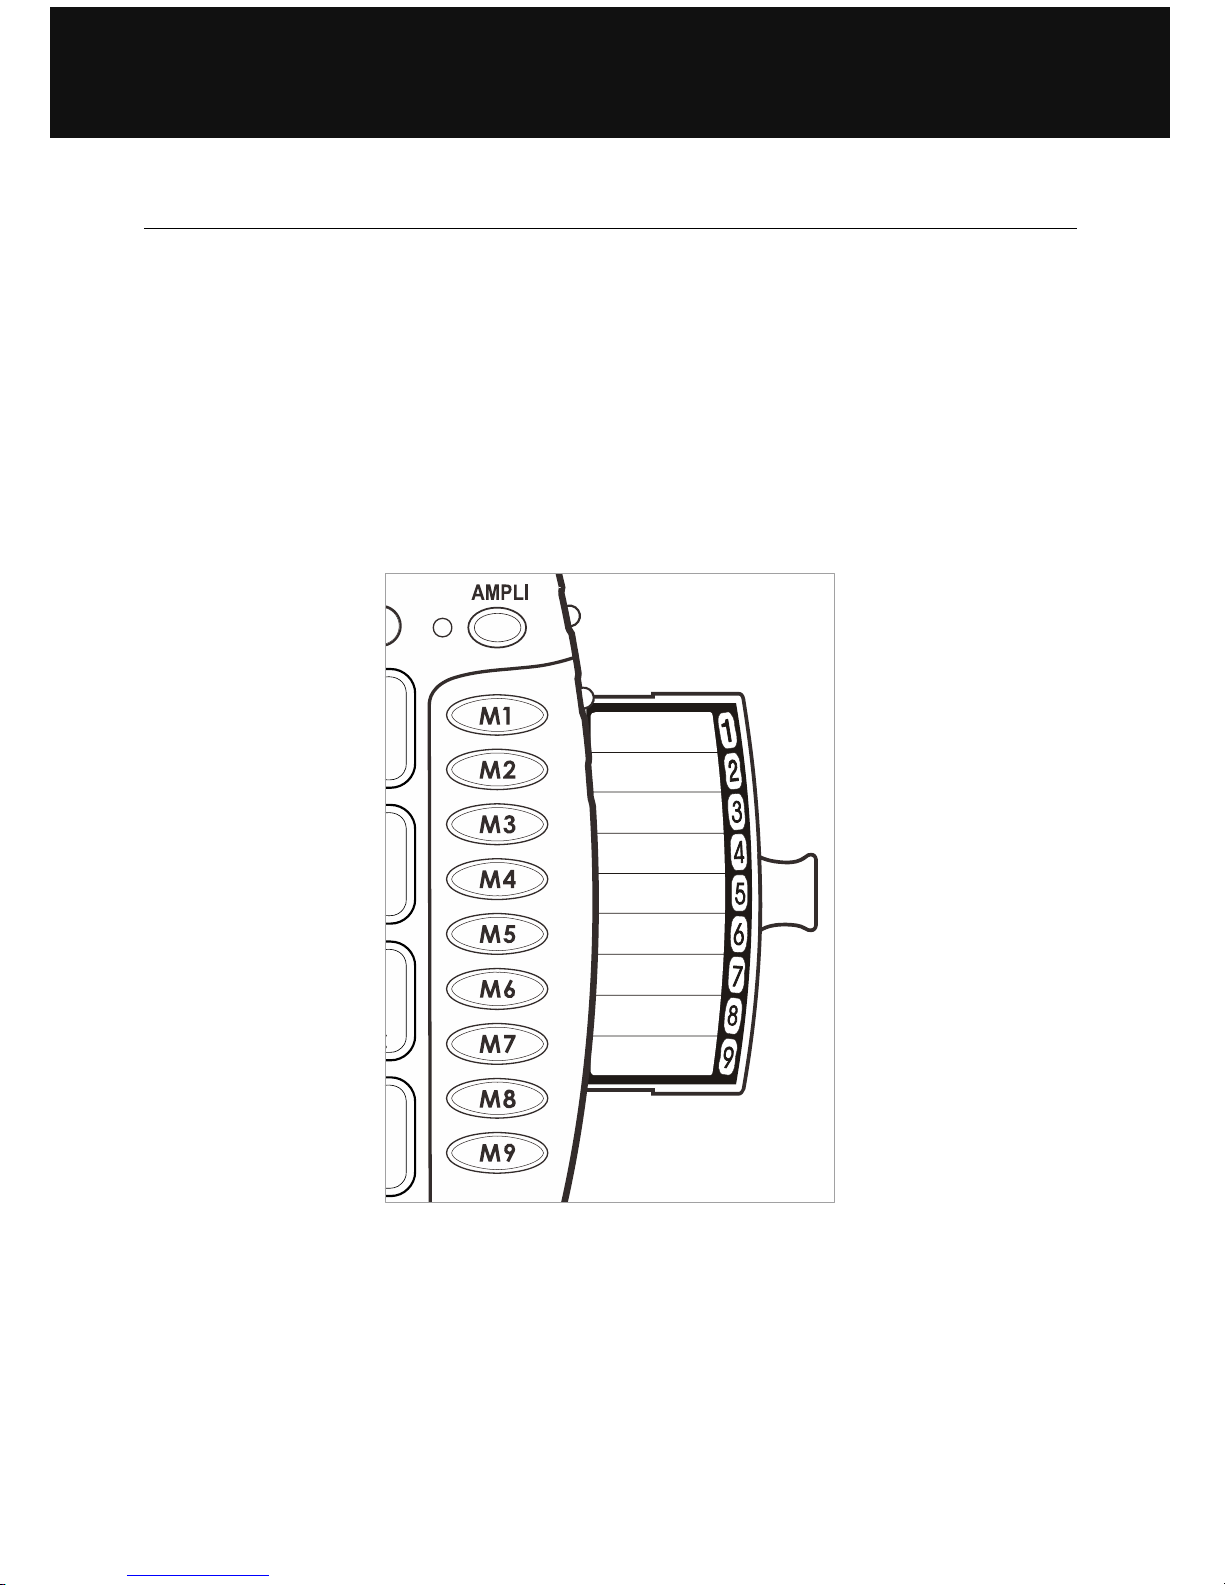
10. Memory storing.
11. Flashing incoming ring indicator.
12. Mute.
13. Direct memories.
14. Ring volume setting.
15. Sending volume setting.
16. Extra volume and tone adjustment.
17. Red light of tone/volume activation.
18. Handset cord.
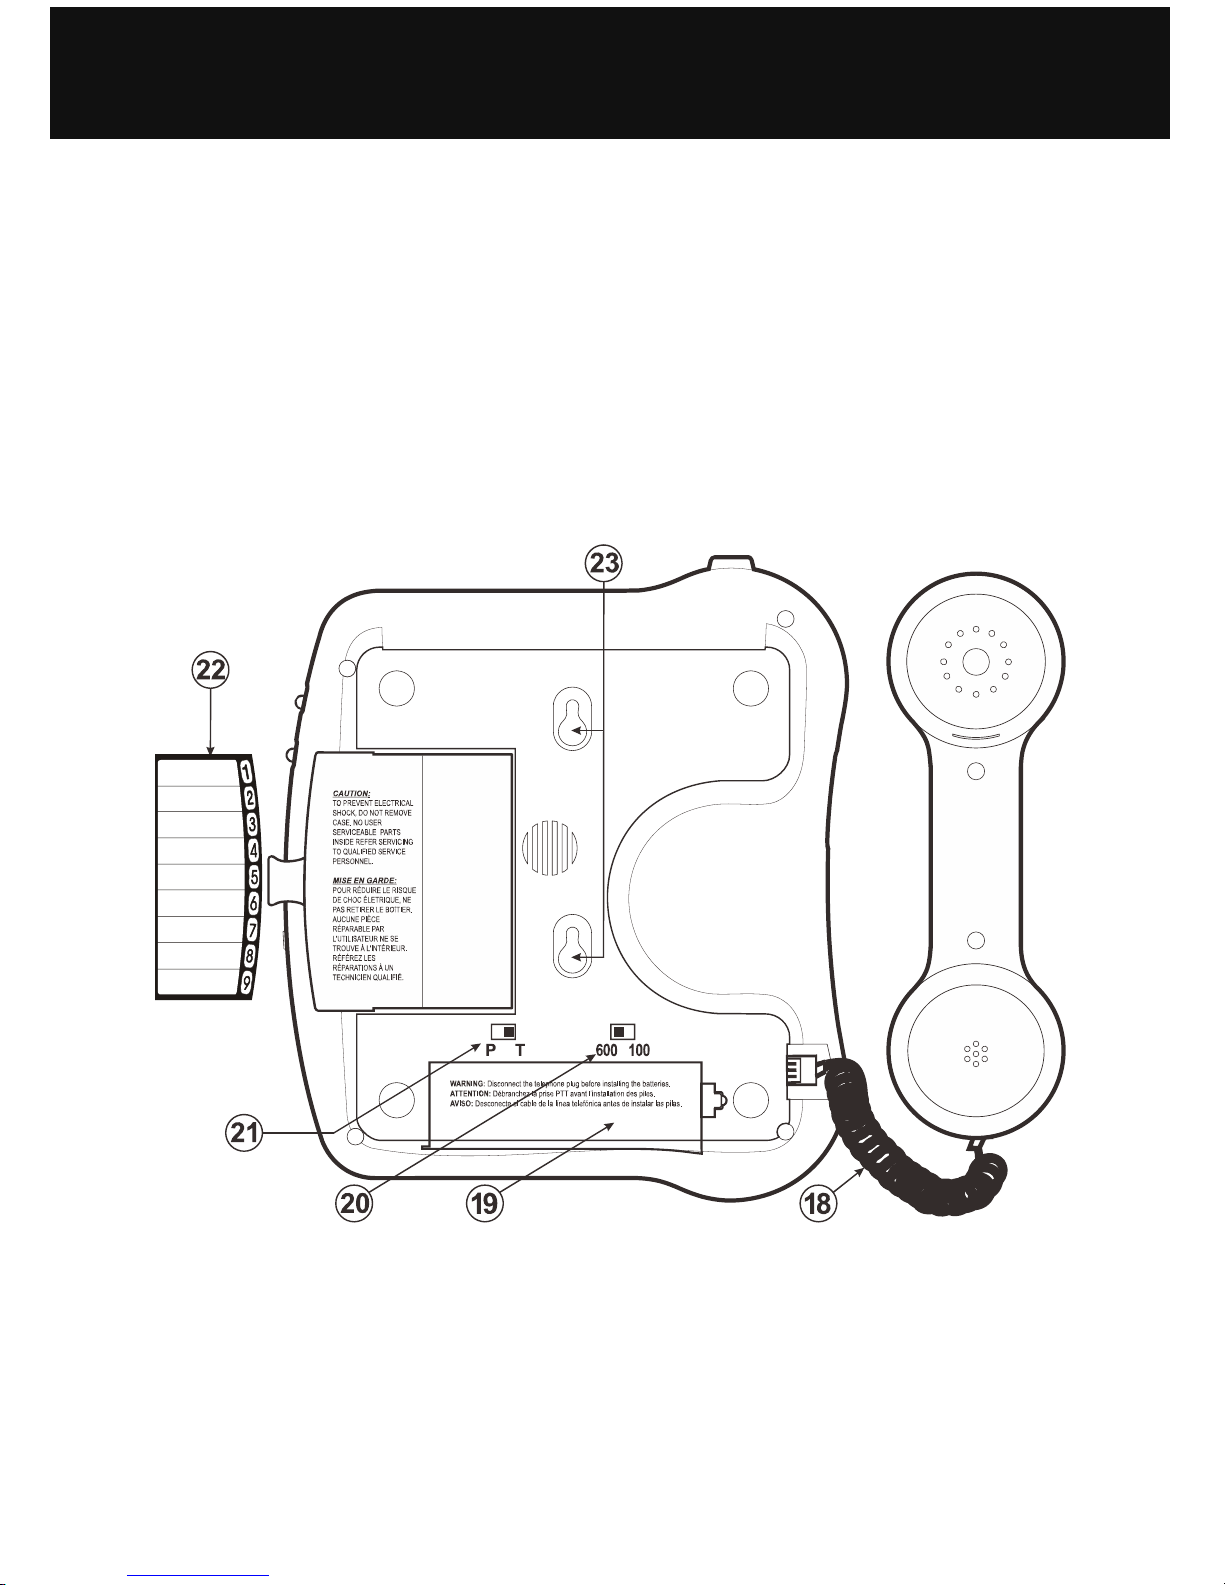
19. Battery compartment.
20. Time break recall.
21. Dialling mode Pulse/Tone.
22. Memo card.
23. Holes for wall mounting.
Description
Page 7
6
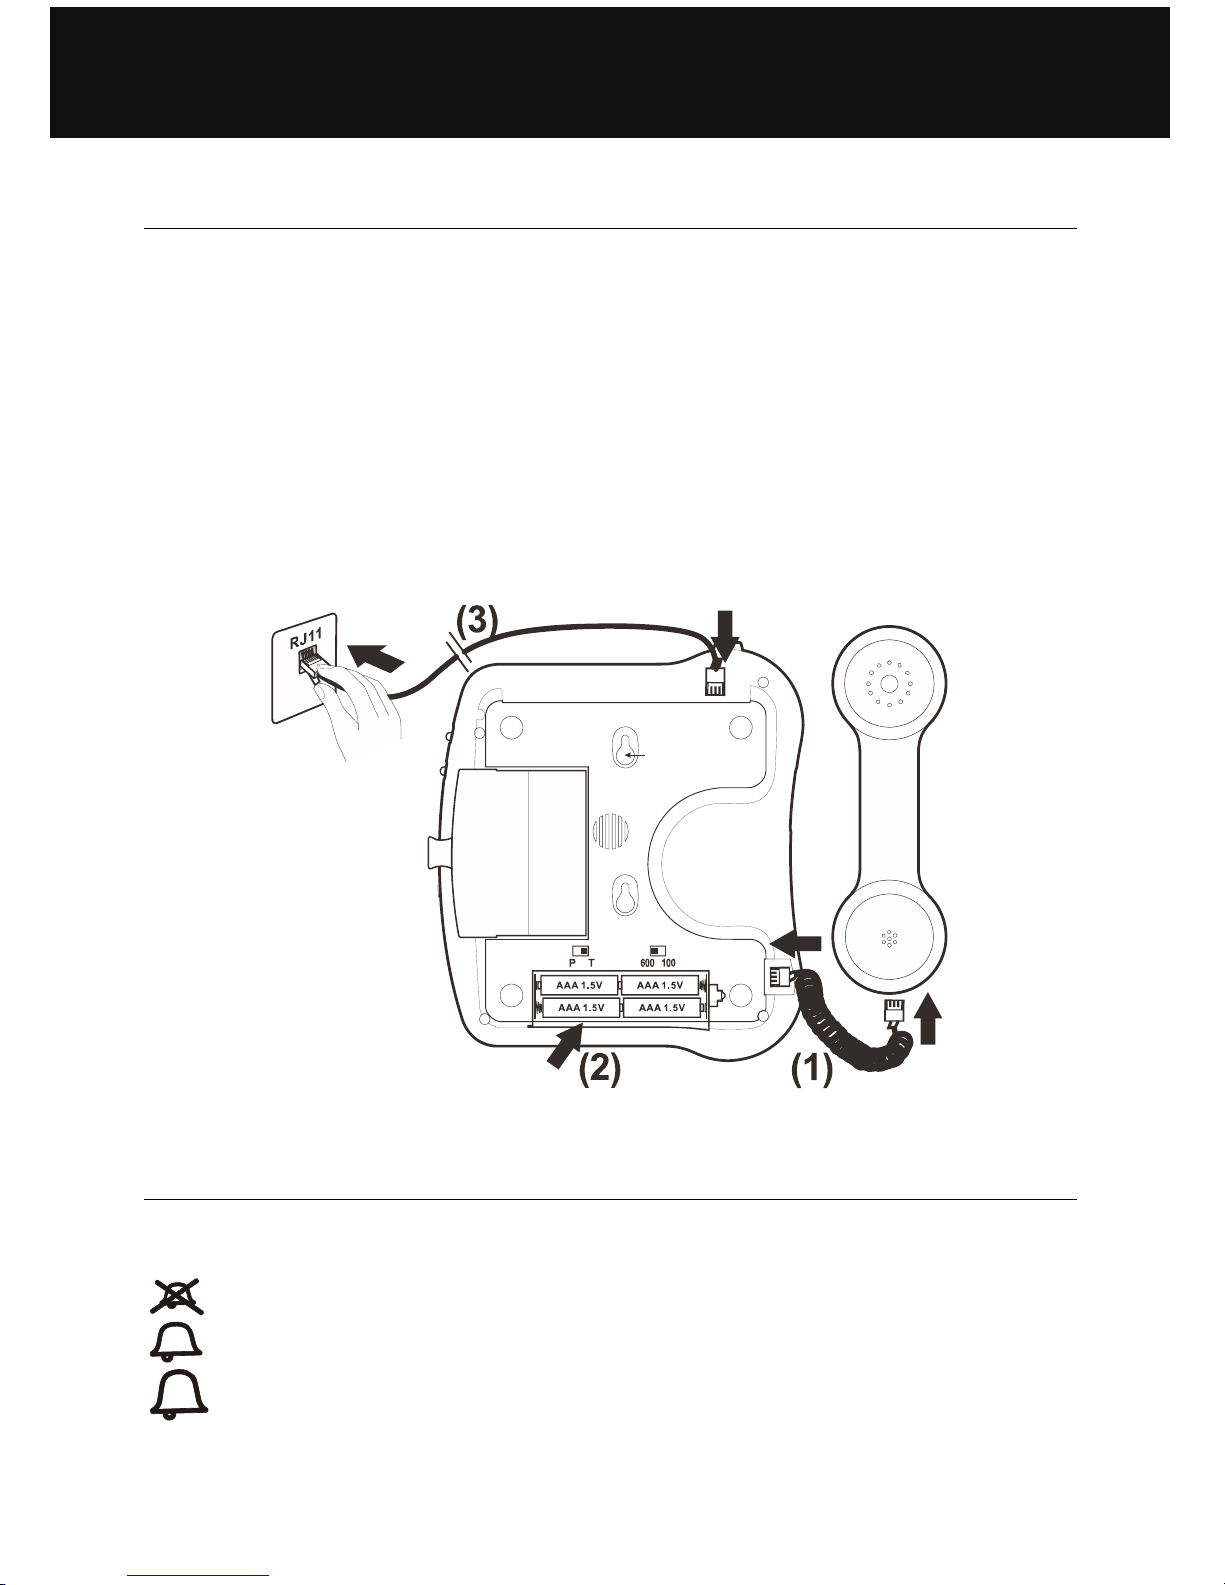
1 – Connecting the telephone
- Connect the handset cord (1).
- Open the battery compartment (2).
- Insert 4 alkaline batteries (type AAA 1.5V, not supplied) in
the comartment (*). Batteries are required if you wish to
increase the ringer level up to 10 dB (2).
- Snap the battery door back in place.
- Connect the line cord plug into the line socket on the rear of
the unit (*) (3).
- Connect the other end of the line cord into the wall PTT
socket (*) (3).
(*) Classified TNV-3 according to EN60950 standard.
2 – Ringer volume setting
A switch located on the right side allows the ringer to be
switched to Hi, Low or Off:
: Off,
: Low,
: Hi.
Note: The ring level will be increased of 10 dB if you insert
batteries.
Setting up
Page 8
7
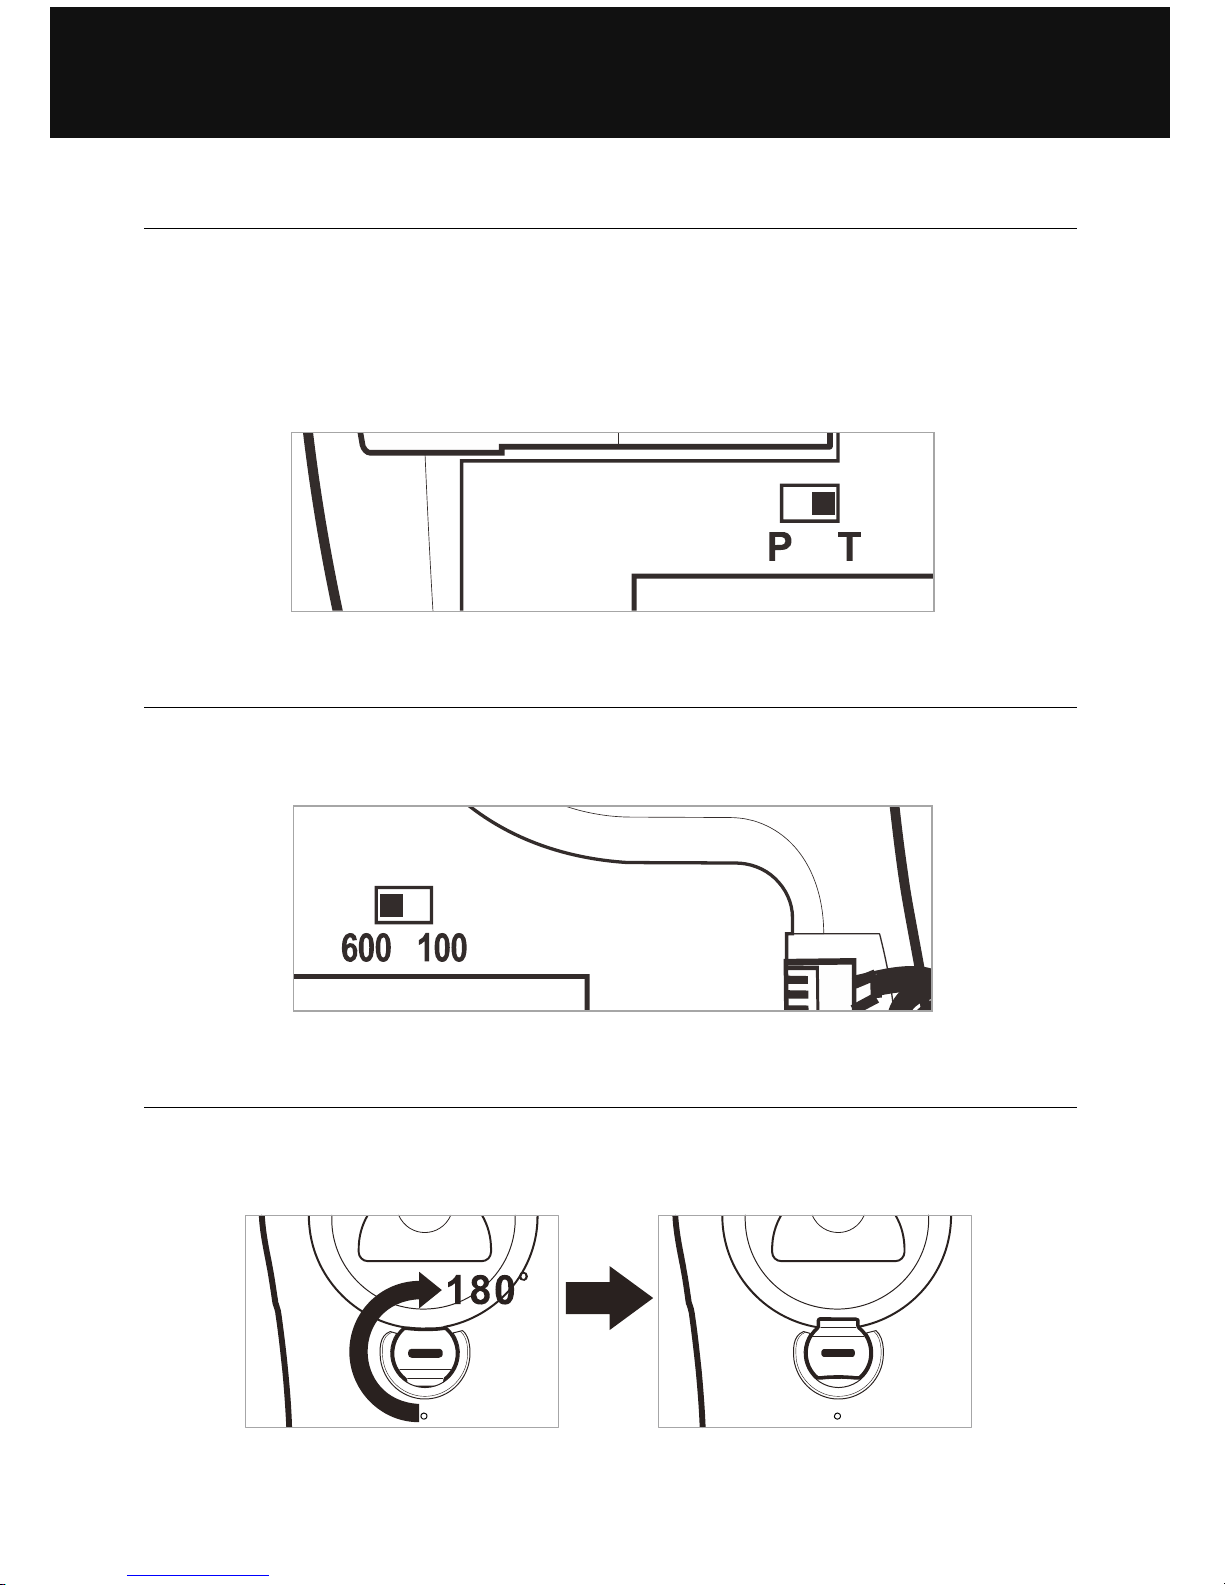
3 – Dialling mode (Tone/Pulse) settings
The Tone/Pulse switch is factory pre-set to Tone position. In
the UK, all telephone exchanges now use Tone (T) dialing. If
your phone does not dial out, it is probably being used from
an older private switch board (PBX). In this case, the
Tone/Pulse switch must be changed to Pulse (P).
4 – Time Break Recall setting (600/100)
Your phone works with a time break recall. It can be switched
to 600ms and 100ms.
5 – Wall mounting
To wall-mount your telephone, turn the “clip” (located in the
base unit, just below the ear piece).
This will ensure that the handset stays firmly in position.
Setting up
Page 9
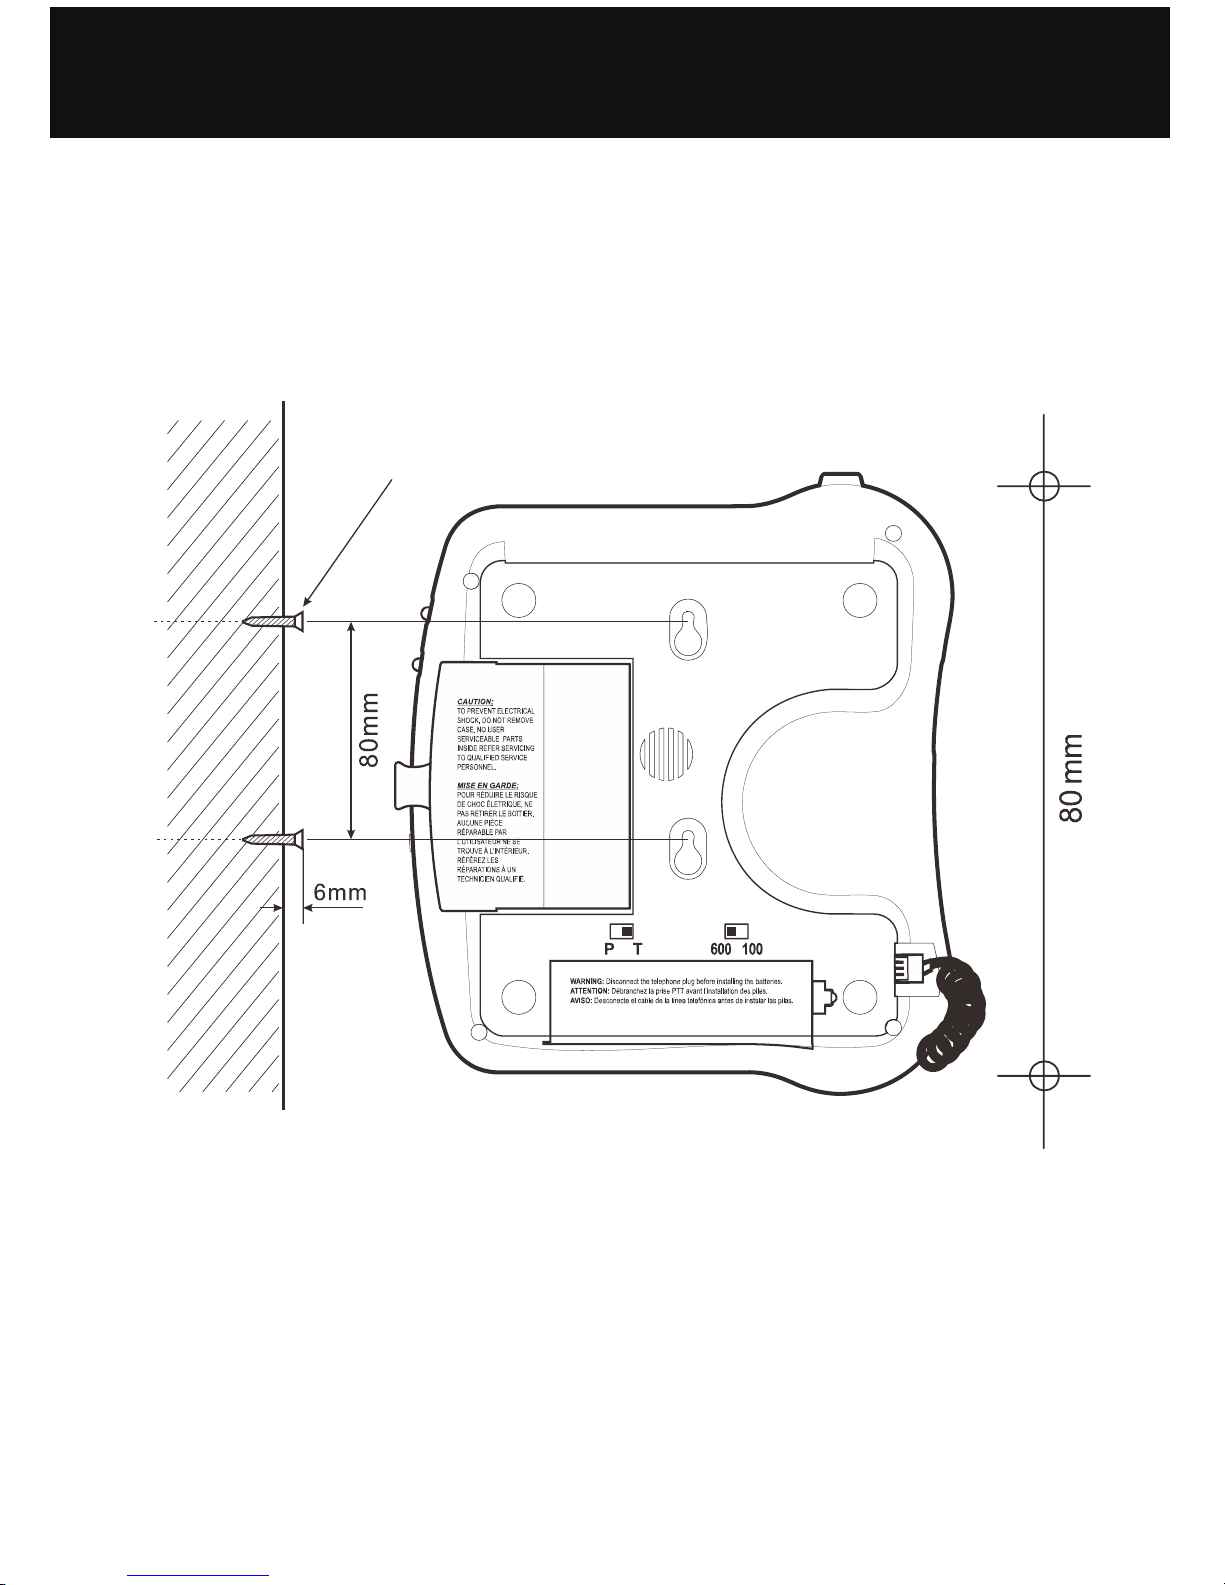
8
- Drill 2 holes in the wall (80mm apart).
- Insert the wall plugs and the screws leaving about 6 mm of
the screws projecting from the wall.
- Slide the telephone downwards to secure.
Setting up
Wall mount template
Screw
Page 10

9
1 – Receiving volume and tone adjustment
You can increase the volume and adjust the receiving tone
according to your own hearing requirements.
The button
allows extra receiving and tone functions to
be activated or not during the conversation.
When the function is activated, the red light of extra receiving
and tone function located near the button
is lit.
Adjust the TONE and VOLUME buttons to fit the levels to
your own hearing requirements.
Volume and tone adjustment
VOLUME
TONE
Normal
Page 11
10
Note: When the tone (treble), earpiece volume and sending
levels are set to the maximum, whistling may occur. Then the
sending level settings should be decreased with the switch
.
When the switch located behind the phone is ON, the
extra-receiving and tone functions are automatically activated
each time you use the phone.
When this switch is OFF, you will need to activate the
function by pressing the button
.
Tone and volume (15dB to 30dB) adjustment is only activated
when the button
is set to ON.
When this button is set to OFF only the volume can be
adjusted from 0dB to 15dB.
2 – Sending volume adjustment
If your voice is quiet or called parties have difficulty hearing
you, you can increase the sending level volume with the
switch located on the right side.
You can also decrease the sending volume if required.
Volume and tone adjustment
Min Normal Max
Page 12
11
If you are using this telephone with a
hearing aid, set your hearing aid to
the “T” setting.
1 – Answer a call
- When an incoming call is received the phone will ring and
flash, to answer the call lift the handset and speak.
- On completion of the call, carefully replace the handset in
the cradle to release the line.
2 – Making a call
- Lift the handset.
- Await the dial tone and dial required number.
- On completion of the call,carefully replace the handset in
the cradle.
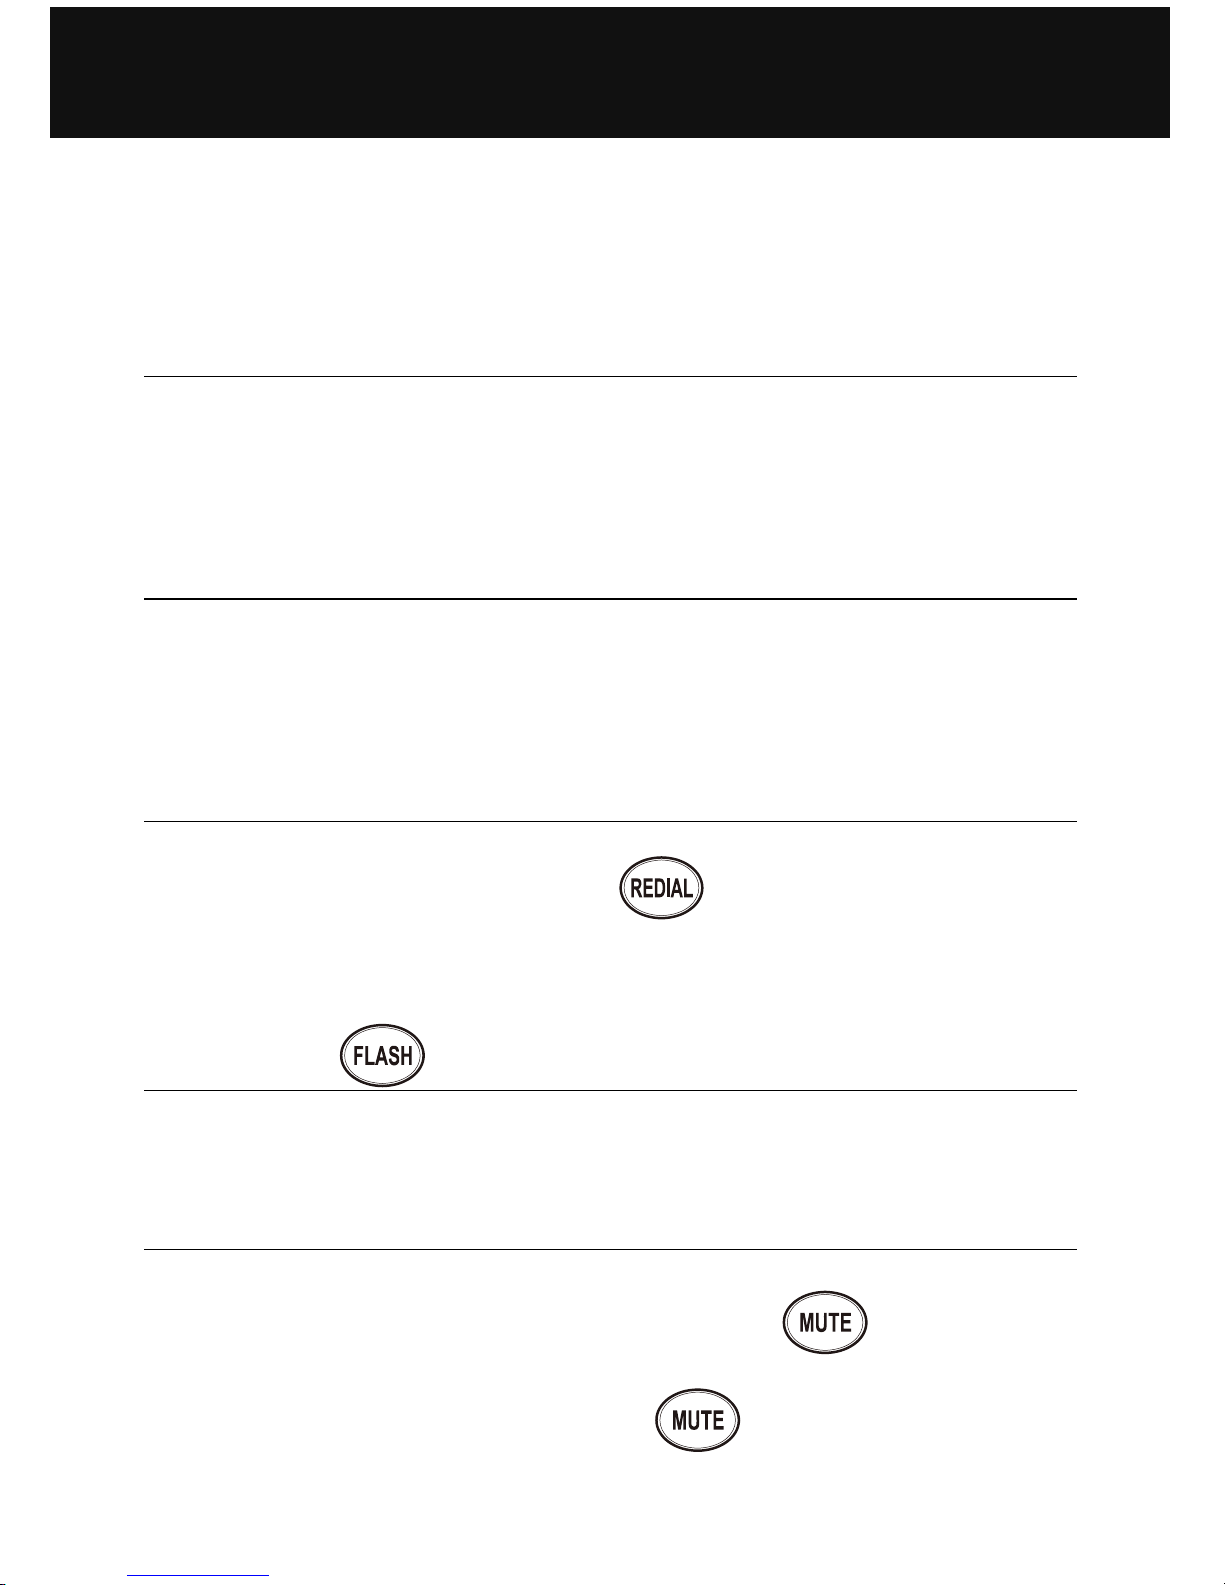
3 – Last number redial
- Lift the handset.
- Await the dial tone and press
button.
-The previously dialled number will be automaticaly redialled
(not in use for memory numbers).
4 – Recall ( ), * & # buttons
These are used with the new services provided on digital
exchanges. For details please contact your network operator.
5 – Mute button
If you wish to speak privately to someone else in the room
without your caller overhearing, press the
button. You
will still be able to hear the callers but they cannot hear you
during the mute operation. Press
button again to
resume normal conversation.
Using the phone Using the phone Using the phone Using the phone
Page 13
12
6 – Storing telephone numbers
Your telephone can store12 direct memories including 3
priority numbers (24 digits maximum for priority memory and
32 digits for M1, M2...M9). For example, the 3 priority P1, P2,
CS (
QuikDialCS™) memories allow you to store the 3
numbers below:
= Fire, = Police, = Customer Service
NOTE: QuikDialCS™ Green Customer Service key at top
has been preprogrammed with our USA customer ser vice
number 1-888-864-2446. Press the QuikDialCS™ key to
direct dial for Sonic Alert Customer Service or technical
related help or questions. Our customer service department is
available from 9Am-5Pm Monday through Friday Central time.
To store a number please follow instructions below:
- Lift the handset.
- Press and hold
button, until hear “Di~” sound.
- Dial the number.
- Press
button again.
- Press M1, M2, ..., or M9 or one of 3 priority memories to
store your number.
PLEASE NOTE:
If you hear a message advising “The number you are dialing
has not been recognized, please check and try again”. Please
ignore this and continue with the storing process and the
numbers will be stored.
Note:
Entering a new number in memory will automatically erase
the previous one.
Using the phone
Page 14
13
7 – Dialing stored numbers
- Lift the handset and await the dial tone.
- Press appropriate button M1, M2, ..., or M9 or one of 3
priority memories, the stored number will be dialled
automatically.
To register your stored phones numbers, use the index
located under the base.
Using the phone
Page 15

14
General
Only use the power supply included with the product.
Do not open the unit. Contact the helpline for all repairs.
The phone is capable of amplifying sounds to a loud volume.
It is important to instruct all potential users of its proper
operation. It is advised to adjust the volume control to its
minimum level (Low) when not in use and alert other users
that hearing damage can potentially result from misuse.
Cleaning
Clean the telephone with a soft cloth. Never use polishes or
cleaning agents - they could damage the finish or the
electrics inside.
Environmental
Do not expose to direct sunlight.
Always ensure there is a free flow of air over the surfaces of
the telephone.
Do not place any part of your product in water and do not use
it in damp or humid conditions e.g. bathrooms.
Do not expose your product to fire or other hazardous
conditions.
Unplug your phone from the telephone socket during
thunderstorms because it could damage your telephone. Your
guarantee does not cover thunderstorm damage.
The telephone is designed for working within a temperature
range of 5°C to 45°C.
Safety information
Page 16

15
- This equipment complies with Part 68 of the FCC rules and the
requirements adopted by the ACTA. On the bottom of this
equipment is a label that contains, among other information, a
product identifier in the format US:AAAEQ##TXXXX. If
requested, this number must be provided to the telephone
company.
- All applicable certification jacks Universal Service Order Codes
(USOC) for the equipment is provided (i.e. RJ11C) in the
package with each piece of approved terminal equipment.
- A plug and jack used to connect this equipment to the
premises wiring and telephone network must comply with the
applicable FCC Part 68 rules and requirement adopted by the
ACTA. A compliant telephone cord and modular plug is
provided with this product. It is designed to be connected to a
compatible modular jack that is also compliant. See installation
instructions for details.
- The REN is useful to determine the quantity of devices you
may connect to your telephone line and still have all of those
devices ring when your telephone number is called. In most,
but not all areas, the sum of the REN’s of all devices
connected to one line should not exceed five (5.0). To be
certain of the number of devices you may connect to your line,
as determined by the REN, you should contact your local
telephone company to determine the maximum REN for your
calling area.
- If this equipment causes harm to the telephone network, the
telephone company will notify you in advance that temporary
discontinuance of service may be required. But if advance
notice isn’t practical, the telephone company will notify the
customer as soon as possible. Also, you will be advised of
your rights to file a complaint with the FCC if you believe it is
necessary.
- The telephone company may make changes in its facilities,
equipment, operation or procedures that could affect the
operation of the equipment. If this happens the telephone
Regulatory compliance
Page 17

16
company will provide advance notice in order for you to make
necessary modifications to maintain uninterrupted service.
- This equipment may not be used on coin service provided by
the telephone company. Connection to party lines is subject to
state tariffs. This equipment is hearing aid compatible.
Warning: Changes or modifications to this unit not expressly
approved by the party responsible for compliance could void the
user’s authority to operate the equipment.
NOTE: This equipment has been tested and found to comply
with the limits for a Class B digital device, pursuant to Part 15 of
the FCC Rules. These limits are designed to provide reasonable
protection against harmful interference in a residential
installation. Some cordless telephones operate at frequencies
that may cause interference to nearby TV’s and VCR’s; to
minimize or prevent such interference, the base of the cordless
telephone should not be placed near or on top of a TV or VCR;
and, if interference is experienced, moving the cordless
telephone farther away from the TV or VCR will often reduce or
eliminate the interference. However, there is no guarantee that
interference will not occur in a particular installation. If this
equipment does cause harmful interference to radio or television
reception, which can be determined by turning the equipment off
and on, the user is encouraged to try to correct the interference
by one or more of the following measures:
• Re-orient or relocate the receiving antenna.
• Increase the separation between the equipment and receiver.
• Connect the equipment into an outlet on a circuit different
from that to which the receiver is connected.
• Consult the dealer or an experienced radio TV technician for
help.
Regulatory compliance
Page 18

17
- If trouble is experienced with this equipment, for repair or
warranty information, please contact our customer service staff
at: 1-888-864-2446
- If the equipment is causing harm to the telephone network, the
telephone company may request that you disconnect the
equipment until the problem is resolved.
- Please follow instructions for repairing if any; otherwise do not
alter or repair any part of device except as specified.
Opening the equipment or any attempt to perform repairs
will void the warranty. For service or repairs, call 1-888-8642446
- Connection to party line service is subject to state tariffs.
Contact the state public utility commission, public service
commission or corporation for information.
- If your home has specially wired alarm equipment connected
to the telephone line, ensure the installation of this telephone
equipment does not disable your alarm equipment. If you have
questions about what will disable alarm equipment, consult
your telephone company or a qualified installer.
- This equipment is hearing aid compatible.
Regulatory compliance
Page 19

18
Sonic Alert warrants the phone against any defect in materials
or workmanship for the period of one year from the date of
purchase.
Should you experience a problem, contact our customer service
department
Be sure to save your sales receipt as proof of purchase date
should you need warranty service.
Within a period of one year from purchase date, Sonic Alert will
repair or replace (our discretion) your phone at no cost, if a
defect in materials or workmanship is found. If we elect to
replace your phone, we may replace it with a new or
reconditioned product of the same or similar design.
Repair or replacement will be warranted for a period of 90 days
or the original time on the original warranty, whichever is longer.
The warranty does not cover accidents, negligence or breakage
to any parts. This includes shipping damage, failure to follow
instructions, misuse, fire, floods, use of incompatible
accessories, Acts of God or failure in your phone service
carrier’s line service. The product must not be tampered with or
taken apart by anyone who is not an authorized
Sonic Alert representative. Tampering with the phone will void
ant written or implied warranties
Sonic Alert shall not be responsible for loss of time,
inconvenience, property damage caused by your phone or any
other accidental or consequential damages
Warranty service is available only with proof of purchase.
Guarantee
Page 20

19
Simply send the AmpliCL100 (postpaid) and a copy of your
sales slip as proof of purchase to:
QuikDialCS™ Green Customer Service key at top has been
pre-programmed with our USA customer service number. Press
the
QuikDialCS™ key to direct dial for any Customer Service
or technical related help or questions. Our customer service
department is available from 9Am-5Pm Monday through Friday
Central time.
Sonic Alert Warranty Center 1081 West Innovation Dr.
Kearney, MO 64060 (RMA@sonicalert.info).
IMPORTANT : YOUR RECEIPT IS PART OF YOUR
WARRANTY AND MUST BE RETAINED AND PRODUCED IN
THE EVENT OF A WARRANTY CLAIM.
Sonic Alert Warranty Center
1081 West Innovation Dr.
Kearney, MO 64060
Customer Service & Warranty: 1-888-864-2446
RMA@sonicalert.info
www.sonicalert.com
Guarantee
Page 21

20
!!!Manuel d’utilisation à lire
impérativement avant la mise en
service!!!
ATTENTION: Ce téléphone peut être destiné aux personnes ayant
des problèmes auditifs. il possède un écouteur a volume variable.
A la première utilisation, assurez vous que le volume soit réglé au
minimum. Les personnes malentendantes pourront par la suite
augmenter le volume pour l’adapter à leur besoin.
Vous devez prendre quelques précautions élémentaires lorsque
vous utilisez le téléphone, cela pour réduire les risques d’incendie,
de secousse électrique, de blessure corporelle; voici quelquesunes de ces précautions.
AVERTISSEMENT : Pour éviter tout risque de secousse électrique,
n’utilisez pas cet appareil au voisinage d’un point d’eau (par
exemple, une baignoire, un lavabo, un évier ou un baquet).
AVERTISSEMENT : Évitez d’utiliser le téléphone pendant un
orage. Il existe un léger risque de secousse électrique consécutive
aux éclairs. Si l’orage est à proximité immédiate, le risque de
secousse électrique existe sans aucun doute.
AVERTISSEMENT : N’utilisez pas le téléphone si vous avez le
sentiment qu’il y a une fuite de gaz dans le voisinage. Les contacts
électriques de certains composants du téléphone peuvent produire
des étincelles susceptibles d’enflammer une poche de gaz due à
la fuite.
Français
Page 22

21
Description ................................................................. 22
Installation .................................................................. 24
1- Raccordements ........................................................ 24
2- Réglage de la sonnerie ............................................ 24
3- Numérotation multifréquences ou décimale ............. 25
4- Interrupteur 600/100ms ............................................ 25
5- Montage murale ....................................................... 25
Réglage du volume et de la tonalité ......................... 27
1- Réglage du volume et de la tonalité de réception .... 27
2- Réglage du volume d’émission ................................ 28
Utilisation .................................................................... 29
1- Recevoir un appel .................................................... 29
2- Appeler .................................................................... 29
3- Rappel du dernier numéro ....................................... 29
4- Touches (FLASH), * & # .......................................... 29
5- Fonction secret ........................................................ 29
6- Mémoriser un numéro de téléphone ........................ 30
7- Appel d’un numéro en mémoire ............................... 31
Securite ....................................................................... 32
Declaration de conformite ......................................... 33
Garantie ....................................................................... 36
Index
Page 23

22
1. Prise cordon de ligne.
2. Activation automatique de la correction d’écoute au
décroché.
3. 3 mémoires d’urgence. (P1, P2, QuikDialCS™)
4. Réglage de la tonalité de réception.
5. Ergot de position murale.
6. Réglage du volume de réception.
7. Prise de cordon combiné.
8. Rappel du dernier numéro composé.
Description
Page 24

23
9. Touche R.
10. Mise en mémoire.
11. Flash lumineux de sonnerie.
12. Secret.
13. Mémoires directes.
14. Réglage du volume de sonnerie.
15. Réglage du volume d’émission.
16. Activation de la correction de tonalité et volume de
réception.
17. Voyant du correcteur de tonalité et volume.
18. Prise de cordon combiné.
19. Compartiment à piles.
20. Réglage du temps de coupure de la fonction R
(600/100ms).
21. Numérotation Décimale (P) ou Multifréquences (T).
22. Index mémoires.
23. Orifices de fixation murale.
Description
Page 25

24
1 – Raccordements
- Branchez le cordon du combiné (1).
- Ouvrez le compartiment à piles (2).
- Insérez 4 piles (type AAA 1.5V alkalines), non fournies dans
le compartiment (*). Les piles sont necessaires si vous
désirez augmenter le niveau de sonnerie de 10 dB (2).
- Refermez le compartiment à piles.
- Branchez le cordon de ligne à l’arrière de la base (*) (3).
- Branchez le conjoncteur téléphonique PTT dans votre prise
téléphonique murale (*) (3).
(*)Classée TNT-3 selon la norme EN60950.
2 – Réglage de la sonnerie
Un commutateur situé sur le côté de l’appareil permet de
régler la sonnerie :
: désactivée,
: faible,
: forte.
Note: Si vous insérez des piles, le niveau de sonnerie sera
augmenté de 10 dB.
Installation
Page 26

25
3 – Numérotation multifréquences (T) ou décimale (P)
Au moment de sa livraison, votre téléphone est en mode
multifréquences (T). Si le central téléphonique dont vous
dépendez fonctionne en mode décimale (P), vos appels
n’aboutiront pas.
Il vous suffira alors de commuter l’interrupteur T/P situé en
dessous du téléphone sur la position P pour remédier à ce
problème.
4 – Interrupteur 300/100ms
Votre téléphone fonctionne avec une pause rappel de temps.
Il peut être commuté à 600ms et 100ms.
5 – Montage murale
Pour maintenir votre combiné en position verticale, tournez
l’ergot situé sur la base de 180°.
Installation
Page 27

26
- Percez 2 trous verticaux distant de 80 mm dans votre mur.
- Insérez 2 chevilles avec leurs vis.
- Laissez dépasser les vis de 6mm.
- Faites glisser votre téléphone dans les têtes de vis.
Installation
GABARIT DE MONTAGE MURAL
La vis
Page 28

27
1 – Réglage du volume et de la tonalité de réception
Vous pouvez amplifier le volume et régler la tonalité de
réception de votre combiné.
La touche
permet d’activer ou de désactiver le
correcteur de réception durant la conversation.
Lorsque la fonction est activée, le voyant rouge du correcteur
de réception situé à côté de la touche est allumé.
Les touches, TONE et VOLUME, vous permettent de corriger
la tonalité et le volume de réception.
Réglage du volume et de la tonalité
VOLUME
TONE
Normal
Page 29

28
Note: Des sifflements dans l’écouteur peuvent apparaître
dans certaines configurations de réglage (tonalité des aigus,
volume de réception et volume d’émission au max), dans ce
cas diminuez le niveau d’émission à l’aide de l’interrupteur
.
L’interrupteur sur ON situé à l’arrière de l’appareil active
automatiquement la correction à chaque décroché du
combiné.
Sur OFF, il faudra activer la fonction en appuyant sur la
touche
.
Le réglage de la tonalité et du volume (de 15dB à 30 dB)
n’est activé que lorsque la touche
est sur ON. Lorsque
cette touche est sur OFF seul le volume peut être réglé de
0dB à 15dB.
2 – Réglage du volume d’émission
Si votre correspondant vous entend faiblement, vous pouvez
augmenter le volume d’émission à l’aide du commutateur
situé sur le coté de l’appareil.
Vous pouvez aussi choisir de diminuer le volume d’émission.
Réglage du volume et de la tonalité
Mini Normal Maxi
Page 30

29
Si vous êtes porteur d’une aide
auditive, commutez cette dernière
en position «T».
1 – Recevoir un appel
- Lorsque le téléphone sonne (flash lumineux de sonnerie de
votre téléphone activé), décrochez le combiné pour parler à
votre correspondant.
- La conversation terminée, raccrochez le combiné pour
libérer la ligne.
2 – Appeler
- Décrochez le combiné.
- Composez le numéro de votre correspondant.
- La conversation terminée, raccrochez le combiné pour
libérer la ligne.
3 – Rappel du dernier numéro
- Décrochez le combiné.
- Appuyez sur la touche
le numéro de votre
correspondant se recompose automatiquement (ne
fonctionne pas pour les numéros en mémoire).
4 – Flash ( ),* & #
Touches d’accès aux services spécifiques de votre opérateur
(Signal d’Appel, Conversation à Trois...).
5 – Fonction secret
I Cette touche permet de couper ponctuellement le
microphone en cours de communication.
- Appuyez sur la touche
. Votre correspondant ne vous
entend plus.
- Appuyez sur la touche
pour rétablir la conversation.
Using the phone Using the phone Using the phone Utilisation
Page 31

30
6 – Mémoriser un numéro de téléphone
Votre téléphone possède 12 mémoires directes dont 3
d’urgences, (24 chiffres maximum par mémoire prioritaires et
32 pour les mémoires M1, M2...M9).
Les mémoires d’urgence permettent de mémoriser par
exemple les 3 numéros suivants: P1, P2, CS(QuikDialCS™)
= Pompier, = Police, = service clientèle
Remarque: La touche QuikDialCS™ (service clientèle) a été
préprogrammée avec notre numéro de service après vente
Américain(1-888-864-2446). Appuyez sur la touche
QuikDialCS™ pour composer directement le numéro du
service clientèle ou technique Sonic Alert ou toutes autres
questions. Notre service clientèle est disponible de 9H à 17H
du Lundi au Vendredi.
Suivez la procédure décrite ci-dessous pour mémoriser vos
numéros:
- Décrochez le combiné.
- Appuyez et maintenez la touche
jusqu'à l'obtention
du Bip sonore dans l'écouteur".
- Composez le numéro à mémoriser.
- Appuyez sur la touche
.
- Appuyez sur une des touches M1, M2, ..., ou M9 ou sur une
des trois touches d’urgence pour enregistrer votre numéro.
ATTENTION: Si vous entendez un message venant du
réseau « Le numéro que vous avez numéroté n’est pas
attribué, Veuillez consulter votre documentation……. », il faut
l’ignorer et continuer la procédure d’enregistrement de la
mémoire.
Note:
Un nouvel enregistrement dans une mémoire efface la
précédente.
Utilisation
Page 32

31
7 – Appel d’un numéro en mémoire
- Décrochez le combiné.
- Appuyez sur une des touches M1, M2, ..., ou M9 ou sur une
des trois touches d’urgence, le numéro en mémoire se
recompose automatiquement.
Pour repérer vos numéros enregistrés, utilisez le répertoire
situé en dessous de la base.
Utilisation
Page 33

32
Généralités
Utilisez exclusivement l'adaptateur secteur fourni avec l'appareil.
N'ouvrez pas l'appareil. Contactez le service d'assistance pour
toute réparation.
Le téléphone permet d’amplifier les sons jusqu’à un volume
élevé. Il est important de bien indiquer son fonctionnement à
toutes les personnes amenées à l’utiliser. Il est conseillé de
régler le volume au niveau minimum (Faible) lorsque l’appareil
n’est pas utilisé, et d’informer tous les utilisateurs des risques
potentiels pour l’ouïe en cas d’erreur d’utilisation.
Nettoyage
Utilisez un chiffon doux pour nettoyer l'appareil. N'utilisez pas
de lustrant ou de produits nettoyants: vous pourriez
endommager le revêtement extérieur ou les composants
électriques internes.
Environnement
Evitez d'exposer directement l'appareil aux rayons du soleil.
Veillez à ce que l'air puisse circuler librement tout autour de
l'appareil.
Ne plongez jamais l'appareil ou une partie de l'appareil dans
l'eau et ne l'utilisez pas dans un environnement humide, par
exemple dans une salle de bains.
N'exposez pas votre appareil au feu ou à tout autre
environnement dangereux.
Votre téléphone pourrait être endommagé en cas d'orage:
débranchez votre appareil de la prise téléphonique murale. La
garantie ne couvre pas les dommages provoqués par l'orage.
L'appareil a été conçu pour fonctionner à une température de
5°C à 45°C.
Securite
Page 34

33
LES RENSEIGNEMENTS FOURNIS À L’UTILISATEUR
CONCERNANT SES DROITS ET OBLIGATIONS ET CEUX DE
LA COMPAGNIE DE TELEPHONE SONT ENONCES CIDESSOUS.
Cet appareil est conforme à la section 68 de la réglementation
FCC ainsi qu’aux normes adoptées par l’ACTA. En dessous de
l’appareil se trouve une étiquette qui présente, entre autres
renseignements, l’identificateur du produit sous la forme US:
AAAEQ##TXXXX. Ce numéro doit être fourni sur demande à la
compagnie de téléphone.
Tous les codes USOC de certification applicables aux
connecteurs de ce matériel sont fournis (c.-àd. RJ11C) dans
l’emballage avec chacune des pièces d’équipement terminal
approuvé.
La fiche et le jack servant à connecter cet appareil au câblage
résidant et au réseau téléphonique doivent être conformes aux
dispositions de la section 68 de la réglementation FCC
applicable et aux normes adoptées par l’ACTA. Ce produit
comporte un cordon téléphonique et une prise modulaire
conformes. Il est conçu pour être connecté à un jack modulaire
compatible qui soit également conforme. Pour en savoir plus,
reportez-vous aux directives d’installation.
On utilise l’indice d’équivalence de sonnerie (REN) pour
déterminer le nombre d’appareils qui peuvent être connectés à
la ligne téléphonique. Si la somme des indices REN dépasse la
limite prévue sur la ligne téléphonique, les appareils risquent de
ne pas sonner en réponse à un appel entrant.
Dans la plupart des régions, la somme des indices REN ne doit
pas être supérieure à cinq (5). Pour connaître précisément le
nombre d’appareils qui peuvent être connectés à une ligne,
conformément à la somme des indices REN, communiquez
avec votre compagnie de téléphone locale. [Dans le cas des
produits approuvés après le 23 juillet 2001, l’indice REN fait
partie de l’identificateur du produit sous la forme US:
AAAEQ##TXXXX. Les chiffres représentés par 1,0B pour les
É.- U. sont l’indice REN sans le point décimal (par ex.., 03 est
un indice REN de 0.3).
Declaration de conformite
Page 35

34
Dans le cas des produits antérieurs, l’indice REN est indiqué
séparément sur l’étiquette.
Si ce produit cause des dommages au réseau téléphonique, la
compagnie de téléphone vous avisera d’avance qu’elle peut
exiger l’interruption temporaire du service. Cependant, si cet
avis préalable s’avère impossible, la compagnie de téléphone
avisera l’abonné le plus tôt possible. Par ailleurs, vous serez
avisé de vos droits de porter plainte auprès de la FCC si vous le
jugez nécessaire.
La compagnie de téléphone peut modifier ses installations, son
matériel, son fonctionnement ou ses procédés, ce qui peut avoir
une incidence sur le fonctionnement de votre équipement.
Le cas échéant, la compagnie de téléphone vous transmettra un
avis préalable afin que vous puissiez apporter les modifications
nécessaires au maintien du service sans interruption.
Si vous éprouvez des problèmes avec votre appareil, veuillez
communiquer avec :
Sonic Alert Warranty Center 1081 West Innovation Dr.
Kearney, MO 64060 T: 1-888-864-2446
Pour renseignements sur la réparation ou la garantie. Si
l’équipement cause des dommages au réseau téléphonique, la
compagnie de téléphone est en droit de vous demander de le
débrancher jusqu’à ce que le problème soit résolu.
Veuillez suivre les directives si vous devez réparer l’appareil
(par ex. la section sur le remplacement des piles); sinon, évitez
de modifier ou de réparer quelque pièce que ce soit de
l’appareil sauf suivant la procédure spécifiée.
La connexion à un service de ligne partagée est assujettie aux
tarifs établis dans chaque région.
Pour en savoir , voir avec les autorités responsables des
services d’utilité publique dans votre région.
NOTE : Si votre résidence est dotée d’un système d’alarme à
câblage spécial relié à la ligne téléphonique, assurez-vous que
Declaration de conformite
Page 36

35
l’installation du téléphone ne neutralise pas votre dispositif
d’alarme. Si vous avez des questions à ce sujet, consultez votre
compagnie de téléphone ou un installateur qualifié.
Cet équipement est compatible avec les prothèses auditives.
MISE EN GARDE : Toute modification apportée à l’appareil et
non explicitement approuvée par la partie responsable de la
conformité peut compromettre le droit de l’utilisateur d’exploiter
l’appareil.
REMARQUE : Cet appareil a été testé et jugé conforme aux
restrictions imposées aux périphéri¬ques numériques de classe
B, en vertu de la section 15 de la réglementation FCC. Ces
restrictions sont conçues pour assurer une protection
raisonnable contre les interférences nuisibles dans une
installation résidentielle. Cet équipement génère, utilise et peut
émettre des radiofréquences et, s’il n’est pas installé et utilisé
conformément au manuel d’instructions, il risque de causer des
interférences nuisibles aux communications radio. Toutefois,
rien ne garantit que le brouillage ne se produira pas dans une
installation donnée. Si l’équipement cause effectivement une
interférence nuisible à la réception radio ou télévisuelle, ce qui
peut être déterminé en allumant et en éteignant successivement
ledit équipement, il est recommandé à l’utilisateur de tenter de
corriger la situation d’interférence en prenant une ou plusieurs
des mesures suivantes :
• Réorientez ou déplacez l’antenne réceptrice.
• Augmentez la distance entre l’équipement et le récepteur.
• Connectez l’équipement dans une prise qui se trouve sur
un circuit différent de celui auquel le récepteur est
connecté.
• Pour obtenir de l’assistance, adressez-vous au
concessionnaire ou à un technicien spécialisé dans les
téléviseurs.
Declaration de conformite
Page 37

36
Sonic Alert garantit le téléphone contre tout défaut matériel ou
vice de fabrication pour une période d'un an à compter de la date
d'achat.
Contactez le service clientèle si vous rencontrez un problème
dans l'utilisation de votre appareil.
Conservez votre ticket de caisse ou votre facture. Vous aurez
besoin de cette preuve d'achat pour toute intervention sous
garantie.
Dans un délai d'un an à compter de la date d'achat, Sonic Alert
s'engage à réparer ou à remplacer (à sa discrétion) votre
téléphone gratuitement, si un défaut matériel ou un vice de
fabrication était identifié.
Si nous choisissons de remplacer votre téléphone, nous pourrons
vous fournir un téléphone neuf ou reconditionné d'un modèle
identique ou comparable.
Les réparations ou remplacements sont garantis 90 jours ou pour
la durée résiduelle de la garantie d'origine, selon la période la
plus favorable au client.
La garantie ne couvre pas les accidents, les pièces cassées ou
les problèmes causés par la négligence de l'utilisateur. Sont
notamment exclus les dommages liés au transport, le non-respect
des instructions fournies, les cas d'incendie, d'inondation,
l'utilisation d'accessoires incompatibles, les catastrophes
naturelles ou les pannes sur les lignes de votre opérateur
téléphonique. Seuls les techniciens agréés
Sonic Alert sont autorisés à intervenir sur votre appareil. Toute
modification apportée au téléphone annule les garanties écrites
ou implicites.
Garantie
Page 38

37
Sonic Alert ne pourra être tenue responsable des pertes de temps,
désagréments et dommages matériels provoqués par votre
téléphone, ni d'aucun autre dommage accidentel ou indirect.
L'accès à la garantie est subordonné à la présentation d'une
preuve d'achat.
Envoyez simplement votre AmpliCL100 (port payé)
accompagné d'une photocopie de votre preuve d'achat, à
l'adresse suivante :
La touche
QuikDialCS™ (service clientèle) a été
préprogrammée avec notre numéro de service après vente
Américain. Appuyez sur la touche
QuikDialCS™ pour
composer directement le numéro du service clientèle ou
technique ou toutes autres questions. Notre service clientèle est
disponible de 9H à 17H du Lundi au Vendredi.
Sonic Alert Warranty Center 1081 West Innovation Dr.
earney, MO 64060 (RMA@sonicalert.info)
IMPORTANT : VOTRE FACTURE D'ACHAT EST UN
ÉLÉMENT ESSENTIEL DE VOTRE GARANTIE. ELLE VOUS
SERA DEMANDÉE EN CAS D'INTERVENTION SOUS
GARANTIE.
Sonic Alert Warranty Center
1081 West Innovation Dr.
Kearney, MO 64060
Service client et garantie : 1-888-864-2446
RMA@sonicalert.info
www.sonicalert.com
Garantie
Page 39

38
!!!Manual de usuario lea
cuidadosamente antes de comenzar a
utilizar!!!
Precaución: Este producto telefónico ha sido específicamente
diseñado para personas con dificultades de audición, y lleva un
control de volumen a la altura del auricular para adaptarlo a las
necesidades individuales. Habrá que tener un cuidado especial de
ajustar el control de volumen al nivel mínimo aceptable por cada
usuario respectivo. Deberá asegurarse de que todos los nuevos
usuarios se familiarizan con este requisito.
Cuando use su equipo telefónico, siempre deberá seguir las
precauciones básicas de seguridad para reducir el riesgo de
incendio, choque eléctrico y lesiones a personas, incluido lo
siguiente:
ADVERTENCIA: No use este producto cerca del agua, por
ejemplo, cerca de una tina de baño, fregadero, lavabo o lavadero,
en un sótano mojado o cerca de una piscina para evitar la
posibilidad de choque eléctrico.
ADVERTENCIA: Evite el uso del teléfono durante las tormentas
eléctricas. Existe el riesgo remoto de choque eléctrico por un rayo.
Si hay tormenta eléctrica en su área existe la posibildad de
choque eléctrico.
ADVERTENCIA: No use el teléfono si sospecha una filtración de
gas en el área. Los contactos eléctricos del teléfono podrían crear
chispas que enciendan cualquier acumulación importante de gas
filtrado.
Español
Page 40

39
DESCRIPCION ............................................................ 40
PUESTA EN MARCHA ................................................ 42
1- Instalación ................................................................ 42
2- Seleccionar el volumen de timbre ............................ 42
3- Tonos / Pulsos (T/P) ................................................ 43
4- Conmutador “(600/100)” ............................................ 43
5- Mural ........................................................................ 43
Ajuste de Volumen y Tono ........................................ 45
1- Recepción de volumen y el ajuste de tono .............. 45
2- Ajuste del nivel de emisión ...................................... 46
PUESTA EN MARCHA ................................................ 47
1- RESPONDER UNA LLAMADA ................................ 47
2- MARCACION ........................................................... 47
3- Marcación automática desde la Rellamada ............. 47
4- Tecla FLASH ............................................................ 47
5- FUNCIÓN "MUTE" ................................................... 47
6- Grabación de las Memorias ..................................... 48
7- Marcación automática desde las Memorias ............. 49
INFORMACIÓN DE SEGURIDAD ............................... 50
CUMPLIMIENTO NORMATIVO .................................. 51
GARANTÍA .................................................................. 54
INDICE
Page 41

40
1. Conector para el cable liso de línea
2. Ajuste automático del volumen y tono del auricular
3. Memorias de emergencia (P1, P2, QuikDialCS™)
4. Ajuste del Tono (graves/agudos) del auricular
5. Pieza para montaje mural
6. Ajuste del volumen de recepción
7. Conector para el cable rizado de la manija
DESCRIPCION
Page 42

41
8. Repetición del último número marcado
9. Tecla FLASH
10. Tecla para guardar las memorias
11. Luz de timbre
12. Tecla MUTE
13. Memorias directas
14. Ajuste del nivel de timbre
15. Ajuste del nivel de emisión
16. Tecla de activación del volumen y tono del auricular
17. Luz roja de activación del volumen y tono
18. Conector para el cable rizado de la manija
19. Compartimiento de pilas
20. Tiempo de llamada por interrupción
21. Conmutador Pulsos/Tonos
22. Directorio telefónico
23. Agujeros para montaje mural
DESCRIPCION
Page 43

42
1 – Instalación
- Conecte un extremo del cable rizado del microteléfono en
el conector que se encuentra en la parte inferior de la
misma, y el otro extremo del cable en el conector que se
encuentra en la parte izquierda de la base (1).
- Inserte 4 pilas alcalinas tipo AAA 1.5V (no suministradas) si
quiere que el volumen de timbre sea muy alto o para
conservar las memorias en caso de que desconecte el
teléfono de la línea telefónica (2).
- Conecte el cable plano de línea al conector de la base, y la
otra parte en la toma telefónica de su hogar (*) (3).
(*)Clasificada TNV-3 según EN 60950 estándar.
2 – Seleccionar el volumen de timbre
Para seleccionar el volumen de timbre utilice el conmutador:
:
anulado
,
:
medio
,
: alto.
Nota : Puede incrementar el nivel de timbre en 10dB si
instala las pilas en su alojamiento.
PUESTA EN MARCHA
Page 44

43
3 – Tonos / Pulsos (T/P)
El teléfono viene ajustado de fábrica para que marque en
modo Tonos (T). En España la mayoría de las centrales
telefónicas utiliza este tipo de marcación. Si su teléfono no
marca posiblemente su línea está conectada a una central
muy antigua. En este caso, mueva el interruptor
Tonos/Pulsos a la opción (P).
4 – Conmutador “(600/100)”
La opción de 600ms, ajustable desde el conmutador,
100ms se utiliza en otros países.
5 – Mural
Este teléfono puede colocarse en la pared. Para evitar que el
microteléfono se caiga, saque la pieza, gírela 180º, y
vuélvala a meter.
PUESTA EN MARCHA
Page 45

44
- Haga dos agujeros en la pared alejados 80 mm.
- Colocar los tacos y los tornillos que salen de
aproximadamente 6 mm de los tornillos que sobresalen de
la pared.
- Coloque el teléfono en las cabezas de los tornillos y deslice
hacia abajo para asegurarlo.
PUESTA EN MARCHA
Tornillo
Plantilla de montaje en pared
Page 46

45
1 – Recepción de volumen y el ajuste de tono
Puede aumentar el volumen y ajustar los tonos graves /
agudos de su auricular según sus necesidades.
La tecla
activa o desactiva la recepción extra y ajuste
de tonos durante la conversación. Cuando la función está
activada la luz roja está encendida.
Ajuste de Volumen y Tono
VOLUMEN
VOLUME
TONO
TONE
Normal
Page 47

46
Nota : Cuando los tonos (agudos), volumen de auricular y
nivel de micrófono están ajustados al máximo se pueden
producir silbidos debido a acoples. Si esto ocurre. A
continuación, la configuración del nivel de origen deberían
ser disminuidos con el interruptor
.
When the switch is ON (on), extra receiving and tone
adjustment is automatically activated every time you lift the
handle. When this switch is OFF (off) setting tones is off. If
you want to activate press
.
2 – Ajuste del nivel de emisión
Si su voz es débil o la otra parte tiene dificultades para oírle,
puede aumentar o disminuir la ganancia de su micrófono con
el conmutador
(mínimo, normal, máximo).
Ajuste de Volumen y Tono
mínimo normal máximo
Page 48

47
Este teléfono dispone de amplificación
adicional con bobina inductiva. Si va a usar
este teléfono con un audífono, coloque su
audífono en la posición T.
1 – RESPONDER UNA LLAMADA
- El timbre suena cuando se recibe una llamada y la luz de
timbre se enciende.
- Levante el auricular e inicie la conversación.
- Al terminar, coloque el auricular en su alojamiento.
2 – MARCACION
Como realizar una llamada manualmente.
- Descuelgue el teléfono y espere a oír el tono de línea.
- Marque el número deseado y establezca la comunicación.
- Al terminar, coloque el auricular en su alojamiento.
3 – Marcación automática desde la Rellamada
Si quiere volver a llamar al último número marcado, o ha
llamado y está ocupado, vuelva a descolgar la manija y pulse la
tecla
. Puede hacer tantos intentos como usted quiera.
4 – Tecla FLASH
Esta tecla le permite tener acceso a los servicios que ofrece su
compañía telefónica o centralita, como: “desvío de llamadas “,
“llamada en espera “, “servicio contestador “, etc.
5 – FUNCIÓN "MUTE"
Pulse y mantenga pulsada esta tecla si desea no ser
escuchado por la persona con la que mantiene la conversación.
Deje de pulsarla para que le escuchen.
Using the phone Using the phone Using the phone PUESTA EN MARCHA
Page 49

48
6 – Grabación de las Memorias
E
l terminal dispone de una capacidad máxima de 12
memorias, dispuestas en las tres de color (emergencia: P1,
P2,
QuikDialCS™
) más las teclas M1 hasta M9. Una vez
programado un número, este quedará almacenado en la
memoria que desee
:
= Fuego
= Policía
= Servicio al cliente al tacto QuikDialCS™
Nota : La tecla de Servicio al Cliente Verde QuikDialCS™ en
la parte superior ha sido preprogramada con nuestro número
(1-888-864-2446) de Sonic Alert servicio al cliente de los EE.
UU. Oprima la tecla QuikDialCS™ para marcar directamente
al Servicio al Cliente o ayuda o preguntas técnicas. Nuestro
departamento de servicio al cliente funciona de 9 a 17, de
lunes a viernes, hora central.
Grabación de las Memorias :
- Descuelgue la manija y pulse la tecla
.
- Pulse M1, M2,….M9 o una de las tres teclas de emergencia
donde quiera almacenar su número.
- Marque el número.
- Pulse otra vez la tecla
.
Nota:
Si desconecta el teléfono de la línea telefónica, los números
se perderán después de pasadas unas horas. Esto no
sucederá si previamente instaló las pilas.
PUESTA EN MARCHA
Page 50

49
7 – Marcación automática desde las Memoriasn
- Descuelgue el teléfono y espere a oír el tono de línea.
- Pulse M1, M2,….M9 o una de las tres teclas de emergencia.
- El número grabado se marcará automáticamente.
Nota: En la parte inferior, el teléfono dispone de un directorio
para apuntar los números que desee.
PUESTA EN MARCHA
Page 51

50
Generalidades
Use solo la fuente de poder incluida con el producto.
No abra la unidad. Para cualquier reparación contacte la
línea de ayuda.
El teléfono es capaz de amplificar sonidos a un volumen muy
alto. Es importante que instruya a todos los usuarios
potenciales sobre la operación correcta. Se recomienda
ajustar el control de volumen a su nivel mínimo (Low – Bajo)
cuando no esté en uso y que se alerte a los otros usuarios
que el uso inadecuado puede causar daño auditivo.
Limpieza
Limpie el teléfono con un paño suave. Nunca use agentes de
limpieza ni limpia-muebles porque podrían dañar el acabado
o los componentes eléctricos en su interior.
Medioambientales
No exponga la unidad a luz solar directa.
Garantice siempre que el aire fluya libremente sobre las
superficies del teléfono.
No coloque ninguna parte del producto en agua ni lo utilice
en condiciones húmedas como por ejemplo baños.
No exponga su producto al fuego ni otras condiciones
peligrosas.
Desenchufe su teléfono del toma durante tormentas
eléctricas porque se podría dañar. Su garantía no cubre daño
por tormentas eléctricas.
El teléfono está diseñado para trabajar dentro de un rango de
temperatura entre 5°C a 45°C.
INFORMACIÓN DE SEGURIDAD
Page 52

51
- Éste equipo cumple la Parte 68 de las reglas FCC y los
requerimientos adoptados por ACTA. En la base de este
equipo hay una etiqueta que contiene, entre otros datos, un
identificador del producto en el formato US: AAAEQ##TXXXX.
Si se lo requiere, se puede proporcionar éste número a la
compañía de teléfonos.
- Todos los códigos de orden de pedido de servicio universal de
los conectores de certificación (USOC) para el equipo se
suministran en el envase (por ejemplo, RJ11C) con cada
pieza de equipo terminal aprobado.
- Un enchufe y un conector usado para conectar éste equipo al
cableado y red telefónica de las instalaciones debe cumplir
con las reglas de la Parte 68 de FCC y los requerimientos
adoptados por ACTA. Se proporcionan un cable de teléfono y
un enchufe modular que cumplen los requisitos con este
producto. Está diseñado para conectarse a un enchufe
modular compatible que también cumple esos requisitos.
Consulte las instrucciones de instalación para los detalles.
- El REN (Número de equivalencia de timbrado) es útil para
determinar la cantidad de dispositivos que usted puede
conectar a su línea telefónica y aún lograr que todos los
dispositivos suenen cuando se llama a su número de teléfono.
En la mayoría, pero no en todas las áreas, la suma de REN
de todos los dispositivos conectados a una línea no debe
exceder de cinco (5). Para estar seguro del número de
dispositivos que se puede conectar a su línea, según lo
determinado por el REN, deberá ponerse en contacto con su
compañía de teléfonos local para saber cuál es el REN
máximo para su área de llamada.
- Si éste equipo causa daño a la red telefónica, la compañía
telefónica le notificará por adelantado si se requiere la
suspensión temporal del servicio. Pero si un aviso por
adelantado no es práctico, la compañía telefónica notificará al
cliente lo antes posible. Además, se le informará de sus
derechos para que presente un reclamo a la FCC si cree que
CUMPLIMIENTO NORMATIVO
Page 53

52
es necesario
- La compañía de teléfonos hará los cambios en sus
instalaciones, equipos, operación o procedimientos que
podrían afectar la operación del equipo. Si esto ocurre, la
compañía de teléfonos le proporcionará un aviso por
adelantado para que realice las modificaciones necesarias
para mantener un servicio sin interrupciones.
- Éste equipo no puede ser usado con el servicio por monedas
que proporciona la compañía de teléfonos. La conexión a las
líneas colectivas está sujeto a tarifas estatales. Éste equipo
es compatible con el uso de audífonos.
Advertencia: Los cambios o modificaciones a esta unidad que
no estén expresamente aprobados por la parte a cargo del
cumplimiento podrían anular la autoridad del usuario para
operar el equipo.
NOTA: Este equipo ha sido probado y demostró cumplir con los
límites para un dispositivo digital Clase B, de acuerdo con la
Parte 15 de la reglamentación del FCC. Estos límites están
diseñados para proporcionar una protección razonable contra la
interferencia dañina en una instalación residencial. Algunos
teléfonos inalámbricos operan a frecuencias que pueden causar
interferencia a los aparatos de TV y VCR cercanos; para
minimizar o prevenir dicha interferencia, la base del teléfono
inalámbrico no debe ser ubicada cerca o encima de un aparato
de TV o VCR; y, en caso de haber interferencia, al alejar el
teléfono inalámbrico del aparato se reducirá o eliminará la
interferencia. Sin embargo, no hay garantía de que no habrá
interferencia en una instalación específica. Si éste equipo no
causa interferencia dañina a la recepción de la radio o la
televisión, lo que se puede determinar encendiendo y apagando
el equipo, se le recomienda al usuario tratar de corregir la
interferencia realizando una o más de las siguientes medidas:
• Reoriente o reubique la antena receptora.
• Aumente la separación entre el equipo y el receptor.
CUMPLIMIENTO NORMATIVO
Page 54

53
• Conecte el equipo a una toma en un circuito distinto de aquel
donde se conecte el receptor.
• Solicite ayuda del distribuidor o a un técnico de radio y TV
con experiencia.
- Si tiene problemas con éste equipo, para recibir información
sobre la reparación o la garantía, favor comunicarse con
nuestro personal de servicio al cliente: al teléfono 1-888-864-
2446.
Si el causa daño a la red telefónica, la compañía le podrá
pedir que desconecte el equipo hasta que se resuelva el
problema.
- Siga las instrucciones para reparación, si corresponde; de lo
contrario no cambie ni repare ninguna parte del dispositivo, a
excepción de las especificadas.
La apertura del equipo o un intento de realizar reparaciones
anulará la garantía. Para servicio o reparaciones, llame al 1888-864-2446.
- La conexión a las líneas colectivas está sujeto a tarifas
estatales. Contacte la comisión de servicios públicos del
estado o la corporación para mayor información.
- Si su hogar tiene equipo de alarma especialmente cableado
conectado a la línea telefónica, asegúrese de que la
instalación de éste equipo telefónico no desactiva su equipo
de alarma. Si tiene preguntas sobre qué desactivará el equipo
de alarma, consulte a su compañía de teléfonos o a un
instalador calificado.
Este teléfono es compatible con el uso de audífonos.
CUMPLIMIENTO NORMATIVO
Page 55

54
Sonic Alert garantiza el teléfono contra cualquier defecto en los
materiales o la mano de obra por el período de un año a partir
de la fecha de compra.
Si tiene un problema, comuníquese con nuestro departamento
de servicio al cliente.
Asegúrese de guardar su recibo de ventas como prueba de la
fecha de compra en caso de necesitar servicio cubierto por la
garantía.
Dentro del período de un año a partir de la fecha de compra,
Sonic Alert reparará o remplazará (a nuestro criterio) su
teléfono sin costo, en caso de descubrir algún defecto en los
materiales o en la mano de obra. Si decidimos reemplazar su
teléfono, podremos hacerlo con un producto nuevo o reacondicionado del mismo diseño o similar.
La reparación o el reemplazo quedarán bajo garantía por un
período de 90 días o por el tiempo original de la garantía
original, la que dure más.
La garantía no cubre accidentes, negligencia ni roturas de las
partes. Esto incluye daño durante el transporte, la imposibilidad
de seguir las instrucciones, uso indebido, incendio,
inundaciones, uso de accesorios incompatibles, acciones
imprevistas o la falla en el servicio de la línea de su proveedor
de servicio telefónico. El producto no debe ser forzado ni
desarmado por alguien que no sea un representante autorizado
de Sonic Alert. El forzar al teléfono anulará cualquier garantía
escrita o implícita.
Sonic Alert no aceptará responsabilidad por la pérdida de
tiempo, inconvenientes, daños a la propiedad causados por su
teléfono u otros daños accidentales o consecuenciales.
GARANTÍA
Page 56

55
El servicio de la garantía sólo esta disponible contra
presentación de la prueba de compra.
Simplemente debe enviar el AmpliCL100 (con correo pagado) y
una copia de la factura de compra como evidencia a:
La tecla
QuikDialCS™ de servicio verde al cliente en la parte
superior ha sido pre-programada con nuestro número de
atención al cliente en los EE.UU.. Pulse la tecla de línea directa
QuikDialCS™ para marcar el Servicio de atención al cliente o
relacionado con asistencia técnica o bien preguntas. Nuestro
departamento de servicio al cliente está disponible de 9Ama
5Pmde Lunes a Viernes, hora del centro.
Sonic Alert Warranty Center 1081 West Innovation Dr.
Kearney, MO 64060 (RMA@sonicalert.info)
IMPORTANTE: SU RECIBO ES PARTE DE SU GARANTÍA Y
DEBE SER RETENIDO Y MOSTRADO EN EL CASO DE UN
RECLAMO RELACIONADO CON LA GARANTÍA.
Centro de Garantía Sonic Alert.
1081 West Innovation Dr.
Kearney, MO 64060
Servicio al cliente y Garantía: 1-888-864-2446
RMA@sonicalert.info
www.sonicalert.com
UGAmpliCL100_EnFrSp_v0.2
GARANTÍA
 Loading...