

Page 1
GE
g
READ THOROUGHLY BEFORE INSTALLING
Lighting Solutions
WARNING
Risk of electric shock
• Turn power off before servicing
– see instructions
GENERAL
This luminaire is designed for use in outdoor applications and must adhere to 25°C Max ambient temperature
limitation. Install and maintain it according to the
following recommendations.
A. MOUNTING
GEH-5915
INSTRUCTIONS
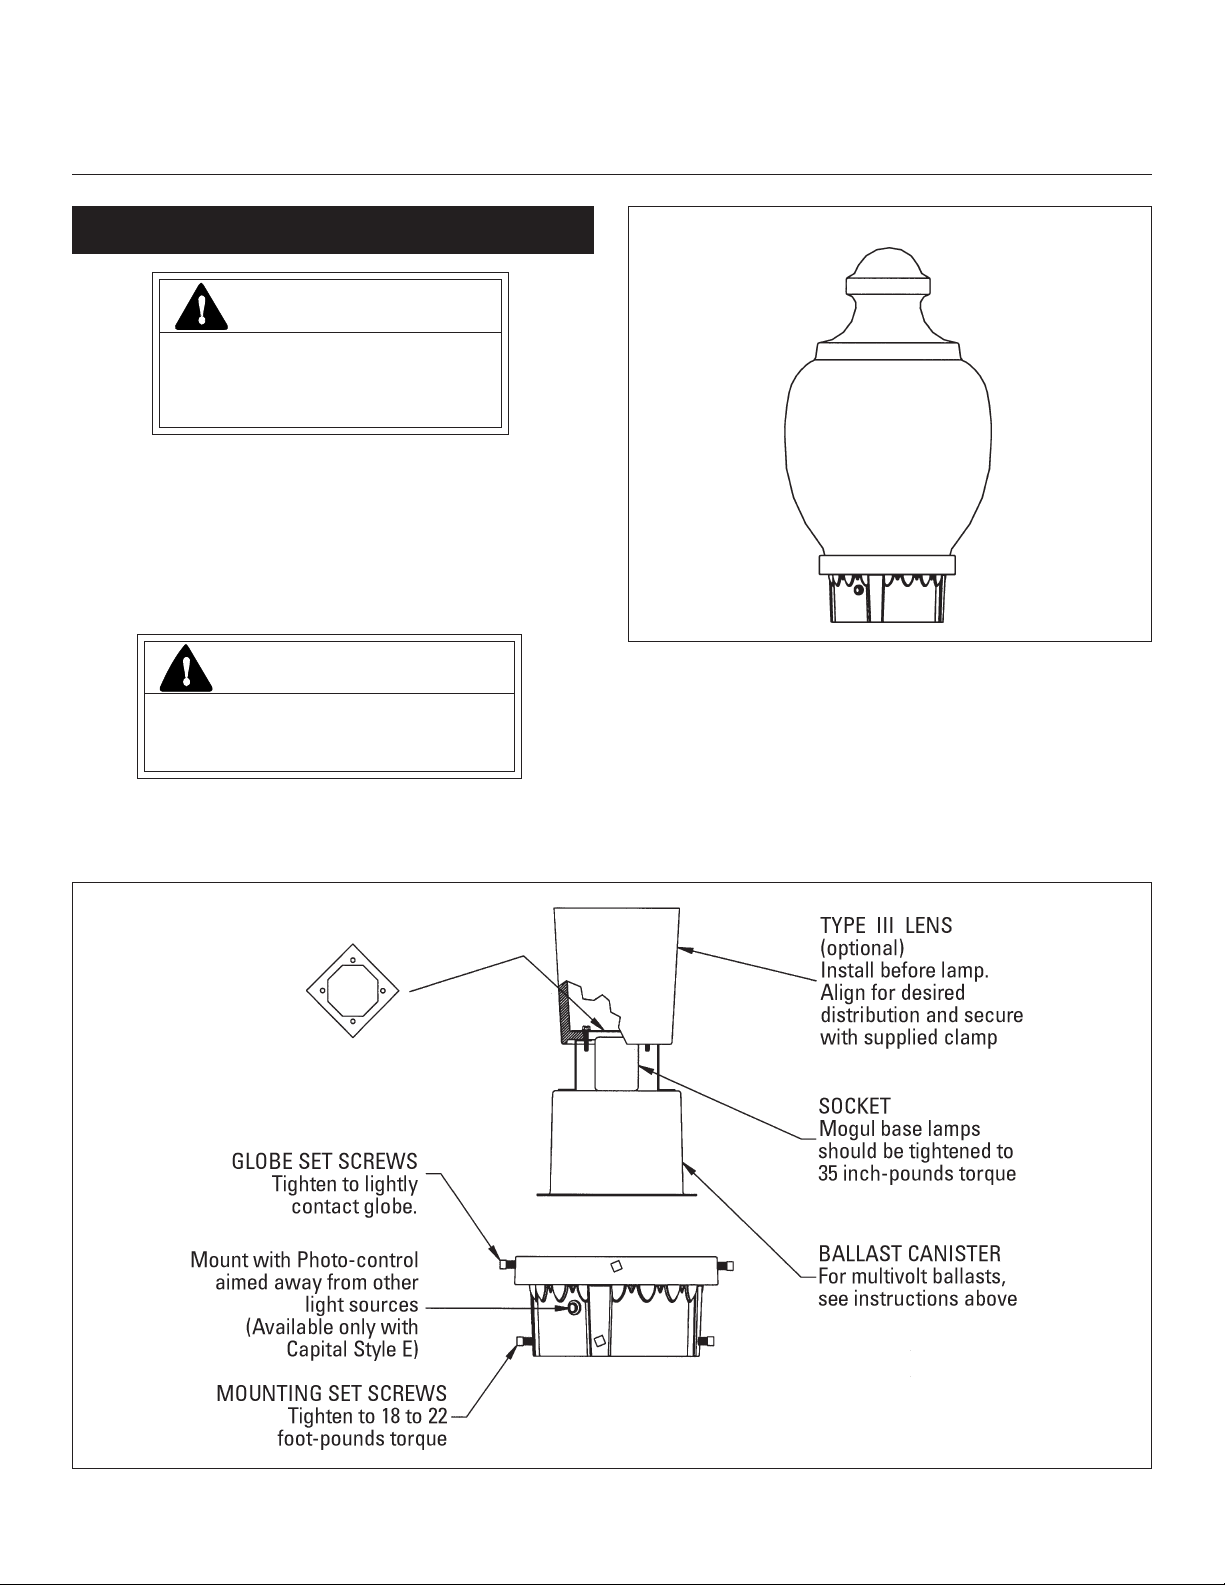
Legacy™ Luminaire
CAUTION
Unit will fall if not installed properly
• Follow installation instructions
1. Place fixture on appropriately sized tenon.
2. Tighten fixture set screws to 18 to 22 ft-lbs. of torque.
3. Remove ballast cannister.
4. Wire unit (see section B of instruction sheet for wiring
instructions)
5. Replace ballast cannister.
6. Install Lamp (see section C of instruction sheet for lamp
instructions)
7. Install refractor making sure that asymmetric refractors
are properly oriented with respect to their “house side” or
“street side” labeling.
8. Tighten globe set screws to lightly contact globe.
These instructions do not purport to cover all details or variations in equipment nor to provide for every possible contingency to be met in connection with installation, operation or
maintenance. Should further information be desired or should particular problems arise which are not covered sufficiently for the purchaser’s purposes, the matter should be referred
to GE Lighting Solutions.
Page 2
B. WIRING
Make all electrical connections in accordance with
the National Electrical Code and any applicable
local code requirements.
Verify that supply voltage is correct by comparing it
to nameplate.
IF SINGLE VOLTAGE:
All single voltage ballasts are pre-wired such that user
need only connect the supply conductors.
IF MULTIVOLT: (120/208/240/277 volts)
Connect the ballast lead with the insulated terminal to
the desired voltage terminal as indicated on the ballast
terminal nameplate.
IF MULTIWATT:
Multiwatt ballasts are available in various combinations
of wattage. See wiring instructions on wiring tag inside
the luminaire.
• Optional Features such as photocontrols are
voltage specific.
• When changing voltage on reconnectable units,
move only the lead with the insulated connector.
C. LAMPS
CAUTION
Risk of burn
• Allow lamp/fixture to cool before
handling
Use only lamps specified on nameplate. Observe
lamp manufacturer’s recommendations and restrictions on lamp operation, particularly ballast type,
burning position, etc.
LAMP TIGHTNESS: The lamp should be securely inserted to
NEMA-EEI specified torque of 35 inch-pounds, which is best
achieved by very firmly tightening to insure application of
sufficient torque. Tightening must be sufficient to fully
depress and load center contact of socket.
NOTE: Use of lubricants on lamp base or sockets
can cause rapid lamp failure and voids fixture
warranty.
D. MAINTENANCE AND CLEANING
It will occasionally be necessary to clean the refractor to
maintain light levels. Frequency of cleaning will depend on
ambient dirt level and minimum light level which is acceptable to the user. The refractor should be washed in a
solution of warm water and mild, nonabrasive household
detergent, rinsed with clean water and wiped dry.
The light output of a luminaire is dependent on the age
of the lamp. In applications where the light level is critical, it
may be desirable to replace lamps before they burn out. The
lamp manufacturer can provide data showing how the lamp
light output decreases with use.
Page 3

GE
g
LIRE ATTENTIVEMENT AVANT D'INSTALLER
Lighting Solutions
AVERTISSEMENT
Risque d'électrocution
• Mettre hors tension avant d'intervenir
– Suivez les instructions
GÉNÉRALITÉS
Ce luminaire a été conçu pour une utilisation à l'extérieur sans
que la température ambiante ne dépasse 25°C. Installez-le et
entretenez-le conformément aux recommandations ci-dessous.
A. MONTAGE
GEH-5915
INSTRUCTIONS
Luminaire Legacy
™
ATTENTION
Risque de chute en cas de mauvais
montage
• Suivez les instructions
1. Placez le luminaire sur un tenon de grosseur appropriée.
2. Serrez les vis d'arrêt du luminaire avec un couple de 18 à 22 lb-pi.
3. Enlevez le réceptacle du ballast.
VIS DE SERRAGE DU GLOBE
Serrer juste assez pour
établir un contact léger
avec le globe.
Installer avec la commande
photoélectrique orientée à
l'écart des autres sources
de lumière
4. Câblez le luminaire (voir les instructions de câblage dans la
section B de cette notice d'installation).
5. Replacez le réceptacle du ballast.
6. Installez la lampe (voir la section C de cette notice d'installation).
7. Installez le réfracteur en vous assurant que les réfracteurs
asymétriques sont correctement orientés par rapport aux
étiquettes « House Side » (côté maison) et « Street Side »
(côté rue).
8. Serrez les vis d'arrêt du globe de façon à ce qu'elles touchent
légèrement ce dernier.
LENTILLE TYPE III
(optionnelle)
Installer avant la lampe. Aligner
selon al distribution désirée, puis
fixer avec la bride fournie.
DOUILLE
Une lampe à base Goliath
doit être insérée, avec un couple de
serrage de 35 lb-po.
RÉCEPTACLE DU BALLAST
Si le ballast est à tensions multiples,
voir les instructions ci-dessus
VIS D'ASSEMBLAGE
Serrer avec un couple
de 18 à 22 lb-pi.
Ces instructions n'ont pas pour destination de couvrir tous les détails ou variantes de l'équipement, ni de répondre à toutes les éventualités que vous pourriez rencontrer pendant l'installation,
le fonctionnement ou l'entretien. Si vous souhaitez des informations complémentaires, ou si vous rencontrez un problème particulier qui ne soit pas adressé de votre point de vue d'acheteur,
le sujet doit être remonté jusqu'à la société GE Lighting Solutions
Ligne ou
Neutre
Page 4

B. CÂBLAGE
Toutes les connexions doivent être conformes aux normes
électriques nationales et à la réglementation locale en
vigueur.
Assurez-vous que la tension électrique est adéquate en
vérifiant la plaque signalétique.
APPAREILS À TENSION UNIQUE :
Tous les ballasts à tension unique sont préalablement câblés, de
sorte que l'utilisateur n'a plus qu'à connecter les conducteurs
d'alimentation.
APPAREILS À TENSIONS MULTIPLES (120/208/240/277 volts)
Branchez le conducteur du ballast à cosse isolée sur la borne de
tension appropriée, conformément aux indications sur la
plaque signalétique des bornes du ballast.
APPAREILS À PUISSANCES MULTIPLES :
Des ballasts à puissances multiples sont disponibles avec diverses
combinaisons de puissance. Consultez les instructions de
câblage sur l'étiquette de câblage à l'intérieur du luminaire.
• Les accessoires optionnels (comme les commandes
photoélectriques) sont conçus pour une tension
spécifique.
• Lorsque vous modifiez la tension électrique sur des
appareils reconnectables, déplacez uniquement le
conducteur avec le connecteur isolé
La puissance d'éclairage d'un luminaire dépend également
de l'usure de la lampe. Dans les applications où la puissance
d'éclairage est critique, il pourrait être préférable de remplacer les
lampes avant qu'elles ne brûlent. Le fabricant de la lampe peut
vous indiquer comment la puissance d'éclairage diminue avec
l'usure.
C. LAMPES
AVERTISSEMENT
Risque de brûlure
• Ne touchez pas le luminaire en
fonctionnement
Utilisez uniquement des lampes conformes aux exigences
de la plaque signalétique. Respectez les recommandations
du fabricant de la lampe, ainsi que les restrictions
s'appliquant à l'utilisation de la lampe, notamment sur le
type de ballast, la position de brûlage, etc.
SERRAGE DE LA LAMPE : La lampe doit être solidement insérée
avec un couple de 35 lb-po (normes NEMA-EEI), ce qui peut être
obtenu avec un serrage très ferme. Le serrage doit être suffisant
pour enfoncer complètement la lampe et charger le contact
central de la douille.
REMARQUE : L'utilisation de lubrifiants sur la base de la
lampe ou sur les douilles peut provoquer une usure rapide
de la lampe et annule la garantie du luminaire.
D. ENTRETIEN ET NETTOYAGE
Il sera occasionnellement nécessaire de nettoyer l'extérieur du
réfracteur pour préserver la puissance d'éclairage. La fréquence
des nettoyages dépendra des saletés du milieu ambiant et de la
puissance d'éclairage minimale qui est nécessaire à l'utilisateur. Le
réfracteur peut être nettoyé avec n'importe quel savon, détergent
ou liquide lave-vitre non abrasif, puis rincé avec de l'eau propre et
essuyé.
g
GE Lighting Solutions • 1-888-MY-GE-LED • www.gelightingsolutions.com
16943533----888
GE Lighting Solutions is a subsidiary of the General Electric Company. Evolve and other trademarks belong to GE Lighting Solutions. The GE brand and logo are trademarks of the General Electric Company.
© 2011 GE Lighting Solutions. Information provided is subject to change without notice. All values are design or typical values when measured under laboratory conditions.
35-201578-108 (10/03)
 Loading...