

Page 1
Щ^ВВВв %^й
^В%0ЫШШВИШ^ Sb,B4^%P9,B В%в> в BSBBB^W
Safety inStfucraoiiS.
Operating instructions. Tips
Aluminum Foil
Automatic Timer and Clock
Canning Tips
Energy-Saving Tips....................
Features
Oven
............................................
Baking, Baking Guide.............
Broiling, Broiling Guide
Control Settings.................
Light Bulb Replacement.........
Roasting, Roasting Guide......
Self-Cleaning Instructions......
Thermostat Adjustment
Surface Cooking
Control Settings.....................
Cooking Guide.........................
Cookware Tips.........................
............................
..............................
.....
.................................
.........................
Car® and Cieanirig
Cleaning Guide
Door Removal
Oven Vent
Storage Drawer
..........................................
............................................
...................................................
.....................................
....
................
.......
..................
..................
.............
........
.........
........
..................
.
........
......
.
.........
...............
..........
...........
..................
.........
.........
.....................
.Z-0
4,19,23
13-22
1A-1A
18-20
13,25
...17,18
21,22
8-11
10,11
10,11
23-26
25,26
6,7
26
24
24
12
14
Frobisfti Soaver
More questions ?...call
...................
aSAnsissrCssSsi^ Se0.S2S.20ea
Installation
9
5
8
8
Anti-Tip Device...................................3,27,29
Flooring Under the Range.........................28
I oo
UCV^^IIliy.................................................................ss..^47
Consumer Services..........................3i
Appliance Registration
Model and Serial Number Location
Warranty
Models: JBP22GR
......................
................................
.......................................
JBP26AR
JSF22R
JBP24GR
JBP25GR
JBF2SGR
JBP26WR
JBP27GR
27-29
2
.............
Back Cover
2
G£ AppHaocss
i:ppbfrri
l|3
1ХЦ- yjc';'
I I (J С/Л '
Page 2

HELP US HELP YOU
Ir-í:
-
Before lîslng your raege,
read this book carefully«
it is intended to help you
operate and maintain your new
range properly.
Keep it handy for answers to
your questions.
If you don’t understand something
or need more help, write (include
your phone number):
Consumer Affairs
GE Appliances
Appliance Park
Louisville, KY 40225
Write down the model
and serial eambers.
You’ll find them on a label
behind the range door or behind
the storage drawer.
These numbers are also on the
Consum_er Product Ownership
Registration Card that came with
your range. Before sending in
this card, please write these
numbers here:
Model Number
Serial Number
Use these numbers in any
correspondence or service calls
coneeming your range.
IF YOU NEED SERVICE.
If yoe received
a damaged range...
Immediately contact the dealer (or
builder) that sold you the range.
Save time and money.
Before yon request
service...
Check the Problem Solver in the
back of this book. It lists causes of
minor operating problems that you
can correct yourself.
To obtain service, see the
Consumer Services page in the
back of this book.
We’re proud of our service and
want you to be pleased. If for some
reason you are not happy with the
service you receive, here are three
steps to follow for further help.
FIRST, contact the people who
serviced your appliance. Explain
why you are not pleased. In most
eases, this will solve the problem.
NEXT, if you are still not pleased,
write all the details—including
your phone number—to:
Manager, Consumer Relations
GE Appliances
Appliance Park
Louisville, KY 40225
Read ail instructions before using ibis appuance.^
IMPORTANT SAFETY NOTICE ' : ■ ; '
The California Safe Drinldng Water and Toxic
Enforcement Act requires the Governor of
California to publish a list of substances known to
the state to cause birth defects or other reproductive
harni, and requires businesses to warn customers of
potential exposure to such substances.
The fiberglass insulation in self-clean ovess gives
off a very small amount of carbon monoxide during
the cleaning cycle. Exposure can be minimized by
venting with an open window or using a ventilation
fan or hood.
FINALLY, if your problem is still
not resolved, write:
Major Appliance Consumer
Action Panel
20 North Wacker Drive
Chicago, IL 60606
2
Page 3

When using electrical appliances, basic safety
precautions should be followed, including the
following:
® Use this appliance only for its intended use as
described in this manual.
® Be sure your appliance Is properly Installed
and grounded by a qualified technician in
accordance with the provided installation
instructions.
® Don’t attempt to repair or replace any part of
your range unless it is spedfically recommended
In this book. All other servicing should be referred
to a qualified technician.
® Before performing any service, DISCONNECT
THE RANGE POWER SUPPLY AT THE.
HOUSEHOLD DISTRIBUTION PANEL BY
REMOVING THE FUSE OR SWITCHING OFF
THE CIRCUIT BREAKER.
Never wear loose-flitliig or hanging garments
while using the appliance. Flammable material
could be ignited if brought in contact with hot
heating elements and may cause severe bums.
® Use only dry pot holders—^moist or damp pot
holders on hot surfaces may result in bums from
steam. Do not let pot holders touch hot heating
elements. Do not use a towel or other bulky cloth.
® For your safety, never use your appliance for
warming or heating the room.
® DO NOT STORE OR USE COMBUSTIBLE
MATERIALS, GASOLINE OR OTHER
FLAMMABLE VAPORS AND LIQUIDS IN
THE YICINITY OF THIS OR ANY OTHER
APPLIANCE,
® Keep hood and grease fílters clean to maintain
good venting and to avoid grease fires.
3
о
a
WARNIMG^—^AII ranges can tip and
~~T ^ injury could result. To prevent
^ accidental tipping of the range,
attach it to the wall and floor by
I installing the Anti-Tip device
supplied. (See Installation
Instructions.) To check if the
device is installed and engaged
properly, carefully tip the range
forward until it engages the device.
if you pull the range out from the wall for any
reason, make sure the device engages the range
when you push the range back.
® Do not leave children alone—children should
not be left alone or unattended in an area where an
appliance is in use. They should never be allowed
to sit or stand on any part of the appliance.
® Don’t allow anyone to climb, stand or hang on
the door, drawer or cooktop. They could damage
the range and even tip it over, causing severe ■
personal Injury, .
® CAUTION: ITEMS OF INTEREST TO
CHILDREN SHOULD NOT BE STORED IN
CABINETS ABOVE A MANGE OM ON THE
BACKSFLASH OF A RANGE—CHILDREN
ITEMS COULD BE SERIOUSLY INJURED,
® Dci not store flaiMiiiaMe materials In an oven or
near the cooktop.
® Do not lei cooking grease or other ilsmmable
materials accumulate In or near the range.
«Do not use water on grease ores.
Never pick up a flaming pan. Smother
flaming pan on surface unit by covering
pmi completely with well-fitting lid, cootóe sheet or
flat tray, or if available, use dry chemical or foamtype extinguisher. Flaming grease outside a pan can
be put out by covering with baking soda or, if
available, a multi-purpose dry chemical or foam-
type fire extinguisher.
® Do not touch heating elements or Interior
surface of oveii. These surfaces may be hot enough
to bum even though they are dark in color. During
and after use, do not touch, or let clothing or other
flammable materials contact surface units, areas
nearby surface uniis or any interipr area of the
oven; allow sufficient time for cooling, first.
Potentially hot surfaces include the cooktop, areas
facing the cooktop, oven vent opening, surfaces
near the opening, crevices around the oven door
and metal trim parts above the door. Remember:
The inside surface of the oven may be hot when the
door is opened
® Wlieu cookhig pGFk,follGw the directions exactly
and always cook the meat to an internal temperature
of at least 170°R This assures that, in the remote
possibility that trichina may be present in the meat,
it will be killed and the meat will be safe to eat.
(continued next page)
m
m
NN
s
c
©
► ... .дам r/f да.
Page 4

IMPORTANT SAFETY MSTMUCTIONS
(continued)
Oycii
® Siaiid away from raEge when opening oven
door. Hot air or steam whteh escapes can cause
hiiriis to hands, face and/or eyes.
® heat lifiopened food containers In the
oven. Pressure could build up and the container
could burst, causing an injsjry.
® Keep oven vent unobstructed. . , '
« Keep oven free from grease buildup.
® Place oven shelf in desired position while oven.
Is cool, if shelves must be handled when hot, do not
let pot holder contact heating units in the oven.
® Piililng out shelf to the shelf stop is a ,
convenience in lifting heavy foods. It is also a
precaution against burns from touching hot
surfaces of the door or oven walls.
® When using cooking or roasting bags in oven,,
follow the manufacturer’s directions.
® Do not use your oven to dry newspapers. If
overheated, they can catch fire.
® Do not use oven for a storage area, items stored
in an oven can ignite.
® Do not leave paper products, cooking utensils,
or food In the oven when not In use.
SeIf»C!eanlMg Oven
® Do not clean door gasket The door gasket is
essential for a good seal. Care should be taken not
to rub, damage or move the gasket.
® Do not use oven cleaners. No commercial oven
cleaner or oven liner protective coating of any kind
should be used in or around any part of the oven.
® Clean only parts listed In this Use and
Care Book, '
® Before self-deanlng the oven, remove broiler
pan and other cookware.
Surface Cooking Units
® Use proper pan size—This
appliance is equipped with different
size surface units. Select cookware
having flat bottoms large enough to cover the
surface unit heating element. The use of undersized
cookware will expose a portion of the heating
element to direct contact and may result in ignition
of clothing. Proper relationship of cookware to
burner will also improve efficiency.
® Never leave surface units unaitended at high
heat settings. Boiiover causes smoking and greasy
spillovers that may catch on fire.
® Be sure drip pans and vent are not covered
and are in place. Their absence during cooking
could damage range parts and wiring.
® Don’t use aluminum foil to line drip pans or
anywhere in the oven except as described in this
book. Misuse could result in a shock, fire hazard or
damage to the range.
® Only certain types of glass, glass^ceramic,
earthenware or other glazed containers are
suitahle for cooktop service; others may break
because of the sudden change in temperature. See
section on Surface Cooking for suggestions.
® To minimize the possibility of burns, ignition of,
flammable materials, and spillage, the handle of a
container should be turned toward the Genter of the
range without extending over nearby surface units.
® Always turn surface unit to OFF before
removing cookware.
® Keep an eye on foods being fried at HI or
MEDIUM HIGH heat settings. . .
® To avoid the possibility of a burn or electric
shock, always he certain that the controls for all
surface units are at OFF position and all colls ,
are cool before attempttng to remove the unit ■
® Don’t immerse or soak removable surface
units. Don’t put them In a dishwasher. Do not
selMean the surface units In the oven, . .
................
® Be sure to wipe up excess spillage before
starting the Self-Clean operation.
/I
штшт
.........
.
® When flaming foods are under the hood, turn
the fan oE The fan, if operating, may spread
the flame.
® Foods for frying should be as dry as possible.
Frost on frozen foods or moisture on fresh foods
can cause hot fat to bubble up and over sides
of pan.
Page 5

IMPORTANT SAFETY INSTRUCTIONS
(continued)
® Use little fat for effective shallow or deep-fat
fryiHg. Filling the pan too full of fat can cause
spillovers when food is added.
® If a comhlnatioii of oils or fats will he used
In frying, stir together before heating, or as fats
melt slowly.
ENERGY-SAVING TIPS
Oven Cooking
® Preheat oven only when necessary. Most foods will
cook satisfactorily without preheating. If you nnd
preheating is necessary, watch the indicator light, and
niii fonii in nve.n nrnmntiv after the liffht ffoes out.
® Always turn oven off before removing food.
® During baking, avoid frequent door openings. Keep
door open as short a time as possible if it is opened.
1/arvwaoio incF/ao/I incl"
W^llipiWLW V^VV^ll \JX jctov VTAXW-
item. Potatoes, other vegetables, and some desserts
will cook together with a main-dish casserole, meat
loaf, chicken or roast. Choose foods that cook at the
same temperature and in approximately the same
amount of time.
® Use residual heat in the oven whenever possible to
iliilMi UUUiSJllg uvcii iiic^aio, r^is>KJ au.VI
rolls or precooked desserts to a warm oven, using
residual heat to warm them.
r-X /1/1/-»n Ale i~\ ri/4/^
® Always heat fat slowly, and watch as it heats.
® Use deep fat thermometer whenever possible to
prevent overheating fat beyond the smoking point.
SAVE THESE INSTRUCTIONS
Surface Cooking
«Use cookware of medium-weight aluminum, with
tight-ntting covers, and flat bottoms which complet
cover the heated portion of the surface unit.
V^UUÜv iiCMi VCgIÜPtaUlCô Wltll a iiiiiiiiiiuiii aiuv/uiAi. v/x
water in a covered pan.
A -fr\i-\Ao \17l-10ri Kr^tiftîrïrr tViAin ninr*lr1v tn rnnUna
vvatvxx XV/UUO VVllWlX w/xxâa^xaji^ «.axwjiaji vv/
temperatures at high heat. When food reaches cooking
temperature, reduce heat immediately to low-est setting
that will keep it cooking.
* Use residual heat with surface cooking whenever
possible. For example, when cooking eggs in their
shells, bring water and eggs to a boil, then turn to
Li’ Lj 11tr\ r^r\rtt'nl At"A
VyX’X’ pWôlllUil CUIU. LWVLl LV/UIVVVCUU VVXtll XJU WJ wuxxxj^xww
the cooking.
Q
s
mSSmS^^^^SmSmmmSsi
Page 6
\//L
......
I rf->4 ,«r^ -BT^ -a- X -B- X-HTii "BTIh A T
J^’EATUKJiS UF YUUK KATNlxF
JBP22GR
■a-TTii “BTi
JISrZZM
JBP24GR
JBP26AR
JJSrZfiljrM
TT6
TT«»
JBP26WR
JBP27GR
(NOTE: Not all doors have windows.)
^—Support Rods
Some models have lift-up
irip Wells S cooktops for easier cleaning.
Page 7

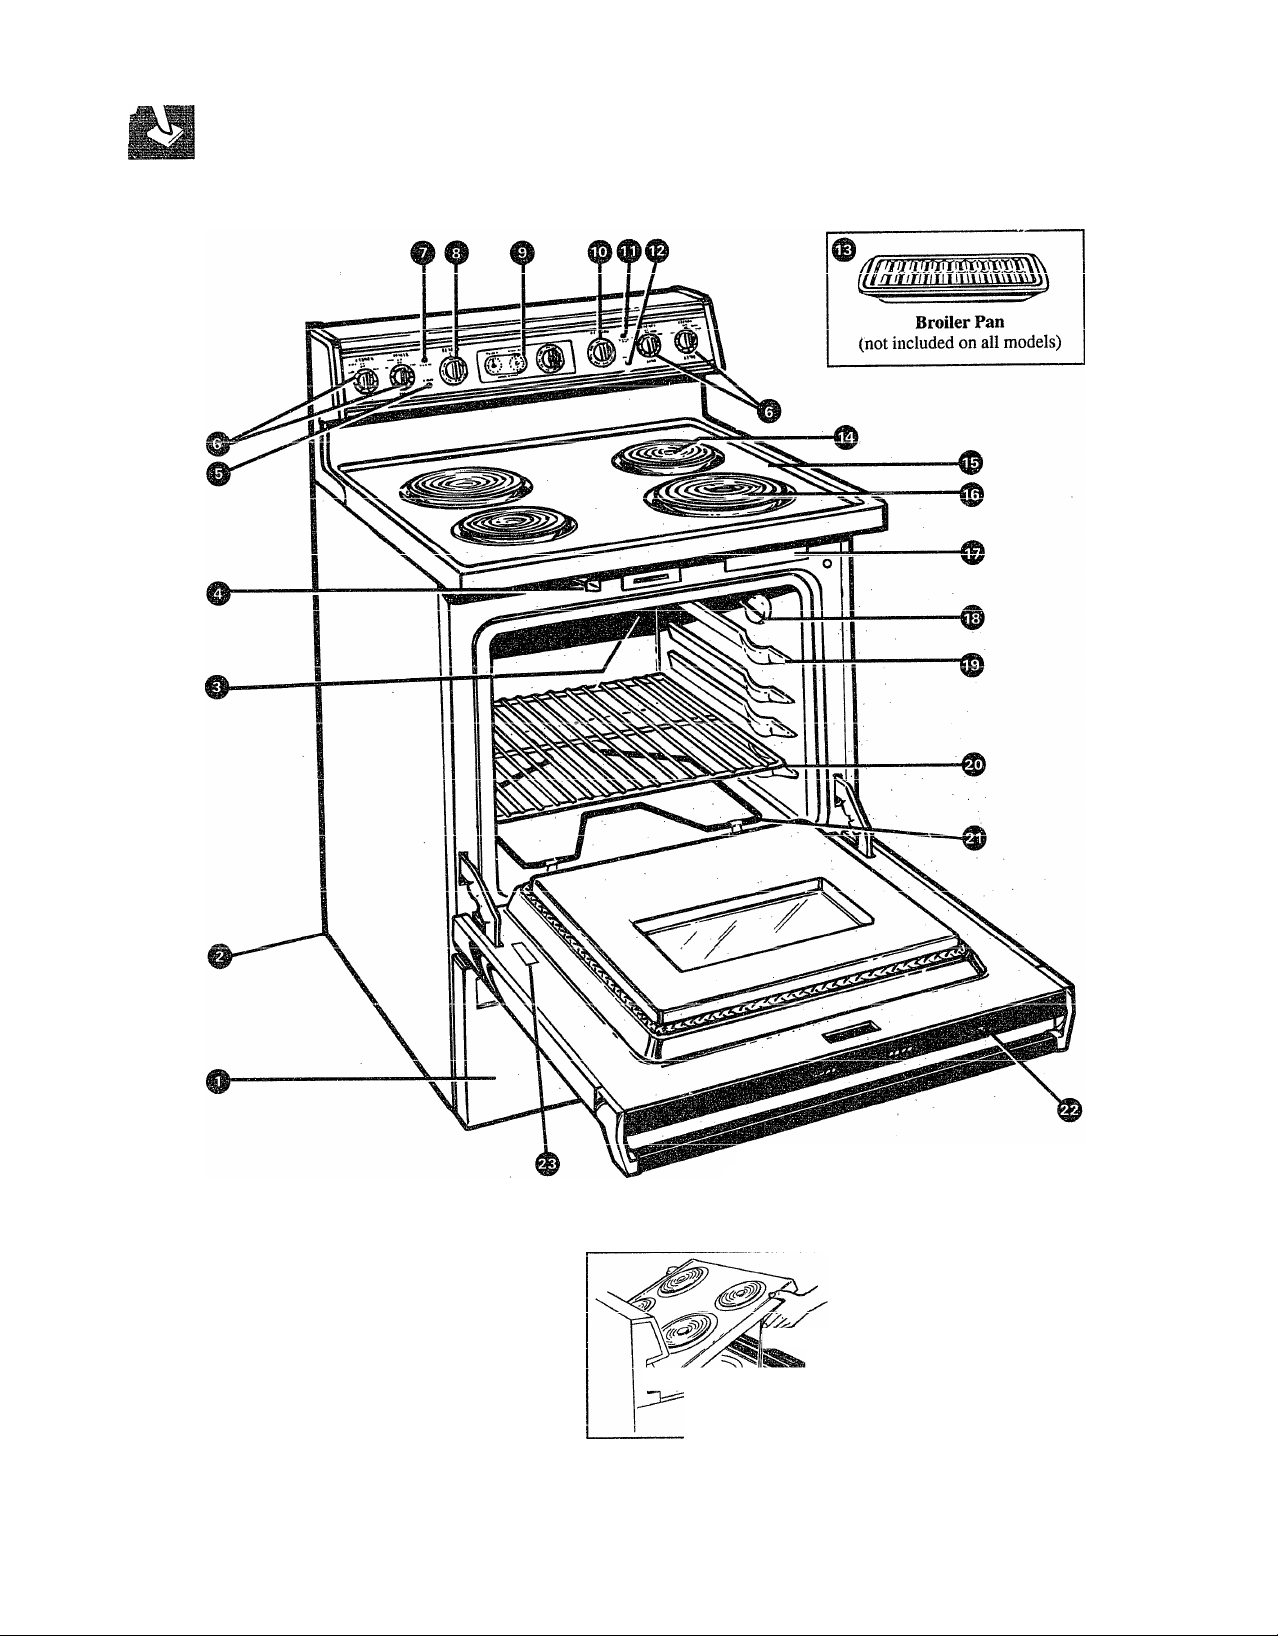
Feature Index (Not aii models have ail features.)
1 Storage Drawer (on some models)
2 Anti-Tip Device (See Installation Instructions.)
Т5-ГЛ-П TTnif-
JU^XV/XX V«/XAXi.
4 Door Latch (Use for Self-Clean only.)
5 Oven Cycling Light
6 Surface Unit Controls
7 Oven “ON” Light
8 Oven Set Control
9 Automatic Oven Timer, Clock and Minute Timer
10 Oven Temp Control
1 1 TT-nif Tri/iir'Cltr^r T in-lif
XX k^UXXiXW./ W'XXXL V^X^ X1A\XXWC«.«.4/X Х^Х^ХХЪ
12 Oven Cleaning Light
13 Broiler Pan and Rack (on some models)
(Do not clean in Self-Cleaning Oven.)
14 Oven Vent
(Located under the right rear surface unit.)
Explained
on page
25,26
3,27, 29
26
21,22
13
8
13
12
13
8
21
17-20,26
24
(й
&9
В
и
т
О
!»te
15 Lift-Up Cooktop (on some models)
16 Calrod® Surface Unit, Drip Pans
17 Model and Serial Number Location
«I^WJIXXXXVX UXW XC4XXKV' %X4./V/X \/X l.yWXXXXAV«> i>XXW «.«. TT wx у
18 Oven Interior Light (on some models)
(Comes on automaiically when door is opened.)
19 Oven Shelf Supports
20 Oven Shelf (Number may vary.)
21 Bake Unit (May be lifted gently for wiping the oven floor.)
ZrZ vjvcii Jbigiii owiiuii (lui muucis wuii uvcu wuiuuw;
23 Anti-Tip Label
fonfT/i Игмлг r\r ctr^rdfri^ г^‘Гd\x/p■г^
23
23,26
2
13
13
13, 26
26
1 *1
XU
— .
©
dQ
fS>
Page 8
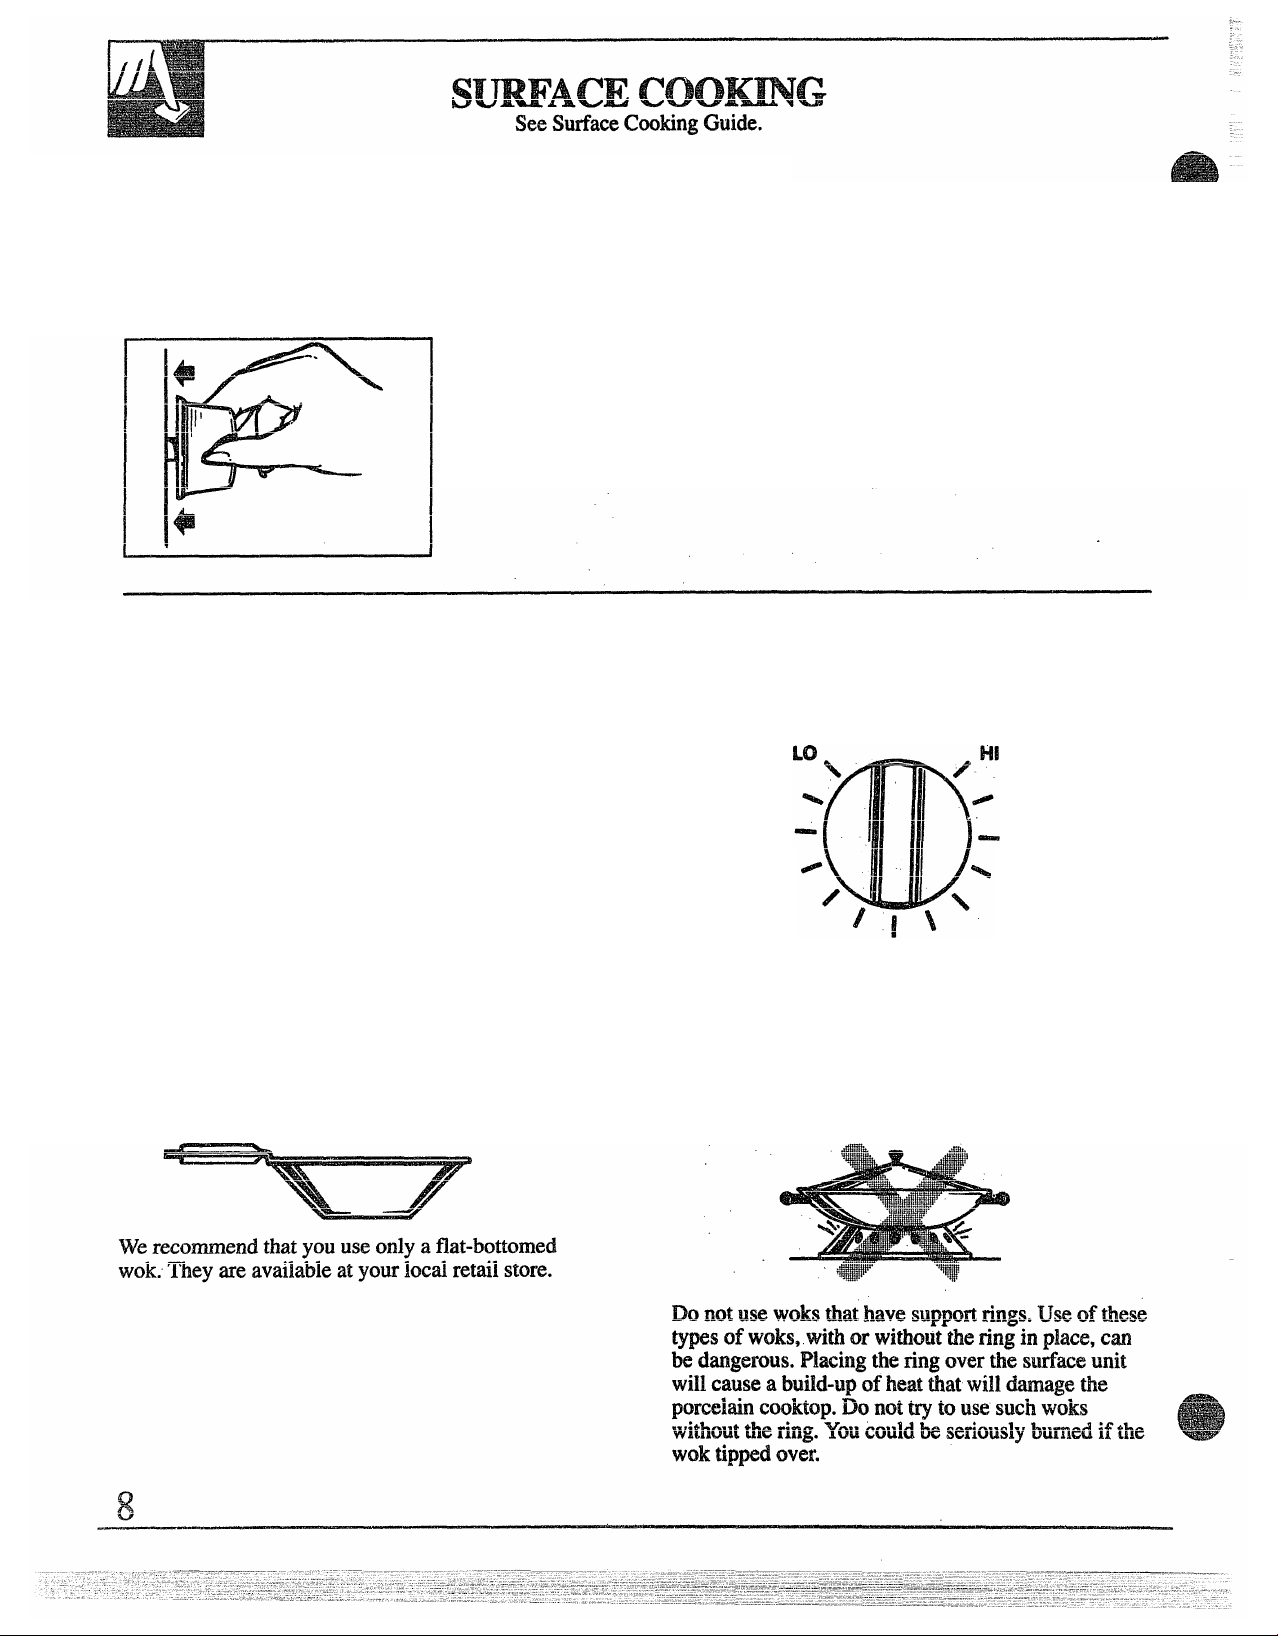
At both OFF and Hi the control “clicks” into position. You may hear slight
“clicking” sounds during cooking, indicating the control is keeping the unit
at the heat level or power level you set.
How to Set the Controls
Push the knob
in and turn in
either direction
to the heat setting
you want.
Heat Setting Guide
HI—^Used to begin cooking or to bring water to a
boil. Reduce heat setting after water boils.
MEDIUM HIGH—(Setting halfway between HI ^d
MED) Maintains a fast boil on large amounts of food.
MED—Saute and brown; keeps food at a medium
boil or simmer.
MEDIUM LOW—(Setting halfway between MED
and LO) Cook after starting at HI; cooks with little
water in covered pan.
LO—Used for long, slow cooking (simmering) to
tenderize and develop flavors. Use this setting to melt
butter and chocolate or to keep foods warm.
NOTE; Surface Indicator Light may glow between LO
and OFF, but there is no power to the surface units.
Be sure you turn control to OFF when you finish
cooking. The surface unit indicator light will glow
when ANY heat on any surface unit is on.
□□
□□
OFF
MEDIUM w
LOW
MED
MEDIUM
HIGH
Wok Cooking
Page 9

'O’r^T^yfU' A »^¥¥SC?
AA^iVJJCi M.MJTO
M
Canning should be done on surface units only.
pAtC tVl5^t KAl/r\nH r\riA inr*K r\f Cllrfor»0
A Wkj VA&MV W^vwjiava urw^ v/A«<W» vrixV' AttWAI \Ji «7UAACAVW UAAAi. «9
drip pan are not recommended for most surface
cooking. However, when canning with water-bath or
pressure canner, larger-diameter pots may be used.
This is because boiling water temperatures (even
under pressure) are not harmful to cooktop surfaces
surrounding the surface units.
Observe the Following Points In Canning
1. Be sure the canner fits over the center of the
surface unit, if your range or its location does not
allow the carmer to be centered on the surface unit,
use smaller-diameter pots for good canning results.
2. For best results, use canners with flat bottoms.
Canners with flanged or rippled bottoms (often found
in enamelware) don’t make good contact with the
surface unit and take a long time to boil water.
Flat-bottom canners are recommended.
HOWEVER, DO NOT USE LARGE DIAMETER
CANNERS OR OTHER LARGE DIAMETER
POTS FOR FRYING OR BOILING FOODS OTHER
THAN WATER. Most syrup or sauce mixtures—
and all types of frying—cook at temperatures much
higher than boiling water. Such temperatures could
eventually harm cooktop surfaces surrounding
surface units.
3. When canning, use recipes and procedures from
reputable sources. Reliable recipes and procedures are
available from the manufacturer of your canner;
manufacturers of glass jars for canning, such as Ball
and Kerr; and the United States Department of
Agriculture Extension Service.
4. Remember that canning is a process that generates
large amounts of steam. To avoid bums from steam or
heat, be careful when canning,
NOTE: If your house has low voltage, canning may
take longer than expected, even though directions
have been carefully followed. The process time will
be shortened by:
(1) using a pressure canner, and
(2) starting with HOT tap water for fastest heating of
large quantities of water.
3,
w
n
fb
n
©
o
E
©
CfP
©
5
n
©
gs
Page 10

SURFACE COOKING GUIDE
Cookware Tips
1. Use medium- or heavy-weight cookware.
Aluminum cookware conducts heat faster than other
metáis. Cast-iron and coated cast-iron cookware are
slow to absorb heat, but generally cook evenly at low
or medium heat settings. Steel pans may cook
unevenly if not combined with other metals.
2. To conserve the most cooking energy, pans should
be flat on the bottom, have straight sides and tight
fitting lids. Match the size of the saucepan to the size
of the surface unit.
Food
Cereal
Commeal, grits,
oatmeal
Cocoa
Coffee
Eggs
Cooked in shell
Fried sunnv-side-uo
Poached
Scrambled or omelets
Fruits
Meats
Braised: Pot roasts of
beef, lamb or veal;
pork chops and steaks
Pan-fried: Tender
chops; thin steaks up
to 3/4-inch; minute
steaks; hamburgers;
franks and sausage;
thin fish fillets
Directions and Settings
Cookware
Covered
Saucepan
to Start Cooking
HI. In covered pan bring
water to boil before adding
cereal.
Uncovered
Saucenan
HI. Stir together water or
milk and cocoa ingredients.
Bring just to aboil.
Percolator HI. At first perk, switch
Covered
Saucepan
4-^ J r\
jicaL lu
HI. Cover eggs with cool
water. Cover pan, cook
until steaming.
Covered
Skillet
UilGUVCiCU
MEDIUM HIGH, Melt butter,
add eggs and cover skillet.
Skillet
Covered
Saucepan
Uncovered
Skillet
Saucepan
»..overea
Skillet
HI. In covered pan bring
water to a boil.
HI. Heat butter until light
golden in color.
XJT Tn
X.XJ.« All v\-rvwi^\x pan x/xxxig
r*r\xrawaA
non n nr
fruit and water to boil.
HI. Melt fat, then add meat.
Switch to MEDIUM HIGH
to brown meat. Add water
\ji uiui;i Í14UÍU.
Uncovered
Skiilet
HI. Preheat skillet, then
grease lightly.
Directions and Settings
to Complete Cooking
MEDIUM LOW or LO, then
add cereal. Finish timing
according to package directions.
MED, to cook 1 or 2 minutes
to completely blend
ingredients.
LO to maintain gentle
LO. Cook only 3 to 4
minutes for soft cooked;
15 minutes for hard cooked.
Continue cooking at MEDIUM
HIGH until whites are just set,
about 3 to 5 more minutes.
T
r\ WTU^^
auu vv
bottoms of eggs have just
set, carefully turn over to
V'VrV'Jn. WUX^X kSXVftV'»
LO. Carefully add eggs. Cook
uncovered about 5 minutes
at MEDrJM hiGH.
MED. Add egg nuxture.
Cook, stirring to desired
doneness.
xwv^« wxxxx v/vvaox\/xiaxxjr cxxt\x
check for sticking.
MEDIUM HIGH or MED.
Brown and cook to desired
doneness, turning over
as needed.
Comments
Cereals bubble and expand
as they cook; use large enough
saucepan to prevent boiiover.
Milk boils over rapidly. Watch as
boiling point approaches.
Percolate 8 to 10 minutes for
Q inline loco íir\r
O XWWV'X
If you do not cover skillet, baste
eggs with fat to cook tops evenly.
Remove cooked eggs with slotted
spoon or pancake turner.
Eggs continue to set slightly after
cooking. For omelet do not stir
last few minutes. When set, fold
in half.
water per pound of fruit.
Dried fruit: Use water as package
directs. Time depends on whether
fruit has been presoaked. If not,
allow more cooking time.
before it is browned, if desired.
Liquid variations for flavor could
be Wine, fruit or iomato juice or
meat broth.
Timing; Steaks 1 to 2 inches: 1 to
2 hours. Beef Stew: 2 to 3 hours.
Pot Roast: I'A to 4 hours.
Pan frying is best for tiiin steaks
and chops. If rare is desired,
preheat skillet before adding meat.
10
Page 11

3. Deep Fat Frying. Do not overfill cookware with fat
that may spill over when adding food. Frosty foods
bubble vigorously. Watch foods frying at high
iemperauires. Keep range and hood clean from
accumulated grease.
NOT OVER 1"
nVPR 1"
Food
Meats
Fried Chicken
Pan-fried bacon
Sauteed: Less tender
thin steaks (chuck,
round, etc.); liver;
thick or whole fish.
Simmered or stewed
meat; chicken;
corned beef; smoked
pork; stewing beef;
ÍOngüc¡ etc.
Melting chocolate,
__ marshmallows,
butter
Pancakes or
French toast
r%
_
rnsm
Noodles or spaghetti
Pressure Cooking
Pudding, Sauces,
Candles, Frostings
Vcgeiafcira
Fresh
Frozen
Sauteed: Onions;
green peppers;
niliShrOOniSj Cclcfy; 6ÍC.
Rice and Grits Covered
’ 1
Cookware
Covered
Skillet
Uncovered
Skillet
Covered
Skillet
Covered
Dutch Oven,
Kettle or
Large
SauCepEO
Uncovered
Saucepan.
Skillet or
Griddle
Large
Covered
Ui JTUl
Pressure
Cooker or
Canner
Uncovered
Saucepan
Covered
Saucepan
Covered
Saucepan
Uncovered
Skillet
Sauce pan
Directions and Settings
to Start Cooking
Ш. Melt fat. Switch to
\>fi7r\Tf T\>f mn« tn
WATA AAAVJiAA 1/А\/УУДа
chicken.
HI. In cold skillet, arrange
bacon slices. Cook just until
Sioliing to Sizzle.
HI. Melt fat. Switch to MED
to brown slowly.
Ш. Cover meat with water
and cover pan or kettle.
Cook until steaming.
MEDIUM LOW. Allow 10 to 15
minutes to melt through. Stir to
smooth.
MEDIUM HIGH. Heat sWllet
8 to 10 minutes. Grease lightly.
HI. In covered kettle, bring
salted water to a boil, uncover
and add pasta slowly so bcihng
does not stop.
HI. Heat until first jiggle
is heard.
HI. Bring just to boil.
Hi. Measure 1/2 to 1 inch
water in saucepan. Add salt
ailu prCpoFCu Vegetable.
In covered saucepan bring
to boil.
Hi. Measure water and salt
as above. Add frozen block
of vegetable. In covered
saucepan bring to boil.
HI. In skillet, melt fat.
HI. Bring salted water to a boil.
Directions and Settings to
Complete Cooking
LO. Cover skillet and cook
UlIVll
few minutes. .
Comments
For crisp, dry chicken, cover
vrt»jr cuvwi 1Э rtr tVVAlAAfg
for 10 minutes. Uncover and
cook, turning occasicmally
feH" 10 to 20 minutes.
MEDIUM HIGH. Cook,
turning over as needed.
LO. Cover and cook
until tender.
A more attention-free method
is to start and cook at MED.
Meat may be breaded or
marinated in sauce before
frying.
LO. Cook until fork tender.
Cwater should poii slowly.)
For very large amounts,
medium heat may be needed.
Add salt or other seasoning
before cooking if meat has
not been smoked or
otherwise cured.
diium auiiawc uiiu. vYticii luciuii^ iimiMuiioiiuwd»
add milk or water.
Cook 2 to 3 minutes per side.
Thick batter takes slightly
IrtnOPir fi.riP Turn rvvpr
*“■**&*'*
pancakes when bubbles
rise to surface.
MEDIUM HIGH. Cook uncovered
until tender. For large amounts,
H! may be needed to keep water
Use large enough kettle to
prevent boilover. Pasta
doubles in size when cooked.
at rolling boil throughout entire
cooking tirne.
MEDIUM HIGH for foods
cooking 10 minutes or less.
Cooker should jiggle 2 to 3
times per minute.
MED for foods over 10 minutes.
LO. To finish cooking.
Stir frequently to prevent
sticking.
MED. Cook 1 pound 10 to 30
or more minutes, depending
Uncovered pan requires more
water and longer time.
on tenderness of vegetable.
LO. Cook according to time
on package.
MED. Add vegetable.
Cook until desired
Break up or stir as needed
while cooking.
Turn over or stir vegetable as
necessary for even browning.
tenderness is reached.
MEDIUM LOW. Cover and cook
according to time.
Rice and grits triple in volume
after cooldng. Time at
MEDIUM LOW. Rice; 1 cup
ncc and 2 cups water for 25
minutes. Grits: 1 cup grits and
1
4 cups water for 40 minutes.
Э5
»
§3
n
Г5
©
©
E
©
m
©
Mi«
-
11
Page 12

AUTOMATIC TIMER AND CLOCK
The automatic timer and clock on your range are
helpful devices that serve several purposes.
To Set the Clock
To set the Clock, push the knob in
and turn the clock hands to the
correct time. (The Minute Timer
pointer will move also. Let the
knob out, then turn the Minute
Timer pointer to OFF.)
Minute Timer
The Minute Timer has been
combined with the CLOCK. Use it
to time all your precise cooking
operations. You’ll recognize the
Minute Timer as the pointer which
is different in color and shape than
the clock hands.
STOP TIME DELAY START
I * //y * I
19 o'''' 12
i-s fill 3=' ' '
vf..-
'//iln''' ''//iln''
PUSH To TURN
To Set the Minute Timer
To set the Minute Timer, turn the
center knob, without pushing in,
until pointer reaches number of
minutes you wish to time.
(Minutes are marked, up to 60, in
¿le center ring on the clock.) At
the end of the set time, a buzzer
sounds to tell you time is up.
Turn knob, without pushing in,
until pointer reaches OFF and
buzzer stops.
12 , Clock
Questions and Answers
O. Must the dock be set on correct time of
day when I wish to use the Automatic Timer
for baking?
A. Yes, if you wish to set the DELAY START or
STOP TIME dials (on some models) to turn on and
oil at set times during timed functions.
Q, Can I use the Minute Timer during oven
cooking?
A. The Minute Timer can be used during any cooking
function. The Automatic Timers (DELAY START and
STOP TIME dials) are used with TIMED BAKED
function only.
O. Should 1 change the clock while I’m Time
Cooking in the oven?
A. The clock should not be changed during any
program that uses the oven timer. You must either
stop those programs or wait until they are finished
before changing time.
12
Page 13

Do not lack the even uGOr With the uGGF Istch 8liC8pt when self-cleanliig.
Before Using Your Oven
USING YOUR OVEN
1. Look at the controls. Be sure
you understand how to set them
properly. Read over the directions
for the Automatic Oven Timer
so you understand its use with
the controls.
Oven Controls
Some models have one oven
control knob—OVEN TEMR
Other models have two oven
control knobs—OVEN TEMP and
OVEN SET. The OVEN SET knob
has settings for BA,KE, TIMED
BAKE, BROIL and OFF.
2. Check oven interior. Look at
the shelves. Take a practice run
at removing and replacing them
properly to give sure, sturdy
support.
OVEN TEMP control ÌH£lirii2inS
the temperature you set, from
WARM (150°F.) to BROIL
(550°F.) and also at CLEAN
(880°F.). On some models, the
OVEN TEMP knob also tUiiis the
oven OFF.
The Oven Cycling Light glows
until the oven reaches your
selected temperature, then goes
off and on with the oven unit(s)
during cooking.
3. Read over information and tips
that follow,
4. Keep this book handy so you
can refer to it, especially during
the first weeks of using your
new range.
PREHEATING the
high temperature settings, is
speedy. It rarely takes longer than
10 minutes. Preheat the oven only
when necessary. Most foods will
cook satisfaetorily without
preheating, ff you find preheating
is necessary, keep an eye on the
indicator light and put food in the
oven promptly after light goes out.
The Oven On Light will glow any
time the OVEN SET knob is not in
the OFF position.
>
p
O
3
PS
a
a
tí
3
fb
w
PS
?
p
o
o
PT
Oven Light (on SGiiic mCdels)
The light comes on automatically when the door is opened. (On models with
oven window, use switch to turn light on and off when door is closed.)
Switch is located on the front of the door.
Oveii Interior Shelves
The shelves are designed with stop-locks, so that
when placed correctly on the shelf supports, they will
stop before coming completely out from the oven, and
will not tilt when removing food from or placing food
on them.
TO REMOVE ■
THE SHELVES
from the oven, pull
the shelf toward
you, tilt front end
upward and pull
the shelf out.
TO REPLACE, place the shelf on shelf support with
stop-locks (curved extension under shelf) facing up
and toward the rear of the oven. Tilt up front and push
shelf toward the back of the oven until it goes past
■’stop” on the oven wall. Then lower the front of the
shelf and push it all the way back.
The oven has four
shelf supports—
A (bottom), B, C and
D (top). Shelf
positions for cooking
food are suggested on
Baking, Roasting and
Broiling pages.
S'
dC
§5
c
Q
d
13
Page 14

Adjusting Oven ThennMtat
POINTER
______________
I /NU/XA \ if-fX
Back of
OVEN TEMP knob
Use the time given in your recipe when using the
oven for the first time. Oven thermostats, in time, may
“drift” from the factory setting and differences in
timing between an oid and a new oven of 5 to iO
lllilJtULW^ CUV UllUOUCU. X^Ul UWIA lAOd UWIi dVi
correctly at the factory and is more likely to be
accurate than the oven which it replaced. However, if
you find that your foods consistently brown too little
or too much, you may make a simple adjustment in
the thermostat (Oven Temp) knob.
Front of
OVEN TEMP knob
To adjust the thermostat knob:
1. Pull the knob off the shaft, look at the back of the
knob and note the current setting before making any
adjustments.
2. Loosen both screws on the back of the knob.
3. If the oven temperature seems too hot, move the
pointer toward the words MAKE COOLER. If the
t#»mnpratiirf» cppmc tr»ni Pfvrvl mnvp thp nnintpr tnwarrl
IrVAAAJlirVA MV««* W JUUiVr T W «BAV J^V^aJlBV«^* VViV V f V«* ««
the words MAKE HOTTER. Each notch will change
the oven temperature about 8 degrees Fahrenheit.
4. Tighten the screws.
5. Replace the knob, matching the flat area of the
knob to the shaft.
How to Set Your Maiige for Baking
Step 1; Place food in oven, being
r»tfartair» trv \
space between pan and walls of
oven for good circulation of heat.
UiyVFVXX X XAAVXA \JX
OVEN TEMP
Step 2; Turn OVEN SET knob (on
some models) to BAKE and
OVEN TEMP knob to the
temperature you desire.
Step 3: Check food for doneness at
_________
I.1I11V UU iwipv. V^UUIV
longer if necessary. Switch offbeat
and remove foods.
14
Page 15

HOW TO TIME BAKE
some moaeis)
The automatic oven timer controls are designed to turn the oven on or off
automatically at specific times that you setr^(Use TIMED BAKE on the
OVEN SET knob.)
How to Set Immediate Start and Automatic Stop
MSSTPEr.« Koirim-iirirr »TrioL-za
sure the hands of the range clock
show the correct time of day.
To start cooking immediately and
turn off automatically, you must
turn the OVEN SET knob to
TIMED BAKE. Remember, foods
continue cookmg after controls are
off because the oven retains heat
for a long time, if the oven door is
not opened.
xticuvv O
STOP TIME DELAY START
ox /<- OV |2
tv?
PUS H T O T UR K
X« xvj piup xiulc:, puMi m
knob on STOP TIME di^ and turn
pointer to time you want oven to
turn off; for example 6:00. The
DELAY START dial should be at
the same position as the time of
day on clock.
OVEN SET
OVEN TEMP
step 2; Turn OVEN SET knob to
TIMED BAKE. Tam OVEN
TEMP knob to oven temperature,
for example 250°F. The oven will
start immediately and will stop at
the time you have set.
How to Set Delay Start and Stop
Delay Start and Stop is setting the
oven timer to turn the oven on and
off automatically at a later time than
the present time of day. You must
use the TIMED BAKE setting.
Clock
STOP TIME DELAY START
'< n ^ '< a
PUS H T O T UR N
Step li To set start time, push in
knob on DELAY START dial and
turn pointer to time you want oven
to turn on, for example 3:30.
\ X .12 .
^ xWOJFFyjs.
0al
>lpf
Clock
STOP TIME DELAY START
\ 12 ,
\
2a OFF
|3®3j |9 0,a|
Step 2: To set Stop Time, push in
knob on STOP TIME dial and turn
pointer to time you want oven to
turn off, for example 6:00. This
means your recipe called for two
and one-half hours of baking time.
Foods that are highly perishable,
such as milk, eggs, fish, stuffings,
poultry and pork should not be
allowed to sit out for more than
one hour before or after cooking.
Room temperature promotes the
growth of harmful bacteria.
NOTE: Be sure that oven light is
off because heat from the bulb will
speed harmful bacteria growth.
NOTE; The time on STOP TIME
dial must be later than the time
shown on range clock and DELAY
START dial.
Step 3: Turn OVEN SET kxUob to
TIMED BAKE. Turn OVEN
TEMP knob to 250°F. or
recommended temperature.
Place food in oven, close the door
and automatically the oven will be
turned on and off at the times you
A1C4V«^ aWk* YTlA^Ai WWVlVAlIg Ad
completed, turn OVEN SET to
OFF and remove food from oven.
OVEN INDICATOR LIGHT(S) at
TIMED BAKE setting may work
differently than they do at BAKE
setting. Carefiiiiy recheck the steps
given above. If all operations are
done as explained, oven will
operate as it should.
W/I^An in
&
©
3
a
W
pr
a
15
Page 16

BAKING GUIDE
1. Aiuiriinum pans conduct heat quickly. For most
conventional baking, light, shiny finishes generally
give best results because they help prevent
overbrowning. For best browning results, we
recommend dull bottom surfaces for cake pans and
pie plates.
2. Dark or non-shiny finishes and glass cookware
generally absorb heat, which may result in dry, cns
crusts. Reduce oven heat 25°F. if lighter crusts are
i^ood
Cookware
Bread
Biscuits (1/2 in. thick)
Coffee cake
Shiny Cookie Sheet
Shiny Metal Pan with
satin-fínish bottom
Com bread or muffins
Gingerbread
Cast-Iron or Glass Pan
Shiny Metal Pan with
satin-fínish bottom
Mumns
rupOvcia
Quick loaf bread
Yeast bread (2 loaves)
Plain rolls
Sweet rolls
Shiny Metal Mumn Fan
U'ccp VJ1Í1 5&» Ui ^(tM 'XiUll
Metal or Glass Loaf Pan
Metal or Glass Loaf Pan
Shiny Oblong or Muffin Pan
Shiny Oblong or Muffin Pan
Cakes
(without shortening)
Angel food
T^llvr «*/^1 1
lV.TiA
Sponge
Aluminum Tube Pan
Metal Jelly Roll Pan
Metal or Ceramic Pan
Cakes
Bundt cakes
Cupcakes
Fruitcakes
Layer
T f\gf
Metal or Ceramic Pan
Shiny Metal Muffin Pan
Metal or Glass Loaf or lUbe Pan
Shiny Metal Pan with
satin-finish bottom
xTAwvoA c/1 JC.«\/aA a an
Cookies
Brownies
Drop
Refrigerator
Rolled or sliced
Metal or Glass Pan
Cookie Sheet
Cookie Sheet '
Cookie Sheet
Fralis,
Other Desserts
Baked apples
Custard
Glass or Metal Pan
Glass Custard Cups or Casserole
(set in pan of hot water)
Puddings, Rice
Glass Custard Cups or Casserole
and Custard
Pies
Frozen
Meringue
One crust
Two crusts
Pastry shell
Miscellaneous
Baked potatoes
Scalloped dishes
Souffles
Foil Pan on Cookie Sheet
WAWOt
Glass or Satin-finish Metal Pan
Glass or Satin-finish Meta! Pan
Glass or Satin-finish Metal Pan
r\
____
OCl Ull V^VCIl OllCli
OlL-li?
Glass or Metal Pan
Glass Pan
Shelf
F<№lltlon
B,C
A,B
B
B
A, B
n
D
B
A.B
A, B
A,B
A
X>
A
A,B
B
A,B
B
vs
JL9
B,C
B,C
B,C
B,C
A, B,C
B
B
A
A tt
A,B
B
B
A, B, C
A, B,C
B
desired. Rapid browning
achieved by preheating cast-iron cookware.
% tliA fwr^n ic ty/\f o1tx/o\7C HAr*ACcotn/
M. I.WAAW'UVAJLA& MAW W WAA Ai9 AAW «AA ▼▼ «9 AAWWW«9t9«AA ^ ^
especially for foods which cook longer than 30 to 40
minutes. For foods with short cooking times,
preheating gives best appearance and crispness.
Although preheating is not necessary with meats, it is
__£•
___
piCiCilCU l(jr Uct&CU guuus.
4. Open the oven door to check food as little as
Temperature
400°-475°
] r______1___
A ViiAA^-rkr» ar%xt^
w uxx&v^xx xx^axxxxg cuiKi I.V/ w^xi&xg^.
Oven
Time,
Minutes
15-20
Comments
Canned, refiigerated biscuits take 2 to
4 minutes less time.
350‘’-400°
400°-450°
350°
400°-425°
20-30
20-40
45-55
20-30
Preheat cast-iron pan for crisp crast.
Decrease about 5 minutes for muffin
mix, or bake at 450°F. for 25 minutes,
then at 350°F. for 10 to 15 minutes.
AC £.f\
45-60
375°-425°
375°-425°
350°-375°
325°-375°
^nco Anno
J -*tw
325°-350°
325”-350"
350°-375°
275°-300°
45-60
10-25
20-30
30-55
in 1 c
45-60
45-65
20-25
2-4 hrs.
Dark metal or glass gives deepest
Kr/\117nvnrV
L/A%/WAAAAAg.
Two-piece pan is convenient.
Liu0 pEïï wîîh wEXëu pEpcI.
Paper liners produce moister cmsts.
Use 300°F. and Shelf B for small or
individual cakes.
350°-375°
-J«A O
J»J\J
325°-350°
350°-400°
400°-425°
375°-400°
350°-400°
300°-350°
20-35
At\ AC n
25-35
10-2 0
6-12
7-12
30-60
30-60
If baking four layers, use Shelves B and D.
Bar cookies from mix use same time.
Use Shelf C and increase temp. 25°F.
to 50°F. for more hrowninp.
" , ' —
-------------------------------------------------------
O'
Reduce temp, to 300°F. for large
custard.
325°
50-90
Cook bread or rice pudding with
custard base 80 to 90 minutes.
400°-425°
-JACO -2«A O
45-70
1< OC
Large pies use 400°F. and more time.
To Quickly brown menngUc, use 400°F.
for 8 to 10 minutes.
400°-425°
400°-425°
■''450’°”“
325°-375°
300°-350°
40-60
40-60
Í2-15
60-90
30-60
30-75
Custard fillings require lower
frpttrmAraiiirA arw4 1r\n<TAr tinriA
increase time for larger amount
or size.
16
Page 17

ROASTING
/L
Roasting is cooking by dry heat. Tender meat or
poultry can be roasted uncovered in your oven.
Roasting temperatures, which should be low and
crp»anv iri»#»« CrtorriarintT tr» a TninimiiTn lA/Han «•rtactirii»
steady, keep spattering to
it is not necessary to sear, baste, cover or add water to
your meat.
Roasting is really a baking procedure used for meats.
Therefore, oven controls are set to BAKE or TIMED
BAKE. (You may hear a slight clicking sound,
indicating the oven is working properly.) Roasting is
W U AJLUJIUAJIAUAAX. TT tXWtl X\y(Xi9UXl^,
f ; just follow
Step 1: Check
W7Airrlit r%f m iicit-
VT WJL^AJIV vrx
and place,
fat-side-up, on
roasting rack in a
__ __ _ i
Line broiler pan with aluminum foil when using pan
for marinating, cooking with fruits, cooking heavily
cured meats, or for basting food during cooking.
Avoid spilling these materials on oven liner or door.
Step 21 Position meat in oven on shelf in A or B
position. No preheating is necessary.
shallow pan.
^Diuuci pail wiui
rack is a good
pan for this.)
_
__
„.ixU
OVEN SET
Step 4: Most meats continue to cook slightly while
standing, after being removed from the oven.
Standing time recommended for roasts is 10 to 20
minutes. This allows roasts to firm up and makes
them easier to carve. Internal temperature will rise
about 5° to 10°F.; to compensate for temperature rise,
if desired, remove roast from oven sooner (at 5° to
10°F. less than temperature in the guide).
NOTE: YOU may wish to use TIMED BAKE, as
described in the Baking section of this book, to turn
oven on and off automatically.
Remember that food will continue to cook in the hot
oven and therefore should be removed when die
desired internal temperature has been reached.
OViNTEMP
Step 3: Turn
OVEN SET (on
some models) to
BAKE and OVEN
TEMPto325°F.
Small poultry
may be cooked
at375°F.for
best browning.
Frozen Roasts
• Frozen roasts of beef, pork, lamb, etc., can be started
without thawing, but allow 10 to 25 minutes per
pound additional time (10 minutes per pound for
roasts under 5 pounds, more time for larger roasts).
Qisestlons and Answers
Q, Is it necessary to check for doneness with a
meat thermometer?
A. Checking the finished internal temperature at the
completion of cooking time is recommended.
Temperatures are shown in Roasting Guide on
r^nr^nicifA nOfT/a Q IKo of
with reduced time, check with thermometer at
half-hour intervals after half the time has passed.
Q. Why Is my roast crumbling when I try to carve it?
A= Roasts are easier to slice if allowed to cool 10 to
20 minutes after removing from oven. Be sure to cut
across the grain of the meat.
X VKX XV/WOtO WV/V/XWU CiL J. .
« Thaw most frozen poultry before roasting to ensure
even doneness. Some commercial frozen poultry can
be cooked successfully without thawing. Follow
directions given on package label.
Q. Do 1 need to preheat my oven each time 1 cook a
roast or poultry?
A. It is unnecessary to preheat your oven.
Q. When buying a roast, are there any special tips
that would help me cook it more evenly?
A. Yes. Buy a roast as even in thickness as possible,
or buy rolled roasts.
Q. Can I seal the sides of my foil “tent” when
roasting a turkey?
A. Sealing the foil will steam the meat. Leaving it
unsealed allows the air to circulate and brown the meat.
W
о
m
So
D
17
Page 18

I//Lm
ROASIMG GUIDE
1. Position oven shelf at B for small-size roasts (3 to
7 ibs.) and at A for larger roasts.
2. Place meat fat-side up, or poultry breast-side-up, on
broiler pan or other shallow pan with irivei. Do not
cover. Do not stuff poultry until just before roasting.
Use meat theimometer for more accurate doneness,
(Do not place thermometer in stuffing.)
3. Remove fat and drippings as necessary. Baste
as desired.
‘ ' •
lype
Oven
Temperature
Meat
Tender cuts of beef; rib, high quality 325°
sirloin tip, rump or top round*
Lamb leg or bone-in shoulder*
Veal shoulder, leg or loin*
325° Rare: 21-25 20-23
325° Well Done:
Pork loin, rib or shoulder* 325°
Ham, precooked
325° To Warm:
Done ness
Rare: 24-30 18-22
Medium:
Wei! Done;
Medium: 25-30
\X7a11
TTvat A.'waiW'«
Well Done:
4. Standing time recommended for roasts is 10 to
20 minutes. This allows roasts to firm up and makes
them easier to carve. Internal temperature will rise
ahniit to 10° F! to onmnensflte for temnerature
----------------— ----
increase, if desired, remove the roast from oven sooner
(at 5° to 10°F. less than temperature in this guide).
5. Frozen roasts can be conventionally roasted by
adding 10 to 25 minutes per pound more time than
given in guide for refrigerated roasts. (10 minutes per
pound for roasts under 5 pounds.) Defrost poultry
before roasting.
---------
-------
• ’ —
-------------------i-------------------------------
Approximate Roasting Time
in Minutes per Pound Temperature °F.
3 to 5 ibis. 6 to 8 lbs.
30-35
22-25
______
'in 'iK : OQ
35-45
24-28
30-40
35-45 30-40
iO minutes per pound (any weight)
Under 19 Ibs. 10 to 15 lbs.
Ham, raw
325° Well Done:
20-30 17-20
*For boneless rolled roasts over 6
inches thick, add 5 to 10 minutes per
pound to times given above.
Poultry 3 to 5 lbs. Over 5 It«.
Chicken or Duck
Chicken pieces
325°
Well Done: 35-40
weii Done:
.ÎD-4U i85°-i90°
30-35
10 to 15 lbs. Over 15 lbs. In thigh:
Turkey
325°
Well Done:
20-25 15-20 185°-190°
-------------
r-----------------------
Interna!
130°-140°
150°-160°
170°-185°
130°-140°
150°-160°
i f \J "•XU«,./
170°-180°
170°-180°
i25°-i30°
170°
185°-190°
Broiling is cooking food by intense radiant heat from
the upper unit in the oven. Most fish and tender cuts
of meat can be broiled. Follow these steps to keep
spattering and smoking to a minimum.
Step li If meat has fat or gristle near edge, cut vertical
slashes through both about 2" apart. If desired, fat may
be trimmed, leaving layer about 1/8" thick.
Step 2: Place meat on broiler rack in broiler pan.
Always use rack so fat drips into broiler pan;
otherwise juices may become hot enough to catch fire.
18
BROILING
Step 3; Position shelf on recommended shelf position
as suggested in Broiling Guide. Most broiling is done
on C position, but if your range is connected to 208
Volts, you may wish to use a higher position.
Step 4i Leave door ajar a few inches. The door stays
open by itself, yet the proper temperature is
maintained in the oven.
Page 19

step 5: Turn OVEN SET (on some models) and
OVEN TEMP knob to BROIL. Preheating units is not
necessary (S^^ Tinl'#»? in Rroilinc» ^
.&1.A
VrJlAJ.Alg
Hi
Step 6: Turn food only once during broiling. Time
foods for first Side per Broiling Guide.
Turn food, then use times given for second side as a
tv piviviivtl twv
and times are given together, use first times given for
thinnest food.)
Step 7: When finished broiling, turn OVEN SET or
OVEN TEMP knob to OFF (depending on your
model). Serve food immediately, leaving the broiler
pan and rack outside oven to cool during meal for
easiest cleaning.
o
taut
o
Use of Aliimlniim Foil
You can use aluminum foil to line your broiler pan and broiler rack.
However, you must mold the foil tightly to the rack and cut slits in it just
Without the slits, the foil will prevent fat and meat juices from draining to
the broiler pan.
do not cut the slits, you are frying, not broiling.
xiic uuuxu ucwuluc iiui ciiuu^ii lu caicii uii lire, ii you
Questions Si Answers
Q. When broiling, is it necessary to always nse a
rack in the pan?
A. Yes. Using the rack suspends the meat over the
pan. As the meat cooks, the juices fail into the pan,
thus keeping meat drier. Juices are protected by the
rack and stay cooler, thus preventing excessive spatter
and smoking.
O. Should 1 salt the meat before broiling?
A. No. Salt draws out the juices and allows them to
evaporate. Always salt after cooking. Turn meat with
tongs; piercing meat with a fork allows juices to
escape. When broiling poultry or fish, brush each side
often with butter.
Q. Why are my meats not turning out as brown as
they should?
A. In some areas, the power (voltage) to the oven
may be low. In these cases, preheat the broil unit for
10 minutes before placing broiler pan with food in
oven. Check to see if you are using the recommended
shelf position. Broil for longest period of time
indicated in the Broiling Guide. Turn food only
once during broiling.
Q. Do I need to grease my broiler rack to prevent
meat from sticking?
A. No. The broiler rack is designed to reflect broiler
heat, thus keejping the surface cool enough to prevent
meat from sticking to the surface. Kowevcf, spraying
the broiler rack lightly with a vegetable cooking spray
before cooking will make cleanup easier.
a
fb
S
19
dQ
Page 20

//Г
BROILING GUIDE
1. Always use broiler pan and rack that comes with
your oven. It is designed to minimize smoking and
spattering by trapping juices in the shielded lower part
of the pan,
2. Oven door should be ajar. There is a special
position on door which holds door open correctly.
3. For steaks and chops, slash fat evenly around
outside edges of meat. To slash, cut crosswise through
outer fat surface just to the edge of the meat. Use
tongs to turn meat over to prevent piercing meat and
losing juices.
4. If desired, marinate meats or chicken before
1_zii_____1
UlUUlUg, Ul urusil WlUl UOIUCWUC SU.U^C litst J lU X\J
minutes only.
Food
___
1. 1_______ ^
Quantity and/or
Thickness
___
^ I.,.,* e 4-^ in
Shelf
Position
Time, Minutes
Bacon 1/2 lb. (about 8 C
thin slices)
Ground Beef
Well Done
i ib. (4 patties)
1/2 to 3/4 inch thick C
Beef Steaks
Rare
Medium
Well Done
Rare
Medium
XlTkll
Chicken
1 inch thick
(1 to 1/2 lbs.) C 9
V/2 inch thick C 10 7-8
(2 to 2‘/2 lbs.) C 15
1 whole
C 7
c 13
G
A 35
(2 to 2'/2 lbs.),
split lengthwise
Bakery Products
Bread (Toast) or 2 to 4 slices
Toaster Pastries
English Muffins
Lobster Tails
lpkg.(2)
2 (split) C 3-4
A Ti
C I/2-2 1/2
D
(6 to 8 oz. each) turn over. Brush with melted butter before and
Fish
1-lb. fillets 1/4 to C 5 5
1/2 inch thick lemon butter before and during cooking if
Ham Slices 1 inch thick
в 8
(precooked)
Pork Chops 2 (1/2 inch thick) C
Well Done 9, n inch thie.kt в
about 1 lb.
Lamb Chops
Medium
Well Done
Medium
Well Done
Wienei« and similar
pi DUUOa^U^^
2(1 inch thick)
about 10 to 12 oz.
c
c
2 (l'/2 inch thick) C 10
about 1 lb. в 17 12-14
1-lb. pkg. (10) C 6
bratv/urst
5. When arranging food on pan, do not let fatty edges
hang over sides, which could soil oven with
fat dripping.
Ue UUC2» IlUt IICCU tU JIV/A
very thin foods, or to increase browning, preheat if
desired.
7. Frozen steaks can be conventionally broiled by
positioning the oven shelf at next lowest shelf
position and increasing cooking time given in this
guide VA times per side.
8. If your range is connected to 208 Volts, rare steaks
may be broiled by preheating the broiler and
pGsitiCuiug the oven shelf one position higher.
First Side
SecondSide
Time, Minutes Comments
3/2
7 4-5
i ■% £1
iO-iO Do not
10
13 13
8 4-/
10
3/2
Arrange in single layer.
Space evenly.
Up to 8 patties take about same time.
7
9
13
Steaks less than 1 inch tliick cook through
before browning. Pan frying is recommended.
Slash fat.
14-16
10-15
Reduce time about 5 co 10 minutes per
side for cut-up chicken. Brush each side
with melted butter. Broil skin-side-down first.
Space evenly. Place English muffins cut-sideup and brush with butter, if desired.
J.U
______1__________
uiruugll OU^K. Ul ¡¡illCll. opi^uu upcu*
1,
after half of broiling time.
Handle and turn very carefully. Brush with
desired. Preheat broiler to increase browning.
8
Increase time 5 to 10 minutes per side
for 1 '/2 inch thick or home-cured ham.
10 Slash fat.
Slash fat.
10
4-6
1-2 If desired, split sausages in half
lengthwise; cut into 5 to 6 inch pieces.
20
Page 21

OPERATING THE SELF-CLEANING OVEN
i^urnim ciemiuig uii№: ^ numm
Before Setting Oven Controls. Check These Things?
1. Prepare oven for cleaning.
2. Turn OVEN SET and OVEN TEMP knobs to
CLEAN.
3. Slide the oven door latch to the right as far as it
will go.
4. Set automatic oven timer.
Step i: Remove broiler pan, broiler rack and other
cookware from the oven. (Oven shelves may be left in
oven. NOTE* Shelves will discolor during the self
clean cycle.)
---------
use soap, rinse thoroughly before self-cleaning to
prevent staining.
'll Winft ?in hftavv Rf>il rm nv#»n hnitnm If vnii
'S'
----------
-----
’ **JT^ ”1^ ' J ^ T W^»w***» ** J
^ Ae Oven Front Frame
_
^ 1
__
Step 3: Clean spatters or spills on oven front frame
(A) and oven door outside gasket (B) with a dampened
cloth. Polish with a dry cloth. Do not clean gasket
(B) . Do not allow water to run down through
openings in top of door (C). Never use a commercial
oven cleaner in or around self-cleaning oven.
• Clean top, sides and outside front of oven door
with soap and water. Do not use abrasives or oven
cleaners.
Step 4; Close oven door and make sure oven light
(D) is off.
Caution: Chrome drip pans should never be cleaned in
the seif-cleaning oven.
w
3
w
»Hic
«
dO
s.
a
Mow to Set Oven for Cleaning
step 1: Turn OVEN SET and OVEN TEMP knobs to
CLEAN. Controls will snap into position when the
CLEAN location is reached.
Step 2: Slide the
latch handle to the
right as far as it
will go.
^tep 3: biet the automatic oven timer:
STOPTJME DELAY START
■A
pusHTOTumt)
® Make sure both the clock and the DELAY START
dial show the correct time of day. When the DELAY
START knob is oushed in and turned, it will “non”
into place when the time shown on the clock is reached.
" - ^ - - „ , — JT r
, CiOCk
• Push in and turn STOP TIME knob. Set Stop Time
for three hours later than present time of day—for
example, if it is 6:00 now, set Stop Time for 9:00.
The oven cycling light (below OVEN TEMP knob),
the CLEANING light and the OVEN ON light will
giQw^ indicating that the self-clean cycle has begun.
When the oven reaches a certain temperature, the
oven door will lock. The latch handle cannot be
moved until oven cleaning is complete and the oven
cools down. Oven door and window (on some
models) get hot during self-clean cycle.
DO NOT TOUCH.
The oven will smoke the first time you use the
seif-clean cycle even though you have wiped up
w/wvwodivw duii« JLUio Id ii^iiiiai aim diiuuiu diup m
about 10 minutes. To help control the smoke, turn
on the exhaust fan over the range when you use the
self-clean cycle the first time.
S'
m
B
fb
m
T
Q
S3
m
©
a
Page 22

OPERATING THE SELF-CLEANING OVEN
Follow These Steps after Self-Cleaning
After cleaning is complete, the door will stay
locked until the oven cools down. This takes about
30 minutes.
Step 1: When oven has
cooled, slide the latch
handle to the left as far
as it will go and open the
door. If the door will not
open, move the latch
handle back to the right,
wait an additional 15 minutes
and then try again. Do not force the latch handle.
(continued)
Step 2: Turn
OVEN SET knob
to OFF.
Step 3: Turn
OVEN TEMP
knob to WARM.
NOTE: To start and stop cleaning at a time later than
shown on clock, push in and tarn DELAY START
dial to time you wish cleaning to start. Then set STOP
TIME dial for three hours later than the Start Time.
Oven will automatically turn on and off at the set times.
Questions and Answers
Q. Why won’t my oven clean
immediately even though I set
all the time and clean knobs
correctly?
A. Check to be sure your DELAY
START dial is set to the same time
as the range clock. Also check to
be sure latch handle is moved to
the right.
Q. If my oven clock is not working,
can I still self-dean my oven?
A. No. Your Automatic Oven
Timer uses the range clock to
help start and stop the self
cleaning cycle.
Q. Can I use commercial oven
cleaners on any part of my
self-cleaning oven?
A. No cleaners or coatings should
be used around any part of this
oven. If you do use them and do
not wipe the oven absolutely clean
afterward, the residue can scar the
oven surface and damage metal
parts the next time the oven is
automatically cleaned.
Q, Can I dean the Woven
Gasket around the oven door?
A. No, this gasket is essential for
a good oven seal, and care must be
taken not to rub, damage or move
this gasket.
Qc After having just used the
oven, I could not move the latch
handle. Why?
A. After several continuous hightemperature baldngs or broilings,
the door cannot be latched, if this
happens, let the oven cool by
opening the oven door. After the
oven has cooled, you will be able
to latch the oven door for self-cleaning.
Q. What should I do if excessive
smoking occurs during cleaning?
A. This is caused by excessive
soil, and you should switch the
OVEN SET knob to OFF. Open
windows to rid room of smoke.
AJIqw the oven to cool for at least
one hour before opening the door.
Wipe up the excess soil and reset
the clean cycle.
Q. Is the “crackling” sound I
hear during cleaning normal?
A. Yes. This is the metal heating
and cooling during both the
cooking and cleaning fanctions.
Q. Should there be any odor
during the cleaning?
A. Yes, there may be a slight
odor during the first few cleanings.
Failure to wipe out excessive soil
might also cause an odor when
cleaning.
O. What causes the hair-like lines on
the enameled surface of my oven?
A. This is a normal condition
resulting from heating and cooling
during cleaning. Tliey do not affect
how your oven performs.
Q. Why do I have ash left In my
oven after eleaning?
A. Some types of soil will leave a
deposit which is ash. It can be
removed with a damp sponge or clotli.
Q. My oven shelves do not slide
easily. What is the matter?
A. After many cleanings, oven
shelves may become so clean they
do not slide easily. To make
shelves slide more easily after each
self-cleaning cycle, dampen
fingers with a small amount of
cooking oil and rub lightly over
sides of shelf where they contact
shelf supports.
Q. My oven shelves have become
gray after the self-dean cycle. Is
this normal?
A. Yes. After the self-clean cycle,
the shelves may lose some luster
and change to a deep gray color.
Q. Can i cook food on the
cooktop while the oven Is
self-deanmg?
A. Yes. While the oven is self
cleaning, you can use the cooktop
just as you normally do.
22
Page 23

AMFI r^¥ ITAMIMn
See Oeaning Guide.
Proper care and cleaning are important so your range will give you efficient
and satisfactory service. Follow these directions carehilly in caring for your
range to assure safe and proper maintenance.
Cooktop
The porcelain enamel cooktop is sturdy but breakable
if misused. This finish is acid-resistant. However, any
food spills with a high acid content (such as fruit
juices, tomato or vinegar) should not be permitted to
remain on the finish.
Lift-Up Cooktop
Some models have a cooktop that can be lifted up for
easier cleaning. To make cleaning easier, the entire
(on some models)
cooktop may be lifted
up and supported in
the up position.
Be sure all surface units are turned off before
rmsing the cooktop. There are two side supports that
lock into position when the cooktop is lifted up. The
Calrod® units do not need to be removed before lifting.
After cleaning under the cooktop with hot, mild soapy
water and a clean cloth, lower the cooktop. Be carefol
not to pinch your fingers.
To lower the cooktop, push the rods back and gently
lower the cooktop until it rests in place.
©
s
m
m
I"
n
Surface Units and Drip Fans
To clean the surface units, turn the control to die
highest setting for a minute. The coils will bum off
any soil.
CAUTION
® Do not immerse the surface units in liquids of any kind.
® Do not clean the surface units in a dishwasher.
® Do not bend the surface unit plug terminals.
• Do not attempt to clean, adjust or in any way repair
To remove the drip pans for cleaning, the surface units
must be removed first.
Surface Unit.
Receptacle
unp ran
Lift the surface unit about 1 inch above the drip pan
and pull it out.
Do not lift the surface unit more than 1 Inch* If you
do, it may not lie flat on the drip pan when you
plug it back In.
Repeated lifting of the surface unit more than
i inch above the drip pan can permanently
damage the receptacle.
To replace a surface unit:
® Replace the drip pan into the recess in the cooktop.
Make sure opening in the pan lines up with the
receptacle.
® Insert the terminals of the surface unit through
the opening in the drip pan and into the receptacle.
® Guide the surface unit into place so it rests evenly.
Q. Can I cover the drip pans with foil?
A. No, because using foil so close to the receptacle
could cause shock, fire or damage to the range. See
the Cleaning Guide for cleaning suggestions.
n
g
p
p
p
23
Page 24

CARE AND CLEANING
(continued)
Oven Vent
The oven is venied through an opening under the right
rear surface unit. Never cover the opening v^ith
aluminum foil or any other material. This would
prevent the oven vent from working properly.
Cooktop Surface Lamp (on some models)
When changing a cooktop lamp, do not touch the
metal at the ends of the lamps
The cooktop light is easily replaced with a fluorescent
tnhc» comí» t*/Qttíjrrí» /’ViOMfrirnY th#» lanr»«
V/X XI.AW TV JUf'V'XWXW UAW
pull the plug to the range or disconnect the power at
the main fuse or circuit breaker panel.
To remove:
• Lift the Imp cover by pulling the bottom edge
toward you and then up.
® Place fingers on top near each end of the lamp.
• Roll the top of the lamp gently toward the front of
the range and gently pull the lamp from the socket,
making sure it does not hit the lamp cover.
To replace:
® Place fingers on the top near each end of the lamp.
• Press the lamp into the slots until it snaps into place.
• Move lamp cover down and snap into place.
24
Control Panel and Knobs
Clean up any spills or spatters with a damp cloth.
Remove heavier soil with warm, soapy water.
Clean control panel with mild liquid dish detergent
and a soft cloth. Rub control panel lightly.
CAUTION: Do not use abrasives of any kind on the
control panel. The lettering on models with touch pads
is sensitive to abrasives and pressure.
The control knobs may be removed for easier
cleaning. To remove knob, pull it straight off the stem.
Wash knobs in soap and water but do not soak.
Removable Oven Door
To REMOVE door, open to BROIL position, or where
y\^u vaiwii« liuiu uwui ixit ii up
and away from the hinges.
To REPLACE, line up the door with the hinges and
push the door firmly into place.
Page 25

i;;
Oven Lamp Replacement (on some models)
CAUTION: Before replacing your oven lamp bulb,
disconnect the electric power for your range at the
main fuse or circuit breaker panel or pull the plug.
Be sure to let the lamp cover and bulb cool
nomnli^.tp.lv hpfnrp rp.mrivina nr rnnliinina thfMTi Wh<»n
-
----r-----
in use, light bulbs can become warm enough to break
if touched with a moist cloth or towel. When cleaning,
avoid touching warm lamps with cleaning cloths if the
lamp cover is removed.
The oven lamp (bulb) is covered with a glass
removable cover which is held in place with a wire.
Remove the oven door, if desired, to reach the
cover easily.
To remove:
* Hold your hand under the cover so it doesn’t fall
when released. W^ith fingers of the same hand, finnly
push back the wire until it clears the cover. Lift off
the cover.
DO NOT REMOVE ANY SCREWS.
• Ri».nlnrp hiilh «/ifh ilii-watt tìntni» annlianr»#» hiilH
To replace cover:
«Place it into the groove of the lamp fecepiacle. Full
the wire forward to the center of cover until it snaps in
place. When in place, the wire holds the cover firmly.
Be certain the wire is in the depression in the center of
thecover.
• Connect electric power to the range.
-----------
----
---- '"t> "" ■“i"
TT JLM.JL IV TT MW J JlM1.e.TMiLW'*
How to Remove the Storage Drawer or,
Kick Раме! to Clean Under the Range
The area under the range can be reached easily for
cleaning by removing ttie bottom drawer (on some
models). To remove, pull the drawer out ¿1 the way,
tilt up the front and remove it. To replace, insert glides
at the back of the drawer beyond the stop on range
glides. Lift the drawer if necessary to insert easily. Let
the front of the drawer down, then push in to close.
To clean under models with a front kick panel,
remove the panel by pulling it straight out at the
bottom. To replace the panel, first hook the top tabs
on and then the bottom tabs.
25
Page 26

CLEANING GUIDE
PART
Bake Unit and
Broi! Unit
Broiler Pan
and Rack
Calrod® Surface
Unit Coils
Ciirome-Plated
Drip Pans
Control Knobs:
Range Top and Oven
Metal, including
Chrome Side Wms
and IVim Strips
Outside and Inside
of Oven Door*
Outside Glass Finish
Oven Gasket*
Oven Liner
Porcelain Enamel
and Painted
Surfaces*
Porcelain Enamel
Drip Pans
Shelves
(See Self-Cleaning
Oven Directions)
Storage Drawer
^Spillage of marinades, fruit juices, tomato sauces and basting materials containing acids may cause discoloration. Spillovers should be wiped up
immediately, with care being taken not to touch any hot portion of the oven. When the surface is cool, dean and rinse.
MATERIALS TO USE
• Soap and Water
• Soap-Filled Scouring Pad
• Dishwasher
• Soap and water
• Stiff-Bristled Brush
• Plastic Scouring Pad
»Mild Soap and Water
• Soap and Water
• Soap and Water
* Soap and Water
• Soap and Water
* Paper Towel
_ ТЧ
___
J-^ry ^ШШ
• Soap and Water
* Ammonia
• Soap-Filled Scouring Pad
• Soap and Water
• Self-Clean Cycle
* Soap and Water
/^1
GENERAL DIRECTIONS
Do not clean the bake unit or broil unit. Any soil will bum off when the unit is heated.
NOTE: The bake unit is hinged and can be lifted gently to clean the oven floor. If
SpillOVcF, FcSidlic, OF aSh aCCUiliUlaicS arOUnd the bake Uilit, gefitiy wipe afOUiid the Ufiit
with warm water.
Drain fat, cool pan and rack slightly. (Do not let soiled pan and rack stand in oven to
cool.) Sprinkle on detergent. Fill the pan with warm water and spread damp cloth or paper
towel over the rack. Let pan and rack stand for a few minutes. Wash; scour if necessary.
Rinse and dry. OPTION: The broiler pan and rack may also be cleaned in a dishwasher.
DO NOT CLEAN IN SELF-CLEANING OVEN.
DO NOT USE dishwasher
to clean the surface unit coils.
DO NOT handle the unit
before completely cooled.
DO NOT immerse plug-in
units in any kind of liquid.
Clean as described below or in the dishwasher. DO NOT CLEAN IN SELF-CLEANING
OVEN; pans will discolor. Wipe after each cooking so unnoticed spatter will
not bum on next time you cook. To remove bumed-on spatters use any or all cleaning
mEicnals mentioned. Rub lightly with scouring pad to prevent scratching of the surface.
Pull off knobs. Wash gently but do not soak. Dry and return controls to range, making
sure to match flat area on the knob and shaft.
DO NOT USE steel wool,
abrasives, ammonia, acids
DO NOT USE oven
cleaners, cleansing
powders or harsh
abrasives.
Wash all glass with cloth dampened in soapy water. Rinse and polish with a dry cloth. If knobs
are removed, do not allow water to ran down inside the surface of glass while cleaning.
Avoid getting ANY cleaning materials on the gasket.
Cool before cleaning. Frequent wiping with mild soap and water will prolong the time
between major cleanings. Be sure to rinse thoroughly to avoid additional staining:
For heavy soiling, use your self-cleaning cycle often.
DO NOT USE oven
cleaners, deansing
powders or harsh
abrasives. These might
scratch the surface.
Porcelain drip pans can be cleaned in dishwasher or by hand. Place them in a covered
container (or plastic bag) with 1/4 cup ammonia to loosen soil. Then scmb with
scouring pad if necessary.
For heavy soil, the shelves can be cleaned during the self-clean cycle. They will change
to a deep gray color and will not slide as easily as before self-cleaning. To make them
slide more easily, use your fingers to apply a little bit of cooking oil to the sides of the
shelf where they contact the shelf supports.
For cleaning, remove drawer by pulling it all the way open, tilt up the front and lift out.
Wipe with damp cloth or sponge and replace. Never use harsh abrasives or scouring pads.
Spatters and spills bum away when the coils are heated.
t tHg end of 3i remoye sll psiis from the Cslrod®
unit and heat the soiled units at HI. Let the soil bum off
about a minute and switch the units to OFF. Avoid getting
cleaning materials on the coils. Wipe off any cleaning
materials with a damp paper towel before heating the
Calrod® unit.
To safely clean surfaces: Wash, rinse, and then polish
with a diy cloth.
INSIDE OF DOOR: Clean ONLY the door liner outside
the gasket. The door is automatically cleaned if the oven is
in the self-cleaning cycle. DO NOT rah or damage gasket.
Avoid getting soap and water on the gasket or in the
openings on the door. Rinse well. NOTE: Soap left on
liner causes additional stains when oven is reheated.
OUTSIDE OF DOOR: Use soap and water to thoroughly
clean the top, sides and front of the oven door.
If acids should spill on the range while it is hot, use a dry
paper towel or cloth to wipe up right away. When the
surface has cooled, wash and rinse. For other spills, such
as fat spatterings, etc., wash with soap and water when
cooled and then rinse. Polish with a dry cloth.
26
Page 27

INSTALLATION INSTRUCTIONS
BEFORE YOU BEOIN
Read these instructions completely
and carefiiUy.
IMPORTANT: Save these instructions for
the local electrical inspector's use.
IMPORTANT: OBSERVE ALL GOVERNING
CODES AND ORDINANCES.
NOTE TO INSTALLER: Leave these
instniciions with the appliance after
installation is completed.
NOTE TO CONSLMER; Keep this Use and
Care Guide and Installation Instructions for
future use.
NOIE: This ^pHance must be propeiify^
j grounded.
mmim will need
Large blade screwdriver
Channel lock pliers or small ratchet wrench with
7/32" socket (for leveling range)
STEP1
m KV kBB BB «m tamioB n bi bbu v b ui a«iiia«v
VA" spacing is recommended from the range to
adjacent vertical walls above cooktop surface.
Allow 30" minimum clearance between surface
units and bottom of unprotected wood or metal
top cabinet, and 15" minimum between
countertop and adjacent cabinet bottom.
To eliminate the risk of burns or fire by reaching
over heated surface units, cabinet storage space
oK/Wr/Ii flnci linifo olinillrl Ko Tf
cabinet storage is to be provided, the risk can be
reduced hy installing a range hood that projects
horizontally a min. of 5" beyond the bottom of
the cabinets.
THi UPSHIHIS
OUlX UXXXi.O OXXVfUXVL CXVVrXVAV^VX« XX.
NOT LESS THAN
WIDTH OF RANGE
^
r"
---------
------------------
^—-□P'
«
^HOOD
^5" MIN.
.....
..........
ELiCfilOL ilQyiilMlifi
CAUTION, FOR PERSONAL SAFETY:
DO NOT USE AN EXTENSION CORD WITH
THIS APPLIANCE.
OTMOiTF. WOTTW- FfTSE O^ OPEN
CIRCUir BREAKER BEFORE BEGINNING
INSTALLATION.
This appliance must he supplied with the proper
voltage and frequency, and connected to an
individual, properly grounded branch circuit,
protected by a circuit breaker or time delay fuse, as
noted on the rating plate.
Wiring must conform to National Electric Codes.
If the electric service provided does not meet the
above specifications, it is recommended that a
licensed electrician install an approved outlet
Because range terminals are not accessible after
range is in position, flexible service conduit or cord
must be used. .
WALL
INSTALL
OUTLET BOX
ON EITHER
SIDE OFQ
\A/A I 1
OUTLET
BOX
co'rÎ^^^^ floor
Atixi-1 Ip tsracKei
(install in either rear corner)
( connnuea next pagej
27
Page 28

INSTALLATION INSTRUCTIONS
(continued)
РЮШ» Ш тят («entd)
u,-Ante «С
floor coveri^s such as cushioned vinyl or
cai^eting. When moving the range on this type^
of flooring, use care, and foiiow these simple and
inexpensive instructions.
The range should be installed on a 1/4 mch thick
sheet of plywood (or similar material) as follows:
When the floor eovering ends at the front of the
rangOf die area that the range will rest on should
be built up with plywood to the same level or
higher than the floor covering. Шз will aUow
the range to be moved for cleaning or servicing.
SfiP2 , .
Pii^i ¥m c®iigc?i®i
Use only a 3-conductor, or if required a 4conductor range cord set as noted below, 'píese
cord sets are provided with ring type terminals.
'The electrical rating of the cord must be 125/250
volts minimum, 40 amperes.
NO'TE: Only a 4-conductor cord is to be used
when the appliance is installed in a mobile home
or where local codes do not permit grounding
through the neutral.
SfiPS
1. Locate connector block at the bottom rear of
range and remove rear wiring cover.
2. Directly below the connector block is a hole
with a knockout ring for accommodating conduit
fittings. Brackets provided are used to support
the flexible cord strain relief, which must be
securely attached to the cord set.
Your range, like many other household
heavy and can зеШе into soft
СТЕР 4
Power Cord Installation—Insert screws
through power cord terminals so that the screws
pass through connector block terminals and
engage nuts. Tighten screws securely.
POWER CORD
RING TERfvliNAL
_ _ POWER
CONNECTOR
BLU UK
TERMINAL
Cable Direct Installation—Clamp bare wires
between the connector block terminals and
movable nuts with screws tightened seoirely
1. Copper Wiring
SCREW
CONNECTOR
BLOCK
TERMINAL
MOVABLE
NUT
Connect the neutral or grounded wire of the
supply circuit to the neutral terminal of the
connector block, located in the center. 'The
power leads must be connected to the outside
(brass colored) terminals.
NEUTRAL
TERMINAL
" CORD
FLEXIBLE
CABLE
WlRiNG UUVbH
(SHOWN REMOVED)
STRAIN RELIEF BRACKETS
(PROVIDED WITH RANGE CORD ,
SET. NOT PART OF RANG^ \M
POWER
CORD
28
CONNECTOR
BLOCK
\
GROUNDING STRAP
(GROUNDING TO RANGE)
Ü ^
WARNING: CONNECTOR BLOCK IS
APPROVED FOR COPPER WIRE
CONNECTION ONLY.
Page 29

2. Aluminum Wiring
A. Connect length of copper building wire to
range terminal block.
B. Splice copper wires to aluminum wiring using
special connectors designed and U.L. approved
for joining copper to aluminum, and follow the
connector manufacturer’s recommended
procedure closely.
NOTE: Wire used, location and enclosure of
splices, etc., must conform to good wiring
practice and local codes.
i»a
Millie
JL« iiiuot u y J L X - L L X ui avivc^L
supplied.
2i See instructions to install (supplied with
bracket).
3. Unless properly installed, range could be
tipped by stepping or sitting on door. Injury
might result from spilled hot liquids or from
range itself.
Typical installation of Anti-Tip bracket
Aitachmeni to Wall
Brackety
SfiPi
S¥if
sPiciM mmumm iis?iiyc?§®i§
WARNING?
Frame grounded to neutral of appliance
through a link. If used in a MOBILE HOME or
if LOCAL CODES do not permit grounding
through the neutral:
1) disconnect the link from neutral,
2) use grounding terminal or lead to ground
unit in accordance with local codes, and
3) connect neutral terminal or lead to branch
circuit in usual manner.
(If the appliance is to be connected by
means of a cord set, use 4'conductor cord
for this purpose.) . ,,
M
SïlPé
iiMii?
liifMliflii
Screw Must Enter
Wood or Metal
WallPlate
li¥Elil0 THE iiiii
Tne range must be level. Leveling feet are located
at each corner of the base of the range. Remove
the storage drawer or kick panel (depending on
your model) and using channel locks, rotate the
levelingfeet in and out as required to level the
range. (For instructions on how to remove and
replace the storage drawer or the kick panel, see
the Cleaning Under the Range section in Care
and Cleaning.) On some models, there are plastic
covers which may be removed for easy
adjustment gust squeeze and pull).
One of the rear leveling feet will engage the
ANTI-TIP bracket (allow for some side to side
adjustment). Allow a minimum clearance of 1/8"
between the range and the leveling foot that is to
be installed into the ANH-TIP bracket.
Check the range for proper installation into the
ANTI-TIP bracket (after the range has been
properly installed) by grasping the edges of the
REAR burner holes and carefully attempting to
tilt the range forward.
AN^ANTl-TIP bracket is supplied with instructions
for installation in a variety of locations. The
instructions include a template, a parts list and a
list of tools necessary to complete the installation.
T>
_____
A i.1________T’a O A'r'rrv'Titr TATfVT^*r%T
imruKiniH L o/irm i
and the instructions that fit your situation before
beginning installation.
STEPS
FI W CHICK
Be sure all switches are in the “off” position
before leaving the range.
29
Page 30

QUESTIONS?
USE THIS PROBLEM SOLVER
PROBLEM
OVEN WILL
NOT WORK
OVEN LIGHT
DOES NOT V/ORK
FOOD DOES NOT
BROIL PROPERLY
FOOD DOES NOT i
ROAST OR BAKE
PROPERLY
POSSIBLE CAUSE
® Plug on range is not completely inserted in the electrical outlet.
® The circuit breaker in your house has been tripped, or a fuse has been blown.
• Oven controls not properly set.
« TVnr»r in InrlrnH nnsitinn aftpr Hpiinina
* Light bulb is loose.
® Bulb is defective. Replace.
“ Switch operating oven light is broken. Call for service.
• OVEN SET knob not set at BROIL.
• OVEN TEMP knob not set at BROIL.
• Door not left ajar as recommended.
e Trnnrrknisr elinl-f-nocition V^Airur ncp»H r'hnnV Krnilina rriiirlf»
- XJIXXJ^X OXXWXX ^V./v3XXXVyXJl
• Food is being cooked on hot pan.
® Cookware is not suited for broiling.
• Aluminum foil used on the broil pan rack has not been fitted properly and
slit as reeoiiuiierided.
• OVEN SET knob not set at BAKE.
® OVEN TEMP knob not set at BAKE.
» Shelf position is incorrect. Check Roasting or Baking Guides.
® Oven shelf is not level.
• Incorrect cookware or cookware of imoroner size is being used.
«A foil tent was not used when needed to slow down browning during roasting.
—----------
----
--------
---
--------------
J5.
CALROD® SURFACE
UNITS NOT
FUNCTIONING
PROPERLY
OVbN WILL NOT
SELF-CLEAN
OVEN DOOR
WONT LATCH
OVEN TEMPERATURE
TOO HOT OR TOO COLD
® Surface units are not plugged in solidly.
* Drip pans are not set securely in the cooktop.
® Surface unit controls are not properly set.
• Automatic timer dials not set or not set properly. Clock must be set to time of
day and the STOP TIME dial must be set and advanced beyond the time noted
on oven clock.
* The STOP TIME dial v/as not advanced for long enough.
® Both OVEN SET and OVEN TEMP knobs must be set at CLEAN setting.
® During the seif-cleaning function, a thick pile of spillover in the oven can
leave a heavy layer of ash that can insulate the area from further heat.
® Latch handle not moved to the right.
® Oven may be too hot from previous use. Open oven door to cool oven. When
oven has cooled, latch handle can again be moved.
* OVEN SET knob must be at CLEAN or OFF before latch handle can be moved.
® OVEN TEMP knob needs adjustment. See Thermostat Adjustment section.
If you need more help...call9 toll free:
GE Answer Center®
800.626,2000
consumer information service
30
Page 31

WéU Be There
With the purchase of your new GE appliance, receive the
assurance that if you ever need information or assistance
from GE, well be there. All you have to do is call—toll-free!
In-Home Repaff
S&nrice
8U-GE-CARES
(800-432-2737)
A GE Consumer Service professional
will provide expert repair service,
that’s C’
for you. Many GE Consumer Service
company-operated locations offer you
service today or tomorrow, or at your
convenience (7:00 a.m. to 7:00 p.m.
A V Cl llCl X L
Q*nn a m fr\ QotiTr--
days). Our factoiy-trained technicians
know your appliance inside and out—
so most repairs can be handled in just
one visit.
Serme Cmitaets
msea
You can have the secure feeling that
GE Consumer Service will still be
there after your warranty expires. Pur-
C4. VVAAJLftW VVCUl~
ranty is still in effect and you’ll receive
a substantial discount With a multipleyear contract, you’re assured of future
service at today’s prices.
^rts and Aeixssories
8m2B-2QB2
motMOaxm eat em8iiS.ea. #w
800.028.2000
Whatever your question about any GE
maior aoDliance. GE Answer Center®
•j XX
information service is available to
help. Your call—and your question—
will be answered prompuy and
courteously. And you can call any
time. GE Answer Center® service is
open 24 hours a day, 7 da)^ a week.
............
•' .............
----- -
---
-----
3
2
B
©
©
o
o
Individuals qualiff ed to service their
own appliances can have needed
parts or accessories sent directly to
their home. The GE parts system pro
vides access to over 47,000 parts...and
all GE Genuine Renewal Parts are
fully warranted. VISA, MasterCard
and Discover cards are accepted.
User maintenance instructions
contained in this booklet cover proce
dures intended to be performed by
any user. Other servicing generally
should be referred to qualiffed ser
vice personnel. Caution must be
exercised, since improper servicing
may cause unsafe operation.
________
MÆsÆ.
rm iTruswÊsmis ww§m
SnanU ^eedB...
m.828.2000
Upon request, GE will provide Bi'aille
controls for a variety of GE appliances,
and a brochure to assist in planning a
barrier-free kitchen for persons witli
limited mobility To obtain these items,
free of charge, call 800.626.2000.
Consumers with impaired hearing
or speech who have access to a TDD
or a conventional teletypewriter may
call 800-TDD-GMC (800-833-4322)
to request information or service.
c
©
m
fS
Page 32

WHAT IS COVERED
FULL ONE-YEAR WARRANTY
For one year from date of original
purchase, we will provide, fre"e of
charge, parts and service labor in
your home to repair or replace
any part of the range that fails
because of a manufacturing
defect.
This warranty is extended to
the original purchaser and any
succeeding owner for products
purchased for ordinary home use
in the 48 mainland states, Hawaii
and Washington, D.C. In Alaska the
warranty is the same except that it
id L.imi I udwaudd yuu iiiudi [jay
to ship the product to the service
shop or for the service technician’s
travel costs to your home.
All warranty service will be
provided by our Factory Service
Centers or by our autho.nzed
Customer Care® servicers during
normal working hours.
Look in the White or Yellow Pages
of your teiephone directory for
GENERAL ELECTRIC COMPANY,
GENERAL ELECTRIC FACTORY
SERVICE, GENERAL ELECTRICHOTPOINT FACTORY SERVICE
Vi v;idY8;;;irfi/’%ii» i mw
CUSTOMER CARE®SERVICE.
WHAT IS NOT COVERED
Some states do not allow the exclusion or limitation of incidental or consequential damages, so the above limitation or exclusion
may not apply to you. This warranty gives you specific iega! rights, and you may also have other rights which vary from state to state.
To know what your legal rights are in your state, consult your local or state consumer affairs office or your state’s Attorney General.
fyiarsaci©r">-ConsuiTier AffafrSc GE Apoliances, Louisville, ICY 40228
• Service trips to your home to
teach you how to use the product.
Read your Use and Care materlaL
If you then have any questions
about operating the product please
contact your dealer or our
Consumer Affairs office at the
address below, or call, toli free:
GE Answer Center®
800.626.2000
consumer information service
• improper instaiiation.
If you have an installation problem,
contact your dealer or installer.
You are responsible for providing
Warrantor: Qarioral Elactrlo Company
if further help is needed concerniiig this warranty, write:
adequate electrical, gas, exhausting
and other connecting facilities as
described in the Instaiiation
Instructions provided with the
product.
« Replacement of house fuses or
resetting of circuit breakers.
® Failure of the product If It Is used
for other than its intended purpose
or used commercially.
• Damage to product caused
by accident, fire, floods or acts
of God.
WARRANTOR IS NOT
RESPONSIBLE FOR
CONSEQUENTIAL DAMAGES.
This book Is printed on recycled paper.
il if»»
JBP22R JBP25GR JBP26WR
JBP26ÂR JBP27GR
 Loading...