

Page 1
1 2 3 4
Arm
Zone
Armed Power
1 2 3 4
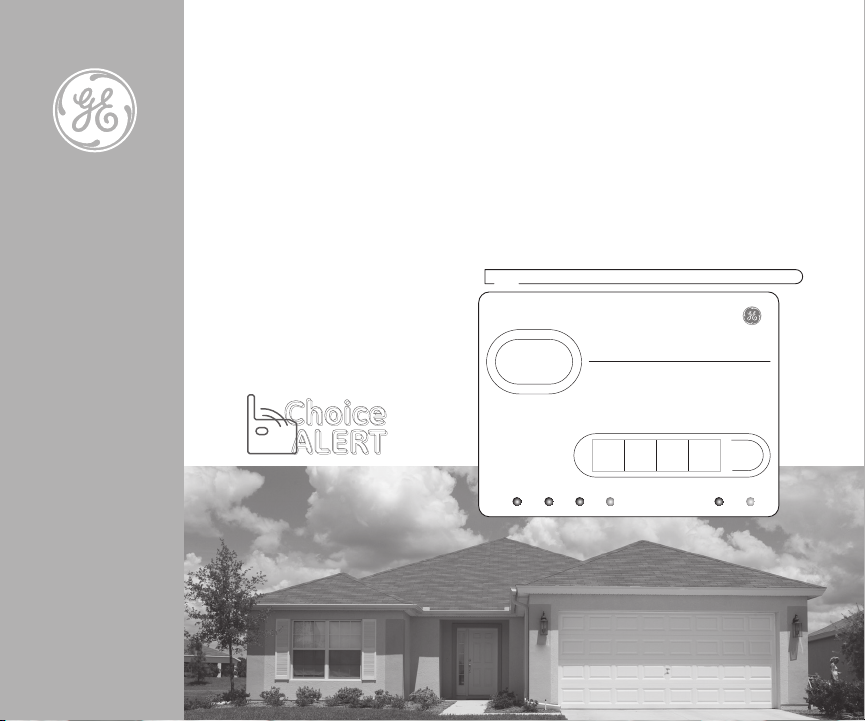
Wireless Alarm System
Choice
ALERT
Choice
ALERT
™
Control Center
User’s Manual
™
Control all Sensors
& accessories from
one location
45129
1
Page 2

3
Table of Contents
Important Safeguards 3
Designing a system 4
Controls, Indicators, and Features 5
Battery Backup - Control Center 5
Low Battery Indicators (Control Center & Sensors) 6
The Choice Alert Operating Modes 6
Notification Mode 6
Dedicated Alert Mode (Zone 4) 7
Armed/Alarm Modes 7
Mute Function 7
Placement of the Control Center 8
Creating a Personal Security Code 8
Sensors and Zones 9
Assigning a Sensor to a Zone 10
Erasing a Sensor from a Zone 11
Testing a Sensor - setting the
Control Center into Test Mode 11
Arming the System (HOME or AWAY) 12
Disarming the System 12 -13
Bypassing a Zone 13
Accessories
Silent Alert 12-13
Alarm Siren 14
Signal repeater 14-15
Q&A 16-17
Important Information
FCC Warning 18
Limitations of Alarm products 20
Product Warnings 20
2
Page 3

Before connecting or operating the Control Center,
please read these instructions carefully and save this
manual for future reference.
Congratulations
The GE Choice Alert™ Wireless Alarm System is one
of the most affordable and expandable wireless
alarm systems available. You’ll discover that the system
offers many features typically found in custom installed
Alarm systems.
The Choice Alert system is reliable and easy-touse. With Choice Alert you can select from a line of
Sensors and Accessories; start small and expand
as you need, or create a system that meets all your
needs. The Choice Alert System is protected by Priority
Code Selection technology which provides increased
security and trouble-free wireless connections. It also
guarantees the Control Center will only respond to
signals from your Sensors in and around your home,
and prevents anyone from tampering with your system.
The user manual explains in simple steps how
to install, use and care for your new Choice Alert
Control Center.
If you have any questions or would like
additional information please visit our web site
www.jascoproducts.com, or contact our
Customer Service Group at 1-800-654-8483.
Important safeguards
Cleaning – Unplug adapter and remove batteries
1.
before cleaning. Do not use strong or abrasive cleaners.
Use a dry cloth to clean the surface of the Control
Center. In case the dirt is hard to remove, use a damp
(not wet) cloth for cleaning.
2. Water and Moisture – Do not use any component
of this system in an exposed outdoor area except those
specifically designed for that purpose (such as the Door/
Window Sensor, Motion Sensor, Silent Alert LED indicator,
Water Leak Sensor). Do not operate this system in the
presence of explosive or flammable fumes.
Precautions
Do not attempt to disassemble the Control Center, or
1.
any of the Sensors or Accessories unless described in
the user’s manuals. There are no user serviceable parts.
2. Handle with Care – Avoid striking or shaking.
Improper use or storage could damage the Control
Center. Modifying or tampering with the device or its
internal components can cause a malfunction and void
the Control Center’s warranty.
3. If you feel the Control Center or any part of the
Choice Alert system is not operating correctly or
as described, please contact Customer Service for
assistance (1-800-654-8483).
Before you begin to install your Choice Alert System,
you will need to plan your security needs. Consider all
the doors and windows that are likely to be used as
points of entry by an intruder, such as those poorly
lit or an entrance or window that cannot be easily
seen from the street. You may want to know if the back
gate is open, whether the garage door is still up or if
the storage shed in the backyard is secure. Perhaps
3
Page 4
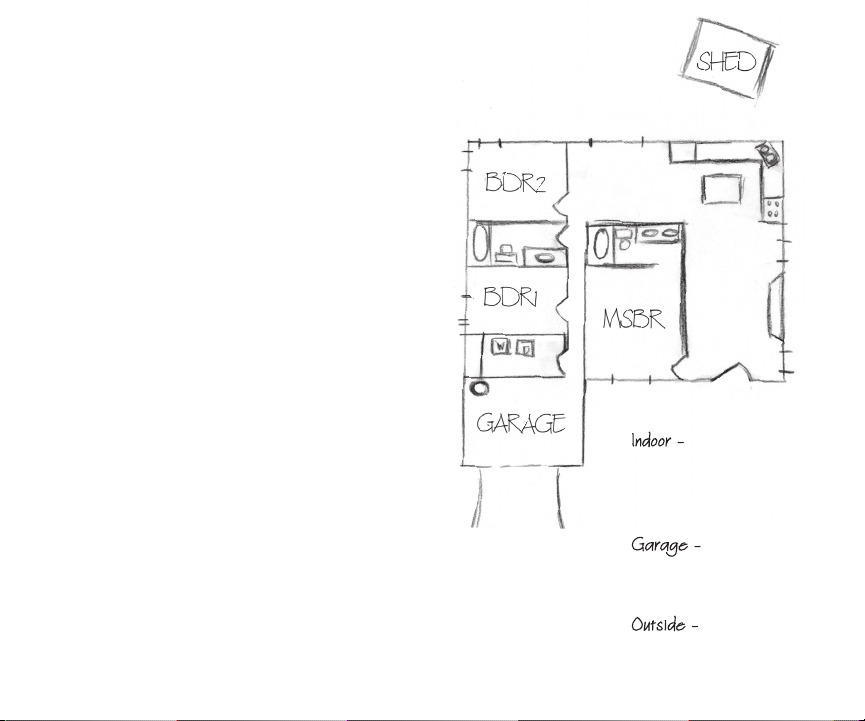
5
you’re concerned about the hot water tank or the
dishwasher leaking?
This system will help alleviate those concerns.
To start, sketch a map of areas in and around your
home and determine which doors and/or windows
need contact Sensors, which areas that might best be
served by a Motion Sensor, etc. The Choice Alert system
can manage up to 16 Sensors – a maximum
of any four (4) Sensors in any of the four (4) protection
Zones. (See diagram of the example sketch.)
We recommend installing a Window/Door Sensor on
the door that you enter/exit most often, and another
at your secondary exit. A Motion Sensor can be
positioned in the area that has traffic such as stairs or
hallways. It can also be placed in main rooms (living
rooms, dens, computer rooms). Additional Sensors can
be added for exterior areas like garage door, outside
gate, storage sheds and workshops. You can also use
the Water Leak Sensor to provide an Alert for potential
water damage areas such as around a hot water
tank, washing machine, dishwasher or air conditioner
condensation pan.
Supplies needed: Clean sheet of paper, ruler and pencil with
an eraser.
Note: Motion Sensors can also be used to protect specific
items that might be targeted by intruders (i.e. electronic
equipment, TV’s, stereos and/or computers). Point the Motion
Sensor directly at the equipment from an opposing wall or
corner and if they are disturbed, the alarm will be triggered.
•
<
•
•
•
5
<
•
5
5
•
;
Indoor -
Window/Door Sensor (6)
•
5 Water Leak Detectors (2)
<
Motion Sensor (1)
•
Garage -
Water Leak Sensor (1)
5
; Garage Door Sensor (1)
Outside -
<
Motion Sensor (1)
Window/Door Sensor (1)
•
4
Page 5
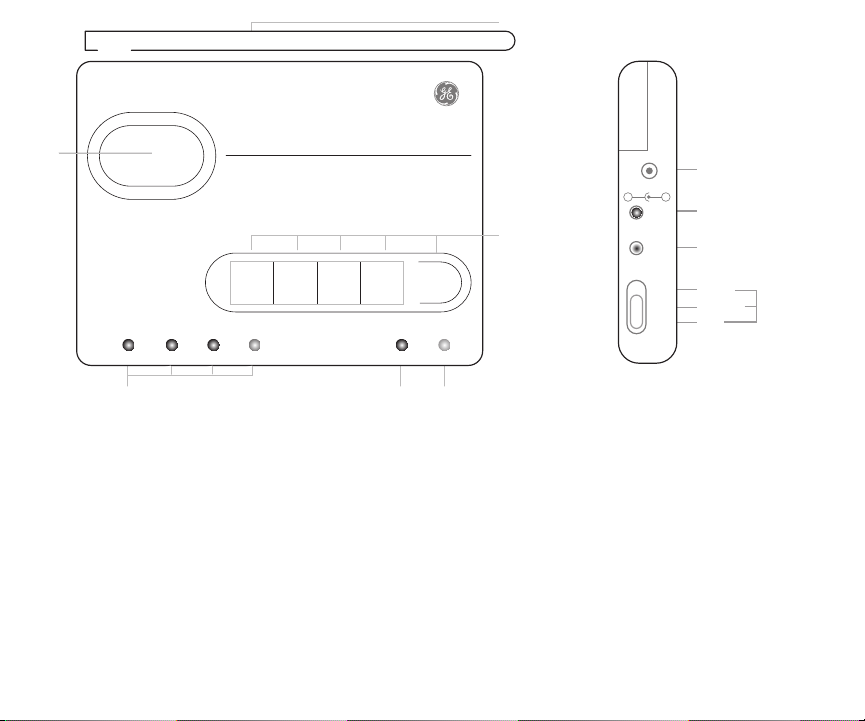
1 2 3 4
Arm
Zone
Armed Power
Zone
Keypad
Antenna
Alarm
Siren
Front
Side
Armed Power
IndicatorsIndicators
1 2 3 4
Alert
Chime
Off
Mute
Learn
Input DC 12V
Alert
Chime
Off
Notification
Switch
Mute
Learn
Input DC 12V
-
+
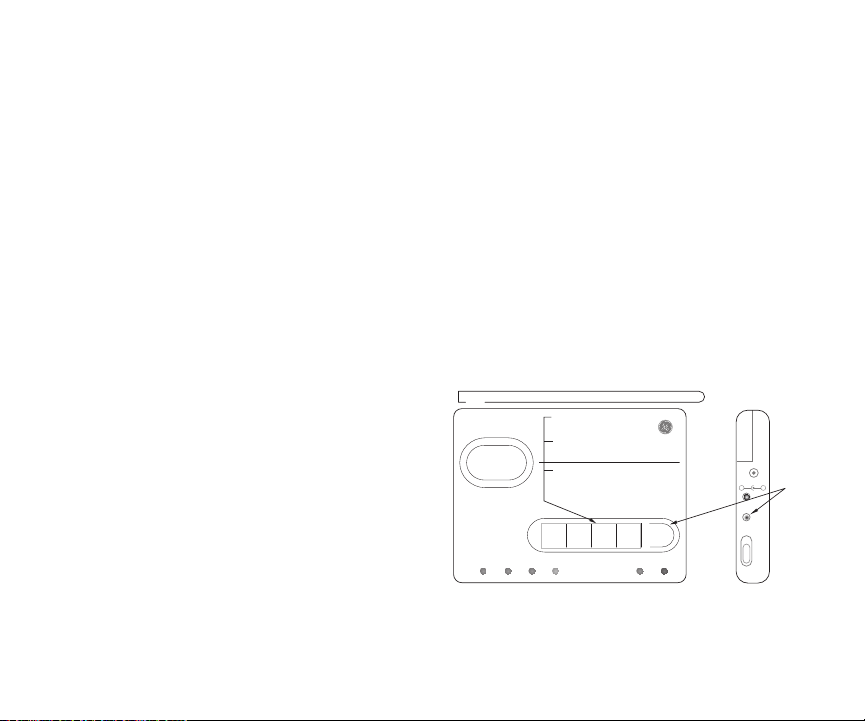
Control, Indicators, and Features:
Zone Indicators
These LEDs indicate Sensor status for each of the
4 Zones in the Choice Alert system.
Armed and Power Indicators
These LEDs indicate status of the system.
Keypad Operations:
Arm button - Use this button on the keypad to select
the arm setting (HOME or AWAY) you wish to use.
Input DC 12 V -
Mute Button - Used to mute a triggered Zone. (See pg 7)
AC adapter input jack.
Learn Button - Used to link Sensors and Accessories to
the main unit. (See pg 10)
Features
Battery Back-up (Control Center)
The Control Center offers battery backup; up to 48
hours, in case of power failure. While the system
will operate correctly without batteries, it is highly
recommended to install four (4) new “AAA” Alkaline
batteries. To install batteries, unplug the AC adapter
from the Control Center and rotate the unit bottom side
up, revealing the battery compartment on the base.
Slide the battery compartment cover off in the direction
5
Page 6
7
of the arrow. Install batteries according to the battery
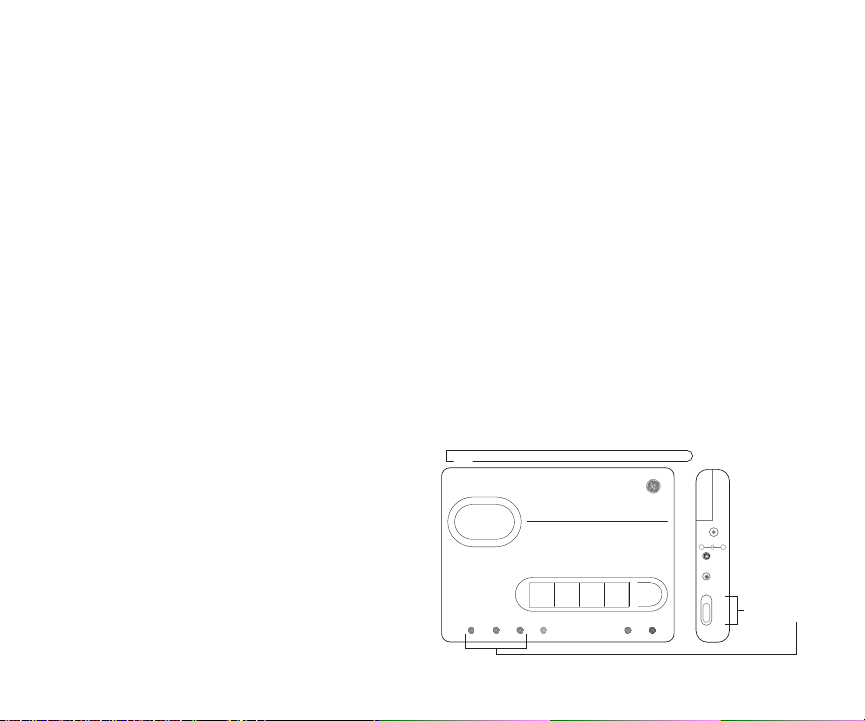
1 2 3 4
Arm
Zone
Armed Power
1 2 3 4
Alert
Chime
Off
Mute
Learn
Input DC 12V
-
+
Mode settings
Control Center has
three Mode settings
“Alert” - Continuous Tone
“Chime” - Single Tone
“Off” - Lights only
Notification switch
(affects Zone 1, 2, 3 only)
polarity diagram inside the battery compartment.
Replace the battery door.
Note: The Control Center has an automatic internal battery
tester. After batteries are installed you can check the backup
battery status at any time by unplugging the AC adapter. If
the batteries are acceptable, the green ‘Power’ LED indicator
will be remain on. If the batteries are low, the LED indicator will
flash slowly. If the batteries are too low to power unit , or dead,
the LED indicator will be off.
Low Battery Indicator (Sensors)
The Control Center continuously monitors all the
Sensors. If the Control Center does not receive a signal
from any Sensor it will begin rapidly flashing the Zone
LED indicator . This indicates one or more Sensors in the
Zone may have low battery power and are unable to
transmit a signal the necessary distance. If all batteries
and/or Sensors are installed at the same time into a
Zone, it is recommended to replace the batteries in
all Sensors in the Zone.
However, you can check the Sensor’s status
independently by placing the Control Center in Test
mode (see Testing a Sensor on page 11) and trigger
each Sensor separately (i.e. open door). If the Sensor
does not trigger an alert then replace the batteries.
Note: The Sensor detection system is ‘range dependant’,
which means Sensors located closer to the Control Center may
seem to have batteries that last longer than those Sensors
at a greater distance. Also, keep in mind, because the Motion
Sensor is continually checking for activity the battery life is less
than the lithium cell batteries in the other Sensors. An Alkaline
“9V” battery in the Motion Sensor can last up to 9 months; the
Lithium cell batteries in the Door/Window, Garage and Water
Leak Sensor can last up to two years. If the Motion Sensor is in a
Zone with other Sensors, try replacing its battery first.
INTRODUCTION
Let’s review the different features, functions and
terminology of the Control Center.
The Choice Alert System operates in
three different modes
1. Notification Mode (Zones 1, 2, 3)
2. Dedicated Alert Mode (Zone 4)
3. Armed/Alarm Mode (Zones 1, 2, 3)
Mode 1 - Notification Mode – Off/Chime/Alert (Zones 1,
2, 3) Perfect for Windows, Doors & Motion Sensors
(alarmed areas)
- Unarmed immediate notification mode
- User is notified of triggered Sensor based on
position
6
of notification switch.
Page 7

Notification switch settings:
Off – In this mode when a Sensor is activated, the
Control Center will issue a visual Alert only (flashing
Zone LED indicator), no audio will be heard.
The LED indicator will continue to flash as long as
the Sensor is activated (door or window is open,
garage door is up, etc.)
Chime –
the Control Center will issue a two-tone chime
In this mode when a Sensor is activated,
sound. In addition, a visual Alert (flashing Zone
LED indicator) will continue as long as the Sensor is
activated (open).
Note: A Motion Sensor in Zones 1, 2 or 3 will not respond in the
Chime mode. It only functions as an Alarm Sensor.
Alert – (Beeping sound) In this mode when a Sensor
is activated, the Control Center will issue a
continuous Alert (beeping sound) and a visual
Alert (flashing Zone LED indicator). Both the flashing
LED indicator and the beep sound will continue until
Sensor is deactivated (door or window is closed, etc.).
The number of beeps will be determined by which
Zone has an activated Sensor.
Zone 1 - you will hear “1 beep…1 beep…1 beep, etc”.
Zone 2 - you will hear “2 beeps…2 beeps…2 beeps, etc”.
If a Sensor in more than one Zone is triggered, (i.e. Zone 1
and Zone 2 then you will hear “1 beep…2 beeps…, 1
beep… 2 beeps, etc.” )
Note: A Motion Sensor in Zones 1, 2 and 3 will not respond in
the Alert mode. It only functions as an Alarm Sensor. A Motion
Sensor can be used for an Alert in Zone 4 only.
Mute – Use this button, while in Alert mode, to
temporarily stop the continuous beeping Alert (e.g.
a window open or leaving the garage door up). To
activate mute for a certain Zone, press the Mute button
after the beeping starts. All triggered Sensors in the
Zone will be muted and the LED indicator will continue
to flash until the Sensor has been reset. To deactivate
the mute, reset the Sensor (close door or window, lower
garage door, remove water, etc) for that Zone. If more
than one Zone has a triggered Sensor, pressing the
Mute button will mute all triggered Zones.
Mode 2 - Dedicated Alert Mode - Zone 4 is a dedicated
Zone for alerts only; it is designed for continuous
monitoring. It works independently of the Notification
Mode switch and the Alarm System. Sensors in Zone
4 will not trigger an alarm (HOME or AWAY). Sensors
in Zone 4 do not respond to the Off/Chime/Alert
Notification Mode switch.
Mode 3 - Armed/Alarm Mode (Zones 1,2,3)
Arm HOME (Instant alarm) –
In this setting the alarm
is instant (no delay) when a Sensor is triggered. All
Sensors (except Motion Sensors) in Zones 1, 2, and
3 will trigger the alarm. Sensors in Zone 4 will not
trigger the alarm. Zone 4 is for Alerts only.
Arm AWAY (Delayed alarm) – In this setting there
is a 45 second exit delay before system is armed.
This allows time to leave the protected area. There
is also a 30 second entry delay; this allows time to
enter the protected area and disarm the system
before alarm sounds. All Sensors in Zones 1, 2, and
3 will trigger the alarm. Sensors in Zone 4 will not
trigger the alarm. Zone 4 is for Alerts only.
Disarm – Entering the 4 digit Security Code anytime
the system is armed, will immediately disarm the
system, regardless of HOME or AWAY setting.
7
Page 8
9
1 2 3 4
Arm
Zone
Armed Power
1 2 3 4
Alert
Chime
Off
Mute
Learn
Input DC 12V
-
+
To create a new Security Code
Step 1
Press and hold
the Learn button,
Then press and
hold the Arm
button together
for three seconds
Step 2
Enter the current code
Step 4
Re- Enter new
code to confirm
Step 3
Enter new code
Bypass – You can bypass a Zone so that any Sensors
in that Zone (1, 2, and/or 3) will not trigger the alarm
regardless of HOME or AWAY setting.
Quick Reference Card
The Control Center comes with a quick reference card
and clear storage envelope. Attach the clear envelope
using the peel off adhesive and press it to the bottom
of the Control Center. Use a pencil to indicate where
Sensors are located around your home. On the reverse
side of the card are brief instructions for Arming/
Disarming the system and assigning a Sensor to a Zone.
Lets get started...
Use the following tips to select an ideal location
Position it…
- in a central location of the home, within a few feet of
an electrical outlet.
- some place accessible and easily noticed.
- Away from doors and windows where it could be
easily noticed by intruders.
- Away from heat sources such as an oven, stove
or vents.
- Away from large metal objects (such as refrigerators,
microwaves, etc.) which could effect the
wireless performance.
After you have selected a location for the Control
Center, you are ready to set up your system.
1) Plug in the AC adapter to a nearby electrical outlet
and plug the other end into the “Input DC12V” jack
on the side of the unit. All the LED indicators on the
front of the unit will light up briefly and go out. This
indicates the Control Center has completed a brief
system check. Only the green power LED indicator
should remain on.
2) Place the Control Center in the selected location
and rotate the antenna to the upright position for
best reception. The Control Center should be able to
receive signals from Sensors and Accessories up to
150 feet away.
Creating a Personal Security Code
The Security Code is used to arm and disarm the alarm
system. The Control Center comes with a factory
default Security Code setting of “1 2 3 4”.
It is recommended to establish your own Personal
Security Code. To change the Security Code, locate the
Learn button on the side and Arm button on top.
Note:
- When setting the Security Code you have 15 seconds to
begin making the change. After 15 seconds the unit will time
out and return to stand-by mode. If this happens you will
need to start over.
8
Page 9

1 2 3 4
Arm
Zone
Armed Power
1 2 3 4
Alert
Chime
Off
Mute
Learn
Input DC 12V
-
+
Zone 4
Continuosly Monitors
any area, in and around
the home, using any
combination of the
four Sensors
Note: Zone 4 is not
affected by Notification
mode switch, and does
not activate alarm
Deticated Alert
Zone (Zone 4)
1 2 3 4
Arm
Zone
Armed Power
1 2 3 4
Alert
Chime
Off
Mute
Learn
Input DC 12V
-
+
Mode settings
Control Center has
three Mode settings
“Alert” - Continuous Tone
“Chime” - Single Tone
“Off” - Lights only
Notification switch
(affects Zone 1, 2, 3 only)
Step 1 -
A. Press and hold the Learn button (unit will beep).
B. While continuing to press the Learn button,
press and hold Arm button (within three seconds).
C. When Control Center sounds a long beep, release
buttons. The green LED power indicator will begin
flashingThis indicates the unit is ready to change the
Security Code.
Step 2 -
While the LED indicator is flashing, enter the
current Security Code (if new, then enter the factory
Security Code of ‘1 2 3 4’.)
Step 3 -
Enter your new four digit Code.
Step 4 -
Enter your new four digit Code again
A.
to confirm.
B. A long ‘beep’ will sound and the green LED
indicator will stop flashing. Your new Code has
been set.
Note:
- If the Security Code is lost or forgotten, you can restore the
Control Center back to factory default Security Code setting
(‘1 2 3 4’). Remove the batteries and AC adapter. Press
and hold the Learn button and plug the AC adapter
back in (continue pressing the Learn button). Wait until
all 4 Zone LED indicators are on and the Zone 1 LED indicator
begins to flash. The Control Center will need four hours to
reset the Security Code back to the factory Default ‘1 2 3 4’.
Once all Zone LED indicators turn off, the system will be
reset to the factory default. The alarm system
cannot be used during this four hour reset process.
Sensors and Zones
There are four Zones, and each Zone can hold up to
four Sensors - Any combination of Sensors (Motion,
Door, Water or Garage) can be assigned to any of the
four Zones. If you decide to expand, it is important
to know you can always add more Sensors, (16 total).
Zones 1, 2 and 3
are designated for Arm/Alarm,
or Notification modes.
Zone 4 is designated for detected Alerts only. Use
Zone 4 for areas you wish to continuously monitor,
but don’t want to trigger the alarm (e.g. notification
of water leaks, garage door is up, back gate left
9
Page 10
11
1 2 3 4
Arm
Zone
Armed Power
1 2 3 4
Alert
Chime
Off
Mute
Learn
Input DC 12V
-
+
Step 1
Press and hold
the Learn button
for three seconds
Step 3
Activate the Sensor
Step 2
Select the Zone number
open, storage sheds or work shops unsecured, etc).
Sensors placed in Zone 4 will not activate the Alarm
or Chime. When a Sensor is triggered in Zone 4, the
Control Center will sound a repeating Alert (4 beeps)
and the Zone 4 LED indicator will flash continuously.
These Alerts will continue until the Sensor is closed.
You can Mute the repeating Alert sound but the LED
indicator will continue to flash until the Sensor is
reset/deactivated (i.e. door is closed).
Here are Some examples of possible
Sensor/Zone combinations.
Example # 1 (4 Sensor system)
Zone 1 – Door Sensor (front door)
Zone 2 – Motion Sensor (living room)
Zone 3 – Window Sensor (bedroom)
Zone 4 – Water Leak Sensor (hot water tank)
Example # 2 (6 Sensor system)
Zone 1 – Two Door Sensors (front door & patio door)
Zone 2 – Two Window Sensors (kitchen & bedroom)
Zone 3 – Motion Sensor (living room)
Zone 4 – Water Leak Sensor (washing machine)
Example # 3 (10 Sensor system)
Zone 1 – Two Door Sensors (front door & back door)
Zone 2 – Four Window Sensors (bedroom one,
two, & three)
Zone 3 – Two Motion Sensors (computer room and living room)
Zone 4 – Door Sensor (back yard gate),
Water Leak Sensor (hot water tank),
Garage door Sensor
Assigning a Sensor to a Zone
Assigning a Sensor into a Zone is an easy step process,
however there are a few points to remember
- Only one Sensor can be assigned at a time.
- A Sensor cannot be assigned to two different Zones.
- Up to four Sensors can be added per Zone (if a fifth
Sensor is added then the first Sensor will be replaced.)
- Batteries must be active in the Sensor before it can
be assigned to a Zone.
- Sensors can be assigned to a Zone and then
mounted, or can be mounted and then assign to
a Zone.
The Door Sensor, Garage Sensor and Water Leak
Sensor use Lithium batteries. To activate the batteries,
remove the yellow battery activation strip. For the
Motion Sensor, attach the “9V” battery leads
to the battery.
Follow these steps to assign a Sensor to a Zone.
Step 1 – Press and hold the Learn button on the
Control Center for three seconds. The Control Center
beeps once. Release the Learn button.
10
Page 11

Step 2 – Press the Zone button (1, 2, 3 or 4) for the
Zone you want to assign to the Sensor. The LED
indicator for that Zone will begin to flash.
Step 3 –
Note: Zone 4 is for dedicated alerts only. Sensors in this Zone
will not trigger an alarm or chime.
Release the Zone button.
Step 4 – Activate the Sensor
- For the Window/Door Sensor, separate the two
pieces or if mounted, open the door or window.
- For the Garage Sensor, lower the detection rod to
its full extension; if mounted, raise the garage door.
- For the Water Leak Sensor, place the contacts in a
small bowl of water, or use a metal paperclip and
touch both contacts.
- For the Motion Sensor, press the Learn button
located inside the battery compartment, or if
mounted wave your hand in front of the Sensor
(red LED indicator will flash inside lens area in front
of Motion Sensor).
Erasing a Sensor from a Zone
Note: If you need to remove a Sensor from a Zone, the system
will erase the entire Zone, so any other Sensors will need to be
put back into that particular Zone.
Step 1 - To erase a Zone, press and hold the Learn
button on the Control Center. The unit will beep once.
Step 2 -
While holding the Learn button, press and
hold the Zone button to be erased. After five seconds
the Control Center will sound two beeps and the
Zone LED indicator will flash twice.
Step 3 - Release all buttons.
Note: The Zone/Sensor cannot be erased if:
- The Zone has been triggered for an Alert or alarm. The
Sensor/Zone must be reset.
- There is loss of signal from the Sensor to the Control
Center (such as low battery, or Sensor is out of range).
- The system is armed.
The Control Center will sound three beeps to indicate it could
not erase the Zone.
Testing a Sensor or your system
Once all the Sensors have been assigned to Zones
in the Control Center you can now test your system.
This allows you to test a Motion Sensor in Zones 1, 2, 3
without arming the system. Ensure the Control Center
can receive the signal from the intended location of the
Sensor before permanently mounting a Sensor.
Step 1 - Unplug AC adapter and remove batteries.
Step 2 - Press and hold the ‘Mute’ button and plug
the AC adapter back into the Control Center. When all
the LED indicators turn on, release the Mute button.
The Control Center is now in Test Mode and any
Sensor can now be tested in any Zone.
Step 3 - Set the Notification Mode to ‘Alert’ position
(see Notification Mode switch Page 6) and begin
activating Sensors one at a time.
Note: For the Motion Sensor, stand in front of the Sensor and
remain motionless for 20 seconds. Begin moving and if the
Sensor is within range of the Control Center it will activate the
Zone in the Control Center for 15 seconds.
Step 4 - When testing is complete, unplug the AC
adapter, then plug the AC adapter back in and
reinstall batteries. This returns the Control Center to
standard operation mode.
Note: The Control Center will automatically return to standard
operation mode after 5 hours.
11
Page 12

13
1 2 3 4
Arm
Zone
Armed Power
1 2 3 4
Alert
Chime
Off
Mute
Learn
Input DC 12V
-
+
AWAY Mode
To set the Alarm in Away Mode
Step 1
Enter four digit Security Code
Step 2
Press “Arm ” button twice
The Armed LED indicator
begins flashing
(45 seconds to exit)
Step 3
To disarm, enter the four
digit Security Code
30 seconds to enter)
Only Zones 1, 2, and 3
1 2 3 4
Arm
Zone
Armed Power
1 2 3 4
Alert
Chime
Off
Mute
Learn
Input DC 12V
-
+
HOME Mode
To set the Alarm in Home Mode
Step 1
Enter four digit Security Code
Step 2
Press and HOLD “Arm ”
button for two seconds
Note: Motion Sensors do not
operate in HOME Mode.
The Armed LED indicator
turns on
Step 3
To disarm, enter the four
digit Security Code
Only Zones 1, 2, and 3
Arm (HOME) – No delay, instant alarm.
This setting is used when you wish to secure the area
but will be home and moving around within the armed
area. In the Arm/HOME setting, any Motion Sensors in
Zone 1, 2, and 3 will not operate. All Sensors must be
closed/not activated in order to set the alarm.
To set the system in HOME mode
Step 1 - Enter your four digit Security Code.
Step 2 - Press/hold the Arm button
for two seconds. The red Arm LED indicator
will turn on. The system is now Armed.
Arm (AWAY) – Delayed alarm for entry/exit.
After the system is armed a 45 second delay begins.
This is to allow time to leave the protected area before
system is active. The Control Center will begin beeping
and the Armed LED indicator will begin to flash. During
the last 10 seconds the beeping will speed up indicating
the alarm will arm shortly. Once the alarm has become
active, the red LED indicator will continue to flash
until system is disarmed. In the Arm/AWAY setting,
all Sensors in Zones 1, 2, and 3 will trigger the Alarm
System. All Sensors must be closed/not activated in
order to set alarm.
To set system in AWAY mode
Step 1 - Enter your four digit Security Code.
Step 2 - Press the Arm button two times. The red
alarm LED indicator will flash continuously.
Note: If a Sensor is triggered in Zone 4 it will not activate the
alarm. It will sound an alert tone only. (See Zone 4 page 9)’.
Disarming the System
When you return to the protected area the unit will
trigger and give you 30 seconds to disarm the system.
To disarm the system at any time, enter the four digit
Security Code. Entering the four digit Security Code will
disarm the system during the 30 second delay entry
period, or even if the alarm has been triggered and the
siren is sounding.
12
Page 13

Bypass a Zone (For all Zones and Modes)
There may be occasions when you would like to
temporarily prevent the Sensors in a Zone from
triggering the alarm. In this situation you can bypass
a Zone when setting the alarm. Once the alarm is
disarmed the Bypass setting will be removed.
Step 1 - Select the Zone to bypass. Before arming
the system, press and hold the Zone button for
three seconds. The Control Center will sound a long
tone while the button is pressed. After three seconds
the tone will stop and the Zone LED indicator will
turn on.
The Zone has been set to bypass Note: Sensors in a
bypassed Zone will not trigger the Alarm, Alert or
Chime functions.
Step 2 - Arm system (HOME or AWAY).
Step 3 - The Bypass setting can be removed
by pressing and holding the Zone button again
for three seconds or by disarming the system.
ACCESSORIES - Silent Alert, Alarm Siren,
and Signal Repeater
Silent Alert
The Silent Alert is designed to provide a
visual warning BEFORE entering the home
if an alarm has been triggered.
You can add any number of Silent Alert
LED indicators to the Choice Alert System.
To add a Silent Alert to the system, you will
need to link it with the Control Center.
Adding a Silent Alert™
Step 1 - Open the Silent Alert by gently
inserting a small blade screwdriver
into the tab slot on one end and gently pry upwards.
This action releases the cover from the base. This
procedure can be easily completed once the Silent
Alert is mounted as well. Install two (2) new “AA”
batteries according to the polarity markings in the
battery compartment.
Step 2 - Press and hold the Learn button inside the
Silent Alert. One of the LED indicators on the front of
the Silent Alert will begin to flash.
Step 3 -
While continuing to press the Learn button
in the Silent Alert, press and hold the Mute button
on the side of the Control Center for three seconds.
The Control Center will sound two beeps and flash
the green power indicator, a test signal to the Silent
Alert. When the Silent Alert receives the test Signal’,
the LED indicator will stop flashing, indicating it has
been linked with your Control Center. Reattach the
Silent Alert to the base.
Anytime the alarm is triggered (in Armed HOME or
AWAY), the siren sounds, and the Control Center will
send a signal to the Silent Alert to begin alternately
flashing its LED indicators. The Silent Alert will
continue to flash the LED indicators until the Control
Center sends a disarm signal.
Note: Even if the Control Center is disconnected from power or
destroyed, the Silent Alert will continue to flash LED indicators.
13
Page 14

15
Test the Silent Alert
Test
Low Batt On Armed
Low Batt On Armed
ON/OFF LEARN
45132
Motion
Sensor
45138
Signal
Repeater
45132
Silent alert
45130
Garage
Door Sensor
Step 1 -
After the Silent Alert has been successfully
linked with the Control Center, press and hold the
Mute button on the Control Center for three seconds.
This action sends a test signal.
Step 2 - When the Silent Alert receives the test signal
from the Control Center, one LED indicator on the
Silent Alert will begin to flash once a second. It will
continue to flash for 30 seconds.
Alarm Siren
The Alarm Siren will increase your system’s sound. Use
in areas where Control Center Siren cannot be heard.
Adding a Alarm Siren
Step 1 - Remove cover
on top of the Alarm
Siren. Plug in the AC
adapter. Insert the
antenna and slide
mode switch to the
‘ON’ position.
Step 2 - Press and hold
the Learn button inside
the Alarm Siren. The ‘ON’ indicator on the front will
begin to flash and it will sound three beeps.
Step 3
press and hold the Mute button on the side of the
Control Center for three seconds. The Control Center
- While continuing to press the Learn button,
will send a test signal to the Alarm Siren.
When the Alarm Siren receives the test signal it will
sound a long tone and the ‘ON’ indicator will stop
flashing. This indicates the Alarm Siren has been linked
with the Control Center. Replace cover to Alarm Siren.
Test the Alarm Siren
Step 1 - After the Alarm Siren has been successfully
linked with the Control Center press and hold the
Mute button on the Control Center for three seconds.
Step 2 - When the Alarm Siren receives the test
signal from the Control Center, one LED indicator
on the Alarm Siren will begin to flash. It will continue
to flash for 30 seconds. This indicates it has received
the test signal.
The Signal Repeater will
extend the range of the
Choice Alert system up to
150 feet from its location
– Effectively repeating the
signal from any Sensor
back to the Control Center
should a Sensor be located
out of range. The Signal Repeater does not send or
receive signals to the Silent Alert or Alarm Siren.
Adding a Signal Repeater
Step 1 - Find an electric outlet near the Sensor
having trouble communicating with the Control
Center. Make certain the location is between the
Sensor and Control Center. Plug the Signal Repeater
into the outlet and press the ‘Test’ button on the side
of Signal Repeater. It will send a test signal out to
the Control Center and the LED indicator on the
Signal Repeater will flash rapidly for about one
second, then go out.
14
Page 15

Step 2 - When the Control Center receives the
Signal Repeater’s test signal, it will flash the green
power indicator. This means a confirmation signal
was sent back to the Signal Repeater. Release
all buttons.
Step 3 -
When the Signal Repeater receives the
confirmation signal, the LED indicator will flash,
five times. If the Signal Repeater does not receive
the confirmation signal from the Control
Center, the LED indicator on the Signal Repeater will
not flash. You will need to move the Signal Repeater
closer to the Control Center and retest.
Step 4 - To Ensure the Signal Repeater can receive
the signal from the Sensor, activate the Sensor. The
Signal Repeater’s LED indicator should flash rapidly,
and the Control Center should respond to the
Sensor’s signal.
This process will help you locate the Signal Repeater
to the best (farthest) position from the Control Center
in order to extend the range of the Sensor.
15
Page 16

17
Choice Alert Control Center F.A.Q.’S
Q. I am trying to program my security code and I keep
waiting on the beep. But, nothing happens. Why?
A. There is a short beep that you hear as soon as you
press the Learn button. After you hold the Learn button
for about 3 seconds you will hear a long beep; once the
long beep sounds you have 15 seconds complete the
other steps in the process.
Q. I bought a new Sensor and the Control Center will
not recognize it. Why?
A. First, make sure that the batteries are new and that
the battery is inserted into the Sensor according to
polarity(+/-) markings. Second, make sure that
you have assigned the Sensor to a Zone. If the Sensor
LED is flashing rapidly all the time, remove and reinsert
the battery.
Q. I put Sensors on Zone 4 and it will not set off the
alarm. Why?
A. Zone 4 is a Dedicated Alert Zone and is designed
to monitor Sensors in this Zone. It will only issue an
alert ( LED will flash, continuous beeping will be heard).
Sensors in Zone 4 will not set off the alarm. Use Zone 4
for water Sensors, garage doors, gates, sheds or other
areas that you want to monitor (i.e. areas that you want
to be alerted if there is a problem, but do not want the
alarm to sound).
Q. I have trim on my door and I cannot match my
Sensor to the magnet. Will this work on my door?
A. The Sensor can be up to ½” apart from the magnet.
Q. I erased a Sensor from a Zone and now all of my
other Sensors in that Zone will not work. Why?
A. The system can only erase entire Zones. You will
need to add the other Sensors back in that Zone to the
Control Center again
Q. Why does one of my Zones continually flash?
A. This can be caused by 1 of 2 conditions. First
condition, if it is a rapid flash it means a Sensor in the
Zone has a low battery. If more than one Sensor is in
a Zone, you will need to test each Sensor by putting
the unit into test mode (see pg. 11 of manual). It may
also be that a Sensor is out of range and cannot make
contact with the Control Center. If this is the case, you
may need to move the Control Center closer or use a
Range Repeater. The Second condition, if it is a slow
flash, one of the Sensors is triggered. Check all Sensors
to ensure the Sensors in the Zone are reset (i.e. close
door, window, etc).
Q. If one Sensor has a low battery, should I replace all
of the batteries?
A. If Sensors were added at the same time,
chances power are good all the batteries will need
to be replaced.
Q. How do I know if any Sensors have low batteries?
A. The Control Center will indicate if any Sensor does
not have sufficient power to transmit a status signal
(battery is low). You can also check each Sensor
independently by using the Test Mode
(see pg.11 in manual).
16
Page 17

Q. If one Sensor has a low battery, will the other
Sensors in the Zone (or other Zones) continue
to operate?
A. Yes, as long as the other Sensors have sufficient
battery power, they will continue to transmit
information to the Control Center and the system will
operate normally.
Q. I programmed all my Sensors to a Zone but only 4
work. Why?
A. This system is designed to hold 4 Sensors per Zone.
If you add more than 4 then the first Sensor added will
be deleted to make room for the new Sensor. If you
have more than 4 Sensors you will need to use multiple
Zones.
Q. I switched the Control Center to off but the lights are
still on. Why?
A. More than likely you are changing the position of
the Zone Notification switch to the ‘off’ position. When
you set this switch to off position, this turns the chime
and alert notification sounds off; It does not “turn” the
Control Center off. The Control Center does not have an
off switch; to disable the Control Center you will need to
unplug the adaptor and remove the batteries.
Q. When I arm the system my motion Sensor doesn’t
trigger the alarm. Why?
A. The motion Sensor is designed to work in the AWAY
mode but not the HOME mode. This allows you to have
the system armed and still be able to move about the
house.
Q. The manual states there is a 48 hour back-up. Do
I have to reprogram the Zones if it has been without
power longer than 48 hours?
A. No, The Control Center will store the Zone and
Security Code Settings indefinitely.
Q. One of my Sensors was damaged and the Control
Center keeps flashing how to I stop this?
A. First, unplug the adaptor and remove the batteries
for 5 seconds. Then, replace the batteries and plug-in
the adaptor. Next, You will need to clear the Zone (see
pg. 11) and re-assign all of the Sensors to the Zone,
including the replacement Sensor.
Q. I have my garage door Sensor in Zone 4. If I
want to leave the door open how do I stop the
continuous beeping?
A. Press the Mute button on the Control Center. This
will temporarily mute the beeping sound for all Sensors
in Zone 4. The Zone 4 LED will continue to flash until
the door is closed/Sensor is reset. Once the Sensor
is reset beeping will start again when Sensor/door is
opened.
Q. The Silent Alert is flashing how do I make it stop?
A. On the Control Center, arm the system in HOME
mode and then disarm the system. This will send
a reset signal to the Silent Alert which will stop the
flashing.
17
Page 18

19
FCC Warning
Model # Description Battery Type Battery Life*
45129 Control Center (4) “AAA” 24 months
45130 Garage Sensor (1) “2032” 24 months
45131 Door/Window (1) “2032” 24 months
Sensor
45132 Motion Sensor (1) “9V” 9 months
45133 Water Leak Sensor 1) “2032” 24 months
45136 Alarm Siren (1) “9V” 24 months
45137 Silent Alert (2) “AA” 18 months
45138 Signal Repeater No batteries N/A
*maximum potential life based upon usage and location
Any unauthorized changes or modifications to the equipment
would void the user’s warranty and may conflict with both
state and federal laws. The Choice Alert system complies with
part 15 of the FCC rules. Operation is subject to the following
conditions:
1) The Choice Alert system may not cause
harmful interference.
2) The Choice Alert system may accept any interference
received including interference that may cause
undesired operation.
NOTE: This equipment has been tested and found to
comply with the limits for a Class B digital device, pursuant to
Part 15 of the FCC Rules. These limits are designed to provide
reasonable protection against harmful interference in a
residential installation. This equipment generates, uses and
can radiate radio frequency energy and, if not installed and
used in accordance with the instructions, may cause harmful
interference to radio communications. However, there is no
guarantee that interference will not occur in a particular
installation. If this equipment does cause harmful
interference to radio or television reception, which can be
determined by turning the equipment off and on, the user is
encouraged to try to correct the interference by one or more
of the following measures:
– Reorient or relocate the receiving antenna.
– Increase the separation between the equipment
and receiver.
– Connect the equipment into an outlet on a circuit
different from that to which the receiver
is connected.
– Consult the dealer or an
experienced radio/TV technician for help
18
Page 19

19
Page 20

WARNING
Limitations of Alarm Products
This product should be tested periodically to make sure it is
working properly. The product, if used properly, may reduce
the risk of burglary, robbery, or other adverse events. However,
JASCO is not an insurer, this product is neither insurance
nor a guarantee that such an event will be prevented, and
users should protect themselves with proper insurance.
JASCO makes no representation that this product cannot
be compromised or circumvented, that it will provide an
adequate warning, or that it will prevent any personal injuries,
property damage, or other losses. Like any alarm product,
including expensive commercial systems, it may be bypassed,
it is subject to compromise, and it may fail to warn for a variety
of reasons, including, but not limited to: improper installation
or positioning; improper maintenance; tampering; dead or
improperly installed batteries; sensing limitations; component
failures; receivers; intrusions may be outside of a product’s
designed range and certain environmental conditions
may impact performance and audible alarm signals may
be outside of hearing range, muted by doors, walls, and
floors, unheard by deep sleepers or the hearing-impaired, or
overwhelmed by other sounds.
is a trademark of the General Electric Company
and is used under license to Jasco Products
Company LLC, 10 E. Memorial Road,
Oklahoma City, OK 73114.
This Jasco product comes with a 1 year limited
warranty. Visit www.jascoproducts.com for details.
WARNING
Risk of personal injury
• Prolonged exposure to alarm siren may cause
permanent hearing loss
Battery Warning
• Remove batteries before storing the Alarm for
extended periods
• Batteries may leak harmful liquids or ignitable
materials or explode causing injury and product
damage
• Do not mix old and new or other battery types
• Replace all batteries at the same time
• Replace fully discharged batteries immediately
45129-1
11/02/07
 Loading...